Music Production on Guix System
The recent release of Guix 1.2.0 was accompanied by a release song (lyrics). Let me tell you how this happened and how you can use Guix System for your own music productions!

It all started only three days before the 1.2.0 release when someone
on the #guix IRC channel brought
up the
tradition of OpenBSD people to write, record, and publish at least
one song alongside their system
releases.
A wistful look at my neglected instruments later I felt compelled to take this as a challenge: with less than three days to go could we actually compose, record, and publish a song using nothing but free software despite a jam-packed weekend schedule? I wanted to find out.
Inspiration and Planning
The working title “Ode to One Two Oh” was an obvious choice, being a quasi-palindrome, and its five syllables suggested a time signature of 5/4. Where to from here?
As I stared at my Emacs session with a Guile REPL (read, eval, print, loop) buffer I tried to recall what the letters “REPL” stand for. Clearly, in my case the “P” was for “Procrastination”, but what about the others? I had stumbled upon the chorus: a description of the Guix development process. Contribute as others before us have shared their contributions (Reciprocation), review patches and discuss (Evaluation), hack on something else (Procrastination), and repeat (Loop).
The words suggested a simple descending melody, which would need to be elevated by a somewhat less simple chord progression. After trying out a few harmonies on the Grand Stick I remembered how terrible my memory was and decided that I would need to scatter the harmonies onto a canvas, listen to the whole progression, and adjust the lines as needed — all without having to build up muscle memory for harmonies and progressions I may very well end up discarding in the process.
This is where my composition workflow probably deviates from most
other people. Many would use a MIDI sequencer for that kind of
approach, whereas I decided to hone in on the exact harmonies with an
unlikely tool: the unparalleled music engraving application
Lilypond. Lilypond sports a versatile
language that covers primitive note input, the means of combining them
to larger phrases and musical ideas, and the means of abstraction —
it allows for musical ideas to be named and recombined in different
shapes. For everything the language doesn’t account for with
specialized syntax I can simply switch to Guile Scheme. No other
notation software is as flexible and malleable as Lilypond. I let it
generate both sheet music and a MIDI file — the sheet music is
displayed in a PDF viewer in Emacs and the MIDI file sent to
fluidsynth (because I trust my ears over my eyes).
lilypond draft.ly && \
  fluidsynth -r 48000 -i -n -a alsa \
    ~/soundfonts/FluidR3GM.sf2 draft.midi
I always try to keep the duration of my stay in the MIDI world at a minimum, because a composition workflow that is firmly rooted in MIDI tends to result in music that sounds sterile or robotic, an undesirable quality that can be hard to eradicate later. So I put them aside and focused on another part of the song. Mirroring the quasi-palindrome of the title, the song’s structure would be A B C B A. With the smooth chords of the B section locked down I walked up to the Grand Stick (I mounted it on a modified microphone stand for more flexibility) and tapped out a contrasting two-handed funky bass line to the click of a metronome.
Time to record!
Audio Recording
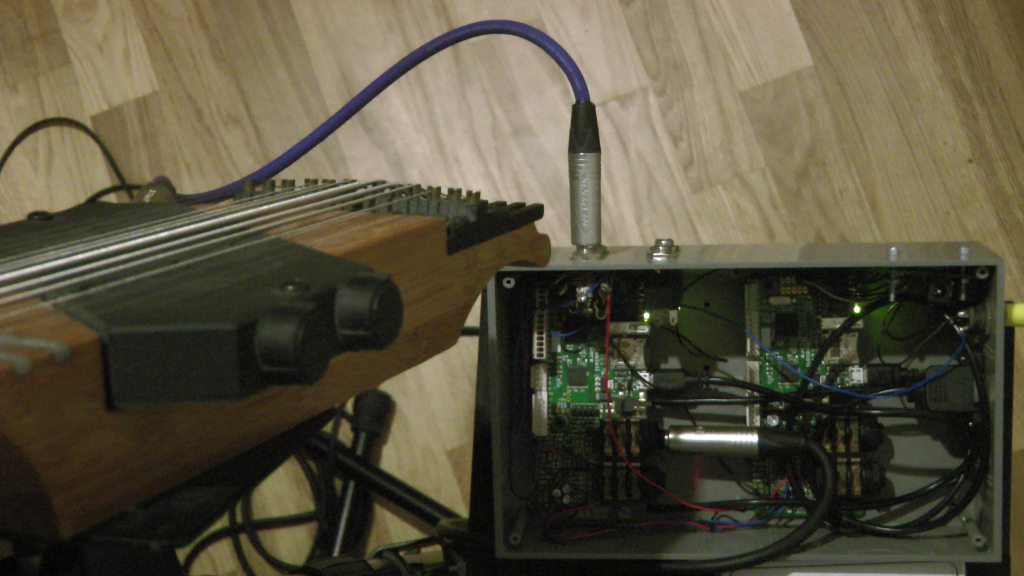
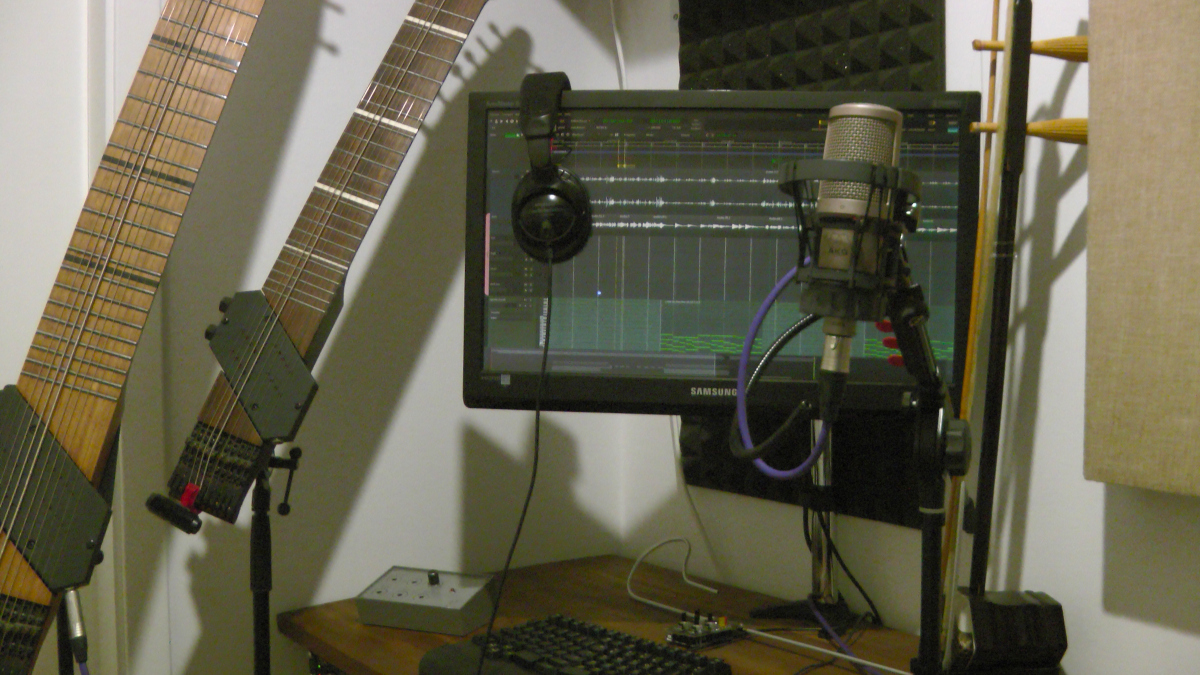
How does the signal of my stringed instrument make it into a file on my computer’s disk? The Stick’s stereo signal feeds into two daisy-chained Axoloti boards with hand-crafted signal processing tuned to the peculiarities of my instrument; the stereo output of the DSP boards is connected to two inputs on my USB audio interface (the Tascam US16x08, though any class-compliant audio interface will work just fine), which presents itself to the system as a 16 channel input sound card.
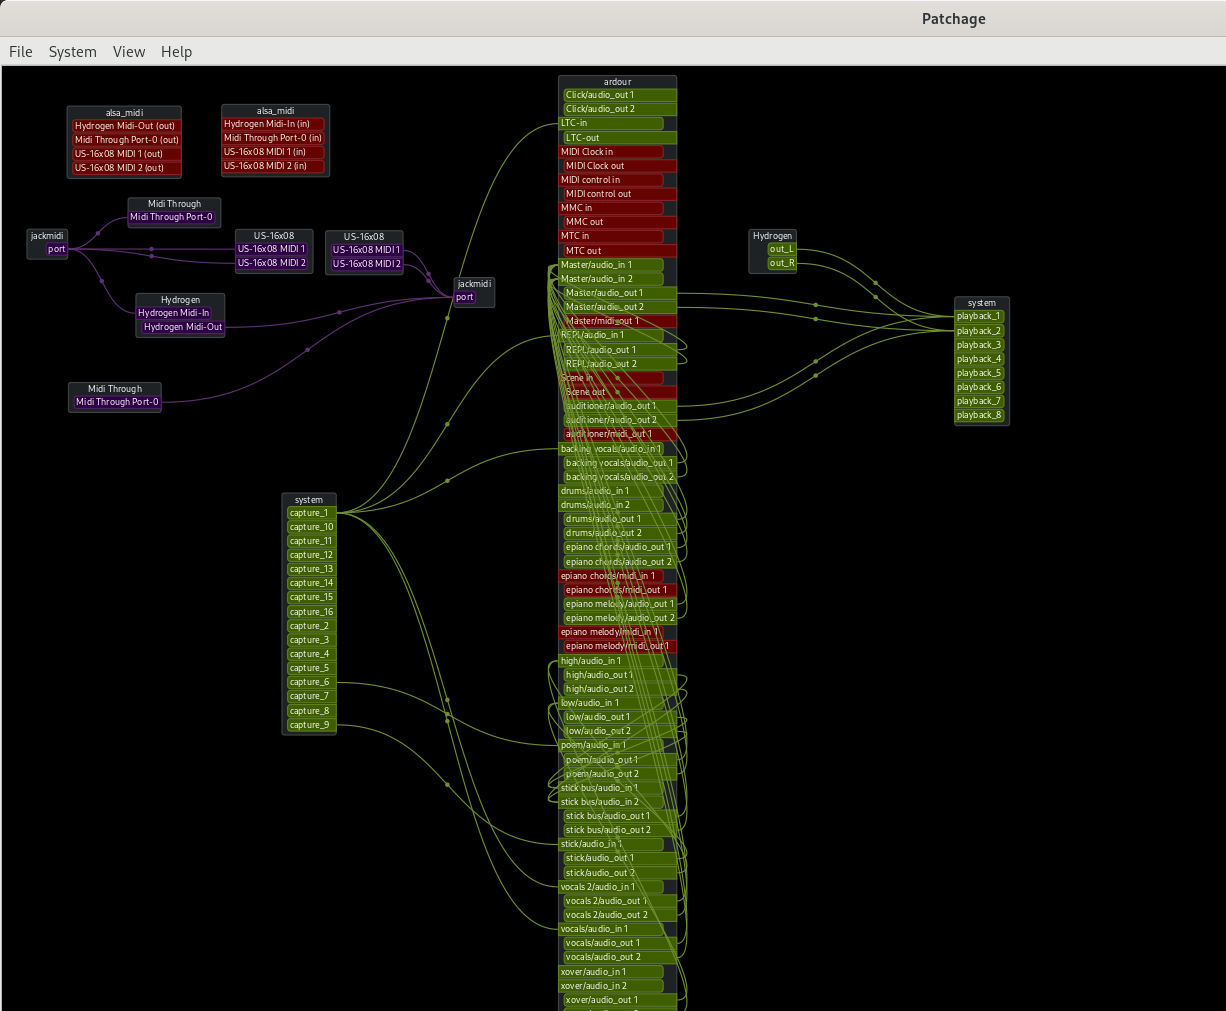
The computer runs JACK 1 to shuffle the incoming signals on all channels to other JACK clients (audio applications and plugins). I use patchage to conveniently wire up inputs and outputs in an interactive graphical signal flow diagram.
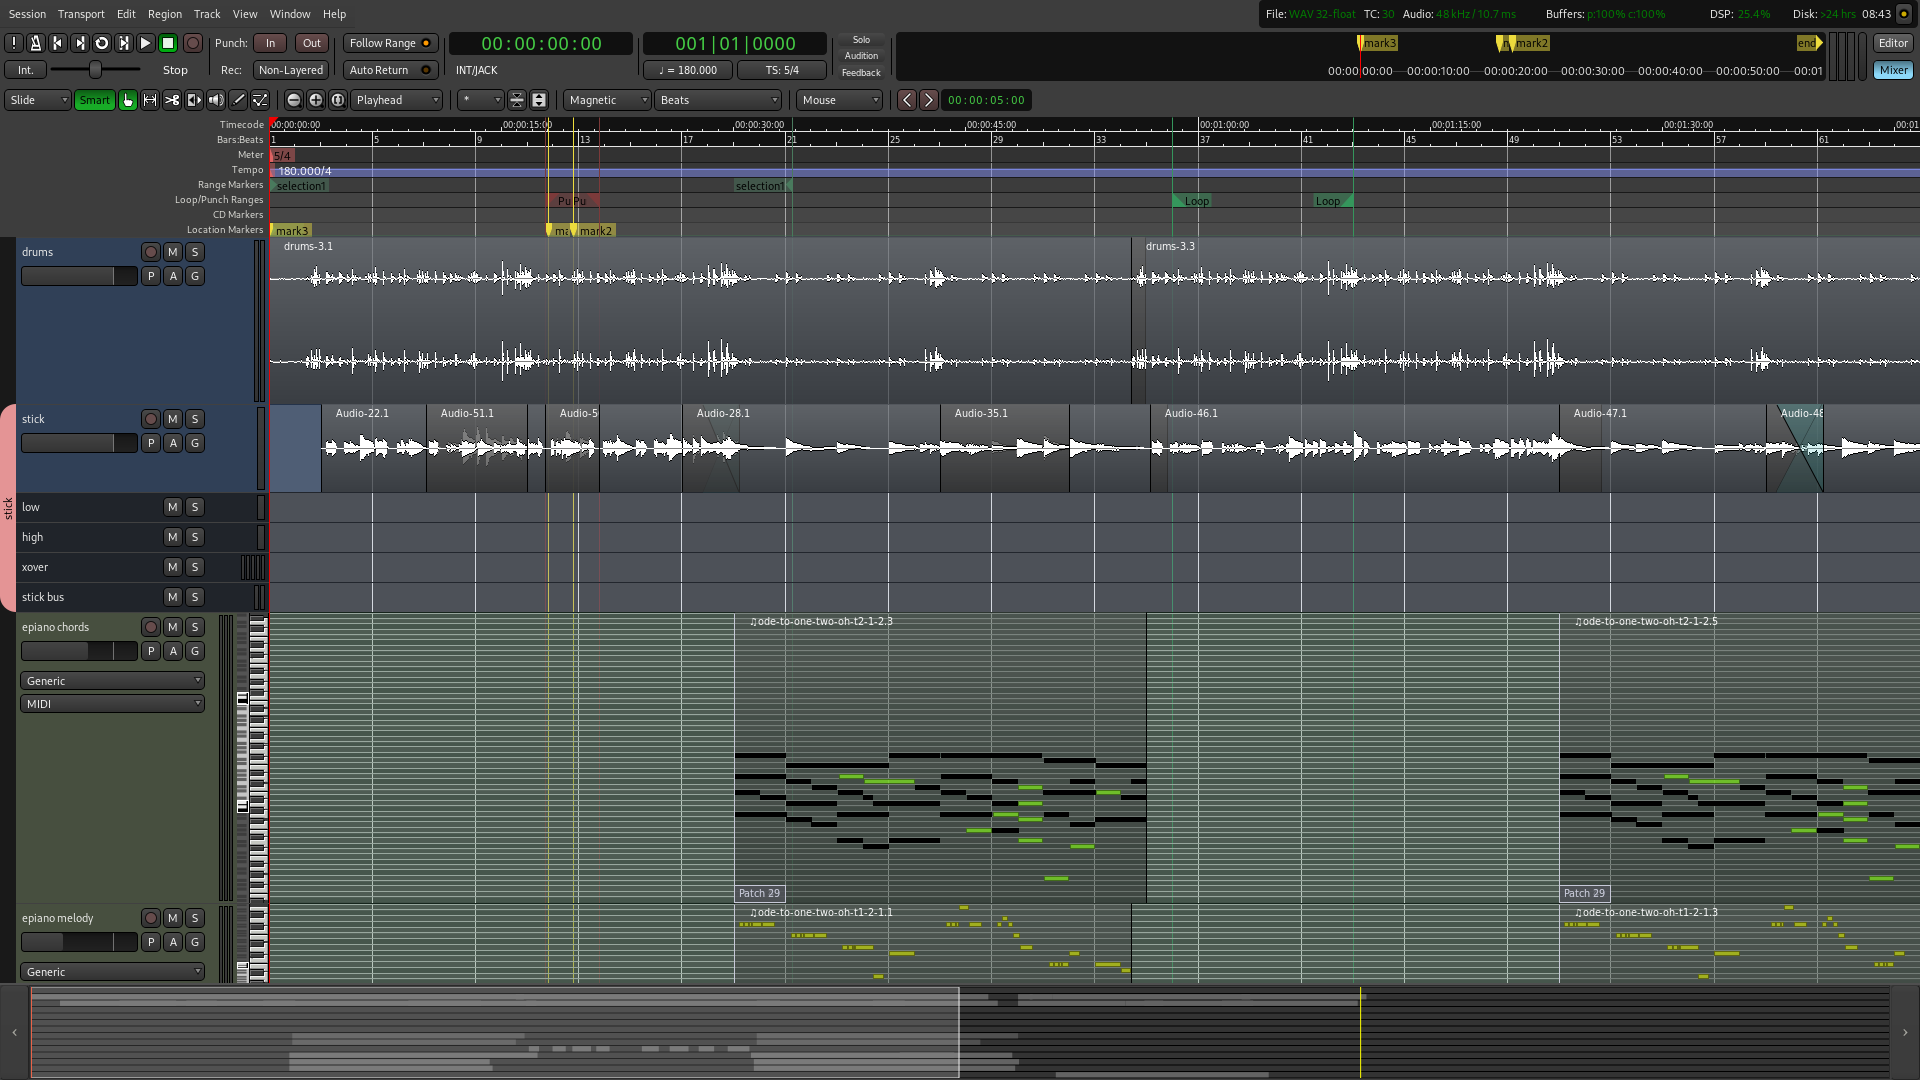
The center piece of my recording session is the venerable Ardour, an incredibly flexible and polished digital audio workstation (DAW) that natively supports JACK and also serves as an LV2 audio plugin host.
Okay, the Stick is ready to be recorded, but I prefer to record a drum track first instead of playing to the click of a metronome. But wait, I really can’t record the drums now! This is an apartment and the neighbors are asleep. Oh, and I’m a lousy funk drummer. Let’s cheat!
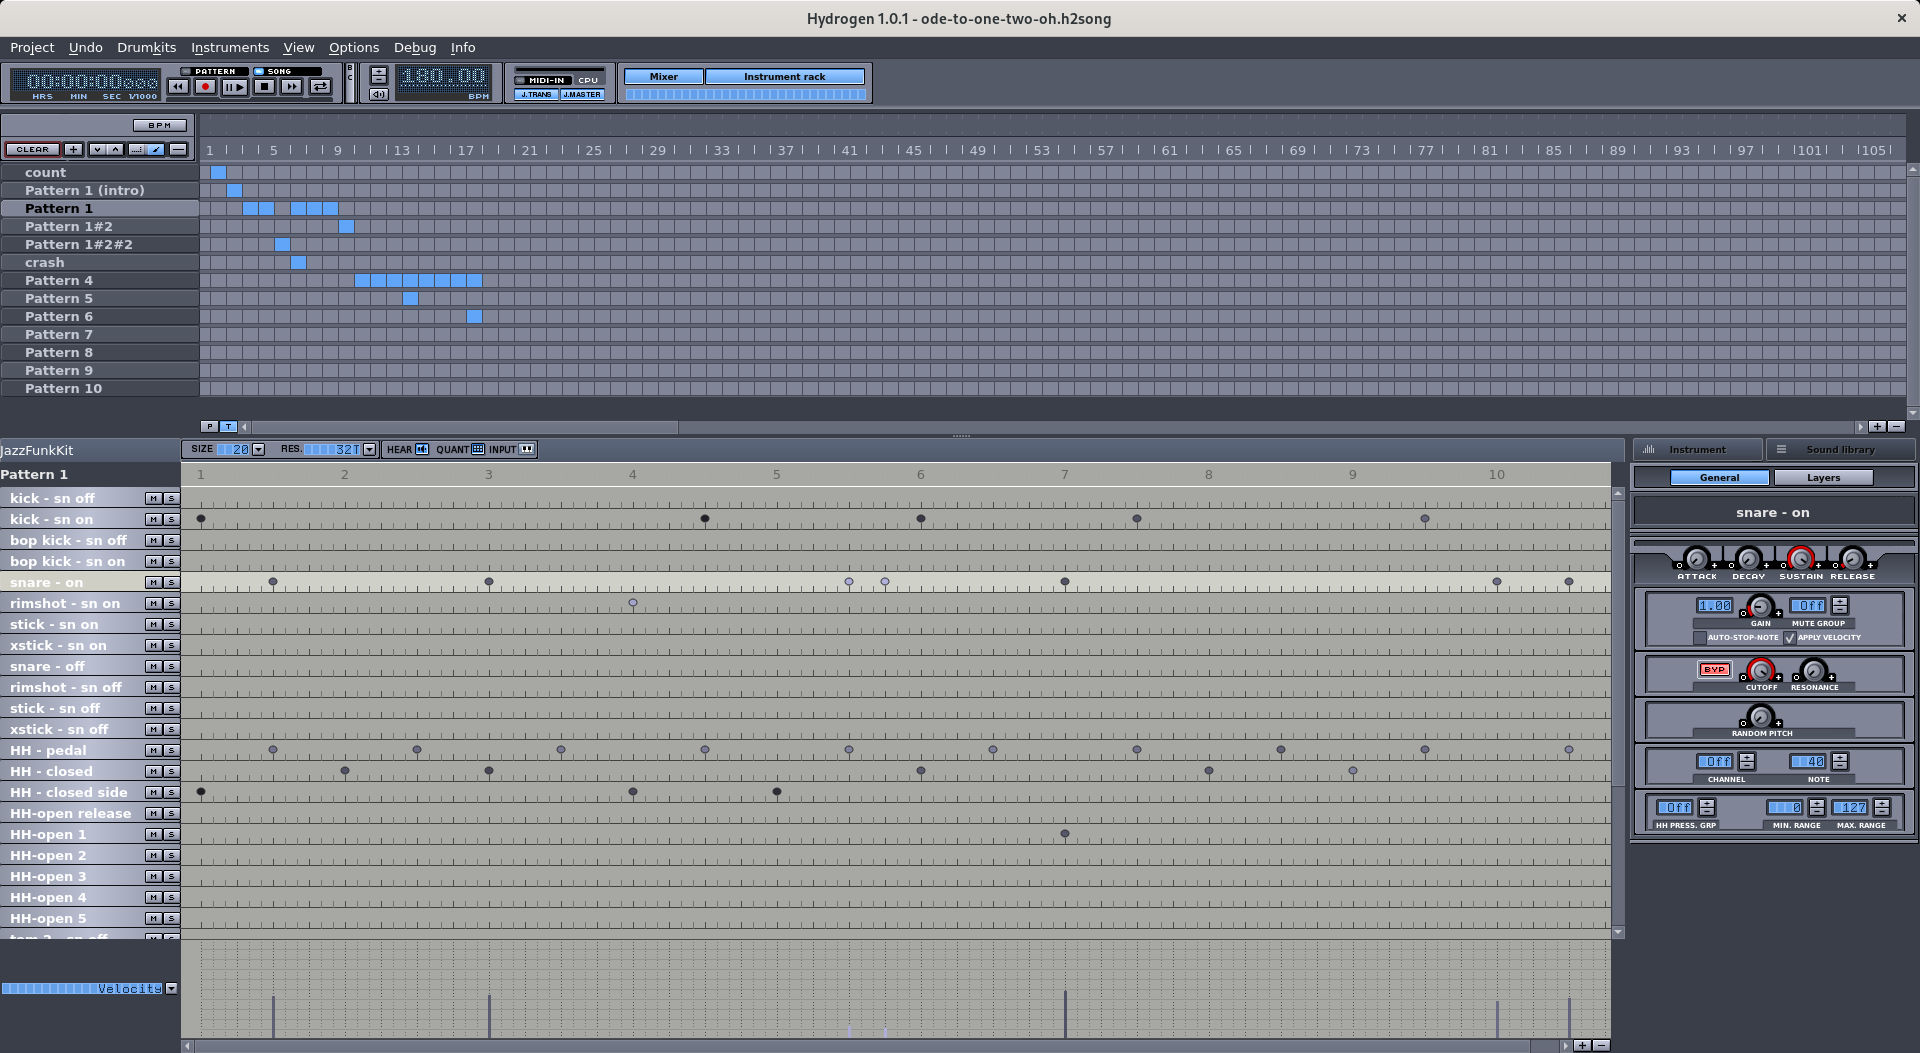
My drum machine of choice is Hydrogen. It lets me create any number of arbitrarily long patterns, combine them, and — that’s crucially important — sync up with other JACK applications such as Ardour. I toggled a button in Ardour to let it take control of the JACK transport, meaning that when I start recording in Ardour the drum machine starts playing in sync — perfect! Let’s roll!
Rough Processing
After frustrating minutes had turned into exhausting hours of recording the bass line (eventually resorting to punching in and out instead of re-recording everything whenever I made an audible mistake) I put my arranger’s hat on and tried to get a sense for what might still be missing. The recorded track sounded rather “flat”; after all this was the “raw” signal straight from the instrument’s pre-amplifier. Time to spruce it up and approximate the final sound!
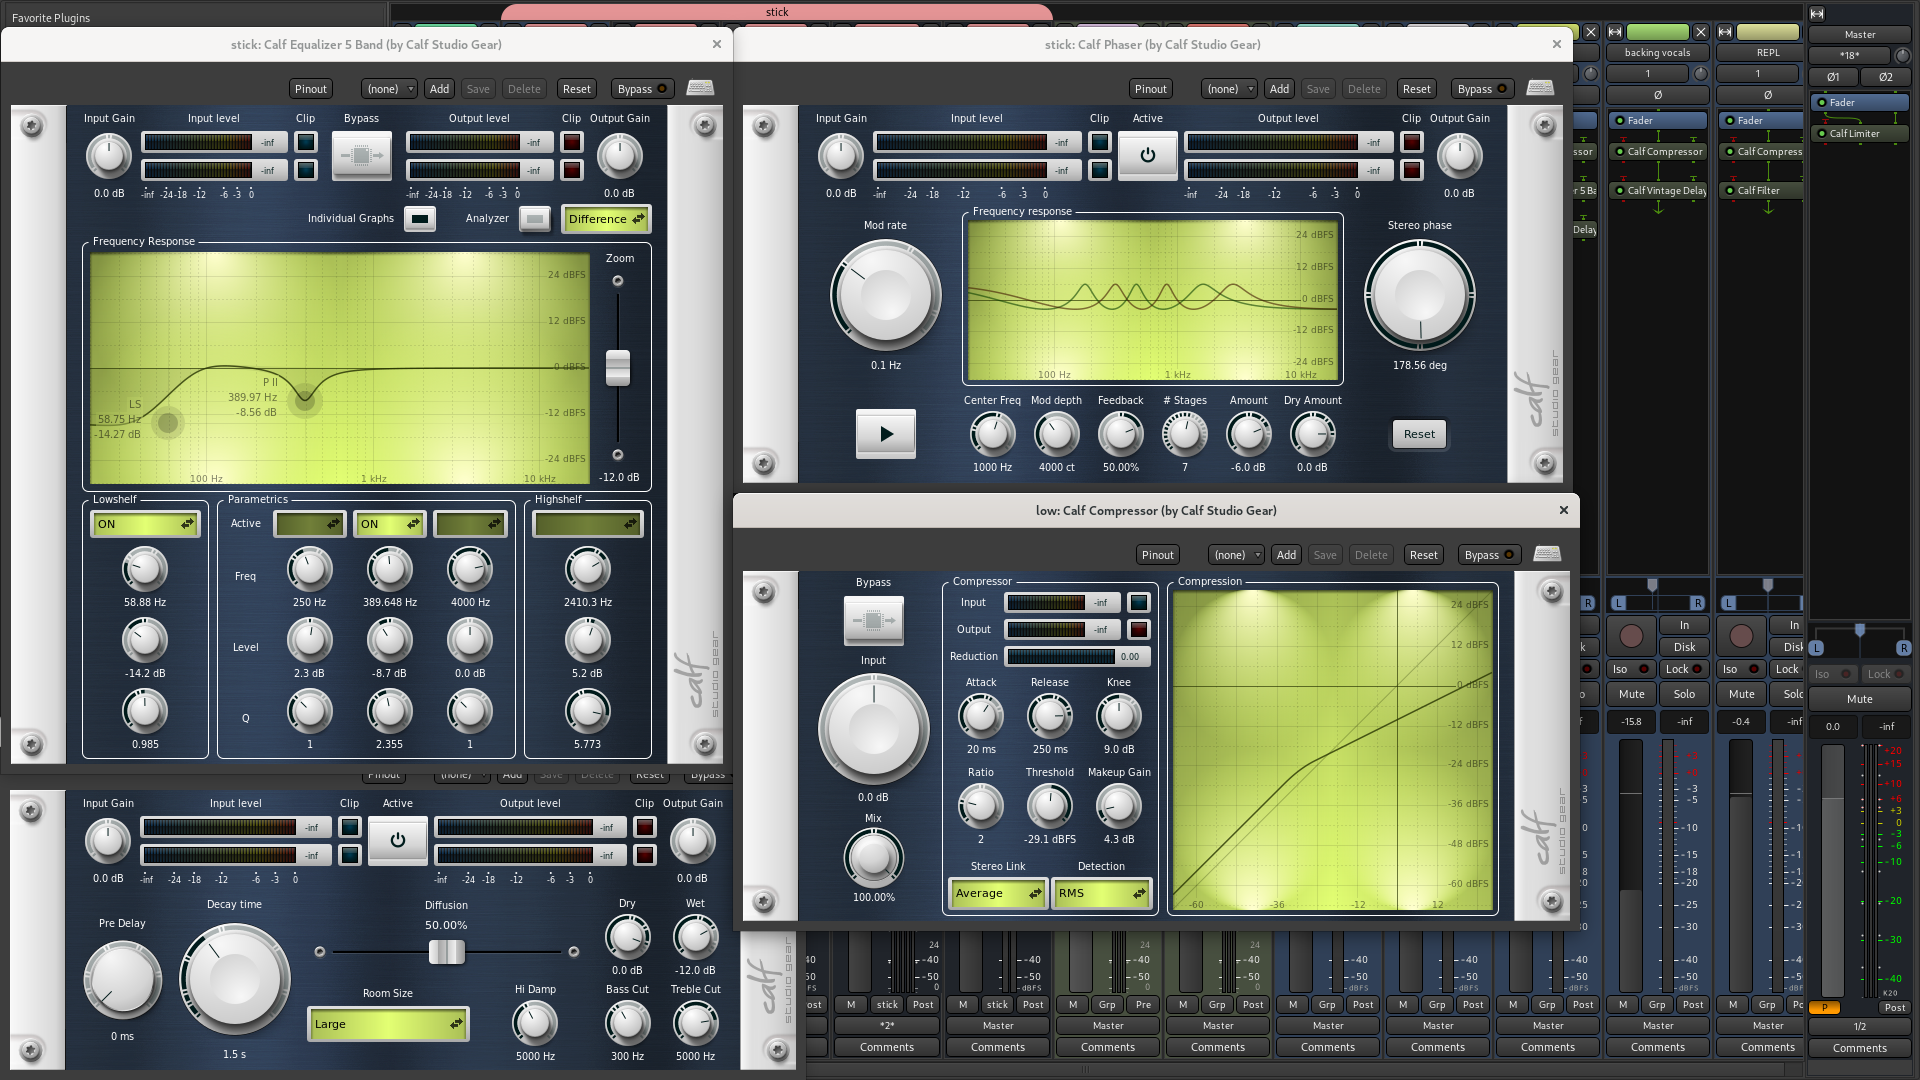
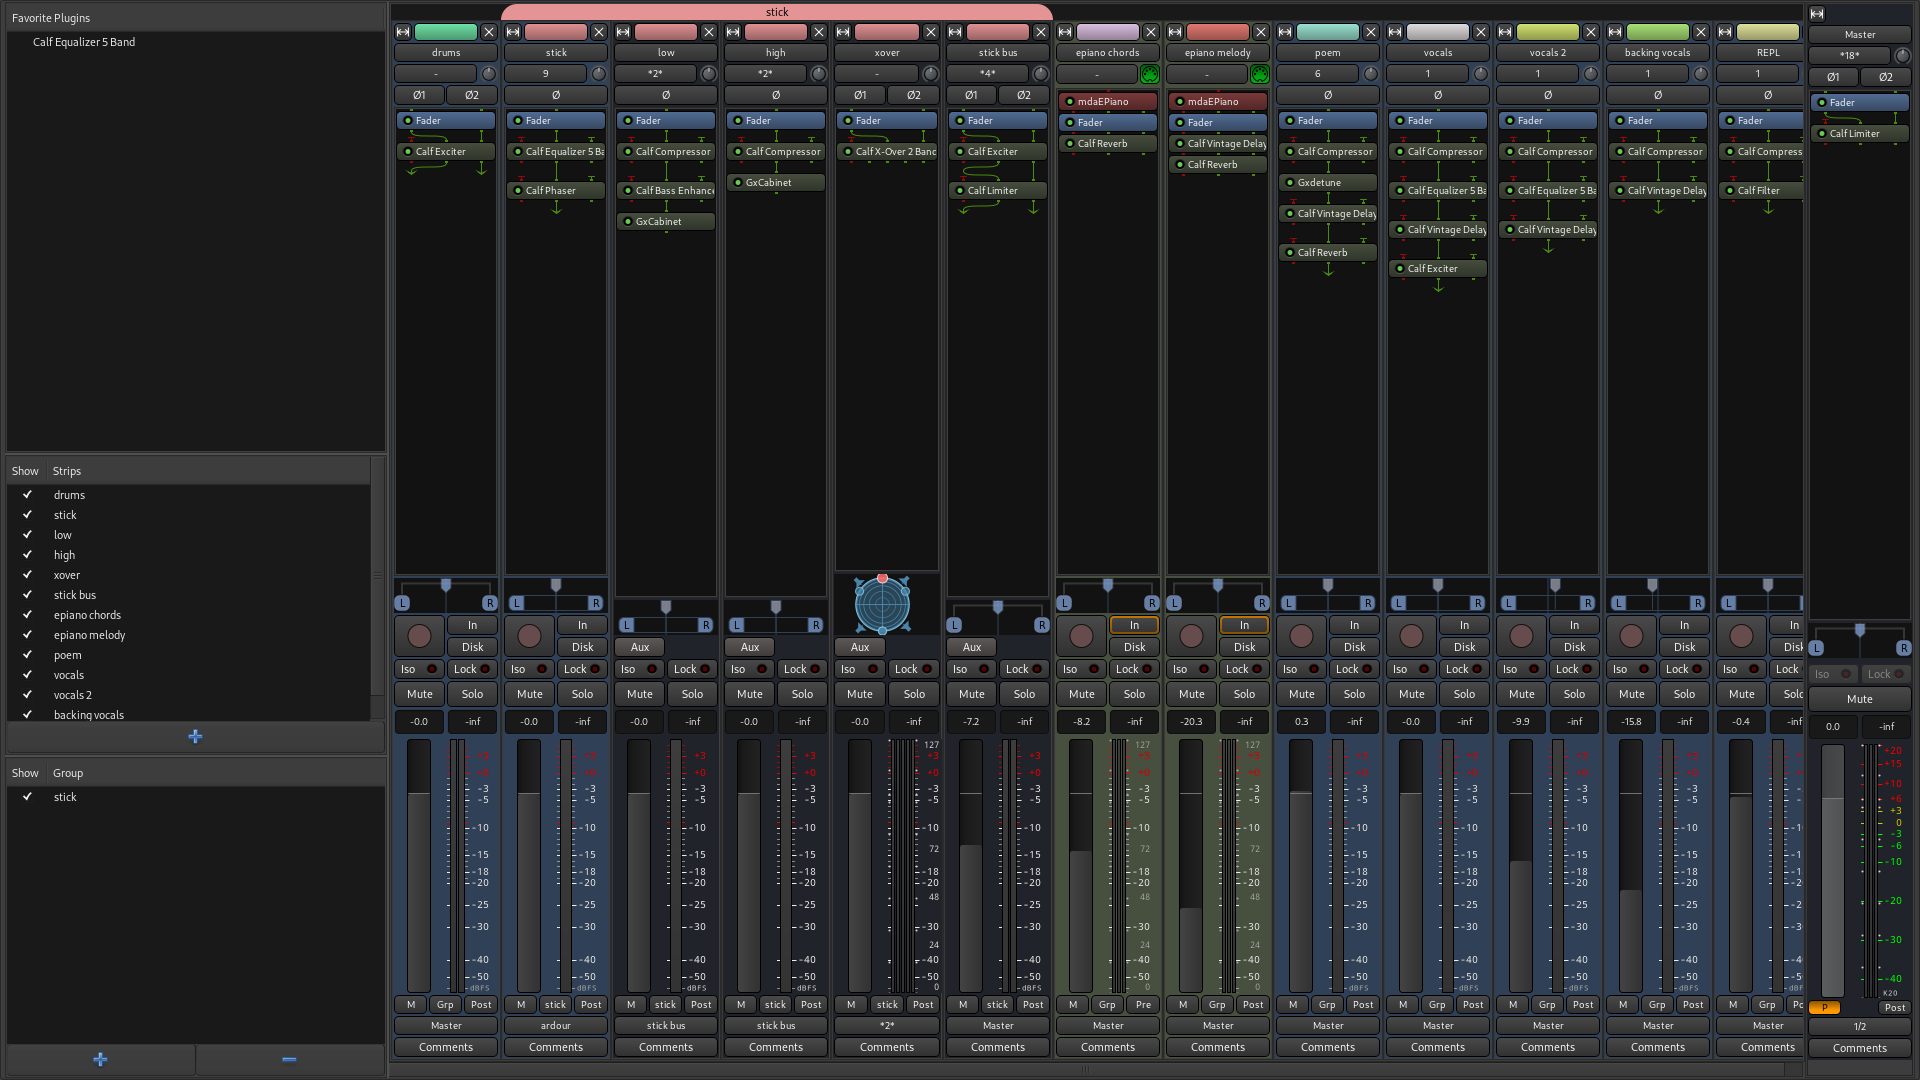
Over the years the selection of audio plugins that I’m using to process my recordings has narrowed down to few more than the Calf suite of LV2 plugins. I will admit to being an extremely superficial person, so a big factor in choosing the Calf plugins is the consistent, very pretty and intuitive user interface they present. What made me stick to the Calf plugins, though, is that they also sound really good. Furthermore, they make it easy to tweak the many parameters and come with helpful diagnostics (such as listening only to the changed frequencies, or spectral visualizations, etc).
First thing I do is to use light compression to even out slight variations in dynamics. Calf Mono Compressor does the job here. The principle is simple: a compressor lowers the volume when a sound gets loud and it raises the volume of the resulting signal according to the dialed in makeup gain. It has a bunch of other knobs to control how far ahead it will look to watch out for loud sounds, another to prevent “pumping” (too rapid activation and deactivation), another to smooth out the “knee” of the threshold curve, etc — but what it really comes down to is: at what level should the signal be reduced, by how much, and what’s the gain to make up for the overall loss in volume.
One piece of advice: resist the temptation of overdoing this! Compression may make the sound punchier, but don’t throw away all dynamics here or you’ll risk draining the life from your hard-earned waveforms. So I stick with a ratio of no more than two, keep the makeup gain fairly low, and the threshold somewhat high to only trigger the compressor in the upper fifth of the dynamic range.
Next: equalization. This is to scoop out an unpleasant character by attenuating certain frequency ranges. Again, the Calf suite has got me covered. A five band EQ is sufficient as I don’t want to be tempted to make sharp cuts in the frequency spectrum of the signal. As a general rule I don’t boost any frequencies but primarily cut. Here, too, the key is to be gentle. Don’t cut more than two or three decibels or you’ll end up with a comically filtered sound. (Exceptions apply for drum recordings, but thankfully we dodged that bullet by using Hydrogen.) If you find that you need to cut or boost more than that, chances are that there are problems with your recording. Don’t try to compensate for problems with post-processing that could have been avoided by improving the recording quality. I scoop out the mids a tiny bit and cut out the very low bass frequencies that don’t contribute anything more than a rumble.
MIDI Resurgence
With the bass line and the drums in place it was time to revisit the harmonies for part B. I really did want to record them with my very red virtual analog hardware synthesizer, but when I brought it into my tiny work room I realized that I had ran out of space on my lap — I had run out of space on my desk months ago, and with all those audio cables piling up on the floor even that was no option.
Lilypond generated a MIDI file earlier, so I sighed and told Ardour to import it. I assigned the ancient electric piano plugin mdaEPiano as a synthesizer to the track, and expanded the track vertically to drag around every MIDI note event by hand, refining the notes and adding tiny timing and velocity imperfections to make it seem as if a human played them. To paper over the clearly audible undesirable imperfections of the plugin’s sound generation I added some Calf Reverb (for the graphics people: adding reverb is roughly equivalent to using the blur tool in a graphics application). I could have picked one of the many better synthesizers and emulators, but we go way back, this plugin and I.
MIDI support in Ardour is really well thought-out as you don’t need to ever leave the main window, so you are always surrounded by audio context. You just expand the track vertically and have as much access to the events as you want. This approach may be a little unusual for those who are used to MIDI sequencers, but for my purposes it is close to perfect.
Lyrics and Vocals: Human vs Machine
At this point things were coming together nicely, but we only had lyrics (a handful of words, really) for the chorus. Not enough for a song, but just a little too much for a laundry list. So I turned to IRC again where our resident Debian ambassador and assuredly human person Vagrant Cascadian happened to volunteer a stroke of genius: what if the lyrics were composed entirely of typos in package descriptions that had been fixed since the last release? Vagrant carefully reordered the words to a poignant poem, bringing them alive as the voice of the adversarial machine, a symbol of the waning hold of the bugs and errors on our way to the next release. What would be more fitting than to let the machine croak these words in the release song?
I started up the Festival speech synthesis software and a few Scheme
expressions later the inimitable monotone of none other than the
entity known only as cmu_us_fem_cg droned the words into an audio
file that I promptly imported into Ardour, and processed with the
GxDetune plugin, Calf Vintage Delay, and some reverb.
I did my best between bites of a Monday pre-release lunch to perform the role of the human contemplating this cycle of creation through hacking by recording three vocal lines (two low, one high) for the chorus.
Final touches
With about half an hour or so left before the release announcement it became clear that there would be no “audio mastering” in the traditional sense. I put on my monitoring headphones (flat frequency response for an “objective” mixing experience) and adjusted the volume levels, plugin settings, and faded in and out the noisy edges of each take. I also added a few more effects: a phaser on the Chapman Stick track to emphasize that this is supposed to be funk; a crossover (Calf X-Over 2 Band) and three audio busses to first process the low bass frequencies separately from the high frequencies (e.g. to use different amplifier simulations) and then to rejoin them; and a limiter on the master bus to avoid any volume spikes above 0dB and to compress the mix.
I exported the final mix as a Vorbis OGG audio file and sent it off to Ludovic to have it included in the release announcement.
Concluding Thoughts
So what’s the verdict? Is the result perfect? Absolutely not! But I do want to point out that any and all mistakes and imperfections are entirely due to my own lack of skill and time — they are not the result of the limitations of free software. A more skilled audio engineer would certainly not be limited by a system like the one I used, a system composed entirely of freedom-respecting software that is made extra reliable by the user-empowering and liberating features of Guix System.
About GNU Guix
GNU Guix is a transactional package manager and an advanced distribution of the GNU system that respects user freedom. Guix can be used on top of any system running the Hurd or the Linux kernel, or it can be used as a standalone operating system distribution for i686, x86_64, ARMv7, and AArch64 machines.
In addition to standard package management features, Guix supports transactional upgrades and roll-backs, unprivileged package management, per-user profiles, and garbage collection. When used as a standalone GNU/Linux distribution, Guix offers a declarative, stateless approach to operating system configuration management. Guix is highly customizable and hackable through Guile programming interfaces and extensions to the Scheme language.
Unless otherwise stated, blog posts on this site are copyrighted by their respective authors and published under the terms of the CC-BY-SA 4.0 license and those of the GNU Free Documentation License (version 1.3 or later, with no Invariant Sections, no Front-Cover Texts, and no Back-Cover Texts).