Próximo: Introdução, Acima: (dir) [Conteúdo][Índice]
GNU Guix
Esse documento descreve Guix versão 4538aa4, uma ferramenta de gerenciamento de pacotes funcional escrita para o sistema GNU.
Este manual também está disponível em inglês (veja GNU Guix Reference Manual), chinês simplificado (veja GNU Guix参考手册), francês (veja Manuel de référence de GNU Guix), alemão (veja Referenzhandbuch zu GNU Guix), espanhol (veja Manual de referencia de GNU Guix) e russo (veja Руководство GNU Guix). Se você quiser traduzi-lo para seu idioma nativo, considere participar do Weblate (veja Traduzindo o Guix).
Sumário
- 1 Introdução
- 2 Instalação
- 3 Instalação do sistema
- 3.1 Limitações
- 3.2 Considerações de Hardware
- 3.3 Instalação em um pendrive e em DVD
- 3.4 Preparando para instalação
- 3.5 Instalação gráfica guiada
- 3.6 Instalação manual
- 3.7 Após a instalação do sistema
- 3.8 Instalando Guix em uma Máquina Virtual
- 3.9 Compilando a imagem de instalação
- 3.10 Construindo a imagem de instalação para placas ARM
- 4 Começando
- 5 Gerenciamento de pacote
- 6 Canais
- 6.1 Especificando canais adicionais
- 6.2 Usando um canal Guix personalizado
- 6.3 Replicando Guix
- 6.4 Customizing the System-Wide Guix
- 6.5 Autenticação de canal
- 6.6 Canais com substitutos
- 6.7 Criando um canal
- 6.8 Módulos de pacote em um subdiretório
- 6.9 Declarando dependências de canal
- 6.10 Especificando autorizações de canal
- 6.11 URL principal
- 6.12 Escrevendo notícias do canal
- 7 Desenvolvimento
- 8 Interface de programação
- 8.1 Módulos de pacote
- 8.2 Definindo pacotes
- 8.3 Definindo variantes de pacote
- 8.4 Escrevendo manifestos
- 8.5 Sistemas de compilação
- 8.6 Fases de construção
- 8.7 Construir utilitários
- 8.8 Caminhos de pesquisa
- 8.9 O armazém
- 8.10 Derivações
- 8.11 A mônada do armazém
- 8.12 Expressões-G
- 8.13 Invocando
guix repl - 8.14 Usando Guix interativamente
- 9 Utilitários
- 9.1 Invocando
guix build - 9.2 Invocando
guix edit - 9.3 Invocando
guix download - 9.4 Invocando
guix hash - 9.5 Invoking
guix import - 9.6 Invocando
guix refresh - 9.7 Invoking
guix style - 9.8 Invocando
guix lint - 9.9 Invocando
guix size - 9.10 Invocando
guix graph - 9.11 Invocando
guix publish - 9.12 Invocando
guix challenge - 9.13 Invocando
guix copy - 9.14 Invocando
guix container - 9.15 Invocando
guix weather - 9.16 Invocando
guix processes
- 9.1 Invocando
- 10 Arquiteturas Estrangeiras
- 11 Configuração do sistema
- 11.1 Começando
- 11.2 Usando o sistema de configuração
- 11.3
operating-systemReference - 11.4 Sistemas de arquivos
- 11.5 Dispositivos mapeados
- 11.6 Espaço de troca (swap)
- 11.7 Contas de usuário
- 11.8 Disposição do teclado
- 11.9 Localidades
- 11.10 Serviços
- 11.10.1 Serviços básicos
- 11.10.2 Execução de trabalho agendado
- 11.10.3 Rotação de log
- 11.10.4 Networking Setup
- 11.10.5 Serviços de Rede
- 11.10.6 Atualizações sem supervisão
- 11.10.7 X Window
- 11.10.8 Serviços de impressão
- 11.10.9 Serviços de desktop
- 11.10.10 Serviços de som
- 11.10.11 File Search Services
- 11.10.12 Serviços de bancos de dados
- 11.10.13 Serviços de correio
- 11.10.14 Serviços de mensageria
- 11.10.15 Serviços de telefonia
- 11.10.16 Serviços de compartilhamento de arquivos
- 11.10.17 Serviços de monitoramento
- 11.10.18 Serviços Kerberos
- 11.10.19 Serviços LDAP
- 11.10.20 Serviços web
- 11.10.21 Serviços de certificado
- 11.10.22 Serviços DNS
- 11.10.23 VNC Services
- 11.10.24 Serviços VPN
- 11.10.25 Sistema de arquivos de rede
- 11.10.26 Samba Services
- 11.10.27 Integração Contínua
- 11.10.28 Serviços de gerenciamento de energia
- 11.10.29 Serviços de áudio
- 11.10.30 Serviços de virtualização
- 11.10.31 Serviços de controlando versão
- 11.10.32 Serviços de jogos
- 11.10.33 Serviço de montagem PAM
- 11.10.34 Serviços Guix
- 11.10.35 Serviços Linux
- 11.10.36 Serviços Hurd
- 11.10.37 Serviços diversos
- 11.11 Privileged Programs
- 11.12 Certificados X.509
- 11.13 Name Service Switch
- 11.14 Disco de RAM inicial
- 11.15 Configuração do carregador de inicialização
- 11.16 Invoking
guix system - 11.17 Invoking
guix deploy - 11.18 Usando o Guix em uma Máquina Virtual
- 11.19 Definindo serviços
- 12 Dicas para solução de problemas do sistema
- 13 Home Configuration
- 13.1 Declarando o ambiente pessoal
- 13.2 Configurando o "Shell"
- 13.3 Serviços pessoais
- 13.3.1 Serviços essenciais pessoais
- 13.3.2 Shells
- 13.3.3 Execução de trabalho agendado pessoal
- 13.3.4 Power Management Home Services
- 13.3.5 Managing User Daemons
- 13.3.6 Secure Shell
- 13.3.7 GNU Privacy Guard
- 13.3.8 Desktop Home Services
- 13.3.9 Guix Home Services
- 13.3.10 Fonts Home Services
- 13.3.11 Sound Home Services
- 13.3.12 Mail Home Services
- 13.3.13 Messaging Home Services
- 13.3.14 Media Home Services
- 13.3.15 Gerenciador de janelas Sway
- 13.3.16 Networking Home Services
- 13.3.17 Miscellaneous Home Services
- 13.4 Invoking
guix home
- 14 Documentação
- 15 Plataformas
- 16 Criando imagens do sistema
- 17 Instalando arquivos de depuração
- 18 Usando TeX e LaTeX
- 19 Atualizações de segurança
- 20 Inicializando
- 21 Portando para uma nova plataforma
- 22 Contribuindo
- 22.1 Requisitos
- 22.2 Compilando do git
- 22.3 Executando o conjunto de testes
- 22.4 Executando guix antes dele ser instalado
- 22.5 A configuração perfeita
- 22.6 Configurações alternativas
- 22.7 Estrutura da árvore de origem
- 22.8 Diretrizes de empacotamento
- 22.8.1 Liberdade de software
- 22.8.2 Nomeando um pacote
- 22.8.3 Números de versão
- 22.8.4 Sinopses e descrições
- 22.8.5 Snippets versus Phases
- 22.8.6 Dependências do módulo cíclico
- 22.8.7 Pacotes Emacs
- 22.8.8 Módulos Python
- 22.8.9 Módulos Perl
- 22.8.10 Pacotes Java
- 22.8.11 Rust Crates
- 22.8.12 Pacotes Elm
- 22.8.13 Fontes
- 22.9 Estilo de código
- 22.10 Enviando patches
- 22.11 Rastreando Bugs e Mudanças
- 22.12 Equipes
- 22.13 Tomando decisões
- 22.14 Confirmar acesso
- 22.15 Revendo o trabalho de outros
- 22.16 Atualizando o pacote Guix
- 22.17 Política de depreciação
- 22.18 Escrevendo documentação
- 22.19 Traduzindo o Guix
- 22.20 Contributing to Guix’s Infrastructure
- 23 Agradecimentos
- Apêndice A Licença de Documentação Livre GNU
- Índice de conceitos
- Índice de programação
Próximo: Instalação, Anterior: GNU Guix, Acima: GNU Guix [Conteúdo][Índice]
1 Introdução
GNU Guix1 é uma ferramenta de gerenciamento de pacotes e distribuição do sistema GNU. O Guix facilita a instalação, a atualização ou a remoção de pacotes de software, a reversão para um conjunto de pacotes anterior, a compilação de pacotes a partir do código-fonte e geralmente ajuda na criação e manutenção de ambientes de software.
Você pode instalar o GNU Guix sobre um sistema GNU/Linux existente, onde ele complementa as ferramentas disponíveis sem interferência (veja Instalação) ou você pode usá-lo como uma distribuição de sistema operacional independente, Guix System2. Veja Distribuição GNU.
Próximo: Distribuição GNU, Acima: Introdução [Conteúdo][Índice]
1.1 Gerenciando software do jeito do Guix
O Guix fornece uma interface de gerenciamento de pacotes de linha de comando (veja Gerenciamento de pacote), ferramentas para ajudar no desenvolvimento de software (veja Desenvolvimento), utilitários de linha de comando para uso mais avançado (veja Utilitários), bem como interfaces de programação Scheme (veja Interface de programação). O build daemon é responsável por compilar pacotes em nome dos usuários (veja Configurando o daemon) e por baixar binários pré-compilados de fontes autorizados (veja Substitutos).
Guix inclui definições de pacotes para muitos pacotes GNU e não-GNU, todos os quais respeitam a liberdade de computação do usuário. É extensível: os usuários podem escrever suas próprias definições de pacotes (veja Definindo pacotes) e disponibilizá-los como módulos de pacotes independentes (veja Módulos de pacote). Também é personalizável: os usuários podem derivar definições de pacotes especializados das existentes, incluindo da linha de comando (veja Opções de transformação de pacote).
Nos bastidores, a Guix implementa a disciplina gerenciamento de pacotes funcional pioneira da Nix (veja Agradecimentos). No Guix, o processo de compilação e instalação de pacotes é visto como uma função, no sentido matemático. Essa função recebe entradas, como scripts de compilação, um compilador e bibliotecas, e retorna um pacote instalado. Como uma função pura, seu resultado depende apenas de suas entradas – por exemplo, não pode fazer referência a um software ou scripts que não foram explicitamente passados como entradas. Uma função de compilação sempre produz o mesmo resultado ao passar por um determinado conjunto de entradas. Não pode alterar o ambiente do sistema em execução de qualquer forma; por exemplo, ele não pode criar, modificar ou excluir arquivos fora de seus diretórios de compilação e instalação. Isto é conseguido através da execução de processos de compilação em ambientes isolados (ou containers), onde somente suas entradas explícitas são visíveis.
O resultado das funções de compilação do pacote é mantido (cached) no sistema de arquivos, em um diretório especial chamado armazém (veja O armazém). Cada pacote é instalado em um diretório próprio no armazém – por padrão, em /gnu/store. O nome do diretório contém um hash de todas as entradas usadas para compilar esse pacote; Assim, a alteração uma entrada gera um nome de diretório diferente.
Essa abordagem é a fundação para os principais recursos do Guix: suporte para atualização transacional de pacotes e reversão, instalação por usuário e coleta de lixo de pacotes (veja Recursos).
Anterior: Gerenciando software do jeito do Guix, Acima: Introdução [Conteúdo][Índice]
1.2 Distribuição GNU
O Guix vem com uma distribuição do sistema GNU que consiste inteiramente de software livre3. A distribuição pode ser instalada por conta própria (veja Instalação do sistema), mas também é possível instalar o Guix como um gerenciador de pacotes em cima de um sistema GNU/Linux instalado (veja Instalação). Quando precisamos distinguir entre os dois, nos referimos à distribuição independente como Guix System.
A distribuição fornece pacotes GNU principais, como GNU libc, GCC e
Binutils, além de muitos aplicativos GNU e não GNU. A lista completa de
pacotes disponíveis pode ser acessada
online ou executando
guix package (veja Invocando guix package):
guix package --list-available
Nosso objetivo é fornecer uma distribuição prática e 100% de software livre, baseada em Linux e outras variantes do GNU, com foco na promoção e forte integração de componentes do GNU e ênfase em programas e ferramentas que ajudam os usuários a exercer essa liberdade.
Os pacotes estão atualmente disponíveis nas seguintes plataformas:
x86_64-linuxArquitetura Intel/AMD
x86_64, kernel Linux-Libre.i686-linuxArquitetura Intel de 32 bits (IA32), kernel Linux-Libre.
armhf-linuxArquitetura ARMv7-A com hard float, Thumb-2 e NEON, usando a interface binária de aplicativos EABI hard-float (ABI) e o kernel Linux-Libre.
aarch64-linuxProcessadores ARMv8-A little-endian de 64 bits, kernel Linux-Libre.
i586-gnuGNU/Hurd sobre a arquitetura Intel de 32 bits (IA32).
Esta configuração é experimental e está em desenvolvimento. A maneira mais fácil de você tentar é configurando uma instância de
hurd-vm-service-typena sua máquina GNU/Linux (vejahurd-vm-service-type). Veja Contribuindo, sobre como ajudar!x86_64-gnuGNU/Hurd on the
x86_64Intel/AMD 64-bit architecture.This configuration is even more experimental and under heavy upstream development.
mips64el-linux (sem suporte)processadores little-endian MIPS de 64 bits, especificamente a série Loongson, n32 ABI e kernel Linux-Libre. Esta configuração não é mais totalmente suportada; em particular, não há trabalho em andamento para garantir que esta arquitetura ainda funcione. Caso alguém decida que deseja reviver esta arquitetura, o código ainda estará disponível.
powerpc-linux (sem suporte)processadores PowerPC big-endian de 32 bits, especificamente o PowerPC G4 com suporte AltiVec e kernel Linux-Libre. Esta configuração não é totalmente suportada e não há trabalho em andamento para garantir que esta arquitetura funcione.
powerpc64le-linuxprocessadores little-endian 64 bits Power ISA, kernel Linux-Libre. Isso inclui sistemas POWER9 como o placa-mãe RYF Talos II. Esta plataforma está disponível como uma "prévia de tecnologia": embora seja suportada, substitutos ainda não estão disponíveis na fazenda de construção (veja Substitutos), e alguns pacotes podem falhar na construção (veja Rastreando Bugs e Mudanças). Dito isso, a comunidade Guix está trabalhando ativamente para melhorar esse suporte, e agora é um ótimo momento para experimentá-lo e se envolver!
riscv64-linuxprocessadores little-endian RISC-V de 64 bits, especificamente RV64GC, e kernel Linux-Libre. Esta plataforma está disponível como uma "prévia de tecnologia": embora seja suportada, substitutos ainda não estão disponíveis na build farm (veja Substitutos), e alguns pacotes podem falhar na compilação (veja Rastreando Bugs e Mudanças). Dito isto, a comunidade Guix está trabalhando ativamente para melhorar este suporte, e agora é um ótimo momento para experimentá-lo e se envolver!
Com o Guix System, você declara todos os aspectos da configuração do sistema operacional, e o Guix cuida de instanciar a configuração de maneira transacional, reproduzível e sem estado (veja Configuração do sistema). O Guix System usa o kernel Linux-libre, o sistema de inicialização Shepherd (veja Introduction em The GNU Shepherd Manual), os conhecidos utilitários do GNU e cadeia de ferramentas, bem como o ambiente gráfico ou os serviços de sistema do sua escolha.
Guix System is available on all the above platforms except
mips64el-linux, powerpc-linux, powerpc64le-linux and
riscv64-linux.
Para obter informações sobre como portar para outras arquiteturas ou kernels, veja Portando para uma nova plataforma.
A construção desta distribuição é um esforço cooperativo e você está convidado a participar! Veja Contribuindo, para obter informações sobre como você pode ajudar.
Próximo: Instalação do sistema, Anterior: Introdução, Acima: GNU Guix [Conteúdo][Índice]
2 Instalação
Você pode instalar a ferramenta de gerenciamento de pacotes Guix sobre um sistema GNU/Linux ou GNU/Hurd existente4, conhecido como distro estrangeiro. Se, em vez disso, você quiser instalar a distribuição completa e autônoma do sistema GNU, Guix System, veja Instalação do sistema. Esta seção se preocupa apenas com a instalação do Guix em uma distro estrangeira.
Importante: Esta seção se aplica somente a sistemas sem Guix. Segui-la para instalações Guix existentes sobrescreverá arquivos importantes do sistema.
Quando instalado sobre uma distro alheia. GNU Guix complementa as ferramentas disponíveis sem interferência. Seus dados residem exclusivamente em dois diretórios, geralmente /gnu/store e /var/guix; outros arquivos no seu sistema, como /etc, são deixados intactos.
Uma vez instalado, o Guix pode ser atualizado executando guix pull
(veja Invocando guix pull).
- Instalação de binários
- Configurando o daemon
- Invocando
guix-daemon - Configuração de aplicativo
- Atualizando o Guix
Próximo: Configurando o daemon, Acima: Instalação [Conteúdo][Índice]
2.1 Instalação de binários
This section describes how to install Guix from a self-contained tarball providing binaries for Guix and for all its dependencies. This is often quicker than installing from source, described later (veja Compilando do git).
Importante: Esta seção se aplica somente a sistemas sem Guix. Segui-la para instalações Guix existentes sobrescreverá arquivos importantes do sistema.
Algumas distribuições GNU/Linux, como Debian, Ubuntu e openSUSE fornecem Guix por meio de seus próprios gerenciadores de pacotes. A versão do Guix pode ser mais antiga que 4538aa4, mas você pode atualizá-la depois executando ‘guix pull’.
Aconselhamos os administradores de sistema que instalam o Guix, tanto a
partir do script de instalação quanto por meio do gerenciador de pacotes
nativo de sua distribuição estrangeira, a também ler e seguir regularmente
os avisos de segurança, conforme mostrado pelo guix pull.
Para Debian ou derivados como Ubuntu ou Trisquel, chame:
sudo apt install guix
Da mesma forma, no openSUSE:
sudo zypper install guix
Se você estiver executando o Parabola, depois de habilitar o repositório pcr (Parabola Community Repo), você pode instalar o Guix com:
sudo pacman -S guix
O projeto Guix também fornece um script de shell, guix-install.sh, que automatiza o processo de instalação binária sem o uso de um gerenciador de pacotes de distro estrangeiro5. O uso de guix-install.sh requer Bash, GnuPG, GNU tar, wget e Xz.
The script guides you through the following:
- Baixando e extraindo o tarball binário
- Setting up the build daemon
- Disponibilizando o comando ‘guix’ para usuários não root
- Configuring substitute servers
Como root, execute:
# cd /tmp
# wget https://git.savannah.gnu.org/cgit/guix.git/plain/etc/guix-install.sh
# chmod +x guix-install.sh
# ./guix-install.sh
O script para instalar o Guix também está empacotado no Parabola (no repositório pcr). Você pode instalá-lo e executá-lo com:
sudo pacman -S guix-installer
sudo guix-install.sh
Nota: Por padrão, guix-install.sh configurará o Guix para baixar binários de pacotes pré-construídos, chamados substitutes (veja Substitutos), das fazendas de construção do projeto. Se você escolher não permitir isso, o Guix construirá tudo a partir da fonte, tornando cada instalação e atualização muito cara. Veja Confiança em binários para uma discussão sobre por que você pode querer construir pacotes a partir da fonte.
Para usar substitutos de
bordeaux.guix.gnu.org,ci.guix.gnu.orgou um espelho, você deve autorizá-los. Por exemplo,# guix archive --authorize < \ ~root/.config/guix/current/share/guix/bordeaux.guix.gnu.org.pub # guix archive --authorize < \ ~root/.config/guix/current/share/guix/ci.guix.gnu.org.pub
Quando terminar de instalar o Guix, veja Configuração de aplicativo para configurações extras que você pode precisar e Começando para seus primeiros passos!
Nota: O tarball da instalação binária pode ser (re)produzido e verificado simplesmente executando o seguinte comando na árvore de código-fonte do Guix:
make guix-binary.sistema.tar.xz... que, por sua vez, executa:
guix pack -s sistema --localstatedir \
  --profile-name=current-guix guix
Veja Invocando
guix pack, para mais informações sobre essa ferramenta útil.
Caso você queira desinstalar o Guix, execute o mesmo script com o sinalizador --uninstall:
./guix-install.sh --uninstall
Com --uninstall, o script exclui irreversivelmente todos os arquivos Guix, configuração e serviços.
Próximo: Invocando guix-daemon, Anterior: Instalação de binários, Acima: Instalação [Conteúdo][Índice]
2.2 Configurando o daemon
Durante a instalação, o build daemon que deve estar em execução para
usar o Guix já foi configurado e você pode executar comandos guix
no seu programa de terminal, veja Começando:
guix build hello
Se isso ocorrer sem erros, sinta-se à vontade para pular esta seção. Você deve continuar com a seção seguinte, Configuração de aplicativo.
No entanto, agora seria um bom momento para substituir versões
desatualizadas do daemon, ajustá-lo, executar compilações em outras máquinas
(veja Usando o recurso de descarregamento) ou iniciá-lo manualmente em ambientes
especiais como “chroots” (veja Acessando um sistema existente via chroot) ou
WSL (não necessário para imagens WSL criadas com Guix, veja wsl2-image-type). Se você quiser saber mais ou otimizar seu sistema,
vale a pena ler esta seção.
Operações como compilar um pacote ou executar o coletor de lixo são todas
executadas por um processo especializado, o build daemon, em nome dos
clientes. Apenas o daemon pode acessar o armazém e seu banco de dados
associado. Assim, qualquer operação que manipule o armazém passa pelo
daemon. Por exemplo, ferramentas de linha de comando como guix
package e guix build se comunicam com o daemon (via chamadas
de procedimento remoto) para instruir o que fazer.
As seções a seguir explicam como preparar o ambiente do daemon de compilação. Veja Substitutos para informações sobre como permitir que o daemon baixe binários pré-compilados.
Próximo: Usando o recurso de descarregamento, Acima: Configurando o daemon [Conteúdo][Índice]
2.2.1 Configuração do ambiente de compilação
Em uma configuração multiusuário padrão, o Guix e seu daemon – o programa
guix-daemon – são instalados pelo administrador do sistema;
/gnu/store é de propriedade de root e guix-daemon é
executado como root. Usuários desprivilegiados podem usar ferramentas
Guix para criar pacotes ou acessar o armazém, e o daemon fará isso em seu
nome, garantindo que o armazém seja mantido em um estado consistente e
permitindo que pacotes construídos sejam compartilhados entre os usuários.
Quando guix-daemon é executado como root, você pode não
querer que os próprios processos de compilação de pacotes também sejam
executados como root, por razões óbvias de segurança. Para evitar
isso, um conjunto especial de usuários de compilação deve ser criado
para uso pelos processos de construção iniciados pelo daemon. Esses usuários
de compilação não precisam ter um shell e um diretório pessoal: eles serão
usados apenas quando o daemon der um privilégio root nos processos de
compilação. Ter vários desses usuários permite que o daemon ative processos
de compilação distintos sob UIDs separados, o que garante que eles não
interfiram uns com os outros - um recurso essencial, pois as compilações são
consideradas funções puras (veja Introdução).
Em um sistema GNU/Linux, um conjunto de usuários de construção pode ser
criado assim (usando a sintaxe Bash e os comandos shadow):
# groupadd --system guixbuild
# for i in $(seq -w 1 10);
do
useradd -g guixbuild -G guixbuild \
-d /var/empty -s $(which nologin) \
-c "Guix build user $i" --system \
guixbuilder$i;
done
O número de usuários de compilação determina quantos trabalhos de compilação
podem ser executados em paralelo, conforme especificado pela opção
--max-jobs (veja --max-jobs). Para usar guix system vm e comandos
relacionados, você pode precisar adicionar os usuários de compilação ao
grupo kvm para que eles possam acessar /dev/kvm, usando
-G guixbuild,kvm em vez de -G guixbuild (veja Invoking guix system).
The guix-daemon program may then be run as root with the
following command6:
# guix-daemon --build-users-group=guixbuild
Dessa forma, o daemon inicia os processos de compilação em um chroot, sob um
dos usuários guixbuilder. No GNU/Linux, por padrão, o ambiente chroot
contém nada além de:
- um diretório
/devmínimo, criado principalmente independentemente do/devdo hospedeiro7; - o diretório
/proc; mostra apenas os processos do contêiner desde que um espaço de nome PID separado é usado; - /etc/passwd com uma entrada para o usuário atual e uma entrada para o usuário nobody;
- /etc/group com uma entrada para o grupo de usuários;
- /etc/hosts com uma entrada que mapeia
localhostpara127.0.0.1; - um diretório /tmp com permissão de escrita.
O chroot não contém um diretório /home, e a variável de ambiente
HOME é definida como o inexistente /homeless-shelter. Isso
ajuda a destacar usos inapropriados de HOME nos scripts de construção
de pacotes.
Tudo isso geralmente é suficiente para garantir que os detalhes do ambiente não influenciem os processos de construção. Em alguns casos excepcionais em que mais controle é necessário — normalmente sobre a data, kernel ou CPU — você pode recorrer a uma máquina de construção virtual (veja máquinas de construção virtual).
Você pode influenciar o diretório onde o daemon armazena árvores de build
via a variável de ambiente TMPDIR. No entanto, a árvore de build
dentro do chroot é sempre chamada /tmp/guix-build-name.drv-0,
onde name é o nome da derivação—por exemplo,
coreutils-8.24. Dessa forma, o valor de TMPDIR não vaza dentro
de ambientes de build, o que evita discrepâncias em casos em que os
processos de build capturam o nome de sua árvore de build.
O daemon também respeita as variáveis de ambiente http_proxy e
https_proxy para downloads HTTP e HTTPS que ele realiza, seja para
derivações de saída fixa (veja Derivações) ou para substitutos
(veja Substitutos).
Se você estiver instalando o Guix como um usuário sem privilégios, ainda é
possível executar guix-daemon desde que você passe
--disable-chroot. No entanto, os processos de construção não serão
isolados uns dos outros, e nem do resto do sistema. Assim, os processos de
construção podem interferir uns nos outros, e podem acessar programas,
bibliotecas e outros arquivos disponíveis no sistema — tornando muito mais
difícil visualizá-los como funções puras.
Próximo: Suporte a SELinux, Anterior: Configuração do ambiente de compilação, Acima: Configurando o daemon [Conteúdo][Índice]
2.2.2 Usando o recurso de descarregamento
Quando desejado, o daemon de compilação pode offload compilações de
derivação para outras máquinas executando Guix, usando o offload
build hook8. Quando esse recurso é habilitado, uma lista de máquinas de
compilação especificadas pelo usuário é lida de
/etc/guix/machines.scm; toda vez que uma compilação é solicitada, por
exemplo via guix build, o daemon tenta descarregá-la para uma das
máquinas que satisfazem as restrições da derivação, em particular seus tipos
de sistema — por exemplo, x86_64-linux. Uma única máquina pode ter
vários tipos de sistema, seja porque sua arquitetura o suporta nativamente,
via emulação (veja Transparent Emulation with
QEMU), ou ambos. Os pré-requisitos ausentes para a compilação são copiados
por SSH para a máquina de destino, que então prossegue com a compilação; em
caso de sucesso, a(s) saída(s) da compilação são copiadas de volta para a
máquina inicial. O recurso de offload vem com um agendador básico que tenta
selecionar a melhor máquina. A melhor máquina é escolhida entre as máquinas
disponíveis com base em critérios como:
- A disponibilidade de um slot de build. Uma máquina de build pode ter tantos
slots de build (conexões) quanto o valor do campo
parallel-buildsdo seu objetobuild-machine. - Sua velocidade relativa, conforme definida pelo campo
speeddo seu objetobuild-machine. - Sua carga. A carga normalizada da máquina deve ser menor que um valor
limite, configurável por meio do campo
overload-thresholdde seu objetobuild-machine. - Disponibilidade de espaço em disco. Mais de 100 MiB devem estar disponíveis.
O arquivo /etc/guix/machines.scm geralmente se parece com isso:
(list (build-machine
(name "eightysix.example.org")
(systems (list "x86_64-linux" "i686-linux"))
(host-key "ssh-ed25519 AAAAC3Nza…")
(user "bob")
(speed 2.)) ;incredibly fast!
(build-machine
(name "armeight.example.org")
(systems (list "aarch64-linux"))
(host-key "ssh-rsa AAAAB3Nza…")
(user "alice")
;; Lembre-se de que 'guix offload' é gerado por
;; 'guix-daemon' como root.
(private-key "/root/.ssh/identity-for-guix")))
No exemplo acima, especificamos uma lista de duas máquinas de compilação,
uma para as arquiteturas x86_64 e i686 e uma para a
arquitetura aarch64.
De fato, esse arquivo é – não surpreendentemente! – um arquivo de Scheme
que é avaliado quando o hook offload é iniciado. Seu valor de retorno
deve ser uma lista de objetos de build-machine. Embora este exemplo
mostre uma lista fixa de máquinas de compilação, pode-se imaginar, digamos,
usando DNS-SD para retornar uma lista de possíveis máquinas de compilação
descobertas na rede local (veja Guile-Avahi em Using Avahi in Guile Scheme Programs). O tipo de dados de
build-machine está detalhado abaixo.
- Tipo de dados: build-machine
Esse tipo de dados representa máquinas de compilação nas quais o daemon pode descarregar compilações. Os campos importantes são:
nameO nome de host da máquina remota.
systemsO sistema digita os tipos que a máquina remota suporta, por exemplo,
(list "x86_64-linux" "i686-linux").userThe user account on the remote machine to use when connecting over SSH. Note that the SSH key pair must not be passphrase-protected, to allow non-interactive logins.
host-keyEssa deve ser a SSH chave pública do host da máquina no formato OpenSSH. Isso é usado para autenticar a máquina quando nos conectamos a ela. É uma string longa que se parece com isso:
ssh-ed25519 AAAAC3NzaC…mde+UhL hint@example.org
Se a máquina estiver executando o daemon OpenSSH,
sshd, a chave do host poderá ser encontrada em um arquivo como /etc/ssh/ssh_host_ed25519_key.pub.Se a máquina estiver executando o daemon SSH do GNU lsh,
lshd, a chave do host estará em /etc/lsh/host-key.pub ou em um arquivo semelhante. Ele pode ser convertido para o formato OpenSSH usando olsh-export-key(veja Converting keys em LSH Manual):$ lsh-export-key --openssh < /etc/lsh/host-key.pub ssh-rsa AAAAB3NzaC1yc2EAAAAEOp8FoQAAAQEAs1eB46LV…
Vários campos opcionais podem ser especificados:
port(padrão:22)O número da porta para o servidor SSH na máquina.
private-key(padrão: ~root/.ssh/id_rsa)O arquivo de chave privada SSH a ser usado ao conectar-se à máquina, no formato OpenSSH. Esta chave não deve ser protegida com uma senha.
Observe que o valor padrão é a chave privada da usuário root. Verifique se ele existe se você usar o padrão.
compression(padrão:"zlib@openssh.com,zlib")compression-level(padrão:3)Os métodos de compactação no nível SSH e o nível de compactação solicitado.
Observe que o descarregamento depende da compactação SSH para reduzir o uso da largura de banda ao transferir arquivos de e para máquinas de compilação.
daemon-socket(padrão:"/var/guix/daemon-socket/socket")O nome do arquivo do soquete do domínio Unix
guix-daemonestá escutando nessa máquina.overload-threshold(default:0.8)O limite de carga acima do qual uma máquina de offload potencial é desconsiderada pelo agendador de offload. O valor traduz aproximadamente o uso total do processador da máquina de build, variando de 0,0 (0%) a 1,0 (100%). Ele também pode ser desabilitado definindo
overload-thresholdpara#f.parallel-builds(padrão:1)O número de compilações que podem ser executadas paralelamente na máquina.
speed(padrão:1.0)Um “fator de velocidade relativo”. O agendador de descarregamento tenderá a preferir máquinas com um fator de velocidade mais alto.
features(padrão:'())Uma lista de strgins que denotam recursos específicos suportados pela máquina. Um exemplo é
"kvm"para máquinas que possuem os módulos KVM Linux e o suporte de hardware correspondente. As derivações podem solicitar recursos pelo nome e serão agendadas nas máquinas de compilação correspondentes.
Nota: No Guix System, em vez de gerenciar /etc/guix/machines.scm de forma independente, você pode escolher especificar máquinas de compilação diretamente na declaração
operating-system, no campobuild-machinesdeguix-configuration. Veja campobuild-machinesdeguix-configuration.
O comando guix deve estar no caminho de pesquisa nas máquinas de
compilação. Você pode verificar se este é o caso executando:
ssh build-machine guix repl --version
Há uma última coisa a fazer quando o machines.scm está em vigor. Como
explicado acima, ao descarregar, os arquivos são transferidos entre os
armazéns das máquinas. Para que isso funcione, primeiro você precisa gerar
um par de chaves em cada máquina para permitir que o daemon exporte arquivos
assinados de arquivos do armazém (veja Invocando guix archive):
# guix archive --generate-key
Nota: Este par de chaves não está relacionado ao par de chaves SSH mencionado anteriormente na descrição do tipo de dados
build-machine.
Cada máquina de construção deve autorizar a chave da máquina principal para que ela aceite itens do armazém que recebe do mestre:
# guix archive --authorize < master-public-key.txt
Da mesma forma, a máquina principal deve autorizar a chave de cada máquina de compilação.
Todo esse barulho com as chaves está aqui para expressar relações de confiança mútua de pares entre a máquina mestre e as de compilação. Concretamente, quando o mestre recebe arquivos de uma máquina de compilação (e vice-versa), seu daemon de compilação pode garantir que eles sejam genuínos, não tenham sido violados e que sejam assinados por uma chave autorizada.
Para testar se sua configuração está operacional, execute este comando no nó principal:
# guix offload test
Isso tentará se conectar a cada uma das máquinas de compilação especificadas em /etc/guix/machines.scm, certificar-se de que o Guix esteja disponível em cada máquina, tentará exportar para a máquina e importar dela e relatará qualquer erro no processo.
Se você quiser testar um arquivo de máquina diferente, basta especificá-lo na linha de comando:
# guix offload test machines-qualif.scm
Por fim, você pode testar o subconjunto das máquinas cujo nome corresponde a uma expressão regular como esta:
# guix offload test machines.scm '\.gnu\.org$'
Para exibir o carregamento atual de todos os hosts de compilação, execute este comando no nó principal:
# guix offload status
Anterior: Usando o recurso de descarregamento, Acima: Configurando o daemon [Conteúdo][Índice]
2.2.3 Suporte a SELinux
O Guix inclui um arquivo de políticas do SELinux em etc/guix-daemon.cil que pode ser instalado em um sistema em que o SELinux está ativado, para rotular os arquivos do Guix e especificar o comportamento esperado do daemon. Como o Guix System não fornece uma política básica do SELinux, a política do daemon não pode ser usada no Guix System.
2.2.3.1 Instalando a política do SELinux
Nota: O script de instalação binária
guix-install.shse oferece para executar as etapas abaixo para você (veja Instalação de binários).
Para instalar a política, execute esse comando como root:
semodule -i /var/guix/profiles/per-user/root/current-guix/share/selinux/guix-daemon.cil
Então, como root, renomeie o sistema de arquivos, possivelmente depois de torná-lo gravável:
mount -o remount,rw /gnu/store restorecon -R /gnu /var/guix
Neste ponto, você pode iniciar ou reiniciar guix-daemon; em uma
distribuição que usa systemd como seu gerenciador de serviços, você pode
fazer isso com:
systemctl restart guix-daemon
Depois que a política é instalada, o sistema de arquivos foi rotulado
novamente e o daemon foi reiniciado, ele deve estar em execução no contexto
guix_daemon_t. Você pode confirmar isso com o seguinte comando:
ps -Zax | grep guix-daemon
Monitore os arquivos de log do SELinux enquanto executa um comando como
guix build hello para se convencer de que o SELinux permite todas as
operações necessárias.
2.2.3.2 Limitações
Esta política não é perfeita. Aqui está uma lista de limitações ou peculiaridades que devem ser consideradas ao implementar a política SELinux fornecida para o daemon Guix.
-
guix_daemon_socket_tisn’t actually used. None of the socket operations involve contexts that have anything to do withguix_daemon_socket_t. It doesn’t hurt to have this unused label, but it would be preferable to define socket rules for only this label. -
guix gcnão pode acessar links arbitrários para perfis. Por design, o rótulo do arquivo do destino de uma ligação simbólica é independente do rótulo do arquivo do próprio link. Embora todos os perfis em $localstatedir estejam rotulados, as ligações para esses perfis herdam o rótulo do diretório em que estão. Para as ligações no diretório pessoal do usuário, seráuser_home_t. Mas, para ligações do diretório pessoal do usuário root, ou /tmp, ou do diretório de trabalho do servidor HTTP etc., isso não funcionará.guix gcseria impedido de ler e seguir essas ligações. - O recurso do daemon de escutar conexões TCP pode não funcionar mais. Isso pode exigir regras extras, porque o SELinux trata os soquetes de rede de maneira diferente dos arquivos.
- Atualmente, todos os arquivos com um nome correspondente à expressão regular
/gnu/store/.+-(guix-.+|profile)/bin/guix-daemonrecebem o rótuloguix_daemon_exec_t; isso significa que qualquer arquivo com esse nome em qualquer perfil poderá ser executado no domínio deguix_daemon_t. Isto não é o ideal. Um invasor pode criar um pacote que forneça esse executável e convencer um usuário a instalar e executá-lo, o que o eleva ao domínio deguix_daemon_t. Nesse ponto, o SELinux não poderia impedir o acesso a arquivos permitidos para processos nesse domínio.Você precisará renomear o diretório store após todas as atualizações para guix-daemon, como após executar
guix pull. Supondo que o store esteja em /gnu, você pode fazer isso comrestorecon -vR /gnu, ou por outros meios fornecidos pelo seu sistema operacional.Poderíamos gerar uma política muito mais restritiva no momento da instalação, para que apenas o nome do arquivo exato do executável
guix-daemonatualmente instalado seja rotulado comguix_daemon_exec_t, em vez de usar um amplo expressão regular. A desvantagem é que o root precisaria instalar ou atualizar a política no momento da instalação sempre que o pacote Guix que fornece o executávelguix-daemonem execução efetiva for atualizado.
Próximo: Configuração de aplicativo, Anterior: Configurando o daemon, Acima: Instalação [Conteúdo][Índice]
2.3 Invocando guix-daemon
O programa guix-daemon implementa todas as funcionalidades para
acessar o armazém. Isso inclui iniciar processos de compilação, executar o
coletor de lixo, consultar a disponibilidade de um resultado da compilação
etc. É normalmente executado como root, assim:
# guix-daemon --build-users-group=guixbuild
Este daemon também pode ser iniciado seguindo o protocolo de “ativação de
soquete” do systemd (veja make-systemd-constructor em The GNU Shepherd Manual).
Para detalhes sobre como configurá-lo, veja Configurando o daemon.
Por padrão, guix-daemon inicia processos de compilação sob
diferentes UIDs, obtidos do grupo de compilação especificado com
--build-users-group. Além disso, cada processo de compilação é
executado em um ambiente chroot que contém apenas o subconjunto do armazém
do qual o processo de compilação depende, conforme especificado por sua
derivação (veja derivação), mais um conjunto de
diretórios de sistema específicos. Por padrão, o último contém /dev e
/dev/pts. Além disso, no GNU/Linux, o ambiente de compilação é um
container: além de ter sua própria árvore de sistema de arquivos, ele
tem um espaço de nome de montagem separado, seu próprio espaço de nome PID,
espaço de nome de rede, etc. Isso ajuda a obter compilações reproduzíveis
(veja Recursos).
Quando o daemon executa uma compilação em nome do usuário, ele cria um
diretório de compilação em /tmp ou no diretório especificado por sua
variável de ambiente TMPDIR. Esse diretório é compartilhado com o
contêiner durante a compilação, embora dentro do contêiner, a árvore de
compilação seja sempre chamada de /tmp/guix-build-name.drv-0.
O diretório de compilação é excluído automaticamente após a conclusão, a menos que a compilação falhe e o cliente tenha especificado --keep-failed (veja --keep-failed).
O daemon escuta conexões e gera um subprocesso para cada sessão iniciada por
um cliente (um dos subcomandos guix). O comando guix
processes permite que você tenha uma visão geral da atividade no seu
sistema visualizando cada uma das sessões e clientes ativos. Veja Invocando guix processes, para mais informações.
As seguintes opções de linha de comando são suportadas:
--build-users-group=grupoObtém os usuários do grupo para executar os processos de compilação (veja usuários de compilação).
--no-substitutes¶Não use substitutos para compilar produtos. Ou seja, sempre crie coisas localmente, em vez de permitir downloads de binários pré-compilados (veja Substitutos).
Quando o daemon é executado com --no-substitutes, os clientes ainda podem habilitar explicitamente a substituição por meio da chamada de procedimento remoto
set-build-options(veja O armazém).--substitute-urls=urlsConsider urls the default whitespace-separated list of substitute source URLs. When this option is omitted, ‘
https://bordeaux.guix.gnu.org https://ci.guix.gnu.org’ is used.Isso significa que os substitutos podem ser baixados de urls, desde que assinados por uma assinatura confiável (veja Substitutos).
Veja Obtendo substitutos de outros servidores, para mais informações sobre como configurar o daemon para obter substitutos de outros servidores.
--no-offloadNão use compilações de offload para outras máquinas (veja Usando o recurso de descarregamento). Ou seja, sempre compile as coisas localmente em vez de descarregar compilações para máquinas remotas.
--cache-failuresArmazena em cache as compilações que falharam. Por padrão, apenas compilações bem-sucedidas são armazenadas em cache.
Quando essa opção é usada, o
guix gc --list-failurespode ser usado para consultar o conjunto de itens do armazém marcados como com falha; Oguix gc --clear-failuresremove os itens do armazém do conjunto de falhas em cache. Veja Invocandoguix gc.--cores=n-c nUsa n núcleos de CPU para compilar cada derivação;
0significa todos disponíveis.O valor padrão é
0, mas pode ser substituído pelos clientes, como a opção --cores deguix build(veja Invocandoguix build).O efeito é definir a variável de ambiente
NIX_BUILD_CORESno processo de compilação, que pode então usá-la para explorar o paralelismo interno — por exemplo, executandomake -j$NIX_BUILD_CORES.--max-jobs=n-M nPermite no máximo n tarefas de compilação em paralelo. O valor padrão é
1. Definir como0significa que nenhuma compilação será executada localmente; em vez disso, o daemon descarregará as compilações (veja Usando o recurso de descarregamento) ou simplesmente falhará.--max-silent-time=segundosQuando o processo de compilação ou substituição permanecer em silêncio por mais de segundos, encerra-o e relata uma falha de compilação.
The default value is
3600(one hour).O valor especificado aqui pode ser substituído pelos clientes (veja --max-silent-time).
--timeout=segundosDa mesma forma, quando o processo de compilação ou substituição durar mais que segundos, encerra-o e relata uma falha de compilação.
O valor padrão é 24 horas.
O valor especificado aqui pode ser substituído pelos clientes (veja --timeout).
--rounds=NCompila cada derivação n vezes seguidas e gera um erro se os resultados consecutivos da compilação não forem idênticos bit a bit. Observe que essa configuração pode ser substituída por clientes como
guix build(veja Invocandoguix build).Quando usado em conjunto com --keep-failed, uma saída de comparação é mantida no armazém, sob /gnu/store/…-check. Isso facilita procurar por diferenças entre os dois resultados.
--debugProduz uma saída de depuração.
Isso é útil para depurar problemas de inicialização do daemon, mas pode ser substituído pelos clientes, por exemplo, a opção --verbosity de
guix build(veja Invocandoguix build).--chroot-directory=diradiciona dir ao chroot de compilação.
Isso pode alterar o resultado dos processos de compilação – por exemplo, se eles usam dependências opcionais encontradas em dir quando estão disponíveis, e não o contrário. Por esse motivo, não é recomendável fazê-lo. Em vez disso, verifique se cada derivação declara todas as entradas necessárias.
--disable-chrootDesabilita compilações em chroot.
O uso dessa opção não é recomendado, pois, novamente, isso permitiria que os processos de compilação obtivessem acesso a dependências não declaradas. Porém, é necessário quando o
guix-daemonestá sendo executado em uma conta de usuário sem privilégios.--log-compression=tipoCompacta logs de compilação de aconrdo com tipo, que pode ser um entre
gzip,bzip2enone.A menos que --lose-logs seja usado, todos os logs de build são mantidos em localstatedir. Para economizar espaço, o daemon os compacta automaticamente com gzip por padrão.
--discover[=yes|no]Se deve descobrir servidores substitutos na rede local usando mDNS e DNS-SD.
Este recurso ainda é experimental. No entanto, aqui estão algumas considerações.
- Pode ser mais rápido/menos caro do que buscar em servidores remotos;
- Não há riscos de segurança, apenas substitutos genuínos serão usados (veja Autenticação de substituto);
- Um invasor anunciando
guix publishna sua LAN não pode fornecer binários maliciosos, mas pode descobrir qual software você está instalando; - Os servidores podem servir substitutos via HTTP, sem criptografia, para que qualquer pessoa na LAN possa ver qual software você está instalando.
Também é possível habilitar ou desabilitar a descoberta de servidor substituto em tempo de execução executando:
herd discover guix-daemon on herd discover guix-daemon off
--disable-deduplication¶Desabilita “deduplicação” automática de arquivos no armazém.
Por padrão, os arquivos adicionados ao armazém são automaticamente “deduplicados”: se um arquivo recém-adicionado for idêntico a outro encontrado no armazém, o daemon tornará o novo arquivo um link físico para o outro arquivo. Isso pode reduzir notavelmente o uso do disco, às custas de um leve aumento na carga de entrada/saída no final de um processo de criação. Esta opção desativa essa otimização.
--gc-keep-outputs[=yes|no]Diz se o coletor de lixo (GC) deve manter as saídas de derivações vivas.
Quando definido como
yes, o GC manterá as saídas de qualquer derivação ativa disponível no armazém—os arquivos .drv. O padrão éno, o que significa que as saídas de derivação são mantidas somente se forem acessíveis a partir de uma raiz do GC. Veja Invocandoguix gc, para mais informações sobre raízes do GC.--gc-keep-derivations[=yes|no]Diz se o coletor de lixo (GC) deve manter as derivações correspondentes às saídas vivas.
Quando definido como
yes, como é o caso por padrão, o GC mantém derivações—ou seja, arquivos .drv—desde que pelo menos uma de suas saídas esteja ativa. Isso permite que os usuários acompanhem as origens dos itens em seu armazém. Defini-lo comonoeconomiza um pouco de espaço em disco.Dessa forma, definir --gc-keep-derivations como
yesfaz com que a vivacidade flua das saídas para as derivações, e definir --gc-keep-outputs comoyesfaz com que a vivacidade flua das derivações para as saídas. Quando ambos são definidos comoyes, o efeito é manter todos os pré-requisitos de compilação (as fontes, o compilador, as bibliotecas e outras ferramentas de tempo de compilação) de objetos ativos no armazém, independentemente de esses pré-requisitos serem acessíveis a partir de uma raiz GC. Isso é conveniente para desenvolvedores, pois economiza reconstruções ou downloads.--impersonate-linux-2.6Em sistemas baseados em Linux, personifique o Linux 2.6. Isso significa que a chamada de sistema
unamedo kernel relatará 2.6 como o número da versão.Isso pode ser útil para criar programas que (geralmente de forma errada) dependem do número da versão do kernel.
--lose-logsNão mantenha logs de build. Por padrão, eles são mantidos em localstatedir/guix/log.
--system=sistemaAssuma sistema como o tipo de sistema atual. Por padrão, é o par arquitetura/kernel encontrado no momento da configuração, como
x86_64-linux.--listen=endpointOuça conexões em endpoint. endpoint é interpretado como o nome do arquivo de um soquete de domínio Unix se ele começar com
/(sinal de barra). Caso contrário, endpoint é interpretado como um nome de host ou nome de host e porta para ouvir. Aqui estão alguns exemplos:--listen=/gnu/var/daemonOuça conexões no soquete de domínio Unix /gnu/var/daemon, criando-o se necessário.
--listen=localhost¶-
Ouça as conexões TCP na interface de rede correspondente a
localhost, na porta 44146. --listen=128.0.0.42:1234Ouça as conexões TCP na interface de rede correspondente ao
128.0.0.42, na porta 1234.
Esta opção pode ser repetida várias vezes, nesse caso
guix-daemonaceita conexões em todos os endpoints especificados. Os usuários podem informar aos comandos do cliente a qual endpoint se conectar definindo a variável de ambienteGUIX_DAEMON_SOCKET(vejaGUIX_DAEMON_SOCKET).Nota: O protocolo daemon é unauthenticated and unencrypted. Usar --listen=host é adequado em redes locais, como clusters, onde apenas nós confiáveis podem se conectar ao daemon de compilação. Em outros casos em que o acesso remoto ao daemon é necessário, recomendamos usar soquetes de domínio Unix junto com SSH.
Quando --listen é omitido,
guix-daemonescuta conexões no soquete de domínio Unix localizado em localstatedir/guix/daemon-socket/socket.
Próximo: Atualizando o Guix, Anterior: Invocando guix-daemon, Acima: Instalação [Conteúdo][Índice]
2.4 Configuração de aplicativo
Ao usar Guix sobre uma distribuição GNU/Linux que não seja um Guix System — uma chamada distro alheia — algumas etapas adicionais são necessárias para colocar tudo no seu lugar. Aqui estão algumas delas.
2.4.1 Localidades
Pacotes instalados via Guix não usarão os dados de localidade do sistema
host. Em vez disso, você deve primeiro instalar um dos pacotes de localidade
disponíveis com Guix e então definir a variável de ambiente
GUIX_LOCPATH:
$ guix install glibc-locales $ export GUIX_LOCPATH=$HOME/.guix-profile/lib/locale
Observe que o pacote glibc-locales contém dados para todos os locais
suportados pela GNU libc e pesa cerca de 930 MiB9. Se você precisar apenas
de alguns locais, poderá definir seu pacote de locais personalizados por
meio do procedimento make-glibc-utf8-locales do módulo (gnu
packages base). O exemplo a seguir define um pacote contendo os vários
locais UTF-8 canadenses conhecidos pela GNU libc, que pesa cerca de
14 MiB:
(use-modules (gnu packages base)) (define my-glibc-locales (make-glibc-utf8-locales glibc #:locales (list "en_CA" "fr_CA" "ik_CA" "iu_CA" "shs_CA") #:name "glibc-canadian-utf8-locales"))
A variável GUIX_LOCPATH desempenha um papel similar a LOCPATH
(veja LOCPATH em The GNU C Library Reference
Manual). Há duas diferenças importantes, no entanto:
-
GUIX_LOCPATHé honrado apenas pela libc no Guix, e não pela libc fornecida por distros estrangeiras. Assim, usarGUIX_LOCPATHpermite que você tenha certeza de que os programas da distro estrangeira não acabarão carregando dados de localidade incompatíveis. - libc sufixa cada entrada de
GUIX_LOCPATHcom/X.Y, ondeX.Yé a versão libc—por exemplo,2.22. Isso significa que, caso seu perfil Guix contenha uma mistura de programas vinculados a diferentes versões libc, cada versão libc tentará carregar apenas dados de localidade no formato correto.
Isso é importante porque o formato de dados de localidade usado por diferentes versões da libc pode ser incompatível.
2.4.2 Name Service Switch
Ao usar o Guix em uma distro alheia, nós recomendamos fortemente que
o sistema use o daemon de cache de serviço de nomes da biblioteca C do
GNU, nscd, que deve ouvir no soquete
/var/run/nscd/socket. Caso não faça isso, os aplicativos instalados
com Guix podem falhar em procurar nomes de máquina e contas de usuário, ou
até mesmo travar. Os próximos parágrafos explicam o porquê.
A biblioteca GNU C implementa um name service switch (NSS), que é um mecanismo extensível para “pesquisas de nomes” em geral: resolução de nomes de host, contas de usuários e muito mais (veja Name Service Switch em The GNU C Library Reference Manual).
Sendo extensível, o NSS suporta plugins, que fornecem novas
implementações de pesquisa de nomes: por exemplo, o plugin nss-mdns
permite a resolução de nomes de host .local, o plugin nis
permite a pesquisa de contas de usuários usando o Network information
service (NIS), e assim por diante. Esses "serviços de pesquisa” extras são
configurados em todo o sistema em /etc/nsswitch.conf, e todos os
programas em execução no sistema honram essas configurações (veja NSS
Configuration File em The GNU C Reference Manual).
Quando eles realizam uma pesquisa de nome — por exemplo chamando a função
getaddrinfo em C — os aplicativos primeiro tentam se conectar ao
nscd; em caso de sucesso, o nscd realiza pesquisas de nome em seu nome. Se o
nscd não estiver em execução, eles realizam a pesquisa de nome sozinhos,
carregando os serviços de pesquisa de nome em seu próprio espaço de endereço
e executando-o. Esses serviços de pesquisa de nome — os arquivos
libnss_*.so — são dlopen’d, mas podem vir da biblioteca C do
sistema host, em vez da biblioteca C à qual o aplicativo está vinculado (a
biblioteca C vem do Guix).
E é aqui que está o problema: se seu aplicativo estiver vinculado à
biblioteca C do Guix (por exemplo, glibc 2.24) e tentar carregar plugins NSS
de outra biblioteca C (por exemplo, libnss_mdns.so para glibc 2.22),
ele provavelmente travará ou terá suas pesquisas de nome falhando
inesperadamente.
Executar nscd no sistema, entre outras vantagens, elimina esse
problema de incompatibilidade binária porque esses arquivos
libnss_*.so são carregados no processo nscd, não nos
próprios aplicativos.
Note that nscd is no longer provided on some GNU/Linux distros,
such as Arch Linux (as of Dec. 2024). nsncd can be used as a
drop-in-replacement. See the nsncd
repository and this blog
post for more information.
2.4.3 Fontes X11
A maioria dos aplicativos gráficos usa o Fontconfig para localizar e
carregar fontes e executar renderização do lado do cliente X11. O pacote
fontconfig no Guix procura fontes em $HOME/.guix-profile por
padrão. Assim, para permitir que aplicativos gráficos instalados com o Guix
exibam fontes, você precisa instalar fontes com o Guix também. Pacotes de
fontes essenciais incluem font-ghostscript, font-dejavu e
font-gnu-freefont.
Depois de instalar ou remover fontes, ou quando notar que um aplicativo não encontra fontes, talvez seja necessário instalar o Fontconfig e forçar uma atualização do cache de fontes executando:
guix install fontconfig fc-cache -rv
Para exibir texto escrito em chinês, japonês ou coreano em aplicativos
gráficos, considere instalar font-adobe-source-han-sans ou
font-wqy-zenhei. O primeiro tem várias saídas, uma por família de
idiomas (veja Pacotes com múltiplas saídas). Por exemplo, o comando a
seguir instala fontes para idiomas chineses:
guix install font-adobe-source-han-sans:cn
Programas mais antigos como xterm não usam Fontconfig e, em vez
disso, dependem da renderização de fontes do lado do servidor. Tais
programas exigem a especificação de um nome completo de uma fonte usando
XLFD (X Logical Font Description), como este:
-*-dejavu sans-medium-r-normal-*-*-100-*-*-*-*-*-1
Para poder usar esses nomes completos para as fontes TrueType instaladas no seu perfil Guix, você precisa estender o caminho da fonte do servidor X:
xset +fp $(dirname $(readlink -f ~/.guix-profile/share/fonts/truetype/fonts.dir))
Depois disso, você pode executar xlsfonts (do pacote xlsfonts)
para garantir que suas fontes TrueType estejam listadas lá.
2.4.4 Certificados X.509
O pacote nss-certs fornece certificados X.509, que permitem que
programas autentiquem servidores Web acessados por HTTPS.
Ao usar uma Guix em uma distro alheia, você pode instalar esse pacote e definir as variáveis de ambiente relevantes de forma que os pacotes saibam onde procurar por certificados. Veja Certificados X.509, para informações detalhadas.
2.4.5 Pacotes Emacs
Quando você instala pacotes do Emacs com o Guix, os arquivos Elisp são
colocados no diretório share/emacs/site-lisp/ do perfil no qual eles
são instalados. As bibliotecas Elisp são disponibilizadas para o Emacs por
meio da variável de ambiente EMACSLOADPATH, que é definida ao instalar
o próprio Emacs.
Além disso, as definições de autoload são avaliadas automaticamente na
inicialização do Emacs, pelo procedimento específico do Guix
guix-emacs-autoload-packages. Este procedimento pode ser invocado
interativamente para que pacotes Emacs recém-instalados sejam descobertos,
sem precisar reiniciar o Emacs. Se, por algum motivo, você quiser evitar o
carregamento automático dos pacotes Emacs instalados com o Guix, você pode
fazer isso executando o Emacs com a opção --no-site-file
(veja Init File em The GNU Emacs Manual).
Nota: A maioria das variantes do Emacs agora são capazes de fazer compilação nativa. A abordagem adotada pelo Guix Emacs, no entanto, difere muito da abordagem adotada pelo upstream.
O Upstream Emacs compila pacotes just-in-time e normalmente coloca arquivos de objetos compartilhados em uma pasta especial dentro do seu
user-emacs-directory. Esses objetos compartilhados dentro da referida pasta são organizados em uma hierarquia plana, e seus nomes de arquivo contêm dois hashes para verificar o nome do arquivo original e o conteúdo do código-fonte.O Guix Emacs, por outro lado, prefere compilar pacotes antes do tempo. Objetos compartilhados retêm muito do nome do arquivo original e nenhum hashe é adicionado para verificar o nome do arquivo original ou o conteúdo do arquivo. Crucialmente, isso permite que o Guix Emacs e os pacotes construídos contra ele sejam enxertados (veja enxertos), mas, ao mesmo tempo, o Guix Emacs não tem a verificação baseada em hash do código-fonte embutido no Emacs upstream. Como esse esquema de nomenclatura é trivial de explorar, desabilitamos a compilação just-in-time.
Observe ainda que
emacs-minimal—o Emacs padrão para construir pacotes—foi configurado sem compilação nativa. Para compilar nativamente seus pacotes emacs antes do tempo, use uma transformação como --with-input=emacs-minimal=emacs.
Anterior: Configuração de aplicativo, Acima: Instalação [Conteúdo][Índice]
2.5 Atualizando o Guix
Para atualizar o Guix, execute:
guix pull
Veja Invocando guix pull, para maiores informações.
Em uma distribuição estrangeira, você pode atualizar o daemon de compilação executando:
sudo -i guix pull
seguido por (supondo que sua distribuição use a ferramenta de gerenciamento de serviço systemd):
systemctl restart guix-daemon.service
No sistema Guix, a atualização do daemon é obtida reconfigurando o sistema
(veja guix system reconfigure).
Próximo: Começando, Anterior: Instalação, Acima: GNU Guix [Conteúdo][Índice]
3 Instalação do sistema
Esta seção explica como instalar o Guix System em uma máquina. Guix, como gerenciador de pacotes, também pode ser instalado sobre um sistema GNU/Linux em execução, veja Instalação.
- Limitações
- Considerações de Hardware
- Instalação em um pendrive e em DVD
- Preparando para instalação
- Instalação gráfica guiada
- Instalação manual
- Após a instalação do sistema
- Instalando Guix em uma Máquina Virtual
- Compilando a imagem de instalação
- Construindo a imagem de instalação para placas ARM
Próximo: Considerações de Hardware, Acima: Instalação do sistema [Conteúdo][Índice]
3.1 Limitações
Consideramos que o Guix System está pronto para uma ampla gama de casos de uso de "desktop” e servidores. As garantias de confiabilidade que ele fornece – atualizações e reversões transacionais, reprodutibilidade – tornam-no uma base sólida.
Cada vez mais serviços de sistema são fornecidos (veja Serviços).
No entanto, antes de prosseguir com a instalação, esteja ciente de que alguns serviços dos quais você depende ainda podem estar faltando na versão 4538aa4.
Mais do que um aviso de isenção de responsabilidade, este é um convite para relatar problemas (e histórias de sucesso!) e se juntar a nós para melhorá-los. Veja Contribuindo, para mais informações.
Próximo: Instalação em um pendrive e em DVD, Anterior: Limitações, Acima: Instalação do sistema [Conteúdo][Índice]
3.2 Considerações de Hardware
GNU Guix se concentra em respeitar a liberdade computacional do usuário. Ele é construído em torno do kernel Linux-libre, o que significa que apenas o hardware para o qual existem drivers e firmware de software livre é suportado. Hoje em dia, uma ampla gama de hardware disponível no mercado é suportada no GNU/Linux-libre – de teclados a placas gráficas, scanners e controladores Ethernet. Infelizmente, ainda existem áreas onde os fornecedores de hardware negam aos usuários o controle sobre sua própria computação, e tal hardware não é suportado no Guix System.
Uma das principais áreas onde faltam drivers ou firmware gratuitos são os
dispositivos WiFi. Os dispositivos WiFi que funcionam incluem aqueles que
usam chips Atheros (AR9271 e AR7010), que corresponde ao driver ath9k
Linux-libre, e aqueles que usam chips Broadcom/AirForce (BCM43xx com
Wireless-Core Revisão 5), que corresponde a o driver livre Linux
b43-open. Existe firmware livre para ambos e está disponível
imediatamente no Guix System, como parte do %base-firmware
(veja firmware).
O instalador avisa você antecipadamente se detectar dispositivos que não funcionam devido à falta de firmware ou drivers gratuitos.
A Free Software Foundation administra Respects Your Freedom (RYF), um programa de certificação para produtos de hardware que respeitem sua liberdade e privacidade e garantam que você tenha controle sobre seu dispositivo. Recomendamos que você verifique a lista de dispositivos certificados RYF.
Outro recurso útil é o site H-Node. Ele contém um catálogo de dispositivos de hardware com informações sobre seu suporte no GNU/Linux.
Próximo: Preparando para instalação, Anterior: Considerações de Hardware, Acima: Instalação do sistema [Conteúdo][Índice]
3.3 Instalação em um pendrive e em DVD
Uma imagem de instalação ISO-9660 que pode ser gravada em um pendrive ou
gravada em um DVD pode ser baixada em
‘https://ftp.gnu.org/gnu/guix/guix-system-install-4538aa4.x86_64-linux.iso’,
onde você pode substituir x86_64-linux por um dos seguintes:
x86_64-linuxpara um sistema GNU/Linux em CPUs de 64 bits compatíveis com Intel/AMD;
i686-linuxpara um sistema GNU/Linux de 32 bits em CPUs compatíveis com Intel.
Certifique-se de baixar o arquivo .sig associado e verificar a autenticidade da imagem em relação a ele, seguindo estas linhas:
$ wget https://ftp.gnu.org/gnu/guix/guix-system-install-4538aa4.x86_64-linux.iso.sig $ gpg --verify guix-system-install-4538aa4.x86_64-linux.iso.sig
Se esse comando falhar porque você não possui a chave pública requerida, execute este comando para importá-lo:
$ wget https://sv.gnu.org/people/viewgpg.php?user_id=15145 \
-qO - | gpg --import -
e execute novamente o comando gpg --verify.
Observe que um aviso como "Esta chave não está certificada com uma assinatura confiável!” é normal.
Esta imagem contém as ferramentas necessárias para uma instalação. Ele deve ser copiado como está para um pendrive ou DVD grande o suficiente.
Copiando para um pendrive
Insira um pendrive de 1 GiB ou mais em sua máquina e determine o nome do dispositivo. Supondo que o pendrive seja conhecido como /dev/sdX, copie a imagem com:
dd if=guix-system-install-4538aa4.x86_64-linux.iso of=/dev/sdX status=progress sync
O acesso a /dev/sdX geralmente requer privilégios de root.
Gravando em um DVD
Insira um DVD virgem em sua máquina e determine o nome do dispositivo. Supondo que a unidade de DVD seja conhecida como /dev/srX, copie a imagem com:
growisofs -dvd-compat -Z /dev/srX=guix-system-install-4538aa4.x86_64-linux.iso
O acesso a /dev/srX geralmente requer privilégios de root.
Inicializando
Feito isso, você poderá reiniciar o sistema e inicializar a partir do
pendrive ou DVD. O último geralmente requer que você entre no menu de
inicialização do BIOS ou UEFI, onde você pode optar por inicializar a partir
do pendrive. Para inicializar a partir do Libreboot, mude para o modo de
comando pressionando a tecla c e digite search_grub usb.
Infelizmente, em algumas máquinas, o meio de instalação não pode ser inicializado corretamente e você só verá uma tela preta após a inicialização, mesmo depois de esperar dez minutos. Isto pode indicar que sua máquina não consegue executar o Sistema Guix; talvez você queira instalar o Guix em uma distribuição estrangeira (veja Instalação de binários). Mas não desista ainda; uma possível solução alternativa é pressionar a tecla e no menu de inicialização do GRUB e anexar nomodeset à linha de inicialização do Linux. Às vezes, o problema da tela preta também pode ser resolvido conectando um monitor diferente.
Veja Instalando Guix em uma Máquina Virtual, se, em vez disso, você quiser instalar o Guix System em uma máquina virtual (VM).
Próximo: Instalação gráfica guiada, Anterior: Instalação em um pendrive e em DVD, Acima: Instalação do sistema [Conteúdo][Índice]
3.4 Preparando para instalação
Depois de inicializar, você pode usar o instalador gráfico guiado, o que facilita o início (veja Instalação gráfica guiada). Alternativamente, se você já está familiarizado com GNU/Linux e deseja mais controle do que o instalador gráfico oferece, você pode escolher o processo de instalação "manual” (veja Instalação manual).
O instalador gráfico está disponível em TTY1. Você pode obter shells root em TTYs 3 a 6 pressionando ctrl-alt-f3, ctrl-alt-f4, etc. TTY2 mostra esta documentação e você pode acessá-la com ctrl-alt -f2. A documentação pode ser navegada usando os comandos do leitor de informações (veja Stand-alone GNU Info). O sistema de instalação executa o daemon do mouse GPM, que permite selecionar texto com o botão esquerdo do mouse e colá-lo com o botão do meio.
Nota: A instalação requer acesso à Internet para que quaisquer dependências ausentes na configuração do sistema possam ser baixadas. Consulte a seção "Rede" abaixo.
Próximo: Instalação manual, Anterior: Preparando para instalação, Acima: Instalação do sistema [Conteúdo][Índice]
3.5 Instalação gráfica guiada
O instalador gráfico é uma interface de usuário baseada em texto. Ele guiará você, com caixas de diálogo, pelas etapas necessárias para instalar o GNU Guix System.
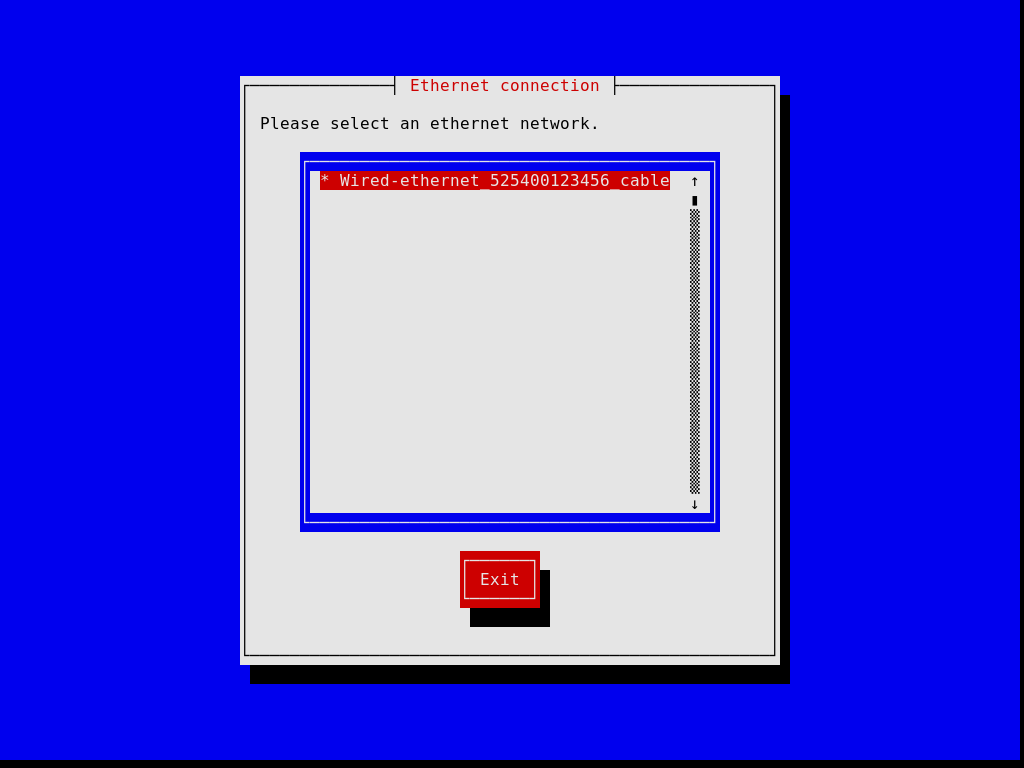
As primeiras caixas de diálogo permitem que você configure o sistema conforme você o utiliza durante a instalação: você pode escolher o idioma, o layout do teclado e configurar a rede que será usada durante a instalação. A imagem abaixo mostra a caixa de diálogo de rede.
As etapas posteriores permitem particionar seu disco rígido, conforme mostrado na imagem abaixo, escolher se deseja ou não usar sistemas de arquivos criptografados, inserir o nome do host e a senha root e criar uma conta adicional, entre outras coisas.

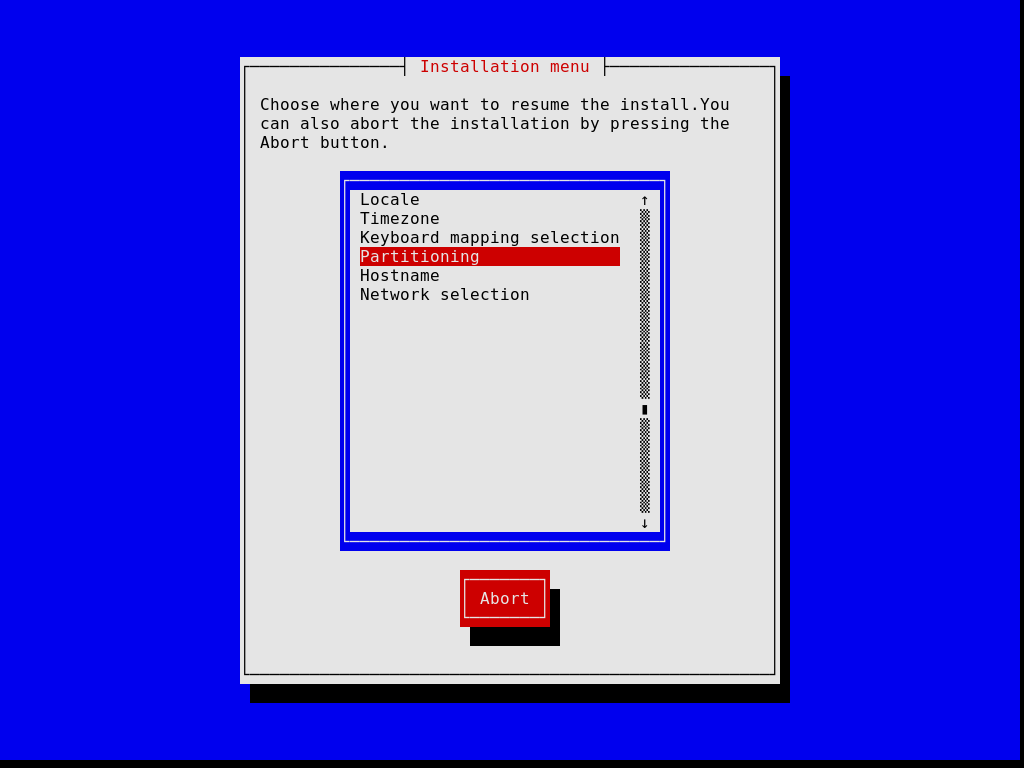
Observe que, a qualquer momento, o instalador permite sair da etapa de instalação atual e retomar uma etapa anterior, conforme imagem abaixo.
Quando terminar, o instalador produz uma configuração do sistema operacional e a exibe (veja Usando o sistema de configuração). Nesse ponto você pode clicar em "OK” e a instalação continuará. Se tiver sucesso, você pode reiniciar no novo sistema e aproveitar. Veja Após a instalação do sistema, para saber o que vem a seguir!
Próximo: Após a instalação do sistema, Anterior: Instalação gráfica guiada, Acima: Instalação do sistema [Conteúdo][Índice]
3.6 Instalação manual
Esta seção descreve como você instalaria "manualmente” o GNU Guix System em sua máquina. Esta opção requer familiaridade com GNU/Linux, com o shell e com ferramentas de administração comuns. Se você acha que isso não é para você, considere usar o instalador gráfico guiado (veja Instalação gráfica guiada).
O sistema de instalação fornece shells root nos TTYs 3 a 6; pressione
ctrl-alt-f3, ctrl-alt-f4 e assim por diante para
alcançá-los. Inclui muitas ferramentas comuns necessárias para instalar o
sistema, mas também é um sistema Guix completo. Isso significa que você pode
instalar pacotes adicionais, caso precise, usando guix package
(veja Invocando guix package).
Próximo: Prosseguindo com a instalação, Acima: Instalação manual [Conteúdo][Índice]
3.6.1 Layout de teclado, rede e particionamento
Antes de instalar o sistema, você pode querer ajustar o layout do teclado, configurar a rede e particionar o disco rígido de destino. Esta seção irá guiá-lo através disso.
3.6.1.1 Disposição do teclado
A imagem de instalação usa o layout de teclado qwerty dos EUA. Se quiser
alterá-lo, você pode usar o comando loadkeys. Por exemplo, o
comando a seguir seleciona o layout do teclado Dvorak:
loadkeys dvorak
Consulte os arquivos em /run/current-system/profile/share/keymaps
para obter uma lista de layouts de teclado disponíveis. Execute man
loadkeys para obter mais informações.
3.6.1.2 Rede
Execute o seguinte comando para ver como são chamadas suas interfaces de rede:
ifconfig -a
… ou, usando o comando ip específico do GNU/Linux:
ip address
As interfaces com fio têm um nome que começa com ‘e’; por exemplo, a interface correspondente ao primeiro controlador Ethernet integrado é chamada ‘eno1’. As interfaces sem fio têm um nome que começa com ‘w’, como ‘w1p2s0’.
- Conexão cabeada
Para configurar uma rede com fio execute o seguinte comando, substituindo interface pelo nome da interface com fio que você deseja usar.
ifconfig interface up
… ou, usando o comando
ipespecífico do GNU/Linux:ip link set interface up
- Conexão sem fio 
-
Para configurar a rede sem fio, você pode criar um arquivo de configuração para a ferramenta de configuração
wpa_supplicant(sua localização não é importante) usando um dos editores de texto disponíveis, comonano:nano wpa_supplicant.conf
Como exemplo, a sub-rotina a seguir pode ir para este arquivo e funcionará para muitas redes sem fio, desde que você forneça o SSID e a senha reais da rede à qual está se conectando:
network={ ssid="my-ssid" key_mgmt=WPA-PSK psk="the network's secret passphrase" }Inicie o serviço sem fio e execute-o em segundo plano com o seguinte comando (substitua interface pelo nome da interface de rede que deseja usar):
wpa_supplicant -c wpa_supplicant.conf -i interface -B
Execute
man wpa_supplicantpara obter mais informações.
Neste ponto, você precisa adquirir um endereço IP. Em uma rede onde os endereços IP são atribuídos automaticamente via DHCP, você pode executar:
dhclient -v interface
Tente executar ping em um servidor para ver se a rede está funcionando:
ping -c 3 gnu.org
Configurar o acesso à rede é quase sempre um requisito porque a imagem não contém todos os softwares e ferramentas que podem ser necessários.
Se você precisar de acesso HTTP e HTTPS para passar por um proxy, execute o seguinte comando:
herd set-http-proxy guix-daemon URL
onde URL é a URL do proxy, por exemplo http://example.org:8118.
Se desejar, você pode continuar a instalação remotamente iniciando um servidor SSH:
herd start ssh-daemon
Certifique-se de definir uma senha com passwd ou configurar a
autenticação de chave pública OpenSSH antes de efetuar login.
3.6.1.3 Particionamento de disco
A menos que isso já tenha sido feito, o próximo passo é particionar e então formatar a(s) partição(ões) de destino.
A imagem de instalação inclui várias ferramentas de particionamento,
incluindo Parted (veja Overview em GNU Parted User Manual),
fdisk e cfdisk. Execute-a e configure seu disco com o
layout de partição que você deseja:
cfdisk
Se o seu disco usa o formato GUID Partition Table (GPT) e você planeja instalar o GRUB baseado em BIOS (que é o padrão), certifique-se de que uma partição de inicialização do BIOS esteja disponível (veja BIOS installation em manual do GNU GRUB).
Se você preferir usar o GRUB baseado em EFI, uma partição de sistema EFI
(ESP) FAT32 EFI System Partition é necessária. Essa partição pode ser
montada em /boot/efi, por exemplo, e deve ter o sinalizador
esp definido. Por exemplo, para parted:
parted /dev/sda set 1 esp on
Nota: Não tem certeza se deve usar o GRUB baseado em EFI ou BIOS? Se o diretório /sys/firmware/efi existir na imagem de instalação, então você provavelmente deve executar uma instalação EFI, usando
grub-efi-bootloader. Caso contrário, você deve usar o GRUB baseado em BIOS, conhecido comogrub-bootloader. Veja Configuração do carregador de inicialização, para mais informações sobre bootloaders.
Depois de terminar de particionar o disco rígido de destino, você precisa criar um sistema de arquivos na(s) partição(ões) relevante(s)10. Para o ESP, se você tiver um e presumindo que seja /dev/sda1, execute:
mkfs.fat -F32 /dev/sda1
Para o sistema de arquivos raiz, ext4 é o formato mais amplamente usado. Outros sistemas de arquivos, como Btrfs, suportam compressão, que é relatada como um bom complemento para a desduplicação de arquivos que o daemon executa independentemente do sistema de arquivos (veja deduplication).
De preferência, atribua um rótulo aos sistemas de arquivos para que você
possa se referir a eles de forma fácil e confiável nas declarações
file-system (veja Sistemas de arquivos). Isso normalmente é feito usando a
opção -L de mkfs.ext4 e comandos relacionados. Então,
assumindo que a partição raiz de destino esteja em /dev/sda2, um
sistema de arquivos com o rótulo my-root pode ser criado com:
mkfs.ext4 -L my-root /dev/sda2
Se você estiver planejando criptografar a partição raiz, você pode usar os
utilitários Cryptsetup/LUKS para fazer isso (veja man cryptsetup para mais informações).
Supondo que você queira armazenar a partição raiz em /dev/sda2, a sequência de comandos para formatá-la como uma partição LUKS seria algo como isto:
cryptsetup luksFormat /dev/sda2 cryptsetup open /dev/sda2 my-partition mkfs.ext4 -L my-root /dev/mapper/my-partition
Feito isso, monte o sistema de arquivos de destino em /mnt com um
comando como (novamente, assumindo que my-root é o rótulo do sistema
de arquivos raiz):
mount LABEL=my-root /mnt
Monte também quaisquer outros sistemas de arquivos que você gostaria de usar
no sistema de destino em relação a este caminho. Se você optou por
/boot/efi como um ponto de montagem EFI, por exemplo, monte-o em
/mnt/boot/efi agora para que ele seja encontrado por guix
system init depois.
Por fim, se você planeja usar uma ou mais partições swap (veja Espaço de troca (swap)), certifique-se de inicializá-las com mkswap. Supondo que
você tenha uma partição swap em /dev/sda3, você executaria:
mkswap /dev/sda3 swapon /dev/sda3
Alternativamente, você pode usar um arquivo de swap. Por exemplo, supondo que no novo sistema você queira usar o arquivo /swapfile como um arquivo de swap, você executaria 11:
# Este é 10 GiB de espaço de swap. Ajuste "count" para alterar o tamanho. dd if=/dev/zero of=/mnt/swapfile bs=1MiB count=10240 # Por segurança, torne o arquivo legível e gravável somente pelo root. chmod 600 /mnt/swapfile mkswap /mnt/swapfile swapon /mnt/swapfile
Observe que se você criptografou a partição raiz e criou um arquivo de swap em seu sistema de arquivos, conforme descrito acima, a criptografia também protegerá o arquivo de swap, assim como qualquer outro arquivo naquele sistema de arquivos.
Anterior: Layout de teclado, rede e particionamento, Acima: Instalação manual [Conteúdo][Índice]
3.6.2 Prosseguindo com a instalação
Com as partições de destino prontas e a raiz de destino montada em /mnt, estamos prontos para começar. Primeiro, execute:
herd start cow-store /mnt
Isso torna /gnu/store copy-on-write, de modo que os pacotes
adicionados a ele durante a fase de instalação são gravados no disco de
destino em /mnt em vez de mantidos na memória. Isso é necessário
porque a primeira fase do comando guix system init (veja abaixo)
envolve downloads ou compilações para /gnu/store que, inicialmente, é
um sistema de arquivos na memória.
Em seguida, você precisa editar um arquivo e fornecer a declaração do
sistema operacional a ser instalado. Para isso, o sistema de instalação vem
com três editores de texto. Recomendamos o GNU nano (veja GNU
nano Manual), que suporta realce de sintaxe e correspondência de
parênteses; outros editores incluem mg (um clone do Emacs) e nvi (um clone
do editor original BSD vi). Recomendamos fortemente armazenar esse
arquivo no sistema de arquivos raiz de destino, digamos, como
/mnt/etc/config.scm. Se isso não for feito, você perderá seu arquivo
de configuração depois de reinicializar o sistema recém-instalado.
Veja Usando o sistema de configuração, para uma visão geral do arquivo de configuração. As configurações de exemplo discutidas nessa seção estão disponíveis em /etc/configuration na imagem de instalação. Assim, para começar com uma configuração de sistema fornecendo um servidor de exibição gráfica (um sistema “desktop”), você pode executar algo como estas linhas:
# mkdir /mnt/etc # cp /etc/configuration/desktop.scm /mnt/etc/config.scm # nano /mnt/etc/config.scm
Você deve prestar atenção ao que seu arquivo de configuração contém e, em particular:
- Certifique-se de que o formulário
bootloader-configurationse refere aos alvos nos quais você deseja instalar o GRUB. Ele deve mencionargrub-bootloaderse você estiver instalando o GRUB da maneira legada, ougrub-efi-bootloaderpara sistemas UEFI mais novos. Para sistemas legados, o campotargetscontém os nomes dos dispositivos, como(list "/dev/sda"); para sistemas UEFI, ele nomeia os caminhos para partições EFI montadas, como(list "/boot/efi"); certifique-se de que os caminhos estejam montados no momento e que uma entradafile-systemesteja especificada em sua configuração. - Certifique-se de que os rótulos do seu sistema de arquivos correspondam ao
valor dos respectivos campos
devicena sua configuraçãofile-system, supondo que sua configuraçãofile-systemuse o procedimentofile-system-labelno seu campodevice. - Se houver partições criptografadas ou RAID, certifique-se de adicionar um
campo
mapped-devicespara descrevê-las (veja Dispositivos mapeados).
Depois de terminar de preparar o arquivo de configuração, o novo sistema deve ser inicializado (lembre-se de que o sistema de arquivos raiz de destino é montado em /mnt):
guix system init /mnt/etc/config.scm /mnt
Isso copia todos os arquivos necessários e instala o GRUB em
/dev/sdX, a menos que você passe a opção
--no-bootloader. Para mais informações, veja Invoking guix system. Este comando pode disparar downloads ou compilações de pacotes
ausentes, o que pode levar algum tempo.
Após a conclusão desse comando – e esperamos que com sucesso! – você pode
executar o comando reboot e inicializar no novo sistema. A senha
root no novo sistema está inicialmente vazia; as senhas de outros
usuários precisam ser inicializadas executando o comando passwd
como root, a menos que sua configuração especifique o contrário
(veja senhas de contas de usuário). Veja Após a instalação do sistema, para o que vem a seguir!
Próximo: Instalando Guix em uma Máquina Virtual, Anterior: Instalação manual, Acima: Instalação do sistema [Conteúdo][Índice]
3.7 Após a instalação do sistema
Success, you’ve now booted into Guix System! Login to the system using the
non-root user that you created during installation. You can upgrade
the system whenever you want by running:
guix pull sudo guix system reconfigure /etc/config.scm
Isso cria uma nova geração sistema com os pacotes e serviços mais recentes.
Agora, veja Começando, junte-se a nós no
#guix na rede IRC Libera.Chat ou no guix-devel@gnu.org para
compartilhar sua experiência!
Próximo: Compilando a imagem de instalação, Anterior: Após a instalação do sistema, Acima: Instalação do sistema [Conteúdo][Índice]
3.8 Instalando Guix em uma Máquina Virtual
Se você deseja instalar o Guix System em uma máquina virtual (VM) ou em um servidor virtual privado (VPS) em vez de na sua máquina favorita, esta seção é para você.
Para inicializar uma VM QEMU para instalar o Guix System em uma imagem de disco, siga estas etapas:
- Primeiro, recupere e descompacte a imagem de instalação do sistema Guix conforme descrito anteriormente (veja Instalação em um pendrive e em DVD).
- Crie uma imagem de disco que irá conter o sistema instalado. Para criar uma
imagem de disco formatada em qcow2, use o comando
qemu-img:qemu-img create -f qcow2 guix-system.img 50G
O arquivo resultante será muito menor que 50 GB (normalmente menos de 1 MB), mas aumentará à medida que o dispositivo de armazenamento virtualizado for preenchido.
- Boot the USB installation image in a VM:
qemu-system-x86_64 -m 1024 -smp 1 -enable-kvm \ -nic user,model=virtio-net-pci -boot menu=on,order=d \ -drive file=guix-system.img \ -drive media=cdrom,readonly=on,file=guix-system-install-4538aa4.sistema.iso
-enable-kvmé opcional, mas melhora significativamente o desempenho, veja Usando o Guix em uma Máquina Virtual. - Agora você está como root na VM, prossiga com o processo de instalação. Veja Preparando para instalação e siga as instruções.
Quando a instalação estiver concluída, você pode inicializar o sistema que está na sua imagem guix-system.img. Veja Usando o Guix em uma Máquina Virtual, para saber como fazer isso.
Anterior: Instalando Guix em uma Máquina Virtual, Acima: Instalação do sistema [Conteúdo][Índice]
3.9 Compilando a imagem de instalação
A imagem de instalação descrita acima foi criada usando o comando
guix system, especificamente:
guix system image -t iso9660 gnu/system/install.scm
Dê uma olhada em gnu/system/install.scm na árvore de origem e veja
também Invoking guix system para mais informações sobre a imagem de
instalação.
3.10 Construindo a imagem de instalação para placas ARM
Muitas placas ARM exigem uma variante específica do bootloader U-Boot.
Se você criar uma imagem de disco e o bootloader não estiver disponível de outra forma (em outra unidade de inicialização, etc.), é aconselhável criar uma imagem que inclua o bootloader, especificamente:
guix system image --system=armhf-linux -e '((@ (gnu system install) os-with-u-boot) (@ (gnu system install) installation-os) "A20-OLinuXino-Lime2")'
A20-OLinuXino-Lime2 é o nome do quadro. Se você especificar um quadro
inválido, uma lista de quadros possíveis será mostrada.
Próximo: Gerenciamento de pacote, Anterior: Instalação do sistema, Acima: GNU Guix [Conteúdo][Índice]
4 Começando
Presumivelmente, você chegou a esta seção porque instalou o Guix sobre outra distribuição (veja Instalação) ou instalou o Guix System autônomo (veja Instalação do sistema). É hora de começar a usar o Guix e esta seção tem como objetivo ajudar você a fazer isso e dar uma ideia de como é.
Guix é sobre instalar software, então provavelmente a primeira coisa que você vai querer fazer é realmente procurar por software. Digamos que você esteja procurando por um editor de texto, você pode executar:
guix search text editor
Este comando mostra a você um número de pacotes correspondentes, cada vez mostrando o nome do pacote, versão, uma descrição e informações adicionais. Depois de descobrir qual você quer usar, digamos Emacs (ah ha!), você pode prosseguir e instalá-lo (execute este comando como um usuário regular, não precisa de privilégios de root!):
guix install emacs
Você instalou seu primeiro pacote, parabéns! O pacote agora está visível no seu perfil padrão, $HOME/.guix-profile—um perfil é um diretório que contém pacotes instalados. No processo, você provavelmente notou que o Guix baixou binários pré-compilados; ou, se você escolheu explicitamente não usar binários pré-compilados, então provavelmente o Guix ainda está compilando software (veja Substitutos, para mais informações).
A menos que você esteja usando o Guix System, o comando guix
install deve ter mostrado esta dica:
dica: Considere definir as variáveis de ambiente necessárias executando:
GUIX_PROFILE="$HOME/.guix-profile"
. "$GUIX_PROFILE/etc/profile"
Alternativamente, consulte `guix package --search-paths -p "$HOME/.guix-profile"'.
De fato, agora você deve informar ao seu shell onde emacs e outros
programas instalados com Guix podem ser encontrados. Colar as duas linhas
acima fará exatamente isso: adicionará $HOME/.guix-profile/bin—que
é onde o pacote instalado está—à variável de ambiente PATH. Você
pode colar essas duas linhas no seu shell para que elas entrem em vigor
imediatamente, mas o mais importante é adicioná-las a ~/.bash_profile
(ou arquivo equivalente se você não usar Bash) para que as variáveis de
ambiente sejam definidas na próxima vez que você gerar um shell. Você só
precisa fazer isso uma vez e outras variáveis de ambiente de caminhos de
busca serão cuidadas de forma semelhante—por exemplo, se você
eventualmente instalar python e bibliotecas Python,
GUIX_PYTHONPATH será definido.
Você pode continuar instalando pacotes à vontade. Para listar os pacotes instalados, execute:
guix package --list-installed
Para remover um pacote, você executaria, sem surpresa, guix
remove. Um recurso diferenciador é a capacidade de reverter qualquer
operação que você fez—instalação, remoção, atualização—simplesmente
digitando:
guix package --roll-back
Isso ocorre porque cada operação é, na verdade, uma transação que cria uma nova geração. Essas gerações e a diferença entre elas podem ser exibidas executando:
guix package --list-generations
Agora você conhece os conceitos básicos de gerenciamento de pacotes!
Indo além: Veja Gerenciamento de pacote, para mais informações sobre gerenciamento de pacotes. Você pode gostar do gerenciamento de pacotes declarativo com
guix package --manifest, gerenciar perfis separados com --profile, excluir gerações antigas, coletar lixo e outros recursos interessantes que serão úteis à medida que você se familiarizar com o Guix. Se você for um desenvolvedor, veja Desenvolvimento para ferramentas adicionais. E se estiver curioso, veja Recursos, para dar uma olhada nos bastidores.Você também pode gerenciar a configuração de todo o seu ambiente pessoal — seus "arquivos dot” de usuário, serviços e pacotes — usando o Guix Home. Veja Home Configuration, para saber mais sobre isso!
Depois de instalar um conjunto de pacotes, você vai querer atualizá-los periodicamente para a versão mais recente e melhor. Para fazer isso, você primeiro vai puxar a revisão mais recente do Guix e sua coleção de pacotes:
guix pull
O resultado final é um novo comando guix, em
~/.config/guix/current/bin. A menos que você esteja no Guix System,
na primeira vez que você executar guix pull, certifique-se de
seguir a dica que o comando imprime e, similar ao que vimos acima, cole
estas duas linhas no seu terminal e .bash_profile:
GUIX_PROFILE="$HOME/.config/guix/current" . "$GUIX_PROFILE/etc/profile"
Você também deve instruir seu shell a apontar para este novo guix:
hash guix
Neste ponto, você está executando um Guix novinho em folha. Você pode então prosseguir e realmente atualizar todos os pacotes que você instalou anteriormente:
guix upgrade
Ao executar este comando, você verá que os binários são baixados (ou talvez alguns pacotes são construídos) e, eventualmente, você acaba com os pacotes atualizados. Se um desses pacotes atualizados não for do seu agrado, lembre-se de que você sempre pode reverter!
Você pode exibir a revisão exata do Guix que está usando atualmente executando:
guix describe
As informações exibidas são tudo o que é necessário para reproduzir exatamente o mesmo Guix, seja em um momento diferente ou em uma máquina diferente.
Indo além: Veja Invocando
guix pull, para mais informações. Veja Canais, sobre como especificar canais adicionais para extrair pacotes, como replicar Guix e muito mais. Você também pode achartime-machineútil (veja Invocandoguix time-machine).
Se você instalou o Guix System, uma das primeiras coisas que você vai querer
fazer é atualizar seu sistema. Depois de executar guix pull para
obter o Guix mais recente, você pode atualizar o sistema assim:
sudo guix system reconfigure /etc/config.scm
Após a conclusão, o sistema executa as versões mais recentes de seus pacotes de software. Assim como para pacotes, você sempre pode reverter para uma geração anterior de todo o sistema. Veja Começando, para aprender como gerenciar seu sistema.
Agora você sabe o suficiente para começar!
Recursos: O restante deste manual fornece uma referência para todas as coisas do Guix. Aqui estão alguns recursos adicionais que você pode achar úteis:
- Veja O Livro de Receitas do GNU Guix, para uma lista de receitas no estilo "como fazer" para uma variedade de aplicações.
- O GNU Guix Reference Card lista em duas páginas a maioria dos comandos e opções que você precisará.
- O site contém vídeos instrucionais que abordam tópicos como o uso diário do Guix, como obter ajuda e como se tornar um colaborador.
- Veja Documentação, para aprender como acessar a documentação no seu computador.
Esperamos que você goste do Guix tanto quanto a comunidade gosta de criá-lo!
5 Gerenciamento de pacote
O propósito do GNU Guix é permitir que os usuários instalem, atualizem e removam facilmente pacotes de software, sem precisar saber sobre seus procedimentos de construção ou dependências. O Guix também vai além desse conjunto óbvio de recursos.
Este capítulo descreve os principais recursos do Guix, bem como as
ferramentas de gerenciamento de pacotes que ele fornece. Junto com a
interface de linha de comando descrita abaixo (veja guix package), você também pode usar a interface Emacs-Guix
(veja The Emacs-Guix Reference Manual), após instalar
o pacote emacs-guix (execute o comando M-x guix-help para
começar com ele):
guix install emacs-guix
- Recursos
- Invocando
guix package - Substitutos
- Pacotes com múltiplas saídas
- Invocando
guix locate - Invocando
guix gc - Invocando
guix pull - Invocando
guix time-machine - Inferiores
- Invocando
guix describe - Invocando
guix archive
Próximo: Invocando guix package, Acima: Gerenciamento de pacote [Conteúdo][Índice]
5.1 Recursos
Aqui presumimos que você já deu os primeiros passos com o Guix (veja Começando) e gostaria de ter uma visão geral do que está acontecendo nos bastidores.
Ao usar o Guix, cada pacote acaba no armazém de pacotes, em seu
próprio diretório — algo que lembra /gnu/store/xxx-package-1.2, onde
xxx é uma string base32.
Em vez de se referir a esses diretórios, os usuários têm seu próprio
perfil, que aponta para os pacotes que eles realmente querem
usar. Esses perfis são armazenados dentro do diretório pessoal de cada
usuário, em $HOME/.guix-profile.
Por exemplo, alice instala o GCC 4.7.2. Como resultado,
/home/alice/.guix-profile/bin/gcc aponta para
/gnu/store/…-gcc-4.7.2/bin/gcc. Agora, na mesma máquina,
bob já tinha instalado o GCC 4.8.0. O perfil de bob
simplesmente continua a apontar para
/gnu/store/…-gcc-4.8.0/bin/gcc—ou seja, ambas as versões do
GCC coexistem no mesmo sistema sem nenhuma interferência.
O comando guix package é a ferramenta central para gerenciar
pacotes (veja Invocando guix package). Ele opera nos perfis por usuário e
pode ser usado com privilégios normais de usuário.
O comando fornece as operações óbvias de instalação, remoção e
atualização. Cada invocação é, na verdade, uma transação: ou a
operação especificada é bem-sucedida ou nada acontece. Portanto, se o
processo guix package for encerrado durante a transação, ou se
ocorrer uma queda de energia durante a transação, o perfil do usuário
permanecerá em seu estado anterior e continuará utilizável.
Além disso, qualquer transação de pacote pode ser revertida. Então, se, por exemplo, uma atualização instalar uma nova versão de um pacote que acabe tendo um bug sério, os usuários podem reverter para a instância anterior de seu perfil, que era conhecida por funcionar bem. Da mesma forma, a configuração global do sistema no Guix está sujeita a atualizações transacionais e roll-back (veja Começando).
Todos os pacotes no repositório de pacotes podem ser
garbage-collected. O Guix pode determinar quais pacotes ainda são
referenciados por perfis de usuário e remover aqueles que comprovadamente
não são mais referenciados (veja Invocando guix gc). Os usuários também
podem remover explicitamente gerações antigas de seus perfis para que os
pacotes aos quais eles se referem possam ser coletados.
Guix adota uma abordagem puramente funcional para gerenciamento de pacotes, conforme descrito na introdução (veja Introdução). Cada nome de diretório de pacote /gnu/store contém um hash de todas as entradas que foram usadas para construir aquele pacote—compilador, bibliotecas, scripts de construção, etc. Essa correspondência direta permite que os usuários tenham certeza de que uma determinada instalação de pacote corresponde ao estado atual de sua distribuição. Também ajuda a maximizar a reprodutibilidade da construção: graças aos ambientes de construção isolados que são usados, uma determinada construção provavelmente produzirá arquivos de bits idênticos quando executada em máquinas diferentes (veja container).
Essa base permite que o Guix suporte transparent binary/source
deployment. Quando um binário pré-construído para um item /gnu/store
está disponível em uma fonte externa—um substituto, o Guix apenas o
baixa e descompacta; caso contrário, ele constrói o pacote a partir da
fonte, localmente (veja Substitutos). Como os resultados da construção
são geralmente reproduzíveis bit a bit, os usuários não precisam confiar em
servidores que fornecem substitutos: eles podem forçar uma construção local
e desafiar os provedores (veja Invocando guix challenge).
O controle sobre o ambiente de construção é um recurso que também é útil
para desenvolvedores. O comando guix shell permite que os
desenvolvedores de um pacote configurem rapidamente o ambiente de
desenvolvimento correto para seu pacote, sem ter que instalar manualmente as
dependências do pacote em seu perfil (veja Invocando guix shell).
Todo o Guix e suas definições de pacote são controlados por versão, e
guix pull permite que você "viaje no tempo” no histórico do
próprio Guix (veja Invocando guix pull). Isso torna possível replicar uma
instância do Guix em uma máquina diferente ou em um ponto posterior no
tempo, o que por sua vez permite que você replique ambientes de
software completos, enquanto retém o rastreamento de procedência
preciso do software.
Próximo: Substitutos, Anterior: Recursos, Acima: Gerenciamento de pacote [Conteúdo][Índice]
5.2 Invocando guix package
O comando guix package é a ferramenta que permite aos usuários
instalar, atualizar e remover pacotes, bem como reverter para configurações
anteriores. Essas operações funcionam no perfil de um usuário—um
diretório de pacotes instalados. Cada usuário tem um perfil padrão em
$HOME/.guix-profile. O comando opera apenas no próprio perfil do
usuário e funciona com privilégios de usuário normais
(veja Recursos). Sua sintaxe é:
guix package opções
Principalmente, opções especifica as operações a serem executadas durante a transação. Após a conclusão, um novo perfil é criado, mas as gerações anteriores do perfil permanecem disponíveis, caso o usuário queira reverter.
Por exemplo, para remover lua e instalar guile e
guile-cairo em uma única transação:
guix package -r lua -i guile guile-cairo
Para sua conveniência, também fornecemos os seguintes aliases:
-
guix searché um alias paraguix package -s, -
guix installé um alias paraguix package -i, -
guix removeé um alias paraguix package -r, -
guix upgradeé um alias paraguix package -u, - e
guix showé um alias paraguix package --show=.
Esses aliases são menos expressivos que guix package e oferecem
menos opções, então em alguns casos você provavelmente desejará usar
guix package diretamente.
guix package também suporta uma abordagem declarativa em que
o usuário especifica o conjunto exato de pacotes que estarão disponíveis e
passa a ele via a opção --manifest (veja --manifest).
Para cada usuário, uma ligação simbólica para o perfil padrão do usuário é
criado automaticamente em $HOME/.guix-profile. Esta ligação simbólico
sempre aponta para a geração atual do perfil padrão do usuário. Assim, os
usuários podem adicionar $HOME/.guix-profile/bin à sua variável de
ambiente PATH e assim por diante.
Se você não estiver usando o sistema Guix, considere adicionar as seguintes
linhas ao seu ~/.bash_profile (veja Bash Startup Files em Manual de referência do GNU Bash) para que os shells recém-gerados obtenham
todos as definições corretas de variáveis de ambiente:
GUIX_PROFILE="$HOME/.guix-profile" ; \ source "$GUIX_PROFILE/etc/profile"
Em uma configuração multiusuário, os perfis de usuário são armazenados em um
local registrado como raiz do coletor de lixo, para o qual
$HOME/.guix-profile aponta (veja Invocando guix gc). Esse diretório
geralmente é
localstatedir/guix/profiles/per-user/usuário, onde
localstatedir é o valor passado para configure como --
localstatedir e usuário é o nome do usuário. O diretório
per-user é criado quando guix-daemon é iniciado, e o
subdiretório usuário é criado por guix package.
As seguintes opções podem ser usadas:
--install=pacote …-i pacote …Instale os pacotes especificados.
Cada pacote pode especificar um nome de pacote simples como
guile, opcionalmente seguido por uma arroba e número de versão, comoguile@3.0.7ou simplesmenteguile@3.0. Neste último caso, a versão mais recente prefixada por3.0é selecionada.Se nenhum número de versão for especificado, a versão mais recente disponível será selecionada. Além disso, tal especificação pacote pode conter dois pontos, seguido pelo nome de uma das saídas do pacote, como em
gcc:docoubinutils@2.22:lib(veja Pacotes com múltiplas saídas).Pacotes com um nome correspondente (e opcionalmente versão) são procurados entre os módulos de distribuição GNU (veja Módulos de pacote).
Alternativamente, um pacote pode especificar diretamente um nome de arquivo de armazém como /gnu/store/...-guile-3.0.7, conforme produzido por, por exemplo,
guix build.Às vezes, os pacotes têm propagated-inputs: são dependências que são instaladas automaticamente junto com o pacote necessário (veja
propagated-inputsempackageobjetos, para obter informações sobre entradas propagadas em definições de pacote).Um exemplo é a biblioteca GNU MPC: seus arquivos de cabeçalho C referem-se aos da biblioteca GNU MPFR, que por sua vez se refere aos da biblioteca GMP. Assim, ao instalar o MPC, as bibliotecas MPFR e GMP também são instaladas no perfil; a remoção do MPC também remove o MPFR e o GMP — a menos que eles também tenham sido explicitamente instalados pelo usuário.
Além disso, os pacotes às vezes dependem da definição de variáveis de ambiente para seus caminhos de pesquisa (veja a explicação de --search-paths abaixo). Quaisquer definições de variáveis ambientais ausentes ou possivelmente incorretas são relatadas aqui.
--install-from-expression=exp-e expInstale o pacote avaliado por exp.
exp deve ser uma expressão de Scheme avaliada como um objeto
<package>. Esta opção é particularmente útil para desambiguar variantes de um pacote com o mesmo nome, com expressões como(@(gnu packages commencement) guile-final).Observe que esta opção instala a primeira saída do pacote especificado, o que pode ser insuficiente quando for necessária uma saída específica de um pacote de múltiplas saídas.
--install-from-file=arquivo-f arquivoInstale o pacote avaliado pelo código em arquivo.
Por exemplo, arquivo pode conter uma definição como esta (veja Definindo pacotes):
(use-modules (guix) (guix build-system gnu) (guix licenses)) (package (name "hello") (version "2.10") (source (origin (method url-fetch) (uri (string-append "mirror://gnu/hello/hello-" version ".tar.gz")) (sha256 (base32 "0ssi1wpaf7plaswqqjwigppsg5fyh99vdlb9kzl7c9lng89ndq1i")))) (build-system gnu-build-system) (synopsis "Hello, GNU world: An example GNU package") (description "Guess what GNU Hello prints!") (home-page "http://www.gnu.org/software/hello/") (license gpl3+))
Os desenvolvedores podem achar útil incluir um arquivo guix.scm na raiz da árvore de origem do projeto que pode ser usado para testar instantâneos de desenvolvimento e criar ambientes de desenvolvimento reproduzíveis (veja Invocando
guix shell).O arquivo também pode conter uma representação JSON de uma ou mais definições de pacote. Executar
guix package -fem hello.json com o seguinte conteúdo resultaria na instalação do pacotegreeterapós construirmyhello:[ { "name": "myhello", "version": "2.10", "source": "mirror://gnu/hello/hello-2.10.tar.gz", "build-system": "gnu", "arguments": { "tests?": false }, "home-page": "https://www.gnu.org/software/hello/", "synopsis": "Hello, GNU world: An example GNU package", "description": "GNU Hello prints a greeting.", "license": "GPL-3.0+", "native-inputs": ["gettext"] }, { "name": "greeter", "version": "1.0", "source": "mirror://gnu/hello/hello-2.10.tar.gz", "build-system": "gnu", "arguments": { "test-target": "foo", "parallel-build?": false }, "home-page": "https://example.com/", "synopsis": "Greeter using GNU Hello", "description": "This is a wrapper around GNU Hello.", "license": "GPL-3.0+", "inputs": ["myhello", "hello"] } ]--remove=pacote …-r pacote …Remova os pacotes especificados.
Quanto a --install, cada pacote pode especificar um número de versão e/ou nome de saída além do nome do pacote. Por exemplo, ‘-r glibc:debug’ removeria a saída de
glibc.--upgrade[=regexp …]¶-u [regexp …]Atualize todos os pacotes instalados. Se um ou mais regexps forem especificados, atualize apenas os pacotes instalados cujo nome corresponda a um regexp. Veja também a opção --do-not-upgrade abaixo.
Note que isso atualiza o pacote para a versão mais recente dos pacotes encontrados na distribuição atualmente instalada. Para atualizar sua distribuição, você deve executar regularmente
guix pull(veja Invocandoguix pull).Ao atualizar, as transformações de pacote que foram aplicadas originalmente ao criar o perfil são automaticamente reaplicadas (veja Opções de transformação de pacote). Por exemplo, suponha que você instalou o Emacs pela ponta do seu branch de desenvolvimento com:
guix install emacs-next --with-branch=emacs-next=master
Na próxima vez que você executar
guix upgrade, o Guix puxará novamente a ponta do branch de desenvolvimento do Emacs e compilaráemacs-nexta partir desse checkout.Observe que opções de transformação como --with-branch e --with-source dependem do estado externo; cabe a você garantir que elas funcionem conforme o esperado. Você também pode descartar transformações que se aplicam a um pacote executando:
guix install pacote
--do-not-upgrade[=regexp …]Quando usado junto com a opção --upgrade, não atualize nenhum pacote cujo nome corresponda a um regexp. Por exemplo, para atualizar todos os pacotes no perfil atual, exceto aqueles que contêm a substring "emacs”:
$ guix package --upgrade . --do-not-upgrade emacs
--manifest=arquivo¶-m arquivo-
Crie uma nova geração do perfil a partir do objeto manifest retornado pelo código Scheme em arquivo. Esta opção pode ser repetida várias vezes, em cujo caso os manifestos são concatenados.
Isso permite que você declarando o conteúdo do perfil em vez de construí-lo por meio de uma sequência de --install e comandos similares. A vantagem é que arquivo pode ser colocado sob controle de versão, copiado para máquinas diferentes para reproduzir o mesmo perfil, e assim por diante.
arquivo deve retornar um objeto manifest, que é aproximadamente uma lista de pacotes:
(use-package-modules guile emacs) (packages->manifest (list emacs guile-2.0 ;; Usa uma saída de pacote específica. (list guile-2.0 "debug")))
Veja Escrevendo manifestos, para obter informações sobre como escrever um manifesto. Veja --export-manifest, para aprender como obter um arquivo de manifesto de um perfil existente.
--roll-back¶-
Reverta para a geração anterior do perfil, ou seja, desfaça a última transação.
Quando combinado com opções como --install, a reversão ocorre antes de qualquer outra ação.
Ao reverter da primeira geração que realmente contém pacotes instalados, o perfil é feito para apontar para a geração zero, que não contém arquivos além de seus próprios metadados.
Após ter revertido, instalar, remover ou atualizar pacotes sobrescreve gerações futuras anteriores. Assim, o histórico das gerações em um perfil é sempre linear.
--switch-generation=padrão¶-S padrãoMude para uma geração específica definida por padrão.
padrão pode ser um número de geração ou um número prefixado com "+” ou "-”. O último significa: mover para frente/para trás por um número especificado de gerações. Por exemplo, se você quiser retornar para a última geração após --roll-back, use --switch-generation=+1.
A diferença entre --roll-back e --switch-generation=-1 é que --switch-generation não fará uma geração zero, então se uma geração especificada não existir, a geração atual não será alterada.
--search-paths[=tipo]¶Relata definições de variáveis de ambiente, na sintaxe Bash, que podem ser necessárias para usar o conjunto de pacotes instalados. Essas variáveis de ambiente são usadas para especificar caminhos de busca para arquivos usados por alguns dos pacotes instalados.
Por exemplo, o GCC precisa que as variáveis de ambiente
CPATHeLIBRARY_PATHsejam definidas para que ele possa procurar cabeçalhos e bibliotecas no perfil do usuário (veja Environment Variables em Usando o GNU Compiler Collection (GCC)). Se o GCC e, digamos, a biblioteca C estiverem instalados no perfil, então --search-paths sugerirá definir essas variáveis como perfil/include e perfil/lib, respectivamente (veja Caminhos de pesquisa, para obter informações sobre especificações de caminho de pesquisa associadas a pacotes.)O caso de uso típico é definir essas variáveis de ambiente no shell:
$ eval $(guix package --search-paths)
tipo pode ser um dos seguintes:
exact,prefixousuffix, o que significa que as definições de variáveis de ambiente retornadas serão configurações exatas ou prefixos ou sufixos do valor atual dessas variáveis. Quando omitido, tipo assume como padrãoexact.Esta opção também pode ser usada para calcular os caminhos de busca combinados de vários perfis. Considere este exemplo:
$ guix package -p foo -i guile $ guix package -p bar -i guile-json $ guix package -p foo -p bar --search-paths
O último comando acima relata sobre a variável
GUILE_LOAD_PATH, embora, considerados individualmente, nem foo nem bar levariam a essa recomendação.--profile=perfil-p perfilUse perfil em vez do perfil padrão do usuário.
perfil deve ser o nome de um arquivo que será criado após a conclusão. Concretamente, perfil será uma mera ligação simbólica ("symlink”) apontanda para o perfil real onde os pacotes estão instalados:
$ guix install hello -p ~/code/my-profile … $ ~/code/my-profile/bin/hello Olá, mundo!
Tudo o que é preciso para se livrar do perfil é remover este link simbólico e seus irmãos que apontam para gerações específicas:
$ rm ~/code/my-profile ~/code/my-profile-*-link
--list-profilesListe todos os perfis dos usuários:
$ guix package --list-profiles /home/charlie/.guix-profile /home/charlie/code/my-profile /home/charlie/code/devel-profile /home/charlie/tmp/test
Ao executar como root, liste todos os perfis de todos os usuários.
--allow-collisionsPermitir pacotes de colisão no novo perfil. Use por sua conta e risco!
Por padrão,
guix packagerelata como um erro collisions no perfil. Colisões acontecem quando duas ou mais versões ou variantes diferentes de um determinado pacote acabam no perfil.--bootstrapUse o bootstrap Guile para construir o perfil. Esta opção é útil somente para desenvolvedores de distribuição.
Além dessas ações, guix package suporta as seguintes opções para
consultar o estado atual de um perfil ou a disponibilidade de pacotes:
- --search=regexp
- -s regexp
-
Liste os pacotes disponíveis cujo nome, sinopse ou descrição correspondem a regexp (sem distinção entre maiúsculas e minúsculas), classificados por relevância. Imprima todos os metadados dos pacotes correspondentes no formato
recutils(veja bancos de dados GNU recutils em manual GNU recutils).Isso permite que campos específicos sejam extraídos usando o comando
recsel, por exemplo:$ guix package -s malloc | recsel -p name,version,relevance name: jemalloc version: 4.5.0 relevance: 6 name: glibc version: 2.25 relevance: 1 name: libgc version: 7.6.0 relevance: 1
Da mesma forma, para mostrar o nome de todos os pacotes disponíveis sob os termos da GNU LGPL versão 3:
$ guix package -s "" | recsel -p name -e 'license ~ "LGPL 3"' name: elfutils name: gmp …
Também é possível refinar os resultados da pesquisa usando vários sinalizadores
-sparaguix package, ou vários argumentos paraguix search. Por exemplo, o comando a seguir retorna uma lista de jogos de tabuleiro (desta vez usando o aliasguix search):$ guix search '\<board\>' game | recsel -p name name: gnubg …
Se omitissemos
-s game, também teríamos pacotes de software que lidam com placas de circuito impresso; remover os colchetes angulares em torno deboardadicionaria ainda mais pacotes relacionados a teclados.E agora um exemplo mais elaborado. O comando a seguir procura bibliotecas criptográficas, filtra as bibliotecas Haskell, Perl, Python e Ruby e imprime o nome e a sinopse dos pacotes correspondentes:
$ guix search crypto library | \ recsel -e '! (name ~ "^(ghc|perl|python|ruby)")' -p name,synopsisVeja Selection Expressions em manual GNU recutils, para obter mais informações sobre expressões de seleção para
recsel -e. - --show=pacote
Exibe detalhes sobre pacote, retirados da lista de pacotes disponíveis, no formato
recutils(veja GNU Recutils Databases em GNU Recutils Manual).$ guix package --show=guile | recsel -p name,version name: guile version: 3.0.5 name: guile version: 3.0.2 name: guile version: 2.2.7 …
Você também pode especificar o nome completo de um pacote para obter detalhes apenas sobre uma versão específica dele (desta vez usando o alias
guix show):$ guix show guile@3.0.5 | recsel -p name,version name: guile version: 3.0.5
- --list-installed[=regexp]
- -I [regexp]
Lista os pacotes instalados mais recentemente no perfil especificado, com os pacotes instalados mais recentemente mostrados por último. Quando regexp for especificado, liste apenas os pacotes instalados cujo nome corresponda a regexp.
Para cada pacote instalado, imprima os seguintes itens, separados por tabulações: o nome do pacote, sua string de versão e a parte do pacote que está instalada (por exemplo,
outpara a saída predefinida,includepara os seus cabeçalhos, etc.) e o caminho deste pacote no armazém.- --list-available[=regexp]
- -A [regexp]
Lista de pacotes atualmente disponíveis na distribuição para este sistema (veja Distribuição GNU). Quando regexp for especificado, liste apenas os pacotes disponíveis cujo nome corresponda a regexp.
Para cada pacote, imprima os seguintes itens separados por tabulações: seu nome, sua string de versão, as partes do pacote (veja Pacotes com múltiplas saídas) e o local de origem de sua definição.
- --list-generations[=padrão] 
- -l [padrão]
Retorne uma lista de gerações junto com suas datas de criação; para cada geração, exiba os pacotes instalados, com os pacotes instalados mais recentemente mostrados por último. Observe que a geração zero nunca é mostrada.
Para cada pacote instalado, mostre os seguintes itens, separados por tabulações: o nome de um pacote, sua string de versão, a parte do pacote que está instalada (veja Pacotes com múltiplas saídas) e a localização deste pacote em o armazém.
Quando padrão é usado, o comando retorna apenas gerações correspondentes. Os padrões válidos incluem:
- Inteiros e números inteiros separados por vírgula. Ambos os padrões denotam
números de geração. Por exemplo, --list-generations=1 retorna o
primeiro.
E --list-generations=1,8,2 gera três gerações na ordem especificada. Não são permitidos espaços nem vírgulas finais.
- Intervalos. --list-generations=2..9 mostra o
gerações especificadas e tudo mais. Observe que o início de um intervalo
deve ser menor que o seu final.
Também é possível omitir o ponto final. Por exemplo, --list-generations=2.. retorna todas as gerações começando pela segunda.
- Duração. Você também pode visitar os últimos N dias, semanas, ou meses passando um número inteiro junto com a primeira letra da duração. Por exemplo, --list-generations=20d lista gerações com até 20 dias.
- Inteiros e números inteiros separados por vírgula. Ambos os padrões denotam
números de geração. Por exemplo, --list-generations=1 retorna o
primeiro.
- --delete-generations[=padrão]
- -d [padrão]
Quando padrão for omitido, exclua todas as gerações, exceto a atual.
Este comando aceita os mesmos padrões de --list-Generations. Quando pattern for especificado, exclua as gerações correspondentes. Quando padrão especifica uma duração, as gerações mais antigas que a duração especificada correspondem. Por exemplo, --delete-generations=1m exclui gerações com mais de um mês.
Se a geração atual corresponder, ela será não excluída. Além disso, a geração zero nunca é excluída.
Observe que a exclusão de gerações impede a reversão para elas. Conseqüentemente, este comando deve ser usado com cuidado.
- --export-manifest
Escreva na saída padrão um manifesto adequado para --manifest correspondente ao(s) perfil(s) selecionado(s).
Esta opção destina-se a ajudá-lo a migrar do modo operacional "imperativo” — executando
guix install,guix upgrade, etc.—para o modo declarativo que --manifest ofertas.Observe que o manifesto resultante aproxima o que seu perfil realmente contém; por exemplo, dependendo de como seu perfil foi criado, ele pode se referir a pacotes ou versões de pacotes que não são exatamente o que você especificou.
Tenha em mente que um manifesto é puramente simbólico: ele contém apenas nomes de pacotes e possivelmente versões, e seu significado varia com o tempo. Se você quiser “fixar” canais nas revisões que foram usadas para construir o(s) perfil(es), veja --export-channels abaixo.
- --export-channels
Escreva na saída padrão a lista de canais usados pelo(s) perfil(s) selecionado(s), em um formato adequado para
guix pull --channelsouguix time-machine --channels(veja Canais) . .Juntamente com --export-manifest, esta opção fornece informações que permitem replicar o perfil atual (veja Replicando Guix).
No entanto, observe que a saída deste comando aproxima o que foi realmente usado para construir este perfil. Em particular, um único perfil pode ter sido construído a partir de diversas revisões diferentes do mesmo canal. Nesse caso, --export-manifest escolhe a última e escreve a lista de outras revisões em um comentário. Se você realmente precisa escolher pacotes de análises de canais diferentes, você pode usar inferiores em seu manifesto para fazer isso (veja Inferiores).
Juntamente com --export-manifest, este é um bom ponto de partida se você estiver disposto a migrar do modelo "imperativo" para o modelo totalmente declarativo que consiste em um arquivo de manifesto junto com um arquivo de canais fixando o canal exato revisão(ões) que você deseja.
Finalmente, como guix package pode realmente iniciar processos de
construção, ele suporta todas as opções de construção comuns (veja Opções de compilação comuns). Ele também oferece suporte a opções de transformação de
pacotes, como --with-source, e as preserva em atualizações
(veja Opções de transformação de pacote).
Próximo: Pacotes com múltiplas saídas, Anterior: Invocando guix package, Acima: Gerenciamento de pacote [Conteúdo][Índice]
5.3 Substitutos
Guix suporta implantação transparente de origem/binário, o que significa que ele pode construir coisas localmente ou baixar itens pré-construídos de um servidor, ou ambos. Chamamos esses itens pré-construídos de substitutos—eles são substitutos para resultados de construção local. Em muitos casos, baixar um substituto é muito mais rápido do que construir coisas localmente.
Substitutos podem ser qualquer coisa resultante de uma construção de derivação (veja Derivações). Claro, no caso comum, eles são binários de pacotes pré-construídos, mas tarballs de origem, por exemplo, que também resultam de construções de derivação, podem estar disponíveis como substitutos.
- Official Substitute Servers
- Autorização de servidor substituto
- Obtendo substitutos de outros servidores
- Autenticação de substituto
- Configurações de proxy
- Falha na substituição
- Confiança em binários
Próximo: Autorização de servidor substituto, Acima: Substitutos [Conteúdo][Índice]
5.3.1 Official Substitute Servers
bordeaux.guix.gnu.org e ci.guix.gnu.org são
ambos front-ends para farms de build oficiais que constroem pacotes do Guix
continuamente para algumas arquiteturas e os disponibilizam como
substitutos. Essas são a fonte padrão de substitutos; que podem ser
substituídos passando a opção --substitute-urls para
guix-daemon (veja guix-daemon
--substitute-urls) ou para ferramentas de cliente como guix
package (veja client --substitute-urls
option).
URLs substitutos podem ser HTTP ou HTTPS. HTTPS é recomendado porque as comunicações são criptografadas; por outro lado, usar HTTP torna todas as comunicações visíveis para um bisbilhoteiro, que pode usar as informações coletadas para determinar, por exemplo, se seu sistema tem vulnerabilidades de segurança não corrigidas.
Substitutos das build farms oficiais são habilitados por padrão ao usar o Guix System (veja Distribuição GNU). No entanto, eles são desabilitados por padrão ao usar o Guix em uma distribuição estrangeira, a menos que você os tenha habilitado explicitamente por meio de uma das etapas de instalação recomendadas (veja Instalação). Os parágrafos a seguir descrevem como habilitar ou desabilitar substitutos para a build farm oficial; o mesmo procedimento também pode ser usado para habilitar substitutos para qualquer outro servidor substituto.
Próximo: Obtendo substitutos de outros servidores, Anterior: Official Substitute Servers, Acima: Substitutos [Conteúdo][Índice]
5.3.2 Autorização de servidor substituto
Para permitir que o Guix baixe substitutos de
bordeaux.guix.gnu.org, ci.guix.gnu.org ou um
espelho, você deve adicionar a chave pública relevante à lista de controle
de acesso (ACL) de importações de arquivo, usando o comando guix
archive (veja Invocando guix archive). Fazer isso implica que você confia
que o servidor substituto não será comprometido e servirá substitutos
genuínos.
Nota: Se você estiver usando o Guix System, pode pular esta seção: O Guix System autoriza substitutos de
bordeaux.guix.gnu.orgeci.guix.gnu.orgpor padrão.
As chaves públicas para cada um dos servidores substitutos mantidos pelo
projeto são instaladas junto com o Guix, em prefix/share/guix/,
onde prefix é o prefixo de instalação do Guix. Se você instalou o Guix
a partir da fonte, certifique-se de verificar a assinatura GPG de
guix-4538aa4.tar.gz, que contém este arquivo de chave
pública. Então, você pode executar algo como isto:
# guix archive --authorize < prefix/share/guix/bordeaux.guix.gnu.org.pub # guix archive --authorize < prefix/share/guix/ci.guix.gnu.org.pub
Uma vez que isso esteja pronto, a saída de um comando como guix build
deve mudar de algo como:
$ guix build emacs --dry-run A seguinte derivações seriam compiladas: /gnu/store/yr7bnx8xwcayd6j95r2clmkdl1qh688w-emacs-24.3.drv /gnu/store/x8qsh1hlhgjx6cwsjyvybnfv2i37z23w-dbus-1.6.4.tar.gz.drv /gnu/store/1ixwp12fl950d15h2cj11c73733jay0z-alsa-lib-1.0.27.1.tar.bz2.drv /gnu/store/nlma1pw0p603fpfiqy7kn4zm105r5dmw-util-linux-2.21.drv …
para algo como:
$ guix build emacs --dry-run 112.3 MB seriam baixados: /gnu/store/pk3n22lbq6ydamyymqkkz7i69wiwjiwi-emacs-24.3 /gnu/store/2ygn4ncnhrpr61rssa6z0d9x22si0va3-libjpeg-8d /gnu/store/71yz6lgx4dazma9dwn2mcjxaah9w77jq-cairo-1.12.16 /gnu/store/7zdhgp0n1518lvfn8mb96sxqfmvqrl7v-libxrender-0.9.7 …
O texto mudou de "As seguintes derivações seriam construídas” para "112,3 MB seriam baixados”. Isso indica que os substitutos dos servidores substitutos configurados são utilizáveis e serão baixados, quando possível, para construções futuras.
O mecanismo de substituição pode ser desabilitado globalmente executando
guix-daemon com --no-substitutes (veja Invocando guix-daemon). Ele também pode ser desabilitado temporariamente passando a
opção --no-substitutes para guix package, guix
build e outras ferramentas de linha de comando.
Próximo: Autenticação de substituto, Anterior: Autorização de servidor substituto, Acima: Substitutos [Conteúdo][Índice]
5.3.3 Obtendo substitutos de outros servidores
Guix pode procurar e buscar substitutos de vários servidores. Isso é útil quando você está usando pacotes de canais adicionais para os quais o servidor oficial não tem substitutos, mas outro servidor os fornece. Outra situação em que isso é útil é quando você prefere baixar do servidor substituto da sua organização, recorrendo ao servidor oficial apenas como um fallback ou descartando-o completamente.
Você pode dar ao Guix uma lista de URLs de servidores substitutos e ele irá verificá-los na ordem especificada. Você também precisa autorizar explicitamente as chaves públicas dos servidores substitutos para instruir o Guix a aceitar os substitutos que eles assinam.
No Guix System, isso é obtido modificando a configuração do serviço
guix. Como o serviço guix faz parte das listas padrão de
serviços, %base-services e %desktop-services, você pode usar
modify-services para alterar sua configuração e adicionar as URLs e
chaves substitutas que você deseja (veja modify-services).
Como exemplo, suponha que você queira buscar substitutos de
guix.example.org e autorizar a chave de assinatura desse servidor,
além do padrão bordeaux.guix.gnu.org e
ci.guix.gnu.org. A configuração do sistema operacional
resultante será algo como:
(operating-system
;; …
(services
;; Suponha que estamos começando com '%desktop-services'. Substitua-o
;; pela lista de serviços que você está realmente usando.
(modify-services %desktop-services
(guix-service-type config =>
(guix-configuration
(inherit config)
(substitute-urls
(append (list "https://guix.example.org")
%default-substitute-urls))
(authorized-keys
(append (list (local-file "./key.pub"))
%default-authorized-guix-keys)))))))
Isso pressupõe que o arquivo key.pub contém a chave de assinatura de
guix.example.org. Com essa alteração em vigor no arquivo de
configuração do seu sistema operacional (digamos /etc/config.scm),
você pode reconfigurar e reiniciar o serviço guix-daemon ou
reinicializar para que as alterações entrem em vigor:
$ sudo guix system reconfigure /etc/config.scm $ sudo herd restart guix-daemon
Se você estiver executando o Guix em uma "distribuição estrangeira”, você deve seguir os seguintes passos para obter substitutos de servidores adicionais:
- Edite o arquivo de configuração de serviço para
guix-daemon; ao usar systemd, normalmente é /etc/systemd/system/guix-daemon.service. Adicione a opção --substitute-urls na linha de comandoguix-daemone liste as URLs de interesse (vejaguix-daemon --substitute-urls):… --substitute-urls='https://guix.example.org https://bordeaux.guix.gnu.org https://ci.guix.gnu.org'
- Reinicie o daemon. Para systemd, é assim:
systemctl daemon-reload systemctl restart guix-daemon.service
- Autorize a chave do novo servidor (veja Invocando
guix archive):guix archive --authorize < key.pub
Novamente, isso pressupõe que key.pub contém a chave pública que
guix.example.orgusa para assinar substitutos.
Agora você está pronto! Os substitutos serão preferencialmente retirados de
https://guix.example.org, usando bordeaux.guix.gnu.org e
então ci.guix.gnu.org como opções de fallback. Claro que
você pode listar quantos servidores substitutos quiser, com a ressalva de
que a pesquisa de substitutos pode ser desacelerada se muitos servidores
precisarem ser contatados.
Troubleshooting: Para diagnosticar problemas, você pode executar
guix weather. Por exemplo, executando:guix weather coreutilsnão apenas informa qual dos servidores atualmente configurados tem substitutos para o pacote
coreutils, mas também informa se um desses servidores não está autorizado. Veja Invocandoguix weather, para mais informações.
Observe que também há situações em que é possível adicionar a URL de um servidor substituto sem autorizar sua chave. Veja Autenticação de substituto, para entender esse ponto.
Próximo: Configurações de proxy, Anterior: Obtendo substitutos de outros servidores, Acima: Substitutos [Conteúdo][Índice]
5.3.4 Autenticação de substituto
Guix detecta e gera um erro ao tentar usar um substituto que foi adulterado. Da mesma forma, ele ignora substitutos que não são assinados, ou que não são assinados por uma das chaves listadas na ACL.
Há uma exceção, no entanto: se um servidor não autorizado fornecer substitutos que sejam bit-for-bit idênticos aos fornecidos por um servidor autorizado, então o servidor não autorizado se torna elegível para downloads. Por exemplo, suponha que escolhemos dois servidores substitutos com esta opção:
--substitute-urls="https://a.example.org https://b.example.org"
Se a ACL contiver apenas a chave para ‘b.example.org’, e se ‘a.example.org’ servir os substitutos exatamente os mesmos, então o Guix baixará os substitutos de ‘a.example.org’ porque ele vem primeiro na lista e pode ser considerado um espelho de ‘b.example.org’. Na prática, máquinas de construção independentes geralmente produzem os mesmos binários, graças às construções reproduzíveis em bits (veja abaixo).
Ao usar HTTPS, o certificado X.509 do servidor é não validado (em outras palavras, o servidor não é autenticado), ao contrário do que os clientes HTTPS, como navegadores da Web, geralmente fazem. Isso ocorre porque o Guix autentica as próprias informações substitutas, conforme explicado acima, que é o que nos importa (enquanto os certificados X.509 são sobre autenticação de ligações entre nomes de domínio e chaves públicas).
Próximo: Falha na substituição, Anterior: Autenticação de substituto, Acima: Substitutos [Conteúdo][Índice]
5.3.5 Configurações de proxy
Os substitutos são baixados por HTTP ou HTTPS. As variáveis de ambiente
http_proxy e https_proxy podem ser definidas no ambiente de
guix-daemon e são honradas para downloads de substitutos. Observe
que o valor dessas variáveis de ambiente no ambiente onde guix
build, guix package e outros comandos de cliente são executados
não tem absolutamente nenhum efeito.
Próximo: Confiança em binários, Anterior: Configurações de proxy, Acima: Substitutos [Conteúdo][Índice]
5.3.6 Falha na substituição
Mesmo quando um substituto para uma derivação estiver disponível, às vezes a tentativa de substituição falhará. Isso pode acontecer por vários motivos: o servidor substituto pode estar offline, o servidor substituto pode ter sido excluído recentemente, a conexão pode ter sido interrompida, etc.
Quando os substitutos estão habilitados e um substituto para uma derivação está disponível, mas a tentativa de substituição falha, o Guix tentará construir a derivação localmente dependendo se --fallback foi fornecido ou não (veja opção de compilação comum --fallback). Especificamente, se --fallback for omitido, nenhuma construção local será executada e a derivação será considerada como tendo falhado. No entanto, se --fallback for fornecido, o Guix tentará construir a derivação localmente, e o sucesso ou fracasso da derivação dependerá do sucesso ou fracasso da construção local. Observe que quando os substitutos estão desabilitados ou nenhum substituto está disponível para a derivação em questão, uma construção local sempre será executada, independentemente de --fallback ter sido fornecido ou não.
Para ter uma ideia de quantos substitutos estão disponíveis no momento, você
pode tentar executar o comando guix weather (veja Invocando guix weather). Este comando fornece estatísticas sobre os substitutos fornecidos
por um servidor.
Anterior: Falha na substituição, Acima: Substitutos [Conteúdo][Índice]
5.3.7 Confiança em binários
Hoje, o controlo de cada indivíduo sobre a sua própria computação está à
mercê de instituições, empresas e grupos com poder e determinação
suficientes para subverter a infra-estrutura informática e explorar as suas
fraquezas. Embora o uso de substitutos possa ser conveniente, encorajamos os
usuários a também construírem por conta própria, ou até mesmo executarem seu
próprio build farm, de modo que os servidores substitutos executados pelo
projeto sejam um alvo menos interessante. Uma maneira de ajudar é publicando
o software que você constrói usando guix publish para que outros
tenham mais uma opção de servidor para baixar substitutos (veja Invocando guix publish).
Guix has the foundations to maximize build reproducibility
(veja Recursos). In most cases, independent builds of a given package or
derivation should yield bit-identical results. Thus, through a diverse set
of independent package builds, we can strengthen the integrity of our
systems. The guix challenge command aims to help users assess
substitute servers, and to assist developers in finding out about
non-deterministic package builds (veja Invocando guix challenge).
Similarly, the --check option of guix build allows users
to check whether previously-installed substitutes are genuine by rebuilding
them locally (veja guix build --check). To force
a full rebuild of a package (ignoring security updates via grafts
(veja Atualizações de segurança), if any grafts exist—which is not always the
case), use --check together with --no-grafts
(veja --no-grafts). Because grafts are
built as their own derivation, if the package you want to rebuild is subject
to being grafted, merely using --check will only rebuild the
grafting derivation, and not actually recompile the package.
No futuro, queremos que o Guix tenha suporte para publicação e recuperação de binários de/para outros usuários, de forma peer-to-peer. Se você gostaria de discutir este projeto, entre em contato conosco em guix-devel@gnu.org.
Próximo: Invocando guix locate, Anterior: Substitutos, Acima: Gerenciamento de pacote [Conteúdo][Índice]
5.4 Pacotes com múltiplas saídas
Frequentemente, os pacotes definidos no Guix têm uma única saída —
ou seja, o pacote fonte leva a exatamente um diretório no armazém. Ao
executar guix install glibc, instala-se a saída padrão do pacote
GNU libc; A saída padrão é chamada out, mas seu nome pode ser omitido
conforme mostrado neste comando. Neste caso específico, a saída padrão de
glibc contém todos os arquivos de cabeçalho C, bibliotecas
compartilhadas, bibliotecas estáticas, documentação de informações e outros
arquivos de suporte.
Às vezes é mais apropriado separar os vários tipos de arquivos produzidos a
partir de um único pacote fonte em saídas separadas. Por exemplo, a
biblioteca GLib C (usada pelo GTK+ e pacotes relacionados) instala mais de
20 MiB de documentação de referência como páginas HTML. Para economizar
espaço para usuários que não precisam, a documentação vai para uma saída
separada, chamada doc. Para instalar a saída principal do GLib, que
contém tudo menos a documentação, seria executado:
guix install glib
O comando para instalar sua documentação é:
guix install glib:doc
Embora a sintaxe de dois pontos funcione para especificação de linha de
comando de saídas de pacotes, ela não funcionará ao usar uma variável
de pacote no código do Scheme. Por exemplo, para adicionar a documentação do
glib aos pacotes instalados globalmente de um operating-system
(veja operating-system Reference), uma lista de dois itens, sendo o
primeiro a variável de pacote e o segundo o nome da saída a ser
selecionada (uma string), devem ser usados:
(use-modules (gnu packages glib)) ;; glib-with-documentation é o símbolo de Guile para o pacote glib (operating-system ... (packages (append (list (list glib-with-documentation "doc")) %base-packages)))
Alguns pacotes instalam programas com diferentes "pegadas de
dependência”. Por exemplo, o pacote WordNet instala ferramentas de linha de
comando e interfaces gráficas de usuário (GUIs). Os primeiros dependem
exclusivamente da biblioteca C, enquanto os últimos dependem apenas do
Tcl/Tk e das bibliotecas X subjacentes. Nesse caso, deixamos as ferramentas
de linha de comando na saída padrão, enquanto as GUIs ficam em uma saída
separada. Isso permite que usuários que não precisam de GUIs economizem
espaço. O comando guix size pode ajudar a descobrir tais situações
(veja Invocando guix size). guix graph também pode ser útil
(veja Invocando guix graph).
Existem vários desses pacotes de múltiplas saídas na distribuição
GNU. Outros nomes de saída convencionais incluem lib para bibliotecas
e possivelmente arquivos de cabeçalho, bin para programas
independentes e debug para informações de depuração
(veja Instalando arquivos de depuração). A saída de um pacote está listada na
terceira coluna da saída de guix package --list-available
(veja Invocando guix package).
Próximo: Invocando guix gc, Anterior: Pacotes com múltiplas saídas, Acima: Gerenciamento de pacote [Conteúdo][Índice]
5.5 Invocando guix locate
Há tantos softwares gratuitos por aí que, mais cedo ou mais tarde, você
precisará procurar por pacotes. O comando guix search que vimos
antes (veja Invocando guix package) permite pesquisar por palavras-chave:
guix search video editor
Às vezes, você deseja descobrir qual pacote fornece um determinado arquivo,
e é aí que entra guix locate. Veja como você pode encontrar o
comando ls:
$ guix locate ls coreutils@9.1 /gnu/store/…-coreutils-9.1/bin/ls
É claro que o comando funciona para qualquer arquivo, não apenas para comandos:
$ guix locate unistr.h icu4c@71.1 /gnu/store/…/include/unicode/unistr.h libunistring@1.0 /gnu/store/…/include/unistr.h
Você também pode especificar padrões de globo com curingas. Por exemplo, aqui está como você procuraria pacotes que fornecem arquivos .service:
$ guix locate -g '*.service' man-db@2.11.1 …/lib/systemd/system/man-db.service wpa-supplicant@2.10 …/system-services/fi.w1.wpa_supplicant1.service
O comando guix locate depende de um banco de dados que mapeia
nomes de arquivos para nomes de pacotes. Por padrão, ele cria
automaticamente esse banco de dados, caso ele ainda não exista, percorrendo
os pacotes disponíveis localmente, o que pode levar alguns minutos
(dependendo do tamanho do seu armazém e da velocidade do seu dispositivo de
armazenamento).
Nota: Por enquanto,
guix locateconstrói seu banco de dados baseado em conhecimento puramente local – o que significa que você não encontrará pacotes que nunca chegaram ao sue armazém. Eventualmente, ele suportará o download de um banco de dados pré-construído para que você possa encontrar mais pacotes.
Por padrão, guix locate primeiro tenta procurar um banco de dados
de todo o sistema, geralmente em /var/cache/guix/locate; Se não
existir ou for muito antigo, ele retornará ao banco de dados por usuário,
por padrão em ~/.cache/guix/locate. Em um sistema multiusuário, os
administradores podem querer atualizar periodicamente o banco de dados de
todo o sistema para que todos os usuários possam se beneficiar dele, por
exemplo, configurando package-database-service-type (veja package-database-service-type).
A sintaxe geral é:
guix locate [opções…] arquivo…
... onde arquivo é o nome de um arquivo a ser pesquisado (especificamente, o "nome base" do arquivo: arquivos cujos diretórios pais são chamados arquivo não são correspondidos).
As opções disponíveis são as seguintes:
--glob-gInterprete arquivo… como padrões de globo—padrões que podem incluir caracteres curinga, como ‘*.scm’ para denotar todos os arquivos que terminam em ‘.scm’.
--statsExibir estatísticas do banco de dados.
--update-uAtualize o banco de dados dos arquivos.
Por padrão, o banco de dados é atualizado automaticamente quando é muito antigo.
--clearLimpe o banco de dados e preencha-o novamente.
Esta opção permite começar de novo, garantindo que os dados antigos sejam removidos do banco de dados, o que também evita ter um banco de dados em constante crescimento. Por padrão,
guix locatefaz isso automaticamente periodicamente, embora com pouca frequência.--database=arquivoUse arquivo como banco de dados, criando-o se necessário.
Por padrão,
guix locateescolhe o banco de dados em ~/.cache/guix ou /var/cache/guix, o que for mais recente.--method=método-m métodoUse método para selecionar o conjunto de pacotes a serem indexados. Os valores possíveis são:
manifestsEste é o método padrão: ele funciona percorrendo perfis na máquina e gravando os pacotes que encontra – pacotes instalados por você ou por outros usuários da máquina, direta ou indiretamente. É rápido mas você pode perder outros pacotes disponíveis no armazém mas não referenciados por nenhum perfil.
storeEste é um método mais lento, porém mais exaustivo: verifica entre todos os pacotes existentes aqueles que estão disponíveis no armazém e os registra.
Próximo: Invocando guix pull, Anterior: Invocando guix locate, Acima: Gerenciamento de pacote [Conteúdo][Índice]
5.6 Invocando guix gc
Pacotes instalados mas não usados podem ser garbage-collected. O
comando guix gc permite que os usuários executem explicitamente o
coletor de lixo para recuperar espaço do diretório /gnu/store. É a
maneira única de remover arquivos de /gnu/store — remover
arquivos ou diretórios manualmente pode quebrá-los sem possibilidade de
reparo!
O coletor de lixo possui um conjunto de raizes conhecidos: qualquer
arquivo em /gnu/store acessível a partir de uma raiz é considerado
live e não pode ser excluído; Qualquer outro arquivo é considerado
dead e pode ser excluído. O conjunto de raízes do coletor de lixo
(abreviadamente “Raízes GC”) inclui perfis de usuário padrão; por padrão,
as ligações simbólicas em /var/guix/gcroots representam essas raízes
do GC. Novas raízes de GC podem ser adicionadas com guix build
--root, por exemplo (veja Invocando guix build). O comando guix
gc --list-roots os lista.
Antes de executar guix gc --collect-garbage para liberar espaço,
geralmente é útil remover gerações antigas dos perfis de usuário; dessa
forma, compilações de pacotes antigos referenciadas por essas gerações podem
ser recuperadas. Isso é conseguido executando guix package
--delete-generations (veja Invocando guix package).
Nossa recomendação é executar uma coleta de lixo periodicamente ou quando houver pouco espaço em disco. Por exemplo, para garantir que pelo menos 5 GB estejam disponíveis no disco, basta executar:
guix gc -F 5G
É perfeitamente seguro executar como um trabalho periódico não interativo
(veja Execução de trabalho agendado, para saber como configurar tal
trabalho). Executar guix gc sem argumentos coletará o máximo de
lixo possível, mas isso geralmente é inconveniente: você pode ter que
reconstruir ou baixar novamente um software que está "morto" do ponto de
vista do GC, mas que é necessário para construir outras peças de software -
por exemplo, a cadeia de ferramentas do compilador.
O comando guix gc tem três modos de operação: pode ser usado para
coletar o lixo de quaisquer arquivos mortos (o padrão), para excluir
arquivos específicos (a opção --delete), para imprimir lixo-
informações do coletor ou para consultas mais avançadas. As opções de coleta
de lixo são as seguintes:
--collect-garbage[=min]-C [min]Colete lixo, ou seja, arquivos e subdiretórios /gnu/store inacessíveis. Esta é a operação padrão quando nenhuma opção é especificada.
Quando min for fornecido, pare quando min bytes forem coletados. min pode ser um número de bytes ou pode incluir uma unidade como sufixo, como
MiBpara mebibytes eGBpara gigabytes (veja especificações de tamanho em GNU Coreutils).Quando min for omitido, colete todo o lixo.
--free-space=free-F freeColete o lixo até que o espaço free esteja disponível em /gnu/store, se possível; free denota espaço de armazenamento, como
500MiB, conforme descrito acima.Quando free ou mais já estiver disponível em /gnu/store, não faça nada e saia imediatamente.
--delete-generations[=duração]-d [duração]Antes de iniciar o processo de coleta de lixo, exclua todas as gerações anteriores a duração, para todos os perfis de usuário e gerações do ambiente pessoal. Quando executado como root, isso se aplica a todos os perfis de todos os usuários.
Por exemplo, este comando exclui todas as gerações de todos os seus perfis com mais de 2 meses (exceto as gerações atuais) e depois libera espaço até que pelo menos 10 GiB estejam disponíveis:
guix gc -d 2m -F 10G
--delete-DTentativa de excluir todos os arquivos e diretórios de armazém especificados como argumentos. Isso falhará se alguns dos arquivos não estiverem no armazém ou se ainda estiverem ativos.
--list-failuresListar itens de armazém correspondentes a falhas de compilação em cache.
Isso não imprime nada, a menos que o daemon tenha sido iniciado com --cache-failures (veja --cache-failures).
--list-rootsListar as raízes do GC de propriedade do usuário; quando executado como root, listar todas as raízes do GC.
--list-busyListar itens de armazém em uso por processos em execução no momento. Esses itens de armazém são efetivamente considerados raízes GC: eles não podem ser excluídos.
--clear-failuresRemova os itens de armazém especificados do cache de compilação com falha.
Novamente, essa opção só faz sentido quando o daemon é iniciado com --cache-failures. Caso contrário, não faz nada.
--list-deadExibe a lista de arquivos e diretórios mortos ainda presentes no armazém, ou seja, arquivos e diretórios que não podem mais ser acessados de nenhuma raiz.
--list-liveExibe a lista de arquivos e diretórios do armazém ativa.
Além disso, as referências entre arquivos de armazém existentes podem ser consultadas:
--references¶--referrersListar as referências (respectivamente, os referenciadores) dos arquivos de armazém fornecidos como argumentos.
--requisites¶-RListe os requisitos dos arquivos de armazém passados como argumentos. Os requisitos incluem os próprios arquivos de armazém, suas referências e as referências destes, recursivamente. Em outras palavras, a lista retornada é o fechamento transitivo dos arquivos de armazém.
Veja Invocando
guix size, para uma ferramenta para criar o perfil do tamanho do fechamento de um elemento. Veja Invocandoguix graph, para uma ferramenta para visualizar o grafo de referências.--derivers¶Retorna a(s) derivação(ões) que levam aos itens de armazém fornecidos (veja Derivações).
Por exemplo, este comando:
guix gc --derivers $(guix package -I ^emacs$ | cut -f4)
retorna o(s) arquivo(s) .drv que levam ao pacote
emacsinstalado no seu perfil.Note que pode haver zero arquivos .drv correspondentes, por exemplo porque esses arquivos foram coletados como lixo. Também pode haver mais de um .drv correspondente devido a derivações de saída fixa.
Por fim, as seguintes opções permitem que você verifique a integridade do armazém e controle o uso do disco.
- --verify[=opções] 
-
Verifique a integridade do armazém.
Por padrão, certifique-se de que todos os itens de armazém marcados como válidos no banco de dados do daemon realmente existam em /gnu/store.
Quando fornecido, opções deve ser uma lista separada por vírgulas contendo um ou mais de
contentserepair.Ao passar --verify=contents, o daemon calcula o hash de conteúdo de cada item do armazém e o compara com seu hash no banco de dados. Incompatibilidades de hash são relatadas como corrupções de dados. Como ele percorre todos os arquivos no armazém, esse comando pode levar muito tempo, especialmente em sistemas com uma unidade de disco lenta.
Usar --verify=repair ou --verify=contents,repair faz com que o daemon tente reparar itens corrompidos do armazém buscando substitutos para eles (veja Substitutos). Como o reparo não é atômico e, portanto, potencialmente perigoso, ele está disponível apenas para o administrador do sistema. Uma alternativa leve, quando você sabe exatamente quais itens no armazém estão corrompidos, é
guix build --repair(veja Invocandoguix build). - --optimize 
Otimize o armazém vinculando fisicamente arquivos idênticos — isso é deduplication.
O daemon executa a desduplicação após cada importação bem-sucedida de build ou archive, a menos que tenha sido iniciado com --disable-deduplication (veja --disable-deduplication). Portanto, essa opção é útil principalmente quando o daemon estava em execução com --disable-deduplication.
- --vacuum-database 
Guix usa um banco de dados sqlite para manter o controle dos itens no armazém (veja O armazém). Com o tempo, é possível que o banco de dados cresça muito e se torne fragmentado. Como resultado, pode-se desejar limpar o espaço liberado e juntar as páginas parcialmente usadas no banco de dados deixadas para trás por pacotes removidos ou após executar o coletor de lixo. Executar
sudo guix gc --vacuum-databasebloqueará o banco de dados eVACUUMo store, desfragmentando o banco de dados e expurgando as páginas liberadas, desbloqueando o banco de dados quando terminar.
Próximo: Invocando guix time-machine, Anterior: Invocando guix gc, Acima: Gerenciamento de pacote [Conteúdo][Índice]
5.7 Invocando guix pull
Os pacotes são instalados ou atualizados para a versão mais recente
disponível na distribuição atualmente disponível na sua máquina local. Para
atualizar essa distribuição, junto com as ferramentas Guix, você deve
executar guix pull: o comando baixa o código-fonte Guix mais
recente e as descrições dos pacotes, e os implementa. O código-fonte é
baixado de um repositório Git, por
padrão o repositório oficial GNU Guix, embora isso possa ser
personalizado. guix pull garante que o código que ele baixa é
autêntico, verificando se os commits são assinados pelos
desenvolvedores Guix.
Especificamente, guix pull baixa o código dos canais
(veja Canais) especificados por um dos seguintes, nesta ordem:
- a opção --channels;
- o arquivo ~/.config/guix/channels.scm do usuário, a menos que -q seja passado;
- o arquivo /etc/guix/channels.scm de todo o sistema, a menos que
-q seja passado (no sistema Guix, este arquivo pode ser declarado
na configuração do sistema operacional, veja campo
channelsdeguix-configuration); - os canais padrão integrados especificados na variável
%default-channels.
Após a conclusão, guix package usará pacotes e versões de pacotes
desta cópia recém-recuperada do Guix. Não apenas isso, mas todos os comandos
Guix e módulos Scheme também serão retirados dessa versão mais
recente. Novos subcomandos guix adicionados pela atualização
também se tornam disponíveis.
Qualquer usuário pode atualizar sua cópia do Guix usando guix
pull, e o efeito é limitado ao usuário que executou guix
pull. Por exemplo, quando o usuário root executa guix
pull, isso não tem efeito na versão do Guix que o usuário alice vê,
e vice-versa.
O resultado da execução de guix pull é um perfil disponível
em ~/.config/guix/current contendo o Guix mais recente.
A opção --list-generations ou -l lista gerações anteriores
produzidas por guix pull, juntamente com detalhes sobre sua
procedência:
$ guix pull -l
Geração 1 10 jun 2018 00:18:18
guix 65956ad
URL do repositório: https://git.savannah.gnu.org/git/guix.git
ramo: origin/master
commit: 65956ad3526ba09e1f7a40722c96c6ef7c0936fe
Geração 2 11 jun 2018 11:02:49
guix e0cc7f6
URL do repositório: https://git.savannah.gnu.org/git/guix.git
ramo: origin/master
commit: e0cc7f669bec22c37481dd03a7941c7d11a64f1d
Geração 3 13 jun 2018 23:31:07 (atual)
guix 844cc1c
URL do repositório: https://git.savannah.gnu.org/git/guix.git
ramo: origin/master
commit: 844cc1c8f394f03b404c5bb3aee086922373490c
Veja guix describe, para outras maneiras
de descrever o status atual do Guix.
Este perfil ~/.config/guix/current funciona exatamente como os perfis
criados por guix package (veja Invocando guix package). Ou seja,
você pode listar gerações, reverter para a geração anterior — ou seja, o
Guix anterior — e assim por diante:
$ guix pull --roll-back trocado da geração 3 para 2 $ guix pull --delete-generations=1 excluindo /var/guix/profiles/per-user/charlie/current-guix-1-link
Você também pode usar guix package (veja Invocando guix package)
para gerenciar o perfil nomeando-o explicitamente:
$ guix package -p ~/.config/guix/current --roll-back trocado da geração 3 para 2 $ guix package -p ~/.config/guix/current --delete-generations=1 excluindo /var/guix/profiles/per-user/charlie/current-guix-1-link
O comando guix pull geralmente é invocado sem argumentos, mas
suporta as seguintes opções:
--url=url--commit=commit--branch=ramoBaixe o código para o canal
guixdo url especificado, no commit fornecido (um ID de commit Git válido representado como uma string hexadecimal ou o nome de uma tag) ou ramo.Essas opções são fornecidas para sua conveniência, mas você também pode especificar sua configuração no arquivo ~/.config/guix/channels.scm ou usando a opção --channels (veja abaixo).
--channels=arquivo-C arquivoLeia a lista de canais de arquivo em vez de ~/.config/guix/channels.scm ou /etc/guix/channels.scm. arquivo deve conter código Scheme que avalia uma lista de objetos de canal. Veja Canais, para mais informações.
--no-channel-files-qInibir o carregamento dos arquivos de canal do usuário e do sistema, ~/.config/guix/channels.scm e /etc/guix/channels.scm.
--news-NExibir notícias escritas por autores de canais para seus usuários para alterações feitas desde a geração anterior (veja Escrevendo Notícias de Canal). Quando --details é passado, exibir adicionalmente pacotes novos e atualizados.
Você pode visualizar essas informações de gerações anteriores com
guix pull -l.--list-generations[=padrão]-l [padrão]Liste todas as gerações de ~/.config/guix/current ou, se padrão for fornecido, o subconjunto de gerações que correspondem a padrão. A sintaxe de padrão é a mesma de
guix package --list-generations(veja Invocandoguix package).Por padrão, isso imprime informações sobre os canais usados em cada revisão, bem como as entradas de notícias correspondentes. Se você passar --details, ele também imprimirá a lista de pacotes adicionados e atualizados em cada geração em comparação com a anterior.
--detailsInstrua --list-generations ou --news para exibir mais informações sobre as diferenças entre gerações subsequentes — veja acima.
--roll-back¶-
Reverta para a geração anterior de ~/.config/guix/current—ou seja, desfaça a última transação.
--switch-generation=padrão¶-S padrãoMude para uma geração específica definida por padrão.
padrão pode ser um número de geração ou um número prefixado com "+” ou "-”. O último significa: mover para frente/para trás por um número especificado de gerações. Por exemplo, se você quiser retornar para a última geração após --roll-back, use --switch-generation=+1.
--delete-generations[=padrão]-d [padrão]Quando padrão for omitido, exclua todas as gerações, exceto a atual.
Este comando aceita os mesmos padrões de --list-Generations. Quando pattern for especificado, exclua as gerações correspondentes. Quando padrão especifica uma duração, as gerações mais antigas que a duração especificada correspondem. Por exemplo, --delete-generations=1m exclui gerações com mais de um mês.
Se a geração atual corresponder, ela não será excluída.
Observe que a exclusão de gerações impede a reversão para elas. Conseqüentemente, este comando deve ser usado com cuidado.
Veja Invocando
guix describe, para uma maneira de exibir informações somente sobre a geração atual.--profile=perfil-p perfilUse perfil em vez de ~/.config/guix/current.
--dry-run-nMostre quais commits de canal seriam usados e o que seria construído ou substituído, mas não faça isso de fato.
--allow-downgradesPermitir extrair revisões de canais mais antigas ou não relacionadas às que estão em uso atualmente.
Por padrão,
guix pullprotege contra os chamados "ataques de downgrade”, nos quais o repositório Git de um canal seria redefinido para uma revisão anterior ou não relacionada a si mesmo, potencialmente levando você a instalar versões mais antigas e conhecidas de pacotes de software.Nota: Certifique-se de entender as implicações de segurança antes de usar --allow-downgrades.
--disable-authenticationPermitir extrair código de canal sem autenticá-lo.
Por padrão,
guix pullautentica o código baixado de canais verificando se seus commits são assinados por desenvolvedores autorizados e gera um erro se esse não for o caso. Esta opção o instrui a não executar nenhuma verificação desse tipo.Nota: Certifique-se de entender as implicações de segurança antes de usar --disable-authentication.
--no-check-certificateDo not validate the X.509 certificates of HTTPS servers.
When using this option, you have absolutely no guarantee that you are communicating with the authentic server responsible for the given URL. Unless the channel is authenticated, this makes you vulnerable to “man-in-the-middle” attacks.
--system=sistema-s sistemaTente compilar para sistema—por exemplo,
i686-linux—em vez do tipo de sistema do host de compilação.--bootstrapUse o bootstrap Guile para construir o Guix mais recente. Esta opção é útil somente para desenvolvedores Guix.
O mecanismo dos canais permite que você instrua guix pull de
qual repositório e branch extrair, bem como repositórios adicionais
contendo módulos de pacote que devem ser implantados. Veja Canais, para
mais informações.
Além disso, guix pull suporta todas as opções de compilação comuns
(veja Opções de compilação comuns).
Próximo: Inferiores, Anterior: Invocando guix pull, Acima: Gerenciamento de pacote [Conteúdo][Índice]
5.8 Invocando guix time-machine
O comando guix time-machine fornece acesso a outras revisões do
Guix, por exemplo, para instalar versões mais antigas de pacotes ou para
reproduzir uma computação em um ambiente idêntico. A revisão do Guix a ser
usada é definida por um commit ou por um arquivo de descrição de canal
criado por guix describe (veja Invocando guix describe).
Vamos supor que você queira viajar para aqueles dias de novembro de 2020,
quando a versão 1.2.0 do Guix foi lançada e, uma vez lá, executar o
guile daquela época:
guix time-machine --commit=v1.2.0 -- \ environment -C --ad-hoc guile -- guile
O comando acima busca Guix 1.2.0 (e possivelmente outros canais
especificados pelos seus arquivos de configuração channels.scm —
veja abaixo) e executa seu comando guix environment para gerar um
ambiente em um contêiner executando guile (guix
environment foi desde então subsumido por guix shell;
veja Invocando guix shell). É como dirigir um DeLorean12! A primeira invocação de guix time-machine pode ser
cara: pode ser necessário baixar ou até mesmo construir um grande número de
pacotes; o resultado é armazenado em cache e os comandos subsequentes
direcionados ao mesmo commit são quase instantâneos.
Quanto ao guix pull, na ausência de quaisquer opções, o
time-machine busca os últimos commits dos canais especificados em
~/.config/guix/channels.scm, /etc/guix/channels.scm, ou os
canais padrão; a opção -q permite que você ignore esses arquivos de
configuração. O comando:
guix time-machine -q -- build hello
construirá então o pacote hello conforme definido no branch principal
do Guix, sem nenhum canal adicional, que é em geral uma revisão mais nova do
Guix do que a que você instalou. A viagem no tempo funciona em ambas as
direções!
Nota: O histórico do Guix é imutável e
guix time-machinefornece exatamente o mesmo software que eles estão em uma revisão específica do Guix. Naturalmente, nenhuma correção de segurança é fornecida para versões antigas do Guix ou seus canais. Um uso descuidado doguix time-machineabre a porta para vulnerabilidades de segurança. Veja --allow-downgrades.
guix time-machine gera um erro ao tentar viajar para commits mais
antigos que "v0.16.0" (commit ‘4a0b87f0’), datados de Dez. 2018. Este
é um dos commits mais antigos que oferecem suporte ao mecanismo de canal que
torna a "viagem no tempo" possível.
Nota: Embora seja tecnicamente possível viajar para um commit tão antigo, a facilidade para fazê-lo dependerá em grande parte da disponibilidade de substitutos binários. Ao viajar para um passado distante, alguns pacotes podem não ser mais facilmente construídos a partir da fonte. Um exemplo são as versões antigas do OpenSSL cujos testes falhavam após uma certa data. Esse problema em particular pode ser contornado executando uma máquina de construção virtual com seu relógio ajustado para a hora certa (veja Máquinas de Construção Virtual).
A sintaxe geral é:
guix time-machine opções… -- comando arg…
onde comando e arg… são passados sem modificações para o
comando guix da revisão especificada. As opções que definem
esta revisão são as mesmas que para guix pull (veja Invocando guix pull):
--url=url--commit=commit--branch=ramoUse o canal
guixdo url especificado, no commit fornecido (um ID de commit Git válido representado como uma string hexadecimal ou o nome de uma tag) ou ramo.--channels=arquivo-C arquivoLeia a lista de canais de arquivo. arquivo deve conter código Scheme que avalia uma lista de objetos de canal. Veja Canais para mais informações.
--no-channel-files-qInibir o carregamento dos arquivos de canal do usuário e do sistema, ~/.config/guix/channels.scm e /etc/guix/channels.scm.
Portanto,
guix time-machine -qé equivalente ao seguinte comando Bash, usando a sintaxe "substituição de processo" (veja Process Substitution em Manual de referência do GNU Bash):guix time-machine -C <(echo %default-channels) …
Observe que guix time-machine pode acionar compilações de canais e
suas dependências, e elas são controladas pelas opções de compilação padrão
(veja Opções de compilação comuns).
Se guix time-machine for executado sem nenhum comando, ele imprime
o nome do arquivo do perfil que seria usado para executar o comando. Isso às
vezes é útil se você precisa obter o nome do arquivo de armazém do perfil
— por exemplo, quando você quer guix copy ele.
Próximo: Invocando guix describe, Anterior: Invocando guix time-machine, Acima: Gerenciamento de pacote [Conteúdo][Índice]
5.9 Inferiores
Nota: A funcionalidade descrita aqui é uma “prévia de tecnologia” da versão 4538aa4. Como tal, a interface está sujeita a alterações.
Às vezes, você pode precisar misturar pacotes da revisão do Guix que você está executando atualmente com pacotes disponíveis em uma revisão diferente do Guix. Os inferiores do Guix permite que você consiga isso compondo diferentes revisões do Guix de maneiras arbitrárias.
Tecnicamente, um “inferior” é essencialmente um processo Guix separado
conectado ao seu processo Guix principal por meio de um REPL
(veja Invocando guix repl). O módulo (guix inferior) permite que
você crie inferiores e se comunique com eles. Ele também fornece uma
interface de alto nível para navegar e manipular os pacotes que um inferior
fornece—pacotes inferiores.
Quando combinados com canais (veja Canais), os inferiores fornecem uma
maneira simples de interagir com uma revisão separada do Guix. Por exemplo,
vamos supor que você queira instalar em seu perfil o pacote guile
atual, junto com o guile-json como ele existia em uma revisão mais
antiga do Guix—talvez porque o mais novo guile-json tenha uma API
incompatível e você queira executar seu código contra a API antiga. Para
fazer isso, você pode escrever um manifesto para uso por guix package
--manifest (veja Escrevendo manifestos); nesse manifesto, você criaria um
inferior para aquela revisão antiga do Guix que você se importa, e você
procuraria o pacote guile-json no inferior:
(use-modules (guix inferior) (guix channels) (srfi srfi-1)) ;para 'first' (define canais ;; Esta é a revisão antiga da qual queremos ;; extrair guile-json. (list (channel (name 'guix) (url "https://git.savannah.gnu.org/git/guix.git") (commit "65956ad3526ba09e1f7a40722c96c6ef7c0936fe")))) (define inferior ;; Um inferior representando a revisão acima. (inferior-for-channels canais)) ;; Agora crie um manifesto com o pacote "guile" atual ;; e o antigo pacote "guile-json". (packages->manifest (list (first (lookup-inferior-packages inferior "guile-json")) (specification->package "guile")))
Na primeira execução, guix package --manifest pode ter que
construir o canal que você especificou antes de poder criar o inferior;
execuções subsequentes serão muito mais rápidas porque a revisão do Guix
será armazenada em cache.
O módulo (guix inferior) fornece os seguintes procedimentos para
abrir um inferior:
- Procedimento: inferior-for-channels canais [#:cache-directory] [#:ttl]
Retorna um inferior para canais, uma lista de canais. Use o cache em cache-directory, onde as entradas podem ser recuperadas após ttl segundos. Este procedimento abre uma nova conexão com o daemon de construção.
Como efeito colateral, esse procedimento pode criar ou substituir binários para canais, o que pode levar tempo.
- Procedimento: open-inferior diretório [#:command "bin/guix"]
Abra o Guix inferior em diretório, executando o comando
diretório/command replou equivalente. Retorne#fse o inferior não puder ser iniciado.
Os procedimentos listados abaixo permitem que você obtenha e manipule pacotes inferiores.
- Procedimento: inferior-packages inferior
Retorna a lista de pacotes conhecidos por inferior.
- Procedimento: lookup-inferior-packages inferior nome [versão]
Retorna a lista ordenada de pacotes inferiores que correspondem a nome em inferior, com os números de versão mais altos primeiro. Se versão for true, retorna apenas pacotes com um número de versão prefixado por versão.
- Procedimento: inferior-package? obj
Retorna verdadeiro se obj for um pacote inferior.
- Procedimento: inferior-package-name pacote
- Procedimento: inferior-package-version pacote
- Procedimento: inferior-package-synopsis pacote
- Procedimento: inferior-package-description pacote
- Procedimento: inferior-package-home-page pacote
- Procedimento: inferior-package-location pacote
- Procedimento: inferior-package-inputs pacote
- Procedimento: inferior-package-native-inputs pacote
- Procedimento: inferior-package-propagated-inputs pacote
- Procedimento: inferior-package-transitive-propagated-inputs pacote
- Procedimento: inferior-package-native-search-paths pacote
- Procedimento: inferior-package-transitive-native-search-paths pacote
- Procedimento: inferior-package-search-paths pacote
Esses procedimentos são a contrapartida dos acessadores de registro de pacote (veja Referência do
package). A maioria deles funciona consultando o inferior de onde pacote vem, então o inferior ainda deve estar ativo quando você chamar esses procedimentos.
Pacotes inferiores podem ser usados transparentemente como qualquer outro
pacote ou objeto tipo arquivo em expressões-G (veja Expressões-G). Eles
também são manipulados transparentemente pelo procedimento
packages->manifest, que é comumente usado em manifestos
(veja a opção --manifest de guix
package). Assim, você pode inserir um pacote inferior praticamente em
qualquer lugar em que inseriria um pacote regular: em manifestos, no campo
packages da sua declaração operating-system e assim por
diante.
Próximo: Invocando guix archive, Anterior: Inferiores, Acima: Gerenciamento de pacote [Conteúdo][Índice]
5.10 Invocando guix describe
Frequentemente você pode querer responder perguntas como: “Qual revisão do
Guix estou usando?” ou “Quais canais estou usando?” Essas são informações
úteis em muitas situações: se você quiser replicar um ambiente em uma
máquina ou conta de usuário diferente, se quiser relatar um bug ou
determinar qual alteração nos canais que você está usando o causou, ou se
quiser registrar o estado do seu sistema para fins de reprodutibilidade. O
comando guix describe responde a essas perguntas.
Quando executado a partir de um guix obtido com guix
pull, guix describe exibe o(s) canal(ais) dos quais foi criado,
incluindo a URL do repositório e os IDs de confirmação (veja Canais):
$ guix describe
Geração 10 03 set 2018 17:32:44 (atual)
guix e0fa68c
URL do repositório: https://git.savannah.gnu.org/git/guix.git
ramo: master
commit: e0fa68c7718fffd33d81af415279d6ddb518f727
Se você estiver familiarizado com o sistema de controle de versão do Git,
isso é similar em espírito a git describe; a saída também é
similar à de guix pull --list-generations, mas limitada à geração
atual (veja a opção
--list-generations). Como o ID de commit do Git mostrado acima se
refere inequivocamente a um snapshot do Guix, essa informação é tudo o que é
preciso para descrever a revisão do Guix que você está usando e também para
replicá-la.
Para facilitar a replicação do Guix, guix describe também pode ser
solicitado a retornar uma lista de canais em vez da descrição legível acima:
$ guix describe -f channels
(list (channel
(name 'guix)
(url "https://git.savannah.gnu.org/git/guix.git")
(commit
"e0fa68c7718fffd33d81af415279d6ddb518f727")
(introduction
(make-channel-introduction
"9edb3f66fd807b096b48283debdcddccfea34bad"
(openpgp-fingerprint
"BBB0 2DDF 2CEA F6A8 0D1D E643 A2A0 6DF2 A33A 54FA")))))
Você pode salvar isso em um arquivo e alimentá-lo com guix pull -C
em alguma outra máquina ou em um momento posterior, o que instanciará
esta revisão exata do Guix (veja a opção
-C). A partir daí, já que você consegue implementar a mesma
revisão do Guix, você pode muito bem replicar um ambiente de software
completo. Humildemente achamos isso incrível, e esperamos que você
goste também!
Os detalhes das opções suportadas por guix describe são os
seguintes:
--format=formato-f formatoProduza saída no formato especificado, um dos seguintes:
humanproduzir resultados legíveis por humanos;
channelsproduz uma lista de especificações de canal que podem ser passadas para
guix pull -Cou instaladas como ~/.config/guix/channels.scm (veja Invocandoguix pull);channels-sans-introcomo
channels, mas omita o campointroduction; use-o para produzir uma especificação de canal adequada para a versão 1.1.0 do Guix ou anterior — o campointroductiontem a ver com autenticação de canal (veja Autenticação de canal) e não é suportado por essas versões mais antigas;json¶produzir uma lista de especificações de canal no formato JSON;
recutilsproduzir uma lista de especificações de canais no formato Recutils.
--list-formatsExibir formatos disponíveis para a opção --format.
--profile=perfil-p perfilExibir informações sobre perfil.
Anterior: Invocando guix describe, Acima: Gerenciamento de pacote [Conteúdo][Índice]
5.11 Invocando guix archive
O comando guix archive permite que os usuários exportem
arquivos do armazém para um único arquivamento e depois importem eles
em uma máquina que execute o Guix. Em particular, ele permite que os
arquivos do armazém sejam transferidos de uma máquina para o store em outra
máquina.
Nota: Se você estiver procurando uma maneira de produzir arquivamentos em um formato adequado para outras ferramentas além do Guix, veja Invocando
guix pack.
Para exportar arquivos de armazém como um arquivamento para saída padrão, execute:
guix archive --export opções especificações...
especificações pode ser nomes de arquivos de armazém ou especificações
de pacotes, como para guix package (veja Invocando guix package). Por exemplo, o comando a seguir cria um arquivo contendo a saída
gui do pacote git e a saída principal de emacs:
guix archive --export git:gui /gnu/store/...-emacs-24.3 > great.nar
Se os pacotes especificados ainda não foram construídos, guix
archive os constrói automaticamente. O processo de construção pode ser
controlado com as opções comuns de construção (veja Opções de compilação comuns).
Para transferir o pacote emacs para uma máquina conectada via SSH,
execute:
guix archive --export -r emacs | ssh a-máquina guix archive --import
Da mesma forma, um perfil de usuário completo pode ser transferido de uma máquina para outra assim:
guix archive --export -r $(readlink -f ~/.guix-profile) | \ ssh a-máquina guix archive --import
No entanto, observe que, em ambos os exemplos, todos os emacs e o
perfil, bem como todas as suas dependências são transferidos (devido a
-r), independentemente do que já esteja disponível no armazém na
máquina de destino. A opção --missing pode ajudar a descobrir quais
itens estão faltando no armazém de destino. O comando guix copy
simplifica e otimiza todo esse processo, então é provavelmente isso que você
deve usar neste caso (veja Invocando guix copy).
Cada item do armazém é escrito no formato arquivamento normalizado ou
nar (descrito abaixo), e a saída de guix archive --export (e
entrada de guix archive --import) é uma embalagem nar.
O formato nar é comparável em espírito ao ‘tar’, mas com diferenças que o tornam mais apropriado para nossos propósitos. Primeiro, em vez de registrar todos os metadados Unix para cada arquivo, o formato nar menciona apenas o tipo de arquivo (regular, diretório ou ligação simbólica); permissões Unix e proprietário/grupo são descartados. Segundo, a ordem em que as entradas de diretório são armazenadas sempre segue a ordem dos nomes de arquivo de acordo com a ordem de agrupamento de localidade C. Isso torna a produção de arquivo totalmente determinística.
O formato da embalagem nar é essencialmente a concatenação de zero ou mais nars junto com metadados para cada item de armazém que ele contém: seu nome de arquivo, referências, derivação correspondente e uma assinatura digital.
Ao exportar, o daemon assina digitalmente o conteúdo do arquivamento, e essa assinatura digital é anexada. Ao importar, o daemon verifica a assinatura e rejeita a importação em caso de uma assinatura inválida ou se a chave de assinatura não for autorizada.
As principais opções são:
--exportExporte os arquivos de armazém ou pacotes especificados (veja abaixo). Grave o arquivo resultante na saída padrão.
Dependências não são incluídas na saída, a menos que --recursive seja passado.
-r--recursiveQuando combinado com --export, isso instrui
guix archivea incluir dependências dos itens fornecidos no arquivo. Assim, o arquivo resultante é autocontido: ele contém o fechamento dos itens exportados do armazém.--importLeia um arquivo da entrada padrão e importe os arquivos listados nele para o armazém. Aborte se o arquivo tiver uma assinatura digital inválida ou se for assinado por uma chave pública que não esteja entre as chaves autorizadas (veja --authorize abaixo).
--missingLeia uma lista de nomes de arquivos do armazém da entrada padrão, um por linha, e escreva na saída padrão o subconjunto desses arquivos que faltam no armazém.
--generate-key[=parâmetros]¶Gere um novo par de chaves para o daemon. Este é um pré-requisito antes que os arquivos possam ser exportados com --export. Esta operação é geralmente instantânea, mas pode levar algum tempo se o pool de entropia do sistema precisar ser recarregado. No Guix System,
guix-service-typecuida da geração deste par de chaves na primeira inicialização.O par de chaves gerado é normalmente armazenado em /etc/guix, em signing-key.pub (chave pública) e signing-key.sec (chave privada, que deve ser mantida em segredo). Quando parâmetros é omitido, uma chave ECDSA usando a curva Ed25519 é gerada ou, para versões do Libgcrypt anteriores a 1.6.0, é uma chave RSA de 4096 bits. Como alternativa, parâmetros pode especificar parâmetros
genkeyadequados para Libgcrypt (vejagcry_pk_genkeyem Manual de referência do Libgcrypt).--authorize¶Autorize importações assinadas pela chave pública passada na entrada padrão. A chave pública deve estar em “s-expression advanced format”—i.e., o mesmo formato do arquivo signing-key.pub.
A lista de chaves autorizadas é mantida no arquivo editável por humanos /etc/guix/acl. O arquivo contém “advanced-format s-expressions” e é estruturado como uma lista de controle de acesso no Simple Public-Key Infrastructure (SPKI).
--extract=diretório-x diretórioLeia um arquivo de item único conforme servido por servidores substitutos (veja Substitutos) e extraia-o para diretório. Esta é uma operação de baixo nível necessária apenas em casos de uso muito restritos; veja abaixo.
Por exemplo, o comando a seguir extrai o substituto para o Emacs servido por
bordeaux.guix.gnu.orgpara /tmp/emacs:$ wget -O - \ https://bordeaux.guix.gnu.org/nar/gzip/…-emacs-24.5 \ | gunzip | guix archive -x /tmp/emacs
Arquivamentos de item único são diferentes de arquivamentos de itens múltiplos produzidos por
guix archive --export; eles contêm um único item de armazém e não incorporam uma assinatura. Portanto, essa operação não faz nenhuma verificação de assinatura e sua saída deve ser considerada insegura.O objetivo principal desta operação é facilitar a inspeção de conteúdos de arquivamento provenientes de servidores substitutos possivelmente não confiáveis (veja Invocando
guix challenge).--list-tLeia um arquivamento de item único servido por servidores substitutos (veja Substitutos) e exiba a lista de arquivos que ele contém, como neste exemplo:
$ wget -O - \ https://bordeaux.guix.gnu.org/nar/lzip/…-emacs-26.3 \ | lzip -d | guix archive -t
Próximo: Desenvolvimento, Anterior: Gerenciamento de pacote, Acima: GNU Guix [Conteúdo][Índice]
6 Canais
Guix e sua coleção de pacotes são atualizados executando guix
pull. Por padrão, guix pull baixa e implementa o próprio Guix do
repositório oficial GNU Guix. Isso pode ser personalizado fornecendo um
arquivo especificando o conjunto de canais para extrair de
(veja Invocando guix pull). Um canal especifica a URL e a ramificação de
um repositório Git a ser implantado, e guix pull pode ser
instruído a extrair de um ou mais canais. Em outras palavras, os canais
podem ser usados para personalizar e estender o Guix, como
veremos abaixo. O Guix é capaz de levar em conta preocupações de segurança e
lidar com atualizações autenticadas.
- Especificando canais adicionais
- Usando um canal Guix personalizado
- Replicando Guix
- Customizing the System-Wide Guix
- Autenticação de canal
- Canais com substitutos
- Criando um canal
- Módulos de pacote em um subdiretório
- Declarando dependências de canal
- Especificando autorizações de canal
- URL principal
- Escrevendo notícias do canal
Próximo: Usando um canal Guix personalizado, Acima: Canais [Conteúdo][Índice]
6.1 Especificando canais adicionais
Você pode especificar canais adicionais para puxar. Para usar um
canal, escreva ~/.config/guix/channels.scm para instruir
guix pull para puxar dele além do(s) canal(ais) Guix
padrão:
;; Adicione pacotes variantes aos fornecidos pelo Guix. (cons (channel (name 'variant-packages) (url "https://example.org/variant-packages.git")) %default-channels)
Note que o snippet acima é (como sempre!) código do Scheme; usamos
cons para adicionar um canal à lista de canais aos quais a variável
%default-channels está vinculada (veja cons and
lists em GNU Guile Reference Manual). Com esse arquivo no lugar,
guix pull compila não apenas o Guix, mas também os módulos do
pacote do seu próprio repositório. O resultado em
~/.config/guix/current é a união do Guix com seus próprios módulos do
pacote:
$ guix describe
Geração 19 27 ago 2018 16:20:48
guix d894ab8
URL do repositório: https://git.savannah.gnu.org/git/guix.git
ramo: master
commit: d894ab8e9bfabcefa6c49d9ba2e834dd5a73a300
variant-packages dd3df5e
URL do repositório: https://example.org/variant-packages.git
ramo: master
commit: dd3df5e2c8818760a8fc0bd699e55d3b69fef2bb
A saída do guix describe acima mostra que agora estamos executando
o geração 19 e que ele inclui o Guix e os pacotes do canal
variant-packages (veja Invocando guix describe).
Próximo: Replicando Guix, Anterior: Especificando canais adicionais, Acima: Canais [Conteúdo][Índice]
6.2 Usando um canal Guix personalizado
O canal chamado guix especifica onde o próprio Guix—suas
ferramentas de linha de comando, bem como sua coleção de pacotes—deve ser
baixado. Por exemplo, suponha que você queira atualizar de outra cópia do
repositório Guix em example.org, e especificamente o branch
super-hacks, você pode escrever em ~/.config/guix/channels.scm
esta especificação:
;; Diga ao 'guix pull' para usar outro repositório. (list (channel (name 'guix) (url "https://example.org/another-guix.git") (branch "super-hacks")))
A partir daí, guix pull buscará o código do branch
super-hacks do repositório em example.org. A preocupação com a
autenticação é abordada abaixo (veja Autenticação de canal).
Note que você pode especificar um diretório local no campo url acima
se o canal que você pretende usar residir em um sistema de arquivos
local. No entanto, neste caso, guix verifica o diretório em busca
de propriedade antes de qualquer processamento posterior. Isso significa que
se o usuário não for o proprietário do diretório, mas quiser usá-lo como
padrão, ele precisará defini-lo como um diretório seguro em seu arquivo de
configuração global do git. Caso contrário, guix se recusará até
mesmo a lê-lo. Supondo que seu diretório local de todo o sistema esteja em
/src/guix.git, você criaria um arquivo de configuração do git em
~/.gitconfig com o seguinte conteúdo:
[safe]
directory = /src/guix.git
Isso também se aplica ao usuário root, a menos que seja chamado com
sudo pelo proprietário do diretório.
Próximo: Customizing the System-Wide Guix, Anterior: Usando um canal Guix personalizado, Acima: Canais [Conteúdo][Índice]
6.3 Replicando Guix
O comando guix describe mostra precisamente quais commits foram
usados para construir a instância do Guix que estamos usando
(veja Invocando guix describe). Podemos replicar essa instância em outra
máquina ou em um ponto diferente no tempo fornecendo uma especificação de
canal “fixada” a esses commits que se parece com isso:
;; Implantar commits específicos dos meus canais de interesse. (list (channel (name 'guix) (url "https://git.savannah.gnu.org/git/guix.git") (commit "6298c3ffd9654d3231a6f25390b056483e8f407c")) (channel (name 'variant-packages) (url "https://example.org/variant-packages.git") (commit "dd3df5e2c8818760a8fc0bd699e55d3b69fef2bb")))
Para obter essa especificação de canal fixado, a maneira mais fácil é
executar guix describe e salvar sua saída no formato
channels em um arquivo, assim:
guix describe -f channels > channels.scm
O arquivo channels.scm resultante pode ser passado para a opção
-C de guix pull (veja Invocando guix pull) ou
guix time-machine (veja Invocando guix time-machine), como neste
exemplo:
guix time-machine -C channels.scm -- shell python -- python3
Dado o arquivo channels.scm, o comando acima sempre buscará a
exatamente a mesma instância Guix, então usará essa instância para
executar exatamente o mesmo Python (veja Invocando guix shell). Em
qualquer máquina, a qualquer momento, ele acaba executando exatamente os
mesmos binários, bit por bit.
Os canais fixados abordam um problema semelhante a “arquivos de bloqueio” conforme implementado por algumas ferramentas de implantação — eles permitem que você fixe e reproduza um conjunto de pacotes. No caso do Guix, no entanto, você está efetivamente fixando o conjunto de pacotes inteiro conforme definido nos commits de canal fornecidos; na verdade, você está fixando todo o Guix, incluindo seus módulos principais e ferramentas de linha de comando. Você também está obtendo fortes garantias de que está, de fato, obtendo exatamente o mesmo software.
Isso lhe dá superpoderes, permitindo que você rastreie a procedência de artefatos binários com granularidade muito fina e reproduza ambientes de software à vontade — algum tipo de capacidade de “meta reprodutibilidade”, se preferir. Veja Inferiores, para outra maneira de aproveitar esses superpoderes.
Próximo: Autenticação de canal, Anterior: Replicando Guix, Acima: Canais [Conteúdo][Índice]
6.4 Customizing the System-Wide Guix
Se você estiver executando o Guix System ou construindo imagens de sistema
com ele, talvez você queira personalizar o guix de todo o sistema
que ele fornece—especificamente,
/run/current-system/profile/bin/guix. Por exemplo, você pode querer
fornecer canais adicionais ou fixar sua revisão.
Isso pode ser feito usando o procedimento guix-for-channels, que
retorna um pacote para os canais fornecidos e o usa como parte da
configuração do seu sistema operacional, como neste exemplo:
(use-modules (gnu packages package-management) (guix channels)) (define my-channels ;; Canais que devem estar disponíveis para ;; /run/current-system/profile/bin/guix. (append (list (channel (name 'guix-science) (url "https://github.com/guix-science/guix-science") (branch "master"))) %default-channels)) (operating-system ;; … (services ;; Change the package used by 'guix-service-type'. (modify-services %base-services (guix-service-type config => (guix-configuration (inherit config) (channels my-channels) (guix (guix-for-channels my-channels)))))))
O sistema operacional resultante terá os canais guix e
guix-science visíveis por padrão. O campo channels de
guix-configuration acima garante ainda mais que
/etc/guix/channels.scm, que é usado por guix pull,
especifica o mesmo conjunto de canais (veja campo channels de guix-configuration).
O módulo (gnu packages package-management) exporta o procedimento
guix-for-channels, descrito abaixo.
- Procedimento: guix-for-channels canais
Retorna um pacote correspondente a canais.
O resultado é um pacote “regular”, que pode ser usado em
guix-configurationcomo mostrado acima ou em qualquer outro lugar que espere um pacote.
Próximo: Canais com substitutos, Anterior: Customizing the System-Wide Guix, Acima: Canais [Conteúdo][Índice]
6.5 Autenticação de canal
Os comandos guix pull e guix time-machine
autenticam o código recuperado dos canais: eles garantem que cada
commit que é buscado seja assinado por um desenvolvedor autorizado. O
objetivo é proteger contra modificações não autorizadas no canal que
levariam os usuários a executar código malicioso.
Como usuário, você deve fornecer uma introdução de canal no seu arquivo de canais para que o Guix saiba como autenticar seu primeiro commit. Uma especificação de canal, incluindo sua introdução, parece algo como estas linhas:
(channel
(name 'algum-canal)
(url "https://example.org/algum-canal.git")
(introduction
(make-channel-introduction
"6f0d8cc0d88abb59c324b2990bfee2876016bb86"
(openpgp-fingerprint
"CABB A931 C0FF EEC6 900D 0CFB 090B 1199 3D9A EBB5"))))
A especificação acima mostra o nome e a URL do canal. A chamada para
make-channel-introduction acima especifica que a autenticação deste
canal começa no commit 6f0d8cc…, que é assinado pela chave
OpenPGP com impressão digital CABB A931….
Para o canal principal, chamado guix, você obtém automaticamente
essas informações da sua instalação Guix. Para outros canais, inclua a
introdução do canal fornecida pelos autores do canal no seu arquivo
channels.scm. Certifique-se de recuperar a introdução do canal de uma
fonte confiável, pois essa é a raiz da sua confiança.
Se você está curioso sobre a mecânica de autenticação, continue lendo!
Próximo: Criando um canal, Anterior: Autenticação de canal, Acima: Canais [Conteúdo][Índice]
6.6 Canais com substitutos
Ao executar guix pull, o Guix primeiro compilará as definições de
cada pacote disponível. Esta é uma operação cara para a qual substitutos
(veja Substitutos) podem estar disponíveis. O seguinte snippet em
channels.scm garantirá que o guix pull use o commit mais
recente com substitutos disponíveis para as definições de pacote: isso é
feito consultando o servidor de integração contínua em
https://ci.guix.gnu.org.
(use-modules (guix ci)) (list (channel-with-substitutes-available %default-guix-channel "https://ci.guix.gnu.org"))
Note que isso não significa que todos os pacotes que você instalará após
executar guix pull terão substitutos disponíveis. Isso apenas
garante que guix pull não tentará compilar definições de
pacotes. Isso é particularmente útil ao usar máquinas com recursos
limitados.
Próximo: Módulos de pacote em um subdiretório, Anterior: Canais com substitutos, Acima: Canais [Conteúdo][Índice]
6.7 Criando um canal
Digamos que você tenha um monte de variantes de pacotes personalizados ou pacotes pessoais que você acha que faria pouco sentido contribuir para o projeto Guix, mas gostaria de ter esses pacotes disponíveis de forma transparente para você na linha de comando. Ao criar um canal, você pode usar e publicar tal coleção de pacotes. Isso envolve as seguintes etapas:
- Um canal fica em um repositório Git, então o primeiro passo, ao criar um
canal, é criar seu repositório:
mkdir meu-canal cd meu-canal git init
- O próximo passo é criar arquivos contendo módulos de pacote (veja Módulos de pacote), cada um dos quais conterá uma ou mais definições de pacote
(veja Definindo pacotes). Um canal pode fornecer coisas além de pacotes,
como sistemas de compilação ou serviços; estamos usando pacotes, pois é o
caso de uso mais comum.
Por exemplo, Alice pode querer fornecer um módulo chamado
(alice packages greetings)que fornecerá suas implementações favoritas de “hello world”. Para fazer isso, Alice criará um diretório correspondente ao nome desse módulo.mkdir -p alice/packages $EDITOR alice/packages/greetings.scm git add alice/packages/greetings.scm
Você pode nomear seus módulos de pacote como quiser; a principal restrição a ter em mente é evitar conflitos de nomes com outras coleções de pacotes, e é por isso que nossa hipotética Alice sabiamente escolheu o namespace
(alice packages …).Observe que você também pode colocar módulos em um subdiretório do repositório; veja Módulos de pacote em um subdiretório, para mais informações sobre isso.
- Com este primeiro módulo em funcionamento, o próximo passo é testar os
pacotes que ele fornece. Isso pode ser feito com
guix build, que precisa ser informado para procurar módulos no checkout do Git. Por exemplo, supondo que(alice packages greetings)forneça um pacote chamadohi-from-alice, Alice executará este comando do checkout do Git:guix build -L. hi-from-alice
... onde
-L.adiciona o diretório atual ao caminho de carregamento do Guile (veja Load Paths em Manual de referência do GNU Guile). - Pode levar algumas iterações para Alice obter definições de pacote
satisfatórias. Eventualmente, Alice fará commit deste arquivo:
git commit
Como autor de um canal, considere agrupar material de autenticação com seu canal para que os usuários possam autenticá-lo. Veja Autenticação de canal e Especificando autorizações de canal para obter informações sobre como fazer isso.
- Para usar o canal de Alice, qualquer pessoa pode adicioná-lo ao seu arquivo
de canal (veja Especificando canais adicionais) e executar
guix pull(veja Invocandoguix pull):$EDITOR ~/.config/guix/channels.scm guix pull
Guix agora se comportará como se o diretório raiz do repositório Git daquele canal tivesse sido adicionado permanentemente ao caminho de carregamento do Guile. Neste exemplo,
(alice packages greetings)será encontrado automaticamente pelo comandoguix.
Voilà!
Aviso: Antes de publicar seu canal, gostaríamos de compartilhar algumas palavras de cautela:
- Antes de publicar um canal, considere contribuir com suas definições de pacote para o Guix propriamente dito (veja Contribuindo). O Guix como um projeto é aberto a software livre de todos os tipos, e os pacotes no Guix propriamente dito estão prontamente disponíveis para todos os usuários do Guix e se beneficiam do processo de garantia de qualidade do projeto.
- Módulos de pacote e definições de pacote são códigos Scheme que usam várias interfaces de programação (APIs). Nós, desenvolvedores Guix, nunca mudamos APIs gratuitamente, mas também não nos comprometemos a congelar APIs. Quando você mantém definições de pacote fora do Guix, consideramos que o fardo da compatibilidade é seu.
- Corolário: se você estiver usando um canal externo e esse canal quebrar, reporte o problema aos autores do canal, não ao projeto Guix.
Você foi avisado! Dito isso, acreditamos que canais externos são uma maneira prática de exercer sua liberdade para aumentar a coleção de pacotes do Guix e compartilhar suas melhorias, que são princípios básicos do software livre. Por favor, envie um e-mail para guix-devel@gnu.org se você quiser discutir isso.
Próximo: Declarando dependências de canal, Anterior: Criando um canal, Acima: Canais [Conteúdo][Índice]
6.8 Módulos de pacote em um subdiretório
Como autor de canal, você pode querer manter seus módulos de canal em um subdiretório. Se seus módulos estiverem no subdiretório guix, você deve adicionar um arquivo de metadados .guix-channel que contenha:
(channel
(version 0)
(directory "guix"))
Os módulos devem estar abaixo do diretório especificado, pois o
diretório directory altera o load-path do Guile. Por exemplo,
se .guix-channel tiver (directory "base"), então um módulo
definido como (define-module (gnu packages fun)) deve estar
localizado em base/gnu/packages/fun.scm.
Fazer isso permite que apenas partes de um repositório sejam usadas como um
canal, pois o Guix espera módulos Guile válidos ao puxar. Por exemplo, os
arquivos de configuração de máquina guix deploy não são módulos
Guile válidos, e tratá-los como tal faria com que guix pull
falhasse.
Próximo: Especificando autorizações de canal, Anterior: Módulos de pacote em um subdiretório, Acima: Canais [Conteúdo][Índice]
6.9 Declarando dependências de canal
Os autores de canais podem decidir aumentar uma coleção de pacotes fornecida por outros canais. Eles podem declarar que seu canal é dependente de outros canais em um arquivo de metadados .guix-channel, que deve ser colocado na raiz do repositório do canal.
O arquivo de metadados deve conter uma expressão S simples como esta:
(channel
(version 0)
(dependencies
(channel
(name algum-coleção)
(url "https://example.org/first-collection.git")
;; The 'introduction' bit below is optional: you would
;; provide it for dependencies that can be authenticated.
(introduction
(channel-introduction
(version 0)
(commit "a8883b58dc82e167c96506cf05095f37c2c2c6cd")
(signer "CABB A931 C0FF EEC6 900D 0CFB 090B 1199 3D9A EBB5"))))
(channel
(name some-other-collection)
(url "https://example.org/second-collection.git")
(branch "testing"))))
No exemplo acima, este canal é declarado para depender de dois outros canais, que serão buscados automaticamente. Os módulos fornecidos pelo canal serão compilados em um ambiente onde os módulos de todos esses canais declarados estão disponíveis.
Por uma questão de confiabilidade e manutenibilidade, você deve evitar dependências em canais que você não controla e deve tentar manter o número de dependências no mínimo.
Próximo: URL principal, Anterior: Declarando dependências de canal, Acima: Canais [Conteúdo][Índice]
6.10 Especificando autorizações de canal
Como vimos acima, o Guix garante que o código-fonte que ele extrai dos canais vem de desenvolvedores autorizados. Como autor de um canal, você precisa especificar a lista de desenvolvedores autorizados no arquivo .guix-authorizations no repositório Git do canal. A regra de autenticação é simples: cada commit deve ser assinado por uma chave listada no arquivo .guix-authorizations de seu(s) commit(s) pai(s)13 O arquivo .guix-authorizations se parece com isso:
;; Exemplo de arquivo '.guix-authorizations'. (authorizations (version 0) ;current file format version (("AD17 A21E F8AE D8F1 CC02 DBD9 F8AE D8F1 765C 61E3" (name "alice")) ("2A39 3FFF 68F4 EF7A 3D29 12AF 68F4 EF7A 22FB B2D5" (name "bob")) ("CABB A931 C0FF EEC6 900D 0CFB 090B 1199 3D9A EBB5" (name "charlie"))))
Cada impressão digital é seguida por pares chave/valor opcionais, como no exemplo acima. Atualmente, esses pares chave/valor são ignorados.
Esta regra de autenticação cria um problema do tipo "ovo e galinha": como autenticamos o primeiro commit? Relacionado a isso: como lidamos com canais cujo histórico de repositório contém commits não assinados e não tem .guix-authorizations? E como bifurcamos canais existentes?
As introduções de canal respondem a essas perguntas descrevendo o primeiro
commit de um canal que deve ser autenticado. Na primeira vez que um canal é
buscado com guix pull ou guix time-machine, o comando
procura o commit introdutório e verifica se ele está assinado pela chave
OpenPGP especificada. A partir daí, ele autentica os commits de acordo com a
regra acima. A autenticação falha se o commit de destino não for descendente
nem ancestral do commit introdutório.
Além disso, seu canal deve fornecer todas as chaves OpenPGP que já foram
mencionadas em .guix-authorizations, armazenadas como arquivos
.key, que podem ser binários ou “ASCII-armored”. Por padrão, esses
arquivos .key são pesquisados no branch chamado keyring, mas
você pode especificar um nome de branch diferente em .guix-channel
assim:
(channel
(version 0)
(keyring-reference "my-keyring-branch"))
Para resumir, como autor de um canal, há três coisas que você precisa fazer para permitir que os usuários autentiquem seu código:
- Exporte as chaves OpenPGP de contribuidores anteriores e atuais com
gpg --exporte armazene-as em arquivos .key, por padrão em uma ramificação chamadakeyring(recomendamos torná-la uma ramificação órfã). - Introduza um .guix-authorizations inicial no repositório do canal. Faça isso em um commit assinado (veja Confirmar acesso, para obter informações sobre como assinar commits do Git).
- Anuncie a introdução do canal, por exemplo, na página web do seu canal. A introdução do canal, como vimos acima, é o par commit/chave—i.e., o commit que introduziu .guix-authorizations, e a impressão digital do OpenPGP usada para assiná-lo.
Antes de enviar para seu repositório Git público, você pode executar
guix git authenticate para verificar se você assinou todos os
commits que está prestes a enviar com uma chave autorizada:
guix git authenticate commit signer
onde commit e signer são a introdução do seu
canal. Veja Invocando guix git authenticate, para detalhes.
Publicar um canal assinado requer disciplina: qualquer erro, como um commit não assinado ou um commit assinado por uma chave não autorizada, impedirá que usuários puxem do seu canal — bem, esse é o ponto principal da autenticação! Preste atenção às mesclagens em particular: commits de mesclagem são considerados autênticos se e somente se forem assinados por uma chave presente no arquivo .guix-authorizations de ambos os ramos.
Próximo: Escrevendo notícias do canal, Anterior: Especificando autorizações de canal, Acima: Canais [Conteúdo][Índice]
6.11 URL principal
Os autores do canal podem indicar a URL principal do repositório Git do canal no arquivo .guix-channel, assim:
(channel
(version 0)
(url "https://example.org/guix.git"))
Isso permite que guix pull determine se está puxando código de um
espelho do canal; quando esse for o caso, ele avisa o usuário que o espelho
pode estar obsoleto e exibe a URL primária. Dessa forma, os usuários não
podem ser enganados para buscar código de um espelho obsoleto que não recebe
atualizações de segurança.
Esse recurso só faz sentido para repositórios autenticados, como o canal
oficial guix, para o qual guix pull garante que o código
que ele recupera é autêntico.
Anterior: URL principal, Acima: Canais [Conteúdo][Índice]
6.12 Escrevendo notícias do canal
Os autores do canal podem ocasionalmente querer comunicar aos seus usuários informações sobre mudanças importantes no canal. Você enviaria um e-mail para todos eles, mas isso não é conveniente.
Em vez disso, os canais podem fornecer um arquivo de notícias; quando
os usuários do canal executam guix pull, esse arquivo de notícias
é lido automaticamente e guix pull --news pode exibir os anúncios
que correspondem aos novos commits que foram extraídos, se houver.
Para fazer isso, os autores do canal devem primeiro declarar o nome do arquivo de notícias em seu arquivo .guix-channel:
(channel
(version 0)
(news-file "etc/news.txt"))
O arquivo de notícias em si, etc/news.txt neste exemplo, deve ser parecido com isto:
(channel-news
(version 0)
(entry (tag "the-bug-fix")
(title (en "Fixed terrible bug")
(fr "Oh la la"))
(body (en "@emph{Good news}! It's fixed!")
(eo "Certe ĝi pli bone funkcias nun!")))
(entry (commit "bdcabe815cd28144a2d2b4bc3c5057b051fa9906")
(title (en "Added a great package")
(ca "Què vol dir guix?"))
(body (en "Don't miss the @code{hello} package!"))))
Enquanto o arquivo de notícias estiver usando a sintaxe Scheme, evite nomeá-lo com uma extensão .scm ou então ele será pego ao construir o canal e gerará um erro, pois não é um módulo válido. Como alternativa, você pode mover o módulo do canal para um subdiretório e armazenar o arquivo de notícias em outro diretório.
O arquivo consiste em uma lista de entradas de notícias. Cada entrada é associada a um commit ou tag: ela descreve as alterações feitas neste commit, possivelmente em commits anteriores também. Os usuários veem as entradas somente na primeira vez que obtêm o commit ao qual a entrada se refere.
O campo title deve ser um resumo de uma linha, enquanto body
pode ser arbitrariamente longo, e ambos podem conter marcação Texinfo
(veja Overview em GNU Texinfo). Tanto o título quanto o corpo
são uma lista de tuplas de tag/mensagem de idioma, o que permite que
guix pull exiba notícias no idioma que corresponde à localidade do
usuário.
Se você quiser traduzir notícias usando um fluxo de trabalho baseado em
gettext, você pode extrair strings traduzíveis com xgettext
(veja xgettext Invocation em GNU Gettext Utilities). Por
exemplo, supondo que você escreva entradas de notícias em inglês primeiro, o
comando abaixo cria um arquivo PO contendo as strings a serem traduzidas:
xgettext -o news.po -l scheme -ken etc/news.txt
Para resumir, sim, você pode usar seu canal como um blog. Mas cuidado, isso é não é bem o que seus usuários podem esperar.
Próximo: Interface de programação, Anterior: Canais, Acima: GNU Guix [Conteúdo][Índice]
7 Desenvolvimento
Se você é um desenvolvedor de software, o Guix fornece ferramentas que você achará úteis, independentemente da linguagem em que estiver desenvolvendo. É sobre isso que este capítulo trata.
O comando guix shell fornece uma maneira conveniente de configurar
ambientes de software únicos, seja para fins de desenvolvimento ou para
executar um comando sem instalá-lo em seu perfil. O comando guix
pack permite que você crie embalagens de aplicativos que podem ser
facilmente distribuídas para usuários que não executam o Guix.
- Invocando
guix shell - Invocando
guix environment - Invocando
guix pack - A cadeia de ferramentas do GCC
- Invocando
guix git authenticate
Próximo: Invocando guix environment, Acima: Desenvolvimento [Conteúdo][Índice]
7.1 Invocando guix shell
O propósito do guix shell é facilitar a criação de ambientes de
software únicos, sem alterar o perfil. Ele é normalmente usado para criar
ambientes de desenvolvimento; também é uma maneira conveniente de executar
aplicativos sem “poluir” seu perfil.
Nota: O comando
guix shellfoi introduzido recentemente para substituirguix environment(veja Invocandoguix environment). Se você estiver familiarizado comguix environment, notará que ele é semelhante, mas também—esperamos!—mais conveniente.
A sintaxe geral é:
guix shell [opções] [pacote…]
Às vezes, uma sessão de shell interativa não é desejada. Um comando
arbitrário pode ser invocado colocando o token -- para separar o
comando do resto dos argumentos.
O exemplo a seguir cria um ambiente contendo Python e NumPy, compilando ou
baixando qualquer pacote ausente e executa o comando python3 nesse
ambiente:
guix shell python python-numpy -- python3
Note que é necessário incluir o pacote principal python neste
comando, mesmo que ele já esteja instalado em seu ambiente. Isso é para que
o ambiente shell saiba definir PYTHONPATH e outras variáveis
relacionadas. O ambiente shell não pode verificar o ambiente instalado
anteriormente, porque então seria não determinístico. Isso é verdade para a
maioria das bibliotecas: seu pacote de linguagem correspondente deve ser
incluído na invocação do shell.
Nota:
guix shelltambém pode ser usado como um interpretador de script, também conhecido como shebang. Aqui está um exemplo de script Python autocontido fazendo uso desse recurso:#!/usr/bin/env -S guix shell python python-numpy -- python3 import numpy print("This is numpy", numpy.version.version)Você pode passar qualquer opção
guix shell, mas há uma ressalva: o kernel Linux tem um limite de 127 bytes no comprimento do shebang.
Ambientes de desenvolvimento podem ser criados como no exemplo abaixo, que gera um shell interativo contendo todas as dependências e variáveis de ambiente necessárias para trabalhar no Inkscape:
guix shell --development inkscape
Sair do shell coloca o usuário de volta no ambiente original antes de
guix shell ser invocado. A próxima coleta de lixo (veja Invocando guix gc) pode limpar pacotes que foram instalados no ambiente e que não são
mais usados fora dele.
Como uma conveniência adicional, guix shell tentará fazer o que
você quer dizer quando for invocado interativamente sem nenhum outro
argumento, como em:
guix shell
Se encontrar um manifest.scm no diretório de trabalho atual ou em
qualquer um dos seus pais, ele usa esse manifesto como se tivesse sido
fornecido via --manifest. Da mesma forma, se encontrar um
guix.scm nos mesmos diretórios, ele o usa para construir um perfil de
desenvolvimento como se --development e --file estivessem
presentes. Em ambos os casos, o arquivo só será carregado se o diretório em
que ele reside estiver listado em
~/.config/guix/shell-authorized-directories. Isso fornece uma maneira
fácil de definir, compartilhar e entrar em ambientes de desenvolvimento.
Por padrão, a sessão ou comando do shell é executado em um ambiente
aumentado, onde os novos pacotes são adicionados às variáveis de
ambiente do caminho de pesquisa, como PATH. Em vez disso, você pode
escolher criar um ambiente isolado contendo apenas os pacotes
solicitados. Passar a opção --pure limpa as definições de variáveis
de ambiente encontradas no ambiente pai14; passar --container vai um passo além ao gerar um
contêiner isolado do resto do sistema:
guix shell --container emacs gcc-toolchain
O comando acima gera um shell interativo em um contêiner onde nada além de
emacs, gcc-toolchain e suas dependências estão disponíveis. O
contêiner não tem acesso à rede e não compartilha nenhum arquivo além do
diretório de trabalho atual com o ambiente ao redor. Isso é útil para evitar
acesso a recursos de todo o sistema, como /usr/bin em distros
estrangeiras.
Esta opção --container também pode ser útil se você deseja executar um aplicativo sensível à segurança, como um navegador da web, em um ambiente isolado. Por exemplo, o comando abaixo inicia o Ungoogled-Chromium em um ambiente isolado, que:
- compartilha o acesso à rede com o host
- herda as variáveis de ambiente do host
DISPLAYeXAUTHORITY - tem acesso aos registros de autenticação do host do
XAUTHORITYfile - não tem informações sobre o diretório atual do host
guix shell --container --network --no-cwd ungoogled-chromium \
--preserve='^XAUTHORITY$' --expose="${XAUTHORITY}" \
--preserve='^DISPLAY$' -- chromium
guix shell define a variável GUIX_ENVIRONMENT no shell que
ele gera; seu valor é o nome do arquivo do perfil deste ambiente. Isso
permite que os usuários, digamos, definam um prompt específico para
ambientes de desenvolvimento em seu .bashrc (veja Bash Startup
Files em Manual de referência do GNU Bash):
if [ -n "$GUIX_ENVIRONMENT" ]
then
export PS1="\u@\h \w [dev]\$ "
fi
... ou para navegar pelo perfil:
$ ls "$GUIX_ENVIRONMENT/bin"
As opções disponíveis estão resumidas abaixo.
--checkConfigure o ambiente e verifique se o shell sobrecarregaria as variáveis de ambiente. É uma boa ideia usar esta opção na primeira vez que você executar
guix shellpara uma sessão interativa para garantir que sua configuração esteja correta.Por exemplo, se o shell modificar a variável de ambiente
PATH, informe isso, pois você obterá um ambiente diferente do que solicitou.Tais problemas geralmente indicam que os arquivos de inicialização do shell estão modificando inesperadamente essas variáveis de ambiente. Por exemplo, se você estiver usando Bash, certifique-se de que as variáveis de ambiente estejam definidas ou modificadas em ~/.bash_profile e não em ~/.bashrc—o primeiro é originado apenas por shells de login. Veja Bash Startup Files em Manual de referência do GNU Bash, para detalhes sobre os arquivos de inicialização do Bash.
--development-DFaça com que
guix shellinclua no ambiente as dependências do pacote a seguir em vez do pacote em si. Isso pode ser combinado com outros pacotes. Por exemplo, o comando abaixo inicia um shell interativo contendo as dependências de tempo de compilação do GNU Guile, além do Autoconf, Automake e Libtool:guix shell -D guile autoconf automake libtool
--expression=expr-e exprCrie um ambiente para o pacote ou lista de pacotes que expr avalia.
Por exemplo, executando:
guix shell -D -e '(@ (gnu packages maths) petsc-openmpi)'
inicia um shell com o ambiente para esta variante específica do pacote PETSc.
Rodando:
guix shell -e '(@ (gnu) %base-packages)'
inicia um shell com todos os pacotes do sistema base disponíveis.
Os comandos acima usam apenas a saída padrão dos pacotes fornecidos. Para selecionar outras saídas, duas tuplas de elementos podem ser especificadas:
guix shell -e '(list (@ (gnu packages bash) bash) "include")'
Veja
package->development-manifest, para obter informações sobre como escrever um manifesto para o ambiente de desenvolvimento de um pacote.--file=arquivo-f arquivoCrie um ambiente contendo o pacote ou lista de pacotes que o código dentro de arquivo avalia.
Por exemplo, arquivo pode conter uma definição como esta (veja Definindo pacotes):
(use-modules (guix) (gnu packages gdb) (gnu packages autotools) (gnu packages texinfo)) ;; Augment the package definition of GDB with the build tools ;; needed when developing GDB (and which are not needed when ;; simply installing it.) (package (inherit gdb) (native-inputs (modify-inputs (package-native-inputs gdb) (prepend autoconf-2.69 automake texinfo))))Com o arquivo acima, você pode entrar em um ambiente de desenvolvimento para o GDB executando:
guix shell -D -f gdb-devel.scm
--manifest=arquivo-m arquivoCrie um ambiente para os pacotes contidos no objeto manifest retornado pelo código Scheme em arquivo. Esta opção pode ser repetida várias vezes, nesse caso os manifestos são concatenados.
Isso é semelhante à opção de mesmo nome em
guix package(veja --manifest) e usa os mesmos arquivos de manifesto.Veja Escrevendo manifestos, para informações sobre como escrever um manifesto. Veja --export-manifest abaixo sobre como obter um primeiro manifesto.
--export-manifestGrave na saída padrão um manifesto adequado para --manifest correspondente às opções de linha de comando fornecidas.
Esta é uma maneira de “converter” argumentos de linha de comando em um manifesto. Por exemplo, imagine que você está cansado de digitar linhas longas e gostaria de obter um manifesto equivalente a esta linha de comando:
guix shell -D guile git emacs emacs-geiser emacs-geiser-guile
Basta adicionar --export-manifest à linha de comando acima:
guix shell --export-manifest \ -D guile git emacs emacs-geiser emacs-geiser-guile
... and you get a manifest along these lines:
(concatenate-manifests (list (specifications->manifest (list "git" "emacs" "emacs-geiser" "emacs-geiser-guile")) (package->development-manifest (specification->package "guile"))))Você pode armazená-lo em um arquivo, digamos manifest.scm, e de lá passá-lo para
guix shellou praticamente qualquer comandoguix:guix shell -m manifest.scm
Voilà, você converteu uma longa linha de comando em um manifesto! Esse processo de conversão honra opções de transformação de pacote (veja Opções de transformação de pacote), então deve ser sem perdas.
--profile=perfil-p perfilCrie um ambiente contendo os pacotes instalados em perfil. Use
guix package(veja Invocandoguix package) para criar e gerenciar perfis.--pureDesconfigura variáveis de ambiente existentes ao construir o novo ambiente, exceto aquelas especificadas com --preserve (veja abaixo). Isso tem o efeito de criar um ambiente no qual os caminhos de pesquisa contêm apenas entradas de pacote.
--preserve=regexp-E regexpQuando usado junto com --pure, preserva as variáveis de ambiente que correspondem a regexp—em outras palavras, coloca-as em uma “lista branca” de variáveis de ambiente que devem ser preservadas. Esta opção pode ser repetida várias vezes.
guix shell --pure --preserve=^SLURM openmpi … \ -- mpirun …
Este exemplo executa
mpirunem um contexto onde as únicas variáveis de ambiente definidas sãoPATH, variáveis de ambiente cujo nome começa com ‘SLURM’, bem como as variáveis “preciosas” usuais (HOME,USER, etc.).--search-pathsExiba as definições de variáveis de ambiente que compõem o ambiente.
--system=sistema-s sistemaTente construir para sistema—por exemplo,
i686-linux.--container¶-CExecute comando dentro de um contêiner isolado. O diretório de trabalho atual fora do contêiner é mapeado dentro do contêiner. Além disso, a menos que substituído por --user, um diretório pessoal (home) fictício é criado que corresponde ao diretório pessoal do usuário atual, e /etc/passwd é configurado adequadamente.
O processo gerado é executado como o usuário atual fora do contêiner. Dentro do contêiner, ele tem o mesmo UID e GID que o usuário atual, a menos que --user seja passado (veja abaixo).
--network-NPara contêineres, compartilhe o namespace de rede com o sistema host. Os contêineres criados sem esse sinalizador têm acesso somente ao dispositivo de loopback.
--link-profile-PPara contêineres, vincule o perfil do ambiente a ~/.guix-profile dentro do contêiner e defina
GUIX_ENVIRONMENTpara isso. Isso é equivalente a tornar ~/.guix-profile uma ligação simbólica para o perfil real dentro do contêiner. A vinculação falhará e abortará o ambiente se o diretório já existir, o que certamente será o caso seguix shellfoi invocado no diretório pessoal do usuário.Certos pacotes são configurados para procurar em ~/.guix-profile por arquivos de configuração e dados;15 --link-profile permite que esses programas se comportem conforme o esperado no ambiente.
--user=usuário-u usuárioPara contêineres, use o nome de usuário usuário no lugar do usuário atual. A entrada /etc/passwd gerada dentro do contêiner conterá o nome usuário, o diretório pessoal será /home/usuário e nenhum dado GECOS do usuário será copiado. Além disso, o UID e o GID dentro do contêiner são 1000. usuário não precisa existir no sistema.
Além disso, qualquer caminho compartilhado ou exposto (veja --share e --expose respectivamente) cujo destino esteja dentro do pessoal do usuário atual será remapeado em relação a /home/USUÁRIO; isso inclui o mapeamento automático do diretório de trabalho atual.
# will expose paths as /home/foo/wd, /home/foo/test, and /home/foo/target cd $HOME/wd guix shell --container --user=foo \ --expose=$HOME/test \ --expose=/tmp/target=$HOME/targetEmbora isso limite o vazamento da identidade do usuário por meio de caminhos iniciais e de cada um dos campos do usuário, esse é apenas um componente útil de uma solução mais ampla de privacidade/anonimato — não uma solução em si.
--no-cwdPara contêineres, o comportamento padrão é compartilhar o diretório de trabalho atual com o contêiner isolado e mudar imediatamente para esse diretório dentro do contêiner. Se isso for indesejável, --no-cwd fará com que o diretório de trabalho atual não seja compartilhado automaticamente e mudará para o diretório pessoal do usuário dentro do contêiner. Veja também --user.
--expose=fonte[=alvo]--share=fonte[=alvo]Para contêineres, --expose (resp. --share) expõe o sistema de arquivos fonte do sistema host como o sistema de arquivos somente leitura (resp. gravável) alvo dentro do contêiner. Se alvo não for especificado, fonte será usado como o ponto de montagem de destino no contêiner.
O exemplo abaixo gera um Guile REPL em um contêiner no qual o diretório pessoal do usuário é acessível somente para leitura por meio do diretório /exchange:
guix shell --container --expose=$HOME=/exchange guile -- guile
--symlink=spec-S specPara contêineres, crie as ligações simbólicas especificadas por spec, conforme documentado em pack-symlink-option.
--emulate-fhs-FQuando usado com --container, emule uma configuração do FHS) dentro do contêiner, fornecendo /bin, /lib e outros diretórios e arquivos especificados pelo FHS.
Como Guix desvia da especificação FHS, esta opção configura o contêiner para imitar mais de perto o de outras distribuições GNU/Linux. Isto é útil para reproduzir outros ambientes de desenvolvimento, testar e usar programas que esperam que a especificação FHS seja seguida. Com esta opção, o contêiner incluirá uma versão do glibc que lerá /etc/ld.so.cache dentro do contêiner para o cache da biblioteca compartilhada (ao contrário do glibc no uso regular do Guix) e configurará os diretórios FHS esperados: /bin, /etc, /lib e /usr do perfil do contêiner.
--nesting-WQuando usado com --container, forneça Guix dentro do contêiner e organize para que ele possa interagir com o daemon de construção que roda fora do contêiner. Isso é útil se você quiser, dentro do seu contêiner isolado, criar outros contêineres, como nesta sessão de exemplo:
$ guix shell -CW coreutils [env]$ guix shell -C guile -- guile -c '(display "olá!\n")' olá! [env]$ exit
A sessão acima inicia um contêiner com programas
coreutilsdisponíveis emPATH. A partir daí, geramosguix shellpara criar um contêiner aninhado que fornece nada além de Guile.Outro exemplo é avaliar um arquivo guix.scm que não é confiável, conforme mostrado aqui:
guix shell -CW -- guix build -f guix.scm
O comando
guix buildexecutado acima só pode acessar o diretório atual.Nos bastidores, a opção -W faz várias coisas:
- mapeia o socket do daemon (por padrão, /var/guix/daemon-socket/socket) dentro do contêiner;
- mapeia todo o armazém (por padrão /gnu/store) dentro do contêiner de
forma que os itens do armazém disponibilizados por invocações aninhadas
guixsejam visíveis; - adiciona o comando
guixusado atualmente ao perfil no contêiner, de modo queguix describeretorne o mesmo estado dentro e fora do contêiner; - compartilha o cache (por padrão ~/.cache/guix) com o host, para
acelerar operações como
guix time-machineeguix shell.
--rebuild-cache¶-
Na maioria dos casos,
guix shellarmazena em cache o ambiente para que os usos subsequentes sejam instantâneos. As entradas de cache menos usadas recentemente são removidas periodicamente. O cache também é invalidado, ao usar --file ou --manifest, sempre que o arquivo correspondente for modificado.O --rebuild-cache força o ambiente em cache a ser atualizado. Isso é útil ao usar --file ou --manifest e o arquivo
guix.scmoumanifest.scmtem dependências externas, ou se seu comportamento depende, digamos, de variáveis de ambiente. --root=arquivo¶-r arquivo-
Crie arquivo como uma ligação simbólica para o perfil deste ambiente e registre-a como raiz do coletor de lixo.
Isso é útil se você deseja proteger seu ambiente da coleta de lixo, para torná-lo “persistente”.
Quando esta opção é omitida,
guix shellarmazena em cache os perfis para que os usos subsequentes do mesmo ambiente sejam instantâneos — isso é comparável ao uso de --root, exceto queguix shellcuida da remoção periódica das raízes do coletor de lixo menos usadas recentemente.Em alguns casos,
guix shellnão armazena perfis em cache—por exemplo, se opções de transformação como --with-latest forem usadas. Nesses casos, o ambiente é protegido da coleta de lixo somente durante a sessãoguix shell. Isso significa que na próxima vez que você recriar o mesmo ambiente, poderá ter que reconstruir ou baixar novamente os pacotes.Veja Invocando
guix pack, para mais sobre as raízes do coletor de lixo.
guix shell também suporta todas as opções de compilação comuns que
guix build suporta (veja Opções de compilação comuns), bem como opções
de transformação de pacotes (veja Opções de transformação de pacote).
Próximo: Invocando guix pack, Anterior: Invocando guix shell, Acima: Desenvolvimento [Conteúdo][Índice]
7.2 Invocando guix environment
O objetivo do guix environment é auxiliar na criação de ambientes
de desenvolvimento.
Aviso de descontinuação: O comando
guix environmentfoi descontinuado em favor doguix shell, que executa funções semelhantes, mas é mais conveniente de usar. Veja Invocandoguix shell.Sendo obsoleto, o
guix environmentestá programado para remoção futura, mas o projeto Guix está comprometido em mantê-lo até 1º de maio de 2023. Entre em contato conosco pelo e-mail guix-devel@gnu.org se quiser discutir o assunto.
A sintaxe geral é:
guix environment opções pacote…
O exemplo a seguir gera uma nova configuração de shell para o desenvolvimento do GNU Guile:
guix environment guile
Se as dependências necessárias ainda não foram construídas, guix
environment as constrói automaticamente. O ambiente do novo shell é uma
versão aumentada do ambiente em que guix environment foi
executado. Ele contém os caminhos de pesquisa necessários para construir o
pacote fornecido adicionado às variáveis de ambiente existentes. Para criar
um ambiente “puro”, no qual as variáveis de ambiente originais foram
desconfiguradas, use a opção --pure16.
Sair de um ambiente Guix é o mesmo que sair do shell, e colocará o usuário
de volta no ambiente antigo antes de guix environment ser
invocado. A próxima coleta de lixo (veja Invocando guix gc) limpará os
pacotes que foram instalados de dentro do ambiente e não são mais usados
fora dele.
guix environment define a variável GUIX_ENVIRONMENT no shell
que ele gera; seu valor é o nome do arquivo do perfil deste ambiente. Isso
permite que os usuários, digamos, definam um prompt específico para
ambientes de desenvolvimento em seu .bashrc (veja Bash Startup
Files em Manual de referência do GNU Bash):
if [ -n "$GUIX_ENVIRONMENT" ]
then
export PS1="\u@\h \w [dev]\$ "
fi
... ou para navegar pelo perfil:
$ ls "$GUIX_ENVIRONMENT/bin"
Além disso, mais de um pacote pode ser especificado, em cujo caso a união das entradas para os pacotes fornecidos é usada. Por exemplo, o comando abaixo gera um shell onde todas as dependências do Guile e do Emacs estão disponíveis:
guix environment guile emacs
Às vezes, uma sessão de shell interativa não é desejada. Um comando
arbitrário pode ser invocado colocando o token -- para separar o
comando do resto dos argumentos:
guix environment guile -- make -j4
Em outras situações, é mais conveniente especificar a lista de pacotes
necessários no ambiente. Por exemplo, o comando a seguir executa
python de um ambiente contendo Python 3 e NumPy:
guix environment --ad-hoc python-numpy python -- python3
Além disso, pode-se querer as dependências de um pacote e também alguns pacotes adicionais que não são dependências de tempo de construção ou tempo de execução, mas são úteis ao desenvolver, no entanto. Por causa disso, o sinalizador --ad-hoc é posicional. Pacotes que aparecem antes de --ad-hoc são interpretados como pacotes cujas dependências serão adicionadas ao ambiente. Pacotes que aparecem depois são interpretados como pacotes que serão adicionados ao ambiente diretamente. Por exemplo, o comando a seguir cria um ambiente de desenvolvimento Guix que inclui adicionalmente Git e strace:
guix environment --pure guix --ad-hoc git strace
Às vezes, é desejável isolar o ambiente o máximo possível, para máxima pureza e reprodutibilidade. Em particular, ao usar Guix em uma distribuição host que não seja Guix System, é desejável impedir o acesso a /usr/bin e outros recursos de todo o sistema do ambiente de desenvolvimento. Por exemplo, o comando a seguir gera um Guile REPL em um “contêiner” onde apenas o armazém e o diretório de trabalho atual são montados:
guix environment --ad-hoc --container guile -- guile
Nota: A opção --container requer Linux-libre 3.19 ou mais recente.
Outro caso de uso típico para contêineres é executar aplicativos sensíveis à
segurança, como um navegador da web. Para executar o Eolie, precisamos expor
e compartilhar alguns arquivos e diretórios; incluímos nss-certs e
expomos /etc/ssl/certs/ para autenticação HTTPS; finalmente,
preservamos a variável de ambiente DISPLAY, pois os aplicativos
gráficos em contêiner não serão exibidos sem ela.
guix environment --preserve='^DISPLAY$' --container --network \ --expose=/etc/machine-id \ --expose=/etc/ssl/certs/ \ --share=$HOME/.local/share/eolie/=$HOME/.local/share/eolie/ \ --ad-hoc eolie nss-certs dbus -- eolie
As opções disponíveis estão resumidas abaixo.
--checkConfigure o ambiente e verifique se o shell sobrecarregaria as variáveis de ambiente. Veja --check, para mais informações.
--root=arquivo¶-r arquivo-
Crie arquivo como uma ligação simbólica para o perfil deste ambiente e registre-a como raiz do coletor de lixo.
Isso é útil se você deseja proteger seu ambiente da coleta de lixo, para torná-lo “persistente”.
Quando esta opção pe omitida, o ambiente é protegido da coleta de lixo apenas pela duração da sessão do
guix environment. Isso significa que na próxima vez que você recriar o mesmo ambiente, você tpoderia ter que reconstruir ou refazer o download dos pacotes. Veja Invocandoguix gc, para mais sobre GC roots. --expression=expr-e exprCrie um ambiente para o pacote ou lista de pacotes que expr avalia.
Por exemplo, executando:
guix environment -e '(@ (gnu packages maths) petsc-openmpi)'
inicia um shell com o ambiente para esta variante específica do pacote PETSc.
Rodando:
guix environment --ad-hoc -e '(@ (gnu) %base-packages)'
inicia um shell com todos os pacotes do sistema base disponíveis.
Os comandos acima usam apenas a saída padrão dos pacotes fornecidos. Para selecionar outras saídas, duas tuplas de elementos podem ser especificadas:
guix environment --ad-hoc -e '(list (@ (gnu packages bash) bash) "include")'
--load=arquivo-l arquivoCrie um ambiente para o pacote ou lista de pacotes que o código dentro de arquivo avalia.
Por exemplo, arquivo pode conter uma definição como esta (veja Definindo pacotes):
(use-modules (guix) (gnu packages gdb) (gnu packages autotools) (gnu packages texinfo)) ;; Augment the package definition of GDB with the build tools ;; needed when developing GDB (and which are not needed when ;; simply installing it.) (package (inherit gdb) (native-inputs (modify-inputs (package-native-inputs gdb) (prepend autoconf-2.69 automake texinfo))))--manifest=arquivo-m arquivoCrie um ambiente para os pacotes contidos no objeto manifest retornado pelo código Scheme em arquivo. Esta opção pode ser repetida várias vezes, nesse caso os manifestos são concatenados.
Isso é semelhante à opção de mesmo nome em
guix package(veja --manifest) e usa os mesmos arquivos de manifesto.Veja
guix shell --export-manifest, para obter informações sobre como “converter” opções de linha de comando em um manifesto.--ad-hocInclui todos os pacotes especificados no ambiente resultante, como se um pacote ad hoc fosse definido com eles como entradas. Esta opção é útil para criar rapidamente um ambiente sem ter que escrever uma expressão de pacote para conter as entradas desejadas.
Por exemplo, o comando:
guix environment --ad-hoc guile guile-sdl -- guile
executa
guileem um ambiente onde Guile e Guile-SDL estão disponíveis.Observe que este exemplo solicita implicitamente a saída padrão de
guileeguile-sdl, mas é possível solicitar uma saída específica — por exemplo,glib:binsolicita a saídabindeglib(veja Pacotes com múltiplas saídas).Esta opção pode ser composta com o comportamento padrão de
guix environment. Pacotes que aparecem antes de --ad-hoc são interpretados como pacotes cujas dependências serão adicionadas ao ambiente, o comportamento padrão. Pacotes que aparecem depois são interpretados como pacotes que serão adicionados ao ambiente diretamente.--profile=perfil-p perfilCrie um ambiente contendo os pacotes instalados em perfil. Use
guix package(veja Invocandoguix package) para criar e gerenciar perfis.--pureDesconfigura variáveis de ambiente existentes ao construir o novo ambiente, exceto aquelas especificadas com --preserve (veja abaixo). Isso tem o efeito de criar um ambiente no qual os caminhos de pesquisa contêm apenas entradas de pacote.
--preserve=regexp-E regexpQuando usado junto com --pure, preserva as variáveis de ambiente que correspondem a regexp—em outras palavras, coloca-as em uma “lista branca” de variáveis de ambiente que devem ser preservadas. Esta opção pode ser repetida várias vezes.
guix environment --pure --preserve=^SLURM --ad-hoc openmpi … \ -- mpirun …
Este exemplo executa
mpirunem um contexto onde as únicas variáveis de ambiente definidas sãoPATH, variáveis de ambiente cujo nome começa com ‘SLURM’, bem como as variáveis “preciosas” usuais (HOME,USER, etc.).--search-pathsExiba as definições de variáveis de ambiente que compõem o ambiente.
--system=sistema-s sistemaTente construir para sistema—por exemplo,
i686-linux.--container¶-CExecute comando dentro de um contêiner isolado. O diretório de trabalho atual fora do contêiner é mapeado dentro do contêiner. Além disso, a menos que substituído por --user, um diretório pessoal (home) fictício é criado que corresponde ao diretório pessoal do usuário atual, e /etc/passwd é configurado adequadamente.
O processo gerado é executado como o usuário atual fora do contêiner. Dentro do contêiner, ele tem o mesmo UID e GID que o usuário atual, a menos que --user seja passado (veja abaixo).
--network-NPara contêineres, compartilhe o namespace de rede com o sistema host. Os contêineres criados sem esse sinalizador têm acesso somente ao dispositivo de loopback.
--link-profile-PPara contêineres, vincule o perfil do ambiente a ~/.guix-profile dentro do contêiner e defina
GUIX_ENVIRONMENTpara isso. Isso é equivalente a tornar ~/.guix-profile uma ligação simbólica para o perfil real dentro do contêiner. A vinculação falhará e abortará o ambiente se o diretório já existir, o que certamente será o caso seguix environmentfoi invocado no diretório pessoal do usuário.Certos pacotes são configurados para procurar em ~/.guix-profile por arquivos de configuração e dados;17 --link-profile permite que esses programas se comportem conforme o esperado no ambiente.
--user=usuário-u usuárioPara contêineres, use o nome de usuário usuário no lugar do usuário atual. A entrada /etc/passwd gerada dentro do contêiner conterá o nome usuário, o diretório pessoal será /home/usuário e nenhum dado GECOS do usuário será copiado. Além disso, o UID e o GID dentro do contêiner são 1000. usuário não precisa existir no sistema.
Além disso, qualquer caminho compartilhado ou exposto (veja --share e --expose respectivamente) cujo destino esteja dentro do pessoal do usuário atual será remapeado em relação a /home/USUÁRIO; isso inclui o mapeamento automático do diretório de trabalho atual.
# will expose paths as /home/foo/wd, /home/foo/test, and /home/foo/target cd $HOME/wd guix environment --container --user=foo \ --expose=$HOME/test \ --expose=/tmp/target=$HOME/targetEmbora isso limite o vazamento da identidade do usuário por meio de caminhos iniciais e de cada um dos campos do usuário, esse é apenas um componente útil de uma solução mais ampla de privacidade/anonimato — não uma solução em si.
--no-cwdPara contêineres, o comportamento padrão é compartilhar o diretório de trabalho atual com o contêiner isolado e mudar imediatamente para esse diretório dentro do contêiner. Se isso for indesejável, --no-cwd fará com que o diretório de trabalho atual não seja compartilhado automaticamente e mudará para o diretório pessoal do usuário dentro do contêiner. Veja também --user.
--expose=fonte[=alvo]--share=fonte[=alvo]Para contêineres, --expose (resp. --share) expõe o sistema de arquivos fonte do sistema host como o sistema de arquivos somente leitura (resp. gravável) alvo dentro do contêiner. Se alvo não for especificado, fonte será usado como o ponto de montagem de destino no contêiner.
O exemplo abaixo gera um Guile REPL em um contêiner no qual o diretório pessoal do usuário é acessível somente para leitura por meio do diretório /exchange:
guix environment --container --expose=$HOME=/exchange --ad-hoc guile -- guile
--emulate-fhs-FPara contêineres, emule uma configuração Filesystem Hierarchy Standard (FHS) dentro do contêiner, veja a especificação oficial. Como o Guix se desvia da especificação FHS, esta opção configura o contêiner para imitar mais de perto o de outras distribuições GNU/Linux. Isto é útil para reproduzir outros ambientes de desenvolvimento, testar e usar programas que esperam que a especificação FHS seja seguida. Com esta opção, o contêiner incluirá uma versão de
glibcque lerá/etc/ld.so.cachedentro do contêiner para o cache da biblioteca compartilhada (ao contrário deglibcno uso regular do Guix) e configurará os diretórios FHS esperados:/bin,/etc,/libe/usrdo perfil do contêiner.
guix environment também oferece suporte a todas as opções de
compilação comuns que guix build oferece suporte (veja Opções de compilação comuns), bem como opções de transformação de pacotes (veja Opções de transformação de pacote).
Próximo: A cadeia de ferramentas do GCC, Anterior: Invocando guix environment, Acima: Desenvolvimento [Conteúdo][Índice]
7.3 Invocando guix pack
Ocasionalmente você quer passar software para pessoas que não têm (ainda!) a
sorte de usar Guix. Você diria para elas executarem guix package -i
algo, mas isso não é possível neste caso. É aqui que guix
pack entra.
Nota: Se você estiver procurando maneiras de trocar binários entre máquinas que já executam Guix, veja Invocando
guix copy, Invocandoguix publishe Invocandoguix archive.
O comando guix pack cria uma embalagem de software
encapsulado: ele cria um tarball ou algum outro arquivo contendo os binários
do software em que você está interessado e todas as suas dependências. O
arquivo resultante pode ser usado em qualquer máquina que não tenha Guix, e
as pessoas podem executar exatamente os mesmos binários que você tem com
Guix. A embalagem em si é criada de forma reproduzível em bits, para que
qualquer um possa verificar se ela realmente contém os resultados da
compilação que você pretende enviar.
Por exemplo, para criar uma embalagem contenda Guile, Emacs, Geiser e todas as suas dependências, você pode executar:
$ guix pack guile emacs emacs-geiser … /gnu/store/…-pack.tar.gz
O resultado aqui é um tarball contendo um diretório /gnu/store com
todos os pacotes relevantes. O tarball resultante contém um perfil com
os três pacotes de interesse; o perfil é o mesmo que seria criado por
guix package -i. É esse mecanismo que é usado para criar o próprio
tarball binário autônomo do Guix (veja Instalação de binários).
Usuários desta embalagem teriam que executar /gnu/store/…-profile/bin/guile para executar o Guile, o que você pode achar inconveniente. Para contornar isso, você pode criar, digamos, uma ligação simbólica /opt/gnu/bin para o perfil:
guix pack -S /opt/gnu/bin=bin guile emacs emacs-geiser
Dessa forma, os usuários podem digitar /opt/gnu/bin/guile e aproveitar.
E se o destinatário do sua embalagem não tiver privilégios de root na máquina dele e, portanto, não puder descompactá-lo no sistema de arquivos raiz? Nesse caso, você vai querer usar a opção --relocatable (veja abaixo). Essa opção produz binários relocáveis, o que significa que eles podem ser colocados em qualquer lugar na hierarquia do sistema de arquivos: no exemplo acima, os usuários podem descompactar seu tarball no diretório pessoal deles e executar diretamente ./opt/gnu/bin/guile.
Como alternativa, você pode produzir uma embalagem no formato de imagem do Docker usando o seguinte comando:
guix pack -f docker -S /bin=bin guile guile-readline
O resultado é um tarball que pode ser passado para o comando docker
load, seguido por docker run:
docker load < arquivo docker run -ti guile-guile-readline /bin/guile
onde arquivo é a imagem retornada por guix pack, e
guile-guile-readline é sua “image tag”. Veja
documentação do Docker para mais informações.
Outra opção é produzir uma imagem SquashFS com o seguinte comando:
guix pack -f squashfs bash guile emacs emacs-geiser
O resultado é uma imagem do sistema de arquivos SquashFS que pode ser
montada ou usada diretamente como uma imagem de contêiner do sistema de
arquivos com o ambiente de execução do
contêiner Singularity, usando comandos como singularity shell ou
singularity exec.
Outro formato internamente baseado em SquashFS é o AppImage. Um arquivo de AppImage pode ser criado e executado sem qualquer provilégio especial:
file=$(guix pack -f appimage --entry-point=bin/guile guile) $file --help
Várias opções de linha de comando permitem que você personalize sua embalagem:
--format=formato-f formatoProduza uma embalagem no formato fornecido.
Os formatos disponíveis são:
tarballEste é o formato padrão. Ele produz um tarball contendo todos os binários e ligações simbólicas especificados.
dockerIsso produz um tarball que segue o Docker Image Specification. Por padrão, o “nome do repositório” como aparece na saída do comando
docker imagesé computado a partir de nomes de pacotes passados na linha de comando ou no arquivo manifesto. Como alternativa, o “nome do repositório” também pode ser configurado por meio da opção --image-tag. Consulte --help-docker-format para obter mais informações sobre essas opções avançadas.squashfsIsso produz uma imagem SquashFS contendo todos os binários e ligações simbólicas especificados, bem como pontos de montagem vazios para sistemas de arquivos virtuais como procfs.
Nota: Singularity requer que você forneça /bin/sh na imagem. Por esse motivo,
guix pack -f squashfssempre implica-S /bin=bin. Portanto, sua invocaçãoguix packdeve sempre começar com algo como:guix pack -f squashfs bash …
Se você esquecer o pacote
bash(ou similar),singularity runesingularity execfalharão com uma mensagem inútil “nenhum arquivo ou diretório”.deb¶Isso produz um arquivo Debian (um pacote com a extensão de arquivo ‘.deb’) contendo todos os binários e ligações simbólicas especificados, que podem ser instalados em cima de qualquer distribuição GNU(/Linux) baseada em dpkg. Opções avançadas podem ser reveladas por meio da opção --help-deb-format. Elas permitem incorporar arquivos de controle para um controle mais refinado, como ativar gatilhos específicos ou fornecer um script de configuração do mantenedor para executar código de configuração arbitrário na instalação.
guix pack -f deb -C xz -S /usr/bin/hello=bin/hello hello
Nota: Como os arquivos produzidos com
guix packcontêm uma coleção de itens de armazém e como cada pacotedpkgnão deve ter arquivos conflitantes, na prática isso significa que você provavelmente não conseguirá instalar mais de um desses arquivos em um dado sistema. Você pode, no entanto, empacotar quantos pacotes Guix quiser em um desses arquivos.Aviso:
dpkgassumirá a propriedade de quaisquer arquivos contidos no pacote que ele não saiba. Não é sensato instalar arquivos ‘.deb’ produzidos pelo Guix em um sistema onde /gnu/store é compartilhado por outro software, como uma instalação do Guix ou outras embalagens não deb.rpm¶Isso produz um arquivo RPM (um pacote com a extensão de arquivo ‘.rpm’) contendo todos os binários e ligações simbólicas especificados, que podem ser instalados em cima de qualquer distribuição GNU/Linux baseada em RPM. O formato RPM incorpora somas de verificação para cada arquivo que ele contém, que o comando
rpmusa para validar a integridade do arquivo.Opções avançadas relacionadas a RPM são reveladas por meio da opção --help-rpm-format. Essas opções permitem incorporar scripts de mantenedor que podem ser executados antes ou depois da instalação do arquivo RPM, por exemplo.
O formato RPM suporta pacotes relocáveis por meio da opção --prefix do comando
rpm, o que pode ser útil para instalar um pacote RPM em um prefixo específico.guix pack -f rpm -R -C xz -S /usr/bin/hello=bin/hello hello
sudo rpm --install --prefix=/opt /gnu/store/...-hello.rpm
Nota: Ao contrário dos pacotes Debian, arquivos conflitantes, mas idênticos em pacotes RPM podem ser instalados simultaneamente, o que significa que vários pacotes RPM produzidos pelo
guix packgeralmente podem ser instalados lado a lado sem nenhum problema.Aviso:
rpmassume a propriedade de quaisquer arquivos contidos no pacote, o que significa que ele removerá /gnu/store ao desinstalar um pacote RPM gerado pelo Guix, a menos que o pacote RPM tenha sido instalado com a opção --prefix do comandorpm. Não é sensato instalar pacotes ‘.rpm’ produzidos pelo Guix em um sistema onde /gnu/store é compartilhado por outro software, como uma instalação do Guix ou outras embalagens não rpm.appimage¶Isto produz um arquivo AppImage com a extensão ‘.AppImage’. Um AppImage é um volume SquashFS prefixado com uma execução que monta o sistema de arquivo SquashFS e executa o binário criado com o --entry-point. Isso resulta num arquivo auto-contido que agrupa o software e todos os requisitos num único arquivo. Quando o mesmo é executado, ele roda o software empacotado.
guix pack -f appimage --entry-point=bin/vlc vlc
A execução usada pelos AppImages invoca o comando
fusermount3para montar a imagem rapidamente. Se o comando está indiponível, o AppImage falha em executar, mas ele ainda pode ser iniciado com a opção --appimage-extract-and-run.Aviso: Ao construir um AppImage, sempre passe a opção --relocatable (ou -R, ou a -RR) para ter certeza que a imagem pode ser usada em sistemas onde o Guix não está instalado. Um aviso é impresso quando esta opção não é usada.
guix pack -f appimage --entry-point=bin/hello --relocatable hello
Nota: The resulting AppImage does not conform to the complete standard as it currently does not contain a .DirIcon file. This does not impact functionality of the AppImage itself, but possibly that of software used to manage AppImages.
Nota: As the generated AppImage packages the complete dependency graph, it will be larger than comparable AppImage files found online, which depend on host system libraries.
--relocatable-RProduza binários relocáveis—ou seja, binários que podem ser colocados em qualquer lugar na hierarquia do sistema de arquivos e executados a partir daí.
Quando essa opção é passada uma vez, os binários resultantes requerem suporte para user namespaces no kernel Linux; quando passada duas vezes18, binários relocáveis recorrem a outras técnicas se os namespaces de usuário não estiverem disponíveis, e essencialmente funcionam em qualquer lugar—veja abaixo as implicações.
Por exemplo, se você criar uma embalagem contendo Bash com:
guix pack -RR -S /mybin=bin bash
... você pode copiar essa embalagem para uma máquina que não tenha Guix e, a partir do seu diretório pessoal, como um usuário normal, executar:
tar xf pack.tar.gz ./mybin/sh
Nesse shell, se você digitar
ls /gnu/store, você notará que /gnu/store aparece e contém todas as dependências debash, mesmo que a máquina realmente não tenha /gnu/store completamente! Essa é provavelmente a maneira mais simples de implementar software construído pelo Guix em uma máquina não Guix.Nota: Por padrão, binários relocáveis dependem do recurso user namespace do kernel Linux, que permite que usuários sem privilégios montem ou alterem a raiz (chroot). Versões antigas do Linux não o suportavam, e algumas distribuições GNU/Linux o desativam.
Para produzir binários relocáveis que funcionam mesmo na ausência de namespaces de usuário, passe --relocatable ou -R duas vezes. Nesse caso, os binários tentarão o suporte a namespaces de usuário e retornarão a outro mecanismo de execução se os namespaces de usuário não forem suportados. Os seguintes mecanismos de execução são suportados:
defaultExperimente usar namespaces de usuário e retorne ao PRoot se eles não forem suportados (veja abaixo).
performanceExperimente usar namespaces de usuário e retorne ao Fakechroot se eles não forem suportados (veja abaixo).
usernsExecute o programa por meio de namespaces de usuário e aborte se eles não forem suportados.
prootExecute através do PRoot. O programa PRoot fornece o suporte necessário para virtualização do sistema de arquivos. Ele consegue isso usando a chamada de sistema
ptraceno programa em execução. Essa abordagem tem a vantagem de funcionar sem exigir suporte especial do kernel, mas incorre em sobrecarga de tempo de execução toda vez que uma chamada de sistema é feita.fakechrootExecute através do Fakechroot. Fakechroot virtualiza acessos ao sistema de arquivos interceptando chamadas para funções da biblioteca C, como
open,stat,exece assim por diante. Ao contrário do PRoot, ele incorre em muito pouca sobrecarga. No entanto, nem sempre funciona: por exemplo, alguns acessos ao sistema de arquivos feitos de dentro da biblioteca C não são interceptados, e acessos ao sistema de arquivos feitos via syscalls diretas também não são interceptados, levando a um comportamento errático.
Ao executar um programa encapsulado, você pode solicitar explicitamente um dos mecanismos de execução listados acima, definindo a variável de ambiente
GUIX_EXECUTION_ENGINEadequadamente.--entry-point=comandoUse comando como o ponto de entrada da embalagem resultante, se o formato da embalagem for compatível — atualmente,
docker,appimageesquashfs(Singularity) o são. comando deve ser relativo ao perfil contido na embalagem.O ponto de entrada especifica o comando que ferramentas como
docker runousingularity runiniciam automaticamente por padrão. Por exemplo, você pode fazer:guix pack -f docker --entry-point=bin/guile guile
A embalagem resultante pode ser facilmente carregado e
docker runsem argumentos extras irá gerarbin/guile:docker load -i pack.tar.gz docker run image-id
--entry-point-argument=comando-A comandoUse comando como um argumento para o ponto de entrada da embalagem resultante. Esta opção é válida somente em conjunto com
--entry-pointe pode aparecer várias vezes na linha de comando.guix pack -f docker --entry-point=bin/guile --entry-point-argument="--help" guile
--max-layers=nEspecifica o número máximo de camadas de imagem do Docker permitidas ao criar uma imagem.
guix pack -f docker --max-layers=100 guile
Esta opção permite que você limite o número de camadas em uma imagem Docker. As imagens Docker são compostas de várias camadas, e cada camada adiciona ao tamanho geral e à complexidade da imagem. Ao definir um número máximo de camadas, você pode controlar os seguintes efeitos:
- Uso do disco: Aumentar o número de camadas pode ajudar a otimizar o espaço em disco necessário para armazenar várias imagens criadas com um grafo de pacote semelhante.
- Puxar: Ao transferir imagens entre diferentes nós ou sistemas, ter mais camadas pode reduzir o tempo necessário para puxar a imagem.
--expression=expr-e exprConsidere o pacote que expr avalia.
Isso tem o mesmo propósito que a opção de mesmo nome em
guix build(veja --expression emguix build).--file=arquivoBuild a pack containing the package or other object the code within file evaluates to.
This has the same purpose as the same-named option in
guix build(veja --file inguix build), but it has no shorthand, because -f already means --format.--manifest=arquivo-m arquivoUse os pacotes contidos no objeto manifesto retornado pelo código Scheme em arquivo. Esta opção pode ser repetida várias vezes, nesse caso os manifestos são concatenados.
Isto tem um propósito similar à opção de mesmo nome em
guix package(veja --manifest) e usa os mesmos arquivos de manifesto. Ele permite que você defina uma coleção de pacotes uma vez e use-a tanto para criar perfis quanto para criar arquivos para uso em máquinas que não tenham o Guix instalado. Note que você pode especificar ou um arquivo de manifesto ou uma lista de pacotes, mas não ambos.Veja Escrevendo manifestos, para obter informações sobre como escrever um manifesto. Veja
guix shell --export-manifest, para obter informações sobre como “converter” opções de linha de comando em um manifesto.--system=sistema-s sistemaTente compilar para sistema—por exemplo,
i686-linux—em vez do tipo de sistema do host de compilação.--target=tripleto¶Construção cruzada para tripleto, que deve ser um tripleto GNU válido, como
"aarch64-linux-gnu"(veja (Autoconf)autoconf).--compression=ferramenta-C ferramentaCompacte o tarball resultante usando ferramenta—um dos seguintes:
gzip,zstd,bzip2,xz,lzipounonepara nenhuma compactação.--symlink=spec-S specAdicione os symlinks especificados por spec à embalagem. Esta opção pode aparecer várias vezes.
spec tem o formato
fonte=alvo, onde fonte é a ligação simbólica que será criado e alvo é o destino da ligação simbólica.Por exemplo,
-S /opt/gnu/bin=bincria uma ligação simbólica /opt/gnu/bin apontanda para o subdiretório bin do perfil.--save-provenanceSalvar informações de procedência para os pacotes passados na linha de comando. As informações de procedência incluem a URL e o commit dos canais em uso (veja Canais).
As informações de procedência são salvas no arquivo /gnu/store/…-profile/manifest na embalagem, junto com os metadados usuais do pacote — o nome e a versão de cada pacote, suas entradas propagadas e assim por diante. São informações úteis para o destinatário da embalagem, que então sabe como a embalagem foi (supostamente) obtida.
Esta opção não é habilitada por padrão porque, assim como os timestamps, as informações de proveniência não contribuem em nada para o processo de construção. Em outras palavras, há uma infinidade de URLs de canais e IDs de commit que podem levar à mesma embalagem. Gravar esses metadados “silenciosos” na saída, portanto, potencialmente quebra a propriedade de reprodutibilidade bit a bit de origem para binário.
--root=arquivo¶-r arquivoCrie arquivo como uma ligação simbólica para a embalagem resultante e registre-a como uma raiz do coletor de lixo.
--localstatedir--profile-name=nomeInclua o “diretório de estado local”, /var/guix, na embalagem resultante, e principalmente o perfil /var/guix/profiles/per-user/root/nome — por padrão, nome é
guix-profile, que corresponde a ~root/.guix-profile./var/guix contém o banco de dados do armazém (veja O armazém), bem como as raízes do coletor de lixo (veja Invocando
guix gc). Fornecê-lo na embalagem significa que o armazém está “completo” e gerenciável pelo Guix; não fornecê-lo na embalagem significa que o armazém está “morto”: itens não podem ser adicionados a ele ou removidos dele após a extração da embalagem.Um caso de uso para isso é o tarball binário independente do Guix (veja Instalação de binários).
--derivation-dExiba o nome da derivação que constrói a embalagem.
--bootstrapUse os binários bootstrap para construir a embalagem. Esta opção é útil somente para desenvolvedores do Guix.
Além disso, guix pack suporta todas as opções de compilação comuns
(veja Opções de compilação comuns) e todas as opções de transformação de pacote
(veja Opções de transformação de pacote).
Próximo: Invocando guix git authenticate, Anterior: Invocando guix pack, Acima: Desenvolvimento [Conteúdo][Índice]
7.4 A cadeia de ferramentas do GCC
Se você precisa de uma cadeia de ferramentas completa para compilar e
vincular código-fonte C ou C++, use o pacote gcc-toolchain. Este
pacote fornece uma cadeia de ferramentas GCC completa para desenvolvimento
C/C++, incluindo o próprio GCC, a GNU C Library (cabeçalhos e binários, além
de símbolos de depuração na saída debug), Binutils e um wrapper de
vinculador.
O propósito do wrapper é inspecionar os switches -L e -l
passados para o vinculador, adicionar argumentos -rpath
correspondentes e invocar o vinculador real com esse novo conjunto de
argumentos. Você pode instruir o wrapper a se recusar a vincular bibliotecas
que não estejam no store definindo a variável de ambiente
GUIX_LD_WRAPPER_ALLOW_IMPURITIES como no.
O pacote gfortran-toolchain fornece uma cadeia de ferramentas GCC
completa para desenvolvimento Fortran. Para outras linguagens, use
‘guix search gcc toolchain’ (veja Invoking guix
package).
Anterior: A cadeia de ferramentas do GCC, Acima: Desenvolvimento [Conteúdo][Índice]
7.5 Invocando guix git authenticate
O comando guix git authenticate autentica um checkout do Git
seguindo a mesma regra dos canais (veja autenticação dos canais). Ou seja, a partir de um commit determinado, ele
garante que todos os commits subsequentes sejam assinados por uma chave
OpenPGP cuja impressão digital apareça no arquivo
.guix-authorizations de seus commits pais.
Você achará esse comando útil se mantiver um canal. Mas, na verdade, esse mecanismo de autenticação é útil em um contexto mais amplo, então você pode querer usá-lo para repositórios Git que não tenham nada a ver com Guix.
A sintaxe geral é:
guix git authenticate commit signer [options…]
By default, this command authenticates the Git checkout in the current directory; it outputs nothing and exits with exit code zero on success and non-zero on failure. commit above denotes the first commit where authentication takes place, and signer is the OpenPGP fingerprint of public key used to sign commit. Together, they form a channel introduction (veja channel introduction). On your first successful run, the introduction is recorded in the .git/config file of your checkout, allowing you to omit them from subsequent invocations:
guix git authenticate [opções…]
Caso você tenha ramos que exijam introduções diferentes, você pode
especificá-las diretamente em .git/config. Por exemplo, se o ramo
chamado personal-fork tiver uma introdução diferente de outros ramos,
você pode estender .git/config ao longo destas linhas:
[guix "authentication-personal-fork"] introduction-commit = cabba936fd807b096b48283debdcddccfea3900d introduction-signer = C0FF EECA BBA9 E6A8 0D1D E643 A2A0 6DF2 A33A 54FA keyring = keyring
A primeira execução também tenta instalar ganchos pré-push e pós-mesclagem,
de modo que guix git authenticate seja invocado assim que você
executar git push, git pull e comandos relacionados; no
entanto, ele não substitui ganchos preexistentes.
As opções de linha de comando descritas abaixo permitem que você ajuste o processo.
--repository=diretório-r diretórioAbra o repositório Git em diretório em vez do diretório atual.
--keyring=referência-k referênciaCarregue o chaveiro OpenPGP de referência, a referência de uma ramificação como
origin/keyringoumy-keyring. A ramificação deve conter chaves públicas OpenPGP em arquivos .key, em formato binário ou “ASCII-armored”. Por padrão, o chaveiro é carregado da ramificação chamadakeyring.--end=commitAutentique revisões até commit.
--statsExibir estatísticas de assinatura de confirmação após a conclusão.
--cache-key=chaveOs commits autenticados anteriormente são armazenados em cache em um arquivo em ~/.cache/guix/authentication. Esta opção força o cache a ser armazenado no arquivo chave naquele diretório.
--historical-authorizations=arquivoPor padrão, qualquer commit cujo(s) commit(s) pai(s) não tenha(m) o arquivo .guix-authorizations é considerado não autêntico. Em contraste, esta opção considera as autorizações em arquivo para qualquer commit que não tenha .guix-authorizations. O formato de arquivo é o mesmo que o de .guix-authorizations (veja formato .guix-authorizations).
Próximo: Utilitários, Anterior: Desenvolvimento, Acima: GNU Guix [Conteúdo][Índice]
8 Interface de programação
O GNU Guix fornece várias interfaces de programação Scheme (APIs) para definir, construir e consultar pacotes. A primeira interface permite que os usuários escrevam definições de pacotes de alto nível. Essas definições se referem a conceitos de empacotamento familiares, como o nome e a versão de um pacote, seu sistema de construção e suas dependências. Essas definições podem então ser transformadas em ações de construção concretas.
As ações de build são executadas pelo daemon Guix, em nome dos usuários. Em uma configuração padrão, o daemon tem acesso de gravação ao armazém—o diretório /gnu/store—enquanto os usuários não têm. A configuração recomendada também faz com que o daemon execute builds em chroots, sob usuários de compilação específicos, para minimizar a interferência com o resto do sistema.
APIs de nível inferior estão disponíveis para interagir com o daemon e o armazém. Para instruir o daemon a executar uma ação de compilação, os usuários na verdade fornecem a ele uma derivação. Uma derivação é uma representação de baixo nível das ações de compilação a serem tomadas e do ambiente no qual elas devem ocorrer — derivações são para definições de pacotes o que assembly é para programas C. O termo “derivação” vem do fato de que os resultados de compilação derivam deles.
Este capítulo descreve todas essas APIs, começando pelas definições de pacotes de alto nível. Veja Estrutura da árvore de origem, para uma visão geral mais geral do código-fonte.
- Módulos de pacote
- Definindo pacotes
- Definindo variantes de pacote
- Escrevendo manifestos
- Sistemas de compilação
- Fases de construção
- Construir utilitários
- Caminhos de pesquisa
- O armazém
- Derivações
- A mônada do armazém
- Expressões-G
- Invocando
guix repl - Usando Guix interativamente
Próximo: Definindo pacotes, Acima: Interface de programação [Conteúdo][Índice]
8.1 Módulos de pacote
Do ponto de vista da programação, as definições de pacotes da distribuição
GNU são fornecidas pelos módulos Guile no namespace (gnu packages
…)19 (veja módulos Guile em Manual de Referência do
GNU Guile). Por exemplo, o módulo (gnu packages emacs) exporta uma
variável chamada emacs, que é vinculada a um objeto <package>
(veja Definindo pacotes).
O namespace do módulo (gnu packages …) é automaticamente
escaneado em busca de pacotes pelas ferramentas de linha de comando. Por
exemplo, ao executar guix install emacs, todos os módulos (gnu
packages …) são escaneados até que um que exporte um objeto de pacote
cujo nome é emacs seja encontrado. Esse recurso de busca de pacotes é
implementado no módulo (gnu packages).
Os usuários podem armazenar definições de pacotes em módulos com nomes
diferentes — por exemplo, (my-packages emacs)20. Há duas maneiras de tornar
essas definições de pacotes visíveis para as interfaces do usuário:
- Ao adicionar o diretório que contém os módulos do seu pacote ao caminho de
pesquisa com o sinalizador
-Ldoguix packagee outros comandos (veja Opções de compilação comuns), ou definindo a variável de ambienteGUIX_PACKAGE_PATHdescrita abaixo. - Ao definir um canal e configurando
guix pullpara que ele puxe dele. Um canal é essencialmente um repositório Git contendo módulos de pacote. Veja Canais, para mais informações sobre como definir e usar canais.
GUIX_PACKAGE_PATH funciona de forma semelhante a outras variáveis de
caminho de pesquisa:
- Variável de ambiente: GUIX_PACKAGE_PATH
Esta é uma lista de diretórios separados por dois pontos para procurar módulos de pacotes adicionais. Os diretórios listados nesta variável têm precedência sobre os próprios módulos da distribuição.
A distribuição é totalmente bootstrapped e auto-contida: cada
pacote é construído com base somente em outros pacotes na distribuição. A
raiz deste grafo de dependência é um pequeno conjunto dos binários
bootstrap, fornecido pelo módulo (gnu packages bootstrap). Para mais
informações sobre bootstrapping, veja Inicializando.
Próximo: Definindo variantes de pacote, Anterior: Módulos de pacote, Acima: Interface de programação [Conteúdo][Índice]
8.2 Definindo pacotes
A interface de alto nível para definições de pacotes é implementada nos
módulos (guix packages) e (guix build-system). Como exemplo, a
definição de pacote, ou receita, para o pacote GNU Hello se parece com
isto:
(define-module (gnu packages hello) #:use-module (guix packages) #:use-module (guix download) #:use-module (guix build-system gnu) #:use-module (guix licenses) #:use-module (gnu packages gawk)) (define-public hello (package (name "hello") (version "2.10") (source (origin (method url-fetch) (uri (string-append "mirror://gnu/hello/hello-" version ".tar.gz")) (sha256 (base32 "0ssi1wpaf7plaswqqjwigppsg5fyh99vdlb9kzl7c9lng89ndq1i")))) (build-system gnu-build-system) (arguments '(#:configure-flags '("--enable-silent-rules"))) (inputs (list gawk)) (synopsis "Hello, GNU world: An example GNU package") (description "Guess what GNU Hello prints!") (home-page "https://www.gnu.org/software/hello/") (license gpl3+)))
Sem ser um especialista em Scheme, o leitor pode ter adivinhado o
significado dos vários campos aqui. Esta expressão vincula a variável
hello a um objeto <package>, que é essencialmente um registro
(veja Scheme records em Manual de Referência do GNU
Guile). Este objeto de pacote pode ser inspecionado usando procedimentos
encontrados no módulo (guix packages); por exemplo,
(package-name hello) retorna—surpresa!—"hello".
Com sorte, você poderá importar parte ou toda a definição do pacote de seu
interesse de outro repositório, usando o comando guix import
(veja Invoking guix import).
No exemplo acima, hello é definido em um módulo próprio, (gnu
packages hello). Tecnicamente, isso não é estritamente necessário, mas é
conveniente fazê-lo: todos os pacotes definidos em módulos sob (gnu
packages …) são automaticamente conhecidos pelas ferramentas de linha
de comando (veja Módulos de pacote).
Há alguns pontos que vale a pena observar na definição do pacote acima:
- O campo
sourcedo pacote é um objeto<origin>(veja Referência doorigin, para a referência completa). Aqui, o métodourl-fetchde(guix download)é usado, o que significa que a fonte é um arquivo a ser baixado por FTP ou HTTP.O prefixo
mirror://gnuinstruiurl-fetcha usar um dos espelhos GNU definidos em(guix download).O campo
sha256especifica o hash SHA256 esperado do arquivo que está sendo baixado. É obrigatório e permite que o Guix verifique a integridade do arquivo. O formulário(base32 …)introduz a representação base32 do hash. Você pode obter essas informações comguix download(veja Invocandoguix download) eguix hash(veja Invocandoguix hash).Quando necessário, o formulário
origintambém pode ter um campopatcheslistando os remendos a serem aplicados e um camposnippetfornecendo uma expressão Scheme para modificar o código-fonte. -
O campo
build-systemespecifica o procedimento para construir o pacote (veja Sistemas de compilação). Aqui,gnu-build-systemrepresenta o familiar GNU Build System, onde os pacotes podem ser configurados, construídos e instalados com a sequência de comando usual./configure && make && make check && make install.Ao começar a empacotar software não trivial, você pode precisar de ferramentas para manipular essas fases de compilação, manipular arquivos e assim por diante. Veja Construir utilitários, para mais informações sobre isso.
- O campo
argumentsespecifica opções para o sistema de compilação (veja Sistemas de compilação). Aqui, ele é interpretado porgnu-build-systemcomo uma solicitação executada configure com o sinalizador --enable-silent-rules.E quanto a esses caracteres de citação (
')? Eles são sintaxe Scheme para introduzir uma lista literal;'é sinônimo dequote. Às vezes, você também verá`(uma crase, sinônimo dequasiquote) e,(uma vírgula, sinônimo deunquote). Veja quoting em Manual de referência do GNU Guile, para detalhes. Aqui, o valor do campoargumentsé uma lista de argumentos passados para o sistema de construção mais adiante, como comapply(vejaapplyem Manual de referência do GNU Guile).A sequência hash-dois-pontos (
#:) define um palavra-chave em Scheme (veja Keywords em Manual de referência do GNU Guile) e#:configure-flagsé uma palavra-chave usada para passar um argumento de palavra-chave para o sistema de compilação (veja Coding With Keywords em Manual de referência do GNU Guile). - O campo
inputsespecifica entradas para o processo de construção—i.e., dependências de tempo de construção ou tempo de execução do pacote. Aqui, adicionamos uma entrada, uma referência à variávelgawk;gawké ele próprio vinculado a um objeto<package>.Note que GCC, Coreutils, Bash e outras ferramentas essenciais não precisam ser especificadas como entradas aqui. Em vez disso,
gnu-build-systemcuida de garantir que elas estejam presentes (veja Sistemas de compilação).No entanto, quaisquer outras dependências precisam ser especificadas no campo
inputs. Qualquer dependência não especificada aqui simplesmente ficará indisponível para o processo de build, possivelmente levando a uma falha de build.
Veja Referência do package, para uma descrição completa dos campos possíveis.
Indo além: Intimidado pela linguagem Scheme ou curioso sobre ela? O Livro de receitas tem uma seção curta para começar que recapitula algumas das coisas mostradas acima e explica os fundamentos. Veja Um curso intensivo de Scheme em Livro de receitas do GNU Guix, para mais informações.
Uma vez que uma definição de pacote esteja pronta, o pacote pode ser
realmente construído usando a ferramenta de linha de comando guix
build (veja Invocando guix build), solucionando problemas de quaisquer
falhas de construção que você encontrar (veja Depurando falhas de compilação). Você pode facilmente voltar para a definição do pacote usando o
comando guix edit (veja Invocando guix edit). Veja Diretrizes de empacotamento, para mais informações sobre como testar definições de pacote, e
Invocando guix lint, para informações sobre como verificar uma
definição para conformidade de estilo.
Por fim, veja Canais, para obter informações sobre como estender a
distribuição adicionando suas próprias definições de pacote em um “canal”.
Por fim, a atualização da definição do pacote para uma nova versão upstream
pode ser parcialmente automatizada pelo comando guix refresh
(veja Invocando guix refresh).
Nos bastidores, uma derivação correspondente ao objeto <package> é
primeiro computada pelo procedimento package-derivation. Essa
derivação é armazenada em um arquivo .drv em /gnu/store. As
ações de construção que ele prescreve podem então ser realizadas usando o
procedimento build-derivations (veja O armazém).
- Procedimento: package-derivation armazém pacote [sistema]
Retorne o objeto
<derivation>de pacote para sistema (veja Derivações).pacote deve ser um objeto
<package>válido e sistema deve ser uma string que indique o tipo de sistema de destino — por exemplo,"x86_64-linux"para um sistema GNU baseado em Linux x86_64. armazém deve ser uma conexão com o daemon, que opera no armazém (veja O armazém).
Da mesma forma, é possível calcular uma derivação que crie um pacote para algum outro sistema:
- Procedimento: package-cross-derivation armazém pacote alvo [sistema]
Retorne o objeto
<derivation>de pacote criado de sistema para alvo.alvo deve ser um tripleto GNU válido que indique o hardware e o sistema operacional de destino, como
"aarch64-linux-gnu"(veja Specifying Target Triplets em Autoconf).
Depois de ter as definições dos pacotes, você pode definir facilmente variantes desses pacotes. Veja Definindo variantes de pacote, para mais informações sobre isso.
Próximo: Referência do origin, Acima: Definindo pacotes [Conteúdo][Índice]
8.2.1 Referência do package
Esta seção resume todas as opções disponíveis nas declarações package
(veja Definindo pacotes).
- Tipo de dados: package
Este é o tipo de dado que representa uma receita de pacote.
nameThe name of the package, as a string.
versionThe version of the package, as a string. Veja Números de versão, for guidelines.
sourceUm objeto que diz como o código-fonte do pacote deve ser adquirido. Na maioria das vezes, este é um objeto
origin, que denota um arquivo obtido da Internet (veja Referência doorigin). Também pode ser qualquer outro objeto “tipo arquivo”, como umlocal-file, que denota um arquivo do sistema de arquivos local (vejalocal-file).build-systemO sistema de compilação que deve ser usado para compilar o pacote (veja Sistemas de compilação).
arguments(padrão:'())Os argumentos que devem ser passados para o sistema de compilação (veja Sistemas de compilação). Esta é uma lista, normalmente contendo pares sequenciais de palavra-chave-valor, como neste exemplo:
(package (name "example") ;; several fields omitted (arguments (list #:tests? #f ;skip tests #:make-flags #~'("VERBOSE=1") ;pass flags to 'make' #:configure-flags #~'("--enable-frobbing"))))O conjunto exato de palavras-chave suportadas depende do sistema de compilação (veja Sistemas de compilação), mas você verá que quase todas elas honram
#:configure-flags,#:make-flags,#:tests?e#:phases. A palavra-chave#:phasesem particular permite que você modifique o conjunto de fases de compilação para seu pacote (veja Fases de construção).O REPL tem comandos dedicados para inspecionar interativamente os valores de alguns desses argumentos, como um auxílio de depuração conveniente (veja Usando Guix interativamente).
Nota de compatibilidade: Até a versão 1.3.0, o campo
argumentsnormalmente usariaquote(') ouquasiquote(`) e nenhuma expressão G, assim:(package ;; several fields omitted (arguments ;old-style quoted arguments '(#:tests? #f #:configure-flags '("--enable-frobbing"))))Para converter esse estilo para o mostrado acima, você pode executar
guix style -S arguments pacote(veja Invokingguix style).inputs(padrão:'()) ¶native-inputs(padrão:'())propagated-inputs(padrão:'())Esses campos listam dependências do pacote. Cada elemento dessas listas é um pacote, origem ou outro “objeto tipo arquivo” (veja Expressões-G); para especificar a saída desse objeto tipo arquivo que deve ser usado, passe uma lista de dois elementos onde o segundo elemento é a saída (veja Pacotes com múltiplas saídas, para mais informações sobre saídas de pacotes). Por exemplo, a lista abaixo especifica três entradas:
(list libffi libunistring `(,glib "bin")) ;a saída "bin" de GLib
No exemplo acima, a saída
"out"delibffielibunistringé usada.Nota de compatibilidade: Até a versão 1.3.0, as listas de entrada eram uma lista de tuplas, onde cada tupla tem um rótulo para a entrada (uma string) como seu primeiro elemento, um pacote, origem ou derivação como seu segundo elemento e, opcionalmente, o nome da saída que deve ser usada, cujo padrão é
"out". Por exemplo, a lista abaixo é equivalente à acima, mas usando o antigo estilo de entrada:;; Estilo de entrada antigo (obsoleto). `(("libffi" ,libffi) ("libunistring" ,libunistring) ("glib:bin" ,glib "bin")) ;a saída "bin" do GLib
Este estilo agora está obsoleto; ele ainda é suportado, mas o suporte será removido em uma versão futura. Ele não deve ser usado para novas definições de pacote. Veja Invoking
guix style, sobre como migrar para o novo estilo.A distinção entre
native-inputseinputsé necessária ao considerar a compilação cruzada. Ao compilar cruzadamente, as dependências listadas eminputssão construídas para a arquitetura target (alvo); inversamente, as dependências listadas emnative-inputssão construídas para a arquitetura da máquina build.native-inputsé normalmente usado para listar ferramentas necessárias no momento da compilação, mas não no momento da execução, como Autoconf, Automake, pkg-config, Gettext ou Bison.guix lintpode relatar prováveis erros nesta área (veja Invocandoguix lint).Por fim,
propagated-inputsé semelhante ainputs, mas os pacotes especificados serão instalados automaticamente nos perfis (veja a função dos perfis no Guix) junto com o pacote ao qual pertencem (vejaguix package, para obter informações sobre comoguix packagelida com entradas propagadas).Por exemplo, isso é necessário ao empacotar uma biblioteca C/C++ que precisa de cabeçalhos de outra biblioteca para compilar, ou quando um arquivo pkg-config faz referência a outro por meio de seu campo
Requires.Outro exemplo em que
propagated-inputsé útil é para linguagens que não têm um recurso para registrar o caminho de pesquisa em tempo de execução semelhante aoRUNPATHde arquivos ELF; isso inclui Guile, Python, Perl e mais. Ao empacotar bibliotecas escritas nessas linguagens, garanta que elas possam encontrar o código da biblioteca do qual dependem em tempo de execução listando as dependências em tempo de execução empropagated-inputsem vez deinputs.outputs(padrão:'("out"))A lista de nomes de saída do pacote. Veja Pacotes com múltiplas saídas, para usos típicos de saídas adicionais.
native-search-paths(padrão:'())search-paths(padrão:'())Uma lista de objetos
search-path-specificationdescrevendo variáveis de ambiente do caminho de pesquisa respeitadas pelo pacote. Veja Caminhos de pesquisa, para mais informações sobre especificações do caminho de pesquisa.Quanto às entradas, a distinção entre
native-search-pathsesearch-pathssó importa quando há compilação cruzada. Em um contexto de compilação cruzada,native-search-pathsse aplica exclusivamente a entradas nativas, enquantosearch-pathsse aplica somente a entradas de host.Pacotes como compiladores cruzados se importam com entradas de destino — por exemplo, nosso compilador cruzado GCC (modificado) tem
CROSS_C_INCLUDE_PATHemsearch-paths, o que permite que ele escolha arquivos .h para o sistema de destino e não aqueles de entradas nativas. Para a maioria dos pacotes, porém, apenasnative-search-pathsfaz sentido.replacement(padrão:#f)Deve ser
#fou um objeto de pacote que será usado como um substituição para este pacote. Veja enxertos, para detalhes.synopsisUma descrição de uma linha do pacote.
descriptionUma descrição mais elaborada do pacote, como uma string na sintaxe Texinfo.
license¶A licença do pacote; um valor de
(guix licenses), ou uma lista de tais valores.home-pageA URL para a página inicial do pacote, como uma string.
supported-systems(padrão:%supported-systems)A lista de sistemas suportados pelo pacote, como strings do formato
arquitetura-kernel, por exemplo"x86_64-linux".location(padrão: localização de origem do formuláriopackage)O local de origem do pacote. É útil sobrescrever isso ao herdar de outro pacote, em cujo caso esse campo não é corrigido automaticamente.
- Macro: this-package
Quando usado no escopo lexical de uma definição de campo de pacote, esse identificador é resolvido para o pacote que está sendo definido.
O exemplo abaixo mostra como adicionar um pacote como uma entrada nativa de si mesmo durante a compilação cruzada:
(package (name "guile") ;; ... ;; Quando compilado de forma cruzada, Guile, por exemplo, depende de ;; uma versão nativa de si mesmo. Adicione aqui. (native-inputs (if (%current-target-system) (list this-package) '())))É um erro fazer referência a
this-packagefora de uma definição de pacote.
Os seguintes procedimentos auxiliares são fornecidos para ajudar a lidar com entradas de pacotes.
- Procedimento: lookup-package-input pacote nome
- Procedimento: lookup-package-native-input pacote nome
- Procedimento: lookup-package-propagated-input pacote nome
- Procedimento: lookup-package-direct-input pacote nome
Procure nome entre as entradas de pacote (ou entradas nativas, propagadas ou diretas). Retorne-o se encontrado,
#fcaso contrário.name is the name of a package or the file name of an origin depended on. Here’s how you might use it:
(use-modules (guix packages) (gnu packages base)) (lookup-package-direct-input coreutils "gmp") ⇒ #<package gmp@6.2.1 …>
Neste exemplo, obtemos o pacote
gmpque está entre as entradas diretas decoreutils.When looking up an origin, use the name that appears in the origin’s
file-namefield or its default file name—e.g.,"foo-1.2.tar.gz".
Às vezes, você vai querer obter a lista de entradas necessárias para
desenvolver um pacote—todas as entradas que são visíveis quando o
pacote é compilado. É isso que o procedimento
package-development-inputs retorna.
- Procedimento: package-development-inputs pacote [sistema] [#:target #f]
Retorna a lista de entradas necessárias para pacote para fins de desenvolvimento em sistema. Quando target é verdadeiro, retorna as entradas necessárias para compilar cruzadamente pacote de sistema para o alvo target, onde target é um tripleto como
"aarch64-linux-gnu".Note que o resultado inclui entradas explícitas e entradas implícitas—entradas adicionadas automaticamente pelo sistema de construção (veja Sistemas de compilação). Vamos pegar o pacote
hellopara ilustrar isso:(use-modules (gnu packages base) (guix packages)) hello ⇒ #<package hello@2.10 gnu/packages/base.scm:79 7f585d4f6790> (package-direct-inputs hello) ⇒ () (package-development-inputs hello) ⇒ (("source" …) ("tar" #<package tar@1.32 …>) …)
Neste exemplo,
package-direct-inputsretorna a lista vazia, porquehellotem zero dependências explícitas. Por outro lado,package-development-inputsinclui entradas adicionadas implicitamente porgnu-build-systemque são necessárias para construirhello: tar, gzip, GCC, libc, Bash e mais. Para visualizá-lo,guix graph hellomostraria entradas explícitas, enquantoguix graph -t bag helloincluiria entradas implícitas (veja Invocandoguix graph).
Como os pacotes são objetos Scheme regulares que capturam um grafo de dependência completo e procedimentos de construção associados, geralmente é útil escrever procedimentos que pegam um pacote e retornam uma versão modificada dele de acordo com alguns parâmetros. Abaixo estão alguns exemplos.
- Procedimento: package-with-c-toolchain pacote cadeia
Retorna uma variante de pacote que usa cadeia de ferramentas em vez da cadeia de ferramentas padrão GNU C/C++. cadeia deve ser uma lista de entradas (tuplas de rótulo/pacote) que fornecem funcionalidade equivalente, como o pacote
gcc-toolchain.O exemplo abaixo retorna uma variante do pacote
hellocriado com GCC 10.x e o restante da cadeia de ferramentas GNU (Binutils e a Biblioteca C GNU) em vez da cadeia de ferramentas padrão:(let ((toolchain (specification->package "gcc-toolchain@10"))) (package-with-c-toolchain hello `(("toolchain" ,toolchain))))A cadeia de ferramentas de construção é parte das entradas implícitas dos pacotes—geralmente não é listada como parte dos vários campos “entradas” e, em vez disso, é puxada pelo sistema de construção. Consequentemente, esse procedimento funciona alterando o sistema de construção de pacote para que ele puxe cadeia de ferramentas em vez dos padrões. Veja Sistemas de compilação, para mais informações sobre sistemas de construção.
Anterior: Referência do package, Acima: Definindo pacotes [Conteúdo][Índice]
8.2.2 Referência do origin
Esta seção documenta origens. Uma declaração origin especifica
dados que devem ser “produzidos”—baixados, normalmente—e cujo hash de
conteúdo é conhecido com antecedência. Origens são usados principalmente
para representar o código-fonte de pacotes (veja Definindo pacotes). Por
esse motivo, o formulário origin permite que você declare remendos
para aplicar ao código-fonte original, bem como trechos de código para
modificá-lo.
- Tipo de dados: origin
Este é o tipo de dado que representa a origem do código-fonte.
uriUm objeto contendo o URI da fonte. O tipo de objeto depende do
method(veja abaixo). Por exemplo, ao usar o método url-fetch de(guix download), os valores válidos deurisão: uma URL representada como uma string, ou uma lista delas.methodUm procedimento monádico que manipula o URI fornecido. O procedimento deve aceitar pelo menos três argumentos: o valor do campo
urie o algoritmo de hash e o valor de hash especificados pelo campohash. Ele deve retornar um item do armazém ou uma derivação na mônada do armazém (veja A mônada do armazém); a maioria dos métodos retorna uma derivação de saída fixa (veja Derivações).Os métodos comumente usados incluem
url-fetch, que busca dados de uma URL, egit-fetch, que busca dados de um repositório Git (veja abaixo).sha256Um bytevector contendo o hash SHA-256 da fonte. Isso é equivalente a fornecer um objeto SHA256
content-hashno campohashdescrito abaixo.hashO objeto
content-hashda fonte — veja abaixo como usarcontent-hash.You can obtain this information using
guix download(veja Invocandoguix download) orguix hash(veja Invocandoguix hash).file-name(padrão:#f)O nome do arquivo sob o qual o código-fonte deve ser salvo. Quando for
#f, um valor padrão sensato será usado na maioria dos casos. Caso a fonte seja obtida de uma URL, o nome do arquivo da URL será usado. Para checkouts de controle de versão, é recomendado fornecer o nome do arquivo explicitamente porque o padrão não é muito descritivo.patches(padrão:'())Uma lista de nomes de arquivos, origens ou objetos tipo arquivo (veja objetos tipo arquivo) apontando para remendos a serem aplicados à origem.
Esta lista de remendos deve ser incondicional. Em particular, não pode depender do valor de
%current-systemou%current-target-system.snippet(padrão:#f)Uma expressão G (veja Expressões-G) ou expressão S que será executada no diretório de origem. Esta é uma maneira conveniente de modificar a origem, às vezes mais conveniente do que um patch.
patch-flags(padrão:'("-p1"))Uma lista de sinalizadores de linha de comando que devem ser passados para o comando
patch.patch-inputs(padrão:#f)Pacotes de entrada ou derivações para o processo de patching. Quando este é
#f, o conjunto usual de entradas necessárias para patching é fornecido, como GNU Patch.modules(padrão:'())Uma lista de módulos Guile que devem ser carregados durante o processo de aplicação de remendos e durante a execução do código no campo
snippet.patch-guile(padrão:#f)O pacote Guile que deve ser usado no processo de patching. Quando este é
#f, um padrão sensato é usado.
- Tipo de dados: content-hash valor [algoritmo]
Construa um objeto hash de conteúdo para o algoritmo fornecido, e com valor como seu valor hash. Quando algoritmo é omitido, presuma que é
sha256.valor pode ser uma string literal, nesse caso ela é decodificada em base32, ou pode ser um bytevector.
Os seguintes formulários são todos equivalentes:
(content-hash "05zxkyz9bv3j9h0xyid1rhvh3klhsmrpkf3bcs6frvlgyr2gwilj") (content-hash "05zxkyz9bv3j9h0xyid1rhvh3klhsmrpkf3bcs6frvlgyr2gwilj" sha256) (content-hash (base32 "05zxkyz9bv3j9h0xyid1rhvh3klhsmrpkf3bcs6frvlgyr2gwilj")) (content-hash (base64 "kkb+RPaP7uyMZmu4eXPVkM4BN8yhRd8BTHLslb6f/Rc=") sha256)
Tecnicamente,
content-hashé atualmente implementado como uma macro. Ele realiza verificações de sanidade no momento da expansão da macro, quando possível, como garantir que valor tenha o tamanho certo para algoritmo.
Como vimos acima, como exatamente os dados aos quais uma origem se refere
são recuperados é determinado pelo seu campo method. O módulo
(guix download) fornece o método mais comum, url-fetch,
descrito abaixo.
- Procedimento: url-fetch url hash-algo hash [nome] [#:executable?? #f]
Retorna uma derivação de saída fixa que busca dados de url (uma string, ou uma lista de strings denotando URLs alternativas), que deve ter hash hash do tipo hash-algo (um símbolo). Por padrão, o nome do arquivo é o nome base de URL; opcionalmente, nome pode especificar um nome de arquivo diferente. Quando executable? é verdadeiro, torna o arquivo baixado executável.
Quando uma das URLs começa com
mirror://, sua parte host é interpretada como o nome de um esquema de espelho, obtido de %mirror-file.Como alternativa, quando a URL começa com
file://, retorne o nome do arquivo correspondente no armazém.
Da mesma forma, o módulo (guix git-download) define o método de
origem git-fetch, que busca dados de um repositório de controle de
versão Git, e o tipo de dados git-reference para descrever o
repositório e a revisão a serem buscados.
- Procedimento: git-fetch ref hash-algo hash [nome]
Retorna uma derivação de saída fixa que busca ref, um objeto
<git-reference>. Espera-se que a saída tenha hash recursivo hash do tipo hash-algo (um símbolo). Use nome como o nome do arquivo, ou um nome genérico se#f.
- Procedimento: git-fetch/lfs ref hash-algo hash [nome]
Esta é uma variante do procedimento
git-fetchque suporta a extensão Git LFS (Large File Storage). Isso pode ser útil para extrair alguns dados de teste binários para executar o conjunto de testes de um pacote, por exemplo.
- Tipo de dados: git-reference
Este tipo de dado representa uma referência Git para
git-fetcha recuperar.urlA URL do repositório Git a ser clonado.
commitEsta string denota o commit a ser buscado (uma string hexadecimal) ou a tag a ser buscada. Você também pode usar um ID de commit “curto” ou um identificador de estilo
git describecomov1.0.1-10-g58d7909c97.recursive?(padrão:#f)Este booleano indica se os submódulos do Git devem ser buscados recursivamente.
O exemplo abaixo denota a tag
v2.10do repositório GNU Hello:(git-reference (url "https://git.savannah.gnu.org/git/hello.git") (commit "v2.10"))Isso é equivalente à referência abaixo, que nomeia explicitamente o commit:
(git-reference (url "https://git.savannah.gnu.org/git/hello.git") (commit "dc7dc56a00e48fe6f231a58f6537139fe2908fb9"))
Para repositórios Mercurial, o módulo (guix hg-download) define o
método de origem hg-fetch e o tipo de dados hg-reference para
suporte ao sistema de controle de versão Mercurial.
- Procedimento: hg-fetch ref hash-algo hash [nome]
Retorna uma derivação de saída fixa que busca ref, um objeto
<hg-reference>. Espera-se que a saída tenha hash recursivo hash do tipo hash-algo (um símbolo). Use nome como o nome do arquivo, ou um nome genérico se#f.
- Tipo de dados: hg-reference
Este tipo de dado representa uma referência Mercurial para
hg-fetcha recuperar.urlA URL do repositório Mercurial a ser clonado.
changesetEsta sequência de caracteres indica a revisão a ser buscado.
Para repositórios Subversion, o módulo (guix svn-download) define o
método de origem svn-fetch e o tipo de dados svn-reference
para suporte ao sistema de controle de versão Subversion.
- Procedimento: svn-fetch ref hash-algo hash [nome]
Retorna uma derivação de saída fixa que busca ref, um objeto
<svn-reference>. Espera-se que a saída tenha hash recursivo hash do tipo hash-algo (um símbolo). Use nome como o nome do arquivo, ou um nome genérico se#f.
- Tipo de dados: svn-reference
Este tipo de dado representa uma referência Subversion para
svn-fetcha recuperar.urlA URL do repositório Subversion a ser clonado.
revisionEsta sequência de caracteres denota a revisão a ser buscada especificada como um número.
recursive?(padrão:#f)Este booleano indica se deve-se buscar recursivamente “externals” do Subversion.
user-name(padrão:#f)O nome de uma conta que tem acesso de leitura ao repositório, se o repositório não for público.
password(padrão:#f)Senha para acessar o repositório Subversion, se necessário.
Para repositórios Bazaar, o módulo (guix bzr-download) define o
método de origem bzr-fetch e o tipo de dados bzr-reference
para suporte ao sistema de controle de versão Bazaar.
- Procedimento: bzr-fetch ref hash-algo hash [nome]
Retorna uma derivação de saída fixa que busca ref, um objeto
<bzr-reference>. Espera-se que a saída tenha hash recursivo hash do tipo hash-algo (um símbolo). Use nome como o nome do arquivo, ou um nome genérico se#f.
- Tipo de dados: bzr-reference
Este tipo de dado representa uma referência Bazaar para
bzr-fetcha recuperar.urlA URL do repositório Bazaar a ser clonado.
revisionEsta sequência de caracteres denota a revisão a ser buscada especificada como um número.
Para repositórios CVS, o módulo (guix cvs-download) define o método
de origem cvs-fetch e o tipo de dados cvs-reference para
suporte ao Concurrent Versions System (CVS).
- Procedimento: cvs-fetch ref hash-algo hash [nome]
Retorna uma derivação de saída fixa que busca ref, um objeto
<cvs-reference>. Espera-se que a saída tenha hash recursivo hash do tipo hash-algo (um símbolo). Use nome como o nome do arquivo, ou um nome genérico se#f.
- Tipo de dados: cvs-reference
Este tipo de dado representa uma referência CVS para
cvs-fetcha recuperar.root-directoryO diretório raiz do CVS.
moduleMódulo a ser buscado.
revisionRevisão para buscar.
O exemplo abaixo denota uma versão do gnu-standards para buscar:
(cvs-reference (root-directory ":pserver:anonymous@cvs.savannah.gnu.org:/sources/gnustandards") (module "gnustandards") (revision "2020-11-25"))
Próximo: Escrevendo manifestos, Anterior: Definindo pacotes, Acima: Interface de programação [Conteúdo][Índice]
8.3 Definindo variantes de pacote
Uma das coisas boas com o Guix é que, dada uma definição de pacote, você pode facilmente derivar variantes desse pacote—para uma versão upstream diferente, com dependências diferentes, opções de compilação diferentes e assim por diante. Alguns desses pacotes personalizados podem ser definidos diretamente da linha de comando (veja Opções de transformação de pacote). Esta seção descreve como definir variantes de pacotes no código. Isso pode ser útil em “manifestos” (veja Escrevendo manifestos) e em sua própria coleção de pacotes (veja Criando um canal), entre outros!
Conforme discutido anteriormente, os pacotes são objetos de primeira classe
na linguagem Scheme. O módulo (guix packages) fornece a construção
package para definir novos objetos de pacote (veja Referência do package). A maneira mais fácil de definir uma variante de pacote é usando
a palavra-chave inherit junto com package. Isso permite que
você herde de uma definição de pacote enquanto substitui os campos que
deseja.
Por exemplo, dada a variável hello, que contém uma definição para a
versão atual do GNU Hello, veja como você definiria uma variante para a
versão 2.2 (lançada em 2006, é vintage!):
(use-modules (gnu packages base)) ;para 'hello' (define hello-2.2 (package (inherit hello) (version "2.2") (source (origin (method url-fetch) (uri (string-append "mirror://gnu/hello/hello-" version ".tar.gz")) (sha256 (base32 "0lappv4slgb5spyqbh6yl5r013zv72yqg2pcl30mginf3wdqd8k9"))))))
O exemplo acima corresponde ao que as opções de transformação de pacote
--with-version ou --with-source fazem. Essencialmente,
hello-2.2 preserva todos os campos de hello, exceto
version e source, que ele substitui. Observe que a variável
hello original ainda está lá, no módulo (gnu packages base),
inalterada. Quando você define um pacote personalizado como este, você está
realmente adicionando uma nova definição de pacote; a original
permanece disponível.
Você pode também definir variantes com um conjunto diferente de dependências
do que o pacote original. Por exemplo, o pacote padrão gdb depende de
guile, mas como essa é uma dependência opcional, você pode definir
uma variante que remova essa dependência assim:
(use-modules (gnu packages gdb)) ;para 'gdb' (define gdb-sans-guile (package (inherit gdb) (inputs (modify-inputs (package-inputs gdb) (delete "guile")))))
O formulário modify-inputs acima remove o pacote "guile" do
campo inputs de gdb. A macro modify-inputs é um
auxiliar que pode ser útil sempre que você quiser remover, adicionar ou
substituir entradas de pacote.
- Macro: modify-inputs entradas cláusulas
Modifique as entradas do pacote fornecido, conforme retornado por
package-inputs& co., de acordo com as cláusulas fornecidas. Cada cláusula deve ter uma das seguintes formas:(delete nome…)Exclua dos pacotes de entrada os nomes (strings) fornecidos.
(prepend pacote…)Adicione pacotes à frente da lista de entrada.
(append pacote…)Adicione pacotes ao final da lista de entrada.
(replace nome substituição)Substitua o pacote chamado nome por substituição.
O exemplo abaixo remove as entradas GMP e ACL do Coreutils e adiciona libcap à frente da lista de entradas:
(modify-inputs (package-inputs coreutils) (delete "gmp" "acl") (prepend libcap))O exemplo abaixo substitui o pacote
guiledas entradas deguile-redisporguile-2.2:(modify-inputs (package-inputs guile-redis) (replace "guile" guile-2.2))The last type of clause is
append, to add inputs at the back of the list.
Em alguns casos, você pode achar útil escrever funções (“procedimentos”,
no jargão do Scheme) que retornam um pacote com base em alguns
parâmetros. Por exemplo, considere a biblioteca luasocket para a
linguagem de programação Lua. Queremos criar pacotes luasocket para
as principais versões do Lua. Uma maneira de fazer isso é definir um
procedimento que pega um pacote Lua e retorna um pacote luasocket que
depende dele:
(define (make-lua-socket name lua) ;; Return a luasocket package built with LUA. (package (name name) (version "3.0") ;; several fields omitted (inputs (list lua)) (synopsis "Socket library for Lua"))) (define-public lua5.1-socket (make-lua-socket "lua5.1-socket" lua-5.1)) (define-public lua5.2-socket (make-lua-socket "lua5.2-socket" lua-5.2))
Aqui definimos os pacotes lua5.1-socket e lua5.2-socket
chamando make-lua-socket com argumentos
diferentes. Veja Procedures em GNU Guile Reference Manual, para
mais informações sobre procedimentos. Ter definições públicas de nível
superior para esses dois pacotes significa que eles podem ser referenciados
a partir da linha de comando (veja Módulos de pacote).
Essas são variantes de pacote bem simples. Como uma conveniência, o módulo
(guix transformations) fornece uma interface de alto nível que mapeia
diretamente para as opções de transformação de pacote mais sofisticadas
(veja Opções de transformação de pacote):
- Procedimento: options->transformation opções
Retorna um procedimento que, quando passado um objeto para construção (pacote, derivação, etc.), aplica as transformações especificadas por opções e retorna os objetos resultantes. opções deve ser uma lista de pares símbolo/string como:
((with-branch . "guile-gcrypt=master") (without-tests . "libgcrypt"))Cada símbolo nomeia uma transformação e a string correspondente é um argumento para essa transformação.
Por exemplo, um manifesto equivalente a este comando:
guix build guix \ --with-branch=guile-gcrypt=master \ --with-debug-info=zlib
... ficaria assim:
(use-modules (guix transformations)) (define transform ;; The package transformation procedure. (options->transformation '((with-branch . "guile-gcrypt=master") (with-debug-info . "zlib")))) (packages->manifest (list (transform (specification->package "guix"))))
O procedimento options->transformation é conveniente, mas talvez
também não seja tão flexível quanto você gostaria. Como ele é implementado?
O leitor astuto provavelmente notou que a maioria das opções de
transformação de pacotes vai além das mudanças superficiais mostradas nos
primeiros exemplos desta seção: elas envolvem reescrita de entrada,
por meio da qual o grafo de dependência de um pacote é reescrito pela
substituição de entradas específicas por outras.
A reescrita do grafo de dependência, para fins de troca de pacotes no grafo,
é o que o procedimento package-input-rewriting em (guix
packages) implementa.
- Procedimento: package-input-rewriting substituições [nome-da-reescrita] [#:deep? #t] [#:recursive? #f]
Retorna um procedimento que, quando recebe um pacote, substitui suas dependências diretas e indiretas, incluindo entradas implícitas quando deep? é verdadeiro, de acordo com substituições. substituições é uma lista de pares de pacotes; o primeiro elemento de cada par é o pacote a ser substituído, e o segundo é a substituição.
When recursive? is true, apply replacements to the right-hand sides of replacements as well, recursively.
Opcionalmente, nome-da-reescrita é um procedimento de um argumento que recebe o nome de um pacote e retorna seu novo nome após a reescrita.
Considere este exemplo:
(define libressl-instead-of-openssl ;; This is a procedure to replace OPENSSL by LIBRESSL, ;; recursively. (package-input-rewriting `((,openssl . ,libressl)))) (define git-with-libressl (libressl-instead-of-openssl git))
Aqui, primeiro definimos um procedimento de reescrita que substitui openssl por libressl. Então, o usamos para definir uma variante do pacote git que usa libressl em vez de openssl. É exatamente isso que a opção de linha de comando --with-input faz (veja --with-input).
A seguinte variante de package-input-rewriting pode corresponder a
pacotes a serem substituídos por nome em vez de identidade.
- Procedimento: package-input-rewriting/spec substituições [#:deep? #t] [#:replace-hidden? #t]
Retorna um procedimento que, dado um pacote, aplica as substituições fornecidas a todo o grafo do pacote, incluindo entradas implícitas, a menos que deep? seja falso.
replacements is a list of spec/procedures pair; each spec is a package specification such as
"gcc"or"guile@2", and each procedure takes a matching package and returns a replacement for that package. Matching packages that have thehidden?property set are not replaced unless replace-hidden? is set to true.
O exemplo acima poderia ser reescrito desta forma:
(define libressl-instead-of-openssl
;; Substitua todos os pacotes chamados "openssl" por LibreSSL.
(package-input-rewriting/spec `(("openssl" . ,(const libressl)))))
A principal diferença aqui é que, dessa vez, os pacotes são correspondidos
por spec e não por identidade. Em outras palavras, qualquer pacote no grafo
que seja chamado openssl será substituído.
Um procedimento mais genérico para reescrever um grafo de dependência de
pacote é package-mapping: ele suporta alterações arbitrárias em nós
no grafo.
- Procedimento: package-mapping proc [cortar?] [#:deep? #f]
Retorna um procedimento que, dado um pacote, aplica proc a todos os pacotes dependentes e retorna o pacote resultante. O procedimento para a recursão quando cortar? retorna true para um determinado pacote. Quando deep? é true, proc é aplicado a entradas implícitas também.
Dicas: Entender como uma variante realmente se parece pode ser difícil quando se começa a combinar as ferramentas mostradas acima. Há várias maneiras de inspecionar um pacote antes de tentar construí-lo que podem ser úteis:
- Você pode inspecionar o pacote interativamente no REPL, por exemplo, para visualizar suas entradas, o código de suas fases de construção ou seus sinalizadores de configuração (veja Usando Guix interativamente).
- Ao reescrever dependências,
guix graphgeralmente pode ajudar a visualizar as alterações feitas (veja Invocandoguix graph).
Próximo: Sistemas de compilação, Anterior: Definindo variantes de pacote, Acima: Interface de programação [Conteúdo][Índice]
8.4 Escrevendo manifestos
Os comandos guix permitem que você especifique listas de pacotes
na linha de comando. Isso é conveniente, mas conforme a linha de comando se
torna mais longa e menos trivial, rapidamente se torna mais conveniente ter
essa lista de pacotes no que chamamos de manifesto. Um manifesto é
algum tipo de “lista de materiais” que define um conjunto de pacotes. Você
normalmente criaria um trecho de código que constrói o manifesto, o
armazenaria em um arquivo, digamos manifest.scm, e então passaria
esse arquivo para a opção -m (ou --manifest) que muitos
comandos guix suportam. Por exemplo, aqui está como um manifesto
para um conjunto de pacotes simples pode se parecer:
;; Manifesto para três pacotes. (specifications->manifest '("gcc-toolchain" "make" "git"))
Depois de ter esse manifesto, você pode passá-lo, por exemplo, para
guix package para instalar apenas esses três pacotes no seu perfil
(veja -m opção de guix package):
guix package -m manifest.scm
... ou você pode passá-lo para guix shell (veja -m opção de guix shell) para gerar um ambiente efêmero:
guix shell -m manifest.scm
... ou você pode passá-lo para guix pack praticamente da mesma
forma (veja -m opção de guix
pack). Você pode armazenar o manifesto sob controle de versão,
compartilhá-lo com outros para que eles possam facilmente configurar, etc.
Mas como você escreve seu primeiro manifesto? Para começar, talvez você
queira escrever um manifesto que espelhe o que você já tem em um perfil. Em
vez de começar do zero, guix package pode gerar um manifesto para
você (veja guix package --export-manifest):
# Escreva em 'manifest.scm' um manifesto correspondente ao # perfil padrão, ~/.guix-profile. guix package --export-manifest > manifest.scm
Ou talvez você queira “traduzir” argumentos de linha de comando em um
manifesto. Nesse caso, guix shell pode ajudar
(veja guix shell --export-manifest):
# Write a manifest for the packages specified on the command line. guix shell --export-manifest gcc-toolchain make git > manifest.scm
Em ambos os casos, a opção --export-manifest tenta arduamente gerar um manifesto fiel; em particular, ela leva em consideração as opções de transformação de pacotes (veja Opções de transformação de pacote).
Nota: Manifestos são simbólicos: eles se referem a pacotes dos canais atualmente em uso (veja Canais). No exemplo acima,
gcc-toolchainpode se referir à versão 14 hoje, mas pode se referir à versão 16 daqui a dois anos.Se você quiser “fixar” seu ambiente de software em versões e variantes de pacotes específicos, precisará de uma informação adicional: a lista de revisões de canal em uso, conforme retornado por
guix describe. Veja Replicando Guix, para mais informações.
Depois de obter seu primeiro manifesto, talvez você queira personalizá-lo. Como seu manifesto é código, agora você tem acesso a todas as interfaces de programação Guix!
Vamos supor que você queira um manifesto para implantar uma variante personalizada do GDB, o GNU Debugger, que não depende do Guile, junto com outro pacote. Com base no exemplo visto na seção anterior (veja Definindo variantes de pacote), você pode escrever um manifesto seguindo estas linhas:
(use-modules (guix packages) (gnu packages gdb) ;para 'gdb' (gnu packages version-control)) ;para 'git' ;; Define a variant of GDB without a dependency on Guile. (define gdb-sans-guile (package (inherit gdb) (inputs (modify-inputs (package-inputs gdb) (delete "guile"))))) ;; Return a manifest containing that one package plus Git. (packages->manifest (list gdb-sans-guile git))
Observe que neste exemplo, o manifesto se refere diretamente às variáveis
gdb e git, que são vinculadas a um objeto package
(veja Referência do package), em vez de chamar
specifications->manifest para procurar pacotes por nome, como fizemos
antes. O formulário use-modules no topo nos permite acessar a
interface do pacote principal (veja Definindo pacotes) e os módulos que
definem gdb e git (veja Módulos de pacote). Sem problemas,
estamos entrelaçando tudo isso — as possibilidades são infinitas, libere sua
criatividade!
O tipo de dados para manifestos, bem como procedimentos de suporte, são
definidos no módulo (guix profiles), que está automaticamente
disponível para o código passado para -m. A referência segue.
- Tipo de dados: manifest
Data type representing a manifest.
Atualmente possui um campo:
entriesEsta deve ser uma lista de registros
manifest-entry— veja abaixo.
- Tipo de dados: manifest-entry
Tipo de dado que representa uma entrada de manifesto. Uma entrada de manifesto contém metadados essenciais: uma string de nome e versão, o objeto (geralmente um pacote) para essa entrada, a saída desejada (veja Pacotes com múltiplas saídas) e uma série de informações opcionais detalhadas abaixo.
Na maioria das vezes, você não construirá uma entrada de manifesto diretamente; em vez disso, você passará um pacote para
package->manifest-entry, descrito abaixo. Em alguns casos incomuns, no entanto, você pode querer criar entradas de manifesto para coisas que são não pacotes, como neste exemplo:;; Manually build a single manifest entry for a non-package object. (let ((hello (program-file "hello" #~(display "Hi!")))) (manifest-entry (name "foo") (version "42") (item (computed-file "hello-directory" #~(let ((bin (string-append #$output "/bin"))) (mkdir #$output) (mkdir bin) (symlink #$hello (string-append bin "/hello")))))))
The available fields are the following:
nameversionNome e sequência de versão para esta entrada.
itemUm pacote ou outro objeto tipo arquivo (veja objetos tipo arquivo).
output(padrão:"out")Saída de
itema ser usada, casoitemtenha múltiplas saídas (veja Pacotes com múltiplas saídas).dependencies(padrão:'())Lista de entradas de manifesto das quais esta entrada depende. Ao construir um perfil, dependências são adicionadas ao perfil.
Normalmente, as entradas propagadas de um pacote (veja
propagated-inputs) acabam tendo uma entrada de manifesto correspondente entre as dependências da própria entrada de manifesto do pacote.search-paths(padrão:'())A lista de especificações de caminhos de pesquisa respeitadas por esta entrada (veja Caminhos de pesquisa).
properties(padrão:'())Lista de pares de símbolo/valor. Ao construir um perfil, essas propriedades são serializadas.
Isso pode ser usado para adicionar metadados adicionais, por exemplo, as transformações aplicadas a um pacote (veja Opções de transformação de pacote).
parent(padrão:(delay #f))Uma promessa apontando para a entrada do manifesto “pai”.
This is used as a hint to provide context when reporting an error related to a manifest entry coming from a
dependenciesfield.
- Procedure: concatenate-manifests lst
Concatenate the manifests listed in lst and return the resulting manifest.
- Procedure: package->manifest-entry package [output] [#:properties]
Return a manifest entry for the output of package package, where output defaults to
"out", and with the given properties. By default properties is the empty list or, if one or more package transformations were applied to package, it is an association list representing those transformations, suitable as an argument tooptions->transformation(vejaoptions->transformation).The code snippet below builds a manifest with an entry for the default output and the
send-emailoutput of thegitpackage:(use-modules (gnu packages version-control)) (manifest (list (package->manifest-entry git) (package->manifest-entry git "send-email")))
- Procedure: packages->manifest packages
Return a list of manifest entries, one for each item listed in packages. Elements of packages can be either package objects or package/string tuples denoting a specific output of a package.
Using this procedure, the manifest above may be rewritten more concisely:
(use-modules (gnu packages version-control)) (packages->manifest (list git `(,git "send-email")))
- Procedure: package->development-manifest package [system] [#:target]
Return a manifest for the development inputs of package for system, optionally when cross-compiling to target. Development inputs include both explicit and implicit inputs of package.
Like the -D option of
guix shell(vejaguix shell -D), the resulting manifest describes the environment in which one can develop package. For example, suppose you’re willing to set up a development environment for Inkscape, with the addition of Git for version control; you can describe that “bill of materials” with the following manifest:(use-modules (gnu packages inkscape) ;for 'inkscape' (gnu packages version-control)) ;for 'git' (concatenate-manifests (list (package->development-manifest inkscape) (packages->manifest (list git))))
In this example, the development manifest that
package->development-manifestreturns includes the compiler (GCC), the many supporting libraries (Boost, GLib, GTK, etc.), and a couple of additional development tools—these are the dependenciesguix show inkscapelists.
Last, the (gnu packages) module provides higher-level facilities to
build manifests. In particular, it lets you look up packages by name—see
below.
- Procedure: specifications->manifest specs
Given specs, a list of specifications such as
"emacs@25.2"or"guile:debug", return a manifest. Specs have the format that command-line tools such asguix installandguix packageunderstand (veja Invocandoguix package).As an example, it lets you rewrite the Git manifest that we saw earlier like this:
(specifications->manifest '("git" "git:send-email"))Notice that we do not need to worry about
use-modules, importing the right set of modules, and referring to the right variables. Instead, we directly refer to packages in the same way as on the command line, which can often be more convenient.
Próximo: Fases de construção, Anterior: Escrevendo manifestos, Acima: Interface de programação [Conteúdo][Índice]
8.5 Sistemas de compilação
Each package definition specifies a build system and arguments for
that build system (veja Definindo pacotes). This build-system
field represents the build procedure of the package, as well as implicit
dependencies of that build procedure.
Build systems are <build-system> objects. The interface to create
and manipulate them is provided by the (guix build-system) module,
and actual build systems are exported by specific modules.
Under the hood, build systems first compile package objects to bags.
A bag is like a package, but with less ornamentation—in other words,
a bag is a lower-level representation of a package, which includes all the
inputs of that package, including some that were implicitly added by the
build system. This intermediate representation is then compiled to a
derivation (veja Derivações). The package-with-c-toolchain is an
example of a way to change the implicit inputs that a package’s build system
pulls in (veja package-with-c-toolchain).
Build systems accept an optional list of arguments. In package
definitions, these are passed via the arguments field
(veja Definindo pacotes). They are typically keyword arguments
(veja keyword arguments in Guile em GNU Guile
Reference Manual). The value of these arguments is usually evaluated in
the build stratum—i.e., by a Guile process launched by the daemon
(veja Derivações).
O principal sistema de compilação é o gnu-build-system, que
implementa o processo padrão de compilação para o GNU e muitos outros
pacotes. É providenciado pelo módulo (guix build-system gnu).
- Variável: gnu-build-system
gnu-build-systemrepresents the GNU Build System, and variants thereof (veja configuration and makefile conventions em GNU Coding Standards).In a nutshell, packages using it are configured, built, and installed with the usual
./configure && make && make check && make installcommand sequence. In practice, a few additional steps are often needed. All these steps are split up in separate phases. Veja Fases de construção, for more info on build phases and ways to customize them.In addition, this build system ensures that the “standard” environment for GNU packages is available. This includes tools such as GCC, libc, Coreutils, Bash, Make, Diffutils, grep, and sed (see the
(guix build-system gnu)module for a complete list). We call these the implicit inputs of a package, because package definitions do not have to mention them.Esta sistema de compilação suporta um número de palavras-chave como argumentos, os quais podems er passados via o campo
argumentsde um pacote. Veja alguns dos principais parâmetros:#:phasesThis argument specifies build-side code that evaluates to an alist of build phases. Veja Fases de construção, for more information.
#:configure-flagsThis is a list of flags (strings) passed to the
configurescript. Veja Definindo pacotes, for an example.#:make-flagsThis list of strings contains flags passed as arguments to
makeinvocations in thebuild,check, andinstallphases.#:out-of-source?This Boolean,
#fby default, indicates whether to run builds in a build directory separate from the source tree.When it is true, the
configurephase creates a separate build directory, changes to that directory, and runs theconfigurescript from there. This is useful for packages that require it, such asglibc.#:tests?This Boolean,
#tby default, indicates whether thecheckphase should run the package’s test suite.#:test-targetThis string,
"check"by default, gives the name of the makefile target used by thecheckphase.#:parallel-build?#:parallel-tests?These Boolean values specify whether to build, respectively run the test suite, in parallel, with the
-jflag ofmake. When they are true,makeis passed-jn, where n is the number specified as the --cores option ofguix-daemonor that of theguixclient command (veja --cores).#:validate-runpath?This Boolean,
#tby default, determines whether to “validate” theRUNPATHof ELF binaries (.soshared libraries as well as executables) previously installed by theinstallphase. Veja thevalidate-runpathphase, for details.#:substituível?This Boolean,
#tby default, tells whether the package outputs should be substitutable—i.e., whether users should be able to obtain substitutes for them instead of building locally (veja Substitutos).#:allowed-references#:disallowed-referencesWhen true, these arguments must be a list of dependencies that must not appear among the references of the build results. If, upon build completion, some of these references are retained, the build process fails.
This is useful to ensure that a package does not erroneously keep a reference to some of it build-time inputs, in cases where doing so would, for example, unnecessarily increase its size (veja Invocando
guix size).
Vários outros sistemas de compilação suportam tais argumentos em palavras-chave.
Other <build-system> objects are defined to support other conventions
and tools used by free software packages. They inherit most of
gnu-build-system, and differ mainly in the set of inputs implicitly
added to the build process, and in the list of phases executed. Some of
these build systems are listed below.
- Variável: agda-build-system
This variable is exported by
(guix build-system agda). It implements a build procedure for Agda libraries.It adds
agdato the set of inputs. A different Agda can be specified with the#:agdakey.The
#:plankey is a list of cons cells(regexp . parameters), where regexp is a regexp that should match the.agdafiles to build, and parameters is an optional list of parameters that will be passed toagdawhen type-checking it.When the library uses Haskell to generate a file containing all imports, the convenience
#:gnu-and-haskell?can be set to#tto addghcand the standard inputs ofgnu-build-systemto the input list. You will still need to manually add a phase or tweak the'buildphase, as in the definition ofagda-stdlib.
- Variável: ant-build-system
This variable is exported by
(guix build-system ant). It implements the build procedure for Java packages that can be built with Ant build tool.It adds both
antand the Java Development Kit (JDK) as provided by theicedteapackage to the set of inputs. Different packages can be specified with the#:antand#:jdkparameters, respectively.When the original package does not provide a suitable Ant build file, the parameter
#:jar-namecan be used to generate a minimal Ant build file build.xml with tasks to build the specified jar archive. In this case the parameter#:source-dircan be used to specify the source sub-directory, defaulting to “src”.The
#:main-classparameter can be used with the minimal ant buildfile to specify the main class of the resulting jar. This makes the jar file executable. The#:test-includeparameter can be used to specify the list of junit tests to run. It defaults to(list "**/*Test.java"). The#:test-excludecan be used to disable some tests. It defaults to(list "**/Abstract*.java"), because abstract classes cannot be run as tests.The parameter
#:build-targetcan be used to specify the Ant task that should be run during thebuildphase. By default the “jar” task will be run.
- Variável: android-ndk-build-system
-
This variable is exported by
(guix build-system android-ndk). It implements a build procedure for Android NDK (native development kit) packages using a Guix-specific build process.O sistema de compilação presume que os pacotes instalam seu prório arquivo (header) de interface pública no subdiretório include da saída
outbem como suas próprias bibliotecas no subdirectório lib da saídaout.Também é presumido que a união de todas as dependências de um pacote não possuem arquivos conflitantes.
For the time being, cross-compilation is not supported - so right now the libraries and header files are assumed to be host tools.
- Variável: asdf-build-system/source
- Variável: asdf-build-system/sbcl
- Variável: asdf-build-system/ecl
-
These variables, exported by
(guix build-system asdf), implement build procedures for Common Lisp packages using “ASDF”. ASDF is a system definition facility for Common Lisp programs and libraries.The
asdf-build-system/sourcesystem installs the packages in source form, and can be loaded using any common lisp implementation, via ASDF. The others, such asasdf-build-system/sbcl, install binary systems in the format which a particular implementation understands. These build systems can also be used to produce executable programs, or lisp images which contain a set of packages pre-loaded.The build system uses naming conventions. For binary packages, the package name should be prefixed with the lisp implementation, such as
sbcl-forasdf-build-system/sbcl.Additionally, the corresponding source package should be labeled using the same convention as Python packages (veja Módulos Python), using the
cl-prefix.In order to create executable programs and images, the build-side procedures
build-programandbuild-imagecan be used. They should be called in a build phase after thecreate-asdf-configurationphase, so that the system which was just built can be used within the resulting image.build-programrequires a list of Common Lisp expressions to be passed as the#:entry-programargument.By default, all the .asd files present in the sources are read to find system definitions. The
#:asd-filesparameter can be used to specify the list of .asd files to read. Furthermore, if the package defines a system for its tests in a separate file, it will be loaded before the tests are run if it is specified by the#:test-asd-fileparameter. If it is not set, the files<system>-tests.asd,<system>-test.asd,tests.asd, andtest.asdwill be tried if they exist.If for some reason the package must be named in a different way than the naming conventions suggest, or if several systems must be compiled, the
#:asd-systemsparameter can be used to specify the list of system names.
- Variável: cargo-build-system
-
This variable is exported by
(guix build-system cargo). It supports builds of packages using Cargo, the build tool of the Rust programming language.It adds
rustcandcargoto the set of inputs. A different Rust package can be specified with the#:rustparameter.Regular cargo dependencies should be added to the package definition similarly to other packages; those needed only at build time to native-inputs, others to inputs. If you need to add source-only crates then you should add them to via the
#:cargo-inputsparameter as a list of name and spec pairs, where the spec can be a package or a source definition. Note that the spec must evaluate to a path to a gzipped tarball which includes aCargo.tomlfile at its root, or it will be ignored. Similarly, cargo dev-dependencies should be added to the package definition via the#:cargo-development-inputsparameter.In its
configurephase, this build system will make any source inputs specified in the#:cargo-inputsand#:cargo-development-inputsparameters available to cargo. It will also remove an includedCargo.lockfile to be recreated bycargoduring thebuildphase. Thepackagephase will runcargo packageto create a source crate for future use. Theinstallphase installs the binaries defined by the crate. Unlessinstall-source? #fis defined it will also install a source crate repository of itself and unpacked sources, to ease in future hacking on rust packages.
- Variável: chicken-build-system
This variable is exported by
(guix build-system chicken). It builds CHICKEN Scheme modules, also called “eggs” or “extensions”. CHICKEN generates C source code, which then gets compiled by a C compiler, in this case GCC.This build system adds
chickento the package inputs, as well as the packages ofgnu-build-system.The build system can’t (yet) deduce the egg’s name automatically, so just like with
go-build-systemand its#:import-path, you should define#:egg-namein the package’sargumentsfield.For example, if you are packaging the
srfi-1egg:(arguments '(#:egg-name "srfi-1"))Egg dependencies must be defined in
propagated-inputs, notinputsbecause CHICKEN doesn’t embed absolute references in compiled eggs. Test dependencies should go tonative-inputs, as usual.
- Variável: copy-build-system
This variable is exported by
(guix build-system copy). It supports builds of simple packages that don’t require much compiling, mostly just moving files around.It adds much of the
gnu-build-systempackages to the set of inputs. Because of this, thecopy-build-systemdoes not require all the boilerplate code often needed for thetrivial-build-system.To further simplify the file installation process, an
#:install-planargument is exposed to let the packager specify which files go where. The install plan is a list of(source target [filters]). filters are optional.- When source matches a file or directory without trailing slash, install it to target.
- If target has a trailing slash, install source basename beneath target.
- Otherwise install source as target.
- When source is a directory with a trailing slash, or when filters are used,
the trailing slash of target is implied with the same meaning as
above.
- Without filters, install the full source content to target.
- With filters among
#:include,#:include-regexp,#:exclude,#:exclude-regexp, only select files are installed depending on the filters. Each filters is specified by a list of strings.- With
#:include, install all the files which the path suffix matches at least one of the elements in the given list. - With
#:include-regexp, install all the files which the subpaths match at least one of the regular expressions in the given list. - The
#:excludeand#:exclude-regexpfilters are the complement of their inclusion counterpart. Without#:includeflags, install all files but those matching the exclusion filters. If both inclusions and exclusions are specified, the exclusions are done on top of the inclusions.
- With
- When a package has multiple outputs, the
#:outputargument can be used to specify which output label the files should be installed to.
In all cases, the paths relative to source are preserved within target.
Exemplos:
-
("foo/bar" "share/my-app/"): Install bar to share/my-app/bar. -
("foo/bar" "share/my-app/baz"): Install bar to share/my-app/baz. -
("foo/" "share/my-app"): Install the content of foo inside share/my-app, e.g., install foo/sub/file to share/my-app/sub/file. -
("foo/" "share/my-app" #:include ("sub/file")): Install only foo/sub/file to share/my-app/sub/file. -
("foo/sub" "share/my-app" #:include ("file")): Install foo/sub/file to share/my-app/file. -
("foo/doc" "share/my-app/doc" #:output "doc"): Install "foo/doc" to "share/my-app/doc" within the"doc"output.
- When source matches a file or directory without trailing slash, install it to target.
- Variável: vim-build-system
This variable is exported by
(guix build-system vim). It is an extension of thecopy-build-system, installing Vim and Neovim plugins into locations where these two text editors know to find their plugins, using their packpaths.Packages which are prefixed with
vim-will be installed in Vim’s packpath, while those prefixed withneovim-will be installed in Neovim’s packpath. If there is adocdirectory with the plugin then helptags will be generated automatically.There are a couple of keywords added with the
vim-build-system:- With
plugin-nameit is possible to set the name of the plugin. While by default this is set to the name and version of the package, it is often more helpful to set this to name which the upstream author calls their plugin. This is the name used for:packaddfrom inside Vim. - With
install-planit is possible to augment the built-in install-plan of thevim-build-system. This is particularly helpful if you have files which should be installed in other locations. For more information about using theinstall-plan, see thecopy-build-system(vejacopy-build-system). - With
#:vimit is possible to add this package to Vim’s packpath, in addition to if it is added automatically because of thevim-prefix in the package’s name. - With
#:neovimit is possible to add this package to Neovim’s packpath, in addition to if it is added automatically because of theneovim-prefix in the package’s name. - With
#:modeit is possible to adjust the path which the plugin is installed into. By default the plugin is installed intostartand other options are available, includingopt. Adding a plugin intooptwill mean you will need to run, for example,:packadd footo load thefooplugin from inside of Vim.
- With
- Variável: clojure-build-system
This variable is exported by
(guix build-system clojure). It implements a simple build procedure for Clojure packages using plain oldcompilein Clojure. Cross-compilation is not supported yet.It adds
clojure,icedteaandzipto the set of inputs. Different packages can be specified with the#:clojure,#:jdkand#:zipparameters, respectively.A list of source directories, test directories and jar names can be specified with the
#:source-dirs,#:test-dirsand#:jar-namesparameters, respectively. Compile directory and main class can be specified with the#:compile-dirand#:main-classparameters, respectively. Other parameters are documented below.This build system is an extension of
ant-build-system, but with the following phases changed:buildThis phase calls
compilein Clojure to compile source files and runsjarto create jars from both source files and compiled files according to the include list and exclude list specified in#:aot-includeand#:aot-exclude, respectively. The exclude list has priority over the include list. These lists consist of symbols representing Clojure libraries or the special keyword#:allrepresenting all Clojure libraries found under the source directories. The parameter#:omit-source?decides if source should be included into the jars.marcarThis phase runs tests according to the include list and exclude list specified in
#:test-includeand#:test-exclude, respectively. Their meanings are analogous to that of#:aot-includeand#:aot-exclude, except that the special keyword#:allnow stands for all Clojure libraries found under the test directories. The parameter#:tests?decides if tests should be run.installThis phase installs all jars built previously.
Apart from the above, this build system also contains an additional phase:
install-docThis phase installs all top-level files with base name matching
%doc-regex. A different regex can be specified with the#:doc-regexparameter. All files (recursively) inside the documentation directories specified in#:doc-dirsare installed as well.
- Variável: cmake-build-system
This variable is exported by
(guix build-system cmake). It implements the build procedure for packages using the CMake build tool.It automatically adds the
cmakepackage to the set of inputs. Which package is used can be specified with the#:cmakeparameter.The
#:configure-flagsparameter is taken as a list of flags passed to thecmakecommand. The#:build-typeparameter specifies in abstract terms the flags passed to the compiler; it defaults to"RelWithDebInfo"(short for “release mode with debugging information”), which roughly means that code is compiled with-O2 -g, as is the case for Autoconf-based packages by default.
- Variável: composer-build-system
This variable is exported by
(guix build-system composer). It implements the build procedure for packages using Composer, the PHP package manager.It automatically adds the
phppackage to the set of inputs. Which package is used can be specified with the#:phpparameter.The
#:test-targetparameter is used to control which script is run for the tests. By default, thetestscript is run if it exists. If the script does not exist, the build system will runphpunitfrom the source directory, assuming there is a phpunit.xml file.
- Variável: dune-build-system
This variable is exported by
(guix build-system dune). It supports builds of packages using Dune, a build tool for the OCaml programming language. It is implemented as an extension of theocaml-build-systemwhich is described below. As such, the#:ocamland#:findlibparameters can be passed to this build system.It automatically adds the
dunepackage to the set of inputs. Which package is used can be specified with the#:duneparameter.There is no
configurephase because dune packages typically don’t need to be configured. The#:build-flagsparameter is taken as a list of flags passed to thedunecommand during the build.The
#:jbuild?parameter can be passed to use thejbuildcommand instead of the more recentdunecommand while building a package. Its default value is#f.The
#:packageparameter can be passed to specify a package name, which is useful when a package contains multiple packages and you want to build only one of them. This is equivalent to passing the-pargument todune.
- Variável: elm-build-system
This variable is exported by
(guix build-system elm). It implements a build procedure for Elm packages similar to ‘elm install’.The build system adds an Elm compiler package to the set of inputs. The default compiler package (currently
elm-sans-reactor) can be overridden using the#:elmargument. Additionally, Elm packages needed by the build system itself are added as implicit inputs if they are not already present: to suppress this behavior, use the#:implicit-elm-package-inputs?argument, which is primarily useful for bootstrapping.The
"dependencies"and"test-dependencies"in an Elm package’s elm.json file correspond topropagated-inputsandinputs, respectively.Elm requires a particular structure for package names: veja Pacotes Elm for more details, including utilities provided by
(guix build-system elm).There are currently a few noteworthy limitations to
elm-build-system:- The build system is focused on packages in the Elm sense of the word:
Elm projects which declare
{ "type": "package" }in their elm.json files. Usingelm-build-systemto build Elm applications (which declare{ "type": "application" }) is possible, but requires ad-hoc modifications to the build phases. For examples, see the definitions of theelm-todomvcexample application and theelmpackage itself (because the front-end for the ‘elm reactor’ command is an Elm application). - Elm supports multiple versions of a package coexisting simultaneously under
ELM_HOME, but this does not yet work well withelm-build-system. This limitation primarily affects Elm applications, because they specify exact versions for their dependencies, whereas Elm packages specify supported version ranges. As a workaround, the example applications mentioned above use thepatch-application-dependenciesprocedure provided by(guix build elm-build-system)to rewrite their elm.json files to refer to the package versions actually present in the build environment. Alternatively, Guix package transformations (veja Definindo variantes de pacote) could be used to rewrite an application’s entire dependency graph. - We are not yet able to run tests for Elm projects because neither
elm-test-rsnor the Node.js-basedelm-testrunner has been packaged for Guix yet.
- The build system is focused on packages in the Elm sense of the word:
Elm projects which declare
- Variável: go-build-system
This variable is exported by
(guix build-system go). It implements a build procedure for Go packages using the standard Go build mechanisms.The user is expected to provide a value for the key
#:import-pathand, in some cases,#:unpack-path. The import path corresponds to the file system path expected by the package’s build scripts and any referring packages, and provides a unique way to refer to a Go package. It is typically based on a combination of the package source code’s remote URI and file system hierarchy structure. In some cases, you will need to unpack the package’s source code to a different directory structure than the one indicated by the import path, and#:unpack-pathshould be used in such cases.Packages that provide Go libraries should install their source code into the built output. The key
#:install-source?, which defaults to#t, controls whether or not the source code is installed. It can be set to#ffor packages that only provide executable files.Packages can be cross-built, and if a specific architecture or operating system is desired then the keywords
#:goarchand#:gooscan be used to force the package to be built for that architecture and operating system. The combinations known to Go can be found in their documentation.The key
#:gocan be used to specify the Go compiler package with which to build the package.The phase
checkprovides a wrapper forgo testwhich builds a test binary (or multiple binaries), vets the code and then runs the test binary. Build, test and test binary flags can be provided as#:test-flagsparameter, default is'(). Seego help testandgo help testflagfor more details.The key
#:embed-files, default is'(), provides a list of future embedded files or regexps matching files. They will be copied to build directory afterunpackphase. See https://pkg.go.dev/embed for more details.
- Variável: glib-or-gtk-build-system
This variable is exported by
(guix build-system glib-or-gtk). It is intended for use with packages making use of GLib or GTK+.This build system adds the following two phases to the ones defined by
gnu-build-system:glib-or-gtk-wrapThe phase
glib-or-gtk-wrapensures that programs in bin/ are able to find GLib “schemas” and GTK+ modules. This is achieved by wrapping the programs in launch scripts that appropriately set theXDG_DATA_DIRSandGTK_PATHenvironment variables.It is possible to exclude specific package outputs from that wrapping process by listing their names in the
#:glib-or-gtk-wrap-excluded-outputsparameter. This is useful when an output is known not to contain any GLib or GTK+ binaries, and where wrapping would gratuitously add a dependency of that output on GLib and GTK+.glib-or-gtk-compile-schemasThe phase
glib-or-gtk-compile-schemasmakes sure that all GSettings schemas of GLib are compiled. Compilation is performed by theglib-compile-schemasprogram. It is provided by the packageglib:binwhich is automatically imported by the build system. Theglibpackage providingglib-compile-schemascan be specified with the#:glibparameter.
Both phases are executed after the
installphase.
- Variável: guile-build-system
This build system is for Guile packages that consist exclusively of Scheme code and that are so lean that they don’t even have a makefile, let alone a configure script. It compiles Scheme code using
guild compile(veja Compilation em GNU Guile Reference Manual) and installs the .scm and .go files in the right place. It also installs documentation.This build system supports cross-compilation by using the --target option of ‘guild compile’.
Packages built with
guile-build-systemmust provide a Guile package in theirnative-inputsfield.
- Variável: julia-build-system
This variable is exported by
(guix build-system julia). It implements the build procedure used by julia packages, which essentially is similar to running ‘julia -e 'using Pkg; Pkg.add(package)'’ in an environment whereJULIA_LOAD_PATHcontains the paths to all Julia package inputs. Tests are run by calling/test/runtests.jl.The Julia package name and uuid is read from the file Project.toml. These values can be overridden by passing the argument
#:julia-package-name(which must be correctly capitalized) or#:julia-package-uuid.Julia packages usually manage their binary dependencies via
JLLWrappers.jl, a Julia package that creates a module (named after the wrapped library followed by_jll.jl.To add the binary path
_jll.jlpackages, you need to patch the files under src/wrappers/, replacing the call to the macroJLLWrappers.@generate_wrapper_header, adding as a second argument containing the store path the binary.As an example, in the MbedTLS Julia package, we add a build phase (veja Fases de construção) to insert the absolute file name of the wrapped MbedTLS package:
(add-after 'unpack 'override-binary-path (lambda* (#:key inputs #:allow-other-keys) (for-each (lambda (wrapper) (substitute* wrapper (("generate_wrapper_header.*") (string-append "generate_wrapper_header(\"MbedTLS\", \"" (assoc-ref inputs "mbedtls") "\")\n")))) ;; There's a Julia file for each platform, override them all. (find-files "src/wrappers/" "\\.jl$"))))Some older packages that aren’t using Project.toml yet, will require this file to be created, too. It is internally done if the arguments
#:julia-package-nameand#:julia-package-uuidare provided.
- Variável: maven-build-system
This variable is exported by
(guix build-system maven). It implements a build procedure for Maven packages. Maven is a dependency and lifecycle management tool for Java. A user of Maven specifies dependencies and plugins in a pom.xml file that Maven reads. When Maven does not have one of the dependencies or plugins in its repository, it will download them and use them to build the package.The maven build system ensures that maven will not try to download any dependency by running in offline mode. Maven will fail if a dependency is missing. Before running Maven, the pom.xml (and subprojects) are modified to specify the version of dependencies and plugins that match the versions available in the guix build environment. Dependencies and plugins must be installed in the fake maven repository at lib/m2, and are symlinked into a proper repository before maven is run. Maven is instructed to use that repository for the build and installs built artifacts there. Changed files are copied to the lib/m2 directory of the package output.
You can specify a pom.xml file with the
#:pom-fileargument, or let the build system use the default pom.xml file in the sources.In case you need to specify a dependency’s version manually, you can use the
#:local-packagesargument. It takes an association list where the key is the groupId of the package and its value is an association list where the key is the artifactId of the package and its value is the version you want to override in the pom.xml.Some packages use dependencies or plugins that are not useful at runtime nor at build time in Guix. You can alter the pom.xml file to remove them using the
#:excludeargument. Its value is an association list where the key is the groupId of the plugin or dependency you want to remove, and the value is a list of artifactId you want to remove.You can override the default
jdkandmavenpackages with the corresponding argument,#:jdkand#:maven.The
#:maven-pluginsargument is a list of maven plugins used during the build, with the same format as theinputsfields of the package declaration. Its default value is(default-maven-plugins)which is also exported.
- Variável: minetest-mod-build-system
This variable is exported by
(guix build-system minetest). It implements a build procedure for Minetest mods, which consists of copying Lua code, images and other resources to the location Minetest searches for mods. The build system also minimises PNG images and verifies that Minetest can load the mod without errors.
- Variável: minify-build-system
This variable is exported by
(guix build-system minify). It implements a minification procedure for simple JavaScript packages.It adds
uglify-jsto the set of inputs and uses it to compress all JavaScript files in the src directory. A different minifier package can be specified with the#:uglify-jsparameter, but it is expected that the package writes the minified code to the standard output.When the input JavaScript files are not all located in the src directory, the parameter
#:javascript-filescan be used to specify a list of file names to feed to the minifier.
- Variável: mozilla-build-system
This variable is exported by
(guix build-system mozilla). It sets the--targetand--hostconfiguration flags to what software developed by Mozilla expects – due to historical reasons, Mozilla software expects--hostto be the system that is cross-compiled from and--targetto be the system that is cross-compiled to, contrary to the standard Autotools conventions.
- Variável: ocaml-build-system
This variable is exported by
(guix build-system ocaml). It implements a build procedure for OCaml packages, which consists of choosing the correct set of commands to run for each package. OCaml packages can expect many different commands to be run. This build system will try some of them.When the package has a setup.ml file present at the top-level, it will run
ocaml setup.ml -configure,ocaml setup.ml -buildandocaml setup.ml -install. The build system will assume that this file was generated by OASIS and will take care of setting the prefix and enabling tests if they are not disabled. You can pass configure and build flags with the#:configure-flagsand#:build-flags. The#:test-flagskey can be passed to change the set of flags used to enable tests. The#:use-make?key can be used to bypass this system in the build and install phases.When the package has a configure file, it is assumed that it is a hand-made configure script that requires a different argument format than in the
gnu-build-system. You can add more flags with the#:configure-flagskey.When the package has a Makefile file (or
#:use-make?is#t), it will be used and more flags can be passed to the build and install phases with the#:make-flagskey.Finally, some packages do not have these files and use a somewhat standard location for its build system. In that case, the build system will run
ocaml pkg/pkg.mlorocaml pkg/build.mland take care of providing the path to the required findlib module. Additional flags can be passed via the#:build-flagskey. Install is taken care of byopam-installer. In this case, theopampackage must be added to thenative-inputsfield of the package definition.Note that most OCaml packages assume they will be installed in the same directory as OCaml, which is not what we want in guix. In particular, they will install .so files in their module’s directory, which is usually fine because it is in the OCaml compiler directory. In guix though, these libraries cannot be found and we use
CAML_LD_LIBRARY_PATH. This variable points to lib/ocaml/site-lib/stubslibs and this is where .so libraries should be installed.
- Variável: python-build-system
This variable is exported by
(guix build-system python). It implements the more or less standard build procedure used by Python packages, which consists in runningpython setup.py buildand thenpython setup.py install --prefix=/gnu/store/….For packages that install stand-alone Python programs under
bin/, it takes care of wrapping these programs so that theirGUIX_PYTHONPATHenvironment variable points to all the Python libraries they depend on.Which Python package is used to perform the build can be specified with the
#:pythonparameter. This is a useful way to force a package to be built for a specific version of the Python interpreter, which might be necessary if the package is only compatible with a single interpreter version.By default guix calls
setup.pyunder control ofsetuptools, much likepipdoes. Some packages are not compatible with setuptools (and pip), thus you can disable this by setting the#:use-setuptools?parameter to#f.If a
"python"output is available, the package is installed into it instead of the default"out"output. This is useful for packages that include a Python package as only a part of the software, and thus want to combine the phases ofpython-build-systemwith another build system. Python bindings are a common usecase.
- Variável: pyproject-build-system
This is a variable exported by
guix build-system pyproject. It is based on python-build-system, and adds support for pyproject.toml and PEP 517. It also supports a variety of build backends and test frameworks.The API is slightly different from python-build-system:
-
#:use-setuptools?and#:test-targetis removed. -
#:configure-flagsis changed. Instead of a list this option must be a JSON object, whose interpretation depends on the build backend. For instance the example from PEP 517 should be written as'(@ ("CC" "gcc") ("--global-option" ("--some-global-option")) ("--build-option" ("--build-option1" "--build-option2"))) -
#:backend-pathis added. It defaults to#false, but when set to a list it will be appended to Python’s search path and overrides the definition in pyproject.toml. -
#:build-backendis added. It defaults to#falseand will try to guess the appropriate backend based on pyproject.toml. -
#:test-backendis added. It defaults to#falseand will guess an appropriate test backend based on what is available in package inputs. -
#:test-flagsis added. The default is'(). These flags are passed as arguments to the test command. Note that flags for verbose output is always enabled on supported backends.
It is considered “experimental” in that the implementation details are not set in stone yet, however users are encouraged to try it for new Python projects (even those using setup.py). The API is subject to change, but any breaking changes in the Guix channel will be dealt with.
Eventually this build system will be deprecated and merged back into python-build-system, probably some time in 2024.
-
- Variável: perl-build-system
This variable is exported by
(guix build-system perl). It implements the standard build procedure for Perl packages, which either consists in runningperl Build.PL --prefix=/gnu/store/…, followed byBuildandBuild install; or in runningperl Makefile.PL PREFIX=/gnu/store/…, followed bymakeandmake install, depending on which ofBuild.PLorMakefile.PLis present in the package distribution. Preference is given to the former if bothBuild.PLandMakefile.PLexist in the package distribution. This preference can be reversed by specifying#tfor the#:make-maker?parameter.The initial
perl Makefile.PLorperl Build.PLinvocation passes flags specified by the#:make-maker-flagsor#:module-build-flagsparameter, respectively.Which Perl package is used can be specified with
#:perl.
- Variável: renpy-build-system
This variable is exported by
(guix build-system renpy). It implements the more or less standard build procedure used by Ren’py games, which consists of loading#:gameonce, thereby creating bytecode for it.It further creates a wrapper script in
bin/and a desktop entry inshare/applications, both of which can be used to launch the game.Which Ren’py package is used can be specified with
#:renpy. Games can also be installed in outputs other than “out” by using#:output.
- Variável: qt-build-system
This variable is exported by
(guix build-system qt). It is intended for use with applications using Qt or KDE.This build system adds the following two phases to the ones defined by
cmake-build-system:check-setupThe phase
check-setupprepares the environment for running the checks as commonly used by Qt test programs. For now this only sets some environment variables:QT_QPA_PLATFORM=offscreen,DBUS_FATAL_WARNINGS=0andCTEST_OUTPUT_ON_FAILURE=1.This phase is added before the
checkphase. It’s a separate phase to ease adjusting if necessary.qt-wrapThe phase
qt-wrapsearches for Qt5 plugin paths, QML paths and some XDG in the inputs and output. In case some path is found, all programs in the output’s bin/, sbin/, libexec/ and lib/libexec/ directories are wrapped in scripts defining the necessary environment variables.It is possible to exclude specific package outputs from that wrapping process by listing their names in the
#:qt-wrap-excluded-outputsparameter. This is useful when an output is known not to contain any Qt binaries, and where wrapping would gratuitously add a dependency of that output on Qt, KDE, or such.This phase is added after the
installphase.
- Variável: r-build-system
This variable is exported by
(guix build-system r). It implements the build procedure used by R packages, which essentially is little more than running ‘R CMD INSTALL --library=/gnu/store/…’ in an environment whereR_LIBS_SITEcontains the paths to all R package inputs. Tests are run after installation using the R functiontools::testInstalledPackage.
- Variável: rakudo-build-system
This variable is exported by
(guix build-system rakudo). It implements the build procedure used by Rakudo for Perl6 packages. It installs the package to/gnu/store/…/NAME-VERSION/share/perl6and installs the binaries, library files and the resources, as well as wrap the files under thebin/directory. Tests can be skipped by passing#fto thetests?parameter.Which rakudo package is used can be specified with
rakudo. Which perl6-tap-harness package used for the tests can be specified with#:prove6or removed by passing#fto thewith-prove6?parameter. Which perl6-zef package used for tests and installing can be specified with#:zefor removed by passing#fto thewith-zef?parameter.
- Variável: rebar-build-system
This variable is exported by
(guix build-system rebar). It implements a build procedure around rebar3, a build system for programs written in the Erlang language.It adds both
rebar3and theerlangto the set of inputs. Different packages can be specified with the#:rebarand#:erlangparameters, respectively.This build system is based on
gnu-build-system, but with the following phases changed:unpackThis phase, after unpacking the source like the
gnu-build-systemdoes, checks for a filecontents.tar.gzat the top-level of the source. If this file exists, it will be unpacked, too. This eases handling of package hosted at https://hex.pm/, the Erlang and Elixir package repository.bootstrapconfigureThere are no
bootstrapandconfigurephase because erlang packages typically don’t need to be configured.buildThis phase runs
rebar3 compilewith the flags listed in#:rebar-flags.marcarUnless
#:tests? #fis passed, this phase runsrebar3 eunit, or some other target specified with#:test-target, with the flags listed in#:rebar-flags,installThis installs the files created in the default profile, or some other profile specified with
#:install-profile.
- Variável: texlive-build-system
Esta variável é exportada pelo
(guix build-system texlive). É usado para compilar os pacotes TeX no modo de lote com um moter especificado. O sistema de compilação configura a variávelTEXINPUTSpara encontrar todos os arquivos de fonte TeX na entrada.By default it tries to run
luatexon all .ins files, and if it fails to find any, on all .dtx files. A different engine and format can be specified with, respectively, the#:tex-engineand#:tex-formatarguments. Different build targets can be specified with the#:build-targetsargument, which expects a list of file names.It also generates font metrics (i.e., .tfm files) out of Metafont files whenever possible. Likewise, it can also create TeX formats (i.e., .fmt files) listed in the
#:create-formatsargument, and generate a symbolic link from bin/ directory to any script located in texmf-dist/scripts/, provided its file name is listed in#:link-scriptsargument.The build system adds
texlive-binfrom(gnu packages tex)to the native inputs. It can be overridden with the#:texlive-binargument.The package
texlive-latex-bin, from the same module, contains most of the tools for building TeX Live packages; for convenience, it is also added by default to the native inputs. However, this can be troublesome when building a dependency oftexlive-latex-binitself. In this particular situation, the#:texlive-latex-bin?argument should be set to#f.
- Variável: ruby-build-system
This variable is exported by
(guix build-system ruby). It implements the RubyGems build procedure used by Ruby packages, which involves runninggem buildfollowed bygem install.The
sourcefield of a package that uses this build system typically references a gem archive, since this is the format that Ruby developers use when releasing their software. The build system unpacks the gem archive, potentially patches the source, runs the test suite, repackages the gem, and installs it. Additionally, directories and tarballs may be referenced to allow building unreleased gems from Git or a traditional source release tarball.Which Ruby package is used can be specified with the
#:rubyparameter. A list of additional flags to be passed to thegemcommand can be specified with the#:gem-flagsparameter.
- Variável: waf-build-system
This variable is exported by
(guix build-system waf). It implements a build procedure around thewafscript. The common phases—configure,build, andinstall—are implemented by passing their names as arguments to thewafscript.The
wafscript is executed by the Python interpreter. Which Python package is used to run the script can be specified with the#:pythonparameter.
- Variável: zig-build-system
This variable is exported by
(guix build-system zig). It implements the build procedures for the Zig build system (zig buildcommand).Selecting this build system adds
zigto the package inputs, in addition to the packages ofgnu-build-system.This build system by default installs package source to output. This behavior can be disabled by setting
#:install-source?parameter to#f.For packages that don’t install anything and don’t come with a test suite (likely library packages to be used by other Zig packages), you can set
#:skip-build?parameter to#t, which skipsbuildandcheckphases.The
configurephase sets up environment forzig build. You need to add custom phases after it if you want to invokezig.The
#:zig-build-flagsparameter is a list of flags that are passed tozig buildinbuildphase. The#:zig-test-flagsparameter is a list of flags that are passed tozig build testincheckphase. The default compiler package can be overridden with the#:zigparameter.The optional
#:zig-release-typeparameter declares the type of release. Possible values are:"safe","fast", or"small". The default value is#f, which causes the release flag to be omitted from thezigcommand and results in a"debug"build.
- Variável: scons-build-system
This variable is exported by
(guix build-system scons). It implements the build procedure used by the SCons software construction tool. This build system runssconsto build the package,scons testto run tests, and thenscons installto install the package.Additional flags to be passed to
sconscan be specified with the#:scons-flagsparameter. The default build and install targets can be overridden with#:build-targetsand#:install-targetsrespectively. The version of Python used to run SCons can be specified by selecting the appropriate SCons package with the#:sconsparameter.
- Variável: haskell-build-system
This variable is exported by
(guix build-system haskell). It implements the Cabal build procedure used by Haskell packages, which involves runningrunhaskell Setup.hs configure --prefix=/gnu/store/…andrunhaskell Setup.hs build. Instead of installing the package by runningrunhaskell Setup.hs install, to avoid trying to register libraries in the read-only compiler store directory, the build system usesrunhaskell Setup.hs copy, followed byrunhaskell Setup.hs register. In addition, the build system generates the package documentation by runningrunhaskell Setup.hs haddock, unless#:haddock? #fis passed. Optional Haddock parameters can be passed with the help of the#:haddock-flagsparameter. If the fileSetup.hsis not found, the build system looks forSetup.lhsinstead.Which Haskell compiler is used can be specified with the
#:haskellparameter which defaults toghc.
- Variável: dub-build-system
This variable is exported by
(guix build-system dub). It implements the Dub build procedure used by D packages, which involves runningdub buildanddub run. Installation is done by copying the files manually.Which D compiler is used can be specified with the
#:ldcparameter which defaults toldc.
- Variável: emacs-build-system
This variable is exported by
(guix build-system emacs). It implements an installation procedure similar to the packaging system of Emacs itself (veja Packages em The GNU Emacs Manual).It first creates the
package-autoloads.el
- Variável: font-build-system
This variable is exported by
(guix build-system font). It implements an installation procedure for font packages where upstream provides pre-compiled TrueType, OpenType, etc. font files that merely need to be copied into place. It copies font files to standard locations in the output directory.
- Variável: meson-build-system
This variable is exported by
(guix build-system meson). It implements the build procedure for packages that use Meson as their build system.It adds both Meson and Ninja to the set of inputs, and they can be changed with the parameters
#:mesonand#:ninjaif needed.This build system is an extension of
gnu-build-system, but with the following phases changed to some specific for Meson:configureThe phase runs
mesonwith the flags specified in#:configure-flags. The flag --buildtype is always set todebugoptimizedunless something else is specified in#:build-type.buildThe phase runs
ninjato build the package in parallel by default, but this can be changed with#:parallel-build?.marcarThe phase runs ‘meson test’ with a base set of options that cannot be overridden. This base set of options can be extended via the
#:test-optionsargument, for example to select or skip a specific test suite.installThe phase runs
ninja installand can not be changed.
Apart from that, the build system also adds the following phases:
fix-runpathThis phase ensures that all binaries can find the libraries they need. It searches for required libraries in subdirectories of the package being built, and adds those to
RUNPATHwhere needed. It also removes references to libraries left over from the build phase bymeson, such as test dependencies, that aren’t actually required for the program to run.glib-or-gtk-wrapThis phase is the phase provided by
glib-or-gtk-build-system, and it is not enabled by default. It can be enabled with#:glib-or-gtk?.glib-or-gtk-compile-schemasThis phase is the phase provided by
glib-or-gtk-build-system, and it is not enabled by default. It can be enabled with#:glib-or-gtk?.
- Variável: linux-module-build-system
linux-module-build-systemallows building Linux kernel modules.This build system is an extension of
gnu-build-system, but with the following phases changed:configureThis phase configures the environment so that the Linux kernel’s Makefile can be used to build the external kernel module.
buildThis phase uses the Linux kernel’s Makefile in order to build the external kernel module.
installThis phase uses the Linux kernel’s Makefile in order to install the external kernel module.
It is possible and useful to specify the Linux kernel to use for building the module (in the
argumentsform of a package using thelinux-module-build-system, use the key#:linuxto specify it).
- Variável: node-build-system
This variable is exported by
(guix build-system node). It implements the build procedure used by Node.js, which implements an approximation of thenpm installcommand, followed by annpm testcommand.Which Node.js package is used to interpret the
npmcommands can be specified with the#:nodeparameter which defaults tonode.
- Variável: tree-sitter-build-system
-
This variable is exported by
(guix build-system tree-sitter). It implements procedures to compile grammars for the Tree-sitter parsing library. It essentially runstree-sitter generateto translategrammar.jsgrammars to JSON and then to C. Which it then compiles to native code.Tree-sitter packages may support multiple grammars, so this build system supports a
#:grammar-directorieskeyword to specify a list of locations where agrammar.jsfile may be found.Grammars sometimes depend on each other, such as C++ depending on C and TypeScript depending on JavaScript. You may use inputs to declare such dependencies.
Lastly, for packages that do not need anything as sophisticated, a “trivial” build system is provided. It is trivial in the sense that it provides basically no support: it does not pull any implicit inputs, and does not have a notion of build phases.
- Variável: trivial-build-system
This variable is exported by
(guix build-system trivial).This build system requires a
#:builderargument. This argument must be a Scheme expression that builds the package output(s)—as withbuild-expression->derivation(vejabuild-expression->derivation).
- Variável: channel-build-system
This variable is exported by
(guix build-system channel).This build system is meant primarily for internal use. A package using this build system must have a channel specification as its
sourcefield (veja Canais); alternatively, its source can be a directory name, in which case an additional#:commitargument must be supplied to specify the commit being built (a hexadecimal string).Optionally, a
#:channelsargument specifying additional channels can be provided.The resulting package is a Guix instance of the given channel(s), similar to how
guix time-machinewould build it.
Próximo: Construir utilitários, Anterior: Sistemas de compilação, Acima: Interface de programação [Conteúdo][Índice]
8.6 Fases de construção
Almost all package build systems implement a notion build phases: a
sequence of actions that the build system executes, when you build the
package, leading to the installed byproducts in the store. A notable
exception is the “bare-bones” trivial-build-system (veja Sistemas de compilação).
As discussed in the previous section, those build systems provide a standard
list of phases. For gnu-build-system, the main build phases are the
following:
set-pathsDefine search path environment variables for all the input packages, including
PATH(veja Caminhos de pesquisa).unpackUnpack the source tarball, and change the current directory to the extracted source tree. If the source is actually a directory, copy it to the build tree, and enter that directory.
patch-source-shebangsPatch shebangs encountered in source files so they refer to the right store file names. For instance, this changes
#!/bin/shto#!/gnu/store/…-bash-4.3/bin/sh.configureRun the configure script with a number of default options, such as --prefix=/gnu/store/…, as well as the options specified by the
#:configure-flagsargument.buildRun
makewith the list of flags specified with#:make-flags. If the#:parallel-build?argument is true (the default), build withmake -j.marcarRun
make check, or some other target specified with#:test-target, unless#:tests? #fis passed. If the#:parallel-tests?argument is true (the default), runmake check -j.installRun
make installwith the flags listed in#:make-flags.patch-shebangsPatch shebangs on the installed executable files.
stripStrip debugging symbols from ELF files (unless
#:strip-binaries?is false), copying them to thedebugoutput when available (veja Instalando arquivos de depuração).validate-runpathValidate the
RUNPATHof ELF binaries, unless#:validate-runpath?is false (veja Sistemas de compilação).This validation step consists in making sure that all the shared libraries needed by an ELF binary, which are listed as
DT_NEEDEDentries in itsPT_DYNAMICsegment, appear in theDT_RUNPATHentry of that binary. In other words, it ensures that running or using those binaries will not result in a “file not found” error at run time. Veja -rpath em The GNU Linker, for more information onRUNPATH.
Other build systems have similar phases, with some variations. For example,
cmake-build-system has same-named phases but its configure
phases runs cmake instead of ./configure. Others, such as
python-build-system, have a wholly different list of standard
phases. All this code runs on the build side: it is evaluated when
you actually build the package, in a dedicated build process spawned by the
build daemon (veja Invocando guix-daemon).
Build phases are represented as association lists or “alists” (veja Association Lists em GNU Guile Reference Manual) where each key is a symbol for the name of the phase and the associated value is a procedure that accepts an arbitrary number of arguments. By convention, those procedures receive information about the build in the form of keyword parameters, which they can use or ignore.
For example, here is how (guix build gnu-build-system) defines
%standard-phases, the variable holding its alist of build
phases21:
;; The build phases of 'gnu-build-system'. (define* (unpack #:key source #:allow-other-keys) ;; Extract the source tarball. (invoke "tar" "xvf" source)) (define* (configure #:key outputs #:allow-other-keys) ;; Run the 'configure' script. Install to output "out". (let ((out (assoc-ref outputs "out"))) (invoke "./configure" (string-append "--prefix=" out)))) (define* (build #:allow-other-keys) ;; Compile. (invoke "make")) (define* (check #:key (test-target "check") (tests? #true) #:allow-other-keys) ;; Run the test suite. (if tests? (invoke "make" test-target) (display "test suite not run\n"))) (define* (install #:allow-other-keys) ;; Install files to the prefix 'configure' specified. (invoke "make" "install")) (define %standard-phases ;; The list of standard phases (quite a few are omitted ;; for brevity). Each element is a symbol/procedure pair. (list (cons 'unpack unpack) (cons 'configure configure) (cons 'build build) (cons 'check check) (cons 'install install)))
This shows how %standard-phases is defined as a list of
symbol/procedure pairs (veja Pairs em GNU Guile Reference
Manual). The first pair associates the unpack procedure with the
unpack symbol—a name; the second pair defines the configure
phase similarly, and so on. When building a package that uses
gnu-build-system with its default list of phases, those phases are
executed sequentially. You can see the name of each phase started and
completed in the build log of packages that you build.
Let’s now look at the procedures themselves. Each one is defined with
define*: #:key lists keyword parameters the procedure accepts,
possibly with a default value, and #:allow-other-keys specifies that
other keyword parameters are ignored (veja Optional Arguments em GNU Guile Reference Manual).
The unpack procedure honors the source parameter, which the
build system uses to pass the file name of the source tarball (or version
control checkout), and it ignores other parameters. The configure
phase only cares about the outputs parameter, an alist mapping
package output names to their store file name (veja Pacotes com múltiplas saídas). It extracts the file name of for out, the default output,
and passes it to ./configure as the installation prefix, meaning
that make install will eventually copy all the files in that
directory (veja configuration and makefile conventions em GNU Coding Standards). build and install ignore
all their arguments. check honors the test-target argument,
which specifies the name of the Makefile target to run tests; it prints a
message and skips tests when tests? is false.
The list of phases used for a particular package can be changed with the
#:phases parameter of the build system. Changing the set of build
phases boils down to building a new alist of phases based on the
%standard-phases alist described above. This can be done with
standard alist procedures such as alist-delete (veja SRFI-1
Association Lists em GNU Guile Reference Manual); however, it is
more convenient to do so with modify-phases (veja modify-phases).
Here is an example of a package definition that removes the configure
phase of %standard-phases and inserts a new phase before the
build phase, called set-prefix-in-makefile:
(define-public example
(package
(name "example")
;; other fields omitted
(build-system gnu-build-system)
(arguments
(list
#:phases
#~(modify-phases %standard-phases
(delete 'configure)
(add-before 'build 'set-prefix-in-makefile
(lambda* (#:key inputs #:allow-other-keys)
;; Modify the makefile so that its
;; 'PREFIX' variable points to #$output and
;; 'XMLLINT' points to the correct path.
(substitute* "Makefile"
(("PREFIX =.*")
(string-append "PREFIX = " #$output "\n"))
(("XMLLINT =.*")
(string-append "XMLLINT = "
(search-input-file inputs "/bin/xmllint")
"\n"))))))))))
The new phase that is inserted is written as an anonymous procedure,
introduced with lambda*; it looks for the xmllint executable
under a /bin directory among the package’s inputs (veja Referência do package). It also honors the outputs parameter we have seen
before. Veja Construir utilitários, for more about the helpers used by this
phase, and for more examples of modify-phases.
Tip: You can inspect the code associated with a package’s
#:phasesargument interactively, at the REPL (veja Usando Guix interativamente).
Keep in mind that build phases are code evaluated at the time the package is
actually built. This explains why the whole modify-phases expression
above is quoted (it comes after the #~ or hash-tilde): it is
staged for later execution. Veja Expressões-G, for an explanation
of code staging and the code strata involved.
Próximo: Caminhos de pesquisa, Anterior: Fases de construção, Acima: Interface de programação [Conteúdo][Índice]
8.7 Construir utilitários
As soon as you start writing non-trivial package definitions
(veja Definindo pacotes) or other build actions (veja Expressões-G),
you will likely start looking for helpers for “shell-like”
actions—creating directories, copying and deleting files recursively,
manipulating build phases, and so on. The (guix build utils) module
provides such utility procedures.
Most build systems load (guix build utils) (veja Sistemas de compilação).
Thus, when writing custom build phases for your package definitions, you can
usually assume those procedures are in scope.
When writing G-expressions, you can import (guix build utils) on the
“build side” using with-imported-modules and then put it in scope
with the use-modules form (veja Using Guile Modules em GNU
Guile Reference Manual):
(with-imported-modules '((guix build utils)) ;import it
(computed-file "empty-tree"
#~(begin
;; Put it in scope.
(use-modules (guix build utils))
;; Happily use its 'mkdir-p' procedure.
(mkdir-p (string-append #$output "/a/b/c")))))
The remainder of this section is the reference for most of the utility
procedures provided by (guix build utils).
- Dealing with Store File Names
- File Types
- File Manipulation
- File Search
- Program Invocation
- Fases de construção
- Wrappers
8.7.1 Dealing with Store File Names
This section documents procedures that deal with store file names.
- Procedure: %store-directory
Return the directory name of the store.
- Procedure: store-file-name? file
Return true if file is in the store.
- Procedure: strip-store-file-name file
Strip the /gnu/store and hash from file, a store file name. The result is typically a
"package-version"string.
- Procedure: package-name->name+version name
Given name, a package name like
"foo-0.9.1b", return two values:"foo"and"0.9.1b". When the version part is unavailable, name and#fare returned. The first hyphen followed by a digit is considered to introduce the version part.
8.7.2 File Types
The procedures below deal with files and file types.
- Procedure: directory-exists? dir
Return
#tif dir exists and is a directory.
- Procedure: executable-file? file
Return
#tif file exists and is executable.
- Procedure: symbolic-link? file
Return
#tif file is a symbolic link (aka. a “symlink”).
- Procedure: elf-file? file
- Procedure: ar-file? file
- Procedure: gzip-file? file
Return
#tif file is, respectively, an ELF file, anararchive (such as a .a static library), or a gzip file.
- Procedure: reset-gzip-timestamp file [#:keep-mtime? #t]
If file is a gzip file, reset its embedded timestamp (as with
gzip --no-name) and return true. Otherwise return#f. When keep-mtime? is true, preserve file’s modification time.
8.7.3 File Manipulation
The following procedures and macros help create, modify, and delete files.
They provide functionality comparable to common shell utilities such as
mkdir -p, cp -r, rm -r, and sed.
They complement Guile’s extensive, but low-level, file system interface
(veja POSIX em GNU Guile Reference Manual).
- Macro: with-directory-excursion directory body …
Run body with directory as the process’s current directory.
Essentially, this macro changes the current directory to directory before evaluating body, using
chdir(veja Processes em GNU Guile Reference Manual). It changes back to the initial directory when the dynamic extent of body is left, be it via normal procedure return or via a non-local exit such as an exception.
- Procedure: mkdir-p dir
Create directory dir and all its ancestors.
- Procedure: install-file file directory
Create directory if it does not exist and copy file in there under the same name.
- Procedure: make-file-writable file
Make file writable for its owner.
- Procedure: copy-recursively source destination [#:log (current-output-port)] [#:follow-symlinks? #f] [#:copy-file
copy-file] [#:keep-mtime? #f] [#:keep-permissions? #t] [#:select? (const #t)] Copy source directory to destination. Follow symlinks if follow-symlinks? is true; otherwise, just preserve them. Call copy-file to copy regular files. Call select?, taking two arguments, file and stat, for each entry in source, where file is the entry’s absolute file name and stat is the result of
lstat(orstatif follow-symlinks? is true); exclude entries for which select? does not return true. When keep-mtime? is true, keep the modification time of the files in source on those of destination. When keep-permissions? is true, preserve file permissions. Write verbose output to the log port.
- Procedure: delete-file-recursively dir [#:follow-mounts? #f]
Delete dir recursively, like
rm -rf, without following symlinks. Don’t follow mount points either, unless follow-mounts? is true. Report but ignore errors.
- Macro: substitute* file ((regexp match-var…) body…) … Substitute regexp in
file by the string returned by body. body is evaluated with each match-var bound to the corresponding positional regexp sub-expression. For example:
(substitute* file (("hello") "good morning\n") (("foo([a-z]+)bar(.*)$" all letters end) (string-append "baz" letters end)))Here, anytime a line of file contains
hello, it is replaced bygood morning. Anytime a line of file matches the second regexp,allis bound to the complete match,lettersis bound to the first sub-expression, andendis bound to the last one.When one of the match-var is
_, no variable is bound to the corresponding match substring.Alternatively, file may be a list of file names, in which case they are all subject to the substitutions.
Be careful about using
$to match the end of a line; by itself it won’t match the terminating newline of a line. For example, to match a whole line ending with a backslash, one needs a regex like"(.*)\\\\\n$".
8.7.4 File Search
This section documents procedures to search and filter files.
- Procedure: file-name-predicate regexp
Return a predicate that returns true when passed a file name whose base name matches regexp.
- Procedure: find-files dir [pred] [#:stat lstat] [#:directories? #f] [#:fail-on-error? #f] Return the
lexicographically sorted list of files under dir for which pred returns true. pred is passed two arguments: the absolute file name, and its stat buffer; the default predicate always returns true. pred can also be a regular expression, in which case it is equivalent to
(file-name-predicate pred). stat is used to obtain file information; usinglstatmeans that symlinks are not followed. If directories? is true, then directories will also be included. If fail-on-error? is true, raise an exception upon error.
Here are a few examples where we assume that the current directory is the root of the Guix source tree:
;; List all the regular files in the current directory. (find-files ".") ⇒ ("./.dir-locals.el" "./.gitignore" …) ;; List all the .scm files under gnu/services. (find-files "gnu/services" "\\.scm$") ⇒ ("gnu/services/admin.scm" "gnu/services/audio.scm" …) ;; List ar files in the current directory. (find-files "." (lambda (file stat) (ar-file? file))) ⇒ ("./libformat.a" "./libstore.a" …)
- Procedure: which program
Return the complete file name for program as found in
$PATH, or#fif program could not be found.
- Procedure: search-input-file inputs name
- Procedure: search-input-directory inputs name
Return the complete file name for name as found in inputs;
search-input-filesearches for a regular file andsearch-input-directorysearches for a directory. If name could not be found, an exception is raised.Here, inputs must be an association list like
inputsandnative-inputsas available to build phases (veja Fases de construção).
Here is a (simplified) example of how search-input-file is used in a
build phase of the wireguard-tools package:
(add-after 'install 'wrap-wg-quick
(lambda* (#:key inputs outputs #:allow-other-keys)
(let ((coreutils (string-append (assoc-ref inputs "coreutils")
"/bin")))
(wrap-program (search-input-file outputs "bin/wg-quick")
#:sh (search-input-file inputs "bin/bash")
`("PATH" ":" prefix ,(list coreutils))))))
8.7.5 Program Invocation
You’ll find handy procedures to spawn processes in this module, essentially
convenient wrappers around Guile’s system* (veja system* em GNU Guile Reference Manual).
- Procedure: invoke program args…
Invoke program with the given args. Raise an
&invoke-errorexception if the exit code is non-zero; otherwise return#t.The advantage compared to
system*is that you do not need to check the return value. This reduces boilerplate in shell-script-like snippets for instance in package build phases.
- Procedure: invoke-error? c
Return true if c is an
&invoke-errorcondition.
- Procedure: invoke-error-program c
- Procedure: invoke-error-arguments c
- Procedure: invoke-error-exit-status c
- Procedure: invoke-error-term-signal c
- Procedure: invoke-error-stop-signal c
Access specific fields of c, an
&invoke-errorcondition.
- Procedure: report-invoke-error c [port]
Report to port (by default the current error port) about c, an
&invoke-errorcondition, in a human-friendly way.Typical usage would look like this:
(use-modules (srfi srfi-34) ;for 'guard' (guix build utils)) (guard (c ((invoke-error? c) (report-invoke-error c))) (invoke "date" "--imaginary-option")) -| command "date" "--imaginary-option" failed with status 1
- Procedure: invoke/quiet program args…
Invoke program with args and capture program’s standard output and standard error. If program succeeds, print nothing and return the unspecified value; otherwise, raise a
&messageerror condition that includes the status code and the output of program.Here’s an example:
(use-modules (srfi srfi-34) ;for 'guard' (srfi srfi-35) ;for 'message-condition?' (guix build utils)) (guard (c ((message-condition? c) (display (condition-message c)))) (invoke/quiet "date") ;all is fine (invoke/quiet "date" "--imaginary-option")) -| 'date --imaginary-option' exited with status 1; output follows: date: unrecognized option '--imaginary-option' Try 'date --help' for more information.
8.7.6 Fases de construção
The (guix build utils) also contains tools to manipulate build phases
as used by build systems (veja Sistemas de compilação). Build phases are
represented as association lists or “alists” (veja Association Lists em GNU Guile Reference Manual) where each key is a symbol naming the
phase and the associated value is a procedure (veja Fases de construção).
Guile core and the (srfi srfi-1) module both provide tools to
manipulate alists. The (guix build utils) module complements those
with tools written with build phases in mind.
- Macro: modify-phases phases clause…
Modify phases sequentially as per each clause, which may have one of the following forms:
(delete old-phase-name) (replace old-phase-name new-phase) (add-before old-phase-name new-phase-name new-phase) (add-after old-phase-name new-phase-name new-phase)
Where every phase-name above is an expression evaluating to a symbol, and new-phase an expression evaluating to a procedure.
The example below is taken from the definition of the grep package.
It adds a phase to run after the install phase, called
fix-egrep-and-fgrep. That phase is a procedure (lambda* is
for anonymous procedures) that takes a #:outputs keyword argument and
ignores extra keyword arguments (veja Optional Arguments em GNU
Guile Reference Manual, for more on lambda* and optional and keyword
arguments.) The phase uses substitute* to modify the installed
egrep and fgrep scripts so that they refer to grep by
its absolute file name:
(modify-phases %standard-phases
(add-after 'install 'fix-egrep-and-fgrep
;; Patch 'egrep' and 'fgrep' to execute 'grep' via its
;; absolute file name instead of searching for it in $PATH.
(lambda* (#:key outputs #:allow-other-keys)
(let* ((out (assoc-ref outputs "out"))
(bin (string-append out "/bin")))
(substitute* (list (string-append bin "/egrep")
(string-append bin "/fgrep"))
(("^exec grep")
(string-append "exec " bin "/grep")))))))
In the example below, phases are modified in two ways: the standard
configure phase is deleted, presumably because the package does not
have a configure script or anything similar, and the default
install phase is replaced by one that manually copies the executable
files to be installed:
(modify-phases %standard-phases
(delete 'configure) ;no 'configure' script
(replace 'install
(lambda* (#:key outputs #:allow-other-keys)
;; The package's Makefile doesn't provide an "install"
;; rule so do it by ourselves.
(let ((bin (string-append (assoc-ref outputs "out")
"/bin")))
(install-file "footswitch" bin)
(install-file "scythe" bin)))))
8.7.7 Wrappers
It is not unusual for a command to require certain environment variables to be set for proper functioning, typically search paths (veja Caminhos de pesquisa). Failing to do that, the command might fail to find files or other commands it relies on, or it might pick the “wrong” ones—depending on the environment in which it runs. Examples include:
- a shell script that assumes all the commands it uses are in
PATH; - a Guile program that assumes all its modules are in
GUILE_LOAD_PATHandGUILE_LOAD_COMPILED_PATH; - a Qt application that expects to find certain plugins in
QT_PLUGIN_PATH.
For a package writer, the goal is to make sure commands always work the same
rather than depend on some external settings. One way to achieve that is to
wrap commands in a thin script that sets those environment variables,
thereby ensuring that those run-time dependencies are always found. The
wrapper would be used to set PATH, GUILE_LOAD_PATH, or
QT_PLUGIN_PATH in the examples above.
To ease that task, the (guix build utils) module provides a couple of
helpers to wrap commands.
- Procedure: wrap-program program [#:sh sh] [#:rest variables]
Make a wrapper for program. variables should look like this:
'(variable delimiter position list-of-directories)
where delimiter is optional.
:will be used if delimiter is not given.For example, this call:
(wrap-program "foo" '("PATH" ":" = ("/gnu/.../bar/bin")) '("CERT_PATH" suffix ("/gnu/.../baz/certs" "/qux/certs")))will copy foo to .foo-real and create the file foo with the following contents:
#!location/of/bin/bash export PATH="/gnu/.../bar/bin" export CERT_PATH="$CERT_PATH${CERT_PATH:+:}/gnu/.../baz/certs:/qux/certs" exec -a $0 location/of/.foo-real "$@"If program has previously been wrapped by
wrap-program, the wrapper is extended with definitions for variables. If it is not, sh will be used as the interpreter.
- Procedure: wrap-script program [#:guile guile] [#:rest variables]
Wrap the script program such that variables are set first. The format of variables is the same as in the
wrap-programprocedure. This procedure differs fromwrap-programin that it does not create a separate shell script. Instead, program is modified directly by prepending a Guile script, which is interpreted as a comment in the script’s language.Special encoding comments as supported by Python are recreated on the second line.
Note that this procedure can only be used once per file as Guile scripts are not supported.
Próximo: O armazém, Anterior: Construir utilitários, Acima: Interface de programação [Conteúdo][Índice]
8.8 Caminhos de pesquisa
Many programs and libraries look for input data in a search path, a list of directories: shells like Bash look for executables in the command search path, a C compiler looks for .h files in its header search path, the Python interpreter looks for .py files in its search path, the spell checker has a search path for dictionaries, and so on.
Search paths can usually be defined or overridden via environment
variables (veja Environment Variables em The GNU C Library Reference
Manual). For example, the search paths mentioned above can be changed by
defining the PATH, C_INCLUDE_PATH, PYTHONPATH (or
GUIX_PYTHONPATH), and DICPATH environment variables—you know,
all these something-PATH variables that you need to get right or things
“won’t be found”.
You may have noticed from the command line that Guix “knows” which search
path environment variables should be defined, and how. When you install
packages in your default profile, the file
~/.guix-profile/etc/profile is created, which you can “source” from
the shell to set those variables. Likewise, if you ask guix shell
to create an environment containing Python and NumPy, a Python library, and
if you pass it the --search-paths option, it will tell you about
PATH and GUIX_PYTHONPATH (veja Invocando guix shell):
$ guix shell python python-numpy --pure --search-paths export PATH="/gnu/store/…-profile/bin" export GUIX_PYTHONPATH="/gnu/store/…-profile/lib/python3.9/site-packages"
When you omit --search-paths, it defines these environment variables right away, such that Python can readily find NumPy:
$ guix shell python python-numpy -- python3 Python 3.9.6 (default, Jan 1 1970, 00:00:01) [GCC 10.3.0] on linux Type "help", "copyright", "credits" or "license" for more information. >>> import numpy >>> numpy.version.version '1.20.3'
For this to work, the definition of the python package
declares the search path it cares about and its associated
environment variable, GUIX_PYTHONPATH. It looks like this:
(package
(name "python")
(version "3.9.9")
;; some fields omitted...
(native-search-paths
(list (search-path-specification
(variable "GUIX_PYTHONPATH")
(files (list "lib/python/3.9/site-packages"))))))
What this native-search-paths field says is that, when the
python package is used, the GUIX_PYTHONPATH environment
variable must be defined to include all the
lib/python/3.9/site-packages sub-directories encountered in its
environment. (The native- bit means that, if we are in a
cross-compilation environment, only native inputs may be added to the search
path; veja search-paths.) In the NumPy example
above, the profile where python appears contains exactly one such
sub-directory, and GUIX_PYTHONPATH is set to that. When there are
several lib/python/3.9/site-packages—this is the case in package
build environments—they are all added to GUIX_PYTHONPATH, separated
by colons (:).
Nota: Notice that
GUIX_PYTHONPATHis specified as part of the definition of thepythonpackage, and not as part of that ofpython-numpy. This is because this environment variable “belongs” to Python, not NumPy: Python actually reads the value of that variable and honors it.Corollary: if you create a profile that does not contain
python,GUIX_PYTHONPATHwill not be defined, even if it contains packages that provide .py files:$ guix shell python-numpy --search-paths --pure export PATH="/gnu/store/…-profile/bin"This makes a lot of sense if we look at this profile in isolation: no software in this profile would read
GUIX_PYTHONPATH.
Of course, there are many variations on that theme: some packages honor more
than one search path, some use separators other than colon, some accumulate
several directories in their search path, and so on. A more complex example
is the search path of libxml2: the value of the XML_CATALOG_FILES
environment variable is space-separated, it must contain a list of
catalog.xml files (not directories), which are to be found in
xml sub-directories—nothing less. The search path specification
looks like this:
(search-path-specification
(variable "XML_CATALOG_FILES")
(separator " ")
(files '("xml"))
(file-pattern "^catalog\\.xml$")
(file-type 'regular))
Worry not, search path specifications are usually not this tricky.
The (guix search-paths) module defines the data type of search path
specifications and a number of helper procedures. Below is the reference of
search path specifications.
- Tipo de dados: search-path-specification
The data type for search path specifications.
variableThe name of the environment variable for this search path (a string).
filesThe list of sub-directories (strings) that should be added to the search path.
separator(default:":")The string used to separate search path components.
As a special case, a
separatorvalue of#fspecifies a “single-component search path”—in other words, a search path that cannot contain more than one element. This is useful in some cases, such as theSSL_CERT_DIRvariable (honored by OpenSSL, cURL, and a few other packages) or theASPELL_DICT_DIRvariable (honored by the GNU Aspell spell checker), both of which must point to a single directory.file-type(default:'directory)The type of file being matched—
'directoryor'regular, though it can be any symbol returned bystat:type(vejastatem GNU Guile Reference Manual).In the
XML_CATALOG_FILESexample above, we would match regular files; in the Python example, we would match directories.file-pattern(default:#f)This must be either
#for a regular expression specifying files to be matched within the sub-directories specified by thefilesfield.Again, the
XML_CATALOG_FILESexample shows a situation where this is needed.
Some search paths are not tied by a single package but to many packages. To
reduce duplications, some of them are pre-defined in (guix
search-paths).
- Variável: $SGML_CATALOG_FILES
- Variável: $XML_CATALOG_FILES
These two search paths indicate where the TR9401 catalog22 or XML catalog files can be found.
- Variável: $SSL_CERT_DIR
- Variável: $SSL_CERT_FILE
These two search paths indicate where X.509 certificates can be found (veja Certificados X.509).
These pre-defined search paths can be used as in the following example:
(package
(name "curl")
;; some fields omitted ...
(native-search-paths (list $SSL_CERT_DIR $SSL_CERT_FILE)))
How do you turn search path specifications on one hand and a bunch of
directories on the other hand in a set of environment variable definitions?
That’s the job of evaluate-search-paths.
- Procedure: evaluate-search-paths search-paths directories [getenv]
Evaluate search-paths, a list of search-path specifications, for directories, a list of directory names, and return a list of specification/value pairs. Use getenv to determine the current settings and report only settings not already effective.
The (guix profiles) provides a higher-level helper procedure,
load-profile, that sets the environment variables of a profile.
Próximo: Derivações, Anterior: Caminhos de pesquisa, Acima: Interface de programação [Conteúdo][Índice]
8.9 O armazém
Conceptually, the store is the place where derivations that have been built successfully are stored—by default, /gnu/store. Sub-directories in the store are referred to as store items or sometimes store paths. The store has an associated database that contains information such as the store paths referred to by each store path, and the list of valid store items—results of successful builds. This database resides in localstatedir/guix/db, where localstatedir is the state directory specified via --localstatedir at configure time, usually /var.
The store is always accessed by the daemon on behalf of its clients
(veja Invocando guix-daemon). To manipulate the store, clients connect to
the daemon over a Unix-domain socket, send requests to it, and read the
result—these are remote procedure calls, or RPCs.
Nota: Users must never modify files under /gnu/store directly. This would lead to inconsistencies and break the immutability assumptions of Guix’s functional model (veja Introdução).
Veja
guix gc --verify, for information on how to check the integrity of the store and attempt recovery from accidental modifications.
The (guix store) module provides procedures to connect to the daemon,
and to perform RPCs. These are described below. By default,
open-connection, and thus all the guix commands, connect to
the local daemon or to the URI specified by the GUIX_DAEMON_SOCKET
environment variable.
- Environment Variable: GUIX_DAEMON_SOCKET
When set, the value of this variable should be a file name or a URI designating the daemon endpoint. When it is a file name, it denotes a Unix-domain socket to connect to. In addition to file names, the supported URI schemes are:
fileunixThese are for Unix-domain sockets.
file:///var/guix/daemon-socket/socketis equivalent to /var/guix/daemon-socket/socket.guix¶-
These URIs denote connections over TCP/IP, without encryption nor authentication of the remote host. The URI must specify the host name and optionally a port number (by default port 44146 is used):
guix://master.guix.example.org:1234
This setup is suitable on local networks, such as clusters, where only trusted nodes may connect to the build daemon at
master.guix.example.org.The --listen option of
guix-daemoncan be used to instruct it to listen for TCP connections (veja --listen). ssh¶These URIs allow you to connect to a remote daemon over SSH. This feature requires Guile-SSH (veja Requisitos) and a working
guilebinary inPATHon the destination machine. It supports public key and GSSAPI authentication. A typical URL might look like this:ssh://charlie@guix.example.org:22
As for
guix copy, the usual OpenSSH client configuration files are honored (veja Invocandoguix copy).
Additional URI schemes may be supported in the future.
Nota: The ability to connect to remote build daemons is considered experimental as of 4538aa4. Please get in touch with us to share any problems or suggestions you may have (veja Contribuindo).
- Procedure: open-connection [uri] [#:reserve-space? #t]
Connect to the daemon over the Unix-domain socket at uri (a string). When reserve-space? is true, instruct it to reserve a little bit of extra space on the file system so that the garbage collector can still operate should the disk become full. Return a server object.
file defaults to
%default-socket-path, which is the normal location given the options that were passed toconfigure.
- Procedure: close-connection server
Close the connection to server.
- Variável: current-build-output-port
This variable is bound to a SRFI-39 parameter, which refers to the port where build and error logs sent by the daemon should be written.
Procedures that make RPCs all take a server object as their first argument.
- Procedure: valid-path? server path
Return
#twhen path designates a valid store item and#fotherwise (an invalid item may exist on disk but still be invalid, for instance because it is the result of an aborted or failed build).A
&store-protocol-errorcondition is raised if path is not prefixed by the store directory (/gnu/store).
- Procedure: add-text-to-store server name text [references]
Add text under file name in the store, and return its store path. references is the list of store paths referred to by the resulting store path.
- Procedure: build-derivations store derivations [mode]
Build derivations, a list of
<derivation>objects, .drv file names, or derivation/output pairs, using the specified mode—(build-mode normal)by default.
Note that the (guix monads) module provides a monad as well as
monadic versions of the above procedures, with the goal of making it more
convenient to work with code that accesses the store (veja A mônada do armazém).
This section is currently incomplete.
Próximo: A mônada do armazém, Anterior: O armazém, Acima: Interface de programação [Conteúdo][Índice]
8.10 Derivações
Low-level build actions and the environment in which they are performed are represented by derivations. A derivation contains the following pieces of information:
- The outputs of the derivation—derivations produce at least one file or directory in the store, but may produce more.
- The inputs of the derivation—i.e., its build-time dependencies—which may be other derivations or plain files in the store (patches, build scripts, etc.).
- The system type targeted by the derivation—e.g.,
x86_64-linux. - The file name of a build script in the store, along with the arguments to be passed.
- A list of environment variables to be defined.
Derivations allow clients of the daemon to communicate build actions to the
store. They exist in two forms: as an in-memory representation, both on the
client- and daemon-side, and as files in the store whose name end in
.drv—these files are referred to as derivation paths.
Derivations paths can be passed to the build-derivations procedure to
perform the build actions they prescribe (veja O armazém).
Operations such as file downloads and version-control checkouts for which the expected content hash is known in advance are modeled as fixed-output derivations. Unlike regular derivations, the outputs of a fixed-output derivation are independent of its inputs—e.g., a source code download produces the same result regardless of the download method and tools being used.
The outputs of derivations—i.e., the build results—have a set of
references, as reported by the references RPC or the
guix gc --references command (veja Invocando guix gc).
References are the set of run-time dependencies of the build results.
References are a subset of the inputs of the derivation; this subset is
automatically computed by the build daemon by scanning all the files in the
outputs.
The (guix derivations) module provides a representation of
derivations as Scheme objects, along with procedures to create and otherwise
manipulate derivations. The lowest-level primitive to create a derivation
is the derivation procedure:
- Procedure: derivation store name builder args [#:outputs '("out")] [#:hash #f] [#:hash-algo #f] [#:recursive? #f]
[#:inputs ’()] [#:env-vars ’()] [#:system (%current-system)] [#:references-graphs #f] [#:allowed-references #f] [#:disallowed-references #f] [#:leaked-env-vars #f] [#:local-build? #f] [#:substitutable? #t] [#:properties ’()] Build a derivation with the given arguments, and return the resulting
<derivation>object.When hash and hash-algo are given, a fixed-output derivation is created—i.e., one whose result is known in advance, such as a file download. If, in addition, recursive? is true, then that fixed output may be an executable file or a directory and hash must be the hash of an archive containing this output.
When references-graphs is true, it must be a list of file name/store path pairs. In that case, the reference graph of each store path is exported in the build environment in the corresponding file, in a simple text format.
When allowed-references is true, it must be a list of store items or outputs that the derivation’s output may refer to. Likewise, disallowed-references, if true, must be a list of things the outputs may not refer to.
When leaked-env-vars is true, it must be a list of strings denoting environment variables that are allowed to “leak” from the daemon’s environment to the build environment. This is only applicable to fixed-output derivations—i.e., when hash is true. The main use is to allow variables such as
http_proxyto be passed to derivations that download files.When local-build? is true, declare that the derivation is not a good candidate for offloading and should rather be built locally (veja Usando o recurso de descarregamento). This is the case for small derivations where the costs of data transfers would outweigh the benefits.
When substitutable? is false, declare that substitutes of the derivation’s output should not be used (veja Substitutos). This is useful, for instance, when building packages that capture details of the host CPU instruction set.
properties must be an association list describing “properties” of the derivation. It is kept as-is, uninterpreted, in the derivation.
Here’s an example with a shell script as its builder, assuming store is an open connection to the daemon, and bash points to a Bash executable in the store:
(use-modules (guix utils) (guix store) (guix derivations)) (let ((builder ; add the Bash script to the store (add-text-to-store store "my-builder.sh" "echo hello world > $out\n" '()))) (derivation store "foo" bash `("-e" ,builder) #:inputs `((,bash) (,builder)) #:env-vars '(("HOME" . "/homeless")))) ⇒ #<derivation /gnu/store/…-foo.drv => /gnu/store/…-foo>
As can be guessed, this primitive is cumbersome to use directly. A better
approach is to write build scripts in Scheme, of course! The best course of
action for that is to write the build code as a “G-expression”, and to
pass it to gexp->derivation. For more information,
veja Expressões-G.
Once upon a time, gexp->derivation did not exist and constructing
derivations with build code written in Scheme was achieved with
build-expression->derivation, documented below. This procedure is
now deprecated in favor of the much nicer gexp->derivation.
- Procedure: build-expression->derivation store name exp [#:system (%current-system)] [#:inputs '()] [#:outputs '("out")] [#:hash
#f] [#:hash-algo #f] [#:recursive? #f] [#:env-vars ’()] [#:modules ’()] [#:references-graphs #f] [#:allowed-references #f] [#:disallowed-references #f] [#:local-build? #f] [#:substitutable? #t] [#:guile-for-build #f] Return a derivation that executes Scheme expression exp as a builder for derivation name. inputs must be a list of
(name drv-path sub-drv)tuples; when sub-drv is omitted,"out"is assumed. modules is a list of names of Guile modules from the current search path to be copied in the store, compiled, and made available in the load path during the execution of exp—e.g.,((guix build utils) (guix build gnu-build-system)).exp is evaluated in an environment where
%outputsis bound to a list of output/path pairs, and where%build-inputsis bound to a list of string/output-path pairs made from inputs. Optionally, env-vars is a list of string pairs specifying the name and value of environment variables visible to the builder. The builder terminates by passing the result of exp toexit; thus, when exp returns#f, the build is considered to have failed.exp is built using guile-for-build (a derivation). When guile-for-build is omitted or is
#f, the value of the%guile-for-buildfluid is used instead.See the
derivationprocedure for the meaning of references-graphs, allowed-references, disallowed-references, local-build?, and substitutable?.
Here’s an example of a single-output derivation that creates a directory containing one file:
(let ((builder '(let ((out (assoc-ref %outputs "out"))) (mkdir out) ; create /gnu/store/…-goo (call-with-output-file (string-append out "/test") (lambda (p) (display '(hello guix) p)))))) (build-expression->derivation store "goo" builder)) ⇒ #<derivation /gnu/store/…-goo.drv => …>
Próximo: Expressões-G, Anterior: Derivações, Acima: Interface de programação [Conteúdo][Índice]
8.11 A mônada do armazém
The procedures that operate on the store described in the previous sections all take an open connection to the build daemon as their first argument. Although the underlying model is functional, they either have side effects or depend on the current state of the store.
The former is inconvenient: the connection to the build daemon has to be carried around in all those functions, making it impossible to compose functions that do not take that parameter with functions that do. The latter can be problematic: since store operations have side effects and/or depend on external state, they have to be properly sequenced.
This is where the (guix monads) module comes in. This module
provides a framework for working with monads, and a particularly
useful monad for our uses, the store monad. Monads are a construct
that allows two things: associating “context” with values (in our case,
the context is the store), and building sequences of computations (here
computations include accesses to the store). Values in a monad—values
that carry this additional context—are called monadic values;
procedures that return such values are called monadic procedures.
Consider this “normal” procedure:
(define (sh-symlink store)
;; Return a derivation that symlinks the 'bash' executable.
(let* ((drv (package-derivation store bash))
(out (derivation->output-path drv))
(sh (string-append out "/bin/bash")))
(build-expression->derivation store "sh"
`(symlink ,sh %output))))
Using (guix monads) and (guix gexp), it may be rewritten as a
monadic function:
(define (sh-symlink)
;; Same, but return a monadic value.
(mlet %store-monad ((drv (package->derivation bash)))
(gexp->derivation "sh"
#~(symlink (string-append #$drv "/bin/bash")
#$output))))
There are several things to note in the second version: the store
parameter is now implicit and is “threaded” in the calls to the
package->derivation and gexp->derivation monadic procedures,
and the monadic value returned by package->derivation is bound
using mlet instead of plain let.
As it turns out, the call to package->derivation can even be omitted
since it will take place implicitly, as we will see later
(veja Expressões-G):
(define (sh-symlink)
(gexp->derivation "sh"
#~(symlink (string-append #$bash "/bin/bash")
#$output)))
Calling the monadic sh-symlink has no effect. As someone once said,
“you exit a monad like you exit a building on fire: by running”. So, to
exit the monad and get the desired effect, one must use
run-with-store:
(run-with-store (open-connection) (sh-symlink)) ⇒ /gnu/store/...-sh-symlink
Note that the (guix monad-repl) module extends the Guile REPL with
new “commands” to make it easier to deal with monadic procedures:
run-in-store, and enter-store-monad (veja Usando Guix interativamente). The former is used to “run” a single monadic value
through the store:
scheme@(guile-user)> ,run-in-store (package->derivation hello) $1 = #<derivation /gnu/store/…-hello-2.9.drv => …>
The latter enters a recursive REPL, where all the return values are automatically run through the store:
scheme@(guile-user)> ,enter-store-monad store-monad@(guile-user) [1]> (package->derivation hello) $2 = #<derivation /gnu/store/…-hello-2.9.drv => …> store-monad@(guile-user) [1]> (text-file "foo" "Hello!") $3 = "/gnu/store/…-foo" store-monad@(guile-user) [1]> ,q scheme@(guile-user)>
Note that non-monadic values cannot be returned in the store-monad
REPL.
Other meta-commands are available at the REPL, such as ,build to
build a file-like object (veja Usando Guix interativamente).
The main syntactic forms to deal with monads in general are provided by the
(guix monads) module and are described below.
- Macro: with-monad monad body …
Evaluate any
>>=orreturnforms in body as being in monad.
- Macro: return val
Return a monadic value that encapsulates val.
- Macro: >>= mval mproc …
Bind monadic value mval, passing its “contents” to monadic procedures mproc…23. There can be one mproc or several of them, as in this example:
(run-with-state (with-monad %state-monad (>>= (return 1) (lambda (x) (return (+ 1 x))) (lambda (x) (return (* 2 x))))) 'some-state) ⇒ 4 ⇒ some-state
- Macro: mlet monad ((var mval) …) body …
- Macro: mlet* monad ((var mval) …) body …
Bind the variables var to the monadic values mval in body, which is a sequence of expressions. As with the bind operator, this can be thought of as “unpacking” the raw, non-monadic value “contained” in mval and making var refer to that raw, non-monadic value within the scope of the body. The form (var -> val) binds var to the “normal” value val, as per
let. The binding operations occur in sequence from left to right. The last expression of body must be a monadic expression, and its result will become the result of themletormlet*when run in the monad.mlet*is tomletwhatlet*is tolet(veja Local Bindings em GNU Guile Reference Manual).
- Macro: mbegin monad mexp …
Bind mexp and the following monadic expressions in sequence, returning the result of the last expression. Every expression in the sequence must be a monadic expression.
This is akin to
mlet, except that the return values of the monadic expressions are ignored. In that sense, it is analogous tobegin, but applied to monadic expressions.
- Macro: mwhen condition mexp0 mexp* …
When condition is true, evaluate the sequence of monadic expressions mexp0..mexp* as in an
mbegin. When condition is false, return*unspecified*in the current monad. Every expression in the sequence must be a monadic expression.
- Macro: munless condition mexp0 mexp* …
When condition is false, evaluate the sequence of monadic expressions mexp0..mexp* as in an
mbegin. When condition is true, return*unspecified*in the current monad. Every expression in the sequence must be a monadic expression.
The (guix monads) module provides the state monad, which allows
an additional value—the state—to be threaded through monadic
procedure calls.
- Variável: %state-monad
The state monad. Procedures in the state monad can access and change the state that is threaded.
Consider the example below. The
squareprocedure returns a value in the state monad. It returns the square of its argument, but also increments the current state value:(define (square x) (mlet %state-monad ((count (current-state))) (mbegin %state-monad (set-current-state (+ 1 count)) (return (* x x))))) (run-with-state (sequence %state-monad (map square (iota 3))) 0) ⇒ (0 1 4) ⇒ 3
When “run” through
%state-monad, we obtain that additional state value, which is the number ofsquarecalls.
- Monadic Procedure: current-state
Return the current state as a monadic value.
- Monadic Procedure: set-current-state value
Set the current state to value and return the previous state as a monadic value.
- Monadic Procedure: state-push value
Push value to the current state, which is assumed to be a list, and return the previous state as a monadic value.
- Monadic Procedure: state-pop
Pop a value from the current state and return it as a monadic value. The state is assumed to be a list.
- Procedure: run-with-state mval [state]
Run monadic value mval starting with state as the initial state. Return two values: the resulting value, and the resulting state.
The main interface to the store monad, provided by the (guix store)
module, is as follows.
- Variável: %store-monad
The store monad—an alias for
%state-monad.Values in the store monad encapsulate accesses to the store. When its effect is needed, a value of the store monad must be “evaluated” by passing it to the
run-with-storeprocedure (see below).
- Procedure: run-with-store store mval [#:guile-for-build] [#:system (%current-system)] Run mval, a monadic
value in the store monad, in store, an open store connection.
- Monadic Procedure: text-file name text [references]
Return as a monadic value the absolute file name in the store of the file containing text, a string. references is a list of store items that the resulting text file refers to; it defaults to the empty list.
- Monadic Procedure: binary-file name data [references]
Return as a monadic value the absolute file name in the store of the file containing data, a bytevector. references is a list of store items that the resulting binary file refers to; it defaults to the empty list.
- Monadic Procedure: interned-file file [name] [#:recursive? #t] [#:select? (const #t)] Return the name of file once
interned in the store. Use name as its store name, or the basename of file if name is omitted.
When recursive? is true, the contents of file are added recursively; if file designates a flat file and recursive? is true, its contents are added, and its permission bits are kept.
When recursive? is true, call
(select? file stat)for each directory entry, where file is the entry’s absolute file name and stat is the result oflstat; exclude entries for which select? does not return true.The example below adds a file to the store, under two different names:
(run-with-store (open-connection) (mlet %store-monad ((a (interned-file "README")) (b (interned-file "README" "LEGU-MIN"))) (return (list a b)))) ⇒ ("/gnu/store/rwm…-README" "/gnu/store/44i…-LEGU-MIN")
The (guix packages) module exports the following package-related
monadic procedures:
- Monadic Procedure: package-file package [file] [#:system (%current-system)] [#:target #f] [#:output "out"] Return as a
monadic value in the absolute file name of file within the output directory of package. When file is omitted, return the name of the output directory of package. When target is true, use it as a cross-compilation target triplet.
Note that this procedure does not build package. Thus, the result might or might not designate an existing file. We recommend not using this procedure unless you know what you are doing.
- Monadic Procedure: package->derivation package [system]
- Monadic Procedure: package->cross-derivation package target [system] Monadic version of
package-derivationand package-cross-derivation(veja Definindo pacotes).
Próximo: Invocando guix repl, Anterior: A mônada do armazém, Acima: Interface de programação [Conteúdo][Índice]
8.12 Expressões-G
So we have “derivations”, which represent a sequence of build actions to
be performed to produce an item in the store (veja Derivações). These
build actions are performed when asking the daemon to actually build the
derivations; they are run by the daemon in a container (veja Invocando guix-daemon).
It should come as no surprise that we like to write these build actions in
Scheme. When we do that, we end up with two strata of Scheme
code24: the
“host code”—code that defines packages, talks to the daemon, etc.—and
the “build code”—code that actually performs build actions, such as
making directories, invoking make, and so on (veja Fases de construção).
To describe a derivation and its build actions, one typically needs to embed
build code inside host code. It boils down to manipulating build code as
data, and the homoiconicity of Scheme—code has a direct representation as
data—comes in handy for that. But we need more than the normal
quasiquote mechanism in Scheme to construct build expressions.
The (guix gexp) module implements G-expressions, a form of
S-expressions adapted to build expressions. G-expressions, or gexps,
consist essentially of three syntactic forms: gexp, ungexp,
and ungexp-splicing (or simply: #~, #$, and
#$@), which are comparable to quasiquote, unquote, and
unquote-splicing, respectively (veja quasiquote em GNU Guile Reference Manual). However, there are
major differences:
- Gexps are meant to be written to a file and run or manipulated by other processes.
- When a high-level object such as a package or derivation is unquoted inside a gexp, the result is as if its output file name had been introduced.
- Gexps carry information about the packages or derivations they refer to, and these dependencies are automatically added as inputs to the build processes that use them.
This mechanism is not limited to package and derivation objects:
compilers able to “lower” other high-level objects to derivations or
files in the store can be defined, such that these objects can also be
inserted into gexps. For example, a useful type of high-level objects that
can be inserted in a gexp is “file-like objects”, which make it easy to
add files to the store and to refer to them in derivations and such (see
local-file and plain-file below).
To illustrate the idea, here is an example of a gexp:
(define build-exp
#~(begin
(mkdir #$output)
(chdir #$output)
(symlink (string-append #$coreutils "/bin/ls")
"list-files")))
This gexp can be passed to gexp->derivation; we obtain a derivation
that builds a directory containing exactly one symlink to
/gnu/store/…-coreutils-8.22/bin/ls:
(gexp->derivation "the-thing" build-exp)
As one would expect, the "/gnu/store/…-coreutils-8.22" string
is substituted to the reference to the coreutils package in the actual
build code, and coreutils is automatically made an input to the
derivation. Likewise, #$output (equivalent to (ungexp
output)) is replaced by a string containing the directory name of the
output of the derivation.
In a cross-compilation context, it is useful to distinguish between
references to the native build of a package—that can run on the
host—versus references to cross builds of a package. To that end, the
#+ plays the same role as #$, but is a reference to a native
package build:
(gexp->derivation "vi"
#~(begin
(mkdir #$output)
(mkdir (string-append #$output "/bin"))
(system* (string-append #+coreutils "/bin/ln")
"-s"
(string-append #$emacs "/bin/emacs")
(string-append #$output "/bin/vi")))
#:target "aarch64-linux-gnu")
In the example above, the native build of coreutils is used, so that
ln can actually run on the host; but then the cross-compiled build
of emacs is referenced.
Another gexp feature is imported modules: sometimes you want to be
able to use certain Guile modules from the “host environment” in the gexp,
so those modules should be imported in the “build environment”. The
with-imported-modules form allows you to express that:
(let ((build (with-imported-modules '((guix build utils))
#~(begin
(use-modules (guix build utils))
(mkdir-p (string-append #$output "/bin"))))))
(gexp->derivation "empty-dir"
#~(begin
#$build
(display "success!\n")
#t)))
In this example, the (guix build utils) module is automatically
pulled into the isolated build environment of our gexp, such that
(use-modules (guix build utils)) works as expected.
Usually you want the closure of the module to be imported—i.e., the
module itself and all the modules it depends on—rather than just the
module; failing to do that, attempts to use the module will fail because of
missing dependent modules. The source-module-closure procedure
computes the closure of a module by looking at its source file headers,
which comes in handy in this case:
(use-modules (guix modules)) ;for 'source-module-closure' (with-imported-modules (source-module-closure '((guix build utils) (gnu build image))) (gexp->derivation "something-with-vms" #~(begin (use-modules (guix build utils) (gnu build image)) …)))
In the same vein, sometimes you want to import not just pure-Scheme modules,
but also “extensions” such as Guile bindings to C libraries or other
“full-blown” packages. Say you need the guile-json package
available on the build side, here’s how you would do it:
(use-modules (gnu packages guile)) ;for 'guile-json' (with-extensions (list guile-json) (gexp->derivation "something-with-json" #~(begin (use-modules (json)) …)))
The syntactic form to construct gexps is summarized below.
- Macro: #~exp 
- Macro: (gexp exp)
Return a G-expression containing exp. exp may contain one or more of the following forms:
#$obj(ungexp obj)Introduce a reference to obj. obj may have one of the supported types, for example a package or a derivation, in which case the
ungexpform is replaced by its output file name—e.g.,"/gnu/store/…-coreutils-8.22.If obj is a list, it is traversed and references to supported objects are substituted similarly.
If obj is another gexp, its contents are inserted and its dependencies are added to those of the containing gexp.
If obj is another kind of object, it is inserted as is.
#$obj:saída(ungexp obj saída)This is like the form above, but referring explicitly to the output of obj—this is useful when obj produces multiple outputs (veja Pacotes com múltiplas saídas).
Sometimes a gexp unconditionally refers to the
"out"output, but the user of that gexp would still like to insert a reference to another output. Thegexp-inputprocedure aims to address that. Veja gexp-input.#+obj#+obj:output(ungexp-native obj)(ungexp-native obj output)Same as
ungexp, but produces a reference to the native build of obj when used in a cross compilation context.#$output[:saída](ungexp output [saída])Insert a reference to derivation output output, or to the main output when output is omitted.
This only makes sense for gexps passed to
gexp->derivation.#$@lst(ungexp-splicing lst)Like the above, but splices the contents of lst inside the containing list.
#+@lst(ungexp-native-splicing lst)Like the above, but refers to native builds of the objects listed in lst.
G-expressions created by
gexpor#~are run-time objects of thegexp?type (see below).
- Macro: with-imported-modules modules body…
Mark the gexps defined in body… as requiring modules in their execution environment.
Each item in modules can be the name of a module, such as
(guix build utils), or it can be a module name, followed by an arrow, followed by a file-like object:`((guix build utils) (guix gcrypt) ((guix config) => ,(scheme-file "config.scm" #~(define-module …))))
In the example above, the first two modules are taken from the search path, and the last one is created from the given file-like object.
This form has lexical scope: it has an effect on the gexps directly defined in body…, but not on those defined, say, in procedures called from body….
- Macro: with-extensions extensions body…
Mark the gexps defined in body… as requiring extensions in their build and execution environment. extensions is typically a list of package objects such as those defined in the
(gnu packages guile)module.Concretely, the packages listed in extensions are added to the load path while compiling imported modules in body…; they are also added to the load path of the gexp returned by body….
- Procedure: gexp? obj
Return
#tif obj is a G-expression.
G-expressions are meant to be written to disk, either as code building some derivation, or as plain files in the store. The monadic procedures below allow you to do that (veja A mônada do armazém, for more information about monads).
- Monadic Procedure: gexp->derivation name exp [#:system (%current-system)] [#:target #f] [#:graft? #t] [#:hash #f]
[#:hash-algo #f] [#:recursive? #f] [#:env-vars ’()] [#:modules ’()] [#:module-path
%load-path] [#:effective-version "2.2"] [#:references-graphs #f] [#:allowed-references #f] [#:disallowed-references #f] [#:leaked-env-vars #f] [#:script-name (string-append name "-builder")] [#:deprecation-warnings #f] [#:local-build? #f] [#:substitutable? #t] [#:properties ’()] [#:guile-for-build #f] Return a derivation name that runs exp (a gexp) with guile-for-build (a derivation) on system; exp is stored in a file called script-name. When target is true, it is used as the cross-compilation target triplet for packages referred to by exp.modules is deprecated in favor of
with-imported-modules. Its meaning is to make modules available in the evaluation context of exp; modules is a list of names of Guile modules searched in module-path to be copied in the store, compiled, and made available in the load path during the execution of exp—e.g.,((guix build utils) (guix build gnu-build-system)).effective-version determines the string to use when adding extensions of exp (see
with-extensions) to the search path—e.g.,"2.2".graft? determines whether packages referred to by exp should be grafted when applicable.
When references-graphs is true, it must be a list of tuples of one of the following forms:
(file-name obj) (file-name obj output) (file-name gexp-input) (file-name store-item)
The right-hand-side of each element of references-graphs is automatically made an input of the build process of exp. In the build environment, each file-name contains the reference graph of the corresponding item, in a simple text format.
allowed-references must be either
#for a list of output names and packages. In the latter case, the list denotes store items that the result is allowed to refer to. Any reference to another store item will lead to a build error. Similarly for disallowed-references, which can list items that must not be referenced by the outputs.deprecation-warnings determines whether to show deprecation warnings while compiling modules. It can be
#f,#t, or'detailed.The other arguments are as for
derivation(veja Derivações).
The local-file, plain-file, computed-file,
program-file, and scheme-file procedures below return
file-like objects. That is, when unquoted in a G-expression, these
objects lead to a file in the store. Consider this G-expression:
#~(system* #$(file-append glibc "/sbin/nscd") "-f" #$(local-file "/tmp/my-nscd.conf"))
The effect here is to “intern” /tmp/my-nscd.conf by copying it to
the store. Once expanded, for instance via gexp->derivation, the
G-expression refers to that copy under /gnu/store; thus, modifying or
removing the file in /tmp does not have any effect on what the
G-expression does. plain-file can be used similarly; it differs in
that the file content is directly passed as a string.
- Procedure: local-file file [name] [#:recursive? #f] [#:select? (const #t)]
Return an object representing local file file to add to the store; this object can be used in a gexp. If file is a literal string denoting a relative file name, it is looked up relative to the source file where it appears; if file is not a literal string, it is looked up relative to the current working directory at run time. file will be added to the store under name–by default the base name of file.
When recursive? is true, the contents of file are added recursively; if file designates a flat file and recursive? is true, its contents are added, and its permission bits are kept.
When recursive? is true, call
(select? file stat)for each directory entry, where file is the entry’s absolute file name and stat is the result oflstat; exclude entries for which select? does not return true.file can be wrapped in the
assume-valid-file-namesyntactic keyword. When this is done, there will not be a warning whenlocal-fileis used with a non-literal path. The path is still looked up relative to the current working directory at run time. Wrapping is done like this:(define alice-key-file-path "alice.pub") ;; ... (local-file (assume-valid-file-name alice-key-file-path))
file can be wrapped in the
assume-source-relative-file-namesyntactic keyword. When this is done, the file name will be looked up relative to the source file where it appears even when it is not a string literal.This is the declarative counterpart of the
interned-filemonadic procedure (vejainterned-file).
- Procedure: plain-file name content
Return an object representing a text file called name with the given content (a string or a bytevector) to be added to the store.
This is the declarative counterpart of
text-file.
- Procedure: computed-file name gexp [#:local-build? #t] [#:options '()]
Return an object representing the store item name, a file or directory computed by gexp. When local-build? is true (the default), the derivation is built locally. options is a list of additional arguments to pass to
gexp->derivation.This is the declarative counterpart of
gexp->derivation.
- Monadic Procedure: gexp->script name exp [#:guile (default-guile)] [#:module-path %load-path] [#:system
(%current-system)] [#:target #f] Return an executable script name that runs exp using guile, with exp’s imported modules in its search path. Look up exp’s modules in module-path.
The example below builds a script that simply invokes the
lscommand:(use-modules (guix gexp) (gnu packages base)) (gexp->script "list-files" #~(execl #$(file-append coreutils "/bin/ls") "ls"))
When “running” it through the store (veja
run-with-store), we obtain a derivation that produces an executable file /gnu/store/…-list-files along these lines:#!/gnu/store/…-guile-2.0.11/bin/guile -ds !# (execl "/gnu/store/…-coreutils-8.22"/bin/ls" "ls")
- Procedure: program-file name exp [#:guile #f] [#:module-path %load-path]
Return an object representing the executable store item name that runs gexp. guile is the Guile package used to execute that script. Imported modules of gexp are looked up in module-path.
This is the declarative counterpart of
gexp->script.
- Monadic Procedure: gexp->file name exp [#:set-load-path? #t] [#:module-path %load-path] [#:splice? #f] [#:guile
(default-guile)] Return a derivation that builds a file name containing exp. When splice? is true, exp is considered to be a list of expressions that will be spliced in the resulting file.
When set-load-path? is true, emit code in the resulting file to set
%load-pathand%load-compiled-pathto honor exp’s imported modules. Look up exp’s modules in module-path.The resulting file holds references to all the dependencies of exp or a subset thereof.
- Procedure: scheme-file name exp [#:splice? #f] [#:guile #f] [#:set-load-path? #t] Return an object representing the Scheme
file name that contains exp. guile is the Guile package used to produce that file.
This is the declarative counterpart of
gexp->file.
- Monadic Procedure: text-file* name text …
Return as a monadic value a derivation that builds a text file containing all of text. text may list, in addition to strings, objects of any type that can be used in a gexp: packages, derivations, local file objects, etc. The resulting store file holds references to all these.
This variant should be preferred over
text-fileanytime the file to create will reference items from the store. This is typically the case when building a configuration file that embeds store file names, like this:(define (profile.sh) ;; Return the name of a shell script in the store that ;; initializes the 'PATH' environment variable. (text-file* "profile.sh" "export PATH=" coreutils "/bin:" grep "/bin:" sed "/bin\n"))In this example, the resulting /gnu/store/…-profile.sh file will reference coreutils, grep, and sed, thereby preventing them from being garbage-collected during its lifetime.
- Procedure: mixed-text-file name text …
Return an object representing store file name containing text. text is a sequence of strings and file-like objects, as in:
(mixed-text-file "profile" "export PATH=" coreutils "/bin:" grep "/bin")This is the declarative counterpart of
text-file*.
- Procedure: file-union name files
Return a
<computed-file>that builds a directory containing all of files. Each item in files must be a two-element list where the first element is the file name to use in the new directory, and the second element is a gexp denoting the target file. Here’s an example:(file-union "etc" `(("hosts" ,(plain-file "hosts" "127.0.0.1 localhost")) ("bashrc" ,(plain-file "bashrc" "alias ls='ls --color=auto'"))))This yields an
etcdirectory containing these two files.
- Procedure: directory-union name things
Return a directory that is the union of things, where things is a list of file-like objects denoting directories. For example:
(directory-union "guile+emacs" (list guile emacs))yields a directory that is the union of the
guileandemacspackages.
- Procedure: file-append obj suffix …
Return a file-like object that expands to the concatenation of obj and suffix, where obj is a lowerable object and each suffix is a string.
As an example, consider this gexp:
(gexp->script "run-uname" #~(system* #$(file-append coreutils "/bin/uname")))The same effect could be achieved with:
(gexp->script "run-uname" #~(system* (string-append #$coreutils "/bin/uname")))There is one difference though: in the
file-appendcase, the resulting script contains the absolute file name as a string, whereas in the second case, the resulting script contains a(string-append …)expression to construct the file name at run time.
- Macro: let-system system body…
- Macro: let-system (system target) body…
Bind system to the currently targeted system—e.g.,
"x86_64-linux"—within body.In the second case, additionally bind target to the current cross-compilation target—a GNU triplet such as
"arm-linux-gnueabihf"—or#fif we are not cross-compiling.let-systemis useful in the occasional case where the object spliced into the gexp depends on the target system, as in this example:#~(system* #+(let-system system (cond ((string-prefix? "armhf-" system) (file-append qemu "/bin/qemu-system-arm")) ((string-prefix? "x86_64-" system) (file-append qemu "/bin/qemu-system-x86_64")) (else (error "dunno!")))) "-net" "user" #$image)
- Macro: with-parameters ((parameter value) …) exp
This macro is similar to the
parameterizeform for dynamically-bound parameters (veja Parameters em GNU Guile Reference Manual). The key difference is that it takes effect when the file-like object returned by exp is lowered to a derivation or store item.A typical use of
with-parametersis to force the system in effect for a given object:(with-parameters ((%current-system "i686-linux")) coreutils)The example above returns an object that corresponds to the i686 build of Coreutils, regardless of the current value of
%current-system.
- Procedure: gexp-input obj [output] [#:native? #f]
Return a gexp input record for the given output of file-like object obj, with
#:native?determining whether this is a native reference (as withungexp-native) or not.This procedure is helpful when you want to pass a reference to a specific output of an object to some procedure that may not know about that output. For example, assume you have this procedure, which takes one file-like object:
(define (make-symlink target) (computed-file "the-symlink" #~(symlink #$target #$output)))Here
make-symlinkcan only ever refer to the default output of target—the"out"output (veja Pacotes com múltiplas saídas). To have it refer to, say, the"lib"output of thehwlocpackage, you can call it like so:(make-symlink (gexp-input hwloc "lib"))You can also compose it like any other file-like object:
(make-symlink (file-append (gexp-input hwloc "lib") "/lib/libhwloc.so"))
Of course, in addition to gexps embedded in “host” code, there are also
modules containing build tools. To make it clear that they are meant to be
used in the build stratum, these modules are kept in the (guix build
…) name space.
Internally, high-level objects are lowered, using their compiler, to
either derivations or store items. For instance, lowering a package yields
a derivation, and lowering a plain-file yields a store item. This is
achieved using the lower-object monadic procedure.
- Monadic Procedure: lower-object obj [system] [#:target #f] Return as a value in
%store-monadthe derivation or store item corresponding to obj for system, cross-compiling for target if target is true. obj must be an object that has an associated gexp compiler, such as a
<package>.
- Procedure: gexp->approximate-sexp gexp
Sometimes, it may be useful to convert a G-exp into a S-exp. For example, some linters (veja Invocando
guix lint) peek into the build phases of a package to detect potential problems. This conversion can be achieved with this procedure. However, some information can be lost in the process. More specifically, lowerable objects will be silently replaced with some arbitrary object – currently the list(*approximate*), but this may change.
Próximo: Usando Guix interativamente, Anterior: Expressões-G, Acima: Interface de programação [Conteúdo][Índice]
8.13 Invocando guix repl
The guix repl command makes it easier to program Guix in Guile by
launching a Guile read-eval-print loop (REPL) for interactive
programming (veja Using Guile Interactively em GNU Guile Reference
Manual), or by running Guile scripts (veja Running Guile Scripts em GNU Guile Reference Manual). Compared to just launching the
guile command, guix repl guarantees that all the Guix
modules and all its dependencies are available in the search path.
A sintaxe geral é:
guix repl options [file args]
When a file argument is provided, file is executed as a Guile scripts:
guix repl my-script.scm
To pass arguments to the script, use -- to prevent them from being
interpreted as arguments to guix repl itself:
guix repl -- my-script.scm --input=foo.txt
To make a script executable directly from the shell, using the guix executable that is on the user’s search path, add the following two lines at the top of the script:
#!/usr/bin/env -S guix repl --!#
To make a script that launches an interactive REPL directly from the shell,
use the --interactive flag:
#!/usr/bin/env -S guix repl --interactive!#
Without a file name argument, a Guile REPL is started, allowing for interactive use (veja Usando Guix interativamente):
$ guix repl scheme@(guile-user)> ,use (gnu packages base) scheme@(guile-user)> coreutils $1 = #<package coreutils@8.29 gnu/packages/base.scm:327 3e28300>
In addition, guix repl implements a simple machine-readable REPL
protocol for use by (guix inferior), a facility to interact with
inferiors, separate processes running a potentially different revision
of Guix.
As opções disponíveis são as seguintes:
--list-typesDisplay the TYPE options for
guix repl --type=TYPEand exit.--type=type-t tipoStart a REPL of the given TYPE, which can be one of the following:
guileThis is default, and it spawns a standard full-featured Guile REPL.
machineSpawn a REPL that uses the machine-readable protocol. This is the protocol that the
(guix inferior)module speaks.
--listen=endpointBy default,
guix replreads from standard input and writes to standard output. When this option is passed, it will instead listen for connections on endpoint. Here are examples of valid options:--listen=tcp:37146Accept connections on localhost on port 37146.
--listen=unix:/tmp/socketAccept connections on the Unix-domain socket /tmp/socket.
--interactive-iLaunch the interactive REPL after file is executed.
--load-path=directory-L diretórioAdd directory to the front of the package module search path (veja Módulos de pacote).
This allows users to define their own packages and make them visible to the script or REPL.
-qInhibit loading of the ~/.guile file. By default, that configuration file is loaded when spawning a
guileREPL.
Anterior: Invocando guix repl, Acima: Interface de programação [Conteúdo][Índice]
8.14 Usando Guix interativamente
The guix repl command gives you access to a warm and friendly
read-eval-print loop (REPL) (veja Invocando guix repl). If you’re
getting into Guix programming—defining your own packages, writing
manifests, defining services for Guix System or Guix Home, etc.—you will
surely find it convenient to toy with ideas at the REPL.
If you use Emacs, the most convenient way to do that is with Geiser
(veja A configuração perfeita), but you do not have to use Emacs to enjoy the
REPL. When using guix repl or guile in the terminal,
we recommend using Readline for completion and Colorized to get colorful
output. To do that, you can run:
guix install guile guile-readline guile-colorized
... and then create a .guile file in your home directory containing this:
(use-modules (ice-9 readline) (ice-9 colorized)) (activate-readline) (activate-colorized)
The REPL lets you evaluate Scheme code; you type a Scheme expression at the prompt, and the REPL prints what it evaluates to:
$ guix repl scheme@(guix-user)> (+ 2 3) $1 = 5 scheme@(guix-user)> (string-append "a" "b") $2 = "ab"
It becomes interesting when you start fiddling with Guix at the REPL. The
first thing you’ll want to do is to “import” the (guix) module,
which gives access to the main part of the programming interface, and
perhaps a bunch of useful Guix modules. You could type (use-modules
(guix)), which is valid Scheme code to import a module (veja Using Guile
Modules em GNU Guile Reference Manual), but the REPL provides the
use command as a shorthand notation (veja REPL Commands em GNU Guile Reference Manual):
scheme@(guix-user)> ,use (guix) scheme@(guix-user)> ,use (gnu packages base)
Notice that REPL commands are introduced by a leading comma. A REPL command
like use is not valid Scheme code; it’s interpreted specially by the
REPL.
Guix extends the Guile REPL with additional commands for convenience. Among
those, the build command comes in handy: it ensures that the given
file-like object is built, building it if needed, and returns its output
file name(s). In the example below, we build the coreutils and
grep packages, as well as a “computed file” (veja computed-file), and we use the scandir procedure to list the
files in Grep’s /bin directory:
scheme@(guix-user)> ,build coreutils
$1 = "/gnu/store/…-coreutils-8.32-debug"
$2 = "/gnu/store/…-coreutils-8.32"
scheme@(guix-user)> ,build grep
$3 = "/gnu/store/…-grep-3.6"
scheme@(guix-user)> ,build (computed-file "x" #~(mkdir #$output))
building /gnu/store/…-x.drv...
$4 = "/gnu/store/…-x"
scheme@(guix-user)> ,use(ice-9 ftw)
scheme@(guix-user)> (scandir (string-append $3 "/bin"))
$5 = ("." ".." "egrep" "fgrep" "grep")
As a packager, you may be willing to inspect the build phases or flags of a given package; this is particularly useful when relying a lot on inheritance to define package variants (veja Definindo variantes de pacote) or when package arguments are a result of some computation, both of which can make it harder to foresee what ends up in the package arguments. Additional commands let you inspect those package arguments:
scheme@(guix-user)> ,phases grep
$1 = (modify-phases %standard-phases
(add-after 'install 'fix-egrep-and-fgrep
(lambda* (#:key outputs #:allow-other-keys)
(let* ((out (assoc-ref outputs "out"))
(bin (string-append out "/bin")))
(substitute* (list (string-append bin "/egrep")
(string-append bin "/fgrep"))
(("^exec grep")
(string-append "exec " bin "/grep")))))))
scheme@(guix-user)> ,configure-flags findutils
$2 = (list "--localstatedir=/var")
scheme@(guix-user)> ,make-flags binutils
$3 = '("MAKEINFO=true")
At a lower-level, a useful command is lower: it takes a file-like
object and “lowers” it into a derivation (veja Derivações) or a store
file:
scheme@(guix-user)> ,lower grep $6 = #<derivation /gnu/store/…-grep-3.6.drv => /gnu/store/…-grep-3.6 7f0e639115f0> scheme@(guix-user)> ,lower (plain-file "x" "Hello!") $7 = "/gnu/store/…-x"
The full list of REPL commands can be seen by typing ,help guix and
is given below for reference.
- REPL command: build object
Lower object and build it if it’s not already built, returning its output file name(s).
- REPL command: lower object
Lower object into a derivation or store file name and return it.
- REPL command: verbosity level
Change build verbosity to level.
This is similar to the --verbosity command-line option (veja Opções de compilação comuns): level 0 means total silence, level 1 shows build events only, and higher levels print build logs.
- REPL command: phases package
- REPL command: configure-flags package
- REPL command: make-flags package
These REPL commands return the value of one element of the
argumentsfield of package (veja Referência dopackage): the first one show the staged code associated with#:phases(veja Fases de construção), the second shows the code for#:configure-flags, and,make-flagsreturns the code for#:make-flags.
- REPL command: run-in-store exp
Run exp, a monadic expression, through the store monad. Veja A mônada do armazém, for more information.
- REPL command: enter-store-monad
Enter a new REPL to evaluate monadic expressions (veja A mônada do armazém). You can quit this “inner” REPL by typing
,q.
Próximo: Arquiteturas Estrangeiras, Anterior: Interface de programação, Acima: GNU Guix [Conteúdo][Índice]
9 Utilitários
This section describes Guix command-line utilities. Some of them are primarily targeted at developers and users who write new package definitions, while others are more generally useful. They complement the Scheme programming interface of Guix in a convenient way.
- Invocando
guix build - Invocando
guix edit - Invocando
guix download - Invocando
guix hash - Invoking
guix import - Invocando
guix refresh - Invoking
guix style - Invocando
guix lint - Invocando
guix size - Invocando
guix graph - Invocando
guix publish - Invocando
guix challenge - Invocando
guix copy - Invocando
guix container - Invocando
guix weather - Invocando
guix
processes
Próximo: Invocando guix edit, Acima: Utilitários [Conteúdo][Índice]
9.1 Invocando guix build
The guix build command builds packages or derivations and their
dependencies, and prints the resulting store paths. Note that it does not
modify the user’s profile—this is the job of the guix package
command (veja Invocando guix package). Thus, it is mainly useful for
distribution developers.
A sintaxe geral é:
guix build options package-or-derivation…
As an example, the following command builds the latest versions of Emacs and of Guile, displays their build logs, and finally displays the resulting directories:
guix build emacs guile
Similarly, the following command builds all the available packages:
guix build --quiet --keep-going \
$(guix package -A | awk '{ print $1 "@" $2 }')
package-or-derivation may be either the name of a package found in the
software distribution such as coreutils or coreutils@8.20, or
a derivation such as /gnu/store/…-coreutils-8.19.drv. In the
former case, a package with the corresponding name (and optionally version)
is searched for among the GNU distribution modules (veja Módulos de pacote).
Alternatively, the --expression option may be used to specify a Scheme expression that evaluates to a package; this is useful when disambiguating among several same-named packages or package variants is needed.
There may be zero or more options. The available options are described in the subsections below.
- Opções de compilação comuns
- Opções de transformação de pacote
- Opções de compilação adicional
- Depurando falhas de compilação
Próximo: Opções de transformação de pacote, Acima: Invocando guix build [Conteúdo][Índice]
9.1.1 Opções de compilação comuns
A number of options that control the build process are common to
guix build and other commands that can spawn builds, such as
guix package or guix archive. These are the following:
--load-path=directory-L diretórioAdd directory to the front of the package module search path (veja Módulos de pacote).
This allows users to define their own packages and make them visible to the command-line tools.
--keep-failed-KKeep the build tree of failed builds. Thus, if a build fails, its build tree is kept under /tmp, in a directory whose name is shown at the end of the build log. This is useful when debugging build issues. Veja Depurando falhas de compilação, for tips and tricks on how to debug build issues.
This option implies --no-offload, and it has no effect when connecting to a remote daemon with a
guix://URI (veja theGUIX_DAEMON_SOCKETvariable).--keep-going-kKeep going when some of the derivations fail to build; return only once all the builds have either completed or failed.
The default behavior is to stop as soon as one of the specified derivations has failed.
--dry-run-nDo not build the derivations.
--fallbackWhen substituting a pre-built binary fails, fall back to building packages locally (veja Falha na substituição).
--substitute-urls=urlsConsider urls the whitespace-separated list of substitute source URLs, overriding the default list of URLs of
guix-daemon(vejaguix-daemonURLs).This means that substitutes may be downloaded from urls, provided they are signed by a key authorized by the system administrator (veja Substitutos).
When urls is the empty string, substitutes are effectively disabled.
--no-substitutesNão use substitutos para compilar produtos. Ou seja, sempre crie coisas localmente, em vez de permitir downloads de binários pré-compilados (veja Substitutos).
--no-graftsDo not “graft” packages. In practice, this means that package updates available as grafts are not applied. Veja Atualizações de segurança, for more information on grafts.
--rounds=nBuild each derivation n times in a row, and raise an error if consecutive build results are not bit-for-bit identical.
This is a useful way to detect non-deterministic builds processes. Non-deterministic build processes are a problem because they make it practically impossible for users to verify whether third-party binaries are genuine. Veja Invocando
guix challenge, for more.Quando usado em conjunto com --keep-failed, uma saída de comparação é mantida no armazém, sob /gnu/store/…-check. Isso facilita procurar por diferenças entre os dois resultados.
--no-offloadNão use compilações de offload para outras máquinas (veja Usando o recurso de descarregamento). Ou seja, sempre compile as coisas localmente em vez de descarregar compilações para máquinas remotas.
--max-silent-time=segundosQuando o processo de compilação ou substituição permanecer em silêncio por mais de segundos, encerra-o e relata uma falha de compilação.
By default, the daemon’s setting is honored (veja --max-silent-time).
--timeout=segundosDa mesma forma, quando o processo de compilação ou substituição durar mais que segundos, encerra-o e relata uma falha de compilação.
By default, the daemon’s setting is honored (veja --timeout).
-v level--verbosity=levelUse the given verbosity level, an integer. Choosing 0 means that no output is produced, 1 is for quiet output; 2 is similar to 1 but it additionally displays download URLs; 3 shows all the build log output on standard error.
--cores=n-c nAllow the use of up to n CPU cores for the build. The special value
0means to use as many CPU cores as available.--max-jobs=n-M nAllow at most n build jobs in parallel. Veja --max-jobs, for details about this option and the equivalent
guix-daemonoption.--debug=levelProduce debugging output coming from the build daemon. level must be an integer between 0 and 5; higher means more verbose output. Setting a level of 4 or more may be helpful when debugging setup issues with the build daemon.
Behind the scenes, guix build is essentially an interface to the
package-derivation procedure of the (guix packages) module,
and to the build-derivations procedure of the (guix
derivations) module.
In addition to options explicitly passed on the command line, guix
build and other guix commands that support building honor the
GUIX_BUILD_OPTIONS environment variable.
- Environment Variable: GUIX_BUILD_OPTIONS
Users can define this variable to a list of command line options that will automatically be used by
guix buildand otherguixcommands that can perform builds, as in the example below:$ export GUIX_BUILD_OPTIONS="--no-substitutes -c 2 -L /foo/bar"
These options are parsed independently, and the result is appended to the parsed command-line options.
Próximo: Opções de compilação adicional, Anterior: Opções de compilação comuns, Acima: Invocando guix build [Conteúdo][Índice]
9.1.2 Opções de transformação de pacote
Another set of command-line options supported by guix build and
also guix package are package transformation options. These
are options that make it possible to define package variants—for
instance, packages built from different source code. This is a convenient
way to create customized packages on the fly without having to type in the
definitions of package variants (veja Definindo pacotes).
Package transformation options are preserved across upgrades: guix
upgrade attempts to apply transformation options initially used when
creating the profile to the upgraded packages.
The available options are listed below. Most commands support them and also support a --help-transform option that lists all the available options and a synopsis (these options are not shown in the --help output for brevity).
--tune[=cpu]Use versions of the packages marked as “tunable” optimized for cpu. When cpu is
native, or when it is omitted, tune for the CPU on which theguixcommand is running.Valid cpu names are those recognized by the underlying compiler, by default the GNU Compiler Collection. On x86_64 processors, this includes CPU names such as
nehalem,haswell, andskylake(veja-marchem Using the GNU Compiler Collection (GCC)).As new generations of CPUs come out, they augment the standard instruction set architecture (ISA) with additional instructions, in particular instructions for single-instruction/multiple-data (SIMD) parallel processing. For example, while Core2 and Skylake CPUs both implement the x86_64 ISA, only the latter supports AVX2 SIMD instructions.
The primary gain one can expect from --tune is for programs that can make use of those SIMD capabilities and that do not already have a mechanism to select the right optimized code at run time. Packages that have the
tunable?property set are considered tunable packages by the --tune option; a package definition with the property set looks like this:(package (name "hello-simd") ;; ... ;; This package may benefit from SIMD extensions so ;; mark it as "tunable". (properties '((tunable? . #t))))Other packages are not considered tunable. This allows Guix to use generic binaries in the cases where tuning for a specific CPU is unlikely to provide any gain.
Tuned packages are built with
-march=CPU; under the hood, the -march option is passed to the actual wrapper by a compiler wrapper. Since the build machine may not be able to run code for the target CPU micro-architecture, the test suite is not run when building a tuned package.To reduce rebuilds to the minimum, tuned packages are grafted onto packages that depend on them (veja grafts). Thus, using --no-grafts cancels the effect of --tune.
We call this technique package multi-versioning: several variants of tunable packages may be built, one for each CPU variant. It is the coarse-grain counterpart of function multi-versioning as implemented by the GNU tool chain (veja Function Multiversioning em Using the GNU Compiler Collection (GCC)).
--with-source=fonte--with-source=pacote=fonte--with-source=package@version=sourceUse source as the source of package, and version as its version number. source must be a file name or a URL, as for
guix download(veja Invocandoguix download).When package is omitted, it is taken to be the package name specified on the command line that matches the base of source—e.g., if source is
/src/guile-2.0.10.tar.gz, the corresponding package isguile.Likewise, when version is omitted, the version string is inferred from source; in the previous example, it is
2.0.10.This option allows users to try out versions of packages other than the one provided by the distribution. The example below downloads ed-1.7.tar.gz from a GNU mirror and uses that as the source for the
edpackage:guix build ed --with-source=mirror://gnu/ed/ed-1.4.tar.gz
As a developer, --with-source makes it easy to test release candidates, and even to test their impact on packages that depend on them:
guix build elogind --with-source=…/shepherd-0.9.0rc1.tar.gz
… or to build from a checkout in a pristine environment:
$ git clone git://git.sv.gnu.org/guix.git $ guix build guix --with-source=guix@1.0=./guix
--with-input=pacote=substitutoReplace dependency on package by a dependency on replacement. package must be a package name, and replacement must be a package specification such as
guileorguile@1.8.For instance, the following command builds Guix, but replaces its dependency on the current stable version of Guile with a dependency on the legacy version of Guile,
guile@2.2:guix build --with-input=guile=guile@2.2 guix
This is a recursive, deep replacement. So in this example, both
guixand its dependencyguile-json(which also depends onguile) get rebuilt againstguile@2.2.This is implemented using the
package-input-rewriting/specScheme procedure (vejapackage-input-rewriting/spec).--with-graft=package=replacementThis is similar to --with-input but with an important difference: instead of rebuilding the whole dependency chain, replacement is built and then grafted onto the binaries that were initially referring to package. Veja Atualizações de segurança, for more information on grafts.
For example, the command below grafts version 3.5.4 of GnuTLS onto Wget and all its dependencies, replacing references to the version of GnuTLS they currently refer to:
guix build --with-graft=gnutls=gnutls@3.5.4 wget
This has the advantage of being much faster than rebuilding everything. But there is a caveat: it works if and only if package and replacement are strictly compatible—for example, if they provide a library, the application binary interface (ABI) of those libraries must be compatible. If replacement is somehow incompatible with package, then the resulting package may be unusable. Use with care!
--with-debug-info=packageBuild package in a way that preserves its debugging info and graft it onto packages that depend on it. This is useful if package does not already provide debugging info as a
debugoutput (veja Instalando arquivos de depuração).For example, suppose you’re experiencing a crash in Inkscape and would like to see what’s up in GLib, a library deep down in Inkscape’s dependency graph. GLib lacks a
debugoutput, so debugging is tough. Fortunately, you rebuild GLib with debugging info and tack it on Inkscape:guix install inkscape --with-debug-info=glib
Only GLib needs to be recompiled so this takes a reasonable amount of time. Veja Instalando arquivos de depuração, for more info.
Nota: Under the hood, this option works by passing the ‘#:strip-binaries? #f’ to the build system of the package of interest (veja Sistemas de compilação). Most build systems support that option but some do not. In that case, an error is raised.
Likewise, if a C/C++ package is built without
-g(which is rarely the case), debugging info will remain unavailable even when#:strip-binaries?is false.--with-c-toolchain=package=toolchainThis option changes the compilation of package and everything that depends on it so that they get built with toolchain instead of the default GNU tool chain for C/C++.
Considere este exemplo:
guix build octave-cli \ --with-c-toolchain=fftw=gcc-toolchain@10 \ --with-c-toolchain=fftwf=gcc-toolchain@10
The command above builds a variant of the
fftwandfftwfpackages using version 10 ofgcc-toolchaininstead of the default tool chain, and then builds a variant of the GNU Octave command-line interface using them. GNU Octave itself is also built withgcc-toolchain@10.This other example builds the Hardware Locality (
hwloc) library and its dependents up tointel-mpi-benchmarkswith the Clang C compiler:guix build --with-c-toolchain=hwloc=clang-toolchain \ intel-mpi-benchmarksNota: There can be application binary interface (ABI) incompatibilities among tool chains. This is particularly true of the C++ standard library and run-time support libraries such as that of OpenMP. By rebuilding all dependents with the same tool chain, --with-c-toolchain minimizes the risks of incompatibility but cannot entirely eliminate them. Choose package wisely.
--with-git-url=pacote=url¶-
Build package from the latest commit of the
masterbranch of the Git repository at url. Git sub-modules of the repository are fetched, recursively.For example, the following command builds the NumPy Python library against the latest commit of the master branch of Python itself:
guix build python-numpy \ --with-git-url=python=https://github.com/python/cpython
This option can also be combined with --with-branch or --with-commit (see below).
Obviously, since it uses the latest commit of the given branch, the result of such a command varies over time. Nevertheless it is a convenient way to rebuild entire software stacks against the latest commit of one or more packages. This is particularly useful in the context of continuous integration (CI).
Checkouts are kept in a cache under ~/.cache/guix/checkouts to speed up consecutive accesses to the same repository. You may want to clean it up once in a while to save disk space.
--with-branch=pacote=ramoBuild package from the latest commit of branch. If the
sourcefield of package is an origin with thegit-fetchmethod (veja Referência doorigin) or agit-checkoutobject, the repository URL is taken from thatsource. Otherwise you have to use --with-git-url to specify the URL of the Git repository.For instance, the following command builds
guile-sqlite3from the latest commit of itsmasterbranch, and then buildsguix(which depends on it) andcuirass(which depends onguix) against this specificguile-sqlite3build:guix build --with-branch=guile-sqlite3=master cuirass
--with-commit=pacote=commitThis is similar to --with-branch, except that it builds from commit rather than the tip of a branch. commit must be a valid Git commit SHA1 identifier, a tag, or a
git describestyle identifier such as1.0-3-gabc123.--with-patch=package=fileAdd file to the list of patches applied to package, where package is a spec such as
python@3.8orglibc. file must contain a patch; it is applied with the flags specified in theoriginof package (veja Referência doorigin), which by default includes-p1(veja patch Directories em Comparing and Merging Files).As an example, the command below rebuilds Coreutils with the GNU C Library (glibc) patched with the given patch:
guix build coreutils --with-patch=glibc=./glibc-frob.patch
In this example, glibc itself as well as everything that leads to Coreutils in the dependency graph is rebuilt.
--with-configure-flag=package=flagAppend flag to the configure flags of package, where package is a spec such as
guile@3.0orglibc. The build system of package must support the#:configure-flagsargument.For example, the command below builds GNU Hello with the configure flag
--disable-nls:guix build hello --with-configure-flag=hello=--disable-nls
The following command passes an extra flag to
cmakeas it buildslapack:guix build lapack \ --with-configure-flag=lapack=-DBUILD_SHARED_LIBS=OFF
Nota: Under the hood, this option works by passing the ‘#:configure-flags’ argument to the build system of the package of interest (veja Sistemas de compilação). Most build systems support that option but some do not. In that case, an error is raised.
--with-latest=package--with-version=package=versionSo you like living on the bleeding edge? The --with-latest option is for you! It replaces occurrences of package in the dependency graph with its latest upstream version, as reported by
guix refresh(veja Invocandoguix refresh).It does so by determining the latest upstream release of package (if possible), downloading it, and authenticating it if it comes with an OpenPGP signature.
As an example, the command below builds Guix against the latest version of Guile-JSON:
guix build guix --with-latest=guile-json
The --with-version works similarly except that it lets you specify that you want precisely version, assuming that version exists upstream. For example, to spawn a development environment with SciPy built against version 1.22.4 of NumPy (skipping its test suite because hey, we’re not gonna wait this long), you would run:
guix shell python python-scipy --with-version=python-numpy=1.22.4
Aviso: Because they depend on source code published at a given point in time on upstream servers, deployments made with --with-latest and --with-version may be non-reproducible: source might disappear or be modified in place on the servers.
To deploy old software versions without compromising on reproducibility, veja
guix time-machine.There are limitations. First, in cases where the tool cannot or does not know how to authenticate source code, you are at risk of running malicious code; a warning is emitted in this case. Second, this option simply changes the source used in the existing package definitions, which is not always sufficient: there might be additional dependencies that need to be added, patches to apply, and more generally the quality assurance work that Guix developers normally do will be missing.
You’ve been warned! When those limitations are acceptable, it’s a snappy way to stay on top. We encourage you to submit patches updating the actual package definitions once you have successfully tested an upgrade with --with-latest (veja Contribuindo).
--without-tests=packageBuild package without running its tests. This can be useful in situations where you want to skip the lengthy test suite of a intermediate package, or if a package’s test suite fails in a non-deterministic fashion. It should be used with care because running the test suite is a good way to ensure a package is working as intended.
Turning off tests leads to a different store item. Consequently, when using this option, anything that depends on package must be rebuilt, as in this example:
guix install --without-tests=python python-notebook
The command above installs
python-notebookon top ofpythonbuilt without running its test suite. To do so, it also rebuilds everything that depends onpython, includingpython-notebookitself.Internally, --without-tests relies on changing the
#:tests?option of a package’scheckphase (veja Sistemas de compilação). Note that some packages use a customizedcheckphase that does not respect a#:tests? #fsetting. Therefore, --without-tests has no effect on these packages.
Wondering how to achieve the same effect using Scheme code, for example in your manifest, or how to write your own package transformation? Veja Definindo variantes de pacote, for an overview of the programming interfaces available.
Próximo: Depurando falhas de compilação, Anterior: Opções de transformação de pacote, Acima: Invocando guix build [Conteúdo][Índice]
9.1.3 Opções de compilação adicional
The command-line options presented below are specific to guix
build.
--quiet-qBuild quietly, without displaying the build log; this is equivalent to --verbosity=0. Upon completion, the build log is kept in /var (or similar) and can always be retrieved using the --log-file option.
--file=arquivo-f arquivoBuild the package, derivation, or other file-like object that the code within file evaluates to (veja file-like objects).
As an example, file might contain a package definition like this (veja Definindo pacotes):
(use-modules (guix) (guix build-system gnu) (guix licenses)) (package (name "hello") (version "2.10") (source (origin (method url-fetch) (uri (string-append "mirror://gnu/hello/hello-" version ".tar.gz")) (sha256 (base32 "0ssi1wpaf7plaswqqjwigppsg5fyh99vdlb9kzl7c9lng89ndq1i")))) (build-system gnu-build-system) (synopsis "Hello, GNU world: An example GNU package") (description "Guess what GNU Hello prints!") (home-page "http://www.gnu.org/software/hello/") (license gpl3+))
The file may also contain a JSON representation of one or more package definitions. Running
guix build -fon hello.json with the following contents would result in building the packagesmyhelloandgreeter:[ { "name": "myhello", "version": "2.10", "source": "mirror://gnu/hello/hello-2.10.tar.gz", "build-system": "gnu", "arguments": { "tests?": false }, "home-page": "https://www.gnu.org/software/hello/", "synopsis": "Hello, GNU world: An example GNU package", "description": "GNU Hello prints a greeting.", "license": "GPL-3.0+", "native-inputs": ["gettext"] }, { "name": "greeter", "version": "1.0", "source": "mirror://gnu/hello/hello-2.10.tar.gz", "build-system": "gnu", "arguments": { "test-target": "foo", "parallel-build?": false }, "home-page": "https://example.com/", "synopsis": "Greeter using GNU Hello", "description": "This is a wrapper around GNU Hello.", "license": "GPL-3.0+", "inputs": ["myhello", "hello"] } ]--manifest=manifest-m manifestBuild all packages listed in the given manifest (veja --manifest).
--expression=expr-e exprBuild the package or derivation expr evaluates to.
For example, expr may be
(@ (gnu packages guile) guile-1.8), which unambiguously designates this specific variant of version 1.8 of Guile.Alternatively, expr may be a G-expression, in which case it is used as a build program passed to
gexp->derivation(veja Expressões-G).Lastly, expr may refer to a zero-argument monadic procedure (veja A mônada do armazém). The procedure must return a derivation as a monadic value, which is then passed through
run-with-store.--development-DBuild the “development environment” (build dependencies) of the following package.
For example, the following command builds the inputs of
hello, but nothelloitself, and also buildsguile:guix build -D hello guile
Notice that -D (or --development) only applies to the immediately following package on the command line. Under the hood, it uses
package->development-manifest(vejapackage->development-manifest).Nota: The effect of combining --development with --target (for cross-compilation) may not be what you expect: it will cross-compile all the dependencies of the given package when it is built natively.
--dependents[=depth]-P [depth]Build the dependents of the following package. By default, build all the direct and indirect dependents; when depth is provided, limit to dependents at that distance: 1 for direct dependents, 2 for dependents of dependents, and so on.
For example, the command below builds all the dependents of libgit2:
guix build --dependents libgit2
To build all the packages that directly depend on NumPy, run:
guix build -P1 python-numpy
The list of dependents is computed in the same way as with
guix refresh --list-dependent(veja Invocandoguix refresh).--source-SBuild the source derivations of the packages, rather than the packages themselves.
For instance,
guix build -S gccreturns something like /gnu/store/…-gcc-4.7.2.tar.bz2, which is the GCC source tarball.The returned source tarball is the result of applying any patches and code snippets specified in the package
origin(veja Definindo pacotes).As with other derivations, the result of building a source derivation can be verified using the --check option (veja build-check). This is useful to validate that a (potentially already built or substituted, thus cached) package source matches against its declared hash.
Note that
guix build -Scompiles the sources only of the specified packages. They do not include the sources of statically linked dependencies and by themselves are insufficient for reproducing the packages.--sourcesFetch and return the source of package-or-derivation and all their dependencies, recursively. This is a handy way to obtain a local copy of all the source code needed to build packages, allowing you to eventually build them even without network access. It is an extension of the --source option and can accept one of the following optional argument values:
packageThis value causes the --sources option to behave in the same way as the --source option.
allBuild the source derivations of all packages, including any source that might be listed as
inputs. This is the default value.$ guix build --sources tzdata The following derivations will be built: /gnu/store/…-tzdata2015b.tar.gz.drv /gnu/store/…-tzcode2015b.tar.gz.drv
transitiveBuild the source derivations of all packages, as well of all transitive inputs to the packages. This can be used e.g. to prefetch package source for later offline building.
$ guix build --sources=transitive tzdata The following derivations will be built: /gnu/store/…-tzcode2015b.tar.gz.drv /gnu/store/…-findutils-4.4.2.tar.xz.drv /gnu/store/…-grep-2.21.tar.xz.drv /gnu/store/…-coreutils-8.23.tar.xz.drv /gnu/store/…-make-4.1.tar.xz.drv /gnu/store/…-bash-4.3.tar.xz.drv …
--system=sistema-s sistemaAttempt to build for system—e.g.,
i686-linux—instead of the system type of the build host. Theguix buildcommand allows you to repeat this option several times, in which case it builds for all the specified systems; other commands ignore extraneous -s options.Nota: The --system flag is for native compilation and must not be confused with cross-compilation. See --target below for information on cross-compilation.
An example use of this is on Linux-based systems, which can emulate different personalities. For instance, passing --system=i686-linux on an
x86_64-linuxsystem or --system=armhf-linux on anaarch64-linuxsystem allows you to build packages in a complete 32-bit environment.Nota: Building for an
armhf-linuxsystem is unconditionally enabled onaarch64-linuxmachines, although certain aarch64 chipsets do not allow for this functionality, notably the ThunderX.Similarly, when transparent emulation with QEMU and
binfmt_miscis enabled (vejaqemu-binfmt-service-type), you can build for any system for which a QEMUbinfmt_mischandler is installed.Builds for a system other than that of the machine you are using can also be offloaded to a remote machine of the right architecture. Veja Usando o recurso de descarregamento, for more information on offloading.
--target=tripleto¶Cross-build for triplet, which must be a valid GNU triplet, such as
"aarch64-linux-gnu"(veja GNU configuration triplets em Autoconf).--list-systemsList all the supported systems, that can be passed as an argument to --system.
--list-targetsList all the supported targets, that can be passed as an argument to --target.
--check¶-
Rebuild package-or-derivation, which are already available in the store, and raise an error if the build results are not bit-for-bit identical.
This mechanism allows you to check whether previously installed substitutes are genuine (veja Substitutos), or whether the build result of a package is deterministic. Veja Invocando
guix challenge, for more background information and tools.Quando usado em conjunto com --keep-failed, uma saída de comparação é mantida no armazém, sob /gnu/store/…-check. Isso facilita procurar por diferenças entre os dois resultados.
--repair¶-
Attempt to repair the specified store items, if they are corrupt, by re-downloading or rebuilding them.
This operation is not atomic and thus restricted to
root. --derivations-dReturn the derivation paths, not the output paths, of the given packages.
--root=arquivo¶-r arquivo-
Make file a symlink to the result, and register it as a garbage collector root.
Consequently, the results of this
guix buildinvocation are protected from garbage collection until file is removed. When that option is omitted, build results are eligible for garbage collection as soon as the build completes. Veja Invocandoguix gc, for more on GC roots. --log-file¶Return the build log file names or URLs for the given package-or-derivation, or raise an error if build logs are missing.
This works regardless of how packages or derivations are specified. For instance, the following invocations are equivalent:
guix build --log-file $(guix build -d guile) guix build --log-file $(guix build guile) guix build --log-file guile guix build --log-file -e '(@ (gnu packages guile) guile-2.0)'
If a log is unavailable locally, and unless --no-substitutes is passed, the command looks for a corresponding log on one of the substitute servers.
So for instance, imagine you want to see the build log of GDB on
aarch64, but you are actually on anx86_64machine:$ guix build --log-file gdb -s aarch64-linux https://bordeaux.guix.gnu.org/log/…-gdb-7.10
You can freely access a huge library of build logs!
Anterior: Opções de compilação adicional, Acima: Invocando guix build [Conteúdo][Índice]
9.1.4 Depurando falhas de compilação
When defining a new package (veja Definindo pacotes), you will probably find yourself spending some time debugging and tweaking the build until it succeeds. To do that, you need to operate the build commands yourself in an environment as close as possible to the one the build daemon uses.
To that end, the first thing to do is to use the --keep-failed or
-K option of guix build, which will keep the failed build
tree in /tmp or whatever directory you specified as TMPDIR
(veja --keep-failed).
From there on, you can cd to the failed build tree and source the
environment-variables file, which contains all the environment
variable definitions that were in place when the build failed. So let’s say
you’re debugging a build failure in package foo; a typical session
would look like this:
$ guix build foo -K … build fails $ cd /tmp/guix-build-foo.drv-0 $ source ./environment-variables $ cd foo-1.2
Now, you can invoke commands as if you were the daemon (almost) and troubleshoot your build process.
Sometimes it happens that, for example, a package’s tests pass when you run them manually but they fail when the daemon runs them. This can happen because the daemon runs builds in containers where, unlike in our environment above, network access is missing, /bin/sh does not exist, etc. (veja Configuração do ambiente de compilação).
In such cases, you may need to inspect the build process from within a container similar to the one the build daemon creates:
$ guix build -K foo … $ cd /tmp/guix-build-foo.drv-0 $ guix shell --no-grafts -C -D foo strace gdb [env]# source ./environment-variables [env]# cd foo-1.2
Here, guix shell -C creates a container and spawns a new shell in
it (veja Invocando guix shell). The strace gdb part adds the
strace and gdb commands to the container, which you may
find handy while debugging. The --no-grafts option makes sure we
get the exact same environment, with ungrafted packages (veja Atualizações de segurança, for more info on grafts).
To get closer to a container like that used by the build daemon, we can remove /bin/sh:
[env]# rm /bin/sh
(Don’t worry, this is harmless: this is all happening in the throw-away
container created by guix shell.)
The strace command is probably not in the search path, but we can
run:
[env]# $GUIX_ENVIRONMENT/bin/strace -f -o log make check
In this way, not only you will have reproduced the environment variables the daemon uses, you will also be running the build process in a container similar to the one the daemon uses.
Próximo: Invocando guix download, Anterior: Invocando guix build, Acima: Utilitários [Conteúdo][Índice]
9.2 Invocando guix edit
So many packages, so many source files! The guix edit command
facilitates the life of users and packagers by pointing their editor at the
source file containing the definition of the specified packages. For
instance:
guix edit gcc@4.9 vim
launches the program specified in the VISUAL or in the EDITOR
environment variable to view the recipe of GCC 4.9.3 and that of Vim.
If you are using a Guix Git checkout (veja Compilando do git), or have
created your own packages on GUIX_PACKAGE_PATH (veja Módulos de pacote), you will be able to edit the package recipes. In other cases,
you will be able to examine the read-only recipes for packages currently in
the store.
Instead of GUIX_PACKAGE_PATH, the command-line option
--load-path=directory (or in short -L
directory) allows you to add directory to the front of the
package module search path and so make your own packages visible.
Próximo: Invocando guix hash, Anterior: Invocando guix edit, Acima: Utilitários [Conteúdo][Índice]
9.3 Invocando guix download
When writing a package definition, developers typically need to download a
source tarball, compute its SHA256 hash, and write that hash in the package
definition (veja Definindo pacotes). The guix download tool
helps with this task: it downloads a file from the given URI, adds it to the
store, and prints both its file name in the store and its SHA256 hash.
The fact that the downloaded file is added to the store saves bandwidth:
when the developer eventually tries to build the newly defined package with
guix build, the source tarball will not have to be downloaded
again because it is already in the store. It is also a convenient way to
temporarily stash files, which may be deleted eventually (veja Invocando guix gc).
The guix download command supports the same URIs as used in
package definitions. In particular, it supports mirror:// URIs.
https URIs (HTTP over TLS) are supported provided the Guile
bindings for GnuTLS are available in the user’s environment; when they are
not available, an error is raised. Veja how to install
the GnuTLS bindings for Guile em GnuTLS-Guile, for more
information.
guix download verifies HTTPS server certificates by loading the
certificates of X.509 authorities from the directory pointed to by the
SSL_CERT_DIR environment variable (veja Certificados X.509), unless
--no-check-certificate is used.
Alternatively, guix download can also retrieve a Git repository,
possibly a specific commit, tag, or branch.
The following options are available:
--hash=algorithm-H algorithmCompute a hash using the specified algorithm. Veja Invocando
guix hash, for more information.--format=fmt-f fmtWrite the hash in the format specified by fmt. For more information on the valid values for fmt, veja Invocando
guix hash.--no-check-certificateDo not validate the X.509 certificates of HTTPS servers.
When using this option, you have absolutely no guarantee that you are communicating with the authentic server responsible for the given URL, which makes you vulnerable to “man-in-the-middle” attacks.
--output=arquivo-o arquivoSave the downloaded file to file instead of adding it to the store.
--git-gCheckout the Git repository at the latest commit on the default branch.
--commit=commit-or-tagCheckout the Git repository at commit-or-tag.
commit-or-tag can be either a tag or a commit defined in the Git repository.
--branch=ramoCheckout the Git repository at branch.
The repository will be checked out at the latest commit of branch, which must be a valid branch of the Git repository.
--recursive-rRecursively clone the Git repository.
Próximo: Invoking guix import, Anterior: Invocando guix download, Acima: Utilitários [Conteúdo][Índice]
9.4 Invocando guix hash
The guix hash command computes the hash of a file. It is
primarily a convenience tool for anyone contributing to the distribution: it
computes the cryptographic hash of one or more files, which can be used in
the definition of a package (veja Definindo pacotes).
A sintaxe geral é:
guix hash option file ...
When file is - (a hyphen), guix hash computes the
hash of data read from standard input. guix hash has the
following options:
--hash=algorithm-H algorithmCompute a hash using the specified algorithm,
sha256by default.algorithm must be the name of a cryptographic hash algorithm supported by Libgcrypt via Guile-Gcrypt—e.g.,
sha512orsha3-256(veja Hash Functions em Guile-Gcrypt Reference Manual).--format=fmt-f fmtWrite the hash in the format specified by fmt.
Supported formats:
base64,nix-base32,base32,base16(hexandhexadecimalcan be used as well).If the --format option is not specified,
guix hashwill output the hash innix-base32. This representation is used in the definitions of packages.--recursive-rThe --recursive option is deprecated in favor of --serializer=nar (see below); -r remains accepted as a convenient shorthand.
--serializer=type-S typeCompute the hash on file using type serialization.
type may be one of the following:
noneThis is the default: it computes the hash of a file’s contents.
narCompute the hash of a “normalized archive” (or “nar”) containing file, including its children if it is a directory. Some of the metadata of file is part of the archive; for instance, when file is a regular file, the hash is different depending on whether file is executable or not. Metadata such as time stamps have no impact on the hash (veja Invocando
guix archive, for more info on the nar format).gitCompute the hash of the file or directory as a Git “tree”, following the same method as the Git version control system.
--exclude-vcs-xWhen combined with --recursive, exclude version control system directories (.bzr, .git, .hg, etc.).
As an example, here is how you would compute the hash of a Git checkout, which is useful when using the
git-fetchmethod (veja Referência doorigin):$ git clone http://example.org/foo.git $ cd foo $ guix hash -x --serializer=nar .
Próximo: Invocando guix refresh, Anterior: Invocando guix hash, Acima: Utilitários [Conteúdo][Índice]
9.5 Invoking guix import
The guix import command is useful for people who would like to add
a package to the distribution with as little work as possible—a legitimate
demand. The command knows of a few repositories from which it can
“import” package metadata. The result is a package definition, or a
template thereof, in the format we know (veja Definindo pacotes).
A sintaxe geral é:
guix import [global-options…] importer package [options…]
importer specifies the source from which to import package metadata,
and options specifies a package identifier and other options specific
to importer. guix import itself has the following
global-options:
--insert=file-i fileInsert the package definition(s) that the importer generated into the specified file, either in alphabetical order among existing package definitions, or at the end of the file otherwise.
Some of the importers rely on the ability to run the gpgv
command. For these, GnuPG must be installed and in $PATH; run
guix install gnupg if needed.
Currently, the available “importers” are:
gnuImport metadata for the given GNU package. This provides a template for the latest version of that GNU package, including the hash of its source tarball, and its canonical synopsis and description.
Additional information such as the package dependencies and its license needs to be figured out manually.
For example, the following command returns a package definition for GNU Hello:
guix import gnu hello
Specific command-line options are:
--key-download=policyAs for
guix refresh, specify the policy to handle missing OpenPGP keys when verifying the package signature. Veja --key-download.
pypi¶Import metadata from the Python Package Index. Information is taken from the JSON-formatted description available at
pypi.python.organd usually includes all the relevant information, including package dependencies. For maximum efficiency, it is recommended to install theunziputility, so that the importer can unzip Python wheels and gather data from them.The command below imports metadata for the latest version of the
itsdangerousPython package:guix import pypi itsdangerous
You can also ask for a specific version:
guix import pypi itsdangerous@1.1.0
--recursive-rTraverse the dependency graph of the given upstream package recursively and generate package expressions for all those packages that are not yet in Guix.
gem¶Import metadata from RubyGems. Information is taken from the JSON-formatted description available at
rubygems.organd includes most relevant information, including runtime dependencies. There are some caveats, however. The metadata doesn’t distinguish between synopses and descriptions, so the same string is used for both fields. Additionally, the details of non-Ruby dependencies required to build native extensions is unavailable and left as an exercise to the packager.The command below imports metadata for the
railsRuby package:guix import gem rails
You can also ask for a specific version:
guix import gem rails@7.0.4
--recursive-rTraverse the dependency graph of the given upstream package recursively and generate package expressions for all those packages that are not yet in Guix.
minetest¶-
Import metadata from ContentDB. Information is taken from the JSON-formatted metadata provided through ContentDB’s API and includes most relevant information, including dependencies. There are some caveats, however. The license information is often incomplete. The commit hash is sometimes missing. The descriptions are in the Markdown format, but Guix uses Texinfo instead. Texture packs and subgames are unsupported.
The command below imports metadata for the Mesecons mod by Jeija:
guix import minetest Jeija/mesecons
The author name can also be left out:
guix import minetest mesecons
--recursive-rTraverse the dependency graph of the given upstream package recursively and generate package expressions for all those packages that are not yet in Guix.
cpan¶Import metadata from MetaCPAN. Information is taken from the JSON-formatted metadata provided through MetaCPAN’s API and includes most relevant information, such as module dependencies. License information should be checked closely. If Perl is available in the store, then the
corelistutility will be used to filter core modules out of the list of dependencies.The command below imports metadata for the Acme::Boolean Perl module:
guix import cpan Acme::Boolean
Like many other importers, the
cpanimporter supports recursive imports:--recursive-rTraverse the dependency graph of the given upstream package recursively and generate package expressions for all those packages that are not yet in Guix.
cran¶-
Import metadata from CRAN, the central repository for the GNU R statistical and graphical environment.
Information is extracted from the DESCRIPTION file of the package.
The command below imports metadata for the Cairo R package:
guix import cran Cairo
You can also ask for a specific version:
guix import cran rasterVis@0.50.3
When --recursive is added, the importer will traverse the dependency graph of the given upstream package recursively and generate package expressions for all those packages that are not yet in Guix.
When --style=specification is added, the importer will generate package definitions whose inputs are package specifications instead of references to package variables. This is useful when generated package definitions are to be appended to existing user modules, as the list of used package modules need not be changed. The default is --style=variable.
When --prefix=license: is added, the importer will prefix license atoms with
license:, allowing a prefixed import of(guix licenses).When --archive=bioconductor is added, metadata is imported from Bioconductor, a repository of R packages for the analysis and comprehension of high-throughput genomic data in bioinformatics.
Information is extracted from the DESCRIPTION file contained in the package archive.
The command below imports metadata for the GenomicRanges R package:
guix import cran --archive=bioconductor GenomicRanges
Finally, you can also import R packages that have not yet been published on CRAN or Bioconductor as long as they are in a git repository. Use --archive=git followed by the URL of the git repository:
guix import cran --archive=git https://github.com/immunogenomics/harmony
texlive¶-
Import TeX package information from the TeX Live package database for TeX packages that are part of the TeX Live distribution.
Information about the package is obtained from the TeX Live package database, a plain text file that is included in the
texlive-scriptspackage. The source code is downloaded from possibly multiple locations in the SVN repository of the Tex Live project. Note that therefore SVN must be installed and in$PATH; runguix install subversionif needed.The command below imports metadata for the
fontspecTeX package:guix import texlive fontspec
Additional options include:
--recursive-rTraverse the dependency graph of the given upstream package recursively and generate package expressions for all those packages that are not yet in Guix.
json¶Import package metadata from a local JSON file. Consider the following example package definition in JSON format:
{ "name": "hello", "version": "2.10", "source": "mirror://gnu/hello/hello-2.10.tar.gz", "build-system": "gnu", "home-page": "https://www.gnu.org/software/hello/", "synopsis": "Hello, GNU world: An example GNU package", "description": "GNU Hello prints a greeting.", "license": "GPL-3.0+", "native-inputs": ["gettext"] }The field names are the same as for the
<package>record (Veja Definindo pacotes). References to other packages are provided as JSON lists of quoted package specification strings such asguileorguile@2.0.The importer also supports a more explicit source definition using the common fields for
<origin>records:{ … "source": { "method": "url-fetch", "uri": "mirror://gnu/hello/hello-2.10.tar.gz", "sha256": { "base32": "0ssi1wpaf7plaswqqjwigppsg5fyh99vdlb9kzl7c9lng89ndq1i" } } … }The command below reads metadata from the JSON file
hello.jsonand outputs a package expression:guix import json hello.json
hackage¶Import metadata from the Haskell community’s central package archive Hackage. Information is taken from Cabal files and includes all the relevant information, including package dependencies.
Specific command-line options are:
--stdin-sRead a Cabal file from standard input.
--no-test-dependencies-tDo not include dependencies required only by the test suites.
--cabal-environment=alist-e alistalist is a Scheme alist defining the environment in which the Cabal conditionals are evaluated. The accepted keys are:
os,arch,impland a string representing the name of a flag. The value associated with a flag has to be either the symboltrueorfalse. The value associated with other keys has to conform to the Cabal file format definition. The default value associated with the keysos,archandimplis ‘linux’, ‘x86_64’ and ‘ghc’, respectively.--recursive-rTraverse the dependency graph of the given upstream package recursively and generate package expressions for all those packages that are not yet in Guix.
The command below imports metadata for the latest version of the HTTP Haskell package without including test dependencies and specifying the value of the flag ‘network-uri’ as
false:guix import hackage -t -e "'((\"network-uri\" . false))" HTTP
A specific package version may optionally be specified by following the package name by an at-sign and a version number as in the following example:
guix import hackage mtl@2.1.3.1
stackage¶The
stackageimporter is a wrapper around thehackageone. It takes a package name, looks up the package version included in a long-term support (LTS) Stackage release and uses thehackageimporter to retrieve its metadata. Note that it is up to you to select an LTS release compatible with the GHC compiler used by Guix.Specific command-line options are:
--no-test-dependencies-tDo not include dependencies required only by the test suites.
--lts-version=versão-l versãoversion is the desired LTS release version. If omitted the latest release is used.
--recursive-rTraverse the dependency graph of the given upstream package recursively and generate package expressions for all those packages that are not yet in Guix.
The command below imports metadata for the HTTP Haskell package included in the LTS Stackage release version 7.18:
guix import stackage --lts-version=7.18 HTTP
elpa¶Import metadata from an Emacs Lisp Package Archive (ELPA) package repository (veja Packages em The GNU Emacs Manual).
Specific command-line options are:
--archive=repo-a reporepo identifies the archive repository from which to retrieve the information. Currently the supported repositories and their identifiers are:
- - GNU, selected by the
gnuidentifier. This is the default.Packages from
elpa.gnu.orgare signed with one of the keys contained in the GnuPG keyring at share/emacs/25.1/etc/package-keyring.gpg (or similar) in theemacspackage (veja ELPA package signatures em The GNU Emacs Manual). - - NonGNU, selected by the
nongnuidentifier. - - MELPA-Stable, selected by the
melpa-stableidentifier. - - MELPA, selected by the
melpaidentifier.
- - GNU, selected by the
--recursive-rTraverse the dependency graph of the given upstream package recursively and generate package expressions for all those packages that are not yet in Guix.
crate¶Import metadata from the crates.io Rust package repository crates.io, as in this example:
guix import crate blake2-rfc
The crate importer also allows you to specify a version string:
guix import crate constant-time-eq@0.1.0
Additional options include:
--recursive-rTraverse the dependency graph of the given upstream package recursively and generate package expressions for all those packages that are not yet in Guix.
--recursive-dev-dependenciesIf --recursive-dev-dependencies is specified, also the recursively imported packages contain their development dependencies, which are recursively imported as well.
--allow-yankedIf no non-yanked version of a crate is available, use the latest yanked version instead instead of aborting.
--mark-missingIf a crate dependency is not (yet) packaged, make the corresponding input in
#:cargo-inputsor#:cargo-development-inputsinto a comment.
elm¶Import metadata from the Elm package repository package.elm-lang.org, as in this example:
guix import elm elm-explorations/webgl
The Elm importer also allows you to specify a version string:
guix import elm elm-explorations/webgl@1.1.3
Additional options include:
--recursive-rTraverse the dependency graph of the given upstream package recursively and generate package expressions for all those packages that are not yet in Guix.
npm-binary¶-
Import metadata from the npm Registry, as in this example:
guix import npm-binary buffer-crc32
The npm-binary importer also allows you to specify a version string:
guix import npm-binary buffer-crc32@1.0.0
Nota: Generated package expressions skip the build step of the
node-build-system. As such, generated package expressions often refer to transpiled or generated files, instead of being built from source.Additional options include:
--recursive-rTraverse the dependency graph of the given upstream package recursively and generate package expressions for all those packages that are not yet in Guix.
opam¶-
Import metadata from the OPAM package repository used by the OCaml community.
Additional options include:
--recursive-rTraverse the dependency graph of the given upstream package recursively and generate package expressions for all those packages that are not yet in Guix.
composer¶-
Import metadata from the Composer package archive used by the PHP community, as in this example:
guix import composer phpunit/phpunit
Additional options include:
--recursive-rTraverse the dependency graph of the given upstream package recursively and generate package expressions for all those packages that are not yet in Guix.
--repoBy default, packages are searched in the official OPAM repository. This option, which can be used more than once, lets you add other repositories which will be searched for packages. It accepts as valid arguments:
- the name of a known repository - can be one of
opam,coq(equivalent tocoq-released),coq-core-dev,coq-extra-devorgrew. - the URL of a repository as expected by the
opam repository addcommand (for instance, the URL equivalent of the aboveopamname would be https://opam.ocaml.org). - the path to a local copy of a repository (a directory containing a packages/ sub-directory).
Repositories are assumed to be passed to this option by order of preference. The additional repositories will not replace the default
opamrepository, which is always kept as a fallback.Also, please note that versions are not compared across repositories. The first repository (from left to right) that has at least one version of a given package will prevail over any others, and the version imported will be the latest one found in this repository only.
- the name of a known repository - can be one of
go¶Import metadata for a Go module using proxy.golang.org.
guix import go gopkg.in/yaml.v2
It is possible to use a package specification with a
@VERSIONsuffix to import a specific version.Additional options include:
--recursive-rTraverse the dependency graph of the given upstream package recursively and generate package expressions for all those packages that are not yet in Guix.
--pin-versionsWhen using this option, the importer preserves the exact versions of the Go modules dependencies instead of using their latest available versions. This can be useful when attempting to import packages that recursively depend on former versions of themselves to build. When using this mode, the symbol of the package is made by appending the version to its name, so that multiple versions of the same package can coexist.
egg¶Import metadata for CHICKEN eggs. The information is taken from PACKAGE.egg files found in the eggs-5-all Git repository. However, it does not provide all the information that we need, there is no “description” field, and the licenses used are not always precise (BSD is often used instead of BSD-N).
guix import egg sourcehut
You can also ask for a specific version:
guix import egg arrays@1.0
Additional options include:
--recursive-rTraverse the dependency graph of the given upstream package recursively and generate package expressions for all those packages that are not yet in Guix.
hexpm¶Import metadata from the hex.pm Erlang and Elixir package repository hex.pm, as in this example:
guix import hexpm stun
The importer tries to determine the build system used by the package.
The hexpm importer also allows you to specify a version string:
guix import hexpm cf@0.3.0
Additional options include:
--recursive-rTraverse the dependency graph of the given upstream package recursively and generate package expressions for all those packages that are not yet in Guix.
The structure of the guix import code is modular. It would be
useful to have more importers for other package formats, and your help is
welcome here (veja Contribuindo).
Próximo: Invoking guix style, Anterior: Invoking guix import, Acima: Utilitários [Conteúdo][Índice]
9.6 Invocando guix refresh
The primary audience of the guix refresh command is packagers. As
a user, you may be interested in the --with-latest option, which
can bring you package update superpowers built upon guix refresh
(veja --with-latest). By
default, guix refresh reports any packages provided by the
distribution that are outdated compared to the latest upstream version, like
this:
$ guix refresh gnu/packages/gettext.scm:29:13: gettext would be upgraded from 0.18.1.1 to 0.18.2.1 gnu/packages/glib.scm:77:12: glib would be upgraded from 2.34.3 to 2.37.0
Alternatively, one can specify packages to consider, in which case a warning is emitted for packages that lack an updater:
$ guix refresh coreutils guile guile-ssh gnu/packages/ssh.scm:205:2: warning: no updater for guile-ssh gnu/packages/guile.scm:136:12: guile would be upgraded from 2.0.12 to 2.0.13
guix refresh browses the upstream repository of each package and
determines the highest version number of the releases therein. The command
knows how to update specific types of packages: GNU packages, ELPA packages,
etc.—see the documentation for --type below. There are many
packages, though, for which it lacks a method to determine whether a new
upstream release is available. However, the mechanism is extensible, so
feel free to get in touch with us to add a new method!
--recursiveConsider the packages specified, and all the packages upon which they depend.
$ guix refresh --recursive coreutils gnu/packages/acl.scm:40:13: acl would be upgraded from 2.2.53 to 2.3.1 gnu/packages/m4.scm:30:12: 1.4.18 is already the latest version of m4 gnu/packages/xml.scm:68:2: warning: no updater for expat gnu/packages/multiprecision.scm:40:12: 6.1.2 is already the latest version of gmp …
If for some reason you don’t want to update to the latest version, you can update to a specific version by appending an equal sign and the desired version number to the package specification. Note that not all updaters support this; an error is reported when an updater cannot refresh to the specified version.
$ guix refresh trytond-party gnu/packages/guile.scm:392:2: guile would be upgraded from 3.0.3 to 3.0.5 $ guix refresh -u guile=3.0.4 … gnu/packages/guile.scm:392:2: guile: updating from version 3.0.3 to version 3.0.4... … $ guix refresh -u guile@2.0=2.0.12 … gnu/packages/guile.scm:147:2: guile: updating from version 2.0.10 to version 2.0.12... …
In some specific cases, you may have many packages specified via a manifest or a module selection which should all be updated together; for these cases, the --target-version option can be provided to have them all refreshed to the same version, as shown in the examples below:
$ guix refresh qtbase qtdeclarative --target-version=6.5.2 gnu/packages/qt.scm:1248:13: qtdeclarative would be upgraded from 6.3.2 to 6.5.2 gnu/packages/qt.scm:584:2: qtbase would be upgraded from 6.3.2 to 6.5.2
$ guix refresh --manifest=qt5-manifest.scm --target-version=5.15.10 gnu/packages/qt.scm:1173:13: qtxmlpatterns would be upgraded from 5.15.8 to 5.15.10 gnu/packages/qt.scm:1202:13: qtdeclarative would be upgraded from 5.15.8 to 5.15.10 gnu/packages/qt.scm:1762:13: qtserialbus would be upgraded from 5.15.8 to 5.15.10 gnu/packages/qt.scm:2070:13: qtquickcontrols2 would be upgraded from 5.15.8 to 5.15.10 …
The --target-version option accepts partial version prefixes, which can be useful to update to the latest major or major-minor prefixed version:
$ guix refresh qtbase@5 qtdeclarative@5 --target-version=5 gnu/packages/qt.scm:1472:13: qtdeclarative would be upgraded from 5.15.8 to 5.15.10 gnu/packages/qt.scm:452:13: qtbase would be upgraded from 5.15.8 to 5.15.10
Sometimes the upstream name differs from the package name used in Guix, and
guix refresh needs a little help. Most updaters honor the
upstream-name property in package definitions, which can be used to
that effect:
(define-public network-manager
(package
(name "network-manager")
;; …
(properties '((upstream-name . "NetworkManager")))))
When passed --update, it modifies distribution source files to
update the version numbers and source code hashes of those package
definitions, as well as possibly their inputs (veja Definindo pacotes).
This is achieved by downloading each package’s latest source tarball and its
associated OpenPGP signature, authenticating the downloaded tarball against
its signature using gpgv, and finally computing its hash—note
that GnuPG must be installed and in $PATH; run guix install
gnupg if needed.
When the public key used to sign the tarball is missing from the user’s
keyring, an attempt is made to automatically retrieve it from a public key
server; when this is successful, the key is added to the user’s keyring;
otherwise, guix refresh reports an error.
The following options are supported:
--expression=expr-e exprConsidere o pacote que expr avalia.
This is useful to precisely refer to a package, as in this example:
guix refresh -l -e '(@@ (gnu packages commencement) glibc-final)'
This command lists the dependents of the “final” libc (essentially all the packages).
--update-uUpdate distribution source files (package definitions) in place. This is usually run from a checkout of the Guix source tree (veja Executando guix antes dele ser instalado):
./pre-inst-env guix refresh -s non-core -u
Veja Definindo pacotes, for more information on package definitions. You can also run it on packages from a third-party channel:
guix refresh -L /path/to/channel -u package
Veja Criando um canal, on how to create a channel.
This command updates the version and source code hash of the package. Depending on the updater being used, it can also update the various ‘inputs’ fields of the package. In some cases, the updater might get inputs wrong—it might not know about an extra input that’s necessary, or it might add an input that should be avoided.
To address that, packagers can add properties stating inputs that should be added to those found by the updater or inputs that should be ignored: the
updater-extra-inputsandupdater-ignored-inputsproperties pertain to “regular” inputs, and there are equivalent properties for ‘native’ and ‘propagated’ inputs. In the example below, we tell the updater that we need ‘openmpi’ as an additional input:(define-public python-mpi4py (package (name "python-mpi4py") ;; … (inputs (list openmpi)) (properties '((updater-extra-inputs . ("openmpi"))))))That way,
guix refresh -u python-mpi4pywill leave the ‘openmpi’ input, even if it is not among the inputs it would normally add.--select=[subset]-s subsetSelect all the packages in subset, one of
core,non-coreormodule:name.The
coresubset refers to all the packages at the core of the distribution—i.e., packages that are used to build “everything else”. This includes GCC, libc, Binutils, Bash, etc. Usually, changing one of these packages in the distribution entails a rebuild of all the others. Thus, such updates are an inconvenience to users in terms of build time or bandwidth used to achieve the upgrade.The
non-coresubset refers to the remaining packages. It is typically useful in cases where an update of the core packages would be inconvenient.The
module:namesubset refers to all the packages in a specified guile module. The module can be specified asmodule:guileormodule:(gnu packages guile), the former is a shorthand for the later.--manifest=arquivo-m arquivoSelect all the packages from the manifest in file. This is useful to check if any packages of the user manifest can be updated.
--type=updater-t updaterSelect only packages handled by updater (may be a comma-separated list of updaters). Currently, updater may be one of:
gnuthe updater for GNU packages;
savannahthe updater for packages hosted at Savannah;
sourceforgethe updater for packages hosted at SourceForge;
gnomethe updater for GNOME packages;
kdethe updater for KDE packages;
xorgthe updater for X.org packages;
kernel.orgthe updater for packages hosted on kernel.org;
eggthe updater for Egg packages;
elpathe updater for ELPA packages;
cranthe updater for CRAN packages;
bioconductorthe updater for Bioconductor R packages;
cpanthe updater for CPAN packages;
pypithe updater for PyPI packages.
gemthe updater for RubyGems packages.
githubthe updater for GitHub packages.
hackagethe updater for Hackage packages.
stackagethe updater for Stackage packages.
cratethe updater for Crates packages.
launchpadthe updater for Launchpad packages.
generic-htmla generic updater that crawls the HTML page where the source tarball of the package is hosted, when applicable, or the HTML page specified by the
release-monitoring-urlproperty of the package.generic-gita generic updater for packages hosted on Git repositories. It tries to be smart about parsing Git tag names, but if it is not able to parse the tag name and compare tags correctly, users can define the following properties for a package.
-
release-tag-prefix: a regular expression for matching a prefix of the tag name. -
release-tag-suffix: a regular expression for matching a suffix of the tag name. -
release-tag-version-delimiter: a string used as the delimiter in the tag name for separating the numbers of the version. -
accept-pre-releases: by default, the updater will ignore pre-releases; to make it also look for pre-releases, set the this property to#t.
(package (name "foo") ;; ... (properties '((release-tag-prefix . "^release0-") (release-tag-suffix . "[a-z]?$") (release-tag-version-delimiter . ":"))))-
For instance, the following command only checks for updates of Emacs packages hosted at
elpa.gnu.organd for updates of CRAN packages:$ guix refresh --type=elpa,cran gnu/packages/statistics.scm:819:13: r-testthat would be upgraded from 0.10.0 to 0.11.0 gnu/packages/emacs.scm:856:13: emacs-auctex would be upgraded from 11.88.6 to 11.88.9
--list-updatersList available updaters and exit (see --type above).
For each updater, display the fraction of packages it covers; at the end, display the fraction of packages covered by all these updaters.
In addition, guix refresh can be passed one or more package names,
as in this example:
$ ./pre-inst-env guix refresh -u emacs idutils gcc@4.8
The command above specifically updates the emacs and idutils
packages. The --select option would have no effect in this case.
You might also want to update definitions that correspond to the packages
installed in your profile:
$ ./pre-inst-env guix refresh -u \
$(guix package --list-installed | cut -f1)
When considering whether to upgrade a package, it is sometimes convenient to
know which packages would be affected by the upgrade and should be checked
for compatibility. For this the following option may be used when passing
guix refresh one or more package names:
--list-dependent-lList top-level dependent packages that would need to be rebuilt as a result of upgrading one or more packages.
Veja the
reverse-packagetype ofguix graph, for information on how to visualize the list of dependents of a package.Veja
guix build --dependents, for a convenient way to build all the dependents of a package.
Be aware that the --list-dependent option only approximates the rebuilds that would be required as a result of an upgrade. More rebuilds might be required under some circumstances.
$ guix refresh --list-dependent flex Building the following 120 packages would ensure 213 dependent packages are rebuilt: hop@2.4.0 emacs-geiser@0.13 notmuch@0.18 mu@0.9.9.5 cflow@1.4 idutils@4.6 …
The command above lists a set of packages that could be built to check for
compatibility with an upgraded flex package.
--list-transitive-TList all the packages which one or more packages depend upon.
$ guix refresh --list-transitive flex flex@2.6.4 depends on the following 25 packages: perl@5.28.0 help2man@1.47.6 bison@3.0.5 indent@2.2.10 tar@1.30 gzip@1.9 bzip2@1.0.6 xz@5.2.4 file@5.33 …
The command above lists a set of packages which, when changed, would cause
flex to be rebuilt.
The following options can be used to customize GnuPG operation:
--gpg=commandUse command as the GnuPG 2.x command. command is searched for in
$PATH.--keyring=fileUse file as the keyring for upstream keys. file must be in the keybox format. Keybox files usually have a name ending in .kbx and the GNU Privacy Guard (GPG) can manipulate these files (veja
kbxutilem Using the GNU Privacy Guard, for information on a tool to manipulate keybox files).When this option is omitted,
guix refreshuses ~/.config/guix/upstream/trustedkeys.kbx as the keyring for upstream signing keys. OpenPGP signatures are checked against keys from this keyring; missing keys are downloaded to this keyring as well (see --key-download below).You can export keys from your default GPG keyring into a keybox file using commands like this one:
gpg --export rms@gnu.org | kbxutil --import-openpgp >> mykeyring.kbx
Likewise, you can fetch keys to a specific keybox file like this:
gpg --no-default-keyring --keyring mykeyring.kbx \ --recv-keys 3CE464558A84FDC69DB40CFB090B11993D9AEBB5
Veja --keyring em Using the GNU Privacy Guard, for more information on GPG’s --keyring option.
--key-download=policyHandle missing OpenPGP keys according to policy, which may be one of:
alwaysAlways download missing OpenPGP keys from the key server, and add them to the user’s GnuPG keyring.
neverNever try to download missing OpenPGP keys. Instead just bail out.
interactiveWhen a package signed with an unknown OpenPGP key is encountered, ask the user whether to download it or not.
autoAutomatically selects the
interactivepolicy when the standard input is connected to a pseudo terminal (TTY), elsealways. This is the default behavior.
--key-server=hostUse host as the OpenPGP key server when importing a public key.
--load-path=directory-L diretórioAdd directory to the front of the package module search path (veja Módulos de pacote).
This allows users to define their own packages and make them visible to the command-line tools.
The github updater uses the GitHub API to query for new releases. When used repeatedly e.g. when
refreshing all packages, GitHub will eventually refuse to answer any further
API requests. By default 60 API requests per hour are allowed, and a full
refresh on all GitHub packages in Guix requires more than this.
Authentication with GitHub through the use of an API token alleviates these
limits. To use an API token, set the environment variable
GUIX_GITHUB_TOKEN to a token procured from
https://github.com/settings/tokens or otherwise.
Próximo: Invocando guix lint, Anterior: Invocando guix refresh, Acima: Utilitários [Conteúdo][Índice]
9.7 Invoking guix style
The guix style command helps users and packagers alike style their
package definitions and configuration files according to the latest
fashionable trends. It can either reformat whole files, with the
--whole-file option, or apply specific styling rules to
individual package definitions. The command currently provides the
following styling rules:
- formatting package definitions according to the project’s conventions (veja Formatação de código);
- rewriting package inputs to the “new style”, as explained below.
The way package inputs are written is going through a transition
(veja Referência do package, for more on package inputs). Until version
1.3.0, package inputs were written using the “old style”, where each input
was given an explicit label, most of the time the package name:
(package
;; …
;; The "old style" (deprecated).
(inputs `(("libunistring" ,libunistring)
("libffi" ,libffi))))
Today, the old style is deprecated and the preferred style looks like this:
(package
;; …
;; The "new style".
(inputs (list libunistring libffi)))
Likewise, uses of alist-delete and friends to manipulate inputs is
now deprecated in favor of modify-inputs (veja Definindo variantes de pacote, for more info on modify-inputs).
In the vast majority of cases, this is a purely mechanical change on the
surface syntax that does not even incur a package rebuild. Running
guix style -S inputs can do that for you, whether you’re working
on packages in Guix proper or in an external channel.
A sintaxe geral é:
guix style [options] package…
This causes guix style to analyze and rewrite the definition of
package… or, when package is omitted, of all the
packages. The --styling or -S option allows you to select
the style rule, the default rule being format—see below.
To reformat entire source files, the syntax is:
guix style --whole-file file…
The available options are listed below.
--dry-run-nShow source file locations that would be edited but do not modify them.
--whole-file-fReformat the given files in their entirety. In that case, subsequent arguments are interpreted as file names (rather than package names), and the --styling option has no effect.
As an example, here is how you might reformat your operating system configuration (you need write permissions for the file):
guix style -f /etc/config.scm
--alphabetical-sort-APlace the top-level package definitions in the given files in alphabetical order. Package definitions with matching names are placed with versions in descending order. This option only has an effect in combination with --whole-file.
--styling=rule-S ruleApply rule, one of the following styling rules:
formatFormat the given package definition(s)—this is the default styling rule. For example, a packager running Guix on a checkout (veja Executando guix antes dele ser instalado) might want to reformat the definition of the Coreutils package like so:
./pre-inst-env guix style coreutils
inputsRewrite package inputs to the “new style”, as described above. This is how you would rewrite inputs of package
whatnotin your own channel:guix style -L ~/my/channel -S inputs whatnot
Rewriting is done in a conservative way: preserving comments and bailing out if it cannot make sense of the code that appears in an inputs field. The --input-simplification option described below provides fine-grain control over when inputs should be simplified.
argumentsRewrite package arguments to use G-expressions (veja Expressões-G). For example, consider this package definition:
(define-public my-package (package ;; … (arguments ;old-style quoted arguments '(#:make-flags '("V=1") #:phases (modify-phases %standard-phases (delete 'build))))))Running
guix style -S argumentson this package would rewrite itsargumentsfield like to:(define-public my-package (package ;; … (arguments (list #:make-flags #~'("V=1") #:phases #~(modify-phases %standard-phases (delete 'build))))))Note that changes made by the
argumentsrule do not entail a rebuild of the affected packages. Furthermore, if a package definition happens to be using G-expressions already,guix styleleaves it unchanged.
--list-stylings-lList and describe the available styling rules and exit.
--load-path=directory-L diretórioAdd directory to the front of the package module search path (veja Módulos de pacote).
--expression=expr-e exprStyle the package expr evaluates to.
Por exemplo, executando:
guix style -e '(@ (gnu packages gcc) gcc-5)'
styles the
gcc-5package definition.--input-simplification=policyWhen using the
inputsstyling rule, with ‘-S inputs’, this option specifies the package input simplification policy for cases where an input label does not match the corresponding package name. policy may be one of the following:silentSimplify inputs only when the change is “silent”, meaning that the package does not need to be rebuilt (its derivation is unchanged).
safeSimplify inputs only when that is “safe” to do: the package might need to be rebuilt, but the change is known to have no observable effect.
alwaysSimplify inputs even when input labels do not match package names, and even if that might have an observable effect.
The default is
silent, meaning that input simplifications do not trigger any package rebuild.
Próximo: Invocando guix size, Anterior: Invoking guix style, Acima: Utilitários [Conteúdo][Índice]
9.8 Invocando guix lint
The guix lint command is meant to help package developers avoid
common errors and use a consistent style. It runs a number of checks on a
given set of packages in order to find common mistakes in their
definitions. Available checkers include (see --list-checkers
for a complete list):
synopsisdescriptionValidate certain typographical and stylistic rules about package descriptions and synopses.
inputs-should-be-nativeIdentify inputs that should most likely be native inputs.
sourcehome-pagemirror-urlgithub-urlsource-file-nameProbe
home-pageandsourceURLs and report those that are invalid. Suggest amirror://URL when applicable. If thesourceURL redirects to a GitHub URL, recommend usage of the GitHub URL. Check that the source file name is meaningful, e.g. is not just a version number or “git-checkout”, without a declaredfile-name(veja Referência doorigin).source-unstable-tarballParse the
sourceURL to determine if a tarball from GitHub is autogenerated or if it is a release tarball. Unfortunately GitHub’s autogenerated tarballs are sometimes regenerated.derivationCheck that the derivation of the given packages can be successfully computed for all the supported systems (veja Derivações).
profile-collisionsCheck whether installing the given packages in a profile would lead to collisions. Collisions occur when several packages with the same name but a different version or a different store file name are propagated. Veja
propagated-inputs, for more information on propagated inputs.archival¶-
Checks whether the package’s source code is archived at Software Heritage.
When the source code that is not archived comes from a version-control system (VCS)—e.g., it’s obtained with
git-fetch, send Software Heritage a “save” request so that it eventually archives it. This ensures that the source will remain available in the long term, and that Guix can fall back to Software Heritage should the source code disappear from its original host. The status of recent “save” requests can be viewed on-line.When source code is a tarball obtained with
url-fetch, simply print a message when it is not archived. As of this writing, Software Heritage does not allow requests to save arbitrary tarballs; we are working on ways to ensure that non-VCS source code is also archived.Software Heritage limits the request rate per IP address. When the limit is reached,
guix lintprints a message and thearchivalchecker stops doing anything until that limit has been reset. cve¶-
Report known vulnerabilities found in the Common Vulnerabilities and Exposures (CVE) databases of the current and past year published by the US NIST.
To view information about a particular vulnerability, visit pages such as:
- ‘
https://web.nvd.nist.gov/view/vuln/detail?vulnId=CVE-YYYY-ABCD’ - ‘
https://cve.mitre.org/cgi-bin/cvename.cgi?name=CVE-YYYY-ABCD’
where
CVE-YYYY-ABCDis the CVE identifier—e.g.,CVE-2015-7554.Package developers can specify in package recipes the Common Platform Enumeration (CPE) name and version of the package when they differ from the name or version that Guix uses, as in this example:
(package (name "grub") ;; … ;; CPE calls this package "grub2". (properties '((cpe-name . "grub2") (cpe-version . "2.3"))))Some entries in the CVE database do not specify which version of a package they apply to, and would thus “stick around” forever. Package developers who found CVE alerts and verified they can be ignored can declare them as in this example:
(package (name "t1lib") ;; … ;; These CVEs no longer apply and can be safely ignored. (properties `((lint-hidden-cve . ("CVE-2011-0433" "CVE-2011-1553" "CVE-2011-1554" "CVE-2011-5244"))))) - ‘
formattingWarn about obvious source code formatting issues: trailing white space, use of tabulations, etc.
input-labelsReport old-style input labels that do not match the name of the corresponding package. This aims to help migrate from the “old input style”. Veja Referência do
package, for more information on package inputs and input styles. Veja Invokingguix style, on how to migrate to the new style.
A sintaxe geral é:
guix lint opções pacote…
If no package is given on the command line, then all packages are checked. The options may be zero or more of the following:
--list-checkers-lList and describe all the available checkers that will be run on packages and exit.
--checkers-cOnly enable the checkers specified in a comma-separated list using the names returned by --list-checkers.
--exclude-xOnly disable the checkers specified in a comma-separated list using the names returned by --list-checkers.
--expression=expr-e exprConsidere o pacote que expr avalia.
This is useful to unambiguously designate packages, as in this example:
guix lint -c archival -e '(@ (gnu packages guile) guile-3.0)'
--no-network-nOnly enable the checkers that do not depend on Internet access.
--load-path=directory-L diretórioAdd directory to the front of the package module search path (veja Módulos de pacote).
This allows users to define their own packages and make them visible to the command-line tools.
Próximo: Invocando guix graph, Anterior: Invocando guix lint, Acima: Utilitários [Conteúdo][Índice]
9.9 Invocando guix size
The guix size command helps package developers profile the disk
usage of packages. It is easy to overlook the impact of an additional
dependency added to a package, or the impact of using a single output for a
package that could easily be split (veja Pacotes com múltiplas saídas). Such are the typical issues that guix size can
highlight.
The command can be passed one or more package specifications such as
gcc@4.8 or guile:debug, or a file name in the store.
Consider this example:
$ guix size coreutils store item total self /gnu/store/…-gcc-5.5.0-lib 60.4 30.1 38.1% /gnu/store/…-glibc-2.27 30.3 28.8 36.6% /gnu/store/…-coreutils-8.28 78.9 15.0 19.0% /gnu/store/…-gmp-6.1.2 63.1 2.7 3.4% /gnu/store/…-bash-static-4.4.12 1.5 1.5 1.9% /gnu/store/…-acl-2.2.52 61.1 0.4 0.5% /gnu/store/…-attr-2.4.47 60.6 0.2 0.3% /gnu/store/…-libcap-2.25 60.5 0.2 0.2% total: 78.9 MiB
The store items listed here constitute the transitive closure of Coreutils—i.e., Coreutils and all its dependencies, recursively—as would be returned by:
$ guix gc -R /gnu/store/…-coreutils-8.23
Here the output shows three columns next to store items. The first column, labeled “total”, shows the size in mebibytes (MiB) of the closure of the store item—that is, its own size plus the size of all its dependencies. The next column, labeled “self”, shows the size of the item itself. The last column shows the ratio of the size of the item itself to the space occupied by all the items listed here.
In this example, we see that the closure of Coreutils weighs in at 79 MiB, most of which is taken by libc and GCC’s run-time support libraries. (That libc and GCC’s libraries represent a large fraction of the closure is not a problem per se because they are always available on the system anyway.)
Since the command also accepts store file names, assessing the size of a build result is straightforward:
guix size $(guix system build config.scm)
When the package(s) passed to guix size are available in the
store25, guix size queries the daemon to determine its
dependencies, and measures its size in the store, similar to du -ms
--apparent-size (veja du invocation em GNU Coreutils).
When the given packages are not in the store, guix size
reports information based on the available substitutes
(veja Substitutos). This makes it possible to profile the disk usage of
store items that are not even on disk, only available remotely.
You can also specify several package names:
$ guix size coreutils grep sed bash store item total self /gnu/store/…-coreutils-8.24 77.8 13.8 13.4% /gnu/store/…-grep-2.22 73.1 0.8 0.8% /gnu/store/…-bash-4.3.42 72.3 4.7 4.6% /gnu/store/…-readline-6.3 67.6 1.2 1.2% … total: 102.3 MiB
In this example we see that the combination of the four packages takes 102.3 MiB in total, which is much less than the sum of each closure since they have a lot of dependencies in common.
When looking at the profile returned by guix size, you may find
yourself wondering why a given package shows up in the profile at all. To
understand it, you can use guix graph --path -t references to
display the shortest path between the two packages (veja Invocando guix graph).
The available options are:
- --substitute-urls=urls
Use substitute information from urls. Veja the same option for
guix build.- --sort=key
Sort lines according to key, one of the following options:
própriothe size of each item (the default);
fechamentothe total size of the item’s closure.
- --map-file=arquivo
Write a graphical map of disk usage in PNG format to file.
For the example above, the map looks like this:
This option requires that Guile-Charting be installed and visible in Guile’s module search path. When that is not the case,
guix sizefails as it tries to load it.- --system=sistema
- -s sistema
Consider packages for system—e.g.,
x86_64-linux.- --load-path=directory
- -L diretório
Add directory to the front of the package module search path (veja Módulos de pacote).
This allows users to define their own packages and make them visible to the command-line tools.
Próximo: Invocando guix publish, Anterior: Invocando guix size, Acima: Utilitários [Conteúdo][Índice]
9.10 Invocando guix graph
Packages and their dependencies form a graph, specifically a directed
acyclic graph (DAG). It can quickly become difficult to have a mental model
of the package DAG, so the guix graph command provides a visual
representation of the DAG. By default, guix graph emits a DAG
representation in the input format of Graphviz, so its output can be passed directly to the dot command
of Graphviz. It can also emit an HTML page with embedded JavaScript code to
display a “chord diagram” in a Web browser, using the
d3.js library, or emit Cypher queries to construct
a graph in a graph database supporting the
openCypher query language. With
--path, it simply displays the shortest path between two packages.
The general syntax is:
guix graph opções pacote…
For example, the following command generates a PDF file representing the package DAG for the GNU Core Utilities, showing its build-time dependencies:
guix graph coreutils | dot -Tpdf > dag.pdf
The output looks like this:
Nice little graph, no?
You may find it more pleasant to navigate the graph interactively with
xdot (from the xdot package):
guix graph coreutils | xdot -
But there is more than one graph! The one above is concise: it is the graph
of package objects, omitting implicit inputs such as GCC, libc, grep, etc.
It is often useful to have such a concise graph, but sometimes one may want
to see more details. guix graph supports several types of graphs,
allowing you to choose the level of detail:
packageThis is the default type used in the example above. It shows the DAG of package objects, excluding implicit dependencies. It is concise, but filters out many details.
reverse-packageThis shows the reverse DAG of packages. For example:
guix graph --type=reverse-package ocaml
... yields the graph of packages that explicitly depend on OCaml (if you are also interested in cases where OCaml is an implicit dependency, see
reverse-bagbelow).Note that for core packages this can yield huge graphs. If all you want is to know the number of packages that depend on a given package, use
guix refresh --list-dependent(veja --list-dependent).bag-emergedThis is the package DAG, including implicit inputs.
For instance, the following command:
guix graph --type=bag-emerged coreutils
... yields this bigger graph:

At the bottom of the graph, we see all the implicit inputs of gnu-build-system (veja
gnu-build-system).Now, note that the dependencies of these implicit inputs—that is, the bootstrap dependencies (veja Inicializando)—are not shown here, for conciseness.
bagSimilar to
bag-emerged, but this time including all the bootstrap dependencies.bag-with-originsSimilar to
bag, but also showing origins and their dependencies.reverse-bagThis shows the reverse DAG of packages. Unlike
reverse-package, it also takes implicit dependencies into account. For example:guix graph -t reverse-bag dune
... yields the graph of all packages that depend on Dune, directly or indirectly. Since Dune is an implicit dependency of many packages via
dune-build-system, this shows a large number of packages, whereasreverse-packagewould show very few if any.derivationThis is the most detailed representation: It shows the DAG of derivations (veja Derivações) and plain store items. Compared to the above representation, many additional nodes are visible, including build scripts, patches, Guile modules, etc.
For this type of graph, it is also possible to pass a .drv file name instead of a package name, as in:
guix graph -t derivation $(guix system build -d my-config.scm)
moduleThis is the graph of package modules (veja Módulos de pacote). For example, the following command shows the graph for the package module that defines the
guilepackage:guix graph -t module guile | xdot -
All the types above correspond to build-time dependencies. The following graph type represents the run-time dependencies:
referencesThis is the graph of references of a package output, as returned by
guix gc --references(veja Invocandoguix gc).If the given package output is not available in the store,
guix graphattempts to obtain dependency information from substitutes.Here you can also pass a store file name instead of a package name. For example, the command below produces the reference graph of your profile (which can be big!):
guix graph -t references $(readlink -f ~/.guix-profile)
referrersThis is the graph of the referrers of a store item, as returned by
guix gc --referrers(veja Invocandoguix gc).This relies exclusively on local information from your store. For instance, let us suppose that the current Inkscape is available in 10 profiles on your machine;
guix graph -t referrers inkscapewill show a graph rooted at Inkscape and with those 10 profiles linked to it.It can help determine what is preventing a store item from being garbage collected.
Often, the graph of the package you are interested in does not fit on your
screen, and anyway all you want to know is why that package actually
depends on some seemingly unrelated package. The --path option
instructs guix graph to display the shortest path between two
packages (or derivations, or store items, etc.):
$ guix graph --path emacs libunistring emacs@26.3 mailutils@3.9 libunistring@0.9.10 $ guix graph --path -t derivation emacs libunistring /gnu/store/…-emacs-26.3.drv /gnu/store/…-mailutils-3.9.drv /gnu/store/…-libunistring-0.9.10.drv $ guix graph --path -t references emacs libunistring /gnu/store/…-emacs-26.3 /gnu/store/…-libidn2-2.2.0 /gnu/store/…-libunistring-0.9.10
Sometimes you still want to visualize the graph but would like to trim it so
it can actually be displayed. One way to do it is via the
--max-depth (or -M) option, which lets you specify the
maximum depth of the graph. In the example below, we visualize only
libreoffice and the nodes whose distance to libreoffice is at
most 2:
guix graph -M 2 libreoffice | xdot -f fdp -
Mind you, that’s still a big ball of spaghetti, but at least dot
can render it quickly and it can be browsed somewhat.
The available options are the following:
- --type=type
- -t tipo
Produce a graph output of type, where type must be one of the values listed above.
- --list-types
Lista os tipos de grafos disponíveis.
- --backend=backend
- -b backend
Produce a graph using the selected backend.
- --list-backends
Lista os backends de grafos disponíveis.
Currently, the available backends are Graphviz and d3.js.
- --path
Display the shortest path between two nodes of the type specified by --type. The example below shows the shortest path between
libreofficeandllvmaccording to the references oflibreoffice:$ guix graph --path -t references libreoffice llvm /gnu/store/…-libreoffice-6.4.2.2 /gnu/store/…-libepoxy-1.5.4 /gnu/store/…-mesa-19.3.4 /gnu/store/…-llvm-9.0.1
- --expression=expr
- -e expr
Considere o pacote que expr avalia.
This is useful to precisely refer to a package, as in this example:
guix graph -e '(@@ (gnu packages commencement) gnu-make-final)'
- --system=sistema
- -s sistema
Display the graph for system—e.g.,
i686-linux.The package dependency graph is largely architecture-independent, but there are some architecture-dependent bits that this option allows you to visualize.
- --load-path=directory
- -L diretório
Add directory to the front of the package module search path (veja Módulos de pacote).
This allows users to define their own packages and make them visible to the command-line tools.
On top of that, guix graph supports all the usual package
transformation options (veja Opções de transformação de pacote). This makes
it easy to view the effect of a graph-rewriting transformation such as
--with-input. For example, the command below outputs the graph of
git once openssl has been replaced by libressl
everywhere in the graph:
guix graph git --with-input=openssl=libressl
So many possibilities, so much fun!
Próximo: Invocando guix challenge, Anterior: Invocando guix graph, Acima: Utilitários [Conteúdo][Índice]
9.11 Invocando guix publish
The purpose of guix publish is to enable users to easily share
their store with others, who can then use it as a substitute server
(veja Substitutos).
When guix publish runs, it spawns an HTTP server which allows
anyone with network access to obtain substitutes from it. This means that
any machine running Guix can also act as if it were a build farm, since the
HTTP interface is compatible with Cuirass, the software behind the
bordeaux.guix.gnu.org build farm.
For security, each substitute is signed, allowing recipients to check their
authenticity and integrity (veja Substitutos). Because guix
publish uses the signing key of the system, which is only readable by the
system administrator, it must be started as root; the --user option
makes it drop root privileges early on.
The signing key pair must be generated before guix publish is
launched, using guix archive --generate-key (veja Invocando guix archive).
When the --advertise option is passed, the server advertises its availability on the local network using multicast DNS (mDNS) and DNS service discovery (DNS-SD), currently via Guile-Avahi (veja Using Avahi in Guile Scheme Programs).
A sintaxe geral é:
guix publish options…
Running guix publish without any additional arguments will spawn
an HTTP server on port 8080:
guix publish
guix publish can also be started following the systemd “socket
activation” protocol (veja make-systemd-constructor em The GNU Shepherd Manual).
Once a publishing server has been authorized, the daemon may download substitutes from it. Veja Obtendo substitutos de outros servidores.
By default, guix publish compresses archives on the fly as it
serves them. This “on-the-fly” mode is convenient in that it requires no
setup and is immediately available. However, when serving lots of clients,
we recommend using the --cache option, which enables caching of the
archives before they are sent to clients—see below for details. The
guix weather command provides a handy way to check what a server
provides (veja Invocando guix weather).
As a bonus, guix publish also serves as a content-addressed mirror
for source files referenced in origin records (veja Referência do origin). For instance, assuming guix publish is running on
example.org, the following URL returns the raw
hello-2.10.tar.gz file with the given SHA256 hash (represented in
nix-base32 format, veja Invocando guix hash):
http://example.org/file/hello-2.10.tar.gz/sha256/0ssi1…ndq1i
Obviously, these URLs only work for files that are in the store; in other cases, they return 404 (“Not Found”).
Build logs are available from /log URLs like:
http://example.org/log/gwspk…-guile-2.2.3
When guix-daemon is configured to save compressed build logs, as
is the case by default (veja Invocando guix-daemon), /log URLs
return the compressed log as-is, with an appropriate Content-Type
and/or Content-Encoding header. We recommend running
guix-daemon with --log-compression=gzip since Web
browsers can automatically decompress it, which is not the case with Bzip2
compression.
The following options are available:
--port=porta-p portaOuve requisições HTTP na porta.
--listen=hostListen on the network interface for host. The default is to accept connections from any interface.
--user=usuário-u usuárioChange privileges to user as soon as possible—i.e., once the server socket is open and the signing key has been read.
--compression[=method[:level]]-C [method[:level]]Compress data using the given method and level. method is one of
lzip,zstd, andgzip; when method is omitted,gzipis used.When level is zero, disable compression. The range 1 to 9 corresponds to different compression levels: 1 is the fastest, and 9 is the best (CPU-intensive). The default is 3.
Usually,
lzipcompresses noticeably better thangzipfor a small increase in CPU usage; see benchmarks on the lzip Web page. However,lzipachieves low decompression throughput (on the order of 50 MiB/s on modern hardware), which can be a bottleneck for someone who downloads over a fast network connection.The compression ratio of
zstdis between that oflzipand that ofgzip; its main advantage is a high decompression speed.Unless --cache is used, compression occurs on the fly and the compressed streams are not cached. Thus, to reduce load on the machine that runs
guix publish, it may be a good idea to choose a low compression level, to runguix publishbehind a caching proxy, or to use --cache. Using --cache has the advantage that it allowsguix publishto addContent-LengthHTTP header to its responses.This option can be repeated, in which case every substitute gets compressed using all the selected methods, and all of them are advertised. This is useful when users may not support all the compression methods: they can select the one they support.
--cache=directory-c directoryCache archives and meta-data (
.narinfoURLs) to directory and only serve archives that are in cache.When this option is omitted, archives and meta-data are created on-the-fly. This can reduce the available bandwidth, especially when compression is enabled, since this may become CPU-bound. Another drawback of the default mode is that the length of archives is not known in advance, so
guix publishdoes not add aContent-LengthHTTP header to its responses, which in turn prevents clients from knowing the amount of data being downloaded.Conversely, when --cache is used, the first request for a store item (via a
.narinfoURL) triggers a background process to bake the archive—computing its.narinfoand compressing the archive, if needed. Once the archive is cached in directory, subsequent requests succeed and are served directly from the cache, which guarantees that clients get the best possible bandwidth.That first
.narinforequest nonetheless returns 200, provided the requested store item is “small enough”, below the cache bypass threshold—see --cache-bypass-threshold below. That way, clients do not have to wait until the archive is baked. For larger store items, the first.narinforequest returns 404, meaning that clients have to wait until the archive is baked.The “baking” process is performed by worker threads. By default, one thread per CPU core is created, but this can be customized. See --workers below.
When --ttl is used, cached entries are automatically deleted when they have expired.
--workers=NWhen --cache is used, request the allocation of N worker threads to “bake” archives.
--ttl=ttlProduce
Cache-ControlHTTP headers that advertise a time-to-live (TTL) of ttl. ttl must denote a duration:5dmeans 5 days,1mmeans 1 month, and so on.This allows the user’s Guix to keep substitute information in cache for ttl. However, note that
guix publishdoes not itself guarantee that the store items it provides will indeed remain available for as long as ttl.Additionally, when --cache is used, cached entries that have not been accessed for ttl and that no longer have a corresponding item in the store, may be deleted.
--negative-ttl=ttlSimilarly produce
Cache-ControlHTTP headers to advertise the time-to-live (TTL) of negative lookups—missing store items, for which the HTTP 404 code is returned. By default, no negative TTL is advertised.This parameter can help adjust server load and substitute latency by instructing cooperating clients to be more or less patient when a store item is missing.
--cache-bypass-threshold=sizeWhen used in conjunction with --cache, store items smaller than size are immediately available, even when they are not yet in cache. size is a size in bytes, or it can be suffixed by
Mfor megabytes and so on. The default is10M.“Cache bypass” allows you to reduce the publication delay for clients at the expense of possibly additional I/O and CPU use on the server side: depending on the client access patterns, those store items can end up being baked several times until a copy is available in cache.
Increasing the threshold may be useful for sites that have few users, or to guarantee that users get substitutes even for store items that are not popular.
--nar-path=pathUse path as the prefix for the URLs of “nar” files (veja normalized archives).
By default, nars are served at a URL such as
/nar/gzip/…-coreutils-8.25. This option allows you to change the/narpart to path.--public-key=file--private-key=fileUse the specific files as the public/private key pair used to sign the store items being published.
The files must correspond to the same key pair (the private key is used for signing and the public key is merely advertised in the signature metadata). They must contain keys in the canonical s-expression format as produced by
guix archive --generate-key(veja Invocandoguix archive). By default, /etc/guix/signing-key.pub and /etc/guix/signing-key.sec are used.--repl[=port]-r [porta]Spawn a Guile REPL server (veja REPL Servers em GNU Guile Reference Manual) on port (37146 by default). This is used primarily for debugging a running
guix publishserver.
Enabling guix publish on Guix System is a one-liner: just
instantiate a guix-publish-service-type service in the
services field of the operating-system declaration
(veja guix-publish-service-type).
If you are instead running Guix on a “foreign distro”, follow these instructions:
- If your host distro uses the systemd init system:
# ln -s ~root/.guix-profile/lib/systemd/system/guix-publish.service \ /etc/systemd/system/ # systemctl start guix-publish && systemctl enable guix-publish - Se sua distro hospedeira usa o sistema init Upstart:
# ln -s ~root/.guix-profile/lib/upstart/system/guix-publish.conf /etc/init/ # start guix-publish
- Otherwise, proceed similarly with your distro’s init system.
Próximo: Invocando guix copy, Anterior: Invocando guix publish, Acima: Utilitários [Conteúdo][Índice]
9.12 Invocando guix challenge
Do the binaries provided by this server really correspond to the source code
it claims to build? Is a package build process deterministic? These are the
questions the guix challenge command attempts to answer.
The former is obviously an important question: Before using a substitute server (veja Substitutos), one had better verify that it provides the right binaries, and thus challenge it. The latter is what enables the former: If package builds are deterministic, then independent builds of the package should yield the exact same result, bit for bit; if a server provides a binary different from the one obtained locally, it may be either corrupt or malicious.
We know that the hash that shows up in /gnu/store file names is the
hash of all the inputs of the process that built the file or
directory—compilers, libraries, build scripts,
etc. (veja Introdução). Assuming deterministic build processes, one
store file name should map to exactly one build output. guix
challenge checks whether there is, indeed, a single mapping by comparing
the build outputs of several independent builds of any given store item.
The command output looks like this:
$ guix challenge \
--substitute-urls="https://bordeaux.guix.gnu.org https://guix.example.org" \
openssl git pius coreutils grep
updating substitutes from 'https://bordeaux.guix.gnu.org'... 100.0%
updating substitutes from 'https://guix.example.org'... 100.0%
/gnu/store/…-openssl-1.0.2d contents differ:
local hash: 0725l22r5jnzazaacncwsvp9kgf42266ayyp814v7djxs7nk963q
https://bordeaux.guix.gnu.org/nar/…-openssl-1.0.2d: 0725l22r5jnzazaacncwsvp9kgf42266ayyp814v7djxs7nk963q
https://guix.example.org/nar/…-openssl-1.0.2d: 1zy4fmaaqcnjrzzajkdn3f5gmjk754b43qkq47llbyak9z0qjyim
differing files:
/lib/libcrypto.so.1.1
/lib/libssl.so.1.1
/gnu/store/…-git-2.5.0 contents differ:
local hash: 00p3bmryhjxrhpn2gxs2fy0a15lnip05l97205pgbk5ra395hyha
https://bordeaux.guix.gnu.org/nar/…-git-2.5.0: 069nb85bv4d4a6slrwjdy8v1cn4cwspm3kdbmyb81d6zckj3nq9f
https://guix.example.org/nar/…-git-2.5.0: 0mdqa9w1p6cmli6976v4wi0sw9r4p5prkj7lzfd1877wk11c9c73
differing file:
/libexec/git-core/git-fsck
/gnu/store/…-pius-2.1.1 contents differ:
local hash: 0k4v3m9z1zp8xzzizb7d8kjj72f9172xv078sq4wl73vnq9ig3ax
https://bordeaux.guix.gnu.org/nar/…-pius-2.1.1: 0k4v3m9z1zp8xzzizb7d8kjj72f9172xv078sq4wl73vnq9ig3ax
https://guix.example.org/nar/…-pius-2.1.1: 1cy25x1a4fzq5rk0pmvc8xhwyffnqz95h2bpvqsz2mpvlbccy0gs
differing file:
/share/man/man1/pius.1.gz
…
5 store items were analyzed:
- 2 (40.0%) were identical
- 3 (60.0%) differed
- 0 (0.0%) were inconclusive
In this example, guix challenge queries all the substitute servers
for each of the fives packages specified on the command line. It then
reports those store items for which the servers obtained a result different
from the local build (if it exists) and/or different from one another; here,
the ‘local hash’ lines indicate that a local build result was available
for each of these packages and shows its hash.
As an example, guix.example.org always gets a different answer.
Conversely, bordeaux.guix.gnu.org agrees with local builds,
except in the case of Git. This might indicate that the build process of
Git is non-deterministic, meaning that its output varies as a function of
various things that Guix does not fully control, in spite of building
packages in isolated environments (veja Recursos). Most common sources
of non-determinism include the addition of timestamps in build results, the
inclusion of random numbers, and directory listings sorted by inode number.
See https://reproducible-builds.org/docs/, for more information.
To find out what is wrong with this Git binary, the easiest approach is to run:
guix challenge git \ --diff=diffoscope \ --substitute-urls="https://bordeaux.guix.gnu.org https://guix.example.org"
This automatically invokes diffoscope, which displays detailed
information about files that differ.
Alternatively, we can do something along these lines (veja Invocando guix archive):
$ wget -q -O - https://bordeaux.guix.gnu.org/nar/lzip/…-git-2.5.0 \ | lzip -d | guix archive -x /tmp/git $ diff -ur --no-dereference /gnu/store/…-git.2.5.0 /tmp/git
This command shows the difference between the files resulting from the local
build, and the files resulting from the build on
bordeaux.guix.gnu.org (veja Comparing and Merging
Files em Comparing and Merging Files). The diff
command works great for text files. When binary files differ, a better
option is Diffoscope, a tool that helps
visualize differences for all kinds of files.
Once you have done that work, you can tell whether the differences are due
to a non-deterministic build process or to a malicious server. We try hard
to remove sources of non-determinism in packages to make it easier to verify
substitutes, but of course, this is a process that involves not just Guix,
but a large part of the free software community. In the meantime,
guix challenge is one tool to help address the problem.
If you are writing packages for Guix, you are encouraged to check whether
bordeaux.guix.gnu.org and other substitute servers obtain the
same build result as you did with:
guix challenge package
A sintaxe geral é:
guix challenge options argument…
where argument is a package specification such as guile@2.0 or
glibc:debug or, alternatively, a store file name as returned, for
example, by guix build or guix gc --list-live.
When a difference is found between the hash of a locally-built item and that of a server-provided substitute, or among substitutes provided by different servers, the command displays it as in the example above and its exit code is 2 (other non-zero exit codes denote other kinds of errors).
The one option that matters is:
--substitute-urls=urlsConsider urls the whitespace-separated list of substitute source URLs to compare to.
--diff=modeUpon mismatches, show differences according to mode, one of:
simple(the default)Show the list of files that differ.
diffoscope- comando
Invoke Diffoscope, passing it two directories whose contents do not match.
When command is an absolute file name, run command instead of Diffoscope.
noneDo not show further details about the differences.
Thus, unless --diff=none is passed,
guix challengedownloads the store items from the given substitute servers so that it can compare them.--verbose-vShow details about matches (identical contents) in addition to information about mismatches.
Próximo: Invocando guix container, Anterior: Invocando guix challenge, Acima: Utilitários [Conteúdo][Índice]
9.13 Invocando guix copy
The guix copy command copies items from the store of one machine
to that of another machine over a secure shell (SSH)
connection26. For example, the following
command copies the coreutils package, the user’s profile, and all
their dependencies over to host, logged in as user:
guix copy --to=user@host \
coreutils $(readlink -f ~/.guix-profile)
If some of the items to be copied are already present on host, they are not actually sent.
The command below retrieves libreoffice and gimp from
host, assuming they are available there:
guix copy --from=host libreoffice gimp
The SSH connection is established using the Guile-SSH client, which is compatible with OpenSSH: it honors ~/.ssh/known_hosts and ~/.ssh/config, and uses the SSH agent for authentication.
The key used to sign items that are sent must be accepted by the remote
machine. Likewise, the key used by the remote machine to sign items you are
retrieving must be in /etc/guix/acl so it is accepted by your own
daemon. Veja Invocando guix archive, for more information about store item
authentication.
A sintaxe geral é:
guix copy [--to=spec|--from=spec] items…
You must always specify one of the following options:
--to=spec--from=specSpecify the host to send to or receive from. spec must be an SSH spec such as
example.org,charlie@example.org, orcharlie@example.org:2222.
The items can be either package names, such as gimp, or store
items, such as /gnu/store/…-idutils-4.6.
When specifying the name of a package to send, it is first built if needed, unless --dry-run was specified. Common build options are supported (veja Opções de compilação comuns).
Próximo: Invocando guix weather, Anterior: Invocando guix copy, Acima: Utilitários [Conteúdo][Índice]
9.14 Invocando guix container
Nota: As of version 4538aa4, this tool is experimental. The interface is subject to radical change in the future.
The purpose of guix container is to manipulate processes running
within an isolated environment, commonly known as a “container”, typically
created by the guix shell (veja Invocando guix shell) and
guix system container (veja Invoking guix system) commands.
A sintaxe geral é:
guix container action options…
action specifies the operation to perform with a container, and options specifies the context-specific arguments for the action.
The following actions are available:
execExecute a command within the context of a running container.
The syntax is:
guix container exec pid program arguments…
pid specifies the process ID of the running container. program specifies an executable file name within the root file system of the container. arguments are the additional options that will be passed to program.
The following command launches an interactive login shell inside a Guix system container, started by
guix system container, and whose process ID is 9001:guix container exec 9001 /run/current-system/profile/bin/bash --login
Note that the pid cannot be the parent process of a container. It must be PID 1 of the container or one of its child processes.
Próximo: Invocando guix processes, Anterior: Invocando guix container, Acima: Utilitários [Conteúdo][Índice]
9.15 Invocando guix weather
Occasionally you’re grumpy because substitutes are lacking and you end up
building packages by yourself (veja Substitutos). The guix
weather command reports on substitute availability on the specified servers
so you can have an idea of whether you’ll be grumpy today. It can sometimes
be useful info as a user, but it is primarily useful to people running
guix publish (veja Invocando guix publish). Sometimes
substitutes are available but they are not authorized on your system;
guix weather reports it so you can authorize them if you want
(veja Obtendo substitutos de outros servidores).
Here’s a sample run:
$ guix weather --substitute-urls=https://guix.example.org
computing 5,872 package derivations for x86_64-linux...
looking for 6,128 store items on https://guix.example.org..
updating substitutes from 'https://guix.example.org'... 100.0%
https://guix.example.org
43.4% substitutes available (2,658 out of 6,128)
7,032.5 MiB of nars (compressed)
19,824.2 MiB on disk (uncompressed)
0.030 seconds per request (182.9 seconds in total)
33.5 requests per second
9.8% (342 out of 3,470) of the missing items are queued
867 queued builds
x86_64-linux: 518 (59.7%)
i686-linux: 221 (25.5%)
aarch64-linux: 128 (14.8%)
build rate: 23.41 builds per hour
x86_64-linux: 11.16 builds per hour
i686-linux: 6.03 builds per hour
aarch64-linux: 6.41 builds per hour
As you can see, it reports the fraction of all the packages for which
substitutes are available on the server—regardless of whether substitutes
are enabled, and regardless of whether this server’s signing key is
authorized. It also reports the size of the compressed archives (“nars”)
provided by the server, the size the corresponding store items occupy in the
store (assuming deduplication is turned off), and the server’s throughput.
The second part gives continuous integration (CI) statistics, if the server
supports it. In addition, using the --coverage option,
guix weather can list “important” package substitutes missing on
the server (see below).
To achieve that, guix weather queries over HTTP(S) meta-data
(narinfos) for all the relevant store items. Like guix
challenge, it ignores signatures on those substitutes, which is innocuous
since the command only gathers statistics and cannot install those
substitutes.
A sintaxe geral é:
guix weather options… [packages…]
When packages is omitted, guix weather checks the
availability of substitutes for all the packages, or for those
specified with --manifest; otherwise it only considers the
specified packages. It is also possible to query specific system types with
--system. guix weather exits with a non-zero code when
the fraction of available substitutes is below 100%.
The available options are listed below.
--substitute-urls=urlsurls is the space-separated list of substitute server URLs to query. When this option is omitted, the URLs specified with the --substitute-urls option of
guix-daemonare used or, as a last resort, the default set of substitute URLs.--system=sistema-s sistemaQuery substitutes for system—e.g.,
aarch64-linux. This option can be repeated, in which caseguix weatherwill query substitutes for several system types.--manifest=arquivoInstead of querying substitutes for all the packages, only ask for those specified in file. file must contain a manifest, as with the
-moption ofguix package(veja Invocandoguix package).This option can be repeated several times, in which case the manifests are concatenated.
--expression=expr-e exprConsidere o pacote que expr avalia.
A typical use case for this option is specifying a package that is hidden and thus cannot be referred to in the usual way, as in this example:
guix weather -e '(@@ (gnu packages rust) rust-bootstrap)'
This option can be repeated.
--coverage[=contagem]-c [contagem]Report on substitute coverage for packages: list packages with at least count dependents (zero by default) for which substitutes are unavailable. Dependent packages themselves are not listed: if b depends on a and a has no substitutes, only a is listed, even though b usually lacks substitutes as well. The result looks like this:
$ guix weather --substitute-urls=https://bordeaux.guix.gnu.org https://ci.guix.gnu.org -c 10 computing 8,983 package derivations for x86_64-linux... looking for 9,343 store items on https://bordeaux.guix.gnu.org https://ci.guix.gnu.org... updating substitutes from 'https://bordeaux.guix.gnu.org https://ci.guix.gnu.org'... 100.0% https://bordeaux.guix.gnu.org https://ci.guix.gnu.org 64.7% substitutes available (6,047 out of 9,343) … 2502 packages are missing from 'https://bordeaux.guix.gnu.org https://ci.guix.gnu.org' for 'x86_64-linux', among which: 58 kcoreaddons@5.49.0 /gnu/store/…-kcoreaddons-5.49.0 46 qgpgme@1.11.1 /gnu/store/…-qgpgme-1.11.1 37 perl-http-cookiejar@0.008 /gnu/store/…-perl-http-cookiejar-0.008 …What this example shows is that
kcoreaddonsand presumably the 58 packages that depend on it have no substitutes atbordeaux.guix.gnu.org; likewise forqgpgmeand the 46 packages that depend on it.If you are a Guix developer, or if you are taking care of this build farm, you’ll probably want to have a closer look at these packages: they may simply fail to build.
--display-missingDisplay the list of store items for which substitutes are missing.
Anterior: Invocando guix weather, Acima: Utilitários [Conteúdo][Índice]
9.16 Invocando guix processes
The guix processes command can be useful to developers and system
administrators, especially on multi-user machines and on build farms: it
lists the current sessions (connections to the daemon), as well as
information about the processes involved27. Here’s an example of the information it
returns:
$ sudo guix processes SessionPID: 19002 ClientPID: 19090 ClientCommand: guix shell python SessionPID: 19402 ClientPID: 19367 ClientCommand: guix publish -u guix-publish -p 3000 -C 9 … SessionPID: 19444 ClientPID: 19419 ClientCommand: cuirass --cache-directory /var/cache/cuirass … LockHeld: /gnu/store/…-perl-ipc-cmd-0.96.lock LockHeld: /gnu/store/…-python-six-bootstrap-1.11.0.lock LockHeld: /gnu/store/…-libjpeg-turbo-2.0.0.lock ChildPID: 20495 ChildCommand: guix offload x86_64-linux 7200 1 28800 ChildPID: 27733 ChildCommand: guix offload x86_64-linux 7200 1 28800 ChildPID: 27793 ChildCommand: guix offload x86_64-linux 7200 1 28800
In this example we see that guix-daemon has three clients:
guix shell, guix publish, and the Cuirass continuous
integration tool; their process identifier (PID) is given by the
ClientPID field. The SessionPID field gives the PID of the
guix-daemon sub-process of this particular session.
The LockHeld fields show which store items are currently locked by
this session, which corresponds to store items being built or substituted
(the LockHeld field is not displayed when guix processes is
not running as root). Last, by looking at the ChildPID and
ChildCommand fields, we understand that these three builds are being
offloaded (veja Usando o recurso de descarregamento).
The output is in Recutils format so we can use the handy recsel
command to select sessions of interest (veja Selection Expressions em GNU recutils manual). As an example, the command shows the
command line and PID of the client that triggered the build of a Perl
package:
$ sudo guix processes | \
recsel -p ClientPID,ClientCommand -e 'LockHeld ~ "perl"'
ClientPID: 19419
ClientCommand: cuirass --cache-directory /var/cache/cuirass …
Additional options are listed below.
--format=formato-f formatoProduza saída no formato especificado, um dos seguintes:
recutilsThe default option. It outputs a set of Session recutils records that include each
ChildProcessas a field.normalizedNormalize the output records into record sets (veja Record Sets em GNU recutils manual). Normalizing into record sets allows joins across record types. The example below lists the PID of each
ChildProcessand the associated PID forSessionthat spawned theChildProcesswhere theSessionwas started usingguix build.$ guix processes --format=normalized | \ recsel \ -j Session \ -t ChildProcess \ -p Session.PID,PID \ -e 'Session.ClientCommand ~ "guix build"' PID: 4435 Session_PID: 4278 PID: 4554 Session_PID: 4278 PID: 4646 Session_PID: 4278
Próximo: Configuração do sistema, Anterior: Utilitários, Acima: GNU Guix [Conteúdo][Índice]
10 Arquiteturas Estrangeiras
You can target computers of different CPU architectures when producing
packages (veja Invocando guix package), packs (veja Invocando guix pack)
or full systems (veja Invoking guix system).
GNU Guix supports two distinct mechanisms to target foreign architectures:
- The traditional cross-compilation mechanism.
- The native building mechanism which consists in building using the CPU instruction set of the foreign system you are targeting. It often requires emulation, using the QEMU program for instance.
Próximo: Construções nativas, Acima: Arquiteturas Estrangeiras [Conteúdo][Índice]
10.1 Compilação cruzada
The commands supporting cross-compilation are proposing the --list-targets and --target options.
The --list-targets option lists all the supported targets that can be passed as an argument to --target.
$ guix build --list-targets The available targets are: - aarch64-linux-gnu - arm-linux-gnueabihf - avr - i586-pc-gnu - i686-linux-gnu - i686-w64-mingw32 - loongarch64-linux-gnu - mips64el-linux-gnu - or1k-elf - powerpc-linux-gnu - powerpc64le-linux-gnu - riscv64-linux-gnu - x86_64-linux-gnu - x86_64-linux-gnux32 - x86_64-w64-mingw32 - xtensa-ath9k-elf
Targets are specified as GNU triplets (veja GNU configuration triplets em Autoconf).
Those triplets are passed to GCC and the other underlying compilers possibly involved when building a package, a system image or any other GNU Guix output.
$ guix build --target=aarch64-linux-gnu hello /gnu/store/9926by9qrxa91ijkhw9ndgwp4bn24g9h-hello-2.12 $ file /gnu/store/9926by9qrxa91ijkhw9ndgwp4bn24g9h-hello-2.12/bin/hello /gnu/store/9926by9qrxa91ijkhw9ndgwp4bn24g9h-hello-2.12/bin/hello: ELF 64-bit LSB executable, ARM aarch64 …
The major benefit of cross-compilation is that there are no performance penalty compared to emulation using QEMU. There are however higher risks that some packages fail to cross-compile because fewer users are using this mechanism extensively.
Anterior: Compilação cruzada, Acima: Arquiteturas Estrangeiras [Conteúdo][Índice]
10.2 Construções nativas
The commands that support impersonating a specific system have the --list-systems and --system options.
The --list-systems option lists all the supported systems that can be passed as an argument to --system.
$ guix build --list-systems The available systems are: - x86_64-linux [current] - aarch64-linux - armhf-linux - i586-gnu - i686-linux - mips64el-linux - powerpc-linux - powerpc64le-linux - riscv64-linux $ guix build --system=i686-linux hello /gnu/store/cc0km35s8x2z4pmwkrqqjx46i8b1i3gm-hello-2.12 $ file /gnu/store/cc0km35s8x2z4pmwkrqqjx46i8b1i3gm-hello-2.12/bin/hello /gnu/store/cc0km35s8x2z4pmwkrqqjx46i8b1i3gm-hello-2.12/bin/hello: ELF 32-bit LSB executable, Intel 80386 …
In the above example, the current system is x86_64-linux. The hello package is however built for the i686-linux system.
This is possible because the i686 CPU instruction set is a subset of the x86_64, hence i686 targeting binaries can be run on x86_64.
Still in the context of the previous example, if picking the
aarch64-linux system and the guix build
--system=aarch64-linux hello has to build some derivations, an extra step
might be needed.
The aarch64-linux targeting binaries cannot directly be run on a x86_64-linux system. An emulation layer is requested. The GNU Guix daemon can take advantage of the Linux kernel binfmt_misc mechanism for that. In short, the Linux kernel can defer the execution of a binary targeting a foreign platform, here aarch64-linux, to a userspace program, usually an emulator.
There is a service that registers QEMU as a backend for the
binfmt_misc mechanism (veja qemu-binfmt-service-type). On Debian based foreign distributions,
the alternative would be the qemu-user-static package.
If the binfmt_misc mechanism is not setup correctly, the building
will fail this way:
$ guix build --system=armhf-linux hello --check … unsupported-platform /gnu/store/jjn969pijv7hff62025yxpfmc8zy0aq0-hello-2.12.drv aarch64-linux while setting up the build environment: a `aarch64-linux' is required to build `/gnu/store/jjn969pijv7hff62025yxpfmc8zy0aq0-hello-2.12.drv', but I am a `x86_64-linux'…
whereas, with the binfmt_misc mechanism correctly linked with QEMU,
one can expect to see:
$ guix build --system=armhf-linux hello --check /gnu/store/13xz4nghg39wpymivlwghy08yzj97hlj-hello-2.12
The main advantage of native building compared to cross-compiling, is that more packages are likely to build correctly. However it comes at a price: compilation backed by QEMU is way slower than cross-compilation, because every instruction needs to be emulated.
The availability of substitutes for the architecture targeted by the
--system option can mitigate this problem. An other way to work
around it is to install GNU Guix on a machine whose CPU supports the
targeted instruction set, and set it up as an offload machine (veja Usando o recurso de descarregamento).
Próximo: Dicas para solução de problemas do sistema, Anterior: Arquiteturas Estrangeiras, Acima: GNU Guix [Conteúdo][Índice]
11 Configuração do sistema
Guix System supports a consistent whole-system configuration mechanism. By that we mean that all aspects of the global system configuration—such as the available system services, timezone and locale settings, user accounts—are declared in a single place. Such a system configuration can be instantiated—i.e., effected.
One of the advantages of putting all the system configuration under the control of Guix is that it supports transactional system upgrades, and makes it possible to roll back to a previous system instantiation, should something go wrong with the new one (veja Recursos). Another advantage is that it makes it easy to replicate the exact same configuration across different machines, or at different points in time, without having to resort to additional administration tools layered on top of the own tools of the system.
This section describes this mechanism. First we focus on the system administrator’s viewpoint—explaining how the system is configured and instantiated. Then we show how this mechanism can be extended, for instance to support new system services.
- Começando
- Usando o sistema de configuração
operating-systemReference- Sistemas de arquivos
- Dispositivos mapeados
- Espaço de troca (swap)
- Contas de usuário
- Disposição do teclado
- Localidades
- Serviços
- Privileged Programs
- Certificados X.509
- Name Service Switch
- Disco de RAM inicial
- Configuração do carregador de inicialização
- Invoking
guix system - Invoking
guix deploy - Usando o Guix em uma Máquina Virtual
- Definindo serviços
Próximo: Usando o sistema de configuração, Acima: Configuração do sistema [Conteúdo][Índice]
11.1 Começando
You’re reading this section probably because you have just installed Guix
System (veja Instalação do sistema) and would like to know where to go from
here. If you’re already familiar with GNU/Linux system administration, the
way Guix System is configured is very different from what you’re used to:
you won’t install a system service by running guix install, you
won’t configure services by modifying files under /etc, and you won’t
create user accounts by invoking useradd; instead, all these
aspects are spelled out in a system configuration file.
The first step with Guix System is thus to write the system configuration file; luckily, system installation already generated one for you and stored it under /etc/config.scm.
Nota: You can store your system configuration file anywhere you like—it doesn’t have to be at /etc/config.scm. It’s a good idea to keep it under version control, for instance in a Git repository.
The entire configuration of the system—user accounts, system services, timezone, locale settings—is declared in this file, which follows this template:
(use-modules (gnu)) (use-package-modules …) (use-service-modules …) (operating-system (host-name …) (timezone …) (locale …) (bootloader …) (file-systems …) (users …) (packages …) (services …))
This configuration file is in fact a Scheme program; the first lines pull in
modules providing variables you might need in the rest of the file—e.g.,
packages, services, etc. The operating-system form declares the
system configuration as a record with a number of fields.
Veja Usando o sistema de configuração, to view complete examples and learn
what to put in there.
The second step, once you have this configuration file, is to test it. Of
course, you can skip this step if you’re feeling lucky—you choose! To do
that, pass your configuration file to guix system vm (no need to
be root, you can do that as a regular user):
guix system vm /etc/config.scm
This command returns the name of a shell script that starts a virtual machine (VM) running the system as described in the configuration file:
/gnu/store/…-run-vm.sh
In this VM, you can log in as root with no password. That’s a good
way to check that your configuration file is correct and that it gives the
expected result, without touching your system. Veja Invoking guix system,
for more information.
Nota: When using
guix system vm, aspects tied to your hardware such as file systems and mapped devices are overridden because they cannot be meaningfully tested in the VM. Other aspects such as static network configuration (vejastatic-networking-service-type) are not overridden but they may not work inside the VM.
The third step, once you’re happy with your configuration, is to instantiate it—make this configuration effective on your system. To do that, run:
sudo guix system reconfigure /etc/config.scm
This operation is transactional: either it succeeds and you end up with an upgraded system, or it fails and nothing has changed. Note that it does not restart system services that were already running. Thus, to upgrade those services, you have to reboot or to explicitly restart them; for example, to restart the secure shell (SSH) daemon, you would run:
sudo herd restart sshd
Nota: System services are managed by the Shepherd (veja Jump Start em The GNU Shepherd Manual). The
herdcommand lets you inspect, start, and stop services. To view the status of services, run:sudo herd statusTo view detailed information about a given service, add its name to the command:
sudo herd status sshdVeja Serviços, for more information.
The system records its provenance—the configuration file and channels that were used to deploy it. You can view it like so:
guix system describe
Additionally, guix system reconfigure preserves previous system
generations, which you can list:
guix system list-generations
Crucially, that means that you can always roll back to an earlier generation should something go wrong! When you eventually reboot, you’ll notice a sub-menu in the bootloader that reads “Old system generations”: it’s what allows you to boot an older generation of your system, should the latest generation be “broken” or otherwise unsatisfying. You can also “permanently” roll back, like so:
sudo guix system roll-back
Alternatively, you can use guix system switch-generation to switch
to a specific generation.
Once in a while, you’ll want to delete old generations that you do not need
anymore to allow garbage collection to free space (veja Invocando guix gc). For example, to remove generations older than 4 months, run:
sudo guix system delete-generations 4m
From there on, anytime you want to change something in the system
configuration, be it adding a user account or changing parameters of a
service, you will first update your configuration file and then run
guix system reconfigure as shown above.
Likewise, to upgrade system software, you first fetch an up-to-date
Guix and then reconfigure your system with that new Guix:
guix pull sudo guix system reconfigure /etc/config.scm
We recommend doing that regularly so that your system includes the latest security updates (veja Atualizações de segurança).
Nota:
sudo guixruns your user’sguixcommand and not root’s, becausesudoleavesPATHunchanged.The difference matters here, because
guix pullupdates theguixcommand and package definitions only for the user it is run as. This means that if you choose to useguix system reconfigurein root’s login shell, you’ll need toguix pullseparately.
That’s it! If you’re getting started with Guix entirely, veja Começando. The next sections dive in more detail into the crux of the matter: system configuration.
Próximo: operating-system Reference, Anterior: Começando, Acima: Configuração do sistema [Conteúdo][Índice]
11.2 Usando o sistema de configuração
The previous section showed the overall workflow you would follow when administering a Guix System machine (veja Começando). Let’s now see in more detail what goes into the system configuration file.
The operating system is configured by providing an operating-system
declaration in a file that can then be passed to the guix system
command (veja Invoking guix system), as we’ve seen before. A simple
setup, with the default Linux-Libre kernel, initial RAM disk, and a couple
of system services added to those provided by default looks like this:
;; -*- mode: scheme; -*- ;; This is an operating system configuration template ;; for a "bare bones" setup, with no X11 display server. (use-modules (gnu)) (use-service-modules networking ssh) (use-package-modules screen ssh) (operating-system (host-name "komputilo") (timezone "Europe/Berlin") (locale "en_US.utf8") ;; Boot in "legacy" BIOS mode, assuming /dev/sdX is the ;; target hard disk, and "my-root" is the label of the target ;; root file system. (bootloader (bootloader-configuration (bootloader grub-bootloader) (targets '("/dev/sdX")))) ;; It's fitting to support the equally bare bones ‘-nographic’ ;; QEMU option, which also nicely sidesteps forcing QWERTY. (kernel-arguments (list "console=ttyS0,115200")) (file-systems (cons (file-system (device (file-system-label "my-root")) (mount-point "/") (type "ext4")) %base-file-systems)) ;; This is where user accounts are specified. The "root" ;; account is implicit, and is initially created with the ;; empty password. (users (cons (user-account (name "alice") (comment "Bob's sister") (group "users") ;; Adding the account to the "wheel" group ;; makes it a sudoer. Adding it to "audio" ;; and "video" allows the user to play sound ;; and access the webcam. (supplementary-groups '("wheel" "audio" "video"))) %base-user-accounts)) ;; Globally-installed packages. (packages (cons screen %base-packages)) ;; Add services to the baseline: a DHCP client and an SSH ;; server. You may wish to add an NTP service here. (services (append (list (service dhcp-client-service-type) (service openssh-service-type (openssh-configuration (openssh openssh-sans-x) (port-number 2222)))) %base-services)))
The configuration is declarative. It is code in the Scheme programming
language; the whole (operating-system …) expression produces a
record with a number of fields. Some of the fields defined
above, such as host-name and bootloader, are mandatory.
Others, such as packages and services, can be omitted, in
which case they get a default value. Veja operating-system Reference, for
details about all the available fields.
Below we discuss the meaning of some of the most important fields.
Troubleshooting: The configuration file is a Scheme program and you might get the syntax or semantics wrong as you get started. Syntactic issues such as misplaced parentheses can often be identified by reformatting your file:
guix style -f config.scmThe Cookbook has a short section to get started with the Scheme programming language that explains the fundamentals, which you will find helpful when hacking your configuration. Veja A Scheme Crash Course em GNU Guix Cookbook.
- Carregador de inicialização
- Globally-Visible Packages
- Serviços do sistema
- Inspecting Services
- Instantiating the System
- The Programming Interface
Carregador de inicialização
The bootloader field describes the method that will be used to boot
your system. Machines based on Intel processors can boot in “legacy” BIOS
mode, as in the example above. However, more recent machines rely instead
on the Unified Extensible Firmware Interface (UEFI) to boot. In that
case, the bootloader field should contain something along these
lines:
(bootloader-configuration
(bootloader grub-efi-bootloader)
(targets '("/boot/efi")))
Veja Configuração do carregador de inicialização, for more information on the available configuration options.
Globally-Visible Packages
The packages field lists packages that will be globally visible on
the system, for all user accounts—i.e., in every user’s PATH
environment variable—in addition to the per-user profiles (veja Invocando guix package). The %base-packages variable provides all the tools
one would expect for basic user and administrator tasks—including the GNU
Core Utilities, the GNU Networking Utilities, the mg lightweight
text editor, find, grep, etc. The example above adds
GNU Screen to those, taken from the (gnu packages screen) module
(veja Módulos de pacote). The (list package output) syntax can be
used to add a specific output of a package:
(use-modules (gnu packages)) (use-modules (gnu packages dns)) (operating-system ;; ... (packages (cons (list isc-bind "utils") %base-packages)))
Referring to packages by variable name, like isc-bind above, has the
advantage of being unambiguous; it also allows typos and such to be
diagnosed right away as “unbound variables”. The downside is that one
needs to know which module defines which package, and to augment the
use-package-modules line accordingly. To avoid that, one can use the
specification->package procedure of the (gnu packages) module,
which returns the best package for a given name or name and version:
(use-modules (gnu packages)) (operating-system ;; ... (packages (append (map specification->package '("tcpdump" "htop" "gnupg@2.0")) %base-packages)))
When a package has more than one output it can be a challenge to refer to a
specific output instead of just to the standard out output. For
these situations one can use the specifications->packages procedure
from the (gnu packages) module. For example:
(use-modules (gnu packages)) (operating-system ;; ... (packages (append (specifications->packages '("git" "git:send-email")) %base-packages)))
Serviços do sistema
The services field lists system services to be made available
when the system starts (veja Serviços). The operating-system
declaration above specifies that, in addition to the basic services, we want
the OpenSSH secure shell daemon listening on port 2222 (veja openssh-service-type). Under the hood,
openssh-service-type arranges so that sshd is started with
the right command-line options, possibly with supporting configuration files
generated as needed (veja Definindo serviços).
Occasionally, instead of using the base services as is, you will want to
customize them. To do this, use modify-services (veja modify-services) to modify the list.
For example, suppose you want to modify guix-daemon and Mingetty (the
console log-in) in the %base-services list (veja %base-services). To do that, you can write the following in your
operating system declaration:
(define %my-services ;; My very own list of services. (modify-services %base-services (guix-service-type config => (guix-configuration (inherit config) ;; Fetch substitutes from example.org. (substitute-urls (list "https://example.org/guix" "https://ci.guix.gnu.org")))) (mingetty-service-type config => (mingetty-configuration (inherit config) ;; Automatically log in as "guest". (auto-login "guest"))))) (operating-system ;; … (services %my-services))
This changes the configuration—i.e., the service parameters—of the
guix-service-type instance, and that of all the
mingetty-service-type instances in the %base-services list
(veja see the cookbook for how to auto-login
one user to a specific TTY em GNU Guix Cookbook)). Observe
how this is accomplished: first, we arrange for the original configuration
to be bound to the identifier config in the body, and then we
write the body so that it evaluates to the desired configuration. In
particular, notice how we use inherit to create a new configuration
which has the same values as the old configuration, but with a few
modifications.
The configuration for a typical “desktop” usage, with an encrypted root partition, a swap file on the root partition, the X11 display server, GNOME and Xfce (users can choose which of these desktop environments to use at the log-in screen by pressing F1), network management, power management, and more, would look like this:
;; -*- mode: scheme; -*- ;; This is an operating system configuration template ;; for a "desktop" setup with GNOME and Xfce where the ;; root partition is encrypted with LUKS, and a swap file. (use-modules (gnu) (gnu system nss) (guix utils)) (use-service-modules desktop sddm xorg) (use-package-modules gnome) (operating-system (host-name "antelope") (timezone "Europe/Paris") (locale "en_US.utf8") ;; Choose US English keyboard layout. The "altgr-intl" ;; variant provides dead keys for accented characters. (keyboard-layout (keyboard-layout "us" "altgr-intl")) ;; Use the UEFI variant of GRUB with the EFI System ;; Partition mounted on /boot/efi. (bootloader (bootloader-configuration (bootloader grub-efi-bootloader) (targets '("/boot/efi")) (keyboard-layout keyboard-layout))) ;; Specify a mapped device for the encrypted root partition. ;; The UUID is that returned by 'cryptsetup luksUUID'. (mapped-devices (list (mapped-device (source (uuid "12345678-1234-1234-1234-123456789abc")) (target "my-root") (type luks-device-mapping)))) (file-systems (append (list (file-system (device (file-system-label "my-root")) (mount-point "/") (type "ext4") (dependencies mapped-devices)) (file-system (device (uuid "1234-ABCD" 'fat)) (mount-point "/boot/efi") (type "vfat"))) %base-file-systems)) ;; Specify a swap file for the system, which resides on the ;; root file system. (swap-devices (list (swap-space (target "/swapfile")))) ;; Create user `bob' with `alice' as its initial password. (users (cons (user-account (name "bob") (comment "Alice's brother") (password (crypt "alice" "$6$abc")) (group "students") (supplementary-groups '("wheel" "netdev" "audio" "video"))) %base-user-accounts)) ;; Add the `students' group (groups (cons* (user-group (name "students")) %base-groups)) ;; This is where we specify system-wide packages. (packages (append (list ;; for user mounts gvfs) %base-packages)) ;; Add GNOME and Xfce---we can choose at the log-in screen ;; by clicking the gear. Use the "desktop" services, which ;; include the X11 log-in service, networking with ;; NetworkManager, and more. (services (if (target-x86-64?) (append (list (service gnome-desktop-service-type) (service xfce-desktop-service-type) (set-xorg-configuration (xorg-configuration (keyboard-layout keyboard-layout)))) %desktop-services) ;; FIXME: Since GDM depends on Rust (gdm -> gnome-shell -> gjs ;; -> mozjs -> rust) and Rust is currently unavailable on ;; non-x86_64 platforms, we use SDDM and Mate here instead of ;; GNOME and GDM. (append (list (service mate-desktop-service-type) (service xfce-desktop-service-type) (set-xorg-configuration (xorg-configuration (keyboard-layout keyboard-layout)) sddm-service-type)) %desktop-services))) ;; Allow resolution of '.local' host names with mDNS. (name-service-switch %mdns-host-lookup-nss))
Um sistema gráfico com uma escolha de gerenciadores de janelas leves em vez de ambientes de desktop completos teria a seguinte aparência:
;; -*- mode: scheme; -*- ;; This is an operating system configuration template ;; for a "desktop" setup without full-blown desktop ;; environments. (use-modules (gnu) (gnu system nss)) (use-service-modules desktop) (use-package-modules bootloaders emacs emacs-xyz ratpoison suckless wm xorg) (operating-system (host-name "antelope") (timezone "Europe/Paris") (locale "en_US.utf8") ;; Use the UEFI variant of GRUB with the EFI System ;; Partition mounted on /boot/efi. (bootloader (bootloader-configuration (bootloader grub-efi-bootloader) (targets '("/boot/efi")))) ;; Assume the target root file system is labelled "my-root", ;; and the EFI System Partition has UUID 1234-ABCD. (file-systems (append (list (file-system (device (file-system-label "my-root")) (mount-point "/") (type "ext4")) (file-system (device (uuid "1234-ABCD" 'fat)) (mount-point "/boot/efi") (type "vfat"))) %base-file-systems)) (users (cons (user-account (name "alice") (comment "Bob's sister") (group "users") (supplementary-groups '("wheel" "netdev" "audio" "video"))) %base-user-accounts)) ;; Add a bunch of window managers; we can choose one at ;; the log-in screen with F1. (packages (append (list ;; window managers ratpoison i3-wm i3status dmenu emacs emacs-exwm emacs-desktop-environment ;; terminal emulator xterm) %base-packages)) ;; Use the "desktop" services, which include the X11 ;; log-in service, networking with NetworkManager, and more. (services %desktop-services) ;; Allow resolution of '.local' host names with mDNS. (name-service-switch %mdns-host-lookup-nss))
Este exemplo faz referência ao sistema de arquivos /boot/efi por seu
UUID, 1234-ABCD. Substitua esse UUID pelo UUID correto no seu
sistema, conforme retornado pelo comando blkid.
Veja Serviços de desktop, for the exact list of services provided by
%desktop-services.
Again, %desktop-services is just a list of service objects. If you
want to remove services from there, you can do so using the procedures for
list filtering (veja SRFI-1 Filtering and Partitioning em GNU Guile
Reference Manual). For instance, the following expression returns a list
that contains all the services in %desktop-services minus the Avahi
service:
(remove (lambda (service)
(eq? (service-kind service) avahi-service-type))
%desktop-services)
Alternatively, the modify-services macro can be used:
(modify-services %desktop-services
(delete avahi-service-type))
Inspecting Services
As you work on your system configuration, you might wonder why some system service doesn’t show up or why the system is not as you expected. There are several ways to inspect and troubleshoot problems.
First, you can inspect the dependency graph of Shepherd services like so:
guix system shepherd-graph /etc/config.scm | \ guix shell xdot -- xdot -
This lets you visualize the Shepherd services as defined in
/etc/config.scm. Each box is a service as would be shown by
sudo herd status on the running system, and each arrow denotes a
dependency (in the sense that if service A depends on B, then
B must be started before A).
Not all “services” are Shepherd services though, since Guix System uses a broader definition of the term (veja Serviços). To visualize system services and their relations at a higher level, run:
guix system extension-graph /etc/config.scm | \ guix shell xdot -- xdot -
This lets you view the service extension graph: how services “extend” each other, for instance by contributing to their configuration. Veja Composição de serviço, to understand the meaning of this graph.
Last, you may also find it useful to inspect your system configuration at the REPL (veja Usando Guix interativamente). Here is an example session:
$ guix repl
scheme@(guix-user)> ,use (gnu)
scheme@(guix-user)> (define os (load "config.scm"))
scheme@(guix-user)> ,pp (map service-kind (operating-system-services os))
$1 = (#<service-type localed cabba93>
…)
Veja Referência de Service, to learn about the Scheme interface to manipulate and inspect services.
Instantiating the System
Assuming the operating-system declaration is stored in the
config.scm file, the sudo guix system reconfigure
config.scm command instantiates that configuration, and makes it the
default boot entry. Veja Começando, for an
overview.
The normal way to change the system configuration is by updating this file
and re-running guix system reconfigure. One should never have to
touch files in /etc or to run commands that modify the system state
such as useradd or grub-install. In fact, you must
avoid that since that would not only void your warranty but also prevent you
from rolling back to previous versions of your system, should you ever need
to.
The Programming Interface
At the Scheme level, the bulk of an operating-system declaration is
instantiated with the following monadic procedure (veja A mônada do armazém):
- Monadic Procedure: operating-system-derivation os
Return a derivation that builds os, an
operating-systemobject (veja Derivações).The output of the derivation is a single directory that refers to all the packages, configuration files, and other supporting files needed to instantiate os.
This procedure is provided by the (gnu system) module. Along with
(gnu services) (veja Serviços), this module contains the guts of
Guix System. Make sure to visit it!
Próximo: Sistemas de arquivos, Anterior: Usando o sistema de configuração, Acima: Configuração do sistema [Conteúdo][Índice]
11.3 operating-system Reference
This section summarizes all the options available in operating-system
declarations (veja Usando o sistema de configuração).
- Tipo de dados: operating-system
This is the data type representing an operating system configuration. By that, we mean all the global system configuration, not per-user configuration (veja Usando o sistema de configuração).
kernel(default:linux-libre)The package object of the operating system kernel to use28.
hurd(default:#f)The package object of the Hurd to be started by the kernel. When this field is set, produce a GNU/Hurd operating system. In that case,
kernelmust also be set to thegnumachpackage—the microkernel the Hurd runs on.Aviso: This feature is experimental and only supported for disk images.
kernel-loadable-modules(default: ’())A list of objects (usually packages) to collect loadable kernel modules from–e.g.
(list ddcci-driver-linux).kernel-arguments(default:%default-kernel-arguments)List of strings or gexps representing additional arguments to pass on the command-line of the kernel—e.g.,
("console=ttyS0").bootloaderThe system bootloader configuration object. Veja Configuração do carregador de inicialização.
labelThis is the label (a string) as it appears in the bootloader’s menu entry. The default label includes the kernel name and version.
keyboard-layout(padrão:#f)This field specifies the keyboard layout to use in the console. It can be either
#f, in which case the default keyboard layout is used (usually US English), or a<keyboard-layout>record. Veja Disposição do teclado, for more information.This keyboard layout is in effect as soon as the kernel has booted. For instance, it is the keyboard layout in effect when you type a passphrase if your root file system is on a
luks-device-mappingmapped device (veja Dispositivos mapeados).Nota: This does not specify the keyboard layout used by the bootloader, nor that used by the graphical display server. Veja Configuração do carregador de inicialização, for information on how to specify the bootloader’s keyboard layout. Veja X Window, for information on how to specify the keyboard layout used by the X Window System.
initrd-modules(default:%base-initrd-modules) ¶-
The list of Linux kernel modules that need to be available in the initial RAM disk. Veja Disco de RAM inicial.
initrd(default:base-initrd)A procedure that returns an initial RAM disk for the Linux kernel. This field is provided to support low-level customization and should rarely be needed for casual use. Veja Disco de RAM inicial.
firmware(default:%base-firmware) ¶List of firmware packages loadable by the operating system kernel.
The default includes firmware needed for Atheros- and Broadcom-based WiFi devices (Linux-libre modules
ath9kandb43-open, respectively). Veja Considerações de Hardware, for more info on supported hardware.host-nameThe host name.
mapped-devices(default:'())A list of mapped devices. Veja Dispositivos mapeados.
file-systemsA list of file systems. Veja Sistemas de arquivos.
swap-devices(default:'()) ¶A list of swap spaces. Veja Espaço de troca (swap).
users(default:%base-user-accounts)groups(default:%base-groups)List of user accounts and groups. Veja Contas de usuário.
If the
userslist lacks a user account with UID 0, a “root” account with UID 0 is automatically added.skeletons(default:(default-skeletons))A list of target file name/file-like object tuples (veja file-like objects). These are the skeleton files that will be added to the home directory of newly-created user accounts.
For instance, a valid value may look like this:
`((".bashrc" ,(plain-file "bashrc" "echo Hello\n")) (".guile" ,(plain-file "guile" "(use-modules (ice-9 readline)) (activate-readline)")))
issue(default:%default-issue)A string denoting the contents of the /etc/issue file, which is displayed when users log in on a text console.
packages(default:%base-packages)A list of packages to be installed in the global profile, which is accessible at /run/current-system/profile. Each element is either a package variable or a package/output tuple. Here’s a simple example of both:
(cons* git ; the default "out" output (list git "send-email") ; another output of git %base-packages) ; the default set
The default set includes core utilities and it is good practice to install non-core utilities in user profiles (veja Invocando
guix package).timezone(default:"Etc/UTC")A timezone identifying string—e.g.,
"Europe/Paris".You can run the
tzselectcommand to find out which timezone string corresponds to your region. Choosing an invalid timezone name causesguix systemto fail.locale(default:"en_US.utf8")The name of the default locale (veja Locale Names em The GNU C Library Reference Manual). Veja Localidades, for more information.
locale-definitions(default:%default-locale-definitions)The list of locale definitions to be compiled and that may be used at run time. Veja Localidades.
locale-libcs(default:(list glibc))The list of GNU libc packages whose locale data and tools are used to build the locale definitions. Veja Localidades, for compatibility considerations that justify this option.
name-service-switch(default:%default-nss)Configuration of the libc name service switch (NSS)—a
<name-service-switch>object. Veja Name Service Switch, for details.services(default:%base-services)A list of service objects denoting system services. Veja Serviços.
essential-services(default: ...)The list of “essential services”—i.e., things like instances of
system-service-type(veja Referência de Service) andhost-name-service-type, which are derived from the operating system definition itself. As a user you should never need to touch this field.pam-services(default:(base-pam-services)) ¶-
Linux pluggable authentication module (PAM) services.
privileged-programs(default:%default-privileged-programs)List of
<privileged-program>. Veja Privileged Programs, for more information.sudoers-file(default:%sudoers-specification) ¶The contents of the /etc/sudoers file as a file-like object (veja
local-fileandplain-file).This file specifies which users can use the
sudocommand, what they are allowed to do, and what privileges they may gain. The default is that onlyrootand members of thewheelgroup may usesudo.
- Macro: this-operating-system
When used in the lexical scope of an operating system field definition, this identifier resolves to the operating system being defined.
The example below shows how to refer to the operating system being defined in the definition of the
labelfield:(use-modules (gnu) (guix)) (operating-system ;; ... (label (package-full-name (operating-system-kernel this-operating-system))))
It is an error to refer to
this-operating-systemoutside an operating system definition.
Próximo: Dispositivos mapeados, Anterior: operating-system Reference, Acima: Configuração do sistema [Conteúdo][Índice]
11.4 Sistemas de arquivos
The list of file systems to be mounted is specified in the
file-systems field of the operating system declaration (veja Usando o sistema de configuração). Each file system is declared using the
file-system form, like this:
(file-system
(mount-point "/home")
(device "/dev/sda3")
(type "ext4"))
As usual, some of the fields are mandatory—those shown in the example above—while others can be omitted. These are described below.
- Tipo de dados: file-system
Objects of this type represent file systems to be mounted. They contain the following members:
tipoThis is a string specifying the type of the file system—e.g.,
"ext4".mount-pointThis designates the place where the file system is to be mounted.
deviceThis names the “source” of the file system. It can be one of three things: a file system label, a file system UUID, or the name of a /dev node. Labels and UUIDs offer a way to refer to file systems without having to hard-code their actual device name29.
File system labels are created using the
file-system-labelprocedure, UUIDs are created usinguuid, and /dev nodes are plain strings. Here’s an example of a file system referred to by its label, as shown by thee2labelcommand:(file-system (mount-point "/home") (type "ext4") (device (file-system-label "my-home")))UUIDs are converted from their string representation (as shown by the
tune2fs -lcommand) using theuuidform30, like this:(file-system (mount-point "/home") (type "ext4") (device (uuid "4dab5feb-d176-45de-b287-9b0a6e4c01cb")))When the source of a file system is a mapped device (veja Dispositivos mapeados), its
devicefield must refer to the mapped device name—e.g., "/dev/mapper/root-partition". This is required so that the system knows that mounting the file system depends on having the corresponding device mapping established.flags(default:'())This is a list of symbols denoting mount flags. Recognized flags include
read-only,bind-mount,no-dev(disallow access to special files),no-suid(ignore setuid and setgid bits),no-atime(do not update file access times),no-diratime(likewise for directories only),strict-atime(update file access time),lazy-time(only update time on the in-memory version of the file inode),no-exec(disallow program execution), andshared(make the mount shared). Veja Mount-Unmount-Remount em The GNU C Library Reference Manual, for more information on these flags.options(padrão:#f)This is either
#f, or a string denoting mount options passed to the file system driver. Veja Mount-Unmount-Remount em The GNU C Library Reference Manual, for details.Run
man 8 mountfor options for various file systems, but beware that what it lists as file-system-independent “mount options” are in fact flags, and belong in theflagsfield described above.The
file-system-options->alistandalist->file-system-optionsprocedures from(gnu system file-systems)can be used to convert file system options given as an association list to the string representation, and vice-versa.mount?(padrão:#t)This value indicates whether to automatically mount the file system when the system is brought up. When set to
#f, the file system gets an entry in /etc/fstab (read by themountcommand) but is not automatically mounted.needed-for-boot?(default:#f)This Boolean value indicates whether the file system is needed when booting. If that is true, then the file system is mounted when the initial RAM disk (initrd) is loaded. This is always the case, for instance, for the root file system.
check?(padrão:#t)This Boolean indicates whether the file system should be checked for errors before being mounted. How and when this happens can be further adjusted with the following options.
skip-check-if-clean?(default:#t)When true, this Boolean indicates that a file system check triggered by
check?may exit early if the file system is marked as “clean”, meaning that it was previously correctly unmounted and should not contain errors.Setting this to false will always force a full consistency check when
check?is true. This may take a very long time and is not recommended on healthy systems—in fact, it may reduce reliability!Conversely, some primitive file systems like
fatdo not keep track of clean shutdowns and will perform a full scan regardless of the value of this option.repair(default:'preen)When
check?finds errors, it can (try to) repair them and continue booting. This option controls when and how to do so.If false, try not to modify the file system at all. Checking certain file systems like
jfsmay still write to the device to replay the journal. No repairs will be attempted.If
#t, try to repair any errors found and assume “yes” to all questions. This will fix the most errors, but may be risky.If
'preen, repair only errors that are safe to fix without human interaction. What that means is left up to the developers of each file system and may be equivalent to “none” or “all”.create-mount-point?(default:#f)When true, the mount point is created if it does not exist yet.
mount-may-fail?(default:#f)When true, this indicates that mounting this file system can fail but that should not be considered an error. This is useful in unusual cases; an example of this is
efivarfs, a file system that can only be mounted on EFI/UEFI systems.dependencies(padrão:'())This is a list of
<file-system>or<mapped-device>objects representing file systems that must be mounted or mapped devices that must be opened before (and unmounted or closed after) this one.As an example, consider a hierarchy of mounts: /sys/fs/cgroup is a dependency of /sys/fs/cgroup/cpu and /sys/fs/cgroup/memory.
Another example is a file system that depends on a mapped device, for example for an encrypted partition (veja Dispositivos mapeados).
shepherd-requirements(default:'())This is a list of symbols denoting Shepherd requirements that must be met before mounting the file system.
As an example, an NFS file system would typically have a requirement for
networking.Typically, file systems are mounted before most other Shepherd services are started. However, file systems with a non-empty shepherd-requirements field are mounted after Shepherd services have begun. Any Shepherd service that depends on a file system with a non-empty shepherd-requirements field must depend on it directly and not on the generic symbol
file-systems.
- Procedure: file-system-label str
This procedure returns an opaque file system label from str, a string:
(file-system-label "home") ⇒ #<file-system-label "home">
File system labels are used to refer to file systems by label rather than by device name. See above for examples.
The (gnu system file-systems) exports the following useful variables.
- Variável: %base-file-systems
These are essential file systems that are required on normal systems, such as
%pseudo-terminal-file-systemand%immutable-store(see below). Operating system declarations should always contain at least these.
- Variável: %pseudo-terminal-file-system
This is the file system to be mounted as /dev/pts. It supports pseudo-terminals created via
openptyand similar functions (veja Pseudo-Terminals em The GNU C Library Reference Manual). Pseudo-terminals are used by terminal emulators such asxterm.
This file system is mounted as /dev/shm and is used to support memory sharing across processes (veja
shm_openem The GNU C Library Reference Manual).
- Variável: %immutable-store
This file system performs a read-only “bind mount” of /gnu/store, making it read-only for all the users including
root. This prevents against accidental modification by software running asrootor by system administrators.The daemon itself is still able to write to the store: it remounts it read-write in its own “name space.”
- Variável: %binary-format-file-system
The
binfmt_miscfile system, which allows handling of arbitrary executable file types to be delegated to user space. This requires thebinfmt.kokernel module to be loaded.
- Variável: %fuse-control-file-system
The
fusectlfile system, which allows unprivileged users to mount and unmount user-space FUSE file systems. This requires thefuse.kokernel module to be loaded.
The (gnu system uuid) module provides tools to deal with file system
“unique identifiers” (UUIDs).
- Procedure: uuid str [type]
Return an opaque UUID (unique identifier) object of the given type (a symbol) by parsing str (a string):
(uuid "4dab5feb-d176-45de-b287-9b0a6e4c01cb") ⇒ #<<uuid> type: dce bv: …> (uuid "1234-ABCD" 'fat) ⇒ #<<uuid> type: fat bv: …>
type may be one of
dce,iso9660,fat,ntfs, or one of the commonly found synonyms for these.UUIDs are another way to unambiguously refer to file systems in operating system configuration. See the examples above.
Acima: Sistemas de arquivos [Conteúdo][Índice]
11.4.1 Sistema de arquivos Btrfs
The Btrfs has special features, such as subvolumes, that merit being explained in more details. The following section attempts to cover basic as well as complex uses of a Btrfs file system with the Guix System.
In its simplest usage, a Btrfs file system can be described, for example, by:
(file-system
(mount-point "/home")
(type "btrfs")
(device (file-system-label "my-home")))
The example below is more complex, as it makes use of a Btrfs subvolume,
named rootfs. The parent Btrfs file system is labeled
my-btrfs-pool, and is located on an encrypted device (hence the
dependency on mapped-devices):
(file-system
(device (file-system-label "my-btrfs-pool"))
(mount-point "/")
(type "btrfs")
(options "subvol=rootfs")
(dependencies mapped-devices))
Some bootloaders, for example GRUB, only mount a Btrfs partition at its top
level during the early boot, and rely on their configuration to refer to the
correct subvolume path within that top level. The bootloaders operating in
this way typically produce their configuration on a running system where the
Btrfs partitions are already mounted and where the subvolume information is
readily available. As an example, grub-mkconfig, the
configuration generator command shipped with GRUB, reads
/proc/self/mountinfo to determine the top-level path of a subvolume.
The Guix System produces a bootloader configuration using the operating system configuration as its sole input; it is therefore necessary to extract the subvolume name on which /gnu/store lives (if any) from that operating system configuration. To better illustrate, consider a subvolume named ’rootfs’ which contains the root file system data. In such situation, the GRUB bootloader would only see the top level of the root Btrfs partition, e.g.:
/ (top level)
├── rootfs (subvolume directory)
├── gnu (normal directory)
├── store (normal directory)
[...]
Thus, the subvolume name must be prepended to the /gnu/store path of the kernel, initrd binaries and any other files referred to in the GRUB configuration that must be found during the early boot.
The next example shows a nested hierarchy of subvolumes and directories:
/ (top level)
├── rootfs (subvolume)
├── gnu (normal directory)
├── store (subvolume)
[...]
This scenario would work without mounting the ’store’ subvolume. Mounting
’rootfs’ is sufficient, since the subvolume name matches its intended mount
point in the file system hierarchy. Alternatively, the ’store’ subvolume
could be referred to by setting the subvol option to either
/rootfs/gnu/store or rootfs/gnu/store.
Finally, a more contrived example of nested subvolumes:
/ (top level)
├── root-snapshots (subvolume)
├── root-current (subvolume)
├── guix-store (subvolume)
[...]
Here, the ’guix-store’ subvolume doesn’t match its intended mount point, so
it is necessary to mount it. The subvolume must be fully specified, by
passing its file name to the subvol option. To illustrate, the
’guix-store’ subvolume could be mounted on /gnu/store by using a file
system declaration such as:
(file-system
(device (file-system-label "btrfs-pool-1"))
(mount-point "/gnu/store")
(type "btrfs")
(options "subvol=root-snapshots/root-current/guix-store,\
compress-force=zstd,space_cache=v2"))
Próximo: Espaço de troca (swap), Anterior: Sistemas de arquivos, Acima: Configuração do sistema [Conteúdo][Índice]
11.5 Dispositivos mapeados
The Linux kernel has a notion of device mapping: a block device, such
as a hard disk partition, can be mapped into another device, usually
in /dev/mapper/, with additional processing over the data that flows
through it31. A typical example is encryption
device mapping: all writes to the mapped device are encrypted, and all reads
are deciphered, transparently. Guix extends this notion by considering any
device or set of devices that are transformed in some way to create a
new device; for instance, RAID devices are obtained by assembling
several other devices, such as hard disks or partitions, into a new one that
behaves as one partition.
Mapped devices are declared using the mapped-device form, defined as
follows; for examples, see below.
- Tipo de dados: mapped-device
Objects of this type represent device mappings that will be made when the system boots up.
sourceThis is either a string specifying the name of the block device to be mapped, such as
"/dev/sda3", or a list of such strings when several devices need to be assembled for creating a new one. In case of LVM this is a string specifying name of the volume group to be mapped.targetThis string specifies the name of the resulting mapped device. For kernel mappers such as encrypted devices of type
luks-device-mapping, specifying"my-partition"leads to the creation of the"/dev/mapper/my-partition"device. For RAID devices of typeraid-device-mapping, the full device name such as"/dev/md0"needs to be given. LVM logical volumes of typelvm-device-mappingneed to be specified as"VGNAME-LVNAME".targetsThis list of strings specifies names of the resulting mapped devices in case there are several. The format is identical to target.
tipoThis must be a
mapped-device-kindobject, which specifies how source is mapped to target.
- Variável: luks-device-mapping
This defines LUKS block device encryption using the
cryptsetupcommand from the package with the same name. It relies on thedm-cryptLinux kernel module.
- Procedure: luks-device-mapping-with-options [#:key-file]
Return a
luks-device-mappingobject, which defines LUKS block device encryption using thecryptsetupcommand from the package with the same name. It relies on thedm-cryptLinux kernel module.If
key-fileis provided, unlocking is first attempted using that key file. This has an advantage of not requiring a password entry, so it can be used (for example) to unlock RAID arrays automatically on boot. If key file unlock fails, password unlock is attempted as well. Key file is not stored in the store and needs to be available at the given location at the time of the unlock attempt.;; Following definition would be equivalent to running: ;; cryptsetup open --key-file /crypto.key /dev/sdb1 data (mapped-device (source "/dev/sdb1) (target "data) (type (luks-device-mapping-with-options #:key-file "/crypto.key")))
- Variável: raid-device-mapping
This defines a RAID device, which is assembled using the
mdadmcommand from the package with the same name. It requires a Linux kernel module for the appropriate RAID level to be loaded, such asraid456for RAID-4, RAID-5 or RAID-6, orraid10for RAID-10.
- Variável: lvm-device-mapping
This defines one or more logical volumes for the Linux Logical Volume Manager (LVM). The volume group is activated by the
vgchangecommand from thelvm2package.
The following example specifies a mapping from /dev/sda3 to
/dev/mapper/home using LUKS—the
Linux Unified Key Setup, a
standard mechanism for disk encryption. The /dev/mapper/home device
can then be used as the device of a file-system declaration
(veja Sistemas de arquivos).
(mapped-device
(source "/dev/sda3")
(target "home")
(type luks-device-mapping))
Alternatively, to become independent of device numbering, one may obtain the LUKS UUID (unique identifier) of the source device by a command like:
cryptsetup luksUUID /dev/sda3
and use it as follows:
(mapped-device
(source (uuid "cb67fc72-0d54-4c88-9d4b-b225f30b0f44"))
(target "home")
(type luks-device-mapping))
It is also desirable to encrypt swap space, since swap space may contain sensitive data. One way to accomplish that is to use a swap file in a file system on a device mapped via LUKS encryption. In this way, the swap file is encrypted because the entire device is encrypted. Veja Espaço de troca (swap), or Veja Disk Partitioning, for an example.
A RAID device formed of the partitions /dev/sda1 and /dev/sdb1 may be declared as follows:
(mapped-device
(source (list "/dev/sda1" "/dev/sdb1"))
(target "/dev/md0")
(type raid-device-mapping))
The /dev/md0 device can then be used as the device of a
file-system declaration (veja Sistemas de arquivos). Note that the RAID
level need not be given; it is chosen during the initial creation and
formatting of the RAID device and is determined automatically later.
LVM logical volumes “alpha” and “beta” from volume group “vg0” can be declared as follows:
(mapped-device
(source "vg0")
(targets (list "vg0-alpha" "vg0-beta"))
(type lvm-device-mapping))
Devices /dev/mapper/vg0-alpha and /dev/mapper/vg0-beta can
then be used as the device of a file-system declaration
(veja Sistemas de arquivos).
Próximo: Contas de usuário, Anterior: Dispositivos mapeados, Acima: Configuração do sistema [Conteúdo][Índice]
11.6 Espaço de troca (swap)
Swap space, as it is commonly called, is a disk area specifically designated for paging: the process in charge of memory management (the Linux kernel or Hurd’s default pager) can decide that some memory pages stored in RAM which belong to a running program but are unused should be stored on disk instead. It unloads those from the RAM, freeing up precious fast memory, and writes them to the swap space. If the program tries to access that very page, the memory management process loads it back into memory for the program to use.
A common misconception about swap is that it is only useful when small amounts of RAM are available to the system. However, it should be noted that kernels often use all available RAM for disk access caching to make I/O faster, and thus paging out unused portions of program memory will expand the RAM available for such caching.
For a more detailed description of how memory is managed from the viewpoint of a monolithic kernel, veja Memory Concepts em The GNU C Library Reference Manual.
The Linux kernel has support for swap partitions and swap files: the former uses a whole disk partition for paging, whereas the second uses a file on a file system for that (the file system driver needs to support it). On a comparable setup, both have the same performance, so one should consider ease of use when deciding between them. Partitions are “simpler” and do not need file system support, but need to be allocated at disk formatting time (logical volumes notwithstanding), whereas files can be allocated and deallocated at any time.
Swap space is also required to put the system into hibernation (also called suspend to disk), whereby memory is dumped to swap before shutdown so it can be restored when the machine is eventually restarted. Hibernation uses at most half the size of the RAM in the configured swap space. The Linux kernel needs to know about the swap space to be used to resume from hibernation on boot (via a kernel argument). When using a swap file, its offset in the device holding it also needs to be given to the kernel; that value has to be updated if the file is initialized again as swap—e.g., because its size was changed.
Note that swap space is not zeroed on shutdown, so sensitive data (such as passwords) may linger on it if it was paged out. As such, you should consider having your swap reside on an encrypted device (veja Dispositivos mapeados).
- Tipo de dados: swap-space
Objects of this type represent swap spaces. They contain the following members:
targetThe device or file to use, either a UUID, a
file-system-labelor a string, as in the definition of afile-system(veja Sistemas de arquivos).dependencies(padrão:'())A list of
file-systemormapped-deviceobjects, upon which the availability of the space depends. Note that just like forfile-systemobjects, dependencies which are needed for boot and mounted in early userspace are not managed by the Shepherd, and so automatically filtered out for you.priority(default:#f)Only supported by the Linux kernel. Either
#fto disable swap priority, or an integer between 0 and 32767. The kernel will first use swap spaces of higher priority when paging, and use same priority spaces on a round-robin basis. The kernel will use swap spaces without a set priority after prioritized spaces, and in the order that they appeared in (not round-robin).discard?(default:#f)Only supported by the Linux kernel. When true, the kernel will notify the disk controller of discarded pages, for example with the TRIM operation on Solid State Drives.
Here are some examples:
(swap-space (target (uuid "4dab5feb-d176-45de-b287-9b0a6e4c01cb")))
Use the swap partition with the given UUID. You can learn the UUID of a
Linux swap partition by running swaplabel device, where
device is the /dev file name of that partition.
(swap-space
(target (file-system-label "swap"))
(dependencies mapped-devices))
Use the partition with label swap, which can be found after all the
mapped-devices mapped devices have been opened. Again, the
swaplabel command allows you to view and change the label of a
Linux swap partition.
Here’s a more involved example with the corresponding file-systems
part of an operating-system declaration.
(file-systems (list (file-system (device (file-system-label "root")) (mount-point "/") (type "ext4")) (file-system (device (file-system-label "btrfs")) (mount-point "/btrfs") (type "btrfs")))) (swap-devices (list (swap-space (target "/btrfs/swapfile") (dependencies (filter (file-system-mount-point-predicate "/btrfs") file-systems)))))
Use the file /btrfs/swapfile as swap space, which depends on the file system mounted at /btrfs. Note how we use Guile’s filter to select the file system in an elegant fashion!
(swap-devices (list (swap-space (target "/dev/mapper/my-swap") (dependencies mapped-devices)))) (kernel-arguments (cons* "resume=/dev/mapper/my-swap" %default-kernel-arguments))
The above snippet of an operating-system declaration enables the
mapped device /dev/mapper/my-swap (which may be part of an encrypted
device) as swap space, and tells the kernel to use it for hibernation via
the resume kernel argument (veja operating-system Reference,
kernel-arguments).
(swap-devices (list (swap-space (target "/swapfile") (dependencies (filter (file-system-mount-point-predicate "/") file-systems))))) (kernel-arguments (cons* "resume=/dev/sda3" ;device that holds /swapfile "resume_offset=92514304" ;offset of /swapfile on device %default-kernel-arguments))
This other snippet of operating-system enables the swap file
/swapfile for hibernation by telling the kernel about the partition
containing it (resume argument) and its offset on that partition
(resume_offset argument). The latter value can be found in the
output of the command filefrag -e as the first number right under
the physical_offset column header (the second command extracts its
value directly):
$ sudo filefrag -e /swapfile Filesystem type is: ef53 File size of /swapfile is 2463842304 (601524 blocks of 4096 bytes) ext: logical_offset: physical_offset: length: expected: flags: 0: 0.. 2047: 92514304.. 92516351: 2048: … $ sudo filefrag -e /swapfile | grep '^ *0:' | cut -d: -f3 | cut -d. -f1 92514304
Próximo: Disposição do teclado, Anterior: Espaço de troca (swap), Acima: Configuração do sistema [Conteúdo][Índice]
11.7 Contas de usuário
User accounts and groups are entirely managed through the
operating-system declaration. They are specified with the
user-account and user-group forms:
(user-account
(name "alice")
(group "users")
(supplementary-groups '("wheel" ;allow use of sudo, etc.
"audio" ;sound card
"video" ;video devices such as webcams
"cdrom")) ;the good ol' CD-ROM
(comment "Bob's sister"))
Here’s a user account that uses a different shell and a custom home directory (the default would be "/home/bob"):
(user-account
(name "bob")
(group "users")
(comment "Alice's bro")
(shell (file-append zsh "/bin/zsh"))
(home-directory "/home/robert"))
When booting or upon completion of guix system reconfigure, the
system ensures that only the user accounts and groups specified in the
operating-system declaration exist, and with the specified
properties. Thus, account or group creations or modifications made by
directly invoking commands such as useradd are lost upon
reconfiguration or reboot. This ensures that the system remains exactly as
declared.
- Tipo de dados: user-account
Objects of this type represent user accounts. The following members may be specified:
nameThe name of the user account.
group¶This is the name (a string) or identifier (a number) of the user group this account belongs to.
supplementary-groups(default:'())Optionally, this can be defined as a list of group names that this account belongs to.
uid(padrão:#f)This is the user ID for this account (a number), or
#f. In the latter case, a number is automatically chosen by the system when the account is created.comment(default:"")A comment about the account, such as the account owner’s full name.
Note that, for non-system accounts, users are free to change their real name as it appears in /etc/passwd using the
chfncommand. When they do, their choice prevails over the system administrator’s choice; reconfiguring does not change their name.home-directoryThis is the name of the home directory for the account.
create-home-directory?(default:#t)Indicates whether the home directory of this account should be created if it does not exist yet.
shell(default: Bash)This is a G-expression denoting the file name of a program to be used as the shell (veja Expressões-G). For example, you would refer to the Bash executable like this:
(file-append bash "/bin/bash")... and to the Zsh executable like that:
(file-append zsh "/bin/zsh")system?(padrão:#f)This Boolean value indicates whether the account is a “system” account. System accounts are sometimes treated specially; for instance, graphical login managers do not list them.
password(padrão:#f)You would normally leave this field to
#f, initialize user passwords asrootwith thepasswdcommand, and then let users change it withpasswd. Passwords set withpasswdare of course preserved across reboot and reconfiguration.If you do want to set an initial password for an account, then this field must contain the encrypted password, as a string. You can use the
cryptprocedure for this purpose:(user-account (name "charlie") (group "users") ;; Specify a SHA-512-hashed initial password. (password (crypt "InitialPassword!" "$6$abc")))Nota: The hash of this initial password will be available in a file in /gnu/store, readable by all the users, so this method must be used with care.
Veja Passphrase Storage em The GNU C Library Reference Manual, for more information on password encryption, and Encryption em GNU Guile Reference Manual, for information on Guile’s
cryptprocedure.
User group declarations are even simpler:
(user-group (name "students"))
- Tipo de dados: user-group
This type is for, well, user groups. There are just a few fields:
nameThe name of the group.
id(default:#f)The group identifier (a number). If
#f, a new number is automatically allocated when the group is created.system?(padrão:#f)This Boolean value indicates whether the group is a “system” group. System groups have low numerical IDs.
password(padrão:#f)What, user groups can have a password? Well, apparently yes. Unless
#f, this field specifies the password of the group.
For convenience, a variable lists all the basic user groups one may expect:
- Variável: %base-groups
This is the list of basic user groups that users and/or packages expect to be present on the system. This includes groups such as “root”, “wheel”, and “users”, as well as groups used to control access to specific devices such as “audio”, “disk”, and “cdrom”.
- Variável: %base-user-accounts
This is the list of basic system accounts that programs may expect to find on a GNU/Linux system, such as the “nobody” account.
Note that the “root” account is not included here. It is a special-case and is automatically added whether or not it is specified.
The Linux kernel also implements subordinate user and group IDs, or “subids”, which are used to map the ID of a user and group to several IDs inside separate name spaces—inside “containers”. Veja the subordinate user and group ID service, for information on how to configure it.
Próximo: Localidades, Anterior: Contas de usuário, Acima: Configuração do sistema [Conteúdo][Índice]
11.8 Disposição do teclado
To specify what each key of your keyboard does, you need to tell the operating system what keyboard layout you want to use. The default, when nothing is specified, is the US English QWERTY layout for 105-key PC keyboards. However, German speakers will usually prefer the German QWERTZ layout, French speakers will want the AZERTY layout, and so on; hackers might prefer Dvorak or bépo, and they might even want to further customize the effect of some of the keys. This section explains how to get that done.
There are three components that will want to know about your keyboard layout:
- The bootloader may want to know what keyboard layout you want to use
(veja
keyboard-layout). This is useful if you want, for instance, to make sure that you can type the passphrase of your encrypted root partition using the right layout. - The operating system kernel, Linux, will need that so that the
console is properly configured (veja
keyboard-layout). - The graphical display server, usually Xorg, also has its own idea of
the keyboard layout (veja
keyboard-layout).
Guix allows you to configure all three separately but, fortunately, it allows you to share the same keyboard layout for all three components.
Keyboard layouts are represented by records created by the
keyboard-layout procedure of (gnu system keyboard). Following
the X Keyboard extension (XKB), each layout has four attributes: a name
(often a language code such as “fi” for Finnish or “jp” for Japanese),
an optional variant name, an optional keyboard model name, and a possibly
empty list of additional options. In most cases the layout name is all you
care about.
- Procedure: keyboard-layout name [variant] [#:model] [#:options '()]
Return a new keyboard layout with the given name and variant.
name must be a string such as
"fr"; variant must be a string such as"bepo"or"nodeadkeys". See thexkeyboard-configpackage for valid options.
Here are a few examples:
;; The German QWERTZ layout. Here we assume a standard ;; "pc105" keyboard model. (keyboard-layout "de") ;; The bépo variant of the French layout. (keyboard-layout "fr" "bepo") ;; The Catalan layout. (keyboard-layout "es" "cat") ;; Arabic layout with "Alt-Shift" to switch to US layout. (keyboard-layout "ar,us" #:options '("grp:alt_shift_toggle")) ;; The Latin American Spanish layout. In addition, the ;; "Caps Lock" key is used as an additional "Ctrl" key, ;; and the "Menu" key is used as a "Compose" key to enter ;; accented letters. (keyboard-layout "latam" #:options '("ctrl:nocaps" "compose:menu")) ;; The Russian layout for a ThinkPad keyboard. (keyboard-layout "ru" #:model "thinkpad") ;; The "US international" layout, which is the US layout plus ;; dead keys to enter accented characters. This is for an ;; Apple MacBook keyboard. (keyboard-layout "us" "intl" #:model "macbook78")
See the share/X11/xkb directory of the xkeyboard-config
package for a complete list of supported layouts, variants, and models.
Let’s say you want your system to use the Turkish keyboard layout throughout your system—bootloader, console, and Xorg. Here’s what your system configuration would look like:
;; Using the Turkish layout for the bootloader, the console, ;; and for Xorg. (operating-system ;; ... (keyboard-layout (keyboard-layout "tr")) ;for the console (bootloader (bootloader-configuration (bootloader grub-efi-bootloader) (targets '("/boot/efi")) (keyboard-layout keyboard-layout))) ;for GRUB (services (cons (set-xorg-configuration (xorg-configuration ;for Xorg (keyboard-layout keyboard-layout))) %desktop-services)))
In the example above, for GRUB and for Xorg, we just refer to the
keyboard-layout field defined above, but we could just as well refer
to a different layout. The set-xorg-configuration procedure
communicates the desired Xorg configuration to the graphical log-in manager,
by default GDM.
We’ve discussed how to specify the default keyboard layout of your system when it starts, but you can also adjust it at run time:
- If you’re using GNOME, its settings panel has a “Region & Language” entry where you can select one or more keyboard layouts.
- Under Xorg, the
setxkbmapcommand (from the same-named package) allows you to change the current layout. For example, this is how you would change the layout to US Dvorak:setxkbmap us dvorak
- The
loadkeyscommand changes the keyboard layout in effect in the Linux console. However, note thatloadkeysdoes not use the XKB keyboard layout categorization described above. The command below loads the French bépo layout:loadkeys fr-bepo
Próximo: Serviços, Anterior: Disposição do teclado, Acima: Configuração do sistema [Conteúdo][Índice]
11.9 Localidades
A locale defines cultural conventions for a particular language and
region of the world (veja Locales em The GNU C Library Reference
Manual). Each locale has a name that typically has the form
language_territory.codeset—e.g.,
fr_LU.utf8 designates the locale for the French language, with
cultural conventions from Luxembourg, and using the UTF-8 encoding.
Usually, you will want to specify the default locale for the machine using
the locale field of the operating-system declaration
(veja locale).
The selected locale is automatically added to the locale definitions
known to the system if needed, with its codeset inferred from its
name—e.g., bo_CN.utf8 will be assumed to use the UTF-8
codeset. Additional locale definitions can be specified in the
locale-definitions slot of operating-system—this is useful,
for instance, if the codeset could not be inferred from the locale name.
The default set of locale definitions includes some widely used locales, but
not all the available locales, in order to save space.
For instance, to add the North Frisian locale for Germany, the value of that field may be:
(cons (locale-definition
(name "fy_DE.utf8") (source "fy_DE"))
%default-locale-definitions)
Likewise, to save space, one might want locale-definitions to list
only the locales that are actually used, as in:
(list (locale-definition
(name "ja_JP.eucjp") (source "ja_JP")
(charset "EUC-JP")))
The compiled locale definitions are available at
/run/current-system/locale/X.Y, where X.Y is the libc version,
which is the default location where the GNU libc provided by Guix looks
for locale data. This can be overridden using the LOCPATH environment
variable (veja LOCPATH and locale packages).
The locale-definition form is provided by the (gnu system
locale) module. Details are given below.
- Tipo de dados: locale-definition
This is the data type of a locale definition.
nameThe name of the locale. Veja Locale Names em The GNU C Library Reference Manual, for more information on locale names.
sourceThe name of the source for that locale. This is typically the
language_territorypart of the locale name.charset(default:"UTF-8")The “character set” or “code set” for that locale, as defined by IANA.
- Variável: %default-locale-definitions
A list of commonly used UTF-8 locales, used as the default value of the
locale-definitionsfield ofoperating-systemdeclarations.These locale definitions use the normalized codeset for the part that follows the dot in the name (veja normalized codeset em The GNU C Library Reference Manual). So for instance it has
uk_UA.utf8but not, say,uk_UA.UTF-8.
11.9.1 Locale Data Compatibility Considerations
operating-system declarations provide a locale-libcs field to
specify the GNU libc packages that are used to compile locale
declarations (veja operating-system Reference). “Why would I care?”,
you may ask. Well, it turns out that the binary format of locale data is
occasionally incompatible from one libc version to another.
For instance, a program linked against libc version 2.21 is unable to read
locale data produced with libc 2.22; worse, that program aborts
instead of simply ignoring the incompatible locale data32. Similarly, a program linked
against libc 2.22 can read most, but not all, of the locale data from libc
2.21 (specifically, LC_COLLATE data is incompatible); thus calls to
setlocale may fail, but programs will not abort.
The “problem” with Guix is that users have a lot of freedom: They can choose whether and when to upgrade software in their profiles, and might be using a libc version different from the one the system administrator used to build the system-wide locale data.
Fortunately, unprivileged users can also install their own locale data and
define GUIX_LOCPATH accordingly (veja GUIX_LOCPATH and locale packages).
Still, it is best if the system-wide locale data at
/run/current-system/locale is built for all the libc versions
actually in use on the system, so that all the programs can access it—this
is especially crucial on a multi-user system. To do that, the administrator
can specify several libc packages in the locale-libcs field of
operating-system:
(use-package-modules base) (operating-system ;; … (locale-libcs (list glibc-2.21 (canonical-package glibc))))
This example would lead to a system containing locale definitions for both libc 2.21 and the current version of libc in /run/current-system/locale.
Próximo: Privileged Programs, Anterior: Localidades, Acima: Configuração do sistema [Conteúdo][Índice]
11.10 Serviços
An important part of preparing an operating-system declaration is
listing system services and their configuration (veja Usando o sistema de configuração). System services are typically daemons launched when
the system boots, or other actions needed at that time—e.g., configuring
network access.
Guix has a broad definition of “service” (veja Composição de serviço),
but many services are managed by the GNU Shepherd (veja Serviços de Shepherd). On a running system, the herd command allows you to
list the available services, show their status, start and stop them, or do
other specific operations (veja Jump Start em The GNU Shepherd
Manual). For example:
# herd status
The above command, run as root, lists the currently defined
services. The herd doc command shows a synopsis of the given
service and its associated actions:
# herd doc nscd Run libc's name service cache daemon (nscd). # herd doc nscd action invalidate invalidate: Invalidate the given cache--e.g., 'hosts' for host name lookups.
The start, stop, and restart sub-commands have
the effect you would expect. For instance, the commands below stop the nscd
service and restart the Xorg display server:
# herd stop nscd Service nscd has been stopped. # herd restart xorg-server Service xorg-server has been stopped. Service xorg-server has been started.
For some services, herd configuration returns the name of the
service’s configuration file, which can be handy to inspect its
configuration:
# herd configuration sshd /gnu/store/…-sshd_config
The following sections document the available services, starting with the
core services, that may be used in an operating-system declaration.
- Serviços básicos
- Execução de trabalho agendado
- Rotação de log
- Networking Setup
- Serviços de Rede
- Atualizações sem supervisão
- X Window
- Serviços de impressão
- Serviços de desktop
- Serviços de som
- File Search Services
- Serviços de bancos de dados
- Serviços de correio
- Serviços de mensageria
- Serviços de telefonia
- Serviços de compartilhamento de arquivos
- Serviços de monitoramento
- Serviços Kerberos
- Serviços LDAP
- Serviços web
- Serviços de certificado
- Serviços DNS
- VNC Services
- Serviços VPN
- Sistema de arquivos de rede
- Samba Services
- Integração Contínua
- Serviços de gerenciamento de energia
- Serviços de áudio
- Serviços de virtualização
- Serviços de controlando versão
- Serviços de jogos
- Serviço de montagem PAM
- Serviços Guix
- Serviços Linux
- Serviços Hurd
- Serviços diversos
Próximo: Execução de trabalho agendado, Acima: Serviços [Conteúdo][Índice]
11.10.1 Serviços básicos
The (gnu services base) module provides definitions for the basic
services that one expects from the system. The services exported by this
module are listed below.
- Variável: %base-services
This variable contains a list of basic services (veja Tipos de Service e Serviços, for more information on service objects) one would expect from the system: a login service (mingetty) on each tty, syslogd, the libc name service cache daemon (nscd), the udev device manager, and more.
This is the default value of the
servicesfield ofoperating-systemdeclarations. Usually, when customizing a system, you will want to append services to%base-services, like this:(append (list (service avahi-service-type) (service openssh-service-type)) %base-services)
- Variável: special-files-service-type
This is the service that sets up “special files” such as /bin/sh; an instance of it is part of
%base-services.The value associated with
special-files-service-typeservices must be a list of two-element lists where the first element is the “special file” and the second element is its target. By default it is:`(("/bin/sh" ,(file-append bash "/bin/sh")) ("/usr/bin/env" ,(file-append coreutils "/bin/env")))
If you want to add, say,
/bin/bashto your system, you can change it to:`(("/bin/sh" ,(file-append bash "/bin/sh")) ("/usr/bin/env" ,(file-append coreutils "/bin/env")) ("/bin/bash" ,(file-append bash "/bin/bash")))
Since this is part of
%base-services, you can usemodify-servicesto customize the set of special files (vejamodify-services). But the simple way to add a special file is via theextra-special-fileprocedure (see below).
- Procedure: extra-special-file file target
Use target as the “special file” file.
For example, adding the following lines to the
servicesfield of your operating system declaration leads to a /usr/bin/env symlink:(extra-special-file "/usr/bin/env" (file-append coreutils "/bin/env"))This procedure is meant for
/bin/sh,/usr/bin/envand similar targets. In particular, use for targets under/etcmight not work as expected if the target is managed by Guix in other ways.
- Variável: host-name-service-type
Type of the service that sets the system host name, whose value is a string. This service is included in
operating-systemby default (vejaessential-services).
- Variável: console-font-service-type
Install the given fonts on the specified ttys (fonts are per virtual console on the kernel Linux). The value of this service is a list of tty/font pairs. The font can be the name of a font provided by the
kbdpackage or any valid argument tosetfont, as in this example:`(("tty1" . "LatGrkCyr-8x16") ("tty2" . ,(file-append font-tamzen "/share/kbd/consolefonts/TamzenForPowerline10x20.psf")) ("tty3" . ,(file-append font-terminus "/share/consolefonts/ter-132n"))) ; for HDPI
- Variável: hosts-service-type
Type of the service that populates the entries for (/etc/hosts). This service type can be extended by passing it a list of
hostrecords.The example below shows how to add two entries to /etc/hosts:
(simple-service 'add-extra-hosts hosts-service-type (list (host "192.0.2.1" "example.com" '("example.net" "example.org")) (host "2001:db8::1" "example.com" '("example.net" "example.org"))))Nota: By default /etc/hosts comes with the following entries:
127.0.0.1 localhost host-name ::1 localhost host-name
For most setups this is what you want though if you find yourself in the situation where you want to change the default entries, you can do so in
operating-systemviamodify-services(vejamodify-services).The following example shows how to unset host-name from being an alias of
localhost.(operating-system ;; … (essential-services (modify-services (operating-system-default-essential-services this-operating-system) (hosts-service-type config => (list (host "127.0.0.1" "localhost") (host "::1" "localhost"))))))
- Procedure: host address canonical-name [aliases]
Return a new record for the host at address with the given canonical-name and possibly aliases.
address must be a string denoting a valid IPv4 or IPv6 address, and canonical-name and the strings listed in aliases must be valid host names.
- Variável: login-service-type
Type of the service that provides a console login service, whose value is a
<login-configuration>object.
- Tipo de dados: login-configuration
Data type representing the configuration of login, which specifies the MOTD (message of the day), among other things.
motd¶A file-like object containing the “message of the day”.
allow-empty-passwords?(default:#t)Allow empty passwords by default so that first-time users can log in when the ’root’ account has just been created.
- Variável: mingetty-service-type
Type of the service that runs Mingetty, an implementation of the virtual console log-in. The value for this service is a
<mingetty-configuration>object.
- Tipo de dados: mingetty-configuration
Data type representing the configuration of Mingetty, which specifies the tty to run, among other things.
ttyThe name of the console this Mingetty runs on—e.g.,
"tty1".auto-login(default:#f)When true, this field must be a string denoting the user name under which the system automatically logs in. When it is
#f, a user name and password must be entered to log in.login-program(default:#f)This must be either
#f, in which case the default log-in program is used (loginfrom the Shadow tool suite), or a gexp denoting the name of the log-in program.login-pause?(default:#f)When set to
#tin conjunction with auto-login, the user will have to press a key before the log-in shell is launched.clear-on-logout?(default:#t)When set to
#t, the screen will be cleared before showing the login prompt. The field name is bit unfortunate, since it controls clearing also before the initial login, not just after a logout.delay(default:#f)When set to a number, sleep that many seconds after startup.
print-issue(default:#t)When set to
#t, write out a new line and the content of /etc/issue. Value of'no-nlcan be used to suppress the new line.print-hostname(default:#t)When set to
#t, print the host name before the login prompt. The host name is printed up to the first dot. Can be set to'longto print the full host name.nice(default:#f)When set to a number, change the process priority using
nice.working-directory(default:#f)When set to a string, change into that directory before calling the login program.
root-directory(default:#f)When set to a string, use this directory at the process’s root directory.
shepherd-requirementList of shepherd requirements. Unless you know what you are doing, it is recommended to extend the default list instead of overriding it.
As an example, when using auto-login on a system with elogind, it is necessary to wait on the
'dbus-systemservice:(modify-services %base-services (mingetty-service-type config => (mingetty-configuration (inherit config) ;; Automatically log in as "guest". (auto-login "guest") (shepherd-requirement (cons 'dbus-system (mingetty-configuration-shepherd-requirement config))))))mingetty(default: mingetty)The Mingetty package to use.
- Variável: agetty-service-type
Type of the service that runs agetty, which implements virtual and serial console log-in. The value for this service is a
<agetty-configuration>object.
- Tipo de dados: agetty-configuration
Data type representing the configuration of agetty, which specifies the tty to run, among other things33.
ttyThe name of the console this agetty runs on, as a string—e.g.,
"ttyS0". This argument is optional, it will default to a reasonable default serial port used by the kernel Linux.For this, if there is a value for an option
agetty.ttyin the kernel command line, agetty will extract the device name of the serial port from it and use that.If not and if there is a value for an option
consolewith a tty in the Linux command line, agetty will extract the device name of the serial port from it and use that.In both cases, agetty will leave the other serial device settings (baud rate etc.) alone—in the hope that Linux pinned them to the correct values.
baud-rate(default:#f)A string containing a comma-separated list of one or more baud rates, in descending order.
term(default:#f)A string containing the value used for the
TERMenvironment variable.eight-bits?(default:#f)When
#t, the tty is assumed to be 8-bit clean, and parity detection is disabled.auto-login(default:#f)When passed a login name, as a string, the specified user will be logged in automatically without prompting for their login name or password.
no-reset?(default:#f)When
#t, don’t reset terminal cflags (control modes).host(default:#f)This accepts a string containing the “login_host”, which will be written into the /var/run/utmpx file.
remote?(padrão:#f)When set to
#tin conjunction with host, this will add an-rfakehost option to the command line of the login program specified in login-program.flow-control?(default:#f)When set to
#t, enable hardware (RTS/CTS) flow control.no-issue?(padrão:#f)When set to
#t, the contents of the /etc/issue file will not be displayed before presenting the login prompt.init-string(default:#f)This accepts a string that will be sent to the tty or modem before sending anything else. It can be used to initialize a modem.
no-clear?(padrão:#f)When set to
#t, agetty will not clear the screen before showing the login prompt.login-program(default: (file-append shadow "/bin/login"))This must be either a gexp denoting the name of a log-in program, or unset, in which case the default value is the
loginfrom the Shadow tool suite.local-line(default:#f)Control the CLOCAL line flag. This accepts one of three symbols as arguments,
'auto,'always, or'never. If#f, the default value chosen by agetty is'auto.extract-baud?(default:#f)When set to
#t, instruct agetty to try to extract the baud rate from the status messages produced by certain types of modems.skip-login?(default:#f)When set to
#t, do not prompt the user for a login name. This can be used with login-program field to use non-standard login systems.no-newline?(padrão:#f)When set to
#t, do not print a newline before printing the /etc/issue file.login-options(default:#f)This option accepts a string containing options that are passed to the login program. When used with the login-program, be aware that a malicious user could try to enter a login name containing embedded options that could be parsed by the login program.
login-pause(default:#f)When set to
#t, wait for any key before showing the login prompt. This can be used in conjunction with auto-login to save memory by lazily spawning shells.chroot(default:#f)Change root to the specified directory. This option accepts a directory path as a string.
hangup?(padrão:#f)Use the Linux system call
vhangupto do a virtual hangup of the specified terminal.keep-baud?(default:#f)When set to
#t, try to keep the existing baud rate. The baud rates from baud-rate are used when agetty receives a BREAK character.timeout(default:#f)When set to an integer value, terminate if no user name could be read within timeout seconds.
detect-case?(default:#f)When set to
#t, turn on support for detecting an uppercase-only terminal. This setting will detect a login name containing only uppercase letters as indicating an uppercase-only terminal and turn on some upper-to-lower case conversions. Note that this will not support Unicode characters.wait-cr?(default:#f)When set to
#t, wait for the user or modem to send a carriage-return or linefeed character before displaying /etc/issue or login prompt. This is typically used with the init-string option.no-hints?(padrão:#f)When set to
#t, do not print hints about Num, Caps, and Scroll locks.no-hostname?(default:#f)By default, the hostname is printed. When this option is set to
#t, no hostname will be shown at all.long-hostname?(default:#f)By default, the hostname is only printed until the first dot. When this option is set to
#t, the fully qualified hostname bygethostnameorgetaddrinfois shown.erase-characters(default:#f)This option accepts a string of additional characters that should be interpreted as backspace when the user types their login name.
kill-characters(default:#f)This option accepts a string that should be interpreted to mean “ignore all previous characters” (also called a “kill” character) when the user types their login name.
chdir(default:#f)This option accepts, as a string, a directory path that will be changed to before login.
delay(default:#f)This options accepts, as an integer, the number of seconds to sleep before opening the tty and displaying the login prompt.
nice(default:#f)This option accepts, as an integer, the nice value with which to run the
loginprogram.extra-options(default:'())This option provides an “escape hatch” for the user to provide arbitrary command-line arguments to
agettyas a list of strings.shepherd-requirement(default:'())The option can be used to provides extra shepherd requirements (for example
'syslogd) to the respective'term-* shepherd service.
- Variável: kmscon-service-type
Type of the service that runs kmscon, which implements virtual console log-in. The value for this service is a
<kmscon-configuration>object.
- Tipo de dados: kmscon-configuration
Data type representing the configuration of Kmscon, which specifies the tty to run, among other things.
virtual-terminalThe name of the console this Kmscon runs on—e.g.,
"tty1".login-program(default:#~(string-append #$shadow "/bin/login"))A gexp denoting the name of the log-in program. The default log-in program is
loginfrom the Shadow tool suite.login-arguments(default:'("-p"))A list of arguments to pass to
login.auto-login(default:#f)When passed a login name, as a string, the specified user will be logged in automatically without prompting for their login name or password.
hardware-acceleration?(default: #f)Whether to use hardware acceleration.
font-engine(default:"pango")Font engine used in Kmscon.
font-size(default:12)Font size used in Kmscon.
keyboard-layout(padrão:#f)If this is
#f, Kmscon uses the default keyboard layout—usually US English (“qwerty”) for a 105-key PC keyboard.Otherwise this must be a
keyboard-layoutobject specifying the keyboard layout. Veja Disposição do teclado, for more information on how to specify the keyboard layout.kmscon(default: kmscon)The Kmscon package to use.
- Variável: nscd-service-type
Type of the service that runs the libc nscd (name service cache daemon), whose value is an
<nscd-configuration>object.For convenience, the Shepherd service for nscd provides the following actions:
invalidate¶-
This invalidate the given cache. For instance, running:
herd invalidate nscd hosts
invalidates the host name lookup cache of nscd.
statisticsRunning
herd statistics nscddisplays information about nscd usage and caches.
- Tipo de dados: nscd-configuration
Data type representing the nscd (name service cache daemon) configuration.
name-services(default:'())List of packages denoting name services that must be visible to the nscd—e.g.,
(list nss-mdns).glibc(default: glibc)Package object denoting the GNU C Library providing the
nscdcommand.log-file(default:#f)Name of the nscd log file. Debugging output goes to that file when
debug-levelis strictly positive, or to standard error if it is#f. Regular messages are written to syslog whendebug-levelis zero, regardless of the value oflog-file.debug-level(default:0)Integer denoting the debugging levels. Higher numbers mean that more debugging output is logged.
caches(default:%nscd-default-caches)List of
<nscd-cache>objects denoting things to be cached; see below.
- Tipo de dados: nscd-cache
Data type representing a cache database of nscd and its parameters.
databaseThis is a symbol representing the name of the database to be cached. Valid values are
passwd,group,hosts, andservices, which designate the corresponding NSS database (veja NSS Basics em The GNU C Library Reference Manual).positive-time-to-livenegative-time-to-live(default:20)A number representing the number of seconds during which a positive or negative lookup result remains in cache.
check-files?(default:#t)Whether to check for updates of the files corresponding to database.
For instance, when database is
hosts, setting this flag instructs nscd to check for updates in /etc/hosts and to take them into account.persistent?(padrão:#t)Whether the cache should be stored persistently on disk.
shared?(padrão:#t)Whether the cache should be shared among users.
max-database-size(default: 32 MiB)Maximum size in bytes of the database cache.
- Variável: %nscd-default-caches
List of
<nscd-cache>objects used by default bynscd-configuration(see above).It enables persistent and aggressive caching of service and host name lookups. The latter provides better host name lookup performance, resilience in the face of unreliable name servers, and also better privacy—often the result of host name lookups is in local cache, so external name servers do not even need to be queried.
- Variável: syslog-service-type
Type of the service that runs the syslog daemon (
syslogd), whose value is a<syslog-configuration>object (see below).Nota: This service is redundant with and for the most part superseded by
shepherd-system-log-service-type(veja the Shepherd system log).
To have a modified syslog-configuration come into effect after
reconfiguring your system, the ‘reload’ action should be preferred to
restarting the service, as many services such as the login manager depend on
it and would be restarted as well:
# herd reload syslog
which will cause the running syslogd process to reload its
configuration.
- Tipo de dados: syslog-configuration
Data type representing the configuration of the syslog daemon.
syslogd(default:#~(string-append #$inetutils "/libexec/syslogd"))The syslog daemon to use.
config-file(default:%default-syslog.conf)The syslog configuration file to use. Veja syslogd invocation em GNU Inetutils, for more information on the configuration file syntax.
extra-options(default:'())List of extra command-line options for
syslog.
- Variável: guix-service-type
This is the type of the service that runs the build daemon,
guix-daemon(veja Invocandoguix-daemon). Its value must be aguix-configurationrecord as described below.
- Tipo de dados: guix-configuration
This data type represents the configuration of the Guix build daemon. Veja Invocando
guix-daemon, for more information.guix(default: guix)The Guix package to use. Veja Customizing the System-Wide Guix to learn how to provide a package with a pre-configured set of channels.
build-group(default:"guixbuild")Name of the group for build user accounts.
build-accounts(default:10)Number of build user accounts to create.
chroot?(default:'default)The value should be one of
#tor#f, in which case chroot is enabled or disabled, respectively; or it should be'default, which amounts to#fin Docker containers (so that they can be run in non-privileged mode) or#totherwise.authorize-key?(default:#t) ¶Whether to authorize the substitute keys listed in
authorized-keys—by default that ofbordeaux.guix.gnu.organdci.guix.gnu.org(veja Substitutos).When
authorize-key?is true, /etc/guix/acl cannot be changed by invokingguix archive --authorize. You must instead adjustguix-configurationas you wish and reconfigure the system. This ensures that your operating system configuration file is self-contained.Nota: When booting or reconfiguring to a system where
authorize-key?is true, the existing /etc/guix/acl file is backed up as /etc/guix/acl.bak if it was determined to be a manually modified file. This is to facilitate migration from earlier versions, which allowed for in-place modifications to /etc/guix/acl.authorized-keys(default:%default-authorized-guix-keys)The list of authorized key files for archive imports, as a list of string-valued gexps (veja Invocando
guix archive). By default, it contains that ofbordeaux.guix.gnu.organdci.guix.gnu.org(veja Substitutos). Seesubstitute-urlsbelow for an example on how to change it.use-substitutes?(default:#t)Whether to use substitutes.
substitute-urls(default:%default-substitute-urls)The list of URLs where to look for substitutes by default.
Suppose you would like to fetch substitutes from
guix.example.orgin addition tobordeaux.guix.gnu.org. You will need to do two things: (1) addguix.example.orgtosubstitute-urls, and (2) authorize its signing key, having done appropriate checks (veja Autorização de servidor substituto). The configuration below does exactly that:(guix-configuration (substitute-urls (append (list "https://guix.example.org") %default-substitute-urls)) (authorized-keys (append (list (local-file "./guix.example.org-key.pub")) %default-authorized-guix-keys)))This example assumes that the file ./guix.example.org-key.pub contains the public key that
guix.example.orguses to sign substitutes.generate-substitute-key?(default:#t)Whether to generate a substitute key pair under /etc/guix/signing-key.pub and /etc/guix/signing-key.sec if there is not already one.
This key pair is used when exporting store items, for instance with
guix publish(veja Invocandoguix publish) orguix archive(veja Invocandoguix archive). Generating a key pair takes a few seconds when enough entropy is available and is only done once; you might want to turn it off for instance in a virtual machine that does not need it and where the extra boot time is a problem.channels(default:#f)List of channels to be specified in /etc/guix/channels.scm, which is what
guix pulluses by default (veja Invocandoguix pull).Nota: When reconfiguring a system, the existing /etc/guix/channels.scm file is backed up as /etc/guix/channels.scm.bak if it was determined to be a manually modified file. This is to facilitate migration from earlier versions, which allowed for in-place modifications to /etc/guix/channels.scm.
max-silent-time(default:3600)timeout(default:(* 3600 24))The number of seconds of silence and the number of seconds of activity, respectively, after which a build process times out. A value of zero disables the timeout.
log-compression(default:'gzip)The type of compression used for build logs—one of
gzip,bzip2, ornone.discover?(default:#f)Se deve descobrir servidores substitutos na rede local usando mDNS e DNS-SD.
build-machines(default:#f)This field must be either
#for a list of gexps evaluating to abuild-machinerecord or to a list ofbuild-machinerecords (veja Usando o recurso de descarregamento).When it is
#f, the /etc/guix/machines.scm file is left untouched. Otherwise, the list of of gexps is written to /etc/guix/machines.scm; if a previously-existing file is found, it is backed up as /etc/guix/machines.scm.bak. This allows you to declare build machines for offloading directly in the operating system declaration, like so:(guix-configuration (build-machines (list #~(build-machine (name "foo.example.org") …) #~(build-machine (name "bar.example.org") …))))Additional build machines may be added via the
guix-extensionmechanism (see below).extra-options(default:'())List of extra command-line options for
guix-daemon.log-file(default:"/var/log/guix-daemon.log")File where
guix-daemon’s standard output and standard error are written.http-proxy(default:#f)The URL of the HTTP and HTTPS proxy used for downloading fixed-output derivations and substitutes.
It is also possible to change the daemon’s proxy at run time through the
set-http-proxyaction, which restarts it:herd set-http-proxy guix-daemon http://localhost:8118
To clear the proxy settings, run:
herd set-http-proxy guix-daemon
tmpdir(default:#f)A directory path where the
guix-daemonwill perform builds.environment(default:'())Environment variables to be set before starting the daemon, as a list of
key=valuestrings.socket-directory-permissions(default:#o755)Permissions to set for the directory /var/guix/daemon-socket. This, together with
socket-directory-groupandsocket-directory-user, determines who can connect to the build daemon via its Unix socket. TCP socket operation is unaffected by these.socket-directory-user(default:#f)socket-directory-group(default:#f)User and group owning the /var/guix/daemon-socket directory or
#fto keep the user or group as root.
- Tipo de dados: guix-extension
This data type represents the parameters of the Guix build daemon that are extendable. This is the type of the object that must be used within a guix service extension. Veja Composição de serviço, for more information.
authorized-keys(default:'())A list of file-like objects where each element contains a public key.
substitute-urls(default:'())A list of strings where each element is a substitute URL.
build-machines(default:'())A list of gexps that evaluate to
build-machinerecords or to a list ofbuild-machinerecords. (veja Usando o recurso de descarregamento).Using this field, a service may add new build machines to receive builds offloaded by the daemon. This is useful for a service such as
hurd-vm-service-type, which can make a GNU/Hurd virtual machine directly usable for offloading (vejahurd-vm-service-type).chroot-directories(default:'())A list of file-like objects or strings pointing to additional directories the build daemon can use.
- Variável: udev-service-type
Type of the service that runs udev, a service which populates the /dev directory dynamically, whose value is a
<udev-configuration>object.Since the file names for udev rules and hardware description files matter, the configuration items for rules and hardware cannot simply be plain file-like objects with the rules content, because the name would be ignored. Instead, they are directory file-like objects that contain optional rules in lib/udev/rules.d and optional hardware files in lib/udev/hwdb.d. This way, the service can be configured with whole packages from which to take rules and hwdb files.
The
udev-service-typecan be extended with file-like directories that respect this hierarchy. For convenience, theudev-ruleandfile->udev-rulecan be used to construct udev rules, whileudev-hardwareandfile->udev-hardwarecan be used to construct hardware description files.In an
operating-systemdeclaration, this service type can be extended using proceduresudev-rules-serviceandudev-hardware-service.
- Tipo de dados: udev-configuration
Data type representing the configuration of udev.
udev(default:eudev) (type: file-like)Package object of the udev service. This package is used at run-time, when compiled for the target system. In order to generate the hwdb.bin hardware index, it is also used when generating the system definition, compiled for the current system.
rules(default: ’()) (type: list-of-file-like)List of file-like objects denoting udev rule files under a sub-directory.
hardware(default: ’()) (type: list-of-file-like)List of file-like objects denoting udev hardware description files under a sub-directory.
- Procedure: udev-rule file-name contents
Return a udev-rule file named file-name containing the rules defined by the contents literal.
In the following example, a rule for a USB device is defined to be stored in the file 90-usb-thing.rules. The rule runs a script upon detecting a USB device with a given product identifier.
(define %example-udev-rule (udev-rule "90-usb-thing.rules" (string-append "ACTION==\"add\", SUBSYSTEM==\"usb\", " "ATTR{product}==\"Example\", " "RUN+=\"/path/to/script\"")))
- Procedure: udev-hardware file-name contents
Return a udev hardware description file named file-name containing the hardware information contents.
- Procedure: udev-rules-service name rules [#:groups '()]
Return a service that extends
udev-service-typewith rules andaccount-service-typewith groups as system groups. This works by creating a singleton service typename-udev-rules, of which the returned service is an instance.Here we show how it can be used to extend
udev-service-typewith the previously defined rule%example-udev-rule.(operating-system ;; … (services (cons (udev-rules-service 'usb-thing %example-udev-rule) %desktop-services)))
- Procedure: udev-hardware-service name hardware
Return a service that extends
udev-service-typewith hardware. The service name isname-udev-hardware.
- Procedure: file->udev-rule file-name file
Return a udev-rule file named file-name containing the rules defined within file, a file-like object.
The following example showcases how we can use an existing rule file.
(use-modules (guix download) ;for url-fetch (guix packages) ;for origin …) (define %android-udev-rules (file->udev-rule "51-android-udev.rules" (let ((version "20170910")) (origin (method url-fetch) (uri (string-append "https://raw.githubusercontent.com/M0Rf30/" "android-udev-rules/" version "/51-android.rules")) (sha256 (base32 "0lmmagpyb6xsq6zcr2w1cyx9qmjqmajkvrdbhjx32gqf1d9is003"))))))
Since guix package definitions can be included in rules in order to
use all their rules under the lib/udev/rules.d sub-directory, then in
lieu of the previous file->udev-rule example, we could have used the
android-udev-rules package which exists in Guix in the (gnu
packages android) module.
- Procedure: file->udev-hardware file-name file
Return a udev hardware description file named file-name containing the rules defined within file, a file-like object.
The following example shows how to use the android-udev-rules package
so that the Android tool adb can detect devices without root
privileges. It also details how to create the adbusers group, which
is required for the proper functioning of the rules defined within the
android-udev-rules package. To create such a group, we must define
it both as part of the supplementary-groups of our
user-account declaration, as well as in the groups of the
udev-rules-service procedure.
(use-modules (gnu packages android) ;for android-udev-rules (gnu system shadow) ;for user-group …) (operating-system ;; … (users (cons (user-account ;; … (supplementary-groups '("adbusers" ;for adb "wheel" "netdev" "audio" "video"))))) ;; … (services (cons (udev-rules-service 'android android-udev-rules #:groups '("adbusers")) %desktop-services)))
- Variável: urandom-seed-service-type
Save some entropy in
%random-seed-fileto seed /dev/urandom when rebooting. It also tries to seed /dev/urandom from /dev/hwrng while booting, if /dev/hwrng exists and is readable.
- Variável: %random-seed-file
This is the name of the file where some random bytes are saved by urandom-seed-service to seed /dev/urandom when rebooting. It defaults to /var/lib/random-seed.
- Variável: gpm-service-type
This is the type of the service that runs GPM, the general-purpose mouse daemon, which provides mouse support to the Linux console. GPM allows users to use the mouse in the console, notably to select, copy, and paste text.
The value for services of this type must be a
gpm-configuration(see below). This service is not part of%base-services.
- Tipo de dados: gpm-configuration
Data type representing the configuration of GPM.
options(default:%default-gpm-options)Command-line options passed to
gpm. The default set of options instructgpmto listen to mouse events on /dev/input/mice. Veja Command Line em gpm manual, for more information.gpm(default:gpm)O pacote GPM a ser usado.
- Variável: guix-publish-service-type
This is the service type for
guix publish(veja Invocandoguix publish). Its value must be aguix-publish-configurationobject, as described below.This assumes that /etc/guix already contains a signing key pair as created by
guix archive --generate-key(veja Invocandoguix archive). If that is not the case, the service will fail to start.
- Tipo de dados: guix-publish-configuration
Data type representing the configuration of the
guix publishservice.guix(default:guix)The Guix package to use.
port(padrão:80)The TCP port to listen for connections.
host(default:"localhost")The host (and thus, network interface) to listen to. Use
"0.0.0.0"to listen on all the network interfaces.advertise?(default:#f)When true, advertise the service on the local network via the DNS-SD protocol, using Avahi.
This allows neighboring Guix devices with discovery on (see
guix-configurationabove) to discover thisguix publishinstance and to automatically download substitutes from it.compression(default:'(("gzip" 3) ("zstd" 3)))This is a list of compression method/level tuple used when compressing substitutes. For example, to compress all substitutes with both lzip at level 7 and gzip at level 9, write:
'(("lzip" 7) ("gzip" 9))
Level 9 achieves the best compression ratio at the expense of increased CPU usage, whereas level 1 achieves fast compression. Veja Invocando
guix publish, for more information on the available compression methods and the tradeoffs involved.An empty list disables compression altogether.
nar-path(default:"nar")The URL path at which “nars” can be fetched. Veja --nar-path, for details.
cache(default:#f)When it is
#f, disable caching and instead generate archives on demand. Otherwise, this should be the name of a directory—e.g.,"/var/cache/guix/publish"—whereguix publishcaches archives and meta-data ready to be sent. Veja --cache, for more information on the tradeoffs involved.workers(default:#f)When it is an integer, this is the number of worker threads used for caching; when
#f, the number of processors is used. Veja --workers, for more information.cache-bypass-threshold(default: 10 MiB)When
cacheis true, this is the maximum size in bytes of a store item for whichguix publishmay bypass its cache in case of a cache miss. Veja --cache-bypass-threshold, for more information.ttl(default:#f)When it is an integer, this denotes the time-to-live in seconds of the published archives. Veja --ttl, for more information.
negative-ttl(default:#f)When it is an integer, this denotes the time-to-live in seconds for the negative lookups. Veja --negative-ttl, for more information.
- Variável: rngd-service-type
Type of the service that runs rng-tools rngd, whose value is an
<rngd-configuration>object.
- Tipo de dados: rngd-configuration
Data type representing the configuration of rngd.
rng-tools(default:rng-tools) (type: file-like)Package object of the rng-tools rngd.
device(default: "/dev/hwrng") (type: string)Path of the device to add to the kernel’s entropy pool. The service will fail if device does not exist.
- Variável: pam-limits-service-type
Type of the service that installs a configuration file for the
pam_limitsmodule. The value for this service type is a list ofpam-limits-entryvalues, which can be used to specifyulimitlimits andnicepriority limits to user sessions. By default, the value is the empty list.The following limits definition sets two hard and soft limits for all login sessions of users in the
realtimegroup:(service pam-limits-service-type (list (pam-limits-entry "@realtime" 'both 'rtprio 99) (pam-limits-entry "@realtime" 'both 'memlock 'unlimited)))The first entry increases the maximum realtime priority for non-privileged processes; the second entry lifts any restriction of the maximum address space that can be locked in memory. These settings are commonly used for real-time audio systems.
Another useful example is raising the maximum number of open file descriptors that can be used:
(service pam-limits-service-type (list (pam-limits-entry "*" 'both 'nofile 100000)))In the above example, the asterisk means the limit should apply to any user. It is important to ensure the chosen value doesn’t exceed the maximum system value visible in the /proc/sys/fs/file-max file, else the users would be prevented from login in. For more information about the Pluggable Authentication Module (PAM) limits, refer to the ‘pam_limits’ man page from the
linux-pampackage.
- Variável: greetd-service-type
greetdis a minimal and flexible login manager daemon, that makes no assumptions about what you want to launch.If you can run it from your shell in a TTY, greetd can start it. If it can be taught to speak a simple JSON-based IPC protocol, then it can be a geeter.
greetd-service-typeprovides necessary infrastructure for logging in users, including:-
greetdPAM service - Special variation of
pam-mountto mountXDG_RUNTIME_DIR
Here is an example of switching from
mingetty-service-typetogreetd-service-type, and how different terminals could be:(append (modify-services %base-services ;; greetd-service-type provides "greetd" PAM service (delete login-service-type) ;; and can be used in place of mingetty-service-type (delete mingetty-service-type)) (list (service greetd-service-type (greetd-configuration (terminals (list ;; we can make any terminal active by default (greetd-terminal-configuration (terminal-vt "1") (terminal-switch #t)) ;; we can make environment without XDG_RUNTIME_DIR set ;; even provide our own environment variables (greetd-terminal-configuration (terminal-vt "2") (default-session-command (greetd-agreety-session (command (greetd-user-session (extra-env '(("MY_VAR" . "1"))) (xdg-env? #f)))))) ;; we can use different shell instead of default bash (greetd-terminal-configuration (terminal-vt "3") (default-session-command (greetd-agreety-session (command (greetd-user-session (command (file-append zsh "/bin/zsh")) (command-args '("-l")) (extra-env '(("MY_VAR" . "1"))) (xdg-env? #f)))))) ;; we can use any other executable command as greeter (greetd-terminal-configuration (terminal-vt "4") (default-session-command (program-file "my-noop-greeter" #~(exit)))) (greetd-terminal-configuration (terminal-vt "5")) (greetd-terminal-configuration (terminal-vt "6")))))) ;; mingetty-service-type can be used in parallel ;; if needed to do so, do not (delete login-service-type) ;; as illustrated above #| (service mingetty-service-type (mingetty-configuration (tty "tty8"))) |#))-
- Tipo de dados: greetd-configuration
Configuration record for the
greetd-service-type.motdA file-like object containing the “message of the day”.
allow-empty-passwords?(default:#t)Allow empty passwords by default so that first-time users can log in when the ’root’ account has just been created.
terminals(default:'())List of
greetd-terminal-configurationper terminal for whichgreetdshould be started.greeter-supplementary-groups(default:'())List of groups which should be added to
greeteruser. For instance:(greeter-supplementary-groups '("seat" "video"))Note that this example will fail if
seatgroup does not exist.
- Tipo de dados: greetd-terminal-configuration
Configuration record for per terminal greetd daemon service.
greetd(default:greetd)The greetd package to use.
extra-shepherd-requirement(default:'())This option can be used to provide a list of additional symbols naming Shepherd services that this service will depend on, such as
'seatdor'elogindwhen the terminal session is a graphical greeter.config-file-nameConfiguration file name to use for greetd daemon. Generally, autogenerated derivation based on
terminal-vtvalue.log-file-nameLog file name to use for greetd daemon. Generally, autogenerated name based on
terminal-vtvalue.terminal-vt(default: ‘"7"’)The VT to run on. Use of a specific VT with appropriate conflict avoidance is recommended.
terminal-switch(default:#f)Make this terminal active on start of
greetd.source-profile?(default:#t)Whether to source /etc/profile and ~/.profile, when they exist.
default-session-user(default: ‘"greeter"’)The user to use for running the greeter.
default-session-command(default:(greetd-agreety-session))Can be either
greetd-agreety-session,greetd-wlgreet-sway-session,greetd-gtkgreet-sway-sessionor a file-like object to use as greeter.
- Data Type: greetd-user-session
Configuration record for the user session command. Greeters require the user command to be specified in some or another way.
greetd-user-sessionprovides a common command for that. Users should prefer POSIX shell commands likebash, which can start an actual user terminal shell, window manager or desktop environment with their own mechanism, for example via ~/.bashrc in the case of Bash.command(default:(file-append bash "/bin/bash"))Command to be started by
agreetyon successful login.command-args(default:'("-l"))Command arguments to pass to command.
extra-env(default:'())Extra environment variables to set on login.
xdg-session-type(default:"tty")Specify the value of
XDG_SESSION_TYPE. The user environment may adapt depending on its value (normally by using .bashrc or similar).xdg-env?(default:#t)If true
XDG_RUNTIME_DIRandXDG_SESSION_TYPEwill be set before starting command. One should note that,extra-envvariables are set right after mentioned variables, so that they can be overridden.
- Tipo de dados: greetd-agreety-session
Configuration record for the agreety greetd greeter.
agreety(default:greetd)The package providing the
agreetycommand.command(default:(greetd-user-session))Command to be started by
agreetyon successful login, an instance ofgreetd-user-session.
- Data Type: greetd-wlgreet-configuration
Generic configuration record for the wlgreet greetd greeter.
output-mode(default:"all")Option to use for
outputModein the TOML configuration file.scale(default:1)Option to use for
scalein the TOML configuration file.background(default:'(0 0 0 0.9))RGBA list to use as the background colour of the login prompt.
headline(default:'(1 1 1 1))RGBA list to use as the headline colour of the UI popup.
prompt(default:'(1 1 1 1))RGBA list to use as the prompt colour of the UI popup.
prompt-error(default:'(1 1 1 1))RGBA list to use as the error colour of the UI popup.
border(default:'(1 1 1 1))RGBA list to use as the border colour of the UI popup.
- Tipo de dados: greetd-wlgreet-sway-session
Sway-specific configuration record for the wlgreet greetd greeter.
wlgreet-session(default:(greetd-wlgreet-session))A
greetd-wlgreet-sessionrecord for generic wlgreet configuration, on top of the Sway-specificgreetd-wlgreet-sway-session.sway(default:sway)The package providing the
swaycommand.sway-configuration(default: #f)File-like object providing an additional Sway configuration file to be prepended to the mandatory part of the configuration.
wlgreet(default:wlgreet)The package providing the
wlgreetcommand.wlgreet-configuration(default:(greetd-wlgreet-configuration))Configuration of
wlgreetrepresented bygreetd-wlgreet-configuration.command(default:(greetd-user-session))Command to be started by
wlgreeton successful login, an instance ofgreetd-user-session.
Here is an example of a greetd configuration that uses wlgreet and Sway:
(greetd-configuration ;; The graphical greeter requires additional group membership. (greeter-supplementary-groups (list "video" "input" "seat")) (terminals (list (greetd-terminal-configuration ;; Sway requires seatd service. (extra-shepherd-requirement '(seatd)) (terminal-vt "1") (terminal-switch #t) (default-session-command (greetd-wlgreet-sway-session (sway-configuration ;; Optional extra sway configuration. (local-file "sway-greetd.conf"))))))))
- Data Type: greetd-gtkgreet-sway-session
Configuration record for the gtkgreet greetd greeter. It can be used as follows:
(greetd-configuration ;; The graphical greeter requires additional groups membership. (greeter-supplementary-groups (list "video" "input" "seat")) (terminals (list (greetd-terminal-configuration ;; Sway requires the seatd service. (extra-shepherd-requirement '(seatd)) (terminal-vt "1") (terminal-switch #t) (default-session-command (greetd-gtkgreet-sway-session (command (greetd-user-session ;; Optionally signal to .bashrc that we want the Wayland ;; compositor. (xdg-session-type "wayland")))))))))sway(default:sway)The package providing the
swayandswaymsgcommands.sway-configuration(default:#f)Extra file-like configuration for sway to be included before executing the greeter.
gtkgreet(default:gtkgreet)The package providing the
gtkgreetcommand.gtkgreet-style(default:#f)Extra file-like CSS stylesheet to customize the GTK look.
command(default:(greetd-user-session))The command to be started by
gtkgreeton successful login, an instance ofgreetd-user-session.
Próximo: Rotação de log, Anterior: Serviços básicos, Acima: Serviços [Conteúdo][Índice]
11.10.2 Execução de trabalho agendado
The (gnu services mcron) module provides an interface to
GNU mcron, a daemon to run jobs at scheduled times (veja GNU mcron). GNU mcron is similar to the traditional Unix
cron daemon; the main difference is that it is implemented in
Guile Scheme, which provides a lot of flexibility when specifying the
scheduling of jobs and their actions.
The example below defines an operating system that runs the
updatedb (veja Invoking updatedb em Finding Files) and
the guix gc commands (veja Invocando guix gc) daily, as well as
the mkid command on behalf of an unprivileged user (veja mkid
invocation em ID Database Utilities). It uses gexps to introduce
job definitions that are passed to mcron (veja Expressões-G).
(use-modules (guix) (gnu) (gnu services mcron)) (use-package-modules base idutils) (define updatedb-job ;; Run 'updatedb' at 3AM every day. Here we write the ;; job's action as a Scheme procedure. #~(job '(next-hour '(3)) (lambda () (system* (string-append #$findutils "/bin/updatedb") "--prunepaths=/tmp /var/tmp /gnu/store")) "updatedb")) (define garbage-collector-job ;; Collect garbage 5 minutes after midnight every day. ;; The job's action is a shell command. #~(job "5 0 * * *" ;Vixie cron syntax "guix gc -F 1G")) (define idutils-job ;; Update the index database as user "charlie" at 12:15PM ;; and 19:15PM. This runs from the user's home directory. #~(job '(next-minute-from (next-hour '(12 19)) '(15)) (string-append #$idutils "/bin/mkid src") #:user "charlie")) (operating-system ;; … ;; %BASE-SERVICES already includes an instance of ;; 'mcron-service-type', which we extend with additional ;; jobs using 'simple-service'. (services (cons (simple-service 'my-cron-jobs mcron-service-type (list garbage-collector-job updatedb-job idutils-job)) %base-services)))
Tip: When providing the action of a job specification as a procedure, you should provide an explicit name for the job via the optional 3rd argument as done in the
updatedb-jobexample above. Otherwise, the job would appear as “Lambda function” in the output ofherd schedule mcron, which is not nearly descriptive enough!
Tip: Avoid calling the Guile procedures
execl,execleorexeclpinside a job specification, else mcron won’t be able to output the completion status of the job.
For more complex jobs defined in Scheme where you need control over the top
level, for instance to introduce a use-modules form, you can move
your code to a separate program using the program-file procedure of
the (guix gexp) module (veja Expressões-G). The example below
illustrates that.
(define %battery-alert-job
;; Beep when the battery percentage falls below %MIN-LEVEL.
#~(job
'(next-minute (range 0 60 1))
#$(program-file
"battery-alert.scm"
(with-imported-modules (source-module-closure
'((guix build utils)))
#~(begin
(use-modules (guix build utils)
(ice-9 popen)
(ice-9 regex)
(ice-9 textual-ports)
(srfi srfi-2))
(define %min-level 20)
(setenv "LC_ALL" "C") ;ensure English output
(and-let* ((input-pipe (open-pipe*
OPEN_READ
#$(file-append acpi "/bin/acpi")))
(output (get-string-all input-pipe))
(m (string-match "Discharging, ([0-9]+)%" output))
(level (string->number (match:substring m 1)))
((< level %min-level)))
(format #t "warning: Battery level is low (~a%)~%" level)
(invoke #$(file-append beep "/bin/beep") "-r5")))))))
Veja mcron job specifications em GNU mcron, for more information on mcron job specifications. Below is the reference of the mcron service.
On a running system, you can use the schedule action of the service
to visualize the mcron jobs that will be executed next:
# herd schedule mcron
The example above lists the next five tasks that will be executed, but you can also specify the number of tasks to display:
# herd schedule mcron 10
- Variável: mcron-service-type
This is the type of the
mcronservice, whose value is anmcron-configurationobject.This service type can be the target of a service extension that provides additional job specifications (veja Composição de serviço). In other words, it is possible to define services that provide additional mcron jobs to run.
- Tipo de dados: mcron-configuration
Available
mcron-configurationfields are:mcron(default:mcron) (type: file-like)The mcron package to use.
jobs(default:'()) (type: list-of-gexps)This is a list of gexps (veja Expressões-G), where each gexp corresponds to an mcron job specification (veja mcron job specifications em GNU mcron).
log?(default:#t) (type: boolean)Log messages to standard output.
log-file(default:"/var/log/mcron.log") (type: string)Log file location.
log-format(default:"~1@*~a ~a: ~a~%") (type: string)(ice-9 format)format string for log messages. The default value produces messages like ‘pid name: message’ (veja Invoking em GNU mcron). Each message is also prefixed by a timestamp by GNU Shepherd.date-format(type: maybe-string)(srfi srfi-19)format string for date.
Próximo: Networking Setup, Anterior: Execução de trabalho agendado, Acima: Serviços [Conteúdo][Índice]
11.10.3 Rotação de log
Log files such as those found in /var/log tend to grow endlessly, so
it’s a good idea to rotate them once in a while—i.e., archive their
contents in separate files, possibly compressed. The (gnu services
admin) module provides an interface to the log rotation service provided by
the Shepherd (veja Log Rotation Service em The GNU Shepherd
Manual).
This log rotation service is made available through
log-rotation-service-type, which takes a
log-rotation-configuration record as its value. By default, this
provides log-rotation, a Shepherd “timed service” that runs
periodically—once a week by default. It automatically knows about the log
files produced by Shepherd services and can be taught about external log
files. You can inspect the service and see when it’s going to run the usual
way:
$ sudo herd status log-rotation Status of log-rotation: It is running since Mon 09 Dec 2024 03:27:47 PM CET (2 days ago). … Upcoming timer alarms: Sun 15 Dec 2024 10:00:00 PM CET (in 4 days) Sun 22 Dec 2024 10:00:00 PM CET (in 11 days) Sun 29 Dec 2024 10:00:00 PM CET (in 18 days)
You can also list files subject to rotation with herd files
log-rotation and trigger rotation manually with herd trigger
log-rotation.
This service is part of %base-services, and thus enabled by default,
with the default settings.
- Variável: log-rotation-service-type
This is the type of the log rotation service. Its associated value must be a
log-rotation-configurationrecord, as discussed below.
- Data Type: log-rotation-configuration
Available
log-rotation-configurationfields are:provision(default:'(log-rotation)) (type: list-of-symbols)The name(s) of the log rotation Shepherd service.
requirement(default:'(user-processes)) (type: list-of-symbols)Dependencies of the log rotation Shepherd service.
calendar-event(type: gexp)Gexp containing the calendar event when log rotation occurs. Veja Timers em The GNU Shepherd Manual, for more information on calendar events.
external-log-files(default:()) (type: list-of-strings)List of file names, external log files that should also be rotated.
compression(default:zstd) (type: symbol)The compression method used for rotated log files, one of
'none,'gzip, and'zstd.expiry(type: gexp-or-integer)Age in seconds after which a log file is deleted.
size-threshold(type: gexp-or-integer)Size in bytes below which a log file is not rotated.
Rottlog
An alternative log rotation service relying on GNU Rot[t]log, a log rotation tool (veja GNU Rot[t]log Manual), is also provided.
Aviso: The Rottlog service presented here is deprecated in favor of
log-rotation-service-type(see above). Therottlog-service-typevariable and related tools will be removed after 2025-06-15.
The example below shows how to extend it with an additional rotation, should you need to do that (usually, services that produce log files already take care of that):
(use-modules (guix) (gnu)) (use-service-modules admin) (define my-log-files ;; Log files that I want to rotate. '("/var/log/something.log" "/var/log/another.log")) (operating-system ;; … (services (cons (simple-service 'rotate-my-stuff rottlog-service-type (list (log-rotation (frequency 'daily) (files my-log-files)))) %base-services)))
- Variável: rottlog-service-type
This is the type of the Rottlog service, whose value is a
rottlog-configurationobject.Other services can extend this one with new
log-rotationobjects (see below), thereby augmenting the set of files to be rotated.This service type can define mcron jobs (veja Execução de trabalho agendado) to run the rottlog service.
- Tipo de dados: rottlog-configuration
Data type representing the configuration of rottlog.
rottlog(default:rottlog)The Rottlog package to use.
rc-file(default:(file-append rottlog "/etc/rc"))The Rottlog configuration file to use (veja Mandatory RC Variables em GNU Rot[t]log Manual).
rotations(default:%default-rotations)A list of
log-rotationobjects as defined below.jobsThis is a list of gexps where each gexp corresponds to an mcron job specification (veja Execução de trabalho agendado).
- Tipo de dados: log-rotation
Data type representing the rotation of a group of log files.
Taking an example from the Rottlog manual (veja Period Related File Examples em GNU Rot[t]log Manual), a log rotation might be defined like this:
(log-rotation (frequency 'daily) (files '("/var/log/apache/*")) (options '("storedir apache-archives" "rotate 6" "notifempty" "nocompress")))The list of fields is as follows:
frequency(default:'weekly)The log rotation frequency, a symbol.
filesThe list of files or file glob patterns to rotate.
options(default:%default-log-rotation-options)The list of rottlog options for this rotation (veja Configuration parameters em GNU Rot[t]log Manual).
post-rotate(default:#f)Either
#for a gexp to execute once the rotation has completed.
- Variável: %default-rotations
Specifies weekly rotation of
%rotated-filesand of /var/log/guix-daemon.log.
- Variável: %rotated-files
The list of syslog-controlled files to be rotated. By default it is:
'("/var/log/messages" "/var/log/secure" "/var/log/debug" \ "/var/log/maillog").
Some log files just need to be deleted periodically once they are old,
without any other criterion and without any archival step. This is the case
of build logs stored by guix-daemon under
/var/log/guix/drvs (veja Invocando guix-daemon). The
log-cleanup service addresses this use case. For example,
%base-services (veja Serviços básicos) includes the following:
;; Periodically delete old build logs. (service log-cleanup-service-type (log-cleanup-configuration (directory "/var/log/guix/drvs")))
That ensures build logs do not accumulate endlessly.
- Variável: log-cleanup-service-type
This is the type of the service to delete old logs. Its value must be a
log-cleanup-configurationrecord as described below.
- Tipo de dados: log-cleanup-configuration
Data type representing the log cleanup configuration
directoryName of the directory containing log files.
expiry(default:(* 6 30 24 3600))Age in seconds after which a file is subject to deletion (six months by default).
schedule(default:"30 12 01,08,15,22 * *")Schedule of the log cleanup job written either as a string in traditional cron syntax or as a gexp representing a Shepherd calendar event (veja Timers em The GNU Shepherd Manual).
Anonip Service
Anonip is a privacy filter that removes IP address from web server logs. This service creates a FIFO and filters any written lines with anonip before writing the filtered log to a target file.
The following example sets up the FIFO /var/run/anonip/https.access.log and writes the filtered log file /var/log/anonip/https.access.log.
(service anonip-service-type
(anonip-configuration
(input "/var/run/anonip/https.access.log")
(output "/var/log/anonip/https.access.log")))
Configure your web server to write its logs to the FIFO at /var/run/anonip/https.access.log and collect the anonymized log file at /var/web-logs/https.access.log.
- Tipo de dados: anonip-configuration
Este tipo de dado representa a configuração do anonip. Ele possui os seguintes parâmetros:
anonip(default:anonip)The anonip package to use.
inputThe file name of the input log file to process. The service creates a FIFO of this name. The web server should write its logs to this FIFO.
outputThe file name of the processed log file.
The following optional settings may be provided:
debug?Print debug messages when
#true.skip-private?When
#truedo not mask addresses in private ranges.columnA 1-based indexed column number. Assume IP address is in the specified column (default is 1).
replacementReplacement string in case address parsing fails, e.g.
"0.0.0.0".ipv4maskNumber of bits to mask in IPv4 addresses.
ipv6maskNumber of bits to mask in IPv6 addresses.
incrementIncrement the IP address by the given number. By default this is zero.
delimiterLog delimiter string.
regexRegular expression for detecting IP addresses. Use this instead of
column.
Próximo: Serviços de Rede, Anterior: Rotação de log, Acima: Serviços [Conteúdo][Índice]
11.10.4 Networking Setup
The (gnu services networking) module provides services to configure
network interfaces and set up networking on your machine. Those services
provide different ways for you to set up your machine: by declaring a static
network configuration, by running a Dynamic Host Configuration Protocol
(DHCP) client, or by running daemons such as NetworkManager and Connman that
automate the whole process, automatically adapt to connectivity changes, and
provide a high-level user interface.
On a laptop, NetworkManager and Connman are by far the most convenient
options, which is why the default desktop services include NetworkManager
(veja %desktop-services). For a server, or for
a virtual machine or a container, static network configuration or a simple
DHCP client are often more appropriate.
This section describes the various network setup services available, starting with static network configuration.
- Variável: static-networking-service-type
This is the type for statically-configured network interfaces. Its value must be a list of
static-networkingrecords. Each of them declares a set of addresses, routes, and links, as shown below.Here is the simplest configuration, with only one network interface controller (NIC) and only IPv4 connectivity:
;; Static networking for one NIC, IPv4-only. (service static-networking-service-type (list (static-networking (addresses (list (network-address (device "eno1") (value "10.0.2.15/24")))) (routes (list (network-route (destination "default") (gateway "10.0.2.2")))) (name-servers '("10.0.2.3")))))
The snippet above can be added to the
servicesfield of your operating system configuration (veja Usando o sistema de configuração). It will configure your machine to have 10.0.2.15 as its IP address, with a 24-bit netmask for the local network—meaning that any 10.0.2.x address is on the local area network (LAN). Traffic to addresses outside the local network is routed via 10.0.2.2. Host names are resolved by sending domain name system (DNS) queries to 10.0.2.3.
- Tipo de dados: static-networking
This is the data type representing a static network configuration.
As an example, here is how you would declare the configuration of a machine with a single network interface controller (NIC) available as
eno1, and with one IPv4 and one IPv6 address:;; Network configuration for one NIC, IPv4 + IPv6. (static-networking (addresses (list (network-address (device "eno1") (value "10.0.2.15/24")) (network-address (device "eno1") (value "2001:123:4567:101::1/64")))) (routes (list (network-route (destination "default") (gateway "10.0.2.2")) (network-route (destination "default") (gateway "2020:321:4567:42::1")))) (name-servers '("10.0.2.3")))
If you are familiar with the
ipcommand of theiproute2package found on Linux-based systems, the declaration above is equivalent to typing:ip address add 10.0.2.15/24 dev eno1 ip address add 2001:123:4567:101::1/64 dev eno1 ip route add default via inet 10.0.2.2 ip route add default via inet6 2020:321:4567:42::1
Run
man 8 ipfor more info. Venerable GNU/Linux users will certainly know how to do it withifconfigandroute, but we’ll spare you that.The available fields of this data type are as follows:
addresseslinks(default:'())routes(default:'())The list of
network-address,network-link, andnetwork-routerecords for this network (see below).name-servers(default:'())The list of IP addresses (strings) of domain name servers. These IP addresses go to /etc/resolv.conf.
provision(default:'(networking))If true, this should be a list of symbols for the Shepherd service corresponding to this network configuration.
requirement(default'())The list of Shepherd services depended on.
- Tipo de dados: network-address
This is the data type representing the IP address of a network interface.
deviceThe name of the network interface for this address—e.g.,
"eno1".valueThe actual IP address and network mask, in CIDR (Classless Inter-Domain Routing) notation, as a string.
For example,
"10.0.2.15/24"denotes IPv4 address 10.0.2.15 on a 24-bit sub-network—all 10.0.2.x addresses are on the same local network.ipv6?Whether
valuedenotes an IPv6 address. By default this is automatically determined.
- Tipo de dados: network-route
This is the data type representing a network route.
destinationThe route destination (a string), either an IP address and network mask or
"default"to denote the default route.source(default:#f)The route source.
device(default:#f)The device used for this route—e.g.,
"eno2".ipv6?(default: auto)Whether this is an IPv6 route. By default this is automatically determined based on
destinationorgateway.gateway(default:#f)IP address (a string) through which traffic is routed.
- Tipo de dados: network-link
Data type for a network link (veja Link em Guile-Netlink Manual). During startup, network links are employed to construct or modify existing or virtual ethernet links. These ethernet links can be identified by their name or mac-address. If there is a need to create virtual interface, name and type fields are required.
nameThe name of the link—e.g.,
"v0p0"(default:#f).tipoA symbol denoting the type of the link—e.g.,
'veth(default:#f).mac-addressThe mac-address of the link—e.g.,
"98:11:22:33:44:55"(default:#f).argumentsList of arguments for this type of link.
Consider a scenario where a server equipped with a network interface which has multiple ports. These ports are connected to a switch, which supports link aggregation (also known as bonding or NIC teaming). The switch uses port channels to consolidate multiple physical interfaces into one logical interface to provide higher bandwidth, load balancing, and link redundancy. When a port is added to a LAG (or link aggregation group), it inherits the properties of the port-channel. Some of these properties are VLAN membership, trunk status, and so on.
VLAN (or virtual local area network) is a logical network that is isolated from other VLANs on the same physical network. This can be used to segregate traffic, improve security, and simplify network management.
With all that in mind let’s configure our static network for the server. We will bond two existing interfaces together using 802.3ad schema and on top of it, build a VLAN interface with id 1055. We assign a static ip to our new VLAN interface.
(static-networking
(links (list (network-link
(name "bond0")
(type 'bond)
(arguments '((mode . "802.3ad")
(miimon . 100)
(lacp-active . "on")
(lacp-rate . "fast"))))
(network-link
(mac-address "98:11:22:33:44:55")
(arguments '((master . "bond0"))))
(network-link
(mac-address "98:11:22:33:44:56")
(arguments '((master . "bond0"))))
(network-link
(name "bond0.1055")
(type 'vlan)
(arguments '((id . 1055)
(link . "bond0"))))))
(addresses (list (network-address
(value "192.168.1.4/24")
(device "bond0.1055")))))
- Variável: %loopback-static-networking
This is the
static-networkingrecord representing the “loopback device”,lo, for IP addresses 127.0.0.1 and ::1, and providing theloopbackShepherd service.
- Variável: %qemu-static-networking
This is the
static-networkingrecord representing network setup when using QEMU’s user-mode network stack oneth0(veja Using the user mode network stack em QEMU Documentation).
- Variável: dhcp-client-service-type
This is the type of services that run dhclient, the ISC Dynamic Host Configuration Protocol (DHCP) client.
- Tipo de dados: dhcp-client-configuration
Data type representing the configuration of the ISC DHCP client service.
package(default:isc-dhcp)The ISC DHCP client package to use.
interfaces(default:'all)Either
'allor the list of interface names that the ISC DHCP client should listen on—e.g.,'("eno1").When set to
'all, the ISC DHCP client listens on all the available non-loopback interfaces that can be activated. Otherwise the ISC DHCP client listens only on the specified interfaces.config-file(default:#f)The configuration file for the ISC DHCP client.
version(default:"4")The DHCP protocol version to use, as a string. Accepted values are
"4"or"6"for DHCPv4 or DHCPv6, respectively, as well as"4o6", for DHCPv4 over DHCPv6 (as specified by RFC 7341).shepherd-requirement(default:'())shepherd-provision(default:'(networking))This option can be used to provide a list of symbols naming Shepherd services that this service will depend on, such as
'wpa-supplicantor'iwdif you require authenticated access for encrypted WiFi or Ethernet networks.Likewise,
shepherd-provisionis a list of Shepherd service names (symbols) provided by this service. You might want to change the default value if you intend to run several ISC DHCP clients, only one of which provides thenetworkingShepherd service.
- Variável: dhcpcd-service-type
This the type for a service running
dhcpcd, a DHCP (Dynamic Host Configuration Protocol) client that can be used as a replacement for the historical ISC client supported bydhcp-client-service-type.Its value must be a
dhcpcd-configurationrecord, as described below. As an example, consider the following setup which runsdhcpcdwith a local DNS (Domain Name System) resolver:(service dhcpcd-service-type (dhcpcd-configuration (option '("rapid_commit" "interface_mtu")) (no-option '("nd_rdnss" "dhcp6_name_servers" "domain_name_servers" "domain_name" "domain_search")) (static '("domain_name_servers=127.0.0.1")) (no-hook '("hostname")))))
- Data Type: dhcpcd-configuration
Available
dhcpcd-configurationfields are:interfaces(default:()) (type: list)List of networking interfaces—e.g.,
"eth0"—to start a DHCP client for. If no interface is specified (i.e., the list is empty) thendhcpcddiscovers available Ethernet interfaces, that can be configured, automatically.command-arguments(default:("-q" "-q")) (type: list)List of additional command-line options.
host-name(default:"") (type: maybe-string)Host name to send via DHCP, defaults to the current system host name.
duid(default:"") (type: maybe-string)DHCPv4 clients require a unique client identifier, this option uses the DHCPv6 Unique Identifier as a DHCPv4 client identifier as well. For more information, refer to RFC 4361 and
dhcpcd.conf(5).persistent?(default:#t) (type: boolean)When true, automatically de-configure the interface when
dhcpcdexits.option(default:("rapid_commit" "domain_name_servers" "domain_name" "domain_search" "host_name" "classless_static_routes" "interface_mtu")) (type: list-of-strings)List of options to request from the server.
require(default:("dhcp_server_identifier")) (type: list-of-strings)List of options to require in responses.
slaac(default:"private") (type: maybe-string)Interface identifier used for SLAAC generated IPv6 addresses.
no-option(default:()) (type: list-of-strings)List of options to remove from the message before it’s processed.
no-hook(default:()) (type: list-of-strings)List of hook script which should not be invoked.
static(default:()) (type: list-of-strings)DHCP client can request different options from a DHCP server, through
staticit is possible to configure static values for selected options. For example,"domain_name_servers=127.0.0.1".vendor-class-id(type: maybe-string)Set the DHCP Vendor Class (e.g.,
MSFT). For more information, refer to RFC 2132.client-id(type: maybe-string)Use the interface hardware address or the given string as a client identifier, this is matually exclusive with the
duidoption.extra-content(type: maybe-string)Extra content to append to the configuration as-is.
- Variável: network-manager-service-type
This is the service type for the NetworkManager service. The value for this service type is a
network-manager-configurationrecord.This service is part of
%desktop-services(veja Serviços de desktop).
- Tipo de dados: network-manager-configuration
Data type representing the configuration of NetworkManager.
network-manager(default:network-manager)The NetworkManager package to use.
shepherd-requirement(default:'(wpa-supplicant))This option can be used to provide a list of symbols naming Shepherd services that this service will depend on, such as
'wpa-supplicantor'iwdif you require authenticated access for encrypted WiFi or Ethernet networks.dns(default:"default")Processing mode for DNS, which affects how NetworkManager uses the
resolv.confconfiguration file.- ‘default’
NetworkManager will update
resolv.confto reflect the nameservers provided by currently active connections.- ‘dnsmasq’
NetworkManager will run
dnsmasqas a local caching nameserver, using a conditional forwarding configuration if you are connected to a VPN, and then updateresolv.confto point to the local nameserver.With this setting, you can share your network connection. For example when you want to share your network connection to another laptop via an Ethernet cable, you can open
nm-connection-editorand configure the Wired connection’s method for IPv4 and IPv6 to be “Shared to other computers” and reestablish the connection (or reboot).You can also set up a host-to-guest connection to QEMU VMs (veja Instalando Guix em uma Máquina Virtual). With a host-to-guest connection, you can e.g. access a Web server running on the VM (veja Serviços web) from a Web browser on your host system, or connect to the VM via SSH (veja
openssh-service-type). To set up a host-to-guest connection, run this command once:nmcli connection add type tun \ connection.interface-name tap0 \ tun.mode tap tun.owner $(id -u) \ ipv4.method shared \ ipv4.addresses 172.28.112.1/24
Then each time you launch your QEMU VM (veja Usando o Guix em uma Máquina Virtual), pass -nic tap,ifname=tap0,script=no,downscript=no to
qemu-system-....- ‘none’
NetworkManager will not modify
resolv.conf.
vpn-plugins(default:'())This is the list of available plugins for virtual private networks (VPNs). An example of this is the
network-manager-openvpnpackage, which allows NetworkManager to manage VPNs via OpenVPN.extra-configuration-files(default:'())A list of two-element lists; the first element of each list is a file name (as a string), and the second is a file-like object. Used to specify configuration files which will be added to the /etc/NetworkManager/conf.d. NetworkManager will read additional configuration from this directory. For details on configuration file precedence and the configuration file format, see ‘man 5 NetworkManager.conf’.
For example, to add two files named 001-basic.conf and 002-unmanaged.conf:
(service network-manager-service-type (network-manager-configuration (extra-configuration-files `(("001-basic.conf" ,(local-file "basic.conf")) ("002-unmanaged.conf" ,(plain-file "constructed-unmanaged.conf" "\ [keyfile] unmanaged-devices=interface-name:wlo1_ap\n"))))))
- Variável: connman-service-type
This is the service type to run Connman, a network connection manager.
Its value must be a
connman-configurationrecord as in this example:(service connman-service-type (connman-configuration (disable-vpn? #t)))See below for details about
connman-configuration.
- Tipo de dados: connman-configuration
Data Type representing the configuration of connman.
connman(default: connman)The connman package to use.
shepherd-requirement(default:'())This option can be used to provide a list of symbols naming Shepherd services that this service will depend on, such as
'wpa-supplicantor'iwdif you require authenticated access for encrypted WiFi or Ethernet networks.disable-vpn?(default:#f)When true, disable connman’s vpn plugin.
general-configuration(default:(connman-general-configuration))Configuration serialized to main.conf and passed as --config to
connmand.
- Tipo de dados: connman-general-configuration
Available
connman-general-configurationfields are:input-request-timeout(type: maybe-number)Set input request timeout. Default is 120 seconds. The request for inputs like passphrase will timeout after certain amount of time. Use this setting to increase the value in case of different user interface designs.
browser-launch-timeout(type: maybe-number)Set browser launch timeout. Default is 300 seconds. The request for launching a browser for portal pages will timeout after certain amount of time. Use this setting to increase the value in case of different user interface designs.
background-scanning?(type: maybe-boolean)Enable background scanning. Default is true. If wifi is disconnected, the background scanning will follow a simple back off mechanism from 3s up to 5 minutes. Then, it will stay in 5 minutes unless user specifically asks for scanning through a D-Bus call. If so, the mechanism will start again from 3s. This feature activates also the background scanning while being connected, which is required for roaming on wifi. When
background-scanning?is false, ConnMan will not perform any scan regardless of wifi is connected or not, unless it is requested by the user through a D-Bus call.use-gateways-as-timeservers?(type: maybe-boolean)Assume that service gateways also function as timeservers. Default is false.
fallback-timeservers(type: maybe-list)List of Fallback timeservers. These timeservers are used for NTP sync when there are no timeservers set by the user or by the service, and when
use-gateways-as-timeservers?is#f. These can contain a mixed combination of fully qualified domain names, IPv4 and IPv6 addresses.fallback-nameservers(type: maybe-list)List of fallback nameservers appended to the list of nameservers given by the service. The nameserver entries must be in numeric format, host names are ignored.
default-auto-connect-technologies(type: maybe-list)List of technologies that are marked autoconnectable by default. The default value for this entry when empty is
"ethernet","wifi","cellular". Services that are automatically connected must have been set up and saved to storage beforehand.default-favourite-technologies(type: maybe-list)List of technologies that are marked favorite by default. The default value for this entry when empty is
"ethernet". Connects to services from this technology even if not setup and saved to storage.always-connected-technologies(type: maybe-list)List of technologies which are always connected regardless of preferred-technologies setting (
auto-connect?#t). The default value is empty and this feature is disabled unless explicitly enabled.preferred-technologies(type: maybe-list)List of preferred technologies from the most preferred one to the least preferred one. Services of the listed technology type will be tried one by one in the order given, until one of them gets connected or they are all tried. A service of a preferred technology type in state ’ready’ will get the default route when compared to another preferred type further down the list with state ’ready’ or with a non-preferred type; a service of a preferred technology type in state ’online’ will get the default route when compared to either a non-preferred type or a preferred type further down in the list.
network-interface-blacklist(type: maybe-list)List of blacklisted network interfaces. Found interfaces will be compared to the list and will not be handled by ConnMan, if their first characters match any of the list entries. Default value is
"vmnet","vboxnet","virbr","ifb".allow-hostname-updates?(type: maybe-boolean)Allow ConnMan to change the system hostname. This can happen for example if we receive DHCP hostname option. Default value is
#t.allow-domainname-updates?(type: maybe-boolean)Allow connman to change the system domainname. This can happen for example if we receive DHCP domainname option. Default value is
#t.single-connected-technology?(type: maybe-boolean)Keep only a single connected technology at any time. When a new service is connected by the user or a better one is found according to preferred-technologies, the new service is kept connected and all the other previously connected services are disconnected. With this setting it does not matter whether the previously connected services are in ’online’ or ’ready’ states, the newly connected service is the only one that will be kept connected. A service connected by the user will be used until going out of network coverage. With this setting enabled applications will notice more network breaks than normal. Note this options can’t be used with VPNs. Default value is
#f.tethering-technologies(type: maybe-list)List of technologies that are allowed to enable tethering. The default value is
"wifi","bluetooth","gadget". Only those technologies listed here are used for tethering. If one wants to tether ethernet, then add"ethernet"in the list. Note that if ethernet tethering is enabled, then a DHCP server is started on all ethernet interfaces. Tethered ethernet should never be connected to corporate or home network as it will disrupt normal operation of these networks. Due to this ethernet is not tethered by default. Do not activate ethernet tethering unless you really know what you are doing.persistent-tethering-mode?(type: maybe-boolean)Restore earlier tethering status when returning from offline mode, re-enabling a technology, and after restarts and reboots. Default value is
#f.enable-6to4?(type: maybe-boolean)Automatically enable anycast 6to4 if possible. This is not recommended, as the use of 6to4 will generally lead to a severe degradation of connection quality. See RFC6343. Default value is
#f(as recommended by RFC6343 section 4.1).vendor-class-id(type: maybe-string)Set DHCP option 60 (Vendor Class ID) to the given string. This option can be used by DHCP servers to identify specific clients without having to rely on MAC address ranges, etc.
enable-online-check?(type: maybe-boolean)Enable or disable use of HTTP GET as an online status check. When a service is in a READY state, and is selected as default, ConnMan will issue an HTTP GET request to verify that end-to-end connectivity is successful. Only then the service will be transitioned to ONLINE state. If this setting is false, the default service will remain in READY state. Default value is
#t.online-check-ipv4-url(type: maybe-string)IPv4 URL used during the online status check. Please refer to the README for more detailed information. Default value is http://ipv4.connman.net/online/status.html.
online-check-ipv6-url(type: maybe-string)IPv6 URL used during the online status check. Please refer to the README for more detailed information. Default value is http://ipv6.connman.net/online/status.html.
online-check-initial-interval(type: maybe-number)Range of intervals between two online check requests. Please refer to the README for more detailed information. Default value is ‘1’.
online-check-max-interval(type: maybe-number)Range of intervals between two online check requests. Please refer to the README for more detailed information. Default value is ‘1’.
enable-online-to-ready-transition?(type: maybe-boolean)WARNING: This is an experimental feature. In addition to
enable-online-checksetting, enable or disable use of HTTP GET to detect the loss of end-to-end connectivity. If this setting is#f, when the default service transitions to ONLINE state, the HTTP GET request is no more called until next cycle, initiated by a transition of the default service to DISCONNECT state. If this setting is#t, the HTTP GET request keeps being called to guarantee that end-to-end connectivity is still successful. If not, the default service will transition to READY state, enabling another service to become the default one, in replacement. Default value is#f.auto-connect-roaming-services?(type: maybe-boolean)Automatically connect roaming services. This is not recommended unless you know you won’t have any billing problem. Default value is
#f.address-conflict-detection?(type: maybe-boolean)Enable or disable the implementation of IPv4 address conflict detection according to RFC5227. ConnMan will send probe ARP packets to see if an IPv4 address is already in use before assigning the address to an interface. If an address conflict occurs for a statically configured address, an IPv4LL address will be chosen instead (according to RFC3927). If an address conflict occurs for an address offered via DHCP, ConnMan sends a DHCP DECLINE once and for the second conflict resorts to finding an IPv4LL address. Default value is
#f.localtime(type: maybe-string)Path to localtime file. Defaults to /etc/localtime.
regulatory-domain-follows-timezone?(type: maybe-boolean)Enable regulatory domain to be changed along timezone changes. With this option set to true each time the timezone changes the first present ISO3166 country code is read from /usr/share/zoneinfo/zone1970.tab and set as regulatory domain value. Default value is
#f.resolv-conf(type: maybe-string)Path to resolv.conf file. If the file does not exist, but intermediate directories exist, it will be created. If this option is not set, it tries to write into /var/run/connman/resolv.conf if it fails (/var/run/connman does not exist or is not writeable). If you do not want to update resolv.conf, you can set /dev/null.
- Variável: wpa-supplicant-service-type
This is the service type to run WPA supplicant, an authentication daemon required to authenticate against encrypted WiFi or ethernet networks.
- Tipo de dados: wpa-supplicant-configuration
Data type representing the configuration of WPA Supplicant.
It takes the following parameters:
wpa-supplicant(default:wpa-supplicant)The WPA Supplicant package to use.
requirement(default:'(user-processes loopback syslogd)List of services that should be started before WPA Supplicant starts.
dbus?(padrão:#t)Whether to listen for requests on D-Bus.
pid-file(default:"/var/run/wpa_supplicant.pid")Where to store the PID file.
interface(default:#f)If this is set, it must specify the name of a network interface that WPA supplicant will control.
config-file(default:#f)Optional configuration file to use.
extra-options(default:'())List of additional command-line arguments to pass to the daemon.
Some networking devices such as modems require special care, and this is what the services below focus on.
- Variável: modem-manager-service-type
This is the service type for the ModemManager service. The value for this service type is a
modem-manager-configurationrecord.This service is part of
%desktop-services(veja Serviços de desktop).
- Tipo de dados: modem-manager-configuration
Data type representing the configuration of ModemManager.
modem-manager(default:modem-manager)The ModemManager package to use.
- Variável: usb-modeswitch-service-type
This is the service type for the USB_ModeSwitch service. The value for this service type is a
usb-modeswitch-configurationrecord.When plugged in, some USB modems (and other USB devices) initially present themselves as a read-only storage medium and not as a modem. They need to be modeswitched before they are usable. The USB_ModeSwitch service type installs udev rules to automatically modeswitch these devices when they are plugged in.
This service is part of
%desktop-services(veja Serviços de desktop).
- Tipo de dados: usb-modeswitch-configuration
Data type representing the configuration of USB_ModeSwitch.
usb-modeswitch(default:usb-modeswitch)The USB_ModeSwitch package providing the binaries for modeswitching.
usb-modeswitch-data(default:usb-modeswitch-data)The package providing the device data and udev rules file used by USB_ModeSwitch.
config-file(default:#~(string-append #$usb-modeswitch:dispatcher "/etc/usb_modeswitch.conf"))Which config file to use for the USB_ModeSwitch dispatcher. By default the config file shipped with USB_ModeSwitch is used which disables logging to /var/log among other default settings. If set to
#f, no config file is used.
Próximo: Atualizações sem supervisão, Anterior: Networking Setup, Acima: Serviços [Conteúdo][Índice]
11.10.5 Serviços de Rede
The (gnu services networking) module discussed in the previous
section provides services for more advanced setups: providing a DHCP service
for others to use, filtering packets with iptables or nftables, running a
WiFi access point with hostapd, running the inetd
“superdaemon”, and more. This section describes those.
- Variável: dhcpd-service-type
This type defines a service that runs a DHCP daemon. To create a service of this type, you must supply a
<dhcpd-configuration>. For example:(service dhcpd-service-type (dhcpd-configuration (config-file (local-file "my-dhcpd.conf")) (interfaces '("enp0s25"))))
- Tipo de dados: dhcpd-configuration
package(default:isc-dhcp)The package that provides the DHCP daemon. This package is expected to provide the daemon at sbin/dhcpd relative to its output directory. The default package is the ISC’s DHCP server.
config-file(default:#f)The configuration file to use. This is required. It will be passed to
dhcpdvia its-cfoption. This may be any “file-like” object (veja file-like objects). Seeman dhcpd.conffor details on the configuration file syntax.version(default:"4")The DHCP version to use. The ISC DHCP server supports the values “4”, “6”, and “4o6”. These correspond to the
dhcpdprogram options-4,-6, and-4o6. Seeman dhcpdfor details.run-directory(default:"/run/dhcpd")The run directory to use. At service activation time, this directory will be created if it does not exist.
pid-file(default:"/run/dhcpd/dhcpd.pid")The PID file to use. This corresponds to the
-pfoption ofdhcpd. Seeman dhcpdfor details.interfaces(default:'())The names of the network interfaces on which dhcpd should listen for broadcasts. If this list is not empty, then its elements (which must be strings) will be appended to the
dhcpdinvocation when starting the daemon. It may not be necessary to explicitly specify any interfaces here; seeman dhcpdfor details.
- Variável: hostapd-service-type
This is the service type to run the hostapd daemon to set up WiFi (IEEE 802.11) access points and authentication servers. Its associated value must be a
hostapd-configurationas shown below:;; Use wlan1 to run the access point for "My Network". (service hostapd-service-type (hostapd-configuration (interface "wlan1") (ssid "My Network") (channel 12)))
- Tipo de dados: hostapd-configuration
This data type represents the configuration of the hostapd service, with the following fields:
package(default:hostapd)The hostapd package to use.
interface(default:"wlan0")The network interface to run the WiFi access point.
ssidThe SSID (service set identifier), a string that identifies this network.
broadcast-ssid?(default:#t)Whether to broadcast this SSID.
channel(default:1)The WiFi channel to use.
driver(default:"nl80211")The driver interface type.
"nl80211"is used with all Linux mac80211 drivers. Use"none"if building hostapd as a standalone RADIUS server that does not control any wireless/wired driver.extra-settings(default:"")Extra settings to append as-is to the hostapd configuration file. See https://w1.fi/cgit/hostap/plain/hostapd/hostapd.conf for the configuration file reference.
- Variável: simulated-wifi-service-type
This is the type of a service to simulate WiFi networking, which can be useful in virtual machines for testing purposes. The service loads the Linux kernel
mac80211_hwsimmodule and starts hostapd to create a pseudo WiFi network that can be seen onwlan0, by default.The service’s value is a
hostapd-configurationrecord.
- Variável: iptables-service-type
This is the service type to set up an iptables configuration. iptables is a packet filtering framework supported by the Linux kernel. This service supports configuring iptables for both IPv4 and IPv6. A simple example configuration rejecting all incoming connections except those to the ssh port 22 is shown below.
(service iptables-service-type (iptables-configuration (ipv4-rules (plain-file "iptables.rules" "*filter :INPUT ACCEPT :FORWARD ACCEPT :OUTPUT ACCEPT -A INPUT -m conntrack --ctstate ESTABLISHED,RELATED -j ACCEPT -A INPUT -p tcp --dport 22 -j ACCEPT -A INPUT -j REJECT --reject-with icmp-port-unreachable COMMIT ")) (ipv6-rules (plain-file "ip6tables.rules" "*filter :INPUT ACCEPT :FORWARD ACCEPT :OUTPUT ACCEPT -A INPUT -m conntrack --ctstate ESTABLISHED,RELATED -j ACCEPT -A INPUT -p tcp --dport 22 -j ACCEPT -A INPUT -j REJECT --reject-with icmp6-port-unreachable COMMIT "))))
- Tipo de dados: iptables-configuration
The data type representing the configuration of iptables.
iptables(default:iptables)The iptables package that provides
iptables-restoreandip6tables-restore.ipv4-rules(default:%iptables-accept-all-rules)The iptables rules to use. It will be passed to
iptables-restore. This may be any “file-like” object (veja file-like objects).ipv6-rules(default:%iptables-accept-all-rules)The ip6tables rules to use. It will be passed to
ip6tables-restore. This may be any “file-like” object (veja file-like objects).
- Variável: nftables-service-type
This is the service type to set up a nftables configuration. nftables is a netfilter project that aims to replace the existing iptables, ip6tables, arptables and ebtables framework. It provides a new packet filtering framework, a new user-space utility
nft, and a compatibility layer for iptables. This service comes with a default ruleset%default-nftables-rulesetthat rejecting all incoming connections except those to the ssh port 22. To use it, simply write:(service nftables-service-type)
- Tipo de dados: nftables-configuration
The data type representing the configuration of nftables.
package(default:nftables)The nftables package that provides
nft.ruleset(default:%default-nftables-ruleset)The nftables ruleset to use. This may be any “file-like” object (veja file-like objects).
- Variável: ntp-service-type
This is the type of the service running the Network Time Protocol (NTP) daemon,
ntpd. The daemon will keep the system clock synchronized with that of the specified NTP servers.The value of this service is an
ntpd-configurationobject, as described below.
- Tipo de dados: ntp-configuration
This is the data type for the NTP service configuration.
servers(default:%ntp-servers)This is the list of servers (
<ntp-server>records) with whichntpdwill be synchronized. See thentp-serverdata type definition below.allow-large-adjustment?(default:#t)This determines whether
ntpdis allowed to make an initial adjustment of more than 1,000 seconds.ntp(default:ntp)The NTP package to use.
- Variável: %ntp-servers
List of host names used as the default NTP servers. These are servers of the NTP Pool Project.
- Tipo de dados: ntp-server
The data type representing the configuration of a NTP server.
type(default:'server)The type of the NTP server, given as a symbol. One of
'pool,'server,'peer,'broadcastor'manycastclient.addressThe address of the server, as a string.
optionsNTPD options to use with that specific server, given as a list of option names and/or of option names and values tuples. The following example define a server to use with the options iburst and prefer, as well as version 3 and a maxpoll time of 16 seconds.
(ntp-server (type 'server) (address "some.ntp.server.org") (options `(iburst (version 3) (maxpoll 16) prefer))))
- Variável: openntpd-service-type
Run the
ntpd, the Network Time Protocol (NTP) daemon, as implemented by OpenNTPD. The daemon will keep the system clock synchronized with that of the given servers.(service openntpd-service-type (openntpd-configuration (listen-on '("127.0.0.1" "::1")) (sensor '("udcf0 correction 70000")) (constraint-from '("www.gnu.org")) (constraints-from '("https://www.google.com/"))))
- Variável: %openntpd-servers
This variable is a list of the server addresses defined in
%ntp-servers.
- Tipo de dados: openntpd-configuration
openntpd(default:openntpd)The openntpd package to use.
listen-on(default:'("127.0.0.1" "::1"))A list of local IP addresses or hostnames the ntpd daemon should listen on.
query-from(default:'())A list of local IP address the ntpd daemon should use for outgoing queries.
sensor(default:'())Specify a list of timedelta sensor devices ntpd should use.
ntpdwill listen to each sensor that actually exists and ignore non-existent ones. See upstream documentation for more information.server(default:'())Specify a list of IP addresses or hostnames of NTP servers to synchronize to.
servers(default:%openntp-servers)Specify a list of IP addresses or hostnames of NTP pools to synchronize to.
constraint-from(default:'())ntpdcan be configured to query the ‘Date’ from trusted HTTPS servers via TLS. This time information is not used for precision but acts as an authenticated constraint, thereby reducing the impact of unauthenticated NTP man-in-the-middle attacks. Specify a list of URLs, IP addresses or hostnames of HTTPS servers to provide a constraint.constraints-from(default:'())As with constraint from, specify a list of URLs, IP addresses or hostnames of HTTPS servers to provide a constraint. Should the hostname resolve to multiple IP addresses,
ntpdwill calculate a median constraint from all of them.
- Variável: inetd-service-type
This service runs the
inetd(veja inetd invocation em GNU Inetutils) daemon.inetdlistens for connections on internet sockets, and lazily starts the specified server program when a connection is made on one of these sockets.The value of this service is an
inetd-configurationobject. The following example configures theinetddaemon to provide the built-inechoservice, as well as an smtp service which forwards smtp traffic over ssh to a serversmtp-serverbehind a gatewayhostname:(service inetd-service-type (inetd-configuration (entries (list (inetd-entry (name "echo") (socket-type 'stream) (protocol "tcp") (wait? #f) (user "root")) (inetd-entry (node "127.0.0.1") (name "smtp") (socket-type 'stream) (protocol "tcp") (wait? #f) (user "root") (program (file-append openssh "/bin/ssh")) (arguments '("ssh" "-qT" "-i" "/path/to/ssh_key" "-W" "smtp-server:25" "user@hostname")))))))See below for more details about
inetd-configuration.
- Tipo de dados: inetd-configuration
Data type representing the configuration of
inetd.program(default:(file-append inetutils "/libexec/inetd"))The
inetdexecutable to use.entries(default:'())A list of
inetdservice entries. Each entry should be created by theinetd-entryconstructor.
- Tipo de dados: inetd-entry
Data type representing an entry in the
inetdconfiguration. Each entry corresponds to a socket whereinetdwill listen for requests.node(default:#f)Optional string, a comma-separated list of local addresses
inetdshould use when listening for this service. Veja Configuration file em GNU Inetutils for a complete description of all options.nameA string, the name must correspond to an entry in
/etc/services.socket-typeOne of
'stream,'dgram,'raw,'rdmor'seqpacket.protocolA string, must correspond to an entry in
/etc/protocols.wait?(padrão:#t)Whether
inetdshould wait for the server to exit before listening to new service requests.userA string containing the user (and, optionally, group) name of the user as whom the server should run. The group name can be specified in a suffix, separated by a colon or period, i.e.
"user","user:group"or"user.group".program(default:"internal")The server program which will serve the requests, or
"internal"ifinetdshould use a built-in service.arguments(padrão:'())A list strings or file-like objects, which are the server program’s arguments, starting with the zeroth argument, i.e. the name of the program itself. For
inetd’s internal services, this entry must be'()or'("internal").
Veja Configuration file em GNU Inetutils for a more detailed discussion of each configuration field.
- Variável: opendht-service-type
This is the type of the service running a OpenDHT node,
dhtnode. The daemon can be used to host your own proxy service to the distributed hash table (DHT), for example to connect to with Jami, among other applications.Importante: When using the OpenDHT proxy server, the IP addresses it “sees” from the clients should be addresses reachable from other peers. In practice this means that a publicly reachable address is best suited for a proxy server, outside of your private network. For example, hosting the proxy server on a IPv4 private local network and exposing it via port forwarding could work for external peers, but peers local to the proxy would have their private addresses shared with the external peers, leading to connectivity problems.
The value of this service is a
opendht-configurationobject, as described below.
- Tipo de dados: opendht-configuration
Available
opendht-configurationfields are:opendht(default:opendht) (type: file-like)The
opendhtpackage to use.peer-discovery?(default:#f) (type: boolean)Whether to enable the multicast local peer discovery mechanism.
enable-logging?(default:#f) (type: boolean)Whether to enable logging messages to syslog. It is disabled by default as it is rather verbose.
debug?(default:#f) (type: boolean)Whether to enable debug-level logging messages. This has no effect if logging is disabled.
bootstrap-host(default:"bootstrap.jami.net:4222") (type: maybe-string)The node host name that is used to make the first connection to the network. A specific port value can be provided by appending the
:PORTsuffix. By default, it uses the Jami bootstrap nodes, but any host can be specified here. It’s also possible to disable bootstrapping by explicitly setting this field to the%unset-valuevalue.port(default:4222) (type: maybe-number)The UDP port to bind to. When left unspecified, an available port is automatically selected.
proxy-server-port(type: maybe-number)Spawn a proxy server listening on the specified port.
proxy-server-port-tls(type: maybe-number)Spawn a proxy server listening to TLS connections on the specified port.
- Variável: tor-service-type
Type for a service that runs the Tor anonymous networking daemon. The service is configured using a
<tor-configuration>record. By default, the Tor daemon runs as thetorunprivileged user, which is a member of thetorgroup.Services of this type can be extended by other services to specify onion services (in addition to those already specified in
tor-configuration) as in this example:(simple-service 'my-extra-onion-service tor-service-type (list (tor-onion-service-configuration (name "extra-onion-service") (mapping '((80 . "127.0.0.1:8080"))))))
- Tipo de dados: tor-configuration
tor(default:tor)The package that provides the Tor daemon. This package is expected to provide the daemon at bin/tor relative to its output directory. The default package is the Tor Project’s implementation.
config-file(default:(plain-file "empty" ""))The configuration file to use. It will be appended to a default configuration file, and the final configuration file will be passed to
torvia its-foption. This may be any “file-like” object (veja file-like objects). Seeman torfor details on the configuration file syntax.hidden-services(default:'())The list of
<tor-onion-service-configuration>records to use. For any onion service you include in this list, appropriate configuration to enable the onion service will be automatically added to the default configuration file.socks-socket-type(default:'tcp)The default socket type that Tor should use for its SOCKS socket. This must be either
'tcpor'unix. If it is'tcp, then by default Tor will listen on TCP port 9050 on the loopback interface (i.e., localhost). If it is'unix, then Tor will listen on the UNIX domain socket /var/run/tor/socks-sock, which will be made writable by members of thetorgroup.If you want to customize the SOCKS socket in more detail, leave
socks-socket-typeat its default value of'tcpand useconfig-fileto override the default by providing your ownSocksPortoption.control-socket?(default:#f)Whether or not to provide a “control socket” by which Tor can be controlled to, for instance, dynamically instantiate tor onion services. If
#t, Tor will listen for control commands on the UNIX domain socket /var/run/tor/control-sock, which will be made writable by members of thetorgroup.transport-plugins(default:'())The list of
<tor-transport-plugin>records to use. For any transport plugin you include in this list, appropriate configuration line to enable transport plugin will be automatically added to the default configuration file.
- Tipo de dados: tor-onion-service-configuration
Data Type representing a Tor Onion Service configuration. See the Tor project’s documentation for more information. Available
tor-onion-service-configurationfields are:name(type: string)Name for this Onion Service. This creates a /var/lib/tor/hidden-services/name directory, where the hostname file contains the ‘
.onion’ host name for this Onion Service.mapping(type: alist)Association list of port to address mappings. The following example:
'((22 . "127.0.0.1:22") (80 . "127.0.0.1:8080"))
maps ports 22 and 80 of the Onion Service to the local ports 22 and 8080.
- Tipo de dados: tor-transport-plugin
Data type representing a Tor pluggable transport plugin in
tor-configuration. Plugguble transports are programs that disguise Tor traffic, which can be useful in case Tor is censored. See the the Tor project’s documentation and specification for more information.Each transport plugin corresponds either to
ClientTransportPlugin ...or toServerTransportPlugin ...line in the default configuration file, seeman tor. Availabletor-transport-pluginfields are:role(default:'client)This must be either
'clientor'server. Otherwise, an error is raised. Set the'servervalue if you want to run a bridge to help censored users connect to the Tor network, see the Tor project’s brige guide. Set the'clientvalue if you want to connect to somebody else’s bridge, see the Tor project’s “Get Bridges” page. In both cases the required additional configuration should be provided via#:config-fileoption oftor-configuration.protocol(default:"obfs4")A string that specifies a pluggable transport protocol.
programThis must be a “file-like” object or a string pointing to the pluggable transport plugin executable. This option allows the Tor daemon run inside the container to access the executable and all the references (e.g. package dependencies) attached to it.
Suppose you would like Tor daemon to use obfs4 type obfuscation and to connect to Tor network via obfs4 bridge (a nonpublic Tor relay with support for obfs4 type obfuscation). Then you may go to https://bridges.torproject.org/ and get there a couple of bridge lines (each starts with
obfs4 ...) and use these lines in tor-service-type configuration as follows:(service tor-service-type (tor-configuration (config-file (plain-file "torrc" "\ UseBridges 1 Bridge obfs4 ... Bridge obfs4 ...")) (transport-plugins (list (tor-transport-plugin (program (file-append go-gitlab-torproject-org-tpo-anti-censorship-pluggable-transports-lyrebird "/bin/lyrebird")))))))
The (gnu services rsync) module provides the following services:
You might want an rsync daemon if you have files that you want available so anyone (or just yourself) can download existing files or upload new files.
- Variável: rsync-service-type
This is the service type for the rsync daemon, The value for this service type is a
rsync-configurationrecord as in this example:;; Export two directories over rsync. By default rsync listens on ;; all the network interfaces. (service rsync-service-type (rsync-configuration (modules (list (rsync-module (name "music") (file-name "/srv/zik") (read-only? #f)) (rsync-module (name "movies") (file-name "/home/charlie/movies"))))))
See below for details about
rsync-configuration.
- Tipo de dados: rsync-configuration
Data type representing the configuration for
rsync-service.package(default: rsync)rsyncpackage to use.address(default:#f)IP address on which
rsynclistens for incoming connections. If unspecified, it defaults to listening on all available addresses.port-number(default:873)TCP port on which
rsynclistens for incoming connections. If port is less than1024rsyncneeds to be started as therootuser and group.pid-file(default:"/var/run/rsyncd/rsyncd.pid")Name of the file where
rsyncwrites its PID.lock-file(default:"/var/run/rsyncd/rsyncd.lock")Name of the file where
rsyncwrites its lock file.log-file(default:"/var/log/rsyncd.log")Name of the file where
rsyncwrites its log file.user(default:"root")Owner of the
rsyncprocess.group(default:"root")Group of the
rsyncprocess.uid(default:"rsyncd")User name or user ID that file transfers to and from that module should take place as when the daemon was run as
root.gid(default:"rsyncd")Group name or group ID that will be used when accessing the module.
modules(default:%default-modules)List of “modules”—i.e., directories exported over rsync. Each element must be a
rsync-modulerecord, as described below.
- Tipo de dados: rsync-module
This is the data type for rsync “modules”. A module is a directory exported over the rsync protocol. The available fields are as follows:
nameThe module name. This is the name that shows up in URLs. For example, if the module is called
music, the corresponding URL will bersync://host.example.org/music.file-nameName of the directory being exported.
comment(default:"")Comment associated with the module. Client user interfaces may display it when they obtain the list of available modules.
read-only?(default:#t)Whether or not client will be able to upload files. If this is false, the uploads will be authorized if permissions on the daemon side permit it.
chroot?(default:#t)When this is true, the rsync daemon changes root to the module’s directory before starting file transfers with the client. This improves security, but requires rsync to run as root.
timeout(default:300)Idle time in seconds after which the daemon closes a connection with the client.
The (gnu services syncthing) module provides the following services:
You might want a Syncthing daemon if you have files between two or more computers and want to sync them in real time, safely protected from prying eyes.
- Variável: syncthing-service-type
This is the service type for the syncthing daemon, The value for this service type is a
syncthing-configurationrecord as in this example:(service syncthing-service-type (syncthing-configuration (user "alice")))Nota: This service is also available for Guix Home, where it runs directly with your user privileges (veja
home-syncthing-service-type).See below for details about
syncthing-configuration.
- Tipo de dados: syncthing-configuration
Data type representing the configuration for
syncthing-service-type.syncthing(default: syncthing)syncthingpackage to use.arguments(default: ’())List of command-line arguments passing to
syncthingbinary.logflags(default: 0)Sum of logging flags, see Syncthing documentation logflags.
user(default: #f)The user as which the Syncthing service is to be run. This assumes that the specified user exists.
group(default: "users")The group as which the Syncthing service is to be run. This assumes that the specified group exists.
home(default: #f)Sets the
HOMEvariable for the Syncthing daemon. The default is $HOME of the specified Syncthinguser.config-file(default: #f)Either a file-like object that resolves to a Syncthing configuration XML file, or a
syncthing-config-filerecord (see below). If set to#f, Guix will not try to generate a config file, and Syncthing will generate a default configuration which will not be touched on reconfigure. Specifying this in a system service moves Syncthing’s common configuration and data directory (--homein https://docs.syncthing.net/users/syncthing.html) to /var/lib/syncthing-<user>.
This section documents a subset of the Syncthing configuration
options—specifically those related to Guix or those affecting how your
computer will connect to other computers over the network (such as Syncthing
relays or discovery servers). The configuration is fully documented in the
upstream Syncthing
config documentation; camelCase there is converted to kebab-case here. If
you are migrating from a Syncthing-managed configuration to one managed by
Guix, you can check what changes were introduced by diffing the
respective config.xml files. Note that you will need to add
whitespace with 4-space indentation to the file generated by Guix, using the
xmllint program from the libxml2 package like so:
XMLLINT_INDENT=" " xmllint --format /path/to/new/config.xml | diff /path/to/old/config.xml -
When generating a configuration file through Guix, you can still temporarily
modify Syncthing from the GUI or through introducer and
autoAcceptFolders mechanisms, but such changes will be reset on
reconfigure.
- Data Type: syncthing-config-file
Data type representing the configuration file read by the Syncthing daemon.
folders(default: (list (syncthing-folder (id "default") (label "Default Folder") (path "~/Sync")))The default here is the same as Syncthing’s default. The value should be a list of
syncthing-folders.devices(default: ’()This should be a list of
syncthing-devices. Guix will automatically add any devices specified in any ‘folders’ to this list. There are instances when you want to connect to a device despite not (initially) sharing any folders (such as a device with autoAcceptFolders). In such instances, you should specify those devices here. If multiple versions of the same device (as determined by comparing device ID) are discovered, the one in this list is prioritized. Otherwise, the first instance in the first folder is used.gui-enabled(default: "true")By default, any user on the computer can access the GUI and make changes to Syncthing. If you leave this enabled, you should probably set
gui-userandgui-password(see below).gui-tls(default: "false")gui-debugging(default: "false")gui-send-basic-auth-prompt(default: "false")gui-address(default: "127.0.0.1:8384")gui-user(default: #f)gui-password(default: #f)A bcrypt hash of the GUI password. Remember that this will be globally exposed in /gnu/store.
gui-apikey(default: #f)You must specify this to use the Syncthing REST interface. This key is kept in /gnu/store and is accessible to all users of the system.
gui-theme(default: "default")ldap-enabled(default: #f)ldap-address(default: "")ldap-bind-dn(default: "")ldap-transport(default: "")ldap-insecure-skip-verify(default: "")ldap-search-base-dn(default: "")ldap-search-filter(default: "")listen-address(default: "default")global-announce-server(default: "default")global-announce-enabled(default: "true")Global discovery servers can be used to help connect devices at unknown IP addresses by storing the last known IP address.
local-announce-enabled(default: "true")This makes devices find each other very easily on the same LAN. Often, this will allow you to just plug an Ethernet between two devices, or connect one device to the other’s hotspot and start syncing.
local-announce-port(default: "21027")local-announce-mcaddr(default: "[ff12::8384]:21027")max-send-kbps(default: "0")max-recv-kbps(default: "0")reconnection-interval-s(default: "60")relays-enabled(default: "true")This option allows your Syncthing instance to use a global network of relays to enable syncing between devices when all other methods fail. As always, Syncthing traffic is encrypted in transport and the relays are unable to decrypt it.
relay-reconnect-interval-m(default: "10")start-browser(default: "true")nat-enabled(default: "true")nat-lease-minutes(default: "60")nat-renewal-minutes(default: "30")nat-timeout-seconds(default: "10")ur-accepted(default: "0")Options whose names begin with ‘ur-’ control usage reporting. Set to -1 to disable, or to a positive value to enable. The default (0) disables reporting, but causes a usage reporting consent prompt to be displayed in the Syncthing GUI.
ur-seen(default: "0")ur-unique-id(default: "")ur-url(default: "https://data.syncthing.net/newdata")ur-post-insecurely(default: "false")ur-initial-delay-s(default: "1800")auto-upgrade-interval-h(default: "12")upgrade-to-pre-releases(default: "false")keep-temporaries-h(default: "24")cache-ignored-files(default: "false")progress-update-interval-s(default: "5")limit-bandwidth-in-lan(default: "false")min-home-disk-free-unit(default: "%")min-home-disk-free(default: "1")releases-url(default: "https://upgrades.syncthing.net/meta.json")overwrite-remote-device-names-on-connect(default: "false")temp-index-min-blocks(default: "10")unacked-notification-id(default: "authenticationUserAndPassword")traffic-class(default: "0")set-low-priority(default: "true")max-folder-concurrency(default: "0")crash-reporting-url(default: "https://crash.syncthing.net/newcrash")crash-reporting-enabled(default: "true")stun-keepalive-start-s(default: "180")stun-keepalive-min-s(default: "20")stun-server(default: "default")database-tuning(default: "auto")max-concurrent-incoming-request-kib(default: "0")announce-lan-addresses(default: "true")send-full-index-on-upgrade(default: "false")connection-limit-enough(default: "0")connection-limit-max(default: "0")insecure-allow-old-tls-versions(default: "false")connection-priority-tcp-lan(default: "10")connection-priority-quic-lan(default: "20")connection-priority-tcp-wan(default: "30")connection-priority-quic-wan(default: "40")connection-priority-relay(default: "50")connection-priority-upgrade-threshold(default: "0")default-folder(default: (syncthing-folder (label "")))default-device(default: (syncthing-device (id "")))default-ignores(default: ""))Options whose names begin with ‘default-’ above do not affect folders and devices added through the Guix configuration interface. They will, however, affect folders and devices that are added through the Syncthing GUI, by an
introducer, or a device withauto-accept-folders.
- Data Type: syncthing-folder
Data type representing a folder to be synchronized.
id(default: #f)This ID cannot match the ID of any other folder on this device. If left unspecified, it will default to the label (see below).
labelA human readable label for the folder.
pathThe path at which to store this folder.
type(default: "sendreceive")rescan-interval-s(default: "3600")fs-watcher-enabled(default: "true")fs-watcher-delay-s(default: "10")ignore-perms(default: "false")auto-normalize(default: "true")devices(default: ’())This should be a list of other Syncthing devices. You do not need to specify the current device. Each device can be listed as a a
syncthing-devicerecord or asyncthing-folder-devicerecord if you want files to be encrypted on disk. See below.filesystem-type(default: "basic")min-disk-free-unit(default: "%")min-disk-free(default: "1")versioning-type(default: #f)versioning-fs-path(default: "")versioning-fs-type(default: "basic")versioning-cleanup-interval-s(default: "3600")versioning-cleanout-days(default: #f)versioning-keep(default: #f)versioning-max-age(default: #f)versioning-command(default: #f)copiers(default: "0")puller-max-pending-kib(default: "0")hashers(default: "0")order(default: "random")ignore-delete(default: "false")scan-progress-interval-s(default: "0")puller-pause-s(default: "0")max-conflicts(default: "10")disable-sparse-files(default: "false")disable-temp-indexes(default: "false")paused(default: "false")weak-hash-threshold-pct(default: "25")marker-name(default: ".stfolder")copy-ownership-from-parent(default: "false")mod-time-window-s(default: "0")max-concurrent-writes(default: "2")disable-fsync(default: "false")block-pull-order(default: "standard")copy-range-method(default: "standard")case-sensitive-fs(default: "false")junctions-as-dirs(default: "false")sync-ownership(default: "false")send-ownership(default: "false")sync-xattrs(default: "false")send-xattrs(default: "false")xattr-filter-max-single-entry-size(default: "1024")xattr-filter-max-total-size(default: "4096"))
- Data Type: syncthing-device
Data type representing a device to synchronize folders with.
idA long hash representing the keys generated by Syncthing on the first launch. You can obtain this from the Syncthing GUI or by inspecting an existing Syncthing configuration file.
name(default: "")A human readable device name for viewing in the GUI or in Scheme.
compression(default: "metadata")introducer(default: "false")skip-introduction-removals(default: "false")introduced-by(default: "")addresses(default: ’("dynamic"))List of addresses at which to search for this device. When the special value “dynamic” is included, Syncthing will search for the device locally as well as via the Syncthing project’s global discovery servers.
paused(default: "false")auto-accept-folders(default: "false")max-send-kbps(default: "0")max-recv-kbps(default: "0")max-request-kib(default: "0")untrusted(default: "false")remote-gui-port(default: "0")num-connections(default: "0"))
- Data Type: syncthing-folder-device
This data type offers two folder-specific device options:
introduced-byandencryption-password.syncthing-folder-devicecorresponds to the ‘device’ option in the upstream ‘folder’ element.If you don’t need to use these options, then you can just use
syncthing-deviceinstead ofsyncthing-folder-devicein thedevicesfield of asyncthing-folderinstance.deviceThe
syncthing-devicefor which this configuration applies.introduced-by(default: "")The name of the device that "introduced" our device to the device sharing this folder. This is only used when "introduced" devices are removed by the introducer. See Syncthing introductions.
encryption-password(default: "")The password used to encrypt data that is synchronized to untrusted devices.
Beware: specifying this field will include this password as plain text (not encrypted) and globally visible in /gnu/store/. If the encryption-password is non-empty, then it will be used as a password to encrypt file chunks as they are synchronized to untrusted devices. For more information on syncing to devices you don’t totally trust, see Syncthing’s documentation on Untrusted (Encrypted) Devices. Note that data transfer is always encrypted while in transport ("end-to-end encryption"), regardless of this setting.
Here is a more complex example configuration for illustrative purposes:
(service syncthing-service-type
(let ((laptop (syncthing-device (id "VHOD2D6-...-7XRMDEN")))
(desktop (syncthing-device (id "64SAZ37-...-FZJ5GUA")
(addresses '("tcp://example.com"))))
(bob-desktop (syncthing-device (id "KYIMEGO-...-FT77EAO"))))
(syncthing-configuration
(user "alice")
(config-file
(syncthing-config-file
(folders (list (syncthing-folder
(label "some-files")
(path "~/data")
(devices (list desktop laptop)))
(syncthing-folder
(label "critical-files")
(path "~/secrets")
(devices
(list desktop
laptop
(syncthing-folder-device
(device bob-desktop)
(encryption-password "mypassword"))))))))))))
Furthermore, (gnu services ssh) provides the following services.
- Variável: lsh-service-type
Type of the service that runs the GNU lsh secure shell (SSH) daemon,
lshd. The value for this service is a<lsh-configuration>object.
- Tipo de dados: lsh-configuration
Data type representing the configuration of
lshd.lsh(default:lsh) (type: file-like)The package object of the GNU lsh secure shell (SSH) daemon.
daemonic?(default:#t) (type: boolean)Whether to detach from the controlling terminal.
host-key(default:"/etc/lsh/host-key") (type: string)File containing the host key. This file must be readable by root only.
interfaces(default:'()) (type: list)List of host names or addresses that
lshdwill listen on. If empty,lshdlistens for connections on all the network interfaces.port-number(default:22) (type: integer)Port to listen on.
allow-empty-passwords?(default:#f) (type: boolean)Whether to accept log-ins with empty passwords.
root-login?(default:#f) (type: boolean)Whether to accept log-ins as root.
syslog-output?(default:#t) (type: boolean)Whether to log
lshdstandard output to syslogd. This will make the service depend on the existence of a syslogd service.pid-file?(default:#f) (type: boolean)When
#t,lshdwrites its PID to the file specified in pid-file.pid-file(default:"/var/run/lshd.pid") (type: string)File that
lshdwill write its PID to.x11-forwarding?(default:#t) (type: boolean)Whether to enable X11 forwarding.
tcp/ip-forwarding?(default:#t) (type: boolean)Whether to enable TCP/IP forwarding.
password-authentication?(default:#t) (type: boolean)Whether to accept log-ins using password authentication.
public-key-authentication?(default:#t) (type: boolean)Whether to accept log-ins using public key authentication.
initialize?(default:#t) (type: boolean)When
#f, it is up to the user to initialize the randomness generator (veja lsh-make-seed em LSH Manual), and to create a key pair with the private key stored in file host-key (veja lshd basics em LSH Manual).
- Variável: openssh-service-type
This is the type for the OpenSSH secure shell daemon,
sshd. Its value must be anopenssh-configurationrecord as in this example:(service openssh-service-type (openssh-configuration (x11-forwarding? #t) (permit-root-login 'prohibit-password) (authorized-keys `(("alice" ,(local-file "alice.pub")) ("bob" ,(local-file "bob.pub"))))))See below for details about
openssh-configuration.This service can be extended with extra authorized keys, as in this example:
(service-extension openssh-service-type (const `(("charlie" ,(local-file "charlie.pub")))))
- Tipo de dados: openssh-configuration
This is the configuration record for OpenSSH’s
sshd.openssh(default openssh)The OpenSSH package to use.
pid-file(default:"/var/run/sshd.pid")Name of the file where
sshdwrites its PID.port-number(default:22)TCP port on which
sshdlistens for incoming connections.max-connections(default:200)Hard limit on the maximum number of simultaneous client connections, enforced by the inetd-style Shepherd service (veja
make-inetd-constructorem The GNU Shepherd Manual).permit-root-login(default:#f)This field determines whether and when to allow logins as root. If
#f, root logins are disallowed; if#t, they are allowed. If it’s the symbol'prohibit-password, then root logins are permitted but not with password-based authentication.allow-empty-passwords?(default:#f)When true, users with empty passwords may log in. When false, they may not.
password-authentication?(default:#t)When true, users may log in with their password. When false, they have other authentication methods.
public-key-authentication?(default:#t)When true, users may log in using public key authentication. When false, users have to use other authentication method.
Authorized public keys are stored in ~/.ssh/authorized_keys. This is used only by protocol version 2.
x11-forwarding?(padrão:#f)When true, forwarding of X11 graphical client connections is enabled—in other words,
sshoptions -X and -Y will work.allow-agent-forwarding?(padrão:#t)Whether to allow agent forwarding.
allow-tcp-forwarding?(padrão:#t)Whether to allow TCP forwarding.
gateway-ports?(padrão:#f)Whether to allow gateway ports.
challenge-response-authentication?(default:#f)Specifies whether challenge response authentication is allowed (e.g. via PAM).
use-pam?(default:#t)Enables the Pluggable Authentication Module interface. If set to
#t, this will enable PAM authentication usingchallenge-response-authentication?andpassword-authentication?, in addition to PAM account and session module processing for all authentication types.Because PAM challenge response authentication usually serves an equivalent role to password authentication, you should disable either
challenge-response-authentication?orpassword-authentication?.print-last-log?(default:#t)Specifies whether
sshdshould print the date and time of the last user login when a user logs in interactively.subsystems(default:'(("sftp" "internal-sftp")))Configures external subsystems (e.g. file transfer daemon).
This is a list of two-element lists, each of which containing the subsystem name and a command (with optional arguments) to execute upon subsystem request.
The command
internal-sftpimplements an in-process SFTP server. Alternatively, one can specify thesftp-servercommand:(service openssh-service-type (openssh-configuration (subsystems `(("sftp" ,(file-append openssh "/libexec/sftp-server"))))))accepted-environment(default:'())List of strings describing which environment variables may be exported.
Each string gets on its own line. See the
AcceptEnvoption inman sshd_config.This example allows ssh-clients to export the
COLORTERMvariable. It is set by terminal emulators, which support colors. You can use it in your shell’s resource file to enable colors for the prompt and commands if this variable is set.(service openssh-service-type (openssh-configuration (accepted-environment '("COLORTERM"))))-
This is the list of authorized keys. Each element of the list is a user name followed by one or more file-like objects that represent SSH public keys. For example:
(openssh-configuration (authorized-keys `(("rekado" ,(local-file "rekado.pub")) ("chris" ,(local-file "chris.pub")) ("root" ,(local-file "rekado.pub") ,(local-file "chris.pub")))))registers the specified public keys for user accounts
rekado,chris, androot.Additional authorized keys can be specified via
service-extension.Note that this does not interfere with the use of ~/.ssh/authorized_keys.
generate-host-keys?(default:#t)Whether to generate host key pairs with
ssh-keygen -Aunder /etc/ssh if there are none.Generating key pairs takes a few seconds when enough entropy is available and is only done once. You might want to turn it off for instance in a virtual machine that does not need it because host keys are provided in some other way, and where the extra boot time is a problem.
log-level(default:'info)This is a symbol specifying the logging level:
quiet,fatal,error,info,verbose,debug, etc. See the man page for sshd_config for the full list of level names.extra-content(default:"")This field can be used to append arbitrary text to the configuration file. It is especially useful for elaborate configurations that cannot be expressed otherwise. This configuration, for example, would generally disable root logins, but permit them from one specific IP address:
(openssh-configuration (extra-content "\ Match Address 192.168.0.1 PermitRootLogin yes"))
- Variável: dropbear-service-type
Type of the service that runs the Dropbear SSH daemon, whose value is a
<dropbear-configuration>object.For example, to specify a Dropbear service listening on port 1234:
(service dropbear-service-type (dropbear-configuration (port-number 1234)))
- Tipo de dados: dropbear-configuration
This data type represents the configuration of a Dropbear SSH daemon.
dropbear(default: dropbear)The Dropbear package to use.
port-number(default: 22)The TCP port where the daemon waits for incoming connections.
syslog-output?(padrão:#t)Whether to enable syslog output.
pid-file(default:"/var/run/dropbear.pid")File name of the daemon’s PID file.
root-login?(default:#f)Whether to allow
rootlogins.allow-empty-passwords?(default:#f)Whether to allow empty passwords.
password-authentication?(default:#t)Whether to enable password-based authentication.
- Variável: autossh-service-type
This is the type for the AutoSSH program that runs a copy of
sshand monitors it, restarting it as necessary should it die or stop passing traffic. AutoSSH can be run manually from the command-line by passing arguments to the binaryautosshfrom the packageautossh, but it can also be run as a Guix service. This latter use case is documented here.AutoSSH can be used to forward local traffic to a remote machine using an SSH tunnel, and it respects the ~/.ssh/config of the user it is run as.
For example, to specify a service running autossh as the user
pinoand forwarding all local connections to port8081toremote:8081using an SSH tunnel, add this call to the operating system’sservicesfield:(service autossh-service-type (autossh-configuration (user "pino") (ssh-options (list "-T" "-N" "-L" "8081:localhost:8081" "remote.net"))))
- Tipo de dados: autossh-configuration
This data type represents the configuration of an AutoSSH service.
user(default"autossh")The user as which the AutoSSH service is to be run. This assumes that the specified user exists.
poll(default600)Specifies the connection poll time in seconds.
first-poll(default#f)Specifies how many seconds AutoSSH waits before the first connection test. After this first test, polling is resumed at the pace defined in
poll. When set to#f, the first poll is not treated specially and will also use the connection poll specified inpoll.gate-time(default30)Specifies how many seconds an SSH connection must be active before it is considered successful.
log-level(default1)The log level, corresponding to the levels used by syslog—so
0is the most silent while7is the chattiest.max-start(default#f)The maximum number of times SSH may be (re)started before AutoSSH exits. When set to
#f, no maximum is configured and AutoSSH may restart indefinitely.message(default"")The message to append to the echo message sent when testing connections.
port(padrão"0")The ports used for monitoring the connection. When set to
"0", monitoring is disabled. When set to"n"where n is a positive integer, ports n and n+1 are used for monitoring the connection, such that port n is the base monitoring port andn+1is the echo port. When set to"n:m"where n and m are positive integers, the ports n and m are used for monitoring the connection, such that port n is the base monitoring port and m is the echo port.ssh-options(default'())The list of command-line arguments to pass to
sshwhen it is run. Options -f and -M are reserved for AutoSSH and may cause undefined behaviour.
- Variável: webssh-service-type
This is the type for the WebSSH program that runs a web SSH client. WebSSH can be run manually from the command-line by passing arguments to the binary
wsshfrom the packagewebssh, but it can also be run as a Guix service. This latter use case is documented here.For example, to specify a service running WebSSH on loopback interface on port
8888with reject policy with a list of allowed to connection hosts, and NGINX as a reverse-proxy to this service listening for HTTPS connection, add this call to the operating system’sservicesfield:(service webssh-service-type (webssh-configuration (address "127.0.0.1") (port 8888) (policy 'reject) (known-hosts '("localhost ecdsa-sha2-nistp256 AAAA…" "127.0.0.1 ecdsa-sha2-nistp256 AAAA…")))) (service nginx-service-type (nginx-configuration (server-blocks (list (nginx-server-configuration (inherit %webssh-configuration-nginx) (server-name '("webssh.example.com")) (listen '("443 ssl")) (ssl-certificate (letsencrypt-certificate "webssh.example.com")) (ssl-certificate-key (letsencrypt-key "webssh.example.com")) (locations (cons (nginx-location-configuration (uri "/.well-known") (body '("root /var/www;"))) (nginx-server-configuration-locations %webssh-configuration-nginx))))))))
- Tipo de dados: webssh-configuration
Data type representing the configuration for
webssh-service.package(default: webssh)websshpackage to use.user-name(default: "webssh")User name or user ID that file transfers to and from that module should take place.
group-name(default: "webssh")Group name or group ID that will be used when accessing the module.
address(default: #f)IP address on which
websshlistens for incoming connections.port(padrão: 8888)TCP port on which
websshlistens for incoming connections.policy(default: #f)Connection policy. reject policy requires to specify known-hosts.
known-hosts(default: ’())List of hosts which allowed for SSH connection from
webssh.log-file(default: "/var/log/webssh.log")Name of the file where
websshwrites its log file.log-level(default: #f)Logging level.
- Variável: block-facebook-hosts-service-type
This service type adds a list of known Facebook hosts to the /etc/hosts file. (veja Host Names em The GNU C Library Reference Manual) Each line contains an entry that maps a known server name of the Facebook on-line service—e.g.,
www.facebook.com—to unroutable IPv4 and IPv6 addresses.This mechanism can prevent programs running locally, such as Web browsers, from accessing Facebook.
The (gnu services avahi) provides the following definition.
- Variável: avahi-service-type
This is the service that runs
avahi-daemon, a system-wide mDNS/DNS-SD responder that allows for service discovery and “zero-configuration” host name lookups (see https://avahi.org/). Its value must be anavahi-configurationrecord—see below.This service extends the name service cache daemon (nscd) so that it can resolve
.localhost names using nss-mdns. Veja Name Service Switch, for information on host name resolution.Additionally, add the avahi package to the system profile so that commands such as
avahi-browseare directly usable.
- Tipo de dados: avahi-configuration
Data type representation the configuration for Avahi.
host-name(padrão:#f)If different from
#f, use that as the host name to publish for this machine; otherwise, use the machine’s actual host name.publish?(padrão:#t)When true, allow host names and services to be published (broadcast) over the network.
publish-workstation?(padrão:#t)When true,
avahi-daemonpublishes the machine’s host name and IP address via mDNS on the local network. To view the host names published on your local network, you can run:avahi-browse _workstation._tcp
wide-area?(padrão:#f)When true, DNS-SD over unicast DNS is enabled.
ipv4?(default:#t)ipv6?(default:#t)These fields determine whether to use IPv4/IPv6 sockets.
domains-to-browse(default:'())This is a list of domains to browse.
- Variável: openvswitch-service-type
This is the type of the Open vSwitch service, whose value should be an
openvswitch-configurationobject.
- Tipo de dados: openvswitch-configuration
Data type representing the configuration of Open vSwitch, a multilayer virtual switch which is designed to enable massive network automation through programmatic extension.
package(default: openvswitch)Package object of the Open vSwitch.
- Variável: pagekite-service-type
This is the service type for the PageKite service, a tunneling solution for making localhost servers publicly visible, even from behind restrictive firewalls or NAT without forwarded ports. The value for this service type is a
pagekite-configurationrecord.Here’s an example exposing the local HTTP and SSH daemons:
(service pagekite-service-type (pagekite-configuration (kites '("http:@kitename:localhost:80:@kitesecret" "raw/22:@kitename:localhost:22:@kitesecret")) (extra-file "/etc/pagekite.rc")))
- Tipo de dados: pagekite-configuration
Data type representing the configuration of PageKite.
package(default: pagekite)Package object of PageKite.
kitename(default:#f)PageKite name for authenticating to the frontend server.
kitesecret(default:#f)Shared secret for authenticating to the frontend server. You should probably put this inside
extra-fileinstead.frontend(default:#f)Connect to the named PageKite frontend server instead of the pagekite.net service.
kites(default:'("http:@kitename:localhost:80:@kitesecret"))List of service kites to use. Exposes HTTP on port 80 by default. The format is
proto:kitename:host:port:secret.extra-file(default:#f)Extra configuration file to read, which you are expected to create manually. Use this to add additional options and manage shared secrets out-of-band.
- Variável: yggdrasil-service-type
The service type for connecting to the Yggdrasil network, an early-stage implementation of a fully end-to-end encrypted IPv6 network.
Yggdrasil provides name-independent routing with cryptographically generated addresses. Static addressing means you can keep the same address as long as you want, even if you move to a new location, or generate a new address (by generating new keys) whenever you want. https://yggdrasil-network.github.io/2018/07/28/addressing.html
Pass it a value of
yggdrasil-configurationto connect it to public peers and/or local peers.Here is an example using public peers and a static address. The static signing and encryption keys are defined in /etc/yggdrasil-private.conf (the default value for
config-file).;; part of the operating-system declaration (service yggdrasil-service-type (yggdrasil-configuration (autoconf? #f) ;; use only the public peers (json-config ;; choose one from ;; https://github.com/yggdrasil-network/public-peers '((peers . #("tcp://1.2.3.4:1337")))) ;; /etc/yggdrasil-private.conf is the default value for config-file ))
# sample content for /etc/yggdrasil-private.conf { # Your private key. DO NOT share this with anyone! PrivateKey: 5c750... }
- Tipo de dados: yggdrasil-configuration
Data type representing the configuration of Yggdrasil.
package(default:yggdrasil)Package object of Yggdrasil.
json-config(default:'())Contents of /etc/yggdrasil.conf. Will be merged with /etc/yggdrasil-private.conf. Note that these settings are stored in the Guix store, which is readable to all users. Do not store your private keys in it. See the output of
yggdrasil -genconffor a quick overview of valid keys and their default values.autoconf?(default:#f)Whether to use automatic mode. Enabling it makes Yggdrasil use a dynamic IP and peer with IPv6 neighbors.
log-level(default:'info)How much detail to include in logs. Use
'debugfor more detail.log-to(default:'stdout)Where to send logs. By default, the service logs standard output to /var/log/yggdrasil.log. The alternative is
'syslog, which sends output to the running syslog service.config-file(default:"/etc/yggdrasil-private.conf")What HJSON file to load sensitive data from. This is where private keys should be stored, which are necessary to specify if you don’t want a randomized address after each restart. Use
#fto disable. Options defined in this file take precedence overjson-config. Use the output ofyggdrasil -genconfas a starting point. To configure a static address, delete everything except PrivateKey option.
- Variável: ipfs-service-type
The service type for connecting to the IPFS network, a global, versioned, peer-to-peer file system. Pass it a
ipfs-configurationto change the ports used for the gateway and API.Here’s an example configuration, using some non-standard ports:
(service ipfs-service-type (ipfs-configuration (gateway "/ip4/127.0.0.1/tcp/8880") (api "/ip4/127.0.0.1/tcp/8881")))
- Tipo de dados: ipfs-configuration
Data type representing the configuration of IPFS.
package(default:go-ipfs)Package object of IPFS.
gateway(default:"/ip4/127.0.0.1/tcp/8082")Address of the gateway, in ‘multiaddress’ format.
api(default:"/ip4/127.0.0.1/tcp/5001")Address of the API endpoint, in ‘multiaddress’ format.
- Variável: keepalived-service-type
This is the type for the Keepalived routing software,
keepalived. Its value must be ankeepalived-configurationrecord as in this example for master machine:(service keepalived-service-type (keepalived-configuration (config-file (local-file "keepalived-master.conf"))))where keepalived-master.conf:
vrrp_instance my-group { state MASTER interface enp9s0 virtual_router_id 100 priority 100 unicast_peer { 10.0.0.2 } virtual_ipaddress { 10.0.0.4/24 } }and for backup machine:
(service keepalived-service-type (keepalived-configuration (config-file (local-file "keepalived-backup.conf"))))where keepalived-backup.conf:
vrrp_instance my-group { state BACKUP interface enp9s0 virtual_router_id 100 priority 99 unicast_peer { 10.0.0.3 } virtual_ipaddress { 10.0.0.4/24 } }
Próximo: X Window, Anterior: Serviços de Rede, Acima: Serviços [Conteúdo][Índice]
11.10.6 Atualizações sem supervisão
The (gnu services admin) module provides a service to perform
unattended upgrades: periodically, the system automatically
reconfigures itself from the latest Guix. Guix System has several
properties that make unattended upgrades safe:
- upgrades are transactional (either the upgrade succeeds or it fails, but you cannot end up with an “in-between” system state);
- the upgrade log is kept—you can view it with
guix system list-generations—and you can roll back to any previous generation, should the upgraded system fail to behave as intended; - channel code is authenticated so you know you can only run genuine code (veja Canais);
-
guix system reconfigureprevents downgrades, which makes it immune to downgrade attacks.
To set up unattended upgrades, add an instance of
unattended-upgrade-service-type like the one below to the list of
your operating system services:
(service unattended-upgrade-service-type)
The defaults above set up weekly upgrades: every Sunday at midnight. You do not need to provide the operating system configuration file: it uses /run/current-system/configuration.scm, which ensures it always uses your latest configuration—veja provenance-service-type, for more information about this file.
There are several things that can be configured, in particular the
periodicity and services (daemons) to be restarted upon completion. When
the upgrade is successful, the service takes care of deleting system
generations older that some threshold, as per guix system
delete-generations. See the reference below for details.
To ensure that upgrades are actually happening, you can run guix
system describe. To investigate upgrade failures, visit the unattended
upgrade log file (see below).
- Variável: unattended-upgrade-service-type
This is the service type for unattended upgrades. It sets up an mcron job (veja Execução de trabalho agendado) that runs
guix system reconfigurefrom the latest version of the specified channels.Its value must be a
unattended-upgrade-configurationrecord (see below).
- Tipo de dados: unattended-upgrade-configuration
This data type represents the configuration of the unattended upgrade service. The following fields are available:
schedule(default:"30 01 * * 0")This is the schedule of upgrades, expressed as a string in traditional cron syntax or as a gexp evaluating to a Shepherd calendar event (veja Timers em The GNU Shepherd Manual).
channels(default:#~%default-channels)This gexp specifies the channels to use for the upgrade (veja Canais). By default, the tip of the official
guixchannel is used.operating-system-file(default:"/run/current-system/configuration.scm")This field specifies the operating system configuration file to use. The default is to reuse the config file of the current configuration.
There are cases, though, where referring to /run/current-system/configuration.scm is not enough, for instance because that file refers to extra files (SSH public keys, extra configuration files, etc.) via
local-fileand similar constructs. For those cases, we recommend something along these lines:(unattended-upgrade-configuration (operating-system-file (file-append (local-file "." "config-dir" #:recursive? #t) "/config.scm")))The effect here is to import all of the current directory into the store, and to refer to config.scm within that directory. Therefore, uses of
local-filewithin config.scm will work as expected. Veja Expressões-G, for information aboutlocal-fileandfile-append.operating-system-expression(default:#f)This field specifies an expression that evaluates to the operating system to use for the upgrade. If no value is provided the
operating-system-filefield value is used.(unattended-upgrade-configuration (operating-system-expression #~(@ (guix system install) installation-os)))reboot?(default:#f)This field specifies whether the system should reboot after completing an unattended upgrade.
When
reboot?is#t, services are not restarted before rebooting. This means that the value forservices-to-restartis ignored. The updated services will be started after the system reboots.services-to-restart(default:'(unattended-upgrade))This field specifies the Shepherd services to restart when the upgrade completes.
Those services are restarted right away upon completion, as with
herd restart, which ensures that the latest version is running—remember that by defaultguix system reconfigureonly restarts services that are not currently running, which is conservative: it minimizes disruption but leaves outdated services running.Use
herd statusto find out candidates for restarting. Veja Serviços, for general information about services. Common services to restart would includentpdandssh-daemon.By default, the
unattended-upgradeservice is restarted. This ensures that the latest version of the unattended upgrade job will be used next time.system-expiration(default:(* 3 30 24 3600))This is the expiration time in seconds for system generations. System generations older that this amount of time are deleted with
guix system delete-generationswhen an upgrade completes.Nota: The unattended upgrade service does not run the garbage collector. You will probably want to set up your own mcron job to run
guix gcperiodically.maximum-duration(default:3600)Maximum duration in seconds for the upgrade; past that time, the upgrade aborts.
This is primarily useful to ensure the upgrade does not end up rebuilding or re-downloading “the world”.
log-file(default:"/var/log/unattended-upgrade.log")File where unattended upgrades are logged.
Próximo: Serviços de impressão, Anterior: Atualizações sem supervisão, Acima: Serviços [Conteúdo][Índice]
11.10.7 X Window
Support for the X Window graphical display system—specifically Xorg—is
provided by the (gnu services xorg) module. Note that there is no
xorg-service procedure. Instead, the X server is started by the
login manager, by default the GNOME Display Manager (GDM).
GDM of course allows users to log in into window managers and desktop environments other than GNOME; for those using GNOME, GDM is required for features such as automatic screen locking.
To use X11, you must install at least one window manager—for example
the windowmaker or openbox packages—preferably by adding it
to the packages field of your operating system definition
(veja system-wide packages).
GDM also supports Wayland: it can itself use Wayland instead of X11 for its
user interface, and it can also start Wayland sessions. Wayland support is
enabled by default. To disable it, set wayland? to #f in
gdm-configuration.
- Variável: gdm-service-type
This is the type for the GNOME Desktop Manager (GDM), a program that manages graphical display servers and handles graphical user logins. Its value must be a
gdm-configuration(see below).GDM looks for session types described by the .desktop files in /run/current-system/profile/share/xsessions (for X11 sessions) and /run/current-system/profile/share/wayland-sessions (for Wayland sessions) and allows users to choose a session from the log-in screen. Packages such as
gnome,xfce,i3andswayprovide .desktop files; adding them to the system-wide set of packages automatically makes them available at the log-in screen.In addition, ~/.xsession files are honored. When available, ~/.xsession must be an executable that starts a window manager and/or other X clients.
- Tipo de dados: gdm-configuration
auto-login?(default:#f)default-user(default:#f)When
auto-login?is false, GDM presents a log-in screen.When
auto-login?is true, GDM logs in directly asdefault-user.auto-suspend?(default#t)When true, GDM will automatically suspend to RAM when nobody is physically connected. When a machine is used via remote desktop or SSH, this should be set to false to avoid GDM interrupting remote sessions or rendering the machine unavailable.
debug?(default:#f)When true, GDM writes debug messages to its log.
gnome-shell-assets(default: ...)List of GNOME Shell assets needed by GDM: icon theme, fonts, etc.
xorg-configuration(default:(xorg-configuration))Configuration of the Xorg graphical server.
x-session(default:(xinitrc))Script to run before starting a X session.
xdmcp?(default:#f)When true, enable the X Display Manager Control Protocol (XDMCP). This should only be enabled in trusted environments, as the protocol is not secure. When enabled, GDM listens for XDMCP queries on the UDP port 177.
dbus-daemon(default:dbus-daemon-wrapper)File name of the
dbus-daemonexecutable.gdm(default:gdm)The GDM package to use.
wayland?(default:#t)When true, enables Wayland in GDM, necessary to use Wayland sessions.
wayland-session(default:gdm-wayland-session-wrapper)The Wayland session wrapper to use, needed to setup the environment.
- Variável: slim-service-type
This is the type for the SLiM graphical login manager for X11.
Like GDM, SLiM looks for session types described by .desktop files and allows users to choose a session from the log-in screen using F1. It also honors ~/.xsession files.
Unlike GDM, SLiM does not spawn the user session on a different VT after logging in, which means that you can only start one graphical session. If you want to be able to run multiple graphical sessions at the same time you have to add multiple SLiM services to your system services. The following example shows how to replace the default GDM service with two SLiM services on tty7 and tty8.
(use-modules (gnu services) (gnu services desktop) (gnu services xorg)) (operating-system ;; ... (services (cons* (service slim-service-type (slim-configuration (display ":0") (vt "vt7"))) (service slim-service-type (slim-configuration (display ":1") (vt "vt8"))) (modify-services %desktop-services (delete gdm-service-type)))))
- Tipo de dados: slim-configuration
Data type representing the configuration of
slim-service-type.allow-empty-passwords?(default:#t)Whether to allow logins with empty passwords.
gnupg?(default:#f)If enabled,
pam-gnupgwill attempt to automatically unlock the user’s GPG keys with the login password viagpg-agent. The keygrips of all keys to be unlocked should be written to ~/.pam-gnupg, and can be queried withgpg -K --with-keygrip. Presetting passphrases must be enabled by addingallow-preset-passphrasein ~/.gnupg/gpg-agent.conf.auto-login?(default:#f)default-user(default:"")When
auto-login?is false, SLiM presents a log-in screen.When
auto-login?is true, SLiM logs in directly asdefault-user.theme(default:%default-slim-theme)theme-name(default:%default-slim-theme-name)The graphical theme to use and its name.
auto-login-session(default:#f)If true, this must be the name of the executable to start as the default session—e.g.,
(file-append windowmaker "/bin/windowmaker").If false, a session described by one of the available .desktop files in
/run/current-system/profileand~/.guix-profilewill be used.Nota: You must install at least one window manager in the system profile or in your user profile. Failing to do that, if
auto-login-sessionis false, you will be unable to log in.xorg-configuration(default(xorg-configuration))Configuration of the Xorg graphical server.
display(default":0")The display on which to start the Xorg graphical server.
vt(default"vt7")The VT on which to start the Xorg graphical server.
xauth(default:xauth)The XAuth package to use.
shepherd(default:shepherd)The Shepherd package used when invoking
haltandreboot.sessreg(default:sessreg)The sessreg package used in order to register the session.
slim(default:slim)The SLiM package to use.
- Variável: %default-theme
- Variável: %default-theme-name
The default SLiM theme and its name.
- Variável: sddm-service-type
This is the type of the service to run the SDDM display manager. Its value must be a
sddm-configurationrecord (see below).Here’s an example use:
(service sddm-service-type (sddm-configuration (auto-login-user "alice") (auto-login-session "xfce.desktop")))
- Tipo de dados: sddm-configuration
This data type represents the configuration of the SDDM login manager. The available fields are:
sddm(default:sddm)The SDDM package to use.
Nota: sddm has Qt6 enabled by default. If you want to still use a Qt5 theme, you need to set it to
sddm-qt5.display-server(default: "x11")Select display server to use for the greeter. Valid values are ‘"x11"’ or ‘"wayland"’.
numlock(default: "on")Valid values are ‘"on"’, ‘"off"’ or ‘"none"’.
halt-command(default#~(string-append #$shepherd "/sbin/halt"))Command to run when halting.
reboot-command(default#~(string-append #$shepherd "/sbin/reboot"))Command to run when rebooting.
theme(default "maldives")Theme to use. Default themes provided by SDDM are ‘"elarun"’, ‘"maldives"’ or ‘"maya"’.
themes-directory(default "/run/current-system/profile/share/sddm/themes")Directory to look for themes.
faces-directory(default "/run/current-system/profile/share/sddm/faces")Directory to look for faces.
default-path(default "/run/current-system/profile/bin")Default PATH to use.
minimum-uid(default: 1000)Minimum UID displayed in SDDM and allowed for log-in.
maximum-uid(default: 2000)Maximum UID to display in SDDM.
remember-last-user?(default #t)Remember last user.
remember-last-session?(default #t)Remember last session.
hide-users(default "")Usernames to hide from SDDM greeter.
hide-shells(default#~(string-append #$shadow "/sbin/nologin"))Users with shells listed will be hidden from the SDDM greeter.
session-command(default#~(string-append #$sddm "/share/sddm/scripts/wayland-session"))Script to run before starting a wayland session.
sessions-directory(default "/run/current-system/profile/share/wayland-sessions")Directory to look for desktop files starting wayland sessions.
xorg-configuration(default(xorg-configuration))Configuration of the Xorg graphical server.
xauth-path(default#~(string-append #$xauth "/bin/xauth"))Path to xauth.
xephyr-path(default#~(string-append #$xorg-server "/bin/Xephyr"))Path to Xephyr.
xdisplay-start(default#~(string-append #$sddm "/share/sddm/scripts/Xsetup"))Script to run after starting xorg-server.
xdisplay-stop(default#~(string-append #$sddm "/share/sddm/scripts/Xstop"))Script to run before stopping xorg-server.
xsession-command(default:xinitrc)Script to run before starting a X session.
xsessions-directory(default: "/run/current-system/profile/share/xsessions")Directory to look for desktop files starting X sessions.
minimum-vt(default: 7)Minimum VT to use.
auto-login-user(default "")User account that will be automatically logged in. Setting this to the empty string disables auto-login.
auto-login-session(default "")The .desktop file name to use as the auto-login session, or the empty string.
relogin?(default #f)Relogin after logout.
- Variável: lightdm-service-type
This is the type of the service to run the LightDM display manager. Its value must be a
lightdm-configurationrecord, which is documented below. Among its distinguishing features are TigerVNC integration for easily remoting your desktop as well as support for the XDMCP protocol, which can be used by remote clients to start a session from the login manager.In its most basic form, it can be used simply as:
(service lightdm-service-type)A more elaborate example making use of the VNC capabilities and enabling more features and verbose logs could look like:
(service lightdm-service-type (lightdm-configuration (allow-empty-passwords? #t) (xdmcp? #t) (vnc-server? #t) (vnc-server-command (file-append tigervnc-server "/bin/Xvnc" " -SecurityTypes None")) (seats (list (lightdm-seat-configuration (name "*") (user-session "ratpoison"))))))
- Tipo de dados: lightdm-configuration
Available
lightdm-configurationfields are:lightdm(default:lightdm) (type: file-like)The lightdm package to use.
allow-empty-passwords?(default:#f) (type: boolean)Whether users not having a password set can login.
debug?(default:#f) (type: boolean)Enable verbose output.
xorg-configuration(type: xorg-configuration)The default Xorg server configuration to use to generate the Xorg server start script. It can be refined per seat via the
xserver-commandof the<lightdm-seat-configuration>record, if desired.greeters(type: list-of-greeter-configurations)The LightDM greeter configurations specifying the greeters to use.
seats(type: list-of-seat-configurations)The seat configurations to use. A LightDM seat is akin to a user.
xdmcp?(default:#f) (type: boolean)Whether a XDMCP server should listen on port UDP 177.
xdmcp-listen-address(type: maybe-string)The host or IP address the XDMCP server listens for incoming connections. When unspecified, listen on for any hosts/IP addresses.
vnc-server?(default:#f) (type: boolean)Whether a VNC server is started.
vnc-server-command(type: file-like)The Xvnc command to use for the VNC server, it’s possible to provide extra options not otherwise exposed along the command, for example to disable security:
(vnc-server-command (file-append tigervnc-server "/bin/Xvnc" " -SecurityTypes None" ))Or to set a PasswordFile for the classic (unsecure) VncAuth mechanism:
(vnc-server-command (file-append tigervnc-server "/bin/Xvnc" " -PasswordFile /var/lib/lightdm/.vnc/passwd"))The password file should be manually created using the
vncpasswdcommand. Note that LightDM will create new sessions for VNC users, which means they need to authenticate in the same way as local users would.vnc-server-listen-address(type: maybe-string)The host or IP address the VNC server listens for incoming connections. When unspecified, listen for any hosts/IP addresses.
vnc-server-port(default:5900) (type: number)The TCP port the VNC server should listen to.
extra-config(default:'()) (type: list-of-strings)Extra configuration values to append to the LightDM configuration file.
- Tipo de dados: lightdm-gtk-greeter-configuration
Available
lightdm-gtk-greeter-configurationfields are:lightdm-gtk-greeter(default:lightdm-gtk-greeter) (type: file-like)The lightdm-gtk-greeter package to use.
assets(default:(adwaita-icon-theme gnome-themes-extra hicolor-icon-theme)) (type: list-of-file-likes)The list of packages complementing the greeter, such as package providing icon themes.
theme-name(default:"Adwaita") (type: string)The name of the theme to use.
icon-theme-name(default:"Adwaita") (type: string)The name of the icon theme to use.
cursor-theme-name(default:"Adwaita") (type: string)The name of the cursor theme to use.
cursor-theme-size(default:16) (type: number)The size to use for the cursor theme.
allow-debugging?(type: maybe-boolean)Set to #t to enable debug log level.
background(type: file-like)The background image to use.
at-spi-enabled?(default:#f) (type: boolean)Enable accessibility support through the Assistive Technology Service Provider Interface (AT-SPI).
a11y-states(default:(contrast font keyboard reader)) (type: list-of-a11y-states)The accessibility features to enable, given as list of symbols.
reader(type: maybe-file-like)The command to use to launch a screen reader.
extra-config(default:'()) (type: list-of-strings)Extra configuration values to append to the LightDM GTK Greeter configuration file.
- Tipo de dados: lightdm-seat-configuration
Available
lightdm-seat-configurationfields are:name(type: seat-name)The name of the seat. An asterisk (*) can be used in the name to apply the seat configuration to all the seat names it matches.
user-session(type: maybe-string)The session to use by default. The session name must be provided as a lowercase string, such as
"gnome","ratpoison", etc.type(default:local) (type: seat-type)The type of the seat, either the
localorxremotesymbol.autologin-user(type: maybe-string)The username to automatically log in with by default.
greeter-session(default:lightdm-gtk-greeter) (type: greeter-session)The greeter session to use, specified as a symbol. Currently, only
lightdm-gtk-greeteris supported.xserver-command(type: maybe-file-like)The Xorg server command to run.
session-wrapper(type: file-like)The xinitrc session wrapper to use.
extra-config(default:'()) (type: list-of-strings)Extra configuration values to append to the seat configuration section.
- Tipo de dados: xorg-configuration
This data type represents the configuration of the Xorg graphical display server. Note that there is no Xorg service; instead, the X server is started by a “display manager” such as GDM, SDDM, LightDM or SLiM. Thus, the configuration of these display managers aggregates an
xorg-configurationrecord.modules(default:%default-xorg-modules)This is a list of module packages loaded by the Xorg server—e.g.,
xf86-video-vesa,xf86-input-libinput, and so on.fonts(default:%default-xorg-fonts)This is a list of font directories to add to the server’s font path.
drivers(default:'())This must be either the empty list, in which case Xorg chooses a graphics driver automatically, or a list of driver names that will be tried in this order—e.g.,
'("modesetting" "vesa").resolutions(default:'())When
resolutionsis the empty list, Xorg chooses an appropriate screen resolution. Otherwise, it must be a list of resolutions—e.g.,'((1024 768) (640 480)).keyboard-layout(padrão:#f)If this is
#f, Xorg uses the default keyboard layout—usually US English (“qwerty”) for a 105-key PC keyboard.Otherwise this must be a
keyboard-layoutobject specifying the keyboard layout in use when Xorg is running. Veja Disposição do teclado, for more information on how to specify the keyboard layout.extra-config(default:'())This is a list of strings or objects appended to the configuration file. It is used to pass extra text to be added verbatim to the configuration file.
server(default:xorg-server)This is the package providing the Xorg server.
server-arguments(default:%default-xorg-server-arguments)This is the list of command-line arguments to pass to the X server. The default is
-nolisten tcp.
- Procedure: set-xorg-configuration config [login-manager-service-type]
Tell the log-in manager (of type login-manager-service-type) to use config, an
<xorg-configuration>record.Since the Xorg configuration is embedded in the log-in manager’s configuration—e.g.,
gdm-configuration—this procedure provides a shorthand to set the Xorg configuration.
- Procedure: xorg-start-command [config]
Return a
startxscript in which the modules, fonts, etc. specified in config, are available. The result should be used in place ofstartx.Usually the X server is started by a login manager.
- Procedure: xorg-start-command-xinit [config]
Return a
startxscript in which the modules, fonts, etc. specified in config are available. The result should be used in place ofstartxand should be invoked by the user from a tty after login. Unlikexorg-start-command, this script calls xinit. Therefore it works well when executed from a tty. This script can be set up asstartxusingstartx-command-service-typeorhome-startx-command-service-type. If you are using a desktop environment, you are unlikely to need this procedure.
- Variável: screen-locker-service-type
Type for a service that adds a package for a screen locker or screen saver to the set of privileged programs and/or add a PAM entry for it. The value for this service is a
<screen-locker-configuration>object.While the default behavior is to setup both a privileged program and PAM entry, these two methods are redundant. Screen locker programs may not execute when PAM is configured and
setuidis set on their executable. In this case,using-setuid?can be set to#f.For example, to make XlockMore usable:
(service screen-locker-service-type (screen-locker-configuration (name "xlock") (program (file-append xlockmore "/bin/xlock"))))makes the good ol’ XlockMore usable.
For example, swaylock fails to execute when compiled with PAM support and setuid enabled. One can thus disable setuid:
(service screen-locker-service-type (screen-locker-configuration (name "swaylock") (program (file-append swaylock "/bin/swaylock")) (using-pam? #t) (using-setuid? #f)))
- Tipo de dados: screen-locker-configuration
Available
screen-locker-configurationfields are:name(type: string)Name of the screen locker.
program(type: file-like)Path to the executable for the screen locker as a G-Expression.
allow-empty-password?(default:#f) (type: boolean)Whether to allow empty passwords.
using-pam?(default:#t) (type: boolean)Whether to setup PAM entry.
using-setuid?(default:#t) (type: boolean)Whether to setup program as setuid binary.
- Variável: startx-command-service-type
Add
startxto the system profile putting it ontoPATH.The value for this service is a
<xorg-configuration>object which is passed to thexorg-start-command-xinitprocedure producing thestartxused. Default value is(xorg-configuration).
Próximo: Serviços de desktop, Anterior: X Window, Acima: Serviços [Conteúdo][Índice]
11.10.8 Serviços de impressão
The (gnu services cups) module provides a Guix service definition for
the CUPS printing service. To add printer support to a Guix system, add a
cups-service to the operating system definition:
- Variável: cups-service-type
The service type for the CUPS print server. Its value should be a valid CUPS configuration (see below). To use the default settings, simply write:
(service cups-service-type)
The CUPS configuration controls the basic things about your CUPS installation: what interfaces it listens on, what to do if a print job fails, how much logging to do, and so on. To actually add a printer, you have to visit the http://localhost:631 URL, or use a tool such as GNOME’s printer configuration services. By default, configuring a CUPS service will generate a self-signed certificate if needed, for secure connections to the print server.
Suppose you want to enable the Web interface of CUPS and also add support
for Epson printers via the epson-inkjet-printer-escpr package and
for HP printers via the hplip-minimal package. You can do that
directly, like this (you need to use the (gnu packages cups) module):
(service cups-service-type
(cups-configuration
(web-interface? #t)
(extensions
(list cups-filters epson-inkjet-printer-escpr hplip-minimal))))
Nota: If you wish to use the Qt5 based GUI which comes with the hplip package then it is suggested that you install the
hplippackage, either in your OS configuration file or as your user.
The available configuration parameters follow. Each parameter definition is
preceded by its type; for example, ‘string-list foo’ indicates that the
foo parameter should be specified as a list of strings. There is
also a way to specify the configuration as a string, if you have an old
cupsd.conf file that you want to port over from some other system;
see the end for more details.
Available cups-configuration fields are:
cups-configurationparameter: package cups ¶The CUPS package.
cups-configurationparameter: package-list extensions (default:(list brlaser cups-filters epson-inkjet-printer-escpr foomatic-filters hplip-minimal splix)) ¶Drivers and other extensions to the CUPS package.
cups-configurationparameter: files-configuration files-configuration ¶Configuration of where to write logs, what directories to use for print spools, and related privileged configuration parameters.
Available
files-configurationfields are:files-configurationparameter: log-location access-log ¶Defines the access log filename. Specifying a blank filename disables access log generation. The value
stderrcauses log entries to be sent to the standard error file when the scheduler is running in the foreground, or to the system log daemon when run in the background. The valuesyslogcauses log entries to be sent to the system log daemon. The server name may be included in filenames using the string%s, as in/var/log/cups/%s-access_log.Defaults to ‘"/var/log/cups/access_log"’.
files-configurationparameter: file-name cache-dir ¶Where CUPS should cache data.
Defaults to ‘"/var/cache/cups"’.
files-configurationparameter: string config-file-perm ¶Specifies the permissions for all configuration files that the scheduler writes.
Note that the permissions for the printers.conf file are currently masked to only allow access from the scheduler user (typically root). This is done because printer device URIs sometimes contain sensitive authentication information that should not be generally known on the system. There is no way to disable this security feature.
Defaults to ‘"0640"’.
files-configurationparameter: log-location error-log ¶Defines the error log filename. Specifying a blank filename disables error log generation. The value
stderrcauses log entries to be sent to the standard error file when the scheduler is running in the foreground, or to the system log daemon when run in the background. The valuesyslogcauses log entries to be sent to the system log daemon. The server name may be included in filenames using the string%s, as in/var/log/cups/%s-error_log.Defaults to ‘"/var/log/cups/error_log"’.
files-configurationparameter: string fatal-errors ¶Specifies which errors are fatal, causing the scheduler to exit. The kind strings are:
noneNo errors are fatal.
allAll of the errors below are fatal.
browseBrowsing initialization errors are fatal, for example failed connections to the DNS-SD daemon.
configConfiguration file syntax errors are fatal.
listenListen or Port errors are fatal, except for IPv6 failures on the loopback or
anyaddresses.logLog file creation or write errors are fatal.
permissionsBad startup file permissions are fatal, for example shared TLS certificate and key files with world-read permissions.
Defaults to ‘"all -browse"’.
files-configurationparameter: boolean file-device? ¶Specifies whether the file pseudo-device can be used for new printer queues. The URI file:///dev/null is always allowed.
Defaults to ‘#f’.
files-configurationparameter: string group ¶Specifies the group name or ID that will be used when executing external programs.
Defaults to ‘"lp"’.
files-configurationparameter: string log-file-group ¶Specifies the group name or ID that will be used for log files.
Defaults to ‘"lpadmin"’.
files-configurationparameter: string log-file-perm ¶Specifies the permissions for all log files that the scheduler writes.
Defaults to ‘"0644"’.
files-configurationparameter: log-location page-log ¶Defines the page log filename. Specifying a blank filename disables page log generation. The value
stderrcauses log entries to be sent to the standard error file when the scheduler is running in the foreground, or to the system log daemon when run in the background. The valuesyslogcauses log entries to be sent to the system log daemon. The server name may be included in filenames using the string%s, as in/var/log/cups/%s-page_log.Defaults to ‘"/var/log/cups/page_log"’.
files-configurationparameter: string remote-root ¶Specifies the username that is associated with unauthenticated accesses by clients claiming to be the root user. The default is
remroot.Defaults to ‘"remroot"’.
files-configurationparameter: file-name request-root ¶Specifies the directory that contains print jobs and other HTTP request data.
Defaults to ‘"/var/spool/cups"’.
files-configurationparameter: sandboxing sandboxing ¶Specifies the level of security sandboxing that is applied to print filters, backends, and other child processes of the scheduler; either
relaxedorstrict. This directive is currently only used/supported on macOS.Defaults to ‘strict’.
files-configurationparameter: file-name server-keychain ¶Specifies the location of TLS certificates and private keys. CUPS will look for public and private keys in this directory: .crt files for PEM-encoded certificates and corresponding .key files for PEM-encoded private keys.
Defaults to ‘"/etc/cups/ssl"’.
files-configurationparameter: file-name server-root ¶Specifies the directory containing the server configuration files.
Defaults to ‘"/etc/cups"’.
files-configurationparameter: boolean sync-on-close? ¶Specifies whether the scheduler calls fsync(2) after writing configuration or state files.
Defaults to ‘#f’.
files-configurationparameter: space-separated-string-list system-group ¶Specifies the group(s) to use for
@SYSTEMgroup authentication.
files-configurationparameter: file-name temp-dir ¶Specifies the directory where temporary files are stored.
Defaults to ‘"/var/spool/cups/tmp"’.
files-configurationparameter: string user ¶Specifies the user name or ID that is used when running external programs.
Defaults to ‘"lp"’.
files-configurationparameter: string set-env ¶Set the specified environment variable to be passed to child processes.
Defaults to ‘"variable value"’.
cups-configurationparameter: access-log-level access-log-level ¶Specifies the logging level for the AccessLog file. The
configlevel logs when printers and classes are added, deleted, or modified and when configuration files are accessed or updated. Theactionslevel logs when print jobs are submitted, held, released, modified, or canceled, and any of the conditions forconfig. Thealllevel logs all requests.Defaults to ‘actions’.
cups-configurationparameter: boolean auto-purge-jobs? ¶Specifies whether to purge job history data automatically when it is no longer required for quotas.
Defaults to ‘#f’.
cups-configurationparameter: comma-separated-string-list browse-dns-sd-sub-types ¶Specifies a list of DNS-SD sub-types to advertise for each shared printer.
The default ‘(list "_cups" "_print" "_universal")’ tells clients that CUPS sharing, IPP Everywhere, AirPrint, and Mopria are supported.
cups-configurationparameter: browse-local-protocols browse-local-protocols ¶Specifies which protocols to use for local printer sharing.
Defaults to ‘dnssd’.
cups-configurationparameter: boolean browse-web-if? ¶Specifies whether the CUPS web interface is advertised.
Defaults to ‘#f’.
cups-configurationparameter: boolean browsing? ¶Specifies whether shared printers are advertised.
Defaults to ‘#f’.
cups-configurationparameter: default-auth-type default-auth-type ¶Specifies the default type of authentication to use.
Defaults to ‘Basic’.
cups-configurationparameter: default-encryption default-encryption ¶Specifies whether encryption will be used for authenticated requests.
Defaults to ‘Required’.
cups-configurationparameter: string default-language ¶Specifies the default language to use for text and web content.
Defaults to ‘"en"’.
cups-configurationparameter: string default-paper-size ¶Specifies the default paper size for new print queues. ‘"Auto"’ uses a locale-specific default, while ‘"None"’ specifies there is no default paper size. Specific size names are typically ‘"Letter"’ or ‘"A4"’.
Defaults to ‘"Auto"’.
cups-configurationparameter: string default-policy ¶Specifies the default access policy to use.
Defaults to ‘"default"’.
Specifies whether local printers are shared by default.
Defaults to ‘#t’.
cups-configurationparameter: non-negative-integer dirty-clean-interval ¶Specifies the delay for updating of configuration and state files, in seconds. A value of 0 causes the update to happen as soon as possible, typically within a few milliseconds.
Defaults to ‘30’.
cups-configurationparameter: error-policy error-policy ¶Specifies what to do when an error occurs. Possible values are
abort-job, which will discard the failed print job;retry-job, which will retry the job at a later time;retry-current-job, which retries the failed job immediately; andstop-printer, which stops the printer.Defaults to ‘stop-printer’.
cups-configurationparameter: non-negative-integer filter-limit ¶Specifies the maximum cost of filters that are run concurrently, which can be used to minimize disk, memory, and CPU resource problems. A limit of 0 disables filter limiting. An average print to a non-PostScript printer needs a filter limit of about 200. A PostScript printer needs about half that (100). Setting the limit below these thresholds will effectively limit the scheduler to printing a single job at any time.
Defaults to ‘0’.
cups-configurationparameter: non-negative-integer filter-nice ¶Specifies the scheduling priority of filters that are run to print a job. The nice value ranges from 0, the highest priority, to 19, the lowest priority.
Defaults to ‘0’.
cups-configurationparameter: host-name-lookups host-name-lookups ¶Specifies whether to do reverse lookups on connecting clients. The
doublesetting causescupsdto verify that the hostname resolved from the address matches one of the addresses returned for that hostname. Double lookups also prevent clients with unregistered addresses from connecting to your server. Only set this option to#tordoubleif absolutely required.Defaults to ‘#f’.
cups-configurationparameter: non-negative-integer job-kill-delay ¶Specifies the number of seconds to wait before killing the filters and backend associated with a canceled or held job.
Defaults to ‘30’.
cups-configurationparameter: non-negative-integer job-retry-interval ¶Specifies the interval between retries of jobs in seconds. This is typically used for fax queues but can also be used with normal print queues whose error policy is
retry-joborretry-current-job.Defaults to ‘30’.
cups-configurationparameter: non-negative-integer job-retry-limit ¶Specifies the number of retries that are done for jobs. This is typically used for fax queues but can also be used with normal print queues whose error policy is
retry-joborretry-current-job.Defaults to ‘5’.
cups-configurationparameter: boolean keep-alive? ¶Specifies whether to support HTTP keep-alive connections.
Defaults to ‘#t’.
cups-configurationparameter: non-negative-integer limit-request-body ¶Specifies the maximum size of print files, IPP requests, and HTML form data. A limit of 0 disables the limit check.
Defaults to ‘0’.
cups-configurationparameter: multiline-string-list listen ¶Listens on the specified interfaces for connections. Valid values are of the form address:port, where address is either an IPv6 address enclosed in brackets, an IPv4 address, or
*to indicate all addresses. Values can also be file names of local UNIX domain sockets. The Listen directive is similar to the Port directive but allows you to restrict access to specific interfaces or networks.
cups-configurationparameter: location-access-control-list location-access-controls ¶Specifies a set of additional access controls.
Available
location-access-controlsfields are:location-access-controlsparameter: file-name path ¶Specifies the URI path to which the access control applies.
location-access-controlsparameter: access-control-list access-controls ¶Access controls for all access to this path, in the same format as the
access-controlsofoperation-access-control.Defaults to ‘'()’.
location-access-controlsparameter: method-access-control-list method-access-controls ¶Access controls for method-specific access to this path.
Defaults to ‘'()’.
Available
method-access-controlsfields are:method-access-controlsparameter: boolean reverse? ¶If
#t, apply access controls to all methods except the listed methods. Otherwise apply to only the listed methods.Defaults to ‘#f’.
method-access-controlsparameter: method-list methods ¶Methods to which this access control applies.
Defaults to ‘'()’.
method-access-controlsparameter: access-control-list access-controls ¶Access control directives, as a list of strings. Each string should be one directive, such as ‘"Order allow,deny"’.
Defaults to ‘'()’.
cups-configurationparameter: non-negative-integer log-debug-history ¶Specifies the number of debugging messages that are retained for logging if an error occurs in a print job. Debug messages are logged regardless of the LogLevel setting.
Defaults to ‘100’.
cups-configurationparameter: log-level log-level ¶Specifies the level of logging for the ErrorLog file. The value
nonestops all logging whiledebug2logs everything.Defaults to ‘info’.
cups-configurationparameter: log-time-format log-time-format ¶Specifies the format of the date and time in the log files. The value
standardlogs whole seconds whileusecslogs microseconds.Defaults to ‘standard’.
cups-configurationparameter: non-negative-integer max-clients ¶Specifies the maximum number of simultaneous clients that are allowed by the scheduler.
Defaults to ‘100’.
cups-configurationparameter: non-negative-integer max-clients-per-host ¶Specifies the maximum number of simultaneous clients that are allowed from a single address.
Defaults to ‘100’.
cups-configurationparameter: non-negative-integer max-copies ¶Specifies the maximum number of copies that a user can print of each job.
Defaults to ‘9999’.
cups-configurationparameter: non-negative-integer max-hold-time ¶Specifies the maximum time a job may remain in the
indefinitehold state before it is canceled. A value of 0 disables cancellation of held jobs.Defaults to ‘0’.
cups-configurationparameter: non-negative-integer max-jobs ¶Specifies the maximum number of simultaneous jobs that are allowed. Set to 0 to allow an unlimited number of jobs.
Defaults to ‘500’.
cups-configurationparameter: non-negative-integer max-jobs-per-printer ¶Specifies the maximum number of simultaneous jobs that are allowed per printer. A value of 0 allows up to
max-jobsper printer.Defaults to ‘0’.
cups-configurationparameter: non-negative-integer max-jobs-per-user ¶Specifies the maximum number of simultaneous jobs that are allowed per user. A value of 0 allows up to
max-jobsper user.Defaults to ‘0’.
cups-configurationparameter: non-negative-integer max-job-time ¶Specifies the maximum time a job may take to print before it is canceled, in seconds. Set to 0 to disable cancellation of “stuck” jobs.
Defaults to ‘10800’.
cups-configurationparameter: non-negative-integer max-log-size ¶Specifies the maximum size of the log files before they are rotated, in bytes. The value 0 disables log rotation.
Defaults to ‘1048576’.
cups-configurationparameter: non-negative-integer max-subscriptions ¶Specifies the maximum number of simultaneous event subscriptions that are allowed. Set to ‘0’ to allow an unlimited number of subscriptions.
Defaults to ‘0’.
cups-configurationparameter: non-negative-integer max-subscriptions-per-job ¶Specifies the maximum number of simultaneous event subscriptions that are allowed per job. A value of ‘0’ allows up to
max-subscriptionsper job.Defaults to ‘0’.
cups-configurationparameter: non-negative-integer max-subscriptions-per-printer ¶Specifies the maximum number of simultaneous event subscriptions that are allowed per printer. A value of ‘0’ allows up to
max-subscriptionsper printer.Defaults to ‘0’.
cups-configurationparameter: non-negative-integer max-subscriptions-per-user ¶Specifies the maximum number of simultaneous event subscriptions that are allowed per user. A value of ‘0’ allows up to
max-subscriptionsper user.Defaults to ‘0’.
cups-configurationparameter: non-negative-integer multiple-operation-timeout ¶Specifies the maximum amount of time to allow between files in a multiple file print job, in seconds.
Defaults to ‘900’.
cups-configurationparameter: environment-variables environment-variables ¶Passes the specified environment variable(s) to child processes; a list of strings.
Defaults to ‘'()’.
cups-configurationparameter: policy-configuration-list policies ¶Specifies named access control policies.
Available
policy-configurationfields are:policy-configurationparameter: string name ¶Name of the policy.
policy-configurationparameter: string job-private-access ¶Specifies an access list for a job’s private values.
@ACLmaps to the printer’s requesting-user-name-allowed or requesting-user-name-denied values.@OWNERmaps to the job’s owner.@SYSTEMmaps to the groups listed for thesystem-groupfield of thefiles-configuration, which is reified into thecups-files.conf(5)file. Other possible elements of the access list include specific user names, and@groupto indicate members of a specific group. The access list may also be simplyallordefault.Defaults to ‘"@OWNER @SYSTEM"’.
policy-configurationparameter: string job-private-values ¶Specifies the list of job values to make private, or
all,default, ornone.Defaults to ‘"job-name job-originating-host-name job-originating-user-name phone"’.
policy-configurationparameter: string subscription-private-access ¶Specifies an access list for a subscription’s private values.
@ACLmaps to the printer’s requesting-user-name-allowed or requesting-user-name-denied values.@OWNERmaps to the job’s owner.@SYSTEMmaps to the groups listed for thesystem-groupfield of thefiles-configuration, which is reified into thecups-files.conf(5)file. Other possible elements of the access list include specific user names, and@groupto indicate members of a specific group. The access list may also be simplyallordefault.Defaults to ‘"@OWNER @SYSTEM"’.
policy-configurationparameter: string subscription-private-values ¶Specifies the list of job values to make private, or
all,default, ornone.Defaults to ‘"notify-events notify-pull-method notify-recipient-uri notify-subscriber-user-name notify-user-data"’.
policy-configurationparameter: operation-access-control-list access-controls ¶Access control by IPP operation.
Defaults to ‘'()’.
cups-configurationparameter: boolean-or-non-negative-integer preserve-job-files ¶Specifies whether job files (documents) are preserved after a job is printed. If a numeric value is specified, job files are preserved for the indicated number of seconds after printing. Otherwise a boolean value applies indefinitely.
Defaults to ‘86400’.
cups-configurationparameter: boolean-or-non-negative-integer preserve-job-history ¶Specifies whether the job history is preserved after a job is printed. If a numeric value is specified, the job history is preserved for the indicated number of seconds after printing. If
#t, the job history is preserved until the MaxJobs limit is reached.Defaults to ‘#t’.
cups-configurationparameter: comma-separated-string-list-or-#f ready-paper-sizes ¶Specifies a list of potential paper sizes that are reported as ready, that is: loaded. The actual list will contain only the sizes that each printer supports.
The default value of
#fis a special case: CUPS will use ‘(list \"Letter\" \"Legal\" \"Tabloid\" \"4x6\" \"Env10\")’ if the default paper size is \"Letter\", and ‘(list \"A3\" \"A4\" \"A5\" \"A6\" \"EnvDL\")’ otherwise.
cups-configurationparameter: non-negative-integer reload-timeout ¶Specifies the amount of time to wait for job completion before restarting the scheduler.
Defaults to ‘30’.
cups-configurationparameter: string server-admin ¶Specifies the email address of the server administrator.
Defaults to ‘"root@localhost.localdomain"’.
cups-configurationparameter: host-name-list-or-* server-alias ¶The ServerAlias directive is used for HTTP Host header validation when clients connect to the scheduler from external interfaces. Using the special name
*can expose your system to known browser-based DNS rebinding attacks, even when accessing sites through a firewall. If the auto-discovery of alternate names does not work, we recommend listing each alternate name with a ServerAlias directive instead of using*.Defaults to ‘*’.
cups-configurationparameter: string server-name ¶Specifies the fully-qualified host name of the server.
Defaults to ‘"localhost"’.
cups-configurationparameter: server-tokens server-tokens ¶Specifies what information is included in the Server header of HTTP responses.
Nonedisables the Server header.ProductOnlyreportsCUPS.MajorreportsCUPS 2.MinorreportsCUPS 2.0.MinimalreportsCUPS 2.0.0.OSreportsCUPS 2.0.0 (uname)where uname is the output of theunamecommand.FullreportsCUPS 2.0.0 (uname) IPP/2.0.Defaults to ‘Minimal’.
cups-configurationparameter: multiline-string-list ssl-listen ¶Listens on the specified interfaces for encrypted connections. Valid values are of the form address:port, where address is either an IPv6 address enclosed in brackets, an IPv4 address, or
*to indicate all addresses.Defaults to ‘'()’.
cups-configurationparameter: ssl-options ssl-options ¶Sets encryption options. By default, CUPS only supports encryption using TLS v1.0 or higher using known secure cipher suites. Security is reduced when
Allowoptions are used, and enhanced whenDenyoptions are used. TheAllowRC4option enables the 128-bit RC4 cipher suites, which are required for some older clients. TheAllowSSL3option enables SSL v3.0, which is required for some older clients that do not support TLS v1.0. TheDenyCBCoption disables all CBC cipher suites. TheDenyTLS1.0option disables TLS v1.0 support - this sets the minimum protocol version to TLS v1.1.Defaults to ‘'()’.
cups-configurationparameter: boolean strict-conformance? ¶Specifies whether the scheduler requires clients to strictly adhere to the IPP specifications.
Defaults to ‘#f’.
cups-configurationparameter: non-negative-integer timeout ¶Specifies the HTTP request timeout, in seconds.
Defaults to ‘900’.
cups-configurationparameter: boolean web-interface? ¶Specifies whether the web interface is enabled.
Defaults to ‘#f’.
At this point you’re probably thinking “oh dear, Guix manual, I like you
but you can stop already with the configuration options”. Indeed.
However, one more point: it could be that you have an existing
cupsd.conf that you want to use. In that case, you can pass an
opaque-cups-configuration as the configuration of a
cups-service-type.
Available opaque-cups-configuration fields are:
opaque-cups-configurationparameter: package cups ¶The CUPS package.
opaque-cups-configurationparameter: string cupsd.conf ¶The contents of the
cupsd.conf, as a string.
opaque-cups-configurationparameter: string cups-files.conf ¶The contents of the
cups-files.conffile, as a string.
For example, if your cupsd.conf and cups-files.conf are in
strings of the same name, you could instantiate a CUPS service like this:
(service cups-service-type
(opaque-cups-configuration
(cupsd.conf cupsd.conf)
(cups-files.conf cups-files.conf)))
Próximo: Serviços de som, Anterior: Serviços de impressão, Acima: Serviços [Conteúdo][Índice]
11.10.9 Serviços de desktop
The (gnu services desktop) module provides services that are usually
useful in the context of a “desktop” setup—that is, on a machine running
a graphical display server, possibly with graphical user interfaces, etc.
It also defines services that provide specific desktop environments like
GNOME, Xfce or MATE.
To simplify things, the module defines a variable containing the set of services that users typically expect on a machine with a graphical environment and networking:
- Variável: %desktop-services
This is a list of services that builds upon
%base-servicesand adds or adjusts services for a typical “desktop” setup.In particular, it adds a graphical login manager (veja
gdm-service-type), screen lockers, a network management tool (vejanetwork-manager-service-type) with modem support (vejamodem-manager-service-type), energy and color management services, theelogindlogin and seat manager, the Polkit privilege service, the GeoClue location service, the AccountsService daemon that allows authorized users change system passwords, a NTP client (veja Serviços de Rede) and the Avahi daemon.
The %desktop-services variable can be used as the services
field of an operating-system declaration (veja services).
Additionally, the following procedures add one (or more!) desktop environments to a system.
-
gnome-desktop-service-typeadds GNOME, -
plasma-desktop-service-typeadds KDE Plasma, -
enlightenment-desktop-service-typeadds Enlightenment, -
lxqt-desktop-service-typeadds LXQt, -
mate-desktop-service-typeadds MATE, and -
xfce-desktop-service-typeadds Xfce.
These service types add “metapackages” such as gnome or
plasma to the system profile, but most of them also set up other
useful services that mere packages can’t do.
For example, they may elevate privileges on a limited number of special-purpose system interfaces and programs. This allows backlight adjustment helpers, power management utilities, screen lockers, and other integrated functionality to work as expected.
The desktop environments in Guix use the Xorg display server by default. If
you’d like to use the newer display server protocol called Wayland, you need
to enable Wayland support in GDM (veja wayland-gdm). Another solution is
to use the sddm-service instead of GDM as the graphical login
manager. You should then select the “GNOME (Wayland)” session in SDDM.
Alternatively you can also try starting GNOME on Wayland manually from a TTY
with the command “XDG_SESSION_TYPE=wayland exec dbus-run-session
gnome-session“. Currently only GNOME has support for Wayland.
- Variável: gnome-desktop-service-type
This is the type of the service that adds the GNOME desktop environment. Its value is a
gnome-desktop-configurationobject (see below).This service adds the
gnomepackage to the system profile, and extends polkit with the actions fromgnome-settings-daemon.
- Tipo de dados: gnome-desktop-configuration
Configuration record for the GNOME desktop environment. Available
gnome-desktop-configurationfields are:core-services(type: list-of-packages)A list of packages that the GNOME Shell and applications may rely on.
shell(type: list-of-packages)A list of packages that constitute the GNOME Shell, without applications.
utilities(type: list-of-packages)A list of packages that serve as applications to use on top of the GNOME Shell.
gnome(type: maybe-package)This field used to be the only configuration point and specified a GNOME meta-package to install system-wide. Since the meta-package itself provides neither sources nor the actual packages and is only used to propagate them, this field is deprecated.
extra-packages(type: list-of-packages)A list of GNOME-adjacent packages to also include. This field is intended for users to add their own packages to their GNOME experience. Note, that it already includes some packages that are considered essential by some (most?) GNOME users.
udev-ignorelist(default:()) (type: list-of-strings)A list of regular expressions denoting udev rules or hardware file names provided by any package that should not be installed. By default, every udev rule and hardware file specified by any package referenced in the other fields are installed.
polkit-ignorelist(default:()) (type: list-of-strings)A list of regular expressions denoting polkit rules provided by any package that should not be installed. By default, every polkit rule added by any package referenced in the other fields are installed.
- Variável: plasma-desktop-service-type
This is the type of the service that adds the Plasma desktop environment. Its value is a
plasma-desktop-configurationobject (see below).This service adds the
plasmapackage to the system profile.
- Tipo de dados: plasma-desktop-configuration
Configuration record for the Plasma desktop environment.
plasma(default:plasma)The Plasma package to use.
- Variável: xfce-desktop-service-type
This is the type of a service to run the https://xfce.org/ desktop environment. Its value is an
xfce-desktop-configurationobject (see below).This service adds the
xfcepackage to the system profile, and extends polkit with the ability forthunarto manipulate the file system as root from within a user session, after the user has authenticated with the administrator’s password.Note that
xfce4-paneland its plugin packages should be installed in the same profile to ensure compatibility. When using this service, you should add extra plugins (xfce4-whiskermenu-plugin,xfce4-weather-plugin, etc.) to thepackagesfield of youroperating-system.
- Tipo de dados: xfce-desktop-configuration
Configuration record for the Xfce desktop environment.
xfce(default:xfce)The Xfce package to use.
- Variável: mate-desktop-service-type
This is the type of the service that runs the MATE desktop environment. Its value is a
mate-desktop-configurationobject (see below).This service adds the
matepackage to the system profile, and extends polkit with the actions frommate-settings-daemon.
- Tipo de dados: mate-desktop-configuration
Configuration record for the MATE desktop environment.
mate(default:mate)The MATE package to use.
- Variável: lxqt-desktop-service-type
This is the type of the service that runs the LXQt desktop environment. Its value is a
lxqt-desktop-configurationobject (see below).This service adds the
lxqtpackage to the system profile.
- Tipo de dados: lxqt-desktop-configuration
Configuration record for the LXQt desktop environment.
lxqt(default:lxqt)The LXQT package to use.
- Variável: sugar-desktop-service-type
This is the type of the service that runs the Sugar desktop environment. Its value is a
sugar-desktop-configurationobject (see below).This service adds the
sugarpackage to the system profile, as well as any selected Sugar activities. By default it only includes a minimal set of activities.
- Tipo de dados: sugar-desktop-configuration
Configuration record for the Sugar desktop environment.
sugar(default:sugar)The Sugar package to use.
gobject-introspection(default:gobject-introspection)The
gobject-introspectionpackage to use. This package is used to access libraries installed as dependencies of Sugar activities.activities(default:(list sugar-help-activity))A list of Sugar activities to install.
The following example configures the Sugar desktop environment with a number of useful activities:
(use-modules (gnu)) (use-package-modules sugar) (use-service-modules desktop) (operating-system ... (services (cons* (service sugar-desktop-service-type (sugar-desktop-configuration (activities (list sugar-browse-activity sugar-help-activity sugar-jukebox-activity sugar-typing-turtle-activity)))) %desktop-services)) ...)
- Variável: enlightenment-desktop-service-type
Return a service that adds the
enlightenmentpackage to the system profile, and extends dbus with actions fromefl.
- Tipo de dados: enlightenment-desktop-service-configuration
enlightenment(default:enlightenment)The enlightenment package to use.
Because the GNOME, Xfce and MATE desktop services pull in so many packages,
the default %desktop-services variable doesn’t include any of them by
default. To add GNOME, Xfce or MATE, just cons them onto
%desktop-services in the services field of your
operating-system:
(use-modules (gnu)) (use-service-modules desktop) (operating-system ... ;; cons* adds items to the list given as its last argument. (services (cons* (service gnome-desktop-service-type) (service xfce-desktop-service-type) %desktop-services)) ...)
These desktop environments will then be available as options in the graphical login window.
The actual service definitions included in %desktop-services and
provided by (gnu services dbus) and (gnu services desktop) are
described below.
- Variável: dbus-root-service-type
Type for a service that runs the D-Bus “system bus”. 34
The value for this service type is a
<dbus-configuration>record.
- Tipo de dados: dbus-configuration
Data type representing the configuration for
dbus-root-service-type.dbus(default:dbus) (type: file-like)Package object for dbus.
services(default:'()) (type: list)List of packages that provide an etc/dbus-1/system.d directory containing additional D-Bus configuration and policy files. For example, to allow avahi-daemon to use the system bus, services must be equal to
(list avahi).verbose?(default:#f) (type: boolean)When
#t, D-Bus is launched with environment variable ‘DBUS_VERBOSE’ set to ‘1’. A verbose-enabled D-Bus package such asdbus-verboseshould be provided to dbus in this scenario. The verbose output is logged to /var/log/dbus-daemon.log.
Elogind
Elogind is a login and seat management daemon that also handles most system-level power events for a computer, for example suspending the system when a lid is closed, or shutting it down when the power button is pressed.
It also provides a D-Bus interface that can be used to know which users are logged in, know what kind of sessions they have open, suspend the system, inhibit system suspend, reboot the system, and other tasks.
- Variável: elogind-service-type
Type of the service that runs
elogind, a login and seat management daemon. The value for this service is a<elogind-configuration>object.
- Tipo de dados: elogind-configuration
Data type representing the configuration of
elogind.elogind(default:elogind) (type: file-like)...
kill-user-processes?(default:#f) (type: boolean)...
kill-only-users(default:'()) (type: list)...
kill-exclude-users(default:'("root")) (type: list-of-string)...
inhibit-delay-max-seconds(default:5) (type: integer)...
handle-power-key(default:'poweroff) (type: symbol)...
handle-suspend-key(default:'suspend) (type: symbol)...
handle-hibernate-key(default:'hibernate) (type: symbol)...
handle-lid-switch(default:'suspend) (type: symbol)...
handle-lid-switch-docked(default:'ignore) (type: symbol)...
handle-lid-switch-external-power(default:*unspecified*) (type: symbol)...
power-key-ignore-inhibited?(default:#f) (type: boolean)...
suspend-key-ignore-inhibited?(default:#f) (type: boolean)...
hibernate-key-ignore-inhibited?(default:#f) (type: boolean)...
lid-switch-ignore-inhibited?(default:#t) (type: boolean)...
holdoff-timeout-seconds(default:30) (type: integer)...
idle-action(default:'ignore) (type: symbol)...
idle-action-seconds(default:(* 30 60)) (type: integer)...
runtime-directory-size-percent(default:10) (type: integer)...
runtime-directory-size(default:#f) (type: integer)...
remove-ipc?(default:#t) (type: boolean)...
suspend-state(default:'("mem" "standby" "freeze")) (type: list)...
suspend-mode(default:'()) (type: list)...
hibernate-state(default:'("disk")) (type: list)...
hibernate-mode(default:'("platform" "shutdown")) (type: list)...
hybrid-sleep-state(default:'("disk")) (type: list)...
hybrid-sleep-mode(default:'("suspend" "platform" "shutdown")) (type: list)...
hibernate-delay-seconds(default:*unspecified*) (type: integer)...
suspend-estimation-seconds(default:*unspecified*) (type: integer)...
system-sleep-hook-files(default:'()) (type: list)A list of executables (file-like objects) that will be installed into the /etc/elogind/system-sleep/ hook directory. For example:
(elogind-configuration (system-sleep-hook-files (list (local-file "sleep-script"))))See ‘Hook directories’ in the
loginctl(1)man page for more information.system-shutdown-hook-files(default:'()) (type: list)A list of executables (file-like objects) that will be installed into the /etc/elogind/system-shutdown/ hook directory.
allow-power-off-interrupts?(default:#f) (type: boolean)allow-suspend-interrupts?(default:#f) (type: boolean)Whether the executables in elogind’s hook directories (see above) can cause a power-off or suspend action to be cancelled (interrupted) by printing an appropriate error message to stdout.
broadcast-power-off-interrupts?(default:#t) (type: boolean)broadcast-suspend-interrupts?(default:#t) (type: boolean)Whether an interrupt of a power-off or suspend action is broadcasted.
- Variável: accountsservice-service-type
Type for the service that runs AccountsService, a system service that can list available accounts, change their passwords, and so on. AccountsService integrates with PolicyKit to enable unprivileged users to acquire the capability to modify their system configuration. See AccountsService for more information.
The value for this service is a file-like object, by default it is set to
accountsservice(the package object for AccountsService).
- Variável: polkit-service-type
Type for the service that runs the Polkit privilege management service, which allows system administrators to grant access to privileged operations in a structured way. By querying the Polkit service, a privileged system component can know when it should grant additional capabilities to ordinary users. For example, an ordinary user can be granted the capability to suspend the system if the user is logged in locally.
The value for this service is a
<polkit-configuration>object.
- Variável: polkit-wheel-service
Service that adds the
wheelgroup as admins to the Polkit service. This makes it so that users in thewheelgroup are queried for their own passwords when performing administrative actions instead ofroot’s, similar to the behaviour used bysudo.
- Variável: upower-service-type
Service that runs
upowerd, a system-wide monitor for power consumption and battery levels, with the given configuration settings.It implements the
org.freedesktop.UPowerD-Bus interface, and is notably used by GNOME.
- Tipo de dados: upower-configuration
Data type representation the configuration for UPower.
upower(default: upower)Package to use for
upower.watts-up-pro?(padrão:#f)Enable the Watts Up Pro device.
poll-batteries?(padrão:#t)Enable polling the kernel for battery level changes.
ignore-lid?(padrão:#f)Ignore the lid state, this can be useful if it’s incorrect on a device.
use-percentage-for-policy?(default:#t)Whether to use a policy based on battery percentage rather than on estimated time left. A policy based on battery percentage is usually more reliable.
percentage-low(default:20)When
use-percentage-for-policy?is#t, this sets the percentage at which the battery is considered low.percentage-critical(default:5)When
use-percentage-for-policy?is#t, this sets the percentage at which the battery is considered critical.percentage-action(default:2)When
use-percentage-for-policy?is#t, this sets the percentage at which action will be taken.time-low(default:1200)When
use-time-for-policy?is#f, this sets the time remaining in seconds at which the battery is considered low.time-critical(default:300)When
use-time-for-policy?is#f, this sets the time remaining in seconds at which the battery is considered critical.time-action(default:120)When
use-time-for-policy?is#f, this sets the time remaining in seconds at which action will be taken.critical-power-action(default:'hybrid-sleep)The action taken when
percentage-actionortime-actionis reached (depending on the configuration ofuse-percentage-for-policy?).Possible values are:
-
'power-off -
'hibernate -
'hybrid-sleep.
-
- Variável: udisks-service-type
Type for the service that runs UDisks, a disk management daemon that provides user interfaces with notifications and ways to mount/unmount disks. Programs that talk to UDisks include the
udisksctlcommand, part of UDisks, and GNOME Disks. Note that Udisks relies on themountcommand, so it will only be able to use the file-system utilities installed in the system profile. For example if you want to be able to mount NTFS file-systems in read and write fashion, you’ll need to haventfs-3ginstalled system-wide.The value for this service is a
<udisks-configuration>object.
- Tipo de dados: udisks-configuration
Data type representing the configuration for
udisks-service-type.udisks(default:udisks) (type: file-like)Package object for UDisks.
- Variável: gvfs-service-type
Type for the service that provides virtual file systems for GIO applications, which enables support for
trash://,ftp://,sftp://and many other location schemas in file managers like Nautilus (GNOME Files) and Thunar.The value for this service is a
<gvfs-configuration>object.
- Tipo de dados: gvfs-configuration
Data type representing the configuration for
gvfs-service-type.gvfs(default:gvfs) (type: file-like)Package object for GVfs.
- Variável: colord-service-type
This is the type of the service that runs
colord, a system service with a D-Bus interface to manage the color profiles of input and output devices such as screens and scanners. It is notably used by the GNOME Color Manager graphical tool. See the colord web site for more information.
- Variável: sane-service-type
This service provides access to scanners via SANE by installing the necessary udev rules. It is included in
%desktop-services(veja Serviços de desktop) and relies by default onsane-backends-minimalpackage (see below) for hardware support.
- Variável: sane-backends-minimal
The default package which the
sane-service-typeinstalls. It supports many recent scanners.
- Variável: sane-backends
This package includes support for all scanners that
sane-backends-minimalsupports, plus older Hewlett-Packard scanners supported byhplippackage. In order to use this on a system which relies on%desktop-services, you may usemodify-services(vejamodify-services) as illustrated below:(use-modules (gnu)) (use-service-modules … desktop) (use-package-modules … scanner) (define %my-desktop-services ;; List of desktop services that supports a broader range of scanners. (modify-services %desktop-services (sane-service-type _ => sane-backends))) (operating-system … (services %my-desktop-services))
- Procedure: geoclue-application name [#:allowed? #t] [#:system? #f] [#:users '()]
Return a configuration allowing an application to access GeoClue location data. name is the Desktop ID of the application, without the
.desktoppart. If allowed? is true, the application will have access to location information by default. The boolean system? value indicates whether an application is a system component or not. Finally users is a list of UIDs of all users for which this application is allowed location info access. An empty users list means that all users are allowed.
- Variável: %standard-geoclue-applications
The standard list of well-known GeoClue application configurations, granting authority to the GNOME date-and-time utility to ask for the current location in order to set the time zone, and allowing the IceCat and Epiphany web browsers to request location information. IceCat and Epiphany both query the user before allowing a web page to know the user’s location.
- Variável: geoclue-service-type
Type for the service that runs the GeoClue location service. This service provides a D-Bus interface to allow applications to request access to a user’s physical location, and optionally to add information to online location databases.
The value for this service is a
<geoclue-configuration>object.
- Variável: bluetooth-service-type
This is the type for the Linux Bluetooth Protocol Stack (BlueZ) system, which generates the /etc/bluetooth/main.conf configuration file. The value for this type is a
bluetooth-configurationrecord as in this example:(service bluetooth-service-type)See below for details about
bluetooth-configuration.
- Tipo de dados: bluetooth-configuration
Data type representing the configuration for
bluetooth-service.bluez(default:bluez)bluezpackage to use.name(default:"BlueZ")Default adapter name.
class(default:#x000000)Default device class. Only the major and minor device class bits are considered.
discoverable-timeout(default:180)How long to stay in discoverable mode before going back to non-discoverable. The value is in seconds.
always-pairable?(default:#f)Always allow pairing even if there are no agents registered.
pairable-timeout(default:0)How long to stay in pairable mode before going back to non-discoverable. The value is in seconds.
device-id(default:#f)Use vendor id source (assigner), vendor, product and version information for DID profile support. The values are separated by ":" and assigner, VID, PID and version.
Possible values are:
-
#fto disable it, -
"assigner:1234:5678:abcd", where assigner is eitherusb(default) orbluetooth.
-
reverse-service-discovery?(default:#t)Do reverse service discovery for previously unknown devices that connect to us. For BR/EDR this option is really only needed for qualification since the BITE tester doesn’t like us doing reverse SDP for some test cases, for LE this disables the GATT client functionally so it can be used in system which can only operate as peripheral.
name-resolving?(default:#t)Enable name resolving after inquiry. Set it to
#fif you don’t need remote devices name and want shorter discovery cycle.debug-keys?(default:#f)Enable runtime persistency of debug link keys. Default is false which makes debug link keys valid only for the duration of the connection that they were created for.
controller-mode(default:'dual)Restricts all controllers to the specified transport.
'dualmeans both BR/EDR and LE are enabled (if supported by the hardware).Possible values are:
-
'dual -
'bredr -
'le
-
multi-profile(default:'off)Enables Multi Profile Specification support. This allows to specify if system supports only Multiple Profiles Single Device (MPSD) configuration or both Multiple Profiles Single Device (MPSD) and Multiple Profiles Multiple Devices (MPMD) configurations.
Possible values are:
-
'off -
'single -
'multiple
-
fast-connectable?(padrão:#f)Permanently enables the Fast Connectable setting for adapters that support it. When enabled other devices can connect faster to us, however the tradeoff is increased power consumptions. This feature will fully work only on kernel version 4.1 and newer.
privacy(default:'off)Default privacy settings.
-
'off: Disable local privacy -
'network/on: A device will only accept advertising packets from peer devices that contain private addresses. It may not be compatible with some legacy devices since it requires the use of RPA(s) all the time -
'device: A device in device privacy mode is only concerned about the privacy of the device and will accept advertising packets from peer devices that contain their Identity Address as well as ones that contain a private address, even if the peer device has distributed its IRK in the past
and additionally, if controller-mode is set to
'dual:-
'limited-network: Apply Limited Discoverable Mode to advertising, which follows the same policy as to BR/EDR that publishes the identity address when discoverable, and Network Privacy Mode for scanning -
'limited-device: Apply Limited Discoverable Mode to advertising, which follows the same policy as to BR/EDR that publishes the identity address when discoverable, and Device Privacy Mode for scanning.
-
just-works-repairing(default:'never)Specify the policy to the JUST-WORKS repairing initiated by peer.
Possible values:
-
'never -
'confirm -
'always
-
temporary-timeout(default:30)How long to keep temporary devices around. The value is in seconds.
0disables the timer completely.refresh-discovery?(default:#t)Enables the device to issue an SDP request to update known services when profile is connected.
experimental(default:#f)Enables experimental features and interfaces, alternatively a list of UUIDs can be given.
Possible values:
-
#t -
#f -
(list (uuid <uuid-1>) (uuid <uuid-2>) ...).
List of possible UUIDs:
-
d4992530-b9ec-469f-ab01-6c481c47da1c: BlueZ Experimental Debug, -
671b10b5-42c0-4696-9227-eb28d1b049d6: BlueZ Experimental Simultaneous Central and Peripheral, -
15c0a148-c273-11ea-b3de-0242ac130004: BlueZ Experimental LL privacy, -
330859bc-7506-492d-9370-9a6f0614037f: BlueZ Experimental Bluetooth Quality Report, -
a6695ace-ee7f-4fb9-881a-5fac66c629af: BlueZ Experimental Offload Codecs.
-
remote-name-request-retry-delay(default:300)The duration to avoid retrying to resolve a peer’s name, if the previous try failed.
page-scan-type(default:#f)BR/EDR Page scan activity type.
page-scan-interval(default:#f)BR/EDR Page scan activity interval.
page-scan-window(default:#f)BR/EDR Page scan activity window.
inquiry-scan-type(default:#f)BR/EDR Inquiry scan activity type.
inquiry-scan-interval(default:#f)BR/EDR Inquiry scan activity interval.
inquiry-scan-window(default:#f)BR/EDR Inquiry scan activity window.
link-supervision-timeout(default:#f)BR/EDR Link supervision timeout.
page-timeout(default:#f)BR/EDR Page timeout.
min-sniff-interval(default:#f)BR/EDR minimum sniff interval.
max-sniff-interval(default:#f)BR/EDR maximum sniff interval.
min-advertisement-interval(default:#f)LE minimum advertisement interval (used for legacy advertisement only).
max-advertisement-interval(default:#f)LE maximum advertisement interval (used for legacy advertisement only).
multi-advertisement-rotation-interval(default:#f)LE multiple advertisement rotation interval.
scan-interval-auto-connect(default:#f)LE scanning interval used for passive scanning supporting auto connect.
scan-window-auto-connect(default:#f)LE scanning window used for passive scanning supporting auto connect.
scan-interval-suspend(default:#f)LE scanning interval used for active scanning supporting wake from suspend.
scan-window-suspend(default:#f)LE scanning window used for active scanning supporting wake from suspend.
scan-interval-discovery(default:#f)LE scanning interval used for active scanning supporting discovery.
scan-window-discovery(default:#f)LE scanning window used for active scanning supporting discovery.
scan-interval-adv-monitor(default:#f)LE scanning interval used for passive scanning supporting the advertisement monitor APIs.
scan-window-adv-monitor(default:#f)LE scanning window used for passive scanning supporting the advertisement monitor APIs.
scan-interval-connect(default:#f)LE scanning interval used for connection establishment.
scan-window-connect(default:#f)LE scanning window used for connection establishment.
min-connection-interval(default:#f)LE default minimum connection interval. This value is superseded by any specific value provided via the Load Connection Parameters interface.
max-connection-interval(default:#f)LE default maximum connection interval. This value is superseded by any specific value provided via the Load Connection Parameters interface.
connection-latency(default:#f)LE default connection latency. This value is superseded by any specific value provided via the Load Connection Parameters interface.
connection-supervision-timeout(default:#f)LE default connection supervision timeout. This value is superseded by any specific value provided via the Load Connection Parameters interface.
autoconnect-timeout(default:#f)LE default autoconnect timeout. This value is superseded by any specific value provided via the Load Connection Parameters interface.
adv-mon-allowlist-scan-duration(default:300)Allowlist scan duration during interleaving scan. Only used when scanning for ADV monitors. The units are msec.
adv-mon-no-filter-scan-duration(default:500)No filter scan duration during interleaving scan. Only used when scanning for ADV monitors. The units are msec.
enable-adv-mon-interleave-scan?(default:#t)Enable/Disable Advertisement Monitor interleave scan for power saving.
cache(default:'always)GATT attribute cache.
Possible values are:
-
'always: Always cache attributes even for devices not paired, this is recommended as it is best for interoperability, with more consistent reconnection times and enables proper tracking of notifications for all devices -
'yes: Only cache attributes of paired devices -
'no: Never cache attributes.
-
key-size(default:0)Minimum required Encryption Key Size for accessing secured characteristics.
Possible values are:
-
0: Don’t care -
7 <= N <= 16
-
exchange-mtu(default:517)Exchange MTU size. Possible values are:
-
23 <= N <= 517
-
att-channels(default:3)Number of ATT channels. Possible values are:
-
1: Disables EATT -
2 <= N <= 5
-
session-mode(default:'basic)AVDTP L2CAP signalling channel mode.
Possible values are:
-
'basic: Use L2CAP basic mode -
'ertm: Use L2CAP enhanced retransmission mode.
-
stream-mode(default:'basic)AVDTP L2CAP transport channel mode.
Possible values are:
-
'basic: Use L2CAP basic mode -
'streaming: Use L2CAP streaming mode.
-
reconnect-uuids(default:'())The ReconnectUUIDs defines the set of remote services that should try to be reconnected to in case of a link loss (link supervision timeout). The policy plugin should contain a sane set of values by default, but this list can be overridden here. By setting the list to empty the reconnection feature gets disabled.
Possible values:
-
'() -
(list (uuid <uuid-1>) (uuid <uuid-2>) ...).
-
reconnect-attempts(default:7)Defines the number of attempts to reconnect after a link lost. Setting the value to 0 disables reconnecting feature.
reconnect-intervals(default:'(1 2 4 8 16 32 64))Defines a list of intervals in seconds to use in between attempts. If the number of attempts defined in reconnect-attempts is bigger than the list of intervals the last interval is repeated until the last attempt.
auto-enable?(default:#f)Defines option to enable all controllers when they are found. This includes adapters present on start as well as adapters that are plugged in later on.
resume-delay(default:2)Audio devices that were disconnected due to suspend will be reconnected on resume. resume-delay determines the delay between when the controller resumes from suspend and a connection attempt is made. A longer delay is better for better co-existence with Wi-Fi. The value is in seconds.
rssi-sampling-period(default:#xFF)Default RSSI Sampling Period. This is used when a client registers an advertisement monitor and leaves the RSSISamplingPeriod unset.
Possible values are:
-
#x0: Report all advertisements -
N = #xXX: Report advertisements every N x 100 msec (range: #x01 to #xFE) -
#xFF: Report only one advertisement per device during monitoring period.
-
- Variável: gnome-keyring-service-type
This is the type of the service that adds the GNOME Keyring. Its value is a
gnome-keyring-configurationobject (see below).This service adds the
gnome-keyringpackage to the system profile and extends PAM with entries usingpam_gnome_keyring.so, unlocking a user’s login keyring when they log in or setting its password with passwd.
- Tipo de dados: gnome-keyring-configuration
Configuration record for the GNOME Keyring service.
keyring(default:gnome-keyring)The GNOME keyring package to use.
pam-servicesA list of
(service . kind)pairs denoting PAM services to extend, where service is the name of an existing service to extend and kind is one ofloginorpasswd.If
loginis given, it adds an optionalpam_gnome_keyring.soto the auth block without arguments and to the session block withauto_start. Ifpasswdis given, it adds an optionalpam_gnome_keyring.soto the password block without arguments.By default, this field contains “gdm-password” with the value
loginand “passwd” is with the valuepasswd.
- Variável: seatd-service-type
seatd is a minimal seat management daemon.
Seat management takes care of mediating access to shared devices (graphics, input), without requiring the applications needing access to be root.
(append (list ;; make sure seatd is running (service seatd-service-type)) ;; normally one would want %base-services %base-services)seatdoperates over a UNIX domain socket, withlibseatproviding the client side of the protocol. Applications that acquire access to the shared resources viaseatd(e.g.sway) need to be able to talk to this socket. This can be achieved by adding the user they run under to the group owningseatd’s socket (usually “seat”), like so:(user-account (name "alice") (group "users") (supplementary-groups '("wheel" ; allow use of sudo, etc. "seat" ; seat management "audio" ; sound card "video" ; video devices such as webcams "cdrom")) ; the good ol' CD-ROM (comment "Bob's sister"))Depending on your setup, you will have to not only add regular users, but also system users to this group. For instance, some greetd greeters require graphics and therefore also need to negotiate with seatd.
- Tipo de dados: seatd-configuration
Configuration record for the seatd daemon service.
seatd(default:seatd)The seatd package to use.
group(default: ‘"seat"’)Group to own the seatd socket.
socket(default: ‘"/run/seatd.sock"’)Where to create the seatd socket.
logfile(default: ‘"/var/log/seatd.log"’)Log file to write to.
loglevel(default: ‘"error"’)Log level to output logs. Possible values: ‘"silent"’, ‘"error"’, ‘"info"’ and ‘"debug"’.
Próximo: File Search Services, Anterior: Serviços de desktop, Acima: Serviços [Conteúdo][Índice]
11.10.10 Serviços de som
The (gnu services sound) module provides a service to configure the
Advanced Linux Sound Architecture (ALSA) system, which makes PulseAudio the
preferred ALSA output driver.
- Variável: alsa-service-type
This is the type for the Advanced Linux Sound Architecture (ALSA) system, which generates the /etc/asound.conf configuration file. The value for this type is a
alsa-configurationrecord as in this example:(service alsa-service-type)See below for details about
alsa-configuration.
- Tipo de dados: alsa-configuration
Data type representing the configuration for
alsa-service.alsa-plugins(default: alsa-plugins)alsa-pluginspackage to use.pulseaudio?(default: #t)Whether ALSA applications should transparently be made to use the PulseAudio sound server.
Using PulseAudio allows you to run several sound-producing applications at the same time and to individual control them via
pavucontrol, among other things.extra-options(default: "")String to append to the /etc/asound.conf file.
Individual users who want to override the system configuration of ALSA can do it with the ~/.asoundrc file:
# In guix, we have to specify the absolute path for plugins.
pcm_type.jack {
lib "/home/alice/.guix-profile/lib/alsa-lib/libasound_module_pcm_jack.so"
}
# Routing ALSA to jack:
# <http://jackaudio.org/faq/routing_alsa.html>.
pcm.rawjack {
type jack
playback_ports {
0 system:playback_1
1 system:playback_2
}
capture_ports {
0 system:capture_1
1 system:capture_2
}
}
pcm.!default {
type plug
slave {
pcm "rawjack"
}
}
See https://www.alsa-project.org/main/index.php/Asoundrc for the details.
- Variável: pulseaudio-service-type
This is the type for the PulseAudio sound server. It exists to allow system overrides of the default settings via
pulseaudio-configuration, see below.Aviso: This service overrides per-user configuration files. If you want PulseAudio to honor configuration files in ~/.config/pulse, you have to unset the environment variables
PULSE_CONFIGandPULSE_CLIENTCONFIGin your ~/.bash_profile.Aviso: This service on its own does not ensure, that the
pulseaudiopackage exists on your machine. It merely adds configuration files for it, as detailed below. In the (admittedly unlikely) case, that you find yourself without apulseaudiopackage, consider enabling it through thealsa-service-typeabove.
- Tipo de dados: pulseaudio-configuration
Data type representing the configuration for
pulseaudio-service.client-conf(default:'())List of settings to set in client.conf. Accepts a list of strings or symbol-value pairs. A string will be inserted as-is with a newline added. A pair will be formatted as “key = value”, again with a newline added.
daemon-conf(default:'((flat-volumes . no)))List of settings to set in daemon.conf, formatted just like client-conf.
script-file(default:(file-append pulseaudio "/etc/pulse/default.pa"))Script file to use as default.pa. In case the
extra-script-filesfield below is used, an.includedirective pointing to /etc/pulse/default.pa.d is appended to the provided script.extra-script-files(default:'())A list of file-like objects defining extra PulseAudio scripts to run at the initialization of the
pulseaudiodaemon, after the mainscript-file. The scripts are deployed to the /etc/pulse/default.pa.d directory; they should have the ‘.pa’ file name extension. For a reference of the available commands, refer toman pulse-cli-syntax.system-script-file(default:(file-append pulseaudio "/etc/pulse/system.pa"))Script file to use as system.pa.
The example below sets the default PulseAudio card profile, the default sink and the default source to use for a old SoundBlaster Audigy sound card:
(pulseaudio-configuration (extra-script-files (list (plain-file "audigy.pa" (string-append "\ set-card-profile alsa_card.pci-0000_01_01.0 \ output:analog-surround-40+input:analog-mono set-default-source alsa_input.pci-0000_01_01.0.analog-mono set-default-sink alsa_output.pci-0000_01_01.0.analog-surround-40\n")))))Note that
pulseaudio-service-typeis part of%desktop-services; if your operating system declaration was derived from one of the desktop templates, you’ll want to adjust the above example to modify the existingpulseaudio-service-typeviamodify-services(vejamodify-services), instead of defining a new one.
- Variável: ladspa-service-type
This service sets the LADSPA_PATH variable, so that programs, which respect it, e.g. PulseAudio, can load LADSPA plugins.
The following example will setup the service to enable modules from the
swh-pluginspackage:(service ladspa-service-type (ladspa-configuration (plugins (list swh-plugins))))See http://plugin.org.uk/ladspa-swh/docs/ladspa-swh.html for the details.
Speaker Safety Daemon System Service
Speaker Safety Daemon is a user-space daemon that implements an analogue of the Texas Instruments Smart Amp speaker protection model. It can be used to protect the speakers on Apple Silicon devices.
- Variável: speakersafetyd-service-type
This is the type for the
speakersafetydsystem service, whose value is aspeakersafetyd-configurationrecord.(service speakersafetyd-service-type)See below for details about
speakersafetyd-configuration.
- Data Type: speakersafetyd-configuration
Available
speakersafetyd-configurationfields are:blackbox-directory(default:"/var/lib/speakersafetyd/blackbox") (type: string)The directory to which blackbox files are written when the speakers are getting too hot. The blackbox files contain audio and debug information which the developers of
speakersafetydmight ask for when reporting bugs.configuration-directory(type: file-like)The base directory as a G-expression (veja Expressões-G) that contains the configuration files of the speaker models.
maximum-gain-reduction(default:7) (type: integer)Maximum gain reduction before panicking, useful for debugging.
speakersafetyd(default:speakersafetyd) (type: file-like)The Speaker Safety Daemon package to use.
Próximo: Serviços de bancos de dados, Anterior: Serviços de som, Acima: Serviços [Conteúdo][Índice]
11.10.11 File Search Services
The services in this section populate file databases that let you
search for files on your machine. These services are provided by the
(gnu services admin) module.
The first one, file-database-service-type, periodically runs the
venerable updatedb command (veja Invoking updatedb em GNU
Findutils). That command populates a database of file names that you can
then search with the locate command (veja Invoing locate em GNU Findutils), as in this example:
locate important-notes.txt
You can enable this service with its default settings by adding this snippet to your operating system services:
(service file-database-service-type)
This updates the database once a week, excluding files from
/gnu/store—these are more usefully handled by guix locate
(veja Invocando guix locate). You can of course provide a custom
configuration, as described below.
- Variável: file-database-service-type
This is the type of the file database service, which runs
updatedbperiodically. Its associated value must be afile-database-configurationrecord, as described below.
- Tipo de dados: file-database-configuration
Record type for the
file-database-service-typeconfiguration, with the following fields:package(default:findutils)The GNU Findutils package from which the
updatedbcommand is taken.schedule(default:%default-file-database-update-schedule)String or G-exp denoting an mcron schedule for the periodic
updatedbjob (veja Guile Syntax em GNU mcron).excluded-directories(default%default-file-database-excluded-directories)List of regular expressions of directories to ignore when building the file database. By default, this includes /tmp and /gnu/store; the latter should instead be indexed by
guix locate(veja Invocandoguix locate). This list is passed to the --prunepaths option ofupdatedb(veja Invoking updatedb em GNU Findutils).
The second service, package-database-service-type, builds the
database used by guix locate, which lets you search for packages
that contain a given file (veja Invocando guix locate). The service
periodically updates a system-wide database, which will be readily available
to anyone running guix locate on the system. To use this service
with its default settings, add this snippet to your service list:
(service package-database-service-type)
This will run guix locate --update once a week.
- Variável: package-database-service-type
This is the service type for periodic
guix locateupdates (veja Invocandoguix locate). Its value must be apackage-database-configurationrecord, as shown below.
- Tipo de dados: package-database-configuration
Data type to configure periodic package database updates. It has the following fields:
package(default:guix)The Guix package to use.
schedule(default:%default-package-database-update-schedule)String or G-exp denoting an mcron schedule for the periodic
guix locate --updatejob (veja Guile Syntax em GNU mcron).method(default:'store)Indexing method for
guix locate. The default value,'store, yields a more complete database but is relatively expensive in terms of CPU and input/output.channels(default:#~%default-channels)G-exp denoting the channels to use when updating the database (veja Canais).
Próximo: Serviços de correio, Anterior: File Search Services, Acima: Serviços [Conteúdo][Índice]
11.10.12 Serviços de bancos de dados
The (gnu services databases) module provides the following services.
PostgreSQL
- Variável: postgresql-service-type
The service type for the PostgreSQL database server. Its value should be a valid
postgresql-configurationobject, documented below. The following example describes a PostgreSQL service with the default configuration.(service postgresql-service-type (postgresql-configuration (postgresql postgresql)))If the services fails to start, it may be due to an incompatible cluster already present in data-directory. Adjust it (or, if you don’t need the cluster anymore, delete data-directory), then restart the service.
Peer authentication is used by default and the
postgresuser account has no shell, which prevents the direct execution ofpsqlcommands as this user. To usepsql, you can temporarily log in aspostgresusing a shell, create a PostgreSQL superuser with the same name as one of the system users and then create the associated database.sudo -u postgres -s /bin/sh createuser --interactive createdb $MY_USER_LOGIN # Replace appropriately.
- Tipo de dados: postgresql-configuration
Data type representing the configuration for the
postgresql-service-type.postgresqlPostgreSQL package to use for the service.
port(padrão:5432)Port on which PostgreSQL should listen.
locale(default:"en_US.utf8")Locale to use as the default when creating the database cluster.
config-file(default:(postgresql-config-file))The configuration file to use when running PostgreSQL. The default behaviour uses the postgresql-config-file record with the default values for the fields.
log-directory(default:"/var/log/postgresql")The directory where
pg_ctloutput will be written in a file named"pg_ctl.log". This file can be useful to debug PostgreSQL configuration errors for instance.data-directory(default:"/var/lib/postgresql/data")Directory in which to store the data.
extension-packages(default:'()) ¶Additional extensions are loaded from packages listed in extension-packages. Extensions are available at runtime. For instance, to create a geographic database using the
postgisextension, a user can configure the postgresql-service as in this example:(use-package-modules databases geo) (operating-system ... ;; postgresql is required to run `psql' but postgis is not required for ;; proper operation. (packages (cons* postgresql %base-packages)) (services (cons* (service postgresql-service-type (postgresql-configuration (postgresql postgresql) (extension-packages (list postgis)))) %base-services)))
Then the extension becomes visible and you can initialise an empty geographic database in this way:
psql -U postgres > create database postgistest; > \connect postgistest; > create extension postgis; > create extension postgis_topology;
There is no need to add this field for contrib extensions such as hstore or dblink as they are already loadable by postgresql. This field is only required to add extensions provided by other packages.
create-account?(default:#t)Whether or not the
postgresuser and group should be created.uid(padrão:#f)Explicitly specify the UID of the
postgresdaemon account. You normally do not need to specify this, in which case a free UID will be automatically assigned.One situation where this option might be useful is if the data-directory is located on a mounted network share.
gid(default:#f)Explicitly specify the GID of the
postgresgroup.
- Tipo de dados: postgresql-config-file
Data type representing the PostgreSQL configuration file. As shown in the following example, this can be used to customize the configuration of PostgreSQL. Note that you can use any G-expression or filename in place of this record, if you already have a configuration file you’d like to use for example.
(service postgresql-service-type (postgresql-configuration (config-file (postgresql-config-file (log-destination "stderr") (hba-file (plain-file "pg_hba.conf" " local all all trust host all all 127.0.0.1/32 md5 host all all ::1/128 md5")) (extra-config '(("session_preload_libraries" "auto_explain") ("random_page_cost" 2) ("auto_explain.log_min_duration" "100 ms") ("work_mem" "500 MB") ("logging_collector" #t) ("log_directory" "/var/log/postgresql")))))))log-destination(default:"syslog")The logging method to use for PostgreSQL. Multiple values are accepted, separated by commas.
hba-file(default:%default-postgres-hba)Filename or G-expression for the host-based authentication configuration.
ident-file(default:%default-postgres-ident)Filename or G-expression for the user name mapping configuration.
socket-directory(default:"/var/run/postgresql")Specifies the directory of the Unix-domain socket(s) on which PostgreSQL is to listen for connections from client applications. If set to
""PostgreSQL does not listen on any Unix-domain sockets, in which case only TCP/IP sockets can be used to connect to the server.By default, the
#falsevalue means the PostgreSQL default value will be used, which is currently ‘/tmp’.extra-config(default:'())List of additional keys and values to include in the PostgreSQL config file. Each entry in the list should be a list where the first element is the key, and the remaining elements are the values.
The values can be numbers, booleans or strings and will be mapped to PostgreSQL parameters types
Boolean,String,Numeric,Numeric with UnitandEnumerateddescribed here.
- Variável: postgresql-role-service-type
This service allows to create PostgreSQL roles and databases after PostgreSQL service start. Here is an example of its use.
(service postgresql-role-service-type (postgresql-role-configuration (roles (list (postgresql-role (name "test") (create-database? #t))))))This service can be extended with extra roles, as in this example:
(service-extension postgresql-role-service-type (const (postgresql-role (name "alice") (create-database? #t))))
- Tipo de dados: postgresql-role
PostgreSQL manages database access permissions using the concept of roles. A role can be thought of as either a database user, or a group of database users, depending on how the role is set up. Roles can own database objects (for example, tables) and can assign privileges on those objects to other roles to control who has access to which objects.
nameThe role name.
permissions(default:'(createdb login))The role permissions list. Supported permissions are
bypassrls,createdb,createrole,login,replicationandsuperuser.create-database?(default:#f)whether to create a database with the same name as the role.
encoding(default:"UTF8")The character set to use for storing text in the database.
collation(default:"en_US.utf8")The string sort order locale setting.
ctype(default:"en_US.utf8")The character classification locale setting.
template(default:"template1")The default template to copy the new database from when creating it. Use
"template0"for a pristine database with no system-local modifications.
- Tipo de dados: postgresql-role-configuration
Data type representing the configuration of postgresql-role-service-type.
host(default:"/var/run/postgresql")The PostgreSQL host to connect to.
log(default:"/var/log/postgresql_roles.log")File name of the log file.
roles(default:'())The initial PostgreSQL roles to create.
MariaDB/MySQL
- Variável: mysql-service-type
This is the service type for a MySQL or MariaDB database server. Its value is a
mysql-configurationobject that specifies which package to use, as well as various settings for themysqlddaemon.
- Tipo de dados: mysql-configuration
Data type representing the configuration of mysql-service-type.
mysql(default: mariadb)Package object of the MySQL database server, can be either mariadb or mysql.
For MySQL, a temporary root password will be displayed at activation time. For MariaDB, the root password is empty.
bind-address(default:"127.0.0.1")The IP on which to listen for network connections. Use
"0.0.0.0"to bind to all available network interfaces.port(padrão:3306)TCP port on which the database server listens for incoming connections.
socket(default:"/run/mysqld/mysqld.sock")Socket file to use for local (non-network) connections.
extra-content(default:"")Additional settings for the my.cnf configuration file.
extra-environment(default:#~'())List of environment variables passed to the
mysqldprocess.auto-upgrade?(default:#t)Whether to automatically run
mysql_upgradeafter starting the service. This is necessary to upgrade the system schema after “major” updates (such as switching from MariaDB 10.4 to 10.5), but can be disabled if you would rather do that manually.
Memcached
- Variável: memcached-service-type
This is the service type for the Memcached service, which provides a distributed in memory cache. The value for the service type is a
memcached-configurationobject.
(service memcached-service-type)
- Tipo de dados: memcached-configuration
Data type representing the configuration of memcached.
memcached(default:memcached)The Memcached package to use.
interfaces(default:'("0.0.0.0"))Network interfaces on which to listen.
tcp-port(default:11211)Port on which to accept connections.
udp-port(default:11211)Port on which to accept UDP connections on, a value of 0 will disable listening on a UDP socket.
additional-options(default:'())Additional command line options to pass to
memcached.
Redis
- Variável: redis-service-type
This is the service type for the Redis key/value store, whose value is a
redis-configurationobject.
- Tipo de dados: redis-configuration
Data type representing the configuration of redis.
redis(default:redis)The Redis package to use.
bind(default:"127.0.0.1")Network interface on which to listen.
port(padrão:6379)Port on which to accept connections on, a value of 0 will disable listening on a TCP socket.
working-directory(default:"/var/lib/redis")Directory in which to store the database and related files.
Próximo: Serviços de mensageria, Anterior: Serviços de bancos de dados, Acima: Serviços [Conteúdo][Índice]
11.10.13 Serviços de correio
The (gnu services mail) module provides Guix service definitions for
email services: IMAP, POP3, and LMTP servers, as well as mail transport
agents (MTAs). Lots of acronyms! These services are detailed in the
subsections below.
Dovecot Service
- Variável: dovecot-service-type
Type for the service that runs the Dovecot IMAP/POP3/LMTP mail server, whose value is a
<dovecot-configuration>object.
By default, Dovecot does not need much configuration; the default
configuration object created by (dovecot-configuration) will suffice
if your mail is delivered to ~/Maildir. A self-signed certificate
will be generated for TLS-protected connections, though Dovecot will also
listen on cleartext ports by default. There are a number of options,
though, which mail administrators might need to change, and as is the case
with other services, Guix allows the system administrator to specify these
parameters via a uniform Scheme interface.
For example, to specify that mail is located at maildir~/.mail, one
would instantiate the Dovecot service like this:
(service dovecot-service-type
(dovecot-configuration
(mail-location "maildir:~/.mail")))
The available configuration parameters follow. Each parameter definition is
preceded by its type; for example, ‘string-list foo’ indicates that the
foo parameter should be specified as a list of strings. There is
also a way to specify the configuration as a string, if you have an old
dovecot.conf file that you want to port over from some other system;
see the end for more details.
Available dovecot-configuration fields are:
dovecot-configurationparameter: package dovecot ¶The dovecot package.
dovecot-configurationparameter: package-list extensions ¶A list of additional Dovecot plugin packages to make available at runtime. During service activation, the lib/dovecot directory from each specified package is combined with Dovecot’s core modules into a unified module directory.
For example, to enable Sieve filtering:
(extensions (list dovecot-pigeonhole))Each package in the list must provide its modules at lib/dovecot, as this is where
make-dovecot-moduledirexpects to find its extensions. The service combines these directories to create a unified module structure.The default value is an empty list, providing only core Dovecot functionality.
dovecot-configurationparameter: comma-separated-string-list listen ¶A list of IPs or hosts where to listen for connections. ‘*’ listens on all IPv4 interfaces, ‘::’ listens on all IPv6 interfaces. If you want to specify non-default ports or anything more complex, customize the address and port fields of the ‘inet-listener’ of the specific services you are interested in.
dovecot-configurationparameter: protocol-configuration-list protocols ¶List of protocols we want to serve. Available protocols include ‘imap’, ‘pop3’, and ‘lmtp’.
Available
protocol-configurationfields are:protocol-configurationparameter: string name ¶The name of the protocol.
protocol-configurationparameter: string auth-socket-path ¶UNIX socket path to the master authentication server to find users. This is used by imap (for shared users) and lda. It defaults to ‘"/var/run/dovecot/auth-userdb"’.
protocol-configurationparameter: boolean imap-metadata? ¶Whether to enable the
IMAP METADATAextension as defined in RFC 5464, which provides a means for clients to set and retrieve per-mailbox, per-user metadata and annotations over IMAP.If this is ‘#t’, you must also specify a dictionary via the
mail-attribute-dictsetting.Defaults to ‘#f’.
protocol-configurationparameter: space-separated-string-list managesieve-notify-capabilities ¶Which NOTIFY capabilities to report to clients that first connect to the ManageSieve service, before authentication. These may differ from the capabilities offered to authenticated users. If this field is left empty, report what the Sieve interpreter supports by default.
Defaults to ‘'()’.
protocol-configurationparameter: space-separated-string-list managesieve-sieve-capability ¶Which SIEVE capabilities to report to clients that first connect to the ManageSieve service, before authentication. These may differ from the capabilities offered to authenticated users. If this field is left empty, report what the Sieve interpreter supports by default.
Defaults to ‘'()’.
protocol-configurationparameter: space-separated-string-list mail-plugins ¶Space separated list of plugins to load.
protocol-configurationparameter: non-negative-integer mail-max-userip-connections ¶Maximum number of IMAP connections allowed for a user from each IP address. NOTE: The username is compared case-sensitively. Defaults to ‘10’.
dovecot-configurationparameter: service-configuration-list services ¶List of services to enable. Available services include ‘imap’, ‘imap-login’, ‘pop3’, ‘pop3-login’, ‘auth’, and ‘lmtp’.
Available
service-configurationfields are:service-configurationparameter: string kind ¶The service kind. Valid values include
director,imap-login,pop3-login,lmtp,imap,pop3,auth,auth-worker,dict,tcpwrap,quota-warning, or anything else.
service-configurationparameter: listener-configuration-list listeners ¶Listeners for the service. A listener is either a
unix-listener-configuration, afifo-listener-configuration, or aninet-listener-configuration. Defaults to ‘'()’.Available
unix-listener-configurationfields are:unix-listener-configurationparameter: string path ¶Path to the file, relative to
base-dirfield. This is also used as the section name.
unix-listener-configurationparameter: string mode ¶The access mode for the socket. Defaults to ‘"0600"’.
unix-listener-configurationparameter: string user ¶The user to own the socket. Defaults to ‘""’.
unix-listener-configurationparameter: string group ¶The group to own the socket. Defaults to ‘""’.
Available
fifo-listener-configurationfields are:fifo-listener-configurationparameter: string path ¶Path to the file, relative to
base-dirfield. This is also used as the section name.
fifo-listener-configurationparameter: string mode ¶The access mode for the socket. Defaults to ‘"0600"’.
fifo-listener-configurationparameter: string user ¶The user to own the socket. Defaults to ‘""’.
fifo-listener-configurationparameter: string group ¶The group to own the socket. Defaults to ‘""’.
Available
inet-listener-configurationfields are:inet-listener-configurationparameter: string protocol ¶The protocol to listen for.
inet-listener-configurationparameter: string address ¶The address on which to listen, or empty for all addresses. Defaults to ‘""’.
inet-listener-configurationparameter: non-negative-integer port ¶The port on which to listen.
inet-listener-configurationparameter: boolean ssl? ¶Whether to use SSL for this service; ‘yes’, ‘no’, or ‘required’. Defaults to ‘#t’.
service-configurationparameter: non-negative-integer client-limit ¶Maximum number of simultaneous client connections per process. Once this number of connections is received, the next incoming connection will prompt Dovecot to spawn another process. If set to 0,
default-client-limitis used instead.Defaults to ‘0’.
service-configurationparameter: non-negative-integer service-count ¶Number of connections to handle before starting a new process. Typically the only useful values are 0 (unlimited) or 1. 1 is more secure, but 0 is faster. <doc/wiki/LoginProcess.txt>. Defaults to ‘1’.
service-configurationparameter: non-negative-integer process-limit ¶Maximum number of processes that can exist for this service. If set to 0,
default-process-limitis used instead.Defaults to ‘0’.
service-configurationparameter: non-negative-integer process-min-avail ¶Number of processes to always keep waiting for more connections. Defaults to ‘0’.
service-configurationparameter: non-negative-integer vsz-limit ¶If you set ‘service-count 0’, you probably need to grow this. Defaults to ‘256000000’.
dovecot-configurationparameter: dict-configuration dict ¶Dict configuration, as created by the
dict-configurationconstructor.Available
dict-configurationfields are:dict-configurationparameter: free-form-fields entries ¶A list of key-value pairs that this dict should hold. Defaults to ‘'()’.
dovecot-configurationparameter: passdb-configuration-list passdbs ¶A list of passdb configurations, each one created by the
passdb-configurationconstructor.Available
passdb-configurationfields are:passdb-configurationparameter: string driver ¶The driver that the passdb should use. Valid values include ‘pam’, ‘passwd’, ‘shadow’, ‘bsdauth’, and ‘static’. Defaults to ‘"pam"’.
passdb-configurationparameter: space-separated-string-list args ¶Space separated list of arguments to the passdb driver. Defaults to ‘""’.
dovecot-configurationparameter: userdb-configuration-list userdbs ¶List of userdb configurations, each one created by the
userdb-configurationconstructor.Available
userdb-configurationfields are:userdb-configurationparameter: string driver ¶The driver that the userdb should use. Valid values include ‘passwd’ and ‘static’. Defaults to ‘"passwd"’.
userdb-configurationparameter: space-separated-string-list args ¶Space separated list of arguments to the userdb driver. Defaults to ‘""’.
userdb-configurationparameter: free-form-args override-fields ¶Override fields from passwd. Defaults to ‘'()’.
dovecot-configurationparameter: plugin-configuration plugin-configuration ¶Plug-in configuration, created by the
plugin-configurationconstructor.
dovecot-configurationparameter: list-of-namespace-configuration namespaces ¶List of namespaces. Each item in the list is created by the
namespace-configurationconstructor.Available
namespace-configurationfields are:namespace-configurationparameter: string name ¶Name for this namespace.
namespace-configurationparameter: string type ¶Namespace type: ‘private’, ‘shared’ or ‘public’. Defaults to ‘"private"’.
namespace-configurationparameter: string separator ¶Hierarchy separator to use. You should use the same separator for all namespaces or some clients get confused. ‘/’ is usually a good one. The default however depends on the underlying mail storage format. Defaults to ‘""’.
namespace-configurationparameter: string prefix ¶Prefix required to access this namespace. This needs to be different for all namespaces. For example ‘Public/’. Defaults to ‘""’.
namespace-configurationparameter: string location ¶Physical location of the mailbox. This is in the same format as mail_location, which is also the default for it. Defaults to ‘""’.
namespace-configurationparameter: boolean inbox? ¶There can be only one INBOX, and this setting defines which namespace has it. Defaults to ‘#f’.
If namespace is hidden, it’s not advertised to clients via NAMESPACE extension. You’ll most likely also want to set ‘list? #f’. This is mostly useful when converting from another server with different namespaces which you want to deprecate but still keep working. For example you can create hidden namespaces with prefixes ‘~/mail/’, ‘~%u/mail/’ and ‘mail/’. Defaults to ‘#f’.
namespace-configurationparameter: boolean list? ¶Show the mailboxes under this namespace with the LIST command. This makes the namespace visible for clients that do not support the NAMESPACE extension. The special
childrenvalue lists child mailboxes, but hides the namespace prefix. Defaults to ‘#t’.
namespace-configurationparameter: boolean subscriptions? ¶Namespace handles its own subscriptions. If set to
#f, the parent namespace handles them. The empty prefix should always have this as#t). Defaults to ‘#t’.
namespace-configurationparameter: mailbox-configuration-list mailboxes ¶List of predefined mailboxes in this namespace. Defaults to ‘'()’.
Available
mailbox-configurationfields are:mailbox-configurationparameter: string name ¶Name for this mailbox.
mailbox-configurationparameter: string auto ¶‘create’ will automatically create this mailbox. ‘subscribe’ will both create and subscribe to the mailbox. Defaults to ‘"no"’.
mailbox-configurationparameter: space-separated-string-list special-use ¶List of IMAP
SPECIAL-USEattributes as specified by RFC 6154. Valid values are\All,\Archive,\Drafts,\Flagged,\Junk,\Sent, and\Trash. Defaults to ‘'()’.
dovecot-configurationparameter: file-name base-dir ¶Base directory where to store runtime data. Defaults to ‘"/var/run/dovecot/"’.
dovecot-configurationparameter: string login-greeting ¶Greeting message for clients. Defaults to ‘"Dovecot ready."’.
dovecot-configurationparameter: space-separated-string-list login-trusted-networks ¶List of trusted network ranges. Connections from these IPs are allowed to override their IP addresses and ports (for logging and for authentication checks). ‘disable-plaintext-auth’ is also ignored for these networks. Typically you would specify your IMAP proxy servers here. Defaults to ‘'()’.
dovecot-configurationparameter: space-separated-string-list login-access-sockets ¶List of login access check sockets (e.g. tcpwrap). Defaults to ‘'()’.
dovecot-configurationparameter: boolean verbose-proctitle? ¶Show more verbose process titles (in ps). Currently shows user name and IP address. Useful for seeing who is actually using the IMAP processes (e.g. shared mailboxes or if the same uid is used for multiple accounts). Defaults to ‘#f’.
dovecot-configurationparameter: boolean shutdown-clients? ¶Should all processes be killed when Dovecot master process shuts down. Setting this to
#fmeans that Dovecot can be upgraded without forcing existing client connections to close (although that could also be a problem if the upgrade is e.g. due to a security fix). Defaults to ‘#t’.
dovecot-configurationparameter: non-negative-integer doveadm-worker-count ¶If non-zero, run mail commands via this many connections to doveadm server, instead of running them directly in the same process. Defaults to ‘0’.
dovecot-configurationparameter: string doveadm-socket-path ¶UNIX socket or host:port used for connecting to doveadm server. Defaults to ‘"doveadm-server"’.
dovecot-configurationparameter: space-separated-string-list import-environment ¶List of environment variables that are preserved on Dovecot startup and passed down to all of its child processes. You can also give key=value pairs to always set specific settings.
dovecot-configurationparameter: boolean disable-plaintext-auth? ¶Disable LOGIN command and all other plaintext authentications unless SSL/TLS is used (LOGINDISABLED capability). Note that if the remote IP matches the local IP (i.e. you’re connecting from the same computer), the connection is considered secure and plaintext authentication is allowed. See also the ‘ssl=required’ setting. Defaults to ‘#t’.
dovecot-configurationparameter: non-negative-integer auth-cache-size ¶Authentication cache size (e.g. ‘#e10e6’). 0 means it’s disabled. Note that bsdauth, PAM and vpopmail require ‘cache-key’ to be set for caching to be used. Defaults to ‘0’.
dovecot-configurationparameter: string auth-cache-ttl ¶Time to live for cached data. After TTL expires the cached record is no longer used, *except* if the main database lookup returns internal failure. We also try to handle password changes automatically: If user’s previous authentication was successful, but this one wasn’t, the cache isn’t used. For now this works only with plaintext authentication. Defaults to ‘"1 hour"’.
dovecot-configurationparameter: string auth-cache-negative-ttl ¶TTL for negative hits (user not found, password mismatch). 0 disables caching them completely. Defaults to ‘"1 hour"’.
dovecot-configurationparameter: space-separated-string-list auth-realms ¶List of realms for SASL authentication mechanisms that need them. You can leave it empty if you don’t want to support multiple realms. Many clients simply use the first one listed here, so keep the default realm first. Defaults to ‘'()’.
dovecot-configurationparameter: string auth-default-realm ¶Default realm/domain to use if none was specified. This is used for both SASL realms and appending @domain to username in plaintext logins. Defaults to ‘""’.
dovecot-configurationparameter: string auth-username-chars ¶List of allowed characters in username. If the user-given username contains a character not listed in here, the login automatically fails. This is just an extra check to make sure user can’t exploit any potential quote escaping vulnerabilities with SQL/LDAP databases. If you want to allow all characters, set this value to empty. Defaults to ‘"abcdefghijklmnopqrstuvwxyzABCDEFGHIJKLMNOPQRSTUVWXYZ01234567890.-_@"’.
dovecot-configurationparameter: string auth-username-translation ¶Username character translations before it’s looked up from databases. The value contains series of from -> to characters. For example ‘#@/@’ means that ‘#’ and ‘/’ characters are translated to ‘@’. Defaults to ‘""’.
dovecot-configurationparameter: string auth-username-format ¶Username formatting before it’s looked up from databases. You can use the standard variables here, e.g. %Lu would lowercase the username, %n would drop away the domain if it was given, or ‘%n-AT-%d’ would change the ‘@’ into ‘-AT-’. This translation is done after ‘auth-username-translation’ changes. Defaults to ‘"%Lu"’.
dovecot-configurationparameter: string auth-master-user-separator ¶If you want to allow master users to log in by specifying the master username within the normal username string (i.e. not using SASL mechanism’s support for it), you can specify the separator character here. The format is then <username><separator><master username>. UW-IMAP uses ‘*’ as the separator, so that could be a good choice. Defaults to ‘""’.
dovecot-configurationparameter: string auth-anonymous-username ¶Username to use for users logging in with ANONYMOUS SASL mechanism. Defaults to ‘"anonymous"’.
dovecot-configurationparameter: non-negative-integer auth-worker-max-count ¶Maximum number of dovecot-auth worker processes. They’re used to execute blocking passdb and userdb queries (e.g. MySQL and PAM). They’re automatically created and destroyed as needed. Defaults to ‘30’.
dovecot-configurationparameter: string auth-gssapi-hostname ¶Host name to use in GSSAPI principal names. The default is to use the name returned by gethostname(). Use ‘$ALL’ (with quotes) to allow all keytab entries. Defaults to ‘""’.
dovecot-configurationparameter: string auth-krb5-keytab ¶Kerberos keytab to use for the GSSAPI mechanism. Will use the system default (usually /etc/krb5.keytab) if not specified. You may need to change the auth service to run as root to be able to read this file. Defaults to ‘""’.
dovecot-configurationparameter: boolean auth-use-winbind? ¶Do NTLM and GSS-SPNEGO authentication using Samba’s winbind daemon and ‘ntlm-auth’ helper. <doc/wiki/Authentication/Mechanisms/Winbind.txt>. Defaults to ‘#f’.
dovecot-configurationparameter: file-name auth-winbind-helper-path ¶Path for Samba’s ‘ntlm-auth’ helper binary. Defaults to ‘"/usr/bin/ntlm_auth"’.
dovecot-configurationparameter: string auth-failure-delay ¶Time to delay before replying to failed authentications. Defaults to ‘"2 secs"’.
dovecot-configurationparameter: boolean auth-ssl-require-client-cert? ¶Require a valid SSL client certificate or the authentication fails. Defaults to ‘#f’.
dovecot-configurationparameter: boolean auth-ssl-username-from-cert? ¶Take the username from client’s SSL certificate, using
X509_NAME_get_text_by_NID()which returns the subject’s DN’s CommonName. Defaults to ‘#f’.
dovecot-configurationparameter: space-separated-string-list auth-mechanisms ¶List of wanted authentication mechanisms. Supported mechanisms are: ‘plain’, ‘login’, ‘digest-md5’, ‘cram-md5’, ‘ntlm’, ‘rpa’, ‘apop’, ‘anonymous’, ‘gssapi’, ‘otp’, ‘skey’, and ‘gss-spnego’. See also the ‘disable-plaintext-auth’ setting.
dovecot-configurationparameter: space-separated-string-list director-servers ¶List of IPs or hostnames to all director servers, including ourself. Ports can be specified as ip:port. The default port is the same as what director service’s ‘inet-listener’ is using. Defaults to ‘'()’.
dovecot-configurationparameter: space-separated-string-list director-mail-servers ¶List of IPs or hostnames to all backend mail servers. Ranges are allowed too, like 10.0.0.10-10.0.0.30. Defaults to ‘'()’.
dovecot-configurationparameter: string director-user-expire ¶How long to redirect users to a specific server after it no longer has any connections. Defaults to ‘"15 min"’.
dovecot-configurationparameter: string director-username-hash ¶How the username is translated before being hashed. Useful values include %Ln if user can log in with or without @domain, %Ld if mailboxes are shared within domain. Defaults to ‘"%Lu"’.
dovecot-configurationparameter: string log-path ¶Log file to use for error messages. ‘syslog’ logs to syslog, ‘/dev/stderr’ logs to stderr. Defaults to ‘"syslog"’.
dovecot-configurationparameter: string info-log-path ¶Log file to use for informational messages. Defaults to ‘log-path’. Defaults to ‘""’.
dovecot-configurationparameter: string debug-log-path ¶Log file to use for debug messages. Defaults to ‘info-log-path’. Defaults to ‘""’.
dovecot-configurationparameter: string syslog-facility ¶Syslog facility to use if you’re logging to syslog. Usually if you don’t want to use ‘mail’, you’ll use local0..local7. Also other standard facilities are supported. Defaults to ‘"mail"’.
dovecot-configurationparameter: boolean auth-verbose? ¶Log unsuccessful authentication attempts and the reasons why they failed. Defaults to ‘#f’.
dovecot-configurationparameter: string auth-verbose-passwords ¶In case of password mismatches, log the attempted password. Valid values are no, plain and sha1. sha1 can be useful for detecting brute force password attempts vs. user simply trying the same password over and over again. You can also truncate the value to n chars by appending ":n" (e.g. sha1:6). Defaults to ‘"no"’.
dovecot-configurationparameter: boolean auth-debug? ¶Even more verbose logging for debugging purposes. Shows for example SQL queries. Defaults to ‘#f’.
dovecot-configurationparameter: boolean auth-debug-passwords? ¶In case of password mismatches, log the passwords and used scheme so the problem can be debugged. Enabling this also enables ‘auth-debug’. Defaults to ‘#f’.
dovecot-configurationparameter: boolean mail-debug? ¶Enable mail process debugging. This can help you figure out why Dovecot isn’t finding your mails. Defaults to ‘#f’.
dovecot-configurationparameter: boolean verbose-ssl? ¶Show protocol level SSL errors. Defaults to ‘#f’.
dovecot-configurationparameter: string log-timestamp ¶Prefix for each line written to log file. % codes are in strftime(3) format. Defaults to ‘"\"%b %d %H:%M:%S \""’.
dovecot-configurationparameter: space-separated-string-list login-log-format-elements ¶List of elements we want to log. The elements which have a non-empty variable value are joined together to form a comma-separated string.
dovecot-configurationparameter: string login-log-format ¶Login log format. %s contains ‘login-log-format-elements’ string, %$ contains the data we want to log. Defaults to ‘"%$: %s"’.
dovecot-configurationparameter: string mail-log-prefix ¶Log prefix for mail processes. See doc/wiki/Variables.txt for list of possible variables you can use. Defaults to ‘"\"%s(%u)<%{pid}><%{session}>: \""’.
dovecot-configurationparameter: string deliver-log-format ¶Format to use for logging mail deliveries. You can use variables:
%$Delivery status message (e.g. ‘saved to INBOX’)
%mMensagem-ID
%sAssunto
%fFrom address
%pPhysical size
%wVirtual size.
Defaults to ‘"msgid=%m: %$"’.
dovecot-configurationparameter: string mail-location ¶Location for users’ mailboxes. The default is empty, which means that Dovecot tries to find the mailboxes automatically. This won’t work if the user doesn’t yet have any mail, so you should explicitly tell Dovecot the full location.
If you’re using mbox, giving a path to the INBOX file (e.g. /var/mail/%u) isn’t enough. You’ll also need to tell Dovecot where the other mailboxes are kept. This is called the root mail directory, and it must be the first path given in the ‘mail-location’ setting.
There are a few special variables you can use, e.g.:
- ‘%u’
nome de usuário
- ‘%n’
user part in user@domain, same as %u if there’s no domain
- ‘%d’
domain part in user@domain, empty if there’s no domain
- ‘%h’
diretório pessoal
See doc/wiki/Variables.txt for full list. Some examples:
- ‘maildir:~/Maildir’
- ‘mbox:~/mail:INBOX=/var/mail/%u’
- ‘mbox:/var/mail/%d/%1n/%n:INDEX=/var/indexes/%d/%1n/%’
Defaults to ‘""’.
dovecot-configurationparameter: string mail-uid ¶System user and group used to access mails. If you use multiple, userdb can override these by returning uid or gid fields. You can use either numbers or names. <doc/wiki/UserIds.txt>. Defaults to ‘""’.
dovecot-configurationparameter: string mail-gid ¶-
Defaults to ‘""’.
dovecot-configurationparameter: string mail-privileged-group ¶Group to enable temporarily for privileged operations. Currently this is used only with INBOX when either its initial creation or dotlocking fails. Typically this is set to ‘"mail"’ to give access to /var/mail. Defaults to ‘""’.
dovecot-configurationparameter: string mail-access-groups ¶Grant access to these supplementary groups for mail processes. Typically these are used to set up access to shared mailboxes. Note that it may be dangerous to set these if users can create symlinks (e.g. if ‘mail’ group is set here,
ln -s /var/mail ~/mail/varcould allow a user to delete others’ mailboxes, orln -s /secret/shared/box ~/mail/myboxwould allow reading it). Defaults to ‘""’.
dovecot-configurationparameter: string mail-attribute-dict ¶The location of a dictionary used to store
IMAP METADATAas defined by RFC 5464.The IMAP METADATA commands are available only if the “imap” protocol configuration’s
imap-metadata?field is ‘#t’.Defaults to ‘""’.
dovecot-configurationparameter: boolean mail-full-filesystem-access? ¶Allow full file system access to clients. There’s no access checks other than what the operating system does for the active UID/GID. It works with both maildir and mboxes, allowing you to prefix mailboxes names with e.g. /path/ or ~user/. Defaults to ‘#f’.
dovecot-configurationparameter: boolean mmap-disable? ¶Don’t use
mmap()at all. This is required if you store indexes to shared file systems (NFS or clustered file system). Defaults to ‘#f’.
dovecot-configurationparameter: boolean dotlock-use-excl? ¶Rely on ‘O_EXCL’ to work when creating dotlock files. NFS supports ‘O_EXCL’ since version 3, so this should be safe to use nowadays by default. Defaults to ‘#t’.
dovecot-configurationparameter: string mail-fsync ¶When to use fsync() or fdatasync() calls:
optimizedWhenever necessary to avoid losing important data
alwaysUseful with e.g. NFS when
write()s are delayedneverNever use it (best performance, but crashes can lose data).
Defaults to ‘"optimized"’.
dovecot-configurationparameter: boolean mail-nfs-storage? ¶Mail storage exists in NFS. Set this to yes to make Dovecot flush NFS caches whenever needed. If you’re using only a single mail server this isn’t needed. Defaults to ‘#f’.
dovecot-configurationparameter: boolean mail-nfs-index? ¶Mail index files also exist in NFS. Setting this to yes requires ‘mmap-disable? #t’ and ‘fsync-disable? #f’. Defaults to ‘#f’.
dovecot-configurationparameter: string lock-method ¶Locking method for index files. Alternatives are fcntl, flock and dotlock. Dotlocking uses some tricks which may create more disk I/O than other locking methods. NFS users: flock doesn’t work, remember to change ‘mmap-disable’. Defaults to ‘"fcntl"’.
dovecot-configurationparameter: file-name mail-temp-dir ¶Directory in which LDA/LMTP temporarily stores incoming mails >128 kB. Defaults to ‘"/tmp"’.
dovecot-configurationparameter: non-negative-integer first-valid-uid ¶Valid UID range for users. This is mostly to make sure that users can’t log in as daemons or other system users. Note that denying root logins is hardcoded to dovecot binary and can’t be done even if ‘first-valid-uid’ is set to 0. Defaults to ‘500’.
dovecot-configurationparameter: non-negative-integer last-valid-uid ¶-
Defaults to ‘0’.
dovecot-configurationparameter: non-negative-integer first-valid-gid ¶Valid GID range for users. Users having non-valid GID as primary group ID aren’t allowed to log in. If user belongs to supplementary groups with non-valid GIDs, those groups are not set. Defaults to ‘1’.
dovecot-configurationparameter: non-negative-integer last-valid-gid ¶-
Defaults to ‘0’.
dovecot-configurationparameter: non-negative-integer mail-max-keyword-length ¶Maximum allowed length for mail keyword name. It’s only forced when trying to create new keywords. Defaults to ‘50’.
dovecot-configurationparameter: colon-separated-file-name-list valid-chroot-dirs ¶List of directories under which chrooting is allowed for mail processes (i.e. /var/mail will allow chrooting to /var/mail/foo/bar too). This setting doesn’t affect ‘login-chroot’ ‘mail-chroot’ or auth chroot settings. If this setting is empty, ‘/./’ in home dirs are ignored. WARNING: Never add directories here which local users can modify, that may lead to root exploit. Usually this should be done only if you don’t allow shell access for users. <doc/wiki/Chrooting.txt>. Defaults to ‘'()’.
dovecot-configurationparameter: string mail-chroot ¶Default chroot directory for mail processes. This can be overridden for specific users in user database by giving ‘/./’ in user’s home directory (e.g. ‘/home/./user’ chroots into /home). Note that usually there is no real need to do chrooting, Dovecot doesn’t allow users to access files outside their mail directory anyway. If your home directories are prefixed with the chroot directory, append ‘/.’ to ‘mail-chroot’. <doc/wiki/Chrooting.txt>. Defaults to ‘""’.
dovecot-configurationparameter: file-name auth-socket-path ¶UNIX socket path to master authentication server to find users. This is used by imap (for shared users) and lda. Defaults to ‘"/var/run/dovecot/auth-userdb"’.
dovecot-configurationparameter: file-name mail-plugin-dir ¶Directory where to look up mail plugins. Defaults to ‘"/usr/lib/dovecot"’.
dovecot-configurationparameter: space-separated-string-list mail-plugins ¶List of plugins to load for all services. Plugins specific to IMAP, LDA, etc. are added to this list in their own .conf files. Defaults to ‘'()’.
dovecot-configurationparameter: non-negative-integer mail-cache-min-mail-count ¶The minimum number of mails in a mailbox before updates are done to cache file. This allows optimizing Dovecot’s behavior to do less disk writes at the cost of more disk reads. Defaults to ‘0’.
dovecot-configurationparameter: string mailbox-idle-check-interval ¶When IDLE command is running, mailbox is checked once in a while to see if there are any new mails or other changes. This setting defines the minimum time to wait between those checks. Dovecot can also use dnotify, inotify and kqueue to find out immediately when changes occur. Defaults to ‘"30 secs"’.
dovecot-configurationparameter: boolean mail-save-crlf? ¶Save mails with CR+LF instead of plain LF. This makes sending those mails take less CPU, especially with sendfile() syscall with Linux and FreeBSD. But it also creates a bit more disk I/O which may just make it slower. Also note that if other software reads the mboxes/maildirs, they may handle the extra CRs wrong and cause problems. Defaults to ‘#f’.
dovecot-configurationparameter: boolean maildir-stat-dirs? ¶By default LIST command returns all entries in maildir beginning with a dot. Enabling this option makes Dovecot return only entries which are directories. This is done by stat()ing each entry, so it causes more disk I/O. (For systems setting struct ‘dirent->d_type’ this check is free and it’s done always regardless of this setting). Defaults to ‘#f’.
dovecot-configurationparameter: boolean maildir-copy-with-hardlinks? ¶When copying a message, do it with hard links whenever possible. This makes the performance much better, and it’s unlikely to have any side effects. Defaults to ‘#t’.
dovecot-configurationparameter: boolean maildir-very-dirty-syncs? ¶Assume Dovecot is the only MUA accessing Maildir: Scan cur/ directory only when its mtime changes unexpectedly or when we can’t find the mail otherwise. Defaults to ‘#f’.
dovecot-configurationparameter: space-separated-string-list mbox-read-locks ¶Which locking methods to use for locking mbox. There are four available:
dotlockCreate <mailbox>.lock file. This is the oldest and most NFS-safe solution. If you want to use /var/mail/ like directory, the users will need write access to that directory.
dotlock-trySame as dotlock, but if it fails because of permissions or because there isn’t enough disk space, just skip it.
fcntlUse this if possible. Works with NFS too if lockd is used.
flockMay not exist in all systems. Doesn’t work with NFS.
lockfMay not exist in all systems. Doesn’t work with NFS.
You can use multiple locking methods; if you do the order they’re declared in is important to avoid deadlocks if other MTAs/MUAs are using multiple locking methods as well. Some operating systems don’t allow using some of them simultaneously.
dovecot-configurationparameter: space-separated-string-list mbox-write-locks 
dovecot-configurationparameter: string mbox-lock-timeout ¶Maximum time to wait for lock (all of them) before aborting. Defaults to ‘"5 mins"’.
dovecot-configurationparameter: string mbox-dotlock-change-timeout ¶If dotlock exists but the mailbox isn’t modified in any way, override the lock file after this much time. Defaults to ‘"2 mins"’.
dovecot-configurationparameter: boolean mbox-dirty-syncs? ¶When mbox changes unexpectedly we have to fully read it to find out what changed. If the mbox is large this can take a long time. Since the change is usually just a newly appended mail, it’d be faster to simply read the new mails. If this setting is enabled, Dovecot does this but still safely fallbacks to re-reading the whole mbox file whenever something in mbox isn’t how it’s expected to be. The only real downside to this setting is that if some other MUA changes message flags, Dovecot doesn’t notice it immediately. Note that a full sync is done with SELECT, EXAMINE, EXPUNGE and CHECK commands. Defaults to ‘#t’.
dovecot-configurationparameter: boolean mbox-very-dirty-syncs? ¶Like ‘mbox-dirty-syncs’, but don’t do full syncs even with SELECT, EXAMINE, EXPUNGE or CHECK commands. If this is set, ‘mbox-dirty-syncs’ is ignored. Defaults to ‘#f’.
dovecot-configurationparameter: boolean mbox-lazy-writes? ¶Delay writing mbox headers until doing a full write sync (EXPUNGE and CHECK commands and when closing the mailbox). This is especially useful for POP3 where clients often delete all mails. The downside is that our changes aren’t immediately visible to other MUAs. Defaults to ‘#t’.
dovecot-configurationparameter: non-negative-integer mbox-min-index-size ¶If mbox size is smaller than this (e.g. 100k), don’t write index files. If an index file already exists it’s still read, just not updated. Defaults to ‘0’.
dovecot-configurationparameter: non-negative-integer mdbox-rotate-size ¶Maximum dbox file size until it’s rotated. Defaults to ‘10000000’.
dovecot-configurationparameter: string mdbox-rotate-interval ¶Maximum dbox file age until it’s rotated. Typically in days. Day begins from midnight, so 1d = today, 2d = yesterday, etc. 0 = check disabled. Defaults to ‘"1d"’.
dovecot-configurationparameter: boolean mdbox-preallocate-space? ¶When creating new mdbox files, immediately preallocate their size to ‘mdbox-rotate-size’. This setting currently works only in Linux with some file systems (ext4, xfs). Defaults to ‘#f’.
dovecot-configurationparameter: string mail-attachment-dir ¶sdbox and mdbox support saving mail attachments to external files, which also allows single instance storage for them. Other backends don’t support this for now.
WARNING: This feature hasn’t been tested much yet. Use at your own risk.
Directory root where to store mail attachments. Disabled, if empty. Defaults to ‘""’.
dovecot-configurationparameter: non-negative-integer mail-attachment-min-size ¶Attachments smaller than this aren’t saved externally. It’s also possible to write a plugin to disable saving specific attachments externally. Defaults to ‘128000’.
dovecot-configurationparameter: string mail-attachment-fs ¶File system backend to use for saving attachments:
posixNo SiS done by Dovecot (but this might help FS’s own deduplication)
sis posixSiS with immediate byte-by-byte comparison during saving
sis-queue posixSiS with delayed comparison and deduplication.
Defaults to ‘"sis posix"’.
dovecot-configurationparameter: string mail-attachment-hash ¶Hash format to use in attachment filenames. You can add any text and variables:
%{md4},%{md5},%{sha1},%{sha256},%{sha512},%{size}. Variables can be truncated, e.g.%{sha256:80}returns only first 80 bits. Defaults to ‘"%{sha1}"’.
dovecot-configurationparameter: non-negative-integer default-process-limit ¶-
Defaults to ‘100’.
dovecot-configurationparameter: non-negative-integer default-client-limit ¶-
Defaults to ‘1000’.
dovecot-configurationparameter: non-negative-integer default-vsz-limit ¶Default VSZ (virtual memory size) limit for service processes. This is mainly intended to catch and kill processes that leak memory before they eat up everything. Defaults to ‘256000000’.
dovecot-configurationparameter: string default-login-user ¶Login user is internally used by login processes. This is the most untrusted user in Dovecot system. It shouldn’t have access to anything at all. Defaults to ‘"dovenull"’.
dovecot-configurationparameter: string default-internal-user ¶Internal user is used by unprivileged processes. It should be separate from login user, so that login processes can’t disturb other processes. Defaults to ‘"dovecot"’.
dovecot-configurationparameter: string ssl? ¶SSL/TLS support: yes, no, required. <doc/wiki/SSL.txt>. Defaults to ‘"required"’.
dovecot-configurationparameter: string ssl-cert ¶PEM encoded X.509 SSL/TLS certificate (public key). Defaults to ‘"</etc/dovecot/default.pem"’.
dovecot-configurationparameter: string ssl-key ¶PEM encoded SSL/TLS private key. The key is opened before dropping root privileges, so keep the key file unreadable by anyone but root. Defaults to ‘"</etc/dovecot/private/default.pem"’.
dovecot-configurationparameter: string ssl-key-password ¶If key file is password protected, give the password here. Alternatively give it when starting dovecot with -p parameter. Since this file is often world-readable, you may want to place this setting instead to a different. Defaults to ‘""’.
dovecot-configurationparameter: string ssl-ca ¶PEM encoded trusted certificate authority. Set this only if you intend to use ‘ssl-verify-client-cert? #t’. The file should contain the CA certificate(s) followed by the matching CRL(s). (e.g. ‘ssl-ca </etc/ssl/certs/ca.pem’). Defaults to ‘""’.
dovecot-configurationparameter: boolean ssl-require-crl? ¶Require that CRL check succeeds for client certificates. Defaults to ‘#t’.
dovecot-configurationparameter: boolean ssl-verify-client-cert? ¶Request client to send a certificate. If you also want to require it, set ‘auth-ssl-require-client-cert? #t’ in auth section. Defaults to ‘#f’.
dovecot-configurationparameter: string ssl-cert-username-field ¶Which field from certificate to use for username. commonName and x500UniqueIdentifier are the usual choices. You’ll also need to set ‘auth-ssl-username-from-cert? #t’. Defaults to ‘"commonName"’.
dovecot-configurationparameter: string ssl-min-protocol ¶Minimum SSL protocol version to accept. Defaults to ‘"TLSv1"’.
dovecot-configurationparameter: string ssl-cipher-list ¶SSL ciphers to use. Defaults to ‘"ALL:!kRSA:!SRP:!kDHd:!DSS:!aNULL:!eNULL:!EXPORT:!DES:!3DES:!MD5:!PSK:!RC4:!ADH:!LOW@STRENGTH"’.
dovecot-configurationparameter: string ssl-crypto-device ¶SSL crypto device to use, for valid values run "openssl engine". Defaults to ‘""’.
dovecot-configurationparameter: string postmaster-address ¶Address to use when sending rejection mails. %d expands to recipient domain. Defaults to ‘"postmaster@%d"’.
dovecot-configurationparameter: string hostname ¶Hostname to use in various parts of sent mails (e.g. in Message-Id) and in LMTP replies. Default is the system’s real hostname@domain. Defaults to ‘""’.
dovecot-configurationparameter: boolean quota-full-tempfail? ¶If user is over quota, return with temporary failure instead of bouncing the mail. Defaults to ‘#f’.
dovecot-configurationparameter: file-name sendmail-path ¶Binary to use for sending mails. Defaults to ‘"/usr/sbin/sendmail"’.
dovecot-configurationparameter: string submission-host ¶If non-empty, send mails via this SMTP host[:port] instead of sendmail. Defaults to ‘""’.
dovecot-configurationparameter: string rejection-subject ¶Subject: header to use for rejection mails. You can use the same variables as for ‘rejection-reason’ below. Defaults to ‘"Rejected: %s"’.
dovecot-configurationparameter: string rejection-reason ¶Human readable error message for rejection mails. You can use variables:
%nCRLF
%rreason
%soriginal subject
%tdestinatário
Defaults to ‘"Your message to <%t> was automatically rejected:%n%r"’.
dovecot-configurationparameter: string recipient-delimiter ¶Delimiter character between local-part and detail in email address. Defaults to ‘"+"’.
dovecot-configurationparameter: string lda-original-recipient-header ¶Header where the original recipient address (SMTP’s RCPT TO: address) is taken from if not available elsewhere. With dovecot-lda -a parameter overrides this. A commonly used header for this is X-Original-To. Defaults to ‘""’.
dovecot-configurationparameter: boolean lda-mailbox-autocreate? ¶Should saving a mail to a nonexistent mailbox automatically create it?. Defaults to ‘#f’.
dovecot-configurationparameter: boolean lda-mailbox-autosubscribe? ¶Should automatically created mailboxes be also automatically subscribed?. Defaults to ‘#f’.
dovecot-configurationparameter: non-negative-integer imap-max-line-length ¶Maximum IMAP command line length. Some clients generate very long command lines with huge mailboxes, so you may need to raise this if you get "Too long argument" or "IMAP command line too large" errors often. Defaults to ‘64000’.
dovecot-configurationparameter: string imap-logout-format ¶IMAP logout format string:
%itotal number of bytes read from client
%ototal number of bytes sent to client.
See doc/wiki/Variables.txt for a list of all the variables you can use. Defaults to ‘"in=%i out=%o deleted=%{deleted} expunged=%{expunged} trashed=%{trashed} hdr_count=%{fetch_hdr_count} hdr_bytes=%{fetch_hdr_bytes} body_count=%{fetch_body_count} body_bytes=%{fetch_body_bytes}"’.
dovecot-configurationparameter: string imap-capability ¶Override the IMAP CAPABILITY response. If the value begins with ’+’, add the given capabilities on top of the defaults (e.g. +XFOO XBAR). Defaults to ‘""’.
dovecot-configurationparameter: string imap-idle-notify-interval ¶How long to wait between "OK Still here" notifications when client is IDLEing. Defaults to ‘"2 mins"’.
dovecot-configurationparameter: string imap-id-send ¶ID field names and values to send to clients. Using * as the value makes Dovecot use the default value. The following fields have default values currently: name, version, os, os-version, support-url, support-email. Defaults to ‘""’.
dovecot-configurationparameter: string imap-id-log ¶ID fields sent by client to log. * means everything. Defaults to ‘""’.
dovecot-configurationparameter: space-separated-string-list imap-client-workarounds ¶Workarounds for various client bugs:
delay-newmailSend EXISTS/RECENT new mail notifications only when replying to NOOP and CHECK commands. Some clients ignore them otherwise, for example OSX Mail (<v2.1). Outlook Express breaks more badly though, without this it may show user "Message no longer in server" errors. Note that OE6 still breaks even with this workaround if synchronization is set to "Headers Only".
tb-extra-mailbox-sepThunderbird gets somehow confused with LAYOUT=fs (mbox and dbox) and adds extra ‘/’ suffixes to mailbox names. This option causes Dovecot to ignore the extra ‘/’ instead of treating it as invalid mailbox name.
tb-lsub-flagsShow \Noselect flags for LSUB replies with LAYOUT=fs (e.g. mbox). This makes Thunderbird realize they aren’t selectable and show them greyed out, instead of only later giving "not selectable" popup error.
Defaults to ‘'()’.
dovecot-configurationparameter: string imap-urlauth-host ¶Host allowed in URLAUTH URLs sent by client. "*" allows all. Defaults to ‘""’.
Whew! Lots of configuration options. The nice thing about it though is that Guix has a complete interface to Dovecot’s configuration language. This allows not only a nice way to declare configurations, but also offers reflective capabilities as well: users can write code to inspect and transform configurations from within Scheme.
However, it could be that you just want to get a dovecot.conf up and
running. In that case, you can pass an opaque-dovecot-configuration
as the #:config parameter to dovecot-service. As its name
indicates, an opaque configuration does not have easy reflective
capabilities.
Available opaque-dovecot-configuration fields are:
opaque-dovecot-configurationparameter: package dovecot ¶The dovecot package.
opaque-dovecot-configurationparameter: string string ¶The contents of the
dovecot.conf, as a string.
For example, if your dovecot.conf is just the empty string, you could
instantiate a dovecot service like this:
(dovecot-service #:config
(opaque-dovecot-configuration
(string "")))
OpenSMTPD Service
- Variável: opensmtpd-service-type
This is the type of the OpenSMTPD service, whose value should be an
opensmtpd-configurationobject as in this example:(service opensmtpd-service-type (opensmtpd-configuration (config-file (local-file "./my-smtpd.conf"))))
- Tipo de dados: opensmtpd-configuration
Data type representing the configuration of opensmtpd.
package(default: opensmtpd)Package object of the OpenSMTPD SMTP server.
shepherd-requirement(default:'())This option can be used to provide a list of symbols naming Shepherd services that this service will depend on, such as
'networkingif you want to configure OpenSMTPD to listen on non-loopback interfaces.config-file(default:%default-opensmtpd-config-file)File-like object of the OpenSMTPD configuration file to use. By default it listens on the loopback network interface, and allows for mail from users and daemons on the local machine, as well as permitting email to remote servers. Run
man smtpd.conffor more information.setgid-commands?(default:#t)Make the following commands setgid to
smtpqso they can be executed:smtpctl,sendmail,send-mail,makemap,mailq, andnewaliases. Veja Privileged Programs, for more information on setgid programs.
Exim Service
- Variável: exim-service-type
This is the type of the Exim mail transfer agent (MTA), whose value should be an
exim-configurationobject as in this example:(service exim-service-type (exim-configuration (config-file (local-file "./my-exim.conf"))))
In order to use an exim-service-type service you must also have a
mail-aliases-service-type service present in your
operating-system (even if it has no aliases).
- Tipo de dados: exim-configuration
Data type representing the configuration of exim.
package(default: exim)Package object of the Exim server.
config-file(default:#f)File-like object of the Exim configuration file to use. If its value is
#fthen use the default configuration file from the package provided inpackage. The resulting configuration file is loaded after setting theexim_userandexim_groupconfiguration variables.
Getmail service
- Variável: getmail-service-type
This is the type of the Getmail mail retriever, whose value should be a
getmail-configuration.
Available getmail-configuration fields are:
getmail-configurationparameter: symbol name ¶A symbol to identify the getmail service.
Defaults to ‘"unset"’.
getmail-configurationparameter: package package ¶The getmail package to use.
getmail-configurationparameter: string user ¶The user to run getmail as.
Defaults to ‘"getmail"’.
getmail-configurationparameter: string group ¶The group to run getmail as.
Defaults to ‘"getmail"’.
getmail-configurationparameter: string directory ¶The getmail directory to use.
Defaults to ‘"/var/lib/getmail/default"’.
getmail-configurationparameter: getmail-configuration-file rcfile ¶The getmail configuration file to use.
Available
getmail-configuration-filefields are:getmail-configuration-fileparameter: getmail-retriever-configuration retriever ¶What mail account to retrieve mail from, and how to access that account.
Available
getmail-retriever-configurationfields are:getmail-retriever-configurationparameter: string type ¶The type of mail retriever to use. Valid values include ‘passwd’ and ‘static’.
Defaults to ‘"SimpleIMAPSSLRetriever"’.
getmail-retriever-configurationparameter: string server ¶Username to login to the mail server with.
Defaults to ‘unset’.
getmail-retriever-configurationparameter: string username ¶Username to login to the mail server with.
Defaults to ‘unset’.
getmail-retriever-configurationparameter: non-negative-integer port ¶Port number to connect to.
Defaults to ‘#f’.
getmail-retriever-configurationparameter: string password ¶Override fields from passwd.
Defaults to ‘""’.
getmail-retriever-configurationparameter: list password-command ¶Override fields from passwd.
Defaults to ‘'()’.
getmail-retriever-configurationparameter: string keyfile ¶PEM-formatted key file to use for the TLS negotiation.
Defaults to ‘""’.
getmail-retriever-configurationparameter: string certfile ¶PEM-formatted certificate file to use for the TLS negotiation.
Defaults to ‘""’.
getmail-retriever-configurationparameter: string ca-certs ¶CA certificates to use.
Defaults to ‘""’.
getmail-retriever-configurationparameter: parameter-alist extra-parameters ¶Extra retriever parameters.
Defaults to ‘'()’.
getmail-configuration-fileparameter: getmail-destination-configuration destination ¶What to do with retrieved messages.
Available
getmail-destination-configurationfields are:getmail-destination-configurationparameter: string type ¶The type of mail destination. Valid values include ‘Maildir’, ‘Mboxrd’ and ‘MDA_external’.
Defaults to ‘unset’.
getmail-destination-configurationparameter: string-or-filelike path ¶The path option for the mail destination. The behaviour depends on the chosen type.
Defaults to ‘""’.
getmail-destination-configurationparameter: parameter-alist extra-parameters ¶Extra destination parameters
Defaults to ‘'()’.
getmail-configuration-fileparameter: getmail-options-configuration options ¶Configure getmail.
Available
getmail-options-configurationfields are:getmail-options-configurationparameter: non-negative-integer verbose ¶If set to ‘0’, getmail will only print warnings and errors. A value of ‘1’ means that messages will be printed about retrieving and deleting messages. If set to ‘2’, getmail will print messages about each of its actions.
Defaults to ‘1’.
getmail-options-configurationparameter: boolean read-all ¶If true, getmail will retrieve all available messages. Otherwise it will only retrieve messages it hasn’t seen previously.
Defaults to ‘#t’.
getmail-options-configurationparameter: boolean delete ¶If set to true, messages will be deleted from the server after retrieving and successfully delivering them. Otherwise, messages will be left on the server.
Defaults to ‘#f’.
getmail-options-configurationparameter: non-negative-integer delete-after ¶Getmail will delete messages this number of days after seeing them, if they have been delivered. This means messages will be left on the server this number of days after delivering them. A value of ‘0’ disabled this feature.
Defaults to ‘0’.
getmail-options-configurationparameter: non-negative-integer delete-bigger-than ¶Delete messages larger than this of bytes after retrieving them, even if the delete and delete-after options are disabled. A value of ‘0’ disables this feature.
Defaults to ‘0’.
getmail-options-configurationparameter: non-negative-integer max-bytes-per-session ¶Retrieve messages totalling up to this number of bytes before closing the session with the server. A value of ‘0’ disables this feature.
Defaults to ‘0’.
getmail-options-configurationparameter: non-negative-integer max-message-size ¶Don’t retrieve messages larger than this number of bytes. A value of ‘0’ disables this feature.
Defaults to ‘0’.
getmail-options-configurationparameter: boolean delivered-to ¶If true, getmail will add a Delivered-To header to messages.
Defaults to ‘#t’.
getmail-options-configurationparameter: boolean received ¶If set, getmail adds a Received header to the messages.
Defaults to ‘#t’.
getmail-options-configurationparameter: string message-log ¶Getmail will record a log of its actions to the named file. A value of ‘""’ disables this feature.
Defaults to ‘""’.
getmail-options-configurationparameter: boolean message-log-syslog ¶If true, getmail will record a log of its actions using the system logger.
Defaults to ‘#f’.
getmail-options-configurationparameter: boolean message-log-verbose ¶If true, getmail will log information about messages not retrieved and the reason for not retrieving them, as well as starting and ending information lines.
Defaults to ‘#f’.
getmail-options-configurationparameter: parameter-alist extra-parameters ¶Extra options to include.
Defaults to ‘'()’.
getmail-configurationparameter: list idle ¶A list of mailboxes that getmail should wait on the server for new mail notifications. This depends on the server supporting the IDLE extension.
Defaults to ‘'()’.
getmail-configurationparameter: list environment-variables ¶Environment variables to set for getmail.
Defaults to ‘'()’.
Mail Aliases Service
- Variável: mail-aliases-service-type
This is the type of the service which provides
/etc/aliases, specifying how to deliver mail to users on this system.(service mail-aliases-service-type '(("postmaster" "bob") ("bob" "bob@example.com" "bob@example2.com")))
The configuration for a mail-aliases-service-type service is an
association list denoting how to deliver mail that comes to this system.
Each entry is of the form (alias addresses ...), with alias
specifying the local alias and addresses specifying where to deliver
this user’s mail.
The aliases aren’t required to exist as users on the local system. In the
above example, there doesn’t need to be a postmaster entry in the
operating-system’s user-accounts in order to deliver the
postmaster mail to bob (which subsequently would deliver mail
to bob@example.com and bob@example2.com).
GNU Mailutils IMAP4 Daemon
- Variável: imap4d-service-type
This is the type of the GNU Mailutils IMAP4 Daemon (veja imap4d em GNU Mailutils Manual), whose value should be an
imap4d-configurationobject as in this example:(service imap4d-service-type (imap4d-configuration (config-file (local-file "imap4d.conf"))))
- Tipo de dados: imap4d-configuration
Data type representing the configuration of
imap4d.package(default:mailutils)The package that provides
imap4d.config-file(default:%default-imap4d-config-file)File-like object of the configuration file to use, by default it will listen on TCP port 143 of
localhost. Veja Conf-imap4d em GNU Mailutils Manual, for details.
Radicale Service
- Variável: radicale-service-type
This is the type of the Radicale CalDAV/CardDAV server whose value should be a
radicale-configuration. The default configuration matches the upstream documentation.
- Tipo de dados: radicale-configuration
Data type representing the configuration of
radicale. Availableradicale-configurationfields are:package(default:radicale) (type: package)Package that provides
radicale.auth(default:'()) (type: radicale-auth-configuration)Configuration for auth-related variables.
- Tipo de dados: radicale-auth-configuration
Data type representing the
authsection of aradicaleconfiguration file. Availableradicale-auth-configurationfields are:type(default:'none) (type: symbol)The method to verify usernames and passwords. Options are
none,htpasswd,remote-user, andhttp-x-remote-user. This value is tied tohtpasswd-filenameandhtpasswd-encryption.htpasswd-filename(default:"/etc/radicale/users") (type: file-name)Path to the htpasswd file. Use htpasswd or similar to generate this file.
htpasswd-encryption(default:'md5) (type: symbol)Encryption method used in the htpasswd file. Options are
plain,bcrypt, andmd5.delay(default:1) (type: non-negative-integer)Average delay after failed login attempts in seconds.
realm(default:"Radicale - Password Required") (type: string)Message displayed in the client when a password is needed.
encoding(default:'()) (type: radicale-encoding-configuration)Configuration for encoding-related variables.
- Tipo de dados: radicale-encoding-configuration
Data type representing the
encodingsection of aradicaleconfiguration file. Availableradicale-encoding-configurationfields are:request(default:'utf-8) (type: symbol)Encoding for responding requests.
stock(default:'utf-8) (type: symbol)Encoding for storing local collections.
headers-file(default: none) (type: file-like)Custom HTTP headers.
logging(default:'()) (type: radicale-logging-configuration)Configuration for logging-related variables.
- Tipo de dados: radicale-logging-configuration
Data type representing the
loggingsection of aradicaleconfiguration file. Availableradicale-logging-configurationfields are:level(default:'warning) (type: symbol)Set the logging level. One of
debug,info,warning,error, orcritical.mask-passwords?(default:#t) (type: boolean)Whether to include passwords in logs.
rights(default:'()) (type: radicale-rights-configuration)Configuration for rights-related variables. This should be a
radicale-rights-configuration.- Tipo de dados: radicale-rights-configuration
Data type representing the
rightssection of aradicaleconfiguration file. Availableradicale-rights-configurationfields are:type(default:'owner-only) (type: symbol)Backend used to check collection access rights. The recommended backend is
owner-only. If access to calendars and address books outside the home directory of users is granted, clients won’t detect these collections and will not show them to the user. Choosing any other method is only useful if you access calendars and address books directly via URL. Options areauthenticate,owner-only,owner-write, andfrom-file.file(default:"") (type: file-name)File for the rights backend
from-file.
server(default:'()) (type: radicale-server-configuration)Configuration for server-related variables. Ignored if WSGI is used.
- Tipo de dados: radicale-server-configuration
Data type representing the
serversection of aradicaleconfiguration file. Availableradicale-server-configurationfields are:hosts(default:(list "localhost:5232")) (type: list-of-ip-addresses)List of IP addresses that the server will bind to.
max-connections(default:8) (type: non-negative-integer)Maximum number of parallel connections. Set to 0 to disable the limit.
max-content-length(default:100000000) (type: non-negative-integer)Maximum size of the request body in bytes.
timeout(default:30) (type: non-negative-integer)Socket timeout in seconds.
ssl?(default:#f) (type: boolean)Whether to enable transport layer encryption.
certificate(default:"/etc/ssl/radicale.cert.pem") (type: file-name)Path of the SSL certificate.
key(default:"/etc/ssl/radicale.key.pem") (type: file-name)Path to the private key for SSL. Only effective if
ssl?is#t.certificate-authority(default:"") (type: file-name)Path to CA certificate for validating client certificates. This can be used to secure TCP traffic between Radicale and a reverse proxy. If you want to authenticate users with client-side certificates, you also have to write an authentication plugin that extracts the username from the certificate.
storage(default:'()) (type: radicale-storage-configuration)Configuration for storage-related variables.
- Tipo de dados: radicale-storage-configuration
Data type representing the
storagesection of aradicaleconfiguration file. Availableradicale-storage-configurationfields are:type(default:'multifilesystem) (type: symbol)Backend used to store data. Options are
multifilesystemandmultifilesystem-nolock.filesystem-folder(default:"/var/lib/radicale/collections") (type: file-name)Folder for storing local collections. Created if not present.
max-sync-token-age(default:2592000) (type: non-negative-integer)Delete sync-tokens that are older than the specified time in seconds.
hook(default:"") (type: string)Command run after changes to storage.
web-interface?(default:#t) (type: boolean)Whether to use Radicale’s built-in web interface.
Rspamd Service
- Variável: rspamd-service-type
This is the type of the Rspamd filtering system whose value should be a
rspamd-configuration.
- Tipo de dados: rspamd-configuration
Available
rspamd-configurationfields are:package(default:rspamd) (type: file-like)The package that provides rspamd.
config-file(default:%default-rspamd-config-file) (type: file-like)File-like object of the configuration file to use. By default all workers are enabled except fuzzy and they are bound to their usual ports, e.g localhost:11334, localhost:11333 and so on
local.d-files(default:()) (type: directory-tree)Configuration files in local.d, provided as a list of two element lists where the first element is the filename and the second one is a file-like object. Settings in these files will be merged with the defaults.
override.d-files(default:()) (type: directory-tree)Configuration files in override.d, provided as a list of two element lists where the first element is the filename and the second one is a file-like object. Settings in these files will override the defaults.
user(default:%default-rspamd-account) (type: user-account)The user to run rspamd as.
group(default:%default-rspamd-group) (type: user-group)The group to run rspamd as.
debug?(default:#f) (type: boolean)Force debug output.
insecure?(default:#f) (type: boolean)Ignore running workers as privileged users.
skip-template?(default:#f) (type: boolean)Do not apply Jinja templates.
shepherd-requirements(default:(user-processes loopback)) (type: list-of-symbols)This is a list of symbols naming Shepherd services that this service will depend on.
Próximo: Serviços de telefonia, Anterior: Serviços de correio, Acima: Serviços [Conteúdo][Índice]
11.10.14 Serviços de mensageria
The (gnu services messaging) module provides Guix service definitions
for messaging services. Currently it provides the following services:
Prosody Service
- Variável: prosody-service-type
This is the type for the Prosody XMPP communication server. Its value must be a
prosody-configurationrecord as in this example:(service prosody-service-type (prosody-configuration (modules-enabled (cons* "groups" "mam" %default-modules-enabled)) (int-components (list (int-component-configuration (hostname "conference.example.net") (plugin "muc") (mod-muc (mod-muc-configuration))))) (virtualhosts (list (virtualhost-configuration (domain "example.net"))))))See below for details about
prosody-configuration.
By default, Prosody does not need much configuration. Only one
virtualhosts field is needed: it specifies the domain you wish
Prosody to serve.
You can perform various sanity checks on the generated configuration with
the prosodyctl check command.
Prosodyctl will also help you to import certificates from the
letsencrypt directory so that the prosody user can access
them. See https://prosody.im/doc/letsencrypt.
prosodyctl --root cert import /etc/certs
The available configuration parameters follow. Each parameter definition is
preceded by its type; for example, ‘string-list foo’ indicates that the
foo parameter should be specified as a list of strings. Types
starting with maybe- denote parameters that won’t show up in
prosody.cfg.lua when their value is left unspecified.
There is also a way to specify the configuration as a string, if you have an
old prosody.cfg.lua file that you want to port over from some other
system; see the end for more details.
The file-object type designates either a file-like object
(veja file-like objects) or a file name.
Available prosody-configuration fields are:
prosody-configurationparameter: package prosody ¶The Prosody package.
prosody-configurationparameter: file-name data-path ¶Location of the Prosody data storage directory. See https://prosody.im/doc/configure. Defaults to ‘"/var/lib/prosody"’.
prosody-configurationparameter: file-object-list plugin-paths ¶Additional plugin directories. They are searched in all the specified paths in order. See https://prosody.im/doc/plugins_directory. Defaults to ‘'()’.
prosody-configurationparameter: file-name certificates ¶Every virtual host and component needs a certificate so that clients and servers can securely verify its identity. Prosody will automatically load certificates/keys from the directory specified here. Defaults to ‘"/etc/prosody/certs"’.
prosody-configurationparameter: string-list admins ¶This is a list of accounts that are admins for the server. Note that you must create the accounts separately. See https://prosody.im/doc/admins and https://prosody.im/doc/creating_accounts. Example:
(admins '("user1@example.com" "user2@example.net"))Defaults to ‘'()’.
prosody-configurationparameter: boolean use-libevent? ¶Enable use of libevent for better performance under high load. See https://prosody.im/doc/libevent. Defaults to ‘#f’.
prosody-configurationparameter: module-list modules-enabled ¶This is the list of modules Prosody will load on startup. It looks for
mod_modulename.luain the plugins folder, so make sure that exists too. Documentation on modules can be found at: https://prosody.im/doc/modules. Defaults to ‘'("roster" "saslauth" "tls" "dialback" "disco" "carbons" "private" "blocklist" "vcard" "version" "uptime" "time" "ping" "pep" "register" "admin_adhoc")’.
prosody-configurationparameter: string-list modules-disabled ¶‘"offline"’, ‘"c2s"’ and ‘"s2s"’ are auto-loaded, but should you want to disable them then add them to this list. Defaults to ‘'()’.
prosody-configurationparameter: file-object groups-file ¶Path to a text file where the shared groups are defined. If this path is empty then ‘mod_groups’ does nothing. See https://prosody.im/doc/modules/mod_groups. Defaults to ‘"/var/lib/prosody/sharedgroups.txt"’.
prosody-configurationparameter: boolean allow-registration? ¶Disable account creation by default, for security. See https://prosody.im/doc/creating_accounts. Defaults to ‘#f’.
prosody-configurationparameter: maybe-ssl-configuration ssl ¶These are the SSL/TLS-related settings. Most of them are disabled so to use Prosody’s defaults. If you do not completely understand these options, do not add them to your config, it is easy to lower the security of your server using them. See https://prosody.im/doc/advanced_ssl_config.
Available
ssl-configurationfields are:ssl-configurationparameter: maybe-string protocol ¶This determines what handshake to use.
ssl-configurationparameter: maybe-file-name key ¶Path to your private key file.
ssl-configurationparameter: maybe-file-name certificate ¶Path to your certificate file.
ssl-configurationparameter: file-object capath ¶Path to directory containing root certificates that you wish Prosody to trust when verifying the certificates of remote servers. Defaults to ‘"/etc/ssl/certs"’.
ssl-configurationparameter: maybe-file-object cafile ¶Path to a file containing root certificates that you wish Prosody to trust. Similar to
capathbut with all certificates concatenated together.
ssl-configurationparameter: maybe-string-list verify ¶A list of verification options (these mostly map to OpenSSL’s
set_verify()flags).
ssl-configurationparameter: maybe-string-list options ¶A list of general options relating to SSL/TLS. These map to OpenSSL’s
set_options(). For a full list of options available in LuaSec, see the LuaSec source.
ssl-configurationparameter: maybe-non-negative-integer depth ¶How long a chain of certificate authorities to check when looking for a trusted root certificate.
ssl-configurationparameter: maybe-string ciphers ¶An OpenSSL cipher string. This selects what ciphers Prosody will offer to clients, and in what order.
ssl-configurationparameter: maybe-file-name dhparam ¶A path to a file containing parameters for Diffie-Hellman key exchange. You can create such a file with:
openssl dhparam -out /etc/prosody/certs/dh-2048.pem 2048
ssl-configurationparameter: maybe-string curve ¶Curve for Elliptic curve Diffie-Hellman. Prosody’s default is ‘"secp384r1"’.
ssl-configurationparameter: maybe-string-list verifyext ¶A list of “extra” verification options.
ssl-configurationparameter: maybe-string password ¶Password for encrypted private keys.
prosody-configurationparameter: boolean c2s-require-encryption? ¶Whether to force all client-to-server connections to be encrypted or not. See https://prosody.im/doc/modules/mod_tls. Defaults to ‘#f’.
prosody-configurationparameter: string-list disable-sasl-mechanisms ¶Set of mechanisms that will never be offered. See https://prosody.im/doc/modules/mod_saslauth. Defaults to ‘'("DIGEST-MD5")’.
prosody-configurationparameter: string-list insecure-sasl-mechanisms ¶Set of mechanisms that will not be offered on unencrypted connections. See https://prosody.im/doc/modules/mod_saslauth. Defaults to ‘'("PLAIN" "LOGIN")’.
prosody-configurationparameter: boolean s2s-require-encryption? ¶Whether to force all server-to-server connections to be encrypted or not. See https://prosody.im/doc/modules/mod_tls. Defaults to ‘#f’.
prosody-configurationparameter: boolean s2s-secure-auth? ¶Whether to require encryption and certificate authentication. This provides ideal security, but requires servers you communicate with to support encryption AND present valid, trusted certificates. See https://prosody.im/doc/s2s#security. Defaults to ‘#f’.
prosody-configurationparameter: string-list s2s-insecure-domains ¶Many servers don’t support encryption or have invalid or self-signed certificates. You can list domains here that will not be required to authenticate using certificates. They will be authenticated using DNS. See https://prosody.im/doc/s2s#security. Defaults to ‘'()’.
prosody-configurationparameter: string-list s2s-secure-domains ¶Even if you leave
s2s-secure-auth?disabled, you can still require valid certificates for some domains by specifying a list here. See https://prosody.im/doc/s2s#security. Defaults to ‘'()’.
prosody-configurationparameter: string authentication ¶Select the authentication backend to use. The default provider stores passwords in plaintext and uses Prosody’s configured data storage to store the authentication data. If you do not trust your server please see https://prosody.im/doc/modules/mod_auth_internal_hashed for information about using the hashed backend. See also https://prosody.im/doc/authentication Defaults to ‘"internal_plain"’.
prosody-configurationparameter: maybe-string log ¶Set logging options. Advanced logging configuration is not yet supported by the Prosody service. See https://prosody.im/doc/logging. Defaults to ‘"*syslog"’.
prosody-configurationparameter: file-name pidfile ¶File to write pid in. See https://prosody.im/doc/modules/mod_posix. Defaults to ‘"/var/run/prosody/prosody.pid"’.
prosody-configurationparameter: maybe-non-negative-integer http-max-content-size ¶Maximum allowed size of the HTTP body (in bytes).
prosody-configurationparameter: maybe-string http-external-url ¶Some modules expose their own URL in various ways. This URL is built from the protocol, host and port used. If Prosody sits behind a proxy, the public URL will be
http-external-urlinstead. See https://prosody.im/doc/http#external_url.
prosody-configurationparameter: virtualhost-configuration-list virtualhosts ¶A host in Prosody is a domain on which user accounts can be created. For example if you want your users to have addresses like ‘"john.smith@example.com"’ then you need to add a host ‘"example.com"’. All options in this list will apply only to this host.
Nota: The name virtual host is used in configuration to avoid confusion with the actual physical host that Prosody is installed on. A single Prosody instance can serve many domains, each one defined as a VirtualHost entry in Prosody’s configuration. Conversely a server that hosts a single domain would have just one VirtualHost entry.
Available
virtualhost-configurationfields are:all these
prosody-configurationfields:admins,use-libevent?,modules-enabled,modules-disabled,groups-file,allow-registration?,ssl,c2s-require-encryption?,disable-sasl-mechanisms,insecure-sasl-mechanisms,s2s-require-encryption?,s2s-secure-auth?,s2s-insecure-domains,s2s-secure-domains,authentication,log,http-max-content-size,http-external-url,raw-content, plus:virtualhost-configurationparameter: string domain ¶Domain you wish Prosody to serve.
prosody-configurationparameter: int-component-configuration-list int-components ¶Components are extra services on a server which are available to clients, usually on a subdomain of the main server (such as ‘"mycomponent.example.com"’). Example components might be chatroom servers, user directories, or gateways to other protocols.
Internal components are implemented with Prosody-specific plugins. To add an internal component, you simply fill the hostname field, and the plugin you wish to use for the component.
See https://prosody.im/doc/components. Defaults to ‘'()’.
Available
int-component-configurationfields are:all these
prosody-configurationfields:admins,use-libevent?,modules-enabled,modules-disabled,groups-file,allow-registration?,ssl,c2s-require-encryption?,disable-sasl-mechanisms,insecure-sasl-mechanisms,s2s-require-encryption?,s2s-secure-auth?,s2s-insecure-domains,s2s-secure-domains,authentication,log,http-max-content-size,http-external-url,raw-content, plus:int-component-configurationparameter: string hostname ¶Hostname of the component.
int-component-configurationparameter: string plugin ¶Plugin you wish to use for the component.
int-component-configurationparameter: maybe-mod-muc-configuration mod-muc ¶Multi-user chat (MUC) is Prosody’s module for allowing you to create hosted chatrooms/conferences for XMPP users.
General information on setting up and using multi-user chatrooms can be found in the “Chatrooms” documentation (https://prosody.im/doc/chatrooms), which you should read if you are new to XMPP chatrooms.
See also https://prosody.im/doc/modules/mod_muc.
Available
mod-muc-configurationfields are:mod-muc-configurationparameter: string name ¶The name to return in service discovery responses. Defaults to ‘"Prosody Chatrooms"’.
mod-muc-configurationparameter: string-or-boolean restrict-room-creation ¶If ‘#t’, this will only allow admins to create new chatrooms. Otherwise anyone can create a room. The value ‘"local"’ restricts room creation to users on the service’s parent domain. E.g. ‘user@example.com’ can create rooms on ‘rooms.example.com’. The value ‘"admin"’ restricts to service administrators only. Defaults to ‘#f’.
mod-muc-configurationparameter: non-negative-integer max-history-messages ¶Maximum number of history messages that will be sent to the member that has just joined the room. Defaults to ‘20’.
prosody-configurationparameter: ext-component-configuration-list ext-components ¶External components use XEP-0114, which most standalone components support. To add an external component, you simply fill the hostname field. See https://prosody.im/doc/components. Defaults to ‘'()’.
Available
ext-component-configurationfields are:all these
prosody-configurationfields:admins,use-libevent?,modules-enabled,modules-disabled,groups-file,allow-registration?,ssl,c2s-require-encryption?,disable-sasl-mechanisms,insecure-sasl-mechanisms,s2s-require-encryption?,s2s-secure-auth?,s2s-insecure-domains,s2s-secure-domains,authentication,log,http-max-content-size,http-external-url,raw-content, plus:ext-component-configurationparameter: string component-secret ¶Password which the component will use to log in.
ext-component-configurationparameter: string hostname ¶Hostname of the component.
prosody-configurationparameter: non-negative-integer-list component-ports ¶Port(s) Prosody listens on for component connections. Defaults to ‘'(5347)’.
prosody-configurationparameter: string component-interface ¶Interface Prosody listens on for component connections. Defaults to ‘"127.0.0.1"’.
prosody-configurationparameter: maybe-raw-content raw-content ¶Raw content that will be added to the configuration file.
It could be that you just want to get a prosody.cfg.lua up and
running. In that case, you can pass an opaque-prosody-configuration
record as the value of prosody-service-type. As its name indicates,
an opaque configuration does not have easy reflective capabilities.
Available opaque-prosody-configuration fields are:
opaque-prosody-configurationparameter: package prosody ¶The prosody package.
opaque-prosody-configurationparameter: string prosody.cfg.lua ¶The contents of the
prosody.cfg.luato use.
For example, if your prosody.cfg.lua is just the empty string, you
could instantiate a prosody service like this:
(service prosody-service-type
(opaque-prosody-configuration
(prosody.cfg.lua "")))
BitlBee Service
BitlBee is a gateway that provides an IRC interface to a variety of messaging protocols such as XMPP.
- Variável: bitlbee-service-type
This is the service type for the BitlBee IRC gateway daemon. Its value is a
bitlbee-configuration(see below).To have BitlBee listen on port 6667 on localhost, add this line to your services:
(service bitlbee-service-type)
- Tipo de dados: bitlbee-configuration
This is the configuration for BitlBee, with the following fields:
interface(default:"127.0.0.1")port(padrão:6667)Listen on the network interface corresponding to the IP address specified in interface, on port.
When interface is
127.0.0.1, only local clients can connect; when it is0.0.0.0, connections can come from any networking interface.bitlbee(default:bitlbee)The BitlBee package to use.
plugins(default:'())List of plugin packages to use—e.g.,
bitlbee-discord.extra-settings(default:"")Configuration snippet added as-is to the BitlBee configuration file.
Quassel Service
Quassel is a distributed IRC client, meaning that one or more clients can attach to and detach from the central core.
- Variável: quassel-service-type
This is the service type for the Quassel IRC backend daemon. Its value is a
quassel-configuration(see below).
- Tipo de dados: quassel-configuration
This is the configuration for Quassel, with the following fields:
quassel(default:quassel)The Quassel package to use.
interface(default:"::,0.0.0.0")port(padrão:4242)Listen on the network interface(s) corresponding to the IPv4 or IPv6 interfaces specified in the comma delimited interface, on port.
loglevel(default:"Info")The level of logging desired. Accepted values are Debug, Info, Warning and Error.
Próximo: Serviços de compartilhamento de arquivos, Anterior: Serviços de mensageria, Acima: Serviços [Conteúdo][Índice]
11.10.15 Serviços de telefonia
The (gnu services telephony) module contains Guix service definitions
for telephony services. Currently it provides the following services:
Jami
- Variável: jami-service-type
The service type for running Jami as a service. It takes a
jami-configurationobject as a value, documented below. This section describes how to configure a Jami server that can be used to host video (or audio) conferences, among other uses. The following example demonstrates how to specify Jami account archives (backups) to be provisioned automatically:(service jami-service-type (jami-configuration (accounts (list (jami-account (archive "/etc/jami/unencrypted-account-1.gz")) (jami-account (archive "/etc/jami/unencrypted-account-2.gz"))))))When the accounts field is specified, the Jami account files of the service found under /var/lib/jami are recreated every time the service starts.
Jami accounts and their corresponding backup archives can be generated using the
jamiorjami-gnomeJami clients. The accounts should not be password-protected, but it is wise to ensure their files are only readable by ‘root’.The next example shows how to declare that only some contacts should be allowed to communicate with a given account:
(service jami-service-type (jami-configuration (accounts (list (jami-account (archive "/etc/jami/unencrypted-account-1.gz") (peer-discovery? #t) (rendezvous-point? #t) (allowed-contacts '("1dbcb0f5f37324228235564b79f2b9737e9a008f" "2dbcb0f5f37324228235564b79f2b9737e9a008f")))))))In this mode, only the declared
allowed-contactscan initiate communication with the Jami account. This can be used, for example, with rendezvous point accounts to create a private video conferencing space.To put the system administrator in full control of the conferences hosted on their system, the Jami service supports the following actions:
# herd doc jami list-actions (list-accounts list-account-details list-banned-contacts list-contacts list-moderators add-moderator ban-contact enable-account disable-account)
The above actions aim to provide the most valuable actions for moderation purposes, not to cover the whole Jami API. Users wanting to interact with the Jami daemon from Guile may be interested in experimenting with the
(gnu build jami-service)module, which powers the above Shepherd actions.The
add-moderatorandban-contactactions accept a contact fingerprint (40 characters long hash) as first argument and an account fingerprint or username as second argument:# herd add-moderator jami 1dbcb0f5f37324228235564b79f2b9737e9a008f \ f3345f2775ddfe07a4b0d95daea111d15fbc1199 # herd list-moderators jami Moderators for account f3345f2775ddfe07a4b0d95daea111d15fbc1199: - 1dbcb0f5f37324228235564b79f2b9737e9a008f
In the case of
ban-contact, the second username argument is optional; when omitted, the account is banned from all Jami accounts:# herd ban-contact jami 1dbcb0f5f37324228235564b79f2b9737e9a008f # herd list-banned-contacts jami Banned contacts for account f3345f2775ddfe07a4b0d95daea111d15fbc1199: - 1dbcb0f5f37324228235564b79f2b9737e9a008f
Banned contacts are also stripped from their moderation privileges.
The
disable-accountaction allows to completely disconnect an account from the network, making it unreachable, whileenable-accountdoes the inverse. They accept a single account username or fingerprint as first argument:# herd disable-account jami f3345f2775ddfe07a4b0d95daea111d15fbc1199 # herd list-accounts jami The following Jami accounts are available: - f3345f2775ddfe07a4b0d95daea111d15fbc1199 (dummy) [disabled]
The
list-account-detailsaction prints the detailed parameters of each accounts in the Recutils format, which means therecselcommand can be used to select accounts of interest (veja Selection Expressions em GNU recutils manual). Note that period characters (‘.’) found in the account parameter keys are mapped to underscores (‘_’) in the output, to meet the requirements of the Recutils format. The following example shows how to print the account fingerprints for all accounts operating in the rendezvous point mode:# herd list-account-details jami | \ recsel -p Account.username -e 'Account.rendezVous ~ "true"' Account_username: f3345f2775ddfe07a4b0d95daea111d15fbc1199
The remaining actions should be self-explanatory.
The complete set of available configuration options is detailed below.
- Tipo de dados: jami-configuration
Available
jami-configurationfields are:libjami(default:libjami) (type: package)The Jami daemon package to use.
dbus(default:dbus-for-jami) (type: package)The D-Bus package to use to start the required D-Bus session.
nss-certs(default:nss-certs) (type: package)The nss-certs package to use to provide TLS certificates.
enable-logging?(default:#t) (type: boolean)Whether to enable logging to syslog.
debug?(default:#f) (type: boolean)Whether to enable debug level messages.
auto-answer?(default:#f) (type: boolean)Whether to force automatic answer to incoming calls.
accounts(type: maybe-jami-account-list)A list of Jami accounts to be (re-)provisioned every time the Jami daemon service starts. When providing this field, the account directories under /var/lib/jami/ are recreated every time the service starts, ensuring a consistent state.
- Tipo de dados: jami-account
Available
jami-accountfields are:archive(type: string-or-computed-file)The account archive (backup) file name of the account. This is used to provision the account when the service starts. The account archive should not be encrypted. It is highly recommended to make it readable only to the ‘root’ user (i.e., not in the store), to guard against leaking the secret key material of the Jami account it contains.
allowed-contacts(type: maybe-account-fingerprint-list)The list of allowed contacts for the account, entered as their 40 characters long fingerprint. Messages or calls from accounts not in that list will be rejected. When left specified, the configuration of the account archive is used as-is with respect to contacts and public inbound calls/messaging allowance, which typically defaults to allow any contact to communicate with the account.
moderators(type: maybe-account-fingerprint-list)The list of contacts that should have moderation privileges (to ban, mute, etc. other users) in rendezvous conferences, entered as their 40 characters long fingerprint. When left unspecified, the configuration of the account archive is used as-is with respect to moderation, which typically defaults to allow anyone to moderate.
rendezvous-point?(type: maybe-boolean)Whether the account should operate in the rendezvous mode. In this mode, all the incoming audio/video calls are mixed into a conference. When left unspecified, the value from the account archive prevails.
peer-discovery?(type: maybe-boolean)Whether peer discovery should be enabled. Peer discovery is used to discover other OpenDHT nodes on the local network, which can be useful to maintain communication between devices on such network even when the connection to the Internet has been lost. When left unspecified, the value from the account archive prevails.
bootstrap-hostnames(type: maybe-list-of-strings)A list of hostnames or IPs pointing to OpenDHT nodes, that should be used to initially join the OpenDHT network. When left unspecified, the value from the account archive prevails.
name-server-uri(type: maybe-string)The URI of the name server to use, that can be used to retrieve the account fingerprint for a registered username.
Mumble server
This section describes how to set up and run a Mumble server (formerly known as Murmur).
- Variável: mumble-server-service-type
-
This is the service to run a Mumble server. It takes a
mumble-server-configurationobject as its value, defined below.
- Tipo de dados: mumble-server-configuration
The service type for the Mumble server. An example configuration can look like this:
(service mumble-server-service-type (mumble-server-configuration (welcome-text "Welcome to this Mumble server running on Guix!") (cert-required? #t) ;disallow text password logins (ssl-cert "/etc/certs/mumble.example.com/fullchain.pem") (ssl-key "/etc/certs/mumble.example.com/privkey.pem")))After reconfiguring your system, you can manually set the mumble-server
SuperUserpassword with the command that is printed during the activation phase.It is recommended to register a normal Mumble user account and grant it admin or moderator rights. You can use the
mumbleclient to login as new normal user, register yourself, and log out. For the next step login with the nameSuperUseruse theSuperUserpassword that you set previously, and grant your newly registered mumble user administrator or moderator rights and create some channels.Available
mumble-server-configurationfields are:package(default:mumble)Package that contains
bin/mumble-server.user(default:"mumble-server")User who will run the Mumble-Server server.
group(default:"mumble-server")Group of the user who will run the mumble-server server.
port(padrão:64738)Port on which the server will listen.
welcome-text(default:"")Welcome text sent to clients when they connect.
server-password(default:"")Password the clients have to enter in order to connect.
max-users(default:100)Maximum of users that can be connected to the server at once.
max-user-bandwidth(default:#f)Maximum voice traffic a user can send per second.
database-file(default:"/var/lib/mumble-server/db.sqlite")File name of the sqlite database. The service’s user will become the owner of the directory.
log-file(default:"/var/log/mumble-server/mumble-server.log")File name of the log file. The service’s user will become the owner of the directory.
autoban-attempts(default:10)Maximum number of logins a user can make in
autoban-timeframewithout getting auto banned forautoban-time.autoban-timeframe(default:120)Timeframe for autoban in seconds.
autoban-time(default:300)Amount of time in seconds for which a client gets banned when violating the autoban limits.
opus-threshold(default:100)Percentage of clients that need to support opus before switching over to opus audio codec.
channel-nesting-limit(default:10)How deep channels can be nested at maximum.
channelname-regex(default:#f)A string in form of a Qt regular expression that channel names must conform to.
username-regex(default:#f)A string in form of a Qt regular expression that user names must conform to.
text-message-length(default:5000)Maximum size in bytes that a user can send in one text chat message.
image-message-length(default:(* 128 1024))Maximum size in bytes that a user can send in one image message.
cert-required?(default:#f)If it is set to
#tclients that use weak password authentication will not be accepted. Users must have completed the certificate wizard to join.remember-channel?(padrão:#f)Should mumble-server remember the last channel each user was in when they disconnected and put them into the remembered channel when they rejoin.
allow-html?(default:#f)Should html be allowed in text messages, user comments, and channel descriptions.
allow-ping?(default:#f)Setting to true exposes the current user count, the maximum user count, and the server’s maximum bandwidth per client to unauthenticated users. In the Mumble client, this information is shown in the Connect dialog.
Disabling this setting will prevent public listing of the server.
bonjour?(padrão:#f)Should the server advertise itself in the local network through the bonjour protocol.
send-version?(default:#f)Should the mumble-server server version be exposed in ping requests.
log-days(default:31)Mumble also stores logs in the database, which are accessible via RPC. The default is 31 days of months, but you can set this setting to 0 to keep logs forever, or -1 to disable logging to the database.
obfuscate-ips?(default:#t)Should logged ips be obfuscated to protect the privacy of users.
ssl-cert(default:#f)File name of the SSL/TLS certificate used for encrypted connections.
(ssl-cert "/etc/certs/example.com/fullchain.pem")ssl-key(default:#f)Filepath to the ssl private key used for encrypted connections.
(ssl-key "/etc/certs/example.com/privkey.pem")ssl-dh-params(default:#f)File name of a PEM-encoded file with Diffie-Hellman parameters for the SSL/TLS encryption. Alternatively you set it to
"@ffdhe2048","@ffdhe3072","@ffdhe4096","@ffdhe6144"or"@ffdhe8192"to use bundled parameters from RFC 7919.ssl-ciphers(default:#f)The
ssl-ciphersoption chooses the cipher suites to make available for use in SSL/TLS.This option is specified using OpenSSL cipher list notation.
It is recommended that you try your cipher string using ’openssl ciphers <string>’ before setting it here, to get a feel for which cipher suites you will get. After setting this option, it is recommend that you inspect your Mumble server log to ensure that Mumble is using the cipher suites that you expected it to.
Nota: Changing this option may impact the backwards compatibility of your Mumble-Server server, and can remove the ability for older Mumble clients to be able to connect to it.
public-registration(default:#f)Must be a
<mumble-server-public-registration-configuration>record or#f.You can optionally register your server in the public server list that the
mumbleclient shows on startup. You cannot register your server if you have set aserver-password, or setallow-pingto#f.It might take a few hours until it shows up in the public list.
file(padrão:#f)Optional alternative override for this configuration.
- Tipo de dados: mumble-server-public-registration-configuration
Configuration for public registration of a mumble-server service.
nameThis is a display name for your server. Not to be confused with the hostname.
passwordA password to identify your registration. Subsequent updates will need the same password. Don’t lose your password.
urlThis should be a
http://orhttps://link to your web site.hostname(padrão:#f)By default your server will be listed by its IP address. If it is set your server will be linked by this host name instead.
Deprecation notice: Due to historical reasons, all of the above
mumble-server-procedures are also exported with themurmur-prefix. It is recommended that you switch to usingmumble-server-going forward.
Próximo: Serviços de monitoramento, Anterior: Serviços de telefonia, Acima: Serviços [Conteúdo][Índice]
11.10.16 Serviços de compartilhamento de arquivos
The (gnu services file-sharing) module provides services that assist
with transferring files over peer-to-peer file-sharing networks.
Transmission Daemon Service
Transmission is a flexible BitTorrent
client that offers a variety of graphical and command-line interfaces. A
transmission-daemon-service-type service provides Transmission’s
headless variant, transmission-daemon, as a system service,
allowing users to share files via BitTorrent even when they are not logged
in.
- Variável: transmission-daemon-service-type
The service type for the Transmission Daemon BitTorrent client. Its value must be a
transmission-daemon-configurationobject as in this example:(service transmission-daemon-service-type (transmission-daemon-configuration ;; Restrict access to the RPC ("control") interface (rpc-authentication-required? #t) (rpc-username "transmission") (rpc-password (transmission-password-hash "transmission" ; desired password "uKd1uMs9")) ; arbitrary salt value ;; Accept requests from this and other hosts on the ;; local network (rpc-whitelist-enabled? #t) (rpc-whitelist '("::1" "127.0.0.1" "192.168.0.*")) ;; Limit bandwidth use during work hours (alt-speed-down (* 1024 2)) ; 2 MB/s (alt-speed-up 512) ; 512 kB/s (alt-speed-time-enabled? #t) (alt-speed-time-day 'weekdays) (alt-speed-time-begin (+ (* 60 8) 30)) ; 8:30 am (alt-speed-time-end (+ (* 60 (+ 12 5)) 30)))) ; 5:30 pm
Once the service is started, users can interact with the daemon through its
Web interface (at http://localhost:9091/) or by using the
transmission-remote command-line tool, available in the
transmission package. (Emacs users may want to also consider the
emacs-transmission package.) Both communicate with the daemon
through its remote procedure call (RPC) interface, which by default is
available to all users on the system; you may wish to change this by
assigning values to the rpc-authentication-required?,
rpc-username and rpc-password settings, as shown in the
example above and documented further below.
The value for rpc-password must be a password hash of the type
generated and used by Transmission clients. This can be copied verbatim
from an existing settings.json file, if another Transmission client
is already being used. Otherwise, the transmission-password-hash and
transmission-random-salt procedures provided by this module can be
used to obtain a suitable hash value.
- Procedure: transmission-password-hash password salt
Returns a string containing the result of hashing password together with salt, in the format recognized by Transmission clients for their
rpc-passwordconfiguration setting.salt must be an eight-character string. The
transmission-random-saltprocedure can be used to generate a suitable salt value at random.
- Procedure: transmission-random-salt
Returns a string containing a random, eight-character salt value of the type generated and used by Transmission clients, suitable for passing to the
transmission-password-hashprocedure.
These procedures are accessible from within a Guile REPL started with the
guix repl command (veja Invocando guix repl). This is useful
for obtaining a random salt value to provide as the second parameter to
‘transmission-password-hash‘, as in this example session:
$ guix repl scheme@(guix-user)> ,use (gnu services file-sharing) scheme@(guix-user)> (transmission-random-salt) $1 = "uKd1uMs9"
Alternatively, a complete password hash can generated in a single step:
scheme@(guix-user)> (transmission-password-hash "transmission"
(transmission-random-salt))
$2 = "{c8bbc6d1740cd8dc819a6e25563b67812c1c19c9VtFPfdsX"
The resulting string can be used as-is for the value of rpc-password,
allowing the password to be kept hidden even in the operating-system
configuration.
Torrent files downloaded by the daemon are directly accessible only to users
in the “transmission” user group, who receive read-only access to the
directory specified by the download-dir configuration setting (and
also the directory specified by incomplete-dir, if
incomplete-dir-enabled? is #t). Downloaded files can be moved
to another directory or deleted altogether using
transmission-remote with its --move and
--remove-and-delete options.
If the watch-dir-enabled? setting is set to #t, users in the
“transmission” group are able also to place .torrent files in the
directory specified by watch-dir to have the corresponding torrents
added by the daemon. (The trash-original-torrent-files? setting
controls whether the daemon deletes these files after processing them.)
Some of the daemon’s configuration settings can be changed temporarily by
transmission-remote and similar tools. To undo these changes, use
the service’s reload action to have the daemon reload its settings
from disk:
# herd reload transmission-daemon
The full set of available configuration settings is defined by the
transmission-daemon-configuration data type.
- Tipo de dados: transmission-daemon-configuration
The data type representing configuration settings for Transmission Daemon. These correspond directly to the settings recognized by Transmission clients in their settings.json file.
Available transmission-daemon-configuration fields are:
transmission-daemon-configurationparameter: package transmission ¶The Transmission package to use.
transmission-daemon-configurationparameter: non-negative-integer stop-wait-period ¶The period, in seconds, to wait when stopping the service for
transmission-daemonto exit before killing its process. This allows the daemon time to complete its housekeeping and send a final update to trackers as it shuts down. On slow hosts, or hosts with a slow network connection, this value may need to be increased.Defaults to ‘10’.
transmission-daemon-configurationparameter: string download-dir ¶The directory to which torrent files are downloaded.
Defaults to ‘"/var/lib/transmission-daemon/downloads"’.
transmission-daemon-configurationparameter: boolean incomplete-dir-enabled? ¶If
#t, files will be held inincomplete-dirwhile their torrent is being downloaded, then moved todownload-dironce the torrent is complete. Otherwise, files for all torrents (including those still being downloaded) will be placed indownload-dir.Defaults to ‘#f’.
transmission-daemon-configurationparameter: maybe-string incomplete-dir ¶The directory in which files from incompletely downloaded torrents will be held when
incomplete-dir-enabled?is#t.Defaults to ‘disabled’.
transmission-daemon-configurationparameter: umask umask ¶The file mode creation mask used for downloaded files. (See the
umaskman page for more information.)Defaults to ‘18’.
transmission-daemon-configurationparameter: boolean rename-partial-files? ¶When
#t, “.part” is appended to the name of partially downloaded files.Defaults to ‘#t’.
transmission-daemon-configurationparameter: preallocation-mode preallocation ¶The mode by which space should be preallocated for downloaded files, one of
none,fast(orsparse) andfull. Specifyingfullwill minimize disk fragmentation at a cost to file-creation speed.Defaults to ‘fast’.
transmission-daemon-configurationparameter: boolean watch-dir-enabled? ¶If
#t, the directory specified bywatch-dirwill be watched for new .torrent files and the torrents they describe added automatically (and the original files removed, iftrash-original-torrent-files?is#t).Defaults to ‘#f’.
transmission-daemon-configurationparameter: maybe-string watch-dir ¶The directory to be watched for .torrent files indicating new torrents to be added, when
watch-dir-enabledis#t.Defaults to ‘disabled’.
transmission-daemon-configurationparameter: boolean trash-original-torrent-files? ¶When
#t, .torrent files will be deleted from the watch directory once their torrent has been added (seewatch-directory-enabled?).Defaults to ‘#f’.
transmission-daemon-configurationparameter: boolean speed-limit-down-enabled? ¶When
#t, the daemon’s download speed will be limited to the rate specified byspeed-limit-down.Defaults to ‘#f’.
transmission-daemon-configurationparameter: non-negative-integer speed-limit-down ¶The default global-maximum download speed, in kilobytes per second.
Defaults to ‘100’.
transmission-daemon-configurationparameter: boolean speed-limit-up-enabled? ¶When
#t, the daemon’s upload speed will be limited to the rate specified byspeed-limit-up.Defaults to ‘#f’.
transmission-daemon-configurationparameter: non-negative-integer speed-limit-up ¶The default global-maximum upload speed, in kilobytes per second.
Defaults to ‘100’.
transmission-daemon-configurationparameter: boolean alt-speed-enabled? ¶When
#t, the alternate speed limitsalt-speed-downandalt-speed-upare used (in place ofspeed-limit-downandspeed-limit-up, if they are enabled) to constrain the daemon’s bandwidth usage. This can be scheduled to occur automatically at certain times during the week; seealt-speed-time-enabled?.Defaults to ‘#f’.
transmission-daemon-configurationparameter: non-negative-integer alt-speed-down ¶The alternate global-maximum download speed, in kilobytes per second.
Defaults to ‘50’.
transmission-daemon-configurationparameter: non-negative-integer alt-speed-up ¶The alternate global-maximum upload speed, in kilobytes per second.
Defaults to ‘50’.
transmission-daemon-configurationparameter: boolean alt-speed-time-enabled? ¶When
#t, the alternate speed limitsalt-speed-downandalt-speed-upwill be enabled automatically during the periods specified byalt-speed-time-day,alt-speed-time-beginandalt-time-speed-end.Defaults to ‘#f’.
transmission-daemon-configurationparameter: day-list alt-speed-time-day ¶The days of the week on which the alternate-speed schedule should be used, specified either as a list of days (
sunday,monday, and so on) or using one of the symbolsweekdays,weekendsorall.Defaults to ‘all’.
transmission-daemon-configurationparameter: non-negative-integer alt-speed-time-begin ¶The time of day at which to enable the alternate speed limits, expressed as a number of minutes since midnight.
Defaults to ‘540’.
transmission-daemon-configurationparameter: non-negative-integer alt-speed-time-end ¶The time of day at which to disable the alternate speed limits, expressed as a number of minutes since midnight.
Defaults to ‘1020’.
transmission-daemon-configurationparameter: string bind-address-ipv4 ¶The IP address at which to listen for peer connections, or “0.0.0.0” to listen at all available IP addresses.
Defaults to ‘"0.0.0.0"’.
transmission-daemon-configurationparameter: string bind-address-ipv6 ¶The IPv6 address at which to listen for peer connections, or “::” to listen at all available IPv6 addresses.
Defaults to ‘"::"’.
transmission-daemon-configurationparameter: boolean peer-port-random-on-start? ¶If
#t, when the daemon starts it will select a port at random on which to listen for peer connections, from the range specified (inclusively) bypeer-port-random-lowandpeer-port-random-high. Otherwise, it listens on the port specified bypeer-port.Defaults to ‘#f’.
transmission-daemon-configurationparameter: port-number peer-port-random-low ¶The lowest selectable port number when
peer-port-random-on-start?is#t.Defaults to ‘49152’.
transmission-daemon-configurationparameter: port-number peer-port-random-high ¶The highest selectable port number when
peer-port-random-on-startis#t.Defaults to ‘65535’.
transmission-daemon-configurationparameter: port-number peer-port ¶The port on which to listen for peer connections when
peer-port-random-on-start?is#f.Defaults to ‘51413’.
transmission-daemon-configurationparameter: boolean port-forwarding-enabled? ¶If
#t, the daemon will attempt to configure port-forwarding on an upstream gateway automatically using UPnP and NAT-PMP.Defaults to ‘#t’.
transmission-daemon-configurationparameter: encryption-mode encryption ¶The encryption preference for peer connections, one of
prefer-unencrypted-connections,prefer-encrypted-connectionsorrequire-encrypted-connections.Defaults to ‘prefer-encrypted-connections’.
transmission-daemon-configurationparameter: maybe-string peer-congestion-algorithm ¶The TCP congestion-control algorithm to use for peer connections, specified using a string recognized by the operating system in calls to
setsockopt. When left unspecified, the operating-system default is used.Note that on GNU/Linux systems, the kernel must be configured to allow processes to use a congestion-control algorithm not in the default set; otherwise, it will deny these requests with “Operation not permitted”. To see which algorithms are available on your system and which are currently permitted for use, look at the contents of the files tcp_available_congestion_control and tcp_allowed_congestion_control in the /proc/sys/net/ipv4 directory.
As an example, to have Transmission Daemon use the TCP Low Priority congestion-control algorithm, you’ll need to modify your kernel configuration to build in support for the algorithm, then update your operating-system configuration to allow its use by adding a
sysctl-service-typeservice (or updating the existing one’s configuration) with lines like the following:(service sysctl-service-type (sysctl-configuration (settings ("net.ipv4.tcp_allowed_congestion_control" . "reno cubic lp"))))The Transmission Daemon configuration can then be updated with
(peer-congestion-algorithm "lp")and the system reconfigured to have the changes take effect.
Defaults to ‘disabled’.
transmission-daemon-configurationparameter: tcp-type-of-service peer-socket-tos ¶The type of service to request in outgoing TCP packets, one of
default,low-cost,throughput,low-delayandreliability.Defaults to ‘default’.
transmission-daemon-configurationparameter: non-negative-integer peer-limit-global ¶The global limit on the number of connected peers.
Defaults to ‘200’.
transmission-daemon-configurationparameter: non-negative-integer peer-limit-per-torrent ¶The per-torrent limit on the number of connected peers.
Defaults to ‘50’.
transmission-daemon-configurationparameter: non-negative-integer upload-slots-per-torrent ¶The maximum number of peers to which the daemon will upload data simultaneously for each torrent.
Defaults to ‘14’.
transmission-daemon-configurationparameter: non-negative-integer peer-id-ttl-hours ¶The maximum lifespan, in hours, of the peer ID associated with each public torrent before it is regenerated.
Defaults to ‘6’.
transmission-daemon-configurationparameter: boolean blocklist-enabled? ¶When
#t, the daemon will ignore peers mentioned in the blocklist it has most recently downloaded fromblocklist-url.Defaults to ‘#f’.
transmission-daemon-configurationparameter: maybe-string blocklist-url ¶The URL of a peer blocklist (in P2P-plaintext or eMule .dat format) to be periodically downloaded and applied when
blocklist-enabled?is#t.Defaults to ‘disabled’.
transmission-daemon-configurationparameter: boolean download-queue-enabled? ¶If
#t, the daemon will be limited to downloading at mostdownload-queue-sizenon-stalled torrents simultaneously.Defaults to ‘#t’.
transmission-daemon-configurationparameter: non-negative-integer download-queue-size ¶The size of the daemon’s download queue, which limits the number of non-stalled torrents it will download at any one time when
download-queue-enabled?is#t.Defaults to ‘5’.
transmission-daemon-configurationparameter: boolean seed-queue-enabled? ¶If
#t, the daemon will be limited to seeding at mostseed-queue-sizenon-stalled torrents simultaneously.Defaults to ‘#f’.
transmission-daemon-configurationparameter: non-negative-integer seed-queue-size ¶The size of the daemon’s seed queue, which limits the number of non-stalled torrents it will seed at any one time when
seed-queue-enabled?is#t.Defaults to ‘10’.
transmission-daemon-configurationparameter: boolean queue-stalled-enabled? ¶When
#t, the daemon will consider torrents for which it has not shared data in the pastqueue-stalled-minutesminutes to be stalled and not count them against itsdownload-queue-sizeandseed-queue-sizelimits.Defaults to ‘#t’.
transmission-daemon-configurationparameter: non-negative-integer queue-stalled-minutes ¶The maximum period, in minutes, a torrent may be idle before it is considered to be stalled, when
queue-stalled-enabled?is#t.Defaults to ‘30’.
transmission-daemon-configurationparameter: boolean ratio-limit-enabled? ¶When
#t, a torrent being seeded will automatically be paused once it reaches the ratio specified byratio-limit.Defaults to ‘#f’.
transmission-daemon-configurationparameter: non-negative-rational ratio-limit ¶The ratio at which a torrent being seeded will be paused, when
ratio-limit-enabled?is#t.Defaults to ‘2.0’.
transmission-daemon-configurationparameter: boolean idle-seeding-limit-enabled? ¶When
#t, a torrent being seeded will automatically be paused once it has been idle foridle-seeding-limitminutes.Defaults to ‘#f’.
transmission-daemon-configurationparameter: non-negative-integer idle-seeding-limit ¶The maximum period, in minutes, a torrent being seeded may be idle before it is paused, when
idle-seeding-limit-enabled?is#t.Defaults to ‘30’.
transmission-daemon-configurationparameter: boolean dht-enabled? ¶Enable the distributed hash table (DHT) protocol, which supports the use of trackerless torrents.
Defaults to ‘#t’.
transmission-daemon-configurationparameter: boolean lpd-enabled? ¶Enable local peer discovery (LPD), which allows the discovery of peers on the local network and may reduce the amount of data sent over the public Internet.
Defaults to ‘#f’.
transmission-daemon-configurationparameter: boolean pex-enabled? ¶Enable peer exchange (PEX), which reduces the daemon’s reliance on external trackers and may improve its performance.
Defaults to ‘#t’.
transmission-daemon-configurationparameter: boolean utp-enabled? ¶Enable the micro transport protocol (uTP), which aims to reduce the impact of BitTorrent traffic on other users of the local network while maintaining full utilization of the available bandwidth.
Defaults to ‘#t’.
transmission-daemon-configurationparameter: boolean rpc-enabled? ¶If
#t, enable the remote procedure call (RPC) interface, which allows remote control of the daemon via its Web interface, thetransmission-remotecommand-line client, and similar tools.Defaults to ‘#t’.
transmission-daemon-configurationparameter: string rpc-bind-address ¶The IP address at which to listen for RPC connections, or “0.0.0.0” to listen at all available IP addresses.
Defaults to ‘"0.0.0.0"’.
transmission-daemon-configurationparameter: port-number rpc-port ¶The port on which to listen for RPC connections.
Defaults to ‘9091’.
transmission-daemon-configurationparameter: string rpc-url ¶The path prefix to use in the RPC-endpoint URL.
Defaults to ‘"/transmission/"’.
transmission-daemon-configurationparameter: boolean rpc-authentication-required? ¶When
#t, clients must authenticate (seerpc-usernameandrpc-password) when using the RPC interface. Note this has the side effect of disabling host-name whitelisting (seerpc-host-whitelist-enabled?.Defaults to ‘#f’.
transmission-daemon-configurationparameter: maybe-string rpc-username ¶The username required by clients to access the RPC interface when
rpc-authentication-required?is#t.Defaults to ‘disabled’.
transmission-daemon-configurationparameter: maybe-transmission-password-hash rpc-password ¶The password required by clients to access the RPC interface when
rpc-authentication-required?is#t. This must be specified using a password hash in the format recognized by Transmission clients, either copied from an existing settings.json file or generated using thetransmission-password-hashprocedure.Defaults to ‘disabled’.
transmission-daemon-configurationparameter: boolean rpc-whitelist-enabled? ¶When
#t, RPC requests will be accepted only when they originate from an address specified inrpc-whitelist.Defaults to ‘#t’.
transmission-daemon-configurationparameter: string-list rpc-whitelist ¶The list of IP and IPv6 addresses from which RPC requests will be accepted when
rpc-whitelist-enabled?is#t. Wildcards may be specified using ‘*’.Defaults to ‘'("127.0.0.1" "::1")’.
transmission-daemon-configurationparameter: boolean rpc-host-whitelist-enabled? ¶When
#t, RPC requests will be accepted only when they are addressed to a host named inrpc-host-whitelist. Note that requests to “localhost” or “localhost.”, or to a numeric address, are always accepted regardless of these settings.Note also this functionality is disabled when
rpc-authentication-required?is#t.Defaults to ‘#t’.
transmission-daemon-configurationparameter: string-list rpc-host-whitelist ¶The list of host names recognized by the RPC server when
rpc-host-whitelist-enabled?is#t.Defaults to ‘'()’.
transmission-daemon-configurationparameter: message-level message-level ¶The minimum severity level of messages to be logged (to /var/log/transmission.log) by the daemon, one of
none(no logging),error,infoanddebug.Defaults to ‘info’.
transmission-daemon-configurationparameter: boolean start-added-torrents? ¶When
#t, torrents are started as soon as they are added; otherwise, they are added in “paused” state.Defaults to ‘#t’.
transmission-daemon-configurationparameter: boolean script-torrent-done-enabled? ¶When
#t, the script specified byscript-torrent-done-filenamewill be invoked each time a torrent completes.Defaults to ‘#f’.
transmission-daemon-configurationparameter: maybe-file-object script-torrent-done-filename ¶A file name or file-like object specifying a script to run each time a torrent completes, when
script-torrent-done-enabled?is#t.Defaults to ‘disabled’.
transmission-daemon-configurationparameter: boolean scrape-paused-torrents-enabled? ¶When
#t, the daemon will scrape trackers for a torrent even when the torrent is paused.Defaults to ‘#t’.
transmission-daemon-configurationparameter: non-negative-integer cache-size-mb ¶The amount of memory, in megabytes, to allocate for the daemon’s in-memory cache. A larger value may increase performance by reducing the frequency of disk I/O.
Defaults to ‘4’.
transmission-daemon-configurationparameter: boolean prefetch-enabled? ¶When
#t, the daemon will try to improve I/O performance by hinting to the operating system which data is likely to be read next from disk to satisfy requests from peers.Defaults to ‘#t’.
Próximo: Serviços Kerberos, Anterior: Serviços de compartilhamento de arquivos, Acima: Serviços [Conteúdo][Índice]
11.10.17 Serviços de monitoramento
Tailon Service
Tailon is a web application for viewing and searching log files.
The following example will configure the service with default values. By
default, Tailon can be accessed on port 8080 (http://localhost:8080).
(service tailon-service-type)
The following example customises more of the Tailon configuration, adding
sed to the list of allowed commands.
(service tailon-service-type
(tailon-configuration
(config-file
(tailon-configuration-file
(allowed-commands '("tail" "grep" "awk" "sed"))))))
- Tipo de dados: tailon-configuration
Data type representing the configuration of Tailon. This type has the following parameters:
config-file(default:(tailon-configuration-file))The configuration file to use for Tailon. This can be set to a tailon-configuration-file record value, or any gexp (veja Expressões-G).
For example, to instead use a local file, the
local-filefunction can be used:(service tailon-service-type (tailon-configuration (config-file (local-file "./my-tailon.conf"))))package(default:tailon)The tailon package to use.
- Tipo de dados: tailon-configuration-file
Data type representing the configuration options for Tailon. This type has the following parameters:
files(default:(list "/var/log"))List of files to display. The list can include strings for a single file or directory, or a list, where the first item is the name of a subsection, and the remaining items are the files or directories in that subsection.
bind(default:"localhost:8080")Address and port to which Tailon should bind on.
relative-root(default:#f)URL path to use for Tailon, set to
#fto not use a path.allow-transfers?(default:#t)Allow downloading the log files in the web interface.
follow-names?(default:#t)Allow tailing of not-yet existent files.
tail-lines(default:200)Number of lines to read initially from each file.
allowed-commands(default:(list "tail" "grep" "awk"))Commands to allow running. By default,
sedis disabled.debug?(default:#f)Set
debug?to#tto show debug messages.wrap-lines(default:#t)Initial line wrapping state in the web interface. Set to
#tto initially wrap lines (the default), or to#fto initially not wrap lines.http-auth(default:#f)HTTP authentication type to use. Set to
#fto disable authentication (the default). Supported values are"digest"or"basic".users(padrão:#f)If HTTP authentication is enabled (see
http-auth), access will be restricted to the credentials provided here. To configure users, use a list of pairs, where the first element of the pair is the username, and the 2nd element of the pair is the password.(tailon-configuration-file (http-auth "basic") (users '(("user1" . "password1") ("user2" . "password2"))))
Darkstat Service
Darkstat is a packet sniffer that captures network traffic, calculates statistics about usage, and serves reports over HTTP.
- Variável: darkstat-service-type
This is the service type for the darkstat service, its value must be a
darkstat-configurationrecord as in this example:(service darkstat-service-type (darkstat-configuration (interface "eno1")))
- Tipo de dados: darkstat-configuration
Data type representing the configuration of
darkstat.package(default:darkstat)The darkstat package to use.
interfaceCapture traffic on the specified network interface.
port(padrão:"667")Bind the web interface to the specified port.
bind-address(default:"127.0.0.1")Bind the web interface to the specified address.
base(default:"/")Specify the path of the base URL. This can be useful if
darkstatis accessed via a reverse proxy.
Prometheus Node Exporter Service
The Prometheus “node exporter” makes hardware and operating system statistics provided by the Linux kernel available for the Prometheus monitoring system. This service should be deployed on all physical nodes and virtual machines, where monitoring these statistics is desirable.
- Variável: prometheus-node-exporter-service-type
This is the service type for the prometheus-node-exporter service, its value must be a
prometheus-node-exporter-configuration.(service prometheus-node-exporter-service-type)
- Tipo de dados: prometheus-node-exporter-configuration
Data type representing the configuration of
node_exporter.package(default:go-github-com-prometheus-node-exporter)The prometheus-node-exporter package to use.
web-listen-address(default:":9100")Bind the web interface to the specified address.
textfile-directory(default:"/var/lib/prometheus/node-exporter")This directory can be used to export metrics specific to this machine. Files containing metrics in the text format, with the filename ending in
.promshould be placed in this directory.extra-options(default:'())Extra options to pass to the Prometheus node exporter.
vnStat Network Traffic Monitor
vnStat is a network traffic monitor that uses interface statistics provided by the kernel rather than traffic sniffing. This makes it a light resource monitor, regardless of network traffic rate.
- Variável: vnstat-service-type
This is the service type for the vnStat daemon and accepts a
vnstat-configurationvalue.The following example will configure the service with default values:
(service vnstat-service-type)
- Tipo de dados: vnstat-configuration
Available
vnstat-configurationfields are:package(default:vnstat) (type: file-like)The vnstat package.
database-directory(default:"/var/lib/vnstat") (type: string)Specifies the directory where the database is to be stored. A full path must be given and a leading ’/’ isn’t required.
5-minute-hours(default:48) (type: maybe-integer)Data retention duration for the 5 minute resolution entries. The configuration defines for how many past hours entries will be stored. Set to
-1for unlimited entries or to0to disable the data collection of this resolution.64bit-interface-counters(default:-2) (type: maybe-integer)Select interface counter handling. Set to
1for defining that all interfaces use 64-bit counters on the kernel side and0for defining 32-bit counter. Set to-1for using the old style logic used in earlier versions where counter values within 32-bits are assumed to be 32-bit and anything larger is assumed to be a 64-bit counter. This may produce false results if a 64-bit counter is reset within the 32-bits. Set to-2for using automatic detection based on available kernel datastructures.always-add-new-interfaces?(default:#t) (type: maybe-boolean)Enable or disable automatic creation of new database entries for interfaces not currently in the database even if the database file already exists when the daemon is started. New database entries will also get created for new interfaces seen while the daemon is running. Pseudo interfaces ‘lo’, ‘lo0’ and ‘sit0’ are always excluded from getting added.
bandwidth-detection?(default:#t) (type: maybe-boolean)Try to automatically detect max-bandwidth value for each monitored interface. Mostly only ethernet interfaces support this feature. max-bandwidth will be used as fallback value if detection fails. Any interface specific max-BW configuration will disable the detection for the specified interface. In Linux, the detection is disabled for tun interfaces due to the Linux kernel always reporting 10 Mbit regardless of the used real interface.
bandwidth-detection-interval(default:5) (type: maybe-integer)How often in minutes interface specific detection of max-bandwidth is done for detecting possible changes when bandwidth-detection is enabled. Can be disabled by setting to
0. Value range: ‘0’..‘30’boot-variation(default:15) (type: maybe-integer)Time in seconds how much the boot time reported by system kernel can variate between updates. Value range: ‘0’..‘300’
check-disk-space?(default:#t) (type: maybe-boolean)Enable or disable the availability check of at least some free disk space before a database write.
create-directories?(default:#t) (type: maybe-boolean)Enable or disable the creation of directories when a configured path doesn’t exist. This includes database-directory.
daemon-group(type: maybe-user-group)Specify the group to which the daemon process should switch during startup. Set to
%unset-valueto disable group switching.daemon-user(type: maybe-user-account)Specify the user to which the daemon process should switch during startup. Set to
%unset-valueto disable user switching.daily-days(default:62) (type: maybe-integer)Data retention duration for the one day resolution entries. The configuration defines for how many past days entries will be stored. Set to
-1for unlimited entries or to0to disable the data collection of this resolution.database-synchronous(default:-1) (type: maybe-integer)Change the setting of the SQLite "synchronous" flag which controls how much care is taken to ensure disk writes have fully completed when writing data to the database before continuing other actions. Higher values take extra steps to ensure data safety at the cost of slower performance. A value of
0will result in all handling being left to the filesystem itself. Set to-1to select the default value according to database mode controlled by database-write-ahead-logging setting. See SQLite documentation for more details regarding values from1to3. Value range: ‘-1’..‘3’database-write-ahead-logging?(default:#f) (type: maybe-boolean)Enable or disable SQLite Write-Ahead Logging mode for the database. See SQLite documentation for more details and note that support for read-only operations isn’t available in older SQLite versions.
hourly-days(default:4) (type: maybe-integer)Data retention duration for the one hour resolution entries. The configuration defines for how many past days entries will be stored. Set to
-1for unlimited entries or to0to disable the data collection of this resolution.log-file(type: maybe-string)Specify log file path and name to be used if use-logging is set to
1.max-bandwidth(type: maybe-integer)Maximum bandwidth for all interfaces. If the interface specific traffic exceeds the given value then the data is assumed to be invalid and rejected. Set to 0 in order to disable the feature. Value range: ‘0’..‘50000’
max-bw(type: maybe-alist)Same as max-bandwidth but can be used for setting individual limits for selected interfaces. This is an association list of interfaces as strings to integer values. For example,
(max-bw `(("eth0" . 15000) ("ppp0" . 10000)))bandwidth-detection is disabled on an interface specific level for each max-bw configuration. Value range: ‘0’..‘50000’
monthly-months(default:25) (type: maybe-integer)Data retention duration for the one month resolution entries. The configuration defines for how many past months entries will be stored. Set to
-1for unlimited entries or to0to disable the data collection of this resolution.month-rotate(default:1) (type: maybe-integer)Day of month that months are expected to change. Usually set to 1 but can be set to alternative values for example for tracking monthly billed traffic where the billing period doesn’t start on the first day. For example, if set to 7, days of February up to and including the 6th will count for January. Changing this option will not cause existing data to be recalculated. Value range: ‘1’..‘28’
month-rotate-affects-years?(default:#f) (type: maybe-boolean)Enable or disable month-rotate also affecting yearly data. Applicable only when month-rotate has a value greater than one.
offline-save-interval(default:30) (type: maybe-integer)How often in minutes cached interface data is saved to file when all monitored interfaces are offline. Value range: save-interval..‘60’
pid-file(default:"/var/run/vnstatd.pid") (type: maybe-string)Specify pid file path and name to be used.
poll-interval(default:5) (type: maybe-integer)How often in seconds interfaces are checked for status changes. Value range: ‘2’..‘60’
rescan-database-on-save?(type: maybe-boolean)Automatically discover added interfaces from the database and start monitoring. The rescan is done every save-interval or offline-save-interval minutes depending on the current activity state.
save-interval(default:5) (type: maybe-integer)How often in minutes cached interface data is saved to file. Value range: ( update-interval / 60 )..‘60’
save-on-status-change?(default:#t) (type: maybe-boolean)Enable or disable the additional saving to file of cached interface data when the availability of an interface changes, i.e., when an interface goes offline or comes online.
time-sync-wait(default:5) (type: maybe-integer)How many minutes to wait during daemon startup for system clock to sync if most recent database update appears to be in the future. This may be needed in systems without a real-time clock (RTC) which require some time after boot to query and set the correct time.
0= wait disabled. Value range: ‘0’..‘60’top-day-entries(default:20) (type: maybe-integer)Data retention duration for the top day entries. The configuration defines how many of the past top day entries will be stored. Set to
-1for unlimited entries or to0to disable the data collection of this resolution.trafficless-entries?(default:#t) (type: maybe-boolean)Create database entries even when there is no traffic during the entry’s time period.
update-file-owner?(default:#t) (type: maybe-boolean)Enable or disable the update of file ownership during daemon process startup. During daemon startup, only database, log and pid files will be modified if the user or group change feature ( daemon-user or daemon-group ) is enabled and the files don’t match the requested user or group. During manual database creation, this option will cause file ownership to be inherited from the database directory if the directory already exists. This option only has effect when the process is started as root or via sudo.
update-interval(default:20) (type: maybe-integer)How often in seconds the interface data is updated. Value range: poll-interval..‘300’
use-logging(default:2) (type: maybe-integer)Enable or disable logging. Accepted values are:
0= disabled,1= logfile and2= syslog.use-utc?(type: maybe-boolean)Enable or disable using UTC as timezone in the database for all entries. When enabled, all entries added to the database will use UTC regardless of the configured system timezone. When disabled, the configured system timezone will be used. Changing this setting will not result in already existing data to be modified.
yearly-years(default:-1) (type: maybe-integer)Data retention duration for the one year resolution entries. The configuration defines for how many past years entries will be stored. Set to
-1for unlimited entries or to0to disable the data collection of this resolution.
Zabbix server
Zabbix is a high performance monitoring system that can collect data from a variety of sources and provide the results in a web-based interface. Alerting and reporting is built-in, as well as templates for common operating system metrics such as network utilization, CPU load, and disk space consumption.
This service provides the central Zabbix monitoring service; you also need
zabbix-front-end-service-type to configure
Zabbix and display results, and optionally zabbix-agent-service-type on machines that should be monitored
(other data sources are supported, such as Prometheus Node Exporter).
- Variável: zabbix-server-service-type
This is the service type for the Zabbix server service. Its value must be a
zabbix-server-configurationrecord, shown below.
- Tipo de dados: zabbix-server-configuration
Available
zabbix-server-configurationfields are:zabbix-server(default:zabbix-server) (type: file-like)The zabbix-server package.
user(default:"zabbix") (type: string)User who will run the Zabbix server.
group(default:"zabbix") (type: string)Group who will run the Zabbix server.
db-host(default:"127.0.0.1") (type: string)Database host name.
db-name(default:"zabbix") (type: string)Database name.
db-user(default:"zabbix") (type: string)Database user.
db-password(default:"") (type: string)Database password. Please, use
include-fileswithDBPassword=SECRETinside a specified file instead.db-port(default:5432) (type: number)Database port.
log-type(default:"") (type: string)Specifies where log messages are written to:
-
system- syslog. -
file- file specified withlog-fileparameter. -
console- standard output.
-
log-file(default:"/var/log/zabbix/server.log") (type: string)Log file name for
log-typefileparameter.pid-file(default:"/var/run/zabbix/zabbix_server.pid") (type: string)Name of PID file.
ssl-ca-location(default:"/etc/ssl/certs/ca-certificates.crt") (type: string)The location of certificate authority (CA) files for SSL server certificate verification.
ssl-cert-location(default:"/etc/ssl/certs") (type: string)Location of SSL client certificates.
extra-options(default:"") (type: extra-options)Extra options will be appended to Zabbix server configuration file.
include-files(default:'()) (type: include-files)You may include individual files or all files in a directory in the configuration file.
Zabbix agent
The Zabbix agent gathers information about the running system for the Zabbix monitoring server. It has a variety of built-in checks, and can be extended with custom user parameters.
- Variável: zabbix-agent-service-type
This is the service type for the Zabbix agent service. Its value must be a
zabbix-agent-configurationrecord, shown below.
- Tipo de dados: zabbix-agent-configuration
Available
zabbix-agent-configurationfields are:zabbix-agent(default:zabbix-agentd) (type: file-like)The zabbix-agent package.
user(default:"zabbix") (type: string)User who will run the Zabbix agent.
group(default:"zabbix") (type: string)Group who will run the Zabbix agent.
hostname(default:"") (type: string)Unique, case sensitive hostname which is required for active checks and must match hostname as configured on the server.
log-type(default:"") (type: string)Specifies where log messages are written to:
-
system- syslog. -
file- file specified withlog-fileparameter. -
console- standard output.
-
log-file(default:"/var/log/zabbix/agent.log") (type: string)Log file name for
log-typefileparameter.pid-file(default:"/var/run/zabbix/zabbix_agent.pid") (type: string)Name of PID file.
server(default:'("127.0.0.1")) (type: list)List of IP addresses, optionally in CIDR notation, or hostnames of Zabbix servers and Zabbix proxies. Incoming connections will be accepted only from the hosts listed here.
server-active(default:'("127.0.0.1")) (type: list)List of IP:port (or hostname:port) pairs of Zabbix servers and Zabbix proxies for active checks. If port is not specified, default port is used. If this parameter is not specified, active checks are disabled.
extra-options(default:"") (type: extra-options)Extra options will be appended to Zabbix server configuration file.
include-files(default:'()) (type: include-files)You may include individual files or all files in a directory in the configuration file.
Zabbix front-end
The Zabbix front-end provides a web interface to Zabbix. It does not need to run on the same machine as the Zabbix server. This service works by extending the PHP-FPM and NGINX services with the configuration necessary for loading the Zabbix user interface.
- Variável: zabbix-front-end-service-type
This is the service type for the Zabbix web frontend. Its value must be a
zabbix-front-end-configurationrecord, shown below.
- Tipo de dados: zabbix-front-end-configuration
Available
zabbix-front-end-configurationfields are:zabbix-server(default:zabbix-server) (type: file-like)The Zabbix server package to use.
nginx(default:'()) (type: list)List of
nginx-server-configurationblocks for the Zabbix front-end. When empty, a default that listens on port 80 is used.db-host(default:"localhost") (type: string)Database host name.
db-port(default:5432) (type: number)Database port.
db-name(default:"zabbix") (type: string)Database name.
db-user(default:"zabbix") (type: string)Database user.
db-password(default:"") (type: string)Database password. Please, use
db-secret-fileinstead.db-secret-file(default:"") (type: string)Secret file which will be appended to zabbix.conf.php file. This file contains credentials for use by Zabbix front-end. You are expected to create it manually.
zabbix-host(default:"localhost") (type: string)Zabbix server hostname.
zabbix-port(default:10051) (type: number)Zabbix server port.
Próximo: Serviços LDAP, Anterior: Serviços de monitoramento, Acima: Serviços [Conteúdo][Índice]
11.10.18 Serviços Kerberos
The (gnu services kerberos) module provides services relating to the
authentication protocol Kerberos.
Krb5 Service
Programs using a Kerberos client library normally expect a configuration file in /etc/krb5.conf. This service generates such a file from a definition provided in the operating system declaration. It does not cause any daemon to be started.
No “keytab” files are provided by this service—you must explicitly
create them. This service is known to work with the MIT client library,
mit-krb5. Other implementations have not been tested.
- Variável: krb5-service-type
A service type for Kerberos 5 clients.
Here is an example of its use:
(service krb5-service-type
(krb5-configuration
(default-realm "EXAMPLE.COM")
(allow-weak-crypto? #t)
(realms (list
(krb5-realm
(name "EXAMPLE.COM")
(admin-server "groucho.example.com")
(kdc "karl.example.com"))
(krb5-realm
(name "ARGRX.EDU")
(admin-server "kerb-admin.argrx.edu")
(kdc "keys.argrx.edu"))))))
This example provides a Kerberos 5 client configuration which:
- Recognizes two realms, viz: “EXAMPLE.COM” and “ARGRX.EDU”, both of which have distinct administration servers and key distribution centers;
- Will default to the realm “EXAMPLE.COM” if the realm is not explicitly specified by clients;
- Accepts services which only support encryption types known to be weak.
The krb5-realm and krb5-configuration types have many fields.
Only the most commonly used ones are described here. For a full list, and
more detailed explanation of each, see the MIT
krb5.conf
documentation.
- Tipo de dados: krb5-realm
-
nameThis field is a string identifying the name of the realm. A common convention is to use the fully qualified DNS name of your organization, converted to upper case.
admin-serverThis field is a string identifying the host where the administration server is running.
kdcThis field is a string identifying the key distribution center for the realm.
- Tipo de dados: krb5-configuration
-
allow-weak-crypto?(default:#f)If this flag is
#tthen services which only offer encryption algorithms known to be weak will be accepted.default-realm(default:#f)This field should be a string identifying the default Kerberos realm for the client. You should set this field to the name of your Kerberos realm. If this value is
#fthen a realm must be specified with every Kerberos principal when invoking programs such askinit.realmsThis should be a non-empty list of
krb5-realmobjects, which clients may access. Normally, one of them will have anamefield matching thedefault-realmfield.
PAM krb5 Service
The pam-krb5 service allows for login authentication and password
management via Kerberos. You will need this service if you want PAM enabled
applications to authenticate users using Kerberos.
- Variável: pam-krb5-service-type
A service type for the Kerberos 5 PAM module.
- Tipo de dados: pam-krb5-configuration
Data type representing the configuration of the Kerberos 5 PAM module. This type has the following parameters:
pam-krb5(default:pam-krb5)The pam-krb5 package to use.
minimum-uid(default:1000)The smallest user ID for which Kerberos authentications should be attempted. Local accounts with lower values will silently fail to authenticate.
Próximo: Serviços web, Anterior: Serviços Kerberos, Acima: Serviços [Conteúdo][Índice]
11.10.19 Serviços LDAP
Authentication against LDAP with nslcd
The (gnu services authentication) module provides the
nslcd-service-type, which can be used to authenticate against an LDAP
server. In addition to configuring the service itself, you may want to add
ldap as a name service to the Name Service Switch. Veja Name Service Switch for detailed information.
Here is a simple operating system declaration with a default configuration
of the nslcd-service-type and a Name Service Switch configuration
that consults the ldap name service last:
(use-service-modules authentication) (use-modules (gnu system nss)) ... (operating-system ... (services (cons* (service nslcd-service-type) (service dhcp-client-service-type) %base-services)) (name-service-switch (let ((services (list (name-service (name "db")) (name-service (name "files")) (name-service (name "ldap"))))) (name-service-switch (inherit %mdns-host-lookup-nss) (password services) (shadow services) (group services) (netgroup services) (gshadow services)))))
Available nslcd-configuration fields are:
nslcd-configurationparameter: package nss-pam-ldapd ¶The
nss-pam-ldapdpackage to use.
nslcd-configurationparameter: maybe-number threads ¶The number of threads to start that can handle requests and perform LDAP queries. Each thread opens a separate connection to the LDAP server. The default is to start 5 threads.
Defaults to ‘disabled’.
nslcd-configurationparameter: string uid ¶This specifies the user id with which the daemon should be run.
Defaults to ‘"nslcd"’.
nslcd-configurationparameter: string gid ¶This specifies the group id with which the daemon should be run.
Defaults to ‘"nslcd"’.
nslcd-configurationparameter: log-option log ¶This option controls the way logging is done via a list containing SCHEME and LEVEL. The SCHEME argument may either be the symbols ‘none’ or ‘syslog’, or an absolute file name. The LEVEL argument is optional and specifies the log level. The log level may be one of the following symbols: ‘crit’, ‘error’, ‘warning’, ‘notice’, ‘info’ or ‘debug’. All messages with the specified log level or higher are logged.
Defaults to ‘'("/var/log/nslcd" info)’.
nslcd-configurationparameter: list uri ¶The list of LDAP server URIs. Normally, only the first server will be used with the following servers as fall-back.
Defaults to ‘'("ldap://localhost:389/")’.
nslcd-configurationparameter: maybe-string ldap-version ¶The version of the LDAP protocol to use. The default is to use the maximum version supported by the LDAP library.
Defaults to ‘disabled’.
nslcd-configurationparameter: maybe-string binddn ¶Specifies the distinguished name with which to bind to the directory server for lookups. The default is to bind anonymously.
Defaults to ‘disabled’.
nslcd-configurationparameter: maybe-string bindpw ¶Specifies the credentials with which to bind. This option is only applicable when used with binddn.
Defaults to ‘disabled’.
nslcd-configurationparameter: maybe-string rootpwmoddn ¶Specifies the distinguished name to use when the root user tries to modify a user’s password using the PAM module.
Defaults to ‘disabled’.
nslcd-configurationparameter: maybe-string rootpwmodpw ¶Specifies the credentials with which to bind if the root user tries to change a user’s password. This option is only applicable when used with rootpwmoddn
Defaults to ‘disabled’.
nslcd-configurationparameter: maybe-string sasl-mech ¶Specifies the SASL mechanism to be used when performing SASL authentication.
Defaults to ‘disabled’.
nslcd-configurationparameter: maybe-string sasl-realm ¶Specifies the SASL realm to be used when performing SASL authentication.
Defaults to ‘disabled’.
nslcd-configurationparameter: maybe-string sasl-authcid ¶Specifies the authentication identity to be used when performing SASL authentication.
Defaults to ‘disabled’.
nslcd-configurationparameter: maybe-string sasl-authzid ¶Specifies the authorization identity to be used when performing SASL authentication.
Defaults to ‘disabled’.
nslcd-configurationparameter: maybe-boolean sasl-canonicalize? ¶Determines whether the LDAP server host name should be canonicalised. If this is enabled the LDAP library will do a reverse host name lookup. By default, it is left up to the LDAP library whether this check is performed or not.
Defaults to ‘disabled’.
nslcd-configurationparameter: maybe-string krb5-ccname ¶Set the name for the GSS-API Kerberos credentials cache.
Defaults to ‘disabled’.
nslcd-configurationparameter: string base ¶The directory search base.
Defaults to ‘"dc=example,dc=com"’.
nslcd-configurationparameter: scope-option scope ¶Specifies the search scope (subtree, onelevel, base or children). The default scope is subtree; base scope is almost never useful for name service lookups; children scope is not supported on all servers.
Defaults to ‘'(subtree)’.
nslcd-configurationparameter: maybe-deref-option deref ¶Specifies the policy for dereferencing aliases. The default policy is to never dereference aliases.
Defaults to ‘disabled’.
nslcd-configurationparameter: maybe-boolean referrals ¶Specifies whether automatic referral chasing should be enabled. The default behaviour is to chase referrals.
Defaults to ‘disabled’.
nslcd-configurationparameter: list-of-map-entries maps ¶This option allows for custom attributes to be looked up instead of the default RFC 2307 attributes. It is a list of maps, each consisting of the name of a map, the RFC 2307 attribute to match and the query expression for the attribute as it is available in the directory.
Defaults to ‘'()’.
nslcd-configurationparameter: list-of-filter-entries filters ¶A list of filters consisting of the name of a map to which the filter applies and an LDAP search filter expression.
Defaults to ‘'()’.
nslcd-configurationparameter: maybe-number bind-timelimit ¶Specifies the time limit in seconds to use when connecting to the directory server. The default value is 10 seconds.
Defaults to ‘disabled’.
nslcd-configurationparameter: maybe-number timelimit ¶Specifies the time limit (in seconds) to wait for a response from the LDAP server. A value of zero, which is the default, is to wait indefinitely for searches to be completed.
Defaults to ‘disabled’.
nslcd-configurationparameter: maybe-number idle-timelimit ¶Specifies the period if inactivity (in seconds) after which the con‐ nection to the LDAP server will be closed. The default is not to time out connections.
Defaults to ‘disabled’.
nslcd-configurationparameter: maybe-number reconnect-sleeptime ¶Specifies the number of seconds to sleep when connecting to all LDAP servers fails. By default one second is waited between the first failure and the first retry.
Defaults to ‘disabled’.
nslcd-configurationparameter: maybe-number reconnect-retrytime ¶Specifies the time after which the LDAP server is considered to be permanently unavailable. Once this time is reached retries will be done only once per this time period. The default value is 10 seconds.
Defaults to ‘disabled’.
nslcd-configurationparameter: maybe-ssl-option ssl ¶Specifies whether to use SSL/TLS or not (the default is not to). If ’start-tls is specified then StartTLS is used rather than raw LDAP over SSL.
Defaults to ‘disabled’.
nslcd-configurationparameter: maybe-tls-reqcert-option tls-reqcert ¶Specifies what checks to perform on a server-supplied certificate. The meaning of the values is described in the ldap.conf(5) manual page.
Defaults to ‘disabled’.
nslcd-configurationparameter: maybe-string tls-cacertdir ¶Specifies the directory containing X.509 certificates for peer authen‐ tication. This parameter is ignored when using GnuTLS.
Defaults to ‘disabled’.
nslcd-configurationparameter: maybe-string tls-cacertfile ¶Specifies the path to the X.509 certificate for peer authentication.
Defaults to ‘disabled’.
nslcd-configurationparameter: maybe-string tls-randfile ¶Specifies the path to an entropy source. This parameter is ignored when using GnuTLS.
Defaults to ‘disabled’.
nslcd-configurationparameter: maybe-string tls-ciphers ¶Specifies the ciphers to use for TLS as a string.
Defaults to ‘disabled’.
nslcd-configurationparameter: maybe-string tls-cert ¶Specifies the path to the file containing the local certificate for client TLS authentication.
Defaults to ‘disabled’.
nslcd-configurationparameter: maybe-string tls-key ¶Specifies the path to the file containing the private key for client TLS authentication.
Defaults to ‘disabled’.
nslcd-configurationparameter: maybe-number pagesize ¶Set this to a number greater than 0 to request paged results from the LDAP server in accordance with RFC2696. The default (0) is to not request paged results.
Defaults to ‘disabled’.
nslcd-configurationparameter: maybe-ignore-users-option nss-initgroups-ignoreusers ¶This option prevents group membership lookups through LDAP for the specified users. Alternatively, the value ’all-local may be used. With that value nslcd builds a full list of non-LDAP users on startup.
Defaults to ‘disabled’.
nslcd-configurationparameter: maybe-number nss-min-uid ¶This option ensures that LDAP users with a numeric user id lower than the specified value are ignored.
Defaults to ‘disabled’.
nslcd-configurationparameter: maybe-number nss-uid-offset ¶This option specifies an offset that is added to all LDAP numeric user ids. This can be used to avoid user id collisions with local users.
Defaults to ‘disabled’.
nslcd-configurationparameter: maybe-number nss-gid-offset ¶This option specifies an offset that is added to all LDAP numeric group ids. This can be used to avoid user id collisions with local groups.
Defaults to ‘disabled’.
nslcd-configurationparameter: maybe-boolean nss-nested-groups ¶If this option is set, the member attribute of a group may point to another group. Members of nested groups are also returned in the higher level group and parent groups are returned when finding groups for a specific user. The default is not to perform extra searches for nested groups.
Defaults to ‘disabled’.
nslcd-configurationparameter: maybe-boolean nss-getgrent-skipmembers ¶If this option is set, the group member list is not retrieved when looking up groups. Lookups for finding which groups a user belongs to will remain functional so the user will likely still get the correct groups assigned on login.
Defaults to ‘disabled’.
nslcd-configurationparameter: maybe-boolean nss-disable-enumeration ¶If this option is set, functions which cause all user/group entries to be loaded from the directory will not succeed in doing so. This can dramatically reduce LDAP server load in situations where there are a great number of users and/or groups. This option is not recommended for most configurations.
Defaults to ‘disabled’.
nslcd-configurationparameter: maybe-string validnames ¶This option can be used to specify how user and group names are verified within the system. This pattern is used to check all user and group names that are requested and returned from LDAP.
Defaults to ‘disabled’.
nslcd-configurationparameter: maybe-boolean ignorecase ¶This specifies whether or not to perform searches using case-insensitive matching. Enabling this could open up the system to authorization bypass vulnerabilities and introduce nscd cache poisoning vulnerabilities which allow denial of service.
Defaults to ‘disabled’.
nslcd-configurationparameter: maybe-boolean pam-authc-ppolicy ¶This option specifies whether password policy controls are requested and handled from the LDAP server when performing user authentication.
Defaults to ‘disabled’.
nslcd-configurationparameter: maybe-string pam-authc-search ¶By default nslcd performs an LDAP search with the user’s credentials after BIND (authentication) to ensure that the BIND operation was successful. The default search is a simple check to see if the user’s DN exists. A search filter can be specified that will be used instead. It should return at least one entry.
Defaults to ‘disabled’.
nslcd-configurationparameter: maybe-string pam-authz-search ¶This option allows flexible fine tuning of the authorisation check that should be performed. The search filter specified is executed and if any entries match, access is granted, otherwise access is denied.
Defaults to ‘disabled’.
nslcd-configurationparameter: maybe-string pam-password-prohibit-message ¶If this option is set password modification using pam_ldap will be denied and the specified message will be presented to the user instead. The message can be used to direct the user to an alternative means of changing their password.
Defaults to ‘disabled’.
nslcd-configurationparameter: list pam-services ¶List of pam service names for which LDAP authentication should suffice.
Defaults to ‘'()’.
LDAP Directory Server
The (gnu services ldap) module provides the
directory-server-service-type, which can be used to create and launch
an LDAP server instance.
Here is an example configuration of the
directory-server-service-type:
(use-service-modules ldap) ... (operating-system ... (services (cons (service directory-server-service-type (directory-server-instance-configuration (slapd (slapd-configuration (root-password "{PBKDF2_SHA256}AAAgAG…ABSOLUTELYSECRET"))))) %base-services)))
The root password should be generated with the pwdhash utility
that is provided by the 389-ds-base package.
Note that changes to the directory server configuration will not be applied to existing instances. You will need to back up and restore server data manually. Only new directory server instances will be created upon system reconfiguration.
- Tipo de dados: directory-server-instance-configuration
Available
directory-server-instance-configurationfields are:package(default:389-ds-base) (type: file-like)The
389-ds-basepackage.config-version(default:2) (type: number)Sets the format version of the configuration file. To use the INF file with
dscreate, this parameter must be 2.full-machine-name(default:"localhost") (type: string)Sets the fully qualified hostname (FQDN) of this system.
selinux(default:#false) (type: boolean)Enables SELinux detection and integration during the installation of this instance. If set to
#true,dscreateauto-detects whether SELinux is enabled.strict-host-checking(default:#true) (type: boolean)Sets whether the server verifies the forward and reverse record set in the
full-machine-nameparameter. When installing this instance with GSSAPI authentication behind a load balancer, set this parameter to#false.systemd(default:#false) (type: boolean)Enables systemd platform features. If set to
#true,dscreateauto-detects whether systemd is installed.slapd(type: slapd-configuration)Configuration of slapd.
- Tipo de dados: slapd-configuration
Available
slapd-configurationfields are:instance-name(default:"localhost") (type: string)Sets the name of the instance. You can refer to this value in other parameters of this INF file using the
{instance_name}variable. Note that this name cannot be changed after the installation!user(default:"dirsrv") (type: string)Sets the user name the ns-slapd process will use after the service started.
group(default:"dirsrv") (type: string)Sets the group name the ns-slapd process will use after the service started.
port(default:389) (type: number)Sets the TCP port the instance uses for LDAP connections.
secure-port(default:636) (type: number)Sets the TCP port the instance uses for TLS-secured LDAP connections (LDAPS).
root-dn(default:"cn=Directory Manager") (type: string)Sets the Distinquished Name (DN) of the administrator account for this instance.
root-password(default:"{invalid}YOU-SHOULD-CHANGE-THIS") (type: string)Sets the password of the account specified in the
root-dnparameter. You can either set this parameter to a plain text passworddscreatehashes during the installation or to a "{algorithm}hash" string generated by thepwdhashutility. Note that setting a plain text password can be a security risk if unprivileged users can read this INF file!self-sign-cert(default:#true) (type: boolean)Sets whether the setup creates a self-signed certificate and enables TLS encryption during the installation. This is not suitable for production, but it enables administrators to use TLS right after the installation. You can replace the self-signed certificate with a certificate issued by a certificate authority.
self-sign-cert-valid-months(default:24) (type: number)Set the number of months the issued self-signed certificate will be valid.
backup-dir(default:"/var/lib/dirsrv/slapd-{instance_name}/bak") (type: string)Set the backup directory of the instance.
cert-dir(default:"/etc/dirsrv/slapd-{instance_name}") (type: string)Sets the directory of the instance’s Network Security Services (NSS) database.
config-dir(default:"/etc/dirsrv/slapd-{instance_name}") (type: string)Sets the configuration directory of the instance.
db-dir(default:"/var/lib/dirsrv/slapd-{instance_name}/db") (type: string)Sets the database directory of the instance.
initconfig-dir(default:"/etc/dirsrv/registry") (type: string)Sets the directory of the operating system’s rc configuration directory.
ldif-dir(default:"/var/lib/dirsrv/slapd-{instance_name}/ldif") (type: string)Sets the LDIF export and import directory of the instance.
lock-dir(default:"/var/lock/dirsrv/slapd-{instance_name}") (type: string)Sets the lock directory of the instance.
log-dir(default:"/var/log/dirsrv/slapd-{instance_name}") (type: string)Sets the log directory of the instance.
run-dir(default:"/run/dirsrv") (type: string)Sets PID directory of the instance.
schema-dir(default:"/etc/dirsrv/slapd-{instance_name}/schema") (type: string)Sets schema directory of the instance.
tmp-dir(default:"/tmp") (type: string)Sets the temporary directory of the instance.
backend-userroot(type: backend-userroot-configuration)Configuration of the userroot backend.
- Tipo de dados: backend-userroot-configuration
Available
backend-userroot-configurationfields are:create-suffix-entry?(default:#false) (type: boolean)Set this parameter to
#trueto create a generic root node entry for the suffix in the database.require-index?(default:#false) (type: boolean)Set this parameter to
#trueto refuse unindexed searches in this database.sample-entries(default:"no") (type: string)Set this parameter to
"yes"to add latest version of sample entries to this database. Or, use"001003006"to use the 1.3.6 version sample entries. Use this option, for example, to create a database for testing purposes.suffix(type: maybe-string)Sets the root suffix stored in this database. If you do not set the suffix attribute the install process will not create the backend/suffix. You can also create multiple backends/suffixes by duplicating this section.
Próximo: Serviços de certificado, Anterior: Serviços LDAP, Acima: Serviços [Conteúdo][Índice]
11.10.20 Serviços web
The (gnu services web) module provides the Apache HTTP Server, the
nginx web server, and also a fastcgi wrapper daemon.
Apache HTTP Server
- Variável: httpd-service-type
Service type for the Apache HTTP server (httpd). The value for this service type is a
httpd-configurationrecord.A simple example configuration is given below.
(service httpd-service-type (httpd-configuration (config (httpd-config-file (server-name "www.example.com") (document-root "/srv/http/www.example.com")))))Other services can also extend the
httpd-service-typeto add to the configuration.(simple-service 'www.example.com-server httpd-service-type (list (httpd-virtualhost "*:80" (list (string-join '("ServerName www.example.com" "DocumentRoot /srv/http/www.example.com") "\n")))))
The details for the httpd-configuration, httpd-module,
httpd-config-file and httpd-virtualhost record types are given
below.
- Tipo de dados: httpd-configuration
This data type represents the configuration for the httpd service.
package(default:httpd)The httpd package to use.
pid-file(default:"/var/run/httpd")The pid file used by the shepherd-service.
config(default:(httpd-config-file))The configuration file to use with the httpd service. The default value is a
httpd-config-filerecord, but this can also be a different G-expression that generates a file, for example aplain-file. A file outside of the store can also be specified through a string.
- Tipo de dados: httpd-module
This data type represents a module for the httpd service.
nameThe name of the module.
fileThe file for the module. This can be relative to the httpd package being used, the absolute location of a file, or a G-expression for a file within the store, for example
(file-append mod-wsgi "/modules/mod_wsgi.so").
- Variável: %default-httpd-modules
A default list of
httpd-moduleobjects.
- Tipo de dados: httpd-config-file
This data type represents a configuration file for the httpd service.
modules(default:%default-httpd-modules)The modules to load. Additional modules can be added here, or loaded by additional configuration.
For example, in order to handle requests for PHP files, you can use Apache’s
mod_proxy_fcgimodule along withphp-fpm-service-type:(service httpd-service-type (httpd-configuration (config (httpd-config-file (modules (cons* (httpd-module (name "proxy_module") (file "modules/mod_proxy.so")) (httpd-module (name "proxy_fcgi_module") (file "modules/mod_proxy_fcgi.so")) %default-httpd-modules)) (extra-config (list "\ <FilesMatch \\.php$> SetHandler \"proxy:unix:/var/run/php-fpm.sock|fcgi://localhost/\" </FilesMatch>")))))) (service php-fpm-service-type (php-fpm-configuration (socket "/var/run/php-fpm.sock") (socket-group "httpd")))
server-root(default:httpd)The
ServerRootin the configuration file, defaults to the httpd package. Directives includingIncludeandLoadModuleare taken as relative to the server root.server-name(default:#f)The
ServerNamein the configuration file, used to specify the request scheme, hostname and port that the server uses to identify itself.This doesn’t need to be set in the server config, and can be specified in virtual hosts. The default is
#fto not specify aServerName.document-root(default:"/srv/http")The
DocumentRootfrom which files will be served.listen(default:'("80"))The list of values for the
Listendirectives in the config file. The value should be a list of strings, when each string can specify the port number to listen on, and optionally the IP address and protocol to use.pid-file(default:"/var/run/httpd")The
PidFileto use. This should match thepid-fileset in thehttpd-configurationso that the Shepherd service is configured correctly.error-log(default:"/var/log/httpd/error_log")The
ErrorLogto which the server will log errors.user(default:"httpd")The
Userwhich the server will answer requests as.group(default:"httpd")The
Groupwhich the server will answer requests as.extra-config(default:(list "TypesConfig etc/httpd/mime.types"))A flat list of strings and G-expressions which will be added to the end of the configuration file.
Any values which the service is extended with will be appended to this list.
- Tipo de dados: httpd-virtualhost
This data type represents a virtualhost configuration block for the httpd service.
These should be added to the extra-config for the httpd-service.
(simple-service 'www.example.com-server httpd-service-type (list (httpd-virtualhost "*:80" (list (string-join '("ServerName www.example.com" "DocumentRoot /srv/http/www.example.com") "\n")))))addresses-and-portsThe addresses and ports for the
VirtualHostdirective.contentsThe contents of the
VirtualHostdirective, this should be a list of strings and G-expressions.
NGINX
- Variável: nginx-service-type
Service type for the NGinx web server. The value for this service type is a
<nginx-configuration>record.A simple example configuration is given below.
(service nginx-service-type (nginx-configuration (server-blocks (list (nginx-server-configuration (server-name '("www.example.com")) (root "/srv/http/www.example.com"))))))In addition to adding server blocks to the service configuration directly, this service can be extended by other services to add server blocks, as in this example:
(simple-service 'my-extra-server nginx-service-type (list (nginx-server-configuration (root "/srv/http/extra-website") (try-files (list "$uri" "$uri/index.html")))))
At startup, nginx has not yet read its configuration file, so it
uses a default file to log error messages. If it fails to load its
configuration file, that is where error messages are logged. After the
configuration file is loaded, the default error log file changes as per
configuration. In our case, startup error messages can be found in
/var/run/nginx/logs/error.log, and after configuration in
/var/log/nginx/error.log. The second location can be changed with
the log-directory configuration option.
- Tipo de dados: nginx-configuration
This data type represents the configuration for NGinx. Some configuration can be done through this and the other provided record types, or alternatively, a config file can be provided.
nginx(default:nginx)The nginx package to use.
shepherd-requirement(default:'())This is a list of symbols naming Shepherd services the nginx service will depend on.
This is useful if you would like
nginxto be started after a back-end web server or a logging service such as Anonip has been started.log-directory(default:"/var/log/nginx")The directory to which NGinx will write log files.
log-format(default:'combined) (type: symbol)Logging format for the access log. Nginx defaults to the httpd-like format named
'combined. Other formats can be defined usinglog-formats.log-formats(default:'())A list of additional log formats to define, the elements should be of type
<nginx-log-format-configuration>.log-level(default:'error) (type: symbol)Logging level for the error log, which can be any of the following values:
'debug,'info,'notice,'warn,'error,'crit,'alert, or'emerg.run-directory(default:"/var/run/nginx")The directory in which NGinx will create a pid file, and write temporary files.
server-blocks(default:'())A list of server blocks to create in the generated configuration file, the elements should be of type
<nginx-server-configuration>.The following example would setup NGinx to serve
www.example.comfrom the/srv/http/www.example.comdirectory, without using HTTPS.(service nginx-service-type (nginx-configuration (server-blocks (list (nginx-server-configuration (server-name '("www.example.com")) (root "/srv/http/www.example.com"))))))upstream-blocks(default:'())A list of upstream blocks to create in the generated configuration file, the elements should be of type
<nginx-upstream-configuration>.Configuring upstreams through the
upstream-blockscan be useful when combined withlocationsin the<nginx-server-configuration>records. The following example creates a server configuration with one location configuration, that will proxy requests to a upstream configuration, which will handle requests with two servers.(service nginx-service-type (nginx-configuration (server-blocks (list (nginx-server-configuration (server-name '("www.example.com")) (root "/srv/http/www.example.com") (locations (list (nginx-location-configuration (uri "/path1") (body '("proxy_pass http://server-proxy;")))))))) (upstream-blocks (list (nginx-upstream-configuration (name "server-proxy") (servers (list "server1.example.com" "server2.example.com")))))))file(padrão:#f)If a configuration file is provided, this will be used, rather than generating a configuration file from the provided
log-directory,run-directory,server-blocksandupstream-blocks. For proper operation, these arguments should match what is in file to ensure that the directories are created when the service is activated.This can be useful if you have an existing configuration file, or it’s not possible to do what is required through the other parts of the nginx-configuration record.
server-names-hash-bucket-size(default:#f)Bucket size for the server names hash tables, defaults to
#fto use the size of the processors cache line.server-names-hash-bucket-max-size(default:#f)Maximum bucket size for the server names hash tables.
modules(padrão:'())List of nginx dynamic modules to load. This should be a list of file names of loadable modules, as in this example:
(modules (list (file-append nginx-accept-language-module "\ /etc/nginx/modules/ngx_http_accept_language_module.so") (file-append nginx-lua-module "\ /etc/nginx/modules/ngx_http_lua_module.so")))lua-package-path(default:'())List of nginx lua packages to load. This should be a list of package names of loadable lua modules, as in this example:
(lua-package-path (list lua-resty-core lua-resty-lrucache lua-resty-signal lua-tablepool lua-resty-shell))lua-package-cpath(default:'())List of nginx lua C packages to load. This should be a list of package names of loadable lua C modules, as in this example:
(lua-package-cpath (list lua-resty-signal))global-directives(default:'((events . ())))Association list of global directives for the top level of the nginx configuration. Values may themselves be association lists.
(global-directives `((worker_processes . 16) (pcre_jit . on) (events . ((worker_connections . 1024)))))extra-content(default:"")Additional content to be appended to the
httpblock. Can either be a value that can be lowered into a string or a list of such values. In the former case, it is inserted directly. In the latter, it is prefixed with indentation and suffixed with a newline. Nested lists are flattened into one line.(extra-content "include /etc/nginx/custom-config.conf;") (extra-content `("include /etc/nginx/custom-config.conf;" ("include " ,%custom-config.conf ";")))
- Data Type: nginx-log-format-configuration
Data type representing the configuration of a custom Nginx log format. This type has the following parameters:
name(type: symbol)The name of the log format as a symbol.
escape(default:'default) (type: symbol)The mode used to escape values of variables in the format. The supported values are:
-
'default, to escape all characters outside of the ASCII printable range. -
'json, to escape all characters invalid in JSON strings. -
'none, to disable escaping.
-
format(type: string)The format as accepted by the
log_formatdirective.
- Tipo de dados: nginx-server-configuration
Data type representing the configuration of an nginx server block. This type has the following parameters:
listen(default:'("80" "443 ssl"))Each
listendirective sets the address and port for IP, or the path for a UNIX-domain socket on which the server will accept requests. Both address and port, or only address or only port can be specified. An address may also be a hostname, for example:'("127.0.0.1:8000" "127.0.0.1" "8000" "*:8000" "localhost:8000")
server-name(default:(list 'default))A list of server names this server represents.
'defaultrepresents the default server for connections matching no other server.root(default:"/srv/http")Root of the website nginx will serve.
locations(default:'())A list of nginx-location-configuration or nginx-named-location-configuration records to use within this server block.
index(default:(list "index.html"))Index files to look for when clients ask for a directory. If it cannot be found, Nginx will send the list of files in the directory.
try-files(default:'())A list of files whose existence is checked in the specified order.
nginxwill use the first file it finds to process the request.ssl-certificate(default:#f)Where to find the certificate for secure connections. Set it to
#fif you don’t have a certificate or you don’t want to use HTTPS.ssl-certificate-key(default:#f)Where to find the private key for secure connections. Set it to
#fif you don’t have a key or you don’t want to use HTTPS.server-tokens?(default:#f)Whether the server should add its configuration to response.
raw-content(default:'())A list of strings or file-like objects to be appended to the server block. Each item is prefixed with indentation and suffixed with a new line. Nested lists are flattened.
- Tipo de dados: nginx-upstream-configuration
Data type representing the configuration of an nginx
upstreamblock. This type has the following parameters:nameName for this group of servers.
serversSpecify the addresses of the servers in the group. The address can be specified as a IP address (e.g. ‘127.0.0.1’), domain name (e.g. ‘backend1.example.com’) or a path to a UNIX socket using the prefix ‘unix:’. For addresses using an IP address or domain name, the default port is 80, and a different port can be specified explicitly.
extra-contentAdditional content to be appended to the upstream block. Can be a string or file-like object or list of thereof. In case of list, each item is prefixed with indentation and suffixed with a new line. Nested lists are flattened.
(extra-content "include /etc/nginx/custom-config.conf;") (extra-content `("include /etc/nginx/custom-config.conf;" ("include " ,%custom-config.conf ";")))
- Tipo de dados: nginx-location-configuration
Data type representing the configuration of an nginx
locationblock. This type has the following parameters:uriURI which this location block matches.
bodyBody of the location block, specified as a list of strings or file-like objects. Each item is prefixed with indentation and suffixed with a new line. Nested lists are flattened.
For example, to pass requests to a upstream server group defined using an
nginx-upstream-configurationblock, the following directive would be specified in the body ‘(list "proxy_pass http://upstream-name;")’.
- Tipo de dados: nginx-named-location-configuration
Data type representing the configuration of an nginx named location block. Named location blocks are used for request redirection, and not used for regular request processing. This type has the following parameters:
nameName to identify this location block.
bodyVeja nginx-location-configuration body, as the body for named location blocks can be used in a similar way to the
nginx-location-configuration body. One restriction is that the body of a named location block cannot contain location blocks.
Varnish Cache
Varnish is a fast cache server that sits in between web applications and end users. It proxies requests from clients and caches the accessed URLs such that multiple requests for the same resource only creates one request to the back-end.
- Variável: varnish-service-type
Service type for the Varnish daemon.
- Tipo de dados: varnish-configuration
Data type representing the
varnishservice configuration. This type has the following parameters:package(default:varnish)The Varnish package to use.
name(default:"default")A name for this Varnish instance. Varnish will create a directory in /var/varnish/ with this name and keep temporary files there. If the name starts with a forward slash, it is interpreted as an absolute directory name.
Pass the
-nargument to other Varnish programs to connect to the named instance, e.g.varnishncsa -n default.backend(default:"localhost:8080")The backend to use. This option has no effect if
vclis set.vcl(default: #f)The VCL (Varnish Configuration Language) program to run. If this is
#f, Varnish will proxybackendusing the default configuration. Otherwise this must be a file-like object with valid VCL syntax.For example, to mirror www.gnu.org with VCL you can do something along these lines:
(define %gnu-mirror (plain-file "gnu.vcl" "vcl 4.1; backend gnu { .host = \"www.gnu.org\"; }")) (operating-system ;; … (services (cons (service varnish-service-type (varnish-configuration (listen '(":80")) (vcl %gnu-mirror))) %base-services)))
The configuration of an already running Varnish instance can be inspected and changed using the
varnishadmprogram.Consult the Varnish User Guide and Varnish Book for comprehensive documentation on Varnish and its configuration language.
listen(default:'("localhost:80"))List of addresses Varnish will listen on.
storage(default:'("malloc,128m"))List of storage backends that will be available in VCL.
parameters(default:'())List of run-time parameters in the form
'(("parameter" . "value")).extra-options(default:'())Additional arguments to pass to the
varnishdprocess.
Whoogle Search
Whoogle Search is a
self-hosted, ad-free, privacy-respecting meta search engine that collects
and displays Google search results. By default, you can configure it by
adding this line to the services field of your operating system
declaration:
(service whoogle-service-type)
As a result, Whoogle Search runs as local Web server, which you can access
by opening ‘http://localhost:5000’ in your browser. The
configuration reference is given below.
- Variável: whoogle-service-type
Service type for Whoogle Search. Its value must be a
whoogle-configurationrecord—see below.
- Tipo de dados: whoogle-configuration
Data type representing Whoogle Search service configuration.
package(default:whoogle-search)The Whoogle Search package to use.
host(default:"127.0.0.1")The host address to run Whoogle on.
port(padrão:5000)The port where Whoogle will be exposed.
environment-variables(default:'())A list of strings with the environment variables to configure Whoogle. You can consult its environment variables template for the list of available options.
Patchwork
Patchwork is a patch tracking system. It can collect patches sent to a mailing list, and display them in a web interface.
- Variável: patchwork-service-type
Service type for Patchwork.
The following example is an example of a minimal service for Patchwork, for
the patchwork.example.com domain.
(service patchwork-service-type
(patchwork-configuration
(domain "patchwork.example.com")
(settings-module
(patchwork-settings-module
(allowed-hosts (list domain))
(default-from-email "patchwork@patchwork.example.com")))
(getmail-retriever-config
(getmail-retriever-configuration
(type "SimpleIMAPSSLRetriever")
(server "imap.example.com")
(port 993)
(username "patchwork")
(password-command
(list (file-append coreutils "/bin/cat")
"/etc/getmail-patchwork-imap-password"))
(extra-parameters
'((mailboxes . ("Patches"))))))))
There are three records for configuring the Patchwork service. The
<patchwork-configuration> relates to the configuration for Patchwork
within the HTTPD service.
The settings-module field within the <patchwork-configuration>
record can be populated with the <patchwork-settings-module> record,
which describes a settings module that is generated within the Guix store.
For the database-configuration field within the
<patchwork-settings-module>, the
<patchwork-database-configuration> must be used.
- Tipo de dados: patchwork-configuration
Data type representing the Patchwork service configuration. This type has the following parameters:
patchwork(default:patchwork)The Patchwork package to use.
domainThe domain to use for Patchwork, this is used in the HTTPD service virtual host.
settings-moduleThe settings module to use for Patchwork. As a Django application, Patchwork is configured with a Python module containing the settings. This can either be an instance of the
<patchwork-settings-module>record, any other record that represents the settings in the store, or a directory outside of the store.static-path(default:"/static/")The path under which the HTTPD service should serve the static files.
getmail-retriever-configThe getmail-retriever-configuration record value to use with Patchwork. Getmail will be configured with this value, the messages will be delivered to Patchwork.
- Tipo de dados: patchwork-settings-module
Data type representing a settings module for Patchwork. Some of these settings relate directly to Patchwork, but others relate to Django, the web framework used by Patchwork, or the Django Rest Framework library. This type has the following parameters:
database-configuration(default:(patchwork-database-configuration))The database connection settings used for Patchwork. See the
<patchwork-database-configuration>record type for more information.secret-key-file(default:"/etc/patchwork/django-secret-key")Patchwork, as a Django web application uses a secret key for cryptographically signing values. This file should contain a unique unpredictable value.
If this file does not exist, it will be created and populated with a random value by the patchwork-setup shepherd service.
This setting relates to Django.
allowed-hostsA list of valid hosts for this Patchwork service. This should at least include the domain specified in the
<patchwork-configuration>record.This is a Django setting.
default-from-emailThe email address from which Patchwork should send email by default.
This is a Patchwork setting.
static-url(default:#f)The URL to use when serving static assets. It can be part of a URL, or a full URL, but must end in a
/.If the default value is used, the
static-pathvalue from the<patchwork-configuration>record will be used.This is a Django setting.
admins(default:'())Email addresses to send the details of errors that occur. Each value should be a list containing two elements, the name and then the email address.
This is a Django setting.
debug?(default:#f)Whether to run Patchwork in debug mode. If set to
#t, detailed error messages will be shown.This is a Django setting.
enable-rest-api?(default:#t)Whether to enable the Patchwork REST API.
This is a Patchwork setting.
enable-xmlrpc?(default:#t)Whether to enable the XML RPC API.
This is a Patchwork setting.
force-https-links?(default:#t)Whether to use HTTPS links on Patchwork pages.
This is a Patchwork setting.
extra-settings(default:"")Extra code to place at the end of the Patchwork settings module.
- Tipo de dados: patchwork-database-configuration
Data type representing the database configuration for Patchwork.
engine(default:"django.db.backends.postgresql_psycopg2")The database engine to use.
name(default:"patchwork")The name of the database to use.
user(default:"httpd")The user to connect to the database as.
password(default:"")The password to use when connecting to the database.
host(default:"")The host to make the database connection to.
port(padrão:"")The port on which to connect to the database.
Mumi
Mumi is a Web interface to the Debbugs bug tracker, by default for the GNU instance. Mumi is a Web server, but it also fetches and indexes mail retrieved from Debbugs.
- Variável: mumi-service-type
This is the service type for Mumi.
- Tipo de dados: mumi-configuration
Data type representing the Mumi service configuration. This type has the following fields:
mumi(default:mumi)The Mumi package to use.
mailer?(default:#true)Whether to enable or disable the mailer component.
senderThe email address used as the sender for comments.
smtpA URI to configure the SMTP settings for Mailutils. This could be something like
sendmail:///path/to/bin/msmtpor any other URI supported by Mailutils. Veja SMTP Mailboxes em GNU Mailutils.file-tagsAssociation list mapping tags to filename regular expressions. Keys are tag names, and values are lists of regular expressions. For each entry of the association list, the tag is applied if a filename referred to in a patch matches any of the regular expressions.
FastCGI
FastCGI is an interface between the front-end and the back-end of a web service. It is a somewhat legacy facility; new web services should generally just talk HTTP between the front-end and the back-end. However there are a number of back-end services such as PHP or the optimized HTTP Git repository access that use FastCGI, so we have support for it in Guix.
To use FastCGI, you configure the front-end web server (e.g., nginx) to
dispatch some subset of its requests to the fastcgi backend, which listens
on a local TCP or UNIX socket. There is an intermediary fcgiwrap
program that sits between the actual backend process and the web server.
The front-end indicates which backend program to run, passing that
information to the fcgiwrap process.
- Variável: fcgiwrap-service-type
A service type for the
fcgiwrapFastCGI proxy.
- Tipo de dados: fcgiwrap-configuration
Data type representing the configuration of the
fcgiwrapservice. This type has the following parameters:package(default:fcgiwrap)The fcgiwrap package to use.
socket(default:tcp:127.0.0.1:9000)The socket on which the
fcgiwrapprocess should listen, as a string. Valid socket values includeunix:/path/to/unix/socket,tcp:dot.ted.qu.ad:portandtcp6:[ipv6_addr]:port.user(default:fcgiwrap)group(default:fcgiwrap)The user and group names, as strings, under which to run the
fcgiwrapprocess. Thefastcgiservice will ensure that if the user asks for the specific user or group namesfcgiwrapthat the corresponding user and/or group is present on the system.It is possible to configure a FastCGI-backed web service to pass HTTP authentication information from the front-end to the back-end, and to allow
fcgiwrapto run the back-end process as a corresponding local user. To enable this capability on the back-end, runfcgiwrapas therootuser and group. Note that this capability also has to be configured on the front-end as well.
PHP-FPM
PHP-FPM (FastCGI Process Manager) is an alternative PHP FastCGI implementation with some additional features useful for sites of any size.
These features include:
- Adaptive process spawning
- Basic statistics (similar to Apache’s mod_status)
- Advanced process management with graceful stop/start
- Ability to start workers with different uid/gid/chroot/environment and different php.ini (replaces safe_mode)
- Stdout & stderr logging
- Emergency restart in case of accidental opcode cache destruction
- Accelerated upload support
- Support for a "slowlog"
- Enhancements to FastCGI, such as fastcgi_finish_request() - a special function to finish request & flush all data while continuing to do something time-consuming (video converting, stats processing, etc.)
... e muito mais.
- Variável: php-fpm-service-type
A Service type for
php-fpm.
- Tipo de dados: php-fpm-configuration
Data Type for php-fpm service configuration.
php(default:php)The php package to use.
socket(default:(string-append "/var/run/php" (version-major (package-version php)) "-fpm.sock"))The address on which to accept FastCGI requests. Valid syntaxes are:
"ip.add.re.ss:port"Listen on a TCP socket to a specific address on a specific port.
"port"Listen on a TCP socket to all addresses on a specific port.
"/path/to/unix/socket"Listen on a unix socket.
user(default:php-fpm)User who will own the php worker processes.
group(default:php-fpm)Group of the worker processes.
socket-user(default:php-fpm)User who can speak to the php-fpm socket.
socket-group(default:nginx)Group that can speak to the php-fpm socket.
pid-file(default:(string-append "/var/run/php" (version-major (package-version php)) "-fpm.pid"))The process id of the php-fpm process is written to this file once the service has started.
log-file(default:(string-append "/var/log/php" (version-major (package-version php)) "-fpm.log"))Log for the php-fpm master process.
process-manager(default:(php-fpm-dynamic-process-manager-configuration))Detailed settings for the php-fpm process manager. Must be one of:
<php-fpm-dynamic-process-manager-configuration><php-fpm-static-process-manager-configuration><php-fpm-on-demand-process-manager-configuration>
display-errors(default#f)Determines whether php errors and warning should be sent to clients and displayed in their browsers. This is useful for local php development, but a security risk for public sites, as error messages can reveal passwords and personal data.
timezone(default#f)Specifies
php_admin_value[date.timezone]parameter.workers-logfile(default(string-append "/var/log/php" (version-major (package-version php)) "-fpm.www.log"))This file will log the
stderroutputs of php worker processes. Can be set to#fto disable logging.file(padrão#f)An optional override of the whole configuration. You can use the
mixed-text-filefunction or an absolute filepath for it.php-ini-file(default#f)An optional override of the default php settings. It may be any “file-like” object (veja file-like objects). You can use the
mixed-text-filefunction or an absolute filepath for it.For local development it is useful to set a higher timeout and memory limit for spawned php processes. This be accomplished with the following operating system configuration snippet:
(define %local-php-ini (plain-file "php.ini" "memory_limit = 2G max_execution_time = 1800")) (operating-system ;; … (services (cons (service php-fpm-service-type (php-fpm-configuration (php-ini-file %local-php-ini))) %base-services)))
Consult the core php.ini directives for comprehensive documentation on the acceptable php.ini directives.
- Tipo de dados: php-fpm-dynamic-process-manager-configuration
Data Type for the
dynamicphp-fpm process manager. With thedynamicprocess manager, spare worker processes are kept around based on its configured limits.max-children(default:5)Maximum of worker processes.
start-servers(default:2)How many worker processes should be started on start-up.
min-spare-servers(default:1)How many spare worker processes should be kept around at minimum.
max-spare-servers(default:3)How many spare worker processes should be kept around at maximum.
- Tipo de dados: php-fpm-static-process-manager-configuration
Data Type for the
staticphp-fpm process manager. With thestaticprocess manager, an unchanging number of worker processes are created.max-children(default:5)Maximum of worker processes.
- Tipo de dados: php-fpm-on-demand-process-manager-configuration
Data Type for the
on-demandphp-fpm process manager. With theon-demandprocess manager, worker processes are only created as requests arrive.max-children(default:5)Maximum of worker processes.
process-idle-timeout(default:10)The time in seconds after which a process with no requests is killed.
- Procedure: nginx-php-location [#:nginx-package nginx] [socket (string-append "/var/run/php" (version-major (package-version
php)) "-fpm.sock")] A helper function to quickly add php to an
nginx-server-configuration.
A simple services setup for nginx with php can look like this:
(services (cons* (service dhcp-client-service-type)
(service php-fpm-service-type)
(service nginx-service-type
(nginx-server-configuration
(server-name '("example.com"))
(root "/srv/http/")
(locations
(list (nginx-php-location)))
(listen '("80"))
(ssl-certificate #f)
(ssl-certificate-key #f)))
%base-services))
The cat avatar generator is a simple service to demonstrate the use of
php-fpm in Nginx. It is used to generate cat avatar from a seed, for
instance the hash of a user’s email address.
- Procedure: cat-avatar-generator-service [#:cache-dir "/var/cache/cat-avatar-generator"] [#:package
cat-avatar-generator] [#:configuration (nginx-server-configuration)] Returns an nginx-server-configuration that inherits
configuration. It extends the nginx configuration to add a server block that servespackage, a version of cat-avatar-generator. During execution, cat-avatar-generator will be able to usecache-diras its cache directory.
A simple setup for cat-avatar-generator can look like this:
(services (cons* (cat-avatar-generator-service
#:configuration
(nginx-server-configuration
(server-name '("example.com"))))
...
%base-services))
Hpcguix-web
The hpcguix-web program is a customizable web interface to browse Guix packages, initially designed for users of high-performance computing (HPC) clusters.
- Variável: hpcguix-web-service-type
The service type for
hpcguix-web.
- Tipo de dados: hpcguix-web-configuration
Data type for the hpcguix-web service configuration.
specs(default:#f)Either
#for a gexp (veja Expressões-G) specifying the hpcguix-web service configuration as anhpcguix-web-configurationrecord. The main fields of that record type are:title-prefix(default:"hpcguix | ")The page title prefix.
guix-command(default:"guix")The
guixcommand to use in examples that appear on HTML pages.package-filter-proc(default:(const #t))A procedure specifying how to filter packages that are displayed.
package-page-extension-proc(default:(const '()))Extension package for
hpcguix-web.menu(default:'())Additional entry in page
menu.channels(default:%default-channels)List of channels from which the package list is built (veja Canais).
package-list-expiration(default:(* 12 3600))The expiration time, in seconds, after which the package list is rebuilt from the latest instances of the given channels.
See the hpcguix-web repository for a complete example.
package(default:hpcguix-web)The hpcguix-web package to use.
address(default:"127.0.0.1")The IP address to listen to.
port(padrão:5000)The port number to listen to.
A typical hpcguix-web service declaration looks like this:
(service hpcguix-web-service-type
(hpcguix-web-configuration
(specs
#~(hpcweb-configuration
(title-prefix "Guix-HPC - ")
(menu '(("/about" "ABOUT")))))))
Nota: The hpcguix-web service periodically updates the package list it publishes by pulling channels from Git. To that end, it needs to access X.509 certificates so that it can authenticate Git servers when communicating over HTTPS, and it assumes that /etc/ssl/certs contains those certificates.
A certificate package,
nss-certs, is provided by default as part of%base-packages. Certificados X.509, for more information on X.509 certificates.
gmnisrv
The gmnisrv program is a simple Gemini protocol server.
- Variável: gmnisrv-service-type
This is the type of the gmnisrv service, whose value should be a
gmnisrv-configurationobject, as in this example:(service gmnisrv-service-type (gmnisrv-configuration (config-file (local-file "./my-gmnisrv.ini"))))
- Tipo de dados: gmnisrv-configuration
Data type representing the configuration of gmnisrv.
package(default: gmnisrv)Package object of the gmnisrv server.
config-file(default:%default-gmnisrv-config-file)File-like object of the gmnisrv configuration file to use. The default configuration listens on port 1965 and serves files from /srv/gemini. Certificates are stored in /var/lib/gemini/certs. For more information, run
man gmnisrvandman gmnisrv.ini.
Agate
The Agate (GitHub page over HTTPS) program is a simple Gemini protocol server written in Rust.
- Variável: agate-service-type
This is the type of the agate service, whose value should be an
agate-service-typeobject, as in this example:(service agate-service-type (agate-configuration (content "/srv/gemini") (certificates "/srv/gemini-certs")))The example above represents the minimal tweaking necessary to get Agate up and running. Specifying the path to the certificate and key directory is always necessary, as the Gemini protocol requires TLS by default.
If the specified
certificatespath is writable by Agate, and contains no valid pre-generated key and certificate, Agate will try to generate them on the first start. In this case you should pass at least one hostname using thehostnamesoption. If the specified directory is read-only, key and certificate should be pre-generated by the user.To obtain a certificate and a key in DER format, you could, for example, use OpenSSL, running commands similar to the following example:
openssl genpkey -out key.der -outform DER -algorithm RSA \ -pkeyopt rsa_keygen_bits:4096 openssl req -x509 -key key.der -outform DER -days 3650 -out cert.der \ -subj "/CN=example.com"Of course, you’ll have to replace example.com with your own domain name, and then point the Agate configuration towards the path of the directory with the generated key and certificate using the
certificatesoption.
- Tipo de dados: agate-configuration
Data type representing the configuration of Agate.
package(default:agate)The package object of the Agate server.
content(default: "/srv/gemini")The directory from which Agate will serve files.
certificates(default: "/srv/gemini-certs")Root of the certificate directory. Must be filled in with a value from the user.
addresses(default:'("[::]:1965" "0.0.0.0:1965"))A list of the addresses to listen on.
hostnames(default:'())Virtual hosts for the Gemini server. If multiple values are specified, corresponding directory names should be present in the
contentdirectory. Optional.languages(default:#f)RFC 4646 language code(s) for text/gemini documents. Optional.
only-tls13?(default:#f)Set to
#tto disable support for TLSv1.2.serve-secret?(default:#f)Set to
#tto serve secret files (files/directories starting with a dot).central-configuration?(default:#f)Set to
#tto look for the .meta configuration file in thecontentroot directory and will ignore.metafiles in other directoriesed25519?(default:#f)Set to
#tto generate keys using the Ed25519 signature algorithm instead of the default ECDSA.skip-port-check?(default:#f)Set to
#tto skip URL port check even when ahostnameis specified.log-ip?(default:#t)Whether or not to output IP addresses when logging.
user(default:"agate")Owner of the
agateprocess.group(default:"agate")Owner’s group of the
agateprocess.log-file(default: "/var/log/agate.log")The file which should store the logging output of Agate.
Próximo: Serviços DNS, Anterior: Serviços web, Acima: Serviços [Conteúdo][Índice]
11.10.21 Serviços de certificado
The (gnu services certbot) module provides a service to automatically
obtain a valid TLS certificate from the Let’s Encrypt certificate
authority. These certificates can then be used to serve content securely
over HTTPS or other TLS-based protocols, with the knowledge that the client
will be able to verify the server’s authenticity.
Let’s Encrypt provides the certbot
tool to automate the certification process. This tool first securely
generates a key on the server. It then makes a request to the Let’s Encrypt
certificate authority (CA) to sign the key. The CA checks that the request
originates from the host in question by using a challenge-response protocol,
requiring the server to provide its response over HTTP. If that protocol
completes successfully, the CA signs the key, resulting in a certificate.
That certificate is valid for a limited period of time, and therefore to
continue to provide TLS services, the server needs to periodically ask the
CA to renew its signature.
The certbot service automates this process: the initial key generation, the initial certification request to the Let’s Encrypt service, the web server challenge/response integration, writing the certificate to disk, the automated periodic renewals, and the deployment tasks associated with the renewal (e.g. reloading services, copying keys with different permissions).
Certbot is run twice a day, at a random minute within the hour. It won’t do anything until your certificates are due for renewal or revoked, but running it regularly would give your service a chance of staying online in case a Let’s Encrypt-initiated revocation happened for some reason.
By using this service, you agree to the ACME Subscriber Agreement, which can be found there: https://acme-v01.api.letsencrypt.org/directory.
- Variável: certbot-service-type
A service type for the
certbotLet’s Encrypt client. Its value must be acertbot-configurationrecord as in this example:(service certbot-service-type (certbot-configuration (email "foo@example.net") (certificates (list (certificate-configuration (domains '("example.net" "www.example.net"))) (certificate-configuration (domains '("bar.example.net")))))))See below for details about
certbot-configuration.
- Tipo de dados: certbot-configuration
Data type representing the configuration of the
certbotservice. This type has the following parameters:package(default:certbot)The certbot package to use.
webroot(default:/var/www)The directory from which to serve the Let’s Encrypt challenge/response files.
certificates(default:'())A list of
certificates-configurations for which to generate certificates and request signatures. Each certificate has anameand severaldomains.email(default:#f)Optional email address used for registration and recovery contact. Setting this is encouraged as it allows you to receive important notifications about the account and issued certificates.
server(default:#f)Optional URL of ACME server. Setting this overrides certbot’s default, which is the Let’s Encrypt server.
rsa-key-size(default:2048)Size of the RSA key.
default-location(default: see below)The default
nginx-location-configuration. Becausecertbotneeds to be able to serve challenges and responses, it needs to be able to run a web server. It does so by extending thenginxweb service with annginx-server-configurationlistening on the domains on port 80, and which has anginx-location-configurationfor the/.well-known/URI path subspace used by Let’s Encrypt. Veja Serviços web, for more on these nginx configuration data types.Requests to other URL paths will be matched by the
default-location, which if present is added to allnginx-server-configurations.By default, the
default-locationwill issue a redirect fromhttp://domain/...tohttps://domain/..., leaving you to define what to serve on your site viahttps.Pass
#fto not issue a default location.
- Tipo de dados: certificate-configuration
Data type representing the configuration of a certificate. This type has the following parameters:
name(default: see below)This name is used by Certbot for housekeeping and in file paths; it doesn’t affect the content of the certificate itself. To see certificate names, run
certbot certificates.Its default is the first provided domain.
domains(default:'())The first domain provided will be the subject CN of the certificate, and all domains will be Subject Alternative Names on the certificate.
challenge(padrão:#f)The challenge type that has to be run by certbot. If
#fis specified, default to the HTTP challenge. If a value is specified, defaults to the manual plugin (seeauthentication-hook,cleanup-hookand the documentation at https://certbot.eff.org/docs/using.html#hooks), and gives Let’s Encrypt permission to log the public IP address of the requesting machine.csr(default:#f)File name of Certificate Signing Request (CSR) in DER or PEM format. If
#fis specified, this argument will not be passed to certbot. If a value is specified, certbot will use it to obtain a certificate, instead of using a self-generated CSR. The domain-name(s) mentioned indomains, must be consistent with the domain-name(s) mentioned in CSR file.authentication-hook(padrão:#f)Command to be run in a shell once for each certificate challenge to be answered. For this command, the shell variable
$CERTBOT_DOMAINwill contain the domain being authenticated,$CERTBOT_VALIDATIONcontains the validation string and$CERTBOT_TOKENcontains the file name of the resource requested when performing an HTTP-01 challenge.cleanup-hook(padrão:#f)Command to be run in a shell once for each certificate challenge that have been answered by the
auth-hook. For this command, the shell variables available in theauth-hookscript are still available, and additionally$CERTBOT_AUTH_OUTPUTwill contain the standard output of theauth-hookscript.deploy-hook(default:#f)Command to be run in a shell once for each successfully issued certificate. For this command, the shell variable
$RENEWED_LINEAGEwill point to the config live subdirectory (for example, ‘"/etc/letsencrypt/live/example.com"’) containing the new certificates and keys; the shell variable$RENEWED_DOMAINSwill contain a space-delimited list of renewed certificate domains (for example, ‘"example.com www.example.com"’.start-self-signed?(default:#t)Whether to generate an initial self-signed certificate during system activation. This option is particularly useful to allow
nginxto start beforecertbothas run, becausecertbotrelies onnginxrunning to perform HTTP challenges.
For each certificate-configuration, the certificate is saved to
/etc/certs/name/fullchain.pem and the key is saved to
/etc/certs/name/privkey.pem.
Próximo: VNC Services, Anterior: Serviços de certificado, Acima: Serviços [Conteúdo][Índice]
11.10.22 Serviços DNS
The (gnu services dns) module provides services related to the
domain name system (DNS). It provides a server service for hosting an
authoritative DNS server for multiple zones, slave or master. This
service uses Knot DNS. And also a caching
and forwarding DNS server for the LAN, which uses
dnsmasq.
Knot Service
An example configuration of an authoritative server for two zones, one master and one slave, is:
(define-zone-entries example.org.zone ;; Name TTL Class Type Data ("@" "" "IN" "A" "127.0.0.1") ("@" "" "IN" "NS" "ns") ("ns" "" "IN" "A" "127.0.0.1")) (define master-zone (knot-zone-configuration (domain "example.org") (zone (zone-file (origin "example.org") (entries example.org.zone))))) (define slave-zone (knot-zone-configuration (domain "plop.org") (dnssec-policy "default") (master (list "plop-master")))) (define plop-master (knot-remote-configuration (id "plop-master") (address (list "208.76.58.171")))) (operating-system ;; ... (services (cons* (service knot-service-type (knot-configuration (remotes (list plop-master)) (zones (list master-zone slave-zone)))) ;; ... %base-services)))
- Variável: knot-service-type
This is the type for the Knot DNS server.
Knot DNS is an authoritative DNS server, meaning that it can serve multiple zones, that is to say domain names you would buy from a registrar. This server is not a resolver, meaning that it can only resolve names for which it is authoritative. This server can be configured to serve zones as a master server or a slave server as a per-zone basis. Slave zones will get their data from masters, and will serve it as an authoritative server. From the point of view of a resolver, there is no difference between master and slave.
The following data types are used to configure the Knot DNS server:
- Tipo de dados: knot-key-configuration
Data type representing a key. This type has the following parameters:
id(default:"")An identifier for other configuration fields to refer to this key. IDs must be unique and must not be empty.
algorithm(padrão:#f)The algorithm to use. Choose between
#f,'hmac-md5,'hmac-sha1,'hmac-sha224,'hmac-sha256,'hmac-sha384and'hmac-sha512.secret(default:"")The secret key itself.
- Tipo de dados: knot-acl-configuration
Data type representing an Access Control List (ACL) configuration. This type has the following parameters:
id(default:"")An identifier for other configuration fields to refer to this key. IDs must be unique and must not be empty.
address(default:'())An ordered list of IP addresses, network subnets, or network ranges represented with strings. The query must match one of them. Empty value means that address match is not required.
key(default:'())An ordered list of references to keys represented with strings. The string must match a key ID defined in a
knot-key-configuration. No key means that a key is not require to match that ACL.action(default:'())An ordered list of actions that are permitted or forbidden by this ACL. Possible values are lists of zero or more elements from
'transfer,'notifyand'update.deny?(padrão:#f)When true, the ACL defines restrictions. Listed actions are forbidden. When false, listed actions are allowed.
- Tipo de dados: zone-entry
Data type representing a record entry in a zone file. This type has the following parameters:
name(default:"@")The name of the record.
"@"refers to the origin of the zone. Names are relative to the origin of the zone. For example, in theexample.orgzone,"ns.example.org"actually refers tons.example.org.example.org. Names ending with a dot are absolute, which means that"ns.example.org."refers tons.example.org.ttl(default:"")The Time-To-Live (TTL) of this record. If not set, the default TTL is used.
class(default:"IN")The class of the record. Knot currently supports only
"IN"and partially"CH".type(default:"A")The type of the record. Common types include A (IPv4 address), AAAA (IPv6 address), NS (Name Server) and MX (Mail eXchange). Many other types are defined.
data(default:"")The data contained in the record. For instance an IP address associated with an A record, or a domain name associated with an NS record. Remember that domain names are relative to the origin unless they end with a dot.
- Tipo de dados: zone-file
Data type representing the content of a zone file. This type has the following parameters:
entries(default:'())The list of entries. The SOA record is taken care of, so you don’t need to put it in the list of entries. This list should probably contain an entry for your primary authoritative DNS server. Other than using a list of entries directly, you can use
define-zone-entriesto define a object containing the list of entries more easily, that you can later pass to theentriesfield of thezone-file.origin(default:"")The name of your zone. This parameter cannot be empty.
ns(default:"ns")The domain of your primary authoritative DNS server. The name is relative to the origin, unless it ends with a dot. It is mandatory that this primary DNS server corresponds to an NS record in the zone and that it is associated to an IP address in the list of entries.
mail(default:"hostmaster")An email address people can contact you at, as the owner of the zone. This is translated as
<mail>@<origin>.serial(default:1)The serial number of the zone. As this is used to keep track of changes by both slaves and resolvers, it is mandatory that it never decreases. Always increment it when you make a change in your zone.
refresh(default:(* 2 24 3600))The frequency at which slaves will do a zone transfer. This value is a number of seconds. It can be computed by multiplications or with
(string->duration).retry(default:(* 15 60))The period after which a slave will retry to contact its master when it fails to do so a first time.
expiry(default:(* 14 24 3600))Default TTL of records. Existing records are considered correct for at most this amount of time. After this period, resolvers will invalidate their cache and check again that it still exists.
nx(default:3600)Default TTL of inexistent records. This delay is usually short because you want your new domains to reach everyone quickly.
- Tipo de dados: knot-remote-configuration
Data type representing a remote configuration. This type has the following parameters:
id(default:"")An identifier for other configuration fields to refer to this remote. IDs must be unique and must not be empty.
address(default:'())An ordered list of destination IP addresses. Addresses are tried in sequence. An optional port can be given with the @ separator. For instance:
(list "1.2.3.4" "2.3.4.5@53"). Default port is 53.via(default:'())An ordered list of source IP addresses. An empty list will have Knot choose an appropriate source IP. An optional port can be given with the @ separator. The default is to choose at random.
key(padrão:#f)A reference to a key, that is a string containing the identifier of a key defined in a
knot-key-configurationfield.
- Tipo de dados: knot-keystore-configuration
Data type representing a keystore to hold dnssec keys. This type has the following parameters:
id(default:"")The id of the keystore. It must not be empty.
backend(default:'pem)The backend to store the keys in. Can be
'pemor'pkcs11.config(default:"/var/lib/knot/keys/keys")The configuration string of the backend. An example for the PKCS#11 is:
"pkcs11:token=knot;pin-value=1234 /gnu/store/.../lib/pkcs11/libsofthsm2.so". For the pem backend, the string represents a path in the file system.
- Tipo de dados: knot-policy-configuration
Data type representing a dnssec policy. Knot DNS is able to automatically sign your zones. It can either generate and manage your keys automatically or use keys that you generate.
Dnssec is usually implemented using two keys: a Key Signing Key (KSK) that is used to sign the second, and a Zone Signing Key (ZSK) that is used to sign the zone. In order to be trusted, the KSK needs to be present in the parent zone (usually a top-level domain). If your registrar supports dnssec, you will have to send them your KSK’s hash so they can add a DS record in their zone. This is not automated and need to be done each time you change your KSK.
The policy also defines the lifetime of keys. Usually, ZSK can be changed easily and use weaker cryptographic functions (they use lower parameters) in order to sign records quickly, so they are changed often. The KSK however requires manual interaction with the registrar, so they are changed less often and use stronger parameters because they sign only one record.
This type has the following parameters:
id(default:"")The id of the policy. It must not be empty.
keystore(default:"default")A reference to a keystore, that is a string containing the identifier of a keystore defined in a
knot-keystore-configurationfield. The"default"identifier means the default keystore (a kasp database that was setup by this service).manual?(padrão:#f)Whether the key management is manual or automatic.
single-type-signing?(default:#f)When
#t, use the Single-Type Signing Scheme.algorithm(default:"ecdsap256sha256")An algorithm of signing keys and issued signatures.
ksk-size(default:256)The length of the KSK. Note that this value is correct for the default algorithm, but would be unsecure for other algorithms.
zsk-size(default:256)The length of the ZSK. Note that this value is correct for the default algorithm, but would be unsecure for other algorithms.
dnskey-ttl(default:'default)The TTL value for DNSKEY records added into zone apex. The special
'defaultvalue means same as the zone SOA TTL.zsk-lifetime(default:(* 30 24 3600))The period between ZSK publication and the next rollover initiation.
propagation-delay(default:(* 24 3600))An extra delay added for each key rollover step. This value should be high enough to cover propagation of data from the master server to all slaves.
rrsig-lifetime(default:(* 14 24 3600))A validity period of newly issued signatures.
rrsig-refresh(default:(* 7 24 3600))A period how long before a signature expiration the signature will be refreshed.
nsec3?(padrão:#f)When
#t, NSEC3 will be used instead of NSEC.nsec3-iterations(default:5)The number of additional times the hashing is performed.
nsec3-salt-length(default:8)The length of a salt field in octets, which is appended to the original owner name before hashing.
nsec3-salt-lifetime(default:(* 30 24 3600))The validity period of newly issued salt field.
- Tipo de dados: knot-zone-configuration
Data type representing a zone served by Knot. This type has the following parameters:
domain(default:"")The domain served by this configuration. It must not be empty.
file(default:"")The file where this zone is saved. This parameter is ignored by master zones. Empty means default location that depends on the domain name.
zone(default:(zone-file))The content of the zone file. This parameter is ignored by slave zones. It must contain a zone-file record.
master(default:'())A list of master remotes. When empty, this zone is a master. When set, this zone is a slave. This is a list of remotes identifiers.
ddns-master(default:#f)The main master. When empty, it defaults to the first master in the list of masters.
notify(default:'())A list of slave remote identifiers.
acl(default:'())A list of acl identifiers.
semantic-checks?(default:#f)When set, this adds more semantic checks to the zone.
zonefile-sync(default:0)The delay between a modification in memory and on disk. 0 means immediate synchronization.
zonefile-load(padrão:#f)The way the zone file contents are applied during zone load. Possible values are:
-
#ffor using the default value from Knot, -
'nonefor not using the zone file at all, -
'differencefor computing the difference between already available contents and zone contents and applying it to the current zone contents, -
'difference-no-serialfor the same as'difference, but ignoring the SOA serial in the zone file, while the server takes care of it automatically. -
'wholefor loading zone contents from the zone file.
-
journal-content(default:#f)The way the journal is used to store zone and its changes. Possible values are
'noneto not use it at all,'changesto store changes and'allto store contents.#fdoes not set this option, so the default value from Knot is used.max-journal-usage(padrão:#f)The maximum size for the journal on disk.
#fdoes not set this option, so the default value from Knot is used.max-journal-depth(padrão:#f)The maximum size of the history.
#fdoes not set this option, so the default value from Knot is used.max-zone-size(padrão:#f)The maximum size of the zone file. This limit is enforced for incoming transfer and updates.
#fdoes not set this option, so the default value from Knot is used.dnssec-policy(padrão:#f)A reference to a
knot-policy-configurationrecord, or the special name"default". If the value is#f, there is no dnssec signing on this zone.serial-policy(default:'increment)A policy between
'incrementand'unixtime.
- Tipo de dados: knot-configuration
Data type representing the Knot configuration. This type has the following parameters:
knot(default:knot)The Knot package.
run-directory(default:"/var/run/knot")The run directory. This directory will be used for pid file and sockets.
includes(default:'())A list of strings or file-like objects denoting other files that must be included at the top of the configuration file.
This can be used to manage secrets out-of-band. For example, secret keys may be stored in an out-of-band file not managed by Guix, and thus not visible in /gnu/store—e.g., you could store secret key configuration in /etc/knot/secrets.conf and add this file to the
includeslist.One can generate a secret tsig key (for nsupdate and zone transfers with the keymgr command from the knot package. Note that the package is not automatically installed by the service. The following example shows how to generate a new tsig key:
keymgr -t mysecret > /etc/knot/secrets.conf chmod 600 /etc/knot/secrets.conf
Also note that the generated key will be named mysecret, so it is the name that needs to be used in the key field of the
knot-acl-configurationrecord and in other places that need to refer to that key.It can also be used to add configuration not supported by this interface.
listen-v4(default:"0.0.0.0")An ip address on which to listen.
listen-v6(default:"::")An ip address on which to listen.
listen-port(default:53)A port on which to listen.
keys(default:'())The list of knot-key-configuration used by this configuration.
acls(default:'())The list of knot-acl-configuration used by this configuration.
remotes(default:'())The list of knot-remote-configuration used by this configuration.
zones(default:'())The list of knot-zone-configuration used by this configuration.
Knot Resolver Service
- Variável: knot-resolver-service-type
This is the type of the knot resolver service, whose value should be a
knot-resolver-configurationobject as in this example:(service knot-resolver-service-type (knot-resolver-configuration (kresd-config-file (plain-file "kresd.conf" " net.listen('192.168.0.1', 5353) user('knot-resolver', 'knot-resolver') modules = { 'hints > iterate', 'stats', 'predict' } cache.size = 100 * MB "))))For more information, refer its manual.
- Tipo de dados: knot-resolver-configuration
Data type representing the configuration of knot-resolver.
package(default: knot-resolver)Package object of the knot DNS resolver.
kresd-config-file(default: %kresd.conf)File-like object of the kresd configuration file to use, by default it will listen on
127.0.0.1and::1.garbage-collection-interval(default: 1000)Number of milliseconds for
kres-cache-gcto periodically trim the cache.
Dnsmasq Service
- Variável: dnsmasq-service-type
This is the type of the dnsmasq service, whose value should be a
dnsmasq-configurationobject as in this example:(service dnsmasq-service-type (dnsmasq-configuration (no-resolv? #t) (servers '("192.168.1.1"))))
- Tipo de dados: dnsmasq-configuration
Data type representing the configuration of dnsmasq.
package(default: dnsmasq)Package object of the dnsmasq server.
provision(default:'(dnsmasq))A list of symbols for the Shepherd service corresponding to this dnsmasq configuration.
no-hosts?(padrão:#f)When true, don’t read the hostnames in /etc/hosts.
port(padrão:53)The port to listen on. Setting this to zero completely disables DNS responses, leaving only DHCP and/or TFTP functions.
local-service?(padrão:#t)Accept DNS queries only from hosts whose address is on a local subnet, ie a subnet for which an interface exists on the server.
listen-addresses(default:'())Listen on the given IP addresses.
resolv-file(default:"/etc/resolv.conf")The file to read the IP address of the upstream nameservers from.
no-resolv?(padrão:#f)When true, don’t read resolv-file.
forward-private-reverse-lookup?(default:#t)When false, all reverse lookups for private IP ranges are answered with "no such domain" rather than being forwarded upstream.
query-servers-in-order?(default:#f)When true, dnsmasq queries the servers in the same order as they appear in servers.
servers(default:'())Specify IP address of upstream servers directly.
servers-file(default:#f)Specify file containing upstream servers. This file is re-read when dnsmasq receives SIGHUP. Could be either a string or a file-like object.
addresses(default:'())For each entry, specify an IP address to return for any host in the given domains. Queries in the domains are never forwarded and always replied to with the specified IP address.
This is useful for redirecting hosts locally, for example:
(service dnsmasq-service-type (dnsmasq-configuration (addresses '(; Redirect to a local web-server. "/example.org/127.0.0.1" ; Redirect subdomain to a specific IP. "/subdomain.example.org/192.168.1.42"))))Note that rules in /etc/hosts take precedence over this.
cache-size(padrão:150)Set the size of dnsmasq’s cache. Setting the cache size to zero disables caching.
negative-cache?(padrão:#t)When false, disable negative caching.
cpe-id(default:#f)If set, add a CPE (Customer-Premises Equipment) identifier to DNS queries which are forwarded upstream.
tftp-enable?(default:#f)Whether to enable the built-in TFTP server.
tftp-no-fail?(default:#f)If true, does not fail dnsmasq if the TFTP server could not start up.
tftp-single-port?(default:#f)Whether to use only one single port for TFTP.
tftp-secure?(default:#f)If true, only files owned by the user running the dnsmasq process are accessible.
If dnsmasq is being run as root, different rules apply:
tftp-secure?has no effect, but only files which have the world-readable bit set are accessible.tftp-max(default:#f)If set, sets the maximal number of concurrent connections allowed.
tftp-mtu(default:#f)If set, sets the MTU for TFTP packets to that value.
tftp-no-blocksize?(default:#f)If true, stops the TFTP server from negotiating the blocksize with a client.
tftp-lowercase?(default:#f)Whether to convert all filenames in TFTP requests to lowercase.
tftp-port-range(default:#f)If set, fixes the dynamical ports (one per client) to the given range (
"<start>,<end>").tftp-root(default:/var/empty,lo)Look for files to transfer using TFTP relative to the given directory. When this is set, TFTP paths which include ‘..’ are rejected, to stop clients getting outside the specified root. Absolute paths (starting with ‘/’) are allowed, but they must be within the TFTP-root. If the optional interface argument is given, the directory is only used for TFTP requests via that interface.
tftp-unique-root(default:#f)If set, add the IP or hardware address of the TFTP client as a path component on the end of the TFTP-root. Only valid if a TFTP root is set and the directory exists. Defaults to adding IP address (in standard dotted-quad format).
For instance, if --tftp-root is ‘/tftp’ and client ‘1.2.3.4’ requests file myfile then the effective path will be /tftp/1.2.3.4/myfile if /tftp/1.2.3.4 exists or /tftp/myfile otherwise. When ‘=mac’ is specified it will append the MAC address instead, using lowercase zero padded digits separated by dashes, e.g.: ‘01-02-03-04-aa-bb’. Note that resolving MAC addresses is only possible if the client is in the local network or obtained a DHCP lease from dnsmasq.
extra-options(default:'())This option provides an “escape hatch” for the user to provide arbitrary command-line arguments to
dnsmasqas a list of strings.
Unbound Service
- Variável: unbound-service-type
This is the type of the service to run Unbound, a validating, recursive, and caching DNS resolver. Its value must be a
unbound-configurationobject as in this example:(service unbound-service-type (unbound-configuration (forward-zone (list (unbound-zone (name ".") (forward-addr '("149.112.112.112#dns.quad9.net" "2620:fe::9#dns.quad9.net")) (forward-tls-upstream #t))))))
- Data Type: unbound-configuration
Available
unbound-configurationfields are:server(type: unbound-server)General options for the Unbound server.
remote-control(type: unbound-remote)Remote control options for the daemon.
forward-zone(default:()) (type: list-of-unbound-zone)A zone for which queries should be forwarded to another resolver.
extra-content(type: maybe-string)Raw content to add to the configuration file.
- Data Type: unbound-server
Available
unbound-serverfields are:interface(type: maybe-list-of-strings)Interfaces listened on for queries from clients.
hide-version(type: maybe-boolean)Refuse the version.server and version.bind queries.
hide-identity(type: maybe-boolean)Refuse the id.server and hostname.bind queries.
tls-cert-bundle(type: maybe-string)Certificate bundle file, used for DNS over TLS.
extra-options(default:()) (type: alist)An association list of options to append.
- Data Type: unbound-remote
Available
unbound-remotefields are:control-enable(type: maybe-boolean)Enable remote control.
control-interface(type: maybe-string)IP address or local socket path to listen on for remote control.
extra-options(default:()) (type: alist)An association list of options to append.
- Data Type: unbound-zone
Available
unbound-zonefields are:name(type: string)Zone name.
forward-addr(type: maybe-list-of-strings)IP address of server to forward to.
forward-tls-upstream(type: maybe-boolean)Whether the queries to this forwarder use TLS for transport.
extra-options(default:()) (type: alist)An association list of options to append.
Próximo: Serviços VPN, Anterior: Serviços DNS, Acima: Serviços [Conteúdo][Índice]
11.10.23 VNC Services
The (gnu services vnc) module provides services related to
Virtual Network Computing (VNC), which makes it possible to locally
use graphical Xorg applications running on a remote machine. Combined with
a graphical manager that supports the X Display Manager Control
Protocol, such as GDM (veja gdm) or LightDM (veja lightdm), it is
possible to remote an entire desktop for a multi-user environment.
Xvnc
Xvnc is a VNC server that spawns its own X window server; which means it can
run on headless servers. The Xvnc implementations provided by the
tigervnc-server and turbovnc aim to be fast and efficient.
- Variável: xvnc-service-type
-
The
xvnc-service-typeservice can be configured via thexvnc-configurationrecord, documented below. A second virtual display could be made available on a remote machine via the following configuration:
(service xvnc-service-type
(xvnc-configuration (display-number 10)))
As a demonstration, the xclock command could then be started on
the remote machine on display number 10, and it could be displayed locally
via the vncviewer command:
# Start xclock on the remote machine.
ssh -L5910:localhost:5910 your-host -- guix shell xclock \
-- env DISPLAY=:10 xclock
# Access it via VNC.
guix shell tigervnc-client -- vncviewer localhost:5910
The following configuration combines XDMCP and Inetd to allow multiple users to concurrently use the remote system and login graphically via the GDM display manager:
(operating-system
[...]
(services (cons*
[...]
(service xvnc-service-type (xvnc-configuration
(display-number 5)
(localhost? #f)
(xdmcp? #t)
(inetd? #t)))
(modify-services %desktop-services
(gdm-service-type config => (gdm-configuration
(inherit config)
(auto-suspend? #f)
(xdmcp? #t)))))))
A remote user could then connect to it by using the vncviewer
command or a compatible VNC client and start a desktop session of their
choosing:
vncviewer remote-host:5905
Aviso: Unless your machine is in a controlled environment, for security reasons, the
localhost?configuration of thexvnc-configurationrecord should be left to its default#tvalue and exposed via a secure means such as an SSH port forward. The XDMCP port, UDP 177 should also be blocked from the outside by a firewall, as it is not a secure protocol and can expose login credentials in clear.
- Tipo de dados: xvnc-configuration
Available
xvnc-configurationfields are:xvnc(default:tigervnc-server) (type: file-like)The package that provides the Xvnc binary.
display-number(default:0) (type: number)The display number used by Xvnc. You should set this to a number not already used a Xorg server.
geometry(default:"1024x768") (type: string)The size of the desktop to be created.
depth(default:24) (type: color-depth)The pixel depth in bits of the desktop to be created. Accepted values are 16, 24 or 32.
port(type: maybe-port)The port on which to listen for connections from viewers. When left unspecified, it defaults to 5900 plus the display number.
ipv4?(default:#t) (type: boolean)Use IPv4 for incoming and outgoing connections.
ipv6?(default:#t) (type: boolean)Use IPv6 for incoming and outgoing connections.
password-file(type: maybe-string)The password file to use, if any. Refer to vncpasswd(1) to learn how to generate such a file.
xdmcp?(default:#f) (type: boolean)Query the XDMCP server for a session. This enables users to log in a desktop session from the login manager screen. For a multiple users scenario, you’ll want to enable the
inetd?option as well, so that each connection to the VNC server is handled separately rather than shared.inetd?(default:#f) (type: boolean)Use an Inetd-style service, which runs the Xvnc server on demand.
frame-rate(default:60) (type: number)The maximum number of updates per second sent to each client.
security-types(default:'("None")) (type: security-types)The allowed security schemes to use for incoming connections. The default is "None", which is safe given that Xvnc is configured to authenticate the user via the display manager, and only for local connections. Accepted values are any of the following: ("None" "VncAuth" "Plain" "TLSNone" "TLSVnc" "TLSPlain" "X509None" "X509Vnc")
localhost?(default:#t) (type: boolean)Only allow connections from the same machine. It is set to #true by default for security, which means SSH or another secure means should be used to expose the remote port.
log-level(default:30) (type: log-level)The log level, a number between 0 and 100, 100 meaning most verbose output. The log messages are output to syslog.
extra-options(default:'()) (type: strings)This can be used to provide extra Xvnc options not exposed via this <xvnc-configuration> record.
Próximo: Sistema de arquivos de rede, Anterior: VNC Services, Acima: Serviços [Conteúdo][Índice]
11.10.24 Serviços VPN
The (gnu services vpn) module provides services related to
virtual private networks (VPNs).
Bitmask
- Variável: bitmask-service-type
A service type for the Bitmask VPN client. It makes the client available in the system and loads its polkit policy. Please note that the client expects an active polkit-agent, which is either run by your desktop-environment or should be run manually.
OpenVPN
It provides a client service for your machine to connect to a VPN,
and a server service for your machine to host a VPN. Both
openvpn-client-service-type and openvpn-server-service-type
can be run simultaneously.
- Variável: openvpn-client-service-type
Type of the service that runs
openvpn, a VPN daemon, as a client.The value for this service is a
<openvpn-client-configuration>object.
- Variável: openvpn-server-service-type
Type of the service that runs
openvpn, a VPN daemon, as a server.The value for this service is a
<openvpn-server-configuration>object.
- Tipo de dados: openvpn-client-configuration
Available
openvpn-client-configurationfields are:openvpn(default:openvpn) (type: file-like)The OpenVPN package.
pid-file(default:"/var/run/openvpn/openvpn.pid") (type: string)The OpenVPN pid file.
proto(default:udp) (type: proto)The protocol (UDP or TCP) used to open a channel between clients and servers.
dev(default:tun) (type: dev)The device type used to represent the VPN connection.
ca(default:"/etc/openvpn/ca.crt") (type: maybe-string)The certificate authority to check connections against.
cert(default:"/etc/openvpn/client.crt") (type: maybe-string)The certificate of the machine the daemon is running on. It should be signed by the authority given in
ca.key(default:"/etc/openvpn/client.key") (type: maybe-string)The key of the machine the daemon is running on. It must be the key whose certificate is
cert.comp-lzo?(default:#t) (type: boolean)Whether to use the lzo compression algorithm.
persist-key?(default:#t) (type: boolean)Don’t re-read key files across SIGUSR1 or –ping-restart.
persist-tun?(default:#t) (type: boolean)Don’t close and reopen TUN/TAP device or run up/down scripts across SIGUSR1 or –ping-restart restarts.
fast-io?(default:#f) (type: boolean)(Experimental) Optimize TUN/TAP/UDP I/O writes by avoiding a call to poll/epoll/select prior to the write operation.
verbosity(default:3) (type: number)Verbosity level.
tls-auth(default:#f) (type: tls-auth-client)Add an additional layer of HMAC authentication on top of the TLS control channel to protect against DoS attacks.
auth-user-pass(type: maybe-string)Authenticate with server using username/password. The option is a file containing username/password on 2 lines. Do not use a file-like object as it would be added to the store and readable by any user.
verify-key-usage?(default:#t) (type: key-usage)Whether to check the server certificate has server usage extension.
bind?(default:#f) (type: bind)Bind to a specific local port number.
resolv-retry?(default:#t) (type: resolv-retry)Retry resolving server address.
remote(default:'()) (type: openvpn-remote-list)A list of remote servers to connect to.
- Tipo de dados: openvpn-remote-configuration
Available
openvpn-remote-configurationfields are:name(default:"my-server") (type: string)Nome do servidor.
port(default:1194) (type: number)Port number the server listens to.
- Tipo de dados: openvpn-server-configuration
Available
openvpn-server-configurationfields are:openvpn(default:openvpn) (type: file-like)The OpenVPN package.
pid-file(default:"/var/run/openvpn/openvpn.pid") (type: string)The OpenVPN pid file.
proto(default:udp) (type: proto)The protocol (UDP or TCP) used to open a channel between clients and servers.
dev(default:tun) (type: dev)The device type used to represent the VPN connection.
ca(default:"/etc/openvpn/ca.crt") (type: maybe-string)The certificate authority to check connections against.
cert(default:"/etc/openvpn/client.crt") (type: maybe-string)The certificate of the machine the daemon is running on. It should be signed by the authority given in
ca.key(default:"/etc/openvpn/client.key") (type: maybe-string)The key of the machine the daemon is running on. It must be the key whose certificate is
cert.comp-lzo?(default:#t) (type: boolean)Whether to use the lzo compression algorithm.
persist-key?(default:#t) (type: boolean)Don’t re-read key files across SIGUSR1 or –ping-restart.
persist-tun?(default:#t) (type: boolean)Don’t close and reopen TUN/TAP device or run up/down scripts across SIGUSR1 or –ping-restart restarts.
fast-io?(default:#f) (type: boolean)(Experimental) Optimize TUN/TAP/UDP I/O writes by avoiding a call to poll/epoll/select prior to the write operation.
verbosity(default:3) (type: number)Verbosity level.
tls-auth(default:#f) (type: tls-auth-server)Add an additional layer of HMAC authentication on top of the TLS control channel to protect against DoS attacks.
port(default:1194) (type: number)Specifies the port number on which the server listens.
server(default:"10.8.0.0 255.255.255.0") (type: ip-mask)An ip and mask specifying the subnet inside the virtual network.
server-ipv6(default:#f) (type: cidr6)A CIDR notation specifying the IPv6 subnet inside the virtual network.
dh(default:"/etc/openvpn/dh2048.pem") (type: string)The Diffie-Hellman parameters file.
ifconfig-pool-persist(default:"/etc/openvpn/ipp.txt") (type: string)The file that records client IPs.
redirect-gateway?(default:#f) (type: gateway)When true, the server will act as a gateway for its clients.
client-to-client?(default:#f) (type: boolean)When true, clients are allowed to talk to each other inside the VPN.
keepalive(default:(10 120)) (type: keepalive)Causes ping-like messages to be sent back and forth over the link so that each side knows when the other side has gone down.
keepaliverequires a pair. The first element is the period of the ping sending, and the second element is the timeout before considering the other side down.max-clients(default:100) (type: number)The maximum number of clients.
status(default:"/var/run/openvpn/status") (type: string)The status file. This file shows a small report on current connection. It is truncated and rewritten every minute.
client-config-dir(default:'()) (type: openvpn-ccd-list)The list of configuration for some clients.
strongSwan
Currently, the strongSwan service only provides legacy-style configuration with ipsec.conf and ipsec.secrets files.
- Variável: strongswan-service-type
A service type for configuring strongSwan for IPsec VPN (Virtual Private Networking). Its value must be a
strongswan-configurationrecord as in this example:(service strongswan-service-type (strongswan-configuration (ipsec-conf "/etc/ipsec.conf") (ipsec-secrets "/etc/ipsec.secrets")))
- Tipo de dados: strongswan-configuration
Data type representing the configuration of the StrongSwan service.
strongswanThe strongSwan package to use for this service.
ipsec-conf(default:#f)The file name of your ipsec.conf. If not
#f, then this andipsec-secretsmust both be strings.ipsec-secrets(default#f)The file name of your ipsec.secrets. If not
#f, then this andipsec-confmust both be strings.
Wireguard
- Variável: wireguard-service-type
A service type for a Wireguard tunnel interface. Its value must be a
wireguard-configurationrecord as in this example:(service wireguard-service-type (wireguard-configuration (peers (list (wireguard-peer (name "my-peer") (endpoint "my.wireguard.com:51820") (public-key "hzpKg9X1yqu1axN6iJp0mWf6BZGo8m1wteKwtTmDGF4=") (allowed-ips '("10.0.0.2/32")))))))
- Tipo de dados: wireguard-configuration
Data type representing the configuration of the Wireguard service.
wireguardThe wireguard package to use for this service.
interface(default:"wg0")The interface name for the VPN.
addresses(default:'("10.0.0.1/32"))List of strings or G-expressions which represent the IP addresses to be assigned to the above interface.
port(padrão:51820)The port on which to listen for incoming connections.
dns(default:'()))List of strings or G-expressions which represent the DNS server(s) to announce to VPN clients via DHCP.
monitor-ips?(default:#f) ¶-
Whether to monitor the resolved Internet addresses (IPs) of the endpoints of the configured peers, resetting the peer endpoints using an IP address that no longer correspond to their freshly resolved host name. Set this to
#tif one or more endpoints use host names provided by a dynamic DNS service to keep the sessions alive. monitor-ips-interval(default:'(next-minute (range 0 60 5)))The time interval at which the IP monitoring job should run, provided as an mcron time specification (veja (mcron)Guile Syntax).
private-key(default:"/etc/wireguard/private.key")The private key file for the interface. It is automatically generated if the file does not exist. If this field is
#f, a private key is not automatically created and the path is not serialized to the configuration file.bootstrap-private-key?(default:#t)Whether or not the private key should be generated automatically if it does not exist.
Setting this to
#fallows one to set the private key using command substitution. One example shown in thewg-quick(8)manual is retrieving a private key usingpassword-store. This can be achieved with the following code:(wireguard-configuration (private-key #~(string-append "<(" #$(file-append password-store "/bin/pass") ;; Wireguard replaces %i with the interface name. " WireGuard/private-keys/%i)")))peers(default:'())The authorized peers on this interface. This is a list of wireguard-peer records.
pre-up(default:'())List of strings or G-expressions. These are script snippets which will be executed before setting up the interface.
post-up(default:'())List of strings or G-expressions. These are script snippets which will be executed after setting up the interface.
pre-down(default:'())List of strings or G-expressions. These are script snippets which will be executed before tearing down the interface.
post-down(default:'())List of strings or G-expressions. These are script snippets which will be executed after tearing down the interface.
table(default:"auto")The routing table to which routes are added, as a string. There are two special values:
"off"that disables the creation of routes altogether, and"auto"(the default) that adds routes to the default table and enables special handling of default routes.auto-start?(default:#t")Whether the Wireguard network should be started automatically by the Shepherd. If it is
#fthe service has to be started manually withherd start wireguard-$interface(for example:herd start wireguard-wg0).
- Tipo de dados: wireguard-peer
Data type representing a Wireguard peer attached to a given interface.
nameThe peer name.
endpoint(default:#f)The optional endpoint for the peer, such as
"demo.wireguard.com:51820".public-keyThe peer public-key represented as a base64 string.
preshared-key(default:#f)An optional pre-shared key file for this peer that can be either a string or a G-expression. The given file will not be autogenerated.
allowed-ipsA list of IP addresses from which incoming traffic for this peer is allowed and to which incoming traffic for this peer is directed.
keep-alive(default:#f)An optional time interval in seconds. A packet will be sent to the server endpoint once per time interval. This helps receiving incoming connections from this peer when you are behind a NAT or a firewall.
Próximo: Samba Services, Anterior: Serviços VPN, Acima: Serviços [Conteúdo][Índice]
11.10.25 Sistema de arquivos de rede
The (gnu services nfs) module provides the following services, which
are most commonly used in relation to mounting or exporting directory trees
as network file systems (NFS).
While it is possible to use the individual components that together make up
a Network File System service, we recommended to configure an NFS server
with the nfs-service-type.
NFS Service
The NFS service takes care of setting up all NFS component services, kernel configuration file systems, and installs configuration files in the locations that NFS expects.
- Variável: nfs-service-type
A service type for a complete NFS server.
- Tipo de dados: nfs-configuration
This data type represents the configuration of the NFS service and all of its subsystems.
It has the following parameters:
nfs-utils(default:nfs-utils)The nfs-utils package to use.
nfs-versions(default:'("4.2" "4.1" "4.0"))If a list of string values is provided, the
rpc.nfsddaemon will be limited to supporting the given versions of the NFS protocol.exports(default:'())This is a list of directories the NFS server should export. Each entry is a list consisting of two elements: a directory name and a string containing all options. This is an example in which the directory /export is served to all NFS clients as a read-only share:
(nfs-configuration (exports '(("/export" "*(ro,insecure,no_subtree_check,crossmnt,fsid=0)"))))rpcmountd-port(default:#f)The network port that the
rpc.mountddaemon should use.rpcstatd-port(default:#f)The network port that the
rpc.statddaemon should use.rpcbind(default:rpcbind)The rpcbind package to use.
idmap-domain(default:"localdomain")The local NFSv4 domain name.
nfsd-port(default:2049)The network port that the
nfsddaemon should use.nfsd-threads(default:8)The number of threads used by the
nfsddaemon.nfsd-tcp?(default:#t)Whether the
nfsddaemon should listen on a TCP socket.nfsd-udp?(default:#f)Whether the
nfsddaemon should listen on a UDP socket.pipefs-directory(default:"/var/lib/nfs/rpc_pipefs")The directory where the pipefs file system is mounted.
debug(default:'()")A list of subsystems for which debugging output should be enabled. This is a list of symbols. Any of these symbols are valid:
nfsd,nfs,rpc,idmap,statd, ormountd.
If you don’t need a complete NFS service or prefer to build it yourself you can use the individual component services that are documented below.
RPC Bind Service
The RPC Bind service provides a facility to map program numbers into universal addresses. Many NFS related services use this facility. Hence it is automatically started when a dependent service starts.
- Variável: rpcbind-service-type
A service type for the RPC portmapper daemon.
- Tipo de dados: rpcbind-configuration
Data type representing the configuration of the RPC Bind Service. This type has the following parameters:
rpcbind(default:rpcbind)The rpcbind package to use.
warm-start?(default:#t)If this parameter is
#t, then the daemon will read a state file on startup thus reloading state information saved by a previous instance.
Pipefs Pseudo File System
The pipefs file system is used to transfer NFS related data between the kernel and user space programs.
- Variável: pipefs-service-type
A service type for the pipefs pseudo file system.
- Tipo de dados: pipefs-configuration
Data type representing the configuration of the pipefs pseudo file system service. This type has the following parameters:
mount-point(default:"/var/lib/nfs/rpc_pipefs")The directory to which the file system is to be attached.
GSS Daemon Service
The global security system (GSS) daemon provides strong security for
RPC based protocols. Before exchanging RPC requests an RPC client must
establish a security context. Typically this is done using the Kerberos
command kinit or automatically at login time using PAM services
(veja Serviços Kerberos).
- Variável: gss-service-type
A service type for the Global Security System (GSS) daemon.
- Tipo de dados: gss-configuration
Data type representing the configuration of the GSS daemon service. This type has the following parameters:
nfs-utils(default:nfs-utils)The package in which the
rpc.gssdcommand is to be found.pipefs-directory(default:"/var/lib/nfs/rpc_pipefs")The directory where the pipefs file system is mounted.
IDMAP Daemon Service
The idmap daemon service provides mapping between user IDs and user names. Typically it is required in order to access file systems mounted via NFSv4.
- Variável: idmap-service-type
A service type for the Identity Mapper (IDMAP) daemon.
- Tipo de dados: idmap-configuration
Data type representing the configuration of the IDMAP daemon service. This type has the following parameters:
nfs-utils(default:nfs-utils)The package in which the
rpc.idmapdcommand is to be found.pipefs-directory(default:"/var/lib/nfs/rpc_pipefs")The directory where the pipefs file system is mounted.
domain(padrão:#f)The local NFSv4 domain name. This must be a string or
#f. If it is#fthen the daemon will use the host’s fully qualified domain name.verbosity(default:0)The verbosity level of the daemon.
Próximo: Integração Contínua, Anterior: Sistema de arquivos de rede, Acima: Serviços [Conteúdo][Índice]
11.10.26 Samba Services
The (gnu services samba) module provides service definitions for
Samba as well as additional helper services. Currently it provides the
following services.
Samba
Samba provides network shares for folders and printers using the SMB/CIFS protocol commonly used on Windows. It can also act as an Active Directory Domain Controller (AD DC) for other hosts in an heterougenious network with different types of Computer systems.
- Variável: samba-service-type
-
The service type to enable the samba services
samba,nmbd,smbdandwinbindd. By default this service type does not run any of the Samba daemons; they must be enabled individually.Below is a basic example that configures a simple, anonymous (unauthenticated) Samba file share exposing the /public directory.
Tip: The /public directory and its contents must be world readable/writable, so you’ll want to run ‘chmod -R 777 /public’ on it.
Caution: Such a Samba configuration should only be used in controlled environments, and you should not share any private files using it, as anyone connecting to your network would be able to access them.
(service samba-service-type (samba-configuration (enable-smbd? #t) (config-file (plain-file "smb.conf" "\ [global] map to guest = Bad User logging = syslog@1 [public] browsable = yes path = /public read only = no guest ok = yes guest only = yes\n"))))
- Tipo de dados: samba-service-configuration
Configuration record for the Samba suite.
package(default:samba)The samba package to use.
config-file(default:#f)The config file to use. To learn about its syntax, run ‘man smb.conf’.
enable-samba?(default:#f)Enable the
sambadaemon.enable-smbd?(default:#f)Enable the
smbddaemon.enable-nmbd?(default:#f)Enable the
nmbddaemon.enable-winbindd?(default:#f)Enable the
winbindddaemon.
Daemon de Descoberta de Serviço da Web
The WSDD (Web Service Discovery daemon) implements the Web Services Dynamic Discovery protocol that enables host discovery over Multicast DNS, similar to what Avahi does. It is a drop-in replacement for SMB hosts that have had SMBv1 disabled for security reasons.
- Variável: wsdd-service-type
Service type for the WSD host daemon. The value for this service type is a
wsdd-configurationrecord. The details for thewsdd-configurationrecord type are given below.
- Tipo de dados: wsdd-configuration
This data type represents the configuration for the wsdd service.
package(default:wsdd)The wsdd package to use.
ipv4only?(default:#f)Only listen to IPv4 addresses.
ipv6only(default:#f)Only listen to IPv6 addresses. Please note: Activating both options is not possible, since there would be no IP versions to listen to.
chroot(default:#f)Chroot into a separate directory to prevent access to other directories. This is to increase security in case there is a vulnerability in
wsdd.hop-limit(default:1)Limit to the level of hops for multicast packets. The default is 1 which should prevent packets from leaving the local network.
interface(default:'())Limit to the given list of interfaces to listen to. By default wsdd will listen to all interfaces. Except the loopback interface is never used.
uuid-device(default:#f)The WSD protocol requires a device to have a UUID. Set this to manually assign the service a UUID.
domain(padrão:#f)Notify this host is a member of an Active Directory.
host-name(padrão:#f)Manually set the hostname rather than letting
wsddinherit this host’s hostname. Only the host name part of a possible FQDN will be used in the default case.preserve-case?(default:#f)By default
wsddwill convert the hostname in workgroup to all uppercase. The opposite is true for hostnames in domains. Setting this parameter will preserve case.workgroup(default: "WORKGROUP")Change the name of the workgroup. By default
wsddreports this host being member of a workgroup.
Próximo: Serviços de gerenciamento de energia, Anterior: Samba Services, Acima: Serviços [Conteúdo][Índice]
11.10.27 Integração Contínua
Cuirass is a continuous integration tool for Guix. It can be used both for development and for providing substitutes to others (veja Substitutos).
The (gnu services cuirass) module provides the following service.
- Procedure: cuirass-service-type
The type of the Cuirass service. Its value must be a
cuirass-configurationobject, as described below.
To add build jobs, you have to set the specifications field of the
configuration. For instance, the following example will build all the
packages provided by the my-channel channel.
(define %cuirass-specs #~(list (specification (name 'my-channel) (build '(channels my-channel)) (channels (cons (channel (name 'my-channel) (url "https://my-channel.git")) %default-channels))))) (service cuirass-service-type (cuirass-configuration (specifications %cuirass-specs)))
To build the linux-libre package defined by the default Guix channel,
one can use the following configuration.
(define %cuirass-specs #~(list (specification (name 'my-linux) (build '(packages "linux-libre"))))) (service cuirass-service-type (cuirass-configuration (specifications %cuirass-specs)))
The other configuration possibilities, as well as the specification record itself are described in the Cuirass manual (veja Specifications em Cuirass).
While information related to build jobs is located directly in the
specifications, global settings for the cuirass process are
accessible in other cuirass-configuration fields.
- Tipo de dados: cuirass-configuration
Data type representing the configuration of Cuirass.
cuirass(default:cuirass)The Cuirass package to use.
log-file(default:"/var/log/cuirass.log")Location of the log file.
web-log-file(default:"/var/log/cuirass-web.log")Location of the log file used by the web interface.
cache-directory(default:"/var/cache/cuirass")Location of the repository cache.
user(default:"cuirass")Owner of the
cuirassprocess.group(default:"cuirass")Owner’s group of the
cuirassprocess.interval(default:60)Number of seconds between the poll of the repositories followed by the Cuirass jobs.
ttl(default:2592000)Duration to keep build results’ GC roots alive, in seconds.
build-expiry(default: 4 months)Duration in seconds after which pending builds are canceled. This helps ensure that the backlog does not grow indefinitely.
threads(default:#f)Number of kernel threads to use for Cuirass. The default value should be appropriate for most cases.
parameters(default:#f)Read parameters from the given parameters file. The supported parameters are described here (veja Parameters em Cuirass).
remote-server(default:#f)A
cuirass-remote-server-configurationrecord to use the build remote mechanism or#fto use the default build mechanism.database(default:"dbname=cuirass host=/var/run/postgresql")Use database as the database containing the jobs and the past build results. Since Cuirass uses PostgreSQL as a database engine, database must be a string such as
"dbname=cuirass host=localhost".port(padrão:8081)Port number used by the HTTP server.
host(default:"localhost")Listen on the network interface for host. The default is to accept connections from localhost.
specifications(default:#~'())A gexp (veja Expressões-G) that evaluates to a list of specifications records. The specification record is described in the Cuirass manual (veja Specifications em Cuirass).
one-shot?(default:#f)Only evaluate specifications and build derivations once.
fallback?(padrão:#f)When substituting a pre-built binary fails, fall back to building packages locally.
extra-options(default:'())Extra options to pass when running the
cuirass registerprocess.web-extra-options(default:'())Extra options to pass when running the
cuirass webprocess.
Cuirass remote building
Cuirass supports two mechanisms to build derivations.
- Using the local Guix daemon. This is the default build mechanism. Once the build jobs are evaluated, they are sent to the local Guix daemon. Cuirass then listens to the Guix daemon output to detect the various build events.
- Using the remote build mechanism. The build jobs are not submitted to the local Guix daemon. Instead, a remote server dispatches build requests to the connect remote workers, according to the build priorities.
To enable this build mode a cuirass-remote-server-configuration
record must be passed as remote-server argument of the
cuirass-configuration record. The
cuirass-remote-server-configuration record is described below.
This build mode scales way better than the default build mode. This is the build mode that is used on the GNU Guix build farm at https://ci.guix.gnu.org. It should be preferred when using Cuirass to build large amount of packages.
- Tipo de dados: cuirass-remote-server-configuration
Data type representing the configuration of the Cuirass remote-server.
backend-port(default:5555)The TCP port for communicating with
remote-workerprocesses using ZMQ. It defaults to5555.log-port(default:5556)The TCP port of the log server. It defaults to
5556.publish-port(default:5557)The TCP port of the publish server. It defaults to
5557.log-file(default:"/var/log/cuirass-remote-server.log")Location of the log file.
cache(default:"/var/cache/cuirass/remote")Use cache directory to cache build log files.
log-expiry(default: 6 months)The duration in seconds after which build logs collected by
cuirass remote-workermay be deleted.trigger-url(default:#f)Once a substitute is successfully fetched, trigger substitute baking at trigger-url.
publish?(padrão:#t)If set to false, do not start a publish server and ignore the
publish-portargument. This can be useful if there is already a standalone publish server standing next to the remote server.public-keyprivate-keyUse the specific files as the public/private key pair used to sign the store items being published.
At least one remote worker must also be started on any machine of the local network to actually perform the builds and report their status.
- Tipo de dados: cuirass-remote-worker-configuration
Data type representing the configuration of the Cuirass remote-worker.
cuirass(default:cuirass)The Cuirass package to use.
workers(default:1)Start workers parallel workers.
server(default:#f)Do not use Avahi discovery and connect to the given
serverIP address instead.systems(default:(list (%current-system)))Only request builds for the given systems.
log-file(default:"/var/log/cuirass-remote-worker.log")Location of the log file.
publish-port(default:5558)The TCP port of the publish server. It defaults to
5558.substitute-urls(default:%default-substitute-urls)The list of URLs where to look for substitutes by default.
public-keyprivate-keyUse the specific files as the public/private key pair used to sign the store items being published.
Laminar
Laminar is a lightweight and modular Continuous Integration service. It doesn’t have a configuration web UI instead uses version-controllable configuration files and scripts.
Laminar encourages the use of existing tools such as bash and cron instead of reinventing them.
- Variável: laminar-service-type
The type of the Laminar service. Its value must be a
laminar-configurationobject, as described below.All configuration values have defaults, a minimal configuration to get Laminar running is shown below. By default, the web interface is available on port 8080.
(service laminar-service-type)
- Tipo de dados: laminar-configuration
Data type representing the configuration of Laminar.
laminar(default:laminar)The Laminar package to use.
home-directory(default:"/var/lib/laminar")The directory for job configurations and run directories.
supplementary-groups(default:())Supplementary groups for the Laminar user account.
bind-http(default:"*:8080")The interface/port or unix socket on which laminard should listen for incoming connections to the web frontend.
bind-rpc(default:"unix-abstract:laminar")The interface/port or unix socket on which laminard should listen for incoming commands such as build triggers.
title(default:"Laminar")The page title to show in the web frontend.
keep-rundirs(default:0)Set to an integer defining how many rundirs to keep per job. The lowest-numbered ones will be deleted. The default is 0, meaning all run dirs will be immediately deleted.
archive-url(default:#f)The web frontend served by laminard will use this URL to form links to artefacts archived jobs.
base-url(default:#f)Base URL to use for links to laminar itself.
Próximo: Serviços de áudio, Anterior: Integração Contínua, Acima: Serviços [Conteúdo][Índice]
11.10.28 Serviços de gerenciamento de energia
Power Profiles Daemon
The (gnu services pm) module provides a Guix service definition for
the Linux Power Profiles Daemon, which makes power profiles handling
available over D-Bus.
The available profiles consist of the default ‘balanced’ mode, a ‘power-saver’ mode and on supported systems a ‘performance’ mode.
Importante: The
power-profiles-daemonconflicts with other power management tools liketlp. Using both together is not recommended.
- Variável: power-profiles-daemon-service-type
This is the service type for the Power Profiles Daemon. The value for this service is a
power-profiles-daemon-configuration.To enable the Power Profiles Daemon with default configuration add this line to your services:
(service power-profiles-daemon-service-type)
- Tipo de dados: power-profiles-daemon-configuration
Data type representing the configuration of
power-profiles-daemon-service-type.power-profiles-daemon(default:power-profiles-daemon) (type: file-like)Package object of power-profiles-daemon.
TLP daemon
The (gnu services pm) module provides a Guix service definition for
the Linux power management tool TLP.
TLP enables various powersaving modes in userspace and kernel. Contrary to
upower-service, it is not a passive, monitoring tool, as it will
apply custom settings each time a new power source is detected. More
information can be found at TLP
home page.
- Variável: tlp-service-type
The service type for the TLP tool. The default settings are optimised for battery life on most systems, but you can tweak them to your heart’s content by adding a valid
tlp-configuration:(service tlp-service-type (tlp-configuration (cpu-scaling-governor-on-ac (list "performance")) (sched-powersave-on-bat? #t)))
Each parameter definition is preceded by its type; for example,
‘boolean foo’ indicates that the foo parameter should be
specified as a boolean. Types starting with maybe- denote parameters
that won’t show up in TLP config file when their value is left unset, or is
explicitly set to the %unset-value value.
Available tlp-configuration fields are:
tlp-configurationparameter: package tlp ¶The TLP package.
tlp-configurationparameter: boolean tlp-enable? ¶Set to true if you wish to enable TLP.
Defaults to ‘#t’.
tlp-configurationparameter: string tlp-default-mode ¶Default mode when no power supply can be detected. Alternatives are AC and BAT.
Defaults to ‘"AC"’.
tlp-configurationparameter: non-negative-integer disk-idle-secs-on-ac ¶Number of seconds Linux kernel has to wait after the disk goes idle, before syncing on AC.
Defaults to ‘0’.
tlp-configurationparameter: non-negative-integer disk-idle-secs-on-bat ¶Same as
disk-idle-acbut on BAT mode.Defaults to ‘2’.
tlp-configurationparameter: non-negative-integer max-lost-work-secs-on-ac ¶Dirty pages flushing periodicity, expressed in seconds.
Defaults to ‘15’.
tlp-configurationparameter: non-negative-integer max-lost-work-secs-on-bat ¶Same as
max-lost-work-secs-on-acbut on BAT mode.Defaults to ‘60’.
tlp-configurationparameter: maybe-space-separated-string-list cpu-scaling-governor-on-ac ¶CPU frequency scaling governor on AC mode. With intel_pstate driver, alternatives are powersave and performance. With acpi-cpufreq driver, alternatives are ondemand, powersave, performance and conservative.
Defaults to ‘disabled’.
tlp-configurationparameter: maybe-space-separated-string-list cpu-scaling-governor-on-bat ¶Same as
cpu-scaling-governor-on-acbut on BAT mode.Defaults to ‘disabled’.
tlp-configurationparameter: maybe-non-negative-integer cpu-scaling-min-freq-on-ac ¶Set the min available frequency for the scaling governor on AC.
Defaults to ‘disabled’.
tlp-configurationparameter: maybe-non-negative-integer cpu-scaling-max-freq-on-ac ¶Set the max available frequency for the scaling governor on AC.
Defaults to ‘disabled’.
tlp-configurationparameter: maybe-non-negative-integer cpu-scaling-min-freq-on-bat ¶Set the min available frequency for the scaling governor on BAT.
Defaults to ‘disabled’.
tlp-configurationparameter: maybe-non-negative-integer cpu-scaling-max-freq-on-bat ¶Set the max available frequency for the scaling governor on BAT.
Defaults to ‘disabled’.
tlp-configurationparameter: maybe-non-negative-integer cpu-min-perf-on-ac ¶Limit the min P-state to control the power dissipation of the CPU, in AC mode. Values are stated as a percentage of the available performance.
Defaults to ‘disabled’.
tlp-configurationparameter: maybe-non-negative-integer cpu-max-perf-on-ac ¶Limit the max P-state to control the power dissipation of the CPU, in AC mode. Values are stated as a percentage of the available performance.
Defaults to ‘disabled’.
tlp-configurationparameter: maybe-non-negative-integer cpu-min-perf-on-bat ¶Same as
cpu-min-perf-on-acon BAT mode.Defaults to ‘disabled’.
tlp-configurationparameter: maybe-non-negative-integer cpu-max-perf-on-bat ¶Same as
cpu-max-perf-on-acon BAT mode.Defaults to ‘disabled’.
tlp-configurationparameter: maybe-boolean cpu-boost-on-ac? ¶Enable CPU turbo boost feature on AC mode.
Defaults to ‘disabled’.
tlp-configurationparameter: maybe-boolean cpu-boost-on-bat? ¶Same as
cpu-boost-on-ac?on BAT mode.Defaults to ‘disabled’.
tlp-configurationparameter: boolean sched-powersave-on-ac? ¶Allow Linux kernel to minimize the number of CPU cores/hyper-threads used under light load conditions.
Defaults to ‘#f’.
tlp-configurationparameter: boolean sched-powersave-on-bat? ¶Same as
sched-powersave-on-ac?but on BAT mode.Defaults to ‘#t’.
tlp-configurationparameter: boolean nmi-watchdog? ¶Enable Linux kernel NMI watchdog.
Defaults to ‘#f’.
tlp-configurationparameter: maybe-string phc-controls ¶For Linux kernels with PHC patch applied, change CPU voltages. An example value would be ‘"F:V F:V F:V F:V"’.
Defaults to ‘disabled’.
tlp-configurationparameter: string energy-perf-policy-on-ac ¶Set CPU performance versus energy saving policy on AC. Alternatives are performance, normal, powersave.
Defaults to ‘"performance"’.
tlp-configurationparameter: string energy-perf-policy-on-bat ¶Same as
energy-perf-policy-acbut on BAT mode.Defaults to ‘"powersave"’.
tlp-configurationparameter: space-separated-string-list disks-devices ¶Hard disk devices.
tlp-configurationparameter: space-separated-string-list disk-apm-level-on-ac ¶Hard disk advanced power management level.
tlp-configurationparameter: space-separated-string-list disk-apm-level-on-bat ¶Same as
disk-apm-batbut on BAT mode.
tlp-configurationparameter: maybe-space-separated-string-list disk-spindown-timeout-on-ac ¶Hard disk spin down timeout. One value has to be specified for each declared hard disk.
Defaults to ‘disabled’.
tlp-configurationparameter: maybe-space-separated-string-list disk-spindown-timeout-on-bat ¶Same as
disk-spindown-timeout-on-acbut on BAT mode.Defaults to ‘disabled’.
tlp-configurationparameter: maybe-space-separated-string-list disk-iosched ¶Select IO scheduler for disk devices. One value has to be specified for each declared hard disk. Example alternatives are cfq, deadline and noop.
Defaults to ‘disabled’.
tlp-configurationparameter: string sata-linkpwr-on-ac ¶SATA aggressive link power management (ALPM) level. Alternatives are min_power, medium_power, max_performance.
Defaults to ‘"max_performance"’.
tlp-configurationparameter: string sata-linkpwr-on-bat ¶Same as
sata-linkpwr-acbut on BAT mode.Defaults to ‘"min_power"’.
tlp-configurationparameter: maybe-string sata-linkpwr-blacklist ¶Exclude specified SATA host devices for link power management.
Defaults to ‘disabled’.
tlp-configurationparameter: maybe-on-off-boolean ahci-runtime-pm-on-ac? ¶Enable Runtime Power Management for AHCI controller and disks on AC mode.
Defaults to ‘disabled’.
tlp-configurationparameter: maybe-on-off-boolean ahci-runtime-pm-on-bat? ¶Same as
ahci-runtime-pm-on-acon BAT mode.Defaults to ‘disabled’.
tlp-configurationparameter: non-negative-integer ahci-runtime-pm-timeout ¶Seconds of inactivity before disk is suspended.
Defaults to ‘15’.
tlp-configurationparameter: string pcie-aspm-on-ac ¶PCI Express Active State Power Management level. Alternatives are default, performance, powersave.
Defaults to ‘"performance"’.
tlp-configurationparameter: string pcie-aspm-on-bat ¶Same as
pcie-aspm-acbut on BAT mode.Defaults to ‘"powersave"’.
tlp-configurationparameter: maybe-non-negative-integer start-charge-thresh-bat0 ¶Percentage when battery 0 should begin charging. Only supported on some laptops.
Defaults to ‘disabled’.
tlp-configurationparameter: maybe-non-negative-integer stop-charge-thresh-bat0 ¶Percentage when battery 0 should stop charging. Only supported on some laptops.
Defaults to ‘disabled’.
tlp-configurationparameter: maybe-non-negative-integer start-charge-thresh-bat1 ¶Percentage when battery 1 should begin charging. Only supported on some laptops.
Defaults to ‘disabled’.
tlp-configurationparameter: maybe-non-negative-integer stop-charge-thresh-bat1 ¶Percentage when battery 1 should stop charging. Only supported on some laptops.
Defaults to ‘disabled’.
tlp-configurationparameter: string radeon-power-profile-on-ac ¶Radeon graphics clock speed level. Alternatives are low, mid, high, auto, default.
Defaults to ‘"high"’.
tlp-configurationparameter: string radeon-power-profile-on-bat ¶Same as
radeon-power-acbut on BAT mode.Defaults to ‘"low"’.
tlp-configurationparameter: string radeon-dpm-state-on-ac ¶Radeon dynamic power management method (DPM). Alternatives are battery, performance.
Defaults to ‘"performance"’.
tlp-configurationparameter: string radeon-dpm-state-on-bat ¶Same as
radeon-dpm-state-acbut on BAT mode.Defaults to ‘"battery"’.
tlp-configurationparameter: string radeon-dpm-perf-level-on-ac ¶Radeon DPM performance level. Alternatives are auto, low, high.
Defaults to ‘"auto"’.
tlp-configurationparameter: string radeon-dpm-perf-level-on-bat ¶Same as
radeon-dpm-perf-acbut on BAT mode.Defaults to ‘"auto"’.
tlp-configurationparameter: on-off-boolean wifi-pwr-on-ac? ¶Wifi power saving mode.
Defaults to ‘#f’.
tlp-configurationparameter: on-off-boolean wifi-pwr-on-bat? ¶Same as
wifi-power-ac?but on BAT mode.Defaults to ‘#t’.
tlp-configurationparameter: y-n-boolean wol-disable? ¶Disable wake on LAN.
Defaults to ‘#t’.
tlp-configurationparameter: non-negative-integer sound-power-save-on-ac ¶Timeout duration in seconds before activating audio power saving on Intel HDA and AC97 devices. A value of 0 disables power saving.
Defaults to ‘0’.
tlp-configurationparameter: non-negative-integer sound-power-save-on-bat ¶Same as
sound-powersave-acbut on BAT mode.Defaults to ‘1’.
tlp-configurationparameter: y-n-boolean sound-power-save-controller? ¶Disable controller in powersaving mode on Intel HDA devices.
Defaults to ‘#t’.
tlp-configurationparameter: boolean bay-poweroff-on-bat? ¶Enable optical drive in UltraBay/MediaBay on BAT mode. Drive can be powered on again by releasing (and reinserting) the eject lever or by pressing the disc eject button on newer models.
Defaults to ‘#f’.
tlp-configurationparameter: string bay-device ¶Name of the optical drive device to power off.
Defaults to ‘"sr0"’.
tlp-configurationparameter: string runtime-pm-on-ac ¶Runtime Power Management for PCI(e) bus devices. Alternatives are on and auto.
Defaults to ‘"on"’.
tlp-configurationparameter: string runtime-pm-on-bat ¶Same as
runtime-pm-acbut on BAT mode.Defaults to ‘"auto"’.
tlp-configurationparameter: boolean runtime-pm-all? ¶Runtime Power Management for all PCI(e) bus devices, except blacklisted ones.
Defaults to ‘#t’.
tlp-configurationparameter: maybe-space-separated-string-list runtime-pm-blacklist ¶Exclude specified PCI(e) device addresses from Runtime Power Management.
Defaults to ‘disabled’.
tlp-configurationparameter: space-separated-string-list runtime-pm-driver-blacklist ¶Exclude PCI(e) devices assigned to the specified drivers from Runtime Power Management.
tlp-configurationparameter: boolean usb-autosuspend? ¶Enable USB autosuspend feature.
Defaults to ‘#t’.
tlp-configurationparameter: maybe-string usb-blacklist ¶Exclude specified devices from USB autosuspend.
Defaults to ‘disabled’.
tlp-configurationparameter: boolean usb-blacklist-wwan? ¶Exclude WWAN devices from USB autosuspend.
Defaults to ‘#t’.
tlp-configurationparameter: maybe-string usb-whitelist ¶Include specified devices into USB autosuspend, even if they are already excluded by the driver or via
usb-blacklist-wwan?.Defaults to ‘disabled’.
tlp-configurationparameter: maybe-boolean usb-autosuspend-disable-on-shutdown? ¶Enable USB autosuspend before shutdown.
Defaults to ‘disabled’.
tlp-configurationparameter: boolean restore-device-state-on-startup? ¶Restore radio device state (bluetooth, wifi, wwan) from previous shutdown on system startup.
Defaults to ‘#f’.
tlp-configurationparameter: string cpu-energy-perf-policy-on-ac ¶Set CPU energy/performance policy when on AC mode. Possible values, in order of increasing power saving, are performance, balance_performance, default, balance_power and power.
tlp-configurationparameter: string cpu-energy-perf-policy-on-bat ¶Set CPU energy/performance policy when on BAT mode. Possible values, in order of increasing power saving, are performance, balance_performance, default, balance_power and power.
Thermald daemon
The (gnu services pm) module provides an interface to thermald, a CPU
frequency scaling service which helps prevent overheating.
- Variável: thermald-service-type
This is the service type for thermald, the Linux Thermal Daemon, which is responsible for controlling the thermal state of processors and preventing overheating.
- Tipo de dados: thermald-configuration
Data type representing the configuration of
thermald-service-type.adaptive?(default:#f)Use DPTF (Dynamic Power and Thermal Framework) adaptive tables when present.
ignore-cpuid-check?(default:#f)Ignore cpuid check for supported CPU models.
thermald(default: thermald)Package object of thermald.
PowerTOP
The
(gnu services pm)module also provides a service definition for PowerTOP, a power consumption analysis and tuning tool. When started, it tunes Linux kernel settings to reduce power consumption.- Variável: powertop-service-type
The service type for PowerTOP. No configuration is necessary. When the service starts, it executes
powertop --auto-tune.(service powertop-service-type)
Available
powertop-configurationfields are:powertop-configurationparameter: package powertop ¶The PowerTOP package. Defaults to
powertopin the(gnu packages linux)module
The (gnu services power) module provides a service definition for
apcupsd, a utility to interact with
APC (APC by Schneider Electric or formerly American Power
Conversion Corporation) UPS (Uninterruptible Power Supply)
devices. Apcupsd also works with some OEM (Original Equipment
Manufacturer)-branded products manufactured by APC.
- Variável: apcupsd-service-type
The service type for apcupsd. For USB UPSes no configuration is necessary, however tweaking some fields to better suit your needs might be desirable. The defaults are taken from the upstream configuration and they are not very conservative (for example, the default
battery-levelof 5% may be considered too low by some).The default event handlers do send emails, read more in apcupsd-event-handlers.
(service apcupsd-service-type)
- Data Type: apcupsd-configuration
-
Available
apcupsd-configurationfields are:apcupsd(default:apcupsd) (type: package)The
apcupsdpackage to use.shepherd-service-name(default:apcupsd) (type: symbol)The name of the shepherd service. You can add the service multiple times with different names to manage multiple UPSes.
auto-start?(default:#t) (type: boolean)Should the shepherd service auto-start?
pid-file(default:"/var/run/apcupsd.pid") (type: string)The file name of the pid file.
debug-level(default:0) (type: integer)The logging verbosity. Bigger number means more logs. The source code uses up to
300as debug level value, so a value of999seems reasonable to enable all the logs.run-dir(default:"/var/run/apcupsd") (type: string)The directory containing runtime information. You need to change this if you desire to run multiple instances of the daemon.
name(type: maybe-string)Use this to give your UPS a name in log files and such. This is particularly useful if you have multiple UPSes. This does not set the EEPROM. It should be 8 characters or less.
cable(default:usb) (type: enum-cable)The type of a cable connecting the UPS to your computer. Possible generic choices are
'simple,'smart,'etherand'usb.Alternatively, a specific cable model number may be used:
'940-0119A,'940-0127A,'940-0128A,'940-0020B,'940-0020C,'940-0023A,'940-0024B,'940-0024C,'940-1524C,'940-0024G,'940-0095A,'940-0095B,'940-0095C,'940-0625A,'M-04-02-2000.type(default:usb) (type: enum-type)The type of the UPS you have.
apcsmartNewer serial character device, appropriate for SmartUPS models using a serial cable (not an USB).
usbMost new UPSes are an USB.
netNetwork link to a master apcupsd through apcupsd’s Network Information Server. This is used if the UPS powering your computer is connected to a different computer for monitoring.
snmpSNMP network link to an SNMP-enabled UPS device.
netsnmpSame as the SNMP above but requires use of the net-snmp library. Unless you have a specific need for this old driver, you should use the
'snmpinstead.dumbAn old serial character device for use with simple-signaling UPSes.
pcnetA PowerChute Network Shutdown protocol which can be used as an alternative to an SNMP with the AP9617 family of smart slot cards.
modbusA serial device for use with newest SmartUPS models supporting the MODBUS protocol.
device(default:"") (type: string)For USB UPSes, usually you want to set this to an empty string (the default). For other UPS types, you must specify an appropriate port or address.
apcsmartSet to the appropriate /dev/tty** device.
usbA null string setting enables auto-detection, which is the best choice for most installations.
netSet to
hostname:port.snmpSet to
hostname:port:vendor:community. The hostname is the ip address or hostname of the UPS on the network. The vendor can be can be "APC" or "APC_NOTRAP". "APC_NOTRAP" will disable SNMP trap catching; you usually want "APC". The port is usually 161. The community is usually "private".netsnmpSame as the
'snmp.dumbSet to the appropriate /dev/tty** device.
pcnetSet to
ipaddr:username:passphrase:port. The ipaddr is the IP address of the UPS management card. The username and the passphrase are the credentials for which the card has been configured. The port is the port number on which to listen for messages from the UPS, normally 3052. If this parameter is empty or missing, the default of 3052 will be used.modbusSet to the appropriate /dev/tty** device. You can also leave it empty for MODBUS over USB or set to the serial number of the UPS.
poll-time(default:60) (type: integer)The interval (in seconds) at which apcupsd polls the UPS for status. This setting applies both to directly-attached UPSes (apcsmart, usb, dumb) and networked UPSes (net, snmp). Lowering this setting will improve the apcupsd’s responsiveness to certain events at the cost of higher CPU utilization.
on-batery-delay(default:6) (type: integer)The time in seconds from when a power failure is detected until we react to it with an onbattery event. The
'poweroutevent will be triggered immediately when a power failure is detected. However, the'onbatteryevent will be trigger only after this delay.battery-level(default:5) (type: integer)If during a power failure, the remaining battery percentage (as reported by the UPS) is below or equal to this value, the apcupsd will initiate a system shutdown.
Nota:
battery-level,remaining-minutes, andtimeoutwork in a conjunction, so the first that occurs will cause the initation of a shutdown.remaining-minutes(default:3) (type: integer)If during a power failure, the remaining runtime in minutes (as calculated internally by the UPS) is below or equal to this value, apcupsd will initiate a system shutdown.
Nota:
battery-level,remaining-minutes, andtimeoutwork in a conjunction, so the first that occurs will cause the initation of a shutdown.timeout(default:0) (type: integer)If during a power failure, the UPS has run on batteries for this many seconds or longer, apcupsd will initiate a system shutdown. The value of 0 disables this timer.
Nota:
battery-level,remaining-minutes, andtimeoutwork in a conjunction, so the first that occurs will cause the initation of a shutdown.annoy-interval(default:300) (type: integer)The time in seconds between annoying users (via the
'annoymeevent) to sign off prior to system shutdown. 0 disables.annoy-delay(default:60) (type: integer)The initial delay in seconds after a power failure before warning users to get off the system.
no-logon(default:disable) (type: enum-no-logon)The condition which determines when users are prevented from logging in during a power failure.
kill-delay(default:0) (type: integer)If this is non-zero, the apcupsd will continue running after a shutdown has been requested, and after the specified time in seconds attempt to kill the power. This is for use on systems where apcupsd cannot regain control after a shutdown.
net-server(default:#f) (type: boolean)If enabled, a network information server process will be started.
net-server-ip(default:"127.0.0.1") (type: string)An IP address on which the NIS server will listen for incoming connections.
net-server-port(default:3551) (type: integer)An IP port on which the NIS server will listen for incoming connections.
net-server-events-file(type: maybe-string)If you want the last few EVENTS to be available over the network by the network information server, you must set this to a file name.
net-server-events-file-max-size(default:10) (type: integer)The maximum size of the events file in kilobytes.
class(default:standalone) (type: enum-class)Normally standalone unless you share an UPS using an APC ShareUPS card.
mode(default:disable) (type: enum-mode)Normally disable unless you share an UPS using an APC ShareUPS card.
stat-time(default:0) (type: integer)The time interval in seconds between writing the status file, 0 disables.
log-stats(default:#f) (type: boolean)Also write the stats as a logs. This generates a lot of output.
data-time(default:0) (type: integer)The time interval in seconds between writing the data records to the log file, 0 disables.
facility(type: maybe-string)The logging facility for the syslog.
event-handlers(type: apcupsd-event-handlers)Handlers for events produced by apcupsd.
- Data Type: apcupsd-event-handlers
-
For a description of the events please refer to ‘man 8 apccontrol’.
Each handler shall be a gexp. It is spliced into the control script for the daemon. In addition to the standard Guile programming environment, the following procedures and variables are also available:
confVariable containing the file name of the configuration file.
powerfail-fileVariable containing the file name of the powerfail file.
cmdThe event currently being handled.
nameThe name of the UPS as specified in the configuration file.
connected?Is
#tifapcupsdis connected to the UPS via a serial port (or a USB port). In most configurations, this will be the case. In the case of a Slave machine where apcupsd is not directly connected to the UPS, this value will be#f.powered?Is
#tif the computer on whichapcupsdis running is powered by the UPS and#fif not. At the moment, this value is unimplemented and always#f.(err fmt args...)Wrapper around
formatoutputting to(current-error-port).(wall fmt args...)Wrapper around
formatoutputting viawall.(apcupsd args...)Call
apcupsdwhile passing the correct configuration file and all the arguments.(mail-to-root subject body)Send an email to the local administrator. This procedure assumes the
sendmailis located at/run/privileged/bin/sendmail(as would be the case withopensmtpd-service-type).
Available
apcupsd-event-handlersfields are:modules(type: gexp)Additional modules to import into the generated handler script.
killpower(type: gexp)The handler for the killpower event.
commfailure(type: gexp)The handler for the commfailure event.
commok(type: gexp)The handler for the commfailure event.
powerout(type: gexp)The handler for the powerout event.
onbattery(type: gexp)The handler for the onbattery event.
offbattery(type: gexp)The handler for the offbattery event.
mainsback(type: gexp)The handler for the mainsback event.
failing(type: gexp)The handler for the failing event.
timeout(type: gexp)The handler for the timeout event.
loadlimit(type: gexp)The handler for the loadlimit event.
runlimit(type: gexp)The handler for the runlimit event.
doreboot(type: gexp)The handler for the doreboot event.
doshutdown(type: gexp)The handler for the doshutdown event.
annoyme(type: gexp)The handler for the annoyme event.
emergency(type: gexp)The handler for the emergency event.
changeme(type: gexp)The handler for the changeme event.
remotedown(type: gexp)The handler for the remotedown event.
startselftest(type: gexp)The handler for the startselftest event.
endselftest(type: gexp)The handler for the endselftest event.
battdetach(type: gexp)The handler for the battdetach event.
battattach(type: gexp)The handler for the battattach event.
Próximo: Serviços de virtualização, Anterior: Serviços de gerenciamento de energia, Acima: Serviços [Conteúdo][Índice]
11.10.29 Serviços de áudio
The (gnu services audio) module provides a service to start MPD (the
Music Player Daemon).
Daemon do reprodutor de música
The Music Player Daemon (MPD) is a service that can play music while being controlled from the local machine or over the network by a variety of clients.
The following example shows the simplest configuration to locally expose,
via PulseAudio, a music collection kept at /srv/music, with
mpd running as the default ‘mpd’ user. This user will spawn
its own PulseAudio daemon, which may compete for the sound card access with
that of your own user. In this configuration, you may have to stop the
playback of your user audio applications to hear MPD’s output and
vice-versa.
(service mpd-service-type
(mpd-configuration
(music-directory "/srv/music")))
Importante: The music directory must be readable to the MPD user, by default, ‘mpd’. Permission problems will be reported via ‘Permission denied’ errors in the MPD logs, which appear in /var/log/messages by default.
Most MPD clients will trigger a database update upon connecting, but you can
also use the update action do to so:
herd update mpd
All the MPD configuration fields are documented below, and a more complex example follows.
- Variável: mpd-service-type
The service type for
mpd
- Tipo de dados: mpd-configuration
Available
mpd-configurationfields are:package(default:mpd) (type: file-like)The MPD package.
user(type: user-account)The user to run mpd as.
group(type: user-group)The group to run mpd as.
The default
%mpd-groupis a system group with name “mpd”.shepherd-requirement(default:'()) (type: list-of-symbols)A list of symbols naming Shepherd services that this service will depend on.
environment-variables(default:'("PULSE_CLIENTCONFIG=/etc/pulse/client.conf" "PULSE_CONFIG=/etc/pulse/daemon.conf")) (type: list-of-strings)A list of strings specifying environment variables.
log-file(type: maybe-string)The location of the log file. Unless specified, logs are sent to the local syslog daemon. Alternatively, a log file name can be specified, for example /var/log/mpd.log.
log-level(type: maybe-string)Suppress any messages below this threshold. The available values, in decreasing order of verbosity, are:
verbose,info,notice,warninganderror.music-directory(type: maybe-string)The directory to scan for music files.
music-dir(type: maybe-string)The directory to scan for music files.
playlist-directory(type: maybe-string)The directory to store playlists.
playlist-dir(type: maybe-string)The directory to store playlists.
db-file(type: maybe-string)The location of the music database. When left unspecified, ~/.cache/db is used.
state-file(type: maybe-string)The location of the file that stores current MPD’s state.
sticker-file(type: maybe-string)The location of the sticker database.
default-port(default:6600) (type: maybe-port)The default port to run mpd on.
endpoints(type: maybe-list-of-strings)The addresses that mpd will bind to. A port different from default-port may be specified, e.g.
localhost:6602and IPv6 addresses must be enclosed in square brackets when a different port is used. To use a Unix domain socket, an absolute path or a path starting with~can be specified here.address(type: maybe-string)The address that mpd will bind to. To use a Unix domain socket, an absolute path can be specified here.
database(type: maybe-mpd-plugin)MPD database plugin configuration.
partitions(default:'()) (type: list-of-mpd-partition)List of MPD "partitions".
neighbors(default:'()) (type: list-of-mpd-plugin)List of MPD neighbor plugin configurations.
inputs(default:'()) (type: list-of-mpd-plugin)List of MPD input plugin configurations.
archive-plugins(default:'()) (type: list-of-mpd-plugin)List of MPD archive plugin configurations.
auto-update?(type: maybe-boolean)Whether to automatically update the music database when files are changed in the music-directory.
input-cache-size(type: maybe-string)MPD input cache size.
decoders(default:'()) (type: list-of-mpd-plugin)List of MPD decoder plugin configurations.
resampler(type: maybe-mpd-plugin)MPD resampler plugin configuration.
filters(default:'()) (type: list-of-mpd-plugin)List of MPD filter plugin configurations.
outputs(type: list-of-mpd-plugin-or-output)The audio outputs that MPD can use. By default this is a single output using pulseaudio.
playlist-plugins(default:'()) (type: list-of-mpd-plugin)List of MPD playlist plugin configurations.
extra-options(default:'()) (type: alist)An association list of option symbols/strings to string values to be appended to the configuration.
- Tipo de dados: mpd-plugin
Data type representing a
mpdplugin.plugin(type: maybe-string)Plugin name.
name(type: maybe-string)Nome.
enabled?(type: maybe-boolean)Whether the plugin is enabled/disabled.
extra-options(default:'()) (type: alist)An association list of option symbols/strings to string values to be appended to the plugin configuration. See MPD plugin reference for available options.
- Tipo de dados: mpd-partition
Data type representing a
mpdpartition.name(type: string)Partition name.
extra-options(default:'()) (type: alist)An association list of option symbols/strings to string values to be appended to the partition configuration. See Configuring Partitions for available options.
- Tipo de dados: mpd-output
Available
mpd-outputfields are:name(default:"MPD") (type: string)The name of the audio output.
type(default:"pulse") (type: string)The type of audio output.
enabled?(default:#t) (type: boolean)Specifies whether this audio output is enabled when MPD is started. By default, all audio outputs are enabled. This is just the default setting when there is no state file; with a state file, the previous state is restored.
format(type: maybe-string)Force a specific audio format on output. See Global Audio Format for a more detailed description.
tags?(default:#t) (type: boolean)If set to
#f, then MPD will not send tags to this output. This is only useful for output plugins that can receive tags, for example thehttpdoutput plugin.always-on?(default:#f) (type: boolean)If set to
#t, then MPD attempts to keep this audio output always open. This may be useful for streaming servers, when you don’t want to disconnect all listeners even when playback is accidentally stopped.mixer-type(type: maybe-string)This field accepts a string that specifies which mixer should be used for this audio output: the
hardwaremixer, thesoftwaremixer, thenullmixer (allows setting the volume, but with no effect; this can be used as a trick to implement an external mixer External Mixer) or no mixer (none). When left unspecified, ahardwaremixer is used for devices that support it.replay-gain-handler(type: maybe-string)This field accepts a string that specifies how Replay Gain is to be applied.
softwareuses an internal software volume control,mixeruses the configured (hardware) mixer control andnonedisables replay gain on this audio output.extra-options(default:'()) (type: alist)An association list of option symbols/strings to string values to be appended to the audio output configuration.
The following example shows a configuration of mpd that configures
some of its plugins and provides a HTTP audio streaming output.
(service mpd-service-type
(mpd-configuration
(outputs
(list (mpd-output
(name "streaming")
(type "httpd")
(mixer-type 'null)
(extra-options
`((encoder . "vorbis")
(port . "8080"))))))
(decoders
(list (mpd-plugin
(plugin "mikmod")
(enabled? #f))
(mpd-plugin
(plugin "openmpt")
(enabled? #t)
(extra-options `((repeat-count . -1)
(interpolation-filter . 1))))))
(resampler (mpd-plugin
(plugin "libsamplerate")
(extra-options `((type . 0)))))))
myMPD
myMPD is a web server frontend for MPD that provides a mobile friendly web client for MPD.
The following example shows a myMPD instance listening on port 80, with album cover caching disabled.
(service mympd-service-type
(mympd-configuration
(port 80)
(covercache-ttl 0)))
- Variável: mympd-service-type
The service type for
mympd.
- Tipo de dados: mympd-configuration
Available
mympd-configurationfields are:package(default:mympd) (type: file-like)The package object of the myMPD server.
shepherd-requirement(default:'()) (type: list-of-symbols)This is a list of symbols naming Shepherd services that this service will depend on.
user(default:%mympd-user) (type: user-account)Owner of the
mympdprocess.The default
%mympd-useris a system user with the name “mympd”, who is a part of the group group (see below).group(default:%mympd-group) (type: user-group)Owner group of the
mympdprocess.The default
%mympd-groupis a system group with name “mympd”.work-directory(default:"/var/lib/mympd") (type: string)Where myMPD will store its data.
cache-directory(default:"/var/cache/mympd") (type: string)Where myMPD will store its cache.
acl(type: maybe-mympd-ip-acl)ACL to access the myMPD webserver.
covercache-ttl(default:31) (type: maybe-integer)How long to keep cached covers,
0disables cover caching.http?(default:#t) (type: boolean)HTTP support.
host(default:"[::]") (type: string)Host name to listen on.
port(default:80) (type: maybe-port)HTTP port to listen on.
log-level(default:5) (type: integer)How much detail to include in logs, possible values:
0to7.log-to(type: maybe-string)Where to send logs. Unless specified, the service logs to the local syslog service under the ‘daemon’ facility. Alternatively, a log file name can be specified, for example /var/log/mympd.log.
lualibs(default:"all") (type: maybe-string)See https://jcorporation.github.io/myMPD/scripting/#lua-standard-libraries.
uri(type: maybe-string)Override URI to myMPD. See https://github.com/jcorporation/myMPD/issues/950.
script-acl(default:(mympd-ip-acl (allow '("127.0.0.1")))) (type: maybe-mympd-ip-acl)ACL to access the myMPD script backend.
ssl?(default:#f) (type: boolean)SSL/TLS support.
ssl-port(default:443) (type: maybe-port)Port to listen for HTTPS.
ssl-cert(type: maybe-string)Path to PEM encoded X.509 SSL/TLS certificate (public key).
ssl-key(type: maybe-string)Path to PEM encoded SSL/TLS private key.
pin-hash(type: maybe-string)SHA-256 hashed pin used by myMPD to control settings access by prompting a pin from the user.
save-caches?(type: maybe-boolean)Whether to preserve caches between service restarts.
- Tipo de dados: mympd-ip-acl
Available
mympd-ip-aclfields are:allow(default:'()) (type: list-of-strings)Allowed IP addresses.
deny(default:'()) (type: list-of-strings)Disallowed IP addresses.
Próximo: Serviços de controlando versão, Anterior: Serviços de áudio, Acima: Serviços [Conteúdo][Índice]
11.10.30 Serviços de virtualização
The (gnu services virtualization) module provides services for the
libvirt and virtlog daemons, as well as other virtualization-related
services.
Libvirt daemon
libvirtd is the server side daemon component of the libvirt
virtualization management system. This daemon runs on host servers and
performs required management tasks for virtualized guests. To connect to
the libvirt daemon as an unprivileged user, it must be added to the
‘libvirt’ group, as shown in the example below.
- Variável: libvirt-service-type
This is the type of the libvirt daemon. Its value must be a
libvirt-configuration.(users (cons (user-account (name "user") (group "users") (supplementary-groups '("libvirt" "audio" "video" "wheel"))) %base-user-accounts)) (service libvirt-service-type (libvirt-configuration (tls-port "16555")))
Available libvirt-configuration fields are:
libvirt-configurationparameter: package libvirt ¶Libvirt package.
libvirt-configurationparameter: boolean listen-tls? ¶Flag listening for secure TLS connections on the public TCP/IP port. You must set
listenfor this to have any effect.It is necessary to setup a CA and issue server certificates before using this capability.
Defaults to ‘#t’.
libvirt-configurationparameter: boolean listen-tcp? ¶Listen for unencrypted TCP connections on the public TCP/IP port. You must set
listenfor this to have any effect.Using the TCP socket requires SASL authentication by default. Only SASL mechanisms which support data encryption are allowed. This is DIGEST_MD5 and GSSAPI (Kerberos5).
Defaults to ‘#f’.
libvirt-configurationparameter: string tls-port ¶Port for accepting secure TLS connections. This can be a port number, or service name.
Defaults to ‘"16514"’.
libvirt-configurationparameter: string tcp-port ¶Port for accepting insecure TCP connections. This can be a port number, or service name.
Defaults to ‘"16509"’.
libvirt-configurationparameter: string listen-addr ¶IP address or hostname used for client connections.
Defaults to ‘"0.0.0.0"’.
libvirt-configurationparameter: boolean mdns-adv? ¶Flag toggling mDNS advertisement of the libvirt service.
Alternatively can disable for all services on a host by stopping the Avahi daemon.
Defaults to ‘#f’.
libvirt-configurationparameter: string mdns-name ¶Default mDNS advertisement name. This must be unique on the immediate broadcast network.
Defaults to ‘"Virtualization Host <hostname>"’.
libvirt-configurationparameter: string unix-sock-group ¶UNIX domain socket group ownership. This can be used to allow a ’trusted’ set of users access to management capabilities without becoming root.
Defaults to ‘"libvirt"’.
libvirt-configurationparameter: string unix-sock-ro-perms ¶UNIX socket permissions for the R/O socket. This is used for monitoring VM status only.
Defaults to ‘"0777"’.
libvirt-configurationparameter: string unix-sock-rw-perms ¶UNIX socket permissions for the R/W socket. Default allows only root. If PolicyKit is enabled on the socket, the default will change to allow everyone (eg, 0777)
Defaults to ‘"0770"’.
libvirt-configurationparameter: string unix-sock-admin-perms ¶UNIX socket permissions for the admin socket. Default allows only owner (root), do not change it unless you are sure to whom you are exposing the access to.
Defaults to ‘"0777"’.
libvirt-configurationparameter: string unix-sock-dir ¶The directory in which sockets will be found/created.
Defaults to ‘"/var/run/libvirt"’.
libvirt-configurationparameter: string auth-unix-ro ¶Authentication scheme for UNIX read-only sockets. By default socket permissions allow anyone to connect
Defaults to ‘"polkit"’.
libvirt-configurationparameter: string auth-unix-rw ¶Authentication scheme for UNIX read-write sockets. By default socket permissions only allow root. If PolicyKit support was compiled into libvirt, the default will be to use ’polkit’ auth.
Defaults to ‘"polkit"’.
libvirt-configurationparameter: string auth-tcp ¶Authentication scheme for TCP sockets. If you don’t enable SASL, then all TCP traffic is cleartext. Don’t do this outside of a dev/test scenario.
Defaults to ‘"sasl"’.
libvirt-configurationparameter: string auth-tls ¶Authentication scheme for TLS sockets. TLS sockets already have encryption provided by the TLS layer, and limited authentication is done by certificates.
It is possible to make use of any SASL authentication mechanism as well, by using ’sasl’ for this option
Defaults to ‘"none"’.
libvirt-configurationparameter: optional-list access-drivers ¶API access control scheme.
By default an authenticated user is allowed access to all APIs. Access drivers can place restrictions on this.
Defaults to ‘'()’.
libvirt-configurationparameter: string key-file ¶Server key file path. If set to an empty string, then no private key is loaded.
Defaults to ‘""’.
libvirt-configurationparameter: string cert-file ¶Server key file path. If set to an empty string, then no certificate is loaded.
Defaults to ‘""’.
libvirt-configurationparameter: string ca-file ¶Server key file path. If set to an empty string, then no CA certificate is loaded.
Defaults to ‘""’.
libvirt-configurationparameter: string crl-file ¶Certificate revocation list path. If set to an empty string, then no CRL is loaded.
Defaults to ‘""’.
libvirt-configurationparameter: boolean tls-no-sanity-cert ¶Disable verification of our own server certificates.
When libvirtd starts it performs some sanity checks against its own certificates.
Defaults to ‘#f’.
libvirt-configurationparameter: boolean tls-no-verify-cert ¶Disable verification of client certificates.
Client certificate verification is the primary authentication mechanism. Any client which does not present a certificate signed by the CA will be rejected.
Defaults to ‘#f’.
libvirt-configurationparameter: optional-list tls-allowed-dn-list ¶Whitelist of allowed x509 Distinguished Name.
Defaults to ‘'()’.
libvirt-configurationparameter: optional-list sasl-allowed-usernames ¶Whitelist of allowed SASL usernames. The format for username depends on the SASL authentication mechanism.
Defaults to ‘'()’.
libvirt-configurationparameter: string tls-priority ¶Override the compile time default TLS priority string. The default is usually ‘"NORMAL"’ unless overridden at build time. Only set this is it is desired for libvirt to deviate from the global default settings.
Defaults to ‘"NORMAL"’.
libvirt-configurationparameter: integer max-clients ¶Maximum number of concurrent client connections to allow over all sockets combined.
Defaults to ‘5000’.
libvirt-configurationparameter: integer max-queued-clients ¶Maximum length of queue of connections waiting to be accepted by the daemon. Note, that some protocols supporting retransmission may obey this so that a later reattempt at connection succeeds.
Defaults to ‘1000’.
libvirt-configurationparameter: integer max-anonymous-clients ¶Maximum length of queue of accepted but not yet authenticated clients. Set this to zero to turn this feature off
Defaults to ‘20’.
libvirt-configurationparameter: integer min-workers ¶Number of workers to start up initially.
Defaults to ‘5’.
libvirt-configurationparameter: integer max-workers ¶Maximum number of worker threads.
If the number of active clients exceeds
min-workers, then more threads are spawned, up to max_workers limit. Typically you’d want max_workers to equal maximum number of clients allowed.Defaults to ‘20’.
libvirt-configurationparameter: integer prio-workers ¶Number of priority workers. If all workers from above pool are stuck, some calls marked as high priority (notably domainDestroy) can be executed in this pool.
Defaults to ‘5’.
libvirt-configurationparameter: integer max-requests ¶Total global limit on concurrent RPC calls.
Defaults to ‘20’.
libvirt-configurationparameter: integer max-client-requests ¶Limit on concurrent requests from a single client connection. To avoid one client monopolizing the server this should be a small fraction of the global max_requests and max_workers parameter.
Defaults to ‘5’.
libvirt-configurationparameter: integer admin-min-workers ¶Same as
min-workersbut for the admin interface.Defaults to ‘1’.
libvirt-configurationparameter: integer admin-max-workers ¶Same as
max-workersbut for the admin interface.Defaults to ‘5’.
libvirt-configurationparameter: integer admin-max-clients ¶Same as
max-clientsbut for the admin interface.Defaults to ‘5’.
libvirt-configurationparameter: integer admin-max-queued-clients ¶Same as
max-queued-clientsbut for the admin interface.Defaults to ‘5’.
libvirt-configurationparameter: integer admin-max-client-requests ¶Same as
max-client-requestsbut for the admin interface.Defaults to ‘5’.
libvirt-configurationparameter: integer log-level ¶Logging level. 4 errors, 3 warnings, 2 information, 1 debug.
Defaults to ‘3’.
libvirt-configurationparameter: string log-filters ¶Logging filters.
A filter allows to select a different logging level for a given category of logs. The format for a filter is one of:
- x:name
- x:+name
where
nameis a string which is matched against the category given in theVIR_LOG_INIT()at the top of each libvirt source file, e.g., ‘"remote"’, ‘"qemu"’, or ‘"util.json"’ (the name in the filter can be a substring of the full category name, in order to match multiple similar categories), the optional ‘"+"’ prefix tells libvirt to log stack trace for each message matching name, andxis the minimal level where matching messages should be logged:- 1: DEBUG
- 2: INFO
- 3: WARNING
- 4: ERROR
Multiple filters can be defined in a single filters statement, they just need to be separated by spaces.
Defaults to ‘"3:remote 4:event"’.
libvirt-configurationparameter: string log-outputs ¶Logging outputs.
An output is one of the places to save logging information. The format for an output can be:
x:stderroutput goes to stderr
x:syslog:nameuse syslog for the output and use the given name as the ident
x:file:file_pathsaída para um arquivo, com o caminho de arquivo dado
x:journaldoutput to journald logging system
In all case the x prefix is the minimal level, acting as a filter
- 1: DEBUG
- 2: INFO
- 3: WARNING
- 4: ERROR
Multiple outputs can be defined, they just need to be separated by spaces.
Defaults to ‘"3:stderr"’.
libvirt-configurationparameter: integer audit-level ¶Allows usage of the auditing subsystem to be altered
- 0: disable all auditing
- 1: enable auditing, only if enabled on host
- 2: enable auditing, and exit if disabled on host.
Defaults to ‘1’.
libvirt-configurationparameter: boolean audit-logging ¶Send audit messages via libvirt logging infrastructure.
Defaults to ‘#f’.
libvirt-configurationparameter: optional-string host-uuid ¶Host UUID. UUID must not have all digits be the same.
Defaults to ‘""’.
libvirt-configurationparameter: string host-uuid-source ¶Source to read host UUID.
-
smbios: fetch the UUID fromdmidecode -s system-uuid -
machine-id: fetch the UUID from/etc/machine-id
If
dmidecodedoes not provide a valid UUID a temporary UUID will be generated.Defaults to ‘"smbios"’.
-
libvirt-configurationparameter: integer keepalive-interval ¶A keepalive message is sent to a client after
keepalive_intervalseconds of inactivity to check if the client is still responding. If set to -1, libvirtd will never send keepalive requests; however clients can still send them and the daemon will send responses.Defaults to ‘5’.
libvirt-configurationparameter: integer keepalive-count ¶Maximum number of keepalive messages that are allowed to be sent to the client without getting any response before the connection is considered broken.
In other words, the connection is automatically closed approximately after
keepalive_interval * (keepalive_count + 1)seconds since the last message received from the client. Whenkeepalive-countis set to 0, connections will be automatically closed afterkeepalive-intervalseconds of inactivity without sending any keepalive messages.Defaults to ‘5’.
libvirt-configurationparameter: integer admin-keepalive-interval ¶Same as above but for admin interface.
Defaults to ‘5’.
libvirt-configurationparameter: integer admin-keepalive-count ¶Same as above but for admin interface.
Defaults to ‘5’.
libvirt-configurationparameter: integer ovs-timeout ¶Timeout for Open vSwitch calls.
The
ovs-vsctlutility is used for the configuration and its timeout option is set by default to 5 seconds to avoid potential infinite waits blocking libvirt.Defaults to ‘5’.
Virtlog daemon
The virtlogd service is a server side daemon component of libvirt that is used to manage logs from virtual machine consoles.
This daemon is not used directly by libvirt client applications, rather it
is called on their behalf by libvirtd. By maintaining the logs in a
standalone daemon, the main libvirtd daemon can be restarted without
risk of losing logs. The virtlogd daemon has the ability to
re-exec() itself upon receiving SIGUSR1, to allow live upgrades
without downtime.
- Variável: virtlog-service-type
This is the type of the virtlog daemon. Its value must be a
virtlog-configuration.(service virtlog-service-type (virtlog-configuration (max-clients 1000)))
libvirtparameter: package libvirt ¶Libvirt package.
virtlog-configurationparameter: integer log-level ¶Logging level. 4 errors, 3 warnings, 2 information, 1 debug.
Defaults to ‘3’.
virtlog-configurationparameter: string log-filters ¶Logging filters.
A filter allows to select a different logging level for a given category of logs The format for a filter is one of:
- x:name
- x:+name
where
nameis a string which is matched against the category given in theVIR_LOG_INIT()at the top of each libvirt source file, e.g., "remote", "qemu", or "util.json" (the name in the filter can be a substring of the full category name, in order to match multiple similar categories), the optional "+" prefix tells libvirt to log stack trace for each message matching name, andxis the minimal level where matching messages should be logged:- 1: DEBUG
- 2: INFO
- 3: WARNING
- 4: ERROR
Multiple filters can be defined in a single filters statement, they just need to be separated by spaces.
Defaults to ‘"3:remote 4:event"’.
virtlog-configurationparameter: string log-outputs ¶Logging outputs.
An output is one of the places to save logging information The format for an output can be:
x:stderroutput goes to stderr
x:syslog:nameuse syslog for the output and use the given name as the ident
x:file:file_pathsaída para um arquivo, com o caminho de arquivo dado
x:journaldoutput to journald logging system
In all case the x prefix is the minimal level, acting as a filter
- 1: DEBUG
- 2: INFO
- 3: WARNING
- 4: ERROR
Multiple outputs can be defined, they just need to be separated by spaces.
Defaults to ‘"3:stderr"’.
virtlog-configurationparameter: integer max-clients ¶Maximum number of concurrent client connections to allow over all sockets combined.
Defaults to ‘1024’.
virtlog-configurationparameter: integer max-size ¶Maximum file size before rolling over.
Defaults to ‘2MB’
virtlog-configurationparameter: integer max-backups ¶Maximum number of backup files to keep.
Defaults to ‘3’
Transparent Emulation with QEMU
qemu-binfmt-service-type provides support for transparent emulation
of program binaries built for different architectures—e.g., it allows you
to transparently execute an ARMv7 program on an x86_64 machine. It achieves
this by combining the QEMU emulator and the
binfmt_misc feature of the kernel Linux. This feature only allows
you to emulate GNU/Linux on a different architecture, but see below for
GNU/Hurd support.
- Variável: qemu-binfmt-service-type
This is the type of the QEMU/binfmt service for transparent emulation. Its value must be a
qemu-binfmt-configurationobject, which specifies the QEMU package to use as well as the architecture we want to emulated:(service qemu-binfmt-service-type (qemu-binfmt-configuration (platforms (lookup-qemu-platforms "arm" "aarch64"))))In this example, we enable transparent emulation for the ARM and aarch64 platforms. Running
herd stop qemu-binfmtturns it off, and runningherd start qemu-binfmtturns it back on (veja theherdcommand em The GNU Shepherd Manual).
- Tipo de dados: qemu-binfmt-configuration
This is the configuration for the
qemu-binfmtservice.platforms(default:'())The list of emulated QEMU platforms. Each item must be a platform object as returned by
lookup-qemu-platforms(see below).For example, let’s suppose you’re on an x86_64 machine and you have this service:
(service qemu-binfmt-service-type (qemu-binfmt-configuration (platforms (lookup-qemu-platforms "arm"))))You can run:
guix build -s armhf-linux inkscape
and it will build Inkscape for ARMv7 as if it were a native build, transparently using QEMU to emulate the ARMv7 CPU. Pretty handy if you’d like to test a package build for an architecture you don’t have access to!
qemu(default:qemu)The QEMU package to use.
- Procedure: lookup-qemu-platforms platforms…
Return the list of QEMU platform objects corresponding to platforms…. platforms must be a list of strings corresponding to platform names, such as
"arm","sparc","mips64el", and so on.
- Procedure: qemu-platform? obj
Return true if obj is a platform object.
- Procedure: qemu-platform-name platform
Return the name of platform—a string such as
"arm".
QEMU Guest Agent
The QEMU guest agent provides control over the emulated system to the host.
The qemu-guest-agent service runs the agent on Guix guests. To
control the agent from the host, open a socket by invoking QEMU with the
following arguments:
qemu-system-x86_64 \ -chardev socket,path=/tmp/qga.sock,server=on,wait=off,id=qga0 \ -device virtio-serial \ -device virtserialport,chardev=qga0,name=org.qemu.guest_agent.0 \ ...
This creates a socket at /tmp/qga.sock on the host. Once the guest
agent is running, you can issue commands with socat:
$ guix shell socat -- socat unix-connect:/tmp/qga.sock stdio
{"execute": "guest-get-host-name"}
{"return": {"host-name": "guix"}}
See QEMU guest agent documentation for more options and commands.
- Variável: qemu-guest-agent-service-type
Tipo de serviço para o serviço de agente convidado QEMU.
- Tipo de dados: qemu-guest-agent-configuration
Configuration for the
qemu-guest-agentservice.qemu(default:qemu-minimal)The QEMU package to use.
device(default:"")File name of the device or socket the agent uses to communicate with the host. If empty, QEMU uses a default file name.
Xen Guest Agent
The Xen guest agent allows a Xen host to control the emulated system. The
xe-guest-utilities service runs the agent on Guix guests.
xe-guest-utilities collects information about the running virtualized guest. This includes:
- static information
- The operating system running
- The Linux kernel version
- dynamic information
- Network interfaces (devices) being added/removed
- Network connections being unplugged/plugged-in
- CPUs being added or removed
- The guest migrating, being paused/resumed, etc.
- ephemeral information
- The amount of memory currently in-use and free
- The amount of disk-space used
Nota: The default Linux-libre kernel that Guix ships already enables the necessary paravirtualization features for a guest. There is nothing you need to do for the guest to support Xen’s paravirtualization features.
The guest utilities are used to have the guest report information back to the virtualizing host and support tasks that require cooperation between host and guest, like CPU hotplugging.
- Variável: xe-guest-utilities-service-type
Service type for the Xen guest utilities service.
- Data Type: xe-guest-utilities-configuration
Configuration for the
xe-guest-utilitiesservice.package(default:xe-guest-utilities)The Xen guest utilities package to use.
pid-file(default:"/var/run/xe-daemon.pid")Name of the file holding the PID of
xe-deamon.log-file(default:"/var/log/xe-guest-utilities.log")Name of the
xe-guest-utilitieslog file.
xe-guest-utilities is the standard guest utilities used for Xen
guests. More recently the Xen Project has been working to develop
xen-guest-agent, a modern drop-in replacement for
xe-guest-utilities. While they nearly have feature-parity,
xen-guest-agent currently lacks some of the features of its
predecessor, namely disk metrics and “PV drivers version”.
- Variável: xen-guest-agent-service-type
Service type for the Xen guest agent service.
- Data Type: xen-guest-agent-configuration
Configuration for the
xen-guest-agentservice.package(default:xen-guest-agent)The Xen guest agent package to use.
Aviso:
xe-guest-utilitiesandxen-guest-agentare mutually exclusive.
Virtual Build Machines
Virtual build machines or “build VMs” let you offload builds to a fully controlled environment. “How can it be more controlled than regular builds? And why would it be useful?”, you ask. Good questions.
Builds spawned by guix-daemon indeed run in a controlled environment;
specifically the daemon spawns build processes in separate namespaces and in
a chroot, such as that build processes only see their declared dependencies
and a well-defined subset of the file system tree (veja Configuração do ambiente de compilação, for details). A few aspects of the environments are not controlled
though: the operating system kernel, the CPU model, and the date. Most of
the time, these aspects have no impact on the build process: the level of
isolation guix-daemon provides is “good enough”.
However, there are occasionally cases where those aspects do influence the build process. A typical example is time traps: build processes that stop working after a certain date35. Another one is software that optimizes for the CPU microarchitecture it is built on or, worse, bugs that manifest only on specific CPUs.
To address that, virtual-build-machine-service-type lets you add a
virtual build machine on your system, as in this example:
(use-modules (gnu services virtualization)) (operating-system ;; … (services (append (list (service virtual-build-machine-service-type)) %base-services)))
By default, you have to explicitly start the build machine when you need it, at which point builds may be offloaded to it (veja Usando o recurso de descarregamento):
herd start build-vm
With the default setting shown above, the build VM runs with its clock set to a date several years in the past, and on a CPU model that corresponds to that date—a model possibly older than that of your machine. This lets you rebuild today software from the past that would otherwise fail to build due to a time trap or other issues in its build process. You can view the VM’s config like this:
herd configuration build-vm
You can configure the build VM, as in this example:
(service virtual-build-machine-service-type
(virtual-build-machine
(cpu "Westmere")
(cpu-count 8)
(memory-size (* 1 1024))
(auto-start? #t)))
The available options are shown below.
- Variável: virtual-build-machine-service-type
This is the service type to run virtual build machines. Virtual build machines are configured so that builds are offloaded to them when they are running.
- Tipo de dados: virtual-build-machine
This is the data type specifying the configuration of a build machine. It contains the fields below:
name(default:'build-vm)The name of this build VM. It is used to construct the name of its Shepherd service.
imageThe image of the virtual machine (veja Criando imagens do sistema). This notably specifies the virtual disk size and the operating system running into it (veja
operating-systemReference). The default value is a minimal operating system image.qemu(default:qemu-minimal)The QEMU package to run the image.
cpuThe CPU model being emulated as a string denoting a model known to QEMU.
The default value is a model that matches
date(see below). To see what CPU models are available, run, for example:qemu-system-x86_64 -cpu help
cpu-count(default:4)The number of CPUs emulated by the virtual machine.
memory-size(default:2048)Size in mebibytes (MiB) of the virtual machine’s main memory (RAM).
date(default: a few years ago)Date inside the virtual machine when it starts; this must be a SRFI-19 date object (veja SRFI-19 Date em GNU Guile Reference Manual).
port-forwardings(default: 11022 and 11004)TCP ports of the virtual machine forwarded to the host. By default, the SSH and secrets ports are forwarded into the host.
systems(default:(list (%current-system)))List of system types supported by the build VM—e.g.,
"x86_64-linux".auto-start?(default:#f)Whether to start the virtual machine when the system boots.
In the next section, you’ll find a variant on this theme: GNU/Hurd virtual machines!
The Hurd in a Virtual Machine
Service hurd-vm provides support for running GNU/Hurd in a virtual
machine (VM), a so-called childhurd. This service is meant to be used
on GNU/Linux and the given GNU/Hurd operating system configuration is
cross-compiled. The virtual machine is a Shepherd service that can be
referred to by the names hurd-vm and childhurd and be
controlled with commands such as:
herd start hurd-vm herd stop childhurd
When the service is running, you can view its console by connecting to it with a VNC client, for example with:
guix shell tigervnc-client -- vncviewer localhost:5900
The default configuration (see hurd-vm-configuration below) spawns a
secure shell (SSH) server in your GNU/Hurd system, which QEMU (the virtual
machine emulator) redirects to port 10022 on the host. By default, the
service enables offloading such that the host guix-daemon
automatically offloads GNU/Hurd builds to the childhurd (veja Usando o recurso de descarregamento). This is what happens when running a command like the
following one, where i586-gnu is the system type of 32-bit GNU/Hurd:
guix build emacs-minimal -s i586-gnu
The childhurd is volatile and stateless: it starts with a fresh root file
system every time you restart it. By default though, all the files under
/etc/childhurd on the host are copied as is to the root file system
of the childhurd when it boots. This allows you to initialize “secrets”
inside the VM: SSH host keys, authorized substitute keys, and so on—see
the explanation of secret-root below.
You will probably find it useful to create an account for you in the
GNU/Hurd virtual machine and to authorize logins with your SSH key. To do
that, you can define the GNU/Hurd system in the usual way (veja Usando o sistema de configuração), and then pass that operating system as the os
field of hurd-vm-configuration, as in this example:
(define childhurd-os ;; Definition of my GNU/Hurd system, derived from the default one. (operating-system (inherit %hurd-vm-operating-system) ;; Add a user account. (users (cons (user-account (name "charlie") (comment "This is me!") (group "users") (supplementary-groups '("wheel"))) ;for 'sudo' %base-user-accounts)) (services ;; Modify the SSH configuration to allow login as "root" ;; and as "charlie" using public key authentication. (modify-services (operating-system-user-services %hurd-vm-operating-system) (openssh-service-type config => (openssh-configuration (inherit config) (authorized-keys `(("root" ,(local-file "/home/charlie/.ssh/id_rsa.pub")) ("charlie" ,(local-file "/home/charlie/.ssh/id_rsa.pub")))))))))) (operating-system ;; … (services ;; Add the 'hurd-vm' service, configured to use the ;; operating system configuration above. (append (list (service hurd-vm-service-type (hurd-vm-configuration (os %childhurd-os)))) %base-services)))
That’s it! The remainder of this section provides the reference of the service configuration.
- Variável: hurd-vm-service-type
This is the type of the Hurd in a Virtual Machine service. Its value must be a
hurd-vm-configurationobject, which specifies the operating system (vejaoperating-systemReference) and the disk size for the Hurd Virtual Machine, the QEMU package to use as well as the options for running it.Por exemplo:
(service hurd-vm-service-type (hurd-vm-configuration (disk-size (* 5000 (expt 2 20))) ;5G (memory-size 1024))) ;1024MiB
would create a disk image big enough to build GNU Hello, with some extra memory.
- Tipo de dados: hurd-vm-configuration
The data type representing the configuration for
hurd-vm-service-type.os(default: %hurd-vm-operating-system)The operating system to instantiate. This default is bare-bones with a permissive OpenSSH secure shell daemon listening on port 2222 (veja
openssh-service-type).qemu(default:qemu-minimal)The QEMU package to use.
image(default: hurd-vm-disk-image)The image object representing the disk image of this virtual machine (veja Criando imagens do sistema).
disk-size(default:'guess)The size of the disk image.
memory-size(default:512)The memory size of the Virtual Machine in mebibytes.
options(default:'("--snapshot"))The extra options for running QEMU.
id(default:#f)If set, a non-zero positive integer used to parameterize Childhurd instances. It is appended to the service’s name, e.g.
childhurd1.net-options(default: hurd-vm-net-options)The procedure used to produce the list of QEMU networking options.
By default, it produces
'("--device" "rtl8139,netdev=net0" "--netdev" (string-append "user,id=net0," "hostfwd=tcp:127.0.0.1:secrets-port-:1004," "hostfwd=tcp:127.0.0.1:ssh-port-:2222," "hostfwd=tcp:127.0.0.1:vnc-port-:5900"))
with forwarded ports:
secrets-port:
(+ 11004 (* 1000 ID))ssh-port:(+ 10022 (* 1000 ID))vnc-port:(+ 15900 (* 1000 ID))offloading?(default:#t)Whether to automatically set up offloading of builds to the childhurd.
When enabled, this lets you run GNU/Hurd builds on the host and have them transparently offloaded to the VM, for instance when running a command like this:
guix build coreutils -s i586-gnu
This option automatically sets up offloading like so:
- Authorizing the childhurd’s key on the host so that the host accepts build
results coming from the childhurd, which can be done like so
(veja
guix archive --authorize, for more on that). - Creating a user account called
offloadingdedicated to offloading in the childhurd. - Creating an SSH key pair on the host and making it an authorized key of the
offloadingaccount in the childhurd. - Adding the childhurd to /etc/guix/machines.scm (veja Usando o recurso de descarregamento).
- Authorizing the childhurd’s key on the host so that the host accepts build
results coming from the childhurd, which can be done like so
(veja
secret-root(default: /etc/childhurd)The root directory with out-of-band secrets to be installed into the childhurd once it runs. Childhurds are volatile which means that on every startup, secrets such as the SSH host keys and Guix signing key are recreated.
If the /etc/childhurd directory does not exist, the
secret-servicerunning in the Childhurd will be sent an empty list of secrets.By default, the service automatically populates /etc/childhurd with the following non-volatile secrets, unless they already exist:
/etc/childhurd/etc/guix/acl /etc/childhurd/etc/guix/signing-key.pub /etc/childhurd/etc/guix/signing-key.sec /etc/childhurd/etc/ssh/authorized_keys.d/offloading /etc/childhurd/etc/ssh/ssh_host_ed25519_key /etc/childhurd/etc/ssh/ssh_host_ecdsa_key /etc/childhurd/etc/ssh/ssh_host_ed25519_key.pub /etc/childhurd/etc/ssh/ssh_host_ecdsa_key.pub
Note that by default the VM image is volatile, i.e., once stopped the
contents are lost. If you want a stateful image instead, override the
configuration’s image and options without the
--snapshot flag using something along these lines:
(service hurd-vm-service-type
(hurd-vm-configuration
(image (const "/out/of/store/writable/hurd.img"))
(options '())))
Ganeti
Nota: This service is considered experimental. Configuration options may be changed in a backwards-incompatible manner, and not all features have been thorougly tested. Users of this service are encouraged to share their experience at guix-devel@gnu.org.
Ganeti is a virtual machine management system. It is designed to keep
virtual machines running on a cluster of servers even in the event of
hardware failures, and to make maintenance and recovery tasks easy. It
consists of multiple services which are described later in this section. In
addition to the Ganeti service, you will need the OpenSSH service
(veja openssh-service-type), and update the
/etc/hosts file (veja hosts-service-type) with the cluster name and address (or use a DNS
server).
All nodes participating in a Ganeti cluster should have the same Ganeti and
/etc/hosts configuration. Here is an example configuration for a
Ganeti cluster node that supports multiple storage backends, and installs
the debootstrap and guix OS providers:
(use-package-modules virtualization) (use-service-modules base ganeti networking ssh) (operating-system ;; … (host-name "node1") ;; Install QEMU so we can use KVM-based instances, and LVM, DRBD and Ceph ;; in order to use the "plain", "drbd" and "rbd" storage backends. (packages (append (map specification->package '("qemu" "lvm2" "drbd-utils" "ceph" ;; Add the debootstrap and guix OS providers. "ganeti-instance-guix" "ganeti-instance-debootstrap")) %base-packages)) (services (append (list (service static-networking-service-type (list (static-networking (addresses (list (network-address (device "eth0") (value "192.168.1.201/24")))) (routes (list (network-route (destination "default") (gateway "192.168.1.254")))) (name-servers '("192.168.1.252" "192.168.1.253"))))) ;; Ganeti uses SSH to communicate between nodes. (service openssh-service-type (openssh-configuration (permit-root-login 'prohibit-password))) (simple-service 'ganeti-hosts-entries hosts-service-type (list (host "192.168.1.200" "ganeti.example.com") (host "192.168.1.201" "node1.example.com" '("node1")) (host "192.168.1.202" "node2.example.com" '("node2")))) (service ganeti-service-type (ganeti-configuration ;; This list specifies allowed file system paths ;; for storing virtual machine images. (file-storage-paths '("/srv/ganeti/file-storage")) ;; This variable configures a single "variant" for ;; both Debootstrap and Guix that works with KVM. (os %default-ganeti-os)))) %base-services)))
Users are advised to read the Ganeti administrators guide to learn about the various cluster options and day-to-day operations. There is also a blog post describing how to configure and initialize a small cluster.
- Variável: ganeti-service-type
This is a service type that includes all the various services that Ganeti nodes should run.
Its value is a
ganeti-configurationobject that defines the package to use for CLI operations, as well as configuration for the various daemons. Allowed file storage paths and available guest operating systems are also configured through this data type.
- Tipo de dados: ganeti-configuration
The
ganetiservice takes the following configuration options:ganeti(default:ganeti)The
ganetipackage to use. It will be installed to the system profile and makegnt-cluster,gnt-instance, etc available. Note that the value specified here does not affect the other services as each refer to a specificganetipackage (see below).noded-configuration(default:(ganeti-noded-configuration))confd-configuration(default:(ganeti-confd-configuration))wconfd-configuration(default:(ganeti-wconfd-configuration))luxid-configuration(default:(ganeti-luxid-configuration))rapi-configuration(default:(ganeti-rapi-configuration))kvmd-configuration(default:(ganeti-kvmd-configuration))mond-configuration(default:(ganeti-mond-configuration))metad-configuration(default:(ganeti-metad-configuration))watcher-configuration(default:(ganeti-watcher-configuration))cleaner-configuration(default:(ganeti-cleaner-configuration))-
These options control the various daemons and cron jobs that are distributed with Ganeti. The possible values for these are described in detail below. To override a setting, you must use the configuration type for that service:
(service ganeti-service-type (ganeti-configuration (rapi-configuration (ganeti-rapi-configuration (interface "eth1")))) (watcher-configuration (ganeti-watcher-configuration (rapi-ip "10.0.0.1")))) file-storage-paths(default:'())List of allowed directories for file storage backend.
hooks(default:#f)When set, this should be a file-like object containing a directory with cluster execution hooks.
os(default:%default-ganeti-os)List of
<ganeti-os>records.
In essence
ganeti-service-typeis shorthand for declaring each service individually:(service ganeti-noded-service-type) (service ganeti-confd-service-type) (service ganeti-wconfd-service-type) (service ganeti-luxid-service-type) (service ganeti-kvmd-service-type) (service ganeti-mond-service-type) (service ganeti-metad-service-type) (service ganeti-watcher-service-type) (service ganeti-cleaner-service-type)
Plus a service extension for
etc-service-typethat configures the file storage backend and OS variants.
- Tipo de dados: ganeti-os
This data type is suitable for passing to the
osparameter ofganeti-configuration. It takes the following parameters:nameThe name for this OS provider. It is only used to specify where the configuration ends up. Setting it to “debootstrap” will create /etc/ganeti/instance-debootstrap.
extension(default:#f)The file extension for variants of this OS type. For example .conf or .scm. It will be appended to the variant file name if set.
variants(default:'())This must be either a list of
ganeti-os-variantobjects for this OS, or a “file-like” object (veja file-like objects) representing the variants directory.To use the Guix OS provider with variant definitions residing in a local directory instead of declaring individual variants (see guix-variants below), you can do:
(ganeti-os (name "guix") (variants (local-file "ganeti-guix-variants" #:recursive? #true)))Note that you will need to maintain the variants.list file (see
ganeti-os-interface(7)) manually in this case.
- Tipo de dados: ganeti-os-variant
This is the data type for a Ganeti OS variant. It takes the following parameters:
nameThe name of this variant.
configurationA configuration file for this variant.
- Variável: %default-debootstrap-hooks
This variable contains hooks to configure networking and the GRUB bootloader.
- Variável: %default-debootstrap-extra-pkgs
This variable contains a list of packages suitable for a fully-virtualized guest.
- Tipo de dados: debootstrap-configuration
-
This data type creates configuration files suitable for the debootstrap OS provider.
hooks(default:%default-debootstrap-hooks)When not
#f, this must be a G-expression that specifies a directory with scripts that will run when the OS is installed. It can also be a list of(name . file-like)pairs. For example:`((99-hello-world . ,(plain-file "#!/bin/sh\necho Hello, World")))
That will create a directory with one executable named
99-hello-worldand run it every time this variant is installed. If set to#f, hooks in /etc/ganeti/instance-debootstrap/hooks will be used, if any.proxy(default:#f)Optional HTTP proxy to use.
mirror(default:#f)The Debian mirror. Typically something like
http://ftp.no.debian.org/debian. The default varies depending on the distribution.arch(default:#f)The dpkg architecture. Set to
armhfto debootstrap an ARMv7 instance on an AArch64 host. Default is to use the current system architecture.suite(default:"stable")When set, this must be a Debian distribution “suite” such as
busterorfocal. If set to#f, the default for the OS provider is used.extra-pkgs(default:%default-debootstrap-extra-pkgs)List of extra packages that will get installed by dpkg in addition to the minimal system.
components(default:#f)When set, must be a list of Debian repository “components”. For example
'("main" "contrib").generate-cache?(default:#t)Whether to automatically cache the generated debootstrap archive.
clean-cache(default:14)Discard the cache after this amount of days. Use
#fto never clear the cache.partition-style(default:'msdos)The type of partition to create. When set, it must be one of
'msdos,'noneor a string.partition-alignment(default:2048)Alignment of the partition in sectors.
- Procedure: debootstrap-variant name configuration
This is a helper procedure that creates a
ganeti-os-variantrecord. It takes two parameters: a name and adebootstrap-configurationobject.
- Procedure: debootstrap-os variants…
This is a helper procedure that creates a
ganeti-osrecord. It takes a list of variants created withdebootstrap-variant.
- Procedure: guix-variant name configuration
This is a helper procedure that creates a
ganeti-os-variantrecord for use with the Guix OS provider. It takes a name and a G-expression that returns a “file-like” (veja file-like objects) object containing a Guix System configuration.
- Procedure: guix-os variants…
This is a helper procedure that creates a
ganeti-osrecord. It takes a list of variants produced byguix-variant.
- Variável: %default-debootstrap-variants
This is a convenience variable to make the debootstrap provider work “out of the box” without users having to declare variants manually. It contains a single debootstrap variant with the default configuration:
(list (debootstrap-variant "default" (debootstrap-configuration)))
- Variável: %default-guix-variants
This is a convenience variable to make the Guix OS provider work without additional configuration. It creates a virtual machine that has an SSH server, a serial console, and authorizes the Ganeti hosts SSH keys.
(list (guix-variant "default" (file-append ganeti-instance-guix "/share/doc/ganeti-instance-guix/examples/dynamic.scm")))
Users can implement support for OS providers unbeknownst to Guix by
extending the ganeti-os and ganeti-os-variant records
appropriately. For example:
(ganeti-os
(name "custom")
(extension ".conf")
(variants
(list (ganeti-os-variant
(name "foo")
(configuration (plain-file "bar" "this is fine"))))))
That creates /etc/ganeti/instance-custom/variants/foo.conf which
points to a file in the store with contents this is fine. It also
creates /etc/ganeti/instance-custom/variants/variants.list with
contents foo.
Obviously this may not work for all OS providers out there. If you find the interface limiting, please reach out to guix-devel@gnu.org.
The rest of this section documents the various services that are included by
ganeti-service-type.
- Variável: ganeti-noded-service-type
ganeti-nodedis the daemon responsible for node-specific functions within the Ganeti system. The value of this service must be aganeti-noded-configurationobject.
- Tipo de dados: ganeti-noded-configuration
This is the configuration for the
ganeti-nodedservice.ganeti(default:ganeti)The
ganetipackage to use for this service.port(padrão:1811)The TCP port on which the node daemon listens for network requests.
address(default:"0.0.0.0")The network address that the daemon will bind to. The default address means bind to all available addresses.
interface(default:#f)When this is set, it must be a specific network interface (e.g.
eth0) that the daemon will bind to.max-clients(default:20)This sets a limit on the maximum number of simultaneous client connections that the daemon will handle. Connections above this count are accepted, but no responses will be sent until enough connections have closed.
ssl?(default:#t)Whether to use SSL/TLS to encrypt network communications. The certificate is automatically provisioned by the cluster and can be rotated with
gnt-cluster renew-crypto.ssl-key(default: "/var/lib/ganeti/server.pem")This can be used to provide a specific encryption key for TLS communications.
ssl-cert(default: "/var/lib/ganeti/server.pem")This can be used to provide a specific certificate for TLS communications.
debug?(default:#f)When true, the daemon performs additional logging for debugging purposes. Note that this will leak encryption details to the log files, use with caution.
- Variável: ganeti-confd-service-type
ganeti-confdanswers queries related to the configuration of a Ganeti cluster. The purpose of this daemon is to have a highly available and fast way to query cluster configuration values. It is automatically active on all master candidates. The value of this service must be aganeti-confd-configurationobject.
- Tipo de dados: ganeti-confd-configuration
This is the configuration for the
ganeti-confdservice.ganeti(default:ganeti)The
ganetipackage to use for this service.port(padrão:1814)The UDP port on which to listen for network requests.
address(default:"0.0.0.0")Network address that the daemon will bind to.
debug?(default:#f)When true, the daemon performs additional logging for debugging purposes.
- Variável: ganeti-wconfd-service-type
ganeti-wconfdis the daemon that has authoritative knowledge about the cluster configuration and is the only entity that can accept changes to it. All jobs that need to modify the configuration will do so by sending appropriate requests to this daemon. It only runs on the master node and will automatically disable itself on other nodes.The value of this service must be a
ganeti-wconfd-configurationobject.
- Tipo de dados: ganeti-wconfd-configuration
This is the configuration for the
ganeti-wconfdservice.ganeti(default:ganeti)The
ganetipackage to use for this service.no-voting?(default:#f)The daemon will refuse to start if the majority of cluster nodes does not agree that it is running on the master node. Set to
#tto start even if a quorum can not be reached (dangerous, use with caution).debug?(default:#f)When true, the daemon performs additional logging for debugging purposes.
- Variável: ganeti-luxid-service-type
ganeti-luxidis a daemon used to answer queries related to the configuration and the current live state of a Ganeti cluster. Additionally, it is the authoritative daemon for the Ganeti job queue. Jobs can be submitted via this daemon and it schedules and starts them.It takes a
ganeti-luxid-configurationobject.
- Tipo de dados: ganeti-luxid-configuration
This is the configuration for the
ganeti-luxidservice.ganeti(default:ganeti)The
ganetipackage to use for this service.no-voting?(default:#f)The daemon will refuse to start if it cannot verify that the majority of cluster nodes believes that it is running on the master node. Set to
#tto ignore such checks and start anyway (this can be dangerous).debug?(default:#f)When true, the daemon performs additional logging for debugging purposes.
- Variável: ganeti-rapi-service-type
ganeti-rapiprovides a remote API for Ganeti clusters. It runs on the master node and can be used to perform cluster actions programmatically via a JSON-based RPC protocol.Most query operations are allowed without authentication (unless require-authentication? is set), whereas write operations require explicit authorization via the /var/lib/ganeti/rapi/users file. See the Ganeti Remote API documentation for more information.
The value of this service must be a
ganeti-rapi-configurationobject.
- Tipo de dados: ganeti-rapi-configuration
This is the configuration for the
ganeti-rapiservice.ganeti(default:ganeti)The
ganetipackage to use for this service.require-authentication?(default:#f)Whether to require authentication even for read-only operations.
port(padrão:5080)The TCP port on which to listen to API requests.
address(default:"0.0.0.0")The network address that the service will bind to. By default it listens on all configured addresses.
interface(default:#f)When set, it must specify a specific network interface such as
eth0that the daemon will bind to.max-clients(default:20)The maximum number of simultaneous client requests to handle. Further connections are allowed, but no responses are sent until enough connections have closed.
ssl?(default:#t)Whether to use SSL/TLS encryption on the RAPI port.
ssl-key(default: "/var/lib/ganeti/server.pem")This can be used to provide a specific encryption key for TLS communications.
ssl-cert(default: "/var/lib/ganeti/server.pem")This can be used to provide a specific certificate for TLS communications.
debug?(default:#f)When true, the daemon performs additional logging for debugging purposes. Note that this will leak encryption details to the log files, use with caution.
- Variável: ganeti-kvmd-service-type
ganeti-kvmdis responsible for determining whether a given KVM instance was shut down by an administrator or a user. Normally Ganeti will restart an instance that was not stopped through Ganeti itself. If the cluster optionuser_shutdownis true, this daemon monitors theQMPsocket provided by QEMU and listens for shutdown events, and marks the instance as USER_down instead of ERROR_down when it shuts down gracefully by itself.It takes a
ganeti-kvmd-configurationobject.
- Tipo de dados: ganeti-kvmd-configuration
-
ganeti(default:ganeti)The
ganetipackage to use for this service.debug?(default:#f)When true, the daemon performs additional logging for debugging purposes.
- Variável: ganeti-mond-service-type
ganeti-mondis an optional daemon that provides Ganeti monitoring functionality. It is responsible for running data collectors and publish the collected information through a HTTP interface.It takes a
ganeti-mond-configurationobject.
- Tipo de dados: ganeti-mond-configuration
-
ganeti(default:ganeti)The
ganetipackage to use for this service.port(padrão:1815)The port on which the daemon will listen.
address(default:"0.0.0.0")The network address that the daemon will bind to. By default it binds to all available interfaces.
debug?(default:#f)When true, the daemon performs additional logging for debugging purposes.
- Variável: ganeti-metad-service-type
ganeti-metadis an optional daemon that can be used to provide information about the cluster to instances or OS install scripts.It takes a
ganeti-metad-configurationobject.
- Tipo de dados: ganeti-metad-configuration
-
ganeti(default:ganeti)The
ganetipackage to use for this service.port(padrão:80)The port on which the daemon will listen.
address(default:#f)If set, the daemon will bind to this address only. If left unset, the behavior depends on the cluster configuration.
debug?(default:#f)When true, the daemon performs additional logging for debugging purposes.
- Variável: ganeti-watcher-service-type
ganeti-watcheris a script designed to run periodically and ensure the health of a cluster. It will automatically restart instances that have stopped without Ganeti’s consent, and repairs DRBD links in case a node has rebooted. It also archives old cluster jobs and restarts Ganeti daemons that are not running. If the cluster parameterensure_node_healthis set, the watcher will also shutdown instances and DRBD devices if the node it is running on is declared offline by known master candidates.It can be paused on all nodes with
gnt-cluster watcher pause.The service takes a
ganeti-watcher-configurationobject.
- Tipo de dados: ganeti-watcher-configuration
-
ganeti(default:ganeti)The
ganetipackage to use for this service.schedule(default:'(next-second-from (next-minute (range 0 60 5))))How often to run the script. The default is every five minutes.
rapi-ip(default:#f)This option needs to be specified only if the RAPI daemon is configured to use a particular interface or address. By default the cluster address is used.
job-age(default:(* 6 3600))Archive cluster jobs older than this age, specified in seconds. The default is 6 hours. This keeps
gnt-job listmanageable.verify-disks?(default:#t)If this is
#f, the watcher will not try to repair broken DRBD links automatically. Administrators will need to usegnt-cluster verify-disksmanually instead.debug?(default:#f)When
#t, the script performs additional logging for debugging purposes.
- Variável: ganeti-cleaner-service-type
ganeti-cleaneris a script designed to run periodically and remove old files from the cluster. This service type controls two cron jobs: one intended for the master node that permanently purges old cluster jobs, and one intended for every node that removes expired X509 certificates, keys, and outdatedganeti-watcherinformation. Like all Ganeti services, it is safe to include even on non-master nodes as it will disable itself as necessary.It takes a
ganeti-cleaner-configurationobject.
- Tipo de dados: ganeti-cleaner-configuration
-
ganeti(default:ganeti)The
ganetipackage to use for thegnt-cleanercommand.master-schedule(default:"45 1 * * *")How often to run the master cleaning job. The default is once per day, at 01:45:00.
node-schedule(default:"45 2 * * *")How often to run the node cleaning job. The default is once per day, at 02:45:00.
Próximo: Serviços de jogos, Anterior: Serviços de virtualização, Acima: Serviços [Conteúdo][Índice]
11.10.31 Serviços de controlando versão
The (gnu services version-control) module provides a service to allow
remote access to local Git repositories. There are three options: the
git-daemon-service-type, which provides access to repositories via
the git:// unsecured TCP-based protocol, extending the nginx
web server to proxy some requests to git-http-backend, or providing a
web interface with cgit-service-type.
- Variável: git-daemon-service-type
Type for a service that runs
git daemon, a simple TCP server to expose repositories over the Git protocol for anonymous access.The value for this service type is a
<git-daemon-configuration>record, by default it allows read-only access to exported36 repositories under /srv/git.
- Tipo de dados: git-daemon-configuration
Data type representing the configuration for
git-daemon-service-type.package(default:git)Package object of the Git distributed version control system.
export-all?(default:#f)Whether to allow access for all Git repositories, even if they do not have the git-daemon-export-ok file.
base-path(default: /srv/git)Whether to remap all the path requests as relative to the given path. If you run
git daemonwith(base-path "/srv/git")on ‘example.com’, then if you later try to pull ‘git://example.com/hello.git’, git daemon will interpret the path as /srv/git/hello.git.user-path(default:#f)Whether to allow
~usernotation to be used in requests. When specified with empty string, requests to ‘git://host/~alice/foo’ is taken as a request to accessfoorepository in the home directory of useralice. If(user-path "path")is specified, the same request is taken as a request to access path/foo repository in the home directory of useralice.listen(default:'())Whether to listen on specific IP addresses or hostnames, defaults to all.
port(padrão:#f)Whether to listen on an alternative port, which defaults to 9418.
whitelist(default:'())If not empty, only allow access to this list of directories.
extra-options(default:'())Extra options that will be passed to
git daemon.37
The git:// protocol lacks authentication. When you pull from a
repository fetched via git://, you don’t know whether the data you
receive was modified or is even coming from the specified host, and your
connection is subject to eavesdropping. It’s better to use an authenticated
and encrypted transport, such as https. Although Git allows you to
serve repositories using unsophisticated file-based web servers, there is a
faster protocol implemented by the git-http-backend program. This
program is the back-end of a proper Git web service. It is designed to sit
behind a FastCGI proxy. Veja Serviços web, for more on running the
necessary fcgiwrap daemon.
Guix has a separate configuration data type for serving Git repositories over HTTP.
- Tipo de dados: git-http-configuration
Data type representing the configuration for a future
git-http-service-type; can currently be used to configure Nginx throughgit-http-nginx-location-configuration.package(default: git)Package object of the Git distributed version control system.
git-root(default: /srv/git)Directory containing the Git repositories to expose to the world.
export-all?(default:#f)Whether to expose access for all Git repositories in git-root, even if they do not have the git-daemon-export-ok file.
uri-path(default: ‘/git/’)Path prefix for Git access. With the default ‘/git/’ prefix, this will map ‘
http://server/git/repo.git’ to /srv/git/repo.git. Requests whose URI paths do not begin with this prefix are not passed on to this Git instance.fcgiwrap-socket(default:127.0.0.1:9000)The socket on which the
fcgiwrapdaemon is listening. Veja Serviços web.
There is no git-http-service-type, currently; instead you can create
an nginx-location-configuration from a git-http-configuration
and then add that location to a web server.
- Procedure: git-http-nginx-location-configuration [config=(git-http-configuration)] Compute an
nginx-location-configurationthat corresponds to the given Git http configuration. An example nginx service definition to serve the default /srv/git over HTTPS might be:(service nginx-service-type (nginx-configuration (server-blocks (list (nginx-server-configuration (listen '("443 ssl")) (server-name "git.my-host.org") (ssl-certificate "/etc/certs/git.my-host.org/fullchain.pem") (ssl-certificate-key "/etc/certs/git.my-host.org/privkey.pem") (locations (list (git-http-nginx-location-configuration (git-http-configuration (uri-path "/"))))))))))This example assumes that you are using Let’s Encrypt to get your TLS certificate. Veja Serviços de certificado. The default
certbotservice will redirect all HTTP traffic ongit.my-host.orgto HTTPS. You will also need to add anfcgiwrapproxy to your system services. Veja Serviços web.
Cgit Service
Cgit is a web frontend for Git repositories written in C.
The following example will configure the service with default values. By
default, Cgit can be accessed on port 80 (http://localhost:80).
(service cgit-service-type)
The file-object type designates either a file-like object
(veja file-like objects) or a string.
Available cgit-configuration fields are:
cgit-configurationparameter: package package ¶The CGIT package.
cgit-configurationparameter: nginx-server-configuration-list nginx ¶NGINX configuration.
cgit-configurationparameter: file-object about-filter ¶Specifies a command which will be invoked to format the content of about pages (both top-level and for each repository).
Defaults to ‘""’.
cgit-configurationparameter: string agefile ¶Specifies a path, relative to each repository path, which can be used to specify the date and time of the youngest commit in the repository.
Defaults to ‘""’.
cgit-configurationparameter: file-object auth-filter ¶Specifies a command that will be invoked for authenticating repository access.
Defaults to ‘""’.
cgit-configurationparameter: string branch-sort ¶Flag which, when set to ‘age’, enables date ordering in the branch ref list, and when set ‘name’ enables ordering by branch name.
Defaults to ‘"name"’.
cgit-configurationparameter: string cache-root ¶Path used to store the cgit cache entries.
Defaults to ‘"/var/cache/cgit"’.
cgit-configurationparameter: integer cache-static-ttl ¶Number which specifies the time-to-live, in minutes, for the cached version of repository pages accessed with a fixed SHA1.
Defaults to ‘-1’.
cgit-configurationparameter: integer cache-dynamic-ttl ¶Number which specifies the time-to-live, in minutes, for the cached version of repository pages accessed without a fixed SHA1.
Defaults to ‘5’.
cgit-configurationparameter: integer cache-repo-ttl ¶Number which specifies the time-to-live, in minutes, for the cached version of the repository summary page.
Defaults to ‘5’.
cgit-configurationparameter: integer cache-root-ttl ¶Number which specifies the time-to-live, in minutes, for the cached version of the repository index page.
Defaults to ‘5’.
cgit-configurationparameter: integer cache-scanrc-ttl ¶Number which specifies the time-to-live, in minutes, for the result of scanning a path for Git repositories.
Defaults to ‘15’.
cgit-configurationparameter: integer cache-about-ttl ¶Number which specifies the time-to-live, in minutes, for the cached version of the repository about page.
Defaults to ‘15’.
cgit-configurationparameter: integer cache-snapshot-ttl ¶Number which specifies the time-to-live, in minutes, for the cached version of snapshots.
Defaults to ‘5’.
cgit-configurationparameter: integer cache-size ¶The maximum number of entries in the cgit cache. When set to ‘0’, caching is disabled.
Defaults to ‘0’.
cgit-configurationparameter: boolean case-sensitive-sort? ¶Sort items in the repo list case sensitively.
Defaults to ‘#t’.
cgit-configurationparameter: list clone-prefix ¶List of common prefixes which, when combined with a repository URL, generates valid clone URLs for the repository.
Defaults to ‘'()’.
cgit-configurationparameter: list clone-url ¶List of
clone-urltemplates.Defaults to ‘'()’.
cgit-configurationparameter: file-object commit-filter ¶Command which will be invoked to format commit messages.
Defaults to ‘""’.
cgit-configurationparameter: string commit-sort ¶Flag which, when set to ‘date’, enables strict date ordering in the commit log, and when set to ‘topo’ enables strict topological ordering.
Defaults to ‘"git log"’.
cgit-configurationparameter: file-object css ¶URL which specifies the css document to include in all cgit pages.
Defaults to ‘"/share/cgit/cgit.css"’.
cgit-configurationparameter: file-object email-filter ¶Specifies a command which will be invoked to format names and email address of committers, authors, and taggers, as represented in various places throughout the cgit interface.
Defaults to ‘""’.
cgit-configurationparameter: boolean embedded? ¶Flag which, when set to ‘#t’, will make cgit generate a HTML fragment suitable for embedding in other HTML pages.
Defaults to ‘#f’.
cgit-configurationparameter: boolean enable-commit-graph? ¶Flag which, when set to ‘#t’, will make cgit print an ASCII-art commit history graph to the left of the commit messages in the repository log page.
Defaults to ‘#f’.
cgit-configurationparameter: boolean enable-filter-overrides? ¶Flag which, when set to ‘#t’, allows all filter settings to be overridden in repository-specific cgitrc files.
Defaults to ‘#f’.
cgit-configurationparameter: boolean enable-follow-links? ¶Flag which, when set to ‘#t’, allows users to follow a file in the log view.
Defaults to ‘#f’.
cgit-configurationparameter: boolean enable-http-clone? ¶If set to ‘#t’, cgit will act as an dumb HTTP endpoint for Git clones.
Defaults to ‘#t’.
cgit-configurationparameter: boolean enable-index-links? ¶Flag which, when set to ‘#t’, will make cgit generate extra links "summary", "commit", "tree" for each repo in the repository index.
Defaults to ‘#f’.
cgit-configurationparameter: boolean enable-index-owner? ¶Flag which, when set to ‘#t’, will make cgit display the owner of each repo in the repository index.
Defaults to ‘#t’.
cgit-configurationparameter: boolean enable-log-filecount? ¶Flag which, when set to ‘#t’, will make cgit print the number of modified files for each commit on the repository log page.
Defaults to ‘#f’.
cgit-configurationparameter: boolean enable-log-linecount? ¶Flag which, when set to ‘#t’, will make cgit print the number of added and removed lines for each commit on the repository log page.
Defaults to ‘#f’.
cgit-configurationparameter: boolean enable-remote-branches? ¶Flag which, when set to
#t, will make cgit display remote branches in the summary and refs views.Defaults to ‘#f’.
cgit-configurationparameter: boolean enable-subject-links? ¶Flag which, when set to
1, will make cgit use the subject of the parent commit as link text when generating links to parent commits in commit view.Defaults to ‘#f’.
cgit-configurationparameter: boolean enable-html-serving? ¶Flag which, when set to ‘#t’, will make cgit use the subject of the parent commit as link text when generating links to parent commits in commit view.
Defaults to ‘#f’.
cgit-configurationparameter: boolean enable-tree-linenumbers? ¶Flag which, when set to ‘#t’, will make cgit generate linenumber links for plaintext blobs printed in the tree view.
Defaults to ‘#t’.
cgit-configurationparameter: boolean enable-git-config? ¶Flag which, when set to ‘#f’, will allow cgit to use Git config to set any repo specific settings.
Defaults to ‘#f’.
cgit-configurationparameter: file-object favicon ¶URL used as link to a shortcut icon for cgit.
Defaults to ‘"/favicon.ico"’.
The content of the file specified with this option will be included verbatim at the bottom of all pages (i.e. it replaces the standard "generated by..." message).
Defaults to ‘""’.
cgit-configurationparameter: string head-include ¶The content of the file specified with this option will be included verbatim in the HTML HEAD section on all pages.
Defaults to ‘""’.
cgit-configurationparameter: string header ¶The content of the file specified with this option will be included verbatim at the top of all pages.
Defaults to ‘""’.
cgit-configurationparameter: file-object include ¶Name of a configfile to include before the rest of the current config- file is parsed.
Defaults to ‘""’.
cgit-configurationparameter: string index-header ¶The content of the file specified with this option will be included verbatim above the repository index.
Defaults to ‘""’.
cgit-configurationparameter: string index-info ¶The content of the file specified with this option will be included verbatim below the heading on the repository index page.
Defaults to ‘""’.
cgit-configurationparameter: boolean local-time? ¶Flag which, if set to ‘#t’, makes cgit print commit and tag times in the servers timezone.
Defaults to ‘#f’.
cgit-configurationparameter: file-object logo ¶URL which specifies the source of an image which will be used as a logo on all cgit pages.
Defaults to ‘"/share/cgit/cgit.png"’.
cgit-configurationparameter: string logo-link ¶URL loaded when clicking on the cgit logo image.
Defaults to ‘""’.
cgit-configurationparameter: file-object owner-filter ¶Command which will be invoked to format the Owner column of the main page.
Defaults to ‘""’.
cgit-configurationparameter: integer max-atom-items ¶Number of items to display in atom feeds view.
Defaults to ‘10’.
cgit-configurationparameter: integer max-commit-count ¶Number of entries to list per page in "log" view.
Defaults to ‘50’.
cgit-configurationparameter: integer max-message-length ¶Number of commit message characters to display in "log" view.
Defaults to ‘80’.
cgit-configurationparameter: integer max-repo-count ¶Specifies the number of entries to list per page on the repository index page.
Defaults to ‘50’.
cgit-configurationparameter: integer max-repodesc-length ¶Specifies the maximum number of repo description characters to display on the repository index page.
Defaults to ‘80’.
cgit-configurationparameter: integer max-blob-size ¶Specifies the maximum size of a blob to display HTML for in KBytes.
Defaults to ‘0’.
cgit-configurationparameter: string max-stats ¶Maximum statistics period. Valid values are ‘week’,‘month’, ‘quarter’ and ‘year’.
Defaults to ‘""’.
cgit-configurationparameter: mimetype-alist mimetype ¶Mimetype for the specified filename extension.
Defaults to ‘'((gif "image/gif") (html "text/html") (jpg "image/jpeg") (jpeg "image/jpeg") (pdf "application/pdf") (png "image/png") (svg "image/svg+xml"))’.
cgit-configurationparameter: file-object mimetype-file ¶Specifies the file to use for automatic mimetype lookup.
Defaults to ‘""’.
cgit-configurationparameter: string module-link ¶Text which will be used as the formatstring for a hyperlink when a submodule is printed in a directory listing.
Defaults to ‘""’.
cgit-configurationparameter: boolean nocache? ¶If set to the value ‘#t’ caching will be disabled.
Defaults to ‘#f’.
cgit-configurationparameter: boolean noplainemail? ¶If set to ‘#t’ showing full author email addresses will be disabled.
Defaults to ‘#f’.
cgit-configurationparameter: boolean noheader? ¶Flag which, when set to ‘#t’, will make cgit omit the standard header on all pages.
Defaults to ‘#f’.
cgit-configurationparameter: project-list project-list ¶A list of subdirectories inside of
repository-directory, relative to it, that should loaded as Git repositories. An empty list means that all subdirectories will be loaded.Defaults to ‘'()’.
cgit-configurationparameter: file-object readme ¶Text which will be used as default
repository-cgit-configurationreadme.Defaults to ‘""’.
cgit-configurationparameter: boolean remove-suffix? ¶If set to
#tandrepository-directoryis enabled, if any repositories are found with a suffix of.git, this suffix will be removed for the URL and name.Defaults to ‘#f’.
cgit-configurationparameter: integer renamelimit ¶Maximum number of files to consider when detecting renames.
Defaults to ‘-1’.
cgit-configurationparameter: string repository-sort ¶The way in which repositories in each section are sorted.
Defaults to ‘""’.
cgit-configurationparameter: robots-list robots ¶Text used as content for the
robotsmeta-tag.Defaults to ‘'("noindex" "nofollow")’.
cgit-configurationparameter: string root-desc ¶Text printed below the heading on the repository index page.
Defaults to ‘"a fast webinterface for the git dscm"’.
cgit-configurationparameter: string root-readme ¶The content of the file specified with this option will be included verbatim below the “about” link on the repository index page.
Defaults to ‘""’.
cgit-configurationparameter: string root-title ¶Text printed as heading on the repository index page.
Defaults to ‘""’.
If set to ‘#t’ and repository-directory is enabled, repository-directory will recurse into directories whose name starts with a period. Otherwise, repository-directory will stay away from such directories, considered as “hidden”. Note that this does not apply to the .git directory in non-bare repos.
Defaults to ‘#f’.
cgit-configurationparameter: list snapshots ¶Text which specifies the default set of snapshot formats that cgit generates links for.
Defaults to ‘'()’.
cgit-configurationparameter: repository-directory repository-directory ¶Name of the directory to scan for repositories (represents
scan-path).Defaults to ‘"/srv/git"’.
cgit-configurationparameter: string section ¶The name of the current repository section - all repositories defined after this option will inherit the current section name.
Defaults to ‘""’.
cgit-configurationparameter: string section-sort ¶Flag which, when set to ‘1’, will sort the sections on the repository listing by name.
Defaults to ‘""’.
cgit-configurationparameter: integer section-from-path ¶A number which, if defined prior to repository-directory, specifies how many path elements from each repo path to use as a default section name.
Defaults to ‘0’.
cgit-configurationparameter: boolean side-by-side-diffs? ¶If set to ‘#t’ shows side-by-side diffs instead of unidiffs per default.
Defaults to ‘#f’.
cgit-configurationparameter: file-object source-filter ¶Specifies a command which will be invoked to format plaintext blobs in the tree view.
Defaults to ‘""’.
cgit-configurationparameter: integer summary-branches ¶Specifies the number of branches to display in the repository “summary” view.
Defaults to ‘10’.
cgit-configurationparameter: integer summary-log ¶Specifies the number of log entries to display in the repository “summary” view.
Defaults to ‘10’.
Specifies the number of tags to display in the repository “summary” view.
Defaults to ‘10’.
cgit-configurationparameter: string strict-export ¶Filename which, if specified, needs to be present within the repository for cgit to allow access to that repository.
Defaults to ‘""’.
cgit-configurationparameter: string virtual-root ¶URL which, if specified, will be used as root for all cgit links.
Defaults to ‘"/"’.
cgit-configurationparameter: repository-cgit-configuration-list repositories ¶A list of
repository-cgit-configurationrecords.Defaults to ‘'()’.
Available
repository-cgit-configurationfields are:repository-cgit-configurationparameter: repo-list snapshots ¶A mask of snapshot formats for this repo that cgit generates links for, restricted by the global
snapshotssetting.Defaults to ‘'()’.
repository-cgit-configurationparameter: repo-file-object source-filter ¶Override the default
source-filter.Defaults to ‘""’.
repository-cgit-configurationparameter: repo-string url ¶The relative URL used to access the repository.
Defaults to ‘""’.
repository-cgit-configurationparameter: repo-file-object about-filter ¶Override the default
about-filter.Defaults to ‘""’.
repository-cgit-configurationparameter: repo-string branch-sort ¶Flag which, when set to ‘age’, enables date ordering in the branch ref list, and when set to ‘name’ enables ordering by branch name.
Defaults to ‘""’.
repository-cgit-configurationparameter: repo-list clone-url ¶A list of URLs which can be used to clone repo.
Defaults to ‘'()’.
repository-cgit-configurationparameter: repo-file-object commit-filter ¶Override the default
commit-filter.Defaults to ‘""’.
repository-cgit-configurationparameter: repo-string commit-sort ¶Flag which, when set to ‘date’, enables strict date ordering in the commit log, and when set to ‘topo’ enables strict topological ordering.
Defaults to ‘""’.
repository-cgit-configurationparameter: repo-string defbranch ¶The name of the default branch for this repository. If no such branch exists in the repository, the first branch name (when sorted) is used as default instead. By default branch pointed to by HEAD, or “master” if there is no suitable HEAD.
Defaults to ‘""’.
repository-cgit-configurationparameter: repo-string desc ¶The value to show as repository description.
Defaults to ‘""’.
repository-cgit-configurationparameter: repo-string homepage ¶The value to show as repository homepage.
Defaults to ‘""’.
repository-cgit-configurationparameter: repo-file-object email-filter ¶Override the default
email-filter.Defaults to ‘""’.
repository-cgit-configurationparameter: maybe-repo-boolean enable-commit-graph? ¶A flag which can be used to disable the global setting
enable-commit-graph?.Defaults to ‘disabled’.
repository-cgit-configurationparameter: maybe-repo-boolean enable-log-filecount? ¶A flag which can be used to disable the global setting
enable-log-filecount?.Defaults to ‘disabled’.
repository-cgit-configurationparameter: maybe-repo-boolean enable-log-linecount? ¶A flag which can be used to disable the global setting
enable-log-linecount?.Defaults to ‘disabled’.
repository-cgit-configurationparameter: maybe-repo-boolean enable-remote-branches? ¶Flag which, when set to
#t, will make cgit display remote branches in the summary and refs views.Defaults to ‘disabled’.
repository-cgit-configurationparameter: maybe-repo-boolean enable-subject-links? ¶A flag which can be used to override the global setting
enable-subject-links?.Defaults to ‘disabled’.
repository-cgit-configurationparameter: maybe-repo-boolean enable-html-serving? ¶A flag which can be used to override the global setting
enable-html-serving?.Defaults to ‘disabled’.
repository-cgit-configurationparameter: repo-boolean hide? ¶Flag which, when set to
#t, hides the repository from the repository index.Defaults to ‘#f’.
repository-cgit-configurationparameter: repo-boolean ignore? ¶Flag which, when set to ‘#t’, ignores the repository.
Defaults to ‘#f’.
repository-cgit-configurationparameter: repo-file-object logo ¶URL which specifies the source of an image which will be used as a logo on this repo’s pages.
Defaults to ‘""’.
repository-cgit-configurationparameter: repo-string logo-link ¶URL loaded when clicking on the cgit logo image.
Defaults to ‘""’.
repository-cgit-configurationparameter: repo-file-object owner-filter ¶Override the default
owner-filter.Defaults to ‘""’.
repository-cgit-configurationparameter: repo-string module-link ¶Text which will be used as the formatstring for a hyperlink when a submodule is printed in a directory listing. The arguments for the formatstring are the path and SHA1 of the submodule commit.
Defaults to ‘""’.
repository-cgit-configurationparameter: module-link-path module-link-path ¶Text which will be used as the formatstring for a hyperlink when a submodule with the specified subdirectory path is printed in a directory listing.
Defaults to ‘'()’.
repository-cgit-configurationparameter: repo-string max-stats ¶Override the default maximum statistics period.
Defaults to ‘""’.
repository-cgit-configurationparameter: repo-string name ¶The value to show as repository name.
Defaults to ‘""’.
repository-cgit-configurationparameter: repo-string owner ¶A value used to identify the owner of the repository.
Defaults to ‘""’.
repository-cgit-configurationparameter: repo-string path ¶An absolute path to the repository directory.
Defaults to ‘""’.
repository-cgit-configurationparameter: repo-string readme ¶A path (relative to repo) which specifies a file to include verbatim as the “About” page for this repo.
Defaults to ‘""’.
repository-cgit-configurationparameter: repo-string section ¶The name of the current repository section - all repositories defined after this option will inherit the current section name.
Defaults to ‘""’.
repository-cgit-configurationparameter: repo-list extra-options ¶Extra options will be appended to cgitrc file.
Defaults to ‘'()’.
cgit-configurationparameter: list extra-options ¶Extra options will be appended to cgitrc file.
Defaults to ‘'()’.
However, it could be that you just want to get a cgitrc up and
running. In that case, you can pass an opaque-cgit-configuration as
a record to cgit-service-type. As its name indicates, an opaque
configuration does not have easy reflective capabilities.
Available opaque-cgit-configuration fields are:
opaque-cgit-configurationparameter: package cgit ¶The cgit package.
opaque-cgit-configurationparameter: string string ¶The contents of the
cgitrc, as a string.
For example, if your cgitrc is just the empty string, you could
instantiate a cgit service like this:
(service cgit-service-type
(opaque-cgit-configuration
(cgitrc "")))
Gitolite Service
Gitolite is a tool for hosting Git repositories on a central server.
Gitolite can handle multiple repositories and users, and supports flexible configuration of the permissions for the users on the repositories.
The following example will configure Gitolite using the default git
user, and the provided SSH public key.
(service gitolite-service-type
(gitolite-configuration
(admin-pubkey (plain-file
"yourname.pub"
"ssh-rsa AAAA... guix@example.com"))))
Gitolite is configured through a special admin repository which you can
clone, for example, if you setup Gitolite on example.com, you would
run the following command to clone the admin repository.
git clone git@example.com:gitolite-admin
When the Gitolite service is activated, the provided admin-pubkey
will be inserted in to the keydir directory in the gitolite-admin
repository. If this results in a change in the repository, it will be
committed using the message “gitolite setup by GNU Guix”.
- Tipo de dados: gitolite-configuration
Data type representing the configuration for
gitolite-service-type.package(default: gitolite)Gitolite package to use. There are optional Gitolite dependencies that are not included in the default package, such as Redis and git-annex. These features can be made available by using the
make-gitoliteprocedure in the(gnu packages version-control) module to produce a variant of Gitolite with the desired additional dependencies.The following code returns a package in which the Redis and git-annex programs can be invoked by Gitolite’s scripts:
(use-modules (gnu packages databases) (gnu packages haskell-apps) (gnu packages version-control)) (make-gitolite (list redis git-annex))user(padrão: git)User to use for Gitolite. This will be user that you use when accessing Gitolite over SSH.
group(padrão: git)Group to use for Gitolite.
home-directory(default: "/var/lib/gitolite")Directory in which to store the Gitolite configuration and repositories.
rc-file(padrão: (gitolite-rc-file))A “file-like” object (veja file-like objects), representing the configuration for Gitolite.
admin-pubkey(padrão: #f)A “file-like” object (veja file-like objects) used to setup Gitolite. This will be inserted in to the keydir directory within the gitolite-admin repository.
To specify the SSH key as a string, use the
plain-filefunction.(plain-file "yourname.pub" "ssh-rsa AAAA... guix@example.com")
- Tipo de dados: gitolite-rc-file
Data type representing the Gitolite RC file.
umask(padrão:#o0077)This controls the permissions Gitolite sets on the repositories and their contents.
A value like
#o0027will give read access to the group used by Gitolite (by default:git). This is necessary when using Gitolite with software like cgit or gitweb.local-code(default:"$rc{GL_ADMIN_BASE}/local")Allows you to add your own non-core programs, or even override the shipped ones with your own.
Please supply the FULL path to this variable. By default, directory called "local" in your gitolite clone is used, providing the benefits of versioning them as well as making changes to them without having to log on to the server.
unsafe-pattern(default:#f)An optional Perl regular expression for catching unsafe configurations in the configuration file. See Gitolite’s documentation for more information.
When the value is not
#f, it should be a string containing a Perl regular expression, such as ‘"[`~#\$\&()|;<>]"’, which is the default value used by gitolite. It rejects any special character in configuration that might be interpreted by a shell, which is useful when sharing the administration burden with other people that do not otherwise have shell access on the server.git-config-keys(default:"")Gitolite allows you to set git config values using the ‘config’ keyword. This setting allows control over the config keys to accept.
roles(default:'(("READERS" . 1) ("WRITERS" . )))Set the role names allowed to be used by users running the perms command.
enable(default:'("help" "desc" "info" "perms" "writable" "ssh-authkeys" "git-config" "daemon" "gitweb"))This setting controls the commands and features to enable within Gitolite.
Gitile Service
Gitile is a Git forge for viewing public git repository contents from a web browser.
Gitile works best in collaboration with Gitolite, and will serve the public repositories from Gitolite by default. The service should listen only on a local port, and a webserver should be configured to serve static resources. The gitile service provides an easy way to extend the Nginx service for that purpose (veja NGINX).
The following example will configure Gitile to serve repositories from a custom location, with some default messages for the home page and the footers.
(service gitile-service-type
(gitile-configuration
(repositories "/srv/git")
(base-git-url "https://myweb.site/git")
(index-title "My git repositories")
(intro '((p "This is all my public work!")))
(footer '((p "This is the end")))
(nginx
(nginx-server-configuration
(ssl-certificate
"/etc/certs/myweb.site/fullchain.pem")
(ssl-certificate-key
"/etc/certs/myweb.site/privkey.pem")
(listen '("443 ssl http2" "[::]:443 ssl http2"))
(locations
(list
;; Allow for https anonymous fetch on /git/ urls.
(git-http-nginx-location-configuration
(git-http-configuration
(uri-path "/git/")
(git-root "/var/lib/gitolite/repositories")))))))))
In addition to the configuration record, you should configure your git repositories to contain some optional information. First, your public repositories need to contain the git-daemon-export-ok magic file that allows Git to export the repository. Gitile uses the presence of this file to detect public repositories it should make accessible. To do so with Gitolite for instance, modify your conf/gitolite.conf to include this in the repositories you want to make public:
repo foo
R = daemon
In addition, Gitile can read the repository configuration to display more information on the repository. Gitile uses the gitweb namespace for its configuration. As an example, you can use the following in your conf/gitolite.conf:
repo foo
R = daemon
desc = A long description, optionally with <i>HTML</i>, shown on the index page
config gitweb.name = The Foo Project
config gitweb.synopsis = A short description, shown on the main page of the project
Do not forget to commit and push these changes once you are satisfied. You may need to change your gitolite configuration to allow the previous configuration options to be set. One way to do that is to add the following service definition:
(service gitolite-service-type
(gitolite-configuration
(admin-pubkey (local-file "key.pub"))
(rc-file
(gitolite-rc-file
(umask #o0027)
;; Allow to set any configuration key
(git-config-keys ".*")
;; Allow any text as a valid configuration value
(unsafe-patt "^$")))))
- Tipo de dados: gitile-configuration
Data type representing the configuration for
gitile-service-type.package(default: gitile)Gitile package to use.
host(default:"localhost")The host on which gitile is listening.
port(padrão:8080)The port on which gitile is listening.
database(default:"/var/lib/gitile/gitile-db.sql")The location of the database.
repositories(default:"/var/lib/gitolite/repositories")The location of the repositories. Note that only public repositories will be shown by Gitile. To make a repository public, add an empty git-daemon-export-ok file at the root of that repository.
base-git-urlThe base git url that will be used to show clone commands.
index-title(default:"Index")The page title for the index page that lists all the available repositories.
intro(default:'())The intro content, as a list of sxml expressions. This is shown above the list of repositories, on the index page.
footer(default:'())The footer content, as a list of sxml expressions. This is shown on every page served by Gitile.
nginxAn nginx server block that will be extended and used as a reverse proxy by Gitile to serve its pages, and as a normal web server to serve its assets.
You can use this block to add more custom URLs to your domain, such as a
/git/URL for anonymous clones, or serving any other files you would like to serve.
Próximo: Serviço de montagem PAM, Anterior: Serviços de controlando versão, Acima: Serviços [Conteúdo][Índice]
11.10.32 Serviços de jogos
Joycond service
The joycond service allows the pairing of Nintendo joycon game controllers over Bluetooth. (veja Serviços de desktop for setting up Bluetooth.)
- Tipo de dados: joycond-configuration
Data type representing the configuration of
joycond.package(default:joycond)The joycond package to use.
- Variável: joycond-service-type
Service type for the joycond service. It also extends the
udev-service-typewith thejoycondpackage (provided via thejoycond-configurationconfiguration), so that joycond controllers can be detected and used by an unprivileged user.
The Battle for Wesnoth Service
The Battle for Wesnoth is a fantasy, turn based tactical strategy game, with several single player campaigns, and multiplayer games (both networked and local).
- Variável: wesnothd-service-type
Service type for the wesnothd service. Its value must be a
wesnothd-configurationobject. To run wesnothd in the default configuration, instantiate it as:(service wesnothd-service-type)
- Tipo de dados: wesnothd-configuration
Data type representing the configuration of
wesnothd.package(default:wesnoth-server)The wesnoth server package to use.
port(padrão:15000)The port to bind the server to.
Próximo: Serviços Guix, Anterior: Serviços de jogos, Acima: Serviços [Conteúdo][Índice]
11.10.33 Serviço de montagem PAM
The (gnu services pam-mount) module provides a service allowing users
to mount volumes when they log in. It should be able to mount any volume
format supported by the system.
- Variável: pam-mount-service-type
Service type for PAM Mount support.
- Tipo de dados: pam-mount-configuration
Data type representing the configuration of PAM Mount.
It takes the following parameters:
rulesThe configuration rules that will be used to generate /etc/security/pam_mount.conf.xml.
The configuration rules are SXML elements (veja SXML em GNU Guile Reference Manual), and the default ones don’t mount anything for anyone at login:
`((debug (@ (enable "0"))) (mntoptions (@ (allow ,(string-join '("nosuid" "nodev" "loop" "encryption" "fsck" "nonempty" "allow_root" "allow_other") ",")))) (mntoptions (@ (require "nosuid,nodev"))) (logout (@ (wait "0") (hup "0") (term "no") (kill "no"))) (mkmountpoint (@ (enable "1") (remove "true"))))
Some
volumeelements must be added to automatically mount volumes at login. Here’s an example allowing the useraliceto mount her encryptedHOMEdirectory and allowing the userbobto mount the partition where he stores his data:(define pam-mount-rules `((debug (@ (enable "0"))) (volume (@ (user "alice") (fstype "crypt") (path "/dev/sda2") (mountpoint "/home/alice"))) (volume (@ (user "bob") (fstype "auto") (path "/dev/sdb3") (mountpoint "/home/bob/data") (options "defaults,autodefrag,compress"))) (mntoptions (@ (allow ,(string-join '("nosuid" "nodev" "loop" "encryption" "fsck" "nonempty" "allow_root" "allow_other") ",")))) (mntoptions (@ (require "nosuid,nodev"))) (logout (@ (wait "0") (hup "0") (term "no") (kill "no"))) (mkmountpoint (@ (enable "1") (remove "true"))))) (service pam-mount-service-type (pam-mount-configuration (rules pam-mount-rules)))
The complete list of possible options can be found in the man page for pam_mount.conf.
PAM Mount Volume Service
PAM mount volumes are automatically mounted at login by the PAM login
service according to a set of per-volume rules. Because they are mounted by
PAM the password entered during login may be used directly to mount
authenticated volumes, such as cifs, using the same credentials.
These volumes will be added in addition to any volumes directly specified in
pam-mount-rules.
Here is an example of a rule which will mount a remote CIFS share from //remote-server/share into a sub-directory of /shares named after the user logging in:
(simple-service 'pam-mount-remote-share pam-mount-volume-service-type
(list (pam-mount-volume
(secondary-group "users")
(file-system-type "cifs")
(server "remote-server")
(file-name "share")
(mount-point "/shares/%(USER)")
(options "nosuid,nodev,seal,cifsacl"))))
- Tipo de dados: pam-mount-volume-service-type
Configuration for a single volume to be mounted. Any fields not specified will be omitted from the run-time PAM configuration. See the man page for the default values when unspecified.
user-name(type: maybe-string)Mount the volume for the given user.
user-id(type: maybe-integer-or-range)Mount the volume for the user with this ID. This field may also be specified as a pair of
(start . end)indicating a range of user IDs for whom to mount the volume.primary-group(type: maybe-string)Mount the volume for users with this primary group name.
group-id(type: maybe-integer-or-range)Mount the volume for the users with this primary group ID. This field may also be specified as a cons cell of
(start . end)indicating a range of group ids for whom to mount the volume.secondary-group(type: maybe-string)Mount the volume for users who are members of this group as either a primary or secondary group.
file-system-type(type: maybe-string)The file system type for the volume being mounted (e.g.,
cifs)no-mount-as-root?(type: maybe-boolean)Whether or not to mount the volume with root privileges. This is normally disabled, but may be enabled for mounts of type
fuse, or other user-level mounts.server(type: maybe-string)The name of the remote server to mount the volume from, when necessary.
file-name(type: maybe-string)The location of the volume, either local or remote, depending on the
file-system-type.mount-point(type: maybe-string)Where to mount the volume in the local file-system. This may be set to ~ to indicate the home directory of the user logging in. If this field is omitted then /etc/fstab is consulted for the mount destination.
options(type: maybe-string)The options to be passed as-is to the underlying mount program.
ssh?(type: maybe-boolean)Enable this option to pass the login password to SSH for use with mounts involving SSH (e.g.,
sshfs).cipher(type: maybe-string)Cryptsetup cipher name for the volume. To be used with the
cryptfile-system-type.file-system-key-cipher(type: maybe-string)Cipher name used by the target volume.
file-system-key-hash(type: maybe-string)SSL hash name used by the target volume.
file-system-key-file-name(type: maybe-string)File name of the file system key for the target volume.
Próximo: Serviços Linux, Anterior: Serviço de montagem PAM, Acima: Serviços [Conteúdo][Índice]
11.10.34 Serviços Guix
Build Farm Front-End (BFFE)
The Build Farm Front-End assists with building Guix packages in bulk. It’s responsible for submitting builds and displaying the status of the build farm.
- Variável: bffe-service-type
Service type for the Build Farm Front-End. Its value must be a
bffe-configurationobject.
- Tipo de dados: bffe-configuration
Data type representing the configuration of the Build Farm Front-End.
package(default:bffe)The Build Farm Front-End package to use.
user(default:"bffe")The system user to run the service as.
group(default:"bffe")The system group to run the service as.
argumentsA list of arguments to the Build Farm Front-End. These are passed to the
run-bffe-serviceprocedure when starting the service.For example, the following value directs the Build Farm Front-End to submit builds for derivations available from
data.guix.gnu.orgto the Build Coordinator instance assumed to be running on the same machine.(list #:build (list (build-from-guix-data-service (data-service-url "https://data.guix.gnu.org") (build-coordinator-url "http://127.0.0.1:8746") (branches '("master")) (systems '("x86_64-linux" "i686-linux")) (systems-and-targets (map (lambda (target) (cons "x86_64-linux" target)) '("aarch64-linux-gnu" "i586-pc-gnu"))) (build-priority (const 0)))) #:web-server-args '(#:event-source "https://example.com" #:controller-args (#:title "example.com build farm")))extra-environment-variables(default: ’())Extra environment variables to set via the shepherd service.
Guix Build Coordinator
The Guix Build Coordinator aids in distributing derivation builds among machines running an agent. The build daemon is still used to build the derivations, but the Guix Build Coordinator manages allocating builds and working with the results.
The Guix Build Coordinator consists of one coordinator, and one or more connected agent processes. The coordinator process handles clients submitting builds, and allocating builds to agents. The agent processes talk to a build daemon to actually perform the builds, then send the results back to the coordinator.
There is a script to run the coordinator component of the Guix Build Coordinator, but the Guix service uses a custom Guile script instead, to provide better integration with G-expressions used in the configuration.
- Variável: guix-build-coordinator-service-type
Service type for the Guix Build Coordinator. Its value must be a
guix-build-coordinator-configurationobject.
- Tipo de dados: guix-build-coordinator-configuration
Data type representing the configuration of the Guix Build Coordinator.
package(default:guix-build-coordinator)The Guix Build Coordinator package to use.
user(default:"guix-build-coordinator")The system user to run the service as.
group(default:"guix-build-coordinator")The system group to run the service as.
database-uri-string(default:"sqlite:///var/lib/guix-build-coordinator/guix_build_coordinator.db")The URI to use for the database.
agent-communication-uri(default:"http://0.0.0.0:8745")The URI describing how to listen to requests from agent processes.
client-communication-uri(default:"http://127.0.0.1:8746")The URI describing how to listen to requests from clients. The client API allows submitting builds and currently isn’t authenticated, so take care when configuring this value.
allocation-strategy(default:#~basic-build-allocation-strategy)A G-expression for the allocation strategy to be used. This is a procedure that takes the datastore as an argument and populates the allocation plan in the database.
hooks(default: ’())An association list of hooks. These provide a way to execute arbitrary code upon certain events, like a build result being processed.
parallel-hooks(default: ’())Hooks can be configured to run in parallel. This parameter is an association list of hooks to do in parallel, where the key is the symbol for the hook and the value is the number of threads to run.
listen-repl(default: #f)Port or filename to spawn a REPL listening on, pass
#tto listen on the default port or#fto disable.guile(default:guile-3.0-latest)The Guile package with which to run the Guix Build Coordinator.
extra-environment-variables(default: ’())Extra environment variables to set via the shepherd service.
- Variável: guix-build-coordinator-agent-service-type
Service type for a Guix Build Coordinator agent. Its value must be a
guix-build-coordinator-agent-configurationobject.
- Tipo de dados: guix-build-coordinator-agent-configuration
Data type representing the configuration a Guix Build Coordinator agent.
package(default:guix-build-coordinator/agent-only)The Guix Build Coordinator package to use.
user(default:"guix-build-coordinator-agent")The system user to run the service as.
coordinator(default:"http://localhost:8745")The URI to use when connecting to the coordinator.
authenticationRecord describing how this agent should authenticate with the coordinator. Possible record types are described below.
systems(default:#f)The systems for which this agent should fetch builds. The agent process will use the current system it’s running on as the default.
max-parallel-builds(default:#f)The number of builds to perform in parallel.
max-parallel-uploads(default:#f)The number of uploads to perform in parallel.
max-allocated-builds(default:#f)The maximum number of builds this agent can be allocated.
max-1min-load-average(default:#f)Load average value to look at when considering starting new builds, if the 1 minute load average exceeds this value, the agent will wait before starting new builds.
This will be unspecified if the value is
#f, and the agent will use the number of cores reported by the system as the max 1 minute load average.derivation-substitute-urls(default:#f)URLs from which to attempt to fetch substitutes for derivations, if the derivations aren’t already available.
non-derivation-substitute-urls(default:#f)URLs from which to attempt to fetch substitutes for build inputs, if the input store items aren’t already available.
extra-options(default: ’())Extra command line options for
guix-build-coordinator-agent.
- Tipo de dados: guix-build-coordinator-agent-password-auth
Data type representing an agent authenticating with a coordinator via a UUID and password.
uuidThe UUID of the agent. This should be generated by the coordinator process, stored in the coordinator database, and used by the intended agent.
passwordThe password to use when connecting to the coordinator.
- Tipo de dados: guix-build-coordinator-agent-password-file-auth
Data type representing an agent authenticating with a coordinator via a UUID and password read from a file.
uuidThe UUID of the agent. This should be generated by the coordinator process, stored in the coordinator database, and used by the intended agent.
password-fileA file containing the password to use when connecting to the coordinator.
- Tipo de dados: guix-build-coordinator-agent-dynamic-auth
Data type representing an agent authenticating with a coordinator via a dynamic auth token and agent name.
agent-nameName of an agent, this is used to match up to an existing entry in the database if there is one. When no existing entry is found, a new entry is automatically added.
tokenDynamic auth token, this is created and stored in the coordinator database, and is used by the agent to authenticate.
- Tipo de dados: guix-build-coordinator-agent-dynamic-auth-with-file
Data type representing an agent authenticating with a coordinator via a dynamic auth token read from a file and agent name.
agent-nameName of an agent, this is used to match up to an existing entry in the database if there is one. When no existing entry is found, a new entry is automatically added.
token-fileFile containing the dynamic auth token, this is created and stored in the coordinator database, and is used by the agent to authenticate.
Guix Data Service
The Guix Data Service processes, stores and provides data about GNU Guix. This includes information about packages, derivations and lint warnings.
The data is stored in a PostgreSQL database, and available through a web interface.
- Variável: guix-data-service-type
Service type for the Guix Data Service. Its value must be a
guix-data-service-configurationobject. The service optionally extends the getmail service, as the guix-commits mailing list is used to find out about changes in the Guix git repository.
- Tipo de dados: guix-data-service-configuration
Data type representing the configuration of the Guix Data Service.
package(default:guix-data-service)The Guix Data Service package to use.
user(default:"guix-data-service")The system user to run the service as.
group(default:"guix-data-service")The system group to run the service as.
port(padrão:8765)The port to bind the web service to.
host(default:"127.0.0.1")The host to bind the web service to.
getmail-idle-mailboxes(default:#f)If set, this is the list of mailboxes that the getmail service will be configured to listen to.
commits-getmail-retriever-configuration(default:#f)If set, this is the
getmail-retriever-configurationobject with which to configure getmail to fetch mail from the guix-commits mailing list.extra-options(default: ’())Extra command line options for
guix-data-service.extra-process-jobs-options(default: ’())Extra command line options for
guix-data-service-process-jobs.git-repositories(default: #f)List of git-repository information to insert into the database.
build-servers(default: #f)List of build-server information to insert into the database.
Guix Home Service
The Guix Home service is a way to let Guix System deploy the home
environment of one or more users (veja Home Configuration, for more on
Guix Home). That way, the system configuration embeds declarations of the
home environment of those users and can be used to deploy everything
consistently at once, saving users the need to run guix home
reconfigure independently.
- Variável: guix-home-service-type
Service type for the Guix Home service. Its value must be a list of lists containing user and home environment pairs. The key of each pair is a string representing the user to deploy the configuration under and the value is a home-environment configuration.
(use-modules (gnu home)) (define my-home (home-environment …)) (operating-system (services (append (list (service guix-home-service-type `(("alice" ,my-home)))) %base-services)))
This service can be extended by other services to add additional home environments, as in this example:
(simple-service 'my-extra-home guix-home-service-type `(("bob" ,my-extra-home)))
Nar Herder
The Nar Herder is a utility for managing a collection of nars.
- Variável: nar-herder-type
Service type for the Guix Data Service. Its value must be a
nar-herder-configurationobject. The service optionally extends the getmail service, as the guix-commits mailing list is used to find out about changes in the Guix git repository.
- Tipo de dados: nar-herder-configuration
Data type representing the configuration of the Guix Data Service.
package(default:nar-herder)The Nar Herder package to use.
user(default:"nar-herder")The system user to run the service as.
group(default:"nar-herder")The system group to run the service as.
port(padrão:8734)The port to bind the server to.
host(default:"127.0.0.1")The host to bind the server to.
mirror(default:#f)Optional URL of the other Nar Herder instance which should be mirrored. This means that this Nar Herder instance will download it’s database, and keep it up to date.
database(default:"/var/lib/nar-herder/nar_herder.db")Location for the database. If this Nar Herder instance is mirroring another, the database will be downloaded if it doesn’t exist. If this Nar Herder instance isn’t mirroring another, an empty database will be created.
database-dump(default:"/var/lib/nar-herder/nar_herder_dump.db")Location of the database dump. This is created and regularly updated by taking a copy of the database. This is the version of the database that is available to download.
storage(default:#f)Optional location in which to store nars.
storage-limit(default:"none")Limit in bytes for the nars stored in the storage location. This can also be set to “none” so that there is no limit.
When the storage location exceeds this size, nars are removed according to the nar removal criteria.
storage-nar-removal-criteria(default:'())Criteria used to remove nars from the storage location. These are used in conjunction with the storage limit.
When the storage location exceeds the storage limit size, nars will be checked against the nar removal criteria and if any of the criteria match, they will be removed. This will continue until the storage location is below the storage limit size.
Each criteria is specified by a string, then an equals sign, then another string. Currently, only one criteria is supported, checking if a nar is stored on another Nar Herder instance.
ttl(default:#f)Produce
Cache-ControlHTTP headers that advertise a time-to-live (TTL) of ttl. ttl must denote a duration:5dmeans 5 days,1mmeans 1 month, and so on.This allows the user’s Guix to keep substitute information in cache for ttl.
new-ttl(default:#f)If specified, this will override the
ttlsetting when used for theCache-Controlheaders, but this value will be used when scheduling the removal of nars.Use this setting when the TTL is being reduced to avoid removing nars while clients still have cached narinfos.
negative-ttl(default:#f)Similarly produce
Cache-ControlHTTP headers to advertise the time-to-live (TTL) of negative lookups—missing store items, for which the HTTP 404 code is returned. By default, no negative TTL is advertised.log-level(default:'DEBUG)Log level to use, specify a log level like
'INFOto stop logging individual requests.cached-compressions(default:'())Activate generating cached nars with different compression details from the stored nars. This is a list of nar-herder-cached-compression-configuration records.
min-uses(default:3)When cached-compressions are enabled, generate cached nars when at least this number of requests are made for a nar.
workers(default:2)Number of cached nars to generate at a time.
nar-source(default:#f)Location to fetch nars from when computing cached compressions. By default, the storage location will be used.
extra-environment-variables(default:'())Extra environment variables to set via the shepherd service.
- Tipo de dados: nar-herder-cached-compression-configuration
Data type representing the cached compression configuration.
tipoType of compression to use, e.g.
'zstd.workers(default:#f)Level of the compression to use.
directory(default:#f)Location to store the cached nars. If unspecified, they will be stored in /var/cache/nar-herder/nar/TYPE.
directory-max-size(default:#f)Maximum size in bytes of the directory.
unused-removal-duration(default:#f)If a cached nar isn’t used for
unused-removal-duration, it will be scheduled for removal.unused-removal-duration must denote a duration:
5dmeans 5 days,1mmeans 1 month, and so on.ttl(default:#f)If specified this overrides the
ttlused for narinfos when this cached compression is available.new-ttl(default:#f)As with the
new-ttloption fornar-herder-configuration, this value will override thettlwhen used for narinfo requests.
Próximo: Serviços Hurd, Anterior: Serviços Guix, Acima: Serviços [Conteúdo][Índice]
11.10.35 Serviços Linux
Early OOM Service
Early OOM, also known as Earlyoom, is a minimalist out of memory (OOM) daemon that runs in user space and provides a more responsive and configurable alternative to the in-kernel OOM killer. It is useful to prevent the system from becoming unresponsive when it runs out of memory.
- Variável: earlyoom-service-type
The service type for running
earlyoom, the Early OOM daemon. Its value must be aearlyoom-configurationobject, described below. The service can be instantiated in its default configuration with:(service earlyoom-service-type)
- Tipo de dados: earlyoom-configuration
This is the configuration record for the
earlyoom-service-type.earlyoom(default: earlyoom)The Earlyoom package to use.
minimum-available-memory(default:10)The threshold for the minimum available memory, in percentages.
minimum-free-swap(default:10)The threshold for the minimum free swap memory, in percentages.
prefer-regexp(default:#f)A regular expression (as a string) to match the names of the processes that should be preferably killed.
avoid-regexp(default:#f)A regular expression (as a string) to match the names of the processes that should not be killed.
memory-report-interval(default:0)The interval in seconds at which a memory report is printed. It is disabled by default.
ignore-positive-oom-score-adj?(default:#f)A boolean indicating whether the positive adjustments set in /proc/*/oom_score_adj should be ignored.
show-debug-messages?(default:#f)A boolean indicating whether debug messages should be printed. The logs are saved at /var/log/earlyoom.log.
send-notification-command(default:#f)This can be used to provide a custom command used for sending notifications.
fstrim Service
The command fstrim can be used to discard (or trim) unused
blocks on a mounted file system.
Aviso: Running
fstrimfrequently, or even usingmount -o discard, might negatively affect the lifetime of poor-quality SSD devices. For most desktop and server systems a sufficient trimming frequency is once a week. Note that not all devices support a queued trim, so each trim command incurs a performance penalty on whatever else might be trying to use the disk at the time.
- Variável: fstrim-service-type
Type for a service that periodically runs
fstrim, whose value must be an<fstrim-configuration>object. The service can be instantiated in its default configuration with:(service fstrim-service-type)
- Tipo de dados: fstrim-configuration
Available
fstrim-configurationfields are:package(default:util-linux) (type: file-like)The package providing the
fstrimcommand.schedule(default:"0 0 * * 0") (type: mcron-time)Schedule for launching
fstrim. This can be a procedure, a list or a string. For additional information, see Job specification em the mcron manual. By default this is set to run weekly on Sunday at 00:00.listed-in(default:'("/etc/fstab" "/proc/self/mountinfo")) (type: maybe-list-of-strings)List of files in fstab or kernel mountinfo format. All missing or empty files are silently ignored. The evaluation of the list stops after the first non-empty file. File systems with
X-fstrim.notrimmount option in fstab are skipped.verbose?(default:#t) (type: boolean)Verbose execution.
quiet-unsupported?(default:#t) (type: boolean)Suppress error messages if trim operation (ioctl) is unsupported.
extra-arguments(type: maybe-list-of-strings)Extra options to append to
fstrim(run ‘man fstrim’ for more information).
Kernel Module Loader Service
The kernel module loader service allows one to load loadable kernel modules
at boot. This is especially useful for modules that don’t autoload and need
to be manually loaded, as is the case with ddcci.
- Variável: kernel-module-loader-service-type
The service type for loading loadable kernel modules at boot with
modprobe. Its value must be a list of strings representing module names. For example loading the drivers provided byddcci-driver-linux, in debugging mode by passing some module parameters, can be done as follow:(use-modules (gnu) (gnu services)) (use-package-modules linux) (use-service-modules linux) (define ddcci-config (plain-file "ddcci.conf" "options ddcci dyndbg delay=120")) (operating-system ... (services (cons* (service kernel-module-loader-service-type '("ddcci" "ddcci_backlight")) (simple-service 'ddcci-config etc-service-type (list `("modprobe.d/ddcci.conf" ,ddcci-config))) %base-services)) (kernel-loadable-modules (list ddcci-driver-linux)))
Cachefilesd Service
The Cachefilesd service starts a daemon that caches network file system data locally. It is especially useful for NFS and AFS shares, where it reduces latencies for repeated access when reading files.
The daemon can be configured as follows:
(service cachefilesd-service-type
(cachefilesd-configuration
(cache-directory "/var/cache/fscache")))
- Variável: cachefilesd-service-type
The service type for starting
cachefilesd. The value for this service type is acachefilesd-configuration, whose only required field is cache-directory.
- Tipo de dados: cachefilesd-configuration
Available
cachefilesd-configurationfields are:cachefilesd(default:cachefilesd) (type: file-like)The cachefilesd package to use.
debug-output?(default:#f) (type: boolean)Print debugging output to stderr.
use-syslog?(default:#t) (type: boolean)Log to syslog facility instead of stdout.
scan?(default:#t) (type: boolean)Scan for cacheable objects.
cache-directory(type: maybe-string)Location of the cache directory.
cache-name(default:"CacheFiles") (type: maybe-string)Name of cache (keep unique).
security-context(type: maybe-string)SELinux security context.
pause-culling-for-block-percentage(default:7) (type: maybe-non-negative-integer)Pause culling when available blocks exceed this percentage.
pause-culling-for-file-percentage(default:7) (type: maybe-non-negative-integer)Pause culling when available files exceed this percentage.
resume-culling-for-block-percentage(default:5) (type: maybe-non-negative-integer)Start culling when available blocks drop below this percentage.
resume-culling-for-file-percentage(default:5) (type: maybe-non-negative-integer)Start culling when available files drop below this percentage.
pause-caching-for-block-percentage(default:1) (type: maybe-non-negative-integer)Pause further allocations when available blocks drop below this percentage.
pause-caching-for-file-percentage(default:1) (type: maybe-non-negative-integer)Pause further allocations when available files drop below this percentage.
log2-table-size(default:12) (type: maybe-non-negative-integer)Size of tables holding cullable objects in logarithm of base 2.
cull?(default:#t) (type: boolean)Create free space by culling (consumes system load).
trace-function-entry-in-kernel-module?(default:#f) (type: boolean)Trace function entry in the kernel module (for debugging).
trace-function-exit-in-kernel-module?(default:#f) (type: boolean)Trace function exit in the kernel module (for debugging).
trace-internal-checkpoints-in-kernel-module?(default:#f) (type: boolean)Trace internal checkpoints in the kernel module (for debugging).
Rasdaemon Service
The Rasdaemon service provides a daemon which monitors platform RAS (Reliability, Availability, and Serviceability) reports from Linux kernel trace events, logging them to syslogd.
Reliability, Availability and Serviceability is a concept used on servers meant to measure their robustness.
Relability is the probability that a system will produce correct outputs:
- Generally measured as Mean Time Between Failures (MTBF), and
- Enhanced by features that help to avoid, detect and repair hardware faults
Availability is the probability that a system is operational at a given time:
- Generally measured as a percentage of downtime per a period of time, and
- Often uses mechanisms to detect and correct hardware faults in runtime.
Serviceability is the simplicity and speed with which a system can be repaired or maintained:
- Generally measured on Mean Time Between Repair (MTBR).
Among the monitoring measures, the most usual ones include:
- CPU – detect errors at instruction execution and at L1/L2/L3 caches;
- Memory – add error correction logic (ECC) to detect and correct errors;
- I/O – add CRC checksums for transferred data;
- Storage – RAID, journal file systems, checksums, Self-Monitoring, Analysis and Reporting Technology (SMART).
By monitoring the number of occurrences of error detections, it is possible to identify if the probability of hardware errors is increasing, and, on such case, do a preventive maintenance to replace a degraded component while those errors are correctable.
For detailed information about the types of error events gathered and how to make sense of them, see the kernel administrator’s guide at https://www.kernel.org/doc/html/latest/admin-guide/ras.html.
- Variável: rasdaemon-service-type
Service type for the
rasdaemonservice. It accepts arasdaemon-configurationobject. Instantiating like(service rasdaemon-service-type)will load with a default configuration, which monitors all events and logs to syslogd.
- Tipo de dados: rasdaemon-configuration
The data type representing the configuration of
rasdaemon.record?(default:#f)-
A boolean indicating whether to record the events in an SQLite database. This provides a more structured access to the information contained in the log file. The database location is hard-coded to /var/lib/rasdaemon/ras-mc_event.db.
Zram Device Service
The Zram device service provides a compressed swap device in system memory. The Linux Kernel documentation has more information about zram devices.
- Variável: zram-device-service-type
This service creates the zram block device, formats it as swap and enables it as a swap device. The service’s value is a
zram-device-configurationrecord.- Tipo de dados: zram-device-configuration
This is the data type representing the configuration for the zram-device service.
size(default"1G")This is the amount of space you wish to provide for the zram device. It accepts a string and can be a number of bytes or use a suffix, eg.:
"512M"or1024000.compression-algorithm(default'lzo)This is the compression algorithm you wish to use. It is difficult to list all the possible compression options, but common ones supported by Guix’s Linux Libre Kernel include
'lzo,'lz4and'zstd.memory-limit(default0)This is the maximum amount of memory which the zram device can use. Setting it to ’0’ disables the limit. While it is generally expected that compression will be 2:1, it is possible that uncompressable data can be written to swap and this is a method to limit how much memory can be used. It accepts a string and can be a number of bytes or use a suffix, eg.:
"2G".priority(default#f)This is the priority of the swap device created from the zram device. Veja Espaço de troca (swap) for a description of swap priorities. You might want to set a specific priority for the zram device, otherwise it could end up not being used much for the reasons described there.
Próximo: Serviços diversos, Anterior: Serviços Linux, Acima: Serviços [Conteúdo][Índice]
11.10.36 Serviços Hurd
- Variável: hurd-console-service-type
This service starts the fancy
VGAconsole client on the Hurd.The service’s value is a
hurd-console-configurationrecord.
- Tipo de dados: hurd-console-configuration
This is the data type representing the configuration for the hurd-console-service.
hurd(default: hurd)The Hurd package to use.
- Variável: hurd-getty-service-type
This service starts a tty using the Hurd
gettyprogram.The service’s value is a
hurd-getty-configurationrecord.
- Tipo de dados: hurd-getty-configuration
This is the data type representing the configuration for the hurd-getty-service.
hurd(default: hurd)The Hurd package to use.
ttyThe name of the console this Getty runs on—e.g.,
"tty1".baud-rate(default:38400)An integer specifying the baud rate of the tty.
Anterior: Serviços Hurd, Acima: Serviços [Conteúdo][Índice]
11.10.37 Serviços diversos
Fingerprint Service
The (gnu services authentication) module provides a DBus service to
read and identify fingerprints via a fingerprint sensor.
- Variável: fprintd-service-type
The service type for
fprintd, which provides the fingerprint reading capability.(service fprintd-service-type)
System Control Service
The (gnu services sysctl) provides a service to configure kernel
parameters at boot.
- Variável: sysctl-service-type
The service type for
sysctl, which modifies kernel parameters under /proc/sys/. To enable IPv4 forwarding, it can be instantiated as:(service sysctl-service-type (sysctl-configuration (settings '(("net.ipv4.ip_forward" . "1")))))Since
sysctl-service-typeis used in the default lists of services,%base-servicesand%desktop-services, you can usemodify-servicesto change its configuration and add the kernel parameters that you want (vejamodify-services).(modify-services %base-services (sysctl-service-type config => (sysctl-configuration (settings (append '(("net.ipv4.ip_forward" . "1")) %default-sysctl-settings)))))
- Tipo de dados: sysctl-configuration
The data type representing the configuration of
sysctl.sysctl(default:(file-append procps "/sbin/sysctl")The
sysctlexecutable to use.settings(default:%default-sysctl-settings)An association list specifies kernel parameters and their values.
- Variável: %default-sysctl-settings
An association list specifying the default
sysctlparameters on Guix System.
PC/SC Smart Card Daemon Service
The (gnu services security-token) module provides the following
service to run pcscd, the PC/SC Smart Card Daemon.
pcscd is the daemon program for pcsc-lite and the MuscleCard
framework. It is a resource manager that coordinates communications with
smart card readers, smart cards and cryptographic tokens that are connected
to the system.
- Variável: pcscd-service-type
Service type for the
pcscdservice. Its value must be apcscd-configurationobject. To run pcscd in the default configuration, instantiate it as:(service pcscd-service-type)
- Tipo de dados: pcscd-configuration
The data type representing the configuration of
pcscd.pcsc-lite(default:pcsc-lite)The pcsc-lite package that provides pcscd.
usb-drivers(default:(list ccid))List of packages that provide USB drivers to pcscd. Drivers are expected to be under pcsc/drivers in the store directory of the package.
LIRC Service
The (gnu services lirc) module provides the following service.
- Variável: lirc-service-type
Type for a service that runs LIRC, a daemon that decodes infrared signals from remote controls.
The value for this service is a
<lirc-configuration>object.
- Tipo de dados: lirc-configuration
Data type representing the configuration of
lircd.lirc(default:lirc) (type: file-like)Package object for
lirc.device(default:#f) (type: string)driver(default:#f) (type: string)config-file(default:#f) (type: string-or-file-like)TODO. See
lircdmanual for details.extra-options(default:'()) (type: list-of-string)Additional command-line options to pass to
lircd.
SPICE Service
The (gnu services spice) module provides the following service.
- Variável: spice-vdagent-service-type
Type of the service that runs VDAGENT, a daemon that enables sharing the clipboard with a vm and setting the guest display resolution when the graphical console window resizes.
- Tipo de dados: spice-vdagent-configuration
Data type representing the configuration of
spice-vdagent-service-type.spice-vdagent(default:spice-vdagent) (type: file-like)Package object for VDAGENT.
inputattach Service
The inputattach service allows you to use input devices such as Wacom tablets, touchscreens, or joysticks with the Xorg display server.
- Variável: inputattach-service-type
Type of a service that runs
inputattachon a device and dispatches events from it.
- Tipo de dados: inputattach-configuration
device-type(default:"wacom")The type of device to connect to. Run
inputattach --help, from theinputattachpackage, to see the list of supported device types.device(padrão:"/dev/ttyS0")The device file to connect to the device.
baud-rate(default:#f)Baud rate to use for the serial connection. Should be a number or
#f.log-file(default:#f)If true, this must be the name of a file to log messages to.
Dictionary Service
The (gnu services dict) module provides the following service:
- Variável: dicod-service-type
This is the type of the service that runs the
dicoddaemon, an implementation of DICT server (veja Dicod em GNU Dico Manual).You can add
open localhostto your ~/.dico file to makelocalhostthe default server fordicoclient (veja Initialization File em GNU Dico Manual).Nota: This service is also available for Guix Home, where it runs directly with your user privileges (veja
home-dicod-service-type).
- Tipo de dados: dicod-configuration
Data type representing the configuration of dicod.
dico(default: dico)Package object of the GNU Dico dictionary server.
interfaces(default: ’("localhost"))This is the list of IP addresses and ports and possibly socket file names to listen to (veja
listendirective em GNU Dico Manual).handlers(default: ’())List of
<dicod-handler>objects denoting handlers (module instances).databases(default: (list %dicod-database:gcide))List of
<dicod-database>objects denoting dictionaries to be served.
- Tipo de dados: dicod-handler
Data type representing a dictionary handler (module instance).
nameName of the handler (module instance).
module(default: #f)Name of the dicod module of the handler (instance). If it is
#f, the module has the same name as the handler. (veja Modules em GNU Dico Manual).optionsList of strings or gexps representing the arguments for the module handler
- Tipo de dados: dicod-database
Data type representing a dictionary database.
nameName of the database, will be used in DICT commands.
handlerName of the dicod handler (module instance) used by this database (veja Handlers em GNU Dico Manual).
complex?(default: #f)Whether the database configuration complex. The complex configuration will need a corresponding
<dicod-handler>object, otherwise not.optionsList of strings or gexps representing the arguments for the database (veja Databases em GNU Dico Manual).
- Variável: %dicod-database:gcide
A
<dicod-database>object serving the GNU Collaborative International Dictionary of English using thegcidepackage.
- Procedure: dicod-freedict-database dictionary-name
Returns a record of type
dicod-databasefor purpose of configuring a database for the FreeDict multilingual dictionary named by dictionary-name, a string such as"kur-eng"for the Kurdish-to-English dictionary, into a service of typedicod-service-type.
- Variável: %dicod-databases:freedict
A relatively large list of records of type
dicod-database, made available for users who wish to configure all the FreeDict multilingual dictionaries provided by thefreedict-dictionariespackage into a service of typedicod-service-type.
The following is an example dicod-service-type configuration,
extending a dicod daemon serving databases for the wordnet and
gcide dictionaries, as well as a selection of FreeDict multilingual
dictionaries.
(service dicod-service-type
(dicod-configuration
(handlers (list
(dicod-handler
(name "wordnet")
(module "wordnet")
(options
(list #~(string-append "wnhome=" #$wordnet))))))
(databases (cons*
(dicod-database
(name "wordnet")
(complex? #t)
(handler "wordnet"))
%dicod-database:gcide
(map
dicod-freedict-database
'("fra-eng" "eng-fra" "eng-spa" "spa-eng"))))))
Docker Service
The (gnu services docker) module provides the following services.
- Variável: containerd-service-type
-
This service type operates containerd containerd, a daemon responsible for overseeing the entire container lifecycle on its host system. This includes image handling, storage management, container execution, supervision, low-level storage operations, network connections, and more.
- Tipo de dados: containerd-configuration
This is the data type representing the configuration of containerd.
containerd(default:containerd)The containerd daemon package to use.
debug?(default#f)Enable or disable debug output.
environment-variables(default:'())List of environment variables to set for
containerd.This must be a list of strings where each string has the form ‘key=value’ as in this example:
(list "HTTP_PROXY=socks5://127.0.0.1:9150" "HTTPS_PROXY=socks5://127.0.0.1:9150")
- Variável: docker-service-type
-
This is the type of the service that runs Docker, a daemon that can execute application bundles (sometimes referred to as “containers”) in isolated environments.
The
containerd-service-typeservice need to be added to a system configuration, otherwise a message about not any service providescontainerdwill be displayed duringguix system reconfigure.
- Tipo de dados: docker-configuration
This is the data type representing the configuration of Docker and Containerd.
docker(default:docker)The Docker daemon package to use.
docker-cli(default:docker-cli)The Docker client package to use.
containerd(default: containerd)This field is deprecated in favor of
containerd-service-typeservice.proxy(default docker-libnetwork-cmd-proxy)The Docker user-land networking proxy package to use.
enable-proxy?(default#t)Enable or disable the use of the Docker user-land networking proxy.
debug?(default#f)Enable or disable debug output.
enable-iptables?(default#t)Enable or disable the addition of iptables rules.
environment-variables(default:'())List of environment variables to set for
dockerd.This must be a list of strings where each string has the form ‘key=value’ as in this example:
(list "LANGUAGE=eo:ca:eu" "TMPDIR=/tmp/dockerd")config-file(type: maybe-file-like)JSON configuration file pass to
dockerd.
- Variável: singularity-service-type
This is the type of the service that allows you to run Singularity, a Docker-style tool to create and run application bundles (aka. “containers”). The value for this service is the Singularity package to use.
The service does not install a daemon; instead, it installs helper programs as setuid-root (veja Privileged Programs) such that unprivileged users can invoke
singularity runand similar commands.
Rootless Podman Service
The (gnu services containers) module provides the following service.
- Variável: rootless-podman-service-type
This is the service type for Podman is a container management tool.
In addition to providing a drop-in replacement for Docker, Podman offers the ability to run containers in “root-less” mode, meaning that regular users can deploy containers without elevated privileges. It does so mainly by leveraging two Linux kernel features: unprivileged user namespaces, and subordinate user and group IDs (veja the subordinate user and group ID service).
The
rootless-podman-service-typesets up the system to allow unprivileged users to runpodmancommands:(use-service-modules containers networking …) (operating-system ;; … (users (cons (user-account (name "alice") (comment "Bob's sister") (group "users") ;; Adding the account to the "cgroup" group ;; makes it possible to run podman commands. (supplementary-groups '("cgroup" "wheel" "audio" "video"))) %base-user-accounts)) (services (append (list (service iptables-service-type) (service rootless-podman-service-type (rootless-podman-configuration (subgids (list (subid-range (name "alice")))) (subuids (list (subid-range (name "alice"))))))) %base-services)))
The
iptables-service-typeis required for Podman to be able to setup its own networks. Due to the change in user groups and file systems it is recommended to reboot (or at least logout), before trying to run Podman commands.To test your installation you can run:
$ podman run -it --rm docker.io/alpine cat /etc/*release* NAME="Alpine Linux" ID=alpine VERSION_ID=3.20.2 PRETTY_NAME="Alpine Linux v3.20" HOME_URL="https://alpinelinux.org/" BUG_REPORT_URL="https://gitlab.alpinelinux.org/alpine/aports/-/issues"
- Data Type: rootless-podman-configuration
Available
rootless-podman-configurationfields are:podman(default:podman) (type: package-or-#f)The Podman package that will be installed in the system profile. Pass
#fto not install Podman.group-name(default:"cgroup") (type: string)The name of the group that will own /sys/fs/cgroup resources. Users that want to use rootless Podman have to be in this group.
containers-registries(type: lowerable)A string or a gexp evaluating to the path of Podman’s
containers/registries.confconfiguration file.containers-storage(type: lowerable)A string or a gexp evaluating to the path of Podman’s
containers/storage.confconfiguration file.containers-policy(type: lowerable)A string or a gexp evaluating to the path of Podman’s
containers/policy.jsonconfiguration file.pam-limits(type: list-of-pam-limits-entries)The PAM limits to be set for rootless Podman.
subgids(default:()) (type: list-of-subid-ranges)A list of subid ranges representing the subgids that will be available for each configured user.
subuids(default:()) (type: list-of-subid-ranges)A list of subid ranges representing the subuids that will be available for each configured user.
OCI backed services
Should you wish to manage your Docker containers with the same consistent interface you use for your other Shepherd services, oci-container-service-type is the tool to use: given an Open Container Initiative (OCI) container image, it will run it in a Shepherd service. One example where this is useful: it lets you run services that are available as Docker/OCI images but not yet packaged for Guix.
- Variável: oci-container-service-type
-
This is a thin wrapper around Docker’s CLI that executes OCI images backed processes as Shepherd Services.
(service oci-container-service-type (list (oci-container-configuration (network "host") (image (oci-image (repository "guile") (tag "3") (value (specifications->manifest '("guile"))) (pack-options '(#:symlinks (("/bin/guile" -> "bin/guile")) #:max-layers 2)))) (entrypoint "/bin/guile") (command '("-c" "(display \"hello!\n\")"))) (oci-container-configuration (image "prom/prometheus") (ports '(("9000" . "9000") ("9090" . "9090")))) (oci-container-configuration (image "grafana/grafana:10.0.1") (network "host") (volumes '("/var/lib/grafana:/var/lib/grafana")))))In this example three different Shepherd services are going to be added to the system. Each
oci-container-configurationrecord translates to adocker runinvocation and its fields directly map to options. You can refer to the upstream documentation for the semantics of each value. If the images are not found, they will be pulled. The services with(network "host")are going to be attached to the host network and are supposed to behave like native processes with regard to networking.
- Tipo de dados: oci-container-configuration
Available
oci-container-configurationfields are:user(default:"oci-container") (type: string)The user under whose authority docker commands will be run.
group(default:"docker") (type: string)The group under whose authority docker commands will be run.
command(default:'()) (type: list-of-strings)Overwrite the default command (
CMD) of the image.entrypoint(default:"") (type: string)Overwrite the default entrypoint (
ENTRYPOINT) of the image.host-environment(default:'()) (type: list)Set environment variables in the host environment where
docker runis invoked. This is especially useful to pass secrets from the host to the container without having them on thedocker run’s command line: by setting theMYSQL_PASSWORDon the host and by passing--env MYSQL_PASSWORDthrough theextra-argumentsfield, it is possible to securely set values in the container environment. This field’s value can be a list of pairs or strings, even mixed:(list '("LANGUAGE\" . "eo:ca:eu") "JAVA_HOME=/opt/java")Pair members can be strings, gexps or file-like objects. Strings are passed directly to
make-forkexec-constructor.environment(default:'()) (type: list)Set environment variables. This can be a list of pairs or strings, even mixed:
(list '("LANGUAGE" . "eo:ca:eu") "JAVA_HOME=/opt/java")Pair members can be strings, gexps or file-like objects. Strings are passed directly to the Docker CLI. You can refer to the upstream documentation for semantics.
image(type: string-or-oci-image)The image used to build the container. It can be a string or an
oci-imagerecord. Strings are resolved by the Docker Engine, and follow the usual formatmyregistry.local:5000/testing/test-image:tag.provision(default:"") (type: string)Set the name of the provisioned Shepherd service.
requirement(default:'()) (type: list-of-symbols)Set additional Shepherd services dependencies to the provisioned Shepherd service.
log-file(type: maybe-string)When
log-fileis set, it names the file to which the service’s standard output and standard error are redirected.log-fileis created if it does not exist, otherwise it is appended to.auto-start?(default:#t) (type: boolean)Whether this service should be started automatically by the Shepherd. If it is
#f, the service has to be started manually withherd start.respawn?(default:#f) (type: boolean)Whether to have Shepherd restart the service when it stops, for instance when the underlying process dies.
shepherd-actions(default:'()) (type: list-of-symbols)This is a list of
shepherd-actionrecords defining actions supported by the service.network(default:"") (type: string)Set a Docker network for the spawned container.
ports(default:'()) (type: list)Set the port or port ranges to expose from the spawned container. This can be a list of pairs or strings, even mixed:
(list '("8080" . "80") "10443:443")Pair members can be strings, gexps or file-like objects. Strings are passed directly to the Docker CLI. You can refer to the upstream documentation for semantics.
volumes(default:'()) (type: list)Set volume mappings for the spawned container. This can be a list of pairs or strings, even mixed:
(list '("/root/data/grafana" . "/var/lib/grafana") "/gnu/store:/gnu/store")Pair members can be strings, gexps or file-like objects. Strings are passed directly to the Docker CLI. You can refer to the upstream documentation for semantics.
container-user(default:"") (type: string)Set the current user inside the spawned container. You can refer to the upstream documentation for semantics.
workdir(default:"") (type: string)Set the current working directory for the spawned Shepherd service. You can refer to the upstream documentation for semantics.
extra-arguments(default:'()) (type: list)A list of strings, gexps or file-like objects that will be directly passed to the
docker runinvocation.
- Tipo de dados: oci-image
Available
oci-imagefields are:repository(type: string)A string like
myregistry.local:5000/testing/test-imagethat names the OCI image.tag(default:"latest") (type: string)A string representing the OCI image tag. Defaults to
latest.value(type: oci-lowerable-image)A
manifestoroperating-systemrecord that will be lowered into an OCI compatible tarball. Otherwise this field’s value can be a gexp or a file-like object that evaluates to an OCI compatible tarball.pack-options(default:'()) (type: list)An optional set of keyword arguments that will be passed to the
docker-imageprocedure fromguix scripts pack. They can be used to replicateguix packbehavior:(oci-image (repository "guile") (tag "3") (value (specifications->manifest '("guile"))) (pack-options '(#:symlinks (("/bin/guile" -> "bin/guile")) #:max-layers 2)))If the
valuefield is anoperating-systemrecord, this field’s value will be ignored.system(default:"") (type: string)Attempt to build for a given system, e.g. "i686-linux"
target(default:"") (type: string)Attempt to cross-build for a given triple, e.g. "aarch64-linux-gnu"
grafts?(default:#f) (type: boolean)Whether to allow grafting or not in the pack build.
Subordinate User and Group ID Service
Among the virtualization facilities implemented by the Linux kernel is the
concept of subordinate IDs. Subordinate IDs allow for mapping user
and group IDs inside process namespaces to user and group IDs of the host
system. Subordinate user ID ranges (subuids) allow users to map virtual
user IDs inside containers to the user ID of an unprivileged user of the
host system. Subordinate group ID ranges (subgids), instead map virtual
group IDs to the group ID of an unprivileged user on the host system. You
can access subuid(5) and subgid(5) Linux man pages for more
details.
The (gnu system shadow) module exposes the
subids-service-type, its configuration record
subids-configuration and its extension record
subids-extension.
With subids-service-type, subuids and subgids ranges can be reserved
for users that desire so:
(use-modules (gnu system shadow) ;for 'subids-service-type' (gnu system accounts) ;for 'subid-range' …) (operating-system ;; … (services (list (simple-service 'alice-bob-subids subids-service-type (subids-extension (subgids (list (subid-range (name "alice")))) (subuids (list (subid-range (name "alice")) (subid-range (name "bob") (start 100700)))))))))
Users (definitely other services), usually, are supposed to extend the
service instead of adding subids directly to subids-configuration,
unless the want to change the default behavior for root. With default
settings the subids-service-type adds, if it’s not already there, a
configuration for the root account to both /etc/subuid and
/etc/subgid, possibly starting at the minimum possible subid.
Otherwise the root subuids and subgids ranges are fitted wherever possible.
The above configuration will yield the following:
# cat /etc/subgid root:100000:65536 alice:165536:65536 # cat /etc/subuid root:100000:700 bob:100700:65536 alice:166236:65536
- Data Type: subids-configuration
-
With default settings the
subids-service-typeadds, if it’s not already there, a configuration for the root account to both /etc/subuid and /etc/subgid, possibly starting at the minimum possible subid. To disable the default behavior and provide your own definition for the root subid ranges you can set to#ftheadd-root?field:(use-modules (gnu system shadow) ;for 'subids-service-type' (gnu system accounts) ;for 'subid-range' …) (operating-system ;; … (services (list (service subids-service-type (subids-configuration (add-root? #f) (subgids (subid-range (name "root") (start 120000) (count 100))) (subuids (subid-range (name "root") (start 120000) (count 100))))) (simple-service 'alice-bob-subids subids-service-type (subids-extension (subgids (list (subid-range (name "alice")))) (subuids (list (subid-range (name "alice")) (subid-range (name "bob") (start 100700)))))))))
Available
subids-configurationfields are:add-root?(default:#t) (type: boolean)Whether to automatically configure subuids and subgids for root.
subgids(default:'()) (type: list-of-subid-ranges)The list of
subid-ranges that will be serialized to/etc/subgid. If a range doesn’t specify a start it will be fitted based on its number of requested subids. If a range doesn’t specify a count the default size of 65536 will be assumed.subuids(default:'()) (type: list-of-subid-ranges)The list of
subid-ranges that will be serialized to/etc/subuid. If a range doesn’t specify a start it will be fitted based on its number of requested subids. If a range doesn’t specify a count the default size of 65536 will be assumed.
- Data Type: subids-extension
-
Available
subids-extensionfields are:subgids(default:'()) (type: list-of-subid-ranges)The list of
subid-ranges that will be appended tosubids-configuration-subgids. Entries with the same name are deduplicated upon merging.subuids(default:'()) (type: list-of-subid-ranges)The list of
subid-ranges that will be appended tosubids-configuration-subuids. Entries with the same name are deduplicated upon merging.
- Data Type: subid-range
-
The
subid-rangerecord is defined at(gnu system accounts). Available fields are:name(type: string)The name of the user or group that will own this range.
start(default:#f) (type: integer)The first requested subid. When false the first available subid with enough contiguous subids will be assigned.
count(default:#f) (type: integer)The number of total allocated subids. When #f the default of 65536 will be assumed .
Auditd Service
The (gnu services auditd) module provides the following service.
- Variável: auditd-service-type
-
This is the type of the service that runs auditd, a daemon that tracks security-relevant information on your system.
Examples of things that can be tracked:
- File accesses
- System calls
- Invoked commands
- Failed login attempts
- Firewall filtering
- Network access
auditctldo pacoteauditpode ser usado para adicionar ou remover eventos a serem rastreaddos (até o próximo reinício). A fim de rastrear permanentemente eventos, ponha os argumentos de linha de comando do auditctl num arquivo chamadoaudit.rulesno diretório de configurações (veja abaixo).aureportdo pacoteauditpode ser usado para visualizar um relatório de todos os eventos gravados. O daemon audit por padrão, produz logs no arquivo /var/log/audit.log.
- Tipo de dados: auditd-configuration
This is the data type representing the configuration of auditd.
audit(default:audit)The audit package to use.
configuration-directory(default:%default-auditd-configuration-directory)The directory containing the configuration file for the audit package, which must be named
auditd.conf, and optionally some audit rules to instantiate on startup.
R-Shiny service
The (gnu services science) module provides the following service.
- Variável: rshiny-service-type
-
This is a type of service which is used to run a webapp created with
r-shiny. This service sets theR_LIBS_USERenvironment variable and runs the provided script to callrunApp.- Tipo de dados: rshiny-configuration
This is the data type representing the configuration of rshiny.
package(default:r-shiny)The package to use.
binary(default"rshiny")The name of the binary or shell script located at
package/bin/to run when the service is run.The common way to create this file is as follows:
… (let* ((out (assoc-ref %outputs "out")) (targetdir (string-append out "/share/" ,name)) (app (string-append out "/bin/" ,name)) (Rbin (search-input-file %build-inputs "/bin/Rscript"))) ;; … (mkdir-p (string-append out "/bin")) (call-with-output-file app (lambda (port) (format port "#!~a library(shiny) setwd(\"~a\") runApp(launch.browser=0, port=4202)~%\n" Rbin targetdir))))
Nix service
The (gnu services nix) module provides the following service.
- Variável: nix-service-type
-
This is the type of the service that runs build daemon of the Nix package manager. Here is an example showing how to use it:
(use-modules (gnu)) (use-service-modules nix) (use-package-modules package-management) (operating-system ;; … (packages (append (list nix) %base-packages)) (services (append (list (service nix-service-type)) %base-services)))
After
guix system reconfigureconfigure Nix for your user:- Add a Nix channel and update it. See
Nix channels for more
information about the available channels. If you would like to use the
unstable Nix channel you can do this by running:
$ nix-channel --add https://nixos.org/channels/nixpkgs-unstable $ nix-channel --update
- Create your Nix profile directory:
$ sudo mkdir -p /nix/var/nix/profiles/per-user/$USER $ sudo chown $USER:root /nix/var/nix/profiles/per-user/$USER
- Create a symlink to your profile and activate Nix profile:
$ ln -s "/nix/var/nix/profiles/per-user/$USER/profile" ~/.nix-profile $ source /run/current-system/profile/etc/profile.d/nix.sh
- Add a Nix channel and update it. See
Nix channels for more
information about the available channels. If you would like to use the
unstable Nix channel you can do this by running:
- Tipo de dados: nix-configuration
This data type represents the configuration of the Nix daemon.
nix(default:nix)The Nix package to use.
sandbox(default:#t)Specifies whether builds are sandboxed by default.
build-directory(default:"/tmp")The directory where build directory are stored during builds. This is useful to change if, for example, the default location does not have enough space to hold build trees for big packages.
This is similar to setting the
TMPDIRenvironment variable forguix-daemon.TMPDIR, for more info.build-sandbox-items(default:'())This is a list of strings or objects appended to the
build-sandbox-itemsfield of the configuration file.extra-config(default:'())This is a list of strings or objects appended to the configuration file. It is used to pass extra text to be added verbatim to the configuration file.
extra-options(default:'())Extra command line options for
nix-service-type.
Fail2Ban service
fail2ban scans log files
(e.g. /var/log/apache/error_log) and bans IP addresses that show
malicious signs – repeated password failures, attempts to make use of
exploits, etc.
fail2ban-service-type service type is provided by the (gnu
services security) module.
This service type runs the fail2ban daemon. It can be configured in
various ways, which are:
- Basic configuration
The basic parameters of the Fail2Ban service can be configured via its
fail2banconfiguration, which is documented below.- User-specified jail extensions
The
fail2ban-jail-servicefunction can be used to add new Fail2Ban jails.- Shepherd extension mechanism
Service developers can extend the
fail2ban-service-typeservice type itself via the usual service extension mechanism.
- Variável: fail2ban-service-type
-
This is the type of the service that runs
fail2bandaemon. Below is an example of a basic, explicit configuration:(append (list (service fail2ban-service-type (fail2ban-configuration (extra-jails (list (fail2ban-jail-configuration (name "sshd") (enabled? #t)))))) ;; There is no implicit dependency on an actual SSH ;; service, so you need to provide one. (service openssh-service-type)) %base-services)
- Procedure: fail2ban-jail-service svc-type jail
Extend svc-type, a
<service-type>object with jail, afail2ban-jail-configurationobject.Por exemplo:
(append (list (service ;; The 'fail2ban-jail-service' procedure can extend any service type ;; with a fail2ban jail. This removes the requirement to explicitly ;; extend services with fail2ban-service-type. (fail2ban-jail-service openssh-service-type (fail2ban-jail-configuration (name "sshd") (enabled? #t))) (openssh-configuration ...))))
Below is the reference for the different jail-service-type
configuration records.
- Tipo de dados: fail2ban-configuration
Available
fail2ban-configurationfields are:fail2ban(default:fail2ban) (type: package)The
fail2banpackage to use. It is used for both binaries and as base default configuration that is to be extended with<fail2ban-jail-configuration>objects.run-directory(default:"/var/run/fail2ban") (type: string)The state directory for the
fail2bandaemon.jails(default:'()) (type: list-of-fail2ban-jail-configurations)Instances of
<fail2ban-jail-configuration>collected from extensions.extra-jails(default:'()) (type: list-of-fail2ban-jail-configurations)Instances of
<fail2ban-jail-configuration>explicitly provided.extra-content(default:'()) (type: text-config)Extra raw content to add to the end of the jail.local file, provided as a list of file-like objects.
- Tipo de dados: fail2ban-ignore-cache-configuration
Available
fail2ban-ignore-cache-configurationfields are:key(type: string)Cache key.
max-count(type: integer)Cache size.
max-time(type: integer)Cache time.
- Tipo de dados: fail2ban-jail-action-configuration
Available
fail2ban-jail-action-configurationfields are:name(type: string)Action name.
arguments(default:'()) (type: list-of-arguments)Action arguments.
- Tipo de dados: fail2ban-jail-configuration
Available
fail2ban-jail-configurationfields are:name(type: string)Required name of this jail configuration.
enabled?(default:#t) (type: boolean)Whether this jail is enabled.
backend(type: maybe-symbol)Backend to use to detect changes in the
log-path. The default is ’auto. To consult the defaults of the jail configuration, refer to the /etc/fail2ban/jail.conf file of thefail2banpackage.max-retry(type: maybe-integer)The number of failures before a host gets banned (e.g.
(max-retry 5)).max-matches(type: maybe-integer)The number of matches stored in ticket (resolvable via tag
<matches>) in action.find-time(type: maybe-string)The time window during which the maximum retry count must be reached for an IP address to be banned. A host is banned if it has generated
max-retryduring the lastfind-timeseconds (e.g.(find-time "10m")). It can be provided in seconds or using Fail2Ban’s "time abbreviation format", as described inman 5 jail.conf.ban-time(type: maybe-string)The duration, in seconds or time abbreviated format, that a ban should last. (e.g.
(ban-time "10m")).ban-time-increment?(type: maybe-boolean)Whether to consider past bans to compute increases to the default ban time of a specific IP address.
ban-time-factor(type: maybe-string)The coefficient to use to compute an exponentially growing ban time.
ban-time-formula(type: maybe-string)This is the formula used to calculate the next value of a ban time.
ban-time-multipliers(type: maybe-string)Used to calculate next value of ban time instead of formula.
ban-time-max-time(type: maybe-string)The maximum number of seconds a ban should last.
ban-time-rnd-time(type: maybe-string)The maximum number of seconds a randomized ban time should last. This can be useful to stop “clever” botnets calculating the exact time an IP address can be unbanned again.
ban-time-overall-jails?(type: maybe-boolean)When true, it specifies the search of an IP address in the database should be made across all jails. Otherwise, only the current jail of the ban IP address is considered.
ignore-self?(type: maybe-boolean)Never ban the local machine’s own IP address.
ignore-ip(default:'()) (type: list-of-strings)A list of IP addresses, CIDR masks or DNS hosts to ignore.
fail2banwill not ban a host which matches an address in this list.ignore-cache(type: maybe-fail2ban-ignore-cache-configuration)Provide cache parameters for the ignore failure check.
filter(type: maybe-fail2ban-jail-filter-configuration)The filter to use by the jail, specified via a
<fail2ban-jail-filter-configuration>object. By default, jails have names matching their filter name.log-time-zone(type: maybe-string)The default time zone for log lines that do not have one.
log-encoding(type: maybe-symbol)The encoding of the log files handled by the jail. Possible values are:
'ascii,'utf-8and'auto.log-path(default:'()) (type: list-of-strings)The file names of the log files to be monitored.
action(default:'()) (type: list-of-fail2ban-jail-actions)A list of
<fail2ban-jail-action-configuration>.extra-content(default:'()) (type: text-config)Extra content for the jail configuration, provided as a list of file-like objects.
- Tipo de dados: fail2ban-jail-filter-configuration
Available
fail2ban-jail-filter-configurationfields are:name(type: string)Filter to use.
mode(type: maybe-string)Mode for filter.
Resize File System Service
This service type lets you resize a live file system during boot, which can be convenient if a Guix image is flashed on an SD Card (e.g. for an embedded device) or uploaded to a VPS. In both cases the medium the image will reside upon may be larger than the image you want to produce.
For an embedded device booting from an SD card you may use something like:
(service resize-file-system-service-type
(resize-file-system-configuration
(file-system
(file-system (device (file-system-label "root"))
(type "ext4")))))
Aviso: Be extra cautious to use the correct device and type. The service has little error handling of its own and relies on the underlying tools. Wrong use could end in loss of data or the corruption of the operating system.
Partitions and file systems are grown to the maximum size available. File systems can only grow when they are on the last partition on a device and have empty space available.
This service supports the ext2, ext3, ext4, btrfs, and bcachefs file systems.
file-system(type: file-system)The file-system object to resize (veja Sistemas de arquivos). This object must have the
deviceandtypefields set. Other fields are ignored.cloud-utils(default:cloud-utils) (type: file-like)The cloud-utils package to use. This package is used for the
growpartcommand.e2fsprogs(default:e2fsprogs) (type: file-like)The e2fsprogs package to use, used for resizing ext2, ext3, and ext4 file systems.
btrfs-progs(default:btrfs-progs) (type: file-like)The btrfs-progs package to use, used for resizing the btrfs file system.
bcachefs-tools(default:bcachefs-tools) (type: file-like)The bcachefs-tools package to use, used for resizing the bcachefs file system.
Backup Services
The (gnu services backup) module offers services for backing up file
system trees. For now, it provides the restic-backup-service-type.
With restic-backup-service-type, you can periodically back up
directories and files with Restic, which
supports end-to-end encryption and deduplication. Consider the following
configuration:
(use-service-modules backup …) ;for 'restic-backup-service-type' (use-package-modules sync …) ;for 'rclone' (operating-system ;; … (packages (append (list rclone) ;for use by restic %base-packages)) (services (list (service restic-backup-service-type (restic-backup-configuration (jobs (list (restic-backup-job (name "remote-ftp") (repository "rclone:remote-ftp:backup/restic") (password-file "/root/.restic") ;; Every day at 23. (schedule "0 23 * * *") (files '("/root/.restic" "/root/.config/rclone" "/etc/ssh/ssh_host_rsa_key" "/etc/ssh/ssh_host_rsa_key.pub" "/etc/guix/signing-key.pub" "/etc/guix/signing-key.sec"))))))))))
Each restic-backup-job translates to a Shepherd timer which sets the
RESTIC_PASSWORD environment variable by reading the first line of
password-file and runs restic backup, creating backups
using rclone of all the files listed in the files field.
The restic-backup-service-type provides the ability to
instantaneously trigger a backup with the trigger Shepherd action:
sudo herd trigger remote-ftp
- Tipo de dados: restic-backup-configuration
Available
restic-backup-configurationfields are:jobs(default:'()) (type: list-of-restic-backup-jobs)The list of backup jobs for the current system.
- Tipo de dados: restic-backup-job
Available
restic-backup-jobfields are:restic(default:restic) (type: package)The restic package to be used for the current job.
user(default:"root") (type: string)The user used for running the current job.
group(default:"root") (type: string)The group used for running the current job.
log-file(type: maybe-string)The file system path to the log file for this job. By default the file will have be /var/log/restic-backup/job-name.log, where job-name is the name defined in the
namefield.max-duration(type: maybe-number)The maximum duration in seconds that a job may last. Past
max-durationseconds, the job is forcefully terminated.wait-for-termination?(default:#f) (type: boolean)Wait until the job has finished before considering executing it again; otherwise, perform it strictly on every occurrence of event, at the risk of having multiple instances running concurrently.
repository(type: string)The restic repository target of this job.
name(type: string)A string denoting a name for this job.
password-file(type: string)Name of the password file, readable by the configured
user, that will be used to set theRESTIC_PASSWORDenvironment variable for the current job.schedule(type: gexp-or-string)A string or a gexp representing the frequency of the backup. Gexp must evaluate to
calendar-eventrecords or to strings. Strings must contain Vixie cron date lines.requirement(default:'()) (type: list-of-symbols)The list of Shepherd services that this backup job depends upon.
files(default:'()) (type: list-of-lowerables)The list of files or directories to be backed up. It must be a list of values that can be lowered to strings.
verbose?(default:#f) (type: boolean)Whether to enable verbose output for the current backup job.
extra-flags(default:'()) (type: list-of-lowerables)A list of values that are lowered to strings. These will be passed as command-line arguments to the current job
restic backupinvocation.
DLNA/UPnP Services
The (gnu services upnp) module offers services related to
UPnP (Universal Plug and Play) and DLNA (Digital Living
Network Alliance), networking protocols that can be used for media streaming
and device interoperability within a local network. For now, this module
provides the readymedia-service-type.
ReadyMedia (formerly
known as MiniDLNA) is a DLNA/UPnP-AV media server. The project’s daemon,
minidlnad, can serve media files (audio, pictures, and video) to
DLNA/UPnP-AV clients available on the network.
readymedia-service-type is a Guix service that wraps around
ReadyMedia’s minidlnad.
Consider the following configuration:
(use-service-modules upnp …) (operating-system … (services (list (service readymedia-service-type (readymedia-configuration (media-directories (list (readymedia-media-directory (path "/media/audio") (types '(A))) (readymedia-media-directory (path "/media/video") (types '(V))) (readymedia-media-directory (path "/media/misc")))) (extra-config '(("notify_interval" . "60"))))) …)))
This sets up the ReadyMedia daemon to serve files from the media folders
specified in media-directories. The media-directories field
is mandatory. All other fields (such as network ports and the server name)
come with a predefined default and can be omitted.
- Tipo de dados: readymedia-configuration
Available
readymedia-configurationfields are:readymedia(default:readymedia) (type: package)The ReadyMedia package to be used for the service.
friendly-name(default:#f) (type: maybe-string)A custom name that will be displayed on connected clients.
media-directories(type: list)The list of media folders to serve content from. Each item is a
readymedia-media-directory.cache-directory(default:"/var/cache/readymedia") (type: string)A folder for ReadyMedia’s cache files. If not existing already, the folder will be created as part of the service activation and the ReadyMedia user will be assigned ownership.
log-directory(default:"/var/log/readymedia") (type: string)A folder for ReadyMedia’s log files. If not existing already, the folder will be created as part of the service activation and the ReadyMedia user will be assigned ownership.
port(default:#f) (type: maybe-integer)A custom port that the service will be listening on.
extra-config(default:'()) (type: alist)An association list of further options, as accepted by ReadyMedia.
- Tipo de dados: readymedia-media-directory
A
media-directoriesentry includes a folderpathand, optionally, thetypesof media files included within the folder.path(type: string)The media folder location.
types(default:'()) (type: list)A list indicating the types of file included in the media folder. Valid values are combinations of individual media types, i.e. symbol
Afor audio,Pfor pictures,Vfor video. An empty list means that no type is specified.
Próximo: Certificados X.509, Anterior: Serviços, Acima: Configuração do sistema [Conteúdo][Índice]
11.11 Privileged Programs
Some programs need to run with elevated privileges, even when they are
launched by unprivileged users. A notorious example is the passwd
program, which users can run to change their password, and which needs to
access the /etc/passwd and /etc/shadow files—something
normally restricted to root, for obvious security reasons. To address that,
passwd should be setuid-root, meaning that it always runs
with root privileges (veja How Change Persona em The GNU C Library
Reference Manual, for more info about the setuid mechanism).
The store itself cannot contain privileged programs: that would be a security issue since any user on the system can write derivations that populate the store (veja O armazém). Thus, a different mechanism is used: instead of directly granting permissions to files that are in the store, we let the system administrator declare which programs should be entrusted with these additional privileges.
The privileged-programs field of an operating-system
declaration contains a list of <privileged-program> denoting the
names of programs to have a setuid or setgid bit set (veja Usando o sistema de configuração). For instance, the mount.nfs program,
which is part of the nfs-utils package, with a setuid root can be designated
like this:
(privileged-program
(program (file-append nfs-utils "/sbin/mount.nfs"))
(setuid? #t))
And then, to make mount.nfs setuid on your system, add the
previous example to your operating system declaration by appending it to
%default-privileged-programs like this:
(operating-system
;; Some fields omitted...
(privileged-programs
(append (list (privileged-program
(program (file-append nfs-utils "/sbin/mount.nfs"))
(setuid? #t)))
%default-privileged-programs)))
- Tipo de dados: privileged-program
This data type represents a program with special privileges, such as setuid
programA file-like object to which all given privileges should apply.
setuid?(default:#f)Whether to set user setuid bit.
setgid?(default:#f)Whether to set group setgid bit.
user(default:0)UID (integer) or user name (string) for the user owner of the program, defaults to root.
group(default:0)GID (integer) group name (string) for the group owner of the program, defaults to root.
capabilities(default:#f)A string representing the program’s POSIX capabilities, as described by the
cap_to_text(3)man page from the libcap package, or#fto make no changes.
A default set of privileged programs is defined by the
%default-privileged-programs variable of the (gnu system)
module.
- Variável: Scheme Variable %default-privileged-programs
A list of
<privileged-program>denoting common programs with elevated privileges.The list includes commands such as
passwd,ping,su, andsudo.
Under the hood, the actual privileged programs are created in the /run/privileged/bin directory at system activation time. The files in this directory refer to the “real” binaries, which are in the store.
Próximo: Name Service Switch, Anterior: Privileged Programs, Acima: Configuração do sistema [Conteúdo][Índice]
11.12 Certificados X.509
Web servers available over HTTPS (that is, HTTP over the transport-layer security mechanism, TLS) send client programs an X.509 certificate that the client can then use to authenticate the server. To do that, clients verify that the server’s certificate is signed by a so-called certificate authority (CA). But to verify the CA’s signature, clients must have first acquired the CA’s certificate.
Web browsers such as GNU IceCat include their own set of CA certificates, such that they are able to verify CA signatures out-of-the-box.
However, most other programs that can talk HTTPS—wget,
git, w3m, etc.—need to be told where CA certificates
can be found.
For users of Guix System, this is done by adding a package that provides
certificates to the packages field of the operating-system
declaration (veja operating-system Reference). Guix includes one such
package, nss-certs, which is a set of CA certificates provided as
part of Mozilla’s Network Security Services.
This package is part of %base-packages, so there is no need to
explicitly add it. The /etc/ssl/certs directory, which is where most
applications and libraries look for certificates by default, points to the
certificates installed globally.
Unprivileged users, including users of Guix on a foreign distro, can also
install their own certificate package in their profile. A number of
environment variables need to be defined so that applications and libraries
know where to find them. Namely, the OpenSSL library honors the
SSL_CERT_DIR and SSL_CERT_FILE variables. Some applications add
their own environment variables; for instance, the Git version control
system honors the certificate bundle pointed to by the GIT_SSL_CAINFO
environment variable. Thus, you would typically run something like:
guix install nss-certs export SSL_CERT_DIR="$HOME/.guix-profile/etc/ssl/certs" export SSL_CERT_FILE="$HOME/.guix-profile/etc/ssl/certs/ca-certificates.crt" export GIT_SSL_CAINFO="$SSL_CERT_FILE"
As another example, R requires the CURL_CA_BUNDLE environment variable
to point to a certificate bundle, so you would have to run something like
this:
guix install nss-certs export CURL_CA_BUNDLE="$HOME/.guix-profile/etc/ssl/certs/ca-certificates.crt"
For other applications you may want to look up the required environment variable in the relevant documentation.
Próximo: Disco de RAM inicial, Anterior: Certificados X.509, Acima: Configuração do sistema [Conteúdo][Índice]
11.13 Name Service Switch
The (gnu system nss) module provides bindings to the configuration
file of the libc name service switch or NSS (veja NSS
Configuration File em The GNU C Library Reference Manual). In a
nutshell, the NSS is a mechanism that allows libc to be extended with new
“name” lookup methods for system databases, which includes host names,
service names, user accounts, and more (veja System
Databases and Name Service Switch em The GNU C Library Reference
Manual).
The NSS configuration specifies, for each system database, which lookup
method is to be used, and how the various methods are chained together—for
instance, under which circumstances NSS should try the next method in the
list. The NSS configuration is given in the name-service-switch
field of operating-system declarations (veja name-service-switch).
As an example, the declaration below configures the NSS to use the
nss-mdns
back-end, which supports host name lookups over multicast DNS (mDNS) for
host names ending in .local:
(name-service-switch
(hosts (list %files ;first, check /etc/hosts
;; If the above did not succeed, try
;; with 'mdns_minimal'.
(name-service
(name "mdns_minimal")
;; 'mdns_minimal' is authoritative for
;; '.local'. When it returns "not found",
;; no need to try the next methods.
(reaction (lookup-specification
(not-found => return))))
;; Then fall back to DNS.
(name-service
(name "dns"))
;; Finally, try with the "full" 'mdns'.
(name-service
(name "mdns")))))
Do not worry: the %mdns-host-lookup-nss variable (see below)
contains this configuration, so you will not have to type it if all you want
is to have .local host lookup working.
Note that, in this case, in addition to setting the
name-service-switch of the operating-system declaration, you
also need to use avahi-service-type (veja avahi-service-type), or %desktop-services, which includes it
(veja Serviços de desktop). Doing this makes nss-mdns accessible to
the name service cache daemon (veja nscd-service).
For convenience, the following variables provide typical NSS configurations.
- Variável: %default-nss
This is the default name service switch configuration, a
name-service-switchobject.
- Variável: %mdns-host-lookup-nss
This is the name service switch configuration with support for host name lookup over multicast DNS (mDNS) for host names ending in
.local.
The reference for name service switch configuration is given below. It is a
direct mapping of the configuration file format of the C library , so please
refer to the C library manual for more information (veja NSS Configuration
File em The GNU C Library Reference Manual). Compared to the
configuration file format of libc NSS, it has the advantage not only of
adding this warm parenthetic feel that we like, but also static checks: you
will know about syntax errors and typos as soon as you run guix
system.
- Tipo de dados: name-service-switch
-
This is the data type representation the configuration of libc’s name service switch (NSS). Each field below represents one of the supported system databases.
aliasesethersgroupgshadowhostsinitgroupsnetgroupnetworkspasswordpublic-keyrpcservicesshadowThe system databases handled by the NSS. Each of these fields must be a list of
<name-service>objects (see below).
- Tipo de dados: name-service
-
This is the data type representing an actual name service and the associated lookup action.
nameA string denoting the name service (veja Services in the NSS configuration em The GNU C Library Reference Manual).
Note that name services listed here must be visible to nscd. This is achieved by passing the
#:name-servicesargument tonscd-servicethe list of packages providing the needed name services (vejanscd-service).reactionAn action specified using the
lookup-specificationmacro (veja Actions in the NSS configuration em The GNU C Library Reference Manual). For example:(lookup-specification (unavailable => continue) (success => return))
Próximo: Configuração do carregador de inicialização, Anterior: Name Service Switch, Acima: Configuração do sistema [Conteúdo][Índice]
11.14 Disco de RAM inicial
For bootstrapping purposes, the Linux-Libre kernel is passed an initial RAM disk, or initrd. An initrd contains a temporary root file system as well as an initialization script. The latter is responsible for mounting the real root file system, and for loading any kernel modules that may be needed to achieve that.
The initrd-modules field of an operating-system declaration
allows you to specify Linux-libre kernel modules that must be available in
the initrd. In particular, this is where you would list modules needed to
actually drive the hard disk where your root partition is—although the
default value of initrd-modules should cover most use cases. For
example, assuming you need the megaraid_sas module in addition to the
default modules to be able to access your root file system, you would write:
(operating-system
;; …
(initrd-modules (cons "megaraid_sas" %base-initrd-modules)))
- Variável: %base-initrd-modules
This is the list of kernel modules included in the initrd by default.
Furthermore, if you need lower-level customization, the initrd field
of an operating-system declaration allows you to specify which initrd
you would like to use. The (gnu system linux-initrd) module provides
three ways to build an initrd: the high-level base-initrd procedure
and the low-level raw-initrd and expression->initrd
procedures.
The base-initrd procedure is intended to cover most common uses. For
example, if you want to add a bunch of kernel modules to be loaded at boot
time, you can define the initrd field of the operating system
declaration like this:
(initrd (lambda (file-systems . rest)
;; Create a standard initrd but set up networking
;; with the parameters QEMU expects by default.
(apply base-initrd file-systems
#:qemu-networking? #t
rest)))
The base-initrd procedure also handles common use cases that involves
using the system as a QEMU guest, or as a “live” system with volatile root
file system.
The base-initrd procedure is built from raw-initrd procedure.
Unlike base-initrd, raw-initrd doesn’t do anything high-level,
such as trying to guess which kernel modules and packages should be included
to the initrd. An example use of raw-initrd is when a user has a
custom Linux kernel configuration and default kernel modules included by
base-initrd are not available.
The initial RAM disk produced by base-initrd or raw-initrd
honors several options passed on the Linux kernel command line (that is,
arguments passed via the linux command of GRUB, or the
-append option of QEMU), notably:
gnu.load=bootTell the initial RAM disk to load boot, a file containing a Scheme program, once it has mounted the root file system.
Guix uses this option to yield control to a boot program that runs the service activation programs and then spawns the GNU Shepherd, the initialization system.
root=rootMount root as the root file system. root can be a device name like
/dev/sda1, a file system label, or a file system UUID. When unspecified, the device name from the root file system of the operating system declaration is used.rootfstype=typeSet the type of the root file system. It overrides the
typefield of the root file system specified via theoperating-systemdeclaration, if any.rootflags=optionsSet the mount options of the root file system. It overrides the
optionsfield of the root file system specified via theoperating-systemdeclaration, if any.fsck.mode=modeWhether to check the root file system for errors before mounting it. mode is one of
skip(never check),force(always check), orautoto respect the root<file-system>object’scheck?setting (veja Sistemas de arquivos) and run a full scan only if the file system was not cleanly shut down.autois the default if this option is not present or if mode is not one of the above.fsck.repair=levelThe level of repairs to perform automatically if errors are found in the root file system. level is one of
no(do not write to root at all if possible),yes(repair as much as possible), orpreento repair problems considered safe to repair automatically.preenis the default if this option is not present or if level is not one of the above.gnu.system=systemHave /run/booted-system and /run/current-system point to system.
modprobe.blacklist=modules…¶-
Instruct the initial RAM disk as well as the
modprobecommand (from the kmod package) to refuse to load modules. modules must be a comma-separated list of module names—e.g.,usbkbd,9pnet. gnu.replStart a read-eval-print loop (REPL) from the initial RAM disk before it tries to load kernel modules and to mount the root file system. Our marketing team calls it boot-to-Guile. The Schemer in you will love it. Veja Using Guile Interactively em GNU Guile Reference Manual, for more information on Guile’s REPL.
Now that you know all the features that initial RAM disks produced by
base-initrd and raw-initrd provide, here is how to use it and
customize it further.
- Procedure: raw-initrd file-systems [#:linux-modules '()] [#:pre-mount #t] [#:mapped-devices '()] [#:keyboard-layout #f] [#:helper-packages '()] [#:qemu-networking? #f]
[#:volatile-root? #f] Return a derivation that builds a raw initrd. file-systems is a list of file systems to be mounted by the initrd, possibly in addition to the root file system specified on the kernel command line via root. linux-modules is a list of kernel modules to be loaded at boot time. mapped-devices is a list of device mappings to realize before file-systems are mounted (veja Dispositivos mapeados). pre-mount is a G-expression to evaluate before realizing mapped-devices. helper-packages is a list of packages to be copied in the initrd. It may include
e2fsck/staticor other packages needed by the initrd to check the root file system.When true, keyboard-layout is a
<keyboard-layout>record denoting the desired console keyboard layout. This is done before mapped-devices are set up and before file-systems are mounted such that, should the user need to enter a passphrase or use the REPL, this happens using the intended keyboard layout.When qemu-networking? is true, set up networking with the standard QEMU parameters. When virtio? is true, load additional modules so that the initrd can be used as a QEMU guest with para-virtualized I/O drivers.
When volatile-root? is true, the root file system is writable but any changes to it are lost.
- Procedure: base-initrd file-systems [#:mapped-devices '()] [#:keyboard-layout #f] [#:qemu-networking? #f]
[#:volatile-root? #f] [#:linux-modules ’()] Return as a file-like object a generic initrd, with kernel modules taken from linux. file-systems is a list of file-systems to be mounted by the initrd, possibly in addition to the root file system specified on the kernel command line via root. mapped-devices is a list of device mappings to realize before file-systems are mounted.
When true, keyboard-layout is a
<keyboard-layout>record denoting the desired console keyboard layout. This is done before mapped-devices are set up and before file-systems are mounted such that, should the user need to enter a passphrase or use the REPL, this happens using the intended keyboard layout.qemu-networking? and volatile-root? behaves as in
raw-initrd.The initrd is automatically populated with all the kernel modules necessary for file-systems and for the given options. Additional kernel modules can be listed in linux-modules. They will be added to the initrd, and loaded at boot time in the order in which they appear.
Needless to say, the initrds we produce and use embed a statically-linked
Guile, and the initialization program is a Guile program. That gives a lot
of flexibility. The expression->initrd procedure builds such an
initrd, given the program to run in that initrd.
- Procedure: expression->initrd exp [#:guile %guile-static-initrd] [#:name "guile-initrd"] Return as a file-like
object a Linux initrd (a gzipped cpio archive) containing guile and that evaluates exp, a G-expression, upon booting. All the derivations referenced by exp are automatically copied to the initrd.
Próximo: Invoking guix system, Anterior: Disco de RAM inicial, Acima: Configuração do sistema [Conteúdo][Índice]
11.15 Configuração do carregador de inicialização
The operating system supports multiple bootloaders. The bootloader is
configured using bootloader-configuration declaration. All the
fields of this structure are bootloader agnostic except for one field,
bootloader that indicates the bootloader to be configured and
installed.
Some of the bootloaders do not honor every field of
bootloader-configuration. For instance, the extlinux bootloader does
not support themes and thus ignores the theme field.
- Tipo de dados: bootloader-configuration
The type of a bootloader configuration declaration.
bootloader¶-
The bootloader to use, as a
bootloaderobject. For nowgrub-bootloader,grub-efi-bootloader,grub-efi-removable-bootloader,grub-efi-netboot-bootloader,grub-efi-netboot-removable-bootloader,extlinux-bootloaderandu-boot-bootloaderare supported.Available bootloaders are described in
(gnu bootloader …)modules. In particular,(gnu bootloader u-boot)contains definitions of bootloaders for a wide range of ARM and AArch64 systems, using the U-Boot bootloader.grub-bootloaderallows you to boot in particular Intel-based machines in “legacy” BIOS mode.grub-efi-bootloaderallows to boot on modern systems using the Unified Extensible Firmware Interface (UEFI). This is what you should use if the installation image contains a /sys/firmware/efi directory when you boot it on your system.grub-efi-removable-bootloaderallows you to boot your system from removable media by writing the GRUB file to the UEFI-specification location of /EFI/BOOT/BOOTX64.efi of the boot directory, usually /boot/efi. This is also useful for some UEFI firmwares that “forget” their configuration from their non-volatile storage. Likegrub-efi-bootloader, this can only be used if the /sys/firmware/efi directory is available.Nota: This will overwrite the GRUB file from any other operating systems that also place their GRUB file in the UEFI-specification location; making them unbootable.
grub-efi-netboot-bootloaderallows you to boot your system over network through TFTP. In combination with an NFS root file system this allows you to build a diskless Guix system.The installation of the
grub-efi-netboot-bootloadergenerates the content of the TFTP root directory attargets(vejatargets) below the sub-directory efi/Guix, to be served by a TFTP server. You may want to mount your TFTP server directories onto thetargetsto move the required files to the TFTP server automatically during installation.If you plan to use an NFS root file system as well (actually if you mount the store from an NFS share), then the TFTP server needs to serve the file /boot/grub/grub.cfg and other files from the store (like GRUBs background image, the kernel (veja
kernel) and the initrd (vejainitrd)), too. All these files from the store will be accessed by GRUB through TFTP with their normal store path, for example as tftp://tftp-server/gnu/store/…-initrd/initrd.cpio.gz.Two symlinks are created to make this possible. For each target in the
targetsfield, the first symlink is ‘target’/efi/Guix/boot/grub/grub.cfg pointing to ../../../boot/grub/grub.cfg, where ‘target’ may be /boot. In this case the link is not leaving the served TFTP root directory, but otherwise it does. The second link is ‘target’/gnu/store and points to ../gnu/store. This link is leaving the served TFTP root directory.The assumption behind all this is that you have an NFS server exporting the root file system for your Guix system, and additionally a TFTP server exporting your
targetsdirectories—usually a single /boot—from that same root file system for your Guix system. In this constellation the symlinks will work.For other constellations you will have to program your own bootloader installer, which then takes care to make necessary files from the store accessible through TFTP, for example by copying them into the TFTP root directory for your
targets.It is important to note that symlinks pointing outside the TFTP root directory may need to be allowed in the configuration of your TFTP server. Further the store link exposes the whole store through TFTP. Both points need to be considered carefully for security aspects. It is advised to disable any TFTP write access!
Please note, that this bootloader will not modify the ‘UEFI Boot Manager’ of the system.
Beside the
grub-efi-netboot-bootloader, the already mentioned TFTP and NFS servers, you also need a properly configured DHCP server to make the booting over netboot possible. For all this we can currently only recommend you to look for instructions about PXE (Preboot eXecution Environment).If a local EFI System Partition (ESP) or a similar partition with a FAT file system is mounted in
targets, then symlinks cannot be created. In this case everything will be prepared for booting from local storage, matching the behavior ofgrub-efi-bootloader, with the difference that all GRUB binaries are copied totargets, necessary for booting over the network.grub-efi-netboot-removable-bootloaderis identical togrub-efi-netboot-bootloaderwith the exception that the sub-directory efi/boot will be used instead of efi/Guix to comply with the UEFI specification for removable media.Nota: This will overwrite the GRUB file from any other operating systems that also place their GRUB file in the UEFI-specification location; making them unbootable.
targetsThis is a list of strings denoting the targets onto which to install the bootloader.
The interpretation of targets depends on the bootloader in question. For
grub-bootloader, for example, they should be device names understood by the bootloaderinstallercommand, such as/dev/sdaor(hd0)(veja Invoking grub-install em GNU GRUB Manual). Forgrub-efi-bootloaderandgrub-efi-removable-bootloaderthey should be mount points of the EFI file system, usually /boot/efi. Forgrub-efi-netboot-bootloader,targetsshould be the mount points corresponding to TFTP root directories served by your TFTP server.menu-entries(default:'())A possibly empty list of
menu-entryobjects (see below), denoting entries to appear in the bootloader menu, in addition to the current system entry and the entry pointing to previous system generations.default-entry(default:0)The index of the default boot menu entry. Index 0 is for the entry of the current system.
timeout(default:5)The number of seconds to wait for keyboard input before booting. Set to 0 to boot immediately, and to -1 to wait indefinitely.
keyboard-layout(padrão:#f)If this is
#f, the bootloader’s menu (if any) uses the default keyboard layout, usually US English (“qwerty”).Otherwise, this must be a
keyboard-layoutobject (veja Disposição do teclado).Nota: This option is currently ignored by bootloaders other than
grubandgrub-efi.theme(default: #f)The bootloader theme object describing the theme to use. If no theme is provided, some bootloaders might use a default theme, that’s true for GRUB.
terminal-outputs(default:'(gfxterm))The output terminals used for the bootloader boot menu, as a list of symbols. GRUB accepts the values:
console,serial,serial_{0-3},gfxterm,vga_text,mda_text,morse, andpkmodem. This field corresponds to the GRUB variableGRUB_TERMINAL_OUTPUT(veja Simple configuration em GNU GRUB manual).terminal-inputs(default:'())The input terminals used for the bootloader boot menu, as a list of symbols. For GRUB, the default is the native platform terminal as determined at run-time. GRUB accepts the values:
console,serial,serial_{0-3},at_keyboard, andusb_keyboard. This field corresponds to the GRUB variableGRUB_TERMINAL_INPUT(veja Simple configuration em GNU GRUB manual).serial-unit(default:#f)The serial unit used by the bootloader, as an integer from 0 to 3. For GRUB, it is chosen at run-time; currently GRUB chooses 0, which corresponds to COM1 (veja Serial terminal em GNU GRUB manual).
serial-speed(default:#f)The speed of the serial interface, as an integer. For GRUB, the default value is chosen at run-time; currently GRUB chooses 9600 bps (veja Serial terminal em GNU GRUB manual).
device-tree-support?(default:#t)Whether to support Linux device tree files loading.
This option in enabled by default. In some cases involving the
u-bootbootloader, where the device tree has already been loaded in RAM, it can be handy to disable the option by setting it to#f.extra-initrd(default:#f)File name of an additional initrd to load during the boot. It may or may not point to a file in the store, but the main use case is for out-of-store files containing secrets.
In order to be able to provide decryption keys for the LUKS device, they need to be available in the initial ram disk. However they cannot be stored inside the usual initrd, since it is stored in the store and being a world-readable (as files in the store are) is not a desired property for a initrd containing decryption keys. You can therefore use this field to instruct GRUB to also load a manually created initrd not stored in the store.
For any use case not involving secrets, you should use regular initrd (veja
initrd) instead.Suitable image can be created for example like this:
echo /key-file.bin | cpio -oH newc >/key-file.cpio chmod 0000 /key-file.cpio
After it is created, you can use it in this manner:
;; Operating system with encrypted boot partition (operating-system ... (bootloader (bootloader-configuration (bootloader grub-efi-bootloader) (targets '("/boot/efi")) ;; Load the initrd with a key file (extra-initrd "/key-file.cpio"))) (mapped-devices (list (mapped-device (source (uuid "12345678-1234-1234-1234-123456789abc")) (target "my-root") (type (luks-device-mapping-with-options ;; And use it to unlock the root device #:key-file "/key-file.bin"))))))
Be careful when using this option, since pointing to a file that is not readable by the grub while booting will cause the boot to fail and require a manual edit of the initrd line in the grub menu.
Currently only supported by GRUB.
Should you want to list additional boot menu entries via the
menu-entries field above, you will need to create them with the
menu-entry form. For example, imagine you want to be able to boot
another distro (hard to imagine!), you can define a menu entry along these
lines:
(menu-entry
(label "The Other Distro")
(linux "/boot/old/vmlinux-2.6.32")
(linux-arguments '("root=/dev/sda2"))
(initrd "/boot/old/initrd"))
Details below.
The type of an entry in the bootloader menu.
labelThe label to show in the menu—e.g.,
"GNU".linux(default:#f)The Linux kernel image to boot, for example:
(file-append linux-libre "/bzImage")For GRUB, it is also possible to specify a device explicitly in the file path using GRUB’s device naming convention (veja Naming convention em GNU GRUB manual), for example:
"(hd0,msdos1)/boot/vmlinuz"
If the device is specified explicitly as above, then the
devicefield is ignored entirely.linux-arguments(default:'())The list of extra Linux kernel command-line arguments—e.g.,
'("console=ttyS0").initrd(default:#f)A G-Expression or string denoting the file name of the initial RAM disk to use (veja Expressões-G).
device(default:#f)The device where the kernel and initrd are to be found—i.e., for GRUB, root for this menu entry (veja root em GNU GRUB manual).
This may be a file system label (a string), a file system UUID (a bytevector, veja Sistemas de arquivos), or
#f, in which case the bootloader will search the device containing the file specified by thelinuxfield (veja search em GNU GRUB manual). It must not be an OS device name such as /dev/sda1.multiboot-kernel(default:#f)The kernel to boot in Multiboot-mode (veja multiboot em GNU GRUB manual). When this field is set, a Multiboot menu-entry is generated. For example:
(file-append mach "/boot/gnumach")multiboot-arguments(default:'())The list of extra command-line arguments for the multiboot-kernel.
For example, when running in QEMU it can be useful to use a text-based console (use options --nographic --serial mon:stdio):
'("console=com0")
To use the new and still experimental rumpdisk user-level disk driver instead of GNU Mach’s in-kernel IDE driver, set
kernel-argumentsto:'("noide")
Of course, these options can be combined:
'("console=com0" "noide")
multiboot-modules(default:'())The list of commands for loading Multiboot modules. For example:
(list (list (file-append hurd "/hurd/ext2fs.static") "ext2fs" …) (list (file-append libc "/lib/ld.so.1") "exec" …))chain-loader(default:#f)A string that can be accepted by
grub’schainloaderdirective. This has no effect if eitherlinuxormultiboot-kernelfields are specified. The following is an example of chainloading a different GNU/Linux system.(bootloader (bootloader-configuration ;; … (menu-entries (list (menu-entry (label "GNU/Linux") (device (uuid "1C31-A17C" 'fat)) (chain-loader "/EFI/GNULinux/grubx64.efi"))))))
For now only GRUB has theme support. GRUB themes are created using the
grub-theme form, which is not fully documented yet.
- Tipo de dados: grub-theme
Data type representing the configuration of the GRUB theme.
gfxmode(default:'("auto"))The GRUB
gfxmodeto set (a list of screen resolution strings, veja gfxmode em GNU GRUB manual).
- Procedure: grub-theme
Return the default GRUB theme used by the operating system if no
themefield is specified inbootloader-configurationrecord.It comes with a fancy background image displaying the GNU and Guix logos.
For example, to override the default resolution, you may use something like
(bootloader
(bootloader-configuration
;; …
(theme (grub-theme
(inherit (grub-theme))
(gfxmode '("1024x786x32" "auto"))))))
Próximo: Invoking guix deploy, Anterior: Configuração do carregador de inicialização, Acima: Configuração do sistema [Conteúdo][Índice]
11.16 Invoking guix system
Once you have written an operating system declaration as seen in the
previous section, it can be instantiated using the guix
system command. The synopsis is:
guix system options… action file
file must be the name of a file containing an operating-system
declaration. action specifies how the operating system is
instantiated. Currently the following values are supported:
searchDisplay available service type definitions that match the given regular expressions, sorted by relevance:
$ guix system search console name: console-fonts location: gnu/services/base.scm:806:2 extends: shepherd-root description: Install the given fonts on the specified ttys (fonts are per + virtual console on GNU/Linux). The value of this service is a list of + tty/font pairs. The font can be the name of a font provided by the `kbd' + package or any valid argument to `setfont', as in this example: + + '(("tty1" . "LatGrkCyr-8x16") + ("tty2" . (file-append + font-tamzen + "/share/kbd/consolefonts/TamzenForPowerline10x20.psf")) + ("tty3" . (file-append + font-terminus + "/share/consolefonts/ter-132n"))) ; for HDPI relevance: 9 name: mingetty location: gnu/services/base.scm:1190:2 extends: shepherd-root description: Provide console login using the `mingetty' program. relevance: 2 name: login location: gnu/services/base.scm:860:2 extends: pam description: Provide a console log-in service as specified by its + configuration value, a `login-configuration' object. relevance: 2 …As for
guix package --search, the result is written inrecutilsformat, which makes it easy to filter the output (veja GNU recutils databases em GNU recutils manual).editEdit or view the definition of the given service types.
For example, the command below opens your editor, as specified by the
EDITORenvironment variable, on the definition of theopensshservice type:guix system edit openssh
reconfigureBuild the operating system described in file, activate it, and switch to it38.
Nota: It is highly recommended to run
guix pullonce before you runguix system reconfigurefor the first time (veja Invocandoguix pull). Failing to do that you would see an older version of Guix oncereconfigurehas completed.This effects all the configuration specified in file: user accounts, system services, global package list, privileged programs, etc. The command starts system services specified in file that are not currently running; if a service is currently running this command will arrange for it to be upgraded the next time it is stopped (e.g. by
herd stop Xorherd restart X).This command creates a new generation whose number is one greater than the current generation (as reported by
guix system list-generations). If that generation already exists, it will be overwritten. This behavior mirrors that ofguix package(veja Invocandoguix package).It adds a bootloader menu entry for the new OS configuration, —unless --no-bootloader is passed. For GRUB, it moves entries for older configurations to a submenu, allowing you to choose an older system generation at boot time should you need it.
On Linux,
guix system reconfigurealso loads the new system for fast reboot via kexec: runningreboot --kexecwill boot the new system by directly executing its kernel, thus bypassing the BIOS initialization phase and bootloader (veja Invoking reboot em The GNU Shepherd Manual). You can avoid this behavior by passing the --no-kexec option.Upon completion, the new system is deployed under /run/current-system. This directory contains provenance meta-data: the list of channels in use (veja Canais) and file itself, when available. You can view it by running:
guix system describe
This information is useful should you later want to inspect how this particular generation was built. In fact, assuming file is self-contained, you can later rebuild generation n of your operating system with:
guix time-machine \ -C /var/guix/profiles/system-n-link/channels.scm -- \ system reconfigure \ /var/guix/profiles/system-n-link/configuration.scm
You can think of it as some sort of built-in version control! Your system is not just a binary artifact: it carries its own source. Veja
provenance-service-type, for more information on provenance tracking.By default,
reconfigureprevents you from downgrading your system, which could (re)introduce security vulnerabilities and also cause problems with “stateful” services such as database management systems. You can override that behavior by passing --allow-downgrades.switch-generation¶Switch to an existing system generation. This action atomically switches the system profile to the specified system generation. It also rearranges the system’s existing bootloader menu entries. It makes the menu entry for the specified system generation the default, and it moves the entries for the other generations to a submenu, if supported by the bootloader being used. The next time the system boots, it will use the specified system generation.
The bootloader itself is not being reinstalled when using this command. Thus, the installed bootloader is used with an updated configuration file.
The target generation can be specified explicitly by its generation number. For example, the following invocation would switch to system generation 7:
guix system switch-generation 7
The target generation can also be specified relative to the current generation with the form
+Nor-N, where+3means “3 generations ahead of the current generation,” and-1means “1 generation prior to the current generation.” When specifying a negative value such as-1, you must precede it with--to prevent it from being parsed as an option. For example:guix system switch-generation -- -1
Currently, the effect of invoking this action is only to switch the system profile to an existing generation and rearrange the bootloader menu entries. To actually start using the target system generation, you must reboot after running this action. In the future, it will be updated to do the same things as
reconfigure, like activating and deactivating services.This action will fail if the specified generation does not exist.
roll-back¶Switch to the preceding system generation. The next time the system boots, it will use the preceding system generation. This is the inverse of
reconfigure, and it is exactly the same as invokingswitch-generationwith an argument of-1.Currently, as with
switch-generation, you must reboot after running this action to actually start using the preceding system generation.delete-generations¶-
Delete system generations, making them candidates for garbage collection (veja Invocando
guix gc, for information on how to run the “garbage collector”).This works in the same way as ‘guix package --delete-generations’ (veja --delete-generations). With no arguments, all system generations but the current one are deleted:
guix system delete-generations
You can also select the generations you want to delete. The example below deletes all the system generations that are more than two months old:
guix system delete-generations 2m
Running this command automatically reinstalls the bootloader with an updated list of menu entries—e.g., the “old generations” sub-menu in GRUB no longer lists the generations that have been deleted.
buildBuild the derivation of the operating system, which includes all the configuration files and programs needed to boot and run the system. This action does not actually install anything.
initPopulate the given directory with all the files necessary to run the operating system specified in file. This is useful for first-time installations of Guix System. For instance:
guix system init my-os-config.scm /mnt
copies to /mnt all the store items required by the configuration specified in my-os-config.scm. This includes configuration files, packages, and so on. It also creates other essential files needed for the system to operate correctly—e.g., the /etc, /var, and /run directories, and the /bin/sh file.
This command also installs bootloader on the targets specified in my-os-config, unless the --no-bootloader option was passed.
installerRun the installer. Usually the installer is built as an iso image, copied to a USB Stick or DVD, and booted from (Instalação em um pendrive e em DVD). If your machine already runs Guix and you still want to run the installer, e.g., for testing purposes, you can skip the step of creating an iso and run for instance:
guix system installer --dry-run
Nota: If you do not use --dry-run then you need to run as root. Be very careful when running the installer as root, it can cause data loss or render your system unbootable!
vm¶-
Build a virtual machine (VM) that contains the operating system declared in file, and return a script to run that VM.
Nota: The
vmaction and others below can use KVM support in the Linux-libre kernel. Specifically, if the machine has hardware virtualization support, the corresponding KVM kernel module should be loaded, and the /dev/kvm device node must exist and be readable and writable by the user and by the build users of the daemon (veja Configuração do ambiente de compilação).Arguments given to the script are passed to QEMU as in the example below, which enables networking and requests 1 GiB of RAM for the emulated machine:
$ /gnu/store/…-run-vm.sh -m 1024 -smp 2 -nic user,model=virtio-net-pci
It’s possible to combine the two steps into one:
$ $(guix system vm my-config.scm) -m 1024 -smp 2 -nic user,model=virtio-net-pci
The VM shares its store with the host system.
By default, the root file system of the VM is mounted volatile; the --persistent option can be provided to make it persistent instead. In that case, the VM disk-image file will be copied from the store to the
TMPDIRdirectory to make it writable.Additional file systems can be shared between the host and the VM using the --share and --expose command-line options: the former specifies a directory to be shared with write access, while the latter provides read-only access to the shared directory.
The example below creates a VM in which the user’s home directory is accessible read-only, and where the /exchange directory is a read-write mapping of $HOME/tmp on the host:
guix system vm my-config.scm \ --expose=$HOME --share=$HOME/tmp=/exchange
On GNU/Linux, the default is to boot directly to the kernel; this has the advantage of requiring only a very tiny root disk image since the store of the host can then be mounted.
The --full-boot option forces a complete boot sequence, starting with the bootloader. This requires more disk space since a root image containing at least the kernel, initrd, and bootloader data files must be created.
The --image-size option can be used to specify the size of the image.
The --no-graphic option will instruct
guix systemto spawn a headless VM that will use the invoking tty for IO. Among other things, this enables copy-pasting, and scrollback. Use the ctrl-a prefix to issue QEMU commands; e.g. ctrl-a h prints a help, ctrl-a x quits the VM, and ctrl-a c switches between the QEMU monitor and the VM. image¶The
imagecommand can produce various image types. The image type can be selected using the --image-type option. It defaults tombr-hybrid-raw. When its value isiso9660, the --label option can be used to specify a volume ID withimage. By default, the root file system of a disk image is mounted non-volatile; the --volatile option can be provided to make it volatile instead. When usingimage, the bootloader installed on the generated image is taken from the providedoperating-systemdefinition. The following example demonstrates how to generate an image that uses thegrub-efi-bootloaderbootloader and boot it with QEMU:image=$(guix system image --image-type=qcow2 \ gnu/system/examples/lightweight-desktop.tmpl) cp $image /tmp/my-image.qcow2 chmod +w /tmp/my-image.qcow2 qemu-system-x86_64 -enable-kvm -hda /tmp/my-image.qcow2 -m 1000 \ -bios $(guix build ovmf-x86-64)/share/firmware/ovmf_x64.binWhen using the
mbr-hybrid-rawimage type, a raw disk image is produced; it can be copied as is to a USB stick, for instance. Assuming/dev/sdcis the device corresponding to a USB stick, one can copy the image to it using the following command:# dd if=$(guix system image my-os.scm) of=/dev/sdc status=progress
The
--list-image-typescommand lists all the available image types.When using the
qcow2image type, the returned image is in qcow2 format, which the QEMU emulator can efficiently use. Veja Usando o Guix em uma Máquina Virtual, for more information on how to run the image in a virtual machine. Thegrub-bootloaderbootloader is always used independently of what is declared in theoperating-systemfile passed as argument. This is to make it easier to work with QEMU, which uses the SeaBIOS BIOS by default, expecting a bootloader to be installed in the Master Boot Record (MBR).When using the
dockerimage type, a Docker image is produced. Guix builds the image from scratch, not from a pre-existing Docker base image. As a result, it contains exactly what you define in the operating system configuration file. You can then load the image and launch a Docker container using commands like the following:image_id="$(docker load < guix-system-docker-image.tar.gz)" container_id="$(docker create $image_id)" docker start $container_id
This command starts a new Docker container from the specified image. It will boot the Guix system in the usual manner, which means it will start any services you have defined in the operating system configuration. You can get an interactive shell running in the container using
docker exec:docker exec -ti $container_id /run/current-system/profile/bin/bash --login
Depending on what you run in the Docker container, it may be necessary to give the container additional permissions. For example, if you intend to build software using Guix inside of the Docker container, you may need to pass the --privileged option to
docker create.Last, the --network option applies to
guix system docker-image: it produces an image where network is supposedly shared with the host, and thus without services like nscd or NetworkManager.containerReturn a script to run the operating system declared in file within a container. Containers are a set of lightweight isolation mechanisms provided by the kernel Linux-libre. Containers are substantially less resource-demanding than full virtual machines since the kernel, shared objects, and other resources can be shared with the host system; this also means they provide thinner isolation.
Currently, the script must be run as root in order to support more than a single user and group. The container shares its store with the host system.
As with the
vmaction (veja guix system vm), additional file systems to be shared between the host and container can be specified using the --share and --expose options:guix system container my-config.scm \ --expose=$HOME --share=$HOME/tmp=/exchange
The --share and --expose options can also be passed to the generated script to bind-mount additional directories into the container.
Nota: This option requires Linux-libre 3.19 or newer.
options can contain any of the common build options (veja Opções de compilação comuns). In addition, options can contain one of the following:
- --expression=expr
- -e expr
Consider the operating-system expr evaluates to. This is an alternative to specifying a file which evaluates to an operating system. This is used to generate the Guix system installer veja Compilando a imagem de instalação).
- --system=sistema
- -s sistema
Attempt to build for system instead of the host system type. This works as per
guix build(veja Invocandoguix build).- --target=tripleto
Construção cruzada para tripleto, que deve ser um tripleto GNU válido, como
"aarch64-linux-gnu"(veja (Autoconf)autoconf).- --derivation
- -d
Return the derivation file name of the given operating system without building anything.
- --save-provenance
As discussed above,
guix system initandguix system reconfigurealways save provenance information via a dedicated service (vejaprovenance-service-type). However, other commands don’t do that by default. If you wish to, say, create a virtual machine image that contains provenance information, you can run:guix system image -t qcow2 --save-provenance config.scm
That way, the resulting image will effectively “embed its own source” in the form of meta-data in /run/current-system. With that information, one can rebuild the image to make sure it really contains what it pretends to contain; or they could use that to derive a variant of the image.
- --image-type=type
- -t tipo
For the
imageaction, create an image with given type.When this option is omitted,
guix systemuses thembr-hybrid-rawimage type.--image-type=iso9660 produces an ISO-9660 image, suitable for burning on CDs and DVDs.
- --image-size=size
For the
imageaction, create an image of the given size. size may be a number of bytes, or it may include a unit as a suffix (veja size specifications em GNU Coreutils).When this option is omitted,
guix systemcomputes an estimate of the image size as a function of the size of the system declared in file.- --network
- -N
For the
containeraction, allow containers to access the host network, that is, do not create a network namespace.- --root=arquivo
- -r arquivo
Make file a symlink to the result, and register it as a garbage collector root.
- --skip-checks
Skip pre-installation safety checks.
By default,
guix system initandguix system reconfigureperform safety checks: they make sure the file systems that appear in theoperating-systemdeclaration actually exist (veja Sistemas de arquivos), and that any Linux kernel modules that may be needed at boot time are listed ininitrd-modules(veja Disco de RAM inicial). Passing this option skips these tests altogether.- --allow-downgrades
Instruct
guix system reconfigureto allow system downgrades.By default,
reconfigureprevents you from downgrading your system. It achieves that by comparing the provenance info of your system (shown byguix system describe) with that of yourguixcommand (shown byguix describe). If the commits forguixare not descendants of those used for your system,guix system reconfigureerrors out. Passing --allow-downgrades allows you to bypass these checks.Nota: Certifique-se de entender as implicações de segurança antes de usar --allow-downgrades.
- --on-error=strategy
Apply strategy when an error occurs when reading file. strategy may be one of the following:
nothing-specialReport the error concisely and exit. This is the default strategy.
backtraceLikewise, but also display a backtrace.
debugReport the error and enter Guile’s debugger. From there, you can run commands such as
,btto get a backtrace,,localsto display local variable values, and more generally inspect the state of the program. Veja Debug Commands em GNU Guile Reference Manual, for a list of available debugging commands.
Once you have built, configured, re-configured, and re-re-configured your Guix installation, you may find it useful to list the operating system generations available on disk—and that you can choose from the bootloader boot menu:
describeDescribe the running system generation: its file name, the kernel and bootloader used, etc., as well as provenance information when available.
The
--list-installedflag is available, with the same syntax that is used inguix package --list-installed(veja Invocandoguix package). When the flag is used, the description will include a list of packages that are currently installed in the system profile, with optional filtering based on a regular expression.Nota: The running system generation—referred to by /run/current-system—is not necessarily the current system generation—referred to by /var/guix/profiles/system: it differs when, for instance, you chose from the bootloader menu to boot an older generation.
It can also differ from the booted system generation—referred to by /run/booted-system—for instance because you reconfigured the system in the meantime.
list-generationsList a summary of each generation of the operating system available on disk, in a human-readable way. This is similar to the --list-generations option of
guix package(veja Invocandoguix package).Optionally, one can specify a pattern, with the same syntax that is used in
guix package --list-generations, to restrict the list of generations displayed. For instance, the following command displays generations that are up to 10 days old:$ guix system list-generations 10d
The
--list-installedflag may also be specified, with the same syntax that is used inguix package --list-installed. This may be helpful if trying to determine when a package was added to the system.
The guix system command has even more to offer! The following
sub-commands allow you to visualize how your system services relate to each
other:
extension-graphEmit to standard output the service extension graph of the operating system defined in file (veja Composição de serviço, for more information on service extensions). By default the output is in Dot/Graphviz format, but you can choose a different format with --graph-backend, as with
guix graph(veja --backend):O comando:
$ guix system extension-graph file | xdot -
shows the extension relations among services.
Nota: The
dotprogram is provided by thegraphvizpackage.shepherd-graphEmit to standard output the dependency graph of shepherd services of the operating system defined in file. Veja Serviços de Shepherd, for more information and for an example graph.
Again, the default output format is Dot/Graphviz, but you can pass --graph-backend to select a different one.
Próximo: Usando o Guix em uma Máquina Virtual, Anterior: Invoking guix system, Acima: Configuração do sistema [Conteúdo][Índice]
11.17 Invoking guix deploy
We’ve already seen operating-system declarations used to manage a
machine’s configuration locally. Suppose you need to configure multiple
machines, though—perhaps you’re managing a service on the web that’s
comprised of several servers. guix deploy enables you to use
those same operating-system declarations to manage multiple remote
hosts at once as a logical “deployment”.
Nota: The functionality described in this section is still under development and is subject to change. Get in touch with us on guix-devel@gnu.org!
guix deploy file
Such an invocation will deploy the machines that the code within file evaluates to. As an example, file might contain a definition like this:
;; This is a Guix deployment of a "bare bones" setup, with ;; no X11 display server, to a machine with an SSH daemon ;; listening on localhost:2222. A configuration such as this ;; may be appropriate for virtual machine with ports ;; forwarded to the host's loopback interface. (use-service-modules networking ssh) (use-package-modules bootloaders) (define %system (operating-system (host-name "gnu-deployed") (timezone "Etc/UTC") (bootloader (bootloader-configuration (bootloader grub-bootloader) (targets '("/dev/vda")) (terminal-outputs '(console)))) (file-systems (cons (file-system (mount-point "/") (device "/dev/vda1") (type "ext4")) %base-file-systems)) (services (append (list (service dhcp-client-service-type) (service openssh-service-type (openssh-configuration (permit-root-login #t) (allow-empty-passwords? #t)))) %base-services)))) (list (machine (operating-system %system) (environment managed-host-environment-type) (configuration (machine-ssh-configuration (host-name "localhost") (system "x86_64-linux") (user "alice") (identity "./id_rsa") (port 2222)))))
The file should evaluate to a list of machine objects. This example,
upon being deployed, will create a new generation on the remote system
realizing the operating-system declaration %system.
environment and configuration specify how the machine should
be provisioned—that is, how the computing resources should be created and
managed. The above example does not create any resources, as a
'managed-host is a machine that is already running the Guix system
and available over the network. This is a particularly simple case; a more
complex deployment may involve, for example, starting virtual machines
through a Virtual Private Server (VPS) provider. In such a case, a
different environment type would be used.
Do note that you first need to generate a key pair on the coordinator
machine to allow the daemon to export signed archives of files from the
store (veja Invocando guix archive), though this step is automatic on Guix
System:
# guix archive --generate-key
Each target machine must authorize the key of the master machine so that it accepts store items it receives from the coordinator:
# guix archive --authorize < coordinator-public-key.txt
user, in this example, specifies the name of the user account to log
in as to perform the deployment. Its default value is root, but root
login over SSH may be forbidden in some cases. To work around this,
guix deploy can log in as an unprivileged user and employ
sudo to escalate privileges. This will only work if sudo is
currently installed on the remote and can be invoked non-interactively as
user. That is, the line in sudoers granting user the
ability to use sudo must contain the NOPASSWD tag. This can
be accomplished with the following operating system configuration snippet:
(use-modules ... (gnu system)) ;for %sudoers-specification (define %user "username") (operating-system ... (sudoers-file (plain-file "sudoers" (string-append (plain-file-content %sudoers-specification) (format #f "~a ALL = NOPASSWD: ALL~%" %user)))))
For more information regarding the format of the sudoers file,
consult man sudoers.
Once you’ve deployed a system on a set of machines, you may find it useful
to run a command on all of them. The --execute or -x
option lets you do that; the example below runs uname -a on all
the machines listed in the deployment file:
guix deploy file -x -- uname -a
One thing you may often need to do after deployment is restart specific services on all the machines, which you can do like so:
guix deploy file -x -- herd restart service
The guix deploy -x command returns zero if and only if the command
succeeded on all the machines.
You may also wish to roll back configurations on machines to a previous generation. You can do that using the --roll-back or -r option like so:
guix deploy --roll-back file
Below are the data types you need to know about when writing a deployment file.
- Tipo de dados: machine
This is the data type representing a single machine in a heterogeneous Guix deployment.
operating-systemThe object of the operating system configuration to deploy.
environmentAn
environment-typedescribing how the machine should be provisioned.configuration(default:#f)An object describing the configuration for the machine’s
environment. If theenvironmenthas a default configuration,#fmay be used. If#fis used for an environment with no default configuration, however, an error will be thrown.
- Tipo de dados: machine-ssh-configuration
This is the data type representing the SSH client parameters for a machine with an
environmentofmanaged-host-environment-type.host-namebuild-locally?(default:#t)If false, system derivations will be built on the machine being deployed to.
systemThe system type describing the architecture of the machine being deployed to—e.g.,
"x86_64-linux".authorize?(default:#t)If true, the coordinator’s signing key will be added to the remote’s ACL keyring.
port(padrão:22)user(default:"root")identity(default:#f)If specified, the path to the SSH private key to use to authenticate with the remote host.
host-key(default:#f)This should be the SSH host key of the machine, which looks like this:
ssh-ed25519 AAAAC3Nz… root@example.org
When
host-keyis#f, the server is authenticated against the ~/.ssh/known_hosts file, just like the OpenSSHsshclient does.allow-downgrades?(default:#f)Whether to allow potential downgrades.
Like
guix system reconfigure,guix deploycompares the channel commits currently deployed on the remote host (as returned byguix system describe) to those currently in use (as returned byguix describe) to determine whether commits currently in use are descendants of those deployed. When this is not the case andallow-downgrades?is false, it raises an error. This ensures you do not accidentally downgrade remote machines.safety-checks?(default:#t)Whether to perform “safety checks” before deployment. This includes verifying that devices and file systems referred to in the operating system configuration actually exist on the target machine, and making sure that Linux modules required to access storage devices at boot time are listed in the
initrd-modulesfield of the operating system.These safety checks ensure that you do not inadvertently deploy a system that would fail to boot. Be careful before turning them off!
- Tipo de dados: digital-ocean-configuration
This is the data type describing the Droplet that should be created for a machine with an
environmentofdigital-ocean-environment-type.ssh-keyThe path to the SSH private key to use to authenticate with the remote host. In the future, this field may not exist.
tagsA list of string “tags” that uniquely identify the machine. Must be given such that no two machines in the deployment have the same set of tags.
regionA Digital Ocean region slug, such as
"nyc3".sizeA Digital Ocean size slug, such as
"s-1vcpu-1gb"enable-ipv6?Whether or not the droplet should be created with IPv6 networking.
- Data Type: hetzner-configuration
This is the data type describing the server that should be created for a machine with an
environmentofhetzner-environment-type. It allows you to configure deployment to a VPS (virtual private server) hosted by Hetzner.allow-downgrades?(default:#f)Whether to allow potential downgrades.
authorize?(default:#t)If true, the public signing key
"/etc/guix/signing-key.pub"of the machine that invokesguix deploywill be added to the operating system ACL keyring of the target machine.build-locally?(default:#t)If true, system derivations will be built on the machine that invokes
guix deploy, otherwise derivations are build on the target machine. Set this to#fif the machine you are deploying from has a different architecture than the target machine and you can’t build derivations for the target architecture by other means, like offloading (veja Usando o recurso de descarregamento) or emulation (veja Transparent Emulation with QEMU).delete?(default:#t)If true, the server will be deleted when an error happens in the provisioning phase. If false, the server will be kept in order to debug any issues.
labels(default:'())A user defined alist of key/value pairs attached to the SSH key and the server on the Hetzner API. Keys and values must be strings, e.g.
'(("environment" . "development")). For more information, see Labels.location(default:"fsn1")The name of a location to create the server in. For example,
"fsn1"corresponds to the Hetzner site in Falkenstein, Germany, while"sin"corresponds to its site in Singapore.server-type(default:"cx42")The name of the server type this virtual server should be created with. For example,
"cx42"corresponds to a x86_64 server that has 8 VCPUs, 16 GB of memory and 160 GB of storage, while"cax31"to the AArch64 equivalent. Other server types and their current prices can be found here. The"cpx11"server type is currently not supported, since its rescue system is too small to bootstrap a Guix system from.ssh-keyThe file name of the SSH private key to use to authenticate with the remote host.
When deploying a machine for the first time, the following steps are taken to provision a server for the machine on the Hetzner Cloud service:
- Create the SSH key of the machine on the Hetzner API.
- Create a server for the machine on the Hetzner API.
- Format the root partition of the disk using the file system of the machine’s operating system. Supported file systems are btrfs and ext4.
- Install a minimal Guix operating system on the server using the rescue mode. This minimal system is used to install the machine’s operating system, after rebooting.
- Reboot the server and apply the machine’s operating system on the server.
Once the server has been provisioned and SSH is available, deployment continues by delegating it to the
managed-host-environment-type.Servers on the Hetzner Cloud service can be provisioned on the AArch64 architecture using UEFI boot mode, or on the x86_64 architecture using BIOS boot mode. The
(gnu machine hetzner)module exports the%hetzner-os-armand%hetzner-os-x86operating systems that are compatible with those two architectures, and can be used as a base for defining your custom operating system.The following example shows the definition of two machines that are deployed on the Hetzner Cloud service. The first one uses the
%hetzner-os-armoperating system to run a server with 16 shared vCPUs and 32 GB of RAM on theaarch64architecture, the second one uses the%hetzner-os-x86operating system on a server with 16 shared vCPUs and 32 GB of RAM on thex86_64architecture.(use-modules (gnu machine) (gnu machine hetzner)) (list (machine (operating-system %hetzner-os-arm) (environment hetzner-environment-type) (configuration (hetzner-configuration (server-type "cax41") (ssh-key "/home/charlie/.ssh/id_rsa")))) (machine (operating-system %hetzner-os-x86) (environment hetzner-environment-type) (configuration (hetzner-configuration (server-type "cpx51") (ssh-key "/home/charlie/.ssh/id_rsa")))))
Passing this file to
guix deploywith the environment variableGUIX_HETZNER_API_TOKENset to a valid Hetzner API key should provision two machines for you.
Próximo: Definindo serviços, Anterior: Invoking guix deploy, Acima: Configuração do sistema [Conteúdo][Índice]
11.18 Usando o Guix em uma Máquina Virtual
To run Guix in a virtual machine (VM), one can use the pre-built Guix VM image distributed at https://ftp.gnu.org/gnu/guix/guix-system-vm-image-4538aa4.x86_64-linux.qcow2. This image is a compressed image in QCOW format. You can pass it to an emulator such as QEMU (see below for details).
This image boots the Xfce graphical environment and it contains some
commonly used tools. You can install more software in the image by running
guix package in a terminal (veja Invocando guix package). You
can also reconfigure the system based on its initial configuration file
available as /run/current-system/configuration.scm (veja Usando o sistema de configuração).
Instead of using this pre-built image, one can also build their own image
using guix system image (veja Invoking guix system).
If you built your own image, you must copy it out of the store (veja O armazém) and give yourself permission to write to the copy before you can use
it. When invoking QEMU, you must choose a system emulator that is suitable
for your hardware platform. Here is a minimal QEMU invocation that will
boot the result of guix system image -t qcow2 on x86_64 hardware:
$ qemu-system-x86_64 \ -nic user,model=virtio-net-pci \ -enable-kvm -m 2048 \ -device virtio-blk,drive=myhd \ -drive if=none,file=guix-system-vm-image-4538aa4.x86_64-linux.qcow2,id=myhd
Here is what each of these options means:
qemu-system-x86_64This specifies the hardware platform to emulate. This should match the host.
-nic user,model=virtio-net-pciEnable the unprivileged user-mode network stack. The guest OS can access the host but not vice versa. This is the simplest way to get the guest OS online.
modelspecifies which network device to emulate:virtio-net-pciis a special device made for virtualized operating systems and recommended for most uses. Assuming your hardware platform is x86_64, you can get a list of available NIC models by runningqemu-system-x86_64 -nic model=help.-enable-kvmIf your system has hardware virtualization extensions, enabling the virtual machine support (KVM) of the Linux kernel will make things run faster.
-m 2048RAM available to the guest OS, in mebibytes. Defaults to 128 MiB, which may be insufficient for some operations.
-device virtio-blk,drive=myhdCreate a
virtio-blkdrive called “myhd”.virtio-blkis a “paravirtualization” mechanism for block devices that allows QEMU to achieve better performance than if it were emulating a complete disk drive. See the QEMU and KVM documentation for more info.-drive if=none,file=/tmp/qemu-image,id=myhdUse our QCOW image, the guix-system-vm-image-4538aa4.x86_64-linux.qcow2 file, as the backing store of the “myhd” drive.
The default run-vm.sh script that is returned by an invocation of
guix system vm does not add a -nic user flag by
default. To get network access from within the vm add the
(dhcp-client-service) to your system definition and start the VM
using $(guix system vm config.scm) -nic user. An important caveat
of using -nic user for networking is that ping will not
work, because it uses the ICMP protocol. You’ll have to use a different
command to check for network connectivity, for example guix
download.
11.18.1 Connecting Through SSH
To enable SSH inside a VM you need to add an SSH server like
openssh-service-type to your VM (veja openssh-service-type). In addition you need to forward the SSH
port, 22 by default, to the host. You can do this with
$(guix system vm config.scm) -nic user,model=virtio-net-pci,hostfwd=tcp::10022-:22
To connect to the VM you can run
ssh -o UserKnownHostsFile=/dev/null -o StrictHostKeyChecking=no -p 10022 localhost
The -p tells ssh the port you want to connect to.
-o UserKnownHostsFile=/dev/null prevents ssh from
complaining every time you modify your config.scm file and the
-o StrictHostKeyChecking=no prevents you from having to allow a
connection to an unknown host every time you connect.
Nota: If you find the above ‘hostfwd’ example not to be working (e.g., your SSH client hangs attempting to connect to the mapped port of your VM), make sure that your Guix System VM has networking support, such as by using the
dhcp-client-service-typeservice type.
11.18.2 Using virt-viewer with Spice
As an alternative to the default qemu graphical client you can use
the remote-viewer from the virt-viewer package. To
connect pass the -spice port=5930,disable-ticketing flag to
qemu. See previous section for further information on how to do
this.
Spice also allows you to do some nice stuff like share your clipboard with
your VM. To enable that you’ll also have to pass the following flags to
qemu:
-device virtio-serial-pci,id=virtio-serial0,max_ports=16,bus=pci.0,addr=0x5 -chardev spicevmc,name=vdagent,id=vdagent -device virtserialport,nr=1,bus=virtio-serial0.0,chardev=vdagent,\ name=com.redhat.spice.0
You’ll also need to add the (spice-vdagent-service) to your system
definition (veja Spice service).
Anterior: Usando o Guix em uma Máquina Virtual, Acima: Configuração do sistema [Conteúdo][Índice]
11.19 Definindo serviços
The previous sections show the available services and how one can combine
them in an operating-system declaration. But how do we define them
in the first place? And what is a service anyway?
- Composição de serviço
- Tipos de Service e Serviços
- Referência de Service
- Serviços de Shepherd
- Complex Configurations
Próximo: Tipos de Service e Serviços, Acima: Definindo serviços [Conteúdo][Índice]
11.19.1 Composição de serviço
Here we define a service as, broadly, something that extends the
functionality of the operating system. Often a service is a process—a
daemon—started when the system boots: a secure shell server, a Web
server, the Guix build daemon, etc. Sometimes a service is a daemon whose
execution can be triggered by another daemon—e.g., an FTP server started
by inetd or a D-Bus service activated by dbus-daemon.
Occasionally, a service does not map to a daemon. For instance, the
“account” service collects user accounts and makes sure they exist when
the system runs; the “udev” service collects device management rules and
makes them available to the eudev daemon; the /etc service populates
the /etc directory of the system.
Guix system services are connected by extensions. For instance, the
secure shell service extends the Shepherd—the initialization
system, running as PID 1—by giving it the command lines to start and
stop the secure shell daemon (veja openssh-service-type); the UPower service extends the D-Bus service
by passing it its .service specification, and extends the udev
service by passing it device management rules (veja upower-service); the Guix daemon service extends the Shepherd by
passing it the command lines to start and stop the daemon, and extends the
account service by passing it a list of required build user accounts
(veja Serviços básicos).
All in all, services and their “extends” relations form a directed acyclic graph (DAG). If we represent services as boxes and extensions as arrows, a typical system might provide something like this:
At the bottom, we see the system service, which produces the directory
containing everything to run and boot the system, as returned by the
guix system build command. Veja Referência de Service, to learn
about the other service types shown here. Veja the
guix system extension-graph command, for information on how to
generate this representation for a particular operating system definition.
Technically, developers can define service types to express these
relations. There can be any number of services of a given type on the
system—for instance, a system running two instances of the GNU secure
shell server (lsh) has two instances of lsh-service-type, with
different parameters.
The following section describes the programming interface for service types and services.
Próximo: Referência de Service, Anterior: Composição de serviço, Acima: Definindo serviços [Conteúdo][Índice]
11.19.2 Tipos de Service e Serviços
A service type is a node in the DAG described above. Let us start
with a simple example, the service type for the Guix build daemon
(veja Invocando guix-daemon):
(define guix-service-type
(service-type
(name 'guix)
(extensions
(list (service-extension shepherd-root-service-type guix-shepherd-service)
(service-extension account-service-type guix-accounts)
(service-extension activation-service-type guix-activation)))
(default-value (guix-configuration))))
It defines three things:
- A name, whose sole purpose is to make inspection and debugging easier.
- A list of service extensions, where each extension designates the
target service type and a procedure that, given the parameters of the
service, returns a list of objects to extend the service of that type.
Every service type has at least one service extension. The only exception is the boot service type, which is the ultimate service.
- Optionally, a default value for instances of this type.
In this example, guix-service-type extends three services:
shepherd-root-service-typeThe
guix-shepherd-serviceprocedure defines how the Shepherd service is extended. Namely, it returns a<shepherd-service>object that defines howguix-daemonis started and stopped (veja Serviços de Shepherd).account-service-typeThis extension for this service is computed by
guix-accounts, which returns a list ofuser-groupanduser-accountobjects representing the build user accounts (veja Invocandoguix-daemon).activation-service-typeHere
guix-activationis a procedure that returns a gexp, which is a code snippet to run at “activation time”—e.g., when the service is booted.
A service of this type is instantiated like this:
(service guix-service-type
(guix-configuration
(build-accounts 5)
(extra-options '("--gc-keep-derivations"))))
The second argument to the service form is a value representing the
parameters of this specific service instance.
Veja guix-configuration, for information
about the guix-configuration data type. When the value is omitted,
the default value specified by guix-service-type is used:
(service guix-service-type)
guix-service-type is quite simple because it extends other services
but is not extensible itself.
The service type for an extensible service looks like this:
(define udev-service-type
(service-type (name 'udev)
(extensions
(list (service-extension shepherd-root-service-type
udev-shepherd-service)))
(compose concatenate) ;concatenate the list of rules
(extend (lambda (config rules)
(udev-configuration
(inherit config)
(rules (append (udev-configuration-rules config)
rules)))))))
This is the service type for the
eudev device management
daemon. Compared to the previous example, in addition to an extension of
shepherd-root-service-type, we see two new fields:
composeThis is the procedure to compose the list of extensions to services of this type.
Services can extend the udev service by passing it lists of rules; we compose those extensions simply by concatenating them.
extendThis procedure defines how the value of the service is extended with the composition of the extensions.
Udev extensions are composed into a list of rules, but the udev service value is itself a
<udev-configuration>record. So here, we extend that record by appending the list of rules it contains to the list of contributed rules.descriptionThis is a string giving an overview of the service type. The string can contain Texinfo markup (veja Overview em GNU Texinfo). The
guix system searchcommand searches these strings and displays them (veja Invokingguix system).
There can be only one instance of an extensible service type such as
udev-service-type. If there were more, the service-extension
specifications would be ambiguous.
Still here? The next section provides a reference of the programming interface for services.
Próximo: Serviços de Shepherd, Anterior: Tipos de Service e Serviços, Acima: Definindo serviços [Conteúdo][Índice]
11.19.3 Referência de Service
We have seen an overview of service types (veja Tipos de Service e Serviços). This section provides a reference on how to manipulate services
and service types. This interface is provided by the (gnu services)
module.
- Procedure: service type [value]
Return a new service of type, a
<service-type>object (see below). value can be any object; it represents the parameters of this particular service instance.When value is omitted, the default value specified by type is used; if type does not specify a default value, an error is raised.
For instance, this:
(service openssh-service-type)is equivalent to this:
(service openssh-service-type (openssh-configuration))In both cases the result is an instance of
openssh-service-typewith the default configuration.
- Procedure: service? obj
Return true if obj is a service.
- Procedure: service-kind service
Return the type of service—i.e., a
<service-type>object.
- Procedure: service-value service
Return the value associated with service. It represents its parameters.
Here is an example of how a service is created and manipulated:
(define s (service nginx-service-type (nginx-configuration (nginx nginx) (log-directory log-directory) (run-directory run-directory) (file config-file)))) (service? s) ⇒ #t (eq? (service-kind s) nginx-service-type) ⇒ #t
The modify-services form provides a handy way to change the
parameters of some of the services of a list such as %base-services
(veja %base-services). It evaluates to a list of
services. Of course, you could always use standard list combinators such as
map and fold to do that (veja List Library em GNU Guile Reference Manual); modify-services simply provides a more
concise form for this common pattern.
- Forma Especial: modify-services services (type variable => body) …
-
Modify the services listed in services according to the given clauses. Each clause has the form:
(type variable => body)
where type is a service type—e.g.,
guix-service-type—and variable is an identifier that is bound within the body to the service parameters—e.g., aguix-configurationinstance—of the original service of that type.The body should evaluate to the new service parameters, which will be used to configure the new service. This new service will replace the original in the resulting list. Because a service’s service parameters are created using
define-record-type*, you can write a succinct body that evaluates to the new service parameters by using theinheritfeature thatdefine-record-type*provides.Clauses can also have the following form:
(delete type)Such a clause removes all services of the given type from services.
Veja Usando o sistema de configuração, for example usage.
Next comes the programming interface for service types. This is something
you want to know when writing new service definitions, but not necessarily
when simply looking for ways to customize your operating-system
declaration.
- Tipo de dados: service-type
-
This is the representation of a service type (veja Tipos de Service e Serviços).
nameThis is a symbol, used only to simplify inspection and debugging.
extensionsA non-empty list of
<service-extension>objects (see below).compose(padrão:#f)If this is
#f, then the service type denotes services that cannot be extended—i.e., services that do not receive “values” from other services.Otherwise, it must be a one-argument procedure. The procedure is called by
fold-servicesand is passed a list of values collected from extensions. It may return any single value.extend(padrão:#f)If this is
#f, services of this type cannot be extended.Otherwise, it must be a two-argument procedure:
fold-servicescalls it, passing it the initial value of the service as the first argument and the result of applyingcomposeto the extension values as the second argument. It must return a value that is a valid parameter value for the service instance.descriptionThis is a string, possibly using Texinfo markup, describing in a couple of sentences what the service is about. This string allows users to find about the service through
guix system search(veja Invokingguix system).default-value(default:&no-default-value)The default value associated for instances of this service type. This allows users to use the
serviceform without its second argument:(service type)The returned service in this case has the default value specified by type.
Veja Tipos de Service e Serviços, for examples.
- Procedure: service-extension target-type compute
Return a new extension for services of type target-type. compute must be a one-argument procedure:
fold-servicescalls it, passing it the value associated with the service that provides the extension; it must return a valid value for the target service.
- Procedure: service-extension? obj
Return true if obj is a service extension.
Occasionally, you might want to simply extend an existing service. This
involves creating a new service type and specifying the extension of
interest, which can be verbose; the simple-service procedure provides
a shorthand for this.
- Procedure: simple-service name target value
Return a service that extends target with value. This works by creating a singleton service type name, of which the returned service is an instance.
For example, this extends mcron (veja Execução de trabalho agendado) with an additional job:
(simple-service 'my-mcron-job mcron-service-type #~(job '(next-hour (3)) "guix gc -F 2G"))
At the core of the service abstraction lies the fold-services
procedure, which is responsible for “compiling” a list of services down to
a single directory that contains everything needed to boot and run the
system—the directory shown by the guix system build command
(veja Invoking guix system). In essence, it propagates service
extensions down the service graph, updating each node parameters on the way,
until it reaches the root node.
- Procedure: fold-services services [#:target-type system-service-type]
Fold services by propagating their extensions down to the root of type target-type; return the root service adjusted accordingly.
Lastly, the (gnu services) module also defines several essential
service types, some of which are listed below.
- Variável: system-service-type
This is the root of the service graph. It produces the system directory as returned by the
guix system buildcommand.
- Variável: boot-service-type
The type of the “boot service”, which produces the boot script. The boot script is what the initial RAM disk runs when booting.
- Variável: etc-service-type
The type of the /etc service. This service is used to create files under /etc and can be extended by passing it name/file tuples such as:
(list `("issue" ,(plain-file "issue" "Welcome!\n")))In this example, the effect would be to add an /etc/issue file pointing to the given file.
- Variável: privileged-program-service-type
Type for the “privileged-program service”. This service collects lists of executable file names, passed as gexps, and adds them to the set of privileged programs on the system (veja Privileged Programs).
- Variável: profile-service-type
Type of the service that populates the system profile—i.e., the programs under /run/current-system/profile. Other services can extend it by passing it lists of packages to add to the system profile.
- Variável: provenance-service-type
This is the type of the service that records provenance meta-data in the system itself. It creates several files under /run/current-system:
- channels.scm
This is a “channel file” that can be passed to
guix pull -Corguix time-machine -C, and which describes the channels used to build the system, if that information was available (veja Canais).- configuration.scm
This is the file that was passed as the value for this
provenance-service-typeservice. By default,guix system reconfigureautomatically passes the OS configuration file it received on the command line.- provenance
This contains the same information as the two other files but in a format that is more readily processable.
In general, these two pieces of information (channels and configuration file) are enough to reproduce the operating system “from source”.
Caveats: This information is necessary to rebuild your operating system, but it is not always sufficient. In particular, configuration.scm itself is insufficient if it is not self-contained—if it refers to external Guile modules or to extra files. If you want configuration.scm to be self-contained, we recommend that modules or files it refers to be part of a channel.
Besides, provenance meta-data is “silent” in the sense that it does not change the bits contained in your system, except for the meta-data bits themselves. Two different OS configurations or sets of channels can lead to the same system, bit-for-bit; when
provenance-service-typeis used, these two systems will have different meta-data and thus different store file names, which makes comparison less trivial.This service is automatically added to your operating system configuration when you use
guix system reconfigure,guix system init, orguix deploy.
- Variável: linux-loadable-module-service-type
Type of the service that collects lists of packages containing kernel-loadable modules, and adds them to the set of kernel-loadable modules.
This service type is intended to be extended by other service types, such as below:
(simple-service 'installing-module linux-loadable-module-service-type (list module-to-install-1 module-to-install-2))This does not actually load modules at bootup, only adds it to the kernel profile so that it can be loaded by other means.
Próximo: Complex Configurations, Anterior: Referência de Service, Acima: Definindo serviços [Conteúdo][Índice]
11.19.4 Serviços de Shepherd
The (gnu services shepherd) module provides a way to define services
managed by the GNU Shepherd, which is the initialization system—the
first process that is started when the system boots, also known as
PID 1 (veja Introduction em The GNU Shepherd Manual).
Services in the Shepherd can depend on each other. For instance, the SSH daemon may need to be started after the syslog daemon has been started, which in turn can only happen once all the file systems have been mounted. The simple operating system defined earlier (veja Usando o sistema de configuração) results in a service graph like this:
You can actually generate such a graph for any operating system definition
using the guix system shepherd-graph command
(veja guix system shepherd-graph).
The %shepherd-root-service is a service object representing
PID 1, of type shepherd-root-service-type; it can be extended by
passing it lists of <shepherd-service> objects.
- Tipo de dados: shepherd-service
The data type representing a service managed by the Shepherd.
provisionThis is a list of symbols denoting what the service provides.
These are the names that may be passed to
herd start,herd status, and similar commands (veja Invoking herd em The GNU Shepherd Manual). Veja Defining Services em The GNU Shepherd Manual, for details.requirement(default:'())List of symbols denoting the Shepherd services this one depends on.
With very few exceptions, services that start a daemon must depend at least on the
user-processesservice; this ensures that these daemons are started after all the file systems have been mounted and that, during shutdown, they are stopped before attempting to terminate remaining user processes.one-shot?(default:#f)Whether this service is one-shot. One-shot services stop immediately after their
startaction has completed. Veja Slots of services em The GNU Shepherd Manual, for more info.respawn?(padrão:#t)Whether to restart the service when it stops, for instance when the underlying process dies.
respawn-limit(default:#f)Set a limit on how many times and how frequently a service may be restarted by Shepherd before it is disabled. Veja Defining Services em The GNU Shepherd Manual, for details.
respawn-delay(default:#f)When true, this is the delay in seconds before restarting a failed service.
start(default:#~(const #t))stop(default:#~(const #f))The
startandstopfields refer to the Shepherd’s facilities to start and stop processes (veja Service De- and Constructors em The GNU Shepherd Manual). They are given as G-expressions that get expanded in the Shepherd configuration file (veja Expressões-G).actions(default:'()) ¶This is a list of
shepherd-actionobjects (see below) defining actions supported by the service, in addition to the standardstartandstopactions. Actions listed here become available asherdsub-commands:herd action service [arguments…]
free-form(default:#f)When set, this field replaces the
start,stop, andactionsfields. It is meant to be used when the service definition comes from some other source, typically the service collection provided by the Shepherd proper (veja Service Collection em The GNU Shepherd Manual).For example, the snippet below defines a service for the Shepherd’s built-in REPL (read-eval-print loop) service (veja REPL Service em The GNU Shepherd Manual):
(shepherd-service (provision '(repl)) (modules '((shepherd service repl))) (free-form #~(repl-service)))In this case, the service object is returned by the
repl-serviceprocedure of the Shepherd, so all thefree-formG-expression does is call that procedure. Note that theprovisionfield must be consistent with the actual service provision.auto-start?(default:#t)Whether this service should be started automatically by the Shepherd. If it is
#fthe service has to be started manually withherd start.documentationA documentation string, as shown when running:
herd doc service-name
where service-name is one of the symbols in
provision(veja Invoking herd em The GNU Shepherd Manual).modules(default:%default-modules)This is the list of modules that must be in scope when
startandstopare evaluated.
The example below defines a Shepherd service that spawns syslogd,
the system logger from the GNU Networking Utilities (veja syslogd em GNU Inetutils):
(let ((config (plain-file "syslogd.conf" "…")))
(shepherd-service
(documentation "Run the syslog daemon (syslogd).")
(provision '(syslogd))
(requirement '(user-processes))
(start #~(make-forkexec-constructor
(list #$(file-append inetutils "/libexec/syslogd")
"--rcfile" #$config)
#:pid-file "/var/run/syslog.pid"))
(stop #~(make-kill-destructor))))
Key elements in this example are the start and stop fields:
they are staged code snippets that use the
make-forkexec-constructor procedure provided by the Shepherd and its
dual, make-kill-destructor (veja Service De- and Constructors em The GNU Shepherd Manual). The start field will have
shepherd spawn syslogd with the given option; note that
we pass config after --rcfile, which is a configuration file
declared above (contents of this file are omitted). Likewise, the
stop field tells how this service is to be stopped; in this case, it
is stopped by making the kill system call on its PID. Code staging
is achieved using G-expressions: #~ stages code, while #$
“escapes” back to host code (veja Expressões-G).
- Tipo de dados: shepherd-action
This is the data type that defines additional actions implemented by a Shepherd service (see above).
nameSymbol naming the action.
documentationThis is a documentation string for the action. It can be viewed by running:
herd doc service action action
procedureThis should be a gexp that evaluates to a procedure of at least one argument, which is the “running value” of the service (veja Slots of services em The GNU Shepherd Manual).
The following example defines an action called
say-hellothat kindly greets the user:(shepherd-action (name 'say-hello) (documentation "Say hi!") (procedure #~(lambda (running . args) (format #t "Hello, friend! arguments: ~s\n" args) #t)))Assuming this action is added to the
exampleservice, then you can do:# herd say-hello example Hello, friend! arguments: () # herd say-hello example a b c Hello, friend! arguments: ("a" "b" "c")This, as you can see, is a fairly sophisticated way to say hello. Veja Defining Services em The GNU Shepherd Manual, for more info on actions.
- Procedure: shepherd-configuration-action
Return a
configurationaction to display file, which should be the name of the service’s configuration file.It can be useful to equip services with that action. For example, the service for the Tor anonymous router (veja
tor-service-type) is defined roughly like this:(let ((torrc (plain-file "torrc" …))) (shepherd-service (provision '(tor)) (requirement '(user-processes loopback syslogd)) (start #~(make-forkexec-constructor (list #$(file-append tor "/bin/tor") "-f" #$torrc) #:user "tor" #:group "tor")) (stop #~(make-kill-destructor)) (actions (list (shepherd-configuration-action torrc))) (documentation "Run the Tor anonymous network overlay.")))Thanks to this action, administrators can inspect the configuration file passed to
torwith this shell command:cat $(herd configuration tor)
This can come in as a handy debugging tool!
- Variável: shepherd-root-service-type
The service type for the Shepherd “root service”—i.e., PID 1.
This is the service type that extensions target when they want to create shepherd services (veja Tipos de Service e Serviços, for an example). Each extension must pass a list of
<shepherd-service>. Its value must be ashepherd-configuration, as described below.
- Tipo de dados: shepherd-configuration
This data type represents the Shepherd’s configuration.
shepherd (default:shepherd)The Shepherd package to use.
services (default:'())A list of
<shepherd-service>to start. You should probably use the service extension mechanism instead (veja Serviços de Shepherd).
The following example specifies the Shepherd package for the operating system:
(operating-system
;; ...
(services (append (list openssh-service-type))
;; ...
%desktop-services)
;; ...
;; Use own Shepherd package.
(essential-services
(modify-services (operating-system-default-essential-services
this-operating-system)
(shepherd-root-service-type config => (shepherd-configuration
(inherit config)
(shepherd my-shepherd))))))
- Variável: shepherd-transient-service-type
This service type represents the Shepherd’s
transientservice, which lets you spawn commands in the background and interact with them as regular Shepherd services; it is similar tosystemd-run.For example, the command below spawns
rsyncin the background, in an environment where theSSH_AUTH_SOCKenvironment variable has the given value:herd spawn transient -E SSH_AUTH_SOCK=$SSH_AUTH_SOCK -- \ rsync -e ssh -vur . backup.example.org:
Veja Transient Service Maker em The GNU Shepherd Manual, for more info on the
transientservice.
- Variável: shepherd-timer-service-type
This is the service type representing the Shepherd’s
timerservice, which lets you schedule the execution of commands, similar to the venerableatcommand. Here is an example:herd schedule timer at 07:00 -- mpg123 Music/alarm.mp3
Veja Timer Service em The GNU Shepherd Manual, for more info on the
timerservice.
- Variável: shepherd-system-log-service-type
This service implements a system log, reading messages applications send to /dev/log and writing them to files or terminals according to user-defined rules. It provides functionality traditionally implemented by
syslogdprograms.The value of services of this type must be a
system-log-configurationrecord, as described below.This service is part of
%base-services(veja Serviços básicos).
- Data Type: system-log-configuration
Available
system-log-configurationfields are:provision(default:'(system-log syslogd)) (type: list-of-symbols)The name(s) of the system log service.
requirement(default:'(root-file-system)) (type: list-of-symbols)Dependencies of the system log service.
kernel-log-file(type: gexp-or-string-or-false)File from which kernel messages are read, /dev/kmsg by default.
message-destination(default:#f) (type: gexp-or-false)This gexp must evaluate to a procedure that, when passed a log message, returns the list of files to write it to;
#fis equivalent to using(default-message-destination-procedure). Veja System Log Service em The GNU Shepherd Manual, for information on how to write that procedure.date-format(type: gexp-or-string)String or string-valued gexp specifying how to format timestamps in log files. It must be a valid string for
strftime(veja Time em GNU Guile Reference Manual), including delimiting space—e.g.,"%c "for a format identical to that of traditional syslogd implementations.history-size(type: gexp-or-integer)Number of logging messages kept in memory for the purposes of making them available to
herd status system-log.max-silent-time(type: gexp-or-integer)Time after which a mark is written to log files if nothing was logged during that time frame.
- Variável: %shepherd-root-service
This service represents PID 1.
Anterior: Serviços de Shepherd, Acima: Definindo serviços [Conteúdo][Índice]
11.19.5 Complex Configurations
Some programs might have rather complex configuration files or formats, and
to make it easier to create Scheme bindings for these configuration files,
you can use the utilities defined in the (gnu services configuration)
module.
The main utility is the define-configuration macro, a helper used to
define a Scheme record type (veja Record Overview em GNU Guile
Reference Manual). The fields from this Scheme record can be serialized
using serializers, which are procedures that take some kind of Scheme
value and translates them into another Scheme value or Expressões-G.
- Macro: define-configuration name clause1 clause2 …
Create a record type named
namethat contains the fields found in the clauses.A clause has the following form:
(field-name type-decl documentation option* …)
field-name is an identifier that denotes the name of the field in the generated record.
type-decl is either
typefor fields that require a value to be set or(type default-value)otherwise.type is the type of the value corresponding to field-name; since Guile is untyped, a predicate procedure—
type?—will be called on the value corresponding to the field to ensure that the value is of the correct type. This means that if say, type ispackage, then a procedure namedpackage?will be applied on the value to make sure that it is indeed a<package>object.default-value is the default value corresponding to the field; if none is specified, the user is forced to provide a value when creating an object of the record type.
documentation is a string formatted with Texinfo syntax which should provide a description of what setting this field does.
option* is one of the following subclauses:
empty-serializerExclude this field from serialization.
(serializer serializer)serializer is the name of a procedure which takes two arguments, the first is the name of the field, and the second is the value corresponding to the field. The procedure should return a string or Expressões-G that represents the content that will be serialized to the configuration file. If none is specified, a procedure of the name
serialize-typewill be used.An example of a simple serializer procedure:
(define (serialize-boolean field-name value) (let ((value (if value "true" "false"))) #~(string-append '#$field-name " = " #$value)))(sanitizer sanitizer)sanitizer is a procedure which takes one argument, a user-supplied value, and returns a “sanitized” value for the field. If no sanitizer is specified, a default sanitizer is used, which raises an error if the value is not of type type.
An example of a sanitizer for a field that accepts both strings and symbols looks like this:
(define (sanitize-foo value) (cond ((string? value) value) ((symbol? value) (symbol->string value)) (else (error "bad value"))))
In some cases multiple different configuration records might be defined in the same file, but their serializers for the same type might have to be different, because they have different configuration formats. For example, the
serialize-booleanprocedure for the Getmail service would have to be different from the one for the Transmission service. To make it easier to deal with this situation, one can specify a serializer prefix by using theprefixliteral in thedefine-configurationform. This means that one doesn’t have to manually specify a custom serializer for every field.(define (foo-serialize-string field-name value) …) (define (bar-serialize-string field-name value) …) (define-configuration foo-configuration (label string "The name of label.") (prefix foo-)) (define-configuration bar-configuration (ip-address string "The IPv4 address for this device.") (prefix bar-))
However, in some cases you might not want to serialize any of the values of the record, to do this, you can use the
no-serializationliteral. There is also thedefine-configuration/no-serializationmacro which is a shorthand of this.;; Nothing will be serialized to disk. (define-configuration foo-configuration (field (string "test") "Some documentation.") (no-serialization)) ;; The same thing as above. (define-configuration/no-serialization bar-configuration (field (string "test") "Some documentation."))
- Macro: define-maybe type
Sometimes a field should not be serialized if the user doesn’t specify a value. To achieve this, you can use the
define-maybemacro to define a “maybe type”; if the value of a maybe type is left unset, or is set to the%unset-valuevalue, then it will not be serialized.When defining a “maybe type”, the corresponding serializer for the regular type will be used by default. For example, a field of type
maybe-stringwill be serialized using theserialize-stringprocedure by default, you can of course change this by specifying a custom serializer procedure. Likewise, the type of the value would have to be a string, or left unspecified.(define-maybe string) (define (serialize-string field-name value) …) (define-configuration baz-configuration (name ;; If set to a string, the `serialize-string' procedure will be used ;; to serialize the string. Otherwise this field is not serialized. maybe-string "The name of this module."))
Like with
define-configuration, one can set a prefix for the serializer name by using theprefixliteral.(define-maybe integer (prefix baz-)) (define (baz-serialize-integer field-name value) …)
There is also the
no-serializationliteral, which when set means that no serializer will be defined for the “maybe type”, regardless of whether its value is set or not.define-maybe/no-serializationis a shorthand for specifying theno-serializationliteral.(define-maybe/no-serialization symbol) (define-configuration/no-serialization test-configuration (mode maybe-symbol "Docstring."))
- Procedure: maybe-value-set? value
Predicate to check whether a user explicitly specified the value of a maybe field.
- Procedure: serialize-configuration configuration fields
Return a G-expression that contains the values corresponding to the fields of configuration, a record that has been generated by
define-configuration. The G-expression can then be serialized to disk by using something likemixed-text-file.
Once you have defined a configuration record, you will most likely also want to document it so that other people know to use it. To help with that, there are two procedures, both of which are documented below.
- Procedure: generate-documentation documentation documentation-name
Generate a Texinfo fragment from the docstrings in documentation, a list of
(label fields sub-documentation ...). label should be a symbol and should be the name of the configuration record. fields should be a list of all the fields available for the configuration record.sub-documentation is a
(field-name configuration-name)tuple. field-name is the name of the field which takes another configuration record as its value, and configuration-name is the name of that configuration record. The same value may be used for multiple field-names, in case a field accepts different types of configurations.sub-documentation is only needed if there are nested configuration records. For example, the
getmail-configurationrecord (veja Serviços de correio) accepts agetmail-configuration-filerecord in one of itsrcfilefield, therefore documentation forgetmail-configuration-fileis nested ingetmail-configuration.(generate-documentation `((getmail-configuration ,getmail-configuration-fields (rcfile getmail-configuration-file)) …) 'getmail-configuration)documentation-name should be a symbol and should be the name of the configuration record.
- Procedure: configuration->documentation configuration-symbol
Take configuration-symbol, the symbol corresponding to the name used when defining a configuration record with
define-configuration, and print the Texinfo documentation of its fields. This is useful if there aren’t any nested configuration records since it only prints the documentation for the top-level fields.
As of right now, there is no automated way to generate documentation for
configuration records and put them in the manual. Instead, every time you
make a change to the docstrings of a configuration record, you have to
manually call generate-documentation or
configuration->documentation, and paste the output into the
doc/guix.texi file.
Below is an example of a record type created using
define-configuration and friends.
(use-modules (gnu services) (guix gexp) (gnu services configuration) (srfi srfi-26) (srfi srfi-1)) ;; Turn field names, which are Scheme symbols into strings (define (uglify-field-name field-name) (let ((str (symbol->string field-name))) ;; field? -> is-field (if (string-suffix? "?" str) (string-append "is-" (string-drop-right str 1)) str))) (define (serialize-string field-name value) #~(string-append #$(uglify-field-name field-name) " = " #$value "\n")) (define (serialize-integer field-name value) (serialize-string field-name (number->string value))) (define (serialize-boolean field-name value) (serialize-string field-name (if value "true" "false"))) (define (serialize-contact-name field-name value) #~(string-append "\n[" #$value "]\n")) (define (list-of-contact-configurations? lst) (every contact-configuration? lst)) (define (serialize-list-of-contact-configurations field-name value) #~(string-append #$@(map (cut serialize-configuration <> contact-configuration-fields) value))) (define (serialize-contacts-list-configuration configuration) (mixed-text-file "contactrc" #~(string-append "[Owner]\n" #$(serialize-configuration configuration contacts-list-configuration-fields)))) (define-maybe integer) (define-maybe string) (define-configuration contact-configuration (name string "The name of the contact." serialize-contact-name) (phone-number maybe-integer "The person's phone number.") (email maybe-string "The person's email address.") (married? boolean "Whether the person is married.")) (define-configuration contacts-list-configuration (name string "The name of the owner of this contact list.") (email string "The owner's email address.") (contacts (list-of-contact-configurations '()) "A list of @code{contact-configuration} records which contain information about all your contacts."))
A contacts list configuration could then be created like this:
(define my-contacts
(contacts-list-configuration
(name "Alice")
(email "alice@example.org")
(contacts
(list (contact-configuration
(name "Bob")
(phone-number 1234)
(email "bob@gnu.org")
(married? #f))
(contact-configuration
(name "Charlie")
(phone-number 0000)
(married? #t))))))
After serializing the configuration to disk, the resulting file would look like this:
[owner] name = Alice email = alice@example.org [Bob] phone-number = 1234 email = bob@gnu.org is-married = false [Charlie] phone-number = 0 is-married = true
Próximo: Home Configuration, Anterior: Configuração do sistema, Acima: GNU Guix [Conteúdo][Índice]
12 Dicas para solução de problemas do sistema
Guix System allows rebooting into a previous generation should the last one be malfunctioning, which makes it quite robust against being broken irreversibly. This feature depends on GRUB being correctly functioning though, which means that if for whatever reasons your GRUB installation becomes corrupted during a system reconfiguration, you may not be able to easily boot into a previous generation. A technique that can be used in this case is to chroot into your broken system and reconfigure it from there. Such technique is explained below.
12.1 Acessando um sistema existente via chroot
This section details how to chroot to an already installed Guix System with the aim of reconfiguring it, for example to fix a broken GRUB installation. The process is similar to how it would be done on other GNU/Linux systems, but there are some Guix System particularities such as the daemon and profiles that make it worthy of explaining here.
- Obtain a bootable image of Guix System. It is recommended the latest development snapshot so the kernel and the tools used are at least as as new as those of your installed system; it can be retrieved from the https://ci.guix.gnu.org URL. Follow the veja Instalação em um pendrive e em DVD section for copying it to a bootable media.
- Boot the image, and proceed with the graphical text-based installer until your network is configured. Alternatively, you could configure the network manually by following the manual-installation-networking section. If you get the error ‘RTNETLINK answers: Operation not possible due to RF-kill’, try ‘rfkill list’ followed by ‘rfkill unblock 0’, where ‘0’ is your device identifier (ID).
- Switch to a virtual console (tty) if you haven’t already by pressing
simultaneously the Control + Alt + F4 keys. Mount your file system at
/mnt. Assuming your root partition is /dev/sda2, you would
do:
mount /dev/sda2 /mnt
- Mount special block devices and Linux-specific directories:
mount --rbind /proc /mnt/proc mount --rbind /sys /mnt/sys mount --rbind /dev /mnt/dev
If your system is EFI-based, you must also mount the ESP partition. Assuming it is /dev/sda1, you can do so with:
mount /dev/sda1 /mnt/boot/efi
- Enter your system via chroot:
chroot /mnt /bin/sh
- Source the system profile as well as your user profile to setup the
environment, where user is the user name used for the Guix System you
are attempting to repair:
source /var/guix/profiles/system/profile/etc/profile source /home/user/.guix-profile/etc/profile
To ensure you are working with the Guix revision you normally would as your normal user, also source your current Guix profile:
source /home/user/.config/guix/current/etc/profile
- Start a minimal
guix-daemonin the background:guix-daemon --build-users-group=guixbuild --disable-chroot &
- Edit your Guix System configuration if needed, then reconfigure with:
guix system reconfigure your-config.scm
- Finally, you should be good to reboot the system to test your fix.
Próximo: Documentação, Anterior: Dicas para solução de problemas do sistema, Acima: GNU Guix [Conteúdo][Índice]
13 Home Configuration
Guix supports declarative configuration of home environments by
utilizing the configuration mechanism described in the previous chapter
(veja Definindo serviços), but for user’s dotfiles and packages. It works
both on Guix System and foreign distros and allows users to declare all the
packages and services that should be installed and configured for the user.
Once a user has written a file containing a home-environment record,
such a configuration can be instantiated by an unprivileged user with
the guix home command (veja Invoking guix home).
The user’s home environment usually consists of three basic parts: software,
configuration, and state. Software in mainstream distros are usually
installed system-wide, but with GNU Guix most software packages can be
installed on a per-user basis without needing root privileges, and are thus
considered part of the user’s home environment. Packages on their own
are not very useful in many cases, because often they require some
additional configuration, usually config files that reside in
XDG_CONFIG_HOME (~/.config by default) or other directories.
Everything else can be considered state, like media files, application
databases, and logs.
Using Guix for managing home environments provides a number of advantages:
- All software can be configured in one language (Guile Scheme), this gives users the ability to share values between configurations of different programs.
- A well-defined home environment is self-contained and can be created in a declarative and reproducible way—there is no need to grab external binaries or manually edit some configuration file.
- After every
guix home reconfigureinvocation, a new home environment generation will be created. This means that users can rollback to a previous home environment generation so they don’t have to worry about breaking their configuration. - It is possible to manage stateful data with Guix Home, this
includes the ability to automatically clone Git repositories on the initial
setup of the machine, and periodically running commands like
rsyncto sync data with another host. This functionality is still in an experimental stage, though.
Próximo: Configurando o "Shell", Acima: Home Configuration [Conteúdo][Índice]
13.1 Declarando o ambiente pessoal
The home environment is configured by providing a home-environment
declaration in a file that can be passed to the guix home command
(veja Invoking guix home). The easiest way to get started is by
generating an initial configuration with guix home import:
guix home import ~/src/guix-config
The guix home import command reads some of the “dot files” such
as ~/.bashrc found in your home directory and copies them to the
given directory, ~/src/guix-config in this case; it also reads the
contents of your profile, ~/.guix-profile, and, based on that, it
populates ~/src/guix-config/home-configuration.scm with a Home
configuration that resembles your current configuration.
A simple setup can include Bash and a custom text configuration, like in the example below. Don’t be afraid to declare home environment parts, which overlaps with your current dot files: before installing any configuration files, Guix Home will back up existing config files to a separate place in the home directory.
Nota: It is highly recommended that you manage your shell or shells with Guix Home, because it will make sure that all the necessary scripts are sourced by the shell configuration file. Otherwise you will need to do it manually. (veja Configurando o "Shell").
(use-modules (gnu home) (gnu home services) (gnu home services shells) (gnu services) (gnu packages admin) (guix gexp)) (home-environment (packages (list htop)) (services (append (list (service home-bash-service-type (home-bash-configuration (guix-defaults? #t) (bash-profile (list (plain-file "bash-profile" "\ export HISTFILE=$XDG_CACHE_HOME/.bash_history"))))) (simple-service 'test-config home-xdg-configuration-files-service-type (list `("test.conf" ,(plain-file "tmp-file.txt" "the content of ~/.config/test.conf"))))) %base-home-services)))
The packages field should be self-explanatory, it will install the
list of packages into the user’s profile. The most important field is
services, it contains a list of home services, which are the
basic building blocks of a home environment.
There is no daemon (at least not necessarily) related to a home service, a home service is just an element that is used to declare part of home environment and extend other parts of it. The extension mechanism discussed in the previous chapter (veja Definindo serviços) should not be confused with Shepherd services (veja Serviços de Shepherd). Using this extension mechanism and some Scheme code that glues things together gives the user the freedom to declare their own, very custom, home environments.
Once the configuration looks good, you can first test it in a throw-away “container”:
guix home container config.scm
The command above spawns a shell where your home environment is running. The shell runs in a container, meaning it’s isolated from the rest of the system, so it’s a good way to try out your configuration—you can see if configuration bits are missing or misbehaving, if daemons get started, and so on. Once you exit that shell, you’re back to the prompt of your original shell “in the real world”.
Once you have a configuration file that suits your needs, you can reconfigure your home by running:
guix home reconfigure config.scm
This “builds” your home environment and creates ~/.guix-home pointing to it. Voilà!
Nota: Make sure the operating system has elogind, systemd, or a similar mechanism to create the XDG run-time directory and has the
XDG_RUNTIME_DIRvariable set. Failing that, the on-first-login script will not execute anything, and processes like user Shepherd and its descendants will not start.
If you’re using Guix System, you can embed your home configuration in your
system configuration such that guix system reconfigure will deploy
both the system and your home at once! Veja guix-home-service-type, for how to do that.
Próximo: Serviços pessoais, Anterior: Declarando o ambiente pessoal, Acima: Home Configuration [Conteúdo][Índice]
13.2 Configurando o "Shell"
This section is safe to skip if your shell or shells are managed by Guix Home. Otherwise, read it carefully.
There are a few scripts that must be evaluated by a login shell to activate
the home environment. The shell startup files only read by login shells
often have profile suffix. For more information about login shells
see Invoking Bash em The GNU Bash Reference Manual and see
Bash Startup Files em The GNU Bash Reference Manual.
The first script that needs to be sourced is setup-environment, which
sets all the necessary environment variables (including variables declared
by the user) and the second one is on-first-login, which starts
Shepherd for the current user and performs actions declared by other home
services that extends home-run-on-first-login-service-type.
Guix Home will always create ~/.profile, which contains the following lines:
HOME_ENVIRONMENT=$HOME/.guix-home . $HOME_ENVIRONMENT/setup-environment $HOME_ENVIRONMENT/on-first-login
This makes POSIX compliant login shells activate the home environment. However, in most cases this file won’t be read by most modern shells, because they are run in non POSIX mode by default and have their own *profile startup files. For example Bash will prefer ~/.bash_profile in case it exists and only if it doesn’t will it fallback to ~/.profile. Zsh (if no additional options are specified) will ignore ~/.profile, even if ~/.zprofile doesn’t exist.
To make your shell respect ~/.profile, add . ~/.profile or
source ~/.profile to the startup file for the login shell. In case
of Bash, it is ~/.bash_profile, and in case of Zsh, it is
~/.zprofile.
Nota: This step is only required if your shell is not managed by Guix Home. Otherwise, everything will be done automatically.
Próximo: Invoking guix home, Anterior: Configurando o "Shell", Acima: Home Configuration [Conteúdo][Índice]
13.3 Serviços pessoais
A home service is not necessarily something that has a daemon and is
managed by Shepherd (veja Jump Start em The GNU Shepherd
Manual), in most cases it doesn’t. It’s a simple building block of the
home environment, often declaring a set of packages to be installed in the
home environment profile, a set of config files to be symlinked into
XDG_CONFIG_HOME (~/.config by default), and environment
variables to be set by a login shell.
There is a service extension mechanism (veja Composição de serviço) which
allows home services to extend other home services and utilize capabilities
they provide; for example: declare mcron jobs (veja GNU Mcron) by extending Execução de trabalho agendado pessoal; declare daemons by
extending Managing User Daemons; add commands, which will be invoked
on by the Bash by extending home-bash-service-type.
A good way to discover available home services is using the guix
home search command (veja Invoking guix home). After the required home
services are found, include its module with the use-modules form
(veja Using Guile Modules em The GNU Guile Reference
Manual), or the #:use-modules directive (veja Creating Guile Modules em The GNU Guile Reference Manual) and declare
a home service using the service function, or extend a service type
by declaring a new service with the simple-service procedure from
(gnu services).
- Serviços essenciais pessoais
- Shells
- Execução de trabalho agendado pessoal
- Power Management Home Services
- Managing User Daemons
- Secure Shell
- GNU Privacy Guard
- Desktop Home Services
- Guix Home Services
- Fonts Home Services
- Sound Home Services
- Mail Home Services
- Messaging Home Services
- Media Home Services
- Gerenciador de janelas Sway
- Networking Home Services
- Miscellaneous Home Services
Próximo: Shells, Acima: Serviços pessoais [Conteúdo][Índice]
13.3.1 Serviços essenciais pessoais
There are a few essential home services defined in (gnu home
services), they are mostly for internal use and are required to build a
home environment, but some of them will be useful for the end user.
- Variável: home-environment-variables-service-type
The service of this type will be instantiated by every home environment automatically by default, there is no need to define it, but someone may want to extend it with a list of pairs to set some environment variables.
(list ("ENV_VAR1" . "value1") ("ENV_VAR2" . "value2"))The easiest way to extend a service type, without defining a new service type is to use the
simple-servicehelper from(gnu services).(simple-service 'some-useful-env-vars-service home-environment-variables-service-type `(("LESSHISTFILE" . "$XDG_CACHE_HOME/.lesshst") ("SHELL" . ,(file-append zsh "/bin/zsh")) ("USELESS_VAR" . #f) ("_JAVA_AWT_WM_NONREPARENTING" . #t) ("LITERAL_VALUE" . ,(literal-string "${abc}"))))If you include such a service in you home environment definition, it will add the following content to the setup-environment script (which is expected to be sourced by the login shell):
export LESSHISTFILE="$XDG_CACHE_HOME/.lesshst" export SHELL="/gnu/store/2hsg15n644f0glrcbkb1kqknmmqdar03-zsh-5.8/bin/zsh" export _JAVA_AWT_WM_NONREPARENTING export LITERAL_VALUE='${abc}'Notice that
literal-stringabove lets us declare that a value is to be interpreted as a literal string, meaning that “special characters” such as the dollar sign will not be interpreted by the shell.Nota: Make sure that module
(gnu packages shells)is imported withuse-modulesor any other way, this namespace contains the definition of thezshpackage, which is used in the example above.The association list (veja Association Lists em The GNU Guile Reference manual) is a data structure containing key-value pairs, for
home-environment-variables-service-typethe key is always a string, the value can be a string, string-valued gexp (veja Expressões-G), file-like object (veja file-like object) or boolean. For gexps, the variable will be set to the value of the gexp; for file-like objects, it will be set to the path of the file in the store (veja O armazém); for#t, it will export the variable without any value; and for#f, it will omit variable.
- Variável: home-profile-service-type
The service of this type will be instantiated by every home environment automatically, there is no need to define it, but you may want to extend it with a list of packages if you want to install additional packages into your profile. Other services, which need to make some programs available to the user will also extend this service type.
The extension value is just a list of packages:
(list htop vim emacs)The same approach as
simple-service(veja simple-service) forhome-environment-variables-service-typecan be used here, too. Make sure that modules containing the specified packages are imported withuse-modules. To find a package or information about its module useguix search(veja Invocandoguix package). Alternatively,specification->packagecan be used to get the package record from a string without importing its related module.
There are few more essential services, but users are not expected to extend them.
- Variável: home-service-type
The root of home services DAG, it generates a folder, which later will be symlinked to ~/.guix-home, it contains configurations, profile with binaries and libraries, and some necessary scripts to glue things together.
- Variável: home-run-on-first-login-service-type
The service of this type generates a Guile script, which is expected to be executed by the login shell. It is only executed if the special flag file inside
XDG_RUNTIME_DIRhasn’t been created, this prevents redundant executions of the script if multiple login shells are spawned.It can be extended with a gexp. However, to autostart an application, users should not use this service, in most cases it’s better to extend
home-shepherd-service-typewith a Shepherd service (veja Serviços de Shepherd), or extend the shell’s startup file with the required command using the appropriate service type.
- Variável: home-files-service-type
The service of this type allows to specify a list of files, which will go to ~/.guix-home/files, usually this directory contains configuration files (to be more precise it contains symlinks to files in /gnu/store), which should be placed in $XDG_CONFIG_DIR or in rare cases in $HOME. It accepts extension values in the following format:
`((".sway/config" ,sway-file-like-object) (".tmux.conf" ,(local-file "./tmux.conf")))
Each nested list contains two values: a subdirectory and file-like object. After building a home environment ~/.guix-home/files will be populated with appropriate content and all nested directories will be created accordingly, however, those files won’t go any further until some other service will do it. By default a
home-symlink-manager-service-type, which creates necessary symlinks in home folder to files from ~/.guix-home/files and backs up already existing, but clashing configs and other things, is a part of essential home services (enabled by default), but it’s possible to use alternative services to implement more advanced use cases like read-only home. Feel free to experiment and share your results.
It is often the case that Guix Home users already have a setup for versioning their user configuration files (also known as dot files) in a single directory, and some way of automatically deploy changes to their user home.
The home-dotfiles-service-type from (gnu home services
dotfiles) is designed to ease the way into using Guix Home for this kind of
users, allowing them to point the service to their dotfiles directory
without migrating them to Guix native configurations.
Please keep in mind that it is advisable to keep your dotfiles directories under version control, for example in the same repository where you’d track your Guix Home configuration.
There are two supported dotfiles directory layouts, for now. The
'plain layout, which is structured as follows:
~$ tree -a ./dotfiles/ dotfiles/ ├── .gitconfig ├── .gnupg │ ├── gpg-agent.conf │ └── gpg.conf ├── .guile ├── .config │ ├── guix │ │ └── channels.scm │ └── nixpkgs │ └── config.nix ├── .nix-channels ├── .tmux.conf └── .vimrc
This tree structure is installed as is to the home directory upon
guix home reconfigure.
The 'stow layout, which must follow the layout suggested by
GNU Stow presents an additional
application specific directory layer, just like:
~$ tree -a ./dotfiles/
dotfiles/
├── git
│ └── .gitconfig
├── gpg
│ └── .gnupg
│ ├── gpg-agent.conf
│ └── gpg.conf
├── guile
│ └── .guile
├── guix
│ └── .config
│ └── guix
│ └── channels.scm
├── nix
│ ├── .config
│ │ └── nixpkgs
│ │ └── config.nix
│ └── .nix-channels
├── tmux
│ └── .tmux.conf
└── vim
└── .vimrc
13 directories, 10 files
For an informal specification please refer to the Stow manual
(veja Introduction em The GNU Stow Manual). This tree structure is
installed following GNU Stow’s logic to the home directory upon
guix home reconfigure.
A suitable configuration with a 'plain layout could be:
(home-environment
;; …
(services
(service home-dotfiles-service-type
(home-dotfiles-configuration
(directories '("./dotfiles"))))))
The expected home directory state would then be:
. ├── .config │ ├── guix │ │ └── channels.scm │ └── nixpkgs │ └── config.nix ├── .gitconfig ├── .gnupg │ ├── gpg-agent.conf │ └── gpg.conf ├── .guile ├── .nix-channels ├── .tmux.conf └── .vimrc
- Variável: home-dotfiles-service-type
Return a service which is very similar to
home-files-service-type(and actually extends it), but designed to ease the way into using Guix Home for users that already track their dotfiles under some kind of version control. This service allows users to point Guix Home to their dotfiles directory and have their files automatically provisioned to their home directory, without migrating all of their dotfiles to Guix native configurations.
- Tipo de dados: home-dotfiles-configuration
Available
home-dotfiles-configurationfields are:source-directory(default:(current-source-directory)) (type: string)The path where dotfile directories are resolved. By default dotfile directories are resolved relative the source location where
home-dotfiles-configurationappears.layout(default:'plain) (type: symbol)The intended layout of the specified
directory. It can be either'stowor'plain.directories(default:'()) (type: list-of-strings)The list of dotfiles directories where
home-dotfiles-service-typewill look for application dotfiles.packages(type: maybe-list-of-strings)The names of a subset of the GNU Stow package layer directories. When provided the
home-dotfiles-service-typewill only provision dotfiles from this subset of applications. This field will be ignored iflayoutis set to'plain.excluded(default:'(".*~" ".*\\.swp" "\\.git" "\\.gitignore")) (type: list-of-strings)The list of file patterns
home-dotfiles-service-typewill exclude while visiting each one of thedirectories.
- Variável: home-xdg-configuration-files-service-type
The service is very similar to
home-files-service-type(and actually extends it), but used for defining files, which will go to ~/.guix-home/files/.config, which will be symlinked to $XDG_CONFIG_DIR byhome-symlink-manager-service-type(for example) during activation. It accepts extension values in the following format:`(("sway/config" ,sway-file-like-object) ;; -> ~/.guix-home/files/.config/sway/config ;; -> $XDG_CONFIG_DIR/sway/config (by symlink-manager) ("tmux/tmux.conf" ,(local-file "./tmux.conf")))
- Variável: home-activation-service-type
The service of this type generates a guile script, which runs on every
guix home reconfigureinvocation or any other action, which leads to the activation of the home environment.
- Variável: home-symlink-manager-service-type
The service of this type generates a guile script, which will be executed during activation of home environment, and do a few following steps:
- Reads the content of files/ directory of current and pending home environments.
- Cleans up all symlinks created by symlink-manager on previous activation. Also, sub-directories, which become empty also will be cleaned up.
- Creates new symlinks the following way: It looks files/ directory
(usually defined with
home-files-service-type,home-xdg-configuration-files-service-typeand maybe some others), takes the files from files/.config/ subdirectory and put respective links inXDG_CONFIG_DIR. For example symlink for files/.config/sway/config will end up in $XDG_CONFIG_DIR/sway/config. The rest files in files/ outside of files/.config/ subdirectory will be treated slightly different: symlink will just go to $HOME. files/.some-program/config will end up in $HOME/.some-program/config. - If some sub-directories are missing, they will be created.
- If there is a clashing files on the way, they will be backed up.
symlink-manager is a part of essential home services and is enabled and used by default.
Próximo: Execução de trabalho agendado pessoal, Anterior: Serviços essenciais pessoais, Acima: Serviços pessoais [Conteúdo][Índice]
13.3.2 Shells
Shells play a quite important role in the environment initialization process, you can configure them manually as described in section Configurando o "Shell", but the recommended way is to use home services listed below. It’s both easier and more reliable.
Each home environment instantiates home-shell-profile-service-type,
which creates a ~/.profile startup file for all POSIX-compatible
shells. This file contains all the necessary steps to properly initialize
the environment, but many modern shells like Bash or Zsh prefer their own
startup files, that’s why the respective home services
(home-bash-service-type and home-zsh-service-type) ensure that
~/.profile is sourced by ~/.bash_profile and
~/.zprofile, respectively.
Shell Profile Service
- Tipo de dados: home-shell-profile-configuration
Available
home-shell-profile-configurationfields are:profile(default:'()) (type: text-config)home-shell-profileis instantiated automatically byhome-environment, DO NOT create this service manually, it can only be extended.profileis a list of file-like objects, which will go to ~/.profile. By default ~/.profile contains the initialization code which must be evaluated by the login shell to make home-environment’s profile available to the user, but other commands can be added to the file if it is really necessary. In most cases shell’s configuration files are preferred places for user’s customizations. Extend home-shell-profile service only if you really know what you do.
Bash Home Service
- Tipo de dados: home-bash-configuration
Available
home-bash-configurationfields are:package(default:bash) (type: package)The Bash package to use.
guix-defaults?(default:#t) (type: boolean)Add sane defaults like reading /etc/bashrc and coloring the output of
lsto the top of the .bashrc file.environment-variables(default:'()) (type: alist)Association list of environment variables to set for the Bash session. The rules for the
home-environment-variables-service-typeapply here (veja Serviços essenciais pessoais). The contents of this field will be added after the contents of thebash-profilefield.aliases(default:'()) (type: alist)Association list of aliases to set for the Bash session. The aliases will be defined after the contents of the
bashrcfield has been put in the .bashrc file. The alias will automatically be quoted, so something like this:'(("ls" . "ls -alF"))
turns into
alias ls="ls -alF"
bash-profile(default:'()) (type: text-config)List of file-like objects, which will be added to .bash_profile. Used for executing user’s commands at start of login shell (In most cases the shell started on tty just after login). .bash_login won’t be ever read, because .bash_profile always present.
bashrc(default:'()) (type: text-config)List of file-like objects, which will be added to .bashrc. Used for executing user’s commands at start of interactive shell (The shell for interactive usage started by typing
bashor by terminal app or any other program).bash-logout(default:'()) (type: text-config)List of file-like objects, which will be added to .bash_logout. Used for executing user’s commands at the exit of login shell. It won’t be read in some cases (if the shell terminates by exec’ing another process for example).
You can extend the Bash service by using the home-bash-extension
configuration record, whose fields must mirror that of
home-bash-configuration (veja home-bash-configuration). The
contents of the extensions will be added to the end of the corresponding
Bash configuration files (veja Bash Startup Files em The GNU Bash
Reference Manual.
For example, here is how you would define a service that extends the Bash
service such that ~/.bash_profile defines an additional environment
variable, PS1:
(define bash-fancy-prompt-service
(simple-service 'bash-fancy-prompt
home-bash-service-type
(home-bash-extension
(environment-variables
'(("PS1" . "\\u \\wλ "))))))
You would then add bash-fancy-prompt-service to the list in the
services field of your home-environment. The reference of
home-bash-extension follows.
- Tipo de dados: home-bash-extension
Available
home-bash-extensionfields are:environment-variables(default:'()) (type: alist)Additional environment variables to set. These will be combined with the environment variables from other extensions and the base service to form one coherent block of environment variables.
aliases(default:'()) (type: alist)Additional aliases to set. These will be combined with the aliases from other extensions and the base service.
bash-profile(default:'()) (type: text-config)Additional text blocks to add to .bash_profile, which will be combined with text blocks from other extensions and the base service.
bashrc(default:'()) (type: text-config)Additional text blocks to add to .bashrc, which will be combined with text blocks from other extensions and the base service.
bash-logout(default:'()) (type: text-config)Additional text blocks to add to .bash_logout, which will be combined with text blocks from other extensions and the base service.
Zsh Home Service
- Tipo de dados: home-zsh-configuration
Available
home-zsh-configurationfields are:package(default:zsh) (type: package)The Zsh package to use.
xdg-flavor?(default:#t) (type: boolean)Place all the configs to $XDG_CONFIG_HOME/zsh. Makes ~/.zshenv to set
ZDOTDIRto $XDG_CONFIG_HOME/zsh. Shell startup process will continue with $XDG_CONFIG_HOME/zsh/.zshenv.environment-variables(default:'()) (type: alist)Association list of environment variables to set for the Zsh session.
zshenv(default:'()) (type: text-config)List of file-like objects, which will be added to .zshenv. Used for setting user’s shell environment variables. Must not contain commands assuming the presence of tty or producing output. Will be read always. Will be read before any other file in
ZDOTDIR.zprofile(default:'()) (type: text-config)List of file-like objects, which will be added to .zprofile. Used for executing user’s commands at start of login shell (In most cases the shell started on tty just after login). Will be read before .zlogin.
zshrc(default:'()) (type: text-config)List of file-like objects, which will be added to .zshrc. Used for executing user’s commands at start of interactive shell (The shell for interactive usage started by typing
zshor by terminal app or any other program).zlogin(default:'()) (type: text-config)List of file-like objects, which will be added to .zlogin. Used for executing user’s commands at the end of starting process of login shell.
zlogout(default:'()) (type: text-config)List of file-like objects, which will be added to .zlogout. Used for executing user’s commands at the exit of login shell. It won’t be read in some cases (if the shell terminates by exec’ing another process for example).
Inputrc Profile Service
The GNU Readline
package includes Emacs and vi editing modes, with the ability to customize
the configuration with settings in the ~/.inputrc file. With the
gnu home services shells module, you can setup your readline
configuration in a predictable manner, as shown below. For more information
about configuring an ~/.inputrc file, veja Readline Init File em GNU Readline.
- Variável: home-inputrc-service-type
-
This is the service to setup various .inputrc configurations. The settings in .inputrc are read by all programs which are linked with GNU Readline.
Here is an example of a service and its configuration that you could add to the
servicesfield of yourhome-environment:(service home-inputrc-service-type (home-inputrc-configuration (key-bindings `(("Control-l" . "clear-screen"))) (variables `(("bell-style" . "visible") ("colored-completion-prefix" . #t) ("editing-mode" . "vi") ("show-mode-in-prompt" . #t))) (conditional-constructs `(("$if mode=vi" . ,(home-inputrc-configuration (variables `(("colored-stats" . #t) ("enable-bracketed-paste" . #t))))) ("$else" . ,(home-inputrc-configuration (variables `(("show-all-if-ambiguous" . #t))))) ("endif" . #t) ("$include" . "/etc/inputrc") ("$include" . ,(file-append (specification->package "readline") "/etc/inputrc"))))))The example above starts with a combination of
key-bindingsandvariables. Theconditional-constructsshow how it is possible to add conditionals and includes. In the example abovecolored-statsis only enabled if the editing mode isvistyle, and it also reads any additional configuration located in /etc/inputrc or in /gnu/store/…-readline/etc/inputrc.The value associated with a
home-inputrc-service-typeinstance must be ahome-inputrc-configurationrecord, as described below.
- Tipo de dados: home-inputrc-configuration
Available
home-inputrc-configurationfields are:key-bindings(default:'()) (type: alist)Association list of readline key bindings to be added to the ~/.inputrc file.
'((\"Control-l\" . \"clear-screen\"))
turns into
Control-l: clear-screen
variables(default:'()) (type: alist)Association list of readline variables to set.
'((\"bell-style\" . \"visible\") (\"colored-completion-prefix\" . #t))
turns into
set bell-style visible set colored-completion-prefix on
conditional-constructs(default:'()) (type: alist)Association list of conditionals to add to the initialization file. This includes
$if,else,endifandincludeand they receive a value of anotherhome-inputrc-configuration.(conditional-constructs `((\"$if mode=vi\" . ,(home-inputrc-configuration (variables `((\"show-mode-in-prompt\" . #t))))) (\"$else\" . ,(home-inputrc-configuration (key-bindings `((\"Control-l\" . \"clear-screen\"))))) (\"$endif\" . #t)))turns into
$if mode=vi set show-mode-in-prompt on $else Control-l: clear-screen $endif
extra-content(default:"") (type: text-config)Extra content appended as-is to the configuration file. Run
man readlinefor more information about all the configuration options.
Próximo: Power Management Home Services, Anterior: Shells, Acima: Serviços pessoais [Conteúdo][Índice]
13.3.3 Execução de trabalho agendado pessoal
The (gnu home services mcron) module provides an interface to
GNU mcron, a daemon to run jobs at scheduled times (veja GNU mcron). The information about system’s mcron is applicable
here (veja Execução de trabalho agendado), the only difference for home
services is that they have to be declared in a home-environment
record instead of an operating-system record.
- Variável: home-mcron-service-type
This is the type of the
mcronhome service, whose value is ahome-mcron-configurationobject. It allows to manage scheduled tasks.This service type can be the target of a service extension that provides additional job specifications (veja Composição de serviço). In other words, it is possible to define services that provide additional mcron jobs to run.
- Tipo de dados: home-mcron-configuration
Available
home-mcron-configurationfields are:mcron(default:mcron) (type: file-like)The mcron package to use.
jobs(default:'()) (type: list-of-gexps)This is a list of gexps (veja Expressões-G), where each gexp corresponds to an mcron job specification (veja mcron job specifications em GNU mcron).
log?(default:#t) (type: boolean)Log messages to standard output.
log-format(default:"~1@*~a ~a: ~a~%") (type: string)(ice-9 format)format string for log messages. The default value produces messages like "‘pid name: message"’ (veja Invoking em GNU mcron). Each message is also prefixed by a timestamp by GNU Shepherd.
Próximo: Managing User Daemons, Anterior: Execução de trabalho agendado pessoal, Acima: Serviços pessoais [Conteúdo][Índice]
13.3.4 Power Management Home Services
The (gnu home services pm) module provides home services pertaining
to battery power.
- Variável: home-batsignal-service-type
Service for
batsignal, a program that monitors battery levels and warns the user through desktop notifications when their battery is getting low. You can also configure a command to be run when the battery level passes a point deemed “dangerous”. This service is configured with thehome-batsignal-configurationrecord.
- Tipo de dados: home-batsignal-configuration
Data type representing the configuration for batsignal.
warning-level(default:15)The battery level to send a warning message at.
warning-message(default:#f)The message to send as a notification when the battery level reaches the
warning-level. Setting to#fuses the default message.critical-level(default:5)The battery level to send a critical message at.
critical-message(default:#f)The message to send as a notification when the battery level reaches the
critical-level. Setting to#fuses the default message.danger-level(default:2)The battery level to run the
danger-commandat.danger-command(default:#f)The command to run when the battery level reaches the
danger-level. Setting to#fdisables running the command entirely.full-level(default:#f)The battery level to send a full message at. Setting to
#fdisables sending the full message entirely.full-message(default:#f)The message to send as a notification when the battery level reaches the
full-level. Setting to#fuses the default message.batteries(default:'())The batteries to monitor. Setting to
'()tries to find batteries automatically.poll-delay(default:60)The time in seconds to wait before checking the batteries again.
icon(default:#f)A file-like object to use as the icon for battery notifications. Setting to
#fdisables notification icons entirely.notifications?(default:#t)Whether to send any notifications.
notifications-expire?(default:#f)Whether notifications sent expire after a time.
notification-command(default:#f)Command to use to send messages. Setting to
#fsends a notification throughlibnotify.ignore-missing?(default:#f)Whether to ignore missing battery errors.
Próximo: Secure Shell, Anterior: Power Management Home Services, Acima: Serviços pessoais [Conteúdo][Índice]
13.3.5 Managing User Daemons
The (gnu home services shepherd) module supports the definitions of
per-user Shepherd services (veja Introduction em The GNU
Shepherd Manual). You extend home-shepherd-service-type with new
services; Guix Home then takes care of starting the shepherd daemon
for you when you log in, which in turns starts the services you asked for.
- Variável: home-shepherd-service-type
The service type for the userland Shepherd, which allows one to manage long-running processes or one-shot tasks. User’s Shepherd is not an init process (PID 1), but almost all other information described in (veja Serviços de Shepherd) is applicable here too.
This is the service type that extensions target when they want to create shepherd services (veja Tipos de Service e Serviços, for an example). Each extension must pass a list of
<shepherd-service>. Its value must be ahome-shepherd-configuration, as described below.
- Tipo de dados: home-shepherd-configuration
This data type represents the Shepherd’s configuration.
shepherd (default:shepherd)The Shepherd package to use.
auto-start? (default:#t)Whether or not to start Shepherd on first login.
daemonize? (default:#t)Whether or not to run Shepherd in the background.
silent? (default:#t)When true, the
shepherdprocess does not write anything to standard output when started automatically.services (default:'())A list of
<shepherd-service>to start. You should probably use the service extension mechanism instead (veja Serviços de Shepherd).
The Shepherd also comes with a log rotation service, which compresses
and then deletes old log files produced by services and daemons that it
runs. This service is made available through
home-log-rotation-service-type as described below.
- Variável: home-log-rotation-service-type
This is the service type for the user Shepherd log rotation service (veja Log Rotation Service em The GNU Shepherd Manual). Its value must be a
log-rotation-configurationrecord, exactly as for its system-wide counterpart. Veja log-rotation-configuration, for its reference.This service is part of
%base-home-services.
- Variável: home-shepherd-transient-service-type
- Variável: home-shepherd-timer-service-type
These are the
timerandtransientShepherd services. The former lets you schedule command execution for later, while the latter can run commands in the background as a regular service.Veja the system
timerandtransientservices, which are their Guix System counterparts, for more info.
Próximo: GNU Privacy Guard, Anterior: Managing User Daemons, Acima: Serviços pessoais [Conteúdo][Índice]
13.3.6 Secure Shell
The OpenSSH package includes a client, the
ssh command, that allows you to connect to remote machines using
the SSH (secure shell) protocol. With the (gnu home services
ssh) module, you can set up OpenSSH so that it works in a predictable
fashion, almost independently of state on the local machine. To do that,
you instantiate home-openssh-service-type in your Home configuration,
as explained below.
- Variável: home-openssh-service-type
This is the type of the service to set up the OpenSSH client. It takes care of several things:
- providing a ~/.ssh/config file based on your configuration so that
sshknows about hosts you regularly connect to and their associated parameters; - providing a ~/.ssh/authorized_keys, which lists public keys that the
local SSH server,
sshd, may accept to connect to this user account; - optionally providing a ~/.ssh/known_hosts file so that ssh can authenticate hosts you connect to.
Here is an example of a service and its configuration that you could add to the
servicesfield of yourhome-environment:(service home-openssh-service-type (home-openssh-configuration (hosts (list (openssh-host (name "ci.guix.gnu.org") (user "charlie")) (openssh-host (name "chbouib") (host-name "chbouib.example.org") (user "supercharlie") (port 10022)))) (authorized-keys (list (local-file "alice.pub")))))The example above lists two hosts and their parameters. For instance, running
ssh chbouibwill automatically connect tochbouib.example.orgon port 10022, logging in as user ‘supercharlie’. Further, it marks the public key in alice.pub as authorized for incoming connections.The value associated with a
home-openssh-service-typeinstance must be ahome-openssh-configurationrecord, as describe below.- providing a ~/.ssh/config file based on your configuration so that
- Tipo de dados: home-openssh-configuration
This is the datatype representing the OpenSSH client and server configuration in one’s home environment. It contains the following fields:
hosts(default:'())A list of
openssh-hostrecords specifying host names and associated connection parameters (see below). This host list goes into ~/.ssh/config, whichsshreads at startup.known-hosts(default:*unspecified*)This must be either:
-
*unspecified*, in which casehome-openssh-service-typeleaves it up tosshand to the user to maintain the list of known hosts at ~/.ssh/known_hosts, or - a list of file-like objects, in which case those are concatenated and emitted as ~/.ssh/known_hosts.
The ~/.ssh/known_hosts contains a list of host name/host key pairs that allow
sshto authenticate hosts you connect to and to detect possible impersonation attacks. By default,sshupdates it in a TOFU, trust-on-first-use fashion, meaning that it records the host’s key in that file the first time you connect to it. This behavior is preserved whenknown-hostsis set to*unspecified*.If you instead provide a list of host keys upfront in the
known-hostsfield, your configuration becomes self-contained and stateless: it can be replicated elsewhere or at another point in time. Preparing this list can be relatively tedious though, which is why*unspecified*is kept as a default.-
authorized-keys(default:#false)The default
#falsevalue means: Leave any ~/.ssh/authorized_keys file alone. Otherwise, this must be a list of file-like objects, each of which containing an SSH public key that should be authorized to connect to this machine.Concretely, these files are concatenated and made available as ~/.ssh/authorized_keys. If an OpenSSH server,
sshd, is running on this machine, then it may take this file into account: this is whatsshddoes by default, but be aware that it can also be configured to ignore it.add-keys-to-agent(default:no)This string specifies whether keys should be automatically added to a running ssh-agent. If this option is set to
yesand a key is loaded from a file, the key and its passphrase are added to the agent with the default lifetime, as if byssh-add. If this option is set toask,sshwill require confirmation. If this option is set toconfirm, each use of the key must be confirmed. If this option is set tono, no keys are added to the agent. Alternately, this option may be specified as a time interval to specify the key’s lifetime inssh-agent, after which it will automatically be removed. The argument must beno,yes,confirm(optionally followed by a time interval),askor a time interval.
- Tipo de dados: openssh-host
Available
openssh-hostfields are:name(type: string)Name of this host declaration. A
openssh-hostmust define onlynameormatch-criteria. Use host-name\"*\"for top-level options.host-name(type: maybe-string)Host name—e.g.,
"foo.example.org"or"192.168.1.2".match-criteria(type: maybe-match-criteria)When specified, this string denotes the set of hosts to which the entry applies, superseding the
host-namefield. Its first element must be all or one ofssh-match-keywords. The rest of the elements are arguments for the keyword, or other criteria. Aopenssh-hostmust define onlynameormatch-criteria. Other host configuration options will apply to all hosts matchingmatch-criteria.address-family(type: maybe-address-family)Address family to use when connecting to this host: one of
AF_INET(for IPv4 only),AF_INET6(for IPv6 only). Additionally, the field can be left unset to allow any address family.identity-file(type: maybe-string)The identity file to use—e.g.,
"/home/charlie/.ssh/id_ed25519".port(type: maybe-natural-number)TCP port number to connect to.
user(type: maybe-string)User name on the remote host.
forward-x11?(type: maybe-boolean)Whether to forward remote client connections to the local X11 graphical display.
forward-x11-trusted?(type: maybe-boolean)Whether remote X11 clients have full access to the original X11 graphical display.
forward-agent?(type: maybe-boolean)Whether the authentication agent (if any) is forwarded to the remote machine.
compression?(type: maybe-boolean)Whether to compress data in transit.
proxy(type: maybe-proxy-command-or-jump-list)The command to use to connect to the server or a list of SSH hosts to jump through before connecting to the server. The field may be set to either a
proxy-commandor a list ofproxy-jumprecords.As an example, a
proxy-commandto connect via an HTTP proxy at 192.0.2.0 would be constructed with:(proxy-command "nc -X connect -x 192.0.2.0:8080 %h %p").- Tipo de dados: proxy-jump
Available
proxy-jumpfields are:user(type: maybe-string)User name on the remote host.
host-name(type: string)Host name—e.g.,
foo.example.orgor192.168.1.2.port(type: maybe-natural-number)TCP port number to connect to.
host-key-algorithms(type: maybe-string-list)The list of accepted host key algorithms—e.g.,
'("ssh-ed25519").accepted-key-types(type: maybe-string-list)The list of accepted user public key types.
extra-content(default:"") (type: raw-configuration-string)Extra content appended as-is to this
Hostblock in ~/.ssh/config.
The parcimonie service runs a daemon that slowly refreshes a GnuPG
public key from a keyserver. It refreshes one key at a time; between every
key update parcimonie sleeps a random amount of time, long enough for the
previously used Tor circuit to expire. This process is meant to make it
hard for an attacker to correlate the multiple key update.
As an example, here is how you would configure parcimonie to refresh
the keys in your GnuPG keyring, as well as those keyrings created by Guix,
such as when running guix import:
(service home-parcimonie-service-type
(home-parcimonie-configuration
(refresh-guix-keyrings? #t)))
This assumes that the Tor anonymous routing daemon is already running on
your system. On Guix System, this can be achieved by setting up
tor-service-type (veja tor-service-type).
The service reference is given below.
- Variável: parcimonie-service-type
This is the service type for
parcimonie(Parcimonie’s web site). Its value must be ahome-parcimonie-configuration, as shown below.
- Tipo de dados: home-parcimonie-configuration
Available
home-parcimonie-configurationfields are:parcimonie(default:parcimonie) (type: file-like)The parcimonie package to use.
verbose?(default:#f) (type: boolean)Whether to have more verbose logging from the service.
gnupg-already-torified?(default:#f) (type: boolean)Whether GnuPG is already configured to pass all traffic through Tor.
refresh-guix-keyrings?(default:#f) (type: boolean)Guix creates a few keyrings in the $XDG_CONFIG_DIR, such as when running
guix import(veja Invokingguix import). Setting this to#twill also refresh any keyrings which Guix has created.extra-content(default:#f) (type: raw-configuration-string)Raw content to add to the parcimonie command.
The OpenSSH package includes a daemon, the
ssh-agent command, that manages keys to connect to remote machines
using the SSH (secure shell) protocol. With the (gnu home
services ssh) service, you can configure the OpenSSH ssh-agent to run upon
login. Veja home-gpg-agent-service-type, for an
alternative to OpenSSH’s ssh-agent.
Here is an example of a service and its configuration that you could add to
the services field of your home-environment:
(service home-ssh-agent-service-type
(home-ssh-agent-configuration
(extra-options '("-t" "1h30m"))))
- Variável: home-ssh-agent-service-type
This is the type of the
ssh-agenthome service, whose value is ahome-ssh-agent-configurationobject.
- Tipo de dados: home-ssh-agent-configuration
Available
home-ssh-agent-configurationfields are:openssh(default:openssh) (type: file-like)The OpenSSH package to use.
socket-directory(default:XDG_RUNTIME_DIR/ssh-agent"The directory to write the ssh-agent’s socket file.
extra-options(default:'())Extra options will be passed to
ssh-agent, please runman ssh-agentfor more information.
Próximo: Desktop Home Services, Anterior: Secure Shell, Acima: Serviços pessoais [Conteúdo][Índice]
13.3.7 GNU Privacy Guard
The (gnu home services gnupg) module provides services that help you
set up the GNU Privacy Guard, also known as GnuPG or GPG, in your home
environment.
The gpg-agent service configures and sets up GPG’s agent, the program
that is responsible for managing OpenPGP private keys and, optionally,
OpenSSH (secure shell) private keys (veja Invoking GPG-AGENT em Using the GNU Privacy Guard).
As an example, here is how you would configure gpg-agent with SSH
support such that it uses the Emacs-based Pinentry interface when prompting
for a passphrase:
(service home-gpg-agent-service-type
(home-gpg-agent-configuration
(pinentry-program
(file-append pinentry-emacs "/bin/pinentry-emacs"))
(ssh-support? #t)))
The service reference is given below.
- Variável: home-gpg-agent-service-type
This is the service type for
gpg-agent(veja Invoking GPG-AGENT em Using the GNU Privacy Guard). Its value must be ahome-gpg-agent-configuration, as shown below.
- Tipo de dados: home-gpg-agent-configuration
Available
home-gpg-agent-configurationfields are:gnupg(default:gnupg) (type: file-like)The GnuPG package to use.
pinentry-program(type: file-like)Pinentry program to use. Pinentry is a small user interface that
gpg-agentdelegates to anytime it needs user input for a passphrase or PIN (personal identification number) (veja Using the PIN-Entry).ssh-support?(default:#f) (type: boolean)Whether to enable SSH (secure shell) support. When true,
gpg-agentacts as a drop-in replacement for OpenSSH’sssh-agentprogram, taking care of OpenSSH secret keys and directing passphrase requests to the chosen Pinentry program.default-cache-ttl(default:600) (type: integer)Time a cache entry is valid, in seconds.
max-cache-ttl(default:7200) (type: integer)Maximum time a cache entry is valid, in seconds. After this time a cache entry will be expired even if it has been accessed recently.
default-cache-ttl-ssh(default:1800) (type: integer)Time a cache entry for SSH keys is valid, in seconds.
max-cache-ttl-ssh(default:7200) (type: integer)Maximum time a cache entry for SSH keys is valid, in seconds.
extra-content(default:"") (type: raw-configuration-string)Raw content to add to the end of ~/.gnupg/gpg-agent.conf.
Próximo: Guix Home Services, Anterior: GNU Privacy Guard, Acima: Serviços pessoais [Conteúdo][Índice]
13.3.8 Desktop Home Services
The (gnu home services desktop) module provides services that you may
find useful on “desktop” systems running a graphical user environment such
as Xorg.
- Variável: home-x11-service-type
This is the service type representing the X Window graphical display server (also referred to as “X11”).
X Window is necessarily started by a system service; on Guix System, starting it is the responsibility of
gdm-service-typeand similar services (veja X Window). At the level of Guix Home, as an unprivileged user, we cannot start X Window; all we can do is check whether it is running. This is what this service does.As a user, you probably don’t need to worry or explicitly instantiate
home-x11-service-type. Services that require an X Window graphical display, such ashome-redshift-service-typebelow, instantiate it and depend on its correspondingx11-displayShepherd service (veja Managing User Daemons).When X Window is running, the
x11-displayShepherd service starts and sets theDISPLAYenvironment variable of theshepherdprocess, using its original value if it was already set; otherwise, it fails to start.The service can also be forced to use a given value for
DISPLAY, like so:herd start x11-display :3
In the example above,
x11-displayis instructed to setDISPLAYto:3.
- Variável: home-redshift-service-type
This is the service type for Redshift, a program that adjusts the display color temperature according to the time of day. Its associated value must be a
home-redshift-configurationrecord, as shown below.A typical configuration, where we manually specify the latitude and longitude, might look like this:
(service home-redshift-service-type (home-redshift-configuration (location-provider 'manual) (latitude 35.81) ;northern hemisphere (longitude -0.80))) ;west of Greenwich
- Tipo de dados: home-redshift-configuration
Available
home-redshift-configurationfields are:redshift(default:redshift) (type: file-like)Redshift package to use.
location-provider(default:geoclue2) (type: symbol)Geolocation provider—
'manualor'geoclue2. In the former case, you must also specify thelatitudeandlongitudefields so Redshift can determine daytime at your place. In the latter case, the Geoclue system service must be running; it will be queried for location information.adjustment-method(default:randr) (type: symbol)Color adjustment method.
daytime-temperature(default:6500) (type: integer)Daytime color temperature (kelvins).
nighttime-temperature(default:4500) (type: integer)Nighttime color temperature (kelvins).
daytime-brightness(type: maybe-inexact-number)Daytime screen brightness, between 0.1 and 1.0, or left unspecified.
nighttime-brightness(type: maybe-inexact-number)Nighttime screen brightness, between 0.1 and 1.0, or left unspecified.
latitude(type: maybe-inexact-number)Latitude, when
location-provideris'manual.longitude(type: maybe-inexact-number)Longitude, when
location-provideris'manual.dawn-time(type: maybe-string)Custom time for the transition from night to day in the morning—
"HH:MM"format. When specified, solar elevation is not used to determine the daytime/nighttime period.dusk-time(type: maybe-string)Likewise, custom time for the transition from day to night in the evening.
extra-content(default:"") (type: raw-configuration-string)Extra content appended as-is to the Redshift configuration file. Run
man redshiftfor more information about the configuration file format.
- Variável: home-dbus-service-type
This is the service type for running a session-specific D-Bus, for unprivileged applications that require D-Bus to be running.
- Tipo de dados: home-dbus-configuration
The configuration record for
home-dbus-service-type.dbus(default:dbus)The package providing the
/bin/dbus-daemoncommand.
- Variável: home-unclutter-service-type
This is the service type for Unclutter, a program that runs on the background of an X11 session and detects when the X pointer hasn’t moved for a specified idle timeout, after which it hides the cursor so that you can focus on the text underneath. Its associated value must be a
home-unclutter-configurationrecord, as shown below.A typical configuration, where we manually specify the idle timeout (in seconds), might look like this:
(service home-unclutter-service-type (home-unclutter-configuration (idle-timeout 2)))
- Tipo de dados: home-unclutter-configuration
The configuration record for
home-unclutter-service-type.unclutter(default:unclutter) (type: file-like)Unclutter package to use.
idle-timeout(default:5) (type: integer)A timeout in seconds after which to hide cursor.
- Variável: home-xmodmap-service-type
This is the service type for the xmodmap utility to modify keymaps and pointer button mappings under the Xorg display server. Its associated value must be a
home-xmodmap-configurationrecord, as shown below.The
key-mapfield takes a list of objects, each of which is either a statement (a string) or an assignment (a pair of strings). As an example, the snippet below swaps around the Caps_Lock and the Control_L keys, by first removing the keysyms (on the right-hand side) from the corresponding modifier maps (on the left-hand side), re-assigning them by swapping each other out, and finally adding back the keysyms to the modifier maps.(service home-xmodmap-service-type (home-xmodmap-configuration (key-map '(("remove Lock" . "Caps_Lock") ("remove Control" . "Control_L") ("keysym Control_L" . "Caps_Lock") ("keysym Caps_Lock" . "Control_L") ("add Lock" . "Caps_Lock") ("add Control" . "Control_L")))))
- Tipo de dados: home-xmodmap-configuration
The configuration record for
home-xmodmap-service-type. Its available fields are:xmodmap(default:xmodmap) (type: file-like)The
xmodmappackage to use.key-map(default:'()) (type: list)The list of expressions to be read by
xmodmapon service startup.
- Variável: home-startx-command-service-type
Add
startxto the home profile putting it ontoPATH.The value for this service is a
<xorg-configuration>object which is passed to thexorg-start-command-xinitprocedure producing thestartxused. Default value is(xorg-configuration).
Próximo: Fonts Home Services, Anterior: Desktop Home Services, Acima: Serviços pessoais [Conteúdo][Índice]
13.3.9 Guix Home Services
The (gnu home services guix) module provides services for
user-specific Guix configuration.
- Variável: home-channels-service-type
This is the service type for managing $XDG_CONFIG_HOME/guix/channels.scm, the file that controls the channels received on
guix pull(veja Canais). Its associated value is a list ofchannelrecords, defined in the(guix channels)module.Generally, it is better to extend this service than to directly configure it, as its default value is the default guix channel(s) defined by
%default-channels. If you configure this service directly, be sure to include a guix channel. Veja Especificando canais adicionais and Usando um canal Guix personalizado for more details.A typical extension for adding a channel might look like this:
(simple-service 'variant-packages-service home-channels-service-type (list (channel (name 'variant-packages) (url "https://example.org/variant-packages.git"))))
Próximo: Sound Home Services, Anterior: Guix Home Services, Acima: Serviços pessoais [Conteúdo][Índice]
13.3.10 Fonts Home Services
The (gnu home services fontutils) module provides services for
user-specific Fontconfig setup. The
Fontconfig
library is used by many applications to access fonts on the system.
- Variável: home-fontconfig-service-type
This is the service type for generating configurations for Fontconfig. Its associated value is a list of either strings (or gexps) pointing to fonts locations, or SXML (veja SXML em GNU Guile Reference Manual) fragments to be converted into XML and put inside the main
fontconfignode.Generally, it is better to extend this service than to directly configure it, as its default value is the default Guix Home’s profile font installation path (~/.guix-home/profile/share/fonts). If you configure this service directly, be sure to include the above directory.
Here’s how you’d extend it to include fonts installed with the Nix package manager, and to prefer your favourite monospace font:
(simple-service 'additional-fonts-service home-fontconfig-service-type (list "~/.nix-profile/share/fonts" '(alias (family "monospace") (prefer (family "Liberation Mono")))))
Próximo: Mail Home Services, Anterior: Fonts Home Services, Acima: Serviços pessoais [Conteúdo][Índice]
13.3.11 Sound Home Services
The (gnu home services sound) module provides services related to
sound support.
PulseAudio RTP Streaming Services
The following services dynamically reconfigure the
PulseAudio sound server: they let you toggle
broadcast of audio output over the network using the RTP (real-time
transport protocol) and, correspondingly, playback of sound received over
RTP. Once home-pulseaudio-rtp-sink-service-type is among your home
services, you can start broadcasting audio output by running this command:
herd start pulseaudio-rtp-sink
You can then run a PulseAudio-capable mixer, such as pavucontrol or
pulsemixer (both from the same-named package) to control which audio
stream(s) should be sent to the RTP “sink”.
By default, audio is broadcasted to a multicast address: any device on the LAN (local area network) receives it and may play it. Using multicast in this way puts a lot of pressure on the network and degrades its performance, so you may instead prefer sending to specifically one device. The first way to do that is by specifying the IP address of the target device when starting the service:
herd start pulseaudio-rtp-sink 192.168.1.42
The other option is to specify this IP address as the one to use by default in your home environment configuration:
(service home-pulseaudio-rtp-sink-service-type
"192.168.1.42")
On the device where you intend to receive and play the RTP stream, you can
use home-pulseaudio-rtp-source-service-type, like so:
(service home-pulseaudio-rtp-source-service-type)
This will then let you start the receiving module for PulseAudio:
herd start pulseaudio-rtp-source
Again, by default it will listen on the multicast address. If, instead, you’d like it to listen for direct incoming connections, you can do that by running:
(service home-pulseaudio-rtp-source-service-type
"0.0.0.0")
The reference of these services is given below.
- Variável: home-pulseaudio-rtp-sink-service-type
- Variável: home-pulseaudio-rtp-source-service-type
This is the type of the service to send, respectively receive, audio streams over RTP (real-time transport protocol).
The value associated with this service is the IP address (a string) where to send, respectively receive, the audio stream. By default, audio is sent/received on multicast address
%pulseaudio-rtp-multicast-address.This service defines one Shepherd service:
pulseaudio-rtp-sink, respectivelypulseaudio-rtp-source. The service is not started by default, so you have to explicitly start it when you want to turn it on, as in this example:herd start pulseaudio-rtp-sink
Stopping the Shepherd service turns off broadcasting.
- Variável: %pulseaudio-rtp-multicast-address
This is the multicast address used by default by the two services above.
PipeWire Home Service
PipeWire provides a low-latency, graph-based audio and video processing service. In addition to its native protocol, it can also be used as a replacement for both JACK and PulseAudio.
While PipeWire provides the media processing and API, it does not, directly,
know about devices such as sound cards, nor how you might want to connect
applications, hardware, and media processing filters. Instead, PipeWire
relies on a session manager to specify all these relationships. While
you may use any session manager you wish, for most people the
WirePlumber
session manager, a reference implementation provided by the PipeWire project
itself, suffices, and that is the one home-pipewire-service-type
uses.
PipeWire can be used as a replacement for PulseAudio by setting
enable-pulseaudio? to #t in
home-pipewire-configuration, so that existing PulseAudio clients may
use it without any further configuration.
In addition, JACK clients may connect to PipeWire by using the
pw-jack program, which comes with PipeWire. Simply prefix the
command with pw-jack when you run it, and audio data should go
through PipeWire:
pw-jack mpv -ao=jack sound-file.wav
For more information on PulseAudio emulation, see https://gitlab.freedesktop.org/pipewire/pipewire/-/wikis/Config-PulseAudio, for JACK, see https://gitlab.freedesktop.org/pipewire/pipewire/-/wikis/Config-JACK.
As PipeWire does not use dbus to start its services on demand (as
PulseAudio does), home-pipewire-service-type uses Shepherd to start
services when logged in, provisioning the pipewire,
wireplumber, and, if configured, pipewire-pulseaudio
services. Veja Managing User Daemons.
- Variável: home-pipewire-service-type
This provides the service definition for
pipewire, which will run on login. Its value is ahome-pipewire-configurationobject.To start the service, add it to the
servicefield of yourhome-environment, such as:(service home-pipewire-service-type)
- Tipo de dados: home-pipewire-configuration
Available
home-pipewire-configurationfields are:pipewire(default:pipewire) (type: file-like)The PipeWire package to use.
wireplumber(default:wireplumber) (type: file-like)The WirePlumber package to use.
enable-pulseaudio?(default:#t) (type: boolean)When true, enable PipeWire’s PulseAudio emulation support, allowing PulseAudio clients to use PipeWire transparently.
extra-content(default:"") (type: string)Extra content to add to the end of ~/.config/alsa/asoundrc.
Próximo: Messaging Home Services, Anterior: Sound Home Services, Acima: Serviços pessoais [Conteúdo][Índice]
13.3.12 Mail Home Services
The (gnu home services mail) module provides services that help you
set up the tools to work with emails in your home environment.
MSMTP is a SMTP (Simple Mail Transfer Protocol) client. It sends mail to a predefined SMTP server that takes care of proper delivery.
The service reference is given below.
- Variável: home-msmtp-service-type
This is the service type for
msmtp. Its value must be ahome-msmtp-configuration, as shown below. It provides the ~/.config/msmtp/config file.As an example, here is how you would configure
msmtpfor a single account:(service home-msmtp-service-type (home-msmtp-configuration (accounts (list (msmtp-account (name "alice") (configuration (msmtp-configuration (host "mail.example.org") (port 587) (user "alice") (password-eval "pass Mail/alice"))))))))
- Tipo de dados: home-msmtp-configuration
Available
home-msmtp-configurationfields are:defaults(type: msmtp-configuration)The configuration that will be set as default for all accounts.
accounts(default:'()) (type: list-of-msmtp-accounts)A list of
msmtp-accountrecords which contain information about all your accounts.default-account(type: maybe-string)Set the default account.
extra-content(default:"") (type: string)Extra content appended as-is to the configuration file. Run
man msmtpfor more information about the configuration file format.
- Tipo de dados: msmtp-account
Available
msmtp-accountfields are:name(type: string)The unique name of the account.
configuration(type: msmtp-configuration)The configuration for this given account.
- Tipo de dados: msmtp-configuration
Available
msmtp-configurationfields are:auth?(type: maybe-boolean)Enable or disable authentication.
tls?(type: maybe-boolean)Enable or disable TLS (also known as SSL) for secured connections.
tls-starttls?(type: maybe-boolean)Choose the TLS variant: start TLS from within the session (‘on’, default), or tunnel the session through TLS (‘off’).
tls-trust-file(type: maybe-string)Activate server certificate verification using a list of trusted Certification Authorities (CAs).
log-file(type: maybe-string)Enable logging to the specified file. An empty argument disables logging. The file name ‘-’ directs the log information to standard output.
host(type: maybe-string)The SMTP server to send the mail to.
port(type: maybe-integer)The port that the SMTP server listens on. The default is 25 ("smtp"), unless TLS without STARTTLS is used, in which case it is 465 ("smtps").
user(type: maybe-string)Set the user name for authentication.
from(type: maybe-string)Set the envelope-from address.
password-eval(type: maybe-string)Set the password for authentication to the output (stdout) of the command cmd.
extra-content(default:"") (type: string)Extra content appended as-is to the configuration block. Run
man msmtpfor more information about the configuration file format.
Próximo: Media Home Services, Anterior: Mail Home Services, Acima: Serviços pessoais [Conteúdo][Índice]
13.3.13 Messaging Home Services
The ZNC bouncer can be run as a daemon to manage your
IRC presence. With the (gnu home services messaging) service, you
can configure ZNC to run upon login.
You will have to provide a ~/.znc/configs/znc.conf separately.
Here is an example of a service and its configuration that you could add to
the services field of your home-environment:
(service home-znc-service-type)
- Variável: home-znc-service-type
This is the type of the ZNC home service, whose value is a
home-znc-configurationobject.
- Tipo de dados: home-znc-configuration
Available
home-znc-configurationfields are:znc(default:znc) (type: file-like)The ZNC package to use.
extra-options(default:'())Extra options will be passed to
znc, please runman zncfor more information.
Próximo: Gerenciador de janelas Sway, Anterior: Messaging Home Services, Acima: Serviços pessoais [Conteúdo][Índice]
13.3.14 Media Home Services
The Kodi media center can be run as a daemon on a
media server. With the (gnu home services kodi) service, you can
configure Kodi to run upon login.
Here is an example of a service and its configuration that you could add to
the services field of your home-environment:
(service home-kodi-service-type
(home-kodi-configuration
(extra-options '("--settings="<settings-file>"))))
- Variável: home-kodi-service-type
This is the type of the Kodi home service, whose value is a
home-kodi-configurationobject.
- Tipo de dados: home-kodi-configuration
Available
home-kodi-configurationfields are:kodi(default:kodi) (type: file-like)The Kodi package to use.
extra-options(default:'())Extra options will be passed to
kodi, please runman kodifor more information.
Próximo: Networking Home Services, Anterior: Media Home Services, Acima: Serviços pessoais [Conteúdo][Índice]
13.3.15 Gerenciador de janelas Sway
The (gnu home services sway) module provides
home-sway-service-type, a home service to configure the
Sway window manager for Wayland in a
declarative way.
Here is an example of a service and its configuration that you could add to
the services field of your home-environment:
(service home-sway-service-type
(sway-configuration
(gestures
'((swipe:3:down . "move to scratchpad")
(swipe:3:up . "scratchpad show")))
(outputs
(list (sway-output
(identifier '*)
(background (file-append sway
"\
/share/backgrounds/sway/Sway_Wallpaper_Blue_1920x1080.png")))))))
The above example describes a Sway configuration in which
- all monitors use a particular wallpaper whose .png is provided by the
swaypackage; - swiping down (resp. up) with three fingers moves the active window to the scratchpad (resp. shows/hides the scratchpad).
Nota: This home service only sets up the configuration file and profile packages for Sway. It does not start Sway in any way. If you want to do so, you might be interested in using
greetd-wlgreet-sway-sessioninstead.The procedure
sway-configuration->filedefined below can be used to provide the value for the optionalsway-configurationfield ofgreetd-wlgreet-sway-session.
- Procedure: sway-configuration->file config
This procedure takes one argument
config, which must be asway-configurationrecord (defined below), and returns a file-like object representing the serialized configuration.
- Variável: home-sway-service-type
This is a home service type to set up Sway. It takes care of:
- providing a ~/.config/sway/config file,
- adding Sway-related packages to your profile.
- Tipo de dados: sway-configuration
This configuration record describes the Sway configuration (see sway(5)). Available fields are:
variables(default:%sway-default-variables)The value of this field is an association list in which keys are symbols and values are either strings, G-expressions or file-like objects (veja Expressões-G).
Exemplo:
(variables `((mod . "Mod4") ; string (term ; file-append . ,(file-append foot "/bin/foot")) (Term ; G-expression . ,#~(string-append #$foot "/bin/foot"))))Nota: Default keybindings assume the existence of variables named
$mod,$left,$right,$upand$down. If you choose not to define these variables, make sure to remove keybindings referring to them.keybindings(default:%sway-default-keybindings)This field describes keybindings for the default mode. The value is an association list: keys are symbols and values are either strings or G-expressions.
The following snippet launches the terminal when pressing $mod+t and $mod+Shift+t (assuming that a variable
$termis defined):`(($mod+t . ,#~(string-append "exec " #$foot "/bin/foot")) ($mod+Shift+t . "exec $term"))
gestures(default:%sway-default-gestures)Similar to the previous field, but for finger-gestures.
The following snippet allows to navigate through workspaces by swiping right and left with three fingers:
'((swipe:3:right . "workspace next_on_output") (swipe:3:left . "workspace prev_on_output"))
packages(default:%sway-default-packages)This field describes a list of packages to add to the user profile. At the moment, the default value only adds
swayto the profile.inputs(padrão:'())List of
sway-inputconfiguration records (described below).outputs(default:'())List of
sway-outputconfiguration records (described below).bar(optionalsway-barrecord)Optional
sway-barrecord (described below) to configure a Sway bar.modes(default:%sway-default-modes)List of
sway-moderecords (described below) to add modes to the Sway configuration. The default value%sway-default-modesadds the “resize” mode of the default Sway configuration (as described below).startup+reload-programs(default:'())Programs to execute at startup time and after every configuration reload. The value of this field is a list of strings, G-expressions or file-like objects (veja Expressões-G).
startup-programs(default:%sway-default-startup-programs)Programs to execute at startup time. As above, values of this field are a list of strings, G-expressions or file-like objects.
The default value,
%sway-default-startup-programs, executesswayidlein order to lock the screen after 5 minutes of inactivity (displaying a background distributed with Sway) and turn the screen off after 10 minutes of inactivity.extra-content(default:'())Lines to add to the configuration file. The value of this field is a list of strings or G-expressions.
- Tipo de dados: sway-input
sway-inputrecords describe input blocks (see sway-input(5)). For example, the following snippet makes all keyboards use a French layout, in which capslock has been remapped to ctrl:(sway-input (identifier "type:keyboard") (layout (keyboard-layout "fr" #:options '("ctrl:nocaps"))))Available fields for
sway-inputconfiguration records are:identifier(default:'*)Identifier of the input. The field accepts symbols and strings. If the
identifieris a symbol, it is inserted as is; if it is a string, it will be quoted in the configuration file.layout(optional<keyboard-layout>record)Keyboard specific option. Field specifying the layout to use for the input. The value must be a
<keyboard-layout>record (veja Disposição do teclado).Nota:
(gnu home services sway)does not re-export thekeyboard-layoutprocedure.disable-while-typing(optional boolean)If
#t(resp.#f) enables (resp. disables) the “disable while typing” option for this input.disable-while-trackpointing(optional boolean)If
#t(resp.#f), enables (resp. disables) the “disable while track-pointing” option for this input.tap(optional boolean)Enables or disables the “tap” option, which allows clicking by tapping on a touchpad.
extra-content(default:'())Lines to add to the input block. The value of this field must a list whose elements are either strings or G-expressions.
- Tipo de dados: sway-output
sway-outputrecords describe Sway outputs (see sway-output(5)). Available fields are:identifier(default:'*)Identifier of the monitor. The field accepts symbols and strings. If the
identifieris a symbol, it is inserted as is; if it is a string, it will be quoted in the configuration file.resolution(optional string)This string defines the resolution of the monitor.
position(optional)The (optional) value of this field must be a
point. Example:(position (point (x 1920) (y 0)))background(optional)The value of this field describes what wallpaper to use on this output. The field accepts the following types of values:
- a string,
- a G-expression,
- a file-like object,
- a pair. The first argument of this pair must be a string, a G-expression or
a file-like object. The second element describes how the wallpaper will be
displayed. It must be a symbol among
stretch,fill,fit,centerandtile.If the second element is not specified (i.e. when the value is not a pair), the
fillmode will be used.
Nota: In order to use an SVG file, you must have
librsvgin your profile (e.g. by adding it in thepackagesfield ofsway-configuration).extra-content(default:'())List defining additional lines to add to the output configuration block. Elements of the list must be either strings or G-expressions.
- Tipo de dados: sway-border-color
borderColor of the border.
backgroundColor of the background.
textColor of the text.
- Tipo de dados: sway-color
background(optional string)Background color of the bar.
statusline(optional string)Text color of the status line.
focused-background(optional string)Background color of the bar on the currently focused monitor.
focused-statusline(optional string)Text color of the statusline on the currently focused monitor.
focused-workspace(optionalsway-border-color)Color scheme for focused workspaces.
active-workspace(optionalsway-border-color)Color scheme for active workspaces.
inactive-workspace(optionalsway-border-color)Color scheme for inactive workspaces.
urgent-workspace(optionalsway-border-color)Color scheme for workspaces containing “urgent windows”.
binding-mode(optionalsway-border-color)Color scheme for the binding mode indicator.
- Tipo de dados: sway-bar
Describes the Sway bar (see sway-bar(5)).
identifier(default:'bar0)Identifier of the bar. The value must be a symbol.
position(optional)Specify the position of the bar. Accepted values are
'topor'bottom.hidden-state(optional)Specify the appearance of the bar when it is hidden. Accepted values are
'hideor'show.binding-mode-indicator(optional)Boolean enabling or disabling the binding mode indicator.
colors(optional)An optional
sway-colorconfiguration record.status-command(optional)This field accept strings, G-expressions and executable file-like values. The default value is a command (string) that prints the date and time every second.
Each line printed on
stdoutby this command (or script) will be displayed on the status area of the bar.Below are a few examples using:
- a string:
"while date +'%Y-%m-%d %X'; do sleep 1; done", - a G-exp:
#~(string-append "while " #$coreutils "/bin/date" " +'%Y-%m-%d %X'; do sleep 1; done")
- an executable file:
(program-file "sway-bar-status" #~(begin (use-modules (ice-9 format) (srfi srfi-19)) (let loop () (let* ((date (date->string (current-date) "~d/~m/~Y (~a) • ~H:~M:~S"))) (format #t "~a~%~!" date) (sleep 1) (loop)))))
- a string:
mouse-bindings(default:'())This field accepts an associative list. Keys are integers describing mouse events. Values can either be strings or G-expressions.
The module
(gnu home services sway)exports constants%ev-code-mouse-left,%ev-code-mouse-rightand%ev-code-mouse-scroll-clickwhose values are integers corresponding to left, right and scroll click respectively. For example, with(mouse-bindings `((,%ev-code-mouse-left . "exec $term"))), left clicks in the status bar open the terminal (assuming that the variable$termis bound to a terminal).
- Tipo de dados: sway-mode
Describes a Sway mode (see sway(5)). For example, the following snippet defines the resize mode of the default Sway configuration:
(sway-mode (mode-name "resize") (keybindings '(($left . "resize shrink width 10px") ($right . "resize grow width 10px") ($down . "resize grow height 10px") ($up . "resize shrink height 10px") (Left . "resize shrink width 10px") (Right . "resize grow width 10px") (Down . "resize grow height 10px") (Up . "resize shrink height 10px") (Return . "mode \"default\"") (Escape . "mode \"default\""))))mode-name(default:"default")Name of the mode. This field accepts strings.
keybindings(default:'())This field describes keybindings. The value is an association list: keys are symbols and values are either strings or G-expressions, as above.
mouse-bindings(default:'())Ditto, but keys are mouse events (integers). Constants
%ev-code-mouse-*described above can be used as helpers to define mouse bindings.
Próximo: Miscellaneous Home Services, Anterior: Gerenciador de janelas Sway, Acima: Serviços pessoais [Conteúdo][Índice]
13.3.16 Networking Home Services
This section lists services somewhat networking-related that you may use with Guix Home.
The (gnu home services syncthing) module provides a service to set up
the https://syncthing.net continuous file backup service.
- Variável: home-syncthing-service-type
This is the service type for the
syncthingdaemon; it is the Home counterpart of thesyncthing-service-typesystem service (vejasyncthing-service-type). The value for this service type is asyncthing-configuration.Here is how you would set it up with the default configuration:
(service home-syncthing-service-type)For a custom configuration, wrap you
syncthing-configurationinfor-home, as in this example:(service home-syncthing-service-type (for-home (syncthing-configuration (logflags 5))))For details about
syncthing-configuration, check out the documentation of the system service (vejasyncthing-service-type).
Anterior: Networking Home Services, Acima: Serviços pessoais [Conteúdo][Índice]
13.3.17 Miscellaneous Home Services
This section lists Home services that lack a better place.
Beets Service
The (gnu home services music) module provides the following service:
- Variável: home-beets-service-type
Beets is a music file and metadata manager that can be used via its command-line interface,
beet. Beets requires a YAML configuration file and this Guix Home service is to create such file.
The service can be used as follows:
(service home-beets-service-type
(home-beets-configuration (directory "/home/alice/music")))
Additional options can be specified via the service wild-card field
extra-options:
(service home-beets-service-type
(home-beets-configuration
(directory "/home/alice/music")
(extra-options '("
import:
move: yes"))))
Dictionary Service
The (gnu home services dict) module provides the following service:
- Variável: home-dicod-service-type
This is the type of the service that runs the
dicoddaemon, an implementation of DICT server (veja Dicod em GNU Dico Manual).You can add
open localhostto your ~/.dico file to makelocalhostthe default server fordicoclient (veja Initialization File em GNU Dico Manual).
This service is a direct mapping of the dicod-service-type system
service (veja Dictionary Service). You can use
it like this:
(service home-dicod-service-type)
You may specify a custom configuration by providing a
dicod-configuration record, exactly like for
dicod-service-type, but wrapping it in for-home:
(service home-dicod-service-type
(for-home
(dicod-configuration …)))
Anterior: Serviços pessoais, Acima: Home Configuration [Conteúdo][Índice]
13.4 Invoking guix home
Once you have written a home environment declaration (veja Declarando o ambiente pessoal, it can be instantiated using the guix
home command. The synopsis is:
guix home options… action file
file must be the name of a file containing a home-environment
declaration. action specifies how the home environment is
instantiated, but there are few auxiliary actions which don’t instantiate
it. Currently the following values are supported:
searchDisplay available home service type definitions that match the given regular expressions, sorted by relevance:
$ guix home search shell name: home-shell-profile location: gnu/home/services/shells.scm:100:2 extends: home-files description: Create `~/.profile', which is used for environment initialization of POSIX compliant login shells. + This service type can be extended with a list of file-like objects. relevance: 6 name: home-fish location: gnu/home/services/shells.scm:640:2 extends: home-files home-profile description: Install and configure Fish, the friendly interactive shell. relevance: 3 name: home-zsh location: gnu/home/services/shells.scm:290:2 extends: home-files home-profile description: Install and configure Zsh. relevance: 1 name: home-bash location: gnu/home/services/shells.scm:508:2 extends: home-files home-profile description: Install and configure GNU Bash. relevance: 1 …
As for
guix search, the result is written inrecutilsformat, which makes it easy to filter the output (veja GNU recutils databases em GNU recutils manual).containerSpawn a shell in an isolated environment—a container—containing your home as specified by file.
For example, this is how you would start an interactive shell in a container with your home:
guix home container config.scm
This is a throw-away container where you can lightheartedly fiddle with files; any changes made within the container, any process started—all this disappears as soon as you exit that shell.
As with
guix shell, several options control that container:- --network
- -N
Enable networking within the container (it is disabled by default).
- --expose=fonte[=alvo]
- --share=fonte[=alvo]
As with
guix shell, make directory source of the host system available as target inside the container—read-only if you pass --expose, and writable if you pass --share (veja --expose and --share).
Additionally, you can run a command in that container, instead of spawning an interactive shell. For instance, here is how you would check which Shepherd services are started in a throw-away home container:
guix home container config.scm -- herd status
The command to run in the container must come after
--(double hyphen).editEdit or view the definition of the given Home service types.
For example, the command below opens your editor, as specified by the
EDITORenvironment variable, on the definition of thehome-mcronservice type:guix home edit home-mcron
reconfigureBuild the home environment described in file, and switch to it. Switching means that the activation script will be evaluated and (in basic scenario) symlinks to configuration files generated from
home-environmentdeclaration will be created in ~. If the file with the same path already exists in home folder it will be moved to ~/timestamp-guix-home-legacy-configs-backup, where timestamp is a current UNIX epoch time.Nota: It is highly recommended to run
guix pullonce before you runguix home reconfigurefor the first time (veja Invocandoguix pull).This effects all the configuration specified in file. The command starts Shepherd services specified in file that are not currently running; if a service is currently running, this command will arrange for it to be upgraded the next time it is stopped (e.g. by
herd stop serviceorherd restart service).This command creates a new generation whose number is one greater than the current generation (as reported by
guix home list-generations). If that generation already exists, it will be overwritten. This behavior mirrors that ofguix package(veja Invocandoguix package).Upon completion, the new home is deployed under ~/.guix-home. This directory contains provenance meta-data: the list of channels in use (veja Canais) and file itself, when available. You can view the provenance information by running:
guix home describe
This information is useful should you later want to inspect how this particular generation was built. In fact, assuming file is self-contained, you can later rebuild generation n of your home environment with:
guix time-machine \ -C /var/guix/profiles/per-user/USER/guix-home-n-link/channels.scm -- \ home reconfigure \ /var/guix/profiles/per-user/USER/guix-home-n-link/configuration.scm
You can think of it as some sort of built-in version control! Your home is not just a binary artifact: it carries its own source.
Nota: If you’re using Guix System,
guix-home-service-type, on how to embed your home configuration in your system configuration such thatguix system reconfiguredeploys both your system and your home.switch-generation¶Switch to an existing home generation. This action atomically switches the home profile to the specified home generation.
The target generation can be specified explicitly by its generation number. For example, the following invocation would switch to home generation 7:
guix home switch-generation 7
The target generation can also be specified relative to the current generation with the form
+Nor-N, where+3means “3 generations ahead of the current generation,” and-1means “1 generation prior to the current generation.” When specifying a negative value such as-1, you must precede it with--to prevent it from being parsed as an option. For example:guix home switch-generation -- -1
This action will fail if the specified generation does not exist.
roll-back¶Switch to the preceding home generation. This is the inverse of
reconfigure, and it is exactly the same as invokingswitch-generationwith an argument of-1.delete-generations¶-
Delete home generations, making them candidates for garbage collection (veja Invocando
guix gc, for information on how to run the “garbage collector”).This works in the same way as ‘guix package --delete-generations’ (veja --delete-generations). With no arguments, all home generations but the current one are deleted:
guix home delete-generations
You can also select the generations you want to delete. The example below deletes all the home generations that are more than two months old:
guix home delete-generations 2m
buildBuild the derivation of the home environment, which includes all the configuration files and programs needed. This action does not actually install anything.
describeDescribe the current home generation: its file name, as well as provenance information when available.
To show installed packages in the current home generation’s profile, the
--list-installedflag is provided, with the same syntax that is used inguix package --list-installed(veja Invocandoguix package). For instance, the following command shows a table of all the packages with “emacs” in their name that are installed in the current home generation’s profile:guix home describe --list-installed=emacs
list-generationsList a summary of each generation of the home environment available on disk, in a human-readable way. This is similar to the --list-generations option of
guix package(veja Invocandoguix package).Optionally, one can specify a pattern, with the same syntax that is used in
guix package --list-generations, to restrict the list of generations displayed. For instance, the following command displays generations that are up to 10 days old:guix home list-generations 10d
The
--list-installedflag may also be specified, with the same syntax that is used inguix home describe. This may be helpful if trying to determine when a package was added to the home profile.importGenerate a home environment from the packages in the default profile and configuration files found in the user’s home directory. The configuration files will be copied to the specified directory, and a home-configuration.scm will be populated with the home environment. Note that not every home service that exists is supported (veja Serviços pessoais).
$ guix home import ~/guix-config guix home: '/home/alice/guix-config' populated with all the Home configuration files
And there’s more! guix home also provides the following
sub-commands to visualize how the services of your home environment relate
to one another:
extension-graphEmit to standard output the service extension graph of the home environment defined in file (veja Composição de serviço, for more information on service extensions). By default the output is in Dot/Graphviz format, but you can choose a different format with --graph-backend, as with
guix graph(veja --backend):O comando:
guix home extension-graph file | xdot -
shows the extension relations among services.
shepherd-graphEmit to standard output the dependency graph of shepherd services of the home environment defined in file. Veja Serviços de Shepherd, for more information and for an example graph.
Again, the default output format is Dot/Graphviz, but you can pass --graph-backend to select a different one.
options can contain any of the common build options (veja Opções de compilação comuns). In addition, options can contain one of the following:
- --expression=expr
- -e expr
Consider the home-environment expr evaluates to. This is an alternative to specifying a file which evaluates to a home environment.
- --allow-downgrades
Instruct
guix home reconfigureto allow system downgrades.Just like
guix system,guix home reconfigure, by default, prevents you from downgrading your home to older or unrelated revisions compared to the channel revisions that were used to deploy it—those shown byguix home describe. Using --allow-downgrades allows you to bypass that check, at the risk of downgrading your home—be careful!
Próximo: Plataformas, Anterior: Home Configuration, Acima: GNU Guix [Conteúdo][Índice]
14 Documentação
In most cases packages installed with Guix come with documentation. There
are two main documentation formats: “Info”, a browsable hypertext format
used for GNU software, and “manual pages” (or “man pages”), the linear
documentation format traditionally found on Unix. Info manuals are accessed
with the info command or with Emacs, and man pages are accessed
using man.
You can look for documentation of software installed on your system by keyword. For example, the following command searches for information about “TLS” in Info manuals:
$ info -k TLS "(emacs)Network Security" -- STARTTLS "(emacs)Network Security" -- TLS "(gnutls)Core TLS API" -- gnutls_certificate_set_verify_flags "(gnutls)Core TLS API" -- gnutls_certificate_set_verify_function …
The command below searches for the same keyword in man pages39:
$ man -k TLS SSL (7) - OpenSSL SSL/TLS library certtool (1) - GnuTLS certificate tool …
These searches are purely local to your computer so you have the guarantee that documentation you find corresponds to what you have actually installed, you can access it off-line, and your privacy is respected.
Once you have these results, you can view the relevant documentation by running, say:
$ info "(gnutls)Core TLS API"
or:
$ man certtool
Info manuals contain sections and indices as well as hyperlinks like those
found in Web pages. The info reader (veja Info reader em Stand-alone GNU Info) and its Emacs counterpart (veja Misc
Help em The GNU Emacs Manual) provide intuitive key bindings to
navigate manuals. Veja Getting Started em Info: An Introduction,
for an introduction to Info navigation.
Próximo: Criando imagens do sistema, Anterior: Documentação, Acima: GNU Guix [Conteúdo][Índice]
15 Plataformas
The packages and systems built by Guix are intended, like most computer
programs, to run on a CPU with a specific instruction set, and under a
specific operating system. Those programs are often also targeting a
specific kernel and system library. Those constraints are captured by Guix
in platform records.
Próximo: Supported Platforms, Acima: Plataformas [Conteúdo][Índice]
15.1 platform Reference
The platform data type describes a platform: an ISA (instruction set architecture), combined with an operating system and
possibly additional system-wide settings such as the ABI (application binary interface).
- Tipo de dados: platform
This is the data type representing a platform.
targetThis field specifies the platform’s GNU triplet as a string (veja GNU configuration triplets em Autoconf).
systemThis string is the system type as it is known to Guix and passed, for instance, to the --system option of most commands.
It usually has the form
"cpu-kernel", where cpu is the target CPU and kernel the target operating system kernel.It can be for instance
"aarch64-linux"or"armhf-linux". You will encounter system types when you perform native builds (veja Construções nativas).linux-architecture(default:#false)This optional string field is only relevant if the kernel is Linux. In that case, it corresponds to the ARCH variable used when building Linux,
"mips"for instance.rust-target(default:#false)This optional string field is used to determine which rust target is best supported by this platform. For example, the base level system targeted by
armhf-linuxsystem is closest toarmv7-unknown-linux-gnueabihf.glibc-dynamic-linkerThis field is the name of the GNU C Library dynamic linker for the corresponding system, as a string. It can be
"/lib/ld-linux-armhf.so.3".
Anterior: platform Reference, Acima: Plataformas [Conteúdo][Índice]
15.2 Supported Platforms
The (guix platforms …) modules export the following variables,
each of which is bound to a platform record.
- Variável: armv7-linux
Platform targeting ARM v7 CPU running GNU/Linux.
- Variável: aarch64-linux
Platform targeting ARM v8 CPU running GNU/Linux.
- Variável: loongarch64-linux
Platform targeting loongarch 64-bit CPU running GNU/Linux.
- Variável: mips64-linux
Platform targeting MIPS little-endian 64-bit CPU running GNU/Linux.
- Variável: powerpc-linux
Platform targeting PowerPC big-endian 32-bit CPU running GNU/Linux.
- Variável: powerpc64le-linux
Platform targeting PowerPC little-endian 64-bit CPU running GNU/Linux.
- Variável: riscv64-linux
Platform targeting RISC-V 64-bit CPU running GNU/Linux.
- Variável: i686-linux
Platform targeting x86 CPU running GNU/Linux.
- Variável: x86_64-linux
Platform targeting x86 64-bit CPU running GNU/Linux.
- Variável: x86_64-linux-x32
Platform targeting x86 64-bit CPU running GNU/Linux with the run-time using the X32 ABI.
- Variável: i686-mingw
Platform targeting x86 CPU running Windows, with run-time support from MinGW.
- Variável: x86_64-mingw
Platform targeting x86 64-bit CPU running Windows, with run-time support from MinGW.
- Variável: i586-gnu
Platform targeting x86 CPU running GNU/Hurd (also referred to as “GNU”).
- Variável: avr
Platform targeting AVR CPUs without an operating system, with run-time support from AVR Libc.
- Variável: or1k-elf
Platform targeting OpenRISC 1000 CPU without an operating system and without a C standard library.
- Variável: xtensa-ath9k-elf
Platform targeting Xtensa CPU used in the Qualcomm Atheros AR7010 and AR9271 USB 802.11n NICs (Network Interface Controllers).
Próximo: Instalando arquivos de depuração, Anterior: Plataformas, Acima: GNU Guix [Conteúdo][Índice]
16 Criando imagens do sistema
When it comes to installing Guix System for the first time on a new machine,
you can basically proceed in three different ways. The first one is to use
an existing operating system on the machine to run the guix system
init command (veja Invoking guix system). The second one, is to produce
an installation image (veja Compilando a imagem de instalação). This is a
bootable system which role is to eventually run guix system init.
Finally, the third option would be to produce an image that is a direct
instantiation of the system you wish to run. That image can then be copied
on a bootable device such as an USB drive or a memory card. The target
machine would then directly boot from it, without any kind of installation
procedure.
The guix system image command is able to turn an operating system
definition into a bootable image. This command supports different image
types, such as mbr-hybrid-raw, iso9660 and docker. Any
modern x86_64 machine will probably be able to boot from an
iso9660 image. However, there are a few machines out there that
require specific image types. Those machines, in general using ARM
processors, may expect specific partitions at specific offsets.
This chapter explains how to define customized system images and how to turn them into actual bootable images.
Próximo: Instanciar uma imagem, Acima: Criando imagens do sistema [Conteúdo][Índice]
16.1 image Reference
The image record, described right after, allows you to define a
customized bootable system image.
- Tipo de dados: image
This is the data type representing a system image.
name(default:#false)The image name as a symbol,
'my-iso9660for instance. The name is optional and it defaults to#false.formatThe image format as a symbol. The following formats are supported:
-
disk-image, a raw disk image composed of one or multiple partitions. -
compressed-qcow2, a compressed qcow2 image composed of one or multiple partitions. -
docker, a Docker image. -
iso9660, an ISO-9660 image. -
tarball, a tar.gz image archive. -
wsl2, a WSL2 image.
-
platform(default:#false)The
platformrecord the image is targeting (veja Plataformas),aarch64-linuxfor instance. By default, this field is set to#falseand the image will target the host platform.size(default:'guess)The image size in bytes or
'guess. The'guesssymbol, which is the default, means that the image size will be inferred based on the image content.operating-systemThe image’s
operating-systemrecord that is instantiated.partition-table-type(default:'mbr)The image partition table type as a symbol. Possible values are
'mbrand'gpt. It default to'mbr.partitions(default:'())The image partitions as a list of
partitionrecords (veja Referência dopartition).compression?(default:#true)Whether the image content should be compressed, as a boolean. It defaults to
#trueand only applies to'iso9660image formats.volatile-root?(default:#true)Whether the image root partition should be made volatile, as a boolean.
This is achieved by using a RAM backed file system (overlayfs) that is mounted on top of the root partition by the initrd. It defaults to
#true. When set to#false, the image root partition is mounted as read-write partition by the initrd.shared-store?(default:#false)Whether the image’s store should be shared with the host system, as a boolean. This can be useful when creating images dedicated to virtual machines. When set to
#false, which is the default, the image’soperating-systemclosure is copied to the image. Otherwise, when set to#true, it is assumed that the host store will be made available at boot, using a9pmount for instance.shared-network?(default:#false)Se deve usar as interfaces de rede do host dentro da imagem, como um booleano. Isso é usado apenas para o formato de imagem
'docker. O padrão é#false.substitutable?(default:#true)Whether the image derivation should be substitutable, as a boolean. It defaults to
true.
Acima: image Reference [Conteúdo][Índice]
16.1.1 Referência do partition
In image record may contain some partitions.
- Tipo de dados: partition
This is the data type representing an image partition.
size(default:'guess)The partition size in bytes or
'guess. The'guesssymbol, which is the default, means that the partition size will be inferred based on the partition content.offset(default:0)The partition’s start offset in bytes, relative to the image start or the previous partition end. It defaults to
0which means that there is no offset applied.file-system(default:"ext4")The partition file system as a string, defaulting to
"ext4".The supported values are
"vfat","fat16","fat32","btrfs", and"ext4"."vfat","fat16", and"fat32"partitions without the'espflag are by default LBA compatible.file-system-options(default:'())As opções de criação do sistema de arquivos de partição que devem ser passadas para a ferramenta de criação de partição, como uma lista de strings. Isso só é suportado ao criar partições
"vfat","fat16","fat32"ou"ext4".See the
"extended-options"man page section of the"mke2fs"tool for a more complete reference.labelThe partition label as a mandatory string,
"my-root"for instance.uuid(default:#false)The partition UUID as an
uuidrecord (veja Sistemas de arquivos). By default it is#false, which means that the partition creation tool will attribute a random UUID to the partition.flags(default:'())The partition flags as a list of symbols. Possible values are
'bootand'esp. The'bootflags should be set if you want to boot from this partition. Exactly one partition should have this flag set, usually the root one. The'espflag identifies a UEFI System Partition.initializer(default:#false)The partition initializer procedure as a gexp. This procedure is called to populate a partition. If no initializer is passed, the
initialize-root-partitionprocedure from the(gnu build image)module is used.
Próximo: image-type Reference, Anterior: image Reference, Acima: Criando imagens do sistema [Conteúdo][Índice]
16.2 Instanciar uma imagem
Let’s say you would like to create an MBR image with three distinct partitions:
- The ESP (EFI System Partition), a partition of 40 MiB at offset 1024 KiB with a vfat file system.
- an ext4 partition of 50 MiB data file, and labeled “data”.
- an ext4 bootable partition containing the
%simple-osoperating-system.
You would then write the following image definition in a my-image.scm
file for instance.
(use-modules (gnu) (gnu image) (gnu tests) (gnu system image) (guix gexp)) (define MiB (expt 2 20)) (image (format 'disk-image) (operating-system %simple-os) (partitions (list (partition (size (* 40 MiB)) (offset (* 1024 1024)) (label "GNU-ESP") (file-system "vfat") (flags '(esp)) (initializer (gexp initialize-efi-partition))) (partition (size (* 50 MiB)) (label "DATA") (file-system "ext4") (initializer #~(lambda* (root . rest) (mkdir root) (call-with-output-file (string-append root "/data") (lambda (port) (format port "my-data")))))) (partition (size 'guess) (label root-label) (file-system "ext4") (flags '(boot)) (initializer (gexp initialize-root-partition))))))
Note que a primeira e a terceira partições usam procedimentos de
inicializadores genéricos, initialize-efi-partition e
initialize-root-partition, respectivamente. O initialize-efi-partition
instala um carregador EFI GRUB que está carregando o carregador de
inicialização GRUB localizado na partição raiz. O initialize-root-partition
instancia um sistema completo conforme definido pelo sistema operacional
%simple-os.
Agora você pode executar:
guix system image my-image.scm
para instanciar a definição image. Isso produz uma imagem de disco
que tem a estrutura esperada:
$ parted $(guix system image my-image.scm) print … Model: (file) Disk /gnu/store/yhylv1bp5b2ypb97pd3bbhz6jk5nbhxw-disk-image: 1714MB Sector size (logical/physical): 512B/512B Partition Table: msdos Disk Flags: Number Start End Size Type File system Flags 1 1049kB 43.0MB 41.9MB primary fat16 esp 2 43.0MB 95.4MB 52.4MB primary ext4 3 95.4MB 1714MB 1619MB primary ext4 boot
The size of the boot partition has been inferred to 1619MB so
that it is large enough to host the %simple-os operating-system.
You can also use existing image record definitions and inherit from
them to simplify the image definition. The (gnu system image)
module provides the following image definition variables.
- Variável: mbr-disk-image
An MBR disk-image composed of a single ROOT partition. The ROOT partition starts at a 1 MiB offset so that the bootloader can install itself in the post-MBR gap.
- Variável: mbr-hybrid-disk-image
An MBR disk-image composed of two partitions: a 64 bits ESP partition and a ROOT boot partition. The ESP partition starts at a 1 MiB offset so that a BIOS compatible bootloader can install itself in the post-MBR gap. The image can be used by
x86_64andi686machines supporting only legacy BIOS booting. The ESP partition ensures that it can also be used by newer machines relying on UEFI booting, hence the hybrid denomination.
- Variável: efi-disk-image
A GPT disk-image composed of two partitions: a 64 bits ESP partition and a ROOT boot partition. This image can be used on most
x86_64andi686machines, supporting BIOS or UEFI booting.
- Variável: efi32-disk-image
Same as
efi-disk-imagebut with a 32 bits EFI partition.
- Variável: iso9660-image
An ISO-9660 image composed of a single bootable partition. This image can also be used on most
x86_64andi686machines.
- Variável: docker-image
Uma imagem do Docker que pode ser usada para gerar um contêiner do Docker.
Using the efi-disk-image we can simplify our previous image
declaration this way:
(use-modules (gnu) (gnu image) (gnu tests) (gnu system image) (guix gexp) (ice-9 match)) (define MiB (expt 2 20)) (define data (partition (size (* 50 MiB)) (label "DATA") (file-system "ext4") (initializer #~(lambda* (root . rest) (mkdir root) (call-with-output-file (string-append root "/data") (lambda (port) (format port "my-data"))))))) (image (inherit efi-disk-image) (operating-system %simple-os) (partitions (match (image-partitions efi-disk-image) ((esp root) (list esp data root)))))
This will give the exact same image instantiation but the
image declaration is simpler.
Próximo: Módulos de imagem, Anterior: Instanciar uma imagem, Acima: Criando imagens do sistema [Conteúdo][Índice]
16.3 image-type Reference
The guix system image command can, as we saw above, take a file
containing an image declaration as argument and produce an actual
disk image from it. The same command can also handle a file containing an
operating-system declaration as argument. In that case, how is the
operating-system turned into an image?
That’s where the image-type record intervenes. This record defines
how to transform an operating-system record into an image
record.
- Tipo de dados: image-type
This is the data type representing an image-type.
nameThe image-type name as a mandatory symbol,
'efi32-rawfor instance.constructorThe image-type constructor, as a mandatory procedure that takes an
operating-systemrecord as argument and returns animagerecord.
There are several image-type records provided by the (gnu
system image) and the (gnu system images …) modules.
- Variável: mbr-raw-image-type
Crie uma imagem baseada na imagem
mbr-disk-image.
- Variável: mbr-hybrid-raw-image-type
Build an image based on the
mbr-hybrid-disk-imageimage.
- Variável: efi-raw-image-type
Build an image based on the
efi-disk-imageimage.
- Variável: efi32-raw-image-type
Build an image based on the
efi32-disk-imageimage.
- Variável: qcow2-image-type
Build an image based on the
mbr-disk-imageimage but with thecompressed-qcow2image format.
- Variável: iso-image-type
Build a compressed image based on the
iso9660-imageimage.
- Variável: uncompressed-iso-image-type
Build an image based on the
iso9660-imageimage but with thecompression?field set to#false.
- Variável: docker-image-type
Build an image based on the
docker-imageimage.
- Variável: raw-with-offset-image-type
Crie uma imagem MBR com uma única partição começando em um deslocamento
1024KiB. Isso é útil para deixar algum espaço para instalar um bootloader na lacuna pós-MBR.
- Variável: pinebook-pro-image-type
Build an image that is targeting the Pinebook Pro machine. The MBR image contains a single partition starting at a
9MiBoffset. Theu-boot-pinebook-pro-rk3399-bootloaderbootloader will be installed in this gap.
- Variável: rock64-image-type
Build an image that is targeting the Rock64 machine. The MBR image contains a single partition starting at a
16MiBoffset. Theu-boot-rock64-rk3328-bootloaderbootloader will be installed in this gap.
- Variável: novena-image-type
Build an image that is targeting the Novena machine. It has the same characteristics as
raw-with-offset-image-type.
- Variável: pine64-image-type
Build an image that is targeting the Pine64 machine. It has the same characteristics as
raw-with-offset-image-type.
- Variável: hurd-image-type
Build an image that is targeting a
i386machine running the Hurd kernel. The MBR image contains a single ext2 partitions with specificfile-system-optionsflags.
- Variável: hurd-qcow2-image-type
Build an image similar to the one built by the
hurd-image-typebut with theformatset to'compressed-qcow2.
- Variável: wsl2-image-type
Build an image for the WSL2 (Windows Subsystem for Linux 2). It can be imported by running:
wsl --import Guix ./guix ./wsl2-image.tar.gz wsl -d Guix
Então, se voltarmos ao comando guix system image tomando uma
declaração operating-system como argumento. Por padrão, o
mbr-raw-image-type é usado para transformar o operating-system
fornecido em uma imagem inicializável real.
Para usar um image-type diferente, a opção --image-type pode
ser usada. A opção --list-image-types listará todos os tipos de
imagem suportados. Acontece que é uma listagem textual de todas as variáveis
image-types descritas logo acima (veja Invoking guix system).
Anterior: image-type Reference, Acima: Criando imagens do sistema [Conteúdo][Índice]
16.4 Módulos de imagem
Vamos pegar o exemplo do Pine64, uma máquina baseada em ARM. Para poder produzir uma imagem direcionada a essa placa, precisamos dos seguintes elementos:
- Um registro
operating-systemcontendo pelo menos um kernel apropriado (linux-libre-arm64-generic) e bootloaderu-boot-pine64-lts-bootloader) para o Pine64. - Possibly, an
image-typerecord providing a way to turn anoperating-systemrecord to animagerecord suitable for the Pine64. - An actual
imagethat can be instantiated with theguix system imagecommand.
The (gnu system images pine64) module provides all those elements:
pine64-barebones-os, pine64-image-type and
pine64-barebones-raw-image respectively.
The module returns the pine64-barebones-raw-image in order for users
to be able to run:
guix system image gnu/system/images/pine64.scm
Now, thanks to the pine64-image-type record declaring the
'pine64-raw image-type, one could also prepare a
my-pine.scm file with the following content:
(use-modules (gnu system images pine64)) (operating-system (inherit pine64-barebones-os) (timezone "Europe/Athens"))
to customize the pine64-barebones-os, and run:
$ guix system image --image-type=pine64-raw my-pine.scm
Note that there are other modules in the gnu/system/images directory
targeting Novena, Pine64, PinebookPro and Rock64
machines.
Próximo: Usando TeX e LaTeX, Anterior: Criando imagens do sistema, Acima: GNU Guix [Conteúdo][Índice]
17 Instalando arquivos de depuração
Program binaries, as produced by the GCC compilers for instance, are typically written in the ELF format, with a section containing debugging information. Debugging information is what allows the debugger, GDB, to map binary code to source code; it is required to debug a compiled program in good conditions.
This chapter explains how to use separate debug info when packages provide it, and how to rebuild packages with debug info when it’s missing.
Próximo: Reconstruindo informações de depuração, Acima: Instalando arquivos de depuração [Conteúdo][Índice]
17.1 Informações de depuração separadas
O problema com informações de depuração é que elas ocupam uma quantidade considerável de espaço em disco. Por exemplo, informações de depuração para a GNU C Library pesam mais de 60 MiB. Assim, como usuário, manter todas as informações de depuração de todos os programas instalados geralmente não é uma opção. No entanto, a economia de espaço não deve vir ao custo de um impedimento à depuração — especialmente no sistema GNU, o que deve tornar mais fácil para os usuários exercerem sua liberdade de computação (veja Distribuição GNU).
Thankfully, the GNU Binary Utilities (Binutils) and GDB provide a mechanism that allows users to get the best of both worlds: debugging information can be stripped from the binaries and stored in separate files. GDB is then able to load debugging information from those files, when they are available (veja Separate Debug Files em Debugging with GDB).
The GNU distribution takes advantage of this by storing debugging
information in the lib/debug sub-directory of a separate package
output unimaginatively called debug (veja Pacotes com múltiplas saídas). Users can choose to install the debug output of a package
when they need it. For instance, the following command installs the
debugging information for the GNU C Library and for GNU Guile:
guix install glibc:debug guile:debug
GDB must then be told to look for debug files in the user’s profile, by
setting the debug-file-directory variable (consider setting it from
the ~/.gdbinit file, veja Startup em Debugging with GDB):
(gdb) set debug-file-directory ~/.guix-profile/lib/debug
From there on, GDB will pick up debugging information from the .debug files under ~/.guix-profile/lib/debug.
Below is an alternative GDB script which is useful when working with other profiles. It takes advantage of the optional Guile integration in GDB. This snippet is included by default on Guix System in the ~/.gdbinit file.
guile
(use-modules (gdb))
(execute (string-append "set debug-file-directory "
(or (getenv "GDB_DEBUG_FILE_DIRECTORY")
"~/.guix-profile/lib/debug")))
end
In addition, you will most likely want GDB to be able to show the source
code being debugged. To do that, you will have to unpack the source code of
the package of interest (obtained with guix build --source,
veja Invocando guix build), and to point GDB to that source directory
using the directory command (veja directory em Debugging with GDB).
The debug output mechanism in Guix is implemented by the
gnu-build-system (veja Sistemas de compilação). Currently, it is
opt-in—debugging information is available only for the packages with
definitions explicitly declaring a debug output. To check whether a
package has a debug output, use guix package
--list-available (veja Invocando guix package).
Read on for how to deal with packages lacking a debug output.
Anterior: Informações de depuração separadas, Acima: Instalando arquivos de depuração [Conteúdo][Índice]
17.2 Reconstruindo informações de depuração
Como vimos acima, alguns pacotres, mas não todos, provêem informação de
depuração numa saída debug. O que podemos fazer quando informação de
depuração está faltando? A opção --with-debug-info provê uma
solução para isso: ela te permite reconstruir os pacotes para os quais a
informação está faltando — e nomente estes — e exertá-los no aplicativo
que você está deupurando. Portanto, enquanto isso não é tão rápido quanto a
instalação de uma saída do debug, isso é relativamente menos custoso.
Let’s illustrate that. Suppose you’re experiencing a bug in Inkscape and
would like to see what’s going on in GLib, a library that’s deep down in its
dependency graph. As it turns out, GLib does not have a debug output
and the backtrace GDB shows is all sadness:
(gdb) bt
#0 0x00007ffff5f92190 in g_getenv ()
from /gnu/store/…-glib-2.62.6/lib/libglib-2.0.so.0
#1 0x00007ffff608a7d6 in gobject_init_ctor ()
from /gnu/store/…-glib-2.62.6/lib/libgobject-2.0.so.0
#2 0x00007ffff7fe275a in call_init (l=<optimized out>, argc=argc@entry=1, argv=argv@entry=0x7fffffffcfd8,
env=env@entry=0x7fffffffcfe8) at dl-init.c:72
#3 0x00007ffff7fe2866 in call_init (env=0x7fffffffcfe8, argv=0x7fffffffcfd8, argc=1, l=<optimized out>)
at dl-init.c:118
To address that, you install Inkscape linked against a variant GLib that contains debug info:
guix install inkscape --with-debug-info=glib
This time, debugging will be a whole lot nicer:
$ gdb --args sh -c 'exec inkscape'
…
(gdb) b g_getenv
Function "g_getenv" not defined.
Make breakpoint pending on future shared library load? (y or [n]) y
Breakpoint 1 (g_getenv) pending.
(gdb) r
Starting program: /gnu/store/…-profile/bin/sh -c exec\ inkscape
…
(gdb) bt
#0 g_getenv (variable=variable@entry=0x7ffff60c7a2e "GOBJECT_DEBUG") at ../glib-2.62.6/glib/genviron.c:252
#1 0x00007ffff608a7d6 in gobject_init () at ../glib-2.62.6/gobject/gtype.c:4380
#2 gobject_init_ctor () at ../glib-2.62.6/gobject/gtype.c:4493
#3 0x00007ffff7fe275a in call_init (l=<optimized out>, argc=argc@entry=3, argv=argv@entry=0x7fffffffd088,
env=env@entry=0x7fffffffd0a8) at dl-init.c:72
…
Much better!
Note that there can be packages for which --with-debug-info will not have the desired effect. Veja --with-debug-info, for more information.
Próximo: Atualizações de segurança, Anterior: Instalando arquivos de depuração, Acima: GNU Guix [Conteúdo][Índice]
18 Usando TeX e LaTeX
Guix provê pacotes para os TeX, LaTeX, ConTeXt, LuaTeX e sistemas de tipografia afins, retirados da distribuição TeX Live. Por conta da TeX Live ser tão grande e encontrar um método neste labirinto é complicado, essa seção providenciará um guia de como implantar os pacotes relevantes para compilar documentos TeX e LaTeX.
TeX Live atualmente vem em dois sabores mutualmente excluisvos no Guix:
- O pacote “monolítico”
texlive: vem com todo pacote único da TeX Live (rigorosamente 4.200), mas isso é enorme — mais que 4 GiB para um único pacote! - Uma distribuição “modular” da TeX Live, na qual você instala os pacotes que você necessita, cujo nome é sempre prefixado com ‘texlive-’.
To insist, these two flavors cannot be combined40. If in the modular setting your document
does not compile, the solution is not to add the monolithic texlive
package, but to add the set of missing packages from the modular
distribution.
Building a coherent system that provides all the essential tools and, at the same time, satisfies all of its internal dependencies can be a difficult task. It is therefore recommended to start with sets of packages, called collections, and schemes, the name for collections of collections. The following command lists available schemes and collections (veja Invoking guix package):
guix search texlive-\(scheme\|collection\) | recsel -p name,description
Se necessário, você pode completar seu sistema com pacotes individuais, principalmente quando eles pertencem a uma coleção grande na qual você não tem interesse.
Por exemplo. o seguinte manifesto e algo razoável, e ainda um ponto de partidal frugal para um usuário francês de LaTeX:
(specifications->manifest
'("rubber"
"texlive-scheme-basic"
"texlive-collection-latexrecommended"
"texlive-collection-fontsrecommended"
"texlive-babel-french"
;; From "latexextra" collection.
"texlive-tabularray"
;; From "binextra" collection.
"texlive-texdoc"))
If you come across a document that does not compile in such a basic setting,
the main difficulty is finding the missing packages. In this case,
pdflatex and similar commands tend to fail with obscure error
messages along the lines of:
doc.tex: File `tikz.sty' not found. doc.tex:7: Emergency stop.
or, for a missing font:
kpathsea: Running mktexmf phvr7t ! I can't find file `phvr7t'.
Como determinar qual é o pacote que falta? No primeiro caso, encontrará a resposta executando:
$ guix search texlive tikz name: texlive-pgf version: 59745 …
No segundo caso, guix search não fornece nada. Ao invés disso,
você pode buscar na base de dados de pacotes do TeX Live usando o comando
tlmgr:
$ tlmgr info phvr7t
tlmgr: cannot find package phvr7t, searching for other matches:
Packages containing `phvr7t' in their title/description:
Packages containing files matching `phvr7t':
helvetic:
texmf-dist/fonts/tfm/adobe/helvetic/phvr7t.tfm
texmf-dist/fonts/tfm/adobe/helvetic/phvr7tn.tfm
texmf-dist/fonts/vf/adobe/helvetic/phvr7t.vf
texmf-dist/fonts/vf/adobe/helvetic/phvr7tn.vf
tex4ht:
texmf-dist/tex4ht/ht-fonts/alias/adobe/helvetic/phvr7t.htf
O arquivo está disponível no pacote TeX Live helvetic, que é
conhecido no Guix como texlive-helvetic. Uma viagem e tanto, mas você
encontrou!
Próximo: Inicializando, Anterior: Usando TeX e LaTeX, Acima: GNU Guix [Conteúdo][Índice]
19 Atualizações de segurança
Ocasionalmente, vulnerabilidades de segurança importantes são descobertas em
pacotes de software e devem ser corrigidas. Os desenvolvedores do Guix se
esforçam para manter o controle das vulnerabilidades conhecidas e aplicar
correções o mais rápido possível no branch master do Guix (ainda não
fornecemos um branch “stable” contendo apenas atualizações de
segurança). A ferramenta guix lint ajuda os desenvolvedores a
descobrirem sobre versões vulneráveis de pacotes de software na
distribuição:
$ guix lint -c cve gnu/packages/base.scm:652:2: glibc@2.21: probably vulnerable to CVE-2015-1781, CVE-2015-7547 gnu/packages/gcc.scm:334:2: gcc@4.9.3: probably vulnerable to CVE-2015-5276 gnu/packages/image.scm:312:2: openjpeg@2.1.0: probably vulnerable to CVE-2016-1923, CVE-2016-1924 …
Veja Invocando guix lint, para mais informações.
Guix segue uma disciplina de gerenciamento de pacotes funcional (veja Introdução), o que implica que, quando um pacote é alterado, todo pacote que depende dele deve ser reconstruído. Isso pode desacelerar significativamente a implantação de correções em pacotes principais, como libc ou Bash, já que basicamente toda a distribuição precisaria ser reconstruída. Usar binários pré-construídos ajuda (veja Substitutos), mas a implantação ainda pode levar mais tempo do que o desejado.
To address this, Guix implements grafts, a mechanism that allows for fast deployment of critical updates without the costs associated with a whole-distribution rebuild. The idea is to rebuild only the package that needs to be patched, and then to “graft” it onto packages explicitly installed by the user and that were previously referring to the original package. The cost of grafting is typically very low, and order of magnitudes lower than a full rebuild of the dependency chain.
For instance, suppose a security update needs to be applied to Bash. Guix
developers will provide a package definition for the “fixed” Bash, say
bash-fixed, in the usual way (veja Definindo pacotes). Then, the
original package definition is augmented with a replacement field
pointing to the package containing the bug fix:
(define bash
(package
(name "bash")
;; …
(replacement bash-fixed)))
From there on, any package depending directly or indirectly on Bash—as
reported by guix gc --requisites (veja Invocando guix gc)—that
is installed is automatically “rewritten” to refer to bash-fixed
instead of bash. This grafting process takes time proportional to
the size of the package, usually less than a minute for an “average”
package on a recent machine. Grafting is recursive: when an indirect
dependency requires grafting, then grafting “propagates” up to the package
that the user is installing.
Currently, the length of the name and version of the graft and that of the
package it replaces (bash-fixed and bash in the example above)
must be equal. This restriction mostly comes from the fact that grafting
works by patching files, including binary files, directly. Other
restrictions may apply: for instance, when adding a graft to a package
providing a shared library, the original shared library and its replacement
must have the same SONAME and be binary-compatible.
The --no-grafts command-line option allows you to forcefully avoid grafting (veja --no-grafts). Thus, the command:
guix build bash --no-grafts
returns the store file name of the original Bash, whereas:
guix build bash
returns the store file name of the “fixed”, replacement Bash. This allows you to distinguish between the two variants of Bash.
To verify which Bash your whole profile refers to, you can run
(veja Invocando guix gc):
guix gc -R $(readlink -f ~/.guix-profile) | grep bash
… e compare os nomes dos arquivos de armazém que você obtém com os acima. Da mesma forma para uma geração completa do sistema Guix:
guix gc -R $(guix system build my-config.scm) | grep bash
Por fim, para verificar quais processos Bash estão em execução, você pode
usar o comando lsof:
lsof | grep /gnu/store/.*bash
Próximo: Portando para uma nova plataforma, Anterior: Atualizações de segurança, Acima: GNU Guix [Conteúdo][Índice]
20 Inicializando
Bootstrapping em nosso contexto se refere a como a distribuição é construída “do nada”. Lembre-se de que o ambiente de construção de uma derivação não contém nada além de suas entradas declaradas (veja Introdução). Então há um problema óbvio de galinha e ovo: como o primeiro pacote é construído? Como o primeiro compilador é compilado?
É tentador pensar nessa questão como algo com que apenas hackers obstinados podem se importar. No entanto, embora a resposta a essa questão seja de natureza técnica, suas implicações são abrangentes. Como a distribuição é bootstrapped define até que ponto nós, como indivíduos e como um coletivo de usuários e hackers, podemos confiar no software que executamos. É uma preocupação central do ponto de vista da segurança e do ponto de vista da liberdade do usuário.
O sistema GNU é feito principalmente de código C, com libc em seu núcleo. O
próprio sistema de construção GNU assume a disponibilidade de um Bourne
shell e ferramentas de linha de comando fornecidas pelo GNU Coreutils, Awk,
Findutils, ‘sed’ e ‘grep’. Além disso, programas de construção — programas
que executam ./configure, make, etc. — são escritos em Guile
Scheme (veja Derivações). Consequentemente, para ser capaz de construir
qualquer coisa, do zero, Guix depende de binários pré-construídos de Guile,
GCC, Binutils, libc e os outros pacotes mencionados acima — os
binários bootstrap.
Esses binários bootstrap são “considerados garantidos”, embora também possamos recriá-los se necessário (veja Preparando para usar os binários do Bootstrap).
- O Bootstrap de código fonte completo
- Preparando para usar os binários do Bootstrap
- Construindo as ferramentas de construção
- Construindo os binários Bootstrap
- Reducing the Set of Bootstrap Binaries
Próximo: Preparando para usar os binários do Bootstrap, Acima: Inicializando [Conteúdo][Índice]
20.1 O Bootstrap de código fonte completo
Guix—como outras distribuições GNU/Linux—é tradicionalmente bootstrapado a partir de um conjunto de binários bootstrap: Bourne shell, ferramentas de linha de comando fornecidas pelo GNU Coreutils, Awk, Findutils, “sed’ e ‘grep’ e Guile, GCC, Binutils e a GNU C Library (veja Inicializando). Normalmente, esses binários bootstrap são “considerados garantidos.”
Tomar os binários bootstrap como garantidos significa que os consideramos uma “semente” correta e confiável para construir o sistema completo. Aí está um problema: o tamanho combinado desses binários bootstrap é de cerca de 250 MB (veja Bootstrappable Builds em GNU Mes). Auditar ou mesmo inspecionar isso é quase impossível.
Para i686-linux e x86_64-linux, o Guix agora apresenta um
full-source bootstrap. Este bootstrap está enraizado em
hex0-seed do pacote Stage0. O programa hex0 é um assembler minimalista: ele lê dígitos
hexadecimais separados por espaços (nibbles) de um arquivo, possivelmente
incluindo comentários, e emite na saída padrão os bytes correspondentes a
esses números hexadecimais. O código-fonte deste programa hex0 inicial é um
arquivo chamado
hex0_x86.hex0
e é escrito na linguagem hex0.
O Hex0 é auto-hospedado, o que significa que ele pode se construir:
./hex0-seed hex0_x86.hex0 hex0
Hex0 é o equivalente ASCII do programa binário e pode ser produzido fazendo algo muito parecido com:
sed 's/[;#].*$//g' hex0_x86.hex0 | xxd -r -p > hex0 chmod +x hex0
É por causa dessa equivalência ASCII-binário que podemos abençoar esse binário inicial de 357 bytes como fonte e, portanto, ‘bootstrap de fonte completa”.
O bootstrap então continua: hex0 constrói hex1 e então para
M0, hex2, M1, mescc-tools e finalmente
M2-Planet. Então, usando mescc-tools, M2-Planet nós
construímos Mes (veja GNU Mes Reference Manual em GNU Mes, um
interpretador Scheme e compilador C em Scheme). A partir daqui começa o
bootstrap mais tradicional baseado em C do Sistema GNU.
Outro passo que o Guix tomou foi substituir o shell e todos os seus utilitários por implementações no Guile Scheme, o Scheme-only bootstrap. O Gash (veja Gash em The Gash manual) é um shell compatível com POSIX que substitui o Bash, e vem com o Gash Utils, que tem substituições minimalistas para o Awk, o GNU Core Utilities, Grep, Gzip, Sed e Tar.
Atualmente, construir o Sistema GNU a partir do código-fonte só é possível
adicionando alguns pacotes históricos do GNU como etapas
intermediárias41. Conforme o Gash e o Gash Utils
amadurecem, e os pacotes GNU se tornam mais inicializáveis novamente (por
exemplo, novos lançamentos do GNU Sed também serão enviados como tarballs
compactados novamente, como alternativa à compressão xz difícil de
inicializar), esse conjunto de pacotes adicionados pode ser reduzido
novamente.
O grafo abaixo mostra o grafo de dependência resultante para
gcc-core-mesboot0, o compilador bootstrap usado para o bootstrap
tradicional do restante do Sistema Guix.
O trabalho está em andamento para levar esses bootstraps às arquiteturas
arm-linux e aarch64-linux e ao Hurd.
Se você estiver interessado, junte-se a nós em ‘#bootstrappable’ na rede IRC Libera.Chat ou discuta em bug-mes@gnu.org ou gash-devel@nongnu.org.
Anterior: O Bootstrap de código fonte completo, Acima: Inicializando [Conteúdo][Índice]
20.2 Preparando para usar os binários do Bootstrap
A figura acima mostra o início do grafo de dependência da distribuição,
correspondendo às definições de pacote do módulo (gnu packages
bootstrap). Uma figura similar pode ser gerada com guix graph
(veja Invocando guix graph), ao longo das linhas de:
guix graph -t derivation \ -e '(@@ (gnu packages bootstrap) %bootstrap-gcc)' \ | dot -Tps > gcc.ps
ou, para o bootstrap de semente binária reduzida
guix graph -t derivation \ -e '(@@ (pacotes gnu bootstrap) %bootstrap-mes)' \ | ponto -Tps > mes.ps
Neste nível de detalhe, as coisas são um pouco complexas. Primeiro, o
próprio Guile consiste em um executável ELF, junto com muitas fontes e
arquivos de Scheme compilados que são carregados dinamicamente quando ele é
executado. Isso é armazenado no tarball guile-2.0.7.tar.xz mostrado
neste grafo. Este tarball é parte da distribuição de “fontes” do Guix e é
inserido no armazém com add-to-store (veja O armazém).
Mas como escrevemos uma derivação que descompacta esse tarball e o adiciona
ao armazém? Para resolver esse problema, a derivação
guile-bootstrap-2.0.drv — a primeira que é construída — usa
bash como seu construtor, que executa
build-bootstrap-guile.sh, que por sua vez chama tar para
descompactar o tarball. Assim, bash, tar, xz e
mkdir são binários estaticamente vinculados, também parte da
distribuição de fontes do Guix, cujo único propósito é permitir que o
tarball do Guile seja descompactado.
Uma vez que guile-bootstrap-2.0.drv é construído, temos um Guile
funcional que pode ser usado para executar programas de construção
subsequentes. Sua primeira tarefa é baixar tarballs contendo os outros
binários pré-construídos — é isso que as derivações .tar.xz.drv
fazem. Módulos Guix como ftp-client.scm são usados para esse
propósito. As derivações module-import.drv importam esses módulos em
um diretório no armazém, usando o layout original. As derivações
module-import-compiled.drv compilam esses módulos e os escrevem em um
diretório de saída com o layout correto. Isso corresponde ao argumento
#:modules de build-expression->derivation
(veja Derivações).
Por fim, os vários tarballs são descompactados pelas derivações
gcc-bootstrap-0.drv, glibc-bootstrap-0.drv ou
bootstrap-mes-0.drv e bootstrap-mescc-tools-0.drv, ponto em
que temos uma cadeia de ferramentas C funcional.
Construindo as ferramentas de construção
O bootstrapping está completo quando temos uma cadeia de ferramentas
completa que não depende das ferramentas bootstrap pré-construídas
discutidas acima. Esse requisito de não dependência é verificado verificando
se os arquivos da cadeia de ferramentas final contêm referências aos
diretórios /gnu/store das entradas bootstrap. O processo que leva a
essa cadeia de ferramentas “final” é descrito pelas definições de pacote
encontradas no módulo (gnu packages commencement).
O comando guix graph nos permite “diminuir o zoom” em comparação
ao grafo acima, observando o nível de objetos do pacote em vez de derivações
individuais — lembre-se de que um pacote pode ser traduzido para várias
derivações, normalmente uma derivação para baixar sua fonte, uma para
construir os módulos Guile de que ele precisa e uma para realmente construir
o pacote a partir da fonte. O comando:
guix graph -t bag \
-e '(@@ (gnu packages commencement)
glibc-final-with-bootstrap-bash)' | xdot -
exibe o grafo de dependência que leva à biblioteca C “final”42, descrita abaixo.
A primeira ferramenta que é construída com os binários bootstrap é o
GNU Make—observado make-boot0 acima—que é um pré-requisito
para todos os pacotes seguintes. A partir daí, Findutils e Diffutils são
construídos.
Então vêm os Binutils e GCC de primeiro estágio, construídos como pseudo cross tools—i.e., com --target igual a --host. Eles são usados para construir a libc. Graças a esse truque de cross-build, essa libc tem a garantia de não manter nenhuma referência à cadeia de ferramentas inicial.
A partir daí, os Binutils finais e o GCC (não mostrados acima) são
construídos. O GCC usa ld dos Binutils finais e vincula programas
à libc recém-construída. Essa cadeia de ferramentas é usada para construir
os outros pacotes usados pelo Guix e pelo GNU Build System: Guile, Bash,
Coreutils, etc.
E voilà! Neste ponto, temos o conjunto completo de ferramentas de construção
que o GNU Build System espera. Elas estão na variável %final-inputs
do módulo (gnu packages commencement) e são implicitamente usadas por
qualquer pacote que use gnu-build-system (veja gnu-build-system).
Construindo os binários Bootstrap
Because the final tool chain does not depend on the bootstrap binaries,
those rarely need to be updated. Nevertheless, it is useful to have an
automated way to produce them, should an update occur, and this is what the
(gnu packages make-bootstrap) module provides.
The following command builds the tarballs containing the bootstrap binaries (Binutils, GCC, glibc, for the traditional bootstrap and linux-libre-headers, bootstrap-mescc-tools, bootstrap-mes for the Reduced Binary Seed bootstrap, and Guile, and a tarball containing a mixture of Coreutils and other basic command-line tools):
guix build bootstrap-tarballs
The generated tarballs are those that should be referred to in the
(gnu packages bootstrap) module mentioned at the beginning of this
section.
Still here? Then perhaps by now you’ve started to wonder: when do we reach a fixed point? That is an interesting question! The answer is unknown, but if you would like to investigate further (and have significant computational and storage resources to do so), then let us know.
Reducing the Set of Bootstrap Binaries
Our traditional bootstrap includes GCC, GNU Libc, Guile, etc. That’s a lot of binary code! Why is that a problem? It’s a problem because these big chunks of binary code are practically non-auditable, which makes it hard to establish what source code produced them. Every unauditable binary also leaves us vulnerable to compiler backdoors as described by Ken Thompson in the 1984 paper Reflections on Trusting Trust.
This is mitigated by the fact that our bootstrap binaries were generated from an earlier Guix revision. Nevertheless it lacks the level of transparency that we get in the rest of the package dependency graph, where Guix always gives us a source-to-binary mapping. Thus, our goal is to reduce the set of bootstrap binaries to the bare minimum.
The Bootstrappable.org web site lists on-going projects to do that. One of these is about replacing the bootstrap GCC with a sequence of assemblers, interpreters, and compilers of increasing complexity, which could be built from source starting from a simple and auditable assembler.
Our first major achievement is the replacement of GCC, the GNU C Library and Binutils by MesCC-Tools (a simple hex linker and macro assembler) and Mes (veja GNU Mes Reference Manual em GNU Mes, a Scheme interpreter and C compiler in Scheme). Neither MesCC-Tools nor Mes can be fully bootstrapped yet and thus we inject them as binary seeds. We call this the Reduced Binary Seed bootstrap, as it has halved the size of our bootstrap binaries! Also, it has eliminated the C compiler binary; i686-linux and x86_64-linux Guix packages are now bootstrapped without any binary C compiler.
Work is ongoing to make MesCC-Tools and Mes fully bootstrappable and we are also looking at any other bootstrap binaries. Your help is welcome!
Próximo: Contribuindo, Anterior: Inicializando, Acima: GNU Guix [Conteúdo][Índice]
21 Portando para uma nova plataforma
As discussed above, the GNU distribution is self-contained, and
self-containment is achieved by relying on pre-built “bootstrap binaries”
(veja Inicializando). These binaries are specific to an operating system
kernel, CPU architecture, and application binary interface (ABI). Thus, to
port the distribution to a platform that is not yet supported, one must
build those bootstrap binaries, and update the (gnu packages
bootstrap) module to use them on that platform.
Fortunately, Guix can cross compile those bootstrap binaries. When everything goes well, and assuming the GNU tool chain supports the target platform, this can be as simple as running a command like this one:
guix build --target=armv5tel-linux-gnueabi bootstrap-tarballs
For this to work, it is first required to register a new platform as defined
in the (guix platform) module. A platform is making the connection
between a GNU triplet (veja GNU configuration
triplets em Autoconf), the equivalent system in Nix
notation, the name of the glibc-dynamic-linker, and the corresponding
Linux architecture name if applicable (veja Plataformas).
Once the bootstrap tarball are built, the (gnu packages bootstrap)
module needs to be updated to refer to these binaries on the target
platform. That is, the hashes and URLs of the bootstrap tarballs for the
new platform must be added alongside those of the currently supported
platforms. The bootstrap Guile tarball is treated specially: it is expected
to be available locally, and gnu/local.mk has rules to download it
for the supported architectures; a rule for the new platform must be added
as well.
In practice, there may be some complications. First, it may be that the
extended GNU triplet that specifies an ABI (like the eabi suffix
above) is not recognized by all the GNU tools. Typically, glibc recognizes
some of these, whereas GCC uses an extra --with-abi configure flag
(see gcc.scm for examples of how to handle this). Second, some of
the required packages could fail to build for that platform. Lastly, the
generated binaries could be broken for some reason.
Próximo: Agradecimentos, Anterior: Portando para uma nova plataforma, Acima: GNU Guix [Conteúdo][Índice]
22 Contribuindo
Este projeto é um esforço cooperativo e precisamos da sua ajuda para fazê-lo
crescer! Por favor, entre em contato conosco por meio de
guix-devel@gnu.org e #guix na rede IRC do Libera
Chat. Ideias, relatórios de bugs, patches e qualquer coisa que possa ser
útil para o projeto são sempre bem-vindos. Nós particularmente agradecemos a
ajuda no empacotamento das (veja Diretrizes de empacotamento).
Queremos oferecer um ambiente acolhedor, amigável e sem assédio, para que todos possam contribuir com o melhor de suas habilidades. Para este fim, nosso projeto usa um “Acordo de contribuição“, que foi adaptado de https://contributor-covenant.org/. Você pode encontrar uma versão local no arquivo CODE-OF-CONDUCT na árvore de fontes.
Os contribuidores não são obrigados a usar seu nome legal em patches e comunicação on-line; eles podem usar qualquer nome ou pseudônimo de sua escolha.
- Requisitos
- Compilando do git
- Executando o conjunto de testes
- Executando guix antes dele ser instalado
- A configuração perfeita
- Configurações alternativas
- Estrutura da árvore de origem
- Diretrizes de empacotamento
- Estilo de código
- Enviando patches
- Rastreando Bugs e Mudanças
- Equipes
- Tomando decisões
- Confirmar acesso
- Revendo o trabalho de outros
- Atualizando o pacote Guix
- Política de depreciação
- Escrevendo documentação
- Traduzindo o Guix
- Contributing to Guix’s Infrastructure
Próximo: Compilando do git, Acima: Contribuindo [Conteúdo][Índice]
22.1 Requisitos
Você pode facilmente hackear o próprio Guix usando Guix e Git, que usamos para controle de versão (veja Compilando do git).
Mas ao empacotar o Guix para distribuições estrangeiras ou ao inicializar em sistemas sem Guix, e se você decidir não confiar e instalar nosso binário prontamente criado (veja Instalação de binários), você pode baixar uma versão de lançamento do nosso tarball de código-fonte reproduzível e continuar lendo.
Esta seção lista os requisitos ao compilar o Guix a partir do fonte. O procedimento de compilação do Guix é o mesmo que para outros softwares GNU, e não é coberto aqui. Por favor, veja os arquivos README e INSTALL na árvore fonte do Guix para detalhes adicionais.
O GNU Guix está disponível para download em seu site em http://www.gnu.org/software/guix/.
GNU Guix depende dos seguintes pacotes:
- GNU Guile, versão 3.0.x, versão 3.0.3 ou posterior;
- Guile-Gcrypt, versão 0.1.0 ou posterior;
- Guile-GnuTLS (veja (GnuTLS-Guile)gnutls-guile)43;
- Guile-SQLite3, versão 0.1.0 ou posterior;
- Guile-zlib, versão 0.1.0 ou posterior;
- Guile-lzlib;
- Guile-Avahi;
- Guile-Git, versão 0.5.0 ou posterior;
- Git (sim, ambos!);
- Guile-JSON 4.3.0 ou posterior;
- GNU Make.
As seguintes dependências são opcionais:
-
O suporte para descarregamento de compilação (veja Usando o recurso de descarregamento)
e
guix copy(veja Invocandoguix copy) depende do Guile-SSH, versão 0.13.0 ou posterior. - Guile-zstd, para
compressão e descompressão zstd em
guix publishe para substitutos (veja Invocandoguix publish). - Guile-Semver para o
importador
crate(veja Invokingguix import). - Guile-Lib para o
importador
go(veja Invokingguix import) e para alguns dos “atualizadores” (veja Invocandoguix refresh). - Quando libbz2 está disponível,
guix-daemonpode usá-lo para comprimir logs de compilação.
A menos que --disable-daemon tenha sido passado para
configure, os seguintes pacotes também são necessários:
- GNU libgcrypt;
- SQLite 3;
- GCC’s g++, com suporte ao padrão C++11.
Próximo: Executando o conjunto de testes, Anterior: Requisitos, Acima: Contribuindo [Conteúdo][Índice]
22.2 Compilando do git
Se você quiser hackear o próprio Guix, é recomendado usar a versão mais recente do repositório Git:
git clone https://git.savannah.gnu.org/git/guix.git
Como você garante que obteve uma cópia genuína do repositório? Para fazer
isso, execute guix git authenticate, passando a ele o commit e a
impressão digital OpenPGP do introdução ao canal (veja Invocando guix git authenticate):
git fetch origin keyring:keyring guix git authenticate 9edb3f66fd807b096b48283debdcddccfea34bad \ "BBB0 2DDF 2CEA F6A8 0D1D E643 A2A0 6DF2 A33A 54FA"
Este comando é concluído com um código de saída zero em caso de sucesso; caso contrário, ele imprime uma mensagem de erro e sai com um código diferente de zero.
Como você pode ver, há um problema de ovo e galinha: primeiro você precisa ter o Guix instalado. Normalmente você instalaria o Guix System (veja Instalação do sistema) ou o Guix em cima de outra distro (veja Instalação de binários); em ambos os casos, você verificaria a assinatura OpenPGP na mídia de instalação. Isso “bootstraps” a cadeia de confiança.
A maneira mais fácil de configurar um ambiente de desenvolvimento para Guix é, claro, usando Guix! O comando a seguir inicia um novo shell onde todas as dependências e variáveis de ambiente apropriadas são configuradas para hackear em Guix:
guix shell -D guix -CPW
ou mesmo, de dentro de uma árvore de trabalho Git para Guix:
guix shell -CPW
Se -C (abreviação de --container) não for compatível com
seu sistema, tente --pure em vez de -CPW. Veja Invocando guix shell, para obter mais informações sobre esse comando.
Se você não conseguir usar o Guix ao criar o Guix a partir de um checkout, a seguir estão os pacotes necessários, além daqueles mencionados nas instruções de instalação (veja Requisitos).
No Guix, dependências extras podem ser adicionadas executando guix
shell:
guix shell -D guix help2man git strace --pure
A partir daí você pode gerar a infraestrutura do sistema de construção usando Autoconf e Automake:
./bootstrap
Se você receber um erro como este:
configure.ac:46: error: possibly undefined macro: PKG_CHECK_MODULES
provavelmente significa que o Autoconf não conseguiu encontrar o pkg.m4, que é fornecido pelo pkg-config. Certifique-se de que pkg.m4 esteja disponível. O mesmo vale para o conjunto de macros guile.m4 fornecido pelo Guile. Por exemplo, se você instalou o Automake em /usr/local, ele não procuraria arquivos .m4 em /usr/share. Nesse caso, você tem que invocar o seguinte comando:
export ACLOCAL_PATH=/usr/share/aclocal
Veja Macro Search Path em The GNU Automake Manual, para mais informações.
Então, execute:
./configure
Opcionalmente, --localstatedir e --sysconfdir podem também ser
providenciados como argumentos. Por padrão, localstatedir é
/var (veja O armazém, para obter informações sobre isso) e
/etc é o valor normal de sysconfdir. Observe que você
provavelmente não executará make install no final (não é
necessário), mas ainda é importante passar os valores localstatedir e
sysconfdir corretos, que são registrados no módulo (guix
config) do Guile.
Finalmente, você pode construir o Guix e, se desejar, executar os testes (veja Executando o conjunto de testes):
make make check
Se alguma coisa falhar, dê uma olhada nas instruções de instalação (veja Instalação) ou envie uma mensagem para a a lista de discussão.
A partir daí, você pode autenticar todos os commits incluídos no seu checkout executando:
guix git authenticate \ 9edb3f66fd807b096b48283debdcddccfea34bad \ "BBB0 2DDF 2CEA F6A8 0D1D E643 A2A0 6DF2 A33A 54FA"
A primeira execução leva alguns minutos, mas as execuções subsequentes são mais rápidas. Em execuções subsequentes, você pode executar o comando sem argumentos, já que o introduction (o ID de confirmação e as impressões digitais do OpenPGP acima) terão sido registrados44:
guix git authenticate
Quando sua configuração para seu repositório Git local não corresponde ao
padrão, você pode fornecer a referência para o branch keyring via
a opção -k. O exemplo a seguir pressupõe que você tenha um Git
remoto chamado ‘myremote’ apontando para o repositório oficial:
guix git authenticate \ -k myremote/keyring \ 9edb3f66fd807b096b48283debdcddccfea34bad \ "BBB0 2DDF 2CEA F6A8 0D1D E643 A2A0 6DF2 A33A 54FA"
Veja Invocando guix git authenticate, para mais informações sobre este
comando.
Nota: Por padrão, os hooks são instalados de forma que
guix git authenticateseja invocado sempre que você executargit pullougit push.
Após atualizar o repositório, make pode falhar com um erro
semelhante ao exemplo a seguir:
error: failed to load 'gnu/packages/linux.scm': ice-9/eval.scm:293:34: In procedure abi-check: #<record-type <origin>>: record ABI mismatch; recompilation needed
Isso significa que um dos tipos de registro que o Guix define (neste
exemplo, o registro origin) foi alterado e todo o guix precisa ser
recompilado para levar essa mudança em consideração. Para fazer isso,
execute make clean-go seguido de make.
Caso make falhe com uma mensagem de erro do Automake após a
atualização, você precisará repetir as etapas descritas nesta seção,
começando com ./bootstrap.
Próximo: Executando guix antes dele ser instalado, Anterior: Compilando do git, Acima: Contribuindo [Conteúdo][Índice]
22.3 Executando o conjunto de testes
Depois que um configure e make bem-sucedido forem
executados, é uma boa ideia executar o conjunto de testes. Ele pode ajudar a
detectar problemas com a configuração ou o ambiente, ou com bugs no próprio
Guix – e realmente, relatar falhas de teste é uma boa maneira de ajudar a
melhorar o software. Para executar o conjunto de testes, digite:
make check
Os casos de teste podem ser executados em paralelo: você pode usar a opção
-j do GNU make para acelerar as coisas. A primeira execução pode
levar alguns minutos em uma máquina recente; as execuções subsequentes serão
mais rápidas porque o armazém criado para fins de teste já terá vários itens
no cache.
Também é possível executar um subconjunto dos testes definindo a variável
makefile TESTS como neste exemplo:
make check TESTS="tests/store.scm tests/cpio.scm"
Por padrão, os resultados dos testes são exibidos em um nível de
arquivo. Para ver os detalhes de cada caso de teste individual, é possível
definir a variável makefile SCM_LOG_DRIVER_FLAGS como neste exemplo:
make check TESTS="tests/base64.scm" SCM_LOG_DRIVER_FLAGS="--brief=no"
O driver de teste Automake personalizado SRFI 64 subjacente usado para o conjunto de testes ’check’ (localizado em build-aux/test-driver.scm) também permite selecionar quais casos de teste executar em um nível mais fino, por meio de suas opções --select e --exclude. Aqui está um exemplo, para executar todos os casos de teste do arquivo de teste tests/packages.scm cujos nomes começam com “transaction-upgrade-entry”:
export SCM_LOG_DRIVER_FLAGS="--select=^transaction-upgrade-entry" make check TESTS="tests/packages.scm"
Aqueles que desejam inspecionar os resultados de testes com falha
diretamente da linha de comando podem adicionar a opção
--errors-only=yes à variável makefile SCM_LOG_DRIVER_FLAGS e
definir a variável makefile do Automake VERBOSE, como em:
make check SCM_LOG_DRIVER_FLAGS="--brief=no --errors-only=yes" VERBOSE=1
A opção --show-duration=yes pode ser usada para imprimir a duração dos casos de teste individuais, quando usada em combinação com --brief=no:
make check SCM_LOG_DRIVER_FLAGS="--brief=no --show-duration=yes"
Veja Parallel Test Harness em GNU Automake para mais informações sobre o Automake Parallel Test Harness.
Em caso de falha, envie um e-mail para bug-guix@gnu.org e anexe o arquivo test-suite.log. Por favor, especifique a versão do Guix que está sendo usada, bem como os números de versão das dependências (veja Requisitos) em sua mensagem.
O Guix também vem com um conjunto de testes de sistema completo que testa instâncias completas do Guix System. Ele só pode ser executado em sistemas nos quais o Guix já está instalado, usando:
make check-system
ou, novamente, definindo TESTS para selecionar um subconjunto de
testes a serem executados:
make check-system TESTS="basic mcron"
Esses testes de sistema são definidos nos módulos (gnu tests
…). Eles trabalham executando os sistemas operacionais em teste com
instrumentação leve em uma máquina virtual (VM). Eles podem ser
computacionalmente intensivos ou bastante baratos, dependendo se os
substitutos estão disponíveis para suas dependências
(veja Substitutos). Alguns deles exigem muito espaço de armazenamento
para armazenar imagens de VM.
Se você encontrar um erro como:
Compilando módulos do Scheme... ice-9/eval.scm:142:16: No procedimento compile-top-call: erro: all-system-tests: variável não vinculada dica: Você esqueceu `(use-modules (gnu tests))'?
pode haver inconsistências na árvore de trabalho de compilações
anteriores. Para resolver isso, tente executar make clean-go
seguido por make.
Novamente, em caso de falhas nos testes, por favor envie bug-guix@gnu.org todos os detalhes.
Próximo: A configuração perfeita, Anterior: Executando o conjunto de testes, Acima: Contribuindo [Conteúdo][Índice]
22.4 Executando guix antes dele ser instalado
Para manter um ambiente de trabalho saudável, você achará útil testar as alterações feitas na árvore local de fontes sem realmente instalá-las. Para que você possa distinguir entre o seu chapéude ”usuário final” e sua fantasia ”misturada”.
Para esse fim, todas as ferramentas de linha de comando podem ser usadas
mesmo se você não tiver executado make install. Para fazer isso,
primeiro você precisa ter um ambiente com todas as dependências disponíveis
(veja Compilando do git) e, em seguida, simplesmente prefixar cada
comando com ./pre-inst-env (o pre-inst-env fica na árvore
de construção superior do Guix; veja Compilando do git para
gerá-lo). Como exemplo, aqui está como você construiria o pacote
hello conforme definido em sua árvore de trabalho (isso pressupõe que
guix-daemon já esteja em execução em seu sistema; não há problema
se for uma versão diferente):
$ ./pre-inst-env guix build hello
Da mesma forma, um exemplo para uma sessão do Guile usando os módulos Guix:
$ ./pre-inst-env guile -c '(use-modules (guix utils)) (pk (%current-system))'
;;; ("x86_64-linux")
… e para um REPL (veja Usando Guix interativamente):
$ ./pre-inst-env guile
scheme@(guile-user)> ,use(guix)
scheme@(guile-user)> ,use(gnu)
scheme@(guile-user)> (define snakes
(fold-packages
(lambda (package lst)
(if (string-prefix? "python"
(package-name package))
(cons package lst)
lst))
'()))
scheme@(guile-user)> (length snakes)
$1 = 361
Se você estiver hackeando o daemon e seu código de suporte ou se
guix-daemon ainda não estiver em execução no seu sistema, você
pode iniciá-lo diretamente da build tree45:
$ sudo -E ./pre-inst-env guix-daemon --build-users-group=guixbuild
O script pre-inst-env configura todas as variáveis de ambiente
necessárias para prover suporte a isso, incluindo PATH e
GUILE_LOAD_PATH.
Observe que ./pre-inst-env guix pull não atualiza a área de
fontes local; ele simplesmente atualiza a ligação simbólica
~/.config/guix/current (veja Invocando guix pull). Execute
git pull em vez disso, se você quiser atualizar sua árvore de
fontes local.
Às vezes, especialmente se você atualizou seu repositório recentemente,
executar ./pre-inst-env imprimirá uma mensagem semelhante ao
exemplo a seguir:
;;; note: source file /home/user/projects/guix/guix/progress.scm ;;; newer than compiled /home/user/projects/guix/guix/progress.go
Esta é apenas uma nota e você pode ignorá-la com segurança. Você pode se
livrar da mensagem executando make -j4. Até que você faça isso, o
Guile será executado um pouco mais devagar porque interpretará o código em
vez de usar arquivos de objeto Guile preparados (.go).
Você pode executar make automaticamente enquanto trabalha usando
watchexec do pacote watchexec. Por exemplo, para compilar
novamente cada vez que você atualizar um arquivo de pacote, execute
‘watchexec -w gnu/packages -- make -j4’.
Próximo: Configurações alternativas, Anterior: Executando guix antes dele ser instalado, Acima: Contribuindo [Conteúdo][Índice]
22.5 A configuração perfeita
A configuração perfeita para hackear no Guix é basicamente a configuração perfeita usada para hackear o Guile (veja Using Guile in Emacs em Manual de referência do GNU Guile). Primeiro, você precisa de mais do que um editor, você precisa de Emacs, capacitado pelo maravilhoso Geiser. Para configurar isso, execute:
guix install emacs guile emacs-geiser emacs-geiser-guile
O Geiser permite desenvolvimento interativo e incremental de dentro do Emacs: compilação e avaliação de código de dentro de buffers, acesso à documentação on-line (docstrings), conclusão sensível ao contexto, M-. para pular para uma definição de objeto, um REPL para testar seu código e muito mais (veja Introduction em Manual do Usuário do Geiser). Se você permitir que o Emacs carregue o arquivo .dir-locals.el na raiz do checkout do projeto, isso fará com que o Geiser adicione automaticamente as fontes locais do Guix ao caminho de carregamento do Guile.
Para realmente editar o código, o Emacs já possui um modo Scheme bacana. Mas além disso, você não deve perder Paredit. Ele fornece recursos para operar diretamente na árvore sintática, como aumentar ou agrupar uma expressão simbólica (S-expression), engolir ou rejeitar a expressão simbólica seguinte, etc.
Também fornecemos modelos para mensagens comuns de commit do git e definições de pacotes no diretório etc/snippets. Esses modelos podem ser usados para expandir sequências curtas de gatilho para trechos de texto interativos. Se você usar YASnippet, você pode querer adicionar o diretório de snippets etc/snippets/yas ao yas-snippet-dirs variável. Se você usar Tempel, você pode querer adicionar o caminho etc/snippets/tempel/* à variável tempel-path no Emacs.
;; Assuming the Guix checkout is in ~/src/guix. ;; Yasnippet configuration (with-eval-after-load 'yasnippet (add-to-list 'yas-snippet-dirs "~/src/guix/etc/snippets/yas")) ;; Tempel configuration (with-eval-after-load 'tempel ;; Certifique-se de que tempel-path seja uma lista — também pode ser uma string. (unless (listp 'tempel-path) (setq tempel-path (list tempel-path))) (add-to-list 'tempel-path "~/src/guix/etc/snippets/tempel/*"))
Os trechos de mensagens de commit dependem de Magit
para exibir arquivos "staged". Ao editar uma mensagem de commit, digite
add seguido por TAB para inserir um modelo de mensagem de
commit para adicionar um pacote; digite update seguido por TAB
para inserir um modelo para atualizar um pacote; digite https seguido
por TAB para inserir um modelo para alterar a URI da página inicial de
um pacote para HTTPS.
O trecho principal para scheme-mode é acionado digitando
package ... seguido de TAB. Esse trecho também insere a string
de acionamento origin..., que pode ser expandida ainda mais. O trecho
origin, por sua vez, pode inserir outras strings acionadoras que
terminam em ..., que também podem ser expandidas.
Além disso, fornecemos inserção e atualização automática de direitos autorais em etc/copyright.el. Você pode definir seu nome completo, e-mail e carregar um arquivo.
(setq user-full-name "Alice Doe") (setq user-mail-address "alice@mail.org") ;; Supondo que o checkout do Guix esteja em ~/src/guix. (load-file "~/src/guix/etc/copyright.el")
Para inserir um copyright na linha atual, invoque M-x guix-copyright.
Para atualizar um copyright você precisa especificar um
copyright-names-regexp.
(setq copyright-names-regexp
(format "%s <%s>" user-full-name user-mail-address))
Você pode verificar se seus direitos autorais estão atualizados avaliando
M-x copyright-update. Se você quiser fazer isso automaticamente após
cada salvamento de buffer, adicione (add-hook 'after-save-hook
'copyright-update) no Emacs.
Acima: A configuração perfeita [Conteúdo][Índice]
22.5.1 Visualizando Bugs no Emacs
O Emacs tem um modo secundário interessante chamado bug-reference,
que, quando combinado com ‘emacs-debbugs’ (o pacote Emacs), pode ser
usado para abrir links como ‘<https://bugs .gnu.org/58697>’ ou
‘<https://issues.guix.gnu.org/58697>’ como buffers de relatório de
bugs. A partir daí você pode facilmente consultar o tópico do email através
da interface do Gnus, responder ou modificar o status do bug, tudo sem sair
do conforto do Emacs! Abaixo está um exemplo de configuração para adicionar
ao seu arquivo de configuração ~/.emacs:
;;; Bug references. (require 'bug-reference) (add-hook 'prog-mode-hook #'bug-reference-prog-mode) (add-hook 'gnus-mode-hook #'bug-reference-mode) (add-hook 'erc-mode-hook #'bug-reference-mode) (add-hook 'gnus-summary-mode-hook #'bug-reference-mode) (add-hook 'gnus-article-mode-hook #'bug-reference-mode) ;;; Isso estende a expressão padrão (a primeira expressão mais alta ;;; fornecida para 'or') para também corresponder a URLs como ;;; <https://issues.guix.gnu.org/58697> ou <https://bugs.gnu.org/58697>. ;;; Também é estendido para detectar trailers git "Fixes: #NNNNN". (setq bug-reference-bug-regexp (rx (group (or (seq word-boundary (or (seq (char "Bb") "ug" (zero-or-one " ") (zero-or-one "#")) (seq (char "Pp") "atch" (zero-or-one " ") "#") (seq (char "Ff") "ixes" (zero-or-one ":") (zero-or-one " ") "#") (seq "RFE" (zero-or-one " ") "#") (seq "PR " (one-or-more (char "a-z+-")) "/")) (group (one-or-more (char "0-9")) (zero-or-one (seq "#" (one-or-more (char "0-9")))))) (seq (? "<") "https://bugs.gnu.org/" (group-n 2 (one-or-more (char "0-9"))) (? ">")) (seq (? "<") "https://issues.guix.gnu.org/" (? "issue/") (group-n 2 (one-or-more (char "0-9"))) (? ">")))))) (setq bug-reference-url-format "https://issues.guix.gnu.org/%s") (require 'debbugs) (require 'debbugs-browse) (add-hook 'bug-reference-mode-hook #'debbugs-browse-mode) (add-hook 'bug-reference-prog-mode-hook #'debbugs-browse-mode) ;; O seguinte permite que o usuário do Emacs Debbugs abra o problema diretamente dentro (setq debbugs-browse-url-regexp (rx line-start "http" (zero-or-one "s") "://" (or "debbugs" "issues.guix" "bugs") ".gnu.org" (one-or-more "/") (group (zero-or-one "cgi/bugreport.cgi?bug=")) (group-n 3 (one-or-more digit)) line-end)) ;; Altera o padrão quando executado como 'M-x debbugs-gnu'. (setq debbugs-gnu-default-packages '("guix" "guix-patches")) ;; Mostrar solicitações de recursos. (setq debbugs-gnu-default-severities '("serious" "important" "normal" "minor" "wishlist"))
Para obter mais informações, consulte Bug Reference em The GNU Emacs Manual e Minor Mode em The Debbugs User Guide.
Próximo: Estrutura da árvore de origem, Anterior: A configuração perfeita, Acima: Contribuindo [Conteúdo][Índice]
22.6 Configurações alternativas
Configurações alternativas ao Emacs podem permitir que você trabalhe no Guix com uma experiência de desenvolvimento semelhante e podem funcionar melhor com as ferramentas que você usa atualmente ou ajudá-lo a fazer a transição para o Emacs.
As opções listadas abaixo fornecem apenas alternativas à configuração baseada em Emacs, que é a mais utilizada na comunidade Guix. Se você quiser realmente entender como a configuração perfeita para o desenvolvimento do Guix deve funcionar, nós o encorajamos a ler a seção anterior, independentemente do editor que você escolher usar.
Próximo: Vim e NeoVim, Acima: Configurações alternativas [Conteúdo][Índice]
22.6.1 Guile Estúdio
Guile Studio é um Emacs pré-configurado com praticamente tudo que você precisa para começar a hackear no Guile. Se você não estiver familiarizado com o Emacs, a transição será mais fácil para você.
guix install guile-studio
Guile Studio vem com Geiser pré-instalado e preparado para ação.
Anterior: Guile Estúdio, Acima: Configurações alternativas [Conteúdo][Índice]
22.6.2 Vim e NeoVim
O Vim (e o NeoVim) também são empacotados no Guix, caso você decida seguir o caminho do mal.
guix install vim
Se você deseja desfrutar de uma experiência de desenvolvimento semelhante à
configuração perfeita, você deve instalar vários plugins para configurar o
editor. O Vim (e o NeoVim) têm o equivalente ao Paredit,
paredit.vim, que irá ajudá-lo com a estrutura edição de arquivos
Scheme (embora o suporte para arquivos muito grandes não seja ótimo).
guix install vim-paredit
Também recomendamos que você execute :set autoindent para que seu
código seja recuado automaticamente conforme você digita.
Para a interação com Git,
fugitive.vim é o plugin mais comumente usado:
guix install vim-fugitive
E claro, se você quiser interagir com o Guix diretamente de dentro do vim,
usando o emulador de terminal integrado, temos nosso próprio pacote
guix.vim!
guix install vim-guix-vim
No NeoVim você pode até fazer uma configuração semelhante ao Geiser usando Conjure que permite conectar-se a um processo Guile em execução e injetar seu código ao vivo (infelizmente ainda não está empacotado no Guix) .
Próximo: Diretrizes de empacotamento, Anterior: Configurações alternativas, Acima: Contribuindo [Conteúdo][Índice]
22.7 Estrutura da árvore de origem
Se você estiver disposto a contribuir com o Guix além dos pacotes, ou se quiser aprender como tudo se encaixa, esta seção fornece um tour guiado na base de código que pode ser útil.
No geral, a árvore de origem do Guix contém quase exclusivamente Guile módulos, cada um dos quais pode ser visto como uma biblioteca independente (veja Modules em Manual de Referência do GNU Guile).
A tabela a seguir fornece uma visão geral dos principais diretórios e o que
eles contêm. Lembre-se de que no Guile, cada nome de módulo é derivado de
seu nome de arquivo—por exemplo, o módulo no arquivo
guix/packages.scm é chamado (guix packages).
- guix
Esta é a localização dos mecanismos principais do Guix. Para ilustrar o que significa “core”, aqui estão alguns exemplos, começando com ferramentas de baixo nível e indo em direção a ferramentas de nível mais alto:
(guix store)Conectando e interagindo com o daemon de compilação (veja O armazém).
(guix derivations)Criando derivações (veja Derivações).
(guix gexps)Escrevendo expressões-G (veja Expressões-G).
(guix packages)Definindo pacotes e origens (veja Referência do
package).(guix download)(guix git-download)Os métodos de download de origem
url-fetchegit-fetch(veja Referência doorigin).(guix swh)Obtendo código-fonte do arquivo Software Heritage.
(guix search-paths)Implementando caminhos de pesquisa (veja Caminhos de pesquisa).
(guix build-system)A interface do sistema de compilação (veja Sistemas de compilação).
(guix profiles)Implementando perfis.
- guix/build-system
Este diretório contém implementações específicas do sistema de compilação (veja Sistemas de compilação), como:
(guix build-system gnu)the GNU build system;
(guix build-system cmake)the CMake build system;
(guix build-system pyproject)The Python “pyproject” build system.
- guix/build
Isto contém código geralmente usado no “lado da construção” (veja strata of code). Isto inclui código usado para construir pacotes ou outros componentes do sistema operacional, assim como utilitários:
(guix build utils)Utilitários para definições de pacotes e muito mais (veja Construir utilitários).
(guix build gnu-build-system)(guix build cmake-build-system)(guix build pyproject-build-system)Implementação de sistemas de construção e, em particular, definição de suas fases de construção (veja Fases de construção).
(guix build syscalls)Interface para a biblioteca C e para chamadas de sistema Linux.
- guix/scripts
Isto contém módulos correspondentes aos subcomandos
guix. Por exemplo, o módulo(guix scripts shell)exporta o procedimentoguix-shell, que corresponde diretamente ao comandoguix shell(veja Invocandoguix shell).- guix/import
Isto contém código de suporte para os importadores e atualizadores (veja Invoking
guix importe veja Invocandoguix refresh). Por exemplo,(guix import pypi)define a interface para PyPI, que é usada pelo comandoguix import pypi.
Todos os diretórios que vimos até agora estão em guix/. O outro lugar
importante é o diretório gnu/, que contém principalmente definições
de pacotes, bem como bibliotecas e ferramentas para Guix System
(veja Configuração do sistema) e Guix Home (veja Home Configuration),
todos os quais se baseiam na funcionalidade fornecida pelos módulos
(guix …)46.
- gnu/packages
Este é de longe o diretório mais lotado da árvore de fontes: ele contém package modules que exportam definições de pacotes (veja Módulos de pacote). Alguns exemplos:
(gnu packages base)Módulo que fornece pacotes “base”:
glibc,coreutils,grep, etc.(gnu packages guile)Guile e pacotes principais do Guile.
(gnu packages linux)O kernel Linux-libre e pacotes relacionados.
(gnu packages python)Python e pacotes principais do Python.
(gnu packages python-xyz)Pacotes Python diversos (não fomos muito criativos).
Em qualquer caso, você pode pular para uma definição de pacote usando
guix edit(veja Invocandoguix edit) e visualizar sua localização comguix show(veja Invocandoguix package).- gnu/packages/patches
Este diretório contém patches aplicados aos pacotes e obtidos usando o procedimento
search-patches.- gnu/services
Isto contém definições de serviço, principalmente para Guix System (veja Serviços), mas algumas delas são adaptadas e reutilizadas para Guix Home, como veremos abaixo. Exemplos:
(gnu services)A estrutura do serviço em si, que define os tipos de dados do serviço e do tipo de serviço (veja Composição de serviço).
(gnu services base)Serviços “básicos” (veja Serviços básicos).
(gnu services desktop)Serviços “desktop” (veja Serviços de desktop).
(gnu services shepherd)Apoio aos serviços Shepherd (veja Serviços de Shepherd).
Você pode pular para uma definição de serviço usando
guix system edite visualizar sua localização comguix system search(veja Invokingguix system).- gnu/system
Estes são os principais módulos do sistema Guix, como:
(gnu system)Define
operating-system(vejaoperating-systemReference).(gnu system file-systems)Define
file-system(veja Sistemas de arquivos).(gnu system mapped-devices)Define
mapped-device(veja Dispositivos mapeados).
- gnu/build
Esses são módulos que são usados no “lado da compilação” ao criar sistemas operacionais ou pacotes, ou em tempo de execução pelos sistemas operacionais.
(gnu build accounts)Criando /etc/passwd, /etc/shadow, etc. (veja Contas de usuário).
(gnu build activation)Ativar um sistema operacional no momento da inicialização ou da reconfiguração.
(gnu build file-systems)Pesquisar, verificar e montar sistemas de arquivos.
(gnu build linux-boot)(gnu build hurd-boot)Inicializando sistemas operacionais GNU/Linux e GNU/Hurd.
(gnu build linux-initrd)Criando um disco RAM inicial do Linux (veja Disco de RAM inicial).
- gnu/home
Isso contém todas as coisas do Guix Home (veja Home Configuration); exemplos:
(gnu home services)Serviços principais como
home-files-service-type.(gnu home services ssh)Serviços relacionados a SSH (veja Secure Shell).
- gnu/installer
Isso contém o instalador do sistema gráfico em modo texto (veja Instalação gráfica guiada).
- gnu/machine
Estas são as abstrações de máquina usadas por
guix deploy(veja Invokingguix deploy).- gnu/tests
Isso contém testes de sistema — testes que geram máquinas virtuais para verificar se os serviços do sistema funcionam conforme o esperado (veja Executando o conjunto de testes).
Por fim, há também alguns diretórios que contêm arquivos que não são módulos Guile:
- nix
Esta é a implementação C++ do
guix-daemon, herdada do Nix (veja Invocandoguix-daemon).- tests
Esses são testes unitários, cada arquivo correspondendo mais ou menos a um módulo, em particular os módulos
(guix …)(veja Executando o conjunto de testes).- doc
Esta é a documentação na forma de arquivos Texinfo: este manual e o Livro de receitas. Veja Writing a Texinfo File em GNU Texinfo, para informações sobre a linguagem de marcação Texinfo.
- po
Este é o local das traduções do próprio Guix, das sinopses e descrições dos pacotes, do manual e do livro de receitas. Note que os arquivos .po que vivem aqui são retirados diretamente do Weblate (veja Traduzindo o Guix).
- etc
Arquivos diversos: conclusões de shell, suporte para systemd e outros sistemas init, ganchos do Git, etc.
Com tudo isso, uma boa parte do seu sistema operacional está na ponta dos
seus dedos! Além de grep e git grep, veja A configuração perfeita sobre como navegar no código do seu editor e veja Usando Guix interativamente para obter informações sobre como usar módulos Scheme
interativamente. Aproveite!
Próximo: Estilo de código, Anterior: Estrutura da árvore de origem, Acima: Contribuindo [Conteúdo][Índice]
22.8 Diretrizes de empacotamento
A distribuição do GNU é incipiente e pode muito bem não ter alguns dos seus pacotes favoritos. Esta seção descreve como você pode ajudar a fazer a distribuição crescer.
Pacotes de software livre geralmente são distribuídos na forma de tarballs de código-fonte – geralmente arquivos tar.gz que contêm todos os arquivos fonte. Adicionar um pacote à distribuição significa essencialmente duas coisas: adicionar uma receita que descreve como criar o pacote, incluindo uma lista de outros pacotes necessários para compilá-lo e adicionar metadados de pacote junto com essa receita, como uma descrição e informações de licenciamento.
No Guix, todas essas informações estão incorporadas em configurações de pacote. As definições de pacote fornecem uma visão de alto nível do pacote. Elas são escritas usando a sintaxe da linguagem de programação Scheme; de fato, para cada pacote, definimos uma variável vinculada à definição do pacote e exportamos essa variável de um módulo (veja Módulos de pacote). No entanto, o conhecimento profundo de Scheme não é um pré-requisito para a criação de pacotes. Para mais informações sobre definições de pacotes, veja Definindo pacotes.
Quando uma definição de pacote está em vigor, armazenada em um arquivo na
árvore de fontes do Guix, ela pode ser testada usando o comando
guix build (veja Invocando guix build). Por exemplo, supondo que
o novo pacote seja chamado gnew, você pode executar este comando na
árvore de construção do Guix (veja Executando guix antes dele ser instalado):
./pre-inst-env guix build gnew --keep-failed
O uso de --keep-failed facilita a depuração de falhas de compilação,
pois fornece acesso à árvore de compilação com falha. Outra opção útil da
linha de comando ao depurar é --log-file, para acessar o log de
compilação.
Se o pacote for desconhecido para o comando guix, pode ser que o
arquivo fonte contenha um erro de sintaxe ou não tenha uma cláusula
define-public para exportar a variável do pacote. Para descobrir
isso, você pode carregar o módulo do Guile para obter mais informações sobre
o erro real:
./pre-inst-env guile -c '(use-modules (gnu packages gnew))'
Assim que seu pacote for compilado corretamente, envie-nos um patch (veja Enviando patches). Bem, se precisar de ajuda, ficaremos felizes em ajudá-lo também. Depois que o patch é confirmado no repositório Guix, o novo pacote é compilado automaticamente nas plataformas suportadas por nosso sistema de integração contínua.
Os usuários podem obter a nova definição de pacote simplesmente executando
guix pull (veja Invocando guix pull). Quando
bordeaux.guix.gnu.org termina de construir o pacote, a
instalação do pacote baixa automaticamente os binários de lá
(veja Substitutos). O único lugar onde a intervenção humana é necessária
é para revisar e aplicar o patch.
- Liberdade de software
- Nomeando um pacote
- Números de versão
- Sinopses e descrições
- Snippets versus Phases
- Dependências do módulo cíclico
- Pacotes Emacs
- Módulos Python
- Módulos Perl
- Pacotes Java
- Rust Crates
- Pacotes Elm
- Fontes
Próximo: Nomeando um pacote, Acima: Diretrizes de empacotamento [Conteúdo][Índice]
22.8.1 Liberdade de software
O sistema operacional GNU foi desenvolvido para que os usuários possam ter liberdade em sua computação. GNU é software livre, o que significa que os usuários têm a quatro liberdades essenciais: executar o programa, estudar e alterar o programa em forma de código-fonte, para redistribuir cópias exatas e para distribuir versões modificadas. Os pacotes encontrados na distribuição GNU fornecem apenas softwares que transmitem essas quatro liberdades.
Além disso, a distribuição GNU segue o diretrizes de distribuição de software livre. Entre outras coisas, estas diretrizes rejeitam firmware não-livre, recomendações de software não-livre e discutem formas de lidar com marcas registradas e patentes.
Algumas fontes de pacotes upstream livres de outra forma contêm um
subconjunto pequeno e opcional que viola as diretrizes acima, por exemplo,
porque esse subconjunto é ele próprio um código não livre. Quando isso
acontece, os itens incorretos são removidos com patches ou trechos de código
apropriados no formato origin do pacote (veja Definindo pacotes). Dessa forma, o guix build --source retorna a fonte
“lançada” em vez da fonte upstream não modificada.
Próximo: Números de versão, Anterior: Liberdade de software, Acima: Diretrizes de empacotamento [Conteúdo][Índice]
22.8.2 Nomeando um pacote
Um pacote na verdade tem dois nomes associados a ele. Primeiro, há o nome da
variável Scheme, a que segue define-public. Por esse nome, o
pacote pode ser tornado conhecido no código Scheme, por exemplo, como
entrada para outro pacote. Segundo, há a string no campo name de uma
definição de pacote. Esse nome é usado por comandos de gerenciamento de
pacotes, como guix package e guix build.
Ambos são geralmente iguais e correspondem à conversão em minúscula do nome
do projeto escolhido a montante, com os sublinhados substituídos por
hífenes. Por exemplo, o GNUnet está disponível como gnunet e SDL_net
como sdl-net.
Uma exceção digna de nota a esta regra é quando o nome do projeto é apenas
um único caractere, ou se já existe um projeto mantido mais antigo com o
mesmo nome - independentemente de já ter sido empacotado para Guix. Use o
bom senso para tornar esses nomes inequívocos e significativos. Por exemplo,
o pacote do Guix para o shell chamado “s” upstream é s-shell e
não s. Sinta-se à vontade para pedir inspiração a seus colegas
hackers.
Não adicionamos prefixos lib para pacotes de bibliotecas, a menos que
eles já façam parte do nome oficial do projeto. Mas veja Módulos Python e
Módulos Perl para regras especiais relativas a módulos para as
linguagens Python e Perl.
Nomes de pacote de fontes são lidados de forma diferente. Veja Fontes.
Próximo: Sinopses e descrições, Anterior: Nomeando um pacote, Acima: Diretrizes de empacotamento [Conteúdo][Índice]
22.8.3 Números de versão
Geralmente, empacotamos apenas a versão mais recente de um determinado
projeto de software livre. Mas, às vezes, por exemplo, para versões
incompatíveis de bibliotecas, são necessárias duas (ou mais) versões do
mesmo pacote. Isso requer nomes de variáveis Scheme diferentes. Usamos o
nome como definido em Nomeando um pacote para a versão mais recente; as
versões anteriores usam o mesmo nome, com o sufixo - e o menor
prefixo do número da versão que pode distinguir as duas versões.
O nome dentro da definição do pacote é o mesmo para todas as versões de um pacote e não contém nenhum número de versão.
Por exemplo, as versões 2.24.20 e 3.9.12 do GTK podem ser empacotados da seguinte forma:
(define-public gtk+ (package (name "gtk+") (version "3.9.12") ...)) (define-public gtk+-2 (package (name "gtk+") (version "2.24.20") ...))
Se também quiséssemos GTK 3.8.2, este seria empacotado como
(define-public gtk+-3.8
(package
(name "gtk+")
(version "3.8.2")
...))
Ocasionalmente, empacotamos snapshots do sistema de controle de versão (VCS)
do upstream em vez de lançamentos formais. Isso deve permanecer excepcional,
porque cabe aos desenvolvedores upstream esclarecer qual é a versão
estável. No entanto, às vezes é necessário. Então, o que devemos colocar no
campo version?
Claramente, precisamos tornar o identificador de commit do snapshot VCS
visível na string de versão, mas também precisamos garantir que a string de
versão esteja aumentando monotonicamente para que o guix package
--upgrade possa determinar qual versão é mais recente. Como os
identificadores de commit, principalmente com o Git, não estão aumentando
monotonicamente, adicionamos um número de revisão que aumentamos cada vez
que atualizamos para um snapshot mais recente. A sequência da versão
resultante é assim:
2.0.11-3.cabba9e ^ ^ ^ | | `-- ID do commit do upstream | | | `--- revisão do pacote do Guix | versão mais recente do upstream
É uma boa ideia reduzir os identificadores de commit no campo version
para, digamos, 7 dígitos. Isso evita um incômodo estético (assumindo que a
estética tenha um papel a desempenhar aqui), bem como problemas relacionados
aos limites do sistema operacional, como o comprimento máximo do shebang
(127 bytes para o kernel Linux). Existem funções auxiliares para fazer isso
para pacotes usando git-fetch ou hg-fetch (veja
abaixo). Porém, é melhor usar os identificadores de commit completos em
origins para evitar ambiguidades. Uma definição típica de pacote pode
ser assim:
(define meu-pacote
(let ((commit "c3f29bc928d5900971f65965feaae59e1272a3f7")
(revision "1")) ;revisão do pacote do Guix
(package
(version (git-version "0.9" revision commit))
(source (origin
(method git-fetch)
(uri (git-reference
(url "git://example.org/meu-pacote.git")
(commit commit)))
(sha256 (base32 "1mbikn…"))
(file-name (git-file-name name version))))
;; …
)))
- Procedimento: git-version VERSION REVISION COMMIT
Retorne a string de versão para pacotes usando
git-fetch.(git-version "0.2.3" "0" "93818c936ee7e2f1ba1b315578bde363a7d43d05") ⇒ "0.2.3-0.93818c9"
- Procedimento: hg-version VERSION REVISION CHANGESET
Retorne a string de versão para pacotes usando
hg-fetch. Funciona da mesma forma quegit-version.
Próximo: Snippets versus Phases, Anterior: Números de versão, Acima: Diretrizes de empacotamento [Conteúdo][Índice]
22.8.4 Sinopses e descrições
Como vimos anteriormente, cada pacote no GNU Guix inclui uma sinopse e
uma descrição (veja Definindo pacotes). Sinopses e descrições são
importantes: são o que o guix package --search pesquisa e uma
informação crucial para ajudar os usuários a determinar se um determinado
pacote atende às suas necessidades. Consequentemente, os empacotadores devem
prestar atenção ao que entra neles.
As sinopses devem começar com uma letra maiúscula e não devem terminar com um ponto. Elas não devem começar com “a” ou “the”, que geralmente não traz nada; por exemplo, prefira “Tool-frobbing tool” em vez de “A tool that frobs files”. A sinopse deve dizer o que é o pacote – por exemplo, “Core GNU utilities (file, text, shell)” – ou para que é usado – por exemplo, a sinopse do GNU grep é “Print lines matching a pattern”.
Lembre-se de que a sinopse deve ser significativa para um público muito amplo. Por exemplo, “Manipulate alignments in the SAM format” pode fazer sentido para um pesquisador experiente em bioinformática, mas pode ser bastante inútil ou até enganoso para um público não especializado. É uma boa ideia apresentar uma sinopse que dê uma ideia do domínio do aplicativo do pacote. Neste exemplo, isso pode fornecer algo como “Manipulate nucleotide sequence alignments”, o que, esperançosamente, dá ao usuário uma melhor ideia de se é isso que eles estão procurando.
Descrições devem levar entre cinco e dez linhas. Use sentenças completas e evite usar acrônimos sem primeiro apresentá-los. Por favor, evite frases de marketing como “inovação mundial”, “força industrial” e “próxima geração”, e evite superlativos como “a mais avançada” – eles não ajudam o usuário procurando por um pacote e podem atém parece suspeito. Em vez idsso, tente se ater aos fatos, mencionando casos de uso e recursos.
As descrições podem incluir marcação Texinfo, que é útil para introduzir
ornamentos como @code ou @dfn, listas de marcadores ou
hiperlinks (veja Overview em GNU Texinfo). No entanto, você deve
ter cuidado ao usar alguns caracteres, por exemplo ‘@’ e chaves, que
são os caracteres especiais básicos em Texinfo (veja Special Characters em GNU Texinfo). Interfaces de usuário como guix show
cuidam de renderizá-lo apropriadamente.
Sinopses e descrições são traduzidas por voluntários no Weblate para que o maior número possível de usuários possam lê-las em seu idioma nativo. As interfaces de usuário os pesquisam e os exibem no idioma especificado pelo código do idioma atual.
Para permitir que xgettext extrai-as com strings traduzíveis, as
sinopses e descrições devem ser strings literais. Isso significa que
você não pode usar string-append ou format para construir
essas strings:
(package
;; …
(synopsis "Isso é traduzível")
(description (string-append "Isso " "*não*" " é traduzível.")))
Tradução é muito trabalhoso, então, como empacotador, por favor, tenha ainda mais atenção às suas sinopses e descrições, pois cada alteração pode implicar em trabalho adicional para tradutores. Para ajudá-loas, é possível tornar recomendações ou instruções visíveis inserindo comentários especiais como esse (veja xgettext Invocation em GNU Gettext):
;; TRANSLATORS: "X11 resize-and-rotate" should not be translated. (description "ARandR is designed to provide a simple visual front end for the X11 resize-and-rotate (RandR) extension. …")
Próximo: Dependências do módulo cíclico, Anterior: Sinopses e descrições, Acima: Diretrizes de empacotamento [Conteúdo][Índice]
22.8.5 Snippets versus Phases
A fronteira entre usar um snippet de origem e uma fase de construção para
modificar as fontes de um pacote pode ser ilusória. Os snippets de origem
são normalmente usados para remover arquivos indesejados, como bibliotecas
agrupadas, fontes não livres ou para aplicar substituições simples. A fonte
derivada de uma origem deve produzir uma fonte que possa ser usada para
construir o pacote em qualquer sistema que o pacote suporte (ou seja, atuar
como a fonte correspondente). Em particular, os snippets de origem não devem
incorporar itens do armazém nas fontes; tal correção deve ser feita usando
fases de construção. Consulte a documentação do registro origin para
obter mais informações (veja Referência do origin).
Próximo: Pacotes Emacs, Anterior: Snippets versus Phases, Acima: Diretrizes de empacotamento [Conteúdo][Índice]
22.8.6 Dependências do módulo cíclico
Embora não possa haver dependências circulares entre pacotes, o mecanismo frouxo de carregamento de módulos do Guile permite dependências circulares entre módulos do Guile, o que não causa problemas, desde que as seguintes condições sejam seguidas para dois módulos que fazem parte de um ciclo de dependência:
- As macros não devem ser compartilhadas entre os módulos co-dependentes
- Variáveis de nível superior são referenciadas apenas em campos de pacote
atrasados (thunked):
arguments,native-inputs,inputs,propagated-inputsoureplacement - Procedimentos que fazem referência a variáveis de nível superior de outro módulo não são chamados no nível superior de um módulo.
Afastar-se das regras acima pode funcionar enquanto não houver ciclos de dependência entre os módulos, mas como tais ciclos são confusos e difíceis de solucionar, é melhor seguir as regras para evitar a introdução de problemas no futuro.
Aqui está uma armadilha comum a ser evitada:
(define-public avr-binutils
(package
(inherit (cross-binutils "avr"))
(name "avr-binutils")))
No exemplo acima, o pacote avr-binutils foi definido no módulo
(gnu packages avr), e o procedimento cross-binutils em
(gnu packages cross-base). Como o campo inherit não é atrasado
(thunked), ele é avaliado no nível superior no momento do carregamento, o
que é problemático na presença de ciclos de dependência do módulo. Isso pode
ser resolvido transformando o pacote em um procedimento, como:
(define (make-avr-binutils)
(package
(inherit (cross-binutils "avr"))
(name "avr-binutils")))
Seria necessário tomar cuidado para garantir que o procedimento acima só seja usado em campos atrasados de pacote ou dentro de outro procedimento também não chamado no nível superior.
Próximo: Módulos Python, Anterior: Dependências do módulo cíclico, Acima: Diretrizes de empacotamento [Conteúdo][Índice]
22.8.7 Pacotes Emacs
Os pacotes Emacs devem preferencialmente usar o sistema de compilação Emacs
(veja emacs-build-system), para uniformidade e os benefícios
proporcionados por suas fases de compilação, como a geração automática do
arquivo autoloads e a compilação de bytes das fontes. Como não existe uma
maneira padronizada de executar um conjunto de testes para pacotes Emacs, os
testes são desabilitados por padrão. Quando um conjunto de testes estiver
disponível, ele deverá ser habilitado definindo o argumento #:tests?
como #true. Por padrão, o comando para executar o teste é
make check, mas qualquer comando pode ser especificado através do
argumento #:test-command. O argumento #:test-command espera
que uma lista contendo um comando e seus argumentos seja invocada durante a
fase check.
As dependências Elisp dos pacotes Emacs são normalmente fornecidas como
propagated-inputs quando necessário em tempo de execução. Quanto a
outros pacotes, as dependências de construção ou teste devem ser
especificadas como native-inputs.
Pacotes Emacs às vezes dependem de diretórios de recursos que devem ser
instalados junto com os arquivos Elisp. O argumento #:include pode
ser usado para esse propósito, especificando uma lista de regexps para
corresponder. A melhor prática ao usar o argumento #:include é
estender em vez de substituir seu valor padrão (acessível por meio da
variável %default-include). Como exemplo, um pacote de extensão
yasnippet normalmente inclui um diretório snippets, que pode ser
copiado para o diretório de instalação usando:
#:include (cons "^snippets/" %default-include)
Ao encontrar problemas, é aconselhável verificar a presença do cabeçalho de
extensão Package-Requires no arquivo de origem principal do pacote e
se quaisquer dependências e suas versões listadas nele foram atendidas.
Próximo: Módulos Perl, Anterior: Pacotes Emacs, Acima: Diretrizes de empacotamento [Conteúdo][Índice]
22.8.8 Módulos Python
Atualmente empacotamos Python 2 e Python 3, sob os nomes de variável Scheme
python-2 e python conforme explicado em Números de versão. Para evitar confusão e conflitos de nomes com outras linguagens
de programação, parece desejável que o nome de um pacote para um módulo
Python contenha a palavra python.
Alguns módulos são compatíveis com apenas uma versão do Python, outros com
ambas. Se o pacote Foo for compilado com Python 3, nós o nomeamos
python-foo. Se ele for compilado com Python 2, nós o nomeamos
python2-foo. Pacotes Python 2 estão sendo removidos da distribuição;
por favor, não envie nenhum pacote Python 2 novo.
Se um projeto já contém a palavra python, nós a descartamos; por
exemplo, o módulo python-dateutil é empacotado sob os nomes
python-dateutil e python2-dateutil. Se o nome do projeto
começa com py (p.ex., pytz), nós o mantemos e o prefixamos
conforme descrito acima.
Nota: Atualmente, há dois sistemas de construção diferentes para pacotes Python no Guix: python-build-system e pyproject-build-system. Por muito tempo, os pacotes Python foram construídos a partir de um arquivo setup.py especificado informalmente. Isso funcionou incrivelmente bem, considerando o sucesso do Python, mas era difícil construir ferramentas em torno dele. Como resultado, uma série de sistemas de construção alternativos surgiram e a comunidade eventualmente decidiu por um padrão formal para especificar os requisitos de construção. pyproject-build-system é a implementação do Guix desse padrão. Ele é considerado “experimental”, pois ainda não suporta todos os vários backends de construção PEP-517, mas você é encorajado a experimentá-lo para novos pacotes Python e relatar quaisquer problemas. Ele eventualmente será descontinuado e mesclado ao python-build-system.
22.8.8.1 Especificando dependências
Informações de dependências para pacotes Python estão geralmente disponíveis na árvore de fonte do pacote, com variados graus de precisão nos arquivos: setup.py, requirements.txt ou tox.ini (este último principalmente para testes de dependência).
Sua missão, ao escrever uma receita para um pacote Python, é mapear essas
dependências para o tipo apropriado de “entrada” (veja inputs). Apesar do importador do pypi normalmente fazer
um bom trabalho (veja Invoking guix import), você pode se interessar em
verificar a lista de verificação a seguir para determinar qual dependência
vai onde.
- Atualmente empacotamos Python com
setuptoolsepipinstalados por padrão. Isto está prestes a mudar, e os usuários são encorajados a usar opython-toolchainse quiserem um ambiente de construção para Python.guix lintavisará sesetuptoolsoupipforem adicionados como entradas nativas porque geralmente não são necessários. - Dependências de Python necessárias em tempo de execução vão em
propagated-inputs. Elas geralmente são definidas com a palavra-chaveinstall_requiresem setup.py ou no arquivo requirements.txt. - Pacotes Python necessários apenas em tempo de compilação — e.g., aqueles
listados sob
build-system.requiresno pyproject.toml ou com a palavra-chavesetup_requiresno setup.py — ou dependencias apenas para teste — e.g., aqueles notests_requireou no tox.ini — vão nonative-inputs. A razão é que (1) eles não precisam ser propagados porque não são necessários em tempo de execução e (2) em um contexto de compilação cruzada, é a entrada “nativa” que nós queríamo.Exemplos são os frameworks de teste
pytest,mockenose. É claro, se qualquer um desses pacotes também for necessário em tempo de compilação, ele precisa ir parapropagated-inputs. - Qualquer coisa que não encaixar nas categorias anteriores vai para
inputs. Por exemplo, programas ou bibliotecas C necessárias para compilar pacotes Python contendo extensões C. - Se um pacote Python tem dependências opcionais (
extras_require), fica a seu critério adicioná-las ou não, com base na sua proporção de utilidade/sobrecarga (vejaguix size).
Próximo: Pacotes Java, Anterior: Módulos Python, Acima: Diretrizes de empacotamento [Conteúdo][Índice]
22.8.9 Módulos Perl
Os programas Perl próprios são nomeados como qualquer outro pacote, usando o
nome upstream em letras minúsculas. Para pacotes Perl que contêm uma única
classe, usamos o nome da classe em letras minúsculas, substituímos todas as
ocorrências de :: por traços e precede o prefixo
perl-. Portanto, a classe XML::Parser se torna
perl-xml-parser. Módulos contendo várias classes mantêm seu nome
upstream em minúsculas e também são precedidos por perl-. Esses
módulos tendem a ter a palavra perl em algum lugar do nome, que é
descartada em favor do prefixo. Por exemplo, libwww-perl se torna
perl-libwww.
Próximo: Rust Crates, Anterior: Módulos Perl, Acima: Diretrizes de empacotamento [Conteúdo][Índice]
22.8.10 Pacotes Java
Os programas Java próprios são nomeados como qualquer outro pacote, usando o nome do upstream em letras minúsculas.
Para evitar confusão e conflitos de nomes com outras linguagens de
programação, é desejável que o nome de um pacote para um pacote Java seja
prefixado com java-. Se um projeto já contém a palavra java,
descartamos isso; por exemplo, o pacote ngsjava é empacotado com o
nome java-ngs.
Para pacotes Java que contêm uma única classe ou uma pequena hierarquia de
classes, usamos o nome da classe em letras minúsculas, substitua todas as
ocorrências de . por traços e acrescente o prefixo
java-. Assim, a classe apache.commons.cli se torna o pacote
java-apache-commons-cli.
Próximo: Pacotes Elm, Anterior: Pacotes Java, Acima: Diretrizes de empacotamento [Conteúdo][Índice]
22.8.11 Rust Crates
Os programas Rust que se autodenominam são nomeados como qualquer outro pacote, usando o nome original em letras minúsculas.
Para evitar colisões de namespace, prefixamos todos os outros pacotes Rust
com o prefixo rust-. O nome deve ser alterado para minúsculas
conforme apropriado e os traços devem permanecer no lugar.
No ecossistema rust é comum que várias versões incompatíveis de um pacote
sejam usadas a qualquer momento, então todas as definições de pacote devem
ter um sufixo versionado. O sufixo versionado é o dígito diferente de zero
mais à esquerda (e quaisquer zeros à esquerda, é claro). Isso segue o
esquema de versão “caret” pretendido pelo Cargo. Exemplos
rust-clap-2, rust-rand-0.6.
Devido à dificuldade em reutilizar pacotes rust como entradas pré-compiladas
para outros pacotes, o sistema de construção Cargo (veja cargo-build-system) apresenta as palavras-chave
#:cargo-inputs e cargo-development-inputs como argumentos do
sistema de construção. Seria útil pensar nelas como semelhantes a
propagated-inputs e native-inputs. Rust dependencies e
build-dependencies devem ir em #:cargo-inputs, e
dev-dependencies deve ir em #:cargo-development-inputs. Se um
pacote Rust vincular a outras bibliotecas, o posicionamento padrão em
inputs e semelhantes deve ser usado.
Deve-se tomar cuidado para garantir que a versão correta das dependências
seja usada; para esse fim, tentamos evitar pular os testes ou usar
#:skip-build? quando possível. Claro que isso nem sempre é possível,
pois o pacote pode ser desenvolvido para um sistema operacional diferente,
depender de recursos do compilador Nightly Rust ou o conjunto de testes pode
ter se atrofiado desde que foi lançado.
Próximo: Fontes, Anterior: Rust Crates, Acima: Diretrizes de empacotamento [Conteúdo][Índice]
22.8.12 Pacotes Elm
Os aplicativos Elm podem ser nomeados como outros softwares: seus nomes não precisam mencionar Elm.
Pacotes no sentido Elm (veja elm-build-system em Sistemas de compilação)
devem usar nomes no formato author/project, onde tanto
author quanto project podem conter hifens internamente, e
author às vezes contém letras maiúsculas.
Para formar o nome do pacote Guix a partir do nome upstream, seguimos uma
convenção semelhante aos pacotes Python (veja Módulos Python),
adicionando um prefixo elm-, a menos que o nome já comece com
elm-.
Em muitos casos, podemos reconstruir o nome upstream de um pacote Elm
heuristicamente, mas, como a conversão para um nome no estilo Guix envolve
perda de informações, isso nem sempre é possível. Deve-se tomar cuidado para
adicionar a propriedade 'upstream-name quando necessário para que
‘guix import elm’ funcione corretamente (veja Invoking guix import). Os cenários mais notáveis quando especificar explicitamente o nome
upstream é necessário são:
- Quando author é
elme project contém um ou mais hifens, como emelm/virtual-dom; e - Quando author contém hifens ou letras maiúsculas, como em
Elm-Canvas/raster-shapes—a menos que author sejaelm-explorations, que é tratado como um caso especial, então pacotes comoelm-explorations/markdownnão precisam usar a propriedade'upstream-name.
O módulo (guix build-system elm) fornece os seguintes utilitários
para trabalhar com nomes e convenções relacionadas:
- Procedimento: elm-package-origin nome-elm versão hash Retorna uma origem Git usando o regime de nomenclatura e marcação
de repositório necessário para um pacote Elm publicado com o nome upstream nome-elm na versão versão com soma de verificação sha256 hash.
Por exemplo:
(package (name "elm-html") (version "1.0.0") (source (elm-package-origin "elm/html" version (base32 "15k1679ja57vvlpinpv06znmrxy09lbhzfkzdc89i01qa8c4gb4a"))) ...)
- Procedimento: elm->package-name nome-elm
Retorna o nome do pacote no estilo Guix para um pacote Elm com nome upstream nome-elm.
Observe que há mais de um nome-elm possível para o qual
elm->package-nameproduzirá um determinado resultado.
- Procedimento: guix-package->elm-name pacote
Dado um Elm pacote, retorna o nome upstream possivelmente inferido, ou
#fo nome upstream não é especificado por meio da propriedade'upstream-namee não pode ser inferido porinfer-elm-package-name.
- Procedimento: infer-elm-package-name guix-name
Dado o guix-name de um pacote Elm, retorna o nome upstream inferido, ou
#fse o nome upstream não puder ser inferido. Se o resultado não for#f, fornecê-lo aelm->package-nameproduziria guix-name.
Anterior: Pacotes Elm, Acima: Diretrizes de empacotamento [Conteúdo][Índice]
22.8.13 Fontes
Para fontes que geralmente não são instaladas por um usuário para fins de digitação ou que são distribuídas como parte de um pacote de software maior, contamos com as regras gerais de empacotamento de software; por exemplo, isso se aplica às fontes entregues como parte do sistema X.Org ou às fontes que fazem parte do TeX Live.
Para facilitar a busca de fontes por um usuário, os nomes de outros pacotes contendo apenas fontes são compilados da seguinte maneira, independentemente do nome do pacote upstream.
O nome de um pacote que contém apenas uma família de fontes começa com
font-; é seguido pelo nome da fundição e um traço - se a
fundição for conhecida e o nome da família da fonte, em que os espaços são
substituídos por hífenes (e, como sempre, todas as letras maiúsculas são
transformadas em minúsculas). Por exemplo, a família de fontes Gentium da
SIL é empacotada com o nome font-sil-gentium.
Para um pacote que contém várias famílias de fontes, o nome da coleção é
usado no lugar do nome da família de fontes. Por exemplo, as fontes
Liberation consistem em três famílias, Liberation Sans, Liberation Serif e
Liberation Mono. Eles podem ser empacotados separadamente com os nomes
font-liberation-sans e assim por diante; mas como eles são
distribuídos juntos com um nome comum, preferimos agrupá-los como
font-liberation.
No caso de vários formatos da mesma família ou coleção de fontes serem
empacotados separadamente, um formato abreviado do formato, precedido por um
traço, é adicionado ao nome do pacote. Usamos -ttf para fontes
TrueType, -otf para fontes OpenType e -type1 para fontes
PostScript Type 1.
Próximo: Enviando patches, Anterior: Diretrizes de empacotamento, Acima: Contribuindo [Conteúdo][Índice]
22.9 Estilo de código
Em geral, nosso código segue os Padrões de Codificação GNU (veja GNU Coding Standards). No entanto, eles não dizem muito sobre Scheme, então aqui estão algumas regras adicionais.
Próximo: Módulos, Acima: Estilo de código [Conteúdo][Índice]
22.9.1 Paradigma de programação
O código Scheme no Guix é escrito em um estilo puramente funcional. Uma
exceção é o código que envolve entrada/saída e procedimentos que implementam
conceitos de baixo nível, como o procedimento memoize.
Próximo: Tipos de dados e correspondência de padrão, Anterior: Paradigma de programação, Acima: Estilo de código [Conteúdo][Índice]
22.9.2 Módulos
Os módulos do Guile que devem ser usados no lado do compilador devem residir
no espaço de nomes (guix build …). Eles não devem fazer
referência a outros módulos Guix ou GNU. No entanto, é aceitável que um
módulo no lado do “hospedeiro” use um módulo na banda do compilador. Como
um exemplo, o módulo (guix search-paths) não deveria ser importado e
usado por um pacote desde que o mesmo não é feito para ser usado como módulo
da “banda de compilação”. Isso também acoplaria o módulo ao grafo de
pacotes de dependência, o que não é desejado.
Módulos que lidam com o sistema GNU mais amplo devem estar no espaço de nome
(gnu …) em vez de (guix …).
Próximo: Formatação de código, Anterior: Módulos, Acima: Estilo de código [Conteúdo][Índice]
22.9.3 Tipos de dados e correspondência de padrão
A tendência no Lisp clássico é usar listas para representar tudo e, em
seguida, pesquisá-las “à mão” usando car, cdr, cadr e
co. Existem vários problemas com esse estilo, notadamente o fato de que é
difícil de ler, propenso a erros e um obstáculo para os relatórios de erros
de tipos adequados.
O código Guix deve definir tipos de dados apropriados (por exemplo, usando
define-record-type*) em vez de listas de abuso. Além disso, ele deve
usar correspondência de padrões, por meio do módulo (ice-9 match) do
Guile, especialmente ao corresponder listas (veja Pattern Matching em Manual de Referência do GNU Guile); a correspondência de padrões
para registros é melhor feita usando match-record do (guix
records), que, diferentemente do match, verifica nomes de campos no
momento da macroexpansão.
Ao definir um novo tipo de registro, mantenha o record type descriptor
(RTD) privado (veja Records em Manual de Referência do GNU Guile,
para mais informações sobre registros e RTDs). Como exemplo, o módulo
(guix packages) define <package> como o RTD para registros de
pacote, mas não o exporta; em vez disso, ele exporta um predicado de tipo,
um construtor e acessadores de campo. Exportar RTDs tornaria mais difícil
alterar a interface binária do aplicativo (porque o código em outros módulos
pode estar correspondendo campos por posição) e tornaria trivial para os
usuários falsificar registros desse tipo, ignorando quaisquer verificações
que possamos ter no construtor oficial (como “sanitizadores de campo”).
Anterior: Tipos de dados e correspondência de padrão, Acima: Estilo de código [Conteúdo][Índice]
22.9.4 Formatação de código
Ao escrever código Scheme, seguimos a sabedoria comum entre os programadores Scheme. Em geral, seguimos o Riastradh’s Lisp Style Rules. Este documento descreve as convenções mais usadas no código de Guile também. Ele é muito bem pensado e bem escrito, então, por favor, leia.
Alguns formulários especiais introduzidos no Guix, como a macro
substitute*, possuem regras especiais de recuo. Estes são definidos
no arquivo .dir-locals.el, que o Emacs usa automaticamente. Observe
também que o Emacs-Guix fornece o modo guix-devel-mode que recua e
destaca o código Guix corretamente (veja Development em O
manual de referência do Emacs-Guix).
Se você não usa o Emacs, por favor, certifique-se que o seu editor conhece estas regras. Para recuar automaticamente uma definição de pacote, você também pode executar:
./pre-inst-env guix style package
Veja Invoking guix style, para mais informações.
Nós exigimos que todos os procedimentos de nível superior carreguem uma
docstring. Porém, este requisito pode ser relaxado para procedimentos
privados simples no espaço de nomes (guix build …).
Os procedimentos não devem ter mais de quatro parâmetros posicionais. Use os parâmetros de palavra-chave para procedimentos que levam mais de quatro parâmetros.
Próximo: Rastreando Bugs e Mudanças, Anterior: Estilo de código, Acima: Contribuindo [Conteúdo][Índice]
22.10 Enviando patches
O desenvolvimento é feito usando o sistema de controle de versão distribuído
Git. Assim, o acesso ao repositório não é estritamente necessário. Aceitamos
contribuições na forma de patches produzidos por git format-patch
enviados para a lista de discussão guix-patches@gnu.org
(veja Submitting patches to a project em Manual do usuário do
Git). Os colaboradores são encorajados a reservar um momento para definir
algumas opções do repositório Git (veja Configurando o Git) primeiro, o que
pode melhorar a legibilidade dos patches. Desenvolvedores Guix experientes
também podem querer dar uma olhada na seção sobre acesso de commit
(veja Confirmar acesso).
Esta lista de discussão é apoiada por uma instância do Debbugs, o que nos
permite acompanhar os envios (veja Rastreando Bugs e Mudanças). Cada
mensagem enviada para essa lista de discussão recebe um novo número de
rastreamento atribuído; as pessoas podem então acompanhar o envio enviando
um e-mail para NÚMERO_DE_ISSÃO@debbugs.gnu.org, onde
NÚMERO_DE_ISSÃO é o número de rastreamento (veja Enviando uma série de patches).
Por favor, escreva os logs de commit no formato de ChangeLog (veja Change Logs em GNU Coding Standards); você pode verificar o histórico de commit para exemplos.
Você pode ajudar a tornar o processo de revisão mais eficiente e aumentar a chance de que seu patch seja revisado rapidamente, descrevendo o contexto do seu patch e o impacto que você espera que ele tenha. Por exemplo, se seu patch estiver corrigindo algo que está quebrado, descreva o problema e como seu patch o corrige. Conte-nos como você testou seu patch. Os usuários do código alterado pelo seu patch terão que ajustar seu fluxo de trabalho? Se sim, conte-nos como. Em geral, tente imaginar quais perguntas um revisor fará e responda a essas perguntas com antecedência.
Antes de enviar um patch que adicione ou modifique uma definição de pacote, execute esta lista de verificação:
- Se os autores do software empacotado fornecerem uma assinatura criptográfica
para o tarball de lançamento, faça um esforço para verificar a autenticidade
do arquivo. Para um arquivo de assinatura GPG separado, isso seria feito com
o comando
gpg --verify. - Reserve algum tempo para fornecer uma sinopse e descrição adequadas para o pacote. Veja Sinopses e descrições, para algumas diretrizes.
- Execute
guix lint pacote, sendo pacote o nome do pacote novo ou modificado e corrija quaisquer erros que forem relatados (veja Invocandoguix lint). - Run
guix style packageto format the new package definition according to the project’s conventions (veja Invokingguix style). - Make sure the package builds on your platform, using
guix build package. Also build at least its direct dependents withguix build --dependents=1 package(vejaguix build). - Recomendamos que você também tente compilar o pacote em outras plataformas
suportadas. Como você pode não ter acesso às plataformas de hardware reais,
recomendamos o uso do
qemu-binfmt-service-typepara emulá-las. Para habilitar isso, adicione o módulo de serviçovirtualizatione o sequinte serviço à lista de serviços da sua configuração dooperating-system:(service qemu-binfmt-service-type (qemu-binfmt-configuration (platforms (lookup-qemu-platforms "arm" "aarch64"))))Então, reconfigure seu sistema.
Você pode criar pacotes para plataformas diferentes especificando a opção
--system. Por exemplo, para compilar o pacote "hello" para as arquiteturas armhf ou aarch64, você executaria os seguintes comandos, respectivamente:guix build --system=armhf-linux --rounds=2 hello guix build --system=aarch64-linux --rounds=2 hello
-
Verifique se o pacote não usa cópias de software já disponíveis como pacotes
separados.
Às vezes, os pacotes incluem cópias do código-fonte de suas dependências como uma conveniência para os usuários. No entanto, como uma distribuição, queremos garantir que esses pacotes acabem usando a cópia que já temos na distribuição, se houver. Isso melhora o uso de recursos (a dependência é criada e armazenada apenas uma vez) e permite que a distribuição faça alterações transversais, como aplicar atualizações de segurança para um determinado pacote de software em um único local e fazê-las afetar todo o sistema – algo que cópias incluídas impedem.
- Dê uma olhada no perfil relatado por
guix size(veja Invocandoguix size). Isso permitirá que você perceba referências a outros pacotes retidos involuntariamente. Também pode ajudar a determinar se deve dividir o pacote (veja Pacotes com múltiplas saídas) e quais dependências opcionais devem ser usadas. Em particular, evite adicionartexlivecomo uma dependência: devido ao seu tamanho extremo, use o procedimentotexlive-updmap.cfg. - Verifique-se os pacotes dependentes (se aplicável) não são afetados pela
alteração;
guix refresh --list-dependent pacoteajudará você a fazer isso (veja Invocandoguix refresh). -
Verifique se o processo de compilação do pacote é determinístico. Isso
normalmente significa verificar se uma compilação independente do pacote
produz o mesmo resultado que você obteve, bit por bit.
Uma maneira simples de fazer isso é compilar o mesmo pacote várias vezes seguidas em sua máquina (veja Invocando
guix build):guix build --rounds=2 meu-pacote
Isso é suficiente para capturar uma classe de problemas comuns de não-determinismo, como registros de data e hora ou saída gerada aleatoriamente no resultado da compilação.
Outra opção é usar
guix challenge(veja Invocandoguix challenge). Você pode executá-lo uma vez que o pacote se tenha sido feito o commit e compilação porSUBSTITUTE-SERVER-1para verificar se obtém o mesmo resultado que você fez. Melhor ainda: encontre outra máquina que possa compilá-lo e executarguix publish. Como a máquina de compilação remota provavelmente é diferente da sua, isso pode capturar problemas de não determinismo relacionados ao hardware - por exemplo, uso de extensões de conjunto de instruções diferentes – ou ao kernel do sistema operacional – por exemplo, confiança emunameou arquivos de /proc. - Ao escrever documentação, por favor, use palavras de gênero neutras ao se referir a pessoas, como singular “they”, “their” , “them”, e assim por diante.
- Verifique se o seu patch contém apenas um conjunto de alterações
relacionadas. Agrupar mudanças não relacionadas juntas torna a revisão mais
difícil e lenta.
Exemplos de alterações não relacionadas incluem a adição de vários pacotes ou uma atualização de pacote juntamente com correções para esse pacote.
- Siga nossas regras de formatação de código, possivelmente executando o
script
guix stylepara fazer isso automaticamente para você (veja Formatação de código). - Quando possível, use espelhos no URL fonte (veja Invocando
guix download). Use URLs confiáveis, não os gerados. Por exemplo, os arquivos do GitHub não são necessariamente idênticos de uma geração para a seguinte, portanto, nesse caso, geralmente é melhor clonar o repositório. Não use o camponameno URL: não é muito útil e se o nome mudar, o URL provavelmente estará errado. - Verifique se o Guix compila (veja Compilando do git) e resolva os avisos, especialmente aqueles sobre o uso de símbolos indefinidos.
- Certifique-se de que suas alterações não quebrem o Guix e simule um
guix pullcom:guix pull --url=/path/to/your/checkout --profile=/tmp/guix.master
Ao postar um patch na lista de discussão, use ‘[PATCH] …’ como
assunto. Se seu patch for aplicado em uma ramificação diferente de
master, digamos core-updates, especifique-o no assunto como
‘[PATCH core-updates] …’.
Você pode usar seu cliente de e-mail, o comando git send-email
(veja Enviando uma série de patches) ou o comando mumi send-email
(veja Debbugs User Interfaces). Preferimos obter patches em mensagens de
texto simples, seja em linha ou como anexos MIME. É aconselhável que você
preste atenção se seu cliente de e-mail alterar algo como quebras de linha
ou recuo, o que pode potencialmente quebrar os patches.
Espere algum atraso quando você enviar seu primeiro patch para guix-patches@gnu.org. Você tem que esperar até receber uma confirmação com o número de rastreamento atribuído. Confirmações futuras não devem ser atrasadas.
Quando um erro for resolvido, feche o tópico enviando um e-mail para NÚMERO_DE_ISSÃO-done@debbugs.gnu.org.
Próximo: Enviando uma série de patches, Acima: Enviando patches [Conteúdo][Índice]
22.10.1 Configurando o Git
Se você ainda não fez isso, você pode querer definir um nome e e-mail que
serão associados aos seus commits (veja Telling
Git your name em Git User Manual). Se você quiser usar um nome ou e-mail
diferente apenas para commits neste repositório, você pode usar git
config --local, ou editar .git/config no repositório em vez de
~/.gitconfig.
Outras configurações importantes do Git serão configuradas automaticamente ao construir o projeto (veja Compilando do git). Um hook .git/hooks/commit-msg será instalado, incorporando ‘Change-Id’ Git trailers em suas mensagens de commit para fins de rastreabilidade. É importante preservá-los ao editar suas mensagens de commit, principalmente se uma primeira versão de suas alterações propostas já foi enviada para revisão. Se você tiver um hook commit-msg próprio que gostaria de usar com o Guix, pode colocá-lo no diretório .git/hooks/commit-msg.d/.
Anterior: Configurando o Git, Acima: Enviando patches [Conteúdo][Índice]
22.10.2 Enviando uma série de patches
Single Patches
O comando git send-email é a melhor maneira de enviar patches
únicos e séries de patches (veja Vários Patches) para a lista de
discussão do Guix. Enviar patches como anexos de e-mail pode dificultar sua
revisão em alguns clientes de e-mail, e git diff não armazena
metadados de commit.
Nota: O comando
git send-emailé fornecido pela saídasend-emaildo pacotegit, ou seja,git:send-email.
O comando a seguir criará um e-mail de patch a partir do último commit, abrirá no seu EDITOR ou VISUAL para edição e o enviará para a lista de discussão do Guix para ser revisado e mesclado. Supondo que você já tenha configurado o Git de acordo com Veja Configurando o Git, você pode simplesmente usar:
$ git send-email --annotate -1
Tip: Para adicionar um prefixo ao assunto do seu patch, você pode usar a opção --subject-prefix. O projeto Guix usa isso para especificar que o patch é destinado a um branch ou repositório diferente do branch
masterdo https://git.savannah.gnu.org/cgit/guix.git.git send-email --annotate --subject-prefix='PATCH core-updates' -1
O e-mail do patch contém uma linha separadora de três traços após a mensagem de commit. Você pode “anotar” o patch com texto explicativo adicionando-o abaixo desta linha. Se não quiser anotar o e-mail, você pode remover a opção --annotate.
Se você precisar enviar um patch revisado, não o reenvie dessa forma ou
envie um patch “fix” para ser aplicado sobre o último; em vez disso, use
git commit --amend ou git
rebase para modificar o commit e use o endereço
NÚMERO_DE_ISSÃO@debbugs.gnu.org e o sinalizador -v
com git send-email.
$ git commit --amend
$ git send-email --annotate -vREVISÃO \
--to=NÚMERO_DE_ISSÃO@debbugs.gnu.org -1
Nota: Devido a um bug aparente em
git send-email, -v REVISÃO (com o espaço) não funcionará; você deve usar -vREVISÃO.
Você pode descobrir NÚMERO_DE_ISSÃO pesquisando na interface do mumi em https://issues.guix.gnu.org pelo nome do seu patch ou lendo o e-mail de confirmação enviado automaticamente pelo Debbugs em resposta a bugs e patches recebidos, que contém o número do bug.
Notificando equipes
Se o seu git checkout tiver sido configurado corretamente
(veja Configurando o Git), o comando git send-email notificará
automaticamente os membros apropriados da equipe, com base no escopo das
suas alterações. Isso depende do script etc/teams.scm, que também
pode ser invocado manualmente se você não usar o comando git
send-email preferencial para enviar patches. Para listar as ações
disponíveis do script, você pode invocá-lo por meio do comando
etc/teams.scm help. Para obter mais informações sobre equipes,
veja Equipes.
Nota: Em distros estrangeiras, talvez seja necessário usar
./pre-inst-env git send-emailpara que etc/teams.scm funcione.
Vários Patches
Embora git send-email sozinho seja suficiente para um único patch,
uma falha infeliz no Debbugs significa que você precisa ter mais cuidado ao
enviar vários patches: se você enviá-los todos para o endereço
guix-patches@gnu.org, um novo problema será criado para cada patch!
Ao enviar uma série de patches, é melhor enviar uma “carta de
apresentação” do Git primeiro, para dar aos revisores uma visão geral da
série de patches. Podemos criar um diretório chamado outgoing
contendo nossa série de patches e uma carta de apresentação chamada
0000-cover-letter.patch com git format-patch.
$ git format-patch -NUMBER_COMMITS -o outgoing \
--cover-letter
Nota:
git format-patchaccepts a wide range of revision range specifiers. For example, if you are working in a branch, you could select all commits in your branch starting atmaster.$ git format-patch master..MY_BRANCH -o outgoing \ --cover-letter
Agora podemos enviar apenas a carta de apresentação para o endereço guix-patches@gnu.org, o que criará um problema para o qual podemos enviar o restante dos patches.
$ git send-email outgoing/0000-cover-letter.patch --annotate $ rm outgoing/0000-cover-letter.patch # we don't want to resend it!
Certifique-se de editar o e-mail para adicionar uma linha de assunto e um resumo apropriados antes de enviá-lo. Observe o shortlog e o diffstat gerados automaticamente abaixo do resumo.
Depois que o remetente do Debbugs responder ao seu e-mail de carta de apresentação, você poderá enviar os patches reais para o endereço do problema recém-criado.
$ git send-email outgoing/*.patch --to=NÚMERO_DE_ISSÃO@debbugs.gnu.org $ rm -rf outgoing # we don't need these anymore
Felizmente, essa dança git format-patch não é necessária para
enviar uma série de patches corrigida, pois já existe um problema para o
conjunto de patches.
$ git send-email -NÚMERO_COMMITS -vREVISÃO \
--to=NÚMERO_DE_ISSÃO@debbugs.gnu.org
Se necessário, você pode usar --cover-letter --annotate para enviar outra carta de apresentação, por exemplo, para explicar o que mudou desde a última revisão e se essas mudanças são necessárias.
Próximo: Equipes, Anterior: Enviando patches, Acima: Contribuindo [Conteúdo][Índice]
22.11 Rastreando Bugs e Mudanças
Esta seção descreve como o projeto Guix rastreia seus relatórios de bugs, envios de patches e ramificações de tópicos.
- O rastreador de problemas
- Gerenciando Patches e Branches
- Debbugs User Interfaces
- Debbugs Marcadores de usuário
- Notificações de construção de Cuirass
Próximo: Gerenciando Patches e Branches, Acima: Rastreando Bugs e Mudanças [Conteúdo][Índice]
22.11.1 O rastreador de problemas
Relatórios de bugs e envios de patches são atualmente rastreados usando a
instância Debbugs em https://bugs.gnu.org. Relatórios de bugs são
arquivados no “pacote” guix (no jargão do Debbugs), enviando um
e-mail para bug-guix@gnu.org, enquanto envios de patches são
arquivados no pacote guix-patches enviando um e-mail para
guix-patches@gnu.org (veja Enviando patches).
Próximo: Debbugs User Interfaces, Anterior: O rastreador de problemas, Acima: Rastreando Bugs e Mudanças [Conteúdo][Índice]
22.11.2 Gerenciando Patches e Branches
As alterações devem ser postadas em guix-patches@gnu.org. Esta
lista de discussão preenche o banco de dados de rastreamento de patches
(veja O rastreador de problemas). Ela também permite que patches sejam coletados
e testados pela ferramenta de garantia de qualidade; o resultado desse teste
eventualmente aparece no painel em
‘https://qa.guix.gnu.org/issue/NÚMERO_DE_ISSÃO’, onde
NÚMERO_DE_ISSÃO é o número atribuído pelo rastreador de
problemas. Reserve um tempo para uma revisão, sem comprometer nada.
Como exceção, algumas mudanças consideradas “triviais” ou “óbvias” podem
ser enviadas diretamente para o branch master. Isso inclui mudanças
para corrigir erros de digitação e reverter commits que causaram problemas
imediatos. Isso está sujeito a ajustes, permitindo que indivíduos se
comprometam diretamente com mudanças não controversas em partes com as quais
estão familiarizados.
Alterações que afetam mais de 300 pacotes dependentes (veja Invocando guix refresh) devem primeiro ser enviadas para um branch de tópico diferente de
master; o conjunto de alterações deve ser consistente, por exemplo,
“GNOME update”, “NumPy update”, etc. Isso permite testes: o branch
aparecerá automaticamente em
‘https://qa.guix.gnu.org/branch/branch’, com uma indicação
de seu status de compilação em várias plataformas.
Para ajudar a coordenar a fusão de branches, você deve criar um novo problema guix-patches sempre que criar um branch (veja O rastreador de problemas). O título do problema que solicita a fusão de um branch deve ter o seguinte formato:
Solicitação de mesclagem do branch "name"
O infraestrutura de QA reconhece tais problemas e lista as solicitações de mesclagem em sua página principal. Os seguintes pontos se aplicam ao gerenciamento dessas ramificações:
- Os commits no branch devem ser uma combinação dos patches relevantes para o branch. Patches não relacionados ao tópico do branch devem ir para outro lugar.
- Quaisquer alterações que possam ser feitas no branch master, devem ser feitas no branch master. Se um commit puder ser dividido para aplicar parte das alterações no master, isso é bom de se fazer.
- Deve ser possível recriar a ramificação iniciando pelo master e aplicando os patches relevantes.
- Evite mesclar o master no branch. Prefira rebasear ou recriar o branch em cima de uma revisão master atualizada.
- Minimize as alterações no master que estão faltando no branch antes de mesclar o branch no master. Isso significa que o estado do branch reflete melhor o estado do master caso o branch seja mesclado.
- Se você não tiver acesso de commit, crie o issue “Request for merging” e solicite que alguém crie o branch. Inclua uma lista de issues/patches para incluir no branch.
Normalmente, os branches serão mesclados de uma maneira “primeiro a chegar, primeiro a ser mesclado”, rastreados por meio dos problemas guix-patches. Se você concordar com uma ordem diferente com os envolvidos, você pode rastrear isso atualizando which issues block47 which other issues. Portanto, para saber qual branch está na frente da fila, procure o issue mais antigo, ou o issue que não está bloqueado por nenhuma outra branch merges. Uma lista ordenada de branches com os issues abertos está disponível em https://qa.guix.gnu.org.
Uma vez que um branch esteja na frente da fila, espere até que tenha passado
tempo suficiente para que as farms de build tenham processado as mudanças, e
para que os testes necessários tenham acontecido. Por exemplo, você pode
verificar ‘https://qa.guix.gnu.org/branch/branch’ para ver
informações sobre alguns builds e disponibilidade de substitutos.
Depois que a ramificação for mesclada, o problema deverá ser fechado e a ramificação excluída.
Sometimes, a branch may be a work in progress, for example for larger efforts such as updating the GNOME desktop. In these cases, the branch name should reflect this by having the ‘wip-’ prefix. The QA infrastructure will avoid building work-in-progress branches, so that the available resources can be better focused on building the branches that are ready to be merged. When the branch is no longer a work in progress, it should be renamed, with the ‘wip-’ prefix removed, and only then should the merge requests be created, as documented earlier.
Próximo: Debbugs Marcadores de usuário, Anterior: Gerenciando Patches e Branches, Acima: Rastreando Bugs e Mudanças [Conteúdo][Índice]
22.11.3 Debbugs User Interfaces
22.11.3.1 Web interface
Uma interface web (na verdade duas interfaces web!) está disponível para navegar pelos problemas:
- https://issues.guix.gnu.org fornece uma interface agradável alimentada por mumi48 para navegar por relatórios de bugs e patches, e para participar de discussões; mumi também tem uma interface de linha de comando como veremos abaixo;
- https://bugs.gnu.org/guix lista relatórios de bugs;
- https://bugs.gnu.org/guix-patches lista envios de patches.
Para visualizar discussões relacionadas ao problema número n, acesse
‘https://issues.guix.gnu.org/n’ ou
‘https://bugs.gnu.org/n’.
22.11.3.2 Command-Line Interface
O Mumi também vem com uma interface de linha de comando que pode ser usada para pesquisar problemas existentes, abrir novos problemas, compor respostas, aplicar e enviar patches. Você não precisa usar o Emacs para usar o cliente de linha de comando mumi. Você interage com ele apenas na linha de comando.
Para usar a interface de linha de comando mumi, navegue até um clone local do repositório git Guix e entre em um shell com mumi, git e git:send-email instalados.
$ cd guix ~/guix$ guix shell mumi git git:send-email
Para procurar problemas, diga todos os problemas abertos sobre "zig", execute
~/guix [env]$ mumi search zig is:open #60889 Add zig-build-system opened on 17 Jan 17:37 Z by Ekaitz Zarraga #61036 [PATCH 0/3] Update zig to 0.10.1 opened on 24 Jan 09:42 Z by Efraim Flashner #39136 [PATCH] gnu: services: Add endlessh. opened on 14 Jan 2020 21:21 by Nicol? Balzarotti #60424 [PATCH] gnu: Add python-online-judge-tools opened on 30 Dec 2022 07:03 by gemmaro #45601 [PATCH 0/6] vlang 0.2 update opened on 1 Jan 2021 19:23 by Ryan Prior
Escolha uma questão e torne-a a questão "atual".
~/guix [env]$ mumi current 61036 #61036 [PATCH 0/3] Update zig to 0.10.1 opened on 24 Jan 09:42 Z by Efraim Flashner
Quando um problema é o problema atual, você pode abri-lo em um navegador da web, redigir respostas, aplicar patches, enviar patches, etc. com comandos curtos e sucintos.
Abra o problema no seu navegador da web usando
~/guix [env]$ mumi www
Redija uma resposta usando
~/guix [env]$ mumi compose
Redija uma resposta e feche o problema usando
~/guix [env]$ mumi compose --close
mumi compose abre seu cliente de e-mail passando URIs
‘mailto:’ para xdg-open. Então, você precisa ter
xdg-open configurado para abrir seu cliente de e-mail
corretamente.
Aplique o patchset mais recente do problema usando
~/guix [env]$ mumi am
Você também pode aplicar um patchset de uma versão específica (digamos, v3) usando
~/guix [env]$ mumi am v3
Ou você pode aplicar um patch de uma mensagem de e-mail específica. Por exemplo, para aplicar o patch da 4ª mensagem (o índice da mensagem começa em 0), execute
~/guix [env]$ mumi am @4
mumi am é um wrapper em torno de git am. Você pode
passar argumentos git am para ele depois de um ‘--’. Por
exemplo, para adicionar um trailer Signed-off-by, execute
~/guix [env]$ mumi am -- -s
Crie e envie patches para o problema usando
~/guix [env]$ git format-patch origin/master ~/guix [env]$ mumi send-email foo.patch bar.patch
Observe que você não precisa passar os argumentos ‘--to’ ou ‘--cc’
para git format-patch. mumi send-email os inserirá
corretamente ao enviar os patches.
Para abrir um novo problema, execute
~/guix [env]$ mumi new
e enviar um e-mail (usando mumi compose) ou patches (usando
mumi send-email).
mumi send-email é realmente um wrapper em torno de git
send-email que automatiza todos os detalhes do envio de patches. Ele usa o
estado atual do problema para descobrir automaticamente o endereço ‘To’
correto para enviar, outros participantes para ‘Cc’, cabeçalhos para
adicionar, etc.
Observe também que, diferentemente de git send-email,
mumi send-email funciona perfeitamente bem com patches únicos e
múltiplos. Ele automatiza a dança dos debbugs de enviar o primeiro patch,
esperar por uma resposta dos debbugs e enviar os patches restantes. Ele faz
isso enviando o primeiro patch, sondando o servidor para uma resposta e, em
seguida, enviando os patches restantes. Infelizmente, essa sondagem pode
levar alguns minutos. Então, seja paciente.
22.11.3.3 Emacs Interface
Se você usa o Emacs, pode achar mais conveniente interagir com problemas usando debbugs.el, que pode ser instalado com:
guix install emacs-debbugs
Por exemplo, para listar todos os problemas abertos em guix-patches,
clique em:
C-u M-x debbugs-gnu RET RET guix-patches RET n y
Para uma maneira mais conveniente (mais curta) de acessar os envios de bugs
e patches, você pode configurar as variáveis
debbugs-gnu-default-packages e debbugs-gnu-default-severities
do Emacs (veja Visualizando Bugs no Emacs).
Para procurar bugs, ‘M-x debbugs-gnu-guix-search’ pode ser usado.
Veja Guia do usuário do Debbugs, para mais informações sobre esta ferramenta bacana!
Próximo: Notificações de construção de Cuirass, Anterior: Debbugs User Interfaces, Acima: Rastreando Bugs e Mudanças [Conteúdo][Índice]
22.11.4 Debbugs Marcadores de usuário
O Debbugs fornece um recurso chamado usertags que permite que qualquer
usuário marque qualquer bug com um rótulo arbitrário. Os bugs podem ser
pesquisados por usertag, então esta é uma maneira útil de organizar
bugs49. Se você usa o Emacs Debbugs, o
ponto de entrada para consultar usertags existentes é o procedimento
‘C-u M-x debbugs-gnu-usertags’. Para definir um usertag, pressione
‘C’ enquanto consulta um bug dentro do buffer *Guix-Patches* aberto com
o buffer ‘C-u M-x debbugs-gnu-bugs’, então selecione usertag e
siga as instruções.
Por exemplo, para visualizar todos os relatórios de bugs (ou patches, no
caso de guix-patches) marcados com a usertag powerpc64le-linux
para o usuário guix, abra uma URL como a seguinte em um navegador da
web:
https://debbugs.gnu.org/cgi-bin/pkgreport.cgi?tag=powerpc64le-linux;users=guix.
Para mais informações sobre como usar usertags, consulte a documentação do Debbugs ou a documentação de qualquer ferramenta que você use para interagir com o Debbugs.
No Guix, estamos experimentando usertags para manter o controle de problemas
específicos da arquitetura, bem como os revisados. Para facilitar a
colaboração, todos os nossos usertags estão associados ao usuário único
guix. Os seguintes usertags existem atualmente para esse usuário:
powerpc64le-linuxO propósito desta usertag é facilitar a localização dos problemas mais importantes para o tipo de sistema
powerpc64le-linux. Atribua esta usertag a bugs ou patches que afetam opowerpc64le-linux, mas não outros tipos de sistema. Além disso, você pode usá-la para identificar problemas que, por algum motivo, são particularmente importantes para o tipo de sistemapowerpc64le-linux, mesmo que o problema afete outros tipos de sistema também.reprodutibilidadePara problemas relacionados à reprodutibilidade. Por exemplo, seria apropriado atribuir esta usertag a um relatório de bug para um pacote que falha em construir de forma reprodutível.
reviewed-looks-goodVocê analisou a série e ela parece boa para você (LGTM).
Se você for um committer e quiser adicionar uma usertag, basta começar a
usá-la com o usuário guix. Se a usertag for útil para você, considere
atualizar esta seção do manual para que outros saibam o que sua usertag
significa.
Anterior: Debbugs Marcadores de usuário, Acima: Rastreando Bugs e Mudanças [Conteúdo][Índice]
22.11.5 Notificações de construção de Cuirass
O Cuirass inclui feeds RSS (Really Simple Syndication) como um de seus recursos (veja (cuirass)Notifications). Como Berlin executa uma instância do Cuirass, esse recurso pode ser usado para manter o controle de pacotes recentemente quebrados ou corrigidos causados por alterações enviadas ao repositório git do Guix. Qualquer cliente RSS pode ser usado. Um bom, incluído no Emacs, é Veja (gnus)Gnus. Para registrar o feed, copie sua URL e, a partir do buffer principal do Gnus, ‘*Group*’, faça o seguinte:
G R https://ci.guix.gnu.org/events/rss/?specification=master RET Guix CI - master RET Build events for specification master. RET
Então, de volta ao buffer ‘*Group*’, pressione s para salvar o grupo RSS recém-adicionado. Assim como para qualquer outro grupo Gnus, você pode atualizar seu conteúdo pressionando a tecla g. Agora você deve receber notificações que dizem algo como:
. [ ?: Cuirass ] Build tree-sitter-meson.aarch64-linux on master is fixed. . [ ?: Cuirass ] Build rust-pbkdf2.aarch64-linux on master is fixed. . [ ?: Cuirass ] Build rust-pbkdf2.x86_64-linux on master is fixed.
onde cada entrada RSS contém um link para a página de detalhes da compilação do Cuirass associada.
Próximo: Tomando decisões, Anterior: Rastreando Bugs e Mudanças, Acima: Contribuindo [Conteúdo][Índice]
22.12 Equipes
Para organizar o trabalho no Guix, incluindo, mas não apenas, os esforços de desenvolvimento, o projeto tem um conjunto de equipes. Cada equipe tem seu próprio foco e interesses e é o principal ponto de contato para perguntas e contribuições nessas áreas. A principal missão de uma equipe é coordenar e revisar o trabalho de indivíduos em seu escopo (veja Revendo o trabalho de outros); ela pode tomar decisões dentro de seu escopo, em acordo com outras equipes sempre que houver sobreposição ou uma conexão próxima, e de acordo com outras regras do projeto, como buscar consenso (veja Tomando decisões).
Como exemplo, a equipe Python é responsável por questões de empacotamento do
núcleo Python; ela pode decidir atualizar os pacotes principais do Python em
uma ramificação dedicada python-team, em colaboração com qualquer
equipe cujo escopo seja diretamente dependente do Python — por exemplo, a
equipe Science — e seguindo regras de ramificação (veja Gerenciando Patches e Branches). A equipe Documentation ajuda a revisar as alterações na
documentação e pode iniciar alterações abrangentes na documentação. A equipe
Translations organiza a tradução do Guix e seu manual e coordena os esforços
nessa área. A equipe Core é responsável pelo desenvolvimento da
funcionalidade principal e das interfaces do Guix; devido à sua natureza
central, parte de seu trabalho pode exigir a solicitação de contribuições da
comunidade em geral e a busca de consenso antes de promulgar decisões que
afetariam toda a comunidade.
As equipes são definidas no arquivo etc/teams.scm no repositório Guix. O escopo de cada equipe é definido, quando aplicável, como um conjunto de arquivos ou como uma expressão regular que corresponde a nomes de arquivos.
Qualquer pessoa interessada no domínio de uma equipe e disposta a contribuir com seu trabalho pode se candidatar para se tornar um membro entrando em contato com os membros atuais por e-mail; acesso de commit não é uma pré-condição. A filiação é formalizada adicionando o nome e endereço de e-mail da pessoa em etc/teams.scm. Membros que não participam do trabalho da equipe por um ano ou mais podem ser removidos; eles são livres para se candidatar novamente para filiação mais tarde.
Uma ou mais pessoas podem propor a criação de uma nova equipe entrando em contato com a comunidade por e-mail em guix-devel@gnu.org, esclarecendo o escopo e o propósito pretendidos. Quando o consenso é alcançado sobre a criação desta equipe, alguém com acesso de commit formaliza sua criação adicionando-a e seus membros iniciais a etc/teams.scm.
Para listar as equipes existentes, execute o seguinte comando em um checkout do Guix:
$ ./etc/teams.scm list-teams id: mentors name: Mentors description: A group of mentors who chaperone contributions by newcomers. members: + Charlie Smith <charlie@example.org> …
You can run the following command to have the Mentors team put in CC of a patch series:
$ git send-email --to=NÚMERO_DE_ISSÃO@debbugs.gnu.org \ --header-cmd='etc/teams.scm cc-mentors-header-cmd' *.patch
A equipe ou equipes apropriadas também podem ser inferidas a partir dos arquivos modificados. Por exemplo, se você quiser enviar os dois últimos commits do repositório Git atual para revisão, você pode executar:
$ guix shell -D guix [env]$ git send-email --to=NÚMERO_DE_ISSÃO@debbugs.gnu.org -2
Próximo: Confirmar acesso, Anterior: Equipes, Acima: Contribuindo [Conteúdo][Índice]
22.13 Tomando decisões
Espera-se de todos os contribuidores, e ainda mais dos committers, que ajudem a construir consenso e tomar decisões com base no consenso. Ao usar o consenso, estamos comprometidos em encontrar soluções com as quais todos possam conviver. Isso implica que nenhuma decisão é tomada contra preocupações significativas e essas preocupações são ativamente resolvidas com propostas que funcionam para todos.
Um colaborador (que pode ou não ter acesso de commit) que deseja bloquear uma proposta tem uma responsabilidade especial de encontrar alternativas, propor ideias/código ou explicar a lógica do status quo para resolver o impasse. Para aprender o que significa tomada de decisão por consenso e entender seus detalhes mais sutis, você é encorajado a ler https://www.seedsforchange.org.uk/consensus.
Próximo: Revendo o trabalho de outros, Anterior: Tomando decisões, Acima: Contribuindo [Conteúdo][Índice]
22.14 Confirmar acesso
Todos podem contribuir para o Guix sem ter acesso de commit (veja Enviando patches). No entanto, para contribuidores frequentes, ter acesso de gravação ao repositório pode ser conveniente. Como regra geral, um contribuidor deve ter acumulado cinquenta (50) commits revisados para ser considerado um committer e ter mantido sua atividade no projeto por pelo menos 6 meses. Isso garante interações suficientes com o contribuidor, o que é essencial para a orientação e avaliação se ele está pronto para se tornar um committer. O acesso de commit não deve ser pensado como um “emblema de honra”, mas sim como uma responsabilidade que um contribuidor está disposto a assumir para ajudar o projeto.
Os committers estão em uma posição onde eles promulgam decisões técnicas. Tais decisões devem ser tomadas por construindo ativamente o consenso entre as partes interessadas e stakeholders. Veja Tomando decisões, para mais sobre isso.
As seções a seguir explicam como obter acesso de commit, como estar pronto para enviar commits e as políticas e expectativas da comunidade para commits enviados upstream.
- Solicitando acesso de confirmação
- Política de Comprometimento
- Abordando questões
- Commit Revocation
- Ajudando
22.14.1 Solicitando acesso de confirmação
Quando você julgar necessário, considere solicitar acesso de confirmação seguindo estas etapas:
- Encontre três committers que atestariam por você. Você pode ver a lista de
committers em
https://savannah.gnu.org/project/memberlist.php?group=guix. Cada um
deles deve enviar uma declaração por e-mail para
guix-maintainers@gnu.org (um alias privado para o coletivo de
mantenedores), assinado com sua chave OpenPGP.
Espera-se que os committers tenham tido algumas interações com você como colaborador e sejam capazes de julgar se você está suficientemente familiarizado com as práticas do projeto. Não é um julgamento sobre o valor do seu trabalho, então uma recusa deve ser interpretada como "vamos tentar novamente mais tarde”.
- Envie para guix-maintainers@gnu.org uma mensagem informando sua
intenção, listando os três committers que dão suporte ao seu aplicativo,
assinados com a chave OpenPGP que você usará para assinar commits e
fornecendo sua impressão digital (veja abaixo). Veja
https://emailselfdefense.fsf.org/en/, para uma introdução à
criptografia de chave pública com GnuPG.
Configure o GnuPG de forma que ele nunca use o algoritmo de hash SHA1 para assinaturas digitais, que é conhecido por ser inseguro desde 2019, por exemplo, adicionando a seguinte linha em ~/.gnupg/gpg.conf (veja GPG Esoteric Options em The GNU Privacy Guard Manual):
digest-algo sha512
- Os mantenedores decidem, em última instância, se lhe concedem acesso de confirmação, geralmente seguindo a recomendação das suas referências.
-
Se e uma vez que você tenha recebido acesso, envie uma mensagem para
guix-devel@gnu.org para dizer isso, novamente assinada com a chave
OpenPGP que você usará para assinar os commits (faça isso antes de enviar
seu primeiro commit). Dessa forma, todos podem notar e garantir que você
controle essa chave OpenPGP.
Importante: Antes de poder fazer push pela primeira vez, os mantenedores devem:
- adicione sua chave OpenPGP à ramificação
keyring; - adicione sua impressão digital OpenPGP ao arquivo .guix-authorizations da(s) ramificação(ões) para as quais você fará o commit.
- adicione sua chave OpenPGP à ramificação
- Não deixe de ler o restante desta seção e... lucre!
Nota: Os mantenedores ficarão felizes em dar acesso de comprometimento a pessoas que contribuem há algum tempo e têm um histórico. Não seja tímido e não subestime seu trabalho!
No entanto, observe que o projeto está trabalhando em direção a um sistema de revisão e mesclagem de patches mais automatizado, o que, como consequência, pode nos levar a ter menos pessoas com acesso de commit ao repositório principal. Fique ligado!
Todos os commits que são enviados para o repositório central no Savannah
devem ser assinados com uma chave OpenPGP, e a chave pública deve ser
carregada para sua conta de usuário no Savannah e para servidores de chave
pública, como keys.openpgp.org. Para configurar o Git para assinar
commits automaticamente, execute:
git config commit.gpgsign true # Substitua a impressão digital da sua chave PGP pública. git config user.signingkey CABBA6EA1DC0FF33
Para verificar se os commits estão assinados com a chave correta, use:
guix git authenticate
Veja Compilando do git para executar a primeira autenticação de um checkout do Guix.
Para evitar enviar acidentalmente commits não assinados ou assinados com a chave errada para o Savannah, certifique-se de configurar o Git de acordo com Veja Configurando o Git.
22.14.2 Política de Comprometimento
Se você obtiver acesso de confirmação, certifique-se de seguir a política abaixo (as discussões sobre a política podem ocorrer em guix-devel@gnu.org).
Certifique-se de estar ciente de como as alterações devem ser tratadas
(veja Gerenciando Patches e Branches) antes de serem enviadas ao
repositório, especialmente para a ramificação master.
Se você estiver fazendo commit e enviando suas próprias alterações, tente esperar pelo menos uma semana (duas semanas para alterações mais significativas, até um mês para alterações como remover um pacote—veja Remoção de Pacotes) depois de enviá-las para revisão. Depois disso, se ninguém mais estiver disponível para revisá-las e se você estiver confiante sobre as alterações, está tudo bem fazer commit.
Ao enviar um commit em nome de outra pessoa, adicione uma linha
Signed-off-by no final da mensagem de log do commit—por exemplo,
com git am --signoff. Isso melhora o rastreamento de quem fez o
quê.
Ao adicionar entradas de notícias do canal (veja Escrevendo Notícias do Canal), certifique-se de que elas estejam bem formadas executando o seguinte comando antes de enviar:
make check-channel-news
22.14.3 Abordando questões
A revisão por pares (veja Enviando patches) e ferramentas como
guix lint (veja Invocando guix lint) e o conjunto de testes
(veja Executando o conjunto de testes) devem detectar problemas antes que eles
sejam enviados. No entanto, confirmações que “quebram” a funcionalidade
podem ocasionalmente passar. Quando isso acontece, há duas prioridades:
mitigar o impacto e entender o que aconteceu para reduzir a chance de
incidentes semelhantes no futuro. A responsabilidade por ambas as coisas
recai principalmente sobre os envolvidos, mas, como tudo, este é um esforço
de grupo.
Alguns problemas podem afetar diretamente todos os usuários, por exemplo,
porque fazem com que guix pull falhe ou interrompa a
funcionalidade principal, porque interrompem pacotes importantes (em tempo
de compilação ou execução) ou porque introduzem vulnerabilidades de
segurança conhecidas.
As pessoas envolvidas na criação, revisão e envio de tais confirmações devem estar na vanguarda para mitigar seu impacto em tempo hábil: enviando uma confirmação de acompanhamento para corrigi-lo (se possível) ou revertendo-o para dar tempo de encontrar uma correção adequada e comunicando-se com outros desenvolvedores sobre o problema.
Se essas pessoas não estiverem disponíveis para resolver o problema a tempo, outros responsáveis pelo commit têm o direito de reverter o(s) commit(s), explicando no log de commits e na lista de discussão qual era o problema, com o objetivo de dar tempo ao responsável pelo commit original, revisor(es) e autor(es) para propor um caminho a seguir.
Uma vez que o problema tenha sido resolvido, é responsabilidade dos envolvidos garantir que a situação seja compreendida. Se você estiver trabalhando para entender o que aconteceu, concentre-se em reunir informações e evite atribuir qualquer culpa. Peça aos envolvidos para descrever o que aconteceu, não peça para eles explicarem a situação — isso os culparia implicitamente, o que não ajuda. A responsabilização vem de um consenso sobre o problema, aprendendo com ele e melhorando os processos para que seja menos provável que ele ocorra novamente.
22.14.3.1 Reverting commits
Like normal commits, the commit message should state why the changes are being made, which in this case would be why the commits are being reverted.
If the changes are being reverted because they led to excessive number of
packages being affected, then a decision should be made whether to allow the
build farms to build the changes, or whether to avoid this. For the bordeaux
build farm, commits can be ignored by adding them to the
ignore-commits list in the build-from-guix-data-service
record, found in the bayfront machine configuration.
22.14.4 Commit Revocation
Para reduzir a possibilidade de erros, os responsáveis pelo commit terão suas contas Savannah removidas do projeto Guix Savannah e suas chaves removidas de .guix-authorizations após 12 meses de inatividade; eles podem solicitar o acesso de commit novamente enviando um e-mail aos mantenedores, sem passar pelo processo de garantia.
Mantenedores50 também pode revogar os direitos de commit de um indivíduo, como último recurso, se a cooperação com o resto da comunidade tiver causado muito atrito — mesmo dentro dos limites do código de conduta do projeto (veja Contribuindo). Eles só fariam isso após discussão pública ou privada com o indivíduo e um aviso claro. Exemplos de comportamento que dificulta a cooperação e pode levar a tal decisão incluem:
- violação repetida da política de compromisso declarada acima;
- falha repetida em levar em consideração as críticas dos colegas;
- quebrando a confiança através de uma série de incidentes graves.
Quando os mantenedores recorrem a tal decisão, eles notificam os desenvolvedores em guix-devel@gnu.org; consultas podem ser enviadas para guix-maintainers@gnu.org. Dependendo da situação, o indivíduo ainda pode ser bem-vindo para contribuir.
22.14.5 Ajudando
Uma última coisa: o projeto continua avançando porque os committers não apenas empurram suas próprias mudanças incríveis, mas também oferecem parte do seu tempo revisando e empurrando as mudanças de outras pessoas. Como committer, você é bem-vindo para usar sua expertise e direitos de commit para ajudar outros contribuidores também!
Próximo: Atualizando o pacote Guix, Anterior: Confirmar acesso, Acima: Contribuindo [Conteúdo][Índice]
22.15 Revendo o trabalho de outros
Perhaps the biggest action you can do to help GNU Guix grow as a project is to review the work contributed by others. You do not need to be a committer to do so; applying, reading the source, building, linting and running other people’s series and sharing your comments about your experience will give some confidence to committers. You must ensure the check list found in the Enviando patches section has been correctly followed. A reviewed patch series should give the best chances for the proposed change to be merged faster, so if a change you would like to see merged hasn’t yet been reviewed, this is the most appropriate thing to do! If you would like to review changes in a specific area and to receive notifications for incoming patches relevant to that domain, consider joining the relevant team(s) (veja Equipes).
Comentários de revisão devem ser inequívocos; seja o mais claro e explícito possível sobre o que você acha que deve ser alterado, garantindo que o autor possa tomar medidas sobre isso. Tente manter as seguintes diretrizes em mente durante a revisão:
- Seja claro e explícito sobre as mudanças que você está sugerindo, garantindo que o autor possa agir sobre isso. Em particular, é uma boa ideia pedir explicitamente por novas revisões quando você quiser.
- Mantenha o foco: não altere o escopo do trabalho que está sendo revisado. Por exemplo, se a contribuição aborda um código que segue um padrão considerado difícil de manejar, seria injusto pedir ao remetente para corrigir todas as ocorrências desse padrão no código; para simplificar, se um problema não relacionado ao patch em questão já estava lá, não peça ao remetente para corrigi-lo.
- Garantir o progresso. Conforme respondem à revisão, os remetentes podem enviar novas revisões de suas alterações; evite solicitar alterações que você não solicitou na rodada anterior de comentários. No geral, o remetente deve ter uma noção clara do progresso; o número de itens abertos para discussão deve diminuir claramente ao longo do tempo.
- Aim for finalization. Revisar código consome tempo. Seu objetivo como revisor é colocar o processo em um caminho claro em direção à integração, possivelmente com mudanças acordadas, ou rejeição, com um raciocínio claro e mutuamente compreendido. Evite deixar o processo de revisão em um estado persistente sem uma saída clara.
- Review is a discussion. The submitter’s and reviewer’s views on how to achieve a particular change may not always be aligned. To lead the discussion, remain focused, ensure progress and aim for finalization, spending time proportional to the stakes51. As a reviewer, try hard to explain the rationale for suggestions you make, and to understand and take into account the submitter’s motivation for doing things in a certain way. In other words, build consensus with everyone involved (veja Tomando decisões).
Quando você considera a alteração proposta adequada e pronta para inclusão no Guix, a seguinte linha bem compreendida/codificada ‘Reviewed-by: Your Name <your-email@example.com>’ 52 deve ser usada para assinar como revisor, o que significa que você revisou a alteração e que ela parece boa para você:
- Se a série toda (contendo vários commits) parecer boa para você, responda com ‘Reviewed-by: Your Name <your-email@example.com>’ para a página de capa, se houver uma, ou para o último patch da série, caso contrário, adicionando outro comentário ‘(para toda a série)’ na linha abaixo para explicitar esse fato.
- Se você quiser marcar um único commit como revisado (mas não a série inteira), basta responder com ‘Reviewed-by: Your Name <your-email@example.com>’ para essa mensagem de commit.
Se você não for um colaborador, pode ajudar outras pessoas a encontrar uma
série que você revisou mais facilmente adicionando uma usertag
reviewed-looks-good para o usuário guix (veja Debbugs Marcadores de usuário).
Próximo: Política de depreciação, Anterior: Revendo o trabalho de outros, Acima: Contribuindo [Conteúdo][Índice]
22.16 Atualizando o pacote Guix
Às vezes, é desejável atualizar o pacote guix em si (o pacote
definido em (gnu packages package-management)), por exemplo, para
tornar novos recursos de daemon disponíveis para uso pelo tipo de serviço
guix-service-type. Para simplificar essa tarefa, o seguinte comando
pode ser usado:
make update-guix-package
O destino de criação do update-guix-package usará o último
commit conhecido correspondente ao HEAD no seu checkout do
Guix, calculará o hash das fontes do Guix correspondentes a esse commit e
atualizará o commit, revision e o hash da definição do pacote
guix.
Para validar se os hashes do pacote guix atualizados estão corretos e
se ele pode ser construído com sucesso, o seguinte comando pode ser
executado no diretório do seu checkout Guix:
./pre-inst-env guix build guix
Para evitar a atualização acidental do pacote guix para um commit ao
qual outros não podem se referir, é feita uma verificação de que o commit
usado já foi enviado para o repositório git Guix hospedado em Savannah.
Esta verificação pode ser desabilitada, por sua conta e risco,
definindo a variável de ambiente
GUIX_ALLOW_ME_TO_USE_PRIVATE_COMMIT. Quando esta variável é definida,
a fonte do pacote atualizado também é adicionada ao armazém. Isto é usado
como parte do processo de lançamento do Guix.
Próximo: Escrevendo documentação, Anterior: Atualizando o pacote Guix, Acima: Contribuindo [Conteúdo][Índice]
22.17 Política de depreciação
Como qualquer projeto animado com um escopo amplo, o Guix muda o tempo todo e em todos os níveis. Como é extensível e programável pelo usuário, mudanças incompatíveis podem impactar diretamente os usuários e dificultar suas vidas. Portanto, é importante reduzir as mudanças incompatíveis visíveis ao usuário ao mínimo e, quando tais mudanças forem consideradas necessárias, comunicá-las claramente por meio de um período de depreciação para que todos possam se adaptar com o mínimo de problemas. Esta seção define os compromissos do projeto para uma depreciação suave e descreve procedimentos e mecanismos para honrá-los.
Há várias maneiras de usar Guix; como lidar com a descontinuação dependerá de cada caso de uso. Elas podem ser categorizadas aproximadamente assim:
- gerenciamento de pacotes exclusivamente através da linha de comando;
- gerenciamento avançado de pacotes usando as interfaces de manifesto e pacote;
- Gerenciamento de sistema e home, usando as interfaces
operating-systeme/ouhome-environmentjuntamente com as interfaces de serviço; - desenvolvimento ou utilização de ferramentas externas que utilizam
interfaces de programação como os módulos
(guix ...).
Esses casos de uso formam um espectro com vários graus de acoplamento — de “distante” a fortemente acoplado. Com base nesse insight, definimos as seguintes políticas de depreciação que consideramos adequadas para cada um desses níveis.
- Command-line tools
Os subcomandos Guix devem ser pensados como permanecendo disponíveis “para sempre”. Uma vez que um subcomando Guix deve ser removido, ele deve ser descontinuado primeiro, e então permanecer disponível por pelo menos um ano após o primeiro lançamento que o descontinuou.
A descontinuação deve ser anunciada primeiro no manual e como uma entrada em etc/news.scm; comunicações adicionais, como uma postagem de blog explicando a justificativa, são bem-vindas. Meses antes da data de remoção programada, o comando deve imprimir um aviso explicando como migrar. Um exemplo disso é a substituição de
guix environmentporguix shell, iniciada em outubro de 202153.Devido ao amplo impacto de tal mudança, recomendamos realizar uma pesquisa com usuários antes de implementar um plano.
- Package name changes
Quando um nome de pacote muda, ele deve permanecer disponível sob seu nome antigo por pelo menos um ano. Por exemplo,
go-ipfsfoi renomeado parakuboapós uma decisão tomada upstream; para comunicar a mudança de nome aos usuários, o módulo do pacote forneceu esta definição:(define-public go-ipfs (deprecated-package "go-ipfs" kubo))Dessa forma, alguém executando
guix install go-ipfsou similar verá um aviso de descontinuação mencionando o novo nome.- Package removal
Pacotes cujos desenvolvedores originais declararam que atingiram o “fim da vida útil” ou não são mantidos podem ser removidos; da mesma forma, pacotes que estão falhando na compilação por dois meses ou mais podem ser removidos.
Não há um mecanismo formal de descontinuação para este caso, a menos que exista uma substituição, caso em que o procedimento
deprecated-packagemencionado acima pode ser usado.Se o pacote que está sendo removido for um “leaf” (nenhum outro pacote depende dele), ele poderá ser removido após um período de revisão de um mês do patch que o removeu (isso se aplica mesmo quando a remoção tem motivações adicionais, como problemas de segurança que afetam o pacote).
Se tiver muitos pacotes dependentes — como é o caso, por exemplo, com a versão Python 2 — a equipe relevante deve propor uma agenda de remoção de descontinuação e buscar consenso com outros empacotadores por pelo menos um mês. Também pode convidar feedback da comunidade de usuários mais ampla, por exemplo, por meio de uma pesquisa. A remoção de todos os pacotes impactados pode ser gradual, abrangendo vários meses, para acomodar todos os casos de uso.
Quando o pacote que está sendo removido é considerado popular, seja ou não uma folha, sua descontinuação deve ser anunciada como uma entrada em
etc/news.scm.- Package upgrade
No caso de pacotes com muitos dependentes e/ou muitos usuários, uma atualização pode ser tratada como a remoção da versão anterior.
Exemplos incluem grandes atualizações de versões de implementações de linguagens de programação, como vimos acima com Python, e grandes atualizações de bibliotecas “grandes” como Qt ou GTK.
- Serviços
Mudanças nos serviços para Guix Home e Guix System têm um impacto direto na configuração do usuário. Para um usuário, ajustar-se a mudanças de interface raramente é recompensador, e é por isso que qualquer mudança desse tipo deve ser claramente comunicada com antecedência por meio de avisos de descontinuação e documentação.
A renomeação de variáveis relacionadas a configuração de serviço, home ou sistema deve ser comunicada por pelo menos seis meses antes da remoção usando os mecanismos
(guix deprecation). Por exemplo, a renomeação demurmur-configurationparamumble-server-configurationfoi comunicada por meio de uma série de definições como esta:(define-deprecated/public-alias murmur-configuration mumble-server-configuration)Os procedimentos previstos para remoção podem ser definidos assim:
(define-deprecated (elogind-service #:key (config (elogind-configuration))) elogind-service-type (service elogind-service-type config))Campos de registro, notavelmente campos de registros de configuração de serviço, devem seguir um período de depreciação similar. Isso geralmente é obtido por meio de ad hoc. Por exemplo, o campo
hosts-filedeoperating-systemfoi depreciado pela adição de uma propriedadesanitizedque emitiria um aviso:(define-record-type* <operating-system> ;; … (hosts-file %operating-system-hosts-file ;deprecated (default #f) (sanitize warn-hosts-file-field-deprecation))) (define-deprecated (operating-system-hosts-file os) hosts-service-type (%operating-system-hosts-file os))
Ao descontinuar interfaces em
operating-system,home-environment,(gnu services)ou qualquer serviço popular, a descontinuação deve vir com uma entrada emetc/news.scm.- Core interfaces
Interfaces de programação principais, em particular os módulos
(guix ...), podem ser confiáveis por uma variedade de ferramentas e canais externos. Qualquer alteração incompatível deve ser formalmente descontinuada comdefine-deprecated, como mostrado acima, por pelo menos um ano antes da remoção. O manual deve documentar claramente a nova interface e, exceto em casos óbvios, explicar como migrar da antiga.Como exemplo, o procedimento
build-expression->derivationfoi substituído porgexp->derivatione permaneceu disponível como um símbolo obsoleto:(define-deprecated (build-expression->derivation store name exp #:key …) gexp->derivation …)Às vezes, bindings são movidos de um módulo para outro. Nesses casos, bindings devem ser reexportados do módulo original por pelo menos um ano.
Esta seção não cobre todas as situações possíveis, mas espera-se que permita que os usuários saibam o que esperar e que os desenvolvedores se mantenham fiéis ao seu espírito. Por favor, envie um e-mail para guix-devel@gnu.org para quaisquer perguntas.
Próximo: Traduzindo o Guix, Anterior: Política de depreciação, Acima: Contribuindo [Conteúdo][Índice]
22.18 Escrevendo documentação
Guix é documentado usando o sistema Texinfo. Se você ainda não está familiarizado com ele, aceitamos contribuições para documentação na maioria dos formatos. Isso inclui texto simples, Markdown, Org, etc.
Contribuições de documentação podem ser enviadas para guix-patches@gnu.org. Adicione ‘[DOCUMENTATION]’ ao assunto.
Quando você precisar fazer mais do que uma simples adição à documentação, preferimos que você envie um patch adequado em vez de enviar um e-mail como descrito acima. Veja Enviando patches para obter mais informações sobre como enviar seus patches.
Para modificar a documentação, você precisa editar doc/guix.texi e doc/contributing.texi (que contém esta seção de documentação), ou doc/guix-cookbook.texi para o livro de receitas. Se você compilou o repositório Guix antes, você terá muito mais arquivos .texi que são traduções desses documentos. Não os modifique, a tradução é gerenciada através de Weblate. Veja Traduzindo o Guix para mais informações.
Para renderizar a documentação, você deve primeiro certificar-se de que
executou ./configure na sua árvore de origem (veja Executando guix antes dele ser instalado). Depois disso, você pode executar um dos seguintes
comandos:
- ‘make doc/guix.info’ para compilar o manual de informações.
Você pode verificar com
info doc/guix.info. - ‘make doc/guix.html’ para compilar a versão HTML. Você pode apontar seu navegador para o arquivo relevante no diretório doc/guix.html.
- ‘make doc/guix-cookbook.info’ para o manual de informações do livro de receitas.
- ‘make doc/guix-cookbook.html’ para a versão HTML do livro de receitas.
Próximo: Contributing to Guix’s Infrastructure, Anterior: Escrevendo documentação, Acima: Contribuindo [Conteúdo][Índice]
22.19 Traduzindo o Guix
Escrever código e pacotes não é a única maneira de fornecer uma contribuição significativa para o Guix. Traduzir para um idioma que você fala é outro exemplo de uma contribuição valiosa que você pode fazer. Esta seção foi criada para descrever o processo de tradução. Ela dá conselhos sobre como você pode se envolver, o que pode ser traduzido, quais erros você deve evitar e o que podemos fazer para ajudar você!
Guix é um grande projeto que tem vários componentes que podem ser traduzidos. Nós coordenamos o esforço de tradução em uma instância Weblate hospedada por nossos amigos no Fedora. Você precisará de uma conta para enviar traduções.
Alguns dos softwares empacotados no Guix também contêm traduções. Não
hospedamos uma plataforma de tradução para eles. Se você quiser traduzir um
pacote fornecido pelo Guix, entre em contato com os desenvolvedores ou
encontre as informações no site deles. Como exemplo, você pode encontrar a
homepage do pacote hello digitando guix show hello. Na
linha "homepage”, você verá https://www.gnu.org/software/hello/ como
a homepage.
Muitos pacotes GNU e não-GNU podem ser traduzidos no Translation Project. Alguns projetos com múltiplos componentes têm sua própria plataforma. Por exemplo, o GNOME tem sua própria plataforma, Damned Lies.
O Guix tem cinco componentes hospedados no Weblate.
-
guixcontém todas as strings do software Guix (o instalador de sistema guiado, gerenciador de pacotes, etc.), excluindo pacotes. -
packagescontém a sinopse (descrição de uma única frase de um pacote) e descrição (descrição mais longa) de pacotes no Guix. -
websitecontém o site oficial do Guix, exceto para postagens de blog e conteúdo multimídia. -
documentation-manualcorresponde a este manual. -
documentation-cookbooké o componente do livro de receitas.
General Directions
Depois de obter uma conta, você deve conseguir selecionar um componente do o projeto guix e selecionar um idioma. Se seu idioma não aparecer na lista, vá até o final e clique no botão "niciar nova tradução”. Selecione o idioma para o qual deseja traduzir na lista para iniciar sua nova tradução.
Como muitos outros pacotes de software livre, o Guix usa GNU Gettext para suas traduções, com as quais sequências traduzíveis são extraídas do código-fonte para os chamados arquivos PO.
Embora os arquivos PO sejam arquivos de texto, as alterações não devem ser feitas com um editor de texto, mas com um software de edição PO. O Weblate integra a funcionalidade de edição PO. Como alternativa, os tradutores podem usar qualquer uma das várias ferramentas de software livre para preencher traduções, das quais Poedit é um exemplo, e (após efetuar login) upload o arquivo alterado. Há também um modo de edição PO especial para usuários do GNU Emacs. Com o tempo, os tradutores descobrem com qual software estão satisfeitos e quais recursos precisam.
No Weblate, você encontrará vários links para o editor, que mostrarão vários subconjuntos (ou todos) das strings. Dê uma olhada ao redor e na documentation para se familiarizar com a plataforma.
Componentes de tradução
Nesta seção, fornecemos orientações mais detalhadas sobre o processo de tradução, bem como detalhes sobre o que você deve ou não fazer. Em caso de dúvida, entre em contato conosco, ficaremos felizes em ajudar!
- guix
Guix é escrito na linguagem de programação Guile, e algumas strings contêm formatação especial que é interpretada pelo Guile. Essas formatações especiais devem ser destacadas pelo Weblate. Elas começam com
~seguido por um ou mais caracteres.Ao imprimir a string, Guile substitui os símbolos especiais de formatação por valores reais. Por exemplo, a string ‘ambiguous package specification `~a'’ seria substituída para conter a dita especificação de pacote em vez de
~a. Para traduzir corretamente essa string, você deve manter o código de formatação em sua tradução, embora você possa colocá-lo onde fizer sentido em seu idioma. Por exemplo, a tradução francesa diz ‘spécification du paquet « ~a » ambiguë’ porque o adjetivo precisa ser colocado no final da frase.Se houver vários símbolos de formatação, certifique-se de respeitar a ordem. O Guile não sabe em qual ordem você pretendia que a string fosse lida, então ele substituirá os símbolos na mesma ordem da frase em inglês.
Por exemplo, você não pode traduzir ‘package '~a' has been superseded by '~a'’ como ‘'~a' supersedes package '~a'’, porque o significado seria invertido. Se foo for substituído por bar, a tradução seria ‘'foo' supersedes package 'bar'’. Para contornar esse problema, é possível usar uma formatação mais avançada para selecionar um dado pedaço de dados, em vez de seguir a ordem padrão em inglês. Veja Formatted Output em GNU Guile Reference Manual, para mais informações sobre formatação no Guile.
- pacotes
-
As descrições de pacotes ocasionalmente contêm marcação Texinfo (veja Sinopses e descrições). A marcação Texinfo se parece com ‘@code{rm -rf}’, ‘@emph{important}’, etc. Ao traduzir, deixe a marcação como está.
Os caracteres após “@” formam o nome da marcação, e o texto entre “{” e “}” é seu conteúdo. Em geral, você não deve traduzir o conteúdo de uma marcação como
@code, pois ela contém código literal que não muda com o idioma. Você pode traduzir o conteúdo de uma marcação de formatação como@emph,@i,@itemize,@item. No entanto, não traduza o nome da marcação, ou ela não será reconhecida. Não traduza a palavra após@end, é o nome da marcação que é fechado nesta posição (por exemplo,@itemize ... @end itemize). - documentation-manual e documentation-cookbook
-
O primeiro passo para garantir uma tradução bem-sucedida do manual é encontrar e traduzir as seguintes strings primeiro:
-
version.texi: Traduza esta string comoversion-xx.texi, ondexxé o código do seu idioma (aquele mostrado na URL no weblate). -
contributing.texi: Traduzir esta string comocontributing.xx.texi, ondexxé o mesmo código de idioma. -
Top: Não traduza esta string, ela é importante para o Texinfo. Se você traduzi-lo, o documento estará vazio (faltando um nó Top). Por favor, procure por ele e registreTopcomo sua tradução.
Traduzir essas strings primeiro garante que podemos incluir sua tradução no repositório guix sem interromper o processo de criação ou a máquina
guix pull.O manual e o livro de receitas usam Texinfo. Quanto a
packages, mantenha a marcação Texinfo como está. Há mais tipos de marcação possíveis no manual do que nas descrições de pacotes. Em geral, não traduza o conteúdo de@code,@file,@var,@value, etc. Você deve traduzir o conteúdo da marcação de formatação, como@emph,@i, etc.O manual contém seções que podem ser referenciadas pelo nome por
@ref,@xrefe@pxref. Temos um mecanismo em vigor para que você não tenha que traduzir o conteúdo delas. Se você mantiver o título em inglês, nós o substituiremos automaticamente pela sua tradução desse título. Isso garante que o Texinfo sempre será capaz de encontrar o nó. Se você decidir alterar a tradução do título, as referências serão atualizadas automaticamente e você não terá que atualizá-las todas sozinho.Ao traduzir referências do livro de receitas para o manual, você precisa substituir o nome do manual e o nome da seção. Por exemplo, para traduzir
@pxref{Defining Packages,,, guix, GNU Guix Reference Manual}, você substituiriaDefining Packagespelo título daquela seção no manual traduzido somente se aquele título estiver traduzido. Se o título ainda não estiver traduzido para o seu idioma, não o traduza aqui, ou o link será quebrado. Substituaguixporguix.xxondexxé o código do seu idioma.GNU Guix Reference Manualé o texto do link. Você pode traduzi-lo como quiser. -
- website
-
As páginas do site são escritas usando SXML, uma versão s-expression do HTML, a linguagem básica da web. Temos um processo para extrair strings traduzíveis da fonte e substituir s-expressions complexas por uma marcação XML mais familiar, onde cada marcação é numerada. Os tradutores podem alterar arbitrariamente a ordem, como no exemplo a seguir.
#. TRANSLATORS: Defining Packages is a section name #. in the English (en) manual. #: apps/base/templates/about.scm:64 msgid "Packages are <1>defined<1.1>en</1.1><1.2>Defining-Packages.html</1.2></1> as native <2>Guile</2> modules." msgstr "Pakete werden als reine <2>Guile</2>-Module <1>definiert<1.1>de</1.1><1.2>Pakete-definieren.html</1.2></1>."
Note que você precisa incluir as mesmas marcações. Você não pode pular nenhuma.
Caso você cometa um erro, o componente pode falhar ao construir corretamente com seu idioma, ou até mesmo fazer o guix pull falhar. Para evitar isso, temos um processo em vigor para verificar o conteúdo dos arquivos antes de enviar para nosso repositório. Não poderemos atualizar a tradução para seu idioma no Guix, então iremos notificá-lo (por meio do weblate e/ou por e-mail) para que você tenha a chance de corrigir o problema.
Fora do Weblate
Atualmente, algumas partes do Guix não podem ser traduzidas no Weblate. Precisamos de ajuda!
-
guix pullnews pode ser traduzido em news.scm, mas não é disponível no Weblate. Se você quiser fornecer uma tradução, pode preparar um patch conforme descrito acima, ou simplesmente nos enviar sua tradução com o nome da entrada de notícias que você traduziu e seu idioma. Veja Escrevendo notícias do canal, para mais informações sobre notícias do canal. - As postagens do blog Guix não podem ser traduzidas no momento.
- O script do instalador (para distribuições estrangeiras) é inteiramente em inglês.
- Algumas das bibliotecas que o Guix usa não podem ser traduzidas ou são traduzidas fora do projeto Guix. O Guile em si não é internacionalizado.
- Outros manuais vinculados a este manual ou ao livro de receitas podem não estar disponíveis traduzido.
Condições de inclusão
Não há condições para adicionar novas traduções dos componentes guix
e guix-packages, além de que eles precisam de pelo menos uma string
traduzida. Novos idiomas serão adicionados ao Guix o mais rápido
possível. Os arquivos podem ser removidos se ficarem fora de sincronia e não
tiverem mais strings traduzidas.
Dado que o site é dedicado a novos usuários, queremos que sua tradução esteja o mais completa possível antes de incluí-la no menu de idiomas. Para que um novo idioma seja incluído, ele precisa atingir pelo menos 80% de conclusão. Quando um idioma é incluído, ele pode ser removido no futuro se ficar fora de sincronia e ficar abaixo de 60% de conclusão.
O manual e o livro de receitas são adicionados automaticamente no destino de compilação padrão. Toda vez que sincronizamos traduções, os desenvolvedores precisam recompilar todos os manuais e livros de receitas traduzidos. Isso é inútil para o que é essencialmente o manual ou livro de receitas em inglês. Portanto, só incluiremos um novo idioma quando ele atingir 10% de conclusão no componente. Quando um idioma é incluído, ele pode ser removido no futuro se ficar fora de sincronia e cair abaixo de 5% de conclusão.
Infraestrutura de tradução
O Weblate é apoiado por um repositório git do qual ele descobre novas strings para traduzir e envia traduções novas e atualizadas. Normalmente, seria suficiente dar a ele acesso de commit para nossos repositórios. No entanto, decidimos usar um repositório separado por dois motivos. Primeiro, teríamos que dar ao Weblate acesso de commit e autorizar sua chave de assinatura, mas não confiamos nele da mesma forma que confiamos nos desenvolvedores do guix, especialmente porque não gerenciamos a instância nós mesmos. Segundo, se os tradutores bagunçarem alguma coisa, isso pode quebrar a geração do site e/ou o guix pull para todos os nossos usuários, independentemente do idioma deles.
Por esses motivos, usamos um repositório dedicado para hospedar as traduções e o sincronizamos com nossos repositórios guix e artworks após verificar se nenhum problema foi introduzido na tradução.
Os desenvolvedores podem baixar os arquivos PO mais recentes do weblate no
repositório Guix executando o comando make download-po. Ele
baixará automaticamente os arquivos mais recentes do weblate, os reformatará
para um formato canônico e verificará se eles não contêm problemas. O manual
precisa ser construído novamente para verificar se há problemas adicionais
que podem travar o Texinfo.
Antes de enviar novos arquivos de tradução, os desenvolvedores devem adicioná-los à maquinaria de make para que as traduções estejam realmente disponíveis. O processo difere para os vários componentes.
- Novos arquivos po para os componentes
guixepackagesdevem ser registrado adicionando o novo idioma em po/guix/LINGUAS ou po/packages/LINGUAS. - Novos arquivos po para o componente
documentation-manualdevem ser registrado adicionando o nome do arquivo emDOC_PO_FILESem po/doc/local.mk, o manual gerado em %D%/guix.xx.texi eminfo_TEXINFOSem doc/local.mk e o gerado em %D%/guix.xx.texi e %D%/contributing.xx.texi emTRANSLATED_INFOtambém em doc/local.mk. - Novos arquivos po para o componente
documentation-cookbookdevem ser registrado adicionando o nome do arquivo emDOC_COOKBOOK_PO_FILESem po/doc/local.mk, o manual gerado em %D%/guix-cookbook.xx.texi eminfo_TEXINFOSem doc/local.mk e o gerado em %D%/guix-cookbook.xx.texi emTRANSLATED_INFOtambém em doc/local.mk. - Novos arquivos po para o componente
websitedevem ser adicionados ao Repositórioguix-artwork, em website/po/. website/po/LINGUAS e website/po/ietf-tags.scm devem ser atualizados adequadamente (veja website/i18n-howto.txt para mais informações sobre o processo).
Anterior: Traduzindo o Guix, Acima: Contribuindo [Conteúdo][Índice]
22.20 Contributing to Guix’s Infrastructure
Since its inception, the Guix project has always valued its autonomy, and that reflects in its infrastructure: our servers run Guix System and exclusively free software, and are administered by volunteers.
Of course this comes at a cost and this is why we need contributions. Our hope is to make infrastructure-related activity more legible so that maybe you can picture yourself helping in one of these areas.
- Coding
- System Administration
- Day-to-Day System Administration
- On-Site Intervention
- Hosting
- Administrative Tasks
Próximo: System Administration, Acima: Contributing to Guix’s Infrastructure [Conteúdo][Índice]
22.20.1 Coding
The project runs many Guix-specific services; this is all lovely Scheme code but it tends to receive less attention than Guix itself:
- Build Farm Front-End: bffe
- Cuirass: Cuirass
- Goggles (IRC logger): Goggles
- Guix Build Coordinator: Build-Coordinator
- Guix Data Service: Data-Service
- Guix Packages Website: Guix-Packages-Website
- mumi: Mumi
- nar-herder: Nar-Herder
- QA Frontpage: QA-Frontpage
There is no time constraint on this coding activity: any improvement is welcome, whenever it comes. Most of these code bases are relatively small, which should make it easier to get started.
Pré-requisitos: familiaridade com o Guile, HTTP, e banco de dados.
Se você deseja iniciar, dê uma olhada no README do projeto de sua escolha e
entre em contato com o guix-devel e os desenvolvedores principais da
ferramenta conforme git shortlog -s | sort -k1 -n.
Próximo: Day-to-Day System Administration, Anterior: Coding, Acima: Contributing to Guix’s Infrastructure [Conteúdo][Índice]
22.20.2 System Administration
A configuração do Sistema Guix para todos os nossos sistemas é mantida neste repositório:
https://git.savannah.gnu.org/cgit/guix/maintenance.git/tree/hydra/
The two front-ends are berlin.scm (the machine behind ci.guix.gnu.org) and bayfront.scm (the machine behind bordeaux.guix.gnu.org, guix.gnu.org, hpc.guix.info, qa.guix.gnu.org, and more). Both connect to a number of build machines and helpers.
Caso não tenha inclusive acesso SSH à máquina, voucê pode ajudar postando
patches para melhorar a configuração (pode testar isso com guix system
vm). Alguns caminhos para você poder ajudar:
- Improve infra monitoring: set up a dashboard to monitor all the infrastructure, and an out-of-band channel to communicate about downtime.
- Implement web site redundancy: guix.gnu.org should be backed by several machines on different sites. Get in touch with us and/or send a patch!
- Implement substitute redundancy: likewise, bordeaux.guix.gnu.org and ci.guix.gnu.org should be backed by several head nodes.
- Improve backup: there’s currently ad-hoc backup of selected pieces over rsync between the two head nodes; we can improve on that, for example with a dedicated backup site and proper testing of recoverability.
- Support mirroring: We’d like to make it easy for others to mirror substitutes from ci.guix and bordeaux.guix, perhaps by offering public rsync access.
- Optimize our web services: Monitor the performance of our services and tweak
nginx config or whatever it takes to improve it.
There is no time constraint on this activity: any improvement is welcome, whenever you can work on it.
Prerequisite: Familiarity with Guix System administration and ideally with the infrastructure handbook:
Próximo: On-Site Intervention, Anterior: System Administration, Acima: Contributing to Guix’s Infrastructure [Conteúdo][Índice]
22.20.3 Day-to-Day System Administration
We’re also looking for people who’d be willing to have SSH access to some of the infrastructure to help with day-to-day maintenance: restarting a build, restarting the occasional service that has gone wild (that can happen), reconfiguring/upgrading a machine, rebooting, etc.
This day-to-day activity requires you to be available some of the time (during office hours or not, during the week-end or not), whenever is convenient for you, so you can react to issues reported on IRC, on the mailing list, or elsewhere, and synchronize with other sysadmins.
Prerequisite: Being a “known” member of the community, familiarity with Guix System administration, with some of the services/web sites being run, and with the infrastructure handbook:
Próximo: Hosting, Anterior: Day-to-Day System Administration, Acima: Contributing to Guix’s Infrastructure [Conteúdo][Índice]
22.20.4 On-Site Intervention
The first front-end is currently generously hosted by the Max Delbrück Center (MDC), a research institute in Berlin, Germany. Only authorized personnel can physically access it.
The second one, bordeaux.guix.gnu.org, is hosted in Bordeaux, France, in a professional data center shared with non-profit ISP Aquilenet. If you live in the region of Bordeaux and would like to help out when we need to go on-site, please make yourself known by emailing guix-sysadmin@gnu.org.
On-site interventions are rare, but they’re usually in response to an emergency.
Próximo: Administrative Tasks, Anterior: On-Site Intervention, Acima: Contributing to Guix’s Infrastructure [Conteúdo][Índice]
22.20.5 Hosting
We’re looking for people who can host machines and help out whenever physical access is needed. More specifically:
- We need hosting of “small” machines such as single-board computers (AArch64, RISC-V) for use as build machines.
- We need hosting for front-ends and x86_64 build machines in a data center where they can be racked and where, ideally, several local Guix sysadmins can physically access them.
The machines should be accessible over Wireguard VPN most of the time, so longer power or network interruptions should be the exception.
Prerequisites: Familiarity with installing and remotely administering Guix System.
Anterior: Hosting, Acima: Contributing to Guix’s Infrastructure [Conteúdo][Índice]
22.20.6 Administrative Tasks
The infra remains up and running thanks to crucial administrative tasks, which includes:
- Selecting and purchasing hardware, for example build machines.
- Renewing domain names.
- Securing funding, in particular via the Guix Foundation: Guix Foundation
Prerequisites: Familiarity with hardware, and/or DNS registrars, and/or sponsorship, and/or crowdfunding.
Próximo: Licença de Documentação Livre GNU, Anterior: Contribuindo, Acima: GNU Guix [Conteúdo][Índice]
23 Agradecimentos
Guix é baseado no gerenciador de pacotes Nix, que foi projetado e implementado por Eelco Dolstra, com contribuições de outras pessoas (veja o arquivo nix/AUTHORS no Guix.) O Nix foi pioneiro no gerenciamento funcional de pacotes e promoveu recursos sem precedentes, como atualizações e reversões de pacotes transacionais, perfis por usuário e processos de construção referencialmente transparentes. Sem esse trabalho, o Guix não existiria.
As distribuições de software baseadas em Nix, Nixpkgs e NixOS, também foram uma inspiração para o Guix.
O GNU Guix em si é um trabalho coletivo com contribuições de várias pessoas. Veja o arquivo AUTHORS no Guix para obter mais informações sobre essas pessoas legais. O arquivo THANKS lista as pessoas que ajudaram a relatar erros, cuidar da infraestrutura, fornecer ilustrações e temas, fazer sugestões e muito mais – obrigado!
Próximo: Índice de conceitos, Anterior: Agradecimentos, Acima: GNU Guix [Conteúdo][Índice]
Apêndice A Licença de Documentação Livre GNU
Copyright © 2000, 2001, 2002, 2007, 2008 Free Software Foundation, Inc. https://fsf.org/ Everyone is permitted to copy and distribute verbatim copies of this license document, but changing it is not allowed.
- PREAMBLE
The purpose of this License is to make a manual, textbook, or other functional and useful document free in the sense of freedom: to assure everyone the effective freedom to copy and redistribute it, with or without modifying it, either commercially or noncommercially. Secondarily, this License preserves for the author and publisher a way to get credit for their work, while not being considered responsible for modifications made by others.
This License is a kind of “copyleft”, which means that derivative works of the document must themselves be free in the same sense. It complements the GNU General Public License, which is a copyleft license designed for free software.
We have designed this License in order to use it for manuals for free software, because free software needs free documentation: a free program should come with manuals providing the same freedoms that the software does. But this License is not limited to software manuals; it can be used for any textual work, regardless of subject matter or whether it is published as a printed book. We recommend this License principally for works whose purpose is instruction or reference.
- APPLICABILITY AND DEFINITIONS
This License applies to any manual or other work, in any medium, that contains a notice placed by the copyright holder saying it can be distributed under the terms of this License. Such a notice grants a world-wide, royalty-free license, unlimited in duration, to use that work under the conditions stated herein. The “Document”, below, refers to any such manual or work. Any member of the public is a licensee, and is addressed as “you”. You accept the license if you copy, modify or distribute the work in a way requiring permission under copyright law.
A “Modified Version” of the Document means any work containing the Document or a portion of it, either copied verbatim, or with modifications and/or translated into another language.
A “Secondary Section” is a named appendix or a front-matter section of the Document that deals exclusively with the relationship of the publishers or authors of the Document to the Document’s overall subject (or to related matters) and contains nothing that could fall directly within that overall subject. (Thus, if the Document is in part a textbook of mathematics, a Secondary Section may not explain any mathematics.) The relationship could be a matter of historical connection with the subject or with related matters, or of legal, commercial, philosophical, ethical or political position regarding them.
The “Invariant Sections” are certain Secondary Sections whose titles are designated, as being those of Invariant Sections, in the notice that says that the Document is released under this License. If a section does not fit the above definition of Secondary then it is not allowed to be designated as Invariant. The Document may contain zero Invariant Sections. If the Document does not identify any Invariant Sections then there are none.
The “Cover Texts” are certain short passages of text that are listed, as Front-Cover Texts or Back-Cover Texts, in the notice that says that the Document is released under this License. A Front-Cover Text may be at most 5 words, and a Back-Cover Text may be at most 25 words.
A “Transparent” copy of the Document means a machine-readable copy, represented in a format whose specification is available to the general public, that is suitable for revising the document straightforwardly with generic text editors or (for images composed of pixels) generic paint programs or (for drawings) some widely available drawing editor, and that is suitable for input to text formatters or for automatic translation to a variety of formats suitable for input to text formatters. A copy made in an otherwise Transparent file format whose markup, or absence of markup, has been arranged to thwart or discourage subsequent modification by readers is not Transparent. An image format is not Transparent if used for any substantial amount of text. A copy that is not “Transparent” is called “Opaque”.
Examples of suitable formats for Transparent copies include plain ASCII without markup, Texinfo input format, LaTeX input format, SGML or XML using a publicly available DTD, and standard-conforming simple HTML, PostScript or PDF designed for human modification. Examples of transparent image formats include PNG, XCF and JPG. Opaque formats include proprietary formats that can be read and edited only by proprietary word processors, SGML or XML for which the DTD and/or processing tools are not generally available, and the machine-generated HTML, PostScript or PDF produced by some word processors for output purposes only.
The “Title Page” means, for a printed book, the title page itself, plus such following pages as are needed to hold, legibly, the material this License requires to appear in the title page. For works in formats which do not have any title page as such, “Title Page” means the text near the most prominent appearance of the work’s title, preceding the beginning of the body of the text.
The “publisher” means any person or entity that distributes copies of the Document to the public.
A section “Entitled XYZ” means a named subunit of the Document whose title either is precisely XYZ or contains XYZ in parentheses following text that translates XYZ in another language. (Here XYZ stands for a specific section name mentioned below, such as “Acknowledgements”, “Dedications”, “Endorsements”, or “History”.) To “Preserve the Title” of such a section when you modify the Document means that it remains a section “Entitled XYZ” according to this definition.
The Document may include Warranty Disclaimers next to the notice which states that this License applies to the Document. These Warranty Disclaimers are considered to be included by reference in this License, but only as regards disclaiming warranties: any other implication that these Warranty Disclaimers may have is void and has no effect on the meaning of this License.
- VERBATIM COPYING
You may copy and distribute the Document in any medium, either commercially or noncommercially, provided that this License, the copyright notices, and the license notice saying this License applies to the Document are reproduced in all copies, and that you add no other conditions whatsoever to those of this License. You may not use technical measures to obstruct or control the reading or further copying of the copies you make or distribute. However, you may accept compensation in exchange for copies. If you distribute a large enough number of copies you must also follow the conditions in section 3.
You may also lend copies, under the same conditions stated above, and you may publicly display copies.
- COPYING IN QUANTITY
If you publish printed copies (or copies in media that commonly have printed covers) of the Document, numbering more than 100, and the Document’s license notice requires Cover Texts, you must enclose the copies in covers that carry, clearly and legibly, all these Cover Texts: Front-Cover Texts on the front cover, and Back-Cover Texts on the back cover. Both covers must also clearly and legibly identify you as the publisher of these copies. The front cover must present the full title with all words of the title equally prominent and visible. You may add other material on the covers in addition. Copying with changes limited to the covers, as long as they preserve the title of the Document and satisfy these conditions, can be treated as verbatim copying in other respects.
If the required texts for either cover are too voluminous to fit legibly, you should put the first ones listed (as many as fit reasonably) on the actual cover, and continue the rest onto adjacent pages.
If you publish or distribute Opaque copies of the Document numbering more than 100, you must either include a machine-readable Transparent copy along with each Opaque copy, or state in or with each Opaque copy a computer-network location from which the general network-using public has access to download using public-standard network protocols a complete Transparent copy of the Document, free of added material. If you use the latter option, you must take reasonably prudent steps, when you begin distribution of Opaque copies in quantity, to ensure that this Transparent copy will remain thus accessible at the stated location until at least one year after the last time you distribute an Opaque copy (directly or through your agents or retailers) of that edition to the public.
It is requested, but not required, that you contact the authors of the Document well before redistributing any large number of copies, to give them a chance to provide you with an updated version of the Document.
- MODIFICATIONS
You may copy and distribute a Modified Version of the Document under the conditions of sections 2 and 3 above, provided that you release the Modified Version under precisely this License, with the Modified Version filling the role of the Document, thus licensing distribution and modification of the Modified Version to whoever possesses a copy of it. In addition, you must do these things in the Modified Version:
- Use in the Title Page (and on the covers, if any) a title distinct from that of the Document, and from those of previous versions (which should, if there were any, be listed in the History section of the Document). You may use the same title as a previous version if the original publisher of that version gives permission.
- List on the Title Page, as authors, one or more persons or entities responsible for authorship of the modifications in the Modified Version, together with at least five of the principal authors of the Document (all of its principal authors, if it has fewer than five), unless they release you from this requirement.
- State on the Title page the name of the publisher of the Modified Version, as the publisher.
- Preserve all the copyright notices of the Document.
- Add an appropriate copyright notice for your modifications adjacent to the other copyright notices.
- Include, immediately after the copyright notices, a license notice giving the public permission to use the Modified Version under the terms of this License, in the form shown in the Addendum below.
- Preserve in that license notice the full lists of Invariant Sections and required Cover Texts given in the Document’s license notice.
- Include an unaltered copy of this License.
- Preserve the section Entitled “History”, Preserve its Title, and add to it an item stating at least the title, year, new authors, and publisher of the Modified Version as given on the Title Page. If there is no section Entitled “History” in the Document, create one stating the title, year, authors, and publisher of the Document as given on its Title Page, then add an item describing the Modified Version as stated in the previous sentence.
- Preserve the network location, if any, given in the Document for public access to a Transparent copy of the Document, and likewise the network locations given in the Document for previous versions it was based on. These may be placed in the “History” section. You may omit a network location for a work that was published at least four years before the Document itself, or if the original publisher of the version it refers to gives permission.
- For any section Entitled “Acknowledgements” or “Dedications”, Preserve the Title of the section, and preserve in the section all the substance and tone of each of the contributor acknowledgements and/or dedications given therein.
- Preserve all the Invariant Sections of the Document, unaltered in their text and in their titles. Section numbers or the equivalent are not considered part of the section titles.
- Delete any section Entitled “Endorsements”. Such a section may not be included in the Modified Version.
- Do not retitle any existing section to be Entitled “Endorsements” or to conflict in title with any Invariant Section.
- Preserve any Warranty Disclaimers.
If the Modified Version includes new front-matter sections or appendices that qualify as Secondary Sections and contain no material copied from the Document, you may at your option designate some or all of these sections as invariant. To do this, add their titles to the list of Invariant Sections in the Modified Version’s license notice. These titles must be distinct from any other section titles.
You may add a section Entitled “Endorsements”, provided it contains nothing but endorsements of your Modified Version by various parties—for example, statements of peer review or that the text has been approved by an organization as the authoritative definition of a standard.
You may add a passage of up to five words as a Front-Cover Text, and a passage of up to 25 words as a Back-Cover Text, to the end of the list of Cover Texts in the Modified Version. Only one passage of Front-Cover Text and one of Back-Cover Text may be added by (or through arrangements made by) any one entity. If the Document already includes a cover text for the same cover, previously added by you or by arrangement made by the same entity you are acting on behalf of, you may not add another; but you may replace the old one, on explicit permission from the previous publisher that added the old one.
The author(s) and publisher(s) of the Document do not by this License give permission to use their names for publicity for or to assert or imply endorsement of any Modified Version.
- COMBINING DOCUMENTS
You may combine the Document with other documents released under this License, under the terms defined in section 4 above for modified versions, provided that you include in the combination all of the Invariant Sections of all of the original documents, unmodified, and list them all as Invariant Sections of your combined work in its license notice, and that you preserve all their Warranty Disclaimers.
The combined work need only contain one copy of this License, and multiple identical Invariant Sections may be replaced with a single copy. If there are multiple Invariant Sections with the same name but different contents, make the title of each such section unique by adding at the end of it, in parentheses, the name of the original author or publisher of that section if known, or else a unique number. Make the same adjustment to the section titles in the list of Invariant Sections in the license notice of the combined work.
In the combination, you must combine any sections Entitled “History” in the various original documents, forming one section Entitled “History”; likewise combine any sections Entitled “Acknowledgements”, and any sections Entitled “Dedications”. You must delete all sections Entitled “Endorsements.”
- COLLECTIONS OF DOCUMENTS
You may make a collection consisting of the Document and other documents released under this License, and replace the individual copies of this License in the various documents with a single copy that is included in the collection, provided that you follow the rules of this License for verbatim copying of each of the documents in all other respects.
You may extract a single document from such a collection, and distribute it individually under this License, provided you insert a copy of this License into the extracted document, and follow this License in all other respects regarding verbatim copying of that document.
- AGGREGATION WITH INDEPENDENT WORKS
A compilation of the Document or its derivatives with other separate and independent documents or works, in or on a volume of a storage or distribution medium, is called an “aggregate” if the copyright resulting from the compilation is not used to limit the legal rights of the compilation’s users beyond what the individual works permit. When the Document is included in an aggregate, this License does not apply to the other works in the aggregate which are not themselves derivative works of the Document.
If the Cover Text requirement of section 3 is applicable to these copies of the Document, then if the Document is less than one half of the entire aggregate, the Document’s Cover Texts may be placed on covers that bracket the Document within the aggregate, or the electronic equivalent of covers if the Document is in electronic form. Otherwise they must appear on printed covers that bracket the whole aggregate.
- TRANSLATION
Translation is considered a kind of modification, so you may distribute translations of the Document under the terms of section 4. Replacing Invariant Sections with translations requires special permission from their copyright holders, but you may include translations of some or all Invariant Sections in addition to the original versions of these Invariant Sections. You may include a translation of this License, and all the license notices in the Document, and any Warranty Disclaimers, provided that you also include the original English version of this License and the original versions of those notices and disclaimers. In case of a disagreement between the translation and the original version of this License or a notice or disclaimer, the original version will prevail.
If a section in the Document is Entitled “Acknowledgements”, “Dedications”, or “History”, the requirement (section 4) to Preserve its Title (section 1) will typically require changing the actual title.
- TERMINATION
You may not copy, modify, sublicense, or distribute the Document except as expressly provided under this License. Any attempt otherwise to copy, modify, sublicense, or distribute it is void, and will automatically terminate your rights under this License.
However, if you cease all violation of this License, then your license from a particular copyright holder is reinstated (a) provisionally, unless and until the copyright holder explicitly and finally terminates your license, and (b) permanently, if the copyright holder fails to notify you of the violation by some reasonable means prior to 60 days after the cessation.
Moreover, your license from a particular copyright holder is reinstated permanently if the copyright holder notifies you of the violation by some reasonable means, this is the first time you have received notice of violation of this License (for any work) from that copyright holder, and you cure the violation prior to 30 days after your receipt of the notice.
Termination of your rights under this section does not terminate the licenses of parties who have received copies or rights from you under this License. If your rights have been terminated and not permanently reinstated, receipt of a copy of some or all of the same material does not give you any rights to use it.
- FUTURE REVISIONS OF THIS LICENSE
The Free Software Foundation may publish new, revised versions of the GNU Free Documentation License from time to time. Such new versions will be similar in spirit to the present version, but may differ in detail to address new problems or concerns. See https://www.gnu.org/copyleft/.
Each version of the License is given a distinguishing version number. If the Document specifies that a particular numbered version of this License “or any later version” applies to it, you have the option of following the terms and conditions either of that specified version or of any later version that has been published (not as a draft) by the Free Software Foundation. If the Document does not specify a version number of this License, you may choose any version ever published (not as a draft) by the Free Software Foundation. If the Document specifies that a proxy can decide which future versions of this License can be used, that proxy’s public statement of acceptance of a version permanently authorizes you to choose that version for the Document.
- RELICENSING
“Massive Multiauthor Collaboration Site” (or “MMC Site”) means any World Wide Web server that publishes copyrightable works and also provides prominent facilities for anybody to edit those works. A public wiki that anybody can edit is an example of such a server. A “Massive Multiauthor Collaboration” (or “MMC”) contained in the site means any set of copyrightable works thus published on the MMC site.
“CC-BY-SA” means the Creative Commons Attribution-Share Alike 3.0 license published by Creative Commons Corporation, a not-for-profit corporation with a principal place of business in San Francisco, California, as well as future copyleft versions of that license published by that same organization.
“Incorporate” means to publish or republish a Document, in whole or in part, as part of another Document.
An MMC is “eligible for relicensing” if it is licensed under this License, and if all works that were first published under this License somewhere other than this MMC, and subsequently incorporated in whole or in part into the MMC, (1) had no cover texts or invariant sections, and (2) were thus incorporated prior to November 1, 2008.
The operator of an MMC Site may republish an MMC contained in the site under CC-BY-SA on the same site at any time before August 1, 2009, provided the MMC is eligible for relicensing.
ADDENDUM: How to use this License for your documents
To use this License in a document you have written, include a copy of the License in the document and put the following copyright and license notices just after the title page:
Copyright (C) year your name. Permission is granted to copy, distribute and/or modify this document under the terms of the GNU Free Documentation License, Version 1.3 or any later version published by the Free Software Foundation; with no Invariant Sections, no Front-Cover Texts, and no Back-Cover Texts. A copy of the license is included in the section entitled ``GNU Free Documentation License''.
If you have Invariant Sections, Front-Cover Texts and Back-Cover Texts, replace the “with…Texts.” line with this:
with the Invariant Sections being list their titles, with
the Front-Cover Texts being list, and with the Back-Cover Texts
being list.
If you have Invariant Sections without Cover Texts, or some other combination of the three, merge those two alternatives to suit the situation.
If your document contains nontrivial examples of program code, we recommend releasing these examples in parallel under your choice of free software license, such as the GNU General Public License, to permit their use in free software.
Próximo: Índice de programação, Anterior: Licença de Documentação Livre GNU, Acima: GNU Guix [Conteúdo][Índice]
Índice de conceitos
| Pular para: | .
/
A B C D E F G H I J K L M N O P Q R S T U V W X Z |
|---|
| Pular para: | .
/
A B C D E F G H I J K L M N O P Q R S T U V W X Z |
|---|
Anterior: Índice de conceitos, Acima: GNU Guix [Conteúdo][Índice]
Índice de programação
| Pular para: | #
$
%
'
(
,
>
`
A B C D E F G H I J K L M N O P Q R S T U V W X Y Z |
|---|
| Pular para: | #
$
%
'
(
,
>
`
A B C D E F G H I J K L M N O P Q R S T U V W X Y Z |
|---|