GNU Guix
这份文档介绍GNU Guix版本1.4.0,一个为GNU系统编写的函数式包管理器。
This manual is also available in Simplified Chinese (see GNU Guix参考手册), French (see Manuel de référence de GNU Guix), German (see Referenzhandbuch zu GNU Guix), Spanish (see Manual de referencia de GNU Guix), Brazilian Portuguese (see Manual de referência do GNU Guix), and Russian (see Руководство GNU Guix). If you would like to translate it in your native language, consider joining Weblate (see 翻译 Guix).
Table of Contents
- 1 介绍
- 2 安装
- 3 系统安装
- 4 System Troubleshooting Tips
- 5 入门
- 6 软件包管理
- 7 通道
- 7.1 Specifying Additional Channels
- 7.2 Using a Custom Guix Channel
- 7.3 Replicating Guix
- 7.4 Channel Authentication
- 7.5 Channels with Substitutes
- 7.6 创建一个频道
- 7.7 Package Modules in a Sub-directory
- 7.8 Declaring Channel Dependencies
- 7.9 Specifying Channel Authorizations
- 7.10 Primary URL
- 7.11 Writing Channel News
- 8 开发
- 9 编程接口
- 10 工具
- 10.1 调用
guix build - 10.2 Invoking
guix edit - 10.3 Invoking
guix download - 10.4 Invoking
guix hash - 10.5 Invoking
guix import - 10.6 Invoking
guix refresh - 10.7 Invoking
guix style - 10.8 Invoking
guix lint - 10.9 Invoking
guix size - 10.10 Invoking
guix graph - 10.11 Invoking
guix publish - 10.12 Invoking
guix challenge - 10.13 Invoking
guix copy - 10.14 Invoking
guix container - 10.15 Invoking
guix weather - 10.16 Invoking
guix processes
- 10.1 调用
- 11 Foreign Architectures
- 12 系统配置
- 12.1 使用配置系统
- 12.2
operating-systemReference - 12.3 文件系统
- 12.4 映射的设备
- 12.5 Swap Space
- 12.6 用户帐号
- 12.7 键盘布局
- 12.8 区域
- 12.9 服务
- 12.9.1 基础服务
- 12.9.2 执行计划任务
- 12.9.3 日志轮替
- 12.9.4 Networking Setup
- 12.9.5 网络服务
- 12.9.6 Unattended Upgrades
- 12.9.7 X窗口
- 12.9.8 打印服务
- 12.9.9 桌面服务
- 12.9.10 声音服务
- 12.9.11 数据库服务
- 12.9.12 邮件服务
- 12.9.13 消息服务
- 12.9.14 电话服务
- 12.9.15 File-Sharing Services
- 12.9.16 监控服务
- 12.9.17 Kerberos服务
- 12.9.18 LDAP Services
- 12.9.19 Web服务
- 12.9.20 证书服务
- 12.9.21 DNS服务
- 12.9.22 VNC Services
- 12.9.23 VPN服务
- 12.9.24 网络文件系统
- 12.9.25 Samba Services
- 12.9.26 持续集成
- 12.9.27 电源管理服务
- 12.9.28 音频服务
- 12.9.29 虚拟化服务
- 12.9.30 版本控制服务
- 12.9.31 游戏服务
- 12.9.32 PAM Mount Service
- 12.9.33 Guix Services
- 12.9.34 Linux Services
- 12.9.35 Hurd Services
- 12.9.36 其它各种服务
- 12.10 setuid程序
- 12.11 X.509证书
- 12.12 Name Service Switch
- 12.13 初始的内存虚拟硬盘
- 12.14 引导设置
- 12.15 Invoking
guix system - 12.16 Invoking
guix deploy - 12.17 Running Guix in a Virtual Machine
- 12.18 定义服务
- 13 Home Configuration
- 14 文档
- 15 Platforms
- 16 Creating System Images
- 17 安装调试文件
- 18 Using TeX and LaTeX
- 19 安全更新
- 20 引导
- 21 Porting to a New Platform
- 22 贡献
- 23 致谢
- Appendix A GNU自由文档许可证
- 概念索引
- 编程索引
1 介绍
GNU Guix1是GNU系统的包管理器和发行版。Guix让无特权的用户可以轻松地安装,升级,或删除软件包,回滚到前一个软件包集合,从源代码构建软件包,及辅助软件环境的创建和维护。
你可以在现有的GNU/Linux发行版上安装GNU Guix(see 安装),Guix可以补充已有的工具,并且不会和它们产生冲突。或者你可以把它当作独立的操作系统发行版(Guix 系统2)。See GNU发行版.
1.1 以Guix的方式管理软件
Guix provides a command-line package management interface (see 软件包管理), tools to help with software development (see 开发), command-line utilities for more advanced usage (see 工具), as well as Scheme programming interfaces (see 编程接口). 构建后台进程为用户构建软件包(see 设置后台进程),及从授权的源(see substitutes)下载预构建的二进制文件。
Guix包含很多GNU和非GNU的软件包定义,所有的这些软件包都尊重用户的自由。它是可扩展的:用户可以编写自己的软件包定义(see 定义软件包),并且把它们作为独立的软件包模块see 软件包模块。它也是可定制的:用户可以从现有的软件包定义衍生出特殊的软件包,包括从命令行(see 软件包转换选项)。
在底层,Guix实现了由Nix(see 致谢)开创的函数式包管理器。在Guix里,软件包构建和安装过程被视为数学意义上的函数。函数获取输入,如构建脚本、编译器和库,并且返回一个安装好的软件包。作为一个纯函数,它的结果只取决于它的输入--例如,它不能引用没有作为显式输入传入的软件和脚本。当传入特定的输入时,一个构建函数总是得到相同的结果。它不能以任何方式修改运行系统的环境,例如,它不能创建,修改,或删除构建和安装环境之外的文件夹。这是通过在隔离的环境(容器)里运行构建进程实现的,在这个环境里只能访问到显式的输入。
软件包构建函数的结果被缓存在文件系统里的一个叫做仓库(see 仓库)的特殊文件夹内。每个软件包都被安装在仓库(默认在/gnu/store)里的一个独立的文件夹内。这个文件夹的名字含有用于构建这个软件包的所有输入的hash,所以,修改输入会得到一个不同的文件夹名。
这种手段是实现Guix的突出功能的基础:对事务型软件包升级和回滚的支持,每个用户独立的安装,软件包垃圾回收see 功能。
Previous: 以Guix的方式管理软件, Up: 介绍 [Contents][Index]
1.2 GNU发行版
Guix提供了一个GNU系统发行版,这个发新版只包含自由软件3。这个发行版可以独立安装(see 系统安装),但是把Guix安装为一个已经安装好的GNU/Linux系统的包管理器也是可行的(see 安装)。当我们需要区分这两者时,我们把独立的发行版称为“Guix系统”。
这个发行版提供了GNU核心软件包,如libc、gcc和Binutils,以及很多GNU和非GNU应用程序。可用的软件包的完整列表可以在on-line浏览,或者通过运行guix
package(see Invoking guix package)获得:
guix package --list-available
我们的目标是提供一个基于Linux和其它GNU变体的可用的100%自由的软件发行版,我们的重点是推广和紧密集成GNU组件,以及强调帮助用户行使那些自由的程序和工具。
目前这些平台提供软件包:
x86_64-linuxIntel/AMD
x86_64架构,Linux-Libre 内核。i686-linuxIntel 32 位架构(IA32),Linux-Libre 内核。
armhf-linuxARMv7-A架构,带硬件浮点数、Thumb-2和NEON扩展,EABI硬件浮点数应用二进制接口(ABI),和Linux-Libre内核。
aarch64-linuxlittle-endian 64-bit ARMv8-A processors, Linux-Libre kernel.
i586-gnuGNU/Hurd on the Intel 32-bit architecture (IA32).
This configuration is experimental and under development. The easiest way for you to give it a try is by setting up an instance of
hurd-vm-service-typeon your GNU/Linux machine (seehurd-vm-service-type). See 贡献, on how to help!mips64el-linux (unsupported)little-endian 64-bit MIPS processors, specifically the Loongson series, n32 ABI, and Linux-Libre kernel. This configuration is no longer fully supported; in particular, there is no ongoing work to ensure that this architecture still works. Should someone decide they wish to revive this architecture then the code is still available.
powerpc-linux (unsupported)big-endian 32-bit PowerPC processors, specifically the PowerPC G4 with AltiVec support, and Linux-Libre kernel. This configuration is not fully supported and there is no ongoing work to ensure this architecture works.
powerpc64le-linuxlittle-endian 64-bit Power ISA processors, Linux-Libre kernel. This includes POWER9 systems such as the RYF Talos II mainboard. This platform is available as a "technology preview": although it is supported, substitutes are not yet available from the build farm (see substitutes), and some packages may fail to build (see 跟踪程序漏洞和补丁). That said, the Guix community is actively working on improving this support, and now is a great time to try it and get involved!
riscv64-linux小端64位RISC-V处理器,特别是RV64GC和Linux Libre内核。该平台可作为“技术预览”使用:尽管支持该平台,但构建场(see substitutes)中尚未提供substitutes,并且某些包可能无法构建 (see 跟踪程序漏洞和补丁)。这就是说,Guix社区正在积极完善这种支持,现在是探索和加入它的好时机!
在Guix系统里,你声明操作系统所有方面的配置,然后Guix以事务型的,可重复的,和无状态的方式解决实例化配置的问题(see 系统配置)。Guix系统使用Linux-Libre内核,Shepherd初始化系统see Introduction in GNU Shepherd用户手册,知名的GNU工具和工具链,以及你可选的图形界面环境和系统服务。
Guix系统在上面所有的平台上都可用,但mips64el-linux, powerpc-linux,
powerpc64le-linux 和 riscv64-linux除外。
关于移植到其它架构或内核的信息,see Porting to a New Platform。
构建这个发行版需要努力合作,欢迎你加入!关于你可以怎样提供帮助的信息,See 贡献。
2 安装
注: 我们推荐使用shell安装脚本在已有的GNU/Linux系统(即foreign distro)上安装Guix。4这个脚本自动下载、安装并且初始化Guix,它需要以root用户身份运行。
在foreign distro上安装时,GNU Guix可以在不引起冲突的前提下补充现有的工具。它的数据只存放在两个文件夹里,通常是/gnu/store和/var/guix;系统上的其它文件,如/etc,不会被修改。
一旦安装好了,可以通过运行guix pull升级Guix(see Invoking guix pull)。
如果你希望手动执行安装步骤,或者想改变安装步骤,接下来这些小节会很有用。它们介绍Guix的软件依赖,以及如何手动安装和使用Guix。
2.1 二进制文件安装
这个小节介绍如何在任意的系统上用独立的Guix二进制文件包安装Guix和它的依赖。这通常比从源代码安装更快,下一小节会介绍如何从源代码安装。唯一的需求是有GNU tar和Xz。
注: 我们推荐使用这个shell安装脚本。这个脚本自动执行下述的下载、安装并且初始化Guix的过程。它需要以root用户身份运行。作为root用户,因此你可以运行这个:
cd /tmp
wget https://git.savannah.gnu.org/cgit/guix.git/plain/etc/guix-install.sh
chmod +x guix-install.sh
./guix-install.sh
If you’re running Debian or a derivative such as Ubuntu, you can instead install the package (it might be a version older than 1.4.0 but you can update it afterwards by running ‘guix pull’):
sudo apt install guixLikewise on openSUSE:
sudo zypper install guixWhen you’re done, see 设置应用程序 for extra configuration you might need, and 入门 for your first steps!
安装步骤如下:
-
Download the binary tarball from
‘
https://ftp.gnu.org/gnu/guix/guix-binary-1.4.0.x86_64-linux.tar.xz’, wherex86_64-linuxcan be replaced withi686-linuxfor ani686(32-bits) machine already running the kernel Linux, and so on (see GNU发行版).请确保下载相关的.sig文件,并且用它验证文件包的可靠性,方法如下:
$ wget https://ftp.gnu.org/gnu/guix/guix-binary-1.4.0.x86_64-linux.tar.xz.sig
$ gpg --verify guix-binary-1.4.0.x86_64-linux.tar.xz.sig
如果那个命令因为缺少所需的公钥而失败了,那么用这个命令导入它:
$ wget 'https://sv.gnu.org/people/viewgpg.php?user_id=15145' \
      -qO - | gpg --import -
再次运行
gpg --verify命令。Take note that a warning like “This key is not certified with a trusted signature!” is normal.
- 现在你需要成为
root用户。基于你的发行版,你可能需要执行su -或sudo -i。以root用户身份,执行:# cd /tmp # tar --warning=no-timestamp -xf \ /path/to/guix-binary-1.4.0.x86_64-linux.tar.xz # mv var/guix /var/ && mv gnu /This creates /gnu/store (see 仓库) and /var/guix. The latter contains a ready-to-use profile for
root(see next step).不要在一个正常的Guix系统上解压这个文件包,因为那会把现有的重要的文件覆盖。
The --warning=no-timestamp option makes sure GNU tar does not emit warnings about “implausibly old time stamps” (such warnings were triggered by GNU tar 1.26 and older; recent versions are fine). They stem from the fact that all the files in the archive have their modification time set to 1 (which means January 1st, 1970). This is done on purpose to make sure the archive content is independent of its creation time, thus making it reproducible.
- 使profile出现在~root/.config/guix/current,这是
guix pull安装更新的位置(see Invokingguix pull):# mkdir -p ~root/.config/guix # ln -sf /var/guix/profiles/per-user/root/current-guix \ ~root/.config/guix/currentSource etc/profile to augment
PATHand other relevant environment variables:# GUIX_PROFILE="`echo ~root`/.config/guix/current" ; \ source $GUIX_PROFILE/etc/profile
- 像下面解释的那样为“构建用户”创建用户组和用户(see 设置构建环境)。
- 运行后台进程,并设置为开机自启动。
如果你的主机的发行版使用systemd init系统,可以用这些命令:
# cp ~root/.config/guix/current/lib/systemd/system/gnu-store.mount \ ~root/.config/guix/current/lib/systemd/system/guix-daemon.service \ /etc/systemd/system/ # systemctl enable --now gnu-store.mount guix-daemonYou may also want to arrange for
guix gcto run periodically:# cp ~root/.config/guix/current/lib/systemd/system/guix-gc.service \ ~root/.config/guix/current/lib/systemd/system/guix-gc.timer \ /etc/systemd/system/ # systemctl enable --now guix-gc.timerYou may want to edit guix-gc.service to adjust the command line options to fit your needs (see Invoking
guix gc).如果你的主机的发行版使用Upstart init系统:
# initctl reload-configuration # cp ~root/.config/guix/current/lib/upstart/system/guix-daemon.conf \ /etc/init/ # start guix-daemon此外,你可以手动启动后台进程:
# ~root/.config/guix/current/bin/guix-daemon \ --build-users-group=guixbuild - 使机器上的其他用户也可以使用
guix命令:# mkdir -p /usr/local/bin # cd /usr/local/bin # ln -s /var/guix/profiles/per-user/root/current-guix/bin/guix
最好让这个用户手册的Info版也可以被访问:
# mkdir -p /usr/local/share/info # cd /usr/local/share/info # for i in /var/guix/profiles/per-user/root/current-guix/share/info/* ; do ln -s $i ; done
That way, assuming /usr/local/share/info is in the search path, running
info guixwill open this manual (see Other Info Directories in GNU Texinfo, for more details on changing the Info search path). -
To use substitutes from
ci.guix.gnu.org,bordeaux.guix.gnu.orgor a mirror (see substitutes), authorize them:# guix archive --authorize < \ ~root/.config/guix/current/share/guix/ci.guix.gnu.org.pub # guix archive --authorize < \ ~root/.config/guix/current/share/guix/bordeaux.guix.gnu.org.pub注: If you do not enable substitutes, Guix will end up building everything from source on your machine, making each installation and upgrade very expensive. See 关于信任二进制文件, for a discussion of reasons why one might want do disable substitutes.
- 每个用户可能需要执行一些额外的步骤以使各自的Guix环境可用,see 设置应用程序。
瞧,安装完成了!
你可以通过给root profile安装一个软件包来确认Guix可以正常工作。
# guix install hello
二进制安装包可以通过在Guix源代码树里运行下面这些命令来重现和验证:
make guix-binary.系统.tar.xz
... 这个命令会执行:
guix pack -s 系统 --localstatedir \ --profile-name=current-guix guix
See Invoking guix pack,了解这个方便的工具。
2.2 需求
这个小节列举了从源代码构建Guix的需求。构建Guix的步骤和其它GNU软件相同,这里不介绍。请阅读Guix源代码树里的README和INSTALL文件以了解更多的信息。
GNU Guix可以从它的网站下载https://www.gnu.org/software/guix/。
GNU Guix依赖这些软件包:
- GNU Guile, version 3.0.x, version 3.0.3 or later;
- Guile-Gcrypt,版本 0.1.0或更新;
- Guile-GnuTLS (see how to install the GnuTLS bindings for Guile in GnuTLS-Guile)5;
- Guile-SQLite3,版本0.1.0或更新;
- Guile-zlib, version 0.1.0 or later;
- Guile-lzlib;
- Guile-Avahi;
- Guile-Git, version 0.5.0 or later;
- Guile-JSON 4.3.0 or later;
- GNU Make。
这些依赖是可选的:
- Support for build offloading (see 使用任务下发设施) and
guix copy(see Invokingguix copy) depends on Guile-SSH, version 0.13.0 or later. - Guile-zstd, for zstd
compression and decompression in
guix publishand for substitutes (see Invokingguix publish). - Guile-Semver for the
crateimporter (see Invokingguix import). - Guile-Lib for the
goimporter (see Invokingguix import) and for some of the “updaters” (see Invokingguix refresh). - 当libbz2存在时,
guix-daemon可以用它压缩构建日志。
Unless --disable-daemon was passed to configure, the
following packages are also needed:
- GNU libgcrypt;
- SQLite 3;
- GCC’s g++,支持 C++11标准。
When configuring Guix on a system that already has a Guix installation, be
sure to specify the same state directory as the existing installation using
the --localstatedir option of the configure script
(see localstatedir in GNU Coding
Standards). Usually, this localstatedir option is set to the value
/var. The configure script protects against unintended
misconfiguration of localstatedir so you do not inadvertently corrupt
your store (see 仓库).
2.3 运行测试套件
成功执行configure和make之后,最好运行测试套件。它可以帮助查找设置和环境的错误,或者是Guix自身的bug--并且,报告测试错误是帮助改进软件的好方法。输入下面的命令以执行测试套件。
make check
测试用例可以并行运行:你可以用GNU make的-j参数来加速运行。才一台较新的机器上第一次运行可能会花几分钟,后续的运行会更快,因为为测试创建的仓库已经包含了各种缓存。
你还可以通过定义makefile的TESTS变量只运行测试的一个子集:
make check TESTS="tests/store.scm tests/cpio.scm"
默认情况下,测试结果只展示到文件层级。为了看每个独立的测试用例的详情,可以像这样定义SCM_LOG_DRIVER_FLAGS
makefile变量:
make check TESTS="tests/base64.scm" SCM_LOG_DRIVER_FLAGS="--brief=no"
The underlying SRFI 64 custom Automake test driver used for the ’check’ test suite (located at build-aux/test-driver.scm) also allows selecting which test cases to run at a finer level, via its --select and --exclude options. Here’s an example, to run all the test cases from the tests/packages.scm test file whose names start with “transaction-upgrade-entry”:
export SCM_LOG_DRIVER_FLAGS="--select=^transaction-upgrade-entry" make check TESTS="tests/packages.scm"
Those wishing to inspect the results of failed tests directly from the
command line can add the --errors-only=yes option to the
SCM_LOG_DRIVER_FLAGS makefile variable and set the VERBOSE
Automake makefile variable, as in:
make check SCM_LOG_DRIVER_FLAGS="--brief=no --errors-only=yes" VERBOSE=1
The --show-duration=yes option can be used to print the duration of the individual test cases, when used in combination with --brief=no:
make check SCM_LOG_DRIVER_FLAGS="--brief=no --show-duration=yes"
See Parallel Test Harness in GNU Automake for more information about the Automake Parallel Test Harness.
遇到错误时,请给bug-guix@gnu.org发邮件,并附带test-suite.log文件。请在消息里说明使用的Guix的版本信息和依赖(see 需求)的版本信息。
Guix还附带了一个可以测试整个Guix系统实例的全系统测试套件。它只能在已经安装Guix的系统上运行:
make check-system
或者,同样的,通过定义TESTS只运行测试的一个子集:
make check-system TESTS="basic mcron"
这些系统测试是在(gnu tests
…)模块里定义的。它们在虚拟机(VM)里运行轻量的指令。它们的计算量可能很多也可能很少,这取决于它们依赖的substitute(see substitutes)是否已经存在。它们之中有些需要很多存储空间以保存虚拟机硬盘。
再重复一遍,如果遇到测试错误,请给bug-guix@gnu.org发邮件,并附带详细的说明。
Next: 调用guix-daemon, Previous: 运行测试套件, Up: 安装 [Contents][Index]
2.4 设置后台进程
构建软件包或运行垃圾回收器之类的操作都是由一个特殊的进程代替客户执行的,即构建后台进程。只有这个进程可以访问仓库和相关的数据库。因此,所有修改仓库的操作都通过这个后台进程执行。例如,guix
package和guix build之类的命令行工具通过和这个后台进程通信(通过远程过程调用)来指示它该做什么。
接下来的几个小节介绍如何准备“构建后台进程”的环境。参考substitutes,了解怎样允许这个后台进程下载预构建好的二进制文件。
2.4.1 设置构建环境
在一个标准的多用户设置里,Guix和它的后台进程–guix-daemon程序–是由root用户安装的,并且guix-daemon以root用户身份运行。无特权的用户可以用Guix的工具构建软件包或访问仓库,这个后台进程会代替用户进行这些操作,以确保仓库保持一致的状态,并且允许构建好的软件包可以在不同用户间共享。
当guix-daemon以root用户身份运行时,由于安全方面的考虑,你可能不希望软件包构建进程也以root用户身份运行。为了避免那样,我们需要创建一个构建用户池,以供后台进程启动的构建进程使用。这些构建用户不需要拥有shell和家目录:他们只会在后台进程为构建进程剥夺root特权时使用。拥有多个这类用户使后台进程可以以不同的UID启动不同的构建进程,这保证它们不会互相干扰–这是一个重要的功能,因为构建被视为纯函数(see 介绍)。
在一个GNU/Linux系统上,可以这样创建一个构建用户池(用bash语法和shadow命令):
# groupadd --system guixbuild
# for i in $(seq -w 1 10);
do
useradd -g guixbuild -G guixbuild \
-d /var/empty -s $(which nologin) \
-c "Guix build user $i" --system \
guixbuilder$i;
done
构建用户的数量决定了有多少个构建任务可以并行执行,即--max-jobs参数(see --max-jobs)。为了使用guix system
vm和相关的命令,你需要把构建用户添加到kvm用户组,以使它们访问/dev/kvm。为此,把-G
guixbuild替换成-G guixbuild,kvm(see Invoking guix system)。
The guix-daemon program may then be run as root with the
following command6:
# guix-daemon --build-users-group=guixbuild
这样,后台进程在一个chroot环境里,以一个guixbuilder用户组成员的身份启动构建进程。在GNU/Linux上,默认的,这个chroot环境仅包含这些东西:
- 一个和主机
/dev独立的7,最小的/dev文件夹; -
/proc文件夹;它只含有当前容器的进程,因为用了一个独立的进程PID命名空间; - /etc/passwd,仅包含当前用户和nobody;
- /etc/group,包含用户的组;
- /etc/hosts,包含
localhost映射到127.0.0.1的条目; - 一个可写的/tmp文件夹。
The chroot does not contain a /home directory, and the HOME
environment variable is set to the non-existent /homeless-shelter.
This helps to highlight inappropriate uses of HOME in the build
scripts of packages.
You can influence the directory where the daemon stores build trees via
the TMPDIR environment variable. However, the build tree within the
chroot is always called /tmp/guix-build-name.drv-0, where
name is the derivation name—e.g., coreutils-8.24. This way,
the value of TMPDIR does not leak inside build environments, which
avoids discrepancies in cases where build processes capture the name of
their build tree.
The daemon also honors the http_proxy and https_proxy
environment variables for HTTP and HTTPS downloads it performs, be it for
fixed-output derivations (see Derivations) or for substitutes
(see substitutes).
If you are installing Guix as an unprivileged user, it is still possible to
run guix-daemon provided you pass --disable-chroot.
However, build processes will not be isolated from one another, and not from
the rest of the system. Thus, build processes may interfere with each
other, and may access programs, libraries, and other files available on the
system—making it much harder to view them as pure functions.
Next: SELinux的支持, Previous: 设置构建环境, Up: 设置后台进程 [Contents][Index]
2.4.2 使用任务下发设施
When desired, the build daemon can offload derivation builds to other
machines running Guix, using the offload build
hook8.
When that feature is enabled, a list of user-specified build machines is
read from /etc/guix/machines.scm; every time a build is requested,
for instance via guix build, the daemon attempts to offload it to one
of the machines that satisfy the constraints of the derivation, in
particular its system types—e.g., x86_64-linux. A single machine
can have multiple system types, either because its architecture natively
supports it, via emulation (see Transparent
Emulation with QEMU), or both. Missing prerequisites for the build are
copied over SSH to the target machine, which then proceeds with the build;
upon success the output(s) of the build are copied back to the initial
machine. The offload facility comes with a basic scheduler that attempts to
select the best machine. The best machine is chosen among the available
machines based on criteria such as:
- The availability of a build slot. A build machine can have as many build
slots (connections) as the value of the
parallel-buildsfield of itsbuild-machineobject. - Its relative speed, as defined via the
speedfield of itsbuild-machineobject. - Its load. The normalized machine load must be lower than a threshold value,
configurable via the
overload-thresholdfield of itsbuild-machineobject. - Disk space availability. More than a 100 MiB must be available.
/etc/guix/machines.scm文件通常是这样的:
(list (build-machine
(name "eightysix.example.org")
(systems (list "x86_64-linux" "i686-linux"))
(host-key "ssh-ed25519 AAAAC3Nza…")
(user "bob")
(speed 2.)) ;incredibly fast!
(build-machine
(name "armeight.example.org")
(systems (list "aarch64-linux"))
(host-key "ssh-rsa AAAAB3Nza…")
(user "alice")
;; Remember 'guix offload' is spawned by
;; 'guix-daemon' as root.
(private-key "/root/.ssh/identity-for-guix")))
In the example above we specify a list of two build machines, one for the
x86_64 and i686 architectures and one for the aarch64
architecture.
事实上,这个文件–并不意外地–是一个Scheme文件,当下发钩子被启动时执行。它的返回值必须是一个包含build-machine对象的列表。虽然这个例子展示的是一个固定的列表,你可以想象,使用DNS-SD来返回一个包含从局域网内发现的构建机器的列表,see Guile-Avahi in 在Guile
Scheme程序里使用Avahi。build-machine数据类型的详细信息如下。
- 数据类型: build-machine
这个数据类型表示后台进程可以下发构建任务的构建机器。重要的项有:
名字远程机器的主机名。
systemsThe system types the remote machine supports—e.g.,
(list "x86_64-linux" "i686-linux").用户通过SSH连接远程机器时使用的用户帐号。注意,SSH密钥不能被密码保护,以支持无交互的登录。
主机公钥这必须是机器的OpenSSH格式的SSH公钥。这是用来在连接机器时认证身份的。它是一个像这样的长字符串:
ssh-ed25519 AAAAC3NzaC…mde+UhL hint@example.org
如果这个机器正在运行OpenSSH后台进程,
sshd,那么主机公钥可以在/etc/ssh/ssh_host_ed25519_key.pub找到。如果这个机器正在运行GNU lsh,
lshd,那么主机公钥可以在/etc/lsh/host-key.pub或类似的位置找到。它可以通过lsh-export-key命令转换成OpenSSH格式(see Converting keys in LSH用户手册):$ lsh-export-key --openssh < /etc/lsh/host-key.pub ssh-rsa AAAAB3NzaC1yc2EAAAAEOp8FoQAAAQEAs1eB46LV…
一些可选的项:
port(默认值:22)机器上的SSH服务器的端口号。
private-key(默认值:~root/.ssh/id_rsa)连接机器时使用的SSH私钥,OpenSSH格式。这个私钥不能被密码保护。
注意,默认值是root帐号的私钥。使用默认值时请确保它存在。
compression(默认值:"zlib@openssh.com,zlib")compression-level(默认值:3)SSH压缩算法和压缩级别。
下发任务依赖SSH压缩来减少传输文件到构建机器时使用的带宽。
daemon-socket(默认值:"/var/guix/daemon-socket/socket")那台机器上的
guix-daemon监听的Unix套接字文件名。overload-threshold(default:0.8)The load threshold above which a potential offload machine is disregarded by the offload scheduler. The value roughly translates to the total processor usage of the build machine, ranging from 0.0 (0%) to 1.0 (100%). It can also be disabled by setting
overload-thresholdto#f.parallel-builds(默认值:1)那台机器上可以并行运行的构建任务数量。
speed(默认值:1.0)一个相对的速度值。下发调度器会偏好速度更快的机器。
features('())一个表示机器支持的功能的字符串列表。例如,
"kvm"表示机器有KVM Linux模块和相关的硬件支持。Derivation可以通过名字请求需要的功能,然后被分发到匹配的机器的任务队列里。
guix命令必须在构建机器的搜素路径里。你可以通过这个命令检查:
ssh build-machine guix repl --version
machines.scm到位后,还有一件要做的事。如上所述,下发任务时会在机器的仓库之间传输文件。为此,你需要在每台机器上生成一个密钥对,以使后台进程可以从仓库导出签名后的文件包(see Invoking guix archive):
# guix archive --generate-key
每台构建机器都必须认证主机器的公钥,从而接收从主机器接收的仓库文件:
# guix archive --authorize < master-public-key.txt
类似的,主机器必须认证每台构建机器的公钥:
所有这些有关公钥的繁琐事宜都是为了表达主服务器和构建服务器之间成对的互相信任关系。具体地,当主机器从构建机器接收文件时(反之亦然),它的构建后台进程可以确保文件是原样的,没有被篡改,并且被认证的公钥签名过。
为了测试你的设置是否能正常工作,在主节点上运行这个命令:
# guix offload test
This will attempt to connect to each of the build machines specified in /etc/guix/machines.scm, make sure Guix is available on each machine, attempt to export to the machine and import from it, and report any error in the process.
如果你希望用别的文件测试,只需要在命令行指定它:
# guix offload test machines-qualif.scm
最后,你可以像这样只测试机器列表里名字匹配某个正则表达式的子集:
# guix offload test machines.scm '\.gnu\.org$'
若想展示所有构建主机的当前负载,在主节点上运行这个命令:
# guix offload status
2.4.3 SELinux的支持
Guix附带一个SELinux策略文件,位置在etc/guix-daemon.cil,它可以在启用SELinux的系统上安装,为Guix的文件添加标签及指定后台进程的期望行为。由于Guix系统不提供SELinux基础策略,这个后台进程策略不能在Guix系统上使用。
2.4.3.1 安装SELinux策略
用root用户执行这个命令以安装策略:
semodule -i etc/guix-daemon.cil
用restorecon或者你的系统提供的其它机制重新给文件系统打标签。
一旦安装好策略,为文件系统重新打好标签,并且重启了后台进程,它应该在guix_daemon_t环境里运行。你可以用下面这个命令确认:
ps -Zax | grep guix-daemon
运行guix build hello之类的命令并监控SELinux日志以说服你自己SELinux允许所有的操作。
2.4.3.2 限制
这个策略不是完美的。这里有一个关于限制和缺陷的列表,当为Guix后台进程部署提供的SELinux策略时该认真考虑。
-
guix_daemon_socket_tisn’t actually used. None of the socket operations involve contexts that have anything to do withguix_daemon_socket_t. It doesn’t hurt to have this unused label, but it would be preferable to define socket rules for only this label. -
guix gc不可以任意访问指向profile的链接。由于设计的原因,符号链接的目标的文件标签和符号链接本身的文件标签是不同的。尽管$localstatedir里的所有profile都被打上了标签,指向这些profile的符号链接继承它们所在的文件夹的标签。对于普通用户的家目录里的链接,标签是user_home_t。但是对于root用户的家目录,或/tmp,或HTTP服务器的工作目录等文件夹里的链接不是这样。guix gc会被阻止读取和跟随这些链接。 - 后台进程监听TCP连接的功能不再可用。这可能需要额外的规则,因为SELinux区别对待网络套接字和文件。
- 目前,所有匹配正则表达式
/gnu/store/.+-(guix-.+|profile)/bin/guix-daemon的文件都被赋予guix_daemon_exec_t标签;这意味着任何profile里的任何有这样名字的的文件都会被允许在guix_daemon_t域里执行。这不够理想。一个攻击者可以构建提供这个可执行程序的软件包,并说服一个用户安装、运行它,以此进入guix_daemon_t域。那时,SELinux无法阻止它访问所在域的进程可以访问的文件。You will need to relabel the store directory after all upgrades to guix-daemon, such as after running
guix pull. Assuming the store is in /gnu, you can do this withrestorecon -vR /gnu, or by other means provided by your operating system.我们可以在安装时生成一个更严格的策略,仅当前安装的
guix-daemon的精确的的文件名会被打上guix_daemon_exec_t标签,而不是用一个宽泛的正则表达式。这样的缺点是root必须在每次安装提供guix-daemon的Guix软件包时安装或升级策略。
2.5 调用guix-daemon
guix-daemon程序实现了所有访问仓库的功能。包括启动构建进程,运行垃圾回收器,查询构建结果,等。它通常以root身份运行:
# guix-daemon --build-users-group=guixbuild
This daemon can also be started following the systemd “socket activation”
protocol (see make-systemd-constructor in The GNU Shepherd Manual).
关于如何设置它,see 设置后台进程。
By default, guix-daemon launches build processes under different
UIDs, taken from the build group specified with
--build-users-group. In addition, each build process is run in a
chroot environment that only contains the subset of the store that the build
process depends on, as specified by its derivation (see derivation), plus a set of specific system directories. By
default, the latter contains /dev and /dev/pts. Furthermore,
on GNU/Linux, the build environment is a container: in addition to
having its own file system tree, it has a separate mount name space, its own
PID name space, network name space, etc. This helps achieve reproducible
builds (see 功能).
When the daemon performs a build on behalf of the user, it creates a build
directory under /tmp or under the directory specified by its
TMPDIR environment variable. This directory is shared with the
container for the duration of the build, though within the container, the
build tree is always called /tmp/guix-build-name.drv-0.
The build directory is automatically deleted upon completion, unless the build failed and the client specified --keep-failed (see --keep-failed).
The daemon listens for connections and spawns one sub-process for each
session started by a client (one of the guix sub-commands). The
guix processes command allows you to get an overview of the
activity on your system by viewing each of the active sessions and clients.
See Invoking guix processes, for more information.
下面这些命令行选项受支持:
--build-users-group=用户组这会从用户组里选取用户,以运行构建进程(see 构建用户)。
--no-substitutes¶不要为构建商品使用substitute。即,总是在本地构建,而不是下载预构建的二进制文件(see substitutes)。
When the daemon runs with --no-substitutes, clients can still explicitly enable substitution via the
set-build-optionsremote procedure call (see 仓库).--substitute-urls=urlsConsider urls the default whitespace-separated list of substitute source URLs. When this option is omitted, ‘
https://ci.guix.gnu.org https://bordeaux.guix.gnu.org’ is used.这意味着可以从urls下载substitute,只要它们的签名可信(see substitutes)。
See Getting Substitutes from Other Servers, for more information on how to configure the daemon to get substitutes from other servers.
--no-offloadDo not use offload builds to other machines (see 使用任务下发设施). That is, always build things locally instead of offloading builds to remote machines.
--cache-failures缓存失败的构建。默认地,只缓存成功的构建。
当这个选项被使用时,可以用
guix gc --list-failures查询被标记为失败的仓库文件;guix gc --clear-failures从仓库里删除失败的缓存。See Invokingguix gc。--cores=n-c n用n个CPU核来构建每个derivation;
0表示有多少就用多少。The default value is
0, but it may be overridden by clients, such as the --cores option ofguix build(see 调用guix build).The effect is to define the
NIX_BUILD_CORESenvironment variable in the build process, which can then use it to exploit internal parallelism—for instance, by runningmake -j$NIX_BUILD_CORES.--max-jobs=n-M n最多允许n个并行的构建任务。默认值是
1。设置为0表示不在本地执行构建;而是下发构建任务(see 使用任务下发设施),或者直接失败。--max-silent-time=seconds当构建或substitution进程超过seconds秒仍然保持静默,就把它结束掉并报告构建失败。
默认值是
0,表示关闭超时。The value specified here can be overridden by clients (see --max-silent-time).
--timeout=seconds类似地,当构建或substitution进程执行超过seconds秒,就把它结束掉并报告构建失败。
默认值是
0,表示关闭超时。The value specified here can be overridden by clients (see --timeout).
--rounds=N为每个derivation构建n次,如果连续的构建结果不是每个比特都相同就报告错误。这个设置可以被
guix build之类的客户端覆盖(see 调用guix build)。当和--keep-failed一起使用时,不同的输出保存在/gnu/store/…-check。这让检查两个结果的区别更容易。
--debug生成调试输出。
This is useful to debug daemon start-up issues, but then it may be overridden by clients, for example the --verbosity option of
guix build(see 调用guix build).--chroot-directory=dir把dir添加到构建的chroot。
这么做可能会改变构建进程的结果–例如,如果它们使用了在dir里发现的可选依赖。因此,建议不要这么做,而是确保每个derivation声明所需的全部输入。
--disable-chroot关闭chroot构建。
不建议使用这个选项,因为它会允许构建进程访问到没被声明的依赖。但是,当
guix-daemon以没有特权的用户身份运行时,这个选项是必须的。--log-compression=type以type方式压缩构建日志,可选的值:
gzip,bzip2,none。Unless --lose-logs is used, all the build logs are kept in the localstatedir. To save space, the daemon automatically compresses them with gzip by default.
--discover[=yes|no]Whether to discover substitute servers on the local network using mDNS and DNS-SD.
This feature is still experimental. However, here are a few considerations.
- It might be faster/less expensive than fetching from remote servers;
- There are no security risks, only genuine substitutes will be used (see 验证substitute);
- An attacker advertising
guix publishon your LAN cannot serve you malicious binaries, but they can learn what software you’re installing; - Servers may serve substitute over HTTP, unencrypted, so anyone on the LAN can see what software you’re installing.
It is also possible to enable or disable substitute server discovery at run-time by running:
herd discover guix-daemon on herd discover guix-daemon off
--disable-deduplication¶关闭自动对仓库文件“去重”。
默认地,添加到仓库的文件会被自动“去重”:如果新添加的文件和仓库里找到的某个文件完全相同,后台进程把这个新文件变成另一个文件的硬链接。这可以明显地减少硬盘使用,代价是构建结束后轻微地增加输入/输出负载。这个选项关闭这个优化。
--gc-keep-outputs[=yes|no]垃圾收集器(GC)是否必须保留存活的derivation的输出。
When set to
yes, the GC will keep the outputs of any live derivation available in the store—the .drv files. The default isno, meaning that derivation outputs are kept only if they are reachable from a GC root. See Invokingguix gc, for more on GC roots.--gc-keep-derivations[=yes|no]垃圾收集器(GC)是否必须保留和存活的输出相关的derivation。
When set to
yes, as is the case by default, the GC keeps derivations—i.e., .drv files—as long as at least one of their outputs is live. This allows users to keep track of the origins of items in their store. Setting it tonosaves a bit of disk space.In this way, setting --gc-keep-derivations to
yescauses liveness to flow from outputs to derivations, and setting --gc-keep-outputs toyescauses liveness to flow from derivations to outputs. When both are set toyes, the effect is to keep all the build prerequisites (the sources, compiler, libraries, and other build-time tools) of live objects in the store, regardless of whether these prerequisites are reachable from a GC root. This is convenient for developers since it saves rebuilds or downloads.--impersonate-linux-2.6On Linux-based systems, impersonate Linux 2.6. This means that the kernel’s
unamesystem call will report 2.6 as the release number.这可能会有助于构建那些(通常是错误地)依赖内核版本号的程序。
--lose-logsDo not keep build logs. By default they are kept under localstatedir/guix/log.
--system=system假设system是当前的系统类型。默认值是configure时发现的架构/内核元组,如
x86_64-linux。--listen=endpointListen for connections on endpoint. endpoint is interpreted as the file name of a Unix-domain socket if it starts with
/(slash sign). Otherwise, endpoint is interpreted as a host name or host name and port to listen to. Here are a few examples:--listen=/gnu/var/daemonListen for connections on the /gnu/var/daemon Unix-domain socket, creating it if needed.
--listen=localhost¶-
Listen for TCP connections on the network interface corresponding to
localhost, on port 44146. --listen=128.0.0.42:1234Listen for TCP connections on the network interface corresponding to
128.0.0.42, on port 1234.
This option can be repeated multiple times, in which case
guix-daemonaccepts connections on all the specified endpoints. Users can tell client commands what endpoint to connect to by setting theGUIX_DAEMON_SOCKETenvironment variable (seeGUIX_DAEMON_SOCKET).注: The daemon protocol is unauthenticated and unencrypted. Using --listen=host is suitable on local networks, such as clusters, where only trusted nodes may connect to the build daemon. In other cases where remote access to the daemon is needed, we recommend using Unix-domain sockets along with SSH.
When --listen is omitted,
guix-daemonlistens for connections on the Unix-domain socket located at localstatedir/guix/daemon-socket/socket.
Next: Upgrading Guix, Previous: 调用guix-daemon, Up: 安装 [Contents][Index]
2.6 设置应用程序
When using Guix on top of GNU/Linux distribution other than Guix System—a so-called foreign distro—a few additional steps are needed to get everything in place. Here are some of them.
2.6.1 区域
Packages installed via Guix will not use the locale data of the host
system. Instead, you must first install one of the locale packages
available with Guix and then define the GUIX_LOCPATH environment
variable:
$ guix install glibc-locales $ export GUIX_LOCPATH=$HOME/.guix-profile/lib/locale
Note that the glibc-locales package contains data for all the locales
supported by the GNU libc and weighs in at around
930 MiB9. If
you only need a few locales, you can define your custom locales package via
the make-glibc-utf8-locales procedure from the (gnu packages
base) module. The following example defines a package containing the
various Canadian UTF-8 locales known to the GNU libc, that weighs
around 14 MiB:
(use-modules (gnu packages base)) (define my-glibc-locales (make-glibc-utf8-locales glibc #:locales (list "en_CA" "fr_CA" "ik_CA" "iu_CA" "shs_CA") #:name "glibc-canadian-utf8-locales"))
The GUIX_LOCPATH variable plays a role similar to LOCPATH
(see LOCPATH in The GNU C Library Reference
Manual). There are two important differences though:
-
GUIX_LOCPATHis honored only by the libc in Guix, and not by the libc provided by foreign distros. Thus, usingGUIX_LOCPATHallows you to make sure the programs of the foreign distro will not end up loading incompatible locale data. - libc suffixes each entry of
GUIX_LOCPATHwith/X.Y, whereX.Yis the libc version—e.g.,2.22. This means that, should your Guix profile contain a mixture of programs linked against different libc version, each libc version will only try to load locale data in the right format.
This is important because the locale data format used by different libc versions may be incompatible.
2.6.2 Name Service Switch
When using Guix on a foreign distro, we strongly recommend that the
system run the GNU C library’s name service cache daemon,
nscd, which should be listening on the /var/run/nscd/socket
socket. Failing to do that, applications installed with Guix may fail to
look up host names or user accounts, or may even crash. The next paragraphs
explain why.
The GNU C library implements a name service switch (NSS), which is an extensible mechanism for “name lookups” in general: host name resolution, user accounts, and more (see Name Service Switch in The GNU C Library Reference Manual).
Being extensible, the NSS supports plugins, which provide new name
lookup implementations: for example, the nss-mdns plugin allow
resolution of .local host names, the nis plugin allows user
account lookup using the Network information service (NIS), and so on.
These extra “lookup services” are configured system-wide in
/etc/nsswitch.conf, and all the programs running on the system honor
those settings (see NSS Configuration File in The GNU C Reference
Manual).
When they perform a name lookup—for instance by calling the
getaddrinfo function in C—applications first try to connect to the
nscd; on success, nscd performs name lookups on their behalf. If the nscd
is not running, then they perform the name lookup by themselves, by loading
the name lookup services into their own address space and running it. These
name lookup services—the libnss_*.so files—are dlopen’d,
but they may come from the host system’s C library, rather than from the C
library the application is linked against (the C library coming from Guix).
And this is where the problem is: if your application is linked against
Guix’s C library (say, glibc 2.24) and tries to load NSS plugins from
another C library (say, libnss_mdns.so for glibc 2.22), it will
likely crash or have its name lookups fail unexpectedly.
Running nscd on the system, among other advantages, eliminates
this binary incompatibility problem because those libnss_*.so files
are loaded in the nscd process, not in applications themselves.
2.6.3 X11 Fonts
The majority of graphical applications use Fontconfig to locate and load
fonts and perform X11-client-side rendering. The fontconfig package
in Guix looks for fonts in $HOME/.guix-profile by default. Thus, to
allow graphical applications installed with Guix to display fonts, you have
to install fonts with Guix as well. Essential font packages include
font-ghostscript, font-dejavu, and font-gnu-freefont.
Once you have installed or removed fonts, or when you notice an application that does not find fonts, you may need to install Fontconfig and to force an update of its font cache by running:
guix install fontconfig fc-cache -rv
To display text written in Chinese languages, Japanese, or Korean in
graphical applications, consider installing
font-adobe-source-han-sans or font-wqy-zenhei. The former has
multiple outputs, one per language family (see 有多个输出的软件包). For instance, the following command installs fonts for Chinese
languages:
guix install font-adobe-source-han-sans:cn
Older programs such as xterm do not use Fontconfig and instead
rely on server-side font rendering. Such programs require to specify a full
name of a font using XLFD (X Logical Font Description), like this:
-*-dejavu sans-medium-r-normal-*-*-100-*-*-*-*-*-1
To be able to use such full names for the TrueType fonts installed in your Guix profile, you need to extend the font path of the X server:
xset +fp $(dirname $(readlink -f ~/.guix-profile/share/fonts/truetype/fonts.dir))
After that, you can run xlsfonts (from xlsfonts package) to
make sure your TrueType fonts are listed there.
2.6.4 X.509证书
The nss-certs package provides X.509 certificates, which allow
programs to authenticate Web servers accessed over HTTPS.
When using Guix on a foreign distro, you can install this package and define the relevant environment variables so that packages know where to look for certificates. See X.509证书, for detailed information.
2.6.5 Emacs Packages
When you install Emacs packages with Guix, the Elisp files are placed under
the share/emacs/site-lisp/ directory of the profile in which they are
installed. The Elisp libraries are made available to Emacs through the
EMACSLOADPATH environment variable, which is set when installing Emacs
itself.
Additionally, autoload definitions are automatically evaluated at the
initialization of Emacs, by the Guix-specific
guix-emacs-autoload-packages procedure. If, for some reason, you
want to avoid auto-loading the Emacs packages installed with Guix, you can
do so by running Emacs with the --no-site-file option (see Init
File in The GNU Emacs Manual).
注: Emacs can now compile packages natively. Under the default configuration, this means that Emacs packages will now be just-in-time (JIT) compiled as you use them, and the results stored in a subdirectory of your
user-emacs-directory.Furthermore, the build system for Emacs packages transparently supports native compilation, but note, that
emacs-minimal—the default Emacs for building packages—has been configured without native compilation. To natively compile your emacs packages ahead of time, use a transformation like --with-input=emacs-minimal=emacs.
2.7 Upgrading Guix
To upgrade Guix, run:
guix pull
See Invoking guix pull, for more information.
On a foreign distro, you can upgrade the build daemon by running:
sudo -i guix pull
followed by (assuming your distro uses the systemd service management tool):
systemctl restart guix-daemon.service
On Guix System, upgrading the daemon is achieved by reconfiguring the system
(see guix system reconfigure).
Next: System Troubleshooting Tips, Previous: 安装, Up: GNU Guix [Contents][Index]
3 系统安装
This section explains how to install Guix System on a machine. Guix, as a package manager, can also be installed on top of a running GNU/Linux system, see 安装.
- 限制
- 硬件的考虑
- U盘和DVD安装
- 准备安装
- 指导的图形安装
- 手动安装
- 系统安装之后
- Installing Guix in a Virtual Machine
- 构建安装镜像
- Building the Installation Image for ARM Boards
3.1 限制
We consider Guix System to be ready for a wide range of “desktop” and server use cases. The reliability guarantees it provides—transactional upgrades and rollbacks, reproducibility—make it a solid foundation.
Nevertheless, before you proceed with the installation, be aware of the following noteworthy limitations applicable to version 1.4.0:
- More and more system services are provided (see 服务), but some may be missing.
- GNOME, Xfce, LXDE, and Enlightenment are available (see 桌面服务), as well as a number of X11 window managers. However, KDE is currently missing.
More than a disclaimer, this is an invitation to report issues (and success stories!), and to join us in improving it. See 贡献, for more info.
3.2 硬件的考虑
GNU Guix focuses on respecting the user’s computing freedom. It builds around the kernel Linux-libre, which means that only hardware for which free software drivers and firmware exist is supported. Nowadays, a wide range of off-the-shelf hardware is supported on GNU/Linux-libre—from keyboards to graphics cards to scanners and Ethernet controllers. Unfortunately, there are still areas where hardware vendors deny users control over their own computing, and such hardware is not supported on Guix System.
One of the main areas where free drivers or firmware are lacking is WiFi
devices. WiFi devices known to work include those using Atheros chips
(AR9271 and AR7010), which corresponds to the ath9k Linux-libre
driver, and those using Broadcom/AirForce chips (BCM43xx with Wireless-Core
Revision 5), which corresponds to the b43-open Linux-libre driver.
Free firmware exists for both and is available out-of-the-box on Guix
System, as part of %base-firmware (see firmware).
The installer warns you early on if it detects devices that are known not to work due to the lack of free firmware or free drivers.
The Free Software Foundation runs Respects Your Freedom (RYF), a certification program for hardware products that respect your freedom and your privacy and ensure that you have control over your device. We encourage you to check the list of RYF-certified devices.
Another useful resource is the H-Node web site. It contains a catalog of hardware devices with information about their support in GNU/Linux.
3.3 U盘和DVD安装
An ISO-9660 installation image that can be written to a USB stick or burnt
to a DVD can be downloaded from
‘https://ftp.gnu.org/gnu/guix/guix-system-install-1.4.0.x86_64-linux.iso’,
where you can replace x86_64-linux with one of:
x86_64-linuxfor a GNU/Linux system on Intel/AMD-compatible 64-bit CPUs;
i686-linuxfor a 32-bit GNU/Linux system on Intel-compatible CPUs.
Make sure to download the associated .sig file and to verify the authenticity of the image against it, along these lines:
$ wget https://ftp.gnu.org/gnu/guix/guix-system-install-1.4.0.系统.iso.sig $ gpg --verify guix-system-install-1.4.0.系统.iso.sig
如果那个命令因为缺少所需的公钥而失败了,那么用这个命令导入它:
$ wget https://sv.gnu.org/people/viewgpg.php?user_id=15145 \
-qO - | gpg --import -
再次运行gpg --verify命令。
Take note that a warning like “This key is not certified with a trusted signature!” is normal.
This image contains the tools necessary for an installation. It is meant to be copied as is to a large-enough USB stick or DVD.
Copying to a USB Stick
Insert a USB stick of 1 GiB or more into your machine, and determine its device name. Assuming that the USB stick is known as /dev/sdX, copy the image with:
dd if=guix-system-install-1.4.0.x86_64-linux.iso of=/dev/sdX status=progress sync
Access to /dev/sdX usually requires root privileges.
Burning on a DVD
Insert a blank DVD into your machine, and determine its device name. Assuming that the DVD drive is known as /dev/srX, copy the image with:
growisofs -dvd-compat -Z /dev/srX=guix-system-install-1.4.0.x86_64-linux.iso
Access to /dev/srX usually requires root privileges.
Booting
Once this is done, you should be able to reboot the system and boot from the
USB stick or DVD. The latter usually requires you to get in the BIOS or
UEFI boot menu, where you can choose to boot from the USB stick. In order
to boot from Libreboot, switch to the command mode by pressing the c
key and type search_grub usb.
See Installing Guix in a Virtual Machine, if, instead, you would like to install Guix System in a virtual machine (VM).
3.4 准备安装
Once you have booted, you can use the guided graphical installer, which makes it easy to get started (see 指导的图形安装). Alternatively, if you are already familiar with GNU/Linux and if you want more control than what the graphical installer provides, you can choose the “manual” installation process (see 手动安装).
The graphical installer is available on TTY1. You can obtain root shells on TTYs 3 to 6 by hitting ctrl-alt-f3, ctrl-alt-f4, etc. TTY2 shows this documentation and you can reach it with ctrl-alt-f2. Documentation is browsable using the Info reader commands (see Stand-alone GNU Info). The installation system runs the GPM mouse daemon, which allows you to select text with the left mouse button and to paste it with the middle button.
注: Installation requires access to the Internet so that any missing dependencies of your system configuration can be downloaded. See the “Networking” section below.
3.5 指导的图形安装
The graphical installer is a text-based user interface. It will guide you, with dialog boxes, through the steps needed to install GNU Guix System.
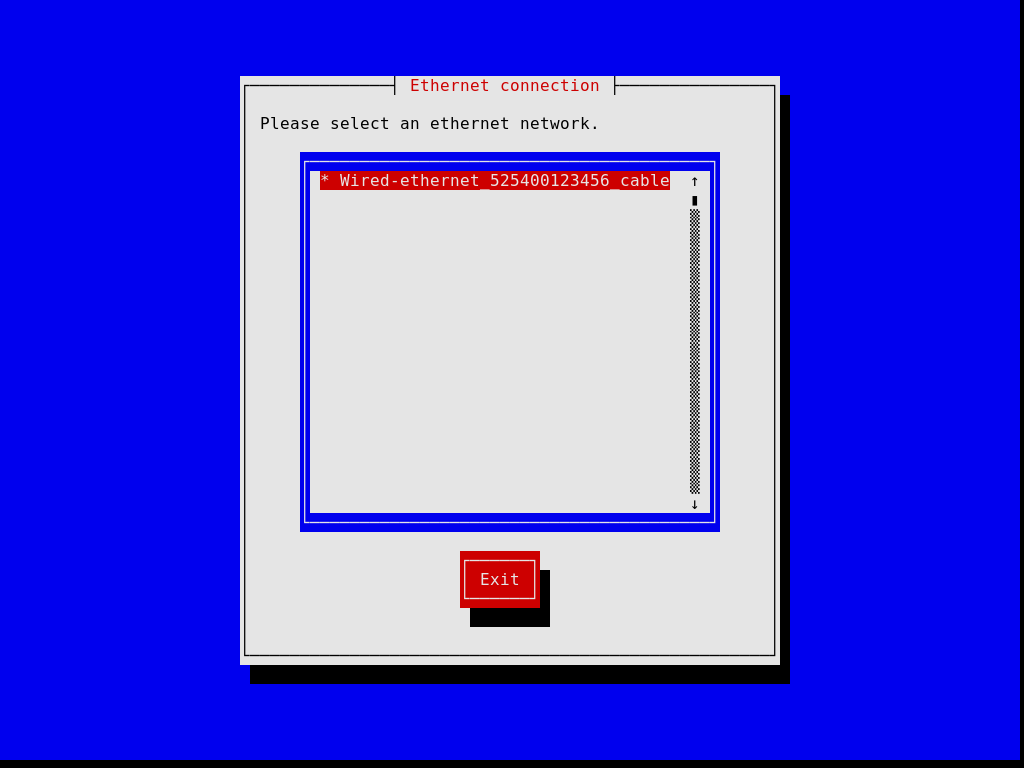
The first dialog boxes allow you to set up the system as you use it during the installation: you can choose the language, keyboard layout, and set up networking, which will be used during the installation. The image below shows the networking dialog.
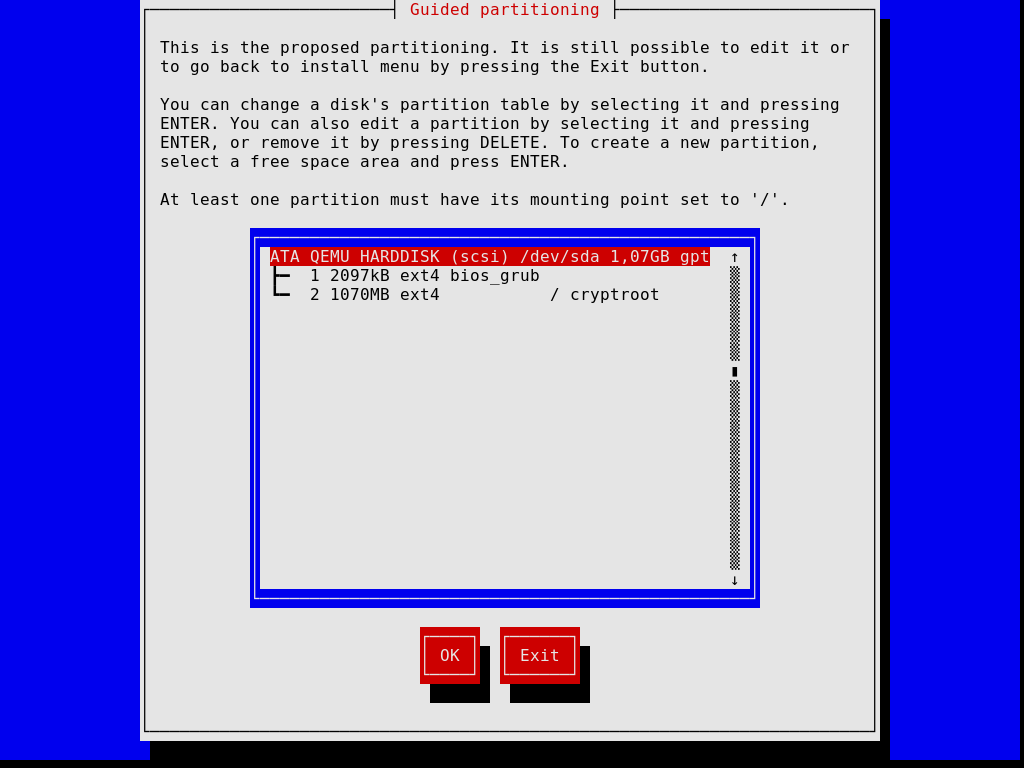
Later steps allow you to partition your hard disk, as shown in the image below, to choose whether or not to use encrypted file systems, to enter the host name and root password, and to create an additional account, among other things.
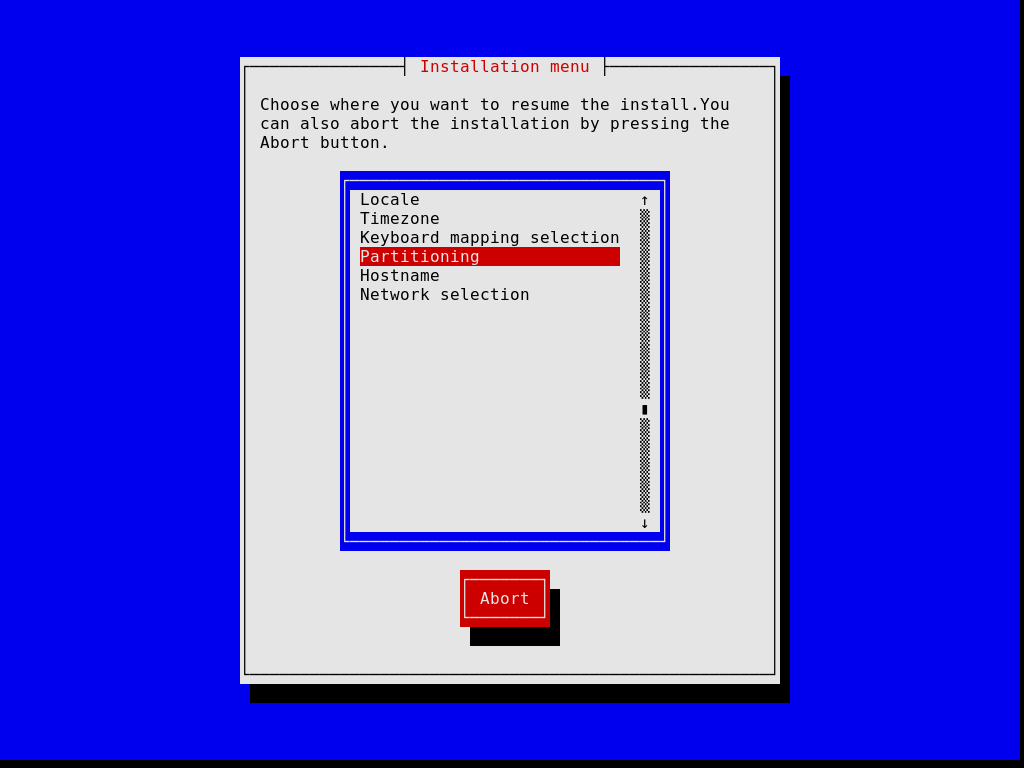
Note that, at any time, the installer allows you to exit the current installation step and resume at a previous step, as show in the image below.
Once you’re done, the installer produces an operating system configuration and displays it (see 使用配置系统). At that point you can hit “OK” and installation will proceed. On success, you can reboot into the new system and enjoy. See 系统安装之后, for what’s next!
3.6 手动安装
This section describes how you would “manually” install GNU Guix System on your machine. This option requires familiarity with GNU/Linux, with the shell, and with common administration tools. If you think this is not for you, consider using the guided graphical installer (see 指导的图形安装).
The installation system provides root shells on TTYs 3 to 6; press
ctrl-alt-f3, ctrl-alt-f4, and so on to reach them. It includes
many common tools needed to install the system, but is also a full-blown
Guix System. This means that you can install additional packages, should
you need it, using guix package (see Invoking guix package).
3.6.1 Keyboard Layout, Networking, and Partitioning
Before you can install the system, you may want to adjust the keyboard layout, set up networking, and partition your target hard disk. This section will guide you through this.
3.6.1.1 键盘布局
安装镜像使用的是美国的 qwerty 键盘布局,如果想更改,可以使用 loadkeys 命令。 例如,用以下命令选择 Dvorak
键盘布局:
loadkeys dvorak
See the files under /run/current-system/profile/share/keymaps for a
list of available keyboard layouts. Run man loadkeys for more
information.
3.6.1.2 Networking
运行以下命令查看你的网络接口的名称:
ifconfig -a
… 或者,使用 GNU/Linux 特有的 ip 命令:
ip address
Wired interfaces have a name starting with ‘e’; for example, the interface corresponding to the first on-board Ethernet controller is called ‘eno1’. Wireless interfaces have a name starting with ‘w’, like ‘w1p2s0’.
- 有线连接
To configure a wired network run the following command, substituting interface with the name of the wired interface you want to use.
ifconfig interface up
… 或者,使用 GNU/Linux 特有的
ip命令:ip link set interface up
- 无线连接 
-
To configure wireless networking, you can create a configuration file for the
wpa_supplicantconfiguration tool (its location is not important) using one of the available text editors such asnano:nano wpa_supplicant.conf
As an example, the following stanza can go to this file and will work for many wireless networks, provided you give the actual SSID and passphrase for the network you are connecting to:
network={ ssid="my-ssid" key_mgmt=WPA-PSK psk="the network's secret passphrase" }Start the wireless service and run it in the background with the following command (substitute interface with the name of the network interface you want to use):
wpa_supplicant -c wpa_supplicant.conf -i interface -B
Run
man wpa_supplicantfor more information.
At this point, you need to acquire an IP address. On a network where IP addresses are automatically assigned via DHCP, you can run:
dhclient -v interface
Try to ping a server to see if networking is up and running:
ping -c 3 gnu.org
Setting up network access is almost always a requirement because the image does not contain all the software and tools that may be needed.
If you need HTTP and HTTPS access to go through a proxy, run the following command:
herd set-http-proxy guix-daemon URL
where URL is the proxy URL, for example
http://example.org:8118.
If you want to, you can continue the installation remotely by starting an SSH server:
herd start ssh-daemon
Make sure to either set a password with passwd, or configure
OpenSSH public key authentication before logging in.
3.6.1.3 磁盘分区
Unless this has already been done, the next step is to partition, and then format the target partition(s).
The installation image includes several partitioning tools, including Parted
(see Overview in GNU Parted User Manual), fdisk, and
cfdisk. Run it and set up your disk with the partition layout you
want:
cfdisk
If your disk uses the GUID Partition Table (GPT) format and you plan to install BIOS-based GRUB (which is the default), make sure a BIOS Boot Partition is available (see BIOS installation in GNU GRUB manual).
If you instead wish to use EFI-based GRUB, a FAT32 EFI System
Partition (ESP) is required. This partition can be mounted at
/boot/efi for instance and must have the esp flag set. E.g.,
for parted:
parted /dev/sda set 1 esp on
注: Unsure whether to use EFI- or BIOS-based GRUB? If the directory /sys/firmware/efi exists in the installation image, then you should probably perform an EFI installation, using
grub-efi-bootloader. Otherwise you should use the BIOS-based GRUB, known asgrub-bootloader. See 引导设置, for more info on bootloaders.
Once you are done partitioning the target hard disk drive, you have to create a file system on the relevant partition(s)10. For the ESP, if you have one and assuming it is /dev/sda1, run:
mkfs.fat -F32 /dev/sda1
For the root file system, ext4 is the most widely used format. Other file systems, such as Btrfs, support compression, which is reported to nicely complement file deduplication that the daemon performs independently of the file system (see deduplication).
Preferably, assign file systems a label so that you can easily and reliably
refer to them in file-system declarations (see 文件系统).
This is typically done using the -L option of mkfs.ext4 and
related commands. So, assuming the target root partition lives at
/dev/sda2, a file system with the label my-root can be created
with:
mkfs.ext4 -L my-root /dev/sda2
If you are instead planning to encrypt the root partition, you can use the
Cryptsetup/LUKS utilities to do that (see man cryptsetup for more information).
Warning: Note that GRUB can unlock LUKS2 devices since version 2.06, but only supports the PBKDF2 key derivation function, which is not the default for
cryptsetup luksFormat. You can check which key derivation function is being used by a device by runningcryptsetup luksDump device, and looking for the PBKDF field of your keyslots.
Assuming you want to store the root partition on /dev/sda2, the command sequence to format it as a LUKS2 partition would be along these lines:
cryptsetup luksFormat --type luks2 --pbkdf pbkdf2 /dev/sda2 cryptsetup open /dev/sda2 my-partition mkfs.ext4 -L my-root /dev/mapper/my-partition
Once that is done, mount the target file system under /mnt with a
command like (again, assuming my-root is the label of the root file
system):
mount LABEL=my-root /mnt
Also mount any other file systems you would like to use on the target system
relative to this path. If you have opted for /boot/efi as an EFI
mount point for example, mount it at /mnt/boot/efi now so it is found
by guix system init afterwards.
Finally, if you plan to use one or more swap partitions (see Swap Space), make sure to initialize them with mkswap. Assuming you
have one swap partition on /dev/sda3, you would run:
mkswap /dev/sda3 swapon /dev/sda3
Alternatively, you may use a swap file. For example, assuming that in the new system you want to use the file /swapfile as a swap file, you would run11:
# This is 10 GiB of swap space. Adjust "count" to change the size. dd if=/dev/zero of=/mnt/swapfile bs=1MiB count=10240 # For security, make the file readable and writable only by root. chmod 600 /mnt/swapfile mkswap /mnt/swapfile swapon /mnt/swapfile
Note that if you have encrypted the root partition and created a swap file in its file system as described above, then the encryption also protects the swap file, just like any other file in that file system.
Previous: Keyboard Layout, Networking, and Partitioning, Up: 手动安装 [Contents][Index]
3.6.2 继续安装步骤
With the target partitions ready and the target root mounted on /mnt, we’re ready to go. First, run:
herd start cow-store /mnt
This makes /gnu/store copy-on-write, such that packages added to it
during the installation phase are written to the target disk on /mnt
rather than kept in memory. This is necessary because the first phase of
the guix system init command (see below) entails downloads or
builds to /gnu/store which, initially, is an in-memory file system.
Next, you have to edit a file and provide the declaration of the operating
system to be installed. To that end, the installation system comes with
three text editors. We recommend GNU nano (see GNU nano
Manual), which supports syntax highlighting and parentheses matching; other
editors include mg (an Emacs clone), and nvi (a clone of the original BSD
vi editor). We strongly recommend storing that file on the target
root file system, say, as /mnt/etc/config.scm. Failing to do that,
you will have lost your configuration file once you have rebooted into the
newly-installed system.
See 使用配置系统, for an overview of the configuration file. The example configurations discussed in that section are available under /etc/configuration in the installation image. Thus, to get started with a system configuration providing a graphical display server (a “desktop” system), you can run something along these lines:
# mkdir /mnt/etc # cp /etc/configuration/desktop.scm /mnt/etc/config.scm # nano /mnt/etc/config.scm
You should pay attention to what your configuration file contains, and in particular:
- Make sure the
bootloader-configurationform refers to the targets you want to install GRUB on. It should mentiongrub-bootloaderif you are installing GRUB in the legacy way, orgrub-efi-bootloaderfor newer UEFI systems. For legacy systems, thetargetsfield contain the names of the devices, like(list "/dev/sda"); for UEFI systems it names the paths to mounted EFI partitions, like(list "/boot/efi"); do make sure the paths are currently mounted and afile-systementry is specified in your configuration. - Be sure that your file system labels match the value of their respective
devicefields in yourfile-systemconfiguration, assuming yourfile-systemconfiguration uses thefile-system-labelprocedure in itsdevicefield. - If there are encrypted or RAID partitions, make sure to add a
mapped-devicesfield to describe them (see 映射的设备).
Once you are done preparing the configuration file, the new system must be initialized (remember that the target root file system is mounted under /mnt):
guix system init /mnt/etc/config.scm /mnt
This copies all the necessary files and installs GRUB on /dev/sdX,
unless you pass the --no-bootloader option. For more information,
see Invoking guix system. This command may trigger downloads or builds
of missing packages, which can take some time.
Once that command has completed—and hopefully succeeded!—you can run
reboot and boot into the new system. The root password in
the new system is initially empty; other users’ passwords need to be
initialized by running the passwd command as root, unless
your configuration specifies otherwise (see user
account passwords). See 系统安装之后, for what’s next!
Next: Installing Guix in a Virtual Machine, Previous: 手动安装, Up: 系统安装 [Contents][Index]
3.7 系统安装之后
Success, you’ve now booted into Guix System! From then on, you can update the system whenever you want by running, say:
guix pull sudo guix system reconfigure /etc/config.scm
This builds a new system generation with the latest packages and services
(see Invoking guix system). We recommend doing that regularly so that
your system includes the latest security updates (see 安全更新).
注: Note that
sudo guixruns your user’sguixcommand and not root’s, becausesudoleavesPATHunchanged. To explicitly run root’sguix, typesudo -i guix ….The difference matters here, because
guix pullupdates theguixcommand and package definitions only for the user it is run as. This means that if you choose to useguix system reconfigurein root’s login shell, you’ll need toguix pullseparately.
Now, see 入门, and join us on #guix on the Libera Chat
IRC network or on guix-devel@gnu.org to share your experience!
3.8 Installing Guix in a Virtual Machine
If you’d like to install Guix System in a virtual machine (VM) or on a virtual private server (VPS) rather than on your beloved machine, this section is for you.
To boot a QEMU VM for installing Guix System in a disk image, follow these steps:
- First, retrieve and decompress the Guix system installation image as described previously (see U盘和DVD安装).
- Create a disk image that will hold the installed system. To make a
qcow2-formatted disk image, use the
qemu-imgcommand:qemu-img create -f qcow2 guix-system.img 50G
The resulting file will be much smaller than 50 GB (typically less than 1 MB), but it will grow as the virtualized storage device is filled up.
- Boot the USB installation image in an VM:
qemu-system-x86_64 -m 1024 -smp 1 -enable-kvm \ -nic user,model=virtio-net-pci -boot menu=on,order=d \ -drive file=guix-system.img \ -drive media=cdrom,file=guix-system-install-1.4.0.system.iso
-enable-kvmis optional, but significantly improves performance, see Running Guix in a Virtual Machine. - You’re now root in the VM, proceed with the installation process. See 准备安装, and follow the instructions.
Once installation is complete, you can boot the system that’s on your guix-system.img image. See Running Guix in a Virtual Machine, for how to do that.
Previous: Installing Guix in a Virtual Machine, Up: 系统安装 [Contents][Index]
3.9 构建安装镜像
The installation image described above was built using the guix
system command, specifically:
guix system image -t iso9660 gnu/system/install.scm
Have a look at gnu/system/install.scm in the source tree, and see
also Invoking guix system for more information about the installation
image.
3.10 Building the Installation Image for ARM Boards
Many ARM boards require a specific variant of the U-Boot bootloader.
If you build a disk image and the bootloader is not available otherwise (on another boot drive etc), it’s advisable to build an image that includes the bootloader, specifically:
guix system image --system=armhf-linux -e '((@ (gnu system install) os-with-u-boot) (@ (gnu system install) installation-os) "A20-OLinuXino-Lime2")'
A20-OLinuXino-Lime2 is the name of the board. If you specify an
invalid board, a list of possible boards will be printed.
4 System Troubleshooting Tips
Guix System allows rebooting into a previous generation should the last one be malfunctioning, which makes it quite robust against being broken irreversibly. This feature depends on GRUB being correctly functioning though, which means that if for whatever reasons your GRUB installation becomes corrupted during a system reconfiguration, you may not be able to easily boot into a previous generation. A technique that can be used in this case is to chroot into your broken system and reconfigure it from there. Such technique is explained below.
4.1 改变目录进入现有系统
This section details how to chroot to an already installed Guix System with the aim of reconfiguring it, for example to fix a broken GRUB installation. The process is similar to how it would be done on other GNU/Linux systems, but there are some Guix System particularities such as the daemon and profiles that make it worthy of explaining here.
- Obtain a bootable image of Guix System. It is recommended the latest development snapshot so the kernel and the tools used are at least as as new as those of your installed system; it can be retrieved from the https://ci.guix.gnu.org URL. Follow the see U盘和DVD安装 section for copying it to a bootable media.
- Boot the image, and proceed with the graphical text-based installer until your network is configured. Alternatively, you could configure the network manually by following the manual-installation-networking section. If you get the error ‘RTNETLINK answers: Operation not possible due to RF-kill’, try ‘rfkill list’ followed by ‘rfkill unblock 0’, where ‘0’ is your device identifier (ID).
- Switch to a virtual console (tty) if you haven’t already by pressing
simultaneously the Control + Alt + F4 keys. Mount your file system at
/mnt. Assuming your root partition is /dev/sda2, you would
do:
mount /dev/sda2 /mnt
- Mount special block devices and Linux-specific directories:
mount --bind /proc /mnt/proc mount --bind /sys /mnt/sys mount --bind /dev /mnt/dev
If your system is EFI-based, you must also mount the ESP partition. Assuming it is /dev/sda1, you can do so with:
mount /dev/sda1 /mnt/boot/efi
- Enter your system via chroot:
chroot /mnt /bin/sh
- Source the system profile as well as your user profile to setup the
environment, where user is the user name used for the Guix System you
are attempting to repair:
source /var/guix/profiles/system/profile/etc/profile source /home/user/.guix-profile/etc/profile
To ensure you are working with the Guix revision you normally would as your normal user, also source your current Guix profile:
source /home/user/.config/guix/current/etc/profile
- Start a minimal
guix-daemonin the background:guix-daemon --build-users-group=guixbuild --disable-chroot &
- Edit your Guix System configuration if needed, then reconfigure with:
guix system reconfigure your-config.scm
- Finally, you should be good to reboot the system to test your fix.
Next: 软件包管理, Previous: System Troubleshooting Tips, Up: GNU Guix [Contents][Index]
5 入门
Presumably, you’ve reached this section because either you have installed Guix on top of another distribution (see 安装), or you’ve installed the standalone Guix System (see 系统安装). It’s time for you to get started using Guix and this section aims to help you do that and give you a feel of what it’s like.
Guix is about installing software, so probably the first thing you’ll want to do is to actually look for software. Let’s say you’re looking for a text editor, you can run:
guix search text editor
This command shows you a number of matching packages, each time showing the package’s name, version, a description, and additional info. Once you’ve found out the one you want to use, let’s say Emacs (ah ha!), you can go ahead and install it (run this command as a regular user, no need for root privileges!):
guix install emacs
You’ve installed your first package, congrats! The package is now visible in your default profile, $HOME/.guix-profile—a profile is a directory containing installed packages. In the process, you’ve probably noticed that Guix downloaded pre-built binaries; or, if you explicitly chose to not use pre-built binaries, then probably Guix is still building software (see substitutes, for more info).
Unless you’re using Guix System, the guix install command must
have printed this hint:
hint: Consider setting the necessary environment variables by running:
GUIX_PROFILE="$HOME/.guix-profile"
. "$GUIX_PROFILE/etc/profile"
Alternately, see `guix package --search-paths -p "$HOME/.guix-profile"'.
Indeed, you must now tell your shell where emacs and other
programs installed with Guix are to be found. Pasting the two lines above
will do just that: it will add $HOME/.guix-profile/bin—which is
where the installed package is—to the PATH environment variable.
You can paste these two lines in your shell so they take effect right away,
but more importantly you should add them to ~/.bash_profile (or
equivalent file if you do not use Bash) so that environment variables are
set next time you spawn a shell. You only need to do this once and other
search paths environment variables will be taken care of similarly—e.g.,
if you eventually install python and Python libraries,
GUIX_PYTHONPATH will be defined.
You can go on installing packages at your will. To list installed packages, run:
guix package --list-installed
To remove a package, you would unsurprisingly run guix remove. A
distinguishing feature is the ability to roll back any operation you
made—installation, removal, upgrade—by simply typing:
guix package --roll-back
This is because each operation is in fact a transaction that creates a new generation. These generations and the difference between them can be displayed by running:
guix package --list-generations
现在你知道包管理的基本知识了吧!
Going further: See 软件包管理, for more about package management. You may like declarative package management with
guix package --manifest, managing separate profiles with --profile, deleting old generations, collecting garbage, and other nifty features that will come in handy as you become more familiar with Guix. If you are a developer, see 开发 for additional tools. And if you’re curious, see 功能, to peek under the hood.
Once you’ve installed a set of packages, you will want to periodically upgrade them to the latest and greatest version. To do that, you will first pull the latest revision of Guix and its package collection:
guix pull
The end result is a new guix command, under
~/.config/guix/current/bin. Unless you’re on Guix System, the first
time you run guix pull, be sure to follow the hint that the
command prints and, similar to what we saw above, paste these two lines in
your terminal and .bash_profile:
GUIX_PROFILE="$HOME/.config/guix/current" . "$GUIX_PROFILE/etc/profile"
You must also instruct your shell to point to this new guix:
hash guix
At this point, you’re running a brand new Guix. You can thus go ahead and actually upgrade all the packages you previously installed:
guix upgrade
As you run this command, you will see that binaries are downloaded (or perhaps some packages are built), and eventually you end up with the upgraded packages. Should one of these upgraded packages not be to your liking, remember you can always roll back!
You can display the exact revision of Guix you’re currently using by running:
guix describe
The information it displays is all it takes to reproduce the exact same Guix, be it at a different point in time or on a different machine.
Going further: See Invoking
guix pull, for more information. See 通道, on how to specify additional channels to pull packages from, how to replicate Guix, and more. You may also findtime-machinehandy (see Invokingguix time-machine).
If you installed Guix System, one of the first things you’ll want to do is
to upgrade your system. Once you’ve run guix pull to get the
latest Guix, you can upgrade the system like this:
sudo guix system reconfigure /etc/config.scm
Upon completion, the system runs the latest versions of its software packages. When you eventually reboot, you’ll notice a sub-menu in the bootloader that reads “Old system generations”: it’s what allows you to boot an older generation of your system, should the latest generation be “broken” or otherwise unsatisfying. Just like for packages, you can always roll back to a previous generation of the whole system:
sudo guix system roll-back
There are many things you’ll probably want to tweak on your system: adding new user accounts, adding new system services, fiddling with the configuration of those services, etc. The system configuration is entirely described in the /etc/config.scm file. See 使用配置系统, to learn how to change it.
Now you know enough to get started!
Resources: The rest of this manual provides a reference for all things Guix. Here are some additional resources you may find useful:
- See The GNU Guix Cookbook, for a list of “how-to” style of recipes for a variety of applications.
- The GNU Guix Reference Card lists in two pages most of the commands and options you’ll ever need.
- The web site contains instructional videos covering topics such as everyday use of Guix, how to get help, and how to become a contributor.
- See 文档, to learn how to access documentation on your computer.
We hope you will enjoy Guix as much as the community enjoys building it!
6 软件包管理
The purpose of GNU Guix is to allow users to easily install, upgrade, and remove software packages, without having to know about their build procedures or dependencies. Guix also goes beyond this obvious set of features.
This chapter describes the main features of Guix, as well as the package
management tools it provides. Along with the command-line interface
described below (see guix package), you
may also use the Emacs-Guix interface (see The
Emacs-Guix Reference Manual), after installing emacs-guix package
(run M-x guix-help command to start with it):
guix install emacs-guix
- 功能
- Invoking
guix package - substitutes
- 有多个输出的软件包
- Invoking
guix gc - Invoking
guix pull - Invoking
guix time-machine - Inferiors
- Invoking
guix describe - Invoking
guix archive
Next: Invoking guix package, Up: 软件包管理 [Contents][Index]
6.1 功能
Here we assume you’ve already made your first steps with Guix (see 入门) and would like to get an overview about what’s going on under the hood.
When using Guix, each package ends up in the package store, in its own
directory—something that resembles /gnu/store/xxx-package-1.2,
where xxx is a base32 string.
Instead of referring to these directories, users have their own
profile, which points to the packages that they actually want to use.
These profiles are stored within each user’s home directory, at
$HOME/.guix-profile.
For example, alice installs GCC 4.7.2. As a result,
/home/alice/.guix-profile/bin/gcc points to
/gnu/store/…-gcc-4.7.2/bin/gcc. Now, on the same machine,
bob had already installed GCC 4.8.0. The profile of bob
simply continues to point to
/gnu/store/…-gcc-4.8.0/bin/gcc—i.e., both versions of GCC
coexist on the same system without any interference.
The guix package command is the central tool to manage packages
(see Invoking guix package). It operates on the per-user profiles, and
can be used with normal user privileges.
The command provides the obvious install, remove, and upgrade operations.
Each invocation is actually a transaction: either the specified
operation succeeds, or nothing happens. Thus, if the guix package
process is terminated during the transaction, or if a power outage occurs
during the transaction, then the user’s profile remains in its previous
state, and remains usable.
In addition, any package transaction may be rolled back. So, if, for example, an upgrade installs a new version of a package that turns out to have a serious bug, users may roll back to the previous instance of their profile, which was known to work well. Similarly, the global system configuration on Guix is subject to transactional upgrades and roll-back (see 使用配置系统).
All packages in the package store may be garbage-collected. Guix can
determine which packages are still referenced by user profiles, and remove
those that are provably no longer referenced (see Invoking guix gc).
Users may also explicitly remove old generations of their profile so that
the packages they refer to can be collected.
Guix takes a purely functional approach to package management, as described in the introduction (see 介绍). Each /gnu/store package directory name contains a hash of all the inputs that were used to build that package—compiler, libraries, build scripts, etc. This direct correspondence allows users to make sure a given package installation matches the current state of their distribution. It also helps maximize build reproducibility: thanks to the isolated build environments that are used, a given build is likely to yield bit-identical files when performed on different machines (see container).
This foundation allows Guix to support transparent binary/source
deployment. When a pre-built binary for a /gnu/store item is
available from an external source—a substitute, Guix just downloads
it and unpacks it; otherwise, it builds the package from source, locally
(see substitutes). Because build results are usually bit-for-bit
reproducible, users do not have to trust servers that provide substitutes:
they can force a local build and challenge providers (see Invoking guix challenge).
Control over the build environment is a feature that is also useful for
developers. The guix shell command allows developers of a package
to quickly set up the right development environment for their package,
without having to manually install the dependencies of the package into
their profile (see Invoking guix shell).
All of Guix and its package definitions is version-controlled, and
guix pull allows you to “travel in time” on the history of Guix
itself (see Invoking guix pull). This makes it possible to replicate a
Guix instance on a different machine or at a later point in time, which in
turn allows you to replicate complete software environments, while
retaining precise provenance tracking of the software.
Next: substitutes, Previous: 功能, Up: 软件包管理 [Contents][Index]
6.2 Invoking guix package
The guix package command is the tool that allows users to install,
upgrade, and remove packages, as well as rolling back to previous
configurations. These operations work on a user profile—a directory
of installed packages. Each user has a default profile in
$HOME/.guix-profile. The command operates only on the user’s own
profile, and works with normal user privileges (see 功能). Its
syntax is:
guix package options
Primarily, options specifies the operations to be performed during the transaction. Upon completion, a new profile is created, but previous generations of the profile remain available, should the user want to roll back.
For example, to remove lua and install guile and
guile-cairo in a single transaction:
guix package -r lua -i guile guile-cairo
For your convenience, we also provide the following aliases:
-
guix searchis an alias forguix package -s, -
guix installis an alias forguix package -i, -
guix removeis an alias forguix package -r, -
guix upgradeis an alias forguix package -u, - and
guix showis an alias forguix package --show=.
These aliases are less expressive than guix package and provide
fewer options, so in some cases you’ll probably want to use guix
package directly.
guix package also supports a declarative approach whereby
the user specifies the exact set of packages to be available and passes it
via the --manifest option (see --manifest).
For each user, a symlink to the user’s default profile is automatically
created in $HOME/.guix-profile. This symlink always points to the
current generation of the user’s default profile. Thus, users can add
$HOME/.guix-profile/bin to their PATH environment variable, and
so on.
If you are not using Guix System, consider adding the following lines to
your ~/.bash_profile (see Bash Startup Files in The GNU Bash
Reference Manual) so that newly-spawned shells get all the right
environment variable definitions:
GUIX_PROFILE="$HOME/.guix-profile" ; \ source "$GUIX_PROFILE/etc/profile"
In a multi-user setup, user profiles are stored in a place registered as a
garbage-collector root, which $HOME/.guix-profile points to
(see Invoking guix gc). That directory is normally
localstatedir/guix/profiles/per-user/user, where
localstatedir is the value passed to configure as
--localstatedir, and user is the user name. The
per-user directory is created when guix-daemon is started,
and the user sub-directory is created by guix package.
The options can be among the following:
--install=package …-i package …Install the specified packages.
Each package may specify a simple package name, such as
guile, optionally followed by an at-sign and version number, such asguile@3.0.7or simplyguile@3.0. In the latter case, the newest version prefixed by3.0is selected.If no version number is specified, the newest available version will be selected. In addition, such a package specification may contain a colon, followed by the name of one of the outputs of the package, as in
gcc:docorbinutils@2.22:lib(see 有多个输出的软件包).Packages with a corresponding name (and optionally version) are searched for among the GNU distribution modules (see 软件包模块).
Alternatively, a package can directly specify a store file name such as /gnu/store/...-guile-3.0.7, as produced by, e.g.,
guix build.Sometimes packages have propagated inputs: these are dependencies that automatically get installed along with the required package (see
propagated-inputsinpackageobjects, for information about propagated inputs in package definitions).An example is the GNU MPC library: its C header files refer to those of the GNU MPFR library, which in turn refer to those of the GMP library. Thus, when installing MPC, the MPFR and GMP libraries also get installed in the profile; removing MPC also removes MPFR and GMP—unless they had also been explicitly installed by the user.
Besides, packages sometimes rely on the definition of environment variables for their search paths (see explanation of --search-paths below). Any missing or possibly incorrect environment variable definitions are reported here.
--install-from-expression=exp-e expInstall the package exp evaluates to.
exp must be a Scheme expression that evaluates to a
<package>object. This option is notably useful to disambiguate between same-named variants of a package, with expressions such as(@ (gnu packages base) guile-final).Note that this option installs the first output of the specified package, which may be insufficient when needing a specific output of a multiple-output package.
--install-from-file=file-f fileInstall the package that the code within file evaluates to.
As an example, file might contain a definition like this (see 定义软件包):
(use-modules (guix) (guix build-system gnu) (guix licenses)) (package (name "hello") (version "2.10") (source (origin (method url-fetch) (uri (string-append "mirror://gnu/hello/hello-" version ".tar.gz")) (sha256 (base32 "0ssi1wpaf7plaswqqjwigppsg5fyh99vdlb9kzl7c9lng89ndq1i")))) (build-system gnu-build-system) (synopsis "Hello, GNU world: An example GNU package") (description "Guess what GNU Hello prints!") (home-page "http://www.gnu.org/software/hello/") (license gpl3+))
Developers may find it useful to include such a guix.scm file in the root of their project source tree that can be used to test development snapshots and create reproducible development environments (see Invoking
guix shell).The file may also contain a JSON representation of one or more package definitions. Running
guix package -fon hello.json with the following contents would result in installing the packagegreeterafter buildingmyhello:[ { "name": "myhello", "version": "2.10", "source": "mirror://gnu/hello/hello-2.10.tar.gz", "build-system": "gnu", "arguments": { "tests?": false } "home-page": "https://www.gnu.org/software/hello/", "synopsis": "Hello, GNU world: An example GNU package", "description": "GNU Hello prints a greeting.", "license": "GPL-3.0+", "native-inputs": ["gettext"] }, { "name": "greeter", "version": "1.0", "source": "https://example.com/greeter-1.0.tar.gz", "build-system": "gnu", "arguments": { "test-target": "foo", "parallel-build?": false, }, "home-page": "https://example.com/", "synopsis": "Greeter using GNU Hello", "description": "This is a wrapper around GNU Hello.", "license": "GPL-3.0+", "inputs": ["myhello", "hello"] } ]--remove=package …-r package …Remove the specified packages.
As for --install, each package may specify a version number and/or output name in addition to the package name. For instance, ‘-r glibc:debug’ would remove the
debugoutput ofglibc.--upgrade[=regexp …]¶-u [regexp …]Upgrade all the installed packages. If one or more regexps are specified, upgrade only installed packages whose name matches a regexp. Also see the --do-not-upgrade option below.
Note that this upgrades package to the latest version of packages found in the distribution currently installed. To update your distribution, you should regularly run
guix pull(see Invokingguix pull).When upgrading, package transformations that were originally applied when creating the profile are automatically re-applied (see 软件包转换选项). For example, assume you first installed Emacs from the tip of its development branch with:
guix install emacs-next --with-branch=emacs-next=master
Next time you run
guix upgrade, Guix will again pull the tip of the Emacs development branch and buildemacs-nextfrom that checkout.Note that transformation options such as --with-branch and --with-source depend on external state; it is up to you to ensure that they work as expected. You can also discard a transformations that apply to a package by running:
guix install package
--do-not-upgrade[=regexp …]When used together with the --upgrade option, do not upgrade any packages whose name matches a regexp. For example, to upgrade all packages in the current profile except those containing the substring “emacs”:
$ guix package --upgrade . --do-not-upgrade emacs
--manifest=file¶-m file-
Create a new generation of the profile from the manifest object returned by the Scheme code in file. This option can be repeated several times, in which case the manifests are concatenated.
This allows you to declare the profile’s contents rather than constructing it through a sequence of --install and similar commands. The advantage is that file can be put under version control, copied to different machines to reproduce the same profile, and so on.
file must return a manifest object, which is roughly a list of packages:
(use-package-modules guile emacs) (packages->manifest (list emacs guile-2.0 ;; Use a specific package output. (list guile-2.0 "debug")))
See 书写清单, for information on how to write a manifest. See --export-manifest, to learn how to obtain a manifest file from an existing profile.
--roll-back¶-
Roll back to the previous generation of the profile—i.e., undo the last transaction.
When combined with options such as --install, roll back occurs before any other actions.
When rolling back from the first generation that actually contains installed packages, the profile is made to point to the zeroth generation, which contains no files apart from its own metadata.
After having rolled back, installing, removing, or upgrading packages overwrites previous future generations. Thus, the history of the generations in a profile is always linear.
--switch-generation=pattern¶-S patternSwitch to a particular generation defined by pattern.
pattern may be either a generation number or a number prefixed with “+” or “-”. The latter means: move forward/backward by a specified number of generations. For example, if you want to return to the latest generation after --roll-back, use --switch-generation=+1.
The difference between --roll-back and --switch-generation=-1 is that --switch-generation will not make a zeroth generation, so if a specified generation does not exist, the current generation will not be changed.
--search-paths[=kind]¶Report environment variable definitions, in Bash syntax, that may be needed in order to use the set of installed packages. These environment variables are used to specify search paths for files used by some of the installed packages.
For example, GCC needs the
CPATHandLIBRARY_PATHenvironment variables to be defined so it can look for headers and libraries in the user’s profile (see Environment Variables in Using the GNU Compiler Collection (GCC)). If GCC and, say, the C library are installed in the profile, then --search-paths will suggest setting these variables to profile/include and profile/lib, respectively (see Search Paths, for info on search path specifications associated with packages.)The typical use case is to define these environment variables in the shell:
$ eval $(guix package --search-paths)
kind may be one of
exact,prefix, orsuffix, meaning that the returned environment variable definitions will either be exact settings, or prefixes or suffixes of the current value of these variables. When omitted, kind defaults toexact.This option can also be used to compute the combined search paths of several profiles. Consider this example:
$ guix package -p foo -i guile $ guix package -p bar -i guile-json $ guix package -p foo -p bar --search-paths
The last command above reports about the
GUILE_LOAD_PATHvariable, even though, taken individually, neither foo nor bar would lead to that recommendation.--profile=profile-p profileUse profile instead of the user’s default profile.
profile must be the name of a file that will be created upon completion. Concretely, profile will be a mere symbolic link (“symlink”) pointing to the actual profile where packages are installed:
$ guix install hello -p ~/code/my-profile … $ ~/code/my-profile/bin/hello Hello, world!
All it takes to get rid of the profile is to remove this symlink and its siblings that point to specific generations:
$ rm ~/code/my-profile ~/code/my-profile-*-link
--list-profilesList all the user’s profiles:
$ guix package --list-profiles /home/charlie/.guix-profile /home/charlie/code/my-profile /home/charlie/code/devel-profile /home/charlie/tmp/test
When running as root, list all the profiles of all the users.
--allow-collisionsAllow colliding packages in the new profile. Use at your own risk!
By default,
guix packagereports as an error collisions in the profile. Collisions happen when two or more different versions or variants of a given package end up in the profile.--bootstrapUse the bootstrap Guile to build the profile. This option is only useful to distribution developers.
In addition to these actions, guix package supports the following
options to query the current state of a profile, or the availability of
packages:
- --search=regexp
- -s regexp
-
List the available packages whose name, synopsis, or description matches regexp (in a case-insensitive fashion), sorted by relevance. Print all the metadata of matching packages in
recutilsformat (see GNU recutils databases in GNU recutils manual).This allows specific fields to be extracted using the
recselcommand, for instance:$ guix package -s malloc | recsel -p name,version,relevance name: jemalloc version: 4.5.0 relevance: 6 name: glibc version: 2.25 relevance: 1 name: libgc version: 7.6.0 relevance: 1
Similarly, to show the name of all the packages available under the terms of the GNU LGPL version 3:
$ guix package -s "" | recsel -p name -e 'license ~ "LGPL 3"' name: elfutils name: gmp …
It is also possible to refine search results using several
-sflags toguix package, or several arguments toguix search. For example, the following command returns a list of board games (this time using theguix searchalias):$ guix search '\<board\>' game | recsel -p name name: gnubg …
If we were to omit
-s game, we would also get software packages that deal with printed circuit boards; removing the angle brackets aroundboardwould further add packages that have to do with keyboards.And now for a more elaborate example. The following command searches for cryptographic libraries, filters out Haskell, Perl, Python, and Ruby libraries, and prints the name and synopsis of the matching packages:
$ guix search crypto library | \ recsel -e '! (name ~ "^(ghc|perl|python|ruby)")' -p name,synopsisSee Selection Expressions in GNU recutils manual, for more information on selection expressions for
recsel -e. - --show=package
Show details about package, taken from the list of available packages, in
recutilsformat (see GNU recutils databases in GNU recutils manual).$ guix package --show=guile | recsel -p name,version name: guile version: 3.0.5 name: guile version: 3.0.2 name: guile version: 2.2.7 …
You may also specify the full name of a package to only get details about a specific version of it (this time using the
guix showalias):$ guix show guile@3.0.5 | recsel -p name,version name: guile version: 3.0.5
- --list-installed[=regexp]
- -I [regexp]
List the currently installed packages in the specified profile, with the most recently installed packages shown last. When regexp is specified, list only installed packages whose name matches regexp.
For each installed package, print the following items, separated by tabs: the package name, its version string, the part of the package that is installed (for instance,
outfor the default output,includefor its headers, etc.), and the path of this package in the store.- --list-available[=regexp]
- -A [regexp]
List packages currently available in the distribution for this system (see GNU发行版). When regexp is specified, list only available packages whose name matches regexp.
For each package, print the following items separated by tabs: its name, its version string, the parts of the package (see 有多个输出的软件包), and the source location of its definition.
- --list-generations[=pattern] 
- -l [pattern]
Return a list of generations along with their creation dates; for each generation, show the installed packages, with the most recently installed packages shown last. Note that the zeroth generation is never shown.
For each installed package, print the following items, separated by tabs: the name of a package, its version string, the part of the package that is installed (see 有多个输出的软件包), and the location of this package in the store.
When pattern is used, the command returns only matching generations. Valid patterns include:
- Integers and comma-separated integers. Both patterns denote
generation numbers. For instance, --list-generations=1 returns the
first one.
And --list-generations=1,8,2 outputs three generations in the specified order. Neither spaces nor trailing commas are allowed.
- Ranges. --list-generations=2..9 prints the
specified generations and everything in between. Note that the start of a
range must be smaller than its end.
It is also possible to omit the endpoint. For example, --list-generations=2.., returns all generations starting from the second one.
- Durations. You can also get the last N days, weeks, or months by passing an integer along with the first letter of the duration. For example, --list-generations=20d lists generations that are up to 20 days old.
- Integers and comma-separated integers. Both patterns denote
generation numbers. For instance, --list-generations=1 returns the
first one.
- --delete-generations[=pattern]
- -d [pattern]
When pattern is omitted, delete all generations except the current one.
This command accepts the same patterns as --list-generations. When pattern is specified, delete the matching generations. When pattern specifies a duration, generations older than the specified duration match. For instance, --delete-generations=1m deletes generations that are more than one month old.
If the current generation matches, it is not deleted. Also, the zeroth generation is never deleted.
Note that deleting generations prevents rolling back to them. Consequently, this command must be used with care.
- --export-manifest
Write to standard output a manifest suitable for --manifest corresponding to the chosen profile(s).
This option is meant to help you migrate from the “imperative” operating mode—running
guix install,guix upgrade, etc.—to the declarative mode that --manifest offers.Be aware that the resulting manifest approximates what your profile actually contains; for instance, depending on how your profile was created, it can refer to packages or package versions that are not exactly what you specified.
Keep in mind that a manifest is purely symbolic: it only contains package names and possibly versions, and their meaning varies over time. If you wish to “pin” channels to the revisions that were used to build the profile(s), see --export-channels below.
- --export-channels
Write to standard output the list of channels used by the chosen profile(s), in a format suitable for
guix pull --channelsorguix time-machine --channels(see 通道).Together with --export-manifest, this option provides information allowing you to replicate the current profile (see Replicating Guix).
However, note that the output of this command approximates what was actually used to build this profile. In particular, a single profile might have been built from several different revisions of the same channel. In that case, --export-manifest chooses the last one and writes the list of other revisions in a comment. If you really need to pick packages from different channel revisions, you can use inferiors in your manifest to do so (see Inferiors).
Together with --export-manifest, this is a good starting point if you are willing to migrate from the “imperative” model to the fully declarative model consisting of a manifest file along with a channels file pinning the exact channel revision(s) you want.
Finally, since guix package may actually start build processes, it
supports all the common build options (see 普通的构建选项). It
also supports package transformation options, such as
--with-source, and preserves them across upgrades (see 软件包转换选项).
Next: 有多个输出的软件包, Previous: Invoking guix package, Up: 软件包管理 [Contents][Index]
6.3 substitutes
Guix supports transparent source/binary deployment, which means that it can either build things locally, or download pre-built items from a server, or both. We call these pre-built items substitutes—they are substitutes for local build results. In many cases, downloading a substitute is much faster than building things locally.
Substitutes can be anything resulting from a derivation build (see Derivations). Of course, in the common case, they are pre-built package binaries, but source tarballs, for instance, which also result from derivation builds, can be available as substitutes.
- Official Substitute Servers
- substitute服务器授权
- Getting Substitutes from Other Servers
- 验证substitute
- 代理设置
- substitute失败
- 关于信任二进制文件
Next: substitute服务器授权, Up: substitutes [Contents][Index]
6.3.1 Official Substitute Servers
ci.guix.gnu.org and bordeaux.guix.gnu.org
are both front-ends to official build farms that build packages from Guix
continuously for some architectures, and make them available as
substitutes. These are the default source of substitutes; which can be
overridden by passing the --substitute-urls option either to
guix-daemon (see guix-daemon
--substitute-urls) or to client tools such as guix package
(see client --substitute-urls option).
Substitute URLs can be either HTTP or HTTPS. HTTPS is recommended because communications are encrypted; conversely, using HTTP makes all communications visible to an eavesdropper, who could use the information gathered to determine, for instance, whether your system has unpatched security vulnerabilities.
Substitutes from the official build farms are enabled by default when using Guix System (see GNU发行版). However, they are disabled by default when using Guix on a foreign distribution, unless you have explicitly enabled them via one of the recommended installation steps (see 安装). The following paragraphs describe how to enable or disable substitutes for the official build farm; the same procedure can also be used to enable substitutes for any other substitute server.
Next: Getting Substitutes from Other Servers, Previous: Official Substitute Servers, Up: substitutes [Contents][Index]
6.3.2 substitute服务器授权
To allow Guix to download substitutes from
ci.guix.gnu.org, bordeaux.guix.gnu.org or a
mirror, you must add the relevant public key to the access control list
(ACL) of archive imports, using the guix archive command
(see Invoking guix archive). Doing so implies that you trust the
substitute server to not be compromised and to serve genuine substitutes.
注: If you are using Guix System, you can skip this section: Guix System authorizes substitutes from
ci.guix.gnu.organdbordeaux.guix.gnu.orgby default.
The public keys for each of the project maintained substitute servers are
installed along with Guix, in prefix/share/guix/, where
prefix is the installation prefix of Guix. If you installed Guix from
source, make sure you checked the GPG signature of
guix-1.4.0.tar.gz, which contains this public key file.
Then, you can run something like this:
# guix archive --authorize < prefix/share/guix/ci.guix.gnu.org.pub # guix archive --authorize < prefix/share/guix/bordeaux.guix.gnu.org.pub
Once this is in place, the output of a command like guix build should
change from something like:
$ guix build emacs --dry-run The following derivations would be built: /gnu/store/yr7bnx8xwcayd6j95r2clmkdl1qh688w-emacs-24.3.drv /gnu/store/x8qsh1hlhgjx6cwsjyvybnfv2i37z23w-dbus-1.6.4.tar.gz.drv /gnu/store/1ixwp12fl950d15h2cj11c73733jay0z-alsa-lib-1.0.27.1.tar.bz2.drv /gnu/store/nlma1pw0p603fpfiqy7kn4zm105r5dmw-util-linux-2.21.drv …
to something like:
$ guix build emacs --dry-run 112.3 MB would be downloaded: /gnu/store/pk3n22lbq6ydamyymqkkz7i69wiwjiwi-emacs-24.3 /gnu/store/2ygn4ncnhrpr61rssa6z0d9x22si0va3-libjpeg-8d /gnu/store/71yz6lgx4dazma9dwn2mcjxaah9w77jq-cairo-1.12.16 /gnu/store/7zdhgp0n1518lvfn8mb96sxqfmvqrl7v-libxrender-0.9.7 …
The text changed from “The following derivations would be built” to “112.3 MB would be downloaded”. This indicates that substitutes from the configured substitute servers are usable and will be downloaded, when possible, for future builds.
The substitute mechanism can be disabled globally by running
guix-daemon with --no-substitutes (see 调用guix-daemon). It can also be disabled temporarily by passing the
--no-substitutes option to guix package, guix
build, and other command-line tools.
Next: 验证substitute, Previous: substitute服务器授权, Up: substitutes [Contents][Index]
6.3.3 Getting Substitutes from Other Servers
Guix can look up and fetch substitutes from several servers. This is useful when you are using packages from additional channels for which the official server does not have substitutes but another server provides them. Another situation where this is useful is when you would prefer to download from your organization’s substitute server, resorting to the official server only as a fallback or dismissing it altogether.
You can give Guix a list of substitute server URLs and it will check them in the specified order. You also need to explicitly authorize the public keys of substitute servers to instruct Guix to accept the substitutes they sign.
On Guix System, this is achieved by modifying the configuration of the
guix service. Since the guix service is part of the default
lists of services, %base-services and %desktop-services, you
can use modify-services to change its configuration and add the URLs
and substitute keys that you want (see modify-services).
As an example, suppose you want to fetch substitutes from
guix.example.org and to authorize the signing key of that server, in
addition to the default ci.guix.gnu.org and
bordeaux.guix.gnu.org. The resulting operating system
configuration will look something like:
(operating-system
;; …
(services
;; Assume we're starting from '%desktop-services'. Replace it
;; with the list of services you're actually using.
(modify-services %desktop-services
(guix-service-type config =>
(guix-configuration
(inherit config)
(substitute-urls
(append (list "https://guix.example.org")
%default-substitute-urls))
(authorized-keys
(append (list (local-file "./key.pub"))
%default-authorized-guix-keys)))))))
This assumes that the file key.pub contains the signing key of
guix.example.org. With this change in place in your operating system
configuration file (say /etc/config.scm), you can reconfigure and
restart the guix-daemon service or reboot so the changes take effect:
$ sudo guix system reconfigure /etc/config.scm $ sudo herd restart guix-daemon
If you’re running Guix on a “foreign distro”, you would instead take the following steps to get substitutes from additional servers:
- Edit the service configuration file for
guix-daemon; when using systemd, this is normally /etc/systemd/system/guix-daemon.service. Add the --substitute-urls option on theguix-daemoncommand line and list the URLs of interest (seeguix-daemon --substitute-urls):… --substitute-urls='https://guix.example.org https://ci.guix.gnu.org https://bordeaux.guix.gnu.org'
- Restart the daemon. For systemd, it goes like this:
systemctl daemon-reload systemctl restart guix-daemon.service
- Authorize the key of the new server (see Invoking
guix archive):guix archive --authorize < key.pub
Again this assumes key.pub contains the public key that
guix.example.orguses to sign substitutes.
Now you’re all set! Substitutes will be preferably taken from
https://guix.example.org, using ci.guix.gnu.org
then bordeaux.guix.gnu.org as fallback options. Of course you
can list as many substitute servers as you like, with the caveat that
substitute lookup can be slowed down if too many servers need to be
contacted.
Note that there are also situations where one may want to add the URL of a substitute server without authorizing its key. See 验证substitute, to understand this fine point.
Next: 代理设置, Previous: Getting Substitutes from Other Servers, Up: substitutes [Contents][Index]
6.3.4 验证substitute
Guix detects and raises an error when attempting to use a substitute that has been tampered with. Likewise, it ignores substitutes that are not signed, or that are not signed by one of the keys listed in the ACL.
There is one exception though: if an unauthorized server provides substitutes that are bit-for-bit identical to those provided by an authorized server, then the unauthorized server becomes eligible for downloads. For example, assume we have chosen two substitute servers with this option:
--substitute-urls="https://a.example.org https://b.example.org"
If the ACL contains only the key for ‘b.example.org’, and if ‘a.example.org’ happens to serve the exact same substitutes, then Guix will download substitutes from ‘a.example.org’ because it comes first in the list and can be considered a mirror of ‘b.example.org’. In practice, independent build machines usually produce the same binaries, thanks to bit-reproducible builds (see below).
When using HTTPS, the server’s X.509 certificate is not validated (in other words, the server is not authenticated), contrary to what HTTPS clients such as Web browsers usually do. This is because Guix authenticates substitute information itself, as explained above, which is what we care about (whereas X.509 certificates are about authenticating bindings between domain names and public keys).
Next: substitute失败, Previous: 验证substitute, Up: substitutes [Contents][Index]
6.3.5 代理设置
Substitutes are downloaded over HTTP or HTTPS. The http_proxy and
https_proxy environment variables can be set in the environment of
guix-daemon and are honored for downloads of substitutes. Note
that the value of those environment variables in the environment where
guix build, guix package, and other client commands are
run has absolutely no effect.
Next: 关于信任二进制文件, Previous: 代理设置, Up: substitutes [Contents][Index]
6.3.6 substitute失败
Even when a substitute for a derivation is available, sometimes the substitution attempt will fail. This can happen for a variety of reasons: the substitute server might be offline, the substitute may recently have been deleted, the connection might have been interrupted, etc.
When substitutes are enabled and a substitute for a derivation is available, but the substitution attempt fails, Guix will attempt to build the derivation locally depending on whether or not --fallback was given (see common build option --fallback). Specifically, if --fallback was omitted, then no local build will be performed, and the derivation is considered to have failed. However, if --fallback was given, then Guix will attempt to build the derivation locally, and the success or failure of the derivation depends on the success or failure of the local build. Note that when substitutes are disabled or no substitute is available for the derivation in question, a local build will always be performed, regardless of whether or not --fallback was given.
To get an idea of how many substitutes are available right now, you can try
running the guix weather command (see Invoking guix weather).
This command provides statistics on the substitutes provided by a server.
Previous: substitute失败, Up: substitutes [Contents][Index]
6.3.7 关于信任二进制文件
Today, each individual’s control over their own computing is at the mercy of
institutions, corporations, and groups with enough power and determination
to subvert the computing infrastructure and exploit its weaknesses. While
using substitutes can be convenient, we encourage users to also build on
their own, or even run their own build farm, such that the project run
substitute servers are less of an interesting target. One way to help is by
publishing the software you build using guix publish so that
others have one more choice of server to download substitutes from
(see Invoking guix publish).
Guix has the foundations to maximize build reproducibility
(see 功能). In most cases, independent builds of a given package or
derivation should yield bit-identical results. Thus, through a diverse set
of independent package builds, we can strengthen the integrity of our
systems. The guix challenge command aims to help users assess
substitute servers, and to assist developers in finding out about
non-deterministic package builds (see Invoking guix challenge).
Similarly, the --check option of guix build allows users
to check whether previously-installed substitutes are genuine by rebuilding
them locally (see guix build --check).
In the future, we want Guix to have support to publish and retrieve binaries to/from other users, in a peer-to-peer fashion. If you would like to discuss this project, join us on guix-devel@gnu.org.
Next: Invoking guix gc, Previous: substitutes, Up: 软件包管理 [Contents][Index]
6.4 有多个输出的软件包
Often, packages defined in Guix have a single output—i.e., the
source package leads to exactly one directory in the store. When running
guix install glibc, one installs the default output of the GNU
libc package; the default output is called out, but its name can be
omitted as shown in this command. In this particular case, the default
output of glibc contains all the C header files, shared libraries,
static libraries, Info documentation, and other supporting files.
Sometimes it is more appropriate to separate the various types of files
produced from a single source package into separate outputs. For instance,
the GLib C library (used by GTK+ and related packages) installs more than
20 MiB of reference documentation as HTML pages. To save space for users
who do not need it, the documentation goes to a separate output, called
doc. To install the main GLib output, which contains everything but
the documentation, one would run:
guix install glib
The command to install its documentation is:
guix install glib:doc
Some packages install programs with different “dependency footprints”.
For instance, the WordNet package installs both command-line tools and
graphical user interfaces (GUIs). The former depend solely on the C
library, whereas the latter depend on Tcl/Tk and the underlying X
libraries. In this case, we leave the command-line tools in the default
output, whereas the GUIs are in a separate output. This allows users who do
not need the GUIs to save space. The guix size command can help
find out about such situations (see Invoking guix size). guix
graph can also be helpful (see Invoking guix graph).
There are several such multiple-output packages in the GNU distribution.
Other conventional output names include lib for libraries and
possibly header files, bin for stand-alone programs, and debug
for debugging information (see 安装调试文件). The outputs
of a packages are listed in the third column of the output of guix
package --list-available (see Invoking guix package).
Next: Invoking guix pull, Previous: 有多个输出的软件包, Up: 软件包管理 [Contents][Index]
6.5 Invoking guix gc
Packages that are installed, but not used, may be garbage-collected.
The guix gc command allows users to explicitly run the garbage
collector to reclaim space from the /gnu/store directory. It is the
only way to remove files from /gnu/store—removing files or
directories manually may break it beyond repair!
The garbage collector has a set of known roots: any file under
/gnu/store reachable from a root is considered live and cannot
be deleted; any other file is considered dead and may be deleted. The
set of garbage collector roots (“GC roots” for short) includes default
user profiles; by default, the symlinks under /var/guix/gcroots
represent these GC roots. New GC roots can be added with guix
build --root, for example (see 调用guix build). The guix
gc --list-roots command lists them.
Prior to running guix gc --collect-garbage to make space, it is often
useful to remove old generations from user profiles; that way, old package
builds referenced by those generations can be reclaimed. This is achieved
by running guix package --delete-generations (see Invoking guix package).
Our recommendation is to run a garbage collection periodically, or when you are short on disk space. For instance, to guarantee that at least 5 GB are available on your disk, simply run:
guix gc -F 5G
It is perfectly safe to run as a non-interactive periodic job
(see 执行计划任务, for how to set up such a job). Running
guix gc with no arguments will collect as much garbage as it can,
but that is often inconvenient: you may find yourself having to rebuild or
re-download software that is “dead” from the GC viewpoint but that is
necessary to build other pieces of software—e.g., the compiler tool chain.
The guix gc command has three modes of operation: it can be used
to garbage-collect any dead files (the default), to delete specific files
(the --delete option), to print garbage-collector information, or
for more advanced queries. The garbage collection options are as follows:
--collect-garbage[=min]-C [min]Collect garbage—i.e., unreachable /gnu/store files and sub-directories. This is the default operation when no option is specified.
When min is given, stop once min bytes have been collected. min may be a number of bytes, or it may include a unit as a suffix, such as
MiBfor mebibytes andGBfor gigabytes (see size specifications in GNU Coreutils).When min is omitted, collect all the garbage.
--free-space=free-F freeCollect garbage until free space is available under /gnu/store, if possible; free denotes storage space, such as
500MiB, as described above.When free or more is already available in /gnu/store, do nothing and exit immediately.
--delete-generations[=duration]-d [duration]Before starting the garbage collection process, delete all the generations older than duration, for all the user profiles and home environment generations; when run as root, this applies to all the profiles of all the users.
For example, this command deletes all the generations of all your profiles that are older than 2 months (except generations that are current), and then proceeds to free space until at least 10 GiB are available:
guix gc -d 2m -F 10G
--delete-DAttempt to delete all the store files and directories specified as arguments. This fails if some of the files are not in the store, or if they are still live.
--list-failuresList store items corresponding to cached build failures.
This prints nothing unless the daemon was started with --cache-failures (see --cache-failures).
--list-rootsList the GC roots owned by the user; when run as root, list all the GC roots.
--list-busyList store items in use by currently running processes. These store items are effectively considered GC roots: they cannot be deleted.
--clear-failuresRemove the specified store items from the failed-build cache.
Again, this option only makes sense when the daemon is started with --cache-failures. Otherwise, it does nothing.
--list-deadShow the list of dead files and directories still present in the store—i.e., files and directories no longer reachable from any root.
--list-liveShow the list of live store files and directories.
In addition, the references among existing store files can be queried:
--references¶--referrersList the references (respectively, the referrers) of store files given as arguments.
--requisites¶-RList the requisites of the store files passed as arguments. Requisites include the store files themselves, their references, and the references of these, recursively. In other words, the returned list is the transitive closure of the store files.
See Invoking
guix size, for a tool to profile the size of the closure of an element. See Invokingguix graph, for a tool to visualize the graph of references.--derivers¶Return the derivation(s) leading to the given store items (see Derivations).
For example, this command:
guix gc --derivers $(guix package -I ^emacs$ | cut -f4)
returns the .drv file(s) leading to the
emacspackage installed in your profile.Note that there may be zero matching .drv files, for instance because these files have been garbage-collected. There can also be more than one matching .drv due to fixed-output derivations.
Lastly, the following options allow you to check the integrity of the store and to control disk usage.
- --verify[=options] 
-
Verify the integrity of the store.
By default, make sure that all the store items marked as valid in the database of the daemon actually exist in /gnu/store.
When provided, options must be a comma-separated list containing one or more of
contentsandrepair.When passing --verify=contents, the daemon computes the content hash of each store item and compares it against its hash in the database. Hash mismatches are reported as data corruptions. Because it traverses all the files in the store, this command can take a long time, especially on systems with a slow disk drive.
Using --verify=repair or --verify=contents,repair causes the daemon to try to repair corrupt store items by fetching substitutes for them (see substitutes). Because repairing is not atomic, and thus potentially dangerous, it is available only to the system administrator. A lightweight alternative, when you know exactly which items in the store are corrupt, is
guix build --repair(see 调用guix build). - --optimize 
Optimize the store by hard-linking identical files—this is deduplication.
The daemon performs deduplication after each successful build or archive import, unless it was started with --disable-deduplication (see --disable-deduplication). Thus, this option is primarily useful when the daemon was running with --disable-deduplication.
- --vacuum-database 
Guix uses an sqlite database to keep track of the items in (see 仓库). Over time it is possible that the database may grow to a large size and become fragmented. As a result, one may wish to clear the freed space and join the partially used pages in the database left behind from removed packages or after running the garbage collector. Running
sudo guix gc --vacuum-databasewill lock the database andVACUUMthe store, defragmenting the database and purging freed pages, unlocking the database when it finishes.
Next: Invoking guix time-machine, Previous: Invoking guix gc, Up: 软件包管理 [Contents][Index]
6.6 Invoking guix pull
Packages are installed or upgraded to the latest version available in the
distribution currently available on your local machine. To update that
distribution, along with the Guix tools, you must run guix pull:
the command downloads the latest Guix source code and package descriptions,
and deploys it. Source code is downloaded from a
Git repository, by default the official
GNU Guix repository, though this can be customized. guix
pull ensures that the code it downloads is authentic by verifying
that commits are signed by Guix developers.
Specifically, guix pull downloads code from the channels
(see 通道) specified by one of the followings, in this order:
- the --channels option;
- the user’s ~/.config/guix/channels.scm file;
- the system-wide /etc/guix/channels.scm file;
- the built-in default channels specified in the
%default-channelsvariable.
On completion, guix package will use packages and package versions
from this just-retrieved copy of Guix. Not only that, but all the Guix
commands and Scheme modules will also be taken from that latest version.
New guix sub-commands added by the update also become available.
Any user can update their Guix copy using guix pull, and the
effect is limited to the user who ran guix pull. For instance,
when user root runs guix pull, this has no effect on the
version of Guix that user alice sees, and vice versa.
The result of running guix pull is a profile available under
~/.config/guix/current containing the latest Guix. Thus, make sure
to add it to the beginning of your search path so that you use the latest
version, and similarly for the Info manual (see 文档):
export PATH="$HOME/.config/guix/current/bin:$PATH" export INFOPATH="$HOME/.config/guix/current/share/info:$INFOPATH"
The --list-generations or -l option lists past generations
produced by guix pull, along with details about their provenance:
$ guix pull -l
Generation 1 Jun 10 2018 00:18:18
guix 65956ad
repository URL: https://git.savannah.gnu.org/git/guix.git
branch: origin/master
commit: 65956ad3526ba09e1f7a40722c96c6ef7c0936fe
Generation 2 Jun 11 2018 11:02:49
guix e0cc7f6
repository URL: https://git.savannah.gnu.org/git/guix.git
branch: origin/master
commit: e0cc7f669bec22c37481dd03a7941c7d11a64f1d
Generation 3 Jun 13 2018 23:31:07 (current)
guix 844cc1c
repository URL: https://git.savannah.gnu.org/git/guix.git
branch: origin/master
commit: 844cc1c8f394f03b404c5bb3aee086922373490c
See guix describe, for other ways to
describe the current status of Guix.
This ~/.config/guix/current profile works exactly like the profiles
created by guix package (see Invoking guix package). That is,
you can list generations, roll back to the previous generation—i.e., the
previous Guix—and so on:
$ guix pull --roll-back switched from generation 3 to 2 $ guix pull --delete-generations=1 deleting /var/guix/profiles/per-user/charlie/current-guix-1-link
You can also use guix package (see Invoking guix package) to
manage the profile by naming it explicitly:
$ guix package -p ~/.config/guix/current --roll-back switched from generation 3 to 2 $ guix package -p ~/.config/guix/current --delete-generations=1 deleting /var/guix/profiles/per-user/charlie/current-guix-1-link
The guix pull command is usually invoked with no arguments, but it
supports the following options:
--url=url--commit=commit--branch=branchDownload code for the
guixchannel from the specified url, at the given commit (a valid Git commit ID represented as a hexadecimal string or the name of a tag), or branch.These options are provided for convenience, but you can also specify your configuration in the ~/.config/guix/channels.scm file or using the --channels option (see below).
--channels=file-C fileRead the list of channels from file instead of ~/.config/guix/channels.scm or /etc/guix/channels.scm. file must contain Scheme code that evaluates to a list of channel objects. See 通道, for more information.
--news-NDisplay news written by channel authors for their users for changes made since the previous generation (see Writing Channel News). When --details is passed, additionally display new and upgraded packages.
You can view that information for previous generations with
guix pull -l.--list-generations[=pattern]-l [pattern]List all the generations of ~/.config/guix/current or, if pattern is provided, the subset of generations that match pattern. The syntax of pattern is the same as with
guix package --list-generations(see Invokingguix package).By default, this prints information about the channels used in each revision as well as the corresponding news entries. If you pass --details, it will also print the list of packages added and upgraded in each generation compared to the previous one.
--detailsInstruct --list-generations or --news to display more information about the differences between subsequent generations—see above.
--roll-back¶-
Roll back to the previous generation of ~/.config/guix/current—i.e., undo the last transaction.
--switch-generation=pattern¶-S patternSwitch to a particular generation defined by pattern.
pattern may be either a generation number or a number prefixed with “+” or “-”. The latter means: move forward/backward by a specified number of generations. For example, if you want to return to the latest generation after --roll-back, use --switch-generation=+1.
--delete-generations[=pattern]-d [pattern]When pattern is omitted, delete all generations except the current one.
This command accepts the same patterns as --list-generations. When pattern is specified, delete the matching generations. When pattern specifies a duration, generations older than the specified duration match. For instance, --delete-generations=1m deletes generations that are more than one month old.
If the current generation matches, it is not deleted.
Note that deleting generations prevents rolling back to them. Consequently, this command must be used with care.
See Invoking
guix describe, for a way to display information about the current generation only.--profile=profile-p profileUse profile instead of ~/.config/guix/current.
--dry-run-nShow which channel commit(s) would be used and what would be built or substituted but do not actually do it.
--allow-downgradesAllow pulling older or unrelated revisions of channels than those currently in use.
By default,
guix pullprotects against so-called “downgrade attacks” whereby the Git repository of a channel would be reset to an earlier or unrelated revision of itself, potentially leading you to install older, known-vulnerable versions of software packages.注: Make sure you understand its security implications before using --allow-downgrades.
--disable-authenticationAllow pulling channel code without authenticating it.
By default,
guix pullauthenticates code downloaded from channels by verifying that its commits are signed by authorized developers, and raises an error if this is not the case. This option instructs it to not perform any such verification.注: Make sure you understand its security implications before using --disable-authentication.
--system=system-s systemAttempt to build for system—e.g.,
i686-linux—instead of the system type of the build host.--bootstrapUse the bootstrap Guile to build the latest Guix. This option is only useful to Guix developers.
The channel mechanism allows you to instruct guix pull which
repository and branch to pull from, as well as additional
repositories containing package modules that should be deployed.
See 通道, for more information.
In addition, guix pull supports all the common build options
(see 普通的构建选项).
Next: Inferiors, Previous: Invoking guix pull, Up: 软件包管理 [Contents][Index]
6.7 Invoking guix time-machine
The guix time-machine command provides access to other revisions
of Guix, for example to install older versions of packages, or to reproduce
a computation in an identical environment. The revision of Guix to be used
is defined by a commit or by a channel description file created by
guix describe (see Invoking guix describe).
Let’s assume that you want to travel to those days of November 2020 when
version 1.2.0 of Guix was released and, once you’re there, run the
guile of that time:
guix time-machine --commit=v1.2.0 -- \ environment -C --ad-hoc guile -- guile
The command above fetches Guix 1.2.0 and runs its guix
environment command to spawn an environment in a container running
guile (guix environment has since been subsumed by
guix shell; see Invoking guix shell). It’s like driving a
DeLorean12! The first guix time-machine invocation can
be expensive: it may have to download or even build a large number of
packages; the result is cached though and subsequent commands targeting the
same commit are almost instantaneous.
注: The history of Guix is immutable and
guix time-machineprovides the exact same software as they are in a specific Guix revision. Naturally, no security fixes are provided for old versions of Guix or its channels. A careless use ofguix time-machineopens the door to security vulnerabilities. See --allow-downgrades.
The general syntax is:
guix time-machine options… -- command arg…
where command and arg… are passed unmodified to the
guix command of the specified revision. The options that
define this revision are the same as for guix pull
(see Invoking guix pull):
--url=url--commit=commit--branch=branchUse the
guixchannel from the specified url, at the given commit (a valid Git commit ID represented as a hexadecimal string or the name of a tag), or branch.--channels=file-C fileRead the list of channels from file. file must contain Scheme code that evaluates to a list of channel objects. See 通道 for more information.
As for guix pull, the absence of any options means that the latest
commit on the master branch will be used. The command
guix time-machine -- build hello
will thus build the package hello as defined in the master branch,
which is in general a newer revision of Guix than you have installed. Time
travel works in both directions!
Note that guix time-machine can trigger builds of channels and
their dependencies, and these are controlled by the standard build options
(see 普通的构建选项).
Next: Invoking guix describe, Previous: Invoking guix time-machine, Up: 软件包管理 [Contents][Index]
6.8 Inferiors
注: The functionality described here is a “technology preview” as of version 1.4.0. As such, the interface is subject to change.
Sometimes you might need to mix packages from the revision of Guix you’re currently running with packages available in a different revision of Guix. Guix inferiors allow you to achieve that by composing different Guix revisions in arbitrary ways.
Technically, an “inferior” is essentially a separate Guix process
connected to your main Guix process through a REPL (see Invoking guix repl). The (guix inferior) module allows you to create inferiors
and to communicate with them. It also provides a high-level interface to
browse and manipulate the packages that an inferior provides—inferior
packages.
When combined with channels (see 通道), inferiors provide a simple
way to interact with a separate revision of Guix. For example, let’s assume
you want to install in your profile the current guile package, along
with the guile-json as it existed in an older revision of
Guix—perhaps because the newer guile-json has an incompatible API
and you want to run your code against the old API. To do that, you could
write a manifest for use by guix package --manifest (see 书写清单); in that manifest, you would create an inferior for that old
Guix revision you care about, and you would look up the guile-json
package in the inferior:
(use-modules (guix inferior) (guix channels) (srfi srfi-1)) ;for 'first' (define channels ;; This is the old revision from which we want to ;; extract guile-json. (list (channel (name 'guix) (url "https://git.savannah.gnu.org/git/guix.git") (commit "65956ad3526ba09e1f7a40722c96c6ef7c0936fe")))) (define inferior ;; An inferior representing the above revision. (inferior-for-channels channels)) ;; Now create a manifest with the current "guile" package ;; and the old "guile-json" package. (packages->manifest (list (first (lookup-inferior-packages inferior "guile-json")) (specification->package "guile")))
On its first run, guix package --manifest might have to build the
channel you specified before it can create the inferior; subsequent runs
will be much faster because the Guix revision will be cached.
The (guix inferior) module provides the following procedures to open
an inferior:
- Scheme Procedure: inferior-for-channels channels [#:cache-directory] [#:ttl] Return an inferior for channels, a list of
channels. Use the cache at cache-directory, where entries can be reclaimed after ttl seconds. This procedure opens a new connection to the build daemon.
As a side effect, this procedure may build or substitute binaries for channels, which can take time.
- Scheme Procedure: open-inferior directory [#:command "bin/guix"] Open the inferior Guix in directory, running
directory/command replor equivalent. Return#fif the inferior could not be launched.
The procedures listed below allow you to obtain and manipulate inferior packages.
- Scheme Procedure: inferior-packages inferior
Return the list of packages known to inferior.
- Scheme Procedure: lookup-inferior-packages inferior name [version] Return the sorted list of inferior packages matching
name in inferior, with highest version numbers first. If version is true, return only packages with a version number prefixed by version.
- Scheme Procedure: inferior-package? obj
Return true if obj is an inferior package.
- Scheme Procedure: inferior-package-name package
- Scheme Procedure: inferior-package-version package
- Scheme Procedure: inferior-package-synopsis package
- Scheme Procedure: inferior-package-description package
- Scheme Procedure: inferior-package-home-page package
- Scheme Procedure: inferior-package-location package
- Scheme Procedure: inferior-package-inputs package
- Scheme Procedure: inferior-package-native-inputs package
- Scheme Procedure: inferior-package-propagated-inputs package
- Scheme Procedure: inferior-package-transitive-propagated-inputs package
- Scheme Procedure: inferior-package-native-search-paths package
- Scheme Procedure: inferior-package-transitive-native-search-paths package
- Scheme Procedure: inferior-package-search-paths package
These procedures are the counterpart of package record accessors (see
packageReference). Most of them work by querying the inferior package comes from, so the inferior must still be live when you call these procedures.
Inferior packages can be used transparently like any other package or
file-like object in G-expressions (see G-表达式). They are also
transparently handled by the packages->manifest procedure, which is
commonly used in manifests (see the
--manifest option of guix package). Thus you can insert
an inferior package pretty much anywhere you would insert a regular package:
in manifests, in the packages field of your operating-system
declaration, and so on.
Next: Invoking guix archive, Previous: Inferiors, Up: 软件包管理 [Contents][Index]
6.9 Invoking guix describe
Often you may want to answer questions like: “Which revision of Guix am I
using?” or “Which channels am I using?” This is useful information in
many situations: if you want to replicate an environment on a
different machine or user account, if you want to report a bug or to
determine what change in the channels you are using caused it, or if you
want to record your system state for reproducibility purposes. The
guix describe command answers these questions.
When run from a guix pulled guix, guix
describe displays the channel(s) that it was built from, including their
repository URL and commit IDs (see 通道):
$ guix describe
Generation 10 Sep 03 2018 17:32:44 (current)
guix e0fa68c
repository URL: https://git.savannah.gnu.org/git/guix.git
branch: master
commit: e0fa68c7718fffd33d81af415279d6ddb518f727
If you’re familiar with the Git version control system, this is similar in
spirit to git describe; the output is also similar to that of
guix pull --list-generations, but limited to the current
generation (see the --list-generations
option). Because the Git commit ID shown above unambiguously refers to a
snapshot of Guix, this information is all it takes to describe the revision
of Guix you’re using, and also to replicate it.
To make it easier to replicate Guix, guix describe can also be
asked to return a list of channels instead of the human-readable description
above:
$ guix describe -f channels
(list (channel
(name 'guix)
(url "https://git.savannah.gnu.org/git/guix.git")
(commit
"e0fa68c7718fffd33d81af415279d6ddb518f727")
(introduction
(make-channel-introduction
"9edb3f66fd807b096b48283debdcddccfea34bad"
(openpgp-fingerprint
"BBB0 2DDF 2CEA F6A8 0D1D E643 A2A0 6DF2 A33A 54FA")))))
You can save this to a file and feed it to guix pull -C on some
other machine or at a later point in time, which will instantiate this
exact Guix revision (see the -C option).
From there on, since you’re able to deploy the same revision of Guix, you
can just as well replicate a complete software environment. We
humbly think that this is awesome, and we hope you’ll like it too!
The details of the options supported by guix describe are as
follows:
--format=format-f formatProduce output in the specified format, one of:
humanproduce human-readable output;
channelsproduce a list of channel specifications that can be passed to
guix pull -Cor installed as ~/.config/guix/channels.scm (see Invokingguix pull);channels-sans-introlike
channels, but omit theintroductionfield; use it to produce a channel specification suitable for Guix version 1.1.0 or earlier—theintroductionfield has to do with channel authentication (see Channel Authentication) and is not supported by these older versions;json¶produce a list of channel specifications in JSON format;
recutilsproduce a list of channel specifications in Recutils format.
--list-formatsDisplay available formats for --format option.
--profile=profile-p profileDisplay information about profile.
Previous: Invoking guix describe, Up: 软件包管理 [Contents][Index]
6.10 Invoking guix archive
The guix archive command allows users to export files from
the store into a single archive, and to later import them on a machine
that runs Guix. In particular, it allows store files to be transferred from
one machine to the store on another machine.
注: If you’re looking for a way to produce archives in a format suitable for tools other than Guix, see Invoking
guix pack.
To export store files as an archive to standard output, run:
guix archive --export options specifications...
specifications may be either store file names or package
specifications, as for guix package (see Invoking guix package). For instance, the following command creates an archive
containing the gui output of the git package and the main
output of emacs:
guix archive --export git:gui /gnu/store/...-emacs-24.3 > great.nar
If the specified packages are not built yet, guix archive
automatically builds them. The build process may be controlled with the
common build options (see 普通的构建选项).
To transfer the emacs package to a machine connected over SSH, one
would run:
guix archive --export -r emacs | ssh the-machine guix archive --import
Similarly, a complete user profile may be transferred from one machine to another like this:
guix archive --export -r $(readlink -f ~/.guix-profile) | \ ssh the-machine guix archive --import
However, note that, in both examples, all of emacs and the profile as
well as all of their dependencies are transferred (due to -r),
regardless of what is already available in the store on the target machine.
The --missing option can help figure out which items are missing
from the target store. The guix copy command simplifies and
optimizes this whole process, so this is probably what you should use in
this case (see Invoking guix copy).
Each store item is written in the normalized archive or nar
format (described below), and the output of guix archive --export
(and input of guix archive --import) is a nar bundle.
The nar format is comparable in spirit to ‘tar’, but with differences that make it more appropriate for our purposes. First, rather than recording all Unix metadata for each file, the nar format only mentions the file type (regular, directory, or symbolic link); Unix permissions and owner/group are dismissed. Second, the order in which directory entries are stored always follows the order of file names according to the C locale collation order. This makes archive production fully deterministic.
That nar bundle format is essentially the concatenation of zero or more nars along with metadata for each store item it contains: its file name, references, corresponding derivation, and a digital signature.
When exporting, the daemon digitally signs the contents of the archive, and that digital signature is appended. When importing, the daemon verifies the signature and rejects the import in case of an invalid signature or if the signing key is not authorized.
The main options are:
--exportExport the specified store files or packages (see below). Write the resulting archive to the standard output.
Dependencies are not included in the output, unless --recursive is passed.
-r--recursiveWhen combined with --export, this instructs
guix archiveto include dependencies of the given items in the archive. Thus, the resulting archive is self-contained: it contains the closure of the exported store items.--importRead an archive from the standard input, and import the files listed therein into the store. Abort if the archive has an invalid digital signature, or if it is signed by a public key not among the authorized keys (see --authorize below).
--missingRead a list of store file names from the standard input, one per line, and write on the standard output the subset of these files missing from the store.
--generate-key[=parameters]¶Generate a new key pair for the daemon. This is a prerequisite before archives can be exported with --export. This operation is usually instantaneous but it can take time if the system’s entropy pool needs to be refilled. On Guix System,
guix-service-typetakes care of generating this key pair the first boot.The generated key pair is typically stored under /etc/guix, in signing-key.pub (public key) and signing-key.sec (private key, which must be kept secret). When parameters is omitted, an ECDSA key using the Ed25519 curve is generated, or, for Libgcrypt versions before 1.6.0, it is a 4096-bit RSA key. Alternatively, parameters can specify
genkeyparameters suitable for Libgcrypt (seegcry_pk_genkeyin The Libgcrypt Reference Manual).Authorize imports signed by the public key passed on standard input. The public key must be in “s-expression advanced format”—i.e., the same format as the signing-key.pub file.
The list of authorized keys is kept in the human-editable file /etc/guix/acl. The file contains “advanced-format s-expressions” and is structured as an access-control list in the Simple Public-Key Infrastructure (SPKI).
--extract=directory-x directoryRead a single-item archive as served by substitute servers (see substitutes) and extract it to directory. This is a low-level operation needed in only very narrow use cases; see below.
For example, the following command extracts the substitute for Emacs served by
ci.guix.gnu.orgto /tmp/emacs:$ wget -O - \ https://ci.guix.gnu.org/nar/gzip/…-emacs-24.5 \ | gunzip | guix archive -x /tmp/emacs
Single-item archives are different from multiple-item archives produced by
guix archive --export; they contain a single store item, and they do not embed a signature. Thus this operation does no signature verification and its output should be considered unsafe.The primary purpose of this operation is to facilitate inspection of archive contents coming from possibly untrusted substitute servers (see Invoking
guix challenge).--list-tRead a single-item archive as served by substitute servers (see substitutes) and print the list of files it contains, as in this example:
$ wget -O - \ https://ci.guix.gnu.org/nar/lzip/…-emacs-26.3 \ | lzip -d | guix archive -t
7 通道
Guix and its package collection are updated by running guix pull
(see Invoking guix pull). By default guix pull downloads and
deploys Guix itself from the official GNU Guix repository. This can be
customized by defining channels in the
~/.config/guix/channels.scm file. A channel specifies a URL and
branch of a Git repository to be deployed, and guix pull can be
instructed to pull from one or more channels. In other words, channels can
be used to customize and to extend Guix, as we will see
below. Guix is able to take into account security concerns and deal with
authenticated updates.
- Specifying Additional Channels
- Using a Custom Guix Channel
- Replicating Guix
- Channel Authentication
- Channels with Substitutes
- 创建一个频道
- Package Modules in a Sub-directory
- Declaring Channel Dependencies
- Specifying Channel Authorizations
- Primary URL
- Writing Channel News
Next: Using a Custom Guix Channel, Up: 通道 [Contents][Index]
7.1 Specifying Additional Channels
You can specify additional channels to pull from. To use a channel,
write ~/.config/guix/channels.scm to instruct guix pull to
pull from it in addition to the default Guix channel(s):
;; Add variant packages to those Guix provides. (cons (channel (name 'variant-packages) (url "https://example.org/variant-packages.git")) %default-channels)
Note that the snippet above is (as always!) Scheme code; we use
cons to add a channel the list of channels that the variable
%default-channels is bound to (see cons and lists in GNU Guile Reference Manual). With this file in place, guix
pull builds not only Guix but also the package modules from your own
repository. The result in ~/.config/guix/current is the union of
Guix with your own package modules:
$ guix describe
Generation 19 Aug 27 2018 16:20:48
guix d894ab8
repository URL: https://git.savannah.gnu.org/git/guix.git
branch: master
commit: d894ab8e9bfabcefa6c49d9ba2e834dd5a73a300
variant-packages dd3df5e
repository URL: https://example.org/variant-packages.git
branch: master
commit: dd3df5e2c8818760a8fc0bd699e55d3b69fef2bb
The output of guix describe above shows that we’re now running
Generation 19 and that it includes both Guix and packages from the
variant-personal-packages channel (see Invoking guix describe).
Next: Replicating Guix, Previous: Specifying Additional Channels, Up: 通道 [Contents][Index]
7.2 Using a Custom Guix Channel
The channel called guix specifies where Guix itself—its
command-line tools as well as its package collection—should be
downloaded. For instance, suppose you want to update from another copy of
the Guix repository at example.org, and specifically the
super-hacks branch, you can write in
~/.config/guix/channels.scm this specification:
;; Tell 'guix pull' to use another repo. (list (channel (name 'guix) (url "https://example.org/another-guix.git") (branch "super-hacks")))
From there on, guix pull will fetch code from the
super-hacks branch of the repository at example.org. The
authentication concern is addressed below (see Channel Authentication).
Next: Channel Authentication, Previous: Using a Custom Guix Channel, Up: 通道 [Contents][Index]
7.3 Replicating Guix
The guix describe command shows precisely which commits were used
to build the instance of Guix we’re using (see Invoking guix describe).
We can replicate this instance on another machine or at a different point in
time by providing a channel specification “pinned” to these commits that
looks like this:
;; Deploy specific commits of my channels of interest. (list (channel (name 'guix) (url "https://git.savannah.gnu.org/git/guix.git") (commit "6298c3ffd9654d3231a6f25390b056483e8f407c")) (channel (name 'variant-packages) (url "https://example.org/variant-packages.git") (commit "dd3df5e2c8818760a8fc0bd699e55d3b69fef2bb")))
To obtain this pinned channel specification, the easiest way is to run
guix describe and to save its output in the channels format
in a file, like so:
guix describe -f channels > channels.scm
The resulting channels.scm file can be passed to the -C
option of guix pull (see Invoking guix pull) or guix
time-machine (see Invoking guix time-machine), as in this example:
guix time-machine -C channels.scm -- shell python -- python3
Given the channels.scm file, the command above will always fetch the
exact same Guix instance, then use that instance to run the exact
same Python (see Invoking guix shell). On any machine, at any time, it
ends up running the exact same binaries, bit for bit.
Pinned channels address a problem similar to “lock files” as implemented by some deployment tools—they let you pin and reproduce a set of packages. In the case of Guix though, you are effectively pinning the entire package set as defined at the given channel commits; in fact, you are pinning all of Guix, including its core modules and command-line tools. You’re also getting strong guarantees that you are, indeed, obtaining the exact same software.
This gives you super powers, allowing you to track the provenance of binary artifacts with very fine grain, and to reproduce software environments at will—some sort of “meta reproducibility” capabilities, if you will. See Inferiors, for another way to take advantage of these super powers.
Next: Channels with Substitutes, Previous: Replicating Guix, Up: 通道 [Contents][Index]
7.4 Channel Authentication
The guix pull and guix time-machine commands
authenticate the code retrieved from channels: they make sure each
commit that is fetched is signed by an authorized developer. The goal is to
protect from unauthorized modifications to the channel that would lead users
to run malicious code.
As a user, you must provide a channel introduction in your channels file so that Guix knows how to authenticate its first commit. A channel specification, including its introduction, looks something along these lines:
(channel
(name 'some-channel)
(url "https://example.org/some-channel.git")
(introduction
(make-channel-introduction
"6f0d8cc0d88abb59c324b2990bfee2876016bb86"
(openpgp-fingerprint
"CABB A931 C0FF EEC6 900D 0CFB 090B 1199 3D9A EBB5"))))
The specification above shows the name and URL of the channel. The call to
make-channel-introduction above specifies that authentication of this
channel starts at commit 6f0d8cc…, which is signed by the
OpenPGP key with fingerprint CABB A931….
For the main channel, called guix, you automatically get that
information from your Guix installation. For other channels, include the
channel introduction provided by the channel authors in your
channels.scm file. Make sure you retrieve the channel introduction
from a trusted source since that is the root of your trust.
If you’re curious about the authentication mechanics, read on!
Next: 创建一个频道, Previous: Channel Authentication, Up: 通道 [Contents][Index]
7.5 Channels with Substitutes
When running guix pull, Guix will first compile the definitions of
every available package. This is an expensive operation for which
substitutes (see substitutes) may be available. The following snippet
in channels.scm will ensure that guix pull uses the latest
commit with available substitutes for the package definitions: this is done
by querying the continuous integration server at
https://ci.guix.gnu.org.
(use-modules (guix ci)) (list (channel-with-substitutes-available %default-guix-channel "https://ci.guix.gnu.org"))
Note that this does not mean that all the packages that you will install
after running guix pull will have available substitutes. It only
ensures that guix pull will not try to compile package
definitions. This is particularly useful when using machines with limited
resources.
Next: Package Modules in a Sub-directory, Previous: Channels with Substitutes, Up: 通道 [Contents][Index]
7.6 创建一个频道
Let’s say you have a bunch of custom package variants or personal packages that you think would make little sense to contribute to the Guix project, but would like to have these packages transparently available to you at the command line. You would first write modules containing those package definitions (see 软件包模块), maintain them in a Git repository, and then you and anyone else can use it as an additional channel to get packages from. Neat, no?
Warning: Before you, dear user, shout—“woow this is soooo coool!”—and publish your personal channel to the world, we would like to share a few words of caution:
- Before publishing a channel, please consider contributing your package definitions to Guix proper (see 贡献). Guix as a project is open to free software of all sorts, and packages in Guix proper are readily available to all Guix users and benefit from the project’s quality assurance process.
- When you maintain package definitions outside Guix, we, Guix developers, consider that the compatibility burden is on you. Remember that package modules and package definitions are just Scheme code that uses various programming interfaces (APIs). We want to remain free to change these APIs to keep improving Guix, possibly in ways that break your channel. We never change APIs gratuitously, but we will not commit to freezing APIs either.
- Corollary: if you’re using an external channel and that channel breaks, please report the issue to the channel authors, not to the Guix project.
You’ve been warned! Having said this, we believe external channels are a practical way to exert your freedom to augment Guix’ package collection and to share your improvements, which are basic tenets of free software. Please email us at guix-devel@gnu.org if you’d like to discuss this.
To create a channel, create a Git repository containing your own package
modules and make it available. The repository can contain anything, but a
useful channel will contain Guile modules that export packages. Once you
start using a channel, Guix will behave as if the root directory of that
channel’s Git repository has been added to the Guile load path (see Load
Paths in GNU Guile Reference Manual). For example, if your channel
contains a file at my-packages/my-tools.scm that defines a Guile
module, then the module will be available under the name (my-packages
my-tools), and you will be able to use it like any other module
(see Modules in GNU Guile Reference Manual).
As a channel author, consider bundling authentication material with your channel so that users can authenticate it. See Channel Authentication, and Specifying Channel Authorizations, for info on how to do it.
Next: Declaring Channel Dependencies, Previous: 创建一个频道, Up: 通道 [Contents][Index]
7.7 Package Modules in a Sub-directory
As a channel author, you may want to keep your channel modules in a sub-directory. If your modules are in the sub-directory guix, you must add a meta-data file .guix-channel that contains:
(channel
(version 0)
(directory "guix"))
Next: Specifying Channel Authorizations, Previous: Package Modules in a Sub-directory, Up: 通道 [Contents][Index]
7.8 Declaring Channel Dependencies
Channel authors may decide to augment a package collection provided by other channels. They can declare their channel to be dependent on other channels in a meta-data file .guix-channel, which is to be placed in the root of the channel repository.
The meta-data file should contain a simple S-expression like this:
(channel
(version 0)
(dependencies
(channel
(name some-collection)
(url "https://example.org/first-collection.git")
;; The 'introduction' bit below is optional: you would
;; provide it for dependencies that can be authenticated.
(introduction
(channel-introduction
(version 0)
(commit "a8883b58dc82e167c96506cf05095f37c2c2c6cd")
(signer "CABB A931 C0FF EEC6 900D 0CFB 090B 1199 3D9A EBB5"))))
(channel
(name some-other-collection)
(url "https://example.org/second-collection.git")
(branch "testing"))))
In the above example this channel is declared to depend on two other channels, which will both be fetched automatically. The modules provided by the channel will be compiled in an environment where the modules of all these declared channels are available.
For the sake of reliability and maintainability, you should avoid dependencies on channels that you don’t control, and you should aim to keep the number of dependencies to a minimum.
Next: Primary URL, Previous: Declaring Channel Dependencies, Up: 通道 [Contents][Index]
7.9 Specifying Channel Authorizations
As we saw above, Guix ensures the source code it pulls from channels comes from authorized developers. As a channel author, you need to specify the list of authorized developers in the .guix-authorizations file in the channel’s Git repository. The authentication rule is simple: each commit must be signed by a key listed in the .guix-authorizations file of its parent commit(s)13 The .guix-authorizations file looks like this:
;; Example '.guix-authorizations' file. (authorizations (version 0) ;current file format version (("AD17 A21E F8AE D8F1 CC02 DBD9 F8AE D8F1 765C 61E3" (name "alice")) ("2A39 3FFF 68F4 EF7A 3D29 12AF 68F4 EF7A 22FB B2D5" (name "bob")) ("CABB A931 C0FF EEC6 900D 0CFB 090B 1199 3D9A EBB5" (name "charlie"))))
Each fingerprint is followed by optional key/value pairs, as in the example above. Currently these key/value pairs are ignored.
This authentication rule creates a chicken-and-egg issue: how do we authenticate the first commit? Related to that: how do we deal with channels whose repository history contains unsigned commits and lack .guix-authorizations? And how do we fork existing channels?
Channel introductions answer these questions by describing the first commit
of a channel that should be authenticated. The first time a channel is
fetched with guix pull or guix time-machine, the command
looks up the introductory commit and verifies that it is signed by the
specified OpenPGP key. From then on, it authenticates commits according to
the rule above. Authentication fails if the target commit is neither a
descendant nor an ancestor of the introductory commit.
Additionally, your channel must provide all the OpenPGP keys that were ever
mentioned in .guix-authorizations, stored as .key files, which
can be either binary or “ASCII-armored”. By default, those .key
files are searched for in the branch named keyring but you can
specify a different branch name in .guix-channel like so:
(channel
(version 0)
(keyring-reference "my-keyring-branch"))
To summarize, as the author of a channel, there are three things you have to do to allow users to authenticate your code:
- Export the OpenPGP keys of past and present committers with
gpg --exportand store them in .key files, by default in a branch namedkeyring(we recommend making it an orphan branch). - Introduce an initial .guix-authorizations in the channel’s repository. Do that in a signed commit (see 提交权利, for information on how to sign Git commits.)
- Advertise the channel introduction, for instance on your channel’s web page. The channel introduction, as we saw above, is the commit/key pair—i.e., the commit that introduced .guix-authorizations, and the fingerprint of the OpenPGP used to sign it.
Before pushing to your public Git repository, you can run guix
git-authenticate to verify that you did sign all the commits you are about
to push with an authorized key:
guix git authenticate commit signer
where commit and signer are your channel introduction.
See Invoking guix git authenticate, for details.
Publishing a signed channel requires discipline: any mistake, such as an unsigned commit or a commit signed by an unauthorized key, will prevent users from pulling from your channel—well, that’s the whole point of authentication! Pay attention to merges in particular: merge commits are considered authentic if and only if they are signed by a key present in the .guix-authorizations file of both branches.
Next: Writing Channel News, Previous: Specifying Channel Authorizations, Up: 通道 [Contents][Index]
7.10 Primary URL
Channel authors can indicate the primary URL of their channel’s Git repository in the .guix-channel file, like so:
(channel
(version 0)
(url "https://example.org/guix.git"))
This allows guix pull to determine whether it is pulling code from
a mirror of the channel; when that is the case, it warns the user that the
mirror might be stale and displays the primary URL. That way, users cannot
be tricked into fetching code from a stale mirror that does not receive
security updates.
This feature only makes sense for authenticated repositories, such as the
official guix channel, for which guix pull ensures the code
it fetches is authentic.
Previous: Primary URL, Up: 通道 [Contents][Index]
7.11 Writing Channel News
Channel authors may occasionally want to communicate to their users information about important changes in the channel. You’d send them all an email, but that’s not convenient.
Instead, channels can provide a news file; when the channel users run
guix pull, that news file is automatically read and guix
pull --news can display the announcements that correspond to the new
commits that have been pulled, if any.
To do that, channel authors must first declare the name of the news file in their .guix-channel file:
(channel
(version 0)
(news-file "etc/news.txt"))
The news file itself, etc/news.txt in this example, must look something like this:
(channel-news
(version 0)
(entry (tag "the-bug-fix")
(title (en "Fixed terrible bug")
(fr "Oh la la"))
(body (en "@emph{Good news}! It's fixed!")
(eo "Certe ĝi pli bone funkcias nun!")))
(entry (commit "bdcabe815cd28144a2d2b4bc3c5057b051fa9906")
(title (en "Added a great package")
(ca "Què vol dir guix?"))
(body (en "Don't miss the @code{hello} package!"))))
While the news file is using the Scheme syntax, avoid naming it with a .scm extension or else it will get picked up when building the channel and yield an error since it is not a valid module. Alternatively, you can move the channel module to a subdirectory and store the news file in another directory.
The file consists of a list of news entries. Each entry is associated with a commit or tag: it describes changes made in this commit, possibly in preceding commits as well. Users see entries only the first time they obtain the commit the entry refers to.
The title field should be a one-line summary while body can be
arbitrarily long, and both can contain Texinfo markup (see Overview in GNU Texinfo). Both the title and body are a list of language
tag/message tuples, which allows guix pull to display news in the
language that corresponds to the user’s locale.
If you want to translate news using a gettext-based workflow, you can
extract translatable strings with xgettext (see xgettext
Invocation in GNU Gettext Utilities). For example, assuming you
write news entries in English first, the command below creates a PO file
containing the strings to translate:
xgettext -o news.po -l scheme -ken etc/news.txt
To sum up, yes, you could use your channel as a blog. But beware, this is not quite what your users might expect.
8 开发
If you are a software developer, Guix provides tools that you should find helpful—independently of the language you’re developing in. This is what this chapter is about.
The guix shell command provides a convenient way to set up one-off
software environments, be it for development purposes or to run a command
without installing it in your profile. The guix pack command
allows you to create application bundles that can be easily
distributed to users who do not run Guix.
- Invoking
guix shell - Invoking
guix environment - Invoking
guix pack - The GCC toolchain
- Invoking
guix git authenticate
Next: Invoking guix environment, Up: 开发 [Contents][Index]
8.1 Invoking guix shell
The purpose of guix shell is to make it easy to create one-off
software environments, without changing one’s profile. It is typically used
to create development environments; it is also a convenient way to run
applications without “polluting” your profile.
注: The
guix shellcommand was recently introduced to supersedeguix environment(see Invokingguix environment). If you are familiar withguix environment, you will notice that it is similar but also—we hope!—more convenient.
The general syntax is:
guix shell [options] [package…]
The following example creates an environment containing Python and NumPy,
building or downloading any missing package, and runs the python3
command in that environment:
guix shell python python-numpy -- python3
Development environments can be created as in the example below, which spawns an interactive shell containing all the dependencies and environment variables needed to work on Inkscape:
guix shell --development inkscape
Exiting the shell places the user back in the original environment before
guix shell was invoked. The next garbage collection
(see Invoking guix gc) may clean up packages that were installed in the
environment and that are no longer used outside of it.
As an added convenience, guix shell will try to do what you mean
when it is invoked interactively without any other arguments as in:
guix shell
If it finds a manifest.scm in the current working directory or any of
its parents, it uses this manifest as though it was given via
--manifest. Likewise, if it finds a guix.scm in the same
directories, it uses it to build a development profile as though both
--development and --file were present. In either case, the
file will only be loaded if the directory it resides in is listed in
~/.config/guix/shell-authorized-directories. This provides an easy
way to define, share, and enter development environments.
By default, the shell session or command runs in an augmented
environment, where the new packages are added to search path environment
variables such as PATH. You can, instead, choose to create an
isolated environment containing nothing but the packages you asked
for. Passing the --pure option clears environment variable
definitions found in the parent environment14; passing --container goes one step further by
spawning a container isolated from the rest of the system:
guix shell --container emacs gcc-toolchain
The command above spawns an interactive shell in a container where nothing
but emacs, gcc-toolchain, and their dependencies is
available. The container lacks network access and shares no files other
than the current working directory with the surrounding environment. This
is useful to prevent access to system-wide resources such as /usr/bin
on foreign distros.
This --container option can also prove useful if you wish to run a
security-sensitive application, such as a web browser, in an isolated
environment. For example, the command below launches Ungoogled-Chromium in
an isolated environment, this time sharing network access with the host and
preserving its DISPLAY environment variable, but without even sharing
the current directory:
guix shell --container --network --no-cwd ungoogled-chromium \ --preserve='^DISPLAY$' -- chromium
guix shell defines the GUIX_ENVIRONMENT variable in the
shell it spawns; its value is the file name of the profile of this
environment. This allows users to, say, define a specific prompt for
development environments in their .bashrc (see Bash Startup
Files in The GNU Bash Reference Manual):
if [ -n "$GUIX_ENVIRONMENT" ]
then
export PS1="\u@\h \w [dev]\$ "
fi
... or to browse the profile:
$ ls "$GUIX_ENVIRONMENT/bin"
The available options are summarized below.
--checkSet up the environment and check whether the shell would clobber environment variables. It’s a good idea to use this option the first time you run
guix shellfor an interactive session to make sure your setup is correct.For example, if the shell modifies the
PATHenvironment variable, report it since you would get a different environment than what you asked for.Such problems usually indicate that the shell startup files are unexpectedly modifying those environment variables. For example, if you are using Bash, make sure that environment variables are set or modified in ~/.bash_profile and not in ~/.bashrc—the former is sourced only by log-in shells. See Bash Startup Files in The GNU Bash Reference Manual, for details on Bash start-up files.
--development-DCause
guix shellto include in the environment the dependencies of the following package rather than the package itself. This can be combined with other packages. For instance, the command below starts an interactive shell containing the build-time dependencies of GNU Guile, plus Autoconf, Automake, and Libtool:guix shell -D guile autoconf automake libtool
--expression=expr-e exprCreate an environment for the package or list of packages that expr evaluates to.
For example, running:
guix shell -D -e '(@ (gnu packages maths) petsc-openmpi)'
starts a shell with the environment for this specific variant of the PETSc package.
Running:
guix shell -e '(@ (gnu) %base-packages)'
starts a shell with all the base system packages available.
The above commands only use the default output of the given packages. To select other outputs, two element tuples can be specified:
guix shell -e '(list (@ (gnu packages bash) bash) "include")'
See
package->development-manifest, for information on how to write a manifest for the development environment of a package.--file=file-f fileCreate an environment containing the package or list of packages that the code within file evaluates to.
As an example, file might contain a definition like this (see 定义软件包):
(use-modules (guix) (gnu packages gdb) (gnu packages autotools) (gnu packages texinfo)) ;; Augment the package definition of GDB with the build tools ;; needed when developing GDB (and which are not needed when ;; simply installing it.) (package (inherit gdb) (native-inputs (modify-inputs (package-native-inputs gdb) (prepend autoconf-2.64 automake texinfo))))With the file above, you can enter a development environment for GDB by running:
guix shell -D -f gdb-devel.scm
--manifest=file-m fileCreate an environment for the packages contained in the manifest object returned by the Scheme code in file. This option can be repeated several times, in which case the manifests are concatenated.
This is similar to the same-named option in
guix package(see --manifest) and uses the same manifest files.See 书写清单, for information on how to write a manifest. See --export-manifest below on how to obtain a first manifest.
--export-manifestWrite to standard output a manifest suitable for --manifest corresponding to given command-line options.
This is a way to “convert” command-line arguments into a manifest. For example, imagine you are tired of typing long lines and would like to get a manifest equivalent to this command line:
guix shell -D guile git emacs emacs-geiser emacs-geiser-guile
Just add --export-manifest to the command line above:
guix shell --export-manifest \ -D guile git emacs emacs-geiser emacs-geiser-guile
... and you get a manifest along these lines:
(concatenate-manifests (list (specifications->manifest (list "git" "emacs" "emacs-geiser" "emacs-geiser-guile")) (package->development-manifest (specification->package "guile"))))You can store it into a file, say manifest.scm, and from there pass it to
guix shellor indeed pretty much anyguixcommand:guix shell -m manifest.scm
Voilà, you’ve converted a long command line into a manifest! That conversion process honors package transformation options (see 软件包转换选项) so it should be lossless.
--profile=profile-p profileCreate an environment containing the packages installed in profile. Use
guix package(see Invokingguix package) to create and manage profiles.--pureUnset existing environment variables when building the new environment, except those specified with --preserve (see below). This has the effect of creating an environment in which search paths only contain package inputs.
--preserve=regexp-E regexpWhen used alongside --pure, preserve the environment variables matching regexp—in other words, put them on a “white list” of environment variables that must be preserved. This option can be repeated several times.
guix shell --pure --preserve=^SLURM openmpi … \ -- mpirun …
This example runs
mpirunin a context where the only environment variables defined arePATH, environment variables whose name starts with ‘SLURM’, as well as the usual “precious” variables (HOME,USER, etc.).--search-pathsDisplay the environment variable definitions that make up the environment.
--system=system-s systemAttempt to build for system—e.g.,
i686-linux.--container¶-CRun command within an isolated container. The current working directory outside the container is mapped inside the container. Additionally, unless overridden with --user, a dummy home directory is created that matches the current user’s home directory, and /etc/passwd is configured accordingly.
The spawned process runs as the current user outside the container. Inside the container, it has the same UID and GID as the current user, unless --user is passed (see below).
--network-NFor containers, share the network namespace with the host system. Containers created without this flag only have access to the loopback device.
--link-profile-PFor containers, link the environment profile to ~/.guix-profile within the container and set
GUIX_ENVIRONMENTto that. This is equivalent to making ~/.guix-profile a symlink to the actual profile within the container. Linking will fail and abort the environment if the directory already exists, which will certainly be the case ifguix shellwas invoked in the user’s home directory.Certain packages are configured to look in ~/.guix-profile for configuration files and data;15 --link-profile allows these programs to behave as expected within the environment.
--user=user-u userFor containers, use the username user in place of the current user. The generated /etc/passwd entry within the container will contain the name user, the home directory will be /home/user, and no user GECOS data will be copied. Furthermore, the UID and GID inside the container are 1000. user need not exist on the system.
Additionally, any shared or exposed path (see --share and --expose respectively) whose target is within the current user’s home directory will be remapped relative to /home/USER; this includes the automatic mapping of the current working directory.
# will expose paths as /home/foo/wd, /home/foo/test, and /home/foo/target cd $HOME/wd guix shell --container --user=foo \ --expose=$HOME/test \ --expose=/tmp/target=$HOME/targetWhile this will limit the leaking of user identity through home paths and each of the user fields, this is only one useful component of a broader privacy/anonymity solution—not one in and of itself.
--no-cwdFor containers, the default behavior is to share the current working directory with the isolated container and immediately change to that directory within the container. If this is undesirable, --no-cwd will cause the current working directory to not be automatically shared and will change to the user’s home directory within the container instead. See also --user.
--expose=source[=target]--share=source[=target]For containers, --expose (resp. --share) exposes the file system source from the host system as the read-only (resp. writable) file system target within the container. If target is not specified, source is used as the target mount point in the container.
The example below spawns a Guile REPL in a container in which the user’s home directory is accessible read-only via the /exchange directory:
guix shell --container --expose=$HOME=/exchange guile -- guile
--symlink=spec-S specFor containers, create the symbolic links specified by spec, as documented in pack-symlink-option.
--emulate-fhs-FWhen used with --container, emulate a Filesystem Hierarchy Standard (FHS) configuration within the container, providing /bin, /lib, and other directories and files specified by the FHS.
As Guix deviates from the FHS specification, this option sets up the container to more closely mimic that of other GNU/Linux distributions. This is useful for reproducing other development environments, testing, and using programs which expect the FHS specification to be followed. With this option, the container will include a version of glibc that will read /etc/ld.so.cache within the container for the shared library cache (contrary to glibc in regular Guix usage) and set up the expected FHS directories: /bin, /etc, /lib, and /usr from the container’s profile.
--rebuild-cache¶-
In most cases,
guix shellcaches the environment so that subsequent uses are instantaneous. Least-recently used cache entries are periodically removed. The cache is also invalidated, when using --file or --manifest, anytime the corresponding file is modified.The --rebuild-cache forces the cached environment to be refreshed. This is useful when using --file or --manifest and the
guix.scmormanifest.scmfile has external dependencies, or if its behavior depends, say, on environment variables. --root=file¶-r file-
Make file a symlink to the profile for this environment, and register it as a garbage collector root.
This is useful if you want to protect your environment from garbage collection, to make it “persistent”.
When this option is omitted,
guix shellcaches profiles so that subsequent uses of the same environment are instantaneous—this is comparable to using --root except thatguix shelltakes care of periodically removing the least-recently used garbage collector roots.In some cases,
guix shelldoes not cache profiles—e.g., if transformation options such as --with-latest are used. In those cases, the environment is protected from garbage collection only for the duration of theguix shellsession. This means that next time you recreate the same environment, you could have to rebuild or re-download packages.See Invoking
guix gc, for more on GC roots.
guix shell also supports all of the common build options that
guix build supports (see 普通的构建选项) as well as
package transformation options (see 软件包转换选项).
Next: Invoking guix pack, Previous: Invoking guix shell, Up: 开发 [Contents][Index]
8.2 Invoking guix environment
The purpose of guix environment is to assist in creating
development environments.
Deprecation warning: The
guix environmentcommand is deprecated in favor ofguix shell, which performs similar functions but is more convenient to use. See Invokingguix shell.Being deprecated,
guix environmentis slated for eventual removal, but the Guix project is committed to keeping it until May 1st, 2023. Please get in touch with us at guix-devel@gnu.org if you would like to discuss it.
The general syntax is:
guix environment options package…
The following example spawns a new shell set up for the development of GNU Guile:
guix environment guile
If the needed dependencies are not built yet, guix environment
automatically builds them. The environment of the new shell is an augmented
version of the environment that guix environment was run in. It
contains the necessary search paths for building the given package added to
the existing environment variables. To create a “pure” environment, in
which the original environment variables have been unset, use the
--pure option16.
Exiting from a Guix environment is the same as exiting from the shell, and
will place the user back in the old environment before guix
environment was invoked. The next garbage collection (see Invoking guix gc) will clean up packages that were installed from within the environment
and are no longer used outside of it.
guix environment defines the GUIX_ENVIRONMENT variable in
the shell it spawns; its value is the file name of the profile of this
environment. This allows users to, say, define a specific prompt for
development environments in their .bashrc (see Bash Startup
Files in The GNU Bash Reference Manual):
if [ -n "$GUIX_ENVIRONMENT" ]
then
export PS1="\u@\h \w [dev]\$ "
fi
... or to browse the profile:
$ ls "$GUIX_ENVIRONMENT/bin"
Additionally, more than one package may be specified, in which case the union of the inputs for the given packages are used. For example, the command below spawns a shell where all of the dependencies of both Guile and Emacs are available:
guix environment guile emacs
Sometimes an interactive shell session is not desired. An arbitrary command
may be invoked by placing the -- token to separate the command from
the rest of the arguments:
guix environment guile -- make -j4
In other situations, it is more convenient to specify the list of packages
needed in the environment. For example, the following command runs
python from an environment containing Python 3 and NumPy:
guix environment --ad-hoc python-numpy python -- python3
Furthermore, one might want the dependencies of a package and also some additional packages that are not build-time or runtime dependencies, but are useful when developing nonetheless. Because of this, the --ad-hoc flag is positional. Packages appearing before --ad-hoc are interpreted as packages whose dependencies will be added to the environment. Packages appearing after are interpreted as packages that will be added to the environment directly. For example, the following command creates a Guix development environment that additionally includes Git and strace:
guix environment --pure guix --ad-hoc git strace
Sometimes it is desirable to isolate the environment as much as possible, for maximal purity and reproducibility. In particular, when using Guix on a host distro that is not Guix System, it is desirable to prevent access to /usr/bin and other system-wide resources from the development environment. For example, the following command spawns a Guile REPL in a “container” where only the store and the current working directory are mounted:
guix environment --ad-hoc --container guile -- guile
注: The --container option requires Linux-libre 3.19 or newer.
Another typical use case for containers is to run security-sensitive
applications such as a web browser. To run Eolie, we must expose and share
some files and directories; we include nss-certs and expose
/etc/ssl/certs/ for HTTPS authentication; finally we preserve the
DISPLAY environment variable since containerized graphical
applications won’t display without it.
guix environment --preserve='^DISPLAY$' --container --network \ --expose=/etc/machine-id \ --expose=/etc/ssl/certs/ \ --share=$HOME/.local/share/eolie/=$HOME/.local/share/eolie/ \ --ad-hoc eolie nss-certs dbus -- eolie
The available options are summarized below.
--checkSet up the environment and check whether the shell would clobber environment variables. See --check, for more info.
--root=file¶-r file-
Make file a symlink to the profile for this environment, and register it as a garbage collector root.
This is useful if you want to protect your environment from garbage collection, to make it “persistent”.
When this option is omitted, the environment is protected from garbage collection only for the duration of the
guix environmentsession. This means that next time you recreate the same environment, you could have to rebuild or re-download packages. See Invokingguix gc, for more on GC roots. --expression=expr-e exprCreate an environment for the package or list of packages that expr evaluates to.
For example, running:
guix environment -e '(@ (gnu packages maths) petsc-openmpi)'
starts a shell with the environment for this specific variant of the PETSc package.
Running:
guix environment --ad-hoc -e '(@ (gnu) %base-packages)'
starts a shell with all the base system packages available.
The above commands only use the default output of the given packages. To select other outputs, two element tuples can be specified:
guix environment --ad-hoc -e '(list (@ (gnu packages bash) bash) "include")'
--load=file-l fileCreate an environment for the package or list of packages that the code within file evaluates to.
As an example, file might contain a definition like this (see 定义软件包):
(use-modules (guix) (gnu packages gdb) (gnu packages autotools) (gnu packages texinfo)) ;; Augment the package definition of GDB with the build tools ;; needed when developing GDB (and which are not needed when ;; simply installing it.) (package (inherit gdb) (native-inputs (modify-inputs (package-native-inputs gdb) (prepend autoconf-2.64 automake texinfo))))--manifest=file-m fileCreate an environment for the packages contained in the manifest object returned by the Scheme code in file. This option can be repeated several times, in which case the manifests are concatenated.
This is similar to the same-named option in
guix package(see --manifest) and uses the same manifest files.See
guix shell --export-manifest, for information on how to “convert” command-line options into a manifest.--ad-hocInclude all specified packages in the resulting environment, as if an ad hoc package were defined with them as inputs. This option is useful for quickly creating an environment without having to write a package expression to contain the desired inputs.
For instance, the command:
guix environment --ad-hoc guile guile-sdl -- guile
runs
guilein an environment where Guile and Guile-SDL are available.Note that this example implicitly asks for the default output of
guileandguile-sdl, but it is possible to ask for a specific output—e.g.,glib:binasks for thebinoutput ofglib(see 有多个输出的软件包).This option may be composed with the default behavior of
guix environment. Packages appearing before --ad-hoc are interpreted as packages whose dependencies will be added to the environment, the default behavior. Packages appearing after are interpreted as packages that will be added to the environment directly.--profile=profile-p profileCreate an environment containing the packages installed in profile. Use
guix package(see Invokingguix package) to create and manage profiles.--pureUnset existing environment variables when building the new environment, except those specified with --preserve (see below). This has the effect of creating an environment in which search paths only contain package inputs.
--preserve=regexp-E regexpWhen used alongside --pure, preserve the environment variables matching regexp—in other words, put them on a “white list” of environment variables that must be preserved. This option can be repeated several times.
guix environment --pure --preserve=^SLURM --ad-hoc openmpi … \ -- mpirun …
This example runs
mpirunin a context where the only environment variables defined arePATH, environment variables whose name starts with ‘SLURM’, as well as the usual “precious” variables (HOME,USER, etc.).--search-pathsDisplay the environment variable definitions that make up the environment.
--system=system-s systemAttempt to build for system—e.g.,
i686-linux.--container¶-CRun command within an isolated container. The current working directory outside the container is mapped inside the container. Additionally, unless overridden with --user, a dummy home directory is created that matches the current user’s home directory, and /etc/passwd is configured accordingly.
The spawned process runs as the current user outside the container. Inside the container, it has the same UID and GID as the current user, unless --user is passed (see below).
--network-NFor containers, share the network namespace with the host system. Containers created without this flag only have access to the loopback device.
--link-profile-PFor containers, link the environment profile to ~/.guix-profile within the container and set
GUIX_ENVIRONMENTto that. This is equivalent to making ~/.guix-profile a symlink to the actual profile within the container. Linking will fail and abort the environment if the directory already exists, which will certainly be the case ifguix environmentwas invoked in the user’s home directory.Certain packages are configured to look in ~/.guix-profile for configuration files and data;17 --link-profile allows these programs to behave as expected within the environment.
--user=user-u userFor containers, use the username user in place of the current user. The generated /etc/passwd entry within the container will contain the name user, the home directory will be /home/user, and no user GECOS data will be copied. Furthermore, the UID and GID inside the container are 1000. user need not exist on the system.
Additionally, any shared or exposed path (see --share and --expose respectively) whose target is within the current user’s home directory will be remapped relative to /home/USER; this includes the automatic mapping of the current working directory.
# will expose paths as /home/foo/wd, /home/foo/test, and /home/foo/target cd $HOME/wd guix environment --container --user=foo \ --expose=$HOME/test \ --expose=/tmp/target=$HOME/targetWhile this will limit the leaking of user identity through home paths and each of the user fields, this is only one useful component of a broader privacy/anonymity solution—not one in and of itself.
--no-cwdFor containers, the default behavior is to share the current working directory with the isolated container and immediately change to that directory within the container. If this is undesirable, --no-cwd will cause the current working directory to not be automatically shared and will change to the user’s home directory within the container instead. See also --user.
--expose=source[=target]--share=source[=target]For containers, --expose (resp. --share) exposes the file system source from the host system as the read-only (resp. writable) file system target within the container. If target is not specified, source is used as the target mount point in the container.
The example below spawns a Guile REPL in a container in which the user’s home directory is accessible read-only via the /exchange directory:
guix environment --container --expose=$HOME=/exchange --ad-hoc guile -- guile
--emulate-fhs-FFor containers, emulate a Filesystem Hierarchy Standard (FHS) configuration within the container, see the official specification. As Guix deviates from the FHS specification, this option sets up the container to more closely mimic that of other GNU/Linux distributions. This is useful for reproducing other development environments, testing, and using programs which expect the FHS specification to be followed. With this option, the container will include a version of
glibcwhich will read/etc/ld.so.cachewithin the container for the shared library cache (contrary toglibcin regular Guix usage) and set up the expected FHS directories:/bin,/etc,/lib, and/usrfrom the container’s profile.
guix environment also supports all of the common build options
that guix build supports (see 普通的构建选项) as well as
package transformation options (see 软件包转换选项).
Next: The GCC toolchain, Previous: Invoking guix environment, Up: 开发 [Contents][Index]
8.3 Invoking guix pack
Occasionally you want to pass software to people who are not (yet!) lucky
enough to be using Guix. You’d tell them to run guix package -i
something, but that’s not possible in this case. This is where
guix pack comes in.
注: If you are looking for ways to exchange binaries among machines that already run Guix, see Invoking
guix copy, Invokingguix publish, and Invokingguix archive.
The guix pack command creates a shrink-wrapped pack or
software bundle: it creates a tarball or some other archive containing
the binaries of the software you’re interested in, and all its
dependencies. The resulting archive can be used on any machine that does
not have Guix, and people can run the exact same binaries as those you have
with Guix. The pack itself is created in a bit-reproducible fashion, so
anyone can verify that it really contains the build results that you pretend
to be shipping.
For example, to create a bundle containing Guile, Emacs, Geiser, and all their dependencies, you can run:
$ guix pack guile emacs emacs-geiser … /gnu/store/…-pack.tar.gz
The result here is a tarball containing a /gnu/store directory with
all the relevant packages. The resulting tarball contains a profile
with the three packages of interest; the profile is the same as would be
created by guix package -i. It is this mechanism that is used to
create Guix’s own standalone binary tarball (see 二进制文件安装).
Users of this pack would have to run /gnu/store/…-profile/bin/guile to run Guile, which you may find inconvenient. To work around it, you can create, say, a /opt/gnu/bin symlink to the profile:
guix pack -S /opt/gnu/bin=bin guile emacs emacs-geiser
That way, users can happily type /opt/gnu/bin/guile and enjoy.
What if the recipient of your pack does not have root privileges on their machine, and thus cannot unpack it in the root file system? In that case, you will want to use the --relocatable option (see below). This option produces relocatable binaries, meaning they they can be placed anywhere in the file system hierarchy: in the example above, users can unpack your tarball in their home directory and directly run ./opt/gnu/bin/guile.
Alternatively, you can produce a pack in the Docker image format using the following command:
guix pack -f docker -S /bin=bin guile guile-readline
The result is a tarball that can be passed to the docker load
command, followed by docker run:
docker load < file docker run -ti guile-guile-readline /bin/guile
where file is the image returned by guix pack, and
guile-guile-readline is its “image tag”. See the
Docker
documentation for more information.
Yet another option is to produce a SquashFS image with the following command:
guix pack -f squashfs bash guile emacs emacs-geiser
The result is a SquashFS file system image that can either be mounted or
directly be used as a file system container image with the
Singularity container execution
environment, using commands like singularity shell or
singularity exec.
Several command-line options allow you to customize your pack:
--format=format-f formatProduce a pack in the given format.
The available formats are:
tarballThis is the default format. It produces a tarball containing all the specified binaries and symlinks.
dockerThis produces a tarball that follows the Docker Image Specification. The “repository name” as it appears in the output of the
docker imagescommand is computed from package names passed on the command line or in the manifest file.squashfsThis produces a SquashFS image containing all the specified binaries and symlinks, as well as empty mount points for virtual file systems like procfs.
注: Singularity requires you to provide /bin/sh in the image. For that reason,
guix pack -f squashfsalways implies-S /bin=bin. Thus, yourguix packinvocation must always start with something like:guix pack -f squashfs bash …
If you forget the
bash(or similar) package,singularity runandsingularity execwill fail with an unhelpful “no such file or directory” message.debThis produces a Debian archive (a package with the ‘.deb’ file extension) containing all the specified binaries and symbolic links, that can be installed on top of any dpkg-based GNU(/Linux) distribution. Advanced options can be revealed via the --help-deb-format option. They allow embedding control files for more fine-grained control, such as activating specific triggers or providing a maintainer configure script to run arbitrary setup code upon installation.
guix pack -f deb -C xz -S /usr/bin/hello=bin/hello hello
注: Because archives produced with
guix packcontain a collection of store items and because eachdpkgpackage must not have conflicting files, in practice that means you likely won’t be able to install more than one such archive on a given system.Warning:
dpkgwill assume ownership of any files contained in the pack that it does not know about. It is unwise to install Guix-produced ‘.deb’ files on a system where /gnu/store is shared by other software, such as a Guix installation or other, non-deb packs.
--relocatable-RProduce relocatable binaries—i.e., binaries that can be placed anywhere in the file system hierarchy and run from there.
When this option is passed once, the resulting binaries require support for user namespaces in the kernel Linux; when passed twice18, relocatable binaries fall to back to other techniques if user namespaces are unavailable, and essentially work anywhere—see below for the implications.
For example, if you create a pack containing Bash with:
guix pack -RR -S /mybin=bin bash
... you can copy that pack to a machine that lacks Guix, and from your home directory as a normal user, run:
tar xf pack.tar.gz ./mybin/sh
In that shell, if you type
ls /gnu/store, you’ll notice that /gnu/store shows up and contains all the dependencies ofbash, even though the machine actually lacks /gnu/store altogether! That is probably the simplest way to deploy Guix-built software on a non-Guix machine.注: By default, relocatable binaries rely on the user namespace feature of the kernel Linux, which allows unprivileged users to mount or change root. Old versions of Linux did not support it, and some GNU/Linux distributions turn it off.
To produce relocatable binaries that work even in the absence of user namespaces, pass --relocatable or -R twice. In that case, binaries will try user namespace support and fall back to another execution engine if user namespaces are not supported. The following execution engines are supported:
defaultTry user namespaces and fall back to PRoot if user namespaces are not supported (see below).
performanceTry user namespaces and fall back to Fakechroot if user namespaces are not supported (see below).
usernsRun the program through user namespaces and abort if they are not supported.
prootRun through PRoot. The PRoot program provides the necessary support for file system virtualization. It achieves that by using the
ptracesystem call on the running program. This approach has the advantage to work without requiring special kernel support, but it incurs run-time overhead every time a system call is made.fakechrootRun through Fakechroot. Fakechroot virtualizes file system accesses by intercepting calls to C library functions such as
open,stat,exec, and so on. Unlike PRoot, it incurs very little overhead. However, it does not always work: for example, some file system accesses made from within the C library are not intercepted, and file system accesses made via direct syscalls are not intercepted either, leading to erratic behavior.
When running a wrapped program, you can explicitly request one of the execution engines listed above by setting the
GUIX_EXECUTION_ENGINEenvironment variable accordingly.--entry-point=commandUse command as the entry point of the resulting pack, if the pack format supports it—currently
dockerandsquashfs(Singularity) support it. command must be relative to the profile contained in the pack.The entry point specifies the command that tools like
docker runorsingularity runautomatically start by default. For example, you can do:guix pack -f docker --entry-point=bin/guile guile
The resulting pack can easily be loaded and
docker runwith no extra arguments will spawnbin/guile:docker load -i pack.tar.gz docker run image-id
--expression=expr-e exprConsider the package expr evaluates to.
This has the same purpose as the same-named option in
guix build(see --expression inguix build).--manifest=file-m fileUse the packages contained in the manifest object returned by the Scheme code in file. This option can be repeated several times, in which case the manifests are concatenated.
This has a similar purpose as the same-named option in
guix package(see --manifest) and uses the same manifest files. It allows you to define a collection of packages once and use it both for creating profiles and for creating archives for use on machines that do not have Guix installed. Note that you can specify either a manifest file or a list of packages, but not both.See 书写清单, for information on how to write a manifest. See
guix shell --export-manifest, for information on how to “convert” command-line options into a manifest.--system=system-s systemAttempt to build for system—e.g.,
i686-linux—instead of the system type of the build host.--target=triplet¶Cross-build for triplet, which must be a valid GNU triplet, such as
"aarch64-linux-gnu"(see GNU configuration triplets in Autoconf).--compression=tool-C toolCompress the resulting tarball using tool—one of
gzip,zstd,bzip2,xz,lzip, ornonefor no compression.--symlink=spec-S specAdd the symlinks specified by spec to the pack. This option can appear several times.
spec has the form
source=target, where source is the symlink that will be created and target is the symlink target.For instance,
-S /opt/gnu/bin=bincreates a /opt/gnu/bin symlink pointing to the bin sub-directory of the profile.--save-provenanceSave provenance information for the packages passed on the command line. Provenance information includes the URL and commit of the channels in use (see 通道).
Provenance information is saved in the /gnu/store/…-profile/manifest file in the pack, along with the usual package metadata—the name and version of each package, their propagated inputs, and so on. It is useful information to the recipient of the pack, who then knows how the pack was (supposedly) obtained.
This option is not enabled by default because, like timestamps, provenance information contributes nothing to the build process. In other words, there is an infinity of channel URLs and commit IDs that can lead to the same pack. Recording such “silent” metadata in the output thus potentially breaks the source-to-binary bitwise reproducibility property.
--root=file¶-r fileMake file a symlink to the resulting pack, and register it as a garbage collector root.
--localstatedir--profile-name=nameInclude the “local state directory”, /var/guix, in the resulting pack, and notably the /var/guix/profiles/per-user/root/name profile—by default name is
guix-profile, which corresponds to ~root/.guix-profile./var/guix contains the store database (see 仓库) as well as garbage-collector roots (see Invoking
guix gc). Providing it in the pack means that the store is “complete” and manageable by Guix; not providing it pack means that the store is “dead”: items cannot be added to it or removed from it after extraction of the pack.One use case for this is the Guix self-contained binary tarball (see 二进制文件安装).
--derivation-dPrint the name of the derivation that builds the pack.
--bootstrapUse the bootstrap binaries to build the pack. This option is only useful to Guix developers.
In addition, guix pack supports all the common build options
(see 普通的构建选项) and all the package transformation options
(see 软件包转换选项).
Next: Invoking guix git authenticate, Previous: Invoking guix pack, Up: 开发 [Contents][Index]
8.4 The GCC toolchain
If you need a complete toolchain for compiling and linking C or C++ source
code, use the gcc-toolchain package. This package provides a
complete GCC toolchain for C/C++ development, including GCC itself, the GNU
C Library (headers and binaries, plus debugging symbols in the debug
output), Binutils, and a linker wrapper.
The wrapper’s purpose is to inspect the -L and -l switches
passed to the linker, add corresponding -rpath arguments, and invoke
the actual linker with this new set of arguments. You can instruct the
wrapper to refuse to link against libraries not in the store by setting the
GUIX_LD_WRAPPER_ALLOW_IMPURITIES environment variable to no.
The package gfortran-toolchain provides a complete GCC toolchain for
Fortran development. For other languages, please use ‘guix search gcc
toolchain’ (see Invoking guix package).
Previous: The GCC toolchain, Up: 开发 [Contents][Index]
8.5 Invoking guix git authenticate
The guix git authenticate command authenticates a Git checkout
following the same rule as for channels (see channel authentication). That is, starting from a given commit, it ensures
that all subsequent commits are signed by an OpenPGP key whose fingerprint
appears in the .guix-authorizations file of its parent commit(s).
You will find this command useful if you maintain a channel. But in fact, this authentication mechanism is useful in a broader context, so you might want to use it for Git repositories that have nothing to do with Guix.
The general syntax is:
guix git authenticate commit signer [options…]
By default, this command authenticates the Git checkout in the current directory; it outputs nothing and exits with exit code zero on success and non-zero on failure. commit above denotes the first commit where authentication takes place, and signer is the OpenPGP fingerprint of public key used to sign commit. Together, they form a “channel introduction” (see channel introduction). The options below allow you to fine-tune the process.
--repository=directory-r directoryOpen the Git repository in directory instead of the current directory.
--keyring=reference-k referenceLoad OpenPGP keyring from reference, the reference of a branch such as
origin/keyringormy-keyring. The branch must contain OpenPGP public keys in .key files, either in binary form or “ASCII-armored”. By default the keyring is loaded from the branch namedkeyring.--statsDisplay commit signing statistics upon completion.
--cache-key=keyPreviously-authenticated commits are cached in a file under ~/.cache/guix/authentication. This option forces the cache to be stored in file key in that directory.
--historical-authorizations=fileBy default, any commit whose parent commit(s) lack the .guix-authorizations file is considered inauthentic. In contrast, this option considers the authorizations in file for any commit that lacks .guix-authorizations. The format of file is the same as that of .guix-authorizations (see .guix-authorizations format).
9 编程接口
GNU Guix provides several Scheme programming interfaces (APIs) to define, build, and query packages. The first interface allows users to write high-level package definitions. These definitions refer to familiar packaging concepts, such as the name and version of a package, its build system, and its dependencies. These definitions can then be turned into concrete build actions.
Build actions are performed by the Guix daemon, on behalf of users. In a standard setup, the daemon has write access to the store—the /gnu/store directory—whereas users do not. The recommended setup also has the daemon perform builds in chroots, under specific build users, to minimize interference with the rest of the system.
Lower-level APIs are available to interact with the daemon and the store. To instruct the daemon to perform a build action, users actually provide it with a derivation. A derivation is a low-level representation of the build actions to be taken, and the environment in which they should occur—derivations are to package definitions what assembly is to C programs. The term “derivation” comes from the fact that build results derive from them.
This chapter describes all these APIs in turn, starting from high-level package definitions.
- 软件包模块
- 定义软件包
- Defining Package Variants
- 书写清单
- 构建系统
- Build Phases
- Build Utilities
- Search Paths
- 仓库
- Derivations
- 仓库monad
- G-表达式
- Invoking
guix repl - Using Guix Interactively
9.1 软件包模块
From a programming viewpoint, the package definitions of the GNU
distribution are provided by Guile modules in the (gnu packages
…) name space19
(see Guile modules in GNU Guile Reference Manual). For
instance, the (gnu packages emacs) module exports a variable named
emacs, which is bound to a <package> object (see 定义软件包).
The (gnu packages …) module name space is automatically scanned
for packages by the command-line tools. For instance, when running
guix install emacs, all the (gnu packages …) modules are
scanned until one that exports a package object whose name is emacs
is found. This package search facility is implemented in the (gnu
packages) module.
Users can store package definitions in modules with different names—e.g.,
(my-packages emacs)20. There are two ways to make these package definitions visible to
the user interfaces:
- By adding the directory containing your package modules to the search path
with the
-Lflag ofguix packageand other commands (see 普通的构建选项), or by setting theGUIX_PACKAGE_PATHenvironment variable described below. - By defining a channel and configuring
guix pullso that it pulls from it. A channel is essentially a Git repository containing package modules. See 通道, for more information on how to define and use channels.
GUIX_PACKAGE_PATH works similarly to other search path variables:
- Environment Variable: GUIX_PACKAGE_PATH
This is a colon-separated list of directories to search for additional package modules. Directories listed in this variable take precedence over the own modules of the distribution.
The distribution is fully bootstrapped and self-contained: each
package is built based solely on other packages in the distribution. The
root of this dependency graph is a small set of bootstrap binaries,
provided by the (gnu packages bootstrap) module. For more
information on bootstrapping, see 引导.
Next: Defining Package Variants, Previous: 软件包模块, Up: 编程接口 [Contents][Index]
9.2 定义软件包
The high-level interface to package definitions is implemented in the
(guix packages) and (guix build-system) modules. As an
example, the package definition, or recipe, for the GNU Hello package
looks like this:
(define-module (gnu packages hello) #:use-module (guix packages) #:use-module (guix download) #:use-module (guix build-system gnu) #:use-module (guix licenses) #:use-module (gnu packages gawk)) (define-public hello (package (name "hello") (version "2.10") (source (origin (method url-fetch) (uri (string-append "mirror://gnu/hello/hello-" version ".tar.gz")) (sha256 (base32 "0ssi1wpaf7plaswqqjwigppsg5fyh99vdlb9kzl7c9lng89ndq1i")))) (build-system gnu-build-system) (arguments '(#:configure-flags '("--enable-silent-rules"))) (inputs (list gawk)) (synopsis "Hello, GNU world: An example GNU package") (description "Guess what GNU Hello prints!") (home-page "https://www.gnu.org/software/hello/") (license gpl3+)))
Without being a Scheme expert, the reader may have guessed the meaning of
the various fields here. This expression binds the variable hello to
a <package> object, which is essentially a record (see Scheme records in GNU Guile Reference Manual). This package object
can be inspected using procedures found in the (guix packages)
module; for instance, (package-name hello)
returns—surprise!—"hello".
With luck, you may be able to import part or all of the definition of the
package you are interested in from another repository, using the guix
import command (see Invoking guix import).
In the example above, hello is defined in a module of its own,
(gnu packages hello). Technically, this is not strictly necessary,
but it is convenient to do so: all the packages defined in modules under
(gnu packages …) are automatically known to the command-line
tools (see 软件包模块).
There are a few points worth noting in the above package definition:
- The
sourcefield of the package is an<origin>object (seeoriginReference, for the complete reference). Here, theurl-fetchmethod from(guix download)is used, meaning that the source is a file to be downloaded over FTP or HTTP.The
mirror://gnuprefix instructsurl-fetchto use one of the GNU mirrors defined in(guix download).The
sha256field specifies the expected SHA256 hash of the file being downloaded. It is mandatory, and allows Guix to check the integrity of the file. The(base32 …)form introduces the base32 representation of the hash. You can obtain this information withguix download(see Invokingguix download) andguix hash(see Invokingguix hash).When needed, the
originform can also have apatchesfield listing patches to be applied, and asnippetfield giving a Scheme expression to modify the source code. -
The
build-systemfield specifies the procedure to build the package (see 构建系统). Here,gnu-build-systemrepresents the familiar GNU Build System, where packages may be configured, built, and installed with the usual./configure && make && make check && make installcommand sequence.When you start packaging non-trivial software, you may need tools to manipulate those build phases, manipulate files, and so on. See Build Utilities, for more on this.
- The
argumentsfield specifies options for the build system (see 构建系统). Here it is interpreted bygnu-build-systemas a request run configure with the --enable-silent-rules flag.What about these quote (
') characters? They are Scheme syntax to introduce a literal list;'is synonymous withquote. Sometimes you’ll also see`(a backquote, synonymous withquasiquote) and,(a comma, synonymous withunquote). See quoting in GNU Guile Reference Manual, for details. Here the value of theargumentsfield is a list of arguments passed to the build system down the road, as withapply(seeapplyin GNU Guile Reference Manual).The hash-colon (
#:) sequence defines a Scheme keyword (see Keywords in GNU Guile Reference Manual), and#:configure-flagsis a keyword used to pass a keyword argument to the build system (see Coding With Keywords in GNU Guile Reference Manual). - The
inputsfield specifies inputs to the build process—i.e., build-time or run-time dependencies of the package. Here, we add an input, a reference to thegawkvariable;gawkis itself bound to a<package>object.Note that GCC, Coreutils, Bash, and other essential tools do not need to be specified as inputs here. Instead,
gnu-build-systemtakes care of ensuring that they are present (see 构建系统).However, any other dependencies need to be specified in the
inputsfield. Any dependency not specified here will simply be unavailable to the build process, possibly leading to a build failure.
See package Reference, for a full description of possible fields.
Going further: Intimidated by the Scheme language or curious about it? The Cookbook has a short section to get started that recaps some of the things shown above and explains the fundamentals. See A Scheme Crash Course in GNU Guix Cookbook, for more information.
Once a package definition is in place, the package may actually be built
using the guix build command-line tool (see 调用guix build),
troubleshooting any build failures you encounter (see 调试构建错误). You can easily jump back to the package definition using the
guix edit command (see Invoking guix edit). See 打包指导, for more information on how to test package definitions, and
Invoking guix lint, for information on how to check a definition for
style conformance.
Lastly, see 通道, for information on how to extend the distribution
by adding your own package definitions in a “channel”.
Finally, updating the package definition to a new upstream version can be
partly automated by the guix refresh command (see Invoking guix refresh).
Behind the scenes, a derivation corresponding to the <package> object
is first computed by the package-derivation procedure. That
derivation is stored in a .drv file under /gnu/store. The
build actions it prescribes may then be realized by using the
build-derivations procedure (see 仓库).
- Scheme Procedure: package-derivation store package [system]
Return the
<derivation>object of package for system (see Derivations).package must be a valid
<package>object, and system must be a string denoting the target system type—e.g.,"x86_64-linux"for an x86_64 Linux-based GNU system. store must be a connection to the daemon, which operates on the store (see 仓库).
Similarly, it is possible to compute a derivation that cross-builds a package for some other system:
- Scheme Procedure: package-cross-derivation store package target [system] Return the
<derivation> object of package cross-built from system to target.
target must be a valid GNU triplet denoting the target hardware and operating system, such as
"aarch64-linux-gnu"(see Specifying Target Triplets in Autoconf).
Once you have package definitions, you can easily define variants of those packages. See Defining Package Variants, for more on that.
Next: origin Reference, Up: 定义软件包 [Contents][Index]
9.2.1 package Reference
This section summarizes all the options available in package
declarations (see 定义软件包).
- Data Type: package
This is the data type representing a package recipe.
名字The name of the package, as a string.
versionThe version of the package, as a string. See 版本号, for guidelines.
sourceAn object telling how the source code for the package should be acquired. Most of the time, this is an
originobject, which denotes a file fetched from the Internet (seeoriginReference). It can also be any other “file-like” object such as alocal-file, which denotes a file from the local file system (seelocal-file).build-systemThe build system that should be used to build the package (see 构建系统).
arguments(default:'())The arguments that should be passed to the build system (see 构建系统). This is a list, typically containing sequential keyword-value pairs, as in this example:
(package (name "example") ;; several fields omitted (arguments (list #:tests? #f ;skip tests #:make-flags #~'("VERBOSE=1") ;pass flags to 'make' #:configure-flags #~'("--enable-frobbing"))))The exact set of supported keywords depends on the build system (see 构建系统), but you will find that almost all of them honor
#:configure-flags,#:make-flags,#:tests?, and#:phases. The#:phaseskeyword in particular lets you modify the set of build phases for your package (see Build Phases).inputs(default:'()) ¶native-inputs(default:'())propagated-inputs(default:'())These fields list dependencies of the package. Each element of these lists is either a package, origin, or other “file-like object” (see G-表达式); to specify the output of that file-like object that should be used, pass a two-element list where the second element is the output (see 有多个输出的软件包, for more on package outputs). For example, the list below specifies three inputs:
(list libffi libunistring `(,glib "bin")) ;the "bin" output of GLib
In the example above, the
"out"output oflibffiandlibunistringis used.Compatibility Note: Until version 1.3.0, input lists were a list of tuples, where each tuple has a label for the input (a string) as its first element, a package, origin, or derivation as its second element, and optionally the name of the output thereof that should be used, which defaults to
"out". For example, the list below is equivalent to the one above, but using the old input style:;; Old input style (deprecated). `(("libffi" ,libffi) ("libunistring" ,libunistring) ("glib:bin" ,glib "bin")) ;the "bin" output of GLib
This style is now deprecated; it is still supported but support will be removed in a future version. It should not be used for new package definitions. See Invoking
guix style, on how to migrate to the new style.The distinction between
native-inputsandinputsis necessary when considering cross-compilation. When cross-compiling, dependencies listed ininputsare built for the target architecture; conversely, dependencies listed innative-inputsare built for the architecture of the build machine.native-inputsis typically used to list tools needed at build time, but not at run time, such as Autoconf, Automake, pkg-config, Gettext, or Bison.guix lintcan report likely mistakes in this area (see Invokingguix lint).Lastly,
propagated-inputsis similar toinputs, but the specified packages will be automatically installed to profiles (see the role of profiles in Guix) alongside the package they belong to (seeguix package, for information on howguix packagedeals with propagated inputs).For example this is necessary when packaging a C/C++ library that needs headers of another library to compile, or when a pkg-config file refers to another one via its
Requiresfield.Another example where
propagated-inputsis useful is for languages that lack a facility to record the run-time search path akin to theRUNPATHof ELF files; this includes Guile, Python, Perl, and more. When packaging libraries written in those languages, ensure they can find library code they depend on at run time by listing run-time dependencies inpropagated-inputsrather thaninputs.outputs(default:'("out"))The list of output names of the package. See 有多个输出的软件包, for typical uses of additional outputs.
native-search-paths(default:'())search-paths(default:'())A list of
search-path-specificationobjects describing search-path environment variables honored by the package. See Search Paths, for more on search path specifications.As for inputs, the distinction between
native-search-pathsandsearch-pathsonly matters when cross-compiling. In a cross-compilation context,native-search-pathsapplies exclusively to native inputs whereassearch-pathsapplies only to host inputs.Packages such as cross-compilers care about target inputs—for instance, our (modified) GCC cross-compiler has
CROSS_C_INCLUDE_PATHinsearch-paths, which allows it to pick .h files for the target system and not those of native inputs. For the majority of packages though, onlynative-search-pathsmakes sense.replacement(default:#f)This must be either
#for a package object that will be used as a replacement for this package. See grafts, for details.synopsisA one-line description of the package.
descriptionA more elaborate description of the package, as a string in Texinfo syntax.
license¶The license of the package; a value from
(guix licenses), or a list of such values.home-pageThe URL to the home-page of the package, as a string.
supported-systems(default:%supported-systems)The list of systems supported by the package, as strings of the form
architecture-kernel, for example"x86_64-linux".location(default: source location of thepackageform)The source location of the package. It is useful to override this when inheriting from another package, in which case this field is not automatically corrected.
- Scheme Syntax: this-package
When used in the lexical scope of a package field definition, this identifier resolves to the package being defined.
The example below shows how to add a package as a native input of itself when cross-compiling:
(package (name "guile") ;; ... ;; When cross-compiled, Guile, for example, depends on ;; a native version of itself. Add it here. (native-inputs (if (%current-target-system) (list this-package) '())))It is an error to refer to
this-packageoutside a package definition.
The following helper procedures are provided to help deal with package inputs.
- Scheme Procedure: lookup-package-input package name
- Scheme Procedure: lookup-package-native-input package name
- Scheme Procedure: lookup-package-propagated-input package name
- Scheme Procedure: lookup-package-direct-input package name
Look up name among package’s inputs (or native, propagated, or direct inputs). Return it if found,
#fotherwise.name is the name of a package depended on. Here’s how you might use it:
(use-modules (guix packages) (gnu packages base)) (lookup-package-direct-input coreutils "gmp") ⇒ #<package gmp@6.2.1 …>
In this example we obtain the
gmppackage that is among the direct inputs ofcoreutils.
Sometimes you will want to obtain the list of inputs needed to
develop a package—all the inputs that are visible when the package
is compiled. This is what the package-development-inputs procedure
returns.
- Scheme Procedure: package-development-inputs package [system] [#:target #f] Return the list of inputs required by
package for development purposes on system. When target is true, return the inputs needed to cross-compile package from system to target, where target is a triplet such as
"aarch64-linux-gnu".Note that the result includes both explicit inputs and implicit inputs—inputs automatically added by the build system (see 构建系统). Let us take the
hellopackage to illustrate that:(use-modules (gnu packages base) (guix packages)) hello ⇒ #<package hello@2.10 gnu/packages/base.scm:79 7f585d4f6790> (package-direct-inputs hello) ⇒ () (package-development-inputs hello) ⇒ (("source" …) ("tar" #<package tar@1.32 …>) …)
In this example,
package-direct-inputsreturns the empty list, becausehellohas zero explicit dependencies. Conversely,package-development-inputsincludes inputs implicitly added bygnu-build-systemthat are required to buildhello: tar, gzip, GCC, libc, Bash, and more. To visualize it,guix graph hellowould show you explicit inputs, whereasguix graph -t bag hellowould include implicit inputs (see Invokingguix graph).
Because packages are regular Scheme objects that capture a complete dependency graph and associated build procedures, it is often useful to write procedures that take a package and return a modified version thereof according to some parameters. Below are a few examples.
- Scheme Procedure: package-with-c-toolchain package toolchain
Return a variant of package that uses toolchain instead of the default GNU C/C++ toolchain. toolchain must be a list of inputs (label/package tuples) providing equivalent functionality, such as the
gcc-toolchainpackage.The example below returns a variant of the
hellopackage built with GCC 10.x and the rest of the GNU tool chain (Binutils and the GNU C Library) instead of the default tool chain:(let ((toolchain (specification->package "gcc-toolchain@10"))) (package-with-c-toolchain hello `(("toolchain" ,toolchain))))The build tool chain is part of the implicit inputs of packages—it’s usually not listed as part of the various “inputs” fields and is instead pulled in by the build system. Consequently, this procedure works by changing the build system of package so that it pulls in toolchain instead of the defaults. 构建系统, for more on build systems.
Previous: package Reference, Up: 定义软件包 [Contents][Index]
9.2.2 origin Reference
This section documents origins. An origin declaration
specifies data that must be “produced”—downloaded, usually—and whose
content hash is known in advance. Origins are primarily used to represent
the source code of packages (see 定义软件包). For that reason,
the origin form allows you to declare patches to apply to the
original source code as well as code snippets to modify it.
- Data Type: origin
This is the data type representing a source code origin.
uriAn object containing the URI of the source. The object type depends on the
method(see below). For example, when using the url-fetch method of(guix download), the validurivalues are: a URL represented as a string, or a list thereof.methodA monadic procedure that handles the given URI. The procedure must accept at least three arguments: the value of the
urifield and the hash algorithm and hash value specified by thehashfield. It must return a store item or a derivation in the store monad (see 仓库monad); most methods return a fixed-output derivation (see Derivations).Commonly used methods include
url-fetch, which fetches data from a URL, andgit-fetch, which fetches data from a Git repository (see below).sha256A bytevector containing the SHA-256 hash of the source. This is equivalent to providing a
content-hashSHA256 object in thehashfield described below.hashThe
content-hashobject of the source—see below for how to usecontent-hash.You can obtain this information using
guix download(see Invokingguix download) orguix hash(see Invokingguix hash).file-name(default:#f)The file name under which the source code should be saved. When this is
#f, a sensible default value will be used in most cases. In case the source is fetched from a URL, the file name from the URL will be used. For version control checkouts, it is recommended to provide the file name explicitly because the default is not very descriptive.patches(default:'())A list of file names, origins, or file-like objects (see file-like objects) pointing to patches to be applied to the source.
This list of patches must be unconditional. In particular, it cannot depend on the value of
%current-systemor%current-target-system.snippet(default:#f)A G-expression (see G-表达式) or S-expression that will be run in the source directory. This is a convenient way to modify the source, sometimes more convenient than a patch.
patch-flags(default:'("-p1"))A list of command-line flags that should be passed to the
patchcommand.patch-inputs(default:#f)Input packages or derivations to the patching process. When this is
#f, the usual set of inputs necessary for patching are provided, such as GNU Patch.modules(default:'())A list of Guile modules that should be loaded during the patching process and while running the code in the
snippetfield.patch-guile(default:#f)The Guile package that should be used in the patching process. When this is
#f, a sensible default is used.
- Data Type: content-hash value [algorithm]
Construct a content hash object for the given algorithm, and with value as its hash value. When algorithm is omitted, assume it is
sha256.value can be a literal string, in which case it is base32-decoded, or it can be a bytevector.
The following forms are all equivalent:
(content-hash "05zxkyz9bv3j9h0xyid1rhvh3klhsmrpkf3bcs6frvlgyr2gwilj") (content-hash "05zxkyz9bv3j9h0xyid1rhvh3klhsmrpkf3bcs6frvlgyr2gwilj" sha256) (content-hash (base32 "05zxkyz9bv3j9h0xyid1rhvh3klhsmrpkf3bcs6frvlgyr2gwilj")) (content-hash (base64 "kkb+RPaP7uyMZmu4eXPVkM4BN8yhRd8BTHLslb6f/Rc=") sha256)
Technically,
content-hashis currently implemented as a macro. It performs sanity checks at macro-expansion time, when possible, such as ensuring that value has the right size for algorithm.
As we have seen above, how exactly the data an origin refers to is retrieved
is determined by its method field. The (guix download) module
provides the most common method, url-fetch, described below.
- Scheme Procedure: url-fetch url hash-algo hash [name] [#:executable? #f] Return a fixed-output derivation that fetches data
from url (a string, or a list of strings denoting alternate URLs), which is expected to have hash hash of type hash-algo (a symbol). By default, the file name is the base name of URL; optionally, name can specify a different file name. When executable? is true, make the downloaded file executable.
When one of the URL starts with
mirror://, then its host part is interpreted as the name of a mirror scheme, taken from %mirror-file.Alternatively, when URL starts with
file://, return the corresponding file name in the store.
Likewise, the (guix git-download) module defines the git-fetch
origin method, which fetches data from a Git version control repository, and
the git-reference data type to describe the repository and revision
to fetch.
- Scheme Procedure: git-fetch ref hash-algo hash
Return a fixed-output derivation that fetches ref, a
<git-reference>object. The output is expected to have recursive hash hash of type hash-algo (a symbol). Use name as the file name, or a generic name if#f.
- Data Type: git-reference
This data type represents a Git reference for
git-fetchto retrieve.urlThe URL of the Git repository to clone.
commitThis string denotes either the commit to fetch (a hexadecimal string), or the tag to fetch. You can also use a “short” commit ID or a
git describestyle identifier such asv1.0.1-10-g58d7909c97.recursive?(default:#f)This Boolean indicates whether to recursively fetch Git sub-modules.
The example below denotes the
v2.10tag of the GNU Hello repository:(git-reference (url "https://git.savannah.gnu.org/git/hello.git") (commit "v2.10"))This is equivalent to the reference below, which explicitly names the commit:
(git-reference (url "https://git.savannah.gnu.org/git/hello.git") (commit "dc7dc56a00e48fe6f231a58f6537139fe2908fb9"))
For Mercurial repositories, the module (guix hg-download) defines the
hg-fetch origin method and hg-reference data type for support
of the Mercurial version control system.
- Scheme Procedure: hg-fetch ref hash-algo hash [name] Return a fixed-output derivation that fetches ref, a
<hg-reference>object. The output is expected to have recursive hash hash of type hash-algo (a symbol). Use name as the file name, or a generic name if#false.
9.3 Defining Package Variants
One of the nice things with Guix is that, given a package definition, you can easily derive variants of that package—for a different upstream version, with different dependencies, different compilation options, and so on. Some of these custom packages can be defined straight from the command line (see 软件包转换选项). This section describes how to define package variants in code. This can be useful in “manifests” (see 书写清单) and in your own package collection (see 创建一个频道), among others!
As discussed earlier, packages are first-class objects in the Scheme
language. The (guix packages) module provides the package
construct to define new package objects (see package Reference). The
easiest way to define a package variant is using the inherit keyword
together with package. This allows you to inherit from a package
definition while overriding the fields you want.
For example, given the hello variable, which contains a definition
for the current version of GNU Hello, here’s how you would define a
variant for version 2.2 (released in 2006, it’s vintage!):
(use-modules (gnu packages base)) ;for 'hello' (define hello-2.2 (package (inherit hello) (version "2.2") (source (origin (method url-fetch) (uri (string-append "mirror://gnu/hello/hello-" version ".tar.gz")) (sha256 (base32 "0lappv4slgb5spyqbh6yl5r013zv72yqg2pcl30mginf3wdqd8k9"))))))
The example above corresponds to what the --with-source package
transformation option does. Essentially hello-2.2 preserves all the
fields of hello, except version and source, which it
overrides. Note that the original hello variable is still there, in
the (gnu packages base) module, unchanged. When you define a custom
package like this, you are really adding a new package definition;
the original one remains available.
You can just as well define variants with a different set of dependencies
than the original package. For example, the default gdb package
depends on guile, but since that is an optional dependency, you can
define a variant that removes that dependency like so:
(use-modules (gnu packages gdb)) ;for 'gdb' (define gdb-sans-guile (package (inherit gdb) (inputs (modify-inputs (package-inputs gdb) (delete "guile")))))
The modify-inputs form above removes the "guile" package from
the inputs field of gdb. The modify-inputs macro is a
helper that can prove useful anytime you want to remove, add, or replace
package inputs.
- Scheme Syntax: modify-inputs inputs clauses
Modify the given package inputs, as returned by
package-inputs& co., according to the given clauses. Each clause must have one of the following forms:(delete name…)Delete from the inputs packages with the given names (strings).
(prepend package…)Add packages to the front of the input list.
(append package…)Add packages to the end of the input list.
The example below removes the GMP and ACL inputs of Coreutils and adds libcap to the front of the input list:
(modify-inputs (package-inputs coreutils) (delete "gmp" "acl") (prepend libcap))The example below replaces the
guilepackage from the inputs ofguile-rediswithguile-2.2:(modify-inputs (package-inputs guile-redis) (replace "guile" guile-2.2))The last type of clause is
append, to add inputs at the back of the list.
In some cases, you may find it useful to write functions (“procedures”, in
Scheme parlance) that return a package based on some parameters. For
example, consider the luasocket library for the Lua programming
language. We want to create luasocket packages for major versions of
Lua. One way to do that is to define a procedure that takes a Lua package
and returns a luasocket package that depends on it:
(define (make-lua-socket name lua) ;; Return a luasocket package built with LUA. (package (name name) (version "3.0") ;; several fields omitted (inputs (list lua)) (synopsis "Socket library for Lua"))) (define-public lua5.1-socket (make-lua-socket "lua5.1-socket" lua-5.1)) (define-public lua5.2-socket (make-lua-socket "lua5.2-socket" lua-5.2))
Here we have defined packages lua5.1-socket and lua5.2-socket
by calling make-lua-socket with different arguments.
See Procedures in GNU Guile Reference Manual, for more info on
procedures. Having top-level public definitions for these two packages
means that they can be referred to from the command line (see 软件包模块).
These are pretty simple package variants. As a convenience, the (guix
transformations) module provides a high-level interface that directly maps
to the more sophisticated package transformation options (see 软件包转换选项):
- Scheme Procedure: options->transformation opts
Return a procedure that, when passed an object to build (package, derivation, etc.), applies the transformations specified by opts and returns the resulting objects. opts must be a list of symbol/string pairs such as:
((with-branch . "guile-gcrypt=master") (without-tests . "libgcrypt"))Each symbol names a transformation and the corresponding string is an argument to that transformation.
For instance, a manifest equivalent to this command:
guix build guix \ --with-branch=guile-gcrypt=master \ --with-debug-info=zlib
... would look like this:
(use-modules (guix transformations)) (define transform ;; The package transformation procedure. (options->transformation '((with-branch . "guile-gcrypt=master") (with-debug-info . "zlib")))) (packages->manifest (list (transform (specification->package "guix"))))
The options->transformation procedure is convenient, but it’s perhaps
also not as flexible as you may like. How is it implemented? The astute
reader probably noticed that most package transformation options go beyond
the superficial changes shown in the first examples of this section: they
involve input rewriting, whereby the dependency graph of a package is
rewritten by replacing specific inputs by others.
Dependency graph rewriting, for the purposes of swapping packages in the
graph, is what the package-input-rewriting procedure in (guix
packages) implements.
- Scheme Procedure: package-input-rewriting replacements [rewrite-name] [#:deep? #t] Return a procedure that, when passed a
package, replaces its direct and indirect dependencies, including implicit inputs when deep? is true, according to replacements. replacements is a list of package pairs; the first element of each pair is the package to replace, and the second one is the replacement.
Optionally, rewrite-name is a one-argument procedure that takes the name of a package and returns its new name after rewrite.
Consider this example:
(define libressl-instead-of-openssl ;; This is a procedure to replace OPENSSL by LIBRESSL, ;; recursively. (package-input-rewriting `((,openssl . ,libressl)))) (define git-with-libressl (libressl-instead-of-openssl git))
Here we first define a rewriting procedure that replaces openssl with libressl. Then we use it to define a variant of the git package that uses libressl instead of openssl. This is exactly what the --with-input command-line option does (see --with-input).
The following variant of package-input-rewriting can match packages
to be replaced by name rather than by identity.
- Scheme Procedure: package-input-rewriting/spec replacements [#:deep? #t]
Return a procedure that, given a package, applies the given replacements to all the package graph, including implicit inputs unless deep? is false. replacements is a list of spec/procedures pair; each spec is a package specification such as
"gcc"or"guile@2", and each procedure takes a matching package and returns a replacement for that package.
The example above could be rewritten this way:
(define libressl-instead-of-openssl
;; Replace all the packages called "openssl" with LibreSSL.
(package-input-rewriting/spec `(("openssl" . ,(const libressl)))))
The key difference here is that, this time, packages are matched by spec and
not by identity. In other words, any package in the graph that is called
openssl will be replaced.
A more generic procedure to rewrite a package dependency graph is
package-mapping: it supports arbitrary changes to nodes in the graph.
- Scheme Procedure: package-mapping proc [cut?] [#:deep? #f]
Return a procedure that, given a package, applies proc to all the packages depended on and returns the resulting package. The procedure stops recursion when cut? returns true for a given package. When deep? is true, proc is applied to implicit inputs as well.
Next: 构建系统, Previous: Defining Package Variants, Up: 编程接口 [Contents][Index]
9.4 书写清单
guix commands let you specify package lists on the command line.
This is convenient, but as the command line becomes longer and less trivial,
it quickly becomes more convenient to have that package list in what we call
a manifest. A manifest is some sort of a “bill of materials” that
defines a package set. You would typically come up with a code snippet that
builds the manifest, store it in a file, say manifest.scm, and then
pass that file to the -m (or --manifest) option that many
guix commands support. For example, here’s what a manifest for a
simple package set might look like:
;; Manifest for three packages. (specifications->manifest '("gcc-toolchain" "make" "git"))
Once you have that manifest, you can pass it, for example, to guix
package to install just those three packages to your profile
(see -m option of guix package):
guix package -m manifest.scm
... or you can pass it to guix shell (see -m option of guix shell) to spawn an ephemeral
environment:
guix shell -m manifest.scm
... or you can pass it to guix pack in pretty much the same way
(see -m option of guix pack). You can
store the manifest under version control, share it with others so they can
easily get set up, etc.
But how do you write your first manifest? To get started, maybe you’ll want
to write a manifest that mirrors what you already have in a profile. Rather
than start from a blank page, guix package can generate a manifest
for you (see guix package --export-manifest):
# Write to 'manifest.scm' a manifest corresponding to the # default profile, ~/.guix-profile. guix package --export-manifest > manifest.scm
Or maybe you’ll want to “translate” command-line arguments into a
manifest. In that case, guix shell can help
(see guix shell --export-manifest):
# Write a manifest for the packages specified on the command line. guix shell --export-manifest gcc-toolchain make git > manifest.scm
In both cases, the --export-manifest option tries hard to generate a faithful manifest; in particular, it takes package transformation options into account (see 软件包转换选项).
注: Manifests are symbolic: they refer to packages of the channels currently in use (see 通道). In the example above,
gcc-toolchainmight refer to version 11 today, but it might refer to version 13 two years from now.If you want to “pin” your software environment to specific package versions and variants, you need an additional piece of information: the list of channel revisions in use, as returned by
guix describe. See Replicating Guix, for more information.
Once you’ve obtained your first manifest, perhaps you’ll want to customize it. Since your manifest is code, you now have access to all the Guix programming interfaces!
Let’s assume you want a manifest to deploy a custom variant of GDB, the GNU Debugger, that does not depend on Guile, together with another package. Building on the example seen in the previous section (see Defining Package Variants), you can write a manifest along these lines:
(use-modules (guix packages) (gnu packages gdb) ;for 'gdb' (gnu packages version-control)) ;for 'git' ;; Define a variant of GDB without a dependency on Guile. (define gdb-sans-guile (package (inherit gdb) (inputs (modify-inputs (package-inputs gdb) (delete "guile"))))) ;; Return a manifest containing that one package plus Git. (packages->manifest (list gdb-sans-guile git))
Note that in this example, the manifest directly refers to the gdb
and git variables, which are bound to a package object
(see package Reference), instead of calling
specifications->manifest to look up packages by name as we did
before. The use-modules form at the top lets us access the core
package interface (see 定义软件包) and the modules that define
gdb and git (see 软件包模块). Seamlessly, we’re
weaving all this together—the possibilities are endless, unleash your
creativity!
The data type for manifests as well as supporting procedures are defined in
the (guix profiles) module, which is automatically available to code
passed to -m. The reference follows.
- Data Type: manifest
Data type representing a manifest.
It currently has one field:
entriesThis must be a list of
manifest-entryrecords—see below.
- Data Type: manifest-entry
Data type representing a manifest entry. A manifest entry contains essential metadata: a name and version string, the object (usually a package) for that entry, the desired output (see 有多个输出的软件包), and a number of optional pieces of information detailed below.
Most of the time, you won’t build a manifest entry directly; instead, you will pass a package to
package->manifest-entry, described below. In some unusual cases though, you might want to create manifest entries for things that are not packages, as in this example:;; Manually build a single manifest entry for a non-package object. (let ((hello (program-file "hello" #~(display "Hi!")))) (manifest-entry (name "foo") (version "42") (item (computed-file "hello-directory" #~(let ((bin (string-append #$output "/bin"))) (mkdir #$output) (mkdir bin) (symlink #$hello (string-append bin "/hello")))))))
The available fields are the following:
名字versionName and version string for this entry.
itemA package or other file-like object (see file-like objects).
output(default:"out")Output of
itemto use, in caseitemhas multiple outputs (see 有多个输出的软件包).dependencies(default:'())List of manifest entries this entry depends on. When building a profile, dependencies are added to the profile.
Typically, the propagated inputs of a package (see
propagated-inputs) end up having a corresponding manifest entry in among the dependencies of the package’s own manifest entry.search-paths(default:'())The list of search path specifications honored by this entry (see Search Paths).
properties(default:'())List of symbol/value pairs. When building a profile, those properties get serialized.
This can be used to piggyback additional metadata—e.g., the transformations applied to a package (see 软件包转换选项).
parent(default:(delay #f))A promise pointing to the “parent” manifest entry.
This is used as a hint to provide context when reporting an error related to a manifest entry coming from a
dependenciesfield.
- Scheme Procedure: concatenate-manifests lst
Concatenate the manifests listed in lst and return the resulting manifest.
- Scheme Procedure: package->manifest-entry package [output] [#:properties] Return a manifest entry for the output
of package package, where output defaults to
"out", and with the given properties. By default properties is the empty list or, if one or more package transformations were applied to package, it is an association list representing those transformations, suitable as an argument tooptions->transformation(seeoptions->transformation).The code snippet below builds a manifest with an entry for the default output and the
send-emailoutput of thegitpackage:(use-modules (gnu packages version-control)) (manifest (list (package->manifest-entry git) (package->manifest-entry git "send-email")))
- Scheme Procedure: packages->manifest packages
Return a list of manifest entries, one for each item listed in packages. Elements of packages can be either package objects or package/string tuples denoting a specific output of a package.
Using this procedure, the manifest above may be rewritten more concisely:
(use-modules (gnu packages version-control)) (packages->manifest (list git `(,git "send-email")))
- Scheme Procedure: package->development-manifest package [system] [#:target] Return a manifest for the development inputs
of package for system, optionally when cross-compiling to target. Development inputs include both explicit and implicit inputs of package.
Like the -D option of
guix shell(seeguix shell -D), the resulting manifest describes the environment in which one can develop package. For example, suppose you’re willing to set up a development environment for Inkscape, with the addition of Git for version control; you can describe that “bill of materials” with the following manifest:(use-modules (gnu packages inkscape) ;for 'inkscape' (gnu packages version-control)) ;for 'git' (concatenate-manifests (list (package->development-manifest inkscape) (packages->manifest (list git))))
In this example, the development manifest that
package->development-manifestreturns includes the compiler (GCC), the many supporting libraries (Boost, GLib, GTK, etc.), and a couple of additional development tools—these are the dependenciesguix show inkscapelists.
Last, the (gnu packages) module provides higher-level facilities to
build manifests. In particular, it lets you look up packages by name—see
below.
- Scheme Procedure: specifications->manifest specs
Given specs, a list of specifications such as
"emacs@25.2"or"guile:debug", return a manifest. Specs have the format that command-line tools such asguix installandguix packageunderstand (see Invokingguix package).As an example, it lets you rewrite the Git manifest that we saw earlier like this:
(specifications->manifest '("git" "git:send-email"))Notice that we do not need to worry about
use-modules, importing the right set of modules, and referring to the right variables. Instead, we directly refer to packages in the same way as on the command line, which can often be more convenient.
Next: Build Phases, Previous: 书写清单, Up: 编程接口 [Contents][Index]
9.5 构建系统
Each package definition specifies a build system and arguments for
that build system (see 定义软件包). This build-system
field represents the build procedure of the package, as well as implicit
dependencies of that build procedure.
Build systems are <build-system> objects. The interface to create
and manipulate them is provided by the (guix build-system) module,
and actual build systems are exported by specific modules.
Under the hood, build systems first compile package objects to bags.
A bag is like a package, but with less ornamentation—in other words,
a bag is a lower-level representation of a package, which includes all the
inputs of that package, including some that were implicitly added by the
build system. This intermediate representation is then compiled to a
derivation (see Derivations). The package-with-c-toolchain is an
example of a way to change the implicit inputs that a package’s build system
pulls in (see package-with-c-toolchain).
Build systems accept an optional list of arguments. In package
definitions, these are passed via the arguments field
(see 定义软件包). They are typically keyword arguments
(see keyword arguments in Guile in GNU Guile
Reference Manual). The value of these arguments is usually evaluated in
the build stratum—i.e., by a Guile process launched by the daemon
(see Derivations).
The main build system is gnu-build-system, which implements the
standard build procedure for GNU and many other packages. It is provided by
the (guix build-system gnu) module.
- Scheme Variable: gnu-build-system
gnu-build-systemrepresents the GNU Build System, and variants thereof (see configuration and makefile conventions in GNU Coding Standards).In a nutshell, packages using it are configured, built, and installed with the usual
./configure && make && make check && make installcommand sequence. In practice, a few additional steps are often needed. All these steps are split up in separate phases. See Build Phases, for more info on build phases and ways to customize them.In addition, this build system ensures that the “standard” environment for GNU packages is available. This includes tools such as GCC, libc, Coreutils, Bash, Make, Diffutils, grep, and sed (see the
(guix build-system gnu)module for a complete list). We call these the implicit inputs of a package, because package definitions do not have to mention them.This build system supports a number of keyword arguments, which can be passed via the
argumentsfield of a package. Here are some of the main parameters:#:phasesThis argument specifies build-side code that evaluates to an alist of build phases. See Build Phases, for more information.
#:configure-flagsThis is a list of flags (strings) passed to the
configurescript. See 定义软件包, for an example.#:make-flagsThis list of strings contains flags passed as arguments to
makeinvocations in thebuild,check, andinstallphases.#:out-of-source?This Boolean,
#fby default, indicates whether to run builds in a build directory separate from the source tree.When it is true, the
configurephase creates a separate build directory, changes to that directory, and runs theconfigurescript from there. This is useful for packages that require it, such asglibc.#:tests?This Boolean,
#tby default, indicates whether thecheckphase should run the package’s test suite.#:test-targetThis string,
"check"by default, gives the name of the makefile target used by thecheckphase.#:parallel-build?#:parallel-tests?These Boolean values specify whether to build, respectively run the test suite, in parallel, with the
-jflag ofmake. When they are true,makeis passed-jn, where n is the number specified as the --cores option ofguix-daemonor that of theguixclient command (see --cores).#:validate-runpath?This Boolean,
#tby default, determines whether to “validate” theRUNPATHof ELF binaries (.soshared libraries as well as executables) previously installed by theinstallphase. See thevalidate-runpathphase, for details.#:substitutable?This Boolean,
#tby default, tells whether the package outputs should be substitutable—i.e., whether users should be able to obtain substitutes for them instead of building locally (see substitutes).#:allowed-references#:disallowed-referencesWhen true, these arguments must be a list of dependencies that must not appear among the references of the build results. If, upon build completion, some of these references are retained, the build process fails.
This is useful to ensure that a package does not erroneously keep a reference to some of it build-time inputs, in cases where doing so would, for example, unnecessarily increase its size (see Invoking
guix size).
Most other build systems support these keyword arguments.
Other <build-system> objects are defined to support other conventions
and tools used by free software packages. They inherit most of
gnu-build-system, and differ mainly in the set of inputs implicitly
added to the build process, and in the list of phases executed. Some of
these build systems are listed below.
- Scheme Variable: ant-build-system
This variable is exported by
(guix build-system ant). It implements the build procedure for Java packages that can be built with Ant build tool.It adds both
antand the Java Development Kit (JDK) as provided by theicedteapackage to the set of inputs. Different packages can be specified with the#:antand#:jdkparameters, respectively.When the original package does not provide a suitable Ant build file, the parameter
#:jar-namecan be used to generate a minimal Ant build file build.xml with tasks to build the specified jar archive. In this case the parameter#:source-dircan be used to specify the source sub-directory, defaulting to “src”.The
#:main-classparameter can be used with the minimal ant buildfile to specify the main class of the resulting jar. This makes the jar file executable. The#:test-includeparameter can be used to specify the list of junit tests to run. It defaults to(list "**/*Test.java"). The#:test-excludecan be used to disable some tests. It defaults to(list "**/Abstract*.java"), because abstract classes cannot be run as tests.The parameter
#:build-targetcan be used to specify the Ant task that should be run during thebuildphase. By default the “jar” task will be run.
- Scheme Variable: android-ndk-build-system
-
This variable is exported by
(guix build-system android-ndk). It implements a build procedure for Android NDK (native development kit) packages using a Guix-specific build process.The build system assumes that packages install their public interface (header) files to the subdirectory include of the
outoutput and their libraries to the subdirectory lib theoutoutput.It’s also assumed that the union of all the dependencies of a package has no conflicting files.
For the time being, cross-compilation is not supported - so right now the libraries and header files are assumed to be host tools.
- Scheme Variable: asdf-build-system/source
- Scheme Variable: asdf-build-system/sbcl
- Scheme Variable: asdf-build-system/ecl
-
These variables, exported by
(guix build-system asdf), implement build procedures for Common Lisp packages using “ASDF”. ASDF is a system definition facility for Common Lisp programs and libraries.The
asdf-build-system/sourcesystem installs the packages in source form, and can be loaded using any common lisp implementation, via ASDF. The others, such asasdf-build-system/sbcl, install binary systems in the format which a particular implementation understands. These build systems can also be used to produce executable programs, or lisp images which contain a set of packages pre-loaded.The build system uses naming conventions. For binary packages, the package name should be prefixed with the lisp implementation, such as
sbcl-forasdf-build-system/sbcl.Additionally, the corresponding source package should be labeled using the same convention as python packages (see Python模块), using the
cl-prefix.In order to create executable programs and images, the build-side procedures
build-programandbuild-imagecan be used. They should be called in a build phase after thecreate-asdf-configurationphase, so that the system which was just built can be used within the resulting image.build-programrequires a list of Common Lisp expressions to be passed as the#:entry-programargument.By default, all the .asd files present in the sources are read to find system definitions. The
#:asd-filesparameter can be used to specify the list of .asd files to read. Furthermore, if the package defines a system for its tests in a separate file, it will be loaded before the tests are run if it is specified by the#:test-asd-fileparameter. If it is not set, the files<system>-tests.asd,<system>-test.asd,tests.asd, andtest.asdwill be tried if they exist.If for some reason the package must be named in a different way than the naming conventions suggest, or if several systems must be compiled, the
#:asd-systemsparameter can be used to specify the list of system names.
- Scheme Variable: cargo-build-system
-
This variable is exported by
(guix build-system cargo). It supports builds of packages using Cargo, the build tool of the Rust programming language.It adds
rustcandcargoto the set of inputs. A different Rust package can be specified with the#:rustparameter.Regular cargo dependencies should be added to the package definition similarly to other packages; those needed only at build time to native-inputs, others to inputs. If you need to add source-only crates then you should add them to via the
#:cargo-inputsparameter as a list of name and spec pairs, where the spec can be a package or a source definition. Note that the spec must evaluate to a path to a gzipped tarball which includes aCargo.tomlfile at its root, or it will be ignored. Similarly, cargo dev-dependencies should be added to the package definition via the#:cargo-development-inputsparameter.In its
configurephase, this build system will make any source inputs specified in the#:cargo-inputsand#:cargo-development-inputsparameters available to cargo. It will also remove an includedCargo.lockfile to be recreated bycargoduring thebuildphase. Thepackagephase will runcargo packageto create a source crate for future use. Theinstallphase installs the binaries defined by the crate. Unlessinstall-source? #fis defined it will also install a source crate repository of itself and unpacked sources, to ease in future hacking on rust packages.
- Scheme Variable: chicken-build-system
This variable is exported by
(guix build-system chicken). It builds CHICKEN Scheme modules, also called “eggs” or “extensions”. CHICKEN generates C source code, which then gets compiled by a C compiler, in this case GCC.This build system adds
chickento the package inputs, as well as the packages ofgnu-build-system.The build system can’t (yet) deduce the egg’s name automatically, so just like with
go-build-systemand its#:import-path, you should define#:egg-namein the package’sargumentsfield.For example, if you are packaging the
srfi-1egg:(arguments '(#:egg-name "srfi-1"))Egg dependencies must be defined in
propagated-inputs, notinputsbecause CHICKEN doesn’t embed absolute references in compiled eggs. Test dependencies should go tonative-inputs, as usual.
- Scheme Variable: copy-build-system
This variable is exported by
(guix build-system copy). It supports builds of simple packages that don’t require much compiling, mostly just moving files around.It adds much of the
gnu-build-systempackages to the set of inputs. Because of this, thecopy-build-systemdoes not require all the boilerplate code often needed for thetrivial-build-system.To further simplify the file installation process, an
#:install-planargument is exposed to let the packager specify which files go where. The install plan is a list of(source target [filters]). filters are optional.- When source matches a file or directory without trailing slash, install it to target.
- If target has a trailing slash, install source basename beneath target.
- Otherwise install source as target.
- When source is a directory with a trailing slash, or when filters are used,
the trailing slash of target is implied with the same meaning as
above.
- Without filters, install the full source content to target.
- With filters among
#:include,#:include-regexp,#:exclude,#:exclude-regexp, only select files are installed depending on the filters. Each filters is specified by a list of strings.- With
#:include, install all the files which the path suffix matches at least one of the elements in the given list. - With
#:include-regexp, install all the files which the subpaths match at least one of the regular expressions in the given list. - The
#:excludeand#:exclude-regexpfilters are the complement of their inclusion counterpart. Without#:includeflags, install all files but those matching the exclusion filters. If both inclusions and exclusions are specified, the exclusions are done on top of the inclusions.
- With
In all cases, the paths relative to source are preserved within target.
Examples:
-
("foo/bar" "share/my-app/"): Install bar to share/my-app/bar. -
("foo/bar" "share/my-app/baz"): Install bar to share/my-app/baz. -
("foo/" "share/my-app"): Install the content of foo inside share/my-app, e.g., install foo/sub/file to share/my-app/sub/file. -
("foo/" "share/my-app" #:include ("sub/file")): Install only foo/sub/file to share/my-app/sub/file. -
("foo/sub" "share/my-app" #:include ("file")): Install foo/sub/file to share/my-app/file.
- When source matches a file or directory without trailing slash, install it to target.
- Scheme Variable: clojure-build-system
This variable is exported by
(guix build-system clojure). It implements a simple build procedure for Clojure packages using plain oldcompilein Clojure. Cross-compilation is not supported yet.It adds
clojure,icedteaandzipto the set of inputs. Different packages can be specified with the#:clojure,#:jdkand#:zipparameters, respectively.A list of source directories, test directories and jar names can be specified with the
#:source-dirs,#:test-dirsand#:jar-namesparameters, respectively. Compile directory and main class can be specified with the#:compile-dirand#:main-classparameters, respectively. Other parameters are documented below.This build system is an extension of
ant-build-system, but with the following phases changed:buildThis phase calls
compilein Clojure to compile source files and runsjarto create jars from both source files and compiled files according to the include list and exclude list specified in#:aot-includeand#:aot-exclude, respectively. The exclude list has priority over the include list. These lists consist of symbols representing Clojure libraries or the special keyword#:allrepresenting all Clojure libraries found under the source directories. The parameter#:omit-source?decides if source should be included into the jars.checkThis phase runs tests according to the include list and exclude list specified in
#:test-includeand#:test-exclude, respectively. Their meanings are analogous to that of#:aot-includeand#:aot-exclude, except that the special keyword#:allnow stands for all Clojure libraries found under the test directories. The parameter#:tests?decides if tests should be run.installThis phase installs all jars built previously.
Apart from the above, this build system also contains an additional phase:
install-docThis phase installs all top-level files with base name matching
%doc-regex. A different regex can be specified with the#:doc-regexparameter. All files (recursively) inside the documentation directories specified in#:doc-dirsare installed as well.
- Scheme Variable: cmake-build-system
This variable is exported by
(guix build-system cmake). It implements the build procedure for packages using the CMake build tool.It automatically adds the
cmakepackage to the set of inputs. Which package is used can be specified with the#:cmakeparameter.The
#:configure-flagsparameter is taken as a list of flags passed to thecmakecommand. The#:build-typeparameter specifies in abstract terms the flags passed to the compiler; it defaults to"RelWithDebInfo"(short for “release mode with debugging information”), which roughly means that code is compiled with-O2 -g, as is the case for Autoconf-based packages by default.
- Scheme Variable: dune-build-system
This variable is exported by
(guix build-system dune). It supports builds of packages using Dune, a build tool for the OCaml programming language. It is implemented as an extension of theocaml-build-systemwhich is described below. As such, the#:ocamland#:findlibparameters can be passed to this build system.It automatically adds the
dunepackage to the set of inputs. Which package is used can be specified with the#:duneparameter.There is no
configurephase because dune packages typically don’t need to be configured. The#:build-flagsparameter is taken as a list of flags passed to thedunecommand during the build.The
#:jbuild?parameter can be passed to use thejbuildcommand instead of the more recentdunecommand while building a package. Its default value is#f.The
#:packageparameter can be passed to specify a package name, which is useful when a package contains multiple packages and you want to build only one of them. This is equivalent to passing the-pargument todune.
- Scheme variable: elm-build-system
This variable is exported by
(guix build-system elm). It implements a build procedure for Elm packages similar to ‘elm install’.The build system adds an Elm compiler package to the set of inputs. The default compiler package (currently
elm-sans-reactor) can be overridden using the#:elmargument. Additionally, Elm packages needed by the build system itself are added as implicit inputs if they are not already present: to suppress this behavior, use the#:implicit-elm-package-inputs?argument, which is primarily useful for bootstrapping.The
"dependencies"and"test-dependencies"in an Elm package’s elm.json file correspond topropagated-inputsandinputs, respectively.Elm requires a particular structure for package names: see Elm Packages for more details, including utilities provided by
(guix build-system elm).There are currently a few noteworthy limitations to
elm-build-system:- The build system is focused on packages in the Elm sense of the word:
Elm projects which declare
{ "type": "package" }in their elm.json files. Usingelm-build-systemto build Elm applications (which declare{ "type": "application" }) is possible, but requires ad-hoc modifications to the build phases. For examples, see the definitions of theelm-todomvcexample application and theelmpackage itself (because the front-end for the ‘elm reactor’ command is an Elm application). - Elm supports multiple versions of a package coexisting simultaneously under
ELM_HOME, but this does not yet work well withelm-build-system. This limitation primarily affects Elm applications, because they specify exact versions for their dependencies, whereas Elm packages specify supported version ranges. As a workaround, the example applications mentioned above use thepatch-application-dependenciesprocedure provided by(guix build elm-build-system)to rewrite their elm.json files to refer to the package versions actually present in the build environment. Alternatively, Guix package transformations (see Defining Package Variants) could be used to rewrite an application’s entire dependency graph. - We are not yet able to run tests for Elm projects because neither
elm-test-rsnor the Node.js-basedelm-testrunner has been packaged for Guix yet.
- The build system is focused on packages in the Elm sense of the word:
Elm projects which declare
- Scheme Variable: go-build-system
This variable is exported by
(guix build-system go). It implements a build procedure for Go packages using the standard Go build mechanisms.The user is expected to provide a value for the key
#:import-pathand, in some cases,#:unpack-path. The import path corresponds to the file system path expected by the package’s build scripts and any referring packages, and provides a unique way to refer to a Go package. It is typically based on a combination of the package source code’s remote URI and file system hierarchy structure. In some cases, you will need to unpack the package’s source code to a different directory structure than the one indicated by the import path, and#:unpack-pathshould be used in such cases.Packages that provide Go libraries should install their source code into the built output. The key
#:install-source?, which defaults to#t, controls whether or not the source code is installed. It can be set to#ffor packages that only provide executable files.Packages can be cross-built, and if a specific architecture or operating system is desired then the keywords
#:goarchand#:gooscan be used to force the package to be built for that architecture and operating system. The combinations known to Go can be found in their documentation.
- Scheme Variable: glib-or-gtk-build-system
This variable is exported by
(guix build-system glib-or-gtk). It is intended for use with packages making use of GLib or GTK+.This build system adds the following two phases to the ones defined by
gnu-build-system:glib-or-gtk-wrapThe phase
glib-or-gtk-wrapensures that programs in bin/ are able to find GLib “schemas” and GTK+ modules. This is achieved by wrapping the programs in launch scripts that appropriately set theXDG_DATA_DIRSandGTK_PATHenvironment variables.It is possible to exclude specific package outputs from that wrapping process by listing their names in the
#:glib-or-gtk-wrap-excluded-outputsparameter. This is useful when an output is known not to contain any GLib or GTK+ binaries, and where wrapping would gratuitously add a dependency of that output on GLib and GTK+.glib-or-gtk-compile-schemasThe phase
glib-or-gtk-compile-schemasmakes sure that all GSettings schemas of GLib are compiled. Compilation is performed by theglib-compile-schemasprogram. It is provided by the packageglib:binwhich is automatically imported by the build system. Theglibpackage providingglib-compile-schemascan be specified with the#:glibparameter.
Both phases are executed after the
installphase.
- Scheme Variable: guile-build-system
This build system is for Guile packages that consist exclusively of Scheme code and that are so lean that they don’t even have a makefile, let alone a configure script. It compiles Scheme code using
guild compile(see Compilation in GNU Guile Reference Manual) and installs the .scm and .go files in the right place. It also installs documentation.This build system supports cross-compilation by using the --target option of ‘guild compile’.
Packages built with
guile-build-systemmust provide a Guile package in theirnative-inputsfield.
- Scheme Variable: julia-build-system
This variable is exported by
(guix build-system julia). It implements the build procedure used by julia packages, which essentially is similar to running ‘julia -e 'using Pkg; Pkg.add(package)'’ in an environment whereJULIA_LOAD_PATHcontains the paths to all Julia package inputs. Tests are run by calling/test/runtests.jl.The Julia package name and uuid is read from the file Project.toml. These values can be overridden by passing the argument
#:julia-package-name(which must be correctly capitalized) or#:julia-package-uuid.Julia packages usually manage their binary dependencies via
JLLWrappers.jl, a Julia package that creates a module (named after the wrapped library followed by_jll.jl.To add the binary path
_jll.jlpackages, you need to patch the files under src/wrappers/, replacing the call to the macroJLLWrappers.@generate_wrapper_header, adding as a second argument containing the store path the binary.As an example, in the MbedTLS Julia package, we add a build phase (see Build Phases) to insert the absolute file name of the wrapped MbedTLS package:
(add-after 'unpack 'override-binary-path (lambda* (#:key inputs #:allow-other-keys) (for-each (lambda (wrapper) (substitute* wrapper (("generate_wrapper_header.*") (string-append "generate_wrapper_header(\"MbedTLS\", \"" (assoc-ref inputs "mbedtls-apache") "\")\n")))) ;; There's a Julia file for each platform, override them all. (find-files "src/wrappers/" "\\.jl$"))))Some older packages that aren’t using Project.toml yet, will require this file to be created, too. It is internally done if the arguments
#:julia-package-nameand#:julia-package-uuidare provided.
- Scheme Variable: maven-build-system
This variable is exported by
(guix build-system maven). It implements a build procedure for Maven packages. Maven is a dependency and lifecycle management tool for Java. A user of Maven specifies dependencies and plugins in a pom.xml file that Maven reads. When Maven does not have one of the dependencies or plugins in its repository, it will download them and use them to build the package.The maven build system ensures that maven will not try to download any dependency by running in offline mode. Maven will fail if a dependency is missing. Before running Maven, the pom.xml (and subprojects) are modified to specify the version of dependencies and plugins that match the versions available in the guix build environment. Dependencies and plugins must be installed in the fake maven repository at lib/m2, and are symlinked into a proper repository before maven is run. Maven is instructed to use that repository for the build and installs built artifacts there. Changed files are copied to the lib/m2 directory of the package output.
You can specify a pom.xml file with the
#:pom-fileargument, or let the build system use the default pom.xml file in the sources.In case you need to specify a dependency’s version manually, you can use the
#:local-packagesargument. It takes an association list where the key is the groupId of the package and its value is an association list where the key is the artifactId of the package and its value is the version you want to override in the pom.xml.Some packages use dependencies or plugins that are not useful at runtime nor at build time in Guix. You can alter the pom.xml file to remove them using the
#:excludeargument. Its value is an association list where the key is the groupId of the plugin or dependency you want to remove, and the value is a list of artifactId you want to remove.You can override the default
jdkandmavenpackages with the corresponding argument,#:jdkand#:maven.The
#:maven-pluginsargument is a list of maven plugins used during the build, with the same format as theinputsfields of the package declaration. Its default value is(default-maven-plugins)which is also exported.
- Scheme Variable: minetest-mod-build-system
This variable is exported by
(guix build-system minetest). It implements a build procedure for Minetest mods, which consists of copying Lua code, images and other resources to the location Minetest searches for mods. The build system also minimises PNG images and verifies that Minetest can load the mod without errors.
- Scheme Variable: minify-build-system
This variable is exported by
(guix build-system minify). It implements a minification procedure for simple JavaScript packages.It adds
uglify-jsto the set of inputs and uses it to compress all JavaScript files in the src directory. A different minifier package can be specified with the#:uglify-jsparameter, but it is expected that the package writes the minified code to the standard output.When the input JavaScript files are not all located in the src directory, the parameter
#:javascript-filescan be used to specify a list of file names to feed to the minifier.
- Scheme Variable: ocaml-build-system
This variable is exported by
(guix build-system ocaml). It implements a build procedure for OCaml packages, which consists of choosing the correct set of commands to run for each package. OCaml packages can expect many different commands to be run. This build system will try some of them.When the package has a setup.ml file present at the top-level, it will run
ocaml setup.ml -configure,ocaml setup.ml -buildandocaml setup.ml -install. The build system will assume that this file was generated by OASIS and will take care of setting the prefix and enabling tests if they are not disabled. You can pass configure and build flags with the#:configure-flagsand#:build-flags. The#:test-flagskey can be passed to change the set of flags used to enable tests. The#:use-make?key can be used to bypass this system in the build and install phases.When the package has a configure file, it is assumed that it is a hand-made configure script that requires a different argument format than in the
gnu-build-system. You can add more flags with the#:configure-flagskey.When the package has a Makefile file (or
#:use-make?is#t), it will be used and more flags can be passed to the build and install phases with the#:make-flagskey.Finally, some packages do not have these files and use a somewhat standard location for its build system. In that case, the build system will run
ocaml pkg/pkg.mlorocaml pkg/build.mland take care of providing the path to the required findlib module. Additional flags can be passed via the#:build-flagskey. Install is taken care of byopam-installer. In this case, theopampackage must be added to thenative-inputsfield of the package definition.Note that most OCaml packages assume they will be installed in the same directory as OCaml, which is not what we want in guix. In particular, they will install .so files in their module’s directory, which is usually fine because it is in the OCaml compiler directory. In guix though, these libraries cannot be found and we use
CAML_LD_LIBRARY_PATH. This variable points to lib/ocaml/site-lib/stubslibs and this is where .so libraries should be installed.
- Scheme Variable: python-build-system
This variable is exported by
(guix build-system python). It implements the more or less standard build procedure used by Python packages, which consists in runningpython setup.py buildand thenpython setup.py install --prefix=/gnu/store/….For packages that install stand-alone Python programs under
bin/, it takes care of wrapping these programs so that theirGUIX_PYTHONPATHenvironment variable points to all the Python libraries they depend on.Which Python package is used to perform the build can be specified with the
#:pythonparameter. This is a useful way to force a package to be built for a specific version of the Python interpreter, which might be necessary if the package is only compatible with a single interpreter version.By default guix calls
setup.pyunder control ofsetuptools, much likepipdoes. Some packages are not compatible with setuptools (and pip), thus you can disable this by setting the#:use-setuptools?parameter to#f.If a
"python"output is available, the package is installed into it instead of the default"out"output. This is useful for packages that include a Python package as only a part of the software, and thus want to combine the phases ofpython-build-systemwith another build system. Python bindings are a common usecase.
- Scheme Variable: pyproject-build-system
This is a variable exported by
guix build-system pyproject. It is based on python-build-system, and adds support for pyproject.toml and PEP 517. It also supports a variety of build backends and test frameworks.The API is slightly different from python-build-system:
-
#:use-setuptools?and#:test-targetis removed. -
#:build-backendis added. It defaults to#falseand will try to guess the appropriate backend based on pyproject.toml. -
#:test-backendis added. It defaults to#falseand will guess an appropriate test backend based on what is available in package inputs. -
#:test-flagsis added. The default is'(). These flags are passed as arguments to the test command. Note that flags for verbose output is always enabled on supported backends.
It is considered “experimental” in that the implementation details are not set in stone yet, however users are encouraged to try it for new Python projects (even those using setup.py). The API is subject to change, but any breaking changes in the Guix channel will be dealt with.
Eventually this build system will be deprecated and merged back into python-build-system, probably some time in 2024.
-
- Scheme Variable: perl-build-system
This variable is exported by
(guix build-system perl). It implements the standard build procedure for Perl packages, which either consists in runningperl Build.PL --prefix=/gnu/store/…, followed byBuildandBuild install; or in runningperl Makefile.PL PREFIX=/gnu/store/…, followed bymakeandmake install, depending on which ofBuild.PLorMakefile.PLis present in the package distribution. Preference is given to the former if bothBuild.PLandMakefile.PLexist in the package distribution. This preference can be reversed by specifying#tfor the#:make-maker?parameter.The initial
perl Makefile.PLorperl Build.PLinvocation passes flags specified by the#:make-maker-flagsor#:module-build-flagsparameter, respectively.Which Perl package is used can be specified with
#:perl.
- Scheme Variable: renpy-build-system
This variable is exported by
(guix build-system renpy). It implements the more or less standard build procedure used by Ren’py games, which consists of loading#:gameonce, thereby creating bytecode for it.It further creates a wrapper script in
bin/and a desktop entry inshare/applications, both of which can be used to launch the game.Which Ren’py package is used can be specified with
#:renpy. Games can also be installed in outputs other than “out” by using#:output.
- Scheme Variable: qt-build-system
This variable is exported by
(guix build-system qt). It is intended for use with applications using Qt or KDE.This build system adds the following two phases to the ones defined by
cmake-build-system:check-setupThe phase
check-setupprepares the environment for running the checks as commonly used by Qt test programs. For now this only sets some environment variables:QT_QPA_PLATFORM=offscreen,DBUS_FATAL_WARNINGS=0andCTEST_OUTPUT_ON_FAILURE=1.This phase is added before the
checkphase. It’s a separate phase to ease adjusting if necessary.qt-wrapThe phase
qt-wrapsearches for Qt5 plugin paths, QML paths and some XDG in the inputs and output. In case some path is found, all programs in the output’s bin/, sbin/, libexec/ and lib/libexec/ directories are wrapped in scripts defining the necessary environment variables.It is possible to exclude specific package outputs from that wrapping process by listing their names in the
#:qt-wrap-excluded-outputsparameter. This is useful when an output is known not to contain any Qt binaries, and where wrapping would gratuitously add a dependency of that output on Qt, KDE, or such.This phase is added after the
installphase.
- Scheme Variable: r-build-system
This variable is exported by
(guix build-system r). It implements the build procedure used by R packages, which essentially is little more than running ‘R CMD INSTALL --library=/gnu/store/…’ in an environment whereR_LIBS_SITEcontains the paths to all R package inputs. Tests are run after installation using the R functiontools::testInstalledPackage.
- Scheme Variable: rakudo-build-system
This variable is exported by
(guix build-system rakudo). It implements the build procedure used by Rakudo for Perl6 packages. It installs the package to/gnu/store/…/NAME-VERSION/share/perl6and installs the binaries, library files and the resources, as well as wrap the files under thebin/directory. Tests can be skipped by passing#fto thetests?parameter.Which rakudo package is used can be specified with
rakudo. Which perl6-tap-harness package used for the tests can be specified with#:prove6or removed by passing#fto thewith-prove6?parameter. Which perl6-zef package used for tests and installing can be specified with#:zefor removed by passing#fto thewith-zef?parameter.
- Scheme Variable: rebar-build-system
This variable is exported by
(guix build-system rebar). It implements a build procedure around rebar3, a build system for programs written in the Erlang language.It adds both
rebar3and theerlangto the set of inputs. Different packages can be specified with the#:rebarand#:erlangparameters, respectively.This build system is based on
gnu-build-system, but with the following phases changed:unpackThis phase, after unpacking the source like the
gnu-build-systemdoes, checks for a filecontents.tar.gzat the top-level of the source. If this file exists, it will be unpacked, too. This eases handling of package hosted at https://hex.pm/, the Erlang and Elixir package repository.bootstrapconfigureThere are no
bootstrapandconfigurephase because erlang packages typically don’t need to be configured.buildThis phase runs
rebar3 compilewith the flags listed in#:rebar-flags.checkUnless
#:tests? #fis passed, this phase runsrebar3 eunit, or some other target specified with#:test-target, with the flags listed in#:rebar-flags,installThis installs the files created in the default profile, or some other profile specified with
#:install-profile.
- Scheme Variable: texlive-build-system
This variable is exported by
(guix build-system texlive). It is used to build TeX packages in batch mode with a specified engine. The build system sets theTEXINPUTSvariable to find all TeX source files in the inputs.By default it runs
luatexon all files ending onins. A different engine and format can be specified with the#:tex-formatargument. Different build targets can be specified with the#:build-targetsargument, which expects a list of file names. The build system adds onlytexlive-binandtexlive-latex-base(both from(gnu packages tex) to the inputs. Both can be overridden with the arguments#:texlive-binand#:texlive-latex-base, respectively.The
#:tex-directoryparameter tells the build system where to install the built files under the texmf tree.
- Scheme Variable: ruby-build-system
This variable is exported by
(guix build-system ruby). It implements the RubyGems build procedure used by Ruby packages, which involves runninggem buildfollowed bygem install.The
sourcefield of a package that uses this build system typically references a gem archive, since this is the format that Ruby developers use when releasing their software. The build system unpacks the gem archive, potentially patches the source, runs the test suite, repackages the gem, and installs it. Additionally, directories and tarballs may be referenced to allow building unreleased gems from Git or a traditional source release tarball.Which Ruby package is used can be specified with the
#:rubyparameter. A list of additional flags to be passed to thegemcommand can be specified with the#:gem-flagsparameter.
- Scheme Variable: waf-build-system
This variable is exported by
(guix build-system waf). It implements a build procedure around thewafscript. The common phases—configure,build, andinstall—are implemented by passing their names as arguments to thewafscript.The
wafscript is executed by the Python interpreter. Which Python package is used to run the script can be specified with the#:pythonparameter.
- Scheme Variable: scons-build-system
This variable is exported by
(guix build-system scons). It implements the build procedure used by the SCons software construction tool. This build system runssconsto build the package,scons testto run tests, and thenscons installto install the package.Additional flags to be passed to
sconscan be specified with the#:scons-flagsparameter. The default build and install targets can be overridden with#:build-targetsand#:install-targetsrespectively. The version of Python used to run SCons can be specified by selecting the appropriate SCons package with the#:sconsparameter.
- Scheme Variable: haskell-build-system
This variable is exported by
(guix build-system haskell). It implements the Cabal build procedure used by Haskell packages, which involves runningrunhaskell Setup.hs configure --prefix=/gnu/store/…andrunhaskell Setup.hs build. Instead of installing the package by runningrunhaskell Setup.hs install, to avoid trying to register libraries in the read-only compiler store directory, the build system usesrunhaskell Setup.hs copy, followed byrunhaskell Setup.hs register. In addition, the build system generates the package documentation by runningrunhaskell Setup.hs haddock, unless#:haddock? #fis passed. Optional Haddock parameters can be passed with the help of the#:haddock-flagsparameter. If the fileSetup.hsis not found, the build system looks forSetup.lhsinstead.Which Haskell compiler is used can be specified with the
#:haskellparameter which defaults toghc.
- Scheme Variable: dub-build-system
This variable is exported by
(guix build-system dub). It implements the Dub build procedure used by D packages, which involves runningdub buildanddub run. Installation is done by copying the files manually.Which D compiler is used can be specified with the
#:ldcparameter which defaults toldc.
- Scheme Variable: emacs-build-system
This variable is exported by
(guix build-system emacs). It implements an installation procedure similar to the packaging system of Emacs itself (see Packages in The GNU Emacs Manual).It first creates the
package-autoloads.el
- Scheme Variable: font-build-system
This variable is exported by
(guix build-system font). It implements an installation procedure for font packages where upstream provides pre-compiled TrueType, OpenType, etc. font files that merely need to be copied into place. It copies font files to standard locations in the output directory.
- Scheme Variable: meson-build-system
This variable is exported by
(guix build-system meson). It implements the build procedure for packages that use Meson as their build system.It adds both Meson and Ninja to the set of inputs, and they can be changed with the parameters
#:mesonand#:ninjaif needed.This build system is an extension of
gnu-build-system, but with the following phases changed to some specific for Meson:configureThe phase runs
mesonwith the flags specified in#:configure-flags. The flag --buildtype is always set todebugoptimizedunless something else is specified in#:build-type.buildThe phase runs
ninjato build the package in parallel by default, but this can be changed with#:parallel-build?.checkThe phase runs ‘meson test’ with a base set of options that cannot be overridden. This base set of options can be extended via the
#:test-optionsargument, for example to select or skip a specific test suite.installThe phase runs
ninja installand can not be changed.
Apart from that, the build system also adds the following phases:
fix-runpathThis phase ensures that all binaries can find the libraries they need. It searches for required libraries in subdirectories of the package being built, and adds those to
RUNPATHwhere needed. It also removes references to libraries left over from the build phase bymeson, such as test dependencies, that aren’t actually required for the program to run.glib-or-gtk-wrapThis phase is the phase provided by
glib-or-gtk-build-system, and it is not enabled by default. It can be enabled with#:glib-or-gtk?.glib-or-gtk-compile-schemasThis phase is the phase provided by
glib-or-gtk-build-system, and it is not enabled by default. It can be enabled with#:glib-or-gtk?.
- Scheme Variable: linux-module-build-system
linux-module-build-systemallows building Linux kernel modules.This build system is an extension of
gnu-build-system, but with the following phases changed:configureThis phase configures the environment so that the Linux kernel’s Makefile can be used to build the external kernel module.
buildThis phase uses the Linux kernel’s Makefile in order to build the external kernel module.
installThis phase uses the Linux kernel’s Makefile in order to install the external kernel module.
It is possible and useful to specify the Linux kernel to use for building the module (in the
argumentsform of a package using thelinux-module-build-system, use the key#:linuxto specify it).
- Scheme Variable: node-build-system
This variable is exported by
(guix build-system node). It implements the build procedure used by Node.js, which implements an approximation of thenpm installcommand, followed by annpm testcommand.Which Node.js package is used to interpret the
npmcommands can be specified with the#:nodeparameter which defaults tonode.
Lastly, for packages that do not need anything as sophisticated, a “trivial” build system is provided. It is trivial in the sense that it provides basically no support: it does not pull any implicit inputs, and does not have a notion of build phases.
- Scheme Variable: trivial-build-system
This variable is exported by
(guix build-system trivial).This build system requires a
#:builderargument. This argument must be a Scheme expression that builds the package output(s)—as withbuild-expression->derivation(seebuild-expression->derivation).
- Scheme Variable: channel-build-system
This variable is exported by
(guix build-system channel).This build system is meant primarily for internal use. A package using this build system must have a channel specification as its
sourcefield (see 通道); alternatively, its source can be a directory name, in which case an additional#:commitargument must be supplied to specify the commit being built (a hexadecimal string).The resulting package is a Guix instance of the given channel, similar to how
guix time-machinewould build it.
Next: Build Utilities, Previous: 构建系统, Up: 编程接口 [Contents][Index]
9.6 Build Phases
Almost all package build systems implement a notion build phases: a
sequence of actions that the build system executes, when you build the
package, leading to the installed byproducts in the store. A notable
exception is the “bare-bones” trivial-build-system (see 构建系统).
As discussed in the previous section, those build systems provide a standard
list of phases. For gnu-build-system, the main build phases are the
following:
set-pathsDefine search path environment variables for all the input packages, including
PATH(see Search Paths).unpackUnpack the source tarball, and change the current directory to the extracted source tree. If the source is actually a directory, copy it to the build tree, and enter that directory.
patch-source-shebangsPatch shebangs encountered in source files so they refer to the right store file names. For instance, this changes
#!/bin/shto#!/gnu/store/…-bash-4.3/bin/sh.configureRun the configure script with a number of default options, such as --prefix=/gnu/store/…, as well as the options specified by the
#:configure-flagsargument.buildRun
makewith the list of flags specified with#:make-flags. If the#:parallel-build?argument is true (the default), build withmake -j.checkRun
make check, or some other target specified with#:test-target, unless#:tests? #fis passed. If the#:parallel-tests?argument is true (the default), runmake check -j.installRun
make installwith the flags listed in#:make-flags.patch-shebangsPatch shebangs on the installed executable files.
stripStrip debugging symbols from ELF files (unless
#:strip-binaries?is false), copying them to thedebugoutput when available (see 安装调试文件).validate-runpathValidate the
RUNPATHof ELF binaries, unless#:validate-runpath?is false (see 构建系统).This validation step consists in making sure that all the shared libraries needed by an ELF binary, which are listed as
DT_NEEDEDentries in itsPT_DYNAMICsegment, appear in theDT_RUNPATHentry of that binary. In other words, it ensures that running or using those binaries will not result in a “file not found” error at run time. See -rpath in The GNU Linker, for more information onRUNPATH.
Other build systems have similar phases, with some variations. For example,
cmake-build-system has same-named phases but its configure
phases runs cmake instead of ./configure. Others, such as
python-build-system, have a wholly different list of standard
phases. All this code runs on the build side: it is evaluated when
you actually build the package, in a dedicated build process spawned by the
build daemon (see 调用guix-daemon).
Build phases are represented as association lists or “alists” (see Association Lists in GNU Guile Reference Manual) where each key is a symbol for the name of the phase and the associated value is a procedure that accepts an arbitrary number of arguments. By convention, those procedures receive information about the build in the form of keyword parameters, which they can use or ignore.
For example, here is how (guix build gnu-build-system) defines
%standard-phases, the variable holding its alist of build
phases21:
;; The build phases of 'gnu-build-system'. (define* (unpack #:key source #:allow-other-keys) ;; Extract the source tarball. (invoke "tar" "xvf" source)) (define* (configure #:key outputs #:allow-other-keys) ;; Run the 'configure' script. Install to output "out". (let ((out (assoc-ref outputs "out"))) (invoke "./configure" (string-append "--prefix=" out)))) (define* (build #:allow-other-keys) ;; Compile. (invoke "make")) (define* (check #:key (test-target "check") (tests? #true) #:allow-other-keys) ;; Run the test suite. (if tests? (invoke "make" test-target) (display "test suite not run\n"))) (define* (install #:allow-other-keys) ;; Install files to the prefix 'configure' specified. (invoke "make" "install")) (define %standard-phases ;; The list of standard phases (quite a few are omitted ;; for brevity). Each element is a symbol/procedure pair. (list (cons 'unpack unpack) (cons 'configure configure) (cons 'build build) (cons 'check check) (cons 'install install)))
This shows how %standard-phases is defined as a list of
symbol/procedure pairs (see Pairs in GNU Guile Reference
Manual). The first pair associates the unpack procedure with the
unpack symbol—a name; the second pair defines the configure
phase similarly, and so on. When building a package that uses
gnu-build-system with its default list of phases, those phases are
executed sequentially. You can see the name of each phase started and
completed in the build log of packages that you build.
Let’s now look at the procedures themselves. Each one is defined with
define*: #:key lists keyword parameters the procedure accepts,
possibly with a default value, and #:allow-other-keys specifies that
other keyword parameters are ignored (see Optional Arguments in GNU Guile Reference Manual).
The unpack procedure honors the source parameter, which the
build system uses to pass the file name of the source tarball (or version
control checkout), and it ignores other parameters. The configure
phase only cares about the outputs parameter, an alist mapping
package output names to their store file name (see 有多个输出的软件包). It extracts the file name of for out, the default output,
and passes it to ./configure as the installation prefix, meaning
that make install will eventually copy all the files in that
directory (see configuration and makefile conventions in GNU Coding Standards). build and install ignore
all their arguments. check honors the test-target argument,
which specifies the name of the Makefile target to run tests; it prints a
message and skips tests when tests? is false.
The list of phases used for a particular package can be changed with the
#:phases parameter of the build system. Changing the set of build
phases boils down to building a new alist of phases based on the
%standard-phases alist described above. This can be done with
standard alist procedures such as alist-delete (see SRFI-1
Association Lists in GNU Guile Reference Manual); however, it is
more convenient to do so with modify-phases (see modify-phases).
Here is an example of a package definition that removes the configure
phase of %standard-phases and inserts a new phase before the
build phase, called set-prefix-in-makefile:
(define-public example
(package
(name "example")
;; other fields omitted
(build-system gnu-build-system)
(arguments
'(#:phases (modify-phases %standard-phases
(delete 'configure)
(add-before 'build 'set-prefix-in-makefile
(lambda* (#:key outputs #:allow-other-keys)
;; Modify the makefile so that its
;; 'PREFIX' variable points to "out".
(let ((out (assoc-ref outputs "out")))
(substitute* "Makefile"
(("PREFIX =.*")
(string-append "PREFIX = "
out "\n")))))))))))
The new phase that is inserted is written as an anonymous procedure,
introduced with lambda*; it honors the outputs parameter we
have seen before. See Build Utilities, for more about the helpers used
by this phase, and for more examples of modify-phases.
Keep in mind that build phases are code evaluated at the time the package is
actually built. This explains why the whole modify-phases expression
above is quoted (it comes after the ' or apostrophe): it is
staged for later execution. See G-表达式, for an explanation
of code staging and the code strata involved.
Next: Search Paths, Previous: Build Phases, Up: 编程接口 [Contents][Index]
9.7 Build Utilities
As soon as you start writing non-trivial package definitions
(see 定义软件包) or other build actions (see G-表达式),
you will likely start looking for helpers for “shell-like”
actions—creating directories, copying and deleting files recursively,
manipulating build phases, and so on. The (guix build utils) module
provides such utility procedures.
Most build systems load (guix build utils) (see 构建系统).
Thus, when writing custom build phases for your package definitions, you can
usually assume those procedures are in scope.
When writing G-expressions, you can import (guix build utils) on the
“build side” using with-imported-modules and then put it in scope
with the use-modules form (see Using Guile Modules in GNU
Guile Reference Manual):
(with-imported-modules '((guix build utils)) ;import it
(computed-file "empty-tree"
#~(begin
;; Put it in scope.
(use-modules (guix build utils))
;; Happily use its 'mkdir-p' procedure.
(mkdir-p (string-append #$output "/a/b/c")))))
The remainder of this section is the reference for most of the utility
procedures provided by (guix build utils).
- Dealing with Store File Names
- File Types
- File Manipulation
- File Search
- Program Invocation
- Build Phases
- Wrappers
9.7.1 Dealing with Store File Names
This section documents procedures that deal with store file names.
- Scheme Procedure: %store-directory
Return the directory name of the store.
- Scheme Procedure: store-file-name? file
Return true if file is in the store.
- Scheme Procedure: strip-store-file-name file
Strip the /gnu/store and hash from file, a store file name. The result is typically a
"package-version"string.
- Scheme Procedure: package-name->name+version name
Given name, a package name like
"foo-0.9.1b", return two values:"foo"and"0.9.1b". When the version part is unavailable, name and#fare returned. The first hyphen followed by a digit is considered to introduce the version part.
9.7.2 File Types
The procedures below deal with files and file types.
- Scheme Procedure: directory-exists? dir
Return
#tif dir exists and is a directory.
- Scheme Procedure: executable-file? file
Return
#tif file exists and is executable.
- Scheme Procedure: symbolic-link? file
Return
#tif file is a symbolic link (aka. a “symlink”).
- Scheme Procedure: elf-file? file
- Scheme Procedure: ar-file? file
- Scheme Procedure: gzip-file? file
Return
#tif file is, respectively, an ELF file, anararchive (such as a .a static library), or a gzip file.
- Scheme Procedure: reset-gzip-timestamp file [#:keep-mtime? #t]
If file is a gzip file, reset its embedded timestamp (as with
gzip --no-name) and return true. Otherwise return#f. When keep-mtime? is true, preserve file’s modification time.
9.7.3 File Manipulation
The following procedures and macros help create, modify, and delete files.
They provide functionality comparable to common shell utilities such as
mkdir -p, cp -r, rm -r, and sed.
They complement Guile’s extensive, but low-level, file system interface
(see POSIX in GNU Guile Reference Manual).
- Scheme Syntax: with-directory-excursion directory body…
Run body with directory as the process’s current directory.
Essentially, this macro changes the current directory to directory before evaluating body, using
chdir(see Processes in GNU Guile Reference Manual). It changes back to the initial directory when the dynamic extent of body is left, be it via normal procedure return or via a non-local exit such as an exception.
- Scheme Procedure: mkdir-p dir
Create directory dir and all its ancestors.
- Scheme Procedure: install-file file directory
Create directory if it does not exist and copy file in there under the same name.
- Scheme Procedure: make-file-writable file
Make file writable for its owner.
- Scheme Procedure: copy-recursively source destination [#:log (current-output-port)] [#:follow-symlinks? #f] [#:copy-file
copy-file] [#:keep-mtime? #f] [#:keep-permissions? #t] Copy source directory to destination. Follow symlinks if follow-symlinks? is true; otherwise, just preserve them. Call copy-file to copy regular files. When keep-mtime? is true, keep the modification time of the files in source on those of destination. When keep-permissions? is true, preserve file permissions. Write verbose output to the log port.
- Scheme Procedure: delete-file-recursively dir [#:follow-mounts? #f] Delete dir recursively, like
rm -rf, without following symlinks. Don’t follow mount points either, unless follow-mounts? is true. Report but ignore errors.
- Scheme Syntax: substitute* file ((regexp match-var…) body…) … Substitute
regexp in file by the string returned by body. body is evaluated with each match-var bound to the corresponding positional regexp sub-expression. For example:
(substitute* file (("hello") "good morning\n") (("foo([a-z]+)bar(.*)$" all letters end) (string-append "baz" letters end)))Here, anytime a line of file contains
hello, it is replaced bygood morning. Anytime a line of file matches the second regexp,allis bound to the complete match,lettersis bound to the first sub-expression, andendis bound to the last one.When one of the match-var is
_, no variable is bound to the corresponding match substring.Alternatively, file may be a list of file names, in which case they are all subject to the substitutions.
Be careful about using
$to match the end of a line; by itself it won’t match the terminating newline of a line.
9.7.4 File Search
This section documents procedures to search and filter files.
- Scheme Procedure: file-name-predicate regexp
Return a predicate that returns true when passed a file name whose base name matches regexp.
- Scheme Procedure: find-files dir [pred] [#:stat lstat] [#:directories? #f] [#:fail-on-error? #f] Return the
lexicographically sorted list of files under dir for which pred returns true. pred is passed two arguments: the absolute file name, and its stat buffer; the default predicate always returns true. pred can also be a regular expression, in which case it is equivalent to
(file-name-predicate pred). stat is used to obtain file information; usinglstatmeans that symlinks are not followed. If directories? is true, then directories will also be included. If fail-on-error? is true, raise an exception upon error.
Here are a few examples where we assume that the current directory is the root of the Guix source tree:
;; List all the regular files in the current directory. (find-files ".") ⇒ ("./.dir-locals.el" "./.gitignore" …) ;; List all the .scm files under gnu/services. (find-files "gnu/services" "\\.scm$") ⇒ ("gnu/services/admin.scm" "gnu/services/audio.scm" …) ;; List ar files in the current directory. (find-files "." (lambda (file stat) (ar-file? file))) ⇒ ("./libformat.a" "./libstore.a" …)
- Scheme Procedure: which program
Return the complete file name for program as found in
$PATH, or#fif program could not be found.
- Scheme Procedure: search-input-file inputs name
- Scheme Procedure: search-input-directory inputs name
Return the complete file name for name as found in inputs;
search-input-filesearches for a regular file andsearch-input-directorysearches for a directory. If name could not be found, an exception is raised.Here, inputs must be an association list like
inputsandnative-inputsas available to build phases (see Build Phases).
Here is a (simplified) example of how search-input-file is used in a
build phase of the wireguard-tools package:
(add-after 'install 'wrap-wg-quick
(lambda* (#:key inputs outputs #:allow-other-keys)
(let ((coreutils (string-append (assoc-ref inputs "coreutils")
"/bin")))
(wrap-program (search-input-file outputs "bin/wg-quick")
#:sh (search-input-file inputs "bin/bash")
`("PATH" ":" prefix ,(list coreutils))))))
9.7.5 Program Invocation
You’ll find handy procedures to spawn processes in this module, essentially
convenient wrappers around Guile’s system* (see system* in GNU Guile Reference Manual).
- Scheme Procedure: invoke program args…
Invoke program with the given args. Raise an
&invoke-errorexception if the exit code is non-zero; otherwise return#t.The advantage compared to
system*is that you do not need to check the return value. This reduces boilerplate in shell-script-like snippets for instance in package build phases.
- Scheme Procedure: invoke-error? c
Return true if c is an
&invoke-errorcondition.
- Scheme Procedure: invoke-error-program c
- Scheme Procedure: invoke-error-arguments c
- Scheme Procedure: invoke-error-exit-status c
- Scheme Procedure: invoke-error-term-signal c
- Scheme Procedure: invoke-error-stop-signal c
Access specific fields of c, an
&invoke-errorcondition.
- Scheme Procedure: report-invoke-error c [port]
Report to port (by default the current error port) about c, an
&invoke-errorcondition, in a human-friendly way.Typical usage would look like this:
(use-modules (srfi srfi-34) ;for 'guard' (guix build utils)) (guard (c ((invoke-error? c) (report-invoke-error c))) (invoke "date" "--imaginary-option")) -| command "date" "--imaginary-option" failed with status 1
- Scheme Procedure: invoke/quiet program args…
Invoke program with args and capture program’s standard output and standard error. If program succeeds, print nothing and return the unspecified value; otherwise, raise a
&messageerror condition that includes the status code and the output of program.Here’s an example:
(use-modules (srfi srfi-34) ;for 'guard' (srfi srfi-35) ;for 'message-condition?' (guix build utils)) (guard (c ((message-condition? c) (display (condition-message c)))) (invoke/quiet "date") ;all is fine (invoke/quiet "date" "--imaginary-option")) -| 'date --imaginary-option' exited with status 1; output follows: date: unrecognized option '--imaginary-option' Try 'date --help' for more information.
9.7.6 Build Phases
The (guix build utils) also contains tools to manipulate build phases
as used by build systems (see 构建系统). Build phases are
represented as association lists or “alists” (see Association Lists in GNU Guile Reference Manual) where each key is a symbol naming the
phase and the associated value is a procedure (see Build Phases).
Guile core and the (srfi srfi-1) module both provide tools to
manipulate alists. The (guix build utils) module complements those
with tools written with build phases in mind.
- Scheme Syntax: modify-phases phases clause…
Modify phases sequentially as per each clause, which may have one of the following forms:
(delete old-phase-name) (replace old-phase-name new-phase) (add-before old-phase-name new-phase-name new-phase) (add-after old-phase-name new-phase-name new-phase)
Where every phase-name above is an expression evaluating to a symbol, and new-phase an expression evaluating to a procedure.
The example below is taken from the definition of the grep package.
It adds a phase to run after the install phase, called
fix-egrep-and-fgrep. That phase is a procedure (lambda* is
for anonymous procedures) that takes a #:outputs keyword argument and
ignores extra keyword arguments (see Optional Arguments in GNU
Guile Reference Manual, for more on lambda* and optional and keyword
arguments.) The phase uses substitute* to modify the installed
egrep and fgrep scripts so that they refer to grep by
its absolute file name:
(modify-phases %standard-phases
(add-after 'install 'fix-egrep-and-fgrep
;; Patch 'egrep' and 'fgrep' to execute 'grep' via its
;; absolute file name instead of searching for it in $PATH.
(lambda* (#:key outputs #:allow-other-keys)
(let* ((out (assoc-ref outputs "out"))
(bin (string-append out "/bin")))
(substitute* (list (string-append bin "/egrep")
(string-append bin "/fgrep"))
(("^exec grep")
(string-append "exec " bin "/grep")))))))
In the example below, phases are modified in two ways: the standard
configure phase is deleted, presumably because the package does not
have a configure script or anything similar, and the default
install phase is replaced by one that manually copies the executable
files to be installed:
(modify-phases %standard-phases
(delete 'configure) ;no 'configure' script
(replace 'install
(lambda* (#:key outputs #:allow-other-keys)
;; The package's Makefile doesn't provide an "install"
;; rule so do it by ourselves.
(let ((bin (string-append (assoc-ref outputs "out")
"/bin")))
(install-file "footswitch" bin)
(install-file "scythe" bin)))))
9.7.7 Wrappers
It is not unusual for a command to require certain environment variables to be set for proper functioning, typically search paths (see Search Paths). Failing to do that, the command might fail to find files or other commands it relies on, or it might pick the “wrong” ones—depending on the environment in which it runs. Examples include:
- a shell script that assumes all the commands it uses are in
PATH; - a Guile program that assumes all its modules are in
GUILE_LOAD_PATHandGUILE_LOAD_COMPILED_PATH; - a Qt application that expects to find certain plugins in
QT_PLUGIN_PATH.
For a package writer, the goal is to make sure commands always work the same
rather than depend on some external settings. One way to achieve that is to
wrap commands in a thin script that sets those environment variables,
thereby ensuring that those run-time dependencies are always found. The
wrapper would be used to set PATH, GUILE_LOAD_PATH, or
QT_PLUGIN_PATH in the examples above.
To ease that task, the (guix build utils) module provides a couple of
helpers to wrap commands.
- Scheme Procedure: wrap-program program [#:sh sh] [#:rest variables] Make a wrapper for program.
variables should look like this:
'(variable delimiter position list-of-directories)
where delimiter is optional.
:will be used if delimiter is not given.For example, this call:
(wrap-program "foo" '("PATH" ":" = ("/gnu/.../bar/bin")) '("CERT_PATH" suffix ("/gnu/.../baz/certs" "/qux/certs")))will copy foo to .foo-real and create the file foo with the following contents:
#!location/of/bin/bash export PATH="/gnu/.../bar/bin" export CERT_PATH="$CERT_PATH${CERT_PATH:+:}/gnu/.../baz/certs:/qux/certs" exec -a $0 location/of/.foo-real "$@"If program has previously been wrapped by
wrap-program, the wrapper is extended with definitions for variables. If it is not, sh will be used as the interpreter.
- Scheme Procedure: wrap-script program [#:guile guile] [#:rest variables] Wrap the script program
such that variables are set first. The format of variables is the same as in the
wrap-programprocedure. This procedure differs fromwrap-programin that it does not create a separate shell script. Instead, program is modified directly by prepending a Guile script, which is interpreted as a comment in the script’s language.Special encoding comments as supported by Python are recreated on the second line.
Note that this procedure can only be used once per file as Guile scripts are not supported.
Next: 仓库, Previous: Build Utilities, Up: 编程接口 [Contents][Index]
9.8 Search Paths
Many programs and libraries look for input data in a search path, a list of directories: shells like Bash look for executables in the command search path, a C compiler looks for .h files in its header search path, the Python interpreter looks for .py files in its search path, the spell checker has a search path for dictionaries, and so on.
Search paths can usually be defined or overridden via environment
variables (see Environment Variables in The GNU C Library Reference
Manual). For example, the search paths mentioned above can be changed by
defining the PATH, C_INCLUDE_PATH, PYTHONPATH (or
GUIX_PYTHONPATH), and DICPATH environment variables—you know,
all these something-PATH variables that you need to get right or things
“won’t be found”.
You may have noticed from the command line that Guix “knows” which search
path environment variables should be defined, and how. When you install
packages in your default profile, the file
~/.guix-profile/etc/profile is created, which you can “source” from
the shell to set those variables. Likewise, if you ask guix shell
to create an environment containing Python and NumPy, a Python library, and
if you pass it the --search-paths option, it will tell you about
PATH and GUIX_PYTHONPATH (see Invoking guix shell):
$ guix shell python python-numpy --pure --search-paths export PATH="/gnu/store/…-profile/bin" export GUIX_PYTHONPATH="/gnu/store/…-profile/lib/python3.9/site-packages"
When you omit --search-paths, it defines these environment variables right away, such that Python can readily find NumPy:
$ guix shell python python-numpy -- python3 Python 3.9.6 (default, Jan 1 1970, 00:00:01) [GCC 10.3.0] on linux Type "help", "copyright", "credits" or "license" for more information. >>> import numpy >>> numpy.version.version '1.20.3'
For this to work, the definition of the python package
declares the search path it cares about and its associated
environment variable, GUIX_PYTHONPATH. It looks like this:
(package
(name "python")
(version "3.9.9")
;; some fields omitted...
(native-search-paths
(list (search-path-specification
(variable "GUIX_PYTHONPATH")
(files (list "lib/python/3.9/site-packages"))))))
What this native-search-paths field says is that, when the
python package is used, the GUIX_PYTHONPATH environment
variable must be defined to include all the
lib/python/3.9/site-packages sub-directories encountered in its
environment. (The native- bit means that, if we are in a
cross-compilation environment, only native inputs may be added to the search
path; see search-paths.) In the NumPy example
above, the profile where python appears contains exactly one such
sub-directory, and GUIX_PYTHONPATH is set to that. When there are
several lib/python/3.9/site-packages—this is the case in package
build environments—they are all added to GUIX_PYTHONPATH, separated
by colons (:).
注: Notice that
GUIX_PYTHONPATHis specified as part of the definition of thepythonpackage, and not as part of that ofpython-numpy. This is because this environment variable “belongs” to Python, not NumPy: Python actually reads the value of that variable and honors it.Corollary: if you create a profile that does not contain
python,GUIX_PYTHONPATHwill not be defined, even if it contains packages that provide .py files:$ guix shell python-numpy --search-paths --pure export PATH="/gnu/store/…-profile/bin"This makes a lot of sense if we look at this profile in isolation: no software in this profile would read
GUIX_PYTHONPATH.
Of course, there are many variations on that theme: some packages honor more
than one search path, some use separators other than colon, some accumulate
several directories in their search path, and so on. A more complex example
is the search path of libxml2: the value of the XML_CATALOG_FILES
environment variable is space-separated, it must contain a list of
catalog.xml files (not directories), which are to be found in
xml sub-directories—nothing less. The search path specification
looks like this:
(package
(name "libxml2")
;; some fields omitted
(native-search-paths
(list (search-path-specification
(variable "XML_CATALOG_FILES")
(separator " ")
(files '("xml"))
(file-pattern "^catalog\\.xml$")
(file-type 'regular)))))
Worry not, search path specifications are usually not this tricky.
The (guix search-paths) module defines the data type of search path
specifications and a number of helper procedures. Below is the reference of
search path specifications.
- Data Type: search-path-specification
The data type for search path specifications.
variableThe name of the environment variable for this search path (a string).
filesThe list of sub-directories (strings) that should be added to the search path.
separator(default:":")The string used to separate search path components.
As a special case, a
separatorvalue of#fspecifies a “single-component search path”—in other words, a search path that cannot contain more than one element. This is useful in some cases, such as theSSL_CERT_DIRvariable (honored by OpenSSL, cURL, and a few other packages) or theASPELL_DICT_DIRvariable (honored by the GNU Aspell spell checker), both of which must point to a single directory.file-type(default:'directory)The type of file being matched—
'directoryor'regular, though it can be any symbol returned bystat:type(seestatin GNU Guile Reference Manual).In the libxml2 example above, we would match regular files; in the Python example, we would match directories.
file-pattern(default:#f)This must be either
#for a regular expression specifying files to be matched within the sub-directories specified by thefilesfield.Again, the libxml2 example shows a situation where this is needed.
Some search paths are not tied by a single package but to many packages. To
reduce duplications, some of them are pre-defined in (guix
search-paths).
- Scheme Variable: $SSL_CERT_DIR
- Scheme Variable: $SSL_CERT_FILE
These two search paths indicate where X.509 certificates can be found (see X.509证书).
These pre-defined search paths can be used as in the following example:
(package
(name "curl")
;; some fields omitted ...
(native-search-paths (list $SSL_CERT_DIR $SSL_CERT_FILE)))
How do you turn search path specifications on one hand and a bunch of
directories on the other hand in a set of environment variable definitions?
That’s the job of evaluate-search-paths.
- Scheme Procedure: evaluate-search-paths search-paths directories [getenv] Evaluate search-paths, a list of
search-path specifications, for directories, a list of directory names, and return a list of specification/value pairs. Use getenv to determine the current settings and report only settings not already effective.
The (guix profiles) provides a higher-level helper procedure,
load-profile, that sets the environment variables of a profile.
Next: Derivations, Previous: Search Paths, Up: 编程接口 [Contents][Index]
9.9 仓库
Conceptually, the store is the place where derivations that have been built successfully are stored—by default, /gnu/store. Sub-directories in the store are referred to as store items or sometimes store paths. The store has an associated database that contains information such as the store paths referred to by each store path, and the list of valid store items—results of successful builds. This database resides in localstatedir/guix/db, where localstatedir is the state directory specified via --localstatedir at configure time, usually /var.
The store is always accessed by the daemon on behalf of its clients
(see 调用guix-daemon). To manipulate the store, clients connect to
the daemon over a Unix-domain socket, send requests to it, and read the
result—these are remote procedure calls, or RPCs.
注: Users must never modify files under /gnu/store directly. This would lead to inconsistencies and break the immutability assumptions of Guix’s functional model (see 介绍).
See
guix gc --verify, for information on how to check the integrity of the store and attempt recovery from accidental modifications.
The (guix store) module provides procedures to connect to the daemon,
and to perform RPCs. These are described below. By default,
open-connection, and thus all the guix commands, connect to
the local daemon or to the URI specified by the GUIX_DAEMON_SOCKET
environment variable.
- Environment Variable: GUIX_DAEMON_SOCKET
When set, the value of this variable should be a file name or a URI designating the daemon endpoint. When it is a file name, it denotes a Unix-domain socket to connect to. In addition to file names, the supported URI schemes are:
fileunixThese are for Unix-domain sockets.
file:///var/guix/daemon-socket/socketis equivalent to /var/guix/daemon-socket/socket.guix¶-
These URIs denote connections over TCP/IP, without encryption nor authentication of the remote host. The URI must specify the host name and optionally a port number (by default port 44146 is used):
guix://master.guix.example.org:1234
This setup is suitable on local networks, such as clusters, where only trusted nodes may connect to the build daemon at
master.guix.example.org.The --listen option of
guix-daemoncan be used to instruct it to listen for TCP connections (see --listen). ssh¶These URIs allow you to connect to a remote daemon over SSH. This feature requires Guile-SSH (see 需求) and a working
guilebinary inPATHon the destination machine. It supports public key and GSSAPI authentication. A typical URL might look like this:ssh://charlie@guix.example.org:22
As for
guix copy, the usual OpenSSH client configuration files are honored (see Invokingguix copy).
Additional URI schemes may be supported in the future.
注: The ability to connect to remote build daemons is considered experimental as of 1.4.0. Please get in touch with us to share any problems or suggestions you may have (see 贡献).
- Scheme Procedure: open-connection [uri] [#:reserve-space? #t]
Connect to the daemon over the Unix-domain socket at uri (a string). When reserve-space? is true, instruct it to reserve a little bit of extra space on the file system so that the garbage collector can still operate should the disk become full. Return a server object.
file defaults to
%default-socket-path, which is the normal location given the options that were passed toconfigure.
- Scheme Procedure: close-connection server
Close the connection to server.
- Scheme Variable: current-build-output-port
This variable is bound to a SRFI-39 parameter, which refers to the port where build and error logs sent by the daemon should be written.
Procedures that make RPCs all take a server object as their first argument.
- Scheme Procedure: valid-path? server path
-
Return
#twhen path designates a valid store item and#fotherwise (an invalid item may exist on disk but still be invalid, for instance because it is the result of an aborted or failed build).A
&store-protocol-errorcondition is raised if path is not prefixed by the store directory (/gnu/store).
- Scheme Procedure: add-text-to-store server name text [references]
Add text under file name in the store, and return its store path. references is the list of store paths referred to by the resulting store path.
- Scheme Procedure: build-derivations store derivations [mode] Build derivations, a list of
<derivation>objects, .drv file names, or derivation/output pairs, using the specified mode—
(build-mode normal)by default.
Note that the (guix monads) module provides a monad as well as
monadic versions of the above procedures, with the goal of making it more
convenient to work with code that accesses the store (see 仓库monad).
This section is currently incomplete.
9.10 Derivations
Low-level build actions and the environment in which they are performed are represented by derivations. A derivation contains the following pieces of information:
- The outputs of the derivation—derivations produce at least one file or directory in the store, but may produce more.
- The inputs of the derivations—i.e., its build-time dependencies—which may be other derivations or plain files in the store (patches, build scripts, etc.).
- The system type targeted by the derivation—e.g.,
x86_64-linux. - The file name of a build script in the store, along with the arguments to be passed.
- A list of environment variables to be defined.
Derivations allow clients of the daemon to communicate build actions to the
store. They exist in two forms: as an in-memory representation, both on the
client- and daemon-side, and as files in the store whose name end in
.drv—these files are referred to as derivation paths.
Derivations paths can be passed to the build-derivations procedure to
perform the build actions they prescribe (see 仓库).
Operations such as file downloads and version-control checkouts for which the expected content hash is known in advance are modeled as fixed-output derivations. Unlike regular derivations, the outputs of a fixed-output derivation are independent of its inputs—e.g., a source code download produces the same result regardless of the download method and tools being used.
The outputs of derivations—i.e., the build results—have a set of
references, as reported by the references RPC or the
guix gc --references command (see Invoking guix gc).
References are the set of run-time dependencies of the build results.
References are a subset of the inputs of the derivation; this subset is
automatically computed by the build daemon by scanning all the files in the
outputs.
The (guix derivations) module provides a representation of
derivations as Scheme objects, along with procedures to create and otherwise
manipulate derivations. The lowest-level primitive to create a derivation
is the derivation procedure:
- Scheme Procedure: derivation store name builder args [#:outputs '("out")] [#:hash #f] [#:hash-algo #f] [#:recursive?
#f] [#:inputs ’()] [#:env-vars ’()] [#:system (%current-system)] [#:references-graphs #f] [#:allowed-references #f] [#:disallowed-references #f] [#:leaked-env-vars #f] [#:local-build? #f] [#:substitutable? #t] [#:properties ’()] Build a derivation with the given arguments, and return the resulting
<derivation>object.When hash and hash-algo are given, a fixed-output derivation is created—i.e., one whose result is known in advance, such as a file download. If, in addition, recursive? is true, then that fixed output may be an executable file or a directory and hash must be the hash of an archive containing this output.
When references-graphs is true, it must be a list of file name/store path pairs. In that case, the reference graph of each store path is exported in the build environment in the corresponding file, in a simple text format.
When allowed-references is true, it must be a list of store items or outputs that the derivation’s output may refer to. Likewise, disallowed-references, if true, must be a list of things the outputs may not refer to.
When leaked-env-vars is true, it must be a list of strings denoting environment variables that are allowed to “leak” from the daemon’s environment to the build environment. This is only applicable to fixed-output derivations—i.e., when hash is true. The main use is to allow variables such as
http_proxyto be passed to derivations that download files.When local-build? is true, declare that the derivation is not a good candidate for offloading and should rather be built locally (see 使用任务下发设施). This is the case for small derivations where the costs of data transfers would outweigh the benefits.
When substitutable? is false, declare that substitutes of the derivation’s output should not be used (see substitutes). This is useful, for instance, when building packages that capture details of the host CPU instruction set.
properties must be an association list describing “properties” of the derivation. It is kept as-is, uninterpreted, in the derivation.
Here’s an example with a shell script as its builder, assuming store is an open connection to the daemon, and bash points to a Bash executable in the store:
(use-modules (guix utils) (guix store) (guix derivations)) (let ((builder ; add the Bash script to the store (add-text-to-store store "my-builder.sh" "echo hello world > $out\n" '()))) (derivation store "foo" bash `("-e" ,builder) #:inputs `((,bash) (,builder)) #:env-vars '(("HOME" . "/homeless")))) ⇒ #<derivation /gnu/store/…-foo.drv => /gnu/store/…-foo>
As can be guessed, this primitive is cumbersome to use directly. A better
approach is to write build scripts in Scheme, of course! The best course of
action for that is to write the build code as a “G-expression”, and to
pass it to gexp->derivation. For more information,
see G-表达式.
Once upon a time, gexp->derivation did not exist and constructing
derivations with build code written in Scheme was achieved with
build-expression->derivation, documented below. This procedure is
now deprecated in favor of the much nicer gexp->derivation.
- Scheme Procedure: build-expression->derivation store name exp [#:system (%current-system)] [#:inputs '()] [#:outputs '("out")] [#:hash #f] [#:hash-algo #f] [#:recursive? #f]
[#:env-vars ’()] [#:modules ’()] [#:references-graphs #f] [#:allowed-references #f] [#:disallowed-references #f] [#:local-build? #f] [#:substitutable? #t] [#:guile-for-build #f] Return a derivation that executes Scheme expression exp as a builder for derivation name. inputs must be a list of
(name drv-path sub-drv)tuples; when sub-drv is omitted,"out"is assumed. modules is a list of names of Guile modules from the current search path to be copied in the store, compiled, and made available in the load path during the execution of exp—e.g.,((guix build utils) (guix build gnu-build-system)).exp is evaluated in an environment where
%outputsis bound to a list of output/path pairs, and where%build-inputsis bound to a list of string/output-path pairs made from inputs. Optionally, env-vars is a list of string pairs specifying the name and value of environment variables visible to the builder. The builder terminates by passing the result of exp toexit; thus, when exp returns#f, the build is considered to have failed.exp is built using guile-for-build (a derivation). When guile-for-build is omitted or is
#f, the value of the%guile-for-buildfluid is used instead.See the
derivationprocedure for the meaning of references-graphs, allowed-references, disallowed-references, local-build?, and substitutable?.
Here’s an example of a single-output derivation that creates a directory containing one file:
(let ((builder '(let ((out (assoc-ref %outputs "out"))) (mkdir out) ; create /gnu/store/…-goo (call-with-output-file (string-append out "/test") (lambda (p) (display '(hello guix) p)))))) (build-expression->derivation store "goo" builder)) ⇒ #<derivation /gnu/store/…-goo.drv => …>
Next: G-表达式, Previous: Derivations, Up: 编程接口 [Contents][Index]
9.11 仓库monad
The procedures that operate on the store described in the previous sections all take an open connection to the build daemon as their first argument. Although the underlying model is functional, they either have side effects or depend on the current state of the store.
The former is inconvenient: the connection to the build daemon has to be carried around in all those functions, making it impossible to compose functions that do not take that parameter with functions that do. The latter can be problematic: since store operations have side effects and/or depend on external state, they have to be properly sequenced.
This is where the (guix monads) module comes in. This module
provides a framework for working with monads, and a particularly
useful monad for our uses, the store monad. Monads are a construct
that allows two things: associating “context” with values (in our case,
the context is the store), and building sequences of computations (here
computations include accesses to the store). Values in a monad—values
that carry this additional context—are called monadic values;
procedures that return such values are called monadic procedures.
Consider this “normal” procedure:
(define (sh-symlink store)
;; Return a derivation that symlinks the 'bash' executable.
(let* ((drv (package-derivation store bash))
(out (derivation->output-path drv))
(sh (string-append out "/bin/bash")))
(build-expression->derivation store "sh"
`(symlink ,sh %output))))
Using (guix monads) and (guix gexp), it may be rewritten as a
monadic function:
(define (sh-symlink)
;; Same, but return a monadic value.
(mlet %store-monad ((drv (package->derivation bash)))
(gexp->derivation "sh"
#~(symlink (string-append #$drv "/bin/bash")
#$output))))
There are several things to note in the second version: the store
parameter is now implicit and is “threaded” in the calls to the
package->derivation and gexp->derivation monadic procedures,
and the monadic value returned by package->derivation is bound
using mlet instead of plain let.
As it turns out, the call to package->derivation can even be omitted
since it will take place implicitly, as we will see later
(see G-表达式):
(define (sh-symlink)
(gexp->derivation "sh"
#~(symlink (string-append #$bash "/bin/bash")
#$output)))
Calling the monadic sh-symlink has no effect. As someone once said,
“you exit a monad like you exit a building on fire: by running”. So, to
exit the monad and get the desired effect, one must use
run-with-store:
(run-with-store (open-connection) (sh-symlink)) ⇒ /gnu/store/...-sh-symlink
Note that the (guix monad-repl) module extends the Guile REPL with
new “commands” to make it easier to deal with monadic procedures:
run-in-store, and enter-store-monad (see Using Guix Interactively). The former is used to “run” a single monadic value
through the store:
scheme@(guile-user)> ,run-in-store (package->derivation hello) $1 = #<derivation /gnu/store/…-hello-2.9.drv => …>
The latter enters a recursive REPL, where all the return values are automatically run through the store:
scheme@(guile-user)> ,enter-store-monad store-monad@(guile-user) [1]> (package->derivation hello) $2 = #<derivation /gnu/store/…-hello-2.9.drv => …> store-monad@(guile-user) [1]> (text-file "foo" "Hello!") $3 = "/gnu/store/…-foo" store-monad@(guile-user) [1]> ,q scheme@(guile-user)>
Note that non-monadic values cannot be returned in the store-monad
REPL.
Other meta-commands are available at the REPL, such as ,build to
build a file-like object (see Using Guix Interactively).
The main syntactic forms to deal with monads in general are provided by the
(guix monads) module and are described below.
- Scheme Syntax: with-monad monad body ...
Evaluate any
>>=orreturnforms in body as being in monad.
- Scheme Syntax: return val
Return a monadic value that encapsulates val.
- Scheme Syntax: >>= mval mproc ...
Bind monadic value mval, passing its “contents” to monadic procedures mproc…22. There can be one mproc or several of them, as in this example:
(run-with-state (with-monad %state-monad (>>= (return 1) (lambda (x) (return (+ 1 x))) (lambda (x) (return (* 2 x))))) 'some-state) ⇒ 4 ⇒ some-state
- Scheme Syntax: mlet monad ((var mval) ...) body ...
- Scheme Syntax: mlet* monad ((var mval) ...) body ... Bind the variables var to the monadic values
mval in body, which is a sequence of expressions. As with the bind operator, this can be thought of as “unpacking” the raw, non-monadic value “contained” in mval and making var refer to that raw, non-monadic value within the scope of the body. The form (var -> val) binds var to the “normal” value val, as per
let. The binding operations occur in sequence from left to right. The last expression of body must be a monadic expression, and its result will become the result of themletormlet*when run in the monad.mlet*is tomletwhatlet*is tolet(see Local Bindings in GNU Guile Reference Manual).
- Scheme System: mbegin monad mexp ...
Bind mexp and the following monadic expressions in sequence, returning the result of the last expression. Every expression in the sequence must be a monadic expression.
This is akin to
mlet, except that the return values of the monadic expressions are ignored. In that sense, it is analogous tobegin, but applied to monadic expressions.
- Scheme System: mwhen condition mexp0 mexp* ...
When condition is true, evaluate the sequence of monadic expressions mexp0..mexp* as in an
mbegin. When condition is false, return*unspecified*in the current monad. Every expression in the sequence must be a monadic expression.
- Scheme System: munless condition mexp0 mexp* ...
When condition is false, evaluate the sequence of monadic expressions mexp0..mexp* as in an
mbegin. When condition is true, return*unspecified*in the current monad. Every expression in the sequence must be a monadic expression.
The (guix monads) module provides the state monad, which allows
an additional value—the state—to be threaded through monadic
procedure calls.
- Scheme Variable: %state-monad
The state monad. Procedures in the state monad can access and change the state that is threaded.
Consider the example below. The
squareprocedure returns a value in the state monad. It returns the square of its argument, but also increments the current state value:(define (square x) (mlet %state-monad ((count (current-state))) (mbegin %state-monad (set-current-state (+ 1 count)) (return (* x x))))) (run-with-state (sequence %state-monad (map square (iota 3))) 0) ⇒ (0 1 4) ⇒ 3
When “run” through
%state-monad, we obtain that additional state value, which is the number ofsquarecalls.
- Monadic Procedure: current-state
Return the current state as a monadic value.
- Monadic Procedure: set-current-state value
Set the current state to value and return the previous state as a monadic value.
- Monadic Procedure: state-push value
Push value to the current state, which is assumed to be a list, and return the previous state as a monadic value.
- Monadic Procedure: state-pop
Pop a value from the current state and return it as a monadic value. The state is assumed to be a list.
- Scheme Procedure: run-with-state mval [state]
Run monadic value mval starting with state as the initial state. Return two values: the resulting value, and the resulting state.
The main interface to the store monad, provided by the (guix store)
module, is as follows.
- Scheme Variable: %store-monad
The store monad—an alias for
%state-monad.Values in the store monad encapsulate accesses to the store. When its effect is needed, a value of the store monad must be “evaluated” by passing it to the
run-with-storeprocedure (see below).
- Scheme Procedure: run-with-store store mval [#:guile-for-build] [#:system (%current-system)]
Run mval, a monadic value in the store monad, in store, an open store connection.
- Monadic Procedure: text-file name text [references]
Return as a monadic value the absolute file name in the store of the file containing text, a string. references is a list of store items that the resulting text file refers to; it defaults to the empty list.
- Monadic Procedure: binary-file name data [references]
Return as a monadic value the absolute file name in the store of the file containing data, a bytevector. references is a list of store items that the resulting binary file refers to; it defaults to the empty list.
- Monadic Procedure: interned-file file [name] [#:recursive? #t] [#:select? (const #t)] Return the name of file once
interned in the store. Use name as its store name, or the basename of file if name is omitted.
When recursive? is true, the contents of file are added recursively; if file designates a flat file and recursive? is true, its contents are added, and its permission bits are kept.
When recursive? is true, call
(select? file stat)for each directory entry, where file is the entry’s absolute file name and stat is the result oflstat; exclude entries for which select? does not return true.The example below adds a file to the store, under two different names:
(run-with-store (open-connection) (mlet %store-monad ((a (interned-file "README")) (b (interned-file "README" "LEGU-MIN"))) (return (list a b)))) ⇒ ("/gnu/store/rwm…-README" "/gnu/store/44i…-LEGU-MIN")
The (guix packages) module exports the following package-related
monadic procedures:
- Monadic Procedure: package-file package [file] [#:system (%current-system)] [#:target #f] [#:output "out"] Return as a
monadic value in the absolute file name of file within the output directory of package. When file is omitted, return the name of the output directory of package. When target is true, use it as a cross-compilation target triplet.
Note that this procedure does not build package. Thus, the result might or might not designate an existing file. We recommend not using this procedure unless you know what you are doing.
- Monadic Procedure: package->derivation package [system]
- Monadic Procedure: package->cross-derivation package target [system] Monadic version of
package-derivationand package-cross-derivation(see 定义软件包).
Next: Invoking guix repl, Previous: 仓库monad, Up: 编程接口 [Contents][Index]
9.12 G-表达式
So we have “derivations”, which represent a sequence of build actions to
be performed to produce an item in the store (see Derivations). These
build actions are performed when asking the daemon to actually build the
derivations; they are run by the daemon in a container (see 调用guix-daemon).
It should come as no surprise that we like to write these build actions in
Scheme. When we do that, we end up with two strata of Scheme
code23: the
“host code”—code that defines packages, talks to the daemon, etc.—and
the “build code”—code that actually performs build actions, such as
making directories, invoking make, and so on (see Build Phases).
To describe a derivation and its build actions, one typically needs to embed
build code inside host code. It boils down to manipulating build code as
data, and the homoiconicity of Scheme—code has a direct representation as
data—comes in handy for that. But we need more than the normal
quasiquote mechanism in Scheme to construct build expressions.
The (guix gexp) module implements G-expressions, a form of
S-expressions adapted to build expressions. G-expressions, or gexps,
consist essentially of three syntactic forms: gexp, ungexp,
and ungexp-splicing (or simply: #~, #$, and
#$@), which are comparable to quasiquote, unquote, and
unquote-splicing, respectively (see quasiquote in GNU Guile Reference Manual). However, there are
major differences:
- Gexps are meant to be written to a file and run or manipulated by other processes.
- When a high-level object such as a package or derivation is unquoted inside a gexp, the result is as if its output file name had been introduced.
- Gexps carry information about the packages or derivations they refer to, and these dependencies are automatically added as inputs to the build processes that use them.
This mechanism is not limited to package and derivation objects:
compilers able to “lower” other high-level objects to derivations or
files in the store can be defined, such that these objects can also be
inserted into gexps. For example, a useful type of high-level objects that
can be inserted in a gexp is “file-like objects”, which make it easy to
add files to the store and to refer to them in derivations and such (see
local-file and plain-file below).
To illustrate the idea, here is an example of a gexp:
(define build-exp
#~(begin
(mkdir #$output)
(chdir #$output)
(symlink (string-append #$coreutils "/bin/ls")
"list-files")))
This gexp can be passed to gexp->derivation; we obtain a derivation
that builds a directory containing exactly one symlink to
/gnu/store/…-coreutils-8.22/bin/ls:
(gexp->derivation "the-thing" build-exp)
As one would expect, the "/gnu/store/…-coreutils-8.22" string
is substituted to the reference to the coreutils package in the actual
build code, and coreutils is automatically made an input to the
derivation. Likewise, #$output (equivalent to (ungexp
output)) is replaced by a string containing the directory name of the
output of the derivation.
In a cross-compilation context, it is useful to distinguish between
references to the native build of a package—that can run on the
host—versus references to cross builds of a package. To that end, the
#+ plays the same role as #$, but is a reference to a native
package build:
(gexp->derivation "vi"
#~(begin
(mkdir #$output)
(mkdir (string-append #$output "/bin"))
(system* (string-append #+coreutils "/bin/ln")
"-s"
(string-append #$emacs "/bin/emacs")
(string-append #$output "/bin/vi")))
#:target "aarch64-linux-gnu")
In the example above, the native build of coreutils is used, so that
ln can actually run on the host; but then the cross-compiled build
of emacs is referenced.
Another gexp feature is imported modules: sometimes you want to be
able to use certain Guile modules from the “host environment” in the gexp,
so those modules should be imported in the “build environment”. The
with-imported-modules form allows you to express that:
(let ((build (with-imported-modules '((guix build utils))
#~(begin
(use-modules (guix build utils))
(mkdir-p (string-append #$output "/bin"))))))
(gexp->derivation "empty-dir"
#~(begin
#$build
(display "success!\n")
#t)))
In this example, the (guix build utils) module is automatically
pulled into the isolated build environment of our gexp, such that
(use-modules (guix build utils)) works as expected.
Usually you want the closure of the module to be imported—i.e., the
module itself and all the modules it depends on—rather than just the
module; failing to do that, attempts to use the module will fail because of
missing dependent modules. The source-module-closure procedure
computes the closure of a module by looking at its source file headers,
which comes in handy in this case:
(use-modules (guix modules)) ;for 'source-module-closure' (with-imported-modules (source-module-closure '((guix build utils) (gnu build image))) (gexp->derivation "something-with-vms" #~(begin (use-modules (guix build utils) (gnu build image)) …)))
In the same vein, sometimes you want to import not just pure-Scheme modules,
but also “extensions” such as Guile bindings to C libraries or other
“full-blown” packages. Say you need the guile-json package
available on the build side, here’s how you would do it:
(use-modules (gnu packages guile)) ;for 'guile-json' (with-extensions (list guile-json) (gexp->derivation "something-with-json" #~(begin (use-modules (json)) …)))
The syntactic form to construct gexps is summarized below.
- Scheme Syntax: #~exp 
- Scheme Syntax: (gexp exp)
Return a G-expression containing exp. exp may contain one or more of the following forms:
#$obj(ungexp obj)Introduce a reference to obj. obj may have one of the supported types, for example a package or a derivation, in which case the
ungexpform is replaced by its output file name—e.g.,"/gnu/store/…-coreutils-8.22.If obj is a list, it is traversed and references to supported objects are substituted similarly.
If obj is another gexp, its contents are inserted and its dependencies are added to those of the containing gexp.
If obj is another kind of object, it is inserted as is.
#$obj:output(ungexp obj output)This is like the form above, but referring explicitly to the output of obj—this is useful when obj produces multiple outputs (see 有多个输出的软件包).
#+obj#+obj:output(ungexp-native obj)(ungexp-native obj output)Same as
ungexp, but produces a reference to the native build of obj when used in a cross compilation context.#$output[:output](ungexp output [output])Insert a reference to derivation output output, or to the main output when output is omitted.
This only makes sense for gexps passed to
gexp->derivation.#$@lst(ungexp-splicing lst)Like the above, but splices the contents of lst inside the containing list.
#+@lst(ungexp-native-splicing lst)Like the above, but refers to native builds of the objects listed in lst.
G-expressions created by
gexpor#~are run-time objects of thegexp?type (see below).
- Scheme Syntax: with-imported-modules modules body…
Mark the gexps defined in body… as requiring modules in their execution environment.
Each item in modules can be the name of a module, such as
(guix build utils), or it can be a module name, followed by an arrow, followed by a file-like object:`((guix build utils) (guix gcrypt) ((guix config) => ,(scheme-file "config.scm" #~(define-module …))))
In the example above, the first two modules are taken from the search path, and the last one is created from the given file-like object.
This form has lexical scope: it has an effect on the gexps directly defined in body…, but not on those defined, say, in procedures called from body….
- Scheme Syntax: with-extensions extensions body…
Mark the gexps defined in body… as requiring extensions in their build and execution environment. extensions is typically a list of package objects such as those defined in the
(gnu packages guile)module.Concretely, the packages listed in extensions are added to the load path while compiling imported modules in body…; they are also added to the load path of the gexp returned by body….
- Scheme Procedure: gexp? obj
Return
#tif obj is a G-expression.
G-expressions are meant to be written to disk, either as code building some derivation, or as plain files in the store. The monadic procedures below allow you to do that (see 仓库monad, for more information about monads).
- Monadic Procedure: gexp->derivation name exp [#:system (%current-system)] [#:target #f] [#:graft? #t] [#:hash #f]
[#:hash-algo #f] [#:recursive? #f] [#:env-vars ’()] [#:modules ’()] [#:module-path
%load-path] [#:effective-version "2.2"] [#:references-graphs #f] [#:allowed-references #f] [#:disallowed-references #f] [#:leaked-env-vars #f] [#:script-name (string-append name "-builder")] [#:deprecation-warnings #f] [#:local-build? #f] [#:substitutable? #t] [#:properties ’()] [#:guile-for-build #f] Return a derivation name that runs exp (a gexp) with guile-for-build (a derivation) on system; exp is stored in a file called script-name. When target is true, it is used as the cross-compilation target triplet for packages referred to by exp.modules is deprecated in favor of
with-imported-modules. Its meaning is to make modules available in the evaluation context of exp; modules is a list of names of Guile modules searched in module-path to be copied in the store, compiled, and made available in the load path during the execution of exp—e.g.,((guix build utils) (guix build gnu-build-system)).effective-version determines the string to use when adding extensions of exp (see
with-extensions) to the search path—e.g.,"2.2".graft? determines whether packages referred to by exp should be grafted when applicable.
When references-graphs is true, it must be a list of tuples of one of the following forms:
(file-name package) (file-name package output) (file-name derivation) (file-name derivation output) (file-name store-item)
The right-hand-side of each element of references-graphs is automatically made an input of the build process of exp. In the build environment, each file-name contains the reference graph of the corresponding item, in a simple text format.
allowed-references must be either
#for a list of output names and packages. In the latter case, the list denotes store items that the result is allowed to refer to. Any reference to another store item will lead to a build error. Similarly for disallowed-references, which can list items that must not be referenced by the outputs.deprecation-warnings determines whether to show deprecation warnings while compiling modules. It can be
#f,#t, or'detailed.The other arguments are as for
derivation(see Derivations).
The local-file, plain-file, computed-file,
program-file, and scheme-file procedures below return
file-like objects. That is, when unquoted in a G-expression, these
objects lead to a file in the store. Consider this G-expression:
#~(system* #$(file-append glibc "/sbin/nscd") "-f" #$(local-file "/tmp/my-nscd.conf"))
The effect here is to “intern” /tmp/my-nscd.conf by copying it to
the store. Once expanded, for instance via gexp->derivation, the
G-expression refers to that copy under /gnu/store; thus, modifying or
removing the file in /tmp does not have any effect on what the
G-expression does. plain-file can be used similarly; it differs in
that the file content is directly passed as a string.
- Scheme Procedure: local-file file [name] [#:recursive? #f] [#:select? (const #t)] Return an object representing local
file file to add to the store; this object can be used in a gexp. If file is a literal string denoting a relative file name, it is looked up relative to the source file where it appears; if file is not a literal string, it is looked up relative to the current working directory at run time. file will be added to the store under name–by default the base name of file.
When recursive? is true, the contents of file are added recursively; if file designates a flat file and recursive? is true, its contents are added, and its permission bits are kept.
When recursive? is true, call
(select? file stat)for each directory entry, where file is the entry’s absolute file name and stat is the result oflstat; exclude entries for which select? does not return true.This is the declarative counterpart of the
interned-filemonadic procedure (seeinterned-file).
- Scheme Procedure: plain-file name content
Return an object representing a text file called name with the given content (a string or a bytevector) to be added to the store.
This is the declarative counterpart of
text-file.
- Scheme Procedure: computed-file name gexp [#:local-build? #t] [#:options '()] Return an object representing the store
item name, a file or directory computed by gexp. When local-build? is true (the default), the derivation is built locally. options is a list of additional arguments to pass to
gexp->derivation.This is the declarative counterpart of
gexp->derivation.
- Monadic Procedure: gexp->script name exp [#:guile (default-guile)] [#:module-path %load-path] [#:system
(%current-system)] [#:target #f] Return an executable script name that runs exp using guile, with exp’s imported modules in its search path. Look up exp’s modules in module-path.
The example below builds a script that simply invokes the
lscommand:(use-modules (guix gexp) (gnu packages base)) (gexp->script "list-files" #~(execl #$(file-append coreutils "/bin/ls") "ls"))
When “running” it through the store (see
run-with-store), we obtain a derivation that produces an executable file /gnu/store/…-list-files along these lines:#!/gnu/store/…-guile-2.0.11/bin/guile -ds !# (execl "/gnu/store/…-coreutils-8.22"/bin/ls" "ls")
- Scheme Procedure: program-file name exp [#:guile #f] [#:module-path %load-path] Return an object representing the
executable store item name that runs gexp. guile is the Guile package used to execute that script. Imported modules of gexp are looked up in module-path.
This is the declarative counterpart of
gexp->script.
- Monadic Procedure: gexp->file name exp [#:set-load-path? #t] [#:module-path %load-path] [#:splice? #f] [#:guile
(default-guile)] Return a derivation that builds a file name containing exp. When splice? is true, exp is considered to be a list of expressions that will be spliced in the resulting file.
When set-load-path? is true, emit code in the resulting file to set
%load-pathand%load-compiled-pathto honor exp’s imported modules. Look up exp’s modules in module-path.The resulting file holds references to all the dependencies of exp or a subset thereof.
- Scheme Procedure: scheme-file name exp [#:splice? #f] [#:set-load-path? #t] Return an object representing the
Scheme file name that contains exp.
This is the declarative counterpart of
gexp->file.
- Monadic Procedure: text-file* name text …
Return as a monadic value a derivation that builds a text file containing all of text. text may list, in addition to strings, objects of any type that can be used in a gexp: packages, derivations, local file objects, etc. The resulting store file holds references to all these.
This variant should be preferred over
text-fileanytime the file to create will reference items from the store. This is typically the case when building a configuration file that embeds store file names, like this:(define (profile.sh) ;; Return the name of a shell script in the store that ;; initializes the 'PATH' environment variable. (text-file* "profile.sh" "export PATH=" coreutils "/bin:" grep "/bin:" sed "/bin\n"))In this example, the resulting /gnu/store/…-profile.sh file will reference coreutils, grep, and sed, thereby preventing them from being garbage-collected during its lifetime.
- Scheme Procedure: mixed-text-file name text …
Return an object representing store file name containing text. text is a sequence of strings and file-like objects, as in:
(mixed-text-file "profile" "export PATH=" coreutils "/bin:" grep "/bin")This is the declarative counterpart of
text-file*.
- Scheme Procedure: file-union name files
Return a
<computed-file>that builds a directory containing all of files. Each item in files must be a two-element list where the first element is the file name to use in the new directory, and the second element is a gexp denoting the target file. Here’s an example:(file-union "etc" `(("hosts" ,(plain-file "hosts" "127.0.0.1 localhost")) ("bashrc" ,(plain-file "bashrc" "alias ls='ls --color=auto'"))))This yields an
etcdirectory containing these two files.
- Scheme Procedure: directory-union name things
Return a directory that is the union of things, where things is a list of file-like objects denoting directories. For example:
(directory-union "guile+emacs" (list guile emacs))yields a directory that is the union of the
guileandemacspackages.
- Scheme Procedure: file-append obj suffix …
Return a file-like object that expands to the concatenation of obj and suffix, where obj is a lowerable object and each suffix is a string.
As an example, consider this gexp:
(gexp->script "run-uname" #~(system* #$(file-append coreutils "/bin/uname")))The same effect could be achieved with:
(gexp->script "run-uname" #~(system* (string-append #$coreutils "/bin/uname")))There is one difference though: in the
file-appendcase, the resulting script contains the absolute file name as a string, whereas in the second case, the resulting script contains a(string-append …)expression to construct the file name at run time.
- Scheme Syntax: let-system system body…
- Scheme Syntax: let-system (system target) body…
Bind system to the currently targeted system—e.g.,
"x86_64-linux"—within body.In the second case, additionally bind target to the current cross-compilation target—a GNU triplet such as
"arm-linux-gnueabihf"—or#fif we are not cross-compiling.let-systemis useful in the occasional case where the object spliced into the gexp depends on the target system, as in this example:#~(system* #+(let-system system (cond ((string-prefix? "armhf-" system) (file-append qemu "/bin/qemu-system-arm")) ((string-prefix? "x86_64-" system) (file-append qemu "/bin/qemu-system-x86_64")) (else (error "dunno!")))) "-net" "user" #$image)
- Scheme Syntax: with-parameters ((parameter value) …) exp
This macro is similar to the
parameterizeform for dynamically-bound parameters (see Parameters in GNU Guile Reference Manual). The key difference is that it takes effect when the file-like object returned by exp is lowered to a derivation or store item.A typical use of
with-parametersis to force the system in effect for a given object:(with-parameters ((%current-system "i686-linux")) coreutils)The example above returns an object that corresponds to the i686 build of Coreutils, regardless of the current value of
%current-system.
Of course, in addition to gexps embedded in “host” code, there are also
modules containing build tools. To make it clear that they are meant to be
used in the build stratum, these modules are kept in the (guix build
…) name space.
Internally, high-level objects are lowered, using their compiler, to
either derivations or store items. For instance, lowering a package yields
a derivation, and lowering a plain-file yields a store item. This is
achieved using the lower-object monadic procedure.
- Monadic Procedure: lower-object obj [system] [#:target #f] Return as a value in
%store-monadthe derivation or store item corresponding to obj for system, cross-compiling for target if target is true. obj must be an object that has an associated gexp compiler, such as a
<package>.
- Procedure: gexp->approximate-sexp gexp
Sometimes, it may be useful to convert a G-exp into a S-exp. For example, some linters (see Invoking
guix lint) peek into the build phases of a package to detect potential problems. This conversion can be achieved with this procedure. However, some information can be lost in the process. More specifically, lowerable objects will be silently replaced with some arbitrary object – currently the list(*approximate*), but this may change.
Next: Using Guix Interactively, Previous: G-表达式, Up: 编程接口 [Contents][Index]
9.13 Invoking guix repl
The guix repl command makes it easier to program Guix in Guile by
launching a Guile read-eval-print loop (REPL) for interactive
programming (see Using Guile Interactively in GNU Guile Reference
Manual), or by running Guile scripts (see Running Guile Scripts in GNU Guile Reference Manual). Compared to just launching the
guile command, guix repl guarantees that all the Guix
modules and all its dependencies are available in the search path.
The general syntax is:
guix repl options [file args]
When a file argument is provided, file is executed as a Guile scripts:
guix repl my-script.scm
To pass arguments to the script, use -- to prevent them from being
interpreted as arguments to guix repl itself:
guix repl -- my-script.scm --input=foo.txt
To make a script executable directly from the shell, using the guix executable that is on the user’s search path, add the following two lines at the top of the script:
#!/usr/bin/env -S guix repl --!#
Without a file name argument, a Guile REPL is started, allowing for interactive use (see Using Guix Interactively):
$ guix repl scheme@(guile-user)> ,use (gnu packages base) scheme@(guile-user)> coreutils $1 = #<package coreutils@8.29 gnu/packages/base.scm:327 3e28300>
In addition, guix repl implements a simple machine-readable REPL
protocol for use by (guix inferior), a facility to interact with
inferiors, separate processes running a potentially different revision
of Guix.
The available options are as follows:
--type=type-t typeStart a REPL of the given TYPE, which can be one of the following:
guileThis is default, and it spawns a standard full-featured Guile REPL.
machineSpawn a REPL that uses the machine-readable protocol. This is the protocol that the
(guix inferior)module speaks.
--listen=endpointBy default,
guix replreads from standard input and writes to standard output. When this option is passed, it will instead listen for connections on endpoint. Here are examples of valid options:--listen=tcp:37146Accept connections on localhost on port 37146.
--listen=unix:/tmp/socketAccept connections on the Unix-domain socket /tmp/socket.
--load-path=directory-L directoryAdd directory to the front of the package module search path (see 软件包模块).
This allows users to define their own packages and make them visible to the script or REPL.
-qInhibit loading of the ~/.guile file. By default, that configuration file is loaded when spawning a
guileREPL.
Previous: Invoking guix repl, Up: 编程接口 [Contents][Index]
9.14 Using Guix Interactively
The guix repl command gives you access to a warm and friendly
read-eval-print loop (REPL) (see Invoking guix repl). If you’re
getting into Guix programming—defining your own packages, writing
manifests, defining services for Guix System or Guix Home, etc.—you will
surely find it convenient to toy with ideas at the REPL.
If you use Emacs, the most convenient way to do that is with Geiser
(see 完美的配置), but you do not have to use Emacs to enjoy the
REPL. When using guix repl or guile in the terminal,
we recommend using Readline for completion and Colorized to get colorful
output. To do that, you can run:
guix install guile guile-readline guile-colorized
... and then create a .guile file in your home directory containing this:
(use-modules (ice-9 readline) (ice-9 colorized)) (activate-readline) (activate-colorized)
The REPL lets you evaluate Scheme code; you type a Scheme expression at the prompt, and the REPL prints what it evaluates to:
$ guix repl scheme@(guix-user)> (+ 2 3) $1 = 5 scheme@(guix-user)> (string-append "a" "b") $2 = "ab"
It becomes interesting when you start fiddling with Guix at the REPL. The
first thing you’ll want to do is to “import” the (guix) module,
which gives access to the main part of the programming interface, and
perhaps a bunch of useful Guix modules. You could type (use-modules
(guix)), which is valid Scheme code to import a module (see Using Guile
Modules in GNU Guile Reference Manual), but the REPL provides the
use command as a shorthand notation (see REPL Commands in GNU Guile Reference Manual):
scheme@(guix-user)> ,use (guix) scheme@(guix-user)> ,use (gnu packages base)
Notice that REPL commands are introduced by a leading comma. A REPL command
like use is not valid Scheme code; it’s interpreted specially by the
REPL.
Guix extends the Guile REPL with additional commands for convenience. Among
those, the build command comes in handy: it ensures that the given
file-like object is built, building it if needed, and returns its output
file name(s). In the example below, we build the coreutils and
grep packages, as well as a “computed file” (see computed-file), and we use the scandir procedure to list the
files in Grep’s /bin directory:
scheme@(guix-user)> ,build coreutils
$1 = "/gnu/store/…-coreutils-8.32-debug"
$2 = "/gnu/store/…-coreutils-8.32"
scheme@(guix-user)> ,build grep
$3 = "/gnu/store/…-grep-3.6"
scheme@(guix-user)> ,build (computed-file "x" #~(mkdir #$output))
building /gnu/store/…-x.drv...
$4 = "/gnu/store/…-x"
scheme@(guix-user)> ,use(ice-9 ftw)
scheme@(guix-user)> (scandir (string-append $3 "/bin"))
$5 = ("." ".." "egrep" "fgrep" "grep")
At a lower-level, a useful command is lower: it takes a file-like
object and “lowers” it into a derivation (see Derivations) or a store
file:
scheme@(guix-user)> ,lower grep $6 = #<derivation /gnu/store/…-grep-3.6.drv => /gnu/store/…-grep-3.6 7f0e639115f0> scheme@(guix-user)> ,lower (plain-file "x" "Hello!") $7 = "/gnu/store/…-x"
The full list of REPL commands can be seen by typing ,help guix and
is given below for reference.
- REPL command: build object
Lower object and build it if it’s not already built, returning its output file name(s).
- REPL command: lower object
Lower object into a derivation or store file name and return it.
- REPL command: verbosity level
Change build verbosity to level.
This is similar to the --verbosity command-line option (see 普通的构建选项): level 0 means total silence, level 1 shows build events only, and higher levels print build logs.
- REPL command: run-in-store exp
Run exp, a monadic expresssion, through the store monad. See 仓库monad, for more information.
- REPL command: enter-store-monad
Enter a new REPL to evaluate monadic expressions (see 仓库monad). You can quit this “inner” REPL by typing
,q.
Next: Foreign Architectures, Previous: 编程接口, Up: GNU Guix [Contents][Index]
10 工具
This section describes Guix command-line utilities. Some of them are primarily targeted at developers and users who write new package definitions, while others are more generally useful. They complement the Scheme programming interface of Guix in a convenient way.
- 调用
guix build - Invoking
guix edit - Invoking
guix download - Invoking
guix hash - Invoking
guix import - Invoking
guix refresh - Invoking
guix style - Invoking
guix lint - Invoking
guix size - Invoking
guix graph - Invoking
guix publish - Invoking
guix challenge - Invoking
guix copy - Invoking
guix container - Invoking
guix weather - Invoking
guix processes
Next: Invoking guix edit, Up: 工具 [Contents][Index]
10.1 调用guix build
The guix build command builds packages or derivations and their
dependencies, and prints the resulting store paths. Note that it does not
modify the user’s profile—this is the job of the guix package
command (see Invoking guix package). Thus, it is mainly useful for
distribution developers.
The general syntax is:
guix build options package-or-derivation…
As an example, the following command builds the latest versions of Emacs and of Guile, displays their build logs, and finally displays the resulting directories:
guix build emacs guile
Similarly, the following command builds all the available packages:
guix build --quiet --keep-going \
$(guix package -A | awk '{ print $1 "@" $2 }')
package-or-derivation may be either the name of a package found in the
software distribution such as coreutils or coreutils@8.20, or
a derivation such as /gnu/store/…-coreutils-8.19.drv. In the
former case, a package with the corresponding name (and optionally version)
is searched for among the GNU distribution modules (see 软件包模块).
Alternatively, the --expression option may be used to specify a Scheme expression that evaluates to a package; this is useful when disambiguating among several same-named packages or package variants is needed.
There may be zero or more options. The available options are described in the subsections below.
Next: 软件包转换选项, Up: 调用guix build [Contents][Index]
10.1.1 普通的构建选项
A number of options that control the build process are common to
guix build and other commands that can spawn builds, such as
guix package or guix archive. These are the following:
--load-path=directory-L directoryAdd directory to the front of the package module search path (see 软件包模块).
This allows users to define their own packages and make them visible to the command-line tools.
--keep-failed-KKeep the build tree of failed builds. Thus, if a build fails, its build tree is kept under /tmp, in a directory whose name is shown at the end of the build log. This is useful when debugging build issues. See 调试构建错误, for tips and tricks on how to debug build issues.
This option implies --no-offload, and it has no effect when connecting to a remote daemon with a
guix://URI (see theGUIX_DAEMON_SOCKETvariable).--keep-going-kKeep going when some of the derivations fail to build; return only once all the builds have either completed or failed.
The default behavior is to stop as soon as one of the specified derivations has failed.
--dry-run-nDo not build the derivations.
--fallbackWhen substituting a pre-built binary fails, fall back to building packages locally (see substitute失败).
--substitute-urls=urlsConsider urls the whitespace-separated list of substitute source URLs, overriding the default list of URLs of
guix-daemon(seeguix-daemonURLs).This means that substitutes may be downloaded from urls, provided they are signed by a key authorized by the system administrator (see substitutes).
When urls is the empty string, substitutes are effectively disabled.
--no-substitutes不要为构建商品使用substitute。即,总是在本地构建,而不是下载预构建的二进制文件(see substitutes)。
--no-graftsDo not “graft” packages. In practice, this means that package updates available as grafts are not applied. See 安全更新, for more information on grafts.
--rounds=nBuild each derivation n times in a row, and raise an error if consecutive build results are not bit-for-bit identical.
This is a useful way to detect non-deterministic builds processes. Non-deterministic build processes are a problem because they make it practically impossible for users to verify whether third-party binaries are genuine. See Invoking
guix challenge, for more.当和--keep-failed一起使用时,不同的输出保存在/gnu/store/…-check。这让检查两个结果的区别更容易。
--no-offloadDo not use offload builds to other machines (see 使用任务下发设施). That is, always build things locally instead of offloading builds to remote machines.
--max-silent-time=seconds当构建或substitution进程超过seconds秒仍然保持静默,就把它结束掉并报告构建失败。
By default, the daemon’s setting is honored (see --max-silent-time).
--timeout=seconds类似地,当构建或substitution进程执行超过seconds秒,就把它结束掉并报告构建失败。
By default, the daemon’s setting is honored (see --timeout).
-v level--verbosity=levelUse the given verbosity level, an integer. Choosing 0 means that no output is produced, 1 is for quiet output; 2 is similar to 1 but it additionally displays download URLs; 3 shows all the build log output on standard error.
--cores=n-c nAllow the use of up to n CPU cores for the build. The special value
0means to use as many CPU cores as available.--max-jobs=n-M nAllow at most n build jobs in parallel. See --max-jobs, for details about this option and the equivalent
guix-daemonoption.--debug=levelProduce debugging output coming from the build daemon. level must be an integer between 0 and 5; higher means more verbose output. Setting a level of 4 or more may be helpful when debugging setup issues with the build daemon.
Behind the scenes, guix build is essentially an interface to the
package-derivation procedure of the (guix packages) module,
and to the build-derivations procedure of the (guix
derivations) module.
In addition to options explicitly passed on the command line, guix
build and other guix commands that support building honor the
GUIX_BUILD_OPTIONS environment variable.
- Environment Variable: GUIX_BUILD_OPTIONS
Users can define this variable to a list of command line options that will automatically be used by
guix buildand otherguixcommands that can perform builds, as in the example below:$ export GUIX_BUILD_OPTIONS="--no-substitutes -c 2 -L /foo/bar"
These options are parsed independently, and the result is appended to the parsed command-line options.
Next: 额外的构建选项, Previous: 普通的构建选项, Up: 调用guix build [Contents][Index]
10.1.2 软件包转换选项
Another set of command-line options supported by guix build and
also guix package are package transformation options. These
are options that make it possible to define package variants—for
instance, packages built from different source code. This is a convenient
way to create customized packages on the fly without having to type in the
definitions of package variants (see 定义软件包).
Package transformation options are preserved across upgrades: guix
upgrade attempts to apply transformation options initially used when
creating the profile to the upgraded packages.
The available options are listed below. Most commands support them and also support a --help-transform option that lists all the available options and a synopsis (these options are not shown in the --help output for brevity).
--tune[=cpu]Use versions of the packages marked as “tunable” optimized for cpu. When cpu is
native, or when it is omitted, tune for the CPU on which theguixcommand is running.Valid cpu names are those recognized by the underlying compiler, by default the GNU Compiler Collection. On x86_64 processors, this includes CPU names such as
nehalem,haswell, andskylake(see-marchin Using the GNU Compiler Collection (GCC)).As new generations of CPUs come out, they augment the standard instruction set architecture (ISA) with additional instructions, in particular instructions for single-instruction/multiple-data (SIMD) parallel processing. For example, while Core2 and Skylake CPUs both implement the x86_64 ISA, only the latter supports AVX2 SIMD instructions.
The primary gain one can expect from --tune is for programs that can make use of those SIMD capabilities and that do not already have a mechanism to select the right optimized code at run time. Packages that have the
tunable?property set are considered tunable packages by the --tune option; a package definition with the property set looks like this:(package (name "hello-simd") ;; ... ;; This package may benefit from SIMD extensions so ;; mark it as "tunable". (properties '((tunable? . #t))))Other packages are not considered tunable. This allows Guix to use generic binaries in the cases where tuning for a specific CPU is unlikely to provide any gain.
Tuned packages are built with
-march=CPU; under the hood, the -march option is passed to the actual wrapper by a compiler wrapper. Since the build machine may not be able to run code for the target CPU micro-architecture, the test suite is not run when building a tuned package.To reduce rebuilds to the minimum, tuned packages are grafted onto packages that depend on them (see grafts). Thus, using --no-grafts cancels the effect of --tune.
We call this technique package multi-versioning: several variants of tunable packages may be built, one for each CPU variant. It is the coarse-grain counterpart of function multi-versioning as implemented by the GNU tool chain (see Function Multiversioning in Using the GNU Compiler Collection (GCC)).
--with-source=source--with-source=package=source--with-source=package@version=sourceUse source as the source of package, and version as its version number. source must be a file name or a URL, as for
guix download(see Invokingguix download).When package is omitted, it is taken to be the package name specified on the command line that matches the base of source—e.g., if source is
/src/guile-2.0.10.tar.gz, the corresponding package isguile.Likewise, when version is omitted, the version string is inferred from source; in the previous example, it is
2.0.10.This option allows users to try out versions of packages other than the one provided by the distribution. The example below downloads ed-1.7.tar.gz from a GNU mirror and uses that as the source for the
edpackage:guix build ed --with-source=mirror://gnu/ed/ed-1.4.tar.gz
As a developer, --with-source makes it easy to test release candidates, and even to test their impact on packages that depend on them:
guix build elogind --with-source=…/shepherd-0.9.0rc1.tar.gz
… or to build from a checkout in a pristine environment:
$ git clone git://git.sv.gnu.org/guix.git $ guix build guix --with-source=guix@1.0=./guix
--with-input=package=replacementReplace dependency on package by a dependency on replacement. package must be a package name, and replacement must be a package specification such as
guileorguile@1.8.For instance, the following command builds Guix, but replaces its dependency on the current stable version of Guile with a dependency on the legacy version of Guile,
guile@2.0:guix build --with-input=guile=guile@2.0 guix
This is a recursive, deep replacement. So in this example, both
guixand its dependencyguile-json(which also depends onguile) get rebuilt againstguile@2.0.This is implemented using the
package-input-rewritingScheme procedure (seepackage-input-rewriting).--with-graft=package=replacementThis is similar to --with-input but with an important difference: instead of rebuilding the whole dependency chain, replacement is built and then grafted onto the binaries that were initially referring to package. See 安全更新, for more information on grafts.
For example, the command below grafts version 3.5.4 of GnuTLS onto Wget and all its dependencies, replacing references to the version of GnuTLS they currently refer to:
guix build --with-graft=gnutls=gnutls@3.5.4 wget
This has the advantage of being much faster than rebuilding everything. But there is a caveat: it works if and only if package and replacement are strictly compatible—for example, if they provide a library, the application binary interface (ABI) of those libraries must be compatible. If replacement is somehow incompatible with package, then the resulting package may be unusable. Use with care!
--with-debug-info=packageBuild package in a way that preserves its debugging info and graft it onto packages that depend on it. This is useful if package does not already provide debugging info as a
debugoutput (see 安装调试文件).For example, suppose you’re experiencing a crash in Inkscape and would like to see what’s up in GLib, a library deep down in Inkscape’s dependency graph. GLib lacks a
debugoutput, so debugging is tough. Fortunately, you rebuild GLib with debugging info and tack it on Inkscape:guix install inkscape --with-debug-info=glib
Only GLib needs to be recompiled so this takes a reasonable amount of time. See 安装调试文件, for more info.
注: Under the hood, this option works by passing the ‘#:strip-binaries? #f’ to the build system of the package of interest (see 构建系统). Most build systems support that option but some do not. In that case, an error is raised.
Likewise, if a C/C++ package is built without
-g(which is rarely the case), debugging info will remain unavailable even when#:strip-binaries?is false.--with-c-toolchain=package=toolchainThis option changes the compilation of package and everything that depends on it so that they get built with toolchain instead of the default GNU tool chain for C/C++.
Consider this example:
guix build octave-cli \ --with-c-toolchain=fftw=gcc-toolchain@10 \ --with-c-toolchain=fftwf=gcc-toolchain@10
The command above builds a variant of the
fftwandfftwfpackages using version 10 ofgcc-toolchaininstead of the default tool chain, and then builds a variant of the GNU Octave command-line interface using them. GNU Octave itself is also built withgcc-toolchain@10.This other example builds the Hardware Locality (
hwloc) library and its dependents up tointel-mpi-benchmarkswith the Clang C compiler:guix build --with-c-toolchain=hwloc=clang-toolchain \ intel-mpi-benchmarks注: There can be application binary interface (ABI) incompatibilities among tool chains. This is particularly true of the C++ standard library and run-time support libraries such as that of OpenMP. By rebuilding all dependents with the same tool chain, --with-c-toolchain minimizes the risks of incompatibility but cannot entirely eliminate them. Choose package wisely.
--with-git-url=package=url¶-
Build package from the latest commit of the
masterbranch of the Git repository at url. Git sub-modules of the repository are fetched, recursively.For example, the following command builds the NumPy Python library against the latest commit of the master branch of Python itself:
guix build python-numpy \ --with-git-url=python=https://github.com/python/cpython
This option can also be combined with --with-branch or --with-commit (see below).
Obviously, since it uses the latest commit of the given branch, the result of such a command varies over time. Nevertheless it is a convenient way to rebuild entire software stacks against the latest commit of one or more packages. This is particularly useful in the context of continuous integration (CI).
Checkouts are kept in a cache under ~/.cache/guix/checkouts to speed up consecutive accesses to the same repository. You may want to clean it up once in a while to save disk space.
--with-branch=package=branchBuild package from the latest commit of branch. If the
sourcefield of package is an origin with thegit-fetchmethod (seeoriginReference) or agit-checkoutobject, the repository URL is taken from thatsource. Otherwise you have to use --with-git-url to specify the URL of the Git repository.For instance, the following command builds
guile-sqlite3from the latest commit of itsmasterbranch, and then buildsguix(which depends on it) andcuirass(which depends onguix) against this specificguile-sqlite3build:guix build --with-branch=guile-sqlite3=master cuirass
--with-commit=package=commitThis is similar to --with-branch, except that it builds from commit rather than the tip of a branch. commit must be a valid Git commit SHA1 identifier, a tag, or a
git describestyle identifier such as1.0-3-gabc123.--with-patch=package=fileAdd file to the list of patches applied to package, where package is a spec such as
python@3.8orglibc. file must contain a patch; it is applied with the flags specified in theoriginof package (seeoriginReference), which by default includes-p1(see patch Directories in Comparing and Merging Files).As an example, the command below rebuilds Coreutils with the GNU C Library (glibc) patched with the given patch:
guix build coreutils --with-patch=glibc=./glibc-frob.patch
In this example, glibc itself as well as everything that leads to Coreutils in the dependency graph is rebuilt.
--with-latest=packageSo you like living on the bleeding edge? This option is for you! It replaces occurrences of package in the dependency graph with its latest upstream version, as reported by
guix refresh(see Invokingguix refresh).It does so by determining the latest upstream release of package (if possible), downloading it, and authenticating it if it comes with an OpenPGP signature.
As an example, the command below builds Guix against the latest version of Guile-JSON:
guix build guix --with-latest=guile-json
There are limitations. First, in cases where the tool cannot or does not know how to authenticate source code, you are at risk of running malicious code; a warning is emitted in this case. Second, this option simply changes the source used in the existing package definitions, which is not always sufficient: there might be additional dependencies that need to be added, patches to apply, and more generally the quality assurance work that Guix developers normally do will be missing.
You’ve been warned! In all the other cases, it’s a snappy way to stay on top. We encourage you to submit patches updating the actual package definitions once you have successfully tested an upgrade (see 贡献).
--without-tests=packageBuild package without running its tests. This can be useful in situations where you want to skip the lengthy test suite of a intermediate package, or if a package’s test suite fails in a non-deterministic fashion. It should be used with care because running the test suite is a good way to ensure a package is working as intended.
Turning off tests leads to a different store item. Consequently, when using this option, anything that depends on package must be rebuilt, as in this example:
guix install --without-tests=python python-notebook
The command above installs
python-notebookon top ofpythonbuilt without running its test suite. To do so, it also rebuilds everything that depends onpython, includingpython-notebookitself.Internally, --without-tests relies on changing the
#:tests?option of a package’scheckphase (see 构建系统). Note that some packages use a customizedcheckphase that does not respect a#:tests? #fsetting. Therefore, --without-tests has no effect on these packages.
Wondering how to achieve the same effect using Scheme code, for example in your manifest, or how to write your own package transformation? See Defining Package Variants, for an overview of the programming interfaces available.
Next: 调试构建错误, Previous: 软件包转换选项, Up: 调用guix build [Contents][Index]
10.1.3 额外的构建选项
The command-line options presented below are specific to guix
build.
--quiet-qBuild quietly, without displaying the build log; this is equivalent to --verbosity=0. Upon completion, the build log is kept in /var (or similar) and can always be retrieved using the --log-file option.
--file=file-f fileBuild the package, derivation, or other file-like object that the code within file evaluates to (see file-like objects).
As an example, file might contain a package definition like this (see 定义软件包):
(use-modules (guix) (guix build-system gnu) (guix licenses)) (package (name "hello") (version "2.10") (source (origin (method url-fetch) (uri (string-append "mirror://gnu/hello/hello-" version ".tar.gz")) (sha256 (base32 "0ssi1wpaf7plaswqqjwigppsg5fyh99vdlb9kzl7c9lng89ndq1i")))) (build-system gnu-build-system) (synopsis "Hello, GNU world: An example GNU package") (description "Guess what GNU Hello prints!") (home-page "http://www.gnu.org/software/hello/") (license gpl3+))
The file may also contain a JSON representation of one or more package definitions. Running
guix build -fon hello.json with the following contents would result in building the packagesmyhelloandgreeter:[ { "name": "myhello", "version": "2.10", "source": "mirror://gnu/hello/hello-2.10.tar.gz", "build-system": "gnu", "arguments": { "tests?": false } "home-page": "https://www.gnu.org/software/hello/", "synopsis": "Hello, GNU world: An example GNU package", "description": "GNU Hello prints a greeting.", "license": "GPL-3.0+", "native-inputs": ["gettext"] }, { "name": "greeter", "version": "1.0", "source": "https://example.com/greeter-1.0.tar.gz", "build-system": "gnu", "arguments": { "test-target": "foo", "parallel-build?": false, }, "home-page": "https://example.com/", "synopsis": "Greeter using GNU Hello", "description": "This is a wrapper around GNU Hello.", "license": "GPL-3.0+", "inputs": ["myhello", "hello"] } ]--manifest=manifest-m manifestBuild all packages listed in the given manifest (see --manifest).
--expression=expr-e exprBuild the package or derivation expr evaluates to.
For example, expr may be
(@ (gnu packages guile) guile-1.8), which unambiguously designates this specific variant of version 1.8 of Guile.Alternatively, expr may be a G-expression, in which case it is used as a build program passed to
gexp->derivation(see G-表达式).Lastly, expr may refer to a zero-argument monadic procedure (see 仓库monad). The procedure must return a derivation as a monadic value, which is then passed through
run-with-store.--source-SBuild the source derivations of the packages, rather than the packages themselves.
For instance,
guix build -S gccreturns something like /gnu/store/…-gcc-4.7.2.tar.bz2, which is the GCC source tarball.The returned source tarball is the result of applying any patches and code snippets specified in the package
origin(see 定义软件包).As with other derivations, the result of building a source derivation can be verified using the --check option (see build-check). This is useful to validate that a (potentially already built or substituted, thus cached) package source matches against its declared hash.
Note that
guix build -Scompiles the sources only of the specified packages. They do not include the sources of statically linked dependencies and by themselves are insufficient for reproducing the packages.--sourcesFetch and return the source of package-or-derivation and all their dependencies, recursively. This is a handy way to obtain a local copy of all the source code needed to build packages, allowing you to eventually build them even without network access. It is an extension of the --source option and can accept one of the following optional argument values:
packageThis value causes the --sources option to behave in the same way as the --source option.
allBuild the source derivations of all packages, including any source that might be listed as
inputs. This is the default value.$ guix build --sources tzdata The following derivations will be built: /gnu/store/…-tzdata2015b.tar.gz.drv /gnu/store/…-tzcode2015b.tar.gz.drv
transitiveBuild the source derivations of all packages, as well of all transitive inputs to the packages. This can be used e.g. to prefetch package source for later offline building.
$ guix build --sources=transitive tzdata The following derivations will be built: /gnu/store/…-tzcode2015b.tar.gz.drv /gnu/store/…-findutils-4.4.2.tar.xz.drv /gnu/store/…-grep-2.21.tar.xz.drv /gnu/store/…-coreutils-8.23.tar.xz.drv /gnu/store/…-make-4.1.tar.xz.drv /gnu/store/…-bash-4.3.tar.xz.drv …
--system=system-s systemAttempt to build for system—e.g.,
i686-linux—instead of the system type of the build host. Theguix buildcommand allows you to repeat this option several times, in which case it builds for all the specified systems; other commands ignore extraneous -s options.注: The --system flag is for native compilation and must not be confused with cross-compilation. See --target below for information on cross-compilation.
An example use of this is on Linux-based systems, which can emulate different personalities. For instance, passing --system=i686-linux on an
x86_64-linuxsystem or --system=armhf-linux on anaarch64-linuxsystem allows you to build packages in a complete 32-bit environment.注: Building for an
armhf-linuxsystem is unconditionally enabled onaarch64-linuxmachines, although certain aarch64 chipsets do not allow for this functionality, notably the ThunderX.Similarly, when transparent emulation with QEMU and
binfmt_miscis enabled (seeqemu-binfmt-service-type), you can build for any system for which a QEMUbinfmt_mischandler is installed.Builds for a system other than that of the machine you are using can also be offloaded to a remote machine of the right architecture. See 使用任务下发设施, for more information on offloading.
--target=triplet¶Cross-build for triplet, which must be a valid GNU triplet, such as
"aarch64-linux-gnu"(see GNU configuration triplets in Autoconf).--list-systemsList all the supported systems, that can be passed as an argument to --system.
--list-targetsList all the supported targets, that can be passed as an argument to --target.
--check¶-
Rebuild package-or-derivation, which are already available in the store, and raise an error if the build results are not bit-for-bit identical.
This mechanism allows you to check whether previously installed substitutes are genuine (see substitutes), or whether the build result of a package is deterministic. See Invoking
guix challenge, for more background information and tools.当和--keep-failed一起使用时,不同的输出保存在/gnu/store/…-check。这让检查两个结果的区别更容易。
--repair¶-
Attempt to repair the specified store items, if they are corrupt, by re-downloading or rebuilding them.
This operation is not atomic and thus restricted to
root. --derivations-dReturn the derivation paths, not the output paths, of the given packages.
--root=file¶-r file-
Make file a symlink to the result, and register it as a garbage collector root.
Consequently, the results of this
guix buildinvocation are protected from garbage collection until file is removed. When that option is omitted, build results are eligible for garbage collection as soon as the build completes. See Invokingguix gc, for more on GC roots. --log-file¶Return the build log file names or URLs for the given package-or-derivation, or raise an error if build logs are missing.
This works regardless of how packages or derivations are specified. For instance, the following invocations are equivalent:
guix build --log-file $(guix build -d guile) guix build --log-file $(guix build guile) guix build --log-file guile guix build --log-file -e '(@ (gnu packages guile) guile-2.0)'
If a log is unavailable locally, and unless --no-substitutes is passed, the command looks for a corresponding log on one of the substitute servers (as specified with --substitute-urls).
So for instance, imagine you want to see the build log of GDB on
aarch64, but you are actually on anx86_64machine:$ guix build --log-file gdb -s aarch64-linux https://ci.guix.gnu.org/log/…-gdb-7.10
You can freely access a huge library of build logs!
Previous: 额外的构建选项, Up: 调用guix build [Contents][Index]
10.1.4 调试构建错误
When defining a new package (see 定义软件包), you will probably find yourself spending some time debugging and tweaking the build until it succeeds. To do that, you need to operate the build commands yourself in an environment as close as possible to the one the build daemon uses.
To that end, the first thing to do is to use the --keep-failed or
-K option of guix build, which will keep the failed build
tree in /tmp or whatever directory you specified as TMPDIR
(see --keep-failed).
From there on, you can cd to the failed build tree and source the
environment-variables file, which contains all the environment
variable definitions that were in place when the build failed. So let’s say
you’re debugging a build failure in package foo; a typical session
would look like this:
$ guix build foo -K … build fails $ cd /tmp/guix-build-foo.drv-0 $ source ./environment-variables $ cd foo-1.2
Now, you can invoke commands as if you were the daemon (almost) and troubleshoot your build process.
Sometimes it happens that, for example, a package’s tests pass when you run them manually but they fail when the daemon runs them. This can happen because the daemon runs builds in containers where, unlike in our environment above, network access is missing, /bin/sh does not exist, etc. (see 设置构建环境).
In such cases, you may need to run inspect the build process from within a container similar to the one the build daemon creates:
$ guix build -K foo … $ cd /tmp/guix-build-foo.drv-0 $ guix shell --no-grafts -C -D foo strace gdb [env]# source ./environment-variables [env]# cd foo-1.2
Here, guix shell -C creates a container and spawns a new shell in
it (see Invoking guix shell). The strace gdb part adds the
strace and gdb commands to the container, which you may
find handy while debugging. The --no-grafts option makes sure we
get the exact same environment, with ungrafted packages (see 安全更新, for more info on grafts).
To get closer to a container like that used by the build daemon, we can remove /bin/sh:
[env]# rm /bin/sh
(Don’t worry, this is harmless: this is all happening in the throw-away
container created by guix shell.)
The strace command is probably not in the search path, but we can
run:
[env]# $GUIX_ENVIRONMENT/bin/strace -f -o log make check
In this way, not only you will have reproduced the environment variables the daemon uses, you will also be running the build process in a container similar to the one the daemon uses.
Next: Invoking guix download, Previous: 调用guix build, Up: 工具 [Contents][Index]
10.2 Invoking guix edit
So many packages, so many source files! The guix edit command
facilitates the life of users and packagers by pointing their editor at the
source file containing the definition of the specified packages. For
instance:
guix edit gcc@4.9 vim
launches the program specified in the VISUAL or in the EDITOR
environment variable to view the recipe of GCC 4.9.3 and that of Vim.
If you are using a Guix Git checkout (see 从Git构建), or have
created your own packages on GUIX_PACKAGE_PATH (see 软件包模块), you will be able to edit the package recipes. In other cases,
you will be able to examine the read-only recipes for packages currently in
the store.
Instead of GUIX_PACKAGE_PATH, the command-line option
--load-path=directory (or in short -L
directory) allows you to add directory to the front of the
package module search path and so make your own packages visible.
Next: Invoking guix hash, Previous: Invoking guix edit, Up: 工具 [Contents][Index]
10.3 Invoking guix download
When writing a package definition, developers typically need to download a
source tarball, compute its SHA256 hash, and write that hash in the package
definition (see 定义软件包). The guix download tool
helps with this task: it downloads a file from the given URI, adds it to the
store, and prints both its file name in the store and its SHA256 hash.
The fact that the downloaded file is added to the store saves bandwidth:
when the developer eventually tries to build the newly defined package with
guix build, the source tarball will not have to be downloaded
again because it is already in the store. It is also a convenient way to
temporarily stash files, which may be deleted eventually (see Invoking guix gc).
The guix download command supports the same URIs as used in
package definitions. In particular, it supports mirror:// URIs.
https URIs (HTTP over TLS) are supported provided the Guile
bindings for GnuTLS are available in the user’s environment; when they are
not available, an error is raised. See how to install
the GnuTLS bindings for Guile in GnuTLS-Guile, for more
information.
guix download verifies HTTPS server certificates by loading the
certificates of X.509 authorities from the directory pointed to by the
SSL_CERT_DIR environment variable (see X.509证书), unless
--no-check-certificate is used.
The following options are available:
--hash=algorithm-H algorithmCompute a hash using the specified algorithm. See Invoking
guix hash, for more information.--format=fmt-f fmtWrite the hash in the format specified by fmt. For more information on the valid values for fmt, see Invoking
guix hash.--no-check-certificateDo not validate the X.509 certificates of HTTPS servers.
When using this option, you have absolutely no guarantee that you are communicating with the authentic server responsible for the given URL, which makes you vulnerable to “man-in-the-middle” attacks.
--output=file-o fileSave the downloaded file to file instead of adding it to the store.
Next: Invoking guix import, Previous: Invoking guix download, Up: 工具 [Contents][Index]
10.4 Invoking guix hash
The guix hash command computes the hash of a file. It is
primarily a convenience tool for anyone contributing to the distribution: it
computes the cryptographic hash of one or more files, which can be used in
the definition of a package (see 定义软件包).
The general syntax is:
guix hash option file ...
When file is - (a hyphen), guix hash computes the
hash of data read from standard input. guix hash has the
following options:
--hash=algorithm-H algorithmCompute a hash using the specified algorithm,
sha256by default.algorithm must be the name of a cryptographic hash algorithm supported by Libgcrypt via Guile-Gcrypt—e.g.,
sha512orsha3-256(see Hash Functions in Guile-Gcrypt Reference Manual).--format=fmt-f fmtWrite the hash in the format specified by fmt.
Supported formats:
base64,nix-base32,base32,base16(hexandhexadecimalcan be used as well).If the --format option is not specified,
guix hashwill output the hash innix-base32. This representation is used in the definitions of packages.--recursive-rThe --recursive option is deprecated in favor of --serializer=nar (see below); -r remains accepted as a convenient shorthand.
--serializer=type-S typeCompute the hash on file using type serialization.
type may be one of the following:
noneThis is the default: it computes the hash of a file’s contents.
narCompute the hash of a “normalized archive” (or “nar”) containing file, including its children if it is a directory. Some of the metadata of file is part of the archive; for instance, when file is a regular file, the hash is different depending on whether file is executable or not. Metadata such as time stamps have no impact on the hash (see Invoking
guix archive, for more info on the nar format).gitCompute the hash of the file or directory as a Git “tree”, following the same method as the Git version control system.
--exclude-vcs-xWhen combined with --recursive, exclude version control system directories (.bzr, .git, .hg, etc.).
As an example, here is how you would compute the hash of a Git checkout, which is useful when using the
git-fetchmethod (seeoriginReference):$ git clone http://example.org/foo.git $ cd foo $ guix hash -x --serializer=nar .
Next: Invoking guix refresh, Previous: Invoking guix hash, Up: 工具 [Contents][Index]
10.5 Invoking guix import
The guix import command is useful for people who would like to add
a package to the distribution with as little work as possible—a legitimate
demand. The command knows of a few repositories from which it can
“import” package metadata. The result is a package definition, or a
template thereof, in the format we know (see 定义软件包).
The general syntax is:
guix import importer options…
importer specifies the source from which to import package metadata, and options specifies a package identifier and other options specific to importer.
Some of the importers rely on the ability to run the gpgv
command. For these, GnuPG must be installed and in $PATH; run
guix install gnupg if needed.
Currently, the available “importers” are:
gnuImport metadata for the given GNU package. This provides a template for the latest version of that GNU package, including the hash of its source tarball, and its canonical synopsis and description.
Additional information such as the package dependencies and its license needs to be figured out manually.
For example, the following command returns a package definition for GNU Hello:
guix import gnu hello
Specific command-line options are:
--key-download=policyAs for
guix refresh, specify the policy to handle missing OpenPGP keys when verifying the package signature. See --key-download.
pypi¶Import metadata from the Python Package Index. Information is taken from the JSON-formatted description available at
pypi.python.organd usually includes all the relevant information, including package dependencies. For maximum efficiency, it is recommended to install theunziputility, so that the importer can unzip Python wheels and gather data from them.The command below imports metadata for the latest version of the
itsdangerousPython package:guix import pypi itsdangerous
You can also ask for a specific version:
guix import pypi itsdangerous@1.1.0
--recursive-rTraverse the dependency graph of the given upstream package recursively and generate package expressions for all those packages that are not yet in Guix.
gem¶Import metadata from RubyGems. Information is taken from the JSON-formatted description available at
rubygems.organd includes most relevant information, including runtime dependencies. There are some caveats, however. The metadata doesn’t distinguish between synopses and descriptions, so the same string is used for both fields. Additionally, the details of non-Ruby dependencies required to build native extensions is unavailable and left as an exercise to the packager.The command below imports metadata for the
railsRuby package:guix import gem rails
You can also ask for a specific version:
guix import gem rails@7.0.4
--recursive-rTraverse the dependency graph of the given upstream package recursively and generate package expressions for all those packages that are not yet in Guix.
minetest¶-
Import metadata from ContentDB. Information is taken from the JSON-formatted metadata provided through ContentDB’s API and includes most relevant information, including dependencies. There are some caveats, however. The license information is often incomplete. The commit hash is sometimes missing. The descriptions are in the Markdown format, but Guix uses Texinfo instead. Texture packs and subgames are unsupported.
The command below imports metadata for the Mesecons mod by Jeija:
guix import minetest Jeija/mesecons
The author name can also be left out:
guix import minetest mesecons
--recursive-rTraverse the dependency graph of the given upstream package recursively and generate package expressions for all those packages that are not yet in Guix.
cpan¶Import metadata from MetaCPAN. Information is taken from the JSON-formatted metadata provided through MetaCPAN’s API and includes most relevant information, such as module dependencies. License information should be checked closely. If Perl is available in the store, then the
corelistutility will be used to filter core modules out of the list of dependencies.The command command below imports metadata for the Acme::Boolean Perl module:
guix import cpan Acme::Boolean
cran¶-
Import metadata from CRAN, the central repository for the GNU R statistical and graphical environment.
Information is extracted from the DESCRIPTION file of the package.
The command command below imports metadata for the Cairo R package:
guix import cran Cairo
You can also ask for a specific version:
guix import cran rasterVis@0.50.3
When --recursive is added, the importer will traverse the dependency graph of the given upstream package recursively and generate package expressions for all those packages that are not yet in Guix.
When --style=specification is added, the importer will generate package definitions whose inputs are package specifications instead of references to package variables. This is useful when generated package definitions are to be appended to existing user modules, as the list of used package modules need not be changed. The default is --style=variable.
When --archive=bioconductor is added, metadata is imported from Bioconductor, a repository of R packages for the analysis and comprehension of high-throughput genomic data in bioinformatics.
Information is extracted from the DESCRIPTION file contained in the package archive.
The command below imports metadata for the GenomicRanges R package:
guix import cran --archive=bioconductor GenomicRanges
Finally, you can also import R packages that have not yet been published on CRAN or Bioconductor as long as they are in a git repository. Use --archive=git followed by the URL of the git repository:
guix import cran --archive=git https://github.com/immunogenomics/harmony
texlive¶-
Import TeX package information from the TeX Live package database for TeX packages that are part of the TeX Live distribution.
Information about the package is obtained from the TeX Live package database, a plain text file that is included in the
texlive-binpackage. The source code is downloaded from possibly multiple locations in the SVN repository of the Tex Live project.The command command below imports metadata for the
fontspecTeX package:guix import texlive fontspec
json¶Import package metadata from a local JSON file. Consider the following example package definition in JSON format:
{ "name": "hello", "version": "2.10", "source": "mirror://gnu/hello/hello-2.10.tar.gz", "build-system": "gnu", "home-page": "https://www.gnu.org/software/hello/", "synopsis": "Hello, GNU world: An example GNU package", "description": "GNU Hello prints a greeting.", "license": "GPL-3.0+", "native-inputs": ["gettext"] }The field names are the same as for the
<package>record (See 定义软件包). References to other packages are provided as JSON lists of quoted package specification strings such asguileorguile@2.0.The importer also supports a more explicit source definition using the common fields for
<origin>records:{ … "source": { "method": "url-fetch", "uri": "mirror://gnu/hello/hello-2.10.tar.gz", "sha256": { "base32": "0ssi1wpaf7plaswqqjwigppsg5fyh99vdlb9kzl7c9lng89ndq1i" } } … }The command below reads metadata from the JSON file
hello.jsonand outputs a package expression:guix import json hello.json
hackage¶Import metadata from the Haskell community’s central package archive Hackage. Information is taken from Cabal files and includes all the relevant information, including package dependencies.
Specific command-line options are:
--stdin-sRead a Cabal file from standard input.
--no-test-dependencies-tDo not include dependencies required only by the test suites.
--cabal-environment=alist-e alistalist is a Scheme alist defining the environment in which the Cabal conditionals are evaluated. The accepted keys are:
os,arch,impland a string representing the name of a flag. The value associated with a flag has to be either the symboltrueorfalse. The value associated with other keys has to conform to the Cabal file format definition. The default value associated with the keysos,archandimplis ‘linux’, ‘x86_64’ and ‘ghc’, respectively.--recursive-rTraverse the dependency graph of the given upstream package recursively and generate package expressions for all those packages that are not yet in Guix.
The command below imports metadata for the latest version of the HTTP Haskell package without including test dependencies and specifying the value of the flag ‘network-uri’ as
false:guix import hackage -t -e "'((\"network-uri\" . false))" HTTP
A specific package version may optionally be specified by following the package name by an at-sign and a version number as in the following example:
guix import hackage mtl@2.1.3.1
stackage¶The
stackageimporter is a wrapper around thehackageone. It takes a package name, looks up the package version included in a long-term support (LTS) Stackage release and uses thehackageimporter to retrieve its metadata. Note that it is up to you to select an LTS release compatible with the GHC compiler used by Guix.Specific command-line options are:
--no-test-dependencies-tDo not include dependencies required only by the test suites.
--lts-version=version-l versionversion is the desired LTS release version. If omitted the latest release is used.
--recursive-rTraverse the dependency graph of the given upstream package recursively and generate package expressions for all those packages that are not yet in Guix.
The command below imports metadata for the HTTP Haskell package included in the LTS Stackage release version 7.18:
guix import stackage --lts-version=7.18 HTTP
elpa¶Import metadata from an Emacs Lisp Package Archive (ELPA) package repository (see Packages in The GNU Emacs Manual).
Specific command-line options are:
--archive=repo-a reporepo identifies the archive repository from which to retrieve the information. Currently the supported repositories and their identifiers are:
- - GNU, selected by the
gnuidentifier. This is the default.Packages from
elpa.gnu.orgare signed with one of the keys contained in the GnuPG keyring at share/emacs/25.1/etc/package-keyring.gpg (or similar) in theemacspackage (see ELPA package signatures in The GNU Emacs Manual). - - NonGNU, selected by the
nongnuidentifier. - - MELPA-Stable, selected by the
melpa-stableidentifier. - - MELPA, selected by the
melpaidentifier.
- - GNU, selected by the
--recursive-rTraverse the dependency graph of the given upstream package recursively and generate package expressions for all those packages that are not yet in Guix.
crate¶Import metadata from the crates.io Rust package repository crates.io, as in this example:
guix import crate blake2-rfc
The crate importer also allows you to specify a version string:
guix import crate constant-time-eq@0.1.0
Additional options include:
--recursive-rTraverse the dependency graph of the given upstream package recursively and generate package expressions for all those packages that are not yet in Guix.
elm¶Import metadata from the Elm package repository package.elm-lang.org, as in this example:
guix import elm elm-explorations/webgl
The Elm importer also allows you to specify a version string:
guix import elm elm-explorations/webgl@1.1.3
Additional options include:
--recursive-rTraverse the dependency graph of the given upstream package recursively and generate package expressions for all those packages that are not yet in Guix.
opam¶-
Import metadata from the OPAM package repository used by the OCaml community.
Additional options include:
--recursive-rTraverse the dependency graph of the given upstream package recursively and generate package expressions for all those packages that are not yet in Guix.
--repoBy default, packages are searched in the official OPAM repository. This option, which can be used more than once, lets you add other repositories which will be searched for packages. It accepts as valid arguments:
- the name of a known repository - can be one of
opam,coq(equivalent tocoq-released),coq-core-dev,coq-extra-devorgrew. - the URL of a repository as expected by the
opam repository addcommand (for instance, the URL equivalent of the aboveopamname would be https://opam.ocaml.org). - the path to a local copy of a repository (a directory containing a packages/ sub-directory).
Repositories are assumed to be passed to this option by order of preference. The additional repositories will not replace the default
opamrepository, which is always kept as a fallback.Also, please note that versions are not compared across repositories. The first repository (from left to right) that has at least one version of a given package will prevail over any others, and the version imported will be the latest one found in this repository only.
- the name of a known repository - can be one of
go¶Import metadata for a Go module using proxy.golang.org.
guix import go gopkg.in/yaml.v2
It is possible to use a package specification with a
@VERSIONsuffix to import a specific version.Additional options include:
--recursive-rTraverse the dependency graph of the given upstream package recursively and generate package expressions for all those packages that are not yet in Guix.
--pin-versionsWhen using this option, the importer preserves the exact versions of the Go modules dependencies instead of using their latest available versions. This can be useful when attempting to import packages that recursively depend on former versions of themselves to build. When using this mode, the symbol of the package is made by appending the version to its name, so that multiple versions of the same package can coexist.
egg¶Import metadata for CHICKEN eggs. The information is taken from PACKAGE.egg files found in the eggs-5-all Git repository. However, it does not provide all the information that we need, there is no “description” field, and the licenses used are not always precise (BSD is often used instead of BSD-N).
guix import egg sourcehut
You can also ask for a specific version:
guix import egg arrays@1.0
Additional options include:
--recursive-rTraverse the dependency graph of the given upstream package recursively and generate package expressions for all those packages that are not yet in Guix.
hexpm¶Import metadata from the hex.pm Erlang and Elixir package repository hex.pm, as in this example:
guix import hexpm stun
The importer tries to determine the build system used by the package.
The hexpm importer also allows you to specify a version string:
guix import hexpm cf@0.3.0
Additional options include:
--recursive-rTraverse the dependency graph of the given upstream package recursively and generate package expressions for all those packages that are not yet in Guix.
The structure of the guix import code is modular. It would be
useful to have more importers for other package formats, and your help is
welcome here (see 贡献).
Next: Invoking guix style, Previous: Invoking guix import, Up: 工具 [Contents][Index]
10.6 Invoking guix refresh
The primary audience of the guix refresh command is packagers. As
a user, you may be interested in the --with-latest option, which
can bring you package update superpowers built upon guix refresh
(see --with-latest). By
default, guix refresh reports any packages provided by the
distribution that are outdated compared to the latest upstream version, like
this:
$ guix refresh gnu/packages/gettext.scm:29:13: gettext would be upgraded from 0.18.1.1 to 0.18.2.1 gnu/packages/glib.scm:77:12: glib would be upgraded from 2.34.3 to 2.37.0
Alternatively, one can specify packages to consider, in which case a warning is emitted for packages that lack an updater:
$ guix refresh coreutils guile guile-ssh gnu/packages/ssh.scm:205:2: warning: no updater for guile-ssh gnu/packages/guile.scm:136:12: guile would be upgraded from 2.0.12 to 2.0.13
guix refresh browses the upstream repository of each package and
determines the highest version number of the releases therein. The command
knows how to update specific types of packages: GNU packages, ELPA packages,
etc.—see the documentation for --type below. There are many
packages, though, for which it lacks a method to determine whether a new
upstream release is available. However, the mechanism is extensible, so
feel free to get in touch with us to add a new method!
--recursiveConsider the packages specified, and all the packages upon which they depend.
$ guix refresh --recursive coreutils gnu/packages/acl.scm:40:13: acl would be upgraded from 2.2.53 to 2.3.1 gnu/packages/m4.scm:30:12: 1.4.18 is already the latest version of m4 gnu/packages/xml.scm:68:2: warning: no updater for expat gnu/packages/multiprecision.scm:40:12: 6.1.2 is already the latest version of gmp …
Sometimes the upstream name differs from the package name used in Guix, and
guix refresh needs a little help. Most updaters honor the
upstream-name property in package definitions, which can be used to
that effect:
(define-public network-manager
(package
(name "network-manager")
;; …
(properties '((upstream-name . "NetworkManager")))))
When passed --update, it modifies distribution source files to
update the version numbers and source tarball hashes of those package
recipes (see 定义软件包). This is achieved by downloading each
package’s latest source tarball and its associated OpenPGP signature,
authenticating the downloaded tarball against its signature using
gpgv, and finally computing its hash—note that GnuPG must be
installed and in $PATH; run guix install gnupg if needed.
When the public key used to sign the tarball is missing from the user’s
keyring, an attempt is made to automatically retrieve it from a public key
server; when this is successful, the key is added to the user’s keyring;
otherwise, guix refresh reports an error.
The following options are supported:
--expression=expr-e exprConsider the package expr evaluates to.
This is useful to precisely refer to a package, as in this example:
guix refresh -l -e '(@@ (gnu packages commencement) glibc-final)'
This command lists the dependents of the “final” libc (essentially all the packages).
--update-uUpdate distribution source files (package recipes) in place. This is usually run from a checkout of the Guix source tree (see 在安装之前运行Guix):
$ ./pre-inst-env guix refresh -s non-core -u
See 定义软件包, for more information on package definitions.
--select=[subset]-s subsetSelect all the packages in subset, one of
coreornon-core.The
coresubset refers to all the packages at the core of the distribution—i.e., packages that are used to build “everything else”. This includes GCC, libc, Binutils, Bash, etc. Usually, changing one of these packages in the distribution entails a rebuild of all the others. Thus, such updates are an inconvenience to users in terms of build time or bandwidth used to achieve the upgrade.The
non-coresubset refers to the remaining packages. It is typically useful in cases where an update of the core packages would be inconvenient.--manifest=file-m fileSelect all the packages from the manifest in file. This is useful to check if any packages of the user manifest can be updated.
--type=updater-t updaterSelect only packages handled by updater (may be a comma-separated list of updaters). Currently, updater may be one of:
gnuthe updater for GNU packages;
savannahthe updater for packages hosted at Savannah;
sourceforgethe updater for packages hosted at SourceForge;
gnomethe updater for GNOME packages;
kdethe updater for KDE packages;
xorgthe updater for X.org packages;
kernel.orgthe updater for packages hosted on kernel.org;
eggthe updater for Egg packages;
elpathe updater for ELPA packages;
cranthe updater for CRAN packages;
bioconductorthe updater for Bioconductor R packages;
cpanthe updater for CPAN packages;
pypithe updater for PyPI packages.
gemthe updater for RubyGems packages.
githubthe updater for GitHub packages.
hackagethe updater for Hackage packages.
stackagethe updater for Stackage packages.
cratethe updater for Crates packages.
launchpadthe updater for Launchpad packages.
generic-htmla generic updater that crawls the HTML page where the source tarball of the package is hosted, when applicable.
generic-gita generic updater for packages hosted on Git repositories. It tries to be smart about parsing Git tag names, but if it is not able to parse the tag name and compare tags correctly, users can define the following properties for a package.
-
release-tag-prefix: a regular expression for matching a prefix of the tag name. -
release-tag-suffix: a regular expression for matching a suffix of the tag name. -
release-tag-version-delimiter: a string used as the delimiter in the tag name for separating the numbers of the version. -
accept-pre-releases: by default, the updater will ignore pre-releases; to make it also look for pre-releases, set the this property to#t.
(package (name "foo") ;; ... (properties '((release-tag-prefix . "^release0-") (release-tag-suffix . "[a-z]?$") (release-tag-version-delimiter . ":"))))-
For instance, the following command only checks for updates of Emacs packages hosted at
elpa.gnu.organd for updates of CRAN packages:$ guix refresh --type=elpa,cran gnu/packages/statistics.scm:819:13: r-testthat would be upgraded from 0.10.0 to 0.11.0 gnu/packages/emacs.scm:856:13: emacs-auctex would be upgraded from 11.88.6 to 11.88.9
--list-updatersList available updaters and exit (see --type above).
For each updater, display the fraction of packages it covers; at the end, display the fraction of packages covered by all these updaters.
In addition, guix refresh can be passed one or more package names,
as in this example:
$ ./pre-inst-env guix refresh -u emacs idutils gcc@4.8
The command above specifically updates the emacs and idutils
packages. The --select option would have no effect in this case.
You might also want to update definitions that correspond to the packages
installed in your profile:
$ ./pre-inst-env guix refresh -u \
$(guix package --list-installed | cut -f1)
When considering whether to upgrade a package, it is sometimes convenient to
know which packages would be affected by the upgrade and should be checked
for compatibility. For this the following option may be used when passing
guix refresh one or more package names:
--list-dependent-lList top-level dependent packages that would need to be rebuilt as a result of upgrading one or more packages.
See the
reverse-packagetype ofguix graph, for information on how to visualize the list of dependents of a package.
Be aware that the --list-dependent option only approximates the rebuilds that would be required as a result of an upgrade. More rebuilds might be required under some circumstances.
$ guix refresh --list-dependent flex Building the following 120 packages would ensure 213 dependent packages are rebuilt: hop@2.4.0 emacs-geiser@0.13 notmuch@0.18 mu@0.9.9.5 cflow@1.4 idutils@4.6 …
The command above lists a set of packages that could be built to check for
compatibility with an upgraded flex package.
--list-transitiveList all the packages which one or more packages depend upon.
$ guix refresh --list-transitive flex flex@2.6.4 depends on the following 25 packages: perl@5.28.0 help2man@1.47.6 bison@3.0.5 indent@2.2.10 tar@1.30 gzip@1.9 bzip2@1.0.6 xz@5.2.4 file@5.33 …
The command above lists a set of packages which, when changed, would cause
flex to be rebuilt.
The following options can be used to customize GnuPG operation:
--gpg=commandUse command as the GnuPG 2.x command. command is searched for in
$PATH.--keyring=fileUse file as the keyring for upstream keys. file must be in the keybox format. Keybox files usually have a name ending in .kbx and the GNU Privacy Guard (GPG) can manipulate these files (see
kbxutilin Using the GNU Privacy Guard, for information on a tool to manipulate keybox files).When this option is omitted,
guix refreshuses ~/.config/guix/upstream/trustedkeys.kbx as the keyring for upstream signing keys. OpenPGP signatures are checked against keys from this keyring; missing keys are downloaded to this keyring as well (see --key-download below).You can export keys from your default GPG keyring into a keybox file using commands like this one:
gpg --export rms@gnu.org | kbxutil --import-openpgp >> mykeyring.kbx
Likewise, you can fetch keys to a specific keybox file like this:
gpg --no-default-keyring --keyring mykeyring.kbx \ --recv-keys 3CE464558A84FDC69DB40CFB090B11993D9AEBB5
See --keyring in Using the GNU Privacy Guard, for more information on GPG’s --keyring option.
--key-download=policyHandle missing OpenPGP keys according to policy, which may be one of:
alwaysAlways download missing OpenPGP keys from the key server, and add them to the user’s GnuPG keyring.
neverNever try to download missing OpenPGP keys. Instead just bail out.
interactiveWhen a package signed with an unknown OpenPGP key is encountered, ask the user whether to download it or not. This is the default behavior.
--key-server=hostUse host as the OpenPGP key server when importing a public key.
--load-path=directory-L directoryAdd directory to the front of the package module search path (see 软件包模块).
This allows users to define their own packages and make them visible to the command-line tools.
The github updater uses the GitHub API to query for new releases. When used repeatedly e.g. when
refreshing all packages, GitHub will eventually refuse to answer any further
API requests. By default 60 API requests per hour are allowed, and a full
refresh on all GitHub packages in Guix requires more than this.
Authentication with GitHub through the use of an API token alleviates these
limits. To use an API token, set the environment variable
GUIX_GITHUB_TOKEN to a token procured from
https://github.com/settings/tokens or otherwise.
Next: Invoking guix lint, Previous: Invoking guix refresh, Up: 工具 [Contents][Index]
10.7 Invoking guix style
The guix style command helps users and packagers alike style their
package definitions and configuration files according to the latest
fashionable trends. It can either reformat whole files, with the
--whole-file option, or apply specific styling rules to
individual package definitions. The command currently provides the
following styling rules:
- formatting package definitions according to the project’s conventions (see 格式化代码);
- rewriting package inputs to the “new style”, as explained below.
The way package inputs are written is going through a transition
(see package Reference, for more on package inputs). Until version
1.3.0, package inputs were written using the “old style”, where each input
was given an explicit label, most of the time the package name:
(package
;; …
;; The "old style" (deprecated).
(inputs `(("libunistring" ,libunistring)
("libffi" ,libffi))))
Today, the old style is deprecated and the preferred style looks like this:
(package
;; …
;; The "new style".
(inputs (list libunistring libffi)))
Likewise, uses of alist-delete and friends to manipulate inputs is
now deprecated in favor of modify-inputs (see Defining Package Variants, for more info on modify-inputs).
In the vast majority of cases, this is a purely mechanical change on the
surface syntax that does not even incur a package rebuild. Running
guix style -S inputs can do that for you, whether you’re working
on packages in Guix proper or in an external channel.
The general syntax is:
guix style [options] package…
This causes guix style to analyze and rewrite the definition of
package… or, when package is omitted, of all the
packages. The --styling or -S option allows you to select
the style rule, the default rule being format—see below.
To reformat entire source files, the syntax is:
guix style --whole-file file…
The available options are listed below.
--dry-run-nShow source file locations that would be edited but do not modify them.
--whole-file-fReformat the given files in their entirety. In that case, subsequent arguments are interpreted as file names (rather than package names), and the --styling option has no effect.
As an example, here is how you might reformat your operating system configuration (you need write permissions for the file):
guix style -f /etc/config.scm
--styling=rule-S ruleApply rule, one of the following styling rules:
formatFormat the given package definition(s)—this is the default styling rule. For example, a packager running Guix on a checkout (see 在安装之前运行Guix) might want to reformat the definition of the Coreutils package like so:
./pre-inst-env guix style coreutils
inputsRewrite package inputs to the “new style”, as described above. This is how you would rewrite inputs of package
whatnotin your own channel:guix style -L ~/my/channel -S inputs whatnot
Rewriting is done in a conservative way: preserving comments and bailing out if it cannot make sense of the code that appears in an inputs field. The --input-simplification option described below provides fine-grain control over when inputs should be simplified.
--list-stylings-lList and describe the available styling rules and exit.
--load-path=directory-L directoryAdd directory to the front of the package module search path (see 软件包模块).
--expression=expr-e exprStyle the package expr evaluates to.
For example, running:
guix style -e '(@ (gnu packages gcc) gcc-5)'
styles the
gcc-5package definition.--input-simplification=policyWhen using the
inputsstyling rule, with ‘-S inputs’, this option specifies the package input simplification policy for cases where an input label does not match the corresponding package name. policy may be one of the following:silentSimplify inputs only when the change is “silent”, meaning that the package does not need to be rebuilt (its derivation is unchanged).
safeSimplify inputs only when that is “safe” to do: the package might need to be rebuilt, but the change is known to have no observable effect.
alwaysSimplify inputs even when input labels do not match package names, and even if that might have an observable effect.
The default is
silent, meaning that input simplifications do not trigger any package rebuild.
Next: Invoking guix size, Previous: Invoking guix style, Up: 工具 [Contents][Index]
10.8 Invoking guix lint
The guix lint command is meant to help package developers avoid
common errors and use a consistent style. It runs a number of checks on a
given set of packages in order to find common mistakes in their
definitions. Available checkers include (see --list-checkers
for a complete list):
synopsisdescriptionValidate certain typographical and stylistic rules about package descriptions and synopses.
inputs-should-be-nativeIdentify inputs that should most likely be native inputs.
sourcehome-pagemirror-urlgithub-urlsource-file-nameProbe
home-pageandsourceURLs and report those that are invalid. Suggest amirror://URL when applicable. If thesourceURL redirects to a GitHub URL, recommend usage of the GitHub URL. Check that the source file name is meaningful, e.g. is not just a version number or “git-checkout”, without a declaredfile-name(seeoriginReference).source-unstable-tarballParse the
sourceURL to determine if a tarball from GitHub is autogenerated or if it is a release tarball. Unfortunately GitHub’s autogenerated tarballs are sometimes regenerated.derivationCheck that the derivation of the given packages can be successfully computed for all the supported systems (see Derivations).
profile-collisionsCheck whether installing the given packages in a profile would lead to collisions. Collisions occur when several packages with the same name but a different version or a different store file name are propagated. See
propagated-inputs, for more information on propagated inputs.archival¶-
Checks whether the package’s source code is archived at Software Heritage.
When the source code that is not archived comes from a version-control system (VCS)—e.g., it’s obtained with
git-fetch, send Software Heritage a “save” request so that it eventually archives it. This ensures that the source will remain available in the long term, and that Guix can fall back to Software Heritage should the source code disappear from its original host. The status of recent “save” requests can be viewed on-line.When source code is a tarball obtained with
url-fetch, simply print a message when it is not archived. As of this writing, Software Heritage does not allow requests to save arbitrary tarballs; we are working on ways to ensure that non-VCS source code is also archived.Software Heritage limits the request rate per IP address. When the limit is reached,
guix lintprints a message and thearchivalchecker stops doing anything until that limit has been reset. cve¶-
Report known vulnerabilities found in the Common Vulnerabilities and Exposures (CVE) databases of the current and past year published by the US NIST.
To view information about a particular vulnerability, visit pages such as:
- ‘
https://web.nvd.nist.gov/view/vuln/detail?vulnId=CVE-YYYY-ABCD’ - ‘
https://cve.mitre.org/cgi-bin/cvename.cgi?name=CVE-YYYY-ABCD’
where
CVE-YYYY-ABCDis the CVE identifier—e.g.,CVE-2015-7554.Package developers can specify in package recipes the Common Platform Enumeration (CPE) name and version of the package when they differ from the name or version that Guix uses, as in this example:
(package (name "grub") ;; … ;; CPE calls this package "grub2". (properties '((cpe-name . "grub2") (cpe-version . "2.3"))))Some entries in the CVE database do not specify which version of a package they apply to, and would thus “stick around” forever. Package developers who found CVE alerts and verified they can be ignored can declare them as in this example:
(package (name "t1lib") ;; … ;; These CVEs no longer apply and can be safely ignored. (properties `((lint-hidden-cve . ("CVE-2011-0433" "CVE-2011-1553" "CVE-2011-1554" "CVE-2011-5244"))))) - ‘
formattingWarn about obvious source code formatting issues: trailing white space, use of tabulations, etc.
input-labelsReport old-style input labels that do not match the name of the corresponding package. This aims to help migrate from the “old input style”. See
packageReference, for more information on package inputs and input styles. See Invokingguix style, on how to migrate to the new style.
The general syntax is:
guix lint options package…
If no package is given on the command line, then all packages are checked. The options may be zero or more of the following:
--list-checkers-lList and describe all the available checkers that will be run on packages and exit.
--checkers-cOnly enable the checkers specified in a comma-separated list using the names returned by --list-checkers.
--exclude-xOnly disable the checkers specified in a comma-separated list using the names returned by --list-checkers.
--expression=expr-e exprConsider the package expr evaluates to.
This is useful to unambiguously designate packages, as in this example:
guix lint -c archival -e '(@ (gnu packages guile) guile-3.0)'
--no-network-nOnly enable the checkers that do not depend on Internet access.
--load-path=directory-L directoryAdd directory to the front of the package module search path (see 软件包模块).
This allows users to define their own packages and make them visible to the command-line tools.
Next: Invoking guix graph, Previous: Invoking guix lint, Up: 工具 [Contents][Index]
10.9 Invoking guix size
The guix size command helps package developers profile the disk
usage of packages. It is easy to overlook the impact of an additional
dependency added to a package, or the impact of using a single output for a
package that could easily be split (see 有多个输出的软件包). Such are the typical issues that guix size can
highlight.
The command can be passed one or more package specifications such as
gcc@4.8 or guile:debug, or a file name in the store.
Consider this example:
$ guix size coreutils store item total self /gnu/store/…-gcc-5.5.0-lib 60.4 30.1 38.1% /gnu/store/…-glibc-2.27 30.3 28.8 36.6% /gnu/store/…-coreutils-8.28 78.9 15.0 19.0% /gnu/store/…-gmp-6.1.2 63.1 2.7 3.4% /gnu/store/…-bash-static-4.4.12 1.5 1.5 1.9% /gnu/store/…-acl-2.2.52 61.1 0.4 0.5% /gnu/store/…-attr-2.4.47 60.6 0.2 0.3% /gnu/store/…-libcap-2.25 60.5 0.2 0.2% total: 78.9 MiB
The store items listed here constitute the transitive closure of Coreutils—i.e., Coreutils and all its dependencies, recursively—as would be returned by:
$ guix gc -R /gnu/store/…-coreutils-8.23
Here the output shows three columns next to store items. The first column, labeled “total”, shows the size in mebibytes (MiB) of the closure of the store item—that is, its own size plus the size of all its dependencies. The next column, labeled “self”, shows the size of the item itself. The last column shows the ratio of the size of the item itself to the space occupied by all the items listed here.
In this example, we see that the closure of Coreutils weighs in at 79 MiB, most of which is taken by libc and GCC’s run-time support libraries. (That libc and GCC’s libraries represent a large fraction of the closure is not a problem per se because they are always available on the system anyway.)
Since the command also accepts store file names, assessing the size of a build result is straightforward:
guix size $(guix system build config.scm)
When the package(s) passed to guix size are available in the
store24, guix size queries the daemon to determine its
dependencies, and measures its size in the store, similar to du -ms
--apparent-size (see du invocation in GNU Coreutils).
When the given packages are not in the store, guix size
reports information based on the available substitutes
(see substitutes). This makes it possible it to profile disk usage of
store items that are not even on disk, only available remotely.
You can also specify several package names:
$ guix size coreutils grep sed bash store item total self /gnu/store/…-coreutils-8.24 77.8 13.8 13.4% /gnu/store/…-grep-2.22 73.1 0.8 0.8% /gnu/store/…-bash-4.3.42 72.3 4.7 4.6% /gnu/store/…-readline-6.3 67.6 1.2 1.2% … total: 102.3 MiB
In this example we see that the combination of the four packages takes 102.3 MiB in total, which is much less than the sum of each closure since they have a lot of dependencies in common.
When looking at the profile returned by guix size, you may find
yourself wondering why a given package shows up in the profile at all. To
understand it, you can use guix graph --path -t references to
display the shortest path between the two packages (see Invoking guix graph).
The available options are:
- --substitute-urls=urls
Use substitute information from urls. See the same option for
guix build.- --sort=key
Sort lines according to key, one of the following options:
selfthe size of each item (the default);
closurethe total size of the item’s closure.
- --map-file=file
Write a graphical map of disk usage in PNG format to file.
For the example above, the map looks like this:
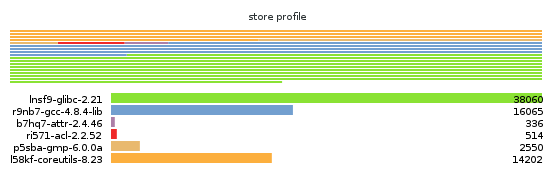
This option requires that Guile-Charting be installed and visible in Guile’s module search path. When that is not the case,
guix sizefails as it tries to load it.- --system=system
- -s system
Consider packages for system—e.g.,
x86_64-linux.- --load-path=directory
- -L directory
Add directory to the front of the package module search path (see 软件包模块).
This allows users to define their own packages and make them visible to the command-line tools.
Next: Invoking guix publish, Previous: Invoking guix size, Up: 工具 [Contents][Index]
10.10 Invoking guix graph
Packages and their dependencies form a graph, specifically a directed
acyclic graph (DAG). It can quickly become difficult to have a mental model
of the package DAG, so the guix graph command provides a visual
representation of the DAG. By default, guix graph emits a DAG
representation in the input format of Graphviz, so its output can be passed directly to the dot command
of Graphviz. It can also emit an HTML page with embedded JavaScript code to
display a “chord diagram” in a Web browser, using the
d3.js library, or emit Cypher queries to construct
a graph in a graph database supporting the
openCypher query language. With
--path, it simply displays the shortest path between two packages.
The general syntax is:
guix graph options package…
For example, the following command generates a PDF file representing the package DAG for the GNU Core Utilities, showing its build-time dependencies:
guix graph coreutils | dot -Tpdf > dag.pdf
The output looks like this:
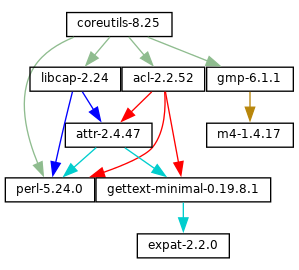
Nice little graph, no?
You may find it more pleasant to navigate the graph interactively with
xdot (from the xdot package):
guix graph coreutils | xdot -
But there is more than one graph! The one above is concise: it is the graph
of package objects, omitting implicit inputs such as GCC, libc, grep, etc.
It is often useful to have such a concise graph, but sometimes one may want
to see more details. guix graph supports several types of graphs,
allowing you to choose the level of detail:
packageThis is the default type used in the example above. It shows the DAG of package objects, excluding implicit dependencies. It is concise, but filters out many details.
reverse-packageThis shows the reverse DAG of packages. For example:
guix graph --type=reverse-package ocaml
... yields the graph of packages that explicitly depend on OCaml (if you are also interested in cases where OCaml is an implicit dependency, see
reverse-bagbelow).Note that for core packages this can yield huge graphs. If all you want is to know the number of packages that depend on a given package, use
guix refresh --list-dependent(see --list-dependent).bag-emergedThis is the package DAG, including implicit inputs.
For instance, the following command:
guix graph --type=bag-emerged coreutils
... yields this bigger graph:
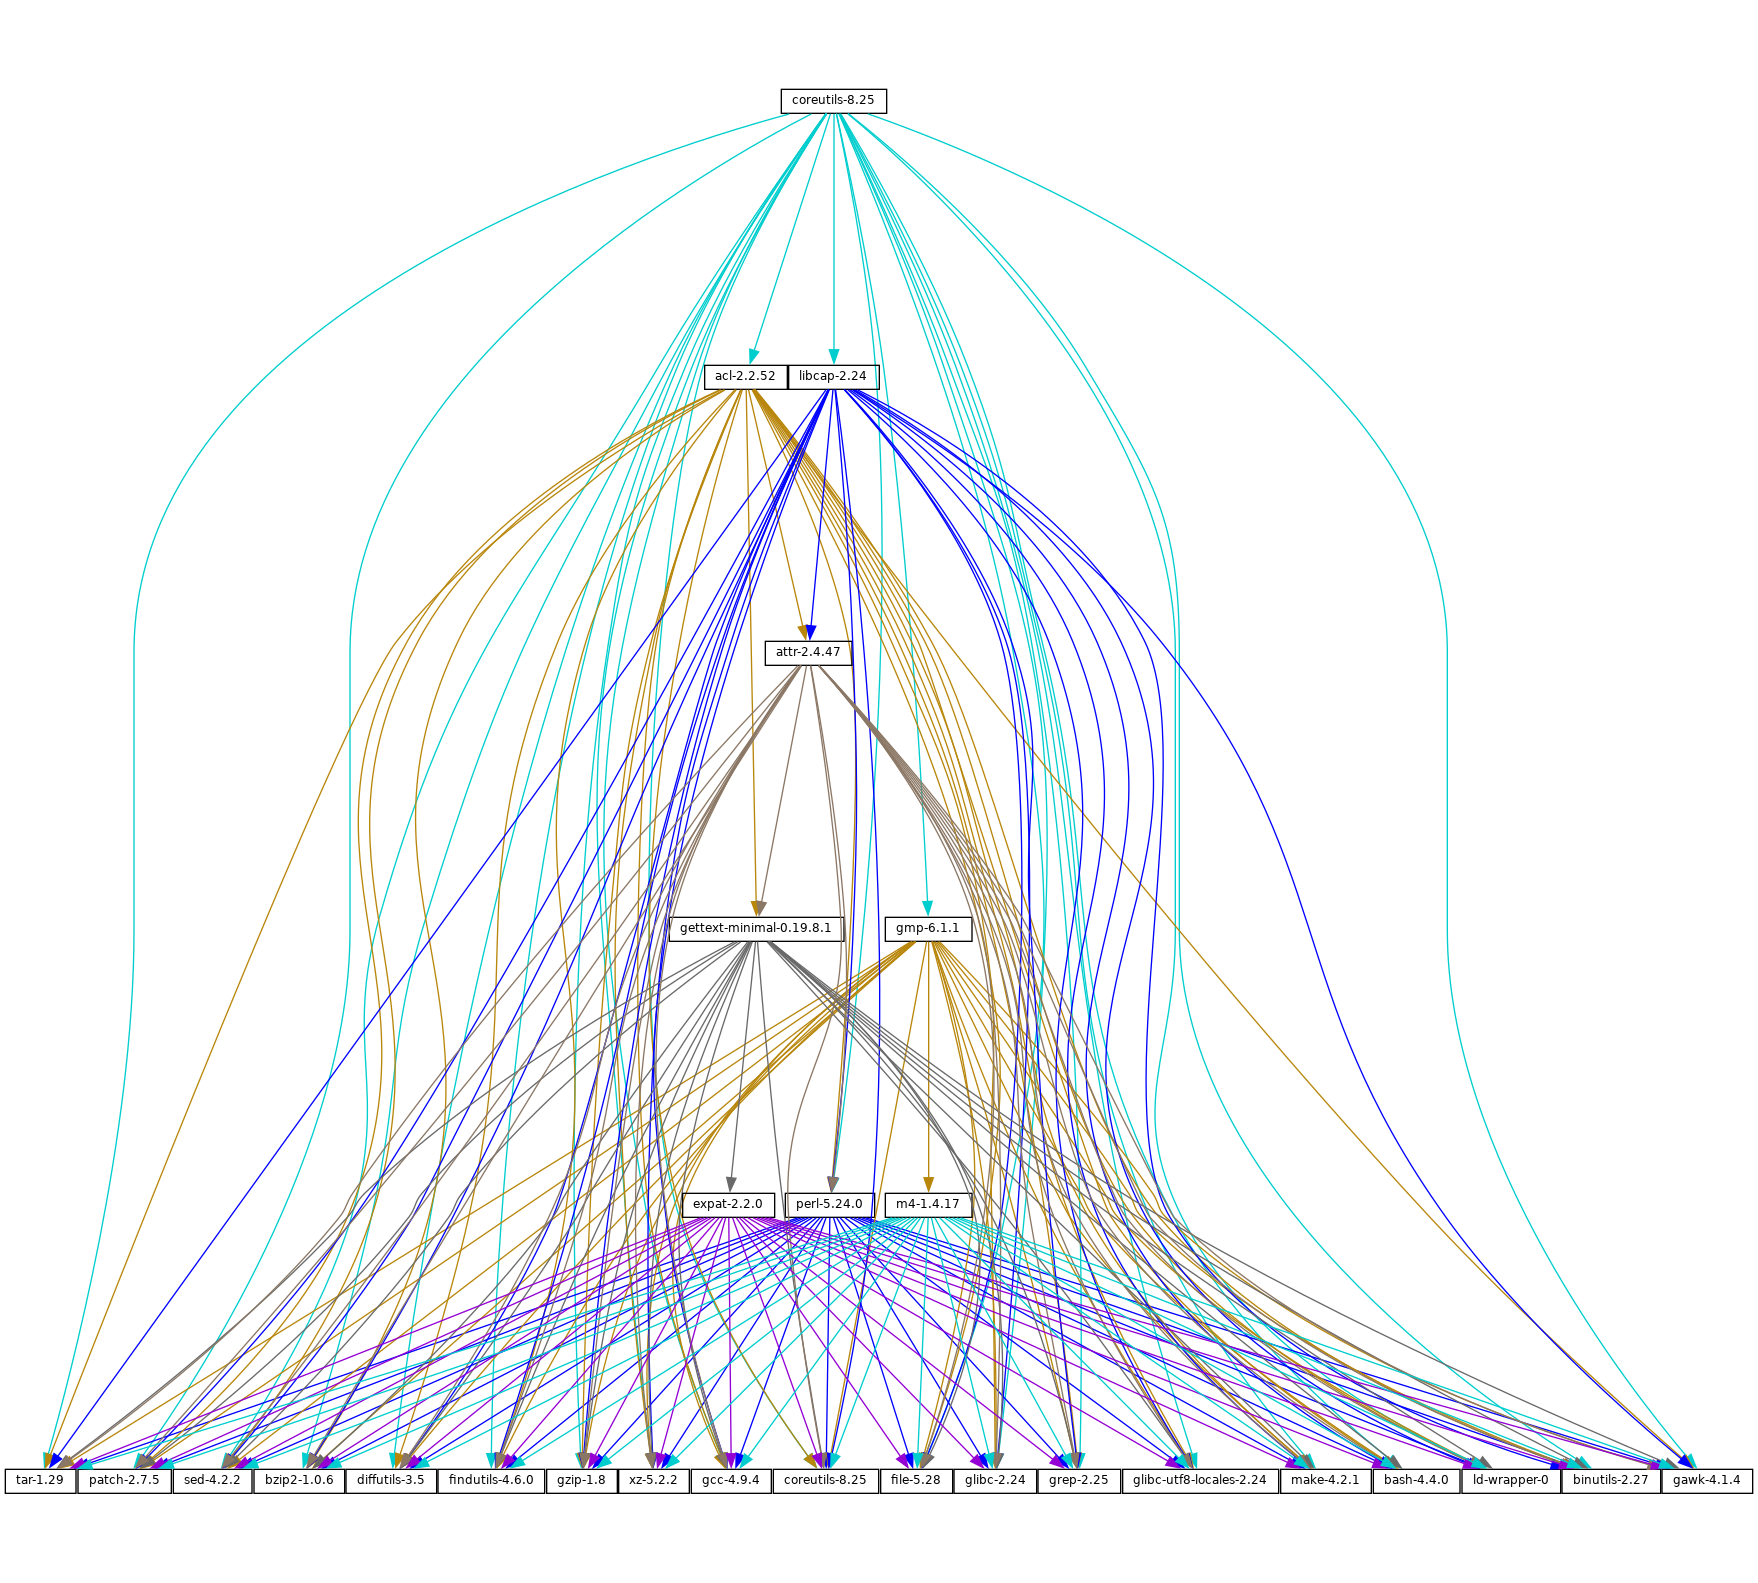
At the bottom of the graph, we see all the implicit inputs of gnu-build-system (see
gnu-build-system).Now, note that the dependencies of these implicit inputs—that is, the bootstrap dependencies (see 引导)—are not shown here, for conciseness.
bagSimilar to
bag-emerged, but this time including all the bootstrap dependencies.bag-with-originsSimilar to
bag, but also showing origins and their dependencies.reverse-bagThis shows the reverse DAG of packages. Unlike
reverse-package, it also takes implicit dependencies into account. For example:guix graph -t reverse-bag dune
... yields the graph of all packages that depend on Dune, directly or indirectly. Since Dune is an implicit dependency of many packages via
dune-build-system, this shows a large number of packages, whereasreverse-packagewould show very few if any.derivationThis is the most detailed representation: It shows the DAG of derivations (see Derivations) and plain store items. Compared to the above representation, many additional nodes are visible, including build scripts, patches, Guile modules, etc.
For this type of graph, it is also possible to pass a .drv file name instead of a package name, as in:
guix graph -t derivation $(guix system build -d my-config.scm)
模块This is the graph of package modules (see 软件包模块). For example, the following command shows the graph for the package module that defines the
guilepackage:guix graph -t module guile | xdot -
All the types above correspond to build-time dependencies. The following graph type represents the run-time dependencies:
referencesThis is the graph of references of a package output, as returned by
guix gc --references(see Invokingguix gc).If the given package output is not available in the store,
guix graphattempts to obtain dependency information from substitutes.Here you can also pass a store file name instead of a package name. For example, the command below produces the reference graph of your profile (which can be big!):
guix graph -t references $(readlink -f ~/.guix-profile)
referrersThis is the graph of the referrers of a store item, as returned by
guix gc --referrers(see Invokingguix gc).This relies exclusively on local information from your store. For instance, let us suppose that the current Inkscape is available in 10 profiles on your machine;
guix graph -t referrers inkscapewill show a graph rooted at Inkscape and with those 10 profiles linked to it.It can help determine what is preventing a store item from being garbage collected.
Often, the graph of the package you are interested in does not fit on your
screen, and anyway all you want to know is why that package actually
depends on some seemingly unrelated package. The --path option
instructs guix graph to display the shortest path between two
packages (or derivations, or store items, etc.):
$ guix graph --path emacs libunistring emacs@26.3 mailutils@3.9 libunistring@0.9.10 $ guix graph --path -t derivation emacs libunistring /gnu/store/…-emacs-26.3.drv /gnu/store/…-mailutils-3.9.drv /gnu/store/…-libunistring-0.9.10.drv $ guix graph --path -t references emacs libunistring /gnu/store/…-emacs-26.3 /gnu/store/…-libidn2-2.2.0 /gnu/store/…-libunistring-0.9.10
Sometimes you still want to visualize the graph but would like to trim it so
it can actually be displayed. One way to do it is via the
--max-depth (or -M) option, which lets you specify the
maximum depth of the graph. In the example below, we visualize only
libreoffice and the nodes whose distance to libreoffice is at
most 2:
guix graph -M 2 libreoffice | xdot -f fdp -
Mind you, that’s still a big ball of spaghetti, but at least dot
can render it quickly and it can be browsed somewhat.
The available options are the following:
- --type=type
- -t type
Produce a graph output of type, where type must be one of the values listed above.
- --list-types
List the supported graph types.
- --backend=backend
- -b backend
Produce a graph using the selected backend.
- --list-backends
List the supported graph backends.
Currently, the available backends are Graphviz and d3.js.
- --path
Display the shortest path between two nodes of the type specified by --type. The example below shows the shortest path between
libreofficeandllvmaccording to the references oflibreoffice:$ guix graph --path -t references libreoffice llvm /gnu/store/…-libreoffice-6.4.2.2 /gnu/store/…-libepoxy-1.5.4 /gnu/store/…-mesa-19.3.4 /gnu/store/…-llvm-9.0.1
- --expression=expr
- -e expr
Consider the package expr evaluates to.
This is useful to precisely refer to a package, as in this example:
guix graph -e '(@@ (gnu packages commencement) gnu-make-final)'
- --system=system
- -s system
Display the graph for system—e.g.,
i686-linux.The package dependency graph is largely architecture-independent, but there are some architecture-dependent bits that this option allows you to visualize.
- --load-path=directory
- -L directory
Add directory to the front of the package module search path (see 软件包模块).
This allows users to define their own packages and make them visible to the command-line tools.
On top of that, guix graph supports all the usual package
transformation options (see 软件包转换选项). This makes
it easy to view the effect of a graph-rewriting transformation such as
--with-input. For example, the command below outputs the graph of
git once openssl has been replaced by libressl
everywhere in the graph:
guix graph git --with-input=openssl=libressl
So many possibilities, so much fun!
Next: Invoking guix challenge, Previous: Invoking guix graph, Up: 工具 [Contents][Index]
10.11 Invoking guix publish
The purpose of guix publish is to enable users to easily share
their store with others, who can then use it as a substitute server
(see substitutes).
When guix publish runs, it spawns an HTTP server which allows
anyone with network access to obtain substitutes from it. This means that
any machine running Guix can also act as if it were a build farm, since the
HTTP interface is compatible with Cuirass, the software behind the
ci.guix.gnu.org build farm.
For security, each substitute is signed, allowing recipients to check their
authenticity and integrity (see substitutes). Because guix
publish uses the signing key of the system, which is only readable by the
system administrator, it must be started as root; the --user option
makes it drop root privileges early on.
The signing key pair must be generated before guix publish is
launched, using guix archive --generate-key (see Invoking guix archive).
When the --advertise option is passed, the server advertises its availability on the local network using multicast DNS (mDNS) and DNS service discovery (DNS-SD), currently via Guile-Avahi (see Using Avahi in Guile Scheme Programs).
The general syntax is:
guix publish options…
Running guix publish without any additional arguments will spawn
an HTTP server on port 8080:
guix publish
guix publish can also be started following the systemd “socket
activation” protocol (see make-systemd-constructor in The GNU Shepherd Manual).
Once a publishing server has been authorized, the daemon may download substitutes from it. See Getting Substitutes from Other Servers.
By default, guix publish compresses archives on the fly as it
serves them. This “on-the-fly” mode is convenient in that it requires no
setup and is immediately available. However, when serving lots of clients,
we recommend using the --cache option, which enables caching of the
archives before they are sent to clients—see below for details. The
guix weather command provides a handy way to check what a server
provides (see Invoking guix weather).
As a bonus, guix publish also serves as a content-addressed mirror
for source files referenced in origin records (see origin Reference). For instance, assuming guix publish is running on
example.org, the following URL returns the raw
hello-2.10.tar.gz file with the given SHA256 hash (represented in
nix-base32 format, see Invoking guix hash):
http://example.org/file/hello-2.10.tar.gz/sha256/0ssi1…ndq1i
Obviously, these URLs only work for files that are in the store; in other cases, they return 404 (“Not Found”).
Build logs are available from /log URLs like:
http://example.org/log/gwspk…-guile-2.2.3
When guix-daemon is configured to save compressed build logs, as
is the case by default (see 调用guix-daemon), /log URLs
return the compressed log as-is, with an appropriate Content-Type
and/or Content-Encoding header. We recommend running
guix-daemon with --log-compression=gzip since Web
browsers can automatically decompress it, which is not the case with Bzip2
compression.
The following options are available:
--port=port-p portListen for HTTP requests on port.
--listen=hostListen on the network interface for host. The default is to accept connections from any interface.
--user=user-u userChange privileges to user as soon as possible—i.e., once the server socket is open and the signing key has been read.
--compression[=method[:level]]-C [method[:level]]Compress data using the given method and level. method is one of
lzip,zstd, andgzip; when method is omitted,gzipis used.When level is zero, disable compression. The range 1 to 9 corresponds to different compression levels: 1 is the fastest, and 9 is the best (CPU-intensive). The default is 3.
Usually,
lzipcompresses noticeably better thangzipfor a small increase in CPU usage; see benchmarks on the lzip Web page. However,lzipachieves low decompression throughput (on the order of 50 MiB/s on modern hardware), which can be a bottleneck for someone who downloads over a fast network connection.The compression ratio of
zstdis between that oflzipand that ofgzip; its main advantage is a high decompression speed.Unless --cache is used, compression occurs on the fly and the compressed streams are not cached. Thus, to reduce load on the machine that runs
guix publish, it may be a good idea to choose a low compression level, to runguix publishbehind a caching proxy, or to use --cache. Using --cache has the advantage that it allowsguix publishto addContent-LengthHTTP header to its responses.This option can be repeated, in which case every substitute gets compressed using all the selected methods, and all of them are advertised. This is useful when users may not support all the compression methods: they can select the one they support.
--cache=directory-c directoryCache archives and meta-data (
.narinfoURLs) to directory and only serve archives that are in cache.When this option is omitted, archives and meta-data are created on-the-fly. This can reduce the available bandwidth, especially when compression is enabled, since this may become CPU-bound. Another drawback of the default mode is that the length of archives is not known in advance, so
guix publishdoes not add aContent-LengthHTTP header to its responses, which in turn prevents clients from knowing the amount of data being downloaded.Conversely, when --cache is used, the first request for a store item (via a
.narinfoURL) triggers a background process to bake the archive—computing its.narinfoand compressing the archive, if needed. Once the archive is cached in directory, subsequent requests succeed and are served directly from the cache, which guarantees that clients get the best possible bandwidth.That first
.narinforequest nonetheless returns 200, provided the requested store item is “small enough”, below the cache bypass threshold—see --cache-bypass-threshold below. That way, clients do not have to wait until the archive is baked. For larger store items, the first.narinforequest returns 404, meaning that clients have to wait until the archive is baked.The “baking” process is performed by worker threads. By default, one thread per CPU core is created, but this can be customized. See --workers below.
When --ttl is used, cached entries are automatically deleted when they have expired.
--workers=NWhen --cache is used, request the allocation of N worker threads to “bake” archives.
--ttl=ttlProduce
Cache-ControlHTTP headers that advertise a time-to-live (TTL) of ttl. ttl must denote a duration:5dmeans 5 days,1mmeans 1 month, and so on.This allows the user’s Guix to keep substitute information in cache for ttl. However, note that
guix publishdoes not itself guarantee that the store items it provides will indeed remain available for as long as ttl.Additionally, when --cache is used, cached entries that have not been accessed for ttl and that no longer have a corresponding item in the store, may be deleted.
--negative-ttl=ttlSimilarly produce
Cache-ControlHTTP headers to advertise the time-to-live (TTL) of negative lookups—missing store items, for which the HTTP 404 code is returned. By default, no negative TTL is advertised.This parameter can help adjust server load and substitute latency by instructing cooperating clients to be more or less patient when a store item is missing.
--cache-bypass-threshold=sizeWhen used in conjunction with --cache, store items smaller than size are immediately available, even when they are not yet in cache. size is a size in bytes, or it can be suffixed by
Mfor megabytes and so on. The default is10M.“Cache bypass” allows you to reduce the publication delay for clients at the expense of possibly additional I/O and CPU use on the server side: depending on the client access patterns, those store items can end up being baked several times until a copy is available in cache.
Increasing the threshold may be useful for sites that have few users, or to guarantee that users get substitutes even for store items that are not popular.
--nar-path=pathUse path as the prefix for the URLs of “nar” files (see normalized archives).
By default, nars are served at a URL such as
/nar/gzip/…-coreutils-8.25. This option allows you to change the/narpart to path.--public-key=file--private-key=fileUse the specific files as the public/private key pair used to sign the store items being published.
The files must correspond to the same key pair (the private key is used for signing and the public key is merely advertised in the signature metadata). They must contain keys in the canonical s-expression format as produced by
guix archive --generate-key(see Invokingguix archive). By default, /etc/guix/signing-key.pub and /etc/guix/signing-key.sec are used.--repl[=port]-r [port]Spawn a Guile REPL server (see REPL Servers in GNU Guile Reference Manual) on port (37146 by default). This is used primarily for debugging a running
guix publishserver.
Enabling guix publish on Guix System is a one-liner: just
instantiate a guix-publish-service-type service in the
services field of the operating-system declaration
(see guix-publish-service-type).
If you are instead running Guix on a “foreign distro”, follow these instructions:
- If your host distro uses the systemd init system:
# ln -s ~root/.guix-profile/lib/systemd/system/guix-publish.service \ /etc/systemd/system/ # systemctl start guix-publish && systemctl enable guix-publish - 如果你的主机的发行版使用Upstart init系统:
# ln -s ~root/.guix-profile/lib/upstart/system/guix-publish.conf /etc/init/ # start guix-publish
- Otherwise, proceed similarly with your distro’s init system.
Next: Invoking guix copy, Previous: Invoking guix publish, Up: 工具 [Contents][Index]
10.12 Invoking guix challenge
Do the binaries provided by this server really correspond to the source code
it claims to build? Is a package build process deterministic? These are the
questions the guix challenge command attempts to answer.
The former is obviously an important question: Before using a substitute server (see substitutes), one had better verify that it provides the right binaries, and thus challenge it. The latter is what enables the former: If package builds are deterministic, then independent builds of the package should yield the exact same result, bit for bit; if a server provides a binary different from the one obtained locally, it may be either corrupt or malicious.
We know that the hash that shows up in /gnu/store file names is the
hash of all the inputs of the process that built the file or
directory—compilers, libraries, build scripts,
etc. (see 介绍). Assuming deterministic build processes, one
store file name should map to exactly one build output. guix
challenge checks whether there is, indeed, a single mapping by comparing
the build outputs of several independent builds of any given store item.
The command output looks like this:
$ guix challenge \
--substitute-urls="https://ci.guix.gnu.org https://guix.example.org" \
openssl git pius coreutils grep
updating substitutes from 'https://ci.guix.gnu.org'... 100.0%
updating substitutes from 'https://guix.example.org'... 100.0%
/gnu/store/…-openssl-1.0.2d contents differ:
local hash: 0725l22r5jnzazaacncwsvp9kgf42266ayyp814v7djxs7nk963q
https://ci.guix.gnu.org/nar/…-openssl-1.0.2d: 0725l22r5jnzazaacncwsvp9kgf42266ayyp814v7djxs7nk963q
https://guix.example.org/nar/…-openssl-1.0.2d: 1zy4fmaaqcnjrzzajkdn3f5gmjk754b43qkq47llbyak9z0qjyim
differing files:
/lib/libcrypto.so.1.1
/lib/libssl.so.1.1
/gnu/store/…-git-2.5.0 contents differ:
local hash: 00p3bmryhjxrhpn2gxs2fy0a15lnip05l97205pgbk5ra395hyha
https://ci.guix.gnu.org/nar/…-git-2.5.0: 069nb85bv4d4a6slrwjdy8v1cn4cwspm3kdbmyb81d6zckj3nq9f
https://guix.example.org/nar/…-git-2.5.0: 0mdqa9w1p6cmli6976v4wi0sw9r4p5prkj7lzfd1877wk11c9c73
differing file:
/libexec/git-core/git-fsck
/gnu/store/…-pius-2.1.1 contents differ:
local hash: 0k4v3m9z1zp8xzzizb7d8kjj72f9172xv078sq4wl73vnq9ig3ax
https://ci.guix.gnu.org/nar/…-pius-2.1.1: 0k4v3m9z1zp8xzzizb7d8kjj72f9172xv078sq4wl73vnq9ig3ax
https://guix.example.org/nar/…-pius-2.1.1: 1cy25x1a4fzq5rk0pmvc8xhwyffnqz95h2bpvqsz2mpvlbccy0gs
differing file:
/share/man/man1/pius.1.gz
…
5 store items were analyzed:
- 2 (40.0%) were identical
- 3 (60.0%) differed
- 0 (0.0%) were inconclusive
In this example, guix challenge queries all the substitute servers
for each of the fives packages specified on the command line. It then
reports those store items for which the servers obtained a result different
from the local build (if it exists) and/or different from one another; here,
the ‘local hash’ lines indicate that a local build result was available
for each of these packages and shows its hash.
As an example, guix.example.org always gets a different answer.
Conversely, ci.guix.gnu.org agrees with local builds,
except in the case of Git. This might indicate that the build process of
Git is non-deterministic, meaning that its output varies as a function of
various things that Guix does not fully control, in spite of building
packages in isolated environments (see 功能). Most common sources
of non-determinism include the addition of timestamps in build results, the
inclusion of random numbers, and directory listings sorted by inode number.
See https://reproducible-builds.org/docs/, for more information.
To find out what is wrong with this Git binary, the easiest approach is to run:
guix challenge git \ --diff=diffoscope \ --substitute-urls="https://ci.guix.gnu.org https://guix.example.org"
This automatically invokes diffoscope, which displays detailed
information about files that differ.
Alternatively, we can do something along these lines (see Invoking guix archive):
$ wget -q -O - https://ci.guix.gnu.org/nar/lzip/…-git-2.5.0 \ | lzip -d | guix archive -x /tmp/git $ diff -ur --no-dereference /gnu/store/…-git.2.5.0 /tmp/git
This command shows the difference between the files resulting from the local
build, and the files resulting from the build on
ci.guix.gnu.org (see Comparing and Merging
Files in Comparing and Merging Files). The diff
command works great for text files. When binary files differ, a better
option is Diffoscope, a tool that helps
visualize differences for all kinds of files.
Once you have done that work, you can tell whether the differences are due
to a non-deterministic build process or to a malicious server. We try hard
to remove sources of non-determinism in packages to make it easier to verify
substitutes, but of course, this is a process that involves not just Guix,
but a large part of the free software community. In the meantime,
guix challenge is one tool to help address the problem.
If you are writing packages for Guix, you are encouraged to check whether
ci.guix.gnu.org and other substitute servers obtain the
same build result as you did with:
guix challenge package
The general syntax is:
guix challenge options argument…
where argument is a package specification such as guile@2.0 or
glibc:debug or, alternatively, a store file name as returned, for
example, by guix build or guix gc --list-live.
When a difference is found between the hash of a locally-built item and that of a server-provided substitute, or among substitutes provided by different servers, the command displays it as in the example above and its exit code is 2 (other non-zero exit codes denote other kinds of errors).
The one option that matters is:
--substitute-urls=urlsConsider urls the whitespace-separated list of substitute source URLs to compare to.
--diff=modeUpon mismatches, show differences according to mode, one of:
simple(the default)Show the list of files that differ.
diffoscope- command
Invoke Diffoscope, passing it two directories whose contents do not match.
When command is an absolute file name, run command instead of Diffoscope.
noneDo not show further details about the differences.
Thus, unless --diff=none is passed,
guix challengedownloads the store items from the given substitute servers so that it can compare them.--verbose-vShow details about matches (identical contents) in addition to information about mismatches.
Next: Invoking guix container, Previous: Invoking guix challenge, Up: 工具 [Contents][Index]
10.13 Invoking guix copy
The guix copy command copies items from the store of one machine
to that of another machine over a secure shell (SSH)
connection25. For example, the following
command copies the coreutils package, the user’s profile, and all
their dependencies over to host, logged in as user:
guix copy --to=user@host \
coreutils $(readlink -f ~/.guix-profile)
If some of the items to be copied are already present on host, they are not actually sent.
The command below retrieves libreoffice and gimp from
host, assuming they are available there:
guix copy --from=host libreoffice gimp
The SSH connection is established using the Guile-SSH client, which is compatible with OpenSSH: it honors ~/.ssh/known_hosts and ~/.ssh/config, and uses the SSH agent for authentication.
The key used to sign items that are sent must be accepted by the remote
machine. Likewise, the key used by the remote machine to sign items you are
retrieving must be in /etc/guix/acl so it is accepted by your own
daemon. See Invoking guix archive, for more information about store item
authentication.
The general syntax is:
guix copy [--to=spec|--from=spec] items…
You must always specify one of the following options:
--to=spec--from=specSpecify the host to send to or receive from. spec must be an SSH spec such as
example.org,charlie@example.org, orcharlie@example.org:2222.
The items can be either package names, such as gimp, or store
items, such as /gnu/store/…-idutils-4.6.
When specifying the name of a package to send, it is first built if needed, unless --dry-run was specified. Common build options are supported (see 普通的构建选项).
Next: Invoking guix weather, Previous: Invoking guix copy, Up: 工具 [Contents][Index]
10.14 Invoking guix container
注: As of version 1.4.0, this tool is experimental. The interface is subject to radical change in the future.
The purpose of guix container is to manipulate processes running
within an isolated environment, commonly known as a “container”, typically
created by the guix shell (see Invoking guix shell) and
guix system container (see Invoking guix system) commands.
The general syntax is:
guix container action options…
action specifies the operation to perform with a container, and options specifies the context-specific arguments for the action.
The following actions are available:
execExecute a command within the context of a running container.
The syntax is:
guix container exec pid program arguments…
pid specifies the process ID of the running container. program specifies an executable file name within the root file system of the container. arguments are the additional options that will be passed to program.
The following command launches an interactive login shell inside a Guix system container, started by
guix system container, and whose process ID is 9001:guix container exec 9001 /run/current-system/profile/bin/bash --login
Note that the pid cannot be the parent process of a container. It must be PID 1 of the container or one of its child processes.
Next: Invoking guix processes, Previous: Invoking guix container, Up: 工具 [Contents][Index]
10.15 Invoking guix weather
Occasionally you’re grumpy because substitutes are lacking and you end up
building packages by yourself (see substitutes). The guix
weather command reports on substitute availability on the specified servers
so you can have an idea of whether you’ll be grumpy today. It can sometimes
be useful info as a user, but it is primarily useful to people running
guix publish (see Invoking guix publish).
Here’s a sample run:
$ guix weather --substitute-urls=https://guix.example.org
computing 5,872 package derivations for x86_64-linux...
looking for 6,128 store items on https://guix.example.org..
updating substitutes from 'https://guix.example.org'... 100.0%
https://guix.example.org
43.4% substitutes available (2,658 out of 6,128)
7,032.5 MiB of nars (compressed)
19,824.2 MiB on disk (uncompressed)
0.030 seconds per request (182.9 seconds in total)
33.5 requests per second
9.8% (342 out of 3,470) of the missing items are queued
867 queued builds
x86_64-linux: 518 (59.7%)
i686-linux: 221 (25.5%)
aarch64-linux: 128 (14.8%)
build rate: 23.41 builds per hour
x86_64-linux: 11.16 builds per hour
i686-linux: 6.03 builds per hour
aarch64-linux: 6.41 builds per hour
As you can see, it reports the fraction of all the packages for which
substitutes are available on the server—regardless of whether substitutes
are enabled, and regardless of whether this server’s signing key is
authorized. It also reports the size of the compressed archives (“nars”)
provided by the server, the size the corresponding store items occupy in the
store (assuming deduplication is turned off), and the server’s throughput.
The second part gives continuous integration (CI) statistics, if the server
supports it. In addition, using the --coverage option,
guix weather can list “important” package substitutes missing on
the server (see below).
To achieve that, guix weather queries over HTTP(S) meta-data
(narinfos) for all the relevant store items. Like guix
challenge, it ignores signatures on those substitutes, which is innocuous
since the command only gathers statistics and cannot install those
substitutes.
The general syntax is:
guix weather options… [packages…]
When packages is omitted, guix weather checks the
availability of substitutes for all the packages, or for those
specified with --manifest; otherwise it only considers the
specified packages. It is also possible to query specific system types with
--system. guix weather exits with a non-zero code when
the fraction of available substitutes is below 100%.
The available options are listed below.
--substitute-urls=urlsurls is the space-separated list of substitute server URLs to query. When this option is omitted, the default set of substitute servers is queried.
--system=system-s systemQuery substitutes for system—e.g.,
aarch64-linux. This option can be repeated, in which caseguix weatherwill query substitutes for several system types.--manifest=fileInstead of querying substitutes for all the packages, only ask for those specified in file. file must contain a manifest, as with the
-moption ofguix package(see Invokingguix package).This option can be repeated several times, in which case the manifests are concatenated.
--coverage[=count]-c [count]Report on substitute coverage for packages: list packages with at least count dependents (zero by default) for which substitutes are unavailable. Dependent packages themselves are not listed: if b depends on a and a has no substitutes, only a is listed, even though b usually lacks substitutes as well. The result looks like this:
$ guix weather --substitute-urls=https://ci.guix.gnu.org https://bordeaux.guix.gnu.org -c 10 computing 8,983 package derivations for x86_64-linux... looking for 9,343 store items on https://ci.guix.gnu.org https://bordeaux.guix.gnu.org... updating substitutes from 'https://ci.guix.gnu.org https://bordeaux.guix.gnu.org'... 100.0% https://ci.guix.gnu.org https://bordeaux.guix.gnu.org 64.7% substitutes available (6,047 out of 9,343) … 2502 packages are missing from 'https://ci.guix.gnu.org https://bordeaux.guix.gnu.org' for 'x86_64-linux', among which: 58 kcoreaddons@5.49.0 /gnu/store/…-kcoreaddons-5.49.0 46 qgpgme@1.11.1 /gnu/store/…-qgpgme-1.11.1 37 perl-http-cookiejar@0.008 /gnu/store/…-perl-http-cookiejar-0.008 …What this example shows is that
kcoreaddonsand presumably the 58 packages that depend on it have no substitutes atci.guix.gnu.org; likewise forqgpgmeand the 46 packages that depend on it.If you are a Guix developer, or if you are taking care of this build farm, you’ll probably want to have a closer look at these packages: they may simply fail to build.
--display-missingDisplay the list of store items for which substitutes are missing.
Previous: Invoking guix weather, Up: 工具 [Contents][Index]
10.16 Invoking guix processes
The guix processes command can be useful to developers and system
administrators, especially on multi-user machines and on build farms: it
lists the current sessions (connections to the daemon), as well as
information about the processes involved26. Here’s an example of the information it
returns:
$ sudo guix processes SessionPID: 19002 ClientPID: 19090 ClientCommand: guix shell python SessionPID: 19402 ClientPID: 19367 ClientCommand: guix publish -u guix-publish -p 3000 -C 9 … SessionPID: 19444 ClientPID: 19419 ClientCommand: cuirass --cache-directory /var/cache/cuirass … LockHeld: /gnu/store/…-perl-ipc-cmd-0.96.lock LockHeld: /gnu/store/…-python-six-bootstrap-1.11.0.lock LockHeld: /gnu/store/…-libjpeg-turbo-2.0.0.lock ChildPID: 20495 ChildCommand: guix offload x86_64-linux 7200 1 28800 ChildPID: 27733 ChildCommand: guix offload x86_64-linux 7200 1 28800 ChildPID: 27793 ChildCommand: guix offload x86_64-linux 7200 1 28800
In this example we see that guix-daemon has three clients:
guix environment, guix publish, and the Cuirass
continuous integration tool; their process identifier (PID) is given by the
ClientPID field. The SessionPID field gives the PID of the
guix-daemon sub-process of this particular session.
The LockHeld fields show which store items are currently locked by
this session, which corresponds to store items being built or substituted
(the LockHeld field is not displayed when guix processes is
not running as root). Last, by looking at the ChildPID and
ChildCommand fields, we understand that these three builds are being
offloaded (see 使用任务下发设施).
The output is in Recutils format so we can use the handy recsel
command to select sessions of interest (see Selection Expressions in GNU recutils manual). As an example, the command shows the
command line and PID of the client that triggered the build of a Perl
package:
$ sudo guix processes | \
recsel -p ClientPID,ClientCommand -e 'LockHeld ~ "perl"'
ClientPID: 19419
ClientCommand: cuirass --cache-directory /var/cache/cuirass …
Additional options are listed below.
--format=format-f formatProduce output in the specified format, one of:
recutilsThe default option. It outputs a set of Session recutils records that include each
ChildProcessas a field.normalizedNormalize the output records into record sets (see Record Sets in GNU recutils manual). Normalizing into record sets allows joins across record types. The example below lists the PID of each
ChildProcessand the associated PID forSessionthat spawned theChildProcesswhere theSessionwas started usingguix build.$ guix processes --format=normalized | \ recsel \ -j Session \ -t ChildProcess \ -p Session.PID,PID \ -e 'Session.ClientCommand ~ "guix build"' PID: 4435 Session_PID: 4278 PID: 4554 Session_PID: 4278 PID: 4646 Session_PID: 4278
11 Foreign Architectures
You can target computers of different CPU architectures when producing
packages (see Invoking guix package), packs (see Invoking guix pack)
or full systems (see Invoking guix system).
GNU Guix supports two distinct mechanisms to target foreign architectures:
- The traditional cross-compilation mechanism.
- The native building mechanism which consists in building using the CPU instruction set of the foreign system you are targeting. It often requires emulation, using the QEMU program for instance.
Next: Native Builds, Up: Foreign Architectures [Contents][Index]
11.1 交叉编译
The commands supporting cross-compilation are proposing the --list-targets and --target options.
The --list-targets option lists all the supported targets that can be passed as an argument to --target.
$ guix build --list-targets The available targets are: - aarch64-linux-gnu - arm-linux-gnueabihf - i586-pc-gnu - i686-linux-gnu - i686-w64-mingw32 - mips64el-linux-gnu - powerpc-linux-gnu - powerpc64le-linux-gnu - riscv64-linux-gnu - x86_64-linux-gnu - x86_64-w64-mingw32
Targets are specified as GNU triplets (see GNU configuration triplets in Autoconf).
Those triplets are passed to GCC and the other underlying compilers possibly involved when building a package, a system image or any other GNU Guix output.
$ guix build --target=aarch64-linux-gnu hello /gnu/store/9926by9qrxa91ijkhw9ndgwp4bn24g9h-hello-2.12 $ file /gnu/store/9926by9qrxa91ijkhw9ndgwp4bn24g9h-hello-2.12/bin/hello /gnu/store/9926by9qrxa91ijkhw9ndgwp4bn24g9h-hello-2.12/bin/hello: ELF 64-bit LSB executable, ARM aarch64 …
The major benefit of cross-compilation is that there are no performance penaly compared to emulation using QEMU. There are however higher risks that some packages fail to cross-compile because few users are using this mechanism extensively.
Previous: 交叉编译, Up: Foreign Architectures [Contents][Index]
11.2 Native Builds
The commands that support impersonating a specific system have the --list-systems and --system options.
The --list-systems option lists all the supported systems that can be passed as an argument to --system.
$ guix build --list-systems The available systems are: - x86_64-linux [current] - aarch64-linux - armhf-linux - i586-gnu - i686-linux - mips64el-linux - powerpc-linux - powerpc64le-linux - riscv64-linux $ guix build --system=i686-linux hello /gnu/store/cc0km35s8x2z4pmwkrqqjx46i8b1i3gm-hello-2.12 $ file /gnu/store/cc0km35s8x2z4pmwkrqqjx46i8b1i3gm-hello-2.12/bin/hello /gnu/store/cc0km35s8x2z4pmwkrqqjx46i8b1i3gm-hello-2.12/bin/hello: ELF 32-bit LSB executable, Intel 80386 …
In the above example, the current system is x86_64-linux. The hello package is however built for the i686-linux system.
This is possible because the i686 CPU instruction set is a subset of the x86_64, hence i686 targeting binaries can be run on x86_64.
Still in the context of the previous example, if picking the
aarch64-linux system and the guix build
--system=aarch64-linux hello has to build some derivations, an extra step
might be needed.
The aarch64-linux targeting binaries cannot directly be run on a x86_64-linux system. An emulation layer is requested. The GNU Guix daemon can take advantage of the Linux kernel binfmt_misc mechanism for that. In short, the Linux kernel can defer the execution of a binary targeting a foreign platform, here aarch64-linux, to a userspace program, usually an emulator.
There is a service that registers QEMU as a backend for the
binfmt_misc mechanism (see qemu-binfmt-service-type). On Debian based foreign distributions,
the alternative would be the qemu-user-static package.
If the binfmt_misc mechanism is not setup correctly, the building
will fail this way:
$ guix build --system=armhf-linux hello --check … unsupported-platform /gnu/store/jjn969pijv7hff62025yxpfmc8zy0aq0-hello-2.12.drv aarch64-linux while setting up the build environment: a `aarch64-linux' is required to build `/gnu/store/jjn969pijv7hff62025yxpfmc8zy0aq0-hello-2.12.drv', but I am a `x86_64-linux'…
whereas, with the binfmt_misc mechanism correctly linked with QEMU,
one can expect to see:
$ guix build --system=armhf-linux hello --check /gnu/store/13xz4nghg39wpymivlwghy08yzj97hlj-hello-2.12
The main advantage of native building compared to cross-compiling, is that more packages are likely to build correctly. However it comes at a price: compilation backed by QEMU is way slower than cross-compilation, because every instruction needs to be emulated.
The availability of substitutes for the architecture targeted by the
--system option can mitigate this problem. An other way to work
around it is to install GNU Guix on a machine whose CPU supports the
targeted instruction set, and set it up as an offload machine (see 使用任务下发设施).
Next: Home Configuration, Previous: Foreign Architectures, Up: GNU Guix [Contents][Index]
12 系统配置
Guix System supports a consistent whole-system configuration mechanism. By that we mean that all aspects of the global system configuration—such as the available system services, timezone and locale settings, user accounts—are declared in a single place. Such a system configuration can be instantiated—i.e., effected.
One of the advantages of putting all the system configuration under the control of Guix is that it supports transactional system upgrades, and makes it possible to roll back to a previous system instantiation, should something go wrong with the new one (see 功能). Another advantage is that it makes it easy to replicate the exact same configuration across different machines, or at different points in time, without having to resort to additional administration tools layered on top of the own tools of the system.
This section describes this mechanism. First we focus on the system administrator’s viewpoint—explaining how the system is configured and instantiated. Then we show how this mechanism can be extended, for instance to support new system services.
- 使用配置系统
operating-systemReference- 文件系统
- 映射的设备
- Swap Space
- 用户帐号
- 键盘布局
- 区域
- 服务
- setuid程序
- X.509证书
- Name Service Switch
- 初始的内存虚拟硬盘
- 引导设置
- Invoking
guix system - Invoking
guix deploy - Running Guix in a Virtual Machine
- 定义服务
Next: operating-system Reference, Up: 系统配置 [Contents][Index]
12.1 使用配置系统
The operating system is configured by providing an operating-system
declaration in a file that can then be passed to the guix system
command (see Invoking guix system). A simple setup, with the default
system services, the default Linux-Libre kernel, initial RAM disk, and boot
loader looks like this:
;; This is an operating system configuration template ;; for a "bare bones" setup, with no X11 display server. (use-modules (gnu)) (use-service-modules networking ssh) (use-package-modules screen ssh) (operating-system (host-name "komputilo") (timezone "Europe/Berlin") (locale "en_US.utf8") ;; Boot in "legacy" BIOS mode, assuming /dev/sdX is the ;; target hard disk, and "my-root" is the label of the target ;; root file system. (bootloader (bootloader-configuration (bootloader grub-bootloader) (targets '("/dev/sdX")))) ;; It's fitting to support the equally bare bones ‘-nographic’ ;; QEMU option, which also nicely sidesteps forcing QWERTY. (kernel-arguments (list "console=ttyS0,115200")) (file-systems (cons (file-system (device (file-system-label "my-root")) (mount-point "/") (type "ext4")) %base-file-systems)) ;; This is where user accounts are specified. The "root" ;; account is implicit, and is initially created with the ;; empty password. (users (cons (user-account (name "alice") (comment "Bob's sister") (group "users") ;; Adding the account to the "wheel" group ;; makes it a sudoer. Adding it to "audio" ;; and "video" allows the user to play sound ;; and access the webcam. (supplementary-groups '("wheel" "audio" "video"))) %base-user-accounts)) ;; Globally-installed packages. (packages (cons screen %base-packages)) ;; Add services to the baseline: a DHCP client and ;; an SSH server. (services (append (list (service dhcp-client-service-type) (service openssh-service-type (openssh-configuration (openssh openssh-sans-x) (port-number 2222)))) %base-services)))
This example should be self-describing. Some of the fields defined above,
such as host-name and bootloader, are mandatory. Others, such
as packages and services, can be omitted, in which case they
get a default value.
Below we discuss the effect of some of the most important fields
(see operating-system Reference, for details about all the available
fields), and how to instantiate the operating system using
guix system.
- Bootloader
- Globally-Visible Packages
- System Services
- Instantiating the System
- The Programming Interface
Bootloader
The bootloader field describes the method that will be used to boot
your system. Machines based on Intel processors can boot in “legacy” BIOS
mode, as in the example above. However, more recent machines rely instead
on the Unified Extensible Firmware Interface (UEFI) to boot. In that
case, the bootloader field should contain something along these
lines:
(bootloader-configuration
(bootloader grub-efi-bootloader)
(targets '("/boot/efi")))
See 引导设置, for more information on the available configuration options.
Globally-Visible Packages
The packages field lists packages that will be globally visible on
the system, for all user accounts—i.e., in every user’s PATH
environment variable—in addition to the per-user profiles (see Invoking guix package). The %base-packages variable provides all the tools
one would expect for basic user and administrator tasks—including the GNU
Core Utilities, the GNU Networking Utilities, the mg lightweight
text editor, find, grep, etc. The example above adds
GNU Screen to those, taken from the (gnu packages screen) module
(see 软件包模块). The (list package output) syntax can be
used to add a specific output of a package:
(use-modules (gnu packages)) (use-modules (gnu packages dns)) (operating-system ;; ... (packages (cons (list isc-bind "utils") %base-packages)))
Referring to packages by variable name, like isc-bind above, has the
advantage of being unambiguous; it also allows typos and such to be
diagnosed right away as “unbound variables”. The downside is that one
needs to know which module defines which package, and to augment the
use-package-modules line accordingly. To avoid that, one can use the
specification->package procedure of the (gnu packages) module,
which returns the best package for a given name or name and version:
(use-modules (gnu packages)) (operating-system ;; ... (packages (append (map specification->package '("tcpdump" "htop" "gnupg@2.0")) %base-packages)))
System Services
The services field lists system services to be made available
when the system starts (see 服务). The operating-system
declaration above specifies that, in addition to the basic services, we want
the OpenSSH secure shell daemon listening on port 2222 (see openssh-service-type). Under the hood,
openssh-service-type arranges so that sshd is started with
the right command-line options, possibly with supporting configuration files
generated as needed (see 定义服务).
Occasionally, instead of using the base services as is, you will want to
customize them. To do this, use modify-services (see modify-services) to modify the list.
For example, suppose you want to modify guix-daemon and Mingetty (the
console log-in) in the %base-services list (see %base-services). To do that, you can write the following in your
operating system declaration:
(define %my-services ;; My very own list of services. (modify-services %base-services (guix-service-type config => (guix-configuration (inherit config) ;; Fetch substitutes from example.org. (substitute-urls (list "https://example.org/guix" "https://ci.guix.gnu.org")))) (mingetty-service-type config => (mingetty-configuration (inherit config) ;; Automatically log in as "guest". (auto-login "guest"))))) (operating-system ;; … (services %my-services))
This changes the configuration—i.e., the service parameters—of the
guix-service-type instance, and that of all the
mingetty-service-type instances in the %base-services list
(see see the cookbook for how to auto-login
one user to a specific TTY in GNU Guix Cookbook)). Observe
how this is accomplished: first, we arrange for the original configuration
to be bound to the identifier config in the body, and then we
write the body so that it evaluates to the desired configuration. In
particular, notice how we use inherit to create a new configuration
which has the same values as the old configuration, but with a few
modifications.
The configuration for a typical “desktop” usage, with an encrypted root partition, a swap file on the root partition, the X11 display server, GNOME and Xfce (users can choose which of these desktop environments to use at the log-in screen by pressing F1), network management, power management, and more, would look like this:
;; This is an operating system configuration template ;; for a "desktop" setup with GNOME and Xfce where the ;; root partition is encrypted with LUKS, and a swap file. (use-modules (gnu) (gnu system nss) (guix utils)) (use-service-modules desktop sddm xorg) (use-package-modules certs gnome) (operating-system (host-name "antelope") (timezone "Europe/Paris") (locale "en_US.utf8") ;; Choose US English keyboard layout. The "altgr-intl" ;; variant provides dead keys for accented characters. (keyboard-layout (keyboard-layout "us" "altgr-intl")) ;; Use the UEFI variant of GRUB with the EFI System ;; Partition mounted on /boot/efi. (bootloader (bootloader-configuration (bootloader grub-efi-bootloader) (targets '("/boot/efi")) (keyboard-layout keyboard-layout))) ;; Specify a mapped device for the encrypted root partition. ;; The UUID is that returned by 'cryptsetup luksUUID'. (mapped-devices (list (mapped-device (source (uuid "12345678-1234-1234-1234-123456789abc")) (target "my-root") (type luks-device-mapping)))) (file-systems (append (list (file-system (device (file-system-label "my-root")) (mount-point "/") (type "ext4") (dependencies mapped-devices)) (file-system (device (uuid "1234-ABCD" 'fat)) (mount-point "/boot/efi") (type "vfat"))) %base-file-systems)) ;; Specify a swap file for the system, which resides on the ;; root file system. (swap-devices (list (swap-space (target "/swapfile")))) ;; Create user `bob' with `alice' as its initial password. (users (cons (user-account (name "bob") (comment "Alice's brother") (password (crypt "alice" "$6$abc")) (group "students") (supplementary-groups '("wheel" "netdev" "audio" "video"))) %base-user-accounts)) ;; Add the `students' group (groups (cons* (user-group (name "students")) %base-groups)) ;; This is where we specify system-wide packages. (packages (append (list ;; for HTTPS access nss-certs ;; for user mounts gvfs) %base-packages)) ;; Add GNOME and Xfce---we can choose at the log-in screen ;; by clicking the gear. Use the "desktop" services, which ;; include the X11 log-in service, networking with ;; NetworkManager, and more. (services (if (target-x86-64?) (append (list (service gnome-desktop-service-type) (service xfce-desktop-service-type) (set-xorg-configuration (xorg-configuration (keyboard-layout keyboard-layout)))) %desktop-services) ;; FIXME: Since GDM depends on Rust (gdm -> gnome-shell -> gjs ;; -> mozjs -> rust) and Rust is currently unavailable on ;; non-x86_64 platforms, we use SDDM and Mate here instead of ;; GNOME and GDM. (append (list (service mate-desktop-service-type) (service xfce-desktop-service-type) (set-xorg-configuration (xorg-configuration (keyboard-layout keyboard-layout)) sddm-service-type)) %desktop-services))) ;; Allow resolution of '.local' host names with mDNS. (name-service-switch %mdns-host-lookup-nss))
A graphical system with a choice of lightweight window managers instead of full-blown desktop environments would look like this:
;; This is an operating system configuration template ;; for a "desktop" setup without full-blown desktop ;; environments. (use-modules (gnu) (gnu system nss)) (use-service-modules desktop) (use-package-modules bootloaders certs emacs emacs-xyz ratpoison suckless wm xorg) (operating-system (host-name "antelope") (timezone "Europe/Paris") (locale "en_US.utf8") ;; Use the UEFI variant of GRUB with the EFI System ;; Partition mounted on /boot/efi. (bootloader (bootloader-configuration (bootloader grub-efi-bootloader) (targets '("/boot/efi")))) ;; Assume the target root file system is labelled "my-root", ;; and the EFI System Partition has UUID 1234-ABCD. (file-systems (append (list (file-system (device (file-system-label "my-root")) (mount-point "/") (type "ext4")) (file-system (device (uuid "1234-ABCD" 'fat)) (mount-point "/boot/efi") (type "vfat"))) %base-file-systems)) (users (cons (user-account (name "alice") (comment "Bob's sister") (group "users") (supplementary-groups '("wheel" "netdev" "audio" "video"))) %base-user-accounts)) ;; Add a bunch of window managers; we can choose one at ;; the log-in screen with F1. (packages (append (list ;; window managers ratpoison i3-wm i3status dmenu emacs emacs-exwm emacs-desktop-environment ;; terminal emulator xterm ;; for HTTPS access nss-certs) %base-packages)) ;; Use the "desktop" services, which include the X11 ;; log-in service, networking with NetworkManager, and more. (services %desktop-services) ;; Allow resolution of '.local' host names with mDNS. (name-service-switch %mdns-host-lookup-nss))
This example refers to the /boot/efi file system by its UUID,
1234-ABCD. Replace this UUID with the right UUID on your system, as
returned by the blkid command.
See 桌面服务, for the exact list of services provided by
%desktop-services. See X.509证书, for background
information about the nss-certs package that is used here.
Again, %desktop-services is just a list of service objects. If you
want to remove services from there, you can do so using the procedures for
list filtering (see SRFI-1 Filtering and Partitioning in GNU Guile
Reference Manual). For instance, the following expression returns a list
that contains all the services in %desktop-services minus the Avahi
service:
(remove (lambda (service)
(eq? (service-kind service) avahi-service-type))
%desktop-services)
Alternatively, the modify-services macro can be used:
(modify-services %desktop-services
(delete avahi-service-type))
Instantiating the System
Assuming the operating-system declaration is stored in the
my-system-config.scm file, the guix system reconfigure
my-system-config.scm command instantiates that configuration, and makes it
the default GRUB boot entry (see Invoking guix system).
注: We recommend that you keep this my-system-config.scm file safe and under version control to easily track changes to your configuration.
The normal way to change the system configuration is by updating this file
and re-running guix system reconfigure. One should never have to
touch files in /etc or to run commands that modify the system state
such as useradd or grub-install. In fact, you must
avoid that since that would not only void your warranty but also prevent you
from rolling back to previous versions of your system, should you ever need
to.
Speaking of roll-back, each time you run guix system reconfigure,
a new generation of the system is created—without modifying or
deleting previous generations. Old system generations get an entry in the
bootloader boot menu, allowing you to boot them in case something went wrong
with the latest generation. Reassuring, no? The guix system
list-generations command lists the system generations available on disk.
It is also possible to roll back the system via the commands guix
system roll-back and guix system switch-generation.
Although the guix system reconfigure command will not modify
previous generations, you must take care when the current generation is not
the latest (e.g., after invoking guix system roll-back), since the
operation might overwrite a later generation (see Invoking guix system).
The Programming Interface
At the Scheme level, the bulk of an operating-system declaration is
instantiated with the following monadic procedure (see 仓库monad):
- Monadic Procedure: operating-system-derivation os
Return a derivation that builds os, an
operating-systemobject (see Derivations).The output of the derivation is a single directory that refers to all the packages, configuration files, and other supporting files needed to instantiate os.
This procedure is provided by the (gnu system) module. Along with
(gnu services) (see 服务), this module contains the guts of
Guix System. Make sure to visit it!
12.2 operating-system Reference
This section summarizes all the options available in operating-system
declarations (see 使用配置系统).
- Data Type: operating-system
This is the data type representing an operating system configuration. By that, we mean all the global system configuration, not per-user configuration (see 使用配置系统).
kernel(default:linux-libre)The package object of the operating system kernel to use27.
hurd(default:#f)The package object of the Hurd to be started by the kernel. When this field is set, produce a GNU/Hurd operating system. In that case,
kernelmust also be set to thegnumachpackage—the microkernel the Hurd runs on.Warning: This feature is experimental and only supported for disk images.
kernel-loadable-modules(default: ’())A list of objects (usually packages) to collect loadable kernel modules from–e.g.
(list ddcci-driver-linux).kernel-arguments(default:%default-kernel-arguments)List of strings or gexps representing additional arguments to pass on the command-line of the kernel—e.g.,
("console=ttyS0").bootloaderThe system bootloader configuration object. See 引导设置.
labelThis is the label (a string) as it appears in the bootloader’s menu entry. The default label includes the kernel name and version.
keyboard-layout(default:#f)This field specifies the keyboard layout to use in the console. It can be either
#f, in which case the default keyboard layout is used (usually US English), or a<keyboard-layout>record. See 键盘布局, for more information.This keyboard layout is in effect as soon as the kernel has booted. For instance, it is the keyboard layout in effect when you type a passphrase if your root file system is on a
luks-device-mappingmapped device (see 映射的设备).注: This does not specify the keyboard layout used by the bootloader, nor that used by the graphical display server. See 引导设置, for information on how to specify the bootloader’s keyboard layout. See X窗口, for information on how to specify the keyboard layout used by the X Window System.
initrd-modules(default:%base-initrd-modules) ¶-
The list of Linux kernel modules that need to be available in the initial RAM disk. See 初始的内存虚拟硬盘.
initrd(default:base-initrd)A procedure that returns an initial RAM disk for the Linux kernel. This field is provided to support low-level customization and should rarely be needed for casual use. See 初始的内存虚拟硬盘.
firmware(default:%base-firmware) ¶List of firmware packages loadable by the operating system kernel.
The default includes firmware needed for Atheros- and Broadcom-based WiFi devices (Linux-libre modules
ath9kandb43-open, respectively). See 硬件的考虑, for more info on supported hardware.host-nameThe host name.
hosts-file¶A file-like object (see file-like objects) for use as /etc/hosts (see Host Names in The GNU C Library Reference Manual). The default is a file with entries for
localhostand host-name.mapped-devices(default:'())A list of mapped devices. See 映射的设备.
file-systemsA list of file systems. See 文件系统.
swap-devices(default:'()) ¶A list of swap spaces. See Swap Space.
users(default:%base-user-accounts)groups(default:%base-groups)List of user accounts and groups. See 用户帐号.
If the
userslist lacks a user account with UID 0, a “root” account with UID 0 is automatically added.skeletons(default:(default-skeletons))A list of target file name/file-like object tuples (see file-like objects). These are the skeleton files that will be added to the home directory of newly-created user accounts.
For instance, a valid value may look like this:
`((".bashrc" ,(plain-file "bashrc" "echo Hello\n")) (".guile" ,(plain-file "guile" "(use-modules (ice-9 readline)) (activate-readline)")))
issue(default:%default-issue)A string denoting the contents of the /etc/issue file, which is displayed when users log in on a text console.
packages(default:%base-packages)A list of packages to be installed in the global profile, which is accessible at /run/current-system/profile. Each element is either a package variable or a package/output tuple. Here’s a simple example of both:
(cons* git ; the default "out" output (list git "send-email") ; another output of git %base-packages) ; the default set
The default set includes core utilities and it is good practice to install non-core utilities in user profiles (see Invoking
guix package).timezone(default:"Etc/UTC")A timezone identifying string—e.g.,
"Europe/Paris".You can run the
tzselectcommand to find out which timezone string corresponds to your region. Choosing an invalid timezone name causesguix systemto fail.locale(default:"en_US.utf8")The name of the default locale (see Locale Names in The GNU C Library Reference Manual). See 区域, for more information.
locale-definitions(default:%default-locale-definitions)The list of locale definitions to be compiled and that may be used at run time. See 区域.
locale-libcs(default:(list glibc))The list of GNU libc packages whose locale data and tools are used to build the locale definitions. See 区域, for compatibility considerations that justify this option.
name-service-switch(default:%default-nss)Configuration of the libc name service switch (NSS)—a
<name-service-switch>object. See Name Service Switch, for details.services(default:%base-services)A list of service objects denoting system services. See 服务.
essential-services(default: ...)The list of “essential services”—i.e., things like instances of
system-service-typeandhost-name-service-type(see 服务参考), which are derived from the operating system definition itself. As a user you should never need to touch this field.pam-services(default:(base-pam-services)) ¶-
Linux pluggable authentication module (PAM) services.
setuid-programs(default:%setuid-programs)List of
<setuid-program>. See setuid程序, for more information.sudoers-file(default:%sudoers-specification) ¶The contents of the /etc/sudoers file as a file-like object (see
local-fileandplain-file).This file specifies which users can use the
sudocommand, what they are allowed to do, and what privileges they may gain. The default is that onlyrootand members of thewheelgroup may usesudo.
- Scheme Syntax: this-operating-system
When used in the lexical scope of an operating system field definition, this identifier resolves to the operating system being defined.
The example below shows how to refer to the operating system being defined in the definition of the
labelfield:(use-modules (gnu) (guix)) (operating-system ;; ... (label (package-full-name (operating-system-kernel this-operating-system))))
It is an error to refer to
this-operating-systemoutside an operating system definition.
Next: 映射的设备, Previous: operating-system Reference, Up: 系统配置 [Contents][Index]
12.3 文件系统
The list of file systems to be mounted is specified in the
file-systems field of the operating system declaration (see 使用配置系统). Each file system is declared using the
file-system form, like this:
(file-system
(mount-point "/home")
(device "/dev/sda3")
(type "ext4"))
As usual, some of the fields are mandatory—those shown in the example above—while others can be omitted. These are described below.
- Data Type: file-system
Objects of this type represent file systems to be mounted. They contain the following members:
typeThis is a string specifying the type of the file system—e.g.,
"ext4".mount-pointThis designates the place where the file system is to be mounted.
deviceThis names the “source” of the file system. It can be one of three things: a file system label, a file system UUID, or the name of a /dev node. Labels and UUIDs offer a way to refer to file systems without having to hard-code their actual device name28.
File system labels are created using the
file-system-labelprocedure, UUIDs are created usinguuid, and /dev node are plain strings. Here’s an example of a file system referred to by its label, as shown by thee2labelcommand:(file-system (mount-point "/home") (type "ext4") (device (file-system-label "my-home")))UUIDs are converted from their string representation (as shown by the
tune2fs -lcommand) using theuuidform29, like this:(file-system (mount-point "/home") (type "ext4") (device (uuid "4dab5feb-d176-45de-b287-9b0a6e4c01cb")))When the source of a file system is a mapped device (see 映射的设备), its
devicefield must refer to the mapped device name—e.g., "/dev/mapper/root-partition". This is required so that the system knows that mounting the file system depends on having the corresponding device mapping established.flags(default:'())This is a list of symbols denoting mount flags. Recognized flags include
read-only,bind-mount,no-dev(disallow access to special files),no-suid(ignore setuid and setgid bits),no-atime(do not update file access times),no-diratime(likewise for directories only),strict-atime(update file access time),lazy-time(only update time on the in-memory version of the file inode),no-exec(disallow program execution), andshared(make the mount shared). See Mount-Unmount-Remount in The GNU C Library Reference Manual, for more information on these flags.options(default:#f)This is either
#f, or a string denoting mount options passed to the file system driver. See Mount-Unmount-Remount in The GNU C Library Reference Manual, for details.Run
man 8 mountfor options for various file systems, but beware that what it lists as file-system-independent “mount options” are in fact flags, and belong in theflagsfield described above.The
file-system-options->alistandalist->file-system-optionsprocedures from(gnu system file-systems)can be used to convert file system options given as an association list to the string representation, and vice-versa.mount?(default:#t)This value indicates whether to automatically mount the file system when the system is brought up. When set to
#f, the file system gets an entry in /etc/fstab (read by themountcommand) but is not automatically mounted.needed-for-boot?(default:#f)This Boolean value indicates whether the file system is needed when booting. If that is true, then the file system is mounted when the initial RAM disk (initrd) is loaded. This is always the case, for instance, for the root file system.
check?(default:#t)This Boolean indicates whether the file system should be checked for errors before being mounted. How and when this happens can be further adjusted with the following options.
skip-check-if-clean?(default:#t)When true, this Boolean indicates that a file system check triggered by
check?may exit early if the file system is marked as “clean”, meaning that it was previously correctly unmounted and should not contain errors.Setting this to false will always force a full consistency check when
check?is true. This may take a very long time and is not recommended on healthy systems—in fact, it may reduce reliability!Conversely, some primitive file systems like
fatdo not keep track of clean shutdowns and will perform a full scan regardless of the value of this option.repair(default:'preen)When
check?finds errors, it can (try to) repair them and continue booting. This option controls when and how to do so.If false, try not to modify the file system at all. Checking certain file systems like
jfsmay still write to the device to replay the journal. No repairs will be attempted.If
#t, try to repair any errors found and assume “yes” to all questions. This will fix the most errors, but may be risky.If
'preen, repair only errors that are safe to fix without human interaction. What that means is left up to the developers of each file system and may be equivalent to “none” or “all”.create-mount-point?(default:#f)When true, the mount point is created if it does not exist yet.
mount-may-fail?(default:#f)When true, this indicates that mounting this file system can fail but that should not be considered an error. This is useful in unusual cases; an example of this is
efivarfs, a file system that can only be mounted on EFI/UEFI systems.dependencies(default:'())This is a list of
<file-system>or<mapped-device>objects representing file systems that must be mounted or mapped devices that must be opened before (and unmounted or closed after) this one.As an example, consider a hierarchy of mounts: /sys/fs/cgroup is a dependency of /sys/fs/cgroup/cpu and /sys/fs/cgroup/memory.
Another example is a file system that depends on a mapped device, for example for an encrypted partition (see 映射的设备).
- Scheme Procedure: file-system-label str
This procedure returns an opaque file system label from str, a string:
(file-system-label "home") ⇒ #<file-system-label "home">
File system labels are used to refer to file systems by label rather than by device name. See above for examples.
The (gnu system file-systems) exports the following useful variables.
- Scheme Variable: %base-file-systems
These are essential file systems that are required on normal systems, such as
%pseudo-terminal-file-systemand%immutable-store(see below). Operating system declarations should always contain at least these.
- Scheme Variable: %pseudo-terminal-file-system
This is the file system to be mounted as /dev/pts. It supports pseudo-terminals created via
openptyand similar functions (see Pseudo-Terminals in The GNU C Library Reference Manual). Pseudo-terminals are used by terminal emulators such asxterm.
This file system is mounted as /dev/shm and is used to support memory sharing across processes (see
shm_openin The GNU C Library Reference Manual).
- Scheme Variable: %immutable-store
This file system performs a read-only “bind mount” of /gnu/store, making it read-only for all the users including
root. This prevents against accidental modification by software running asrootor by system administrators.The daemon itself is still able to write to the store: it remounts it read-write in its own “name space.”
- Scheme Variable: %binary-format-file-system
The
binfmt_miscfile system, which allows handling of arbitrary executable file types to be delegated to user space. This requires thebinfmt.kokernel module to be loaded.
- Scheme Variable: %fuse-control-file-system
The
fusectlfile system, which allows unprivileged users to mount and unmount user-space FUSE file systems. This requires thefuse.kokernel module to be loaded.
The (gnu system uuid) module provides tools to deal with file system
“unique identifiers” (UUIDs).
- Scheme Procedure: uuid str [type]
Return an opaque UUID (unique identifier) object of the given type (a symbol) by parsing str (a string):
(uuid "4dab5feb-d176-45de-b287-9b0a6e4c01cb") ⇒ #<<uuid> type: dce bv: …> (uuid "1234-ABCD" 'fat) ⇒ #<<uuid> type: fat bv: …>
type may be one of
dce,iso9660,fat,ntfs, or one of the commonly found synonyms for these.UUIDs are another way to unambiguously refer to file systems in operating system configuration. See the examples above.
12.3.1 Btrfs file system
The Btrfs has special features, such as subvolumes, that merit being explained in more details. The following section attempts to cover basic as well as complex uses of a Btrfs file system with the Guix System.
In its simplest usage, a Btrfs file system can be described, for example, by:
(file-system
(mount-point "/home")
(type "btrfs")
(device (file-system-label "my-home")))
The example below is more complex, as it makes use of a Btrfs subvolume,
named rootfs. The parent Btrfs file system is labeled
my-btrfs-pool, and is located on an encrypted device (hence the
dependency on mapped-devices):
(file-system
(device (file-system-label "my-btrfs-pool"))
(mount-point "/")
(type "btrfs")
(options "subvol=rootfs")
(dependencies mapped-devices))
Some bootloaders, for example GRUB, only mount a Btrfs partition at its top
level during the early boot, and rely on their configuration to refer to the
correct subvolume path within that top level. The bootloaders operating in
this way typically produce their configuration on a running system where the
Btrfs partitions are already mounted and where the subvolume information is
readily available. As an example, grub-mkconfig, the
configuration generator command shipped with GRUB, reads
/proc/self/mountinfo to determine the top-level path of a subvolume.
The Guix System produces a bootloader configuration using the operating system configuration as its sole input; it is therefore necessary to extract the subvolume name on which /gnu/store lives (if any) from that operating system configuration. To better illustrate, consider a subvolume named ’rootfs’ which contains the root file system data. In such situation, the GRUB bootloader would only see the top level of the root Btrfs partition, e.g.:
/ (top level)
├── rootfs (subvolume directory)
├── gnu (normal directory)
├── store (normal directory)
[...]
Thus, the subvolume name must be prepended to the /gnu/store path of the kernel, initrd binaries and any other files referred to in the GRUB configuration that must be found during the early boot.
The next example shows a nested hierarchy of subvolumes and directories:
/ (top level)
├── rootfs (subvolume)
├── gnu (normal directory)
├── store (subvolume)
[...]
This scenario would work without mounting the ’store’ subvolume. Mounting
’rootfs’ is sufficient, since the subvolume name matches its intended mount
point in the file system hierarchy. Alternatively, the ’store’ subvolume
could be referred to by setting the subvol option to either
/rootfs/gnu/store or rootfs/gnu/store.
Finally, a more contrived example of nested subvolumes:
/ (top level)
├── root-snapshots (subvolume)
├── root-current (subvolume)
├── guix-store (subvolume)
[...]
Here, the ’guix-store’ subvolume doesn’t match its intended mount point, so
it is necessary to mount it. The subvolume must be fully specified, by
passing its file name to the subvol option. To illustrate, the
’guix-store’ subvolume could be mounted on /gnu/store by using a file
system declaration such as:
(file-system
(device (file-system-label "btrfs-pool-1"))
(mount-point "/gnu/store")
(type "btrfs")
(options "subvol=root-snapshots/root-current/guix-store,\
compress-force=zstd,space_cache=v2"))
Next: Swap Space, Previous: 文件系统, Up: 系统配置 [Contents][Index]
12.4 映射的设备
The Linux kernel has a notion of device mapping: a block device, such
as a hard disk partition, can be mapped into another device, usually
in /dev/mapper/, with additional processing over the data that flows
through it30. A typical example is encryption
device mapping: all writes to the mapped device are encrypted, and all reads
are deciphered, transparently. Guix extends this notion by considering any
device or set of devices that are transformed in some way to create a
new device; for instance, RAID devices are obtained by assembling
several other devices, such as hard disks or partitions, into a new one that
behaves as one partition.
Mapped devices are declared using the mapped-device form, defined as
follows; for examples, see below.
- Data Type: mapped-device
Objects of this type represent device mappings that will be made when the system boots up.
sourceThis is either a string specifying the name of the block device to be mapped, such as
"/dev/sda3", or a list of such strings when several devices need to be assembled for creating a new one. In case of LVM this is a string specifying name of the volume group to be mapped.targetThis string specifies the name of the resulting mapped device. For kernel mappers such as encrypted devices of type
luks-device-mapping, specifying"my-partition"leads to the creation of the"/dev/mapper/my-partition"device. For RAID devices of typeraid-device-mapping, the full device name such as"/dev/md0"needs to be given. LVM logical volumes of typelvm-device-mappingneed to be specified as"VGNAME-LVNAME".targetsThis list of strings specifies names of the resulting mapped devices in case there are several. The format is identical to target.
typeThis must be a
mapped-device-kindobject, which specifies how source is mapped to target.
- Scheme Variable: luks-device-mapping
This defines LUKS block device encryption using the
cryptsetupcommand from the package with the same name. It relies on thedm-cryptLinux kernel module.
- Scheme Variable: raid-device-mapping
This defines a RAID device, which is assembled using the
mdadmcommand from the package with the same name. It requires a Linux kernel module for the appropriate RAID level to be loaded, such asraid456for RAID-4, RAID-5 or RAID-6, orraid10for RAID-10.
- Scheme Variable: lvm-device-mapping
This defines one or more logical volumes for the Linux Logical Volume Manager (LVM). The volume group is activated by the
vgchangecommand from thelvm2package.
The following example specifies a mapping from /dev/sda3 to
/dev/mapper/home using LUKS—the
Linux Unified Key Setup, a
standard mechanism for disk encryption. The /dev/mapper/home device
can then be used as the device of a file-system declaration
(see 文件系统).
(mapped-device
(source "/dev/sda3")
(target "home")
(type luks-device-mapping))
Alternatively, to become independent of device numbering, one may obtain the LUKS UUID (unique identifier) of the source device by a command like:
cryptsetup luksUUID /dev/sda3
and use it as follows:
(mapped-device
(source (uuid "cb67fc72-0d54-4c88-9d4b-b225f30b0f44"))
(target "home")
(type luks-device-mapping))
It is also desirable to encrypt swap space, since swap space may contain sensitive data. One way to accomplish that is to use a swap file in a file system on a device mapped via LUKS encryption. In this way, the swap file is encrypted because the entire device is encrypted. See Swap Space, or See Disk Partitioning, for an example.
A RAID device formed of the partitions /dev/sda1 and /dev/sdb1 may be declared as follows:
(mapped-device
(source (list "/dev/sda1" "/dev/sdb1"))
(target "/dev/md0")
(type raid-device-mapping))
The /dev/md0 device can then be used as the device of a
file-system declaration (see 文件系统). Note that the RAID
level need not be given; it is chosen during the initial creation and
formatting of the RAID device and is determined automatically later.
LVM logical volumes “alpha” and “beta” from volume group “vg0” can be declared as follows:
(mapped-device
(source "vg0")
(targets (list "vg0-alpha" "vg0-beta"))
(type lvm-device-mapping))
Devices /dev/mapper/vg0-alpha and /dev/mapper/vg0-beta can
then be used as the device of a file-system declaration
(see 文件系统).
12.5 Swap Space
Swap space, as it is commonly called, is a disk area specifically designated for paging: the process in charge of memory management (the Linux kernel or Hurd’s default pager) can decide that some memory pages stored in RAM which belong to a running program but are unused should be stored on disk instead. It unloads those from the RAM, freeing up precious fast memory, and writes them to the swap space. If the program tries to access that very page, the memory management process loads it back into memory for the program to use.
A common misconception about swap is that it is only useful when small amounts of RAM are available to the system. However, it should be noted that kernels often use all available RAM for disk access caching to make I/O faster, and thus paging out unused portions of program memory will expand the RAM available for such caching.
For a more detailed description of how memory is managed from the viewpoint of a monolithic kernel, See Memory Concepts in The GNU C Library Reference Manual.
The Linux kernel has support for swap partitions and swap files: the former uses a whole disk partition for paging, whereas the second uses a file on a file system for that (the file system driver needs to support it). On a comparable setup, both have the same performance, so one should consider ease of use when deciding between them. Partitions are “simpler” and do not need file system support, but need to be allocated at disk formatting time (logical volumes notwithstanding), whereas files can be allocated and deallocated at any time.
Note that swap space is not zeroed on shutdown, so sensitive data (such as passwords) may linger on it if it was paged out. As such, you should consider having your swap reside on an encrypted device (see 映射的设备).
- Data Type: swap-space
Objects of this type represent swap spaces. They contain the following members:
targetThe device or file to use, either a UUID, a
file-system-labelor a string, as in the definition of afile-system(see 文件系统).dependencies(default:'())A list of
file-systemormapped-deviceobjects, upon which the availability of the space depends. Note that just like forfile-systemobjects, dependencies which are needed for boot and mounted in early userspace are not managed by the Shepherd, and so automatically filtered out for you.priority(default:#f)Only supported by the Linux kernel. Either
#fto disable swap priority, or an integer between 0 and 32767. The kernel will first use swap spaces of higher priority when paging, and use same priority spaces on a round-robin basis. The kernel will use swap spaces without a set priority after prioritized spaces, and in the order that they appeared in (not round-robin).discard?(default:#f)Only supported by the Linux kernel. When true, the kernel will notify the disk controller of discarded pages, for example with the TRIM operation on Solid State Drives.
Here are some examples:
(swap-space (target (uuid "4dab5feb-d176-45de-b287-9b0a6e4c01cb")))
Use the swap partition with the given UUID. You can learn the UUID of a
Linux swap partition by running swaplabel device, where
device is the /dev file name of that partition.
(swap-space
(target (file-system-label "swap"))
(dependencies mapped-devices))
Use the partition with label swap, which can be found after all the
mapped-devices mapped devices have been opened. Again, the
swaplabel command allows you to view and change the label of a
Linux swap partition.
Here’s a more involved example with the corresponding file-systems
part of an operating-system declaration.
(file-systems (list (file-system (device (file-system-label "root")) (mount-point "/") (type "ext4")) (file-system (device (file-system-label "btrfs")) (mount-point "/btrfs") (type "btrfs")))) (swap-devices (list (swap-space (target "/btrfs/swapfile") (dependencies (filter (file-system-mount-point-predicate "/btrfs") file-systems)))))
Use the file /btrfs/swapfile as swap space, which depends on the file system mounted at /btrfs. Note how we use Guile’s filter to select the file system in an elegant fashion!
Next: 键盘布局, Previous: Swap Space, Up: 系统配置 [Contents][Index]
12.6 用户帐号
User accounts and groups are entirely managed through the
operating-system declaration. They are specified with the
user-account and user-group forms:
(user-account
(name "alice")
(group "users")
(supplementary-groups '("wheel" ;allow use of sudo, etc.
"audio" ;sound card
"video" ;video devices such as webcams
"cdrom")) ;the good ol' CD-ROM
(comment "Bob's sister"))
Here’s a user account that uses a different shell and a custom home directory (the default would be "/home/bob"):
(user-account
(name "bob")
(group "users")
(comment "Alice's bro")
(shell (file-append zsh "/bin/zsh"))
(home-directory "/home/robert"))
When booting or upon completion of guix system reconfigure, the
system ensures that only the user accounts and groups specified in the
operating-system declaration exist, and with the specified
properties. Thus, account or group creations or modifications made by
directly invoking commands such as useradd are lost upon
reconfiguration or reboot. This ensures that the system remains exactly as
declared.
- Data Type: user-account
Objects of this type represent user accounts. The following members may be specified:
名字The name of the user account.
group¶This is the name (a string) or identifier (a number) of the user group this account belongs to.
supplementary-groups(default:'())Optionally, this can be defined as a list of group names that this account belongs to.
uid(default:#f)This is the user ID for this account (a number), or
#f. In the latter case, a number is automatically chosen by the system when the account is created.comment(default:"")A comment about the account, such as the account owner’s full name.
Note that, for non-system accounts, users are free to change their real name as it appears in /etc/passwd using the
chfncommand. When they do, their choice prevails over the system administrator’s choice; reconfiguring does not change their name.home-directoryThis is the name of the home directory for the account.
create-home-directory?(default:#t)Indicates whether the home directory of this account should be created if it does not exist yet.
shell(default: Bash)This is a G-expression denoting the file name of a program to be used as the shell (see G-表达式). For example, you would refer to the Bash executable like this:
(file-append bash "/bin/bash")... and to the Zsh executable like that:
(file-append zsh "/bin/zsh")system?(default:#f)This Boolean value indicates whether the account is a “system” account. System accounts are sometimes treated specially; for instance, graphical login managers do not list them.
password(default:#f)You would normally leave this field to
#f, initialize user passwords asrootwith thepasswdcommand, and then let users change it withpasswd. Passwords set withpasswdare of course preserved across reboot and reconfiguration.If you do want to set an initial password for an account, then this field must contain the encrypted password, as a string. You can use the
cryptprocedure for this purpose:(user-account (name "charlie") (group "users") ;; Specify a SHA-512-hashed initial password. (password (crypt "InitialPassword!" "$6$abc")))注: The hash of this initial password will be available in a file in /gnu/store, readable by all the users, so this method must be used with care.
See Passphrase Storage in The GNU C Library Reference Manual, for more information on password encryption, and Encryption in GNU Guile Reference Manual, for information on Guile’s
cryptprocedure.
User group declarations are even simpler:
(user-group (name "students"))
- Data Type: user-group
This type is for, well, user groups. There are just a few fields:
名字The name of the group.
id(default:#f)The group identifier (a number). If
#f, a new number is automatically allocated when the group is created.system?(default:#f)This Boolean value indicates whether the group is a “system” group. System groups have low numerical IDs.
password(default:#f)What, user groups can have a password? Well, apparently yes. Unless
#f, this field specifies the password of the group.
For convenience, a variable lists all the basic user groups one may expect:
- Scheme Variable: %base-groups
This is the list of basic user groups that users and/or packages expect to be present on the system. This includes groups such as “root”, “wheel”, and “users”, as well as groups used to control access to specific devices such as “audio”, “disk”, and “cdrom”.
- Scheme Variable: %base-user-accounts
This is the list of basic system accounts that programs may expect to find on a GNU/Linux system, such as the “nobody” account.
Note that the “root” account is not included here. It is a special-case and is automatically added whether or not it is specified.
12.7 键盘布局
To specify what each key of your keyboard does, you need to tell the operating system what keyboard layout you want to use. The default, when nothing is specified, is the US English QWERTY layout for 105-key PC keyboards. However, German speakers will usually prefer the German QWERTZ layout, French speakers will want the AZERTY layout, and so on; hackers might prefer Dvorak or bépo, and they might even want to further customize the effect of some of the keys. This section explains how to get that done.
There are three components that will want to know about your keyboard layout:
- The bootloader may want to know what keyboard layout you want to use
(see
keyboard-layout). This is useful if you want, for instance, to make sure that you can type the passphrase of your encrypted root partition using the right layout. - The operating system kernel, Linux, will need that so that the
console is properly configured (see
keyboard-layout). - The graphical display server, usually Xorg, also has its own idea of
the keyboard layout (see
keyboard-layout).
Guix allows you to configure all three separately but, fortunately, it allows you to share the same keyboard layout for all three components.
Keyboard layouts are represented by records created by the
keyboard-layout procedure of (gnu system keyboard). Following
the X Keyboard extension (XKB), each layout has four attributes: a name
(often a language code such as “fi” for Finnish or “jp” for Japanese),
an optional variant name, an optional keyboard model name, and a possibly
empty list of additional options. In most cases the layout name is all you
care about.
- Scheme Procedure: keyboard-layout name [variant] [#:model] [#:options '()] Return a new keyboard layout with the given
name and variant.
name must be a string such as
"fr"; variant must be a string such as"bepo"or"nodeadkeys". See thexkeyboard-configpackage for valid options.
Here are a few examples:
;; The German QWERTZ layout. Here we assume a standard ;; "pc105" keyboard model. (keyboard-layout "de") ;; The bépo variant of the French layout. (keyboard-layout "fr" "bepo") ;; The Catalan layout. (keyboard-layout "es" "cat") ;; Arabic layout with "Alt-Shift" to switch to US layout. (keyboard-layout "ar,us" #:options '("grp:alt_shift_toggle")) ;; The Latin American Spanish layout. In addition, the ;; "Caps Lock" key is used as an additional "Ctrl" key, ;; and the "Menu" key is used as a "Compose" key to enter ;; accented letters. (keyboard-layout "latam" #:options '("ctrl:nocaps" "compose:menu")) ;; The Russian layout for a ThinkPad keyboard. (keyboard-layout "ru" #:model "thinkpad") ;; The "US international" layout, which is the US layout plus ;; dead keys to enter accented characters. This is for an ;; Apple MacBook keyboard. (keyboard-layout "us" "intl" #:model "macbook78")
See the share/X11/xkb directory of the xkeyboard-config
package for a complete list of supported layouts, variants, and models.
Let’s say you want your system to use the Turkish keyboard layout throughout your system—bootloader, console, and Xorg. Here’s what your system configuration would look like:
;; Using the Turkish layout for the bootloader, the console, ;; and for Xorg. (operating-system ;; ... (keyboard-layout (keyboard-layout "tr")) ;for the console (bootloader (bootloader-configuration (bootloader grub-efi-bootloader) (targets '("/boot/efi")) (keyboard-layout keyboard-layout))) ;for GRUB (services (cons (set-xorg-configuration (xorg-configuration ;for Xorg (keyboard-layout keyboard-layout))) %desktop-services)))
In the example above, for GRUB and for Xorg, we just refer to the
keyboard-layout field defined above, but we could just as well refer
to a different layout. The set-xorg-configuration procedure
communicates the desired Xorg configuration to the graphical log-in manager,
by default GDM.
We’ve discussed how to specify the default keyboard layout of your system when it starts, but you can also adjust it at run time:
- If you’re using GNOME, its settings panel has a “Region & Language” entry where you can select one or more keyboard layouts.
- Under Xorg, the
setxkbmapcommand (from the same-named package) allows you to change the current layout. For example, this is how you would change the layout to US Dvorak:setxkbmap us dvorak
- The
loadkeyscommand changes the keyboard layout in effect in the Linux console. However, note thatloadkeysdoes not use the XKB keyboard layout categorization described above. The command below loads the French bépo layout:loadkeys fr-bepo
12.8 区域
A locale defines cultural conventions for a particular language and
region of the world (see Locales in The GNU C Library Reference
Manual). Each locale has a name that typically has the form
language_territory.codeset—e.g.,
fr_LU.utf8 designates the locale for the French language, with
cultural conventions from Luxembourg, and using the UTF-8 encoding.
Usually, you will want to specify the default locale for the machine using
the locale field of the operating-system declaration
(see locale).
The selected locale is automatically added to the locale definitions
known to the system if needed, with its codeset inferred from its
name—e.g., bo_CN.utf8 will be assumed to use the UTF-8
codeset. Additional locale definitions can be specified in the
locale-definitions slot of operating-system—this is useful,
for instance, if the codeset could not be inferred from the locale name.
The default set of locale definitions includes some widely used locales, but
not all the available locales, in order to save space.
For instance, to add the North Frisian locale for Germany, the value of that field may be:
(cons (locale-definition
(name "fy_DE.utf8") (source "fy_DE"))
%default-locale-definitions)
Likewise, to save space, one might want locale-definitions to list
only the locales that are actually used, as in:
(list (locale-definition
(name "ja_JP.eucjp") (source "ja_JP")
(charset "EUC-JP")))
The compiled locale definitions are available at
/run/current-system/locale/X.Y, where X.Y is the libc version,
which is the default location where the GNU libc provided by Guix looks
for locale data. This can be overridden using the LOCPATH environment
variable (see LOCPATH and locale packages).
The locale-definition form is provided by the (gnu system
locale) module. Details are given below.
- Data Type: locale-definition
This is the data type of a locale definition.
名字The name of the locale. See Locale Names in The GNU C Library Reference Manual, for more information on locale names.
sourceThe name of the source for that locale. This is typically the
language_territorypart of the locale name.charset(default:"UTF-8")The “character set” or “code set” for that locale, as defined by IANA.
- Scheme Variable: %default-locale-definitions
A list of commonly used UTF-8 locales, used as the default value of the
locale-definitionsfield ofoperating-systemdeclarations.These locale definitions use the normalized codeset for the part that follows the dot in the name (see normalized codeset in The GNU C Library Reference Manual). So for instance it has
uk_UA.utf8but not, say,uk_UA.UTF-8.
12.8.1 Locale Data Compatibility Considerations
operating-system declarations provide a locale-libcs field to
specify the GNU libc packages that are used to compile locale
declarations (see operating-system Reference). “Why would I care?”,
you may ask. Well, it turns out that the binary format of locale data is
occasionally incompatible from one libc version to another.
For instance, a program linked against libc version 2.21 is unable to read
locale data produced with libc 2.22; worse, that program aborts
instead of simply ignoring the incompatible locale data31. Similarly, a program linked
against libc 2.22 can read most, but not all, of the locale data from libc
2.21 (specifically, LC_COLLATE data is incompatible); thus calls to
setlocale may fail, but programs will not abort.
The “problem” with Guix is that users have a lot of freedom: They can choose whether and when to upgrade software in their profiles, and might be using a libc version different from the one the system administrator used to build the system-wide locale data.
Fortunately, unprivileged users can also install their own locale data and
define GUIX_LOCPATH accordingly (see GUIX_LOCPATH and locale packages).
Still, it is best if the system-wide locale data at
/run/current-system/locale is built for all the libc versions
actually in use on the system, so that all the programs can access it—this
is especially crucial on a multi-user system. To do that, the administrator
can specify several libc packages in the locale-libcs field of
operating-system:
(use-package-modules base) (operating-system ;; … (locale-libcs (list glibc-2.21 (canonical-package glibc))))
This example would lead to a system containing locale definitions for both libc 2.21 and the current version of libc in /run/current-system/locale.
12.9 服务
An important part of preparing an operating-system declaration is
listing system services and their configuration (see 使用配置系统). System services are typically daemons launched when
the system boots, or other actions needed at that time—e.g., configuring
network access.
Guix has a broad definition of “service” (see 合成服务),
but many services are managed by the GNU Shepherd (see Shepherd服务). On a running system, the herd command allows you to
list the available services, show their status, start and stop them, or do
other specific operations (see Jump Start in The GNU Shepherd
Manual). For example:
# herd status
The above command, run as root, lists the currently defined
services. The herd doc command shows a synopsis of the given
service and its associated actions:
# herd doc nscd Run libc's name service cache daemon (nscd). # herd doc nscd action invalidate invalidate: Invalidate the given cache--e.g., 'hosts' for host name lookups.
The start, stop, and restart sub-commands have
the effect you would expect. For instance, the commands below stop the nscd
service and restart the Xorg display server:
# herd stop nscd Service nscd has been stopped. # herd restart xorg-server Service xorg-server has been stopped. Service xorg-server has been started.
For some services, herd configuration returns the name of the
service’s configuration file, which can be handy to inspect its
configuration:
# herd configuration sshd /gnu/store/…-sshd_config
The following sections document the available services, starting with the
core services, that may be used in an operating-system declaration.
- 基础服务
- 执行计划任务
- 日志轮替
- Networking Setup
- 网络服务
- Unattended Upgrades
- X窗口
- 打印服务
- 桌面服务
- 声音服务
- 数据库服务
- 邮件服务
- 消息服务
- 电话服务
- File-Sharing Services
- 监控服务
- Kerberos服务
- LDAP Services
- Web服务
- 证书服务
- DNS服务
- VNC Services
- VPN服务
- 网络文件系统
- Samba Services
- 持续集成
- 电源管理服务
- 音频服务
- 虚拟化服务
- 版本控制服务
- 游戏服务
- PAM Mount Service
- Guix Services
- Linux Services
- Hurd Services
- 其它各种服务
12.9.1 基础服务
The (gnu services base) module provides definitions for the basic
services that one expects from the system. The services exported by this
module are listed below.
- Scheme Variable: %base-services
This variable contains a list of basic services (see 服务类型和服务, for more information on service objects) one would expect from the system: a login service (mingetty) on each tty, syslogd, the libc name service cache daemon (nscd), the udev device manager, and more.
This is the default value of the
servicesfield ofoperating-systemdeclarations. Usually, when customizing a system, you will want to append services to%base-services, like this:(append (list (service avahi-service-type) (service openssh-service-type)) %base-services)
- Scheme Variable: special-files-service-type
This is the service that sets up “special files” such as /bin/sh; an instance of it is part of
%base-services.The value associated with
special-files-service-typeservices must be a list of tuples where the first element is the “special file” and the second element is its target. By default it is:`(("/bin/sh" ,(file-append bash "/bin/sh")) ("/usr/bin/env" ,(file-append coreutils "/bin/env")))
If you want to add, say,
/bin/bashto your system, you can change it to:`(("/bin/sh" ,(file-append bash "/bin/sh")) ("/usr/bin/env" ,(file-append coreutils "/bin/env")) ("/bin/bash" ,(file-append bash "/bin/bash")))
Since this is part of
%base-services, you can usemodify-servicesto customize the set of special files (seemodify-services). But the simple way to add a special file is via theextra-special-fileprocedure (see below).
- Scheme Procedure: extra-special-file file target
Use target as the “special file” file.
For example, adding the following lines to the
servicesfield of your operating system declaration leads to a /usr/bin/env symlink:(extra-special-file "/usr/bin/env" (file-append coreutils "/bin/env"))
- Scheme Procedure: host-name-service name
Return a service that sets the host name to name.
- Scheme Variable: console-font-service-type
Install the given fonts on the specified ttys (fonts are per virtual console on the kernel Linux). The value of this service is a list of tty/font pairs. The font can be the name of a font provided by the
kbdpackage or any valid argument tosetfont, as in this example:`(("tty1" . "LatGrkCyr-8x16") ("tty2" . ,(file-append font-tamzen "/share/kbd/consolefonts/TamzenForPowerline10x20.psf")) ("tty3" . ,(file-append font-terminus "/share/consolefonts/ter-132n"))) ; for HDPI
- Scheme Procedure: login-service config
Return a service to run login according to config, a
<login-configuration>object, which specifies the message of the day, among other things.
- Data Type: login-configuration
This is the data type representing the configuration of login.
motd¶A file-like object containing the “message of the day”.
allow-empty-passwords?(default:#t)Allow empty passwords by default so that first-time users can log in when the ’root’ account has just been created.
- Scheme Procedure: mingetty-service config
Return a service to run mingetty according to config, a
<mingetty-configuration>object, which specifies the tty to run, among other things.
- Data Type: mingetty-configuration
This is the data type representing the configuration of Mingetty, which provides the default implementation of virtual console log-in.
ttyThe name of the console this Mingetty runs on—e.g.,
"tty1".auto-login(default:#f)When true, this field must be a string denoting the user name under which the system automatically logs in. When it is
#f, a user name and password must be entered to log in.login-program(default:#f)This must be either
#f, in which case the default log-in program is used (loginfrom the Shadow tool suite), or a gexp denoting the name of the log-in program.login-pause?(default:#f)When set to
#tin conjunction with auto-login, the user will have to press a key before the log-in shell is launched.clear-on-logout?(default:#t)When set to
#t, the screen will be cleared after logout.mingetty(default: mingetty)The Mingetty package to use.
- Scheme Procedure: agetty-service config
Return a service to run agetty according to config, an
<agetty-configuration>object, which specifies the tty to run, among other things.
- Data Type: agetty-configuration
This is the data type representing the configuration of agetty, which implements virtual and serial console log-in. See the
agetty(8)man page for more information.ttyThe name of the console this agetty runs on, as a string—e.g.,
"ttyS0". This argument is optional, it will default to a reasonable default serial port used by the kernel Linux.For this, if there is a value for an option
agetty.ttyin the kernel command line, agetty will extract the device name of the serial port from it and use that.If not and if there is a value for an option
consolewith a tty in the Linux command line, agetty will extract the device name of the serial port from it and use that.In both cases, agetty will leave the other serial device settings (baud rate etc.) alone—in the hope that Linux pinned them to the correct values.
baud-rate(default:#f)A string containing a comma-separated list of one or more baud rates, in descending order.
term(default:#f)A string containing the value used for the
TERMenvironment variable.eight-bits?(default:#f)When
#t, the tty is assumed to be 8-bit clean, and parity detection is disabled.auto-login(default:#f)When passed a login name, as a string, the specified user will be logged in automatically without prompting for their login name or password.
no-reset?(default:#f)When
#t, don’t reset terminal cflags (control modes).host(default:#f)This accepts a string containing the “login_host”, which will be written into the /var/run/utmpx file.
remote?(default:#f)When set to
#tin conjunction with host, this will add an-rfakehost option to the command line of the login program specified in login-program.flow-control?(default:#f)When set to
#t, enable hardware (RTS/CTS) flow control.no-issue?(default:#f)When set to
#t, the contents of the /etc/issue file will not be displayed before presenting the login prompt.init-string(default:#f)This accepts a string that will be sent to the tty or modem before sending anything else. It can be used to initialize a modem.
no-clear?(default:#f)When set to
#t, agetty will not clear the screen before showing the login prompt.login-program(default: (file-append shadow "/bin/login"))This must be either a gexp denoting the name of a log-in program, or unset, in which case the default value is the
loginfrom the Shadow tool suite.local-line(default:#f)Control the CLOCAL line flag. This accepts one of three symbols as arguments,
'auto,'always, or'never. If#f, the default value chosen by agetty is'auto.extract-baud?(default:#f)When set to
#t, instruct agetty to try to extract the baud rate from the status messages produced by certain types of modems.skip-login?(default:#f)When set to
#t, do not prompt the user for a login name. This can be used with login-program field to use non-standard login systems.no-newline?(default:#f)When set to
#t, do not print a newline before printing the /etc/issue file.login-options(default:#f)This option accepts a string containing options that are passed to the login program. When used with the login-program, be aware that a malicious user could try to enter a login name containing embedded options that could be parsed by the login program.
login-pause(default:#f)When set to
#t, wait for any key before showing the login prompt. This can be used in conjunction with auto-login to save memory by lazily spawning shells.chroot(default:#f)Change root to the specified directory. This option accepts a directory path as a string.
hangup?(default:#f)Use the Linux system call
vhangupto do a virtual hangup of the specified terminal.keep-baud?(default:#f)When set to
#t, try to keep the existing baud rate. The baud rates from baud-rate are used when agetty receives a BREAK character.timeout(default:#f)When set to an integer value, terminate if no user name could be read within timeout seconds.
detect-case?(default:#f)When set to
#t, turn on support for detecting an uppercase-only terminal. This setting will detect a login name containing only uppercase letters as indicating an uppercase-only terminal and turn on some upper-to-lower case conversions. Note that this will not support Unicode characters.wait-cr?(default:#f)When set to
#t, wait for the user or modem to send a carriage-return or linefeed character before displaying /etc/issue or login prompt. This is typically used with the init-string option.no-hints?(default:#f)When set to
#t, do not print hints about Num, Caps, and Scroll locks.no-hostname?(default:#f)By default, the hostname is printed. When this option is set to
#t, no hostname will be shown at all.long-hostname?(default:#f)By default, the hostname is only printed until the first dot. When this option is set to
#t, the fully qualified hostname bygethostnameorgetaddrinfois shown.erase-characters(default:#f)This option accepts a string of additional characters that should be interpreted as backspace when the user types their login name.
kill-characters(default:#f)This option accepts a string that should be interpreted to mean “ignore all previous characters” (also called a “kill” character) when the user types their login name.
chdir(default:#f)This option accepts, as a string, a directory path that will be changed to before login.
delay(default:#f)This options accepts, as an integer, the number of seconds to sleep before opening the tty and displaying the login prompt.
nice(default:#f)This option accepts, as an integer, the nice value with which to run the
loginprogram.extra-options(default:'())This option provides an “escape hatch” for the user to provide arbitrary command-line arguments to
agettyas a list of strings.shepherd-requirement(default:'())The option can be used to provides extra shepherd requirements (for example
'syslogd) to the respective'term-* shepherd service.
- Scheme Procedure: kmscon-service-type config
Return a service to run kmscon according to config, a
<kmscon-configuration>object, which specifies the tty to run, among other things.
- Data Type: kmscon-configuration
This is the data type representing the configuration of Kmscon, which implements virtual console log-in.
virtual-terminalThe name of the console this Kmscon runs on—e.g.,
"tty1".login-program(default:#~(string-append #$shadow "/bin/login"))A gexp denoting the name of the log-in program. The default log-in program is
loginfrom the Shadow tool suite.login-arguments(default:'("-p"))A list of arguments to pass to
login.auto-login(default:#f)When passed a login name, as a string, the specified user will be logged in automatically without prompting for their login name or password.
hardware-acceleration?(default: #f)Whether to use hardware acceleration.
font-engine(default:"pango")Font engine used in Kmscon.
font-size(default:12)Font size used in Kmscon.
keyboard-layout(default:#f)If this is
#f, Kmscon uses the default keyboard layout—usually US English (“qwerty”) for a 105-key PC keyboard.Otherwise this must be a
keyboard-layoutobject specifying the keyboard layout. See 键盘布局, for more information on how to specify the keyboard layout.kmscon(default: kmscon)The Kmscon package to use.
- Scheme Procedure: nscd-service [config] [#:glibc glibc] [#:name-services '()] Return a service that runs the libc name service cache
daemon (nscd) with the given config—an
<nscd-configuration>object. See Name Service Switch, for an example.For convenience, the Shepherd service for nscd provides the following actions:
invalidate¶-
This invalidate the given cache. For instance, running:
herd invalidate nscd hosts
invalidates the host name lookup cache of nscd.
statisticsRunning
herd statistics nscddisplays information about nscd usage and caches.
- Scheme Variable: %nscd-default-configuration
This is the default
<nscd-configuration>value (see below) used bynscd-service. It uses the caches defined by%nscd-default-caches; see below.
- Data Type: nscd-configuration
This is the data type representing the name service cache daemon (nscd) configuration.
name-services(default:'())List of packages denoting name services that must be visible to the nscd—e.g.,
(list nss-mdns).glibc(default: glibc)Package object denoting the GNU C Library providing the
nscdcommand.log-file(default:"/var/log/nscd.log")Name of the nscd log file. This is where debugging output goes when
debug-levelis strictly positive.debug-level(default:0)Integer denoting the debugging levels. Higher numbers mean that more debugging output is logged.
caches(default:%nscd-default-caches)List of
<nscd-cache>objects denoting things to be cached; see below.
- Data Type: nscd-cache
Data type representing a cache database of nscd and its parameters.
databaseThis is a symbol representing the name of the database to be cached. Valid values are
passwd,group,hosts, andservices, which designate the corresponding NSS database (see NSS Basics in The GNU C Library Reference Manual).positive-time-to-livenegative-time-to-live(default:20)A number representing the number of seconds during which a positive or negative lookup result remains in cache.
check-files?(default:#t)Whether to check for updates of the files corresponding to database.
For instance, when database is
hosts, setting this flag instructs nscd to check for updates in /etc/hosts and to take them into account.persistent?(default:#t)Whether the cache should be stored persistently on disk.
shared?(default:#t)Whether the cache should be shared among users.
max-database-size(default: 32 MiB)Maximum size in bytes of the database cache.
- Scheme Variable: %nscd-default-caches
List of
<nscd-cache>objects used by default bynscd-configuration(see above).It enables persistent and aggressive caching of service and host name lookups. The latter provides better host name lookup performance, resilience in the face of unreliable name servers, and also better privacy—often the result of host name lookups is in local cache, so external name servers do not even need to be queried.
- Data Type: syslog-configuration
This data type represents the configuration of the syslog daemon.
syslogd(default:#~(string-append #$inetutils "/libexec/syslogd"))The syslog daemon to use.
config-file(default:%default-syslog.conf)The syslog configuration file to use.
- Scheme Procedure: syslog-service config
Return a service that runs a syslog daemon according to config.
See syslogd invocation in GNU Inetutils, for more information on the configuration file syntax.
- Scheme Variable: guix-service-type
This is the type of the service that runs the build daemon,
guix-daemon(see 调用guix-daemon). Its value must be aguix-configurationrecord as described below.
- Data Type: guix-configuration
This data type represents the configuration of the Guix build daemon. See 调用
guix-daemon, for more information.guix(default: guix)The Guix package to use.
build-group(default:"guixbuild")Name of the group for build user accounts.
build-accounts(default:10)Number of build user accounts to create.
authorize-key?(default:#t) ¶Whether to authorize the substitute keys listed in
authorized-keys—by default that ofci.guix.gnu.organdbordeaux.guix.gnu.org(see substitutes).When
authorize-key?is true, /etc/guix/acl cannot be changed by invokingguix archive --authorize. You must instead adjustguix-configurationas you wish and reconfigure the system. This ensures that your operating system configuration file is self-contained.注: When booting or reconfiguring to a system where
authorize-key?is true, the existing /etc/guix/acl file is backed up as /etc/guix/acl.bak if it was determined to be a manually modified file. This is to facilitate migration from earlier versions, which allowed for in-place modifications to /etc/guix/acl.authorized-keys(default:%default-authorized-guix-keys)The list of authorized key files for archive imports, as a list of string-valued gexps (see Invoking
guix archive). By default, it contains that ofci.guix.gnu.organdbordeaux.guix.gnu.org(see substitutes). Seesubstitute-urlsbelow for an example on how to change it.use-substitutes?(default:#t)Whether to use substitutes.
substitute-urls(default:%default-substitute-urls)The list of URLs where to look for substitutes by default.
Suppose you would like to fetch substitutes from
guix.example.orgin addition toci.guix.gnu.org. You will need to do two things: (1) addguix.example.orgtosubstitute-urls, and (2) authorize its signing key, having done appropriate checks (see substitute服务器授权). The configuration below does exactly that:(guix-configuration (substitute-urls (append (list "https://guix.example.org") %default-substitute-urls)) (authorized-keys (append (list (local-file "./guix.example.org-key.pub")) %default-authorized-guix-keys)))This example assumes that the file ./guix.example.org-key.pub contains the public key that
guix.example.orguses to sign substitutes.generate-substitute-key?(default:#t)Whether to generate a substitute key pair under /etc/guix/signing-key.pub and /etc/guix/signing-key.sec if there is not already one.
This key pair is used when exporting store items, for instance with
guix publish(see Invokingguix publish) orguix archive(see Invokingguix archive). Generating a key pair takes a few seconds when enough entropy is available and is only done once; you might want to turn it off for instance in a virtual machine that does not need it and where the extra boot time is a problem.max-silent-time(default:0)timeout(default:0)The number of seconds of silence and the number of seconds of activity, respectively, after which a build process times out. A value of zero disables the timeout.
log-compression(default:'gzip)The type of compression used for build logs—one of
gzip,bzip2, ornone.discover?(default:#f)Whether to discover substitute servers on the local network using mDNS and DNS-SD.
extra-options(default:'())List of extra command-line options for
guix-daemon.log-file(default:"/var/log/guix-daemon.log")File where
guix-daemon’s standard output and standard error are written.http-proxy(default:#f)The URL of the HTTP and HTTPS proxy used for downloading fixed-output derivations and substitutes.
It is also possible to change the daemon’s proxy at run time through the
set-http-proxyaction, which restarts it:herd set-http-proxy guix-daemon http://localhost:8118
To clear the proxy settings, run:
herd set-http-proxy guix-daemon
tmpdir(default:#f)A directory path where the
guix-daemonwill perform builds.
- Data Type: guix-extension
-
This data type represents the parameters of the Guix build daemon that are extendable. This is the type of the object that must be used within a guix service extension. See 合成服务, for more information.
authorized-keys(default:'())A list of file-like objects where each element contains a public key.
substitute-urls(default:'())A list of strings where each element is a substitute URL.
chroot-directories(default:'())A list of file-like objects or strings pointing to additional directories the build daemon can use.
- Scheme Procedure: udev-service [#:udev eudev #:rules
'()] Run udev, which populates the /dev directory dynamically. udev rules can be provided as a list of files through the rules variable. The procedures
udev-rule,udev-rules-serviceandfile->udev-rulefrom(gnu services base)simplify the creation of such rule files.The
herd rules udevcommand, as root, returns the name of the directory containing all the active udev rules.
- Scheme Procedure: udev-rule [file-name contents]
Return a udev-rule file named file-name containing the rules defined by the contents literal.
In the following example, a rule for a USB device is defined to be stored in the file 90-usb-thing.rules. The rule runs a script upon detecting a USB device with a given product identifier.
(define %example-udev-rule (udev-rule "90-usb-thing.rules" (string-append "ACTION==\"add\", SUBSYSTEM==\"usb\", " "ATTR{product}==\"Example\", " "RUN+=\"/path/to/script\"")))
- Scheme Procedure: udev-rules-service [name rules] [#:groups groups] Return a service that extends
udev-service-typewith rules andaccount-service-typewith groups as system groups. This works by creating a singleton service typename-udev-rules, of which the returned service is an instance.Here we show how it can be used to extend
udev-service-typewith the previously defined rule%example-udev-rule.(operating-system ;; … (services (cons (udev-rules-service 'usb-thing %example-udev-rule) %desktop-services)))
- Scheme Procedure: file->udev-rule [file-name file]
Return a udev file named file-name containing the rules defined within file, a file-like object.
The following example showcases how we can use an existing rule file.
(use-modules (guix download) ;for url-fetch (guix packages) ;for origin …) (define %android-udev-rules (file->udev-rule "51-android-udev.rules" (let ((version "20170910")) (origin (method url-fetch) (uri (string-append "https://raw.githubusercontent.com/M0Rf30/" "android-udev-rules/" version "/51-android.rules")) (sha256 (base32 "0lmmagpyb6xsq6zcr2w1cyx9qmjqmajkvrdbhjx32gqf1d9is003"))))))
Additionally, Guix package definitions can be included in rules in
order to extend the udev rules with the definitions found under their
lib/udev/rules.d sub-directory. In lieu of the previous
file->udev-rule example, we could have used the
android-udev-rules package which exists in Guix in the (gnu
packages android) module.
The following example shows how to use the android-udev-rules package
so that the Android tool adb can detect devices without root
privileges. It also details how to create the adbusers group, which
is required for the proper functioning of the rules defined within the
android-udev-rules package. To create such a group, we must define
it both as part of the supplementary-groups of our
user-account declaration, as well as in the groups of the
udev-rules-service procedure.
(use-modules (gnu packages android) ;for android-udev-rules (gnu system shadow) ;for user-group …) (operating-system ;; … (users (cons (user-account ;; … (supplementary-groups '("adbusers" ;for adb "wheel" "netdev" "audio" "video"))))) ;; … (services (cons (udev-rules-service 'android android-udev-rules #:groups '("adbusers")) %desktop-services)))
- Scheme Variable: urandom-seed-service-type
Save some entropy in
%random-seed-fileto seed /dev/urandom when rebooting. It also tries to seed /dev/urandom from /dev/hwrng while booting, if /dev/hwrng exists and is readable.
- Scheme Variable: %random-seed-file
This is the name of the file where some random bytes are saved by urandom-seed-service to seed /dev/urandom when rebooting. It defaults to /var/lib/random-seed.
- Scheme Variable: gpm-service-type
This is the type of the service that runs GPM, the general-purpose mouse daemon, which provides mouse support to the Linux console. GPM allows users to use the mouse in the console, notably to select, copy, and paste text.
The value for services of this type must be a
gpm-configuration(see below). This service is not part of%base-services.
- Data Type: gpm-configuration
Data type representing the configuration of GPM.
options(default:%default-gpm-options)Command-line options passed to
gpm. The default set of options instructgpmto listen to mouse events on /dev/input/mice. See Command Line in gpm manual, for more information.gpm(default:gpm)The GPM package to use.
- Scheme Variable: guix-publish-service-type
This is the service type for
guix publish(see Invokingguix publish). Its value must be aguix-publish-configurationobject, as described below.This assumes that /etc/guix already contains a signing key pair as created by
guix archive --generate-key(see Invokingguix archive). If that is not the case, the service will fail to start.
- Data Type: guix-publish-configuration
Data type representing the configuration of the
guix publishservice.guix(default:guix)The Guix package to use.
port(default:80)The TCP port to listen for connections.
host(default:"localhost")The host (and thus, network interface) to listen to. Use
"0.0.0.0"to listen on all the network interfaces.advertise?(default:#f)When true, advertise the service on the local network via the DNS-SD protocol, using Avahi.
This allows neighboring Guix devices with discovery on (see
guix-configurationabove) to discover thisguix publishinstance and to automatically download substitutes from it.compression(default:'(("gzip" 3) ("zstd" 3)))This is a list of compression method/level tuple used when compressing substitutes. For example, to compress all substitutes with both lzip at level 7 and gzip at level 9, write:
'(("lzip" 7) ("gzip" 9))
Level 9 achieves the best compression ratio at the expense of increased CPU usage, whereas level 1 achieves fast compression. See Invoking
guix publish, for more information on the available compression methods and the tradeoffs involved.An empty list disables compression altogether.
nar-path(default:"nar")The URL path at which “nars” can be fetched. See --nar-path, for details.
cache(default:#f)When it is
#f, disable caching and instead generate archives on demand. Otherwise, this should be the name of a directory—e.g.,"/var/cache/guix/publish"—whereguix publishcaches archives and meta-data ready to be sent. See --cache, for more information on the tradeoffs involved.workers(default:#f)When it is an integer, this is the number of worker threads used for caching; when
#f, the number of processors is used. See --workers, for more information.cache-bypass-threshold(default: 10 MiB)When
cacheis true, this is the maximum size in bytes of a store item for whichguix publishmay bypass its cache in case of a cache miss. See --cache-bypass-threshold, for more information.ttl(default:#f)When it is an integer, this denotes the time-to-live in seconds of the published archives. See --ttl, for more information.
negative-ttl(default:#f)When it is an integer, this denotes the time-to-live in seconds for the negative lookups. See --negative-ttl, for more information.
- Scheme Procedure: rngd-service [#:rng-tools rng-tools] [#:device "/dev/hwrng"] Return a service that runs the
rngd program from rng-tools to add device to the kernel’s entropy pool. The service will fail if device does not exist.
- Scheme Procedure: pam-limits-service [#:limits
'()] -
Return a service that installs a configuration file for the
pam_limitsmodule. The procedure optionally takes a list ofpam-limits-entryvalues, which can be used to specifyulimitlimits andnicepriority limits to user sessions.The following limits definition sets two hard and soft limits for all login sessions of users in the
realtimegroup:(pam-limits-service (list (pam-limits-entry "@realtime" 'both 'rtprio 99) (pam-limits-entry "@realtime" 'both 'memlock 'unlimited)))The first entry increases the maximum realtime priority for non-privileged processes; the second entry lifts any restriction of the maximum address space that can be locked in memory. These settings are commonly used for real-time audio systems.
Another useful example is raising the maximum number of open file descriptors that can be used:
(pam-limits-service (list (pam-limits-entry "*" 'both 'nofile 100000)))In the above example, the asterisk means the limit should apply to any user. It is important to ensure the chosen value doesn’t exceed the maximum system value visible in the /proc/sys/fs/file-max file, else the users would be prevented from login in. For more information about the Pluggable Authentication Module (PAM) limits, refer to the ‘pam_limits’ man page from the
linux-pampackage.
- Scheme Variable: greetd-service-type
greetdis a minimal and flexible login manager daemon, that makes no assumptions about what you want to launch.If you can run it from your shell in a TTY, greetd can start it. If it can be taught to speak a simple JSON-based IPC protocol, then it can be a geeter.
greetd-service-typeprovides necessary infrastructure for logging in users, including:-
greetdPAM service - Special variation of
pam-mountto mountXDG_RUNTIME_DIR
Here is example of switching from
mingetty-service-typetogreetd-service-type, and how different terminals could be:(append (modify-services %base-services ;; greetd-service-type provides "greetd" PAM service (delete login-service-type) ;; and can be used in place of mingetty-service-type (delete mingetty-service-type)) (list (service greetd-service-type (greetd-configuration (terminals (list ;; we can make any terminal active by default (greetd-terminal-configuration (terminal-vt "1") (terminal-switch #t)) ;; we can make environment without XDG_RUNTIME_DIR set ;; even provide our own environment variables (greetd-terminal-configuration (terminal-vt "2") (default-session-command (greetd-agreety-session (extra-env '(("MY_VAR" . "1"))) (xdg-env? #f)))) ;; we can use different shell instead of default bash (greetd-terminal-configuration (terminal-vt "3") (default-session-command (greetd-agreety-session (command (file-append zsh "/bin/zsh"))))) ;; we can use any other executable command as greeter (greetd-terminal-configuration (terminal-vt "4") (default-session-command (program-file "my-noop-greeter" #~(exit)))) (greetd-terminal-configuration (terminal-vt "5")) (greetd-terminal-configuration (terminal-vt "6")))))) ;; mingetty-service-type can be used in parallel ;; if needed to do so, do not (delete login-service-type) ;; as illustrated above #| (service mingetty-service-type (mingetty-configuration (tty "tty8"))) |#))-
- Data Type: greetd-configuration
Configuration record for the
greetd-service-type.motdA file-like object containing the “message of the day”.
allow-empty-passwords?(default:#t)Allow empty passwords by default so that first-time users can log in when the ’root’ account has just been created.
terminals(default:'())List of
greetd-terminal-configurationper terminal for whichgreetdshould be started.greeter-supplementary-groups(default:'())List of groups which should be added to
greeteruser. For instance:(greeter-supplementary-groups '("seat" "video"))Note that this example will fail if
seatgroup does not exist.
- Data Type: greetd-terminal-configuration
Configuration record for per terminal greetd daemon service.
greetd(default:greetd)The greetd package to use.
config-file-nameConfiguration file name to use for greetd daemon. Generally, autogenerated derivation based on
terminal-vtvalue.log-file-nameLog file name to use for greetd daemon. Generally, autogenerated name based on
terminal-vtvalue.terminal-vt(default: ‘"7"’)The VT to run on. Use of a specific VT with appropriate conflict avoidance is recommended.
terminal-switch(default:#f)Make this terminal active on start of
greetd.default-session-user(default: ‘"greeter"’)The user to use for running the greeter.
default-session-command(default:(greetd-agreety-session))Can be either instance of
greetd-agreety-sessionconfiguration orgexp->scriptlike object to use as greeter.
- Data Type: greetd-agreety-session
Configuration record for the agreety greetd greeter.
agreety(default:greetd)The package with
/bin/agreetycommand.command(default:(file-append bash "/bin/bash"))Command to be started by
/bin/agreetyon successful login.command-args(default:'("-l"))Command arguments to pass to command.
extra-env(default:'())Extra environment variables to set on login.
xdg-env?(default:#t)If true
XDG_RUNTIME_DIRandXDG_SESSION_TYPEwill be set before starting command. One should note that,extra-envvariables are set right after mentioned variables, so that they can be overriden.
- Data Type: greetd-wlgreet-session
Generic configuration record for the wlgreet greetd greeter.
wlgreet(default:wlgreet)The package with the
/bin/wlgreetcommand.command(default:(file-append sway "/bin/sway"))Command to be started by
/bin/wlgreeton successful login.command-args(default:'())Command arguments to pass to command.
output-mode(default:"all")Option to use for
outputModein the TOML configuration file.scale(default:1)Option to use for
scalein the TOML configuration file.background(default:'(0 0 0 0.9))RGBA list to use as the background colour of the login prompt.
headline(default:'(1 1 1 1))RGBA list to use as the headline colour of the UI popup.
prompt(default:'(1 1 1 1))RGBA list to use as the prompt colour of the UI popup.
prompt-error(default:'(1 1 1 1))RGBA list to use as the error colour of the UI popup.
border(default:'(1 1 1 1))RGBA list to use as the border colour of the UI popup.
extra-env(default:'())Extra environment variables to set on login.
- Data Type: greetd-wlgreet-sway-session
Sway-specific configuration record for the wlgreet greetd greeter.
wlgreet-session(default:(greetd-wlgreet-session))A
greetd-wlgreet-sessionrecord for generic wlgreet configuration, on top of the Sway-specificgreetd-wlgreet-sway-session.sway(default:sway)The package providing the
/bin/swaycommand.sway-configuration(default: #f)File-like object providing an additional Sway configuration file to be prepended to the mandatory part of the configuration.
Here is an example of a greetd configuration that uses wlgreet and Sway:
(greetd-configuration ;; We need to give the greeter user these permissions, otherwise ;; Sway will crash on launch. (greeter-supplementary-groups (list "video" "input" "seat")) (terminals (list (greetd-terminal-configuration (terminal-vt "1") (terminal-switch #t) (default-session-command (greetd-wlgreet-sway-session (sway-configuration (local-file "sway-greetd.conf"))))))))
12.9.2 执行计划任务
The (gnu services mcron) module provides an interface to
GNU mcron, a daemon to run jobs at scheduled times (see GNU mcron). GNU mcron is similar to the traditional Unix
cron daemon; the main difference is that it is implemented in
Guile Scheme, which provides a lot of flexibility when specifying the
scheduling of jobs and their actions.
The example below defines an operating system that runs the
updatedb (see Invoking updatedb in Finding Files) and
the guix gc commands (see Invoking guix gc) daily, as well as
the mkid command on behalf of an unprivileged user (see mkid
invocation in ID Database Utilities). It uses gexps to introduce
job definitions that are passed to mcron (see G-表达式).
(use-modules (guix) (gnu) (gnu services mcron)) (use-package-modules base idutils) (define updatedb-job ;; Run 'updatedb' at 3AM every day. Here we write the ;; job's action as a Scheme procedure. #~(job '(next-hour '(3)) (lambda () (execl (string-append #$findutils "/bin/updatedb") "updatedb" "--prunepaths=/tmp /var/tmp /gnu/store")) "updatedb")) (define garbage-collector-job ;; Collect garbage 5 minutes after midnight every day. ;; The job's action is a shell command. #~(job "5 0 * * *" ;Vixie cron syntax "guix gc -F 1G")) (define idutils-job ;; Update the index database as user "charlie" at 12:15PM ;; and 19:15PM. This runs from the user's home directory. #~(job '(next-minute-from (next-hour '(12 19)) '(15)) (string-append #$idutils "/bin/mkid src") #:user "charlie")) (operating-system ;; … ;; %BASE-SERVICES already includes an instance of ;; 'mcron-service-type', which we extend with additional ;; jobs using 'simple-service'. (services (cons (simple-service 'my-cron-jobs mcron-service-type (list garbage-collector-job updatedb-job idutils-job)) %base-services)))
Tip: When providing the action of a job specification as a procedure, you should provide an explicit name for the job via the optional 3rd argument as done in the
updatedb-jobexample above. Otherwise, the job would appear as “Lambda function” in the output ofherd schedule mcron, which is not nearly descriptive enough!
For more complex jobs defined in Scheme where you need control over the top
level, for instance to introduce a use-modules form, you can move
your code to a separate program using the program-file procedure of
the (guix gexp) module (see G-表达式). The example below
illustrates that.
(define %battery-alert-job
;; Beep when the battery percentage falls below %MIN-LEVEL.
#~(job
'(next-minute (range 0 60 1))
#$(program-file
"battery-alert.scm"
(with-imported-modules (source-module-closure
'((guix build utils)))
#~(begin
(use-modules (guix build utils)
(ice-9 popen)
(ice-9 regex)
(ice-9 textual-ports)
(srfi srfi-2))
(define %min-level 20)
(setenv "LC_ALL" "C") ;ensure English output
(and-let* ((input-pipe (open-pipe*
OPEN_READ
#$(file-append acpi "/bin/acpi")))
(output (get-string-all input-pipe))
(m (string-match "Discharging, ([0-9]+)%" output))
(level (string->number (match:substring m 1)))
((< level %min-level)))
(format #t "warning: Battery level is low (~a%)~%" level)
(invoke #$(file-append beep "/bin/beep") "-r5")))))))
See mcron job specifications in GNU mcron, for more information on mcron job specifications. Below is the reference of the mcron service.
On a running system, you can use the schedule action of the service
to visualize the mcron jobs that will be executed next:
# herd schedule mcron
The example above lists the next five tasks that will be executed, but you can also specify the number of tasks to display:
# herd schedule mcron 10
- Scheme Variable: mcron-service-type
This is the type of the
mcronservice, whose value is anmcron-configurationobject.This service type can be the target of a service extension that provides additional job specifications (see 合成服务). In other words, it is possible to define services that provide additional mcron jobs to run.
- Data Type: mcron-configuration
Available
mcron-configurationfields are:mcron(default:mcron) (type: file-like)The mcron package to use.
jobs(default:()) (type: list-of-gexps)This is a list of gexps (see G-表达式), where each gexp corresponds to an mcron job specification (see mcron job specifications in GNU mcron).
log?(default:#t) (type: boolean)Log messages to standard output.
log-format(default:"~1@*~a ~a: ~a~%") (type: string)(ice-9 format)format string for log messages. The default value produces messages like "‘pid name: message"’ (see Invoking in GNU mcron). Each message is also prefixed by a timestamp by GNU Shepherd.
Next: Networking Setup, Previous: 执行计划任务, Up: 服务 [Contents][Index]
12.9.3 日志轮替
Log files such as those found in /var/log tend to grow endlessly, so
it’s a good idea to rotate them once in a while—i.e., archive their
contents in separate files, possibly compressed. The (gnu services
admin) module provides an interface to GNU Rot[t]log, a log rotation
tool (see GNU Rot[t]log Manual).
This service is part of %base-services, and thus enabled by default,
with the default settings, for commonly encountered log files. The example
below shows how to extend it with an additional rotation, should you
need to do that (usually, services that produce log files already take care
of that):
(use-modules (guix) (gnu)) (use-service-modules admin) (define my-log-files ;; Log files that I want to rotate. '("/var/log/something.log" "/var/log/another.log")) (operating-system ;; … (services (cons (simple-service 'rotate-my-stuff rottlog-service-type (list (log-rotation (frequency 'daily) (files my-log-files)))) %base-services)))
- Scheme Variable: rottlog-service-type
This is the type of the Rottlog service, whose value is a
rottlog-configurationobject.Other services can extend this one with new
log-rotationobjects (see below), thereby augmenting the set of files to be rotated.This service type can define mcron jobs (see 执行计划任务) to run the rottlog service.
- Data Type: rottlog-configuration
Data type representing the configuration of rottlog.
rottlog(default:rottlog)The Rottlog package to use.
rc-file(default:(file-append rottlog "/etc/rc"))The Rottlog configuration file to use (see Mandatory RC Variables in GNU Rot[t]log Manual).
rotations(default:%default-rotations)A list of
log-rotationobjects as defined below.jobsThis is a list of gexps where each gexp corresponds to an mcron job specification (see 执行计划任务).
- Data Type: log-rotation
Data type representing the rotation of a group of log files.
Taking an example from the Rottlog manual (see Period Related File Examples in GNU Rot[t]log Manual), a log rotation might be defined like this:
(log-rotation (frequency 'daily) (files '("/var/log/apache/*")) (options '("storedir apache-archives" "rotate 6" "notifempty" "nocompress")))The list of fields is as follows:
frequency(default:'weekly)The log rotation frequency, a symbol.
filesThe list of files or file glob patterns to rotate.
options(default:%default-log-rotation-options)The list of rottlog options for this rotation (see Configuration parameters in GNU Rot[t]log Manual).
post-rotate(default:#f)Either
#for a gexp to execute once the rotation has completed.
- Scheme Variable: %default-rotations
Specifies weekly rotation of
%rotated-filesand of /var/log/guix-daemon.log.
- Scheme Variable: %rotated-files
The list of syslog-controlled files to be rotated. By default it is:
'("/var/log/messages" "/var/log/secure" "/var/log/debug" \ "/var/log/maillog").
Some log files just need to be deleted periodically once they are old,
without any other criterion and without any archival step. This is the case
of build logs stored by guix-daemon under
/var/log/guix/drvs (see 调用guix-daemon). The
log-cleanup service addresses this use case. For example,
%base-services (see 基础服务) includes the following:
;; Periodically delete old build logs. (service log-cleanup-service-type (log-cleanup-configuration (directory "/var/log/guix/drvs")))
That ensures build logs do not accumulate endlessly.
- Scheme Variable: log-cleanup-service-type
This is the type of the service to delete old logs. Its value must be a
log-cleanup-configurationrecord as described below.
- Data Type: log-cleanup-configuration
Data type representing the log cleanup configuration
directoryName of the directory containing log files.
expiry(default:(* 6 30 24 3600))Age in seconds after which a file is subject to deletion (six months by default).
schedule(default:"30 12 01,08,15,22 * *")String or gexp denoting the corresponding mcron job schedule (see 执行计划任务).
Anonip Service
Anonip is a privacy filter that removes IP address from web server logs. This service creates a FIFO and filters any written lines with anonip before writing the filtered log to a target file.
The following example sets up the FIFO /var/run/anonip/https.access.log and writes the filtered log file /var/log/anonip/https.access.log.
(service anonip-service-type
(anonip-configuration
(input "/var/run/anonip/https.access.log")
(output "/var/log/anonip/https.access.log")))
Configure your web server to write its logs to the FIFO at /var/run/anonip/https.access.log and collect the anonymized log file at /var/web-logs/https.access.log.
- Data Type: anonip-configuration
This data type represents the configuration of anonip. It has the following parameters:
anonip(default:anonip)The anonip package to use.
inputThe file name of the input log file to process. The service creates a FIFO of this name. The web server should write its logs to this FIFO.
outputThe file name of the processed log file.
The following optional settings may be provided:
skip-private?When
#truedo not mask addresses in private ranges.columnA 1-based indexed column number. Assume IP address is in the specified column (default is 1).
replacementReplacement string in case address parsing fails, e.g.
"0.0.0.0".ipv4maskNumber of bits to mask in IPv4 addresses.
ipv6maskNumber of bits to mask in IPv6 addresses.
incrementIncrement the IP address by the given number. By default this is zero.
delimiterLog delimiter string.
regexRegular expression for detecting IP addresses. Use this instead of
column.
12.9.4 Networking Setup
The (gnu services networking) module provides services to configure
network interfaces and set up networking on your machine. Those services
provide different ways for you to set up your machine: by declaring a static
network configuration, by running a Dynamic Host Configuration Protocol
(DHCP) client, or by running daemons such as NetworkManager and Connman that
automate the whole process, automatically adapt to connectivity changes, and
provide a high-level user interface.
On a laptop, NetworkManager and Connman are by far the most convenient
options, which is why the default desktop services include NetworkManager
(see %desktop-services). For a server, or for
a virtual machine or a container, static network configuration or a simple
DHCP client are often more appropriate.
This section describes the various network setup services available, starting with static network configuration.
- Scheme Variable: static-networking-service-type
This is the type for statically-configured network interfaces. Its value must be a list of
static-networkingrecords. Each of them declares a set of addresses, routes, and links, as shown below.Here is the simplest configuration, with only one network interface controller (NIC) and only IPv4 connectivity:
;; Static networking for one NIC, IPv4-only. (service static-networking-service-type (list (static-networking (addresses (list (network-address (device "eno1") (value "10.0.2.15/24")))) (routes (list (network-route (destination "default") (gateway "10.0.2.2")))) (name-servers '("10.0.2.3")))))
The snippet above can be added to the
servicesfield of your operating system configuration (see 使用配置系统). It will configure your machine to have 10.0.2.15 as its IP address, with a 24-bit netmask for the local network—meaning that any 10.0.2.x address is on the local area network (LAN). Traffic to addresses outside the local network is routed via 10.0.2.2. Host names are resolved by sending domain name system (DNS) queries to 10.0.2.3.
- Data Type: static-networking
This is the data type representing a static network configuration.
As an example, here is how you would declare the configuration of a machine with a single network interface controller (NIC) available as
eno1, and with one IPv4 and one IPv6 address:;; Network configuration for one NIC, IPv4 + IPv6. (static-networking (addresses (list (network-address (device "eno1") (value "10.0.2.15/24")) (network-address (device "eno1") (value "2001:123:4567:101::1/64")))) (routes (list (network-route (destination "default") (gateway "10.0.2.2")) (network-route (destination "default") (gateway "2020:321:4567:42::1")))) (name-servers '("10.0.2.3")))
If you are familiar with the
ipcommand of theiproute2package found on Linux-based systems, the declaration above is equivalent to typing:ip address add 10.0.2.15/24 dev eno1 ip address add 2001:123:4567:101::1/64 dev eno1 ip route add default via inet 10.0.2.2 ip route add default via inet6 2020:321:4567:42::1
Run
man 8 ipfor more info. Venerable GNU/Linux users will certainly know how to do it withifconfigandroute, but we’ll spare you that.The available fields of this data type are as follows:
addresseslinks(default:'())routes(default:'())The list of
network-address,network-link, andnetwork-routerecords for this network (see below).name-servers(default:'())The list of IP addresses (strings) of domain name servers. These IP addresses go to /etc/resolv.conf.
provision(default:'(networking))If true, this should be a list of symbols for the Shepherd service corresponding to this network configuration.
requirement(default'())The list of Shepherd services depended on.
- Data Type: network-address
This is the data type representing the IP address of a network interface.
deviceThe name of the network interface for this address—e.g.,
"eno1".valueThe actual IP address and network mask, in CIDR (Classless Inter-Domain Routing) notation, as a string.
For example,
"10.0.2.15/24"denotes IPv4 address 10.0.2.15 on a 24-bit sub-network—all 10.0.2.x addresses are on the same local network.ipv6?Whether
valuedenotes an IPv6 address. By default this is automatically determined.
- Data Type: network-route
This is the data type representing a network route.
destinationThe route destination (a string), either an IP address and network mask or
"default"to denote the default route.source(default:#f)The route source.
device(default:#f)The device used for this route—e.g.,
"eno2".ipv6?(default: auto)Whether this is an IPv6 route. By default this is automatically determined based on
destinationorgateway.gateway(default:#f)IP address (a string) through which traffic is routed.
- Data Type: network-link
Data type for a network link (see Link in Guile-Netlink Manual).
名字The name of the link—e.g.,
"v0p0".typeA symbol denoting the type of the link—e.g.,
'veth.argumentsList of arguments for this type of link.
- Scheme Variable: %loopback-static-networking
This is the
static-networkingrecord representing the “loopback device”,lo, for IP addresses 127.0.0.1 and ::1, and providing theloopbackShepherd service.
- Scheme Variable: %qemu-static-networking
This is the
static-networkingrecord representing network setup when using QEMU’s user-mode network stack oneth0(see Using the user mode network stack in QEMU Documentation).
- Scheme Variable: dhcp-client-service-type
This is the type of services that run dhcp, a Dynamic Host Configuration Protocol (DHCP) client.
- Data Type: dhcp-client-configuration
Data type representing the configuration of the DHCP client service.
package(default:isc-dhcp)DHCP client package to use.
interfaces(default:'all)Either
'allor the list of interface names that the DHCP client should listen on—e.g.,'("eno1").When set to
'all, the DHCP client listens on all the available non-loopback interfaces that can be activated. Otherwise the DHCP client listens only on the specified interfaces.
- Scheme Variable: network-manager-service-type
This is the service type for the NetworkManager service. The value for this service type is a
network-manager-configurationrecord.This service is part of
%desktop-services(see 桌面服务).
- Data Type: network-manager-configuration
Data type representing the configuration of NetworkManager.
network-manager(default:network-manager)The NetworkManager package to use.
dns(default:"default")Processing mode for DNS, which affects how NetworkManager uses the
resolv.confconfiguration file.- ‘default’
NetworkManager will update
resolv.confto reflect the nameservers provided by currently active connections.- ‘dnsmasq’
NetworkManager will run
dnsmasqas a local caching nameserver, using a conditional forwarding configuration if you are connected to a VPN, and then updateresolv.confto point to the local nameserver.With this setting, you can share your network connection. For example when you want to share your network connection to another laptop via an Ethernet cable, you can open
nm-connection-editorand configure the Wired connection’s method for IPv4 and IPv6 to be “Shared to other computers” and reestablish the connection (or reboot).You can also set up a host-to-guest connection to QEMU VMs (see Installing Guix in a Virtual Machine). With a host-to-guest connection, you can e.g. access a Web server running on the VM (see Web服务) from a Web browser on your host system, or connect to the VM via SSH (see
openssh-service-type). To set up a host-to-guest connection, run this command once:nmcli connection add type tun \ connection.interface-name tap0 \ tun.mode tap tun.owner $(id -u) \ ipv4.method shared \ ipv4.addresses 172.28.112.1/24
Then each time you launch your QEMU VM (see Running Guix in a Virtual Machine), pass -nic tap,ifname=tap0,script=no,downscript=no to
qemu-system-....- ‘none’
NetworkManager will not modify
resolv.conf.
vpn-plugins(default:'())This is the list of available plugins for virtual private networks (VPNs). An example of this is the
network-manager-openvpnpackage, which allows NetworkManager to manage VPNs via OpenVPN.
- Scheme Variable: connman-service-type
This is the service type to run Connman, a network connection manager.
Its value must be an
connman-configurationrecord as in this example:(service connman-service-type (connman-configuration (disable-vpn? #t)))See below for details about
connman-configuration.
- Data Type: connman-configuration
Data Type representing the configuration of connman.
connman(default: connman)The connman package to use.
disable-vpn?(default:#f)When true, disable connman’s vpn plugin.
- Scheme Variable: wpa-supplicant-service-type
This is the service type to run WPA supplicant, an authentication daemon required to authenticate against encrypted WiFi or ethernet networks.
- Data Type: wpa-supplicant-configuration
Data type representing the configuration of WPA Supplicant.
It takes the following parameters:
wpa-supplicant(default:wpa-supplicant)The WPA Supplicant package to use.
requirement(default:'(user-processes loopback syslogd)List of services that should be started before WPA Supplicant starts.
dbus?(default:#t)Whether to listen for requests on D-Bus.
pid-file(default:"/var/run/wpa_supplicant.pid")Where to store the PID file.
interface(default:#f)If this is set, it must specify the name of a network interface that WPA supplicant will control.
config-file(default:#f)Optional configuration file to use.
extra-options(default:'())List of additional command-line arguments to pass to the daemon.
Some networking devices such as modems require special care, and this is what the services below focus on.
- Scheme Variable: modem-manager-service-type
This is the service type for the ModemManager service. The value for this service type is a
modem-manager-configurationrecord.This service is part of
%desktop-services(see 桌面服务).
- Data Type: modem-manager-configuration
Data type representing the configuration of ModemManager.
modem-manager(default:modem-manager)The ModemManager package to use.
- Scheme Variable: usb-modeswitch-service-type
This is the service type for the USB_ModeSwitch service. The value for this service type is a
usb-modeswitch-configurationrecord.When plugged in, some USB modems (and other USB devices) initially present themselves as a read-only storage medium and not as a modem. They need to be modeswitched before they are usable. The USB_ModeSwitch service type installs udev rules to automatically modeswitch these devices when they are plugged in.
This service is part of
%desktop-services(see 桌面服务).
- Data Type: usb-modeswitch-configuration
Data type representing the configuration of USB_ModeSwitch.
usb-modeswitch(default:usb-modeswitch)The USB_ModeSwitch package providing the binaries for modeswitching.
usb-modeswitch-data(default:usb-modeswitch-data)The package providing the device data and udev rules file used by USB_ModeSwitch.
config-file(default:#~(string-append #$usb-modeswitch:dispatcher "/etc/usb_modeswitch.conf"))Which config file to use for the USB_ModeSwitch dispatcher. By default the config file shipped with USB_ModeSwitch is used which disables logging to /var/log among other default settings. If set to
#f, no config file is used.
Next: Unattended Upgrades, Previous: Networking Setup, Up: 服务 [Contents][Index]
12.9.5 网络服务
The (gnu services networking) module discussed in the previous
section provides services for more advanced setups: providing a DHCP service
for others to use, filtering packets with iptables or nftables, running a
WiFi access point with hostapd, running the inetd
“superdaemon”, and more. This section describes those.
- Scheme Procedure: dhcpd-service-type
This type defines a service that runs a DHCP daemon. To create a service of this type, you must supply a
<dhcpd-configuration>. For example:(service dhcpd-service-type (dhcpd-configuration (config-file (local-file "my-dhcpd.conf")) (interfaces '("enp0s25"))))
- Data Type: dhcpd-configuration
package(default:isc-dhcp)The package that provides the DHCP daemon. This package is expected to provide the daemon at sbin/dhcpd relative to its output directory. The default package is the ISC’s DHCP server.
config-file(default:#f)The configuration file to use. This is required. It will be passed to
dhcpdvia its-cfoption. This may be any “file-like” object (see file-like objects). Seeman dhcpd.conffor details on the configuration file syntax.version(default:"4")The DHCP version to use. The ISC DHCP server supports the values “4”, “6”, and “4o6”. These correspond to the
dhcpdprogram options-4,-6, and-4o6. Seeman dhcpdfor details.run-directory(default:"/run/dhcpd")The run directory to use. At service activation time, this directory will be created if it does not exist.
pid-file(default:"/run/dhcpd/dhcpd.pid")The PID file to use. This corresponds to the
-pfoption ofdhcpd. Seeman dhcpdfor details.interfaces(default:'())The names of the network interfaces on which dhcpd should listen for broadcasts. If this list is not empty, then its elements (which must be strings) will be appended to the
dhcpdinvocation when starting the daemon. It may not be necessary to explicitly specify any interfaces here; seeman dhcpdfor details.
- Scheme Variable: hostapd-service-type
This is the service type to run the hostapd daemon to set up WiFi (IEEE 802.11) access points and authentication servers. Its associated value must be a
hostapd-configurationas shown below:;; Use wlan1 to run the access point for "My Network". (service hostapd-service-type (hostapd-configuration (interface "wlan1") (ssid "My Network") (channel 12)))
- Data Type: hostapd-configuration
This data type represents the configuration of the hostapd service, with the following fields:
package(default:hostapd)The hostapd package to use.
interface(default:"wlan0")The network interface to run the WiFi access point.
ssidThe SSID (service set identifier), a string that identifies this network.
broadcast-ssid?(default:#t)Whether to broadcast this SSID.
channel(default:1)The WiFi channel to use.
driver(default:"nl80211")The driver interface type.
"nl80211"is used with all Linux mac80211 drivers. Use"none"if building hostapd as a standalone RADIUS server that does # not control any wireless/wired driver.extra-settings(default:"")Extra settings to append as-is to the hostapd configuration file. See https://w1.fi/cgit/hostap/plain/hostapd/hostapd.conf for the configuration file reference.
- Scheme Variable: simulated-wifi-service-type
This is the type of a service to simulate WiFi networking, which can be useful in virtual machines for testing purposes. The service loads the Linux kernel
mac80211_hwsimmodule and starts hostapd to create a pseudo WiFi network that can be seen onwlan0, by default.The service’s value is a
hostapd-configurationrecord.
- Scheme Variable: iptables-service-type
This is the service type to set up an iptables configuration. iptables is a packet filtering framework supported by the Linux kernel. This service supports configuring iptables for both IPv4 and IPv6. A simple example configuration rejecting all incoming connections except those to the ssh port 22 is shown below.
(service iptables-service-type (iptables-configuration (ipv4-rules (plain-file "iptables.rules" "*filter :INPUT ACCEPT :FORWARD ACCEPT :OUTPUT ACCEPT -A INPUT -m conntrack --ctstate ESTABLISHED,RELATED -j ACCEPT -A INPUT -p tcp --dport 22 -j ACCEPT -A INPUT -j REJECT --reject-with icmp-port-unreachable COMMIT ")) (ipv6-rules (plain-file "ip6tables.rules" "*filter :INPUT ACCEPT :FORWARD ACCEPT :OUTPUT ACCEPT -A INPUT -m conntrack --ctstate ESTABLISHED,RELATED -j ACCEPT -A INPUT -p tcp --dport 22 -j ACCEPT -A INPUT -j REJECT --reject-with icmp6-port-unreachable COMMIT "))))
- Data Type: iptables-configuration
The data type representing the configuration of iptables.
iptables(default:iptables)The iptables package that provides
iptables-restoreandip6tables-restore.ipv4-rules(default:%iptables-accept-all-rules)The iptables rules to use. It will be passed to
iptables-restore. This may be any “file-like” object (see file-like objects).ipv6-rules(default:%iptables-accept-all-rules)The ip6tables rules to use. It will be passed to
ip6tables-restore. This may be any “file-like” object (see file-like objects).
- Scheme Variable: nftables-service-type
This is the service type to set up a nftables configuration. nftables is a netfilter project that aims to replace the existing iptables, ip6tables, arptables and ebtables framework. It provides a new packet filtering framework, a new user-space utility
nft, and a compatibility layer for iptables. This service comes with a default ruleset%default-nftables-rulesetthat rejecting all incoming connections except those to the ssh port 22. To use it, simply write:(service nftables-service-type)
- Data Type: nftables-configuration
The data type representing the configuration of nftables.
package(default:nftables)The nftables package that provides
nft.ruleset(default:%default-nftables-ruleset)The nftables ruleset to use. This may be any “file-like” object (see file-like objects).
- Scheme Variable: ntp-service-type
This is the type of the service running the Network Time Protocol (NTP) daemon,
ntpd. The daemon will keep the system clock synchronized with that of the specified NTP servers.The value of this service is an
ntpd-configurationobject, as described below.
- Data Type: ntp-configuration
This is the data type for the NTP service configuration.
servers(default:%ntp-servers)This is the list of servers (
<ntp-server>records) with whichntpdwill be synchronized. See thentp-serverdata type definition below.allow-large-adjustment?(default:#t)This determines whether
ntpdis allowed to make an initial adjustment of more than 1,000 seconds.ntp(default:ntp)The NTP package to use.
- Scheme Variable: %ntp-servers
List of host names used as the default NTP servers. These are servers of the NTP Pool Project.
- Data Type: ntp-server
The data type representing the configuration of a NTP server.
type(default:'server)The type of the NTP server, given as a symbol. One of
'pool,'server,'peer,'broadcastor'manycastclient.addressThe address of the server, as a string.
optionsNTPD options to use with that specific server, given as a list of option names and/or of option names and values tuples. The following example define a server to use with the options iburst and prefer, as well as version 3 and a maxpoll time of 16 seconds.
(ntp-server (type 'server) (address "some.ntp.server.org") (options `(iburst (version 3) (maxpoll 16) prefer))))
- Scheme Procedure: openntpd-service-type
Run the
ntpd, the Network Time Protocol (NTP) daemon, as implemented by OpenNTPD. The daemon will keep the system clock synchronized with that of the given servers.(service openntpd-service-type (openntpd-configuration (listen-on '("127.0.0.1" "::1")) (sensor '("udcf0 correction 70000")) (constraint-from '("www.gnu.org")) (constraints-from '("https://www.google.com/"))))
- Scheme Variable: %openntpd-servers
This variable is a list of the server addresses defined in
%ntp-servers.
- Data Type: openntpd-configuration
openntpd(default:(file-append openntpd "/sbin/ntpd"))The openntpd executable to use.
listen-on(default:'("127.0.0.1" "::1"))A list of local IP addresses or hostnames the ntpd daemon should listen on.
query-from(default:'())A list of local IP address the ntpd daemon should use for outgoing queries.
sensor(default:'())Specify a list of timedelta sensor devices ntpd should use.
ntpdwill listen to each sensor that actually exists and ignore non-existent ones. See upstream documentation for more information.server(default:'())Specify a list of IP addresses or hostnames of NTP servers to synchronize to.
servers(default:%openntp-servers)Specify a list of IP addresses or hostnames of NTP pools to synchronize to.
constraint-from(default:'())ntpdcan be configured to query the ‘Date’ from trusted HTTPS servers via TLS. This time information is not used for precision but acts as an authenticated constraint, thereby reducing the impact of unauthenticated NTP man-in-the-middle attacks. Specify a list of URLs, IP addresses or hostnames of HTTPS servers to provide a constraint.constraints-from(default:'())As with constraint from, specify a list of URLs, IP addresses or hostnames of HTTPS servers to provide a constraint. Should the hostname resolve to multiple IP addresses,
ntpdwill calculate a median constraint from all of them.
- Scheme variable: inetd-service-type
This service runs the
inetd(see inetd invocation in GNU Inetutils) daemon.inetdlistens for connections on internet sockets, and lazily starts the specified server program when a connection is made on one of these sockets.The value of this service is an
inetd-configurationobject. The following example configures theinetddaemon to provide the built-inechoservice, as well as an smtp service which forwards smtp traffic over ssh to a serversmtp-serverbehind a gatewayhostname:(service inetd-service-type (inetd-configuration (entries (list (inetd-entry (name "echo") (socket-type 'stream) (protocol "tcp") (wait? #f) (user "root")) (inetd-entry (node "127.0.0.1") (name "smtp") (socket-type 'stream) (protocol "tcp") (wait? #f) (user "root") (program (file-append openssh "/bin/ssh")) (arguments '("ssh" "-qT" "-i" "/path/to/ssh_key" "-W" "smtp-server:25" "user@hostname")))))))See below for more details about
inetd-configuration.
- Data Type: inetd-configuration
Data type representing the configuration of
inetd.program(default:(file-append inetutils "/libexec/inetd"))The
inetdexecutable to use.entries(default:'())A list of
inetdservice entries. Each entry should be created by theinetd-entryconstructor.
- Data Type: inetd-entry
Data type representing an entry in the
inetdconfiguration. Each entry corresponds to a socket whereinetdwill listen for requests.node(default:#f)Optional string, a comma-separated list of local addresses
inetdshould use when listening for this service. See Configuration file in GNU Inetutils for a complete description of all options.名字A string, the name must correspond to an entry in
/etc/services.socket-typeOne of
'stream,'dgram,'raw,'rdmor'seqpacket.protocolA string, must correspond to an entry in
/etc/protocols.wait?(default:#t)Whether
inetdshould wait for the server to exit before listening to new service requests.用户A string containing the user (and, optionally, group) name of the user as whom the server should run. The group name can be specified in a suffix, separated by a colon or period, i.e.
"user","user:group"or"user.group".program(default:"internal")The server program which will serve the requests, or
"internal"ifinetdshould use a built-in service.arguments(default:'())A list strings or file-like objects, which are the server program’s arguments, starting with the zeroth argument, i.e. the name of the program itself. For
inetd’s internal services, this entry must be'()or'("internal").
See Configuration file in GNU Inetutils for a more detailed discussion of each configuration field.
- Scheme Variable: opendht-service-type
This is the type of the service running a OpenDHT node,
dhtnode. The daemon can be used to host your own proxy service to the distributed hash table (DHT), for example to connect to with Jami, among other applications.Important: When using the OpenDHT proxy server, the IP addresses it “sees” from the clients should be addresses reachable from other peers. In practice this means that a publicly reachable address is best suited for a proxy server, outside of your private network. For example, hosting the proxy server on a IPv4 private local network and exposing it via port forwarding could work for external peers, but peers local to the proxy would have their private addresses shared with the external peers, leading to connectivity problems.
The value of this service is a
opendht-configurationobject, as described below.
- Data Type: opendht-configuration
Available
opendht-configurationfields are:opendht(default:opendht) (type: file-like)The
opendhtpackage to use.peer-discovery?(default:#f) (type: boolean)Whether to enable the multicast local peer discovery mechanism.
enable-logging?(default:#f) (type: boolean)Whether to enable logging messages to syslog. It is disabled by default as it is rather verbose.
debug?(default:#f) (type: boolean)Whether to enable debug-level logging messages. This has no effect if logging is disabled.
bootstrap-host(default:"bootstrap.jami.net:4222") (type: maybe-string)The node host name that is used to make the first connection to the network. A specific port value can be provided by appending the
:PORTsuffix. By default, it uses the Jami bootstrap nodes, but any host can be specified here. It’s also possible to disable bootstrapping by explicitly setting this field to the%unset-valuevalue.port(default:4222) (type: maybe-number)The UDP port to bind to. When left unspecified, an available port is automatically selected.
proxy-server-port(type: maybe-number)Spawn a proxy server listening on the specified port.
proxy-server-port-tls(type: maybe-number)Spawn a proxy server listening to TLS connections on the specified port.
- Scheme Variable: tor-service-type
This is the type for a service that runs the Tor anonymous networking daemon. The service is configured using a
<tor-configuration>record. By default, the Tor daemon runs as thetorunprivileged user, which is a member of thetorgroup.
- Data Type: tor-configuration
tor(default:tor)The package that provides the Tor daemon. This package is expected to provide the daemon at bin/tor relative to its output directory. The default package is the Tor Project’s implementation.
config-file(default:(plain-file "empty" ""))The configuration file to use. It will be appended to a default configuration file, and the final configuration file will be passed to
torvia its-foption. This may be any “file-like” object (see file-like objects). Seeman torfor details on the configuration file syntax.hidden-services(default:'())The list of
<hidden-service>records to use. For any hidden service you include in this list, appropriate configuration to enable the hidden service will be automatically added to the default configuration file. You may conveniently create<hidden-service>records using thetor-hidden-serviceprocedure described below.socks-socket-type(default:'tcp)The default socket type that Tor should use for its SOCKS socket. This must be either
'tcpor'unix. If it is'tcp, then by default Tor will listen on TCP port 9050 on the loopback interface (i.e., localhost). If it is'unix, then Tor will listen on the UNIX domain socket /var/run/tor/socks-sock, which will be made writable by members of thetorgroup.If you want to customize the SOCKS socket in more detail, leave
socks-socket-typeat its default value of'tcpand useconfig-fileto override the default by providing your ownSocksPortoption.control-socket?(default:#f)Whether or not to provide a “control socket” by which Tor can be controlled to, for instance, dynamically instantiate tor onion services. If
#t, Tor will listen for control commands on the UNIX domain socket /var/run/tor/control-sock, which will be made writable by members of thetorgroup.
Define a new Tor hidden service called name and implementing mapping. mapping is a list of port/host tuples, such as:
'((22 "127.0.0.1:22") (80 "127.0.0.1:8080"))
In this example, port 22 of the hidden service is mapped to local port 22, and port 80 is mapped to local port 8080.
This creates a /var/lib/tor/hidden-services/name directory, where the hostname file contains the
.onionhost name for the hidden service.See the Tor project’s documentation for more information.
The (gnu services rsync) module provides the following services:
You might want an rsync daemon if you have files that you want available so anyone (or just yourself) can download existing files or upload new files.
- Scheme Variable: rsync-service-type
This is the service type for the rsync daemon, The value for this service type is a
rsync-configurationrecord as in this example:;; Export two directories over rsync. By default rsync listens on ;; all the network interfaces. (service rsync-service-type (rsync-configuration (modules (list (rsync-module (name "music") (file-name "/srv/zik") (read-only? #f)) (rsync-module (name "movies") (file-name "/home/charlie/movies"))))))
See below for details about
rsync-configuration.
- Data Type: rsync-configuration
Data type representing the configuration for
rsync-service.package(default: rsync)rsyncpackage to use.address(default:#f)IP address on which
rsynclistens for incoming connections. If unspecified, it defaults to listening on all available addresses.port-number(default:873)TCP port on which
rsynclistens for incoming connections. If port is less than1024rsyncneeds to be started as therootuser and group.pid-file(default:"/var/run/rsyncd/rsyncd.pid")Name of the file where
rsyncwrites its PID.lock-file(default:"/var/run/rsyncd/rsyncd.lock")Name of the file where
rsyncwrites its lock file.log-file(default:"/var/log/rsyncd.log")Name of the file where
rsyncwrites its log file.user(default:"root")Owner of the
rsyncprocess.group(default:"root")Group of the
rsyncprocess.uid(default:"rsyncd")User name or user ID that file transfers to and from that module should take place as when the daemon was run as
root.gid(default:"rsyncd")Group name or group ID that will be used when accessing the module.
modules(default:%default-modules)List of “modules”—i.e., directories exported over rsync. Each element must be a
rsync-modulerecord, as described below.
- Data Type: rsync-module
This is the data type for rsync “modules”. A module is a directory exported over the rsync protocol. The available fields are as follows:
名字The module name. This is the name that shows up in URLs. For example, if the module is called
music, the corresponding URL will bersync://host.example.org/music.file-nameName of the directory being exported.
comment(default:"")Comment associated with the module. Client user interfaces may display it when they obtain the list of available modules.
read-only?(default:#t)Whether or not client will be able to upload files. If this is false, the uploads will be authorized if permissions on the daemon side permit it.
chroot?(default:#t)When this is true, the rsync daemon changes root to the module’s directory before starting file transfers with the client. This improves security, but requires rsync to run as root.
timeout(default:300)Idle time in seconds after which the daemon closes a connection with the client.
The (gnu services syncthing) module provides the following services:
You might want a syncthing daemon if you have files between two or more computers and want to sync them in real time, safely protected from prying eyes.
- Scheme Variable: syncthing-service-type
This is the service type for the syncthing daemon, The value for this service type is a
syncthing-configurationrecord as in this example:(service syncthing-service-type (syncthing-configuration (user "alice")))See below for details about
syncthing-configuration.- Data Type: syncthing-configuration
Data type representing the configuration for
syncthing-service-type.syncthing(default: syncthing)syncthingpackage to use.arguments(default: ’())List of command-line arguments passing to
syncthingbinary.logflags(default: 0)Sum of logging flags, see Syncthing documentation logflags.
user(default: #f)The user as which the Syncthing service is to be run. This assumes that the specified user exists.
group(default: "users")The group as which the Syncthing service is to be run. This assumes that the specified group exists.
home(default: #f)Common configuration and data directory. The default configuration directory is $HOME of the specified Syncthing
user.
Furthermore, (gnu services ssh) provides the following services.
- Scheme Procedure: lsh-service [#:host-key "/etc/lsh/host-key"] [#:daemonic? #t] [#:interfaces '()] [#:port-number 22] [#:allow-empty-passwords? #f] [#:root-login? #f] [#:syslog-output? #t]
[#:x11-forwarding? #t] [#:tcp/ip-forwarding? #t] [#:password-authentication? #t] [#:public-key-authentication? #t] [#:initialize? #t] Run the
lshdprogram from lsh to listen on port port-number. host-key must designate a file containing the host key, and readable only by root.When daemonic? is true,
lshdwill detach from the controlling terminal and log its output to syslogd, unless one sets syslog-output? to false. Obviously, it also makes lsh-service depend on existence of syslogd service. When pid-file? is true,lshdwrites its PID to the file called pid-file.When initialize? is true, automatically create the seed and host key upon service activation if they do not exist yet. This may take long and require interaction.
When initialize? is false, it is up to the user to initialize the randomness generator (see lsh-make-seed in LSH Manual), and to create a key pair with the private key stored in file host-key (see lshd basics in LSH Manual).
When interfaces is empty, lshd listens for connections on all the network interfaces; otherwise, interfaces must be a list of host names or addresses.
allow-empty-passwords? specifies whether to accept log-ins with empty passwords, and root-login? specifies whether to accept log-ins as root.
The other options should be self-descriptive.
- Scheme Variable: openssh-service-type
This is the type for the OpenSSH secure shell daemon,
sshd. Its value must be anopenssh-configurationrecord as in this example:(service openssh-service-type (openssh-configuration (x11-forwarding? #t) (permit-root-login 'prohibit-password) (authorized-keys `(("alice" ,(local-file "alice.pub")) ("bob" ,(local-file "bob.pub"))))))See below for details about
openssh-configuration.This service can be extended with extra authorized keys, as in this example:
(service-extension openssh-service-type (const `(("charlie" ,(local-file "charlie.pub")))))
- Data Type: openssh-configuration
This is the configuration record for OpenSSH’s
sshd.openssh(default openssh)The OpenSSH package to use.
pid-file(default:"/var/run/sshd.pid")Name of the file where
sshdwrites its PID.port-number(default:22)TCP port on which
sshdlistens for incoming connections.max-connections(default:200)Hard limit on the maximum number of simultaneous client connections, enforced by the inetd-style Shepherd service (see
make-inetd-constructorin The GNU Shepherd Manual).permit-root-login(default:#f)This field determines whether and when to allow logins as root. If
#f, root logins are disallowed; if#t, they are allowed. If it’s the symbol'prohibit-password, then root logins are permitted but not with password-based authentication.allow-empty-passwords?(default:#f)When true, users with empty passwords may log in. When false, they may not.
password-authentication?(default:#t)When true, users may log in with their password. When false, they have other authentication methods.
public-key-authentication?(default:#t)When true, users may log in using public key authentication. When false, users have to use other authentication method.
Authorized public keys are stored in ~/.ssh/authorized_keys. This is used only by protocol version 2.
x11-forwarding?(default:#f)When true, forwarding of X11 graphical client connections is enabled—in other words,
sshoptions -X and -Y will work.allow-agent-forwarding?(default:#t)Whether to allow agent forwarding.
allow-tcp-forwarding?(default:#t)Whether to allow TCP forwarding.
gateway-ports?(default:#f)Whether to allow gateway ports.
challenge-response-authentication?(default:#f)Specifies whether challenge response authentication is allowed (e.g. via PAM).
use-pam?(default:#t)Enables the Pluggable Authentication Module interface. If set to
#t, this will enable PAM authentication usingchallenge-response-authentication?andpassword-authentication?, in addition to PAM account and session module processing for all authentication types.Because PAM challenge response authentication usually serves an equivalent role to password authentication, you should disable either
challenge-response-authentication?orpassword-authentication?.print-last-log?(default:#t)Specifies whether
sshdshould print the date and time of the last user login when a user logs in interactively.subsystems(default:'(("sftp" "internal-sftp")))Configures external subsystems (e.g. file transfer daemon).
This is a list of two-element lists, each of which containing the subsystem name and a command (with optional arguments) to execute upon subsystem request.
The command
internal-sftpimplements an in-process SFTP server. Alternatively, one can specify thesftp-servercommand:(service openssh-service-type (openssh-configuration (subsystems `(("sftp" ,(file-append openssh "/libexec/sftp-server"))))))accepted-environment(default:'())List of strings describing which environment variables may be exported.
Each string gets on its own line. See the
AcceptEnvoption inman sshd_config.This example allows ssh-clients to export the
COLORTERMvariable. It is set by terminal emulators, which support colors. You can use it in your shell’s resource file to enable colors for the prompt and commands if this variable is set.(service openssh-service-type (openssh-configuration (accepted-environment '("COLORTERM"))))-
This is the list of authorized keys. Each element of the list is a user name followed by one or more file-like objects that represent SSH public keys. For example:
(openssh-configuration (authorized-keys `(("rekado" ,(local-file "rekado.pub")) ("chris" ,(local-file "chris.pub")) ("root" ,(local-file "rekado.pub") ,(local-file "chris.pub")))))registers the specified public keys for user accounts
rekado,chris, androot.Additional authorized keys can be specified via
service-extension.Note that this does not interfere with the use of ~/.ssh/authorized_keys.
generate-host-keys?(default:#t)Whether to generate host key pairs with
ssh-keygen -Aunder /etc/ssh if there are none.Generating key pairs takes a few seconds when enough entropy is available and is only done once. You might want to turn it off for instance in a virtual machine that does not need it because host keys are provided in some other way, and where the extra boot time is a problem.
log-level(default:'info)This is a symbol specifying the logging level:
quiet,fatal,error,info,verbose,debug, etc. See the man page for sshd_config for the full list of level names.extra-content(default:"")This field can be used to append arbitrary text to the configuration file. It is especially useful for elaborate configurations that cannot be expressed otherwise. This configuration, for example, would generally disable root logins, but permit them from one specific IP address:
(openssh-configuration (extra-content "\ Match Address 192.168.0.1 PermitRootLogin yes"))
- Scheme Procedure: dropbear-service [config]
Run the Dropbear SSH daemon with the given config, a
<dropbear-configuration>object.For example, to specify a Dropbear service listening on port 1234, add this call to the operating system’s
servicesfield:(dropbear-service (dropbear-configuration (port-number 1234)))
- Data Type: dropbear-configuration
This data type represents the configuration of a Dropbear SSH daemon.
dropbear(default: dropbear)The Dropbear package to use.
port-number(default: 22)The TCP port where the daemon waits for incoming connections.
syslog-output?(default:#t)Whether to enable syslog output.
pid-file(default:"/var/run/dropbear.pid")File name of the daemon’s PID file.
root-login?(default:#f)Whether to allow
rootlogins.allow-empty-passwords?(default:#f)Whether to allow empty passwords.
password-authentication?(default:#t)Whether to enable password-based authentication.
- Scheme Variable: autossh-service-type
This is the type for the AutoSSH program that runs a copy of
sshand monitors it, restarting it as necessary should it die or stop passing traffic. AutoSSH can be run manually from the command-line by passing arguments to the binaryautosshfrom the packageautossh, but it can also be run as a Guix service. This latter use case is documented here.AutoSSH can be used to forward local traffic to a remote machine using an SSH tunnel, and it respects the ~/.ssh/config of the user it is run as.
For example, to specify a service running autossh as the user
pinoand forwarding all local connections to port8081toremote:8081using an SSH tunnel, add this call to the operating system’sservicesfield:(service autossh-service-type (autossh-configuration (user "pino") (ssh-options (list "-T" "-N" "-L" "8081:localhost:8081" "remote.net"))))
- Data Type: autossh-configuration
This data type represents the configuration of an AutoSSH service.
user(default"autossh")The user as which the AutoSSH service is to be run. This assumes that the specified user exists.
poll(default600)Specifies the connection poll time in seconds.
first-poll(default#f)Specifies how many seconds AutoSSH waits before the first connection test. After this first test, polling is resumed at the pace defined in
poll. When set to#f, the first poll is not treated specially and will also use the connection poll specified inpoll.gate-time(default30)Specifies how many seconds an SSH connection must be active before it is considered successful.
log-level(default1)The log level, corresponding to the levels used by syslog—so
0is the most silent while7is the chattiest.max-start(default#f)The maximum number of times SSH may be (re)started before AutoSSH exits. When set to
#f, no maximum is configured and AutoSSH may restart indefinitely.message(default"")The message to append to the echo message sent when testing connections.
port(default"0")The ports used for monitoring the connection. When set to
"0", monitoring is disabled. When set to"n"where n is a positive integer, ports n and n+1 are used for monitoring the connection, such that port n is the base monitoring port andn+1is the echo port. When set to"n:m"where n and m are positive integers, the ports n and m are used for monitoring the connection, such that port n is the base monitoring port and m is the echo port.ssh-options(default'())The list of command-line arguments to pass to
sshwhen it is run. Options -f and -M are reserved for AutoSSH and may cause undefined behaviour.
- Scheme Variable: webssh-service-type
This is the type for the WebSSH program that runs a web SSH client. WebSSH can be run manually from the command-line by passing arguments to the binary
wsshfrom the packagewebssh, but it can also be run as a Guix service. This latter use case is documented here.For example, to specify a service running WebSSH on loopback interface on port
8888with reject policy with a list of allowed to connection hosts, and NGINX as a reverse-proxy to this service listening for HTTPS connection, add this call to the operating system’sservicesfield:(service webssh-service-type (webssh-configuration (address "127.0.0.1") (port 8888) (policy 'reject) (known-hosts '("localhost ecdsa-sha2-nistp256 AAAA…" "127.0.0.1 ecdsa-sha2-nistp256 AAAA…")))) (service nginx-service-type (nginx-configuration (server-blocks (list (nginx-server-configuration (inherit %webssh-configuration-nginx) (server-name '("webssh.example.com")) (listen '("443 ssl")) (ssl-certificate (letsencrypt-certificate "webssh.example.com")) (ssl-certificate-key (letsencrypt-key "webssh.example.com")) (locations (cons (nginx-location-configuration (uri "/.well-known") (body '("root /var/www;"))) (nginx-server-configuration-locations %webssh-configuration-nginx))))))))
- Data Type: webssh-configuration
Data type representing the configuration for
webssh-service.package(default: webssh)websshpackage to use.user-name(default: "webssh")User name or user ID that file transfers to and from that module should take place.
group-name(default: "webssh")Group name or group ID that will be used when accessing the module.
address(default: #f)IP address on which
websshlistens for incoming connections.port(default: 8888)TCP port on which
websshlistens for incoming connections.policy(default: #f)Connection policy. reject policy requires to specify known-hosts.
known-hosts(default: ’())List of hosts which allowed for SSH connection from
webssh.log-file(default: "/var/log/webssh.log")Name of the file where
websshwrites its log file.log-level(default: #f)Logging level.
- Scheme Variable: %facebook-host-aliases
This variable contains a string for use in /etc/hosts (see Host Names in The GNU C Library Reference Manual). Each line contains a entry that maps a known server name of the Facebook on-line service—e.g.,
www.facebook.com—to the local host—127.0.0.1or its IPv6 equivalent,::1.This variable is typically used in the
hosts-filefield of anoperating-systemdeclaration (see /etc/hosts):(use-modules (gnu) (guix)) (operating-system (host-name "mymachine") ;; ... (hosts-file ;; Create a /etc/hosts file with aliases for "localhost" ;; and "mymachine", as well as for Facebook servers. (plain-file "hosts" (string-append (local-host-aliases host-name) %facebook-host-aliases))))
This mechanism can prevent programs running locally, such as Web browsers, from accessing Facebook.
The (gnu services avahi) provides the following definition.
- Scheme Variable: avahi-service-type
This is the service that runs
avahi-daemon, a system-wide mDNS/DNS-SD responder that allows for service discovery and “zero-configuration” host name lookups (see https://avahi.org/). Its value must be anavahi-configurationrecord—see below.This service extends the name service cache daemon (nscd) so that it can resolve
.localhost names using nss-mdns. See Name Service Switch, for information on host name resolution.Additionally, add the avahi package to the system profile so that commands such as
avahi-browseare directly usable.
- Data Type: avahi-configuration
Data type representation the configuration for Avahi.
host-name(default:#f)If different from
#f, use that as the host name to publish for this machine; otherwise, use the machine’s actual host name.publish?(default:#t)When true, allow host names and services to be published (broadcast) over the network.
publish-workstation?(default:#t)When true,
avahi-daemonpublishes the machine’s host name and IP address via mDNS on the local network. To view the host names published on your local network, you can run:avahi-browse _workstation._tcp
wide-area?(default:#f)When true, DNS-SD over unicast DNS is enabled.
ipv4?(default:#t)ipv6?(default:#t)These fields determine whether to use IPv4/IPv6 sockets.
domains-to-browse(default:'())This is a list of domains to browse.
- Scheme Variable: openvswitch-service-type
This is the type of the Open vSwitch service, whose value should be an
openvswitch-configurationobject.
- Data Type: openvswitch-configuration
Data type representing the configuration of Open vSwitch, a multilayer virtual switch which is designed to enable massive network automation through programmatic extension.
package(default: openvswitch)Package object of the Open vSwitch.
- Scheme Variable: pagekite-service-type
This is the service type for the PageKite service, a tunneling solution for making localhost servers publicly visible, even from behind restrictive firewalls or NAT without forwarded ports. The value for this service type is a
pagekite-configurationrecord.Here’s an example exposing the local HTTP and SSH daemons:
(service pagekite-service-type (pagekite-configuration (kites '("http:@kitename:localhost:80:@kitesecret" "raw/22:@kitename:localhost:22:@kitesecret")) (extra-file "/etc/pagekite.rc")))
- Data Type: pagekite-configuration
Data type representing the configuration of PageKite.
package(default: pagekite)Package object of PageKite.
kitename(default:#f)PageKite name for authenticating to the frontend server.
kitesecret(default:#f)Shared secret for authenticating to the frontend server. You should probably put this inside
extra-fileinstead.frontend(default:#f)Connect to the named PageKite frontend server instead of the pagekite.net service.
kites(default:'("http:@kitename:localhost:80:@kitesecret"))List of service kites to use. Exposes HTTP on port 80 by default. The format is
proto:kitename:host:port:secret.extra-file(default:#f)Extra configuration file to read, which you are expected to create manually. Use this to add additional options and manage shared secrets out-of-band.
- Scheme Variable: yggdrasil-service-type
The service type for connecting to the Yggdrasil network, an early-stage implementation of a fully end-to-end encrypted IPv6 network.
Yggdrasil provides name-independent routing with cryptographically generated addresses. Static addressing means you can keep the same address as long as you want, even if you move to a new location, or generate a new address (by generating new keys) whenever you want. https://yggdrasil-network.github.io/2018/07/28/addressing.html
Pass it a value of
yggdrasil-configurationto connect it to public peers and/or local peers.Here is an example using public peers and a static address. The static signing and encryption keys are defined in /etc/yggdrasil-private.conf (the default value for
config-file).;; part of the operating-system declaration (service yggdrasil-service-type (yggdrasil-configuration (autoconf? #f) ;; use only the public peers (json-config ;; choose one from ;; https://github.com/yggdrasil-network/public-peers '((peers . #("tcp://1.2.3.4:1337")))) ;; /etc/yggdrasil-private.conf is the default value for config-file ))
# sample content for /etc/yggdrasil-private.conf { # Your public key. Your peers may ask you for this to put # into their AllowedPublicKeys configuration. PublicKey: 64277... # Your private key. DO NOT share this with anyone! PrivateKey: 5c750... }
- Data Type: yggdrasil-configuration
Data type representing the configuration of Yggdrasil.
package(default:yggdrasil)Package object of Yggdrasil.
json-config(default:'())Contents of /etc/yggdrasil.conf. Will be merged with /etc/yggdrasil-private.conf. Note that these settings are stored in the Guix store, which is readable to all users. Do not store your private keys in it. See the output of
yggdrasil -genconffor a quick overview of valid keys and their default values.autoconf?(default:#f)Whether to use automatic mode. Enabling it makes Yggdrasil use adynamic IP and peer with IPv6 neighbors.
log-level(default:'info)How much detail to include in logs. Use
'debugfor more detail.log-to(default:'stdout)Where to send logs. By default, the service logs standard output to /var/log/yggdrasil.log. The alternative is
'syslog, which sends output to the running syslog service.config-file(default:"/etc/yggdrasil-private.conf")What HJSON file to load sensitive data from. This is where private keys should be stored, which are necessary to specify if you don’t want a randomized address after each restart. Use
#fto disable. Options defined in this file take precedence overjson-config. Use the output ofyggdrasil -genconfas a starting point. To configure a static address, delete everything except these options:-
EncryptionPublicKey -
EncryptionPrivateKey -
SigningPublicKey -
SigningPrivateKey
-
- Scheme Variable: ipfs-service-type
The service type for connecting to the IPFS network, a global, versioned, peer-to-peer file system. Pass it a
ipfs-configurationto change the ports used for the gateway and API.Here’s an example configuration, using some non-standard ports:
(service ipfs-service-type (ipfs-configuration (gateway "/ip4/127.0.0.1/tcp/8880") (api "/ip4/127.0.0.1/tcp/8881")))
- Data Type: ipfs-configuration
Data type representing the configuration of IPFS.
package(default:go-ipfs)Package object of IPFS.
gateway(default:"/ip4/127.0.0.1/tcp/8082")Address of the gateway, in ‘multiaddress’ format.
api(default:"/ip4/127.0.0.1/tcp/5001")Address of the API endpoint, in ‘multiaddress’ format.
- Scheme Variable: keepalived-service-type
This is the type for the Keepalived routing software,
keepalived. Its value must be ankeepalived-configurationrecord as in this example for master machine:(service keepalived-service-type (keepalived-configuration (config-file (local-file "keepalived-master.conf"))))where keepalived-master.conf:
vrrp_instance my-group { state MASTER interface enp9s0 virtual_router_id 100 priority 100 unicast_peer { 10.0.0.2 } virtual_ipaddress { 10.0.0.4/24 } }and for backup machine:
(service keepalived-service-type (keepalived-configuration (config-file (local-file "keepalived-backup.conf"))))where keepalived-backup.conf:
vrrp_instance my-group { state BACKUP interface enp9s0 virtual_router_id 100 priority 99 unicast_peer { 10.0.0.3 } virtual_ipaddress { 10.0.0.4/24 } }
12.9.6 Unattended Upgrades
Guix provides a service to perform unattended upgrades: periodically, the system automatically reconfigures itself from the latest Guix. Guix System has several properties that make unattended upgrades safe:
- upgrades are transactional (either the upgrade succeeds or it fails, but you cannot end up with an “in-between” system state);
- the upgrade log is kept—you can view it with
guix system list-generations—and you can roll back to any previous generation, should the upgraded system fail to behave as intended; - channel code is authenticated so you know you can only run genuine code (see 通道);
-
guix system reconfigureprevents downgrades, which makes it immune to downgrade attacks.
To set up unattended upgrades, add an instance of
unattended-upgrade-service-type like the one below to the list of
your operating system services:
(service unattended-upgrade-service-type)
The defaults above set up weekly upgrades: every Sunday at midnight. You do not need to provide the operating system configuration file: it uses /run/current-system/configuration.scm, which ensures it always uses your latest configuration—see provenance-service-type, for more information about this file.
There are several things that can be configured, in particular the
periodicity and services (daemons) to be restarted upon completion. When
the upgrade is successful, the service takes care of deleting system
generations older that some threshold, as per guix system
delete-generations. See the reference below for details.
To ensure that upgrades are actually happening, you can run guix
system describe. To investigate upgrade failures, visit the unattended
upgrade log file (see below).
- Scheme Variable: unattended-upgrade-service-type
This is the service type for unattended upgrades. It sets up an mcron job (see 执行计划任务) that runs
guix system reconfigurefrom the latest version of the specified channels.Its value must be a
unattended-upgrade-configurationrecord (see below).
- Data Type: unattended-upgrade-configuration
This data type represents the configuration of the unattended upgrade service. The following fields are available:
schedule(default:"30 01 * * 0")This is the schedule of upgrades, expressed as a gexp containing an mcron job schedule (see mcron job specifications in GNU mcron).
channels(default:#~%default-channels)This gexp specifies the channels to use for the upgrade (see 通道). By default, the tip of the official
guixchannel is used.operating-system-file(default:"/run/current-system/configuration.scm")This field specifies the operating system configuration file to use. The default is to reuse the config file of the current configuration.
There are cases, though, where referring to /run/current-system/configuration.scm is not enough, for instance because that file refers to extra files (SSH public keys, extra configuration files, etc.) via
local-fileand similar constructs. For those cases, we recommend something along these lines:(unattended-upgrade-configuration (operating-system-file (file-append (local-file "." "config-dir" #:recursive? #t) "/config.scm")))The effect here is to import all of the current directory into the store, and to refer to config.scm within that directory. Therefore, uses of
local-filewithin config.scm will work as expected. See G-表达式, for information aboutlocal-fileandfile-append.services-to-restart(default:'(mcron))This field specifies the Shepherd services to restart when the upgrade completes.
Those services are restarted right away upon completion, as with
herd restart, which ensures that the latest version is running—remember that by defaultguix system reconfigureonly restarts services that are not currently running, which is conservative: it minimizes disruption but leaves outdated services running.Use
herd statusto find out candidates for restarting. See 服务, for general information about services. Common services to restart would includentpdandssh-daemon.By default, the
mcronservice is restarted. This ensures that the latest version of the unattended upgrade job will be used next time.system-expiration(default:(* 3 30 24 3600))This is the expiration time in seconds for system generations. System generations older that this amount of time are deleted with
guix system delete-generationswhen an upgrade completes.注: The unattended upgrade service does not run the garbage collector. You will probably want to set up your own mcron job to run
guix gcperiodically.maximum-duration(default:3600)Maximum duration in seconds for the upgrade; past that time, the upgrade aborts.
This is primarily useful to ensure the upgrade does not end up rebuilding or re-downloading “the world”.
log-file(default:"/var/log/unattended-upgrade.log")File where unattended upgrades are logged.
Next: 打印服务, Previous: Unattended Upgrades, Up: 服务 [Contents][Index]
12.9.7 X窗口
Support for the X Window graphical display system—specifically Xorg—is
provided by the (gnu services xorg) module. Note that there is no
xorg-service procedure. Instead, the X server is started by the
login manager, by default the GNOME Display Manager (GDM).
GDM of course allows users to log in into window managers and desktop environments other than GNOME; for those using GNOME, GDM is required for features such as automatic screen locking.
To use X11, you must install at least one window manager—for example
the windowmaker or openbox packages—preferably by adding it
to the packages field of your operating system definition
(see system-wide packages).
GDM also supports Wayland: it can itself use Wayland instead of X11 for its
user interface, and it can also start Wayland sessions. The former is
required for the latter, to enable, set wayland? to #t in
gdm-configuration.
- Scheme Variable: gdm-service-type
This is the type for the GNOME Desktop Manager (GDM), a program that manages graphical display servers and handles graphical user logins. Its value must be a
gdm-configuration(see below).GDM looks for session types described by the .desktop files in /run/current-system/profile/share/xsessions (for X11 sessions) and /run/current-system/profile/share/wayland-sessions (for Wayland sessions) and allows users to choose a session from the log-in screen. Packages such as
gnome,xfce,i3andswayprovide .desktop files; adding them to the system-wide set of packages automatically makes them available at the log-in screen.In addition, ~/.xsession files are honored. When available, ~/.xsession must be an executable that starts a window manager and/or other X clients.
- Data Type: gdm-configuration
auto-login?(default:#f)default-user(default:#f)When
auto-login?is false, GDM presents a log-in screen.When
auto-login?is true, GDM logs in directly asdefault-user.auto-suspend?(default#t)When true, GDM will automatically suspend to RAM when nobody is physically connected. When a machine is used via remote desktop or SSH, this should be set to false to avoid GDM interrupting remote sessions or rendering the machine unavailable.
debug?(default:#f)When true, GDM writes debug messages to its log.
gnome-shell-assets(default: ...)List of GNOME Shell assets needed by GDM: icon theme, fonts, etc.
xorg-configuration(default:(xorg-configuration))Configuration of the Xorg graphical server.
x-session(default:(xinitrc))Script to run before starting a X session.
xdmcp?(default:#f)When true, enable the X Display Manager Control Protocol (XDMCP). This should only be enabled in trusted environments, as the protocol is not secure. When enabled, GDM listens for XDMCP queries on the UDP port 177.
dbus-daemon(default:dbus-daemon-wrapper)File name of the
dbus-daemonexecutable.gdm(default:gdm)The GDM package to use.
wayland?(default:#f)When true, enables Wayland in GDM, necessary to use Wayland sessions.
wayland-session(default:gdm-wayland-session-wrapper)The Wayland session wrapper to use, needed to setup the environment.
- Scheme Variable: slim-service-type
This is the type for the SLiM graphical login manager for X11.
Like GDM, SLiM looks for session types described by .desktop files and allows users to choose a session from the log-in screen using F1. It also honors ~/.xsession files.
Unlike GDM, SLiM does not spawn the user session on a different VT after logging in, which means that you can only start one graphical session. If you want to be able to run multiple graphical sessions at the same time you have to add multiple SLiM services to your system services. The following example shows how to replace the default GDM service with two SLiM services on tty7 and tty8.
(use-modules (gnu services) (gnu services desktop) (gnu services xorg)) (operating-system ;; ... (services (cons* (service slim-service-type (slim-configuration (display ":0") (vt "vt7"))) (service slim-service-type (slim-configuration (display ":1") (vt "vt8"))) (modify-services %desktop-services (delete gdm-service-type)))))
- Data Type: slim-configuration
Data type representing the configuration of
slim-service-type.allow-empty-passwords?(default:#t)Whether to allow logins with empty passwords.
gnupg?(default:#f)If enabled,
pam-gnupgwill attempt to automatically unlock the user’s GPG keys with the login password viagpg-agent. The keygrips of all keys to be unlocked should be written to ~/.pam-gnupg, and can be queried withgpg -K --with-keygrip. Presetting passphrases must be enabled by addingallow-preset-passphrasein ~/.gnupg/gpg-agent.conf.auto-login?(default:#f)default-user(default:"")When
auto-login?is false, SLiM presents a log-in screen.When
auto-login?is true, SLiM logs in directly asdefault-user.theme(default:%default-slim-theme)theme-name(default:%default-slim-theme-name)The graphical theme to use and its name.
auto-login-session(default:#f)If true, this must be the name of the executable to start as the default session—e.g.,
(file-append windowmaker "/bin/windowmaker").If false, a session described by one of the available .desktop files in
/run/current-system/profileand~/.guix-profilewill be used.注: You must install at least one window manager in the system profile or in your user profile. Failing to do that, if
auto-login-sessionis false, you will be unable to log in.xorg-configuration(default(xorg-configuration))Configuration of the Xorg graphical server.
display(默认值:":0")The display on which to start the Xorg graphical server.
vt(默认值:"vt7")The VT on which to start the Xorg graphical server.
xauth(default:xauth)The XAuth package to use.
shepherd(default:shepherd)The Shepherd package used when invoking
haltandreboot.sessreg(default:sessreg)The sessreg package used in order to register the session.
slim(default:slim)The SLiM package to use.
- Scheme Variable: %default-theme
- Scheme Variable: %default-theme-name
The default SLiM theme and its name.
- Scheme Variable: sddm-service-type
This is the type of the service to run the SDDM display manager. Its value must be a
sddm-configurationrecord (see below).Here’s an example use:
(service sddm-service-type (sddm-configuration (auto-login-user "alice") (auto-login-session "xfce.desktop")))
- Data Type: sddm-configuration
This data type represents the configuration of the SDDM login manager. The available fields are:
sddm(default:sddm)The SDDM package to use.
display-server(default: "x11")Select display server to use for the greeter. Valid values are ‘"x11"’ or ‘"wayland"’.
numlock(default: "on")Valid values are ‘"on"’, ‘"off"’ or ‘"none"’.
halt-command(default#~(string-append #$shepherd "/sbin/halt"))Command to run when halting.
reboot-command(default#~(string-append #$shepherd "/sbin/reboot"))Command to run when rebooting.
theme(default "maldives")Theme to use. Default themes provided by SDDM are ‘"elarun"’, ‘"maldives"’ or ‘"maya"’.
themes-directory(default "/run/current-system/profile/share/sddm/themes")Directory to look for themes.
faces-directory(default "/run/current-system/profile/share/sddm/faces")Directory to look for faces.
default-path(default "/run/current-system/profile/bin")Default PATH to use.
minimum-uid(default: 1000)Minimum UID displayed in SDDM and allowed for log-in.
maximum-uid(default: 2000)Maximum UID to display in SDDM.
remember-last-user?(default #t)Remember last user.
remember-last-session?(default #t)Remember last session.
hide-users(default "")Usernames to hide from SDDM greeter.
hide-shells(default#~(string-append #$shadow "/sbin/nologin"))Users with shells listed will be hidden from the SDDM greeter.
session-command(default#~(string-append #$sddm "/share/sddm/scripts/wayland-session"))Script to run before starting a wayland session.
sessions-directory(default "/run/current-system/profile/share/wayland-sessions")Directory to look for desktop files starting wayland sessions.
xorg-configuration(default(xorg-configuration))Configuration of the Xorg graphical server.
xauth-path(default#~(string-append #$xauth "/bin/xauth"))Path to xauth.
xephyr-path(default#~(string-append #$xorg-server "/bin/Xephyr"))Path to Xephyr.
xdisplay-start(default#~(string-append #$sddm "/share/sddm/scripts/Xsetup"))Script to run after starting xorg-server.
xdisplay-stop(default#~(string-append #$sddm "/share/sddm/scripts/Xstop"))Script to run before stopping xorg-server.
xsession-command(default:xinitrc)Script to run before starting a X session.
xsessions-directory(default: "/run/current-system/profile/share/xsessions")Directory to look for desktop files starting X sessions.
minimum-vt(default: 7)Minimum VT to use.
auto-login-user(default "")User account that will be automatically logged in. Setting this to the empty string disables auto-login.
auto-login-session(default "")The .desktop file name to use as the auto-login session, or the empty string.
relogin?(default #f)Relogin after logout.
- Scheme Variable: lightdm-service-type
This is the type of the service to run the LightDM display manager. Its value must be a
lightdm-configurationrecord, which is documented below. Among its distinguishing features are TigerVNC integration for easily remoting your desktop as well as support for the XDMCP protocol, which can be used by remote clients to start a session from the login manager.In its most basic form, it can be used simply as:
(service lightdm-service-type)A more elaborate example making use of the VNC capabilities and enabling more features and verbose logs could look like:
(service lightdm-service-type (lightdm-configuration (allow-empty-passwords? #t) (xdmcp? #t) (vnc-server? #t) (vnc-server-command (file-append tigervnc-server "/bin/Xvnc" " -SecurityTypes None")) (seats (list (lightdm-seat-configuration (name "*") (user-session "ratpoison"))))))
- Data Type: lightdm-configuration
Available
lightdm-configurationfields are:lightdm(default:lightdm) (type: file-like)The lightdm package to use.
allow-empty-passwords?(default:#f) (type: boolean)Whether users not having a password set can login.
debug?(default:#f) (type: boolean)Enable verbose output.
xorg-configuration(type: xorg-configuration)The default Xorg server configuration to use to generate the Xorg server start script. It can be refined per seat via the
xserver-commandof the<lightdm-seat-configuration>record, if desired.greeters(type: list-of-greeter-configurations)The LightDM greeter configurations specifying the greeters to use.
seats(type: list-of-seat-configurations)The seat configurations to use. A LightDM seat is akin to a user.
xdmcp?(default:#f) (type: boolean)Whether a XDMCP server should listen on port UDP 177.
xdmcp-listen-address(type: maybe-string)The host or IP address the XDMCP server listens for incoming connections. When unspecified, listen on for any hosts/IP addresses.
vnc-server?(default:#f) (type: boolean)Whether a VNC server is started.
vnc-server-command(type: file-like)The Xvnc command to use for the VNC server, it’s possible to provide extra options not otherwise exposed along the command, for example to disable security:
(vnc-server-command (file-append tigervnc-server "/bin/Xvnc" " -SecurityTypes None" ))Or to set a PasswordFile for the classic (unsecure) VncAuth mecanism:
(vnc-server-command (file-append tigervnc-server "/bin/Xvnc" " -PasswordFile /var/lib/lightdm/.vnc/passwd"))The password file should be manually created using the
vncpasswdcommand. Note that LightDM will create new sessions for VNC users, which means they need to authenticate in the same way as local users would.vnc-server-listen-address(type: maybe-string)The host or IP address the VNC server listens for incoming connections. When unspecified, listen for any hosts/IP addresses.
vnc-server-port(default:5900) (type: number)The TCP port the VNC server should listen to.
extra-config(default:()) (type: list-of-strings)Extra configuration values to append to the LightDM configuration file.
- Data Type: lightdm-gtk-greeter-configuration
Available
lightdm-gtk-greeter-configurationfields are:lightdm-gtk-greeter(default:lightdm-gtk-greeter) (type: file-like)The lightdm-gtk-greeter package to use.
assets(default:
(adwaita-icon-theme gnome-themes-extrahicolor-icon-theme)) (type: list-of-file-likes) The list of packages complementing the greeter, such as package providing icon themes.theme-name(default:"Adwaita") (type: string)The name of the theme to use.
icon-theme-name(default:"Adwaita") (type: string)The name of the icon theme to use.
cursor-theme-name(default:"Adwaita") (type: string)The name of the cursor theme to use.
cursor-theme-size(default:16) (type: number)The size to use for the cursor theme.
allow-debugging?(type: maybe-boolean)Set to #t to enable debug log level.
background(type: file-like)The background image to use.
at-spi-enabled?(default:#f) (type: boolean)Enable accessibility support through the Assistive Technology Service Provider Interface (AT-SPI).
a11y-states(default:
(contrast font keyboard reader)) (type: list-of-a11y-states) The accessibility features to enable, given as list of symbols.reader(type: maybe-file-like)The command to use to launch a screen reader.
extra-config(default:()) (type: list-of-strings)Extra configuration values to append to the LightDM GTK Greeter configuration file.
- Data Type: lightdm-seat-configuration
Available
lightdm-seat-configurationfields are:name(type: seat-name)The name of the seat. An asterisk (*) can be used in the name to apply the seat configuration to all the seat names it matches.
user-session(type: maybe-string)The session to use by default. The session name must be provided as a lowercase string, such as
"gnome","ratpoison", etc.type(default:local) (type: seat-type)The type of the seat, either the
localorxremotesymbol.autologin-user(type: maybe-string)The username to automatically log in with by default.
greeter-session(default:
lightdm-gtk-greeter) (type: greeter-session) The greeter session to use, specified as a symbol. Currently, onlylightdm-gtk-greeteris supported.xserver-command(type: maybe-file-like)The Xorg server command to run.
session-wrapper(type: file-like)The xinitrc session wrapper to use.
extra-config(default:()) (type: list-of-strings)Extra configuration values to append to the seat configuration section.
- Data Type: xorg-configuration
This data type represents the configuration of the Xorg graphical display server. Note that there is no Xorg service; instead, the X server is started by a “display manager” such as GDM, SDDM, LightDM or SLiM. Thus, the configuration of these display managers aggregates an
xorg-configurationrecord.modules(default:%default-xorg-modules)This is a list of module packages loaded by the Xorg server—e.g.,
xf86-video-vesa,xf86-input-keyboard, and so on.fonts(default:%default-xorg-fonts)This is a list of font directories to add to the server’s font path.
drivers(default:'())This must be either the empty list, in which case Xorg chooses a graphics driver automatically, or a list of driver names that will be tried in this order—e.g.,
("modesetting" "vesa").resolutions(default:'())When
resolutionsis the empty list, Xorg chooses an appropriate screen resolution. Otherwise, it must be a list of resolutions—e.g.,((1024 768) (640 480)).keyboard-layout(default:#f)If this is
#f, Xorg uses the default keyboard layout—usually US English (“qwerty”) for a 105-key PC keyboard.Otherwise this must be a
keyboard-layoutobject specifying the keyboard layout in use when Xorg is running. See 键盘布局, for more information on how to specify the keyboard layout.extra-config(default:'())This is a list of strings or objects appended to the configuration file. It is used to pass extra text to be added verbatim to the configuration file.
server(default:xorg-server)This is the package providing the Xorg server.
server-arguments(default:%default-xorg-server-arguments)This is the list of command-line arguments to pass to the X server. The default is
-nolisten tcp.
- Scheme Procedure: set-xorg-configuration config [login-manager-service-type] Tell the log-in manager (of type
login-manager-service-type) to use config, an
<xorg-configuration>record.Since the Xorg configuration is embedded in the log-in manager’s configuration—e.g.,
gdm-configuration—this procedure provides a shorthand to set the Xorg configuration.
- Scheme Procedure: xorg-start-command [config]
Return a
startxscript in which the modules, fonts, etc. specified in config, are available. The result should be used in place ofstartx.Usually the X server is started by a login manager.
- Scheme Procedure: screen-locker-service package [program]
Add package, a package for a screen locker or screen saver whose command is program, to the set of setuid programs and add a PAM entry for it. For example:
(screen-locker-service xlockmore "xlock")makes the good ol’ XlockMore usable.
12.9.8 打印服务
The (gnu services cups) module provides a Guix service definition for
the CUPS printing service. To add printer support to a Guix system, add a
cups-service to the operating system definition:
- Scheme Variable: cups-service-type
The service type for the CUPS print server. Its value should be a valid CUPS configuration (see below). To use the default settings, simply write:
(service cups-service-type)
The CUPS configuration controls the basic things about your CUPS installation: what interfaces it listens on, what to do if a print job fails, how much logging to do, and so on. To actually add a printer, you have to visit the http://localhost:631 URL, or use a tool such as GNOME’s printer configuration services. By default, configuring a CUPS service will generate a self-signed certificate if needed, for secure connections to the print server.
Suppose you want to enable the Web interface of CUPS and also add support
for Epson printers via the epson-inkjet-printer-escpr package and
for HP printers via the hplip-minimal package. You can do that
directly, like this (you need to use the (gnu packages cups) module):
(service cups-service-type
(cups-configuration
(web-interface? #t)
(extensions
(list cups-filters epson-inkjet-printer-escpr hplip-minimal))))
注: If you wish to use the Qt5 based GUI which comes with the hplip package then it is suggested that you install the
hplippackage, either in your OS configuration file or as your user.
The available configuration parameters follow. Each parameter definition is
preceded by its type; for example, ‘string-list foo’ indicates that the
foo parameter should be specified as a list of strings. There is
also a way to specify the configuration as a string, if you have an old
cupsd.conf file that you want to port over from some other system;
see the end for more details.
Available cups-configuration fields are:
cups-configurationparameter: package cups ¶The CUPS package.
cups-configurationparameter: package-list extensions (default:(list brlaser cups-filters epson-inkjet-printer-escpr foomatic-filters hplip-minimal splix)) ¶Drivers and other extensions to the CUPS package.
cups-configurationparameter: files-configuration files-configuration ¶Configuration of where to write logs, what directories to use for print spools, and related privileged configuration parameters.
Available
files-configurationfields are:files-configurationparameter: log-location access-log ¶Defines the access log filename. Specifying a blank filename disables access log generation. The value
stderrcauses log entries to be sent to the standard error file when the scheduler is running in the foreground, or to the system log daemon when run in the background. The valuesyslogcauses log entries to be sent to the system log daemon. The server name may be included in filenames using the string%s, as in/var/log/cups/%s-access_log.Defaults to ‘"/var/log/cups/access_log"’.
files-configurationparameter: file-name cache-dir ¶Where CUPS should cache data.
Defaults to ‘"/var/cache/cups"’.
files-configurationparameter: string config-file-perm ¶Specifies the permissions for all configuration files that the scheduler writes.
Note that the permissions for the printers.conf file are currently masked to only allow access from the scheduler user (typically root). This is done because printer device URIs sometimes contain sensitive authentication information that should not be generally known on the system. There is no way to disable this security feature.
Defaults to ‘"0640"’.
files-configurationparameter: log-location error-log ¶Defines the error log filename. Specifying a blank filename disables error log generation. The value
stderrcauses log entries to be sent to the standard error file when the scheduler is running in the foreground, or to the system log daemon when run in the background. The valuesyslogcauses log entries to be sent to the system log daemon. The server name may be included in filenames using the string%s, as in/var/log/cups/%s-error_log.Defaults to ‘"/var/log/cups/error_log"’.
files-configurationparameter: string fatal-errors ¶Specifies which errors are fatal, causing the scheduler to exit. The kind strings are:
noneNo errors are fatal.
allAll of the errors below are fatal.
browseBrowsing initialization errors are fatal, for example failed connections to the DNS-SD daemon.
configConfiguration file syntax errors are fatal.
listenListen or Port errors are fatal, except for IPv6 failures on the loopback or
anyaddresses.logLog file creation or write errors are fatal.
permissionsBad startup file permissions are fatal, for example shared TLS certificate and key files with world-read permissions.
Defaults to ‘"all -browse"’.
files-configurationparameter: boolean file-device? ¶Specifies whether the file pseudo-device can be used for new printer queues. The URI file:///dev/null is always allowed.
Defaults to ‘#f’.
files-configurationparameter: string group ¶Specifies the group name or ID that will be used when executing external programs.
Defaults to ‘"lp"’.
files-configurationparameter: string log-file-group ¶Specifies the group name or ID that will be used for log files.
Defaults to ‘"lpadmin"’.
files-configurationparameter: string log-file-perm ¶Specifies the permissions for all log files that the scheduler writes.
Defaults to ‘"0644"’.
files-configurationparameter: log-location page-log ¶Defines the page log filename. Specifying a blank filename disables page log generation. The value
stderrcauses log entries to be sent to the standard error file when the scheduler is running in the foreground, or to the system log daemon when run in the background. The valuesyslogcauses log entries to be sent to the system log daemon. The server name may be included in filenames using the string%s, as in/var/log/cups/%s-page_log.Defaults to ‘"/var/log/cups/page_log"’.
files-configurationparameter: string remote-root ¶Specifies the username that is associated with unauthenticated accesses by clients claiming to be the root user. The default is
remroot.Defaults to ‘"remroot"’.
files-configurationparameter: file-name request-root ¶Specifies the directory that contains print jobs and other HTTP request data.
Defaults to ‘"/var/spool/cups"’.
files-configurationparameter: sandboxing sandboxing ¶Specifies the level of security sandboxing that is applied to print filters, backends, and other child processes of the scheduler; either
relaxedorstrict. This directive is currently only used/supported on macOS.Defaults to ‘strict’.
files-configurationparameter: file-name server-keychain ¶Specifies the location of TLS certificates and private keys. CUPS will look for public and private keys in this directory: .crt files for PEM-encoded certificates and corresponding .key files for PEM-encoded private keys.
Defaults to ‘"/etc/cups/ssl"’.
files-configurationparameter: file-name server-root ¶Specifies the directory containing the server configuration files.
Defaults to ‘"/etc/cups"’.
files-configurationparameter: boolean sync-on-close? ¶Specifies whether the scheduler calls fsync(2) after writing configuration or state files.
Defaults to ‘#f’.
files-configurationparameter: space-separated-string-list system-group ¶Specifies the group(s) to use for
@SYSTEMgroup authentication.
files-configurationparameter: file-name temp-dir ¶Specifies the directory where temporary files are stored.
Defaults to ‘"/var/spool/cups/tmp"’.
files-configurationparameter: string user ¶Specifies the user name or ID that is used when running external programs.
Defaults to ‘"lp"’.
files-configurationparameter: string set-env ¶Set the specified environment variable to be passed to child processes.
Defaults to ‘"variable value"’.
cups-configurationparameter: access-log-level access-log-level ¶Specifies the logging level for the AccessLog file. The
configlevel logs when printers and classes are added, deleted, or modified and when configuration files are accessed or updated. Theactionslevel logs when print jobs are submitted, held, released, modified, or canceled, and any of the conditions forconfig. Thealllevel logs all requests.Defaults to ‘actions’.
cups-configurationparameter: boolean auto-purge-jobs? ¶Specifies whether to purge job history data automatically when it is no longer required for quotas.
Defaults to ‘#f’.
cups-configurationparameter: comma-separated-string-list browse-dns-sd-sub-types ¶Specifies a list of DNS-SD sub-types to advertise for each shared printer. For example, ‘"_cups" "_print"’ will tell network clients that both CUPS sharing and IPP Everywhere are supported.
Defaults to ‘"_cups"’.
cups-configurationparameter: browse-local-protocols browse-local-protocols ¶Specifies which protocols to use for local printer sharing.
Defaults to ‘dnssd’.
cups-configurationparameter: boolean browse-web-if? ¶Specifies whether the CUPS web interface is advertised.
Defaults to ‘#f’.
cups-configurationparameter: boolean browsing? ¶Specifies whether shared printers are advertised.
Defaults to ‘#f’.
cups-configurationparameter: string classification ¶Specifies the security classification of the server. Any valid banner name can be used, including ‘"classified"’, ‘"confidential"’, ‘"secret"’, ‘"topsecret"’, and ‘"unclassified"’, or the banner can be omitted to disable secure printing functions.
Defaults to ‘""’.
cups-configurationparameter: boolean classify-override? ¶Specifies whether users may override the classification (cover page) of individual print jobs using the
job-sheetsoption.Defaults to ‘#f’.
cups-configurationparameter: default-auth-type default-auth-type ¶Specifies the default type of authentication to use.
Defaults to ‘Basic’.
cups-configurationparameter: default-encryption default-encryption ¶Specifies whether encryption will be used for authenticated requests.
Defaults to ‘Required’.
cups-configurationparameter: string default-language ¶Specifies the default language to use for text and web content.
Defaults to ‘"en"’.
cups-configurationparameter: string default-paper-size ¶Specifies the default paper size for new print queues. ‘"Auto"’ uses a locale-specific default, while ‘"None"’ specifies there is no default paper size. Specific size names are typically ‘"Letter"’ or ‘"A4"’.
Defaults to ‘"Auto"’.
cups-configurationparameter: string default-policy ¶Specifies the default access policy to use.
Defaults to ‘"default"’.
Specifies whether local printers are shared by default.
Defaults to ‘#t’.
cups-configurationparameter: non-negative-integer dirty-clean-interval ¶Specifies the delay for updating of configuration and state files, in seconds. A value of 0 causes the update to happen as soon as possible, typically within a few milliseconds.
Defaults to ‘30’.
cups-configurationparameter: error-policy error-policy ¶Specifies what to do when an error occurs. Possible values are
abort-job, which will discard the failed print job;retry-job, which will retry the job at a later time;retry-current-job, which retries the failed job immediately; andstop-printer, which stops the printer.Defaults to ‘stop-printer’.
cups-configurationparameter: non-negative-integer filter-limit ¶Specifies the maximum cost of filters that are run concurrently, which can be used to minimize disk, memory, and CPU resource problems. A limit of 0 disables filter limiting. An average print to a non-PostScript printer needs a filter limit of about 200. A PostScript printer needs about half that (100). Setting the limit below these thresholds will effectively limit the scheduler to printing a single job at any time.
Defaults to ‘0’.
cups-configurationparameter: non-negative-integer filter-nice ¶Specifies the scheduling priority of filters that are run to print a job. The nice value ranges from 0, the highest priority, to 19, the lowest priority.
Defaults to ‘0’.
cups-configurationparameter: host-name-lookups host-name-lookups ¶Specifies whether to do reverse lookups on connecting clients. The
doublesetting causescupsdto verify that the hostname resolved from the address matches one of the addresses returned for that hostname. Double lookups also prevent clients with unregistered addresses from connecting to your server. Only set this option to#tordoubleif absolutely required.Defaults to ‘#f’.
cups-configurationparameter: non-negative-integer job-kill-delay ¶Specifies the number of seconds to wait before killing the filters and backend associated with a canceled or held job.
Defaults to ‘30’.
cups-configurationparameter: non-negative-integer job-retry-interval ¶Specifies the interval between retries of jobs in seconds. This is typically used for fax queues but can also be used with normal print queues whose error policy is
retry-joborretry-current-job.Defaults to ‘30’.
cups-configurationparameter: non-negative-integer job-retry-limit ¶Specifies the number of retries that are done for jobs. This is typically used for fax queues but can also be used with normal print queues whose error policy is
retry-joborretry-current-job.Defaults to ‘5’.
cups-configurationparameter: boolean keep-alive? ¶Specifies whether to support HTTP keep-alive connections.
Defaults to ‘#t’.
cups-configurationparameter: non-negative-integer limit-request-body ¶Specifies the maximum size of print files, IPP requests, and HTML form data. A limit of 0 disables the limit check.
Defaults to ‘0’.
cups-configurationparameter: multiline-string-list listen ¶Listens on the specified interfaces for connections. Valid values are of the form address:port, where address is either an IPv6 address enclosed in brackets, an IPv4 address, or
*to indicate all addresses. Values can also be file names of local UNIX domain sockets. The Listen directive is similar to the Port directive but allows you to restrict access to specific interfaces or networks.
cups-configurationparameter: non-negative-integer listen-back-log ¶Specifies the number of pending connections that will be allowed. This normally only affects very busy servers that have reached the MaxClients limit, but can also be triggered by large numbers of simultaneous connections. When the limit is reached, the operating system will refuse additional connections until the scheduler can accept the pending ones.
Defaults to ‘128’.
cups-configurationparameter: location-access-control-list location-access-controls ¶Specifies a set of additional access controls.
Available
location-access-controlsfields are:location-access-controlsparameter: file-name path ¶Specifies the URI path to which the access control applies.
location-access-controlsparameter: access-control-list access-controls ¶Access controls for all access to this path, in the same format as the
access-controlsofoperation-access-control.Defaults to ‘()’.
location-access-controlsparameter: method-access-control-list method-access-controls ¶Access controls for method-specific access to this path.
Defaults to ‘()’.
Available
method-access-controlsfields are:method-access-controlsparameter: boolean reverse? ¶If
#t, apply access controls to all methods except the listed methods. Otherwise apply to only the listed methods.Defaults to ‘#f’.
method-access-controlsparameter: method-list methods ¶Methods to which this access control applies.
Defaults to ‘()’.
method-access-controlsparameter: access-control-list access-controls ¶Access control directives, as a list of strings. Each string should be one directive, such as ‘"Order allow,deny"’.
Defaults to ‘()’.
cups-configurationparameter: non-negative-integer log-debug-history ¶Specifies the number of debugging messages that are retained for logging if an error occurs in a print job. Debug messages are logged regardless of the LogLevel setting.
Defaults to ‘100’.
cups-configurationparameter: log-level log-level ¶Specifies the level of logging for the ErrorLog file. The value
nonestops all logging whiledebug2logs everything.Defaults to ‘info’.
cups-configurationparameter: log-time-format log-time-format ¶Specifies the format of the date and time in the log files. The value
standardlogs whole seconds whileusecslogs microseconds.Defaults to ‘standard’.
cups-configurationparameter: non-negative-integer max-clients ¶Specifies the maximum number of simultaneous clients that are allowed by the scheduler.
Defaults to ‘100’.
cups-configurationparameter: non-negative-integer max-clients-per-host ¶Specifies the maximum number of simultaneous clients that are allowed from a single address.
Defaults to ‘100’.
cups-configurationparameter: non-negative-integer max-copies ¶Specifies the maximum number of copies that a user can print of each job.
Defaults to ‘9999’.
cups-configurationparameter: non-negative-integer max-hold-time ¶Specifies the maximum time a job may remain in the
indefinitehold state before it is canceled. A value of 0 disables cancellation of held jobs.Defaults to ‘0’.
cups-configurationparameter: non-negative-integer max-jobs ¶Specifies the maximum number of simultaneous jobs that are allowed. Set to 0 to allow an unlimited number of jobs.
Defaults to ‘500’.
cups-configurationparameter: non-negative-integer max-jobs-per-printer ¶Specifies the maximum number of simultaneous jobs that are allowed per printer. A value of 0 allows up to MaxJobs jobs per printer.
Defaults to ‘0’.
cups-configurationparameter: non-negative-integer max-jobs-per-user ¶Specifies the maximum number of simultaneous jobs that are allowed per user. A value of 0 allows up to MaxJobs jobs per user.
Defaults to ‘0’.
cups-configurationparameter: non-negative-integer max-job-time ¶Specifies the maximum time a job may take to print before it is canceled, in seconds. Set to 0 to disable cancellation of “stuck” jobs.
Defaults to ‘10800’.
cups-configurationparameter: non-negative-integer max-log-size ¶Specifies the maximum size of the log files before they are rotated, in bytes. The value 0 disables log rotation.
Defaults to ‘1048576’.
cups-configurationparameter: non-negative-integer multiple-operation-timeout ¶Specifies the maximum amount of time to allow between files in a multiple file print job, in seconds.
Defaults to ‘900’.
cups-configurationparameter: string page-log-format ¶Specifies the format of PageLog lines. Sequences beginning with percent (‘%’) characters are replaced with the corresponding information, while all other characters are copied literally. The following percent sequences are recognized:
- ‘%%’
insert a single percent character
- ‘%{name}’
insert the value of the specified IPP attribute
- ‘%C’
insert the number of copies for the current page
- ‘%P’
insert the current page number
- ‘%T’
insert the current date and time in common log format
- ‘%j’
insert the job ID
- ‘%p’
insert the printer name
- ‘%u’
insert the username
A value of the empty string disables page logging. The string
%p %u %j %T %P %C %{job-billing} %{job-originating-host-name} %{job-name} %{media} %{sides}creates a page log with the standard items.Defaults to ‘""’.
cups-configurationparameter: environment-variables environment-variables ¶Passes the specified environment variable(s) to child processes; a list of strings.
Defaults to ‘()’.
cups-configurationparameter: policy-configuration-list policies ¶Specifies named access control policies.
Available
policy-configurationfields are:policy-configurationparameter: string name ¶Name of the policy.
policy-configurationparameter: string job-private-access ¶Specifies an access list for a job’s private values.
@ACLmaps to the printer’s requesting-user-name-allowed or requesting-user-name-denied values.@OWNERmaps to the job’s owner.@SYSTEMmaps to the groups listed for thesystem-groupfield of thefiles-configuration, which is reified into thecups-files.conf(5)file. Other possible elements of the access list include specific user names, and@groupto indicate members of a specific group. The access list may also be simplyallordefault.Defaults to ‘"@OWNER @SYSTEM"’.
policy-configurationparameter: string job-private-values ¶Specifies the list of job values to make private, or
all,default, ornone.Defaults to ‘"job-name job-originating-host-name job-originating-user-name phone"’.
policy-configurationparameter: string subscription-private-access ¶Specifies an access list for a subscription’s private values.
@ACLmaps to the printer’s requesting-user-name-allowed or requesting-user-name-denied values.@OWNERmaps to the job’s owner.@SYSTEMmaps to the groups listed for thesystem-groupfield of thefiles-configuration, which is reified into thecups-files.conf(5)file. Other possible elements of the access list include specific user names, and@groupto indicate members of a specific group. The access list may also be simplyallordefault.Defaults to ‘"@OWNER @SYSTEM"’.
policy-configurationparameter: string subscription-private-values ¶Specifies the list of job values to make private, or
all,default, ornone.Defaults to ‘"notify-events notify-pull-method notify-recipient-uri notify-subscriber-user-name notify-user-data"’.
policy-configurationparameter: operation-access-control-list access-controls ¶Access control by IPP operation.
Defaults to ‘()’.
cups-configurationparameter: boolean-or-non-negative-integer preserve-job-files ¶Specifies whether job files (documents) are preserved after a job is printed. If a numeric value is specified, job files are preserved for the indicated number of seconds after printing. Otherwise a boolean value applies indefinitely.
Defaults to ‘86400’.
cups-configurationparameter: boolean-or-non-negative-integer preserve-job-history ¶Specifies whether the job history is preserved after a job is printed. If a numeric value is specified, the job history is preserved for the indicated number of seconds after printing. If
#t, the job history is preserved until the MaxJobs limit is reached.Defaults to ‘#t’.
cups-configurationparameter: non-negative-integer reload-timeout ¶Specifies the amount of time to wait for job completion before restarting the scheduler.
Defaults to ‘30’.
cups-configurationparameter: string rip-cache ¶Specifies the maximum amount of memory to use when converting documents into bitmaps for a printer.
Defaults to ‘"128m"’.
cups-configurationparameter: string server-admin ¶Specifies the email address of the server administrator.
Defaults to ‘"root@localhost.localdomain"’.
cups-configurationparameter: host-name-list-or-* server-alias ¶The ServerAlias directive is used for HTTP Host header validation when clients connect to the scheduler from external interfaces. Using the special name
*can expose your system to known browser-based DNS rebinding attacks, even when accessing sites through a firewall. If the auto-discovery of alternate names does not work, we recommend listing each alternate name with a ServerAlias directive instead of using*.Defaults to ‘*’.
cups-configurationparameter: string server-name ¶Specifies the fully-qualified host name of the server.
Defaults to ‘"localhost"’.
cups-configurationparameter: server-tokens server-tokens ¶Specifies what information is included in the Server header of HTTP responses.
Nonedisables the Server header.ProductOnlyreportsCUPS.MajorreportsCUPS 2.MinorreportsCUPS 2.0.MinimalreportsCUPS 2.0.0.OSreportsCUPS 2.0.0 (uname)where uname is the output of theunamecommand.FullreportsCUPS 2.0.0 (uname) IPP/2.0.Defaults to ‘Minimal’.
cups-configurationparameter: multiline-string-list ssl-listen ¶Listens on the specified interfaces for encrypted connections. Valid values are of the form address:port, where address is either an IPv6 address enclosed in brackets, an IPv4 address, or
*to indicate all addresses.Defaults to ‘()’.
cups-configurationparameter: ssl-options ssl-options ¶Sets encryption options. By default, CUPS only supports encryption using TLS v1.0 or higher using known secure cipher suites. Security is reduced when
Allowoptions are used, and enhanced whenDenyoptions are used. TheAllowRC4option enables the 128-bit RC4 cipher suites, which are required for some older clients. TheAllowSSL3option enables SSL v3.0, which is required for some older clients that do not support TLS v1.0. TheDenyCBCoption disables all CBC cipher suites. TheDenyTLS1.0option disables TLS v1.0 support - this sets the minimum protocol version to TLS v1.1.Defaults to ‘()’.
cups-configurationparameter: boolean strict-conformance? ¶Specifies whether the scheduler requires clients to strictly adhere to the IPP specifications.
Defaults to ‘#f’.
cups-configurationparameter: non-negative-integer timeout ¶Specifies the HTTP request timeout, in seconds.
Defaults to ‘900’.
cups-configurationparameter: boolean web-interface? ¶Specifies whether the web interface is enabled.
Defaults to ‘#f’.
At this point you’re probably thinking “oh dear, Guix manual, I like you
but you can stop already with the configuration options”. Indeed.
However, one more point: it could be that you have an existing
cupsd.conf that you want to use. In that case, you can pass an
opaque-cups-configuration as the configuration of a
cups-service-type.
Available opaque-cups-configuration fields are:
opaque-cups-configurationparameter: package cups ¶The CUPS package.
opaque-cups-configurationparameter: string cupsd.conf ¶The contents of the
cupsd.conf, as a string.
opaque-cups-configurationparameter: string cups-files.conf ¶The contents of the
cups-files.conffile, as a string.
For example, if your cupsd.conf and cups-files.conf are in
strings of the same name, you could instantiate a CUPS service like this:
(service cups-service-type
(opaque-cups-configuration
(cupsd.conf cupsd.conf)
(cups-files.conf cups-files.conf)))
12.9.9 桌面服务
The (gnu services desktop) module provides services that are usually
useful in the context of a “desktop” setup—that is, on a machine running
a graphical display server, possibly with graphical user interfaces, etc.
It also defines services that provide specific desktop environments like
GNOME, Xfce or MATE.
To simplify things, the module defines a variable containing the set of services that users typically expect on a machine with a graphical environment and networking:
- Scheme Variable: %desktop-services
This is a list of services that builds upon
%base-servicesand adds or adjusts services for a typical “desktop” setup.In particular, it adds a graphical login manager (see
gdm-service-type), screen lockers, a network management tool (seenetwork-manager-service-type) with modem support (seemodem-manager-service-type), energy and color management services, theelogindlogin and seat manager, the Polkit privilege service, the GeoClue location service, the AccountsService daemon that allows authorized users change system passwords, an NTP client (see 网络服务), the Avahi daemon, and has the name service switch service configured to be able to usenss-mdns(see mDNS).
The %desktop-services variable can be used as the services
field of an operating-system declaration (see services).
Additionally, the gnome-desktop-service-type,
xfce-desktop-service, mate-desktop-service-type,
lxqt-desktop-service-type and
enlightenment-desktop-service-type procedures can add GNOME, Xfce,
MATE and/or Enlightenment to a system. To “add GNOME” means that
system-level services like the backlight adjustment helpers and the power
management utilities are added to the system, extending polkit and
dbus appropriately, allowing GNOME to operate with elevated
privileges on a limited number of special-purpose system interfaces.
Additionally, adding a service made by gnome-desktop-service-type
adds the GNOME metapackage to the system profile. Likewise, adding the Xfce
service not only adds the xfce metapackage to the system profile, but
it also gives the Thunar file manager the ability to open a “root-mode”
file management window, if the user authenticates using the administrator’s
password via the standard polkit graphical interface. To “add MATE” means
that polkit and dbus are extended appropriately, allowing MATE
to operate with elevated privileges on a limited number of special-purpose
system interfaces. Additionally, adding a service of type
mate-desktop-service-type adds the MATE metapackage to the system
profile. “Adding Enlightenment” means that dbus is extended
appropriately, and several of Enlightenment’s binaries are set as setuid,
allowing Enlightenment’s screen locker and other functionality to work as
expected.
The desktop environments in Guix use the Xorg display server by default. If
you’d like to use the newer display server protocol called Wayland, you need
to enable Wayland support in GDM (see wayland-gdm). Another solution is
to use the sddm-service instead of GDM as the graphical login
manager. You should then select the “GNOME (Wayland)” session in SDDM.
Alternatively you can also try starting GNOME on Wayland manually from a TTY
with the command “XDG_SESSION_TYPE=wayland exec dbus-run-session
gnome-session“. Currently only GNOME has support for Wayland.
- Scheme Variable: gnome-desktop-service-type
This is the type of the service that adds the GNOME desktop environment. Its value is a
gnome-desktop-configurationobject (see below).This service adds the
gnomepackage to the system profile, and extends polkit with the actions fromgnome-settings-daemon.
- Data Type: gnome-desktop-configuration
Configuration record for the GNOME desktop environment.
gnome(默认值:gnome)The GNOME package to use.
- Scheme Variable: xfce-desktop-service-type
This is the type of a service to run the https://xfce.org/ desktop environment. Its value is an
xfce-desktop-configurationobject (see below).This service adds the
xfcepackage to the system profile, and extends polkit with the ability forthunarto manipulate the file system as root from within a user session, after the user has authenticated with the administrator’s password.Note that
xfce4-paneland its plugin packages should be installed in the same profile to ensure compatibility. When using this service, you should add extra plugins (xfce4-whiskermenu-plugin,xfce4-weather-plugin, etc.) to thepackagesfield of youroperating-system.
- Data Type: xfce-desktop-configuration
Configuration record for the Xfce desktop environment.
xfce(默认值:xfce)The Xfce package to use.
- Scheme Variable: mate-desktop-service-type
This is the type of the service that runs the MATE desktop environment. Its value is a
mate-desktop-configurationobject (see below).This service adds the
matepackage to the system profile, and extends polkit with the actions frommate-settings-daemon.
- Data Type: mate-desktop-configuration
Configuration record for the MATE desktop environment.
mate(默认值:mate)The MATE package to use.
- Scheme Variable: lxqt-desktop-service-type
This is the type of the service that runs the LXQt desktop environment. Its value is a
lxqt-desktop-configurationobject (see below).This service adds the
lxqtpackage to the system profile.
- Data Type: lxqt-desktop-configuration
Configuration record for the LXQt desktop environment.
lxqt(default:lxqt)The LXQT package to use.
- Scheme Variable: enlightenment-desktop-service-type
Return a service that adds the
enlightenmentpackage to the system profile, and extends dbus with actions fromefl.
- Data Type: enlightenment-desktop-service-configuration
enlightenment(默认值:enlightenment)The enlightenment package to use.
Because the GNOME, Xfce and MATE desktop services pull in so many packages,
the default %desktop-services variable doesn’t include any of them by
default. To add GNOME, Xfce or MATE, just cons them onto
%desktop-services in the services field of your
operating-system:
(use-modules (gnu)) (use-service-modules desktop) (operating-system ... ;; cons* adds items to the list given as its last argument. (services (cons* (service gnome-desktop-service-type) (service xfce-desktop-service) %desktop-services)) ...)
These desktop environments will then be available as options in the graphical login window.
The actual service definitions included in %desktop-services and
provided by (gnu services dbus) and (gnu services desktop) are
described below.
- Scheme Procedure: dbus-service [#:dbus dbus] [#:services '()] [#:verbose?] Return a service that runs the ``system bus'', using
dbus, with support for services. When verbose? is true, it causes the ‘DBUS_VERBOSE’ environment variable to be set to ‘1’; a verbose-enabled D-Bus package such as
dbus-verboseshould be provided as dbus in this scenario. The verbose output is logged to /var/log/dbus-daemon.log.D-Bus is an inter-process communication facility. Its system bus is used to allow system services to communicate and to be notified of system-wide events.
services must be a list of packages that provide an etc/dbus-1/system.d directory containing additional D-Bus configuration and policy files. For example, to allow avahi-daemon to use the system bus, services must be equal to
(list avahi).
- Scheme Procedure: elogind-service [#:config config]
Return a service that runs the
elogindlogin and seat management daemon. Elogind exposes a D-Bus interface that can be used to know which users are logged in, know what kind of sessions they have open, suspend the system, inhibit system suspend, reboot the system, and other tasks.Elogind handles most system-level power events for a computer, for example suspending the system when a lid is closed, or shutting it down when the power button is pressed.
The config keyword argument specifies the configuration for elogind, and should be the result of an
(elogind-configuration (parameter value)...)invocation. Available parameters and their default values are:kill-user-processes?#fkill-only-users()kill-exclude-users("root")inhibit-delay-max-seconds5handle-power-keypoweroffhandle-suspend-keysuspendhandle-hibernate-keyhibernatehandle-lid-switchsuspendhandle-lid-switch-dockedignorehandle-lid-switch-external-power*unspecified*power-key-ignore-inhibited?#fsuspend-key-ignore-inhibited?#fhibernate-key-ignore-inhibited?#flid-switch-ignore-inhibited?#tholdoff-timeout-seconds30idle-actionignoreidle-action-seconds(* 30 60)runtime-directory-size-percent10runtime-directory-size#fremove-ipc?#tsuspend-state("mem" "standby" "freeze")suspend-mode()hibernate-state("disk")hibernate-mode("platform" "shutdown")hybrid-sleep-state("disk")hybrid-sleep-mode("suspend" "platform" "shutdown")
- Scheme Procedure: accountsservice-service [#:accountsservice accountsservice] Return a service that runs
AccountsService, a system service that can list available accounts, change their passwords, and so on. AccountsService integrates with PolicyKit to enable unprivileged users to acquire the capability to modify their system configuration. the accountsservice web site for more information.
The accountsservice keyword argument is the
accountsservicepackage to expose as a service.
- Scheme Procedure: polkit-service [#:polkit polkit] Return a service that runs the
Polkit privilege management service, which allows system administrators to grant access to privileged operations in a structured way. By querying the Polkit service, a privileged system component can know when it should grant additional capabilities to ordinary users. For example, an ordinary user can be granted the capability to suspend the system if the user is logged in locally.
- Scheme Variable: polkit-wheel-service
Service that adds the
wheelgroup as admins to the Polkit service. This makes it so that users in thewheelgroup are queried for their own passwords when performing administrative actions instead ofroot’s, similar to the behaviour used bysudo.
- Scheme Variable: upower-service-type
Service that runs
upowerd, a system-wide monitor for power consumption and battery levels, with the given configuration settings.It implements the
org.freedesktop.UPowerD-Bus interface, and is notably used by GNOME.
- Data Type: upower-configuration
Data type representation the configuration for UPower.
upower(default: upower)Package to use for
upower.watts-up-pro?(default:#f)Enable the Watts Up Pro device.
poll-batteries?(default:#t)Enable polling the kernel for battery level changes.
ignore-lid?(default:#f)Ignore the lid state, this can be useful if it’s incorrect on a device.
use-percentage-for-policy?(default:#t)Whether to use a policy based on battery percentage rather than on estimated time left. A policy based on battery percentage is usually more reliable.
percentage-low(default:20)When
use-percentage-for-policy?is#t, this sets the percentage at which the battery is considered low.percentage-critical(default:5)When
use-percentage-for-policy?is#t, this sets the percentage at which the battery is considered critical.percentage-action(default:2)When
use-percentage-for-policy?is#t, this sets the percentage at which action will be taken.time-low(default:1200)When
use-time-for-policy?is#f, this sets the time remaining in seconds at which the battery is considered low.time-critical(default:300)When
use-time-for-policy?is#f, this sets the time remaining in seconds at which the battery is considered critical.time-action(default:120)When
use-time-for-policy?is#f, this sets the time remaining in seconds at which action will be taken.critical-power-action(default:'hybrid-sleep)The action taken when
percentage-actionortime-actionis reached (depending on the configuration ofuse-percentage-for-policy?).Possible values are:
-
'power-off -
'hibernate -
'hybrid-sleep.
-
- Scheme Procedure: udisks-service [#:udisks udisks]
Return a service for UDisks, a disk management daemon that provides user interfaces with notifications and ways to mount/unmount disks. Programs that talk to UDisks include the
udisksctlcommand, part of UDisks, and GNOME Disks. Note that Udisks relies on themountcommand, so it will only be able to use the file-system utilities installed in the system profile. For example if you want to be able to mount NTFS file-systems in read and write fashion, you’ll need to haventfs-3ginstalled system-wide.
- Scheme Variable: colord-service-type
This is the type of the service that runs
colord, a system service with a D-Bus interface to manage the color profiles of input and output devices such as screens and scanners. It is notably used by the GNOME Color Manager graphical tool. See the colord web site for more information.
- Scheme Variable: sane-service-type
This service provides access to scanners via SANE by installing the necessary udev rules. It is included in
%desktop-services(see 桌面服务) and relies by default onsane-backends-minimalpackage (see below) for hardware support.
- Scheme Variable: sane-backends-minimal
The default package which the
sane-service-typeinstalls. It supports many recent scanners.
- Scheme Variable: sane-backends
This package includes support for all scanners that
sane-backends-minimalsupports, plus older Hewlett-Packard scanners supported byhplippackage. In order to use this on a system which relies on%desktop-services, you may usemodify-services(seemodify-services) as illustrated below:(use-modules (gnu)) (use-service-modules … desktop) (use-package-modules … scanner) (define %my-desktop-services ;; List of desktop services that supports a broader range of scanners. (modify-services %desktop-services (sane-service-type _ => sane-backends))) (operating-system … (services %my-desktop-services))
- Scheme Procedure: geoclue-application name [#:allowed? #t] [#:system? #f] [#:users '()]
Return a configuration allowing an application to access GeoClue location data. name is the Desktop ID of the application, without the
.desktoppart. If allowed? is true, the application will have access to location information by default. The boolean system? value indicates whether an application is a system component or not. Finally users is a list of UIDs of all users for which this application is allowed location info access. An empty users list means that all users are allowed.
- Scheme Variable: %standard-geoclue-applications
The standard list of well-known GeoClue application configurations, granting authority to the GNOME date-and-time utility to ask for the current location in order to set the time zone, and allowing the IceCat and Epiphany web browsers to request location information. IceCat and Epiphany both query the user before allowing a web page to know the user’s location.
- Scheme Procedure: geoclue-service [#:colord colord] [#:whitelist '()] [#:wifi-geolocation-url
"https://location.services.mozilla.com/v1/geolocate?key=geoclue"] [#:submit-data? #f] [#:wifi-submission-url "https://location.services.mozilla.com/v1/submit?key=geoclue"] [#:submission-nick "geoclue"] [#:applications %standard-geoclue-applications] Return a service that runs the GeoClue location service. This service provides a D-Bus interface to allow applications to request access to a user’s physical location, and optionally to add information to online location databases. See the GeoClue web site for more information.
- Scheme Procedure: bluetooth-service [#:bluez bluez] [#:auto-enable? #f] Return a service that runs the
bluetoothd daemon, which manages all the Bluetooth devices and provides a number of D-Bus interfaces. When AUTO-ENABLE? is true, the bluetooth controller is powered automatically at boot, which can be useful when using a bluetooth keyboard or mouse.
Users need to be in the
lpgroup to access the D-Bus service.
- Scheme Variable: bluetooth-service-type
This is the type for the Linux Bluetooth Protocol Stack (BlueZ) system, which generates the /etc/bluetooth/main.conf configuration file. The value for this type is a
bluetooth-configurationrecord as in this example:(service bluetooth-service-type)See below for details about
bluetooth-configuration.
- Data Type: bluetooth-configuration
Data type representing the configuration for
bluetooth-service.bluez(default:bluez)bluezpackage to use.name(default:"BlueZ")Default adapter name.
class(default:#x000000)Default device class. Only the major and minor device class bits are considered.
discoverable-timeout(default:180)How long to stay in discoverable mode before going back to non-discoverable. The value is in seconds.
always-pairable?(default:#f)Always allow pairing even if there are no agents registered.
pairable-timeout(default:0)How long to stay in pairable mode before going back to non-discoverable. The value is in seconds.
device-id(default:#f)Use vendor id source (assigner), vendor, product and version information for DID profile support. The values are separated by ":" and assigner, VID, PID and version.
Possible values are:
-
#fto disable it, -
"assigner:1234:5678:abcd", where assigner is eitherusb(default) orbluetooth.
-
reverse-service-discovery?(default:#t)Do reverse service discovery for previously unknown devices that connect to us. For BR/EDR this option is really only needed for qualification since the BITE tester doesn’t like us doing reverse SDP for some test cases, for LE this disables the GATT client functionally so it can be used in system which can only operate as peripheral.
name-resolving?(default:#t)Enable name resolving after inquiry. Set it to
#fif you don’t need remote devices name and want shorter discovery cycle.debug-keys?(default:#f)Enable runtime persistency of debug link keys. Default is false which makes debug link keys valid only for the duration of the connection that they were created for.
controller-mode(default:'dual)Restricts all controllers to the specified transport.
'dualmeans both BR/EDR and LE are enabled (if supported by the hardware).Possible values are:
-
'dual -
'bredr -
'le
-
multi-profile(default:'off)Enables Multi Profile Specification support. This allows to specify if system supports only Multiple Profiles Single Device (MPSD) configuration or both Multiple Profiles Single Device (MPSD) and Multiple Profiles Multiple Devices (MPMD) configurations.
Possible values are:
-
'off -
'single -
'multiple
-
fast-connectable?(default:#f)Permanently enables the Fast Connectable setting for adapters that support it. When enabled other devices can connect faster to us, however the tradeoff is increased power consumptions. This feature will fully work only on kernel version 4.1 and newer.
privacy(default:'off)Default privacy settings.
-
'off: Disable local privacy -
'network/on: A device will only accept advertising packets from peer devices that contain private addresses. It may not be compatible with some legacy devices since it requires the use of RPA(s) all the time -
'device: A device in device privacy mode is only concerned about the privacy of the device and will accept advertising packets from peer devices that contain their Identity Address as well as ones that contain a private address, even if the peer device has distributed its IRK in the past
and additionally, if controller-mode is set to
'dual:-
'limited-network: Apply Limited Discoverable Mode to advertising, which follows the same policy as to BR/EDR that publishes the identity address when discoverable, and Network Privacy Mode for scanning -
'limited-device: Apply Limited Discoverable Mode to advertising, which follows the same policy as to BR/EDR that publishes the identity address when discoverable, and Device Privacy Mode for scanning.
-
just-works-repairing(default:'never)Specify the policy to the JUST-WORKS repairing initiated by peer.
Possible values:
-
'never -
'confirm -
'always
-
temporary-timeout(default:30)How long to keep temporary devices around. The value is in seconds.
0disables the timer completely.refresh-discovery?(default:#t)Enables the device to issue an SDP request to update known services when profile is connected.
experimental(default:#f)Enables experimental features and interfaces, alternatively a list of UUIDs can be given.
Possible values:
-
#t -
#f -
(list (uuid <uuid-1>) (uuid <uuid-2>) ...).
List of possible UUIDs:
-
d4992530-b9ec-469f-ab01-6c481c47da1c: BlueZ Experimental Debug, -
671b10b5-42c0-4696-9227-eb28d1b049d6: BlueZ Experimental Simultaneous Central and Peripheral, -
"15c0a148-c273-11ea-b3de-0242ac130004: BlueZ Experimental LL privacy, -
330859bc-7506-492d-9370-9a6f0614037f: BlueZ Experimental Bluetooth Quality Report, -
a6695ace-ee7f-4fb9-881a-5fac66c629af: BlueZ Experimental Offload Codecs.
-
remote-name-request-retry-delay(default:300)The duration to avoid retrying to resolve a peer’s name, if the previous try failed.
page-scan-type(default:#f)BR/EDR Page scan activity type.
page-scan-interval(default:#f)BR/EDR Page scan activity interval.
page-scan-window(default:#f)BR/EDR Page scan activity window.
inquiry-scan-type(default:#f)BR/EDR Inquiry scan activity type.
inquiry-scan-interval(default:#f)BR/EDR Inquiry scan activity interval.
inquiry-scan-window(default:#f)BR/EDR Inquiry scan activity window.
link-supervision-timeout(default:#f)BR/EDR Link supervision timeout.
page-timeout(default:#f)BR/EDR Page timeout.
min-sniff-interval(default:#f)BR/EDR minimum sniff interval.
max-sniff-interval(default:#f)BR/EDR maximum sniff interval.
min-advertisement-interval(default:#f)LE minimum advertisement interval (used for legacy advertisement only).
max-advertisement-interval(default:#f)LE maximum advertisement interval (used for legacy advertisement only).
multi-advertisement-rotation-interval(default:#f)LE multiple advertisement rotation interval.
scan-interval-auto-connect(default:#f)LE scanning interval used for passive scanning supporting auto connect.
scan-window-auto-connect(default:#f)LE scanning window used for passive scanning supporting auto connect.
scan-interval-suspend(default:#f)LE scanning interval used for active scanning supporting wake from suspend.
scan-window-suspend(default:#f)LE scanning window used for active scanning supporting wake from suspend.
scan-interval-discovery(default:#f)LE scanning interval used for active scanning supporting discovery.
scan-window-discovery(default:#f)LE scanning window used for active scanning supporting discovery.
scan-interval-adv-monitor(default:#f)LE scanning interval used for passive scanning supporting the advertisement monitor APIs.
scan-window-adv-monitor(default:#f)LE scanning window used for passive scanning supporting the advertisement monitor APIs.
scan-interval-connect(default:#f)LE scanning interval used for connection establishment.
scan-window-connect(default:#f)LE scanning window used for connection establishment.
min-connection-interval(default:#f)LE default minimum connection interval. This value is superseded by any specific value provided via the Load Connection Parameters interface.
max-connection-interval(default:#f)LE default maximum connection interval. This value is superseded by any specific value provided via the Load Connection Parameters interface.
connection-latency(default:#f)LE default connection latency. This value is superseded by any specific value provided via the Load Connection Parameters interface.
connection-supervision-timeout(default:#f)LE default connection supervision timeout. This value is superseded by any specific value provided via the Load Connection Parameters interface.
autoconnect-timeout(default:#f)LE default autoconnect timeout. This value is superseded by any specific value provided via the Load Connection Parameters interface.
adv-mon-allowlist-scan-duration(default:300)Allowlist scan duration during interleaving scan. Only used when scanning for ADV monitors. The units are msec.
adv-mon-no-filter-scan-duration(default:500)No filter scan duration during interleaving scan. Only used when scanning for ADV monitors. The units are msec.
enable-adv-mon-interleave-scan?(default:#t)Enable/Disable Advertisement Monitor interleave scan for power saving.
cache(default:'always)GATT attribute cache.
Possible values are:
-
'always: Always cache attributes even for devices not paired, this is recommended as it is best for interoperability, with more consistent reconnection times and enables proper tracking of notifications for all devices -
'yes: Only cache attributes of paired devices -
'no: Never cache attributes.
-
key-size(default:0)Minimum required Encryption Key Size for accessing secured characteristics.
Possible values are:
-
0: Don’t care -
7 <= N <= 16
-
exchange-mtu(default:517)Exchange MTU size. Possible values are:
-
23 <= N <= 517
-
att-channels(default:3)Number of ATT channels. Possible values are:
-
1: Disables EATT -
2 <= N <= 5
-
session-mode(default:'basic)AVDTP L2CAP signalling channel mode.
Possible values are:
-
'basic: Use L2CAP basic mode -
'ertm: Use L2CAP enhanced retransmission mode.
-
stream-mode(default:'basic)AVDTP L2CAP transport channel mode.
Possible values are:
-
'basic: Use L2CAP basic mode -
'streaming: Use L2CAP streaming mode.
-
reconnect-uuids(default:'())The ReconnectUUIDs defines the set of remote services that should try to be reconnected to in case of a link loss (link supervision timeout). The policy plugin should contain a sane set of values by default, but this list can be overridden here. By setting the list to empty the reconnection feature gets disabled.
Possible values:
-
'() -
(list (uuid <uuid-1>) (uuid <uuid-2>) ...).
-
reconnect-attempts(default:7)Defines the number of attempts to reconnect after a link lost. Setting the value to 0 disables reconnecting feature.
reconnect-intervals(default:'(1 2 4 8 16 32 64))Defines a list of intervals in seconds to use in between attempts. If the number of attempts defined in reconnect-attempts is bigger than the list of intervals the last interval is repeated until the last attempt.
auto-enable?(default:#f)Defines option to enable all controllers when they are found. This includes adapters present on start as well as adapters that are plugged in later on.
resume-delay(default:2)Audio devices that were disconnected due to suspend will be reconnected on resume. resume-delay determines the delay between when the controller resumes from suspend and a connection attempt is made. A longer delay is better for better co-existence with Wi-Fi. The value is in seconds.
rssi-sampling-period(default:#xFF)Default RSSI Sampling Period. This is used when a client registers an advertisement monitor and leaves the RSSISamplingPeriod unset.
Possible values are:
-
#x0: Report all advertisements -
N = #xXX: Report advertisements every N x 100 msec (range: #x01 to #xFE) -
#xFF: Report only one advertisement per device during monitoring period.
-
- Scheme Variable: gnome-keyring-service-type
This is the type of the service that adds the GNOME Keyring. Its value is a
gnome-keyring-configurationobject (see below).This service adds the
gnome-keyringpackage to the system profile and extends PAM with entries usingpam_gnome_keyring.so, unlocking a user’s login keyring when they log in or setting its password with passwd.
- Data Type: gnome-keyring-configuration
Configuration record for the GNOME Keyring service.
keyring(default:gnome-keyring)The GNOME keyring package to use.
pam-servicesA list of
(service . kind)pairs denoting PAM services to extend, where service is the name of an existing service to extend and kind is one ofloginorpasswd.If
loginis given, it adds an optionalpam_gnome_keyring.soto the auth block without arguments and to the session block withauto_start. Ifpasswdis given, it adds an optionalpam_gnome_keyring.soto the password block without arguments.By default, this field contains “gdm-password” with the value
loginand “passwd” is with the valuepasswd.
- Scheme Variable: seatd-service-type
seatd is a minimal seat management daemon.
Seat management takes care of mediating access to shared devices (graphics, input), without requiring the applications needing access to be root.
(append (list ;; make sure seatd is running (service seatd-service-type)) ;; normally one would want %base-services %base-services)seatdoperates over a UNIX domain socket, withlibseatproviding the client side of the protocol. Applications that acquire access to the shared resources viaseatd(e.g.sway) need to be able to talk to this socket. This can be achieved by adding the user they run under to the group owningseatd’s socket (usually “seat”), like so:(user-account (name "alice") (group "users") (supplementary-groups '("wheel" ; allow use of sudo, etc. "seat" ; seat management "audio" ; sound card "video" ; video devices such as webcams "cdrom")) ; the good ol' CD-ROM (comment "Bob's sister"))Depending on your setup, you will have to not only add regular users, but also system users to this group. For instance, some greetd greeters require graphics and therefore also need to negotiate with seatd.
- Data Type: seatd-configuration
Configuration record for the seatd daemon service.
seatd(default:seatd)The seatd package to use.
group(default: ‘"seat"’)Group to own the seatd socket.
socket(default: ‘"/run/seatd.sock"’)Where to create the seatd socket.
logfile(default: ‘"/var/log/seatd.log"’)Log file to write to.
loglevel(default: ‘"error"’)Log level to output logs. Possible values: ‘"silent"’, ‘"error"’, ‘"info"’ and ‘"debug"’.
12.9.10 声音服务
The (gnu services sound) module provides a service to configure the
Advanced Linux Sound Architecture (ALSA) system, which makes PulseAudio the
preferred ALSA output driver.
- Scheme Variable: alsa-service-type
This is the type for the Advanced Linux Sound Architecture (ALSA) system, which generates the /etc/asound.conf configuration file. The value for this type is a
alsa-configurationrecord as in this example:(service alsa-service-type)See below for details about
alsa-configuration.
- Data Type: alsa-configuration
Data type representing the configuration for
alsa-service.alsa-plugins(default: alsa-plugins)alsa-pluginspackage to use.pulseaudio?(default: #t)Whether ALSA applications should transparently be made to use the PulseAudio sound server.
Using PulseAudio allows you to run several sound-producing applications at the same time and to individual control them via
pavucontrol, among other things.extra-options(default: "")String to append to the /etc/asound.conf file.
Individual users who want to override the system configuration of ALSA can do it with the ~/.asoundrc file:
# In guix, we have to specify the absolute path for plugins.
pcm_type.jack {
lib "/home/alice/.guix-profile/lib/alsa-lib/libasound_module_pcm_jack.so"
}
# Routing ALSA to jack:
# <http://jackaudio.org/faq/routing_alsa.html>.
pcm.rawjack {
type jack
playback_ports {
0 system:playback_1
1 system:playback_2
}
capture_ports {
0 system:capture_1
1 system:capture_2
}
}
pcm.!default {
type plug
slave {
pcm "rawjack"
}
}
See https://www.alsa-project.org/main/index.php/Asoundrc for the details.
- Scheme Variable: pulseaudio-service-type
This is the type for the PulseAudio sound server. It exists to allow system overrides of the default settings via
pulseaudio-configuration, see below.Warning: This service overrides per-user configuration files. If you want PulseAudio to honor configuration files in ~/.config/pulse you have to unset the environment variables
PULSE_CONFIGandPULSE_CLIENTCONFIGin your ~/.bash_profile.Warning: This service on its own does not ensure, that the
pulseaudiopackage exists on your machine. It merely adds configuration files for it, as detailed below. In the (admittedly unlikely) case, that you find yourself without apulseaudiopackage, consider enabling it through thealsa-service-typeabove.
- Data Type: pulseaudio-configuration
Data type representing the configuration for
pulseaudio-service.client-conf(default:'())List of settings to set in client.conf. Accepts a list of strings or symbol-value pairs. A string will be inserted as-is with a newline added. A pair will be formatted as “key = value”, again with a newline added.
daemon-conf(default:'((flat-volumes . no)))List of settings to set in daemon.conf, formatted just like client-conf.
script-file(default:(file-append pulseaudio "/etc/pulse/default.pa"))Script file to use as default.pa. In case the
extra-script-filesfield below is used, an.includedirective pointing to /etc/pulse/default.pa.d is appended to the provided script.extra-script-files(default:'())A list of file-like objects defining extra PulseAudio scripts to run at the initialization of the
pulseaudiodaemon, after the mainscript-file. The scripts are deployed to the /etc/pulse/default.pa.d directory; they should have the ‘.pa’ file name extension. For a reference of the available commands, refer toman pulse-cli-syntax.system-script-file(default:(file-append pulseaudio "/etc/pulse/system.pa"))Script file to use as system.pa.
The example below sets the default PulseAudio card profile, the default sink and the default source to use for a old SoundBlaster Audigy sound card:
(pulseaudio-configuration (extra-script-files (list (plain-file "audigy.pa" (string-append "\ set-card-profile alsa_card.pci-0000_01_01.0 \ output:analog-surround-40+input:analog-mono set-default-source alsa_input.pci-0000_01_01.0.analog-mono set-default-sink alsa_output.pci-0000_01_01.0.analog-surround-40\n")))))Note that
pulseaudio-service-typeis part of%desktop-services; if your operating system declaration was derived from one of the desktop templates, you’ll want to adjust the above example to modify the existingpulseaudio-service-typeviamodify-services(seemodify-services), instead of defining a new one.
- Scheme Variable: ladspa-service-type
This service sets the LADSPA_PATH variable, so that programs, which respect it, e.g. PulseAudio, can load LADSPA plugins.
The following example will setup the service to enable modules from the
swh-pluginspackage:(service ladspa-service-type (ladspa-configuration (plugins (list swh-plugins))))See http://plugin.org.uk/ladspa-swh/docs/ladspa-swh.html for the details.
12.9.11 数据库服务
The (gnu services databases) module provides the following services.
PostgreSQL
The following example describes a PostgreSQL service with the default configuration.
(service postgresql-service-type
(postgresql-configuration
(postgresql postgresql-10)))
If the services fails to start, it may be due to an incompatible cluster already present in data-directory. Adjust it (or, if you don’t need the cluster anymore, delete data-directory), then restart the service.
Peer authentication is used by default and the postgres user account
has no shell, which prevents the direct execution of psql commands as
this user. To use psql, you can temporarily log in as
postgres using a shell, create a PostgreSQL superuser with the same
name as one of the system users and then create the associated database.
sudo -u postgres -s /bin/sh createuser --interactive createdb $MY_USER_LOGIN # Replace appropriately.
- Data Type: postgresql-configuration
Data type representing the configuration for the
postgresql-service-type.postgresqlPostgreSQL package to use for the service.
port(default:5432)Port on which PostgreSQL should listen.
locale(default:"en_US.utf8")Locale to use as the default when creating the database cluster.
config-file(default:(postgresql-config-file))The configuration file to use when running PostgreSQL. The default behaviour uses the postgresql-config-file record with the default values for the fields.
log-directory(default:"/var/log/postgresql")The directory where
pg_ctloutput will be written in a file named"pg_ctl.log". This file can be useful to debug PostgreSQL configuration errors for instance.data-directory(default:"/var/lib/postgresql/data")Directory in which to store the data.
extension-packages(default:'()) ¶Additional extensions are loaded from packages listed in extension-packages. Extensions are available at runtime. For instance, to create a geographic database using the
postgisextension, a user can configure the postgresql-service as in this example:(use-package-modules databases geo) (operating-system ... ;; postgresql is required to run `psql' but postgis is not required for ;; proper operation. (packages (cons* postgresql %base-packages)) (services (cons* (service postgresql-service-type (postgresql-configuration (postgresql postgresql-10) (extension-packages (list postgis)))) %base-services)))
Then the extension becomes visible and you can initialise an empty geographic database in this way:
psql -U postgres > create database postgistest; > \connect postgistest; > create extension postgis; > create extension postgis_topology;
There is no need to add this field for contrib extensions such as hstore or dblink as they are already loadable by postgresql. This field is only required to add extensions provided by other packages.
- Data Type: postgresql-config-file
Data type representing the PostgreSQL configuration file. As shown in the following example, this can be used to customize the configuration of PostgreSQL. Note that you can use any G-expression or filename in place of this record, if you already have a configuration file you’d like to use for example.
(service postgresql-service-type (postgresql-configuration (config-file (postgresql-config-file (log-destination "stderr") (hba-file (plain-file "pg_hba.conf" " local all all trust host all all 127.0.0.1/32 md5 host all all ::1/128 md5")) (extra-config '(("session_preload_libraries" "auto_explain") ("random_page_cost" 2) ("auto_explain.log_min_duration" "100 ms") ("work_mem" "500 MB") ("logging_collector" #t) ("log_directory" "/var/log/postgresql")))))))log-destination(default:"syslog")The logging method to use for PostgreSQL. Multiple values are accepted, separated by commas.
hba-file(default:%default-postgres-hba)Filename or G-expression for the host-based authentication configuration.
ident-file(default:%default-postgres-ident)Filename or G-expression for the user name mapping configuration.
socket-directory(default:"/var/run/postgresql")Specifies the directory of the Unix-domain socket(s) on which PostgreSQL is to listen for connections from client applications. If set to
""PostgreSQL does not listen on any Unix-domain sockets, in which case only TCP/IP sockets can be used to connect to the server.By default, the
#falsevalue means the PostgreSQL default value will be used, which is currently ‘/tmp’.extra-config(default:'())List of additional keys and values to include in the PostgreSQL config file. Each entry in the list should be a list where the first element is the key, and the remaining elements are the values.
The values can be numbers, booleans or strings and will be mapped to PostgreSQL parameters types
Boolean,String,Numeric,Numeric with UnitandEnumerateddescribed here.
- Scheme Variable: postgresql-role-service-type
This service allows to create PostgreSQL roles and databases after PostgreSQL service start. Here is an example of its use.
(service postgresql-role-service-type (postgresql-role-configuration (roles (list (postgresql-role (name "test") (create-database? #t))))))This service can be extended with extra roles, as in this example:
(service-extension postgresql-role-service-type (const (postgresql-role (name "alice") (create-database? #t))))
- Data Type: postgresql-role
PostgreSQL manages database access permissions using the concept of roles. A role can be thought of as either a database user, or a group of database users, depending on how the role is set up. Roles can own database objects (for example, tables) and can assign privileges on those objects to other roles to control who has access to which objects.
名字The role name.
permissions(default:'(createdb login))The role permissions list. Supported permissions are
bypassrls,createdb,createrole,login,replicationandsuperuser.create-database?(default:#f)Whether to create a database with the same name as the role.
- Data Type: postgresql-role-configuration
Data type representing the configuration of postgresql-role-service-type.
host(default:"/var/run/postgresql")The PostgreSQL host to connect to.
log(default:"/var/log/postgresql_roles.log")File name of the log file.
roles(default:'())The initial PostgreSQL roles to create.
MariaDB/MySQL
- Scheme Variable: mysql-service-type
This is the service type for a MySQL or MariaDB database server. Its value is a
mysql-configurationobject that specifies which package to use, as well as various settings for themysqlddaemon.
- Data Type: mysql-configuration
Data type representing the configuration of mysql-service-type.
mysql(default: mariadb)Package object of the MySQL database server, can be either mariadb or mysql.
For MySQL, a temporary root password will be displayed at activation time. For MariaDB, the root password is empty.
bind-address(default:"127.0.0.1")The IP on which to listen for network connections. Use
"0.0.0.0"to bind to all available network interfaces.port(default:3306)TCP port on which the database server listens for incoming connections.
socket(default:"/run/mysqld/mysqld.sock")Socket file to use for local (non-network) connections.
extra-content(default:"")Additional settings for the my.cnf configuration file.
extra-environment(default:#~'())List of environment variables passed to the
mysqldprocess.auto-upgrade?(default:#t)Whether to automatically run
mysql_upgradeafter starting the service. This is necessary to upgrade the system schema after “major” updates (such as switching from MariaDB 10.4 to 10.5), but can be disabled if you would rather do that manually.
Memcached
- Scheme Variable: memcached-service-type
This is the service type for the Memcached service, which provides a distributed in memory cache. The value for the service type is a
memcached-configurationobject.
(service memcached-service-type)
- Data Type: memcached-configuration
Data type representing the configuration of memcached.
memcached(default:memcached)The Memcached package to use.
interfaces(default:'("0.0.0.0"))Network interfaces on which to listen.
tcp-port(default:11211)Port on which to accept connections.
udp-port(default:11211)Port on which to accept UDP connections on, a value of 0 will disable listening on a UDP socket.
additional-options(default:'())Additional command line options to pass to
memcached.
Redis
- Scheme Variable: redis-service-type
This is the service type for the Redis key/value store, whose value is a
redis-configurationobject.
- Data Type: redis-configuration
Data type representing the configuration of redis.
redis(default:redis)The Redis package to use.
bind(default:"127.0.0.1")Network interface on which to listen.
port(default:6379)Port on which to accept connections on, a value of 0 will disable listening on a TCP socket.
working-directory(default:"/var/lib/redis")Directory in which to store the database and related files.
12.9.12 邮件服务
The (gnu services mail) module provides Guix service definitions for
email services: IMAP, POP3, and LMTP servers, as well as mail transport
agents (MTAs). Lots of acronyms! These services are detailed in the
subsections below.
Dovecot Service
- Scheme Procedure: dovecot-service [#:config (dovecot-configuration)]
Return a service that runs the Dovecot IMAP/POP3/LMTP mail server.
By default, Dovecot does not need much configuration; the default
configuration object created by (dovecot-configuration) will suffice
if your mail is delivered to ~/Maildir. A self-signed certificate
will be generated for TLS-protected connections, though Dovecot will also
listen on cleartext ports by default. There are a number of options,
though, which mail administrators might need to change, and as is the case
with other services, Guix allows the system administrator to specify these
parameters via a uniform Scheme interface.
For example, to specify that mail is located at maildir~/.mail, one
would instantiate the Dovecot service like this:
(dovecot-service #:config
(dovecot-configuration
(mail-location "maildir:~/.mail")))
The available configuration parameters follow. Each parameter definition is
preceded by its type; for example, ‘string-list foo’ indicates that the
foo parameter should be specified as a list of strings. There is
also a way to specify the configuration as a string, if you have an old
dovecot.conf file that you want to port over from some other system;
see the end for more details.
Available dovecot-configuration fields are:
dovecot-configurationparameter: package dovecot ¶The dovecot package.
dovecot-configurationparameter: comma-separated-string-list listen ¶A list of IPs or hosts where to listen for connections. ‘*’ listens on all IPv4 interfaces, ‘::’ listens on all IPv6 interfaces. If you want to specify non-default ports or anything more complex, customize the address and port fields of the ‘inet-listener’ of the specific services you are interested in.
dovecot-configurationparameter: protocol-configuration-list protocols ¶List of protocols we want to serve. Available protocols include ‘imap’, ‘pop3’, and ‘lmtp’.
Available
protocol-configurationfields are:protocol-configurationparameter: string name ¶The name of the protocol.
protocol-configurationparameter: string auth-socket-path ¶UNIX socket path to the master authentication server to find users. This is used by imap (for shared users) and lda. It defaults to ‘"/var/run/dovecot/auth-userdb"’.
protocol-configurationparameter: boolean imap-metadata? ¶Whether to enable the
IMAP METADATAextension as defined in RFC 5464, which provides a means for clients to set and retrieve per-mailbox, per-user metadata and annotations over IMAP.If this is ‘#t’, you must also specify a dictionary via the
mail-attribute-dictsetting.Defaults to ‘#f’.
protocol-configurationparameter: space-separated-string-list managesieve-notify-capabilities ¶Which NOTIFY capabilities to report to clients that first connect to the ManageSieve service, before authentication. These may differ from the capabilities offered to authenticated users. If this field is left empty, report what the Sieve interpreter supports by default.
Defaults to ‘()’.
protocol-configurationparameter: space-separated-string-list managesieve-sieve-capability ¶Which SIEVE capabilities to report to clients that first connect to the ManageSieve service, before authentication. These may differ from the capabilities offered to authenticated users. If this field is left empty, report what the Sieve interpreter supports by default.
Defaults to ‘()’.
protocol-configurationparameter: space-separated-string-list mail-plugins ¶Space separated list of plugins to load.
protocol-configurationparameter: non-negative-integer mail-max-userip-connections ¶Maximum number of IMAP connections allowed for a user from each IP address. NOTE: The username is compared case-sensitively. Defaults to ‘10’.
dovecot-configurationparameter: service-configuration-list services ¶List of services to enable. Available services include ‘imap’, ‘imap-login’, ‘pop3’, ‘pop3-login’, ‘auth’, and ‘lmtp’.
Available
service-configurationfields are:service-configurationparameter: string kind ¶The service kind. Valid values include
director,imap-login,pop3-login,lmtp,imap,pop3,auth,auth-worker,dict,tcpwrap,quota-warning, or anything else.
service-configurationparameter: listener-configuration-list listeners ¶Listeners for the service. A listener is either a
unix-listener-configuration, afifo-listener-configuration, or aninet-listener-configuration. Defaults to ‘()’.Available
unix-listener-configurationfields are:unix-listener-configurationparameter: string path ¶Path to the file, relative to
base-dirfield. This is also used as the section name.
unix-listener-configurationparameter: string mode ¶The access mode for the socket. Defaults to ‘"0600"’.
unix-listener-configurationparameter: string user ¶The user to own the socket. Defaults to ‘""’.
unix-listener-configurationparameter: string group ¶The group to own the socket. Defaults to ‘""’.
Available
fifo-listener-configurationfields are:fifo-listener-configurationparameter: string path ¶Path to the file, relative to
base-dirfield. This is also used as the section name.
fifo-listener-configurationparameter: string mode ¶The access mode for the socket. Defaults to ‘"0600"’.
fifo-listener-configurationparameter: string user ¶The user to own the socket. Defaults to ‘""’.
fifo-listener-configurationparameter: string group ¶The group to own the socket. Defaults to ‘""’.
Available
inet-listener-configurationfields are:inet-listener-configurationparameter: string protocol ¶The protocol to listen for.
inet-listener-configurationparameter: string address ¶The address on which to listen, or empty for all addresses. Defaults to ‘""’.
inet-listener-configurationparameter: non-negative-integer port ¶The port on which to listen.
inet-listener-configurationparameter: boolean ssl? ¶Whether to use SSL for this service; ‘yes’, ‘no’, or ‘required’. Defaults to ‘#t’.
service-configurationparameter: non-negative-integer client-limit ¶Maximum number of simultaneous client connections per process. Once this number of connections is received, the next incoming connection will prompt Dovecot to spawn another process. If set to 0,
default-client-limitis used instead.Defaults to ‘0’.
service-configurationparameter: non-negative-integer service-count ¶Number of connections to handle before starting a new process. Typically the only useful values are 0 (unlimited) or 1. 1 is more secure, but 0 is faster. <doc/wiki/LoginProcess.txt>. Defaults to ‘1’.
service-configurationparameter: non-negative-integer process-limit ¶Maximum number of processes that can exist for this service. If set to 0,
default-process-limitis used instead.Defaults to ‘0’.
service-configurationparameter: non-negative-integer process-min-avail ¶Number of processes to always keep waiting for more connections. Defaults to ‘0’.
service-configurationparameter: non-negative-integer vsz-limit ¶If you set ‘service-count 0’, you probably need to grow this. Defaults to ‘256000000’.
dovecot-configurationparameter: dict-configuration dict ¶Dict configuration, as created by the
dict-configurationconstructor.Available
dict-configurationfields are:dict-configurationparameter: free-form-fields entries ¶A list of key-value pairs that this dict should hold. Defaults to ‘()’.
dovecot-configurationparameter: passdb-configuration-list passdbs ¶A list of passdb configurations, each one created by the
passdb-configurationconstructor.Available
passdb-configurationfields are:passdb-configurationparameter: string driver ¶The driver that the passdb should use. Valid values include ‘pam’, ‘passwd’, ‘shadow’, ‘bsdauth’, and ‘static’. Defaults to ‘"pam"’.
passdb-configurationparameter: space-separated-string-list args ¶Space separated list of arguments to the passdb driver. Defaults to ‘""’.
dovecot-configurationparameter: userdb-configuration-list userdbs ¶List of userdb configurations, each one created by the
userdb-configurationconstructor.Available
userdb-configurationfields are:userdb-configurationparameter: string driver ¶The driver that the userdb should use. Valid values include ‘passwd’ and ‘static’. Defaults to ‘"passwd"’.
userdb-configurationparameter: space-separated-string-list args ¶Space separated list of arguments to the userdb driver. Defaults to ‘""’.
userdb-configurationparameter: free-form-args override-fields ¶Override fields from passwd. Defaults to ‘()’.
dovecot-configurationparameter: plugin-configuration plugin-configuration ¶Plug-in configuration, created by the
plugin-configurationconstructor.
dovecot-configurationparameter: list-of-namespace-configuration namespaces ¶List of namespaces. Each item in the list is created by the
namespace-configurationconstructor.Available
namespace-configurationfields are:namespace-configurationparameter: string name ¶Name for this namespace.
namespace-configurationparameter: string type ¶Namespace type: ‘private’, ‘shared’ or ‘public’. Defaults to ‘"private"’.
namespace-configurationparameter: string separator ¶Hierarchy separator to use. You should use the same separator for all namespaces or some clients get confused. ‘/’ is usually a good one. The default however depends on the underlying mail storage format. Defaults to ‘""’.
namespace-configurationparameter: string prefix ¶Prefix required to access this namespace. This needs to be different for all namespaces. For example ‘Public/’. Defaults to ‘""’.
namespace-configurationparameter: string location ¶Physical location of the mailbox. This is in the same format as mail_location, which is also the default for it. Defaults to ‘""’.
namespace-configurationparameter: boolean inbox? ¶There can be only one INBOX, and this setting defines which namespace has it. Defaults to ‘#f’.
If namespace is hidden, it’s not advertised to clients via NAMESPACE extension. You’ll most likely also want to set ‘list? #f’. This is mostly useful when converting from another server with different namespaces which you want to deprecate but still keep working. For example you can create hidden namespaces with prefixes ‘~/mail/’, ‘~%u/mail/’ and ‘mail/’. Defaults to ‘#f’.
namespace-configurationparameter: boolean list? ¶Show the mailboxes under this namespace with the LIST command. This makes the namespace visible for clients that do not support the NAMESPACE extension. The special
childrenvalue lists child mailboxes, but hides the namespace prefix. Defaults to ‘#t’.
namespace-configurationparameter: boolean subscriptions? ¶Namespace handles its own subscriptions. If set to
#f, the parent namespace handles them. The empty prefix should always have this as#t). Defaults to ‘#t’.
namespace-configurationparameter: mailbox-configuration-list mailboxes ¶List of predefined mailboxes in this namespace. Defaults to ‘()’.
Available
mailbox-configurationfields are:mailbox-configurationparameter: string name ¶Name for this mailbox.
mailbox-configurationparameter: string auto ¶‘create’ will automatically create this mailbox. ‘subscribe’ will both create and subscribe to the mailbox. Defaults to ‘"no"’.
mailbox-configurationparameter: space-separated-string-list special-use ¶List of IMAP
SPECIAL-USEattributes as specified by RFC 6154. Valid values are\All,\Archive,\Drafts,\Flagged,\Junk,\Sent, and\Trash. Defaults to ‘()’.
dovecot-configurationparameter: file-name base-dir ¶Base directory where to store runtime data. Defaults to ‘"/var/run/dovecot/"’.
dovecot-configurationparameter: string login-greeting ¶Greeting message for clients. Defaults to ‘"Dovecot ready."’.
dovecot-configurationparameter: space-separated-string-list login-trusted-networks ¶List of trusted network ranges. Connections from these IPs are allowed to override their IP addresses and ports (for logging and for authentication checks). ‘disable-plaintext-auth’ is also ignored for these networks. Typically you would specify your IMAP proxy servers here. Defaults to ‘()’.
dovecot-configurationparameter: space-separated-string-list login-access-sockets ¶List of login access check sockets (e.g. tcpwrap). Defaults to ‘()’.
dovecot-configurationparameter: boolean verbose-proctitle? ¶Show more verbose process titles (in ps). Currently shows user name and IP address. Useful for seeing who is actually using the IMAP processes (e.g. shared mailboxes or if the same uid is used for multiple accounts). Defaults to ‘#f’.
dovecot-configurationparameter: boolean shutdown-clients? ¶Should all processes be killed when Dovecot master process shuts down. Setting this to
#fmeans that Dovecot can be upgraded without forcing existing client connections to close (although that could also be a problem if the upgrade is e.g. due to a security fix). Defaults to ‘#t’.
dovecot-configurationparameter: non-negative-integer doveadm-worker-count ¶If non-zero, run mail commands via this many connections to doveadm server, instead of running them directly in the same process. Defaults to ‘0’.
dovecot-configurationparameter: string doveadm-socket-path ¶UNIX socket or host:port used for connecting to doveadm server. Defaults to ‘"doveadm-server"’.
dovecot-configurationparameter: space-separated-string-list import-environment ¶List of environment variables that are preserved on Dovecot startup and passed down to all of its child processes. You can also give key=value pairs to always set specific settings.
dovecot-configurationparameter: boolean disable-plaintext-auth? ¶Disable LOGIN command and all other plaintext authentications unless SSL/TLS is used (LOGINDISABLED capability). Note that if the remote IP matches the local IP (i.e. you’re connecting from the same computer), the connection is considered secure and plaintext authentication is allowed. See also ssl=required setting. Defaults to ‘#t’.
dovecot-configurationparameter: non-negative-integer auth-cache-size ¶Authentication cache size (e.g. ‘#e10e6’). 0 means it’s disabled. Note that bsdauth, PAM and vpopmail require ‘cache-key’ to be set for caching to be used. Defaults to ‘0’.
dovecot-configurationparameter: string auth-cache-ttl ¶Time to live for cached data. After TTL expires the cached record is no longer used, *except* if the main database lookup returns internal failure. We also try to handle password changes automatically: If user’s previous authentication was successful, but this one wasn’t, the cache isn’t used. For now this works only with plaintext authentication. Defaults to ‘"1 hour"’.
dovecot-configurationparameter: string auth-cache-negative-ttl ¶TTL for negative hits (user not found, password mismatch). 0 disables caching them completely. Defaults to ‘"1 hour"’.
dovecot-configurationparameter: space-separated-string-list auth-realms ¶List of realms for SASL authentication mechanisms that need them. You can leave it empty if you don’t want to support multiple realms. Many clients simply use the first one listed here, so keep the default realm first. Defaults to ‘()’.
dovecot-configurationparameter: string auth-default-realm ¶Default realm/domain to use if none was specified. This is used for both SASL realms and appending @domain to username in plaintext logins. Defaults to ‘""’.
dovecot-configurationparameter: string auth-username-chars ¶List of allowed characters in username. If the user-given username contains a character not listed in here, the login automatically fails. This is just an extra check to make sure user can’t exploit any potential quote escaping vulnerabilities with SQL/LDAP databases. If you want to allow all characters, set this value to empty. Defaults to ‘"abcdefghijklmnopqrstuvwxyzABCDEFGHIJKLMNOPQRSTUVWXYZ01234567890.-_@"’.
dovecot-configurationparameter: string auth-username-translation ¶Username character translations before it’s looked up from databases. The value contains series of from -> to characters. For example ‘#@/@’ means that ‘#’ and ‘/’ characters are translated to ‘@’. Defaults to ‘""’.
dovecot-configurationparameter: string auth-username-format ¶Username formatting before it’s looked up from databases. You can use the standard variables here, e.g. %Lu would lowercase the username, %n would drop away the domain if it was given, or ‘%n-AT-%d’ would change the ‘@’ into ‘-AT-’. This translation is done after ‘auth-username-translation’ changes. Defaults to ‘"%Lu"’.
dovecot-configurationparameter: string auth-master-user-separator ¶If you want to allow master users to log in by specifying the master username within the normal username string (i.e. not using SASL mechanism’s support for it), you can specify the separator character here. The format is then <username><separator><master username>. UW-IMAP uses ‘*’ as the separator, so that could be a good choice. Defaults to ‘""’.
dovecot-configurationparameter: string auth-anonymous-username ¶Username to use for users logging in with ANONYMOUS SASL mechanism. Defaults to ‘"anonymous"’.
dovecot-configurationparameter: non-negative-integer auth-worker-max-count ¶Maximum number of dovecot-auth worker processes. They’re used to execute blocking passdb and userdb queries (e.g. MySQL and PAM). They’re automatically created and destroyed as needed. Defaults to ‘30’.
dovecot-configurationparameter: string auth-gssapi-hostname ¶Host name to use in GSSAPI principal names. The default is to use the name returned by gethostname(). Use ‘$ALL’ (with quotes) to allow all keytab entries. Defaults to ‘""’.
dovecot-configurationparameter: string auth-krb5-keytab ¶Kerberos keytab to use for the GSSAPI mechanism. Will use the system default (usually /etc/krb5.keytab) if not specified. You may need to change the auth service to run as root to be able to read this file. Defaults to ‘""’.
dovecot-configurationparameter: boolean auth-use-winbind? ¶Do NTLM and GSS-SPNEGO authentication using Samba’s winbind daemon and ‘ntlm-auth’ helper. <doc/wiki/Authentication/Mechanisms/Winbind.txt>. Defaults to ‘#f’.
dovecot-configurationparameter: file-name auth-winbind-helper-path ¶Path for Samba’s ‘ntlm-auth’ helper binary. Defaults to ‘"/usr/bin/ntlm_auth"’.
dovecot-configurationparameter: string auth-failure-delay ¶Time to delay before replying to failed authentications. Defaults to ‘"2 secs"’.
dovecot-configurationparameter: boolean auth-ssl-require-client-cert? ¶Require a valid SSL client certificate or the authentication fails. Defaults to ‘#f’.
dovecot-configurationparameter: boolean auth-ssl-username-from-cert? ¶Take the username from client’s SSL certificate, using
X509_NAME_get_text_by_NID()which returns the subject’s DN’s CommonName. Defaults to ‘#f’.
dovecot-configurationparameter: space-separated-string-list auth-mechanisms ¶List of wanted authentication mechanisms. Supported mechanisms are: ‘plain’, ‘login’, ‘digest-md5’, ‘cram-md5’, ‘ntlm’, ‘rpa’, ‘apop’, ‘anonymous’, ‘gssapi’, ‘otp’, ‘skey’, and ‘gss-spnego’. NOTE: See also ‘disable-plaintext-auth’ setting.
dovecot-configurationparameter: space-separated-string-list director-servers ¶List of IPs or hostnames to all director servers, including ourself. Ports can be specified as ip:port. The default port is the same as what director service’s ‘inet-listener’ is using. Defaults to ‘()’.
dovecot-configurationparameter: space-separated-string-list director-mail-servers ¶List of IPs or hostnames to all backend mail servers. Ranges are allowed too, like 10.0.0.10-10.0.0.30. Defaults to ‘()’.
dovecot-configurationparameter: string director-user-expire ¶How long to redirect users to a specific server after it no longer has any connections. Defaults to ‘"15 min"’.
dovecot-configurationparameter: string director-username-hash ¶How the username is translated before being hashed. Useful values include %Ln if user can log in with or without @domain, %Ld if mailboxes are shared within domain. Defaults to ‘"%Lu"’.
dovecot-configurationparameter: string log-path ¶Log file to use for error messages. ‘syslog’ logs to syslog, ‘/dev/stderr’ logs to stderr. Defaults to ‘"syslog"’.
dovecot-configurationparameter: string info-log-path ¶Log file to use for informational messages. Defaults to ‘log-path’. Defaults to ‘""’.
dovecot-configurationparameter: string debug-log-path ¶Log file to use for debug messages. Defaults to ‘info-log-path’. Defaults to ‘""’.
dovecot-configurationparameter: string syslog-facility ¶Syslog facility to use if you’re logging to syslog. Usually if you don’t want to use ‘mail’, you’ll use local0..local7. Also other standard facilities are supported. Defaults to ‘"mail"’.
dovecot-configurationparameter: boolean auth-verbose? ¶Log unsuccessful authentication attempts and the reasons why they failed. Defaults to ‘#f’.
dovecot-configurationparameter: string auth-verbose-passwords ¶In case of password mismatches, log the attempted password. Valid values are no, plain and sha1. sha1 can be useful for detecting brute force password attempts vs. user simply trying the same password over and over again. You can also truncate the value to n chars by appending ":n" (e.g. sha1:6). Defaults to ‘"no"’.
dovecot-configurationparameter: boolean auth-debug? ¶Even more verbose logging for debugging purposes. Shows for example SQL queries. Defaults to ‘#f’.
dovecot-configurationparameter: boolean auth-debug-passwords? ¶In case of password mismatches, log the passwords and used scheme so the problem can be debugged. Enabling this also enables ‘auth-debug’. Defaults to ‘#f’.
dovecot-configurationparameter: boolean mail-debug? ¶Enable mail process debugging. This can help you figure out why Dovecot isn’t finding your mails. Defaults to ‘#f’.
dovecot-configurationparameter: boolean verbose-ssl? ¶Show protocol level SSL errors. Defaults to ‘#f’.
dovecot-configurationparameter: string log-timestamp ¶Prefix for each line written to log file. % codes are in strftime(3) format. Defaults to ‘"\"%b %d %H:%M:%S \""’.
dovecot-configurationparameter: space-separated-string-list login-log-format-elements ¶List of elements we want to log. The elements which have a non-empty variable value are joined together to form a comma-separated string.
dovecot-configurationparameter: string login-log-format ¶Login log format. %s contains ‘login-log-format-elements’ string, %$ contains the data we want to log. Defaults to ‘"%$: %s"’.
dovecot-configurationparameter: string mail-log-prefix ¶Log prefix for mail processes. See doc/wiki/Variables.txt for list of possible variables you can use. Defaults to ‘"\"%s(%u)<%{pid}><%{session}>: \""’.
dovecot-configurationparameter: string deliver-log-format ¶Format to use for logging mail deliveries. You can use variables:
%$Delivery status message (e.g. ‘saved to INBOX’)
%mMessage-ID
%sSubject
%fFrom address
%pPhysical size
%wVirtual size.
Defaults to ‘"msgid=%m: %$"’.
dovecot-configurationparameter: string mail-location ¶Location for users’ mailboxes. The default is empty, which means that Dovecot tries to find the mailboxes automatically. This won’t work if the user doesn’t yet have any mail, so you should explicitly tell Dovecot the full location.
If you’re using mbox, giving a path to the INBOX file (e.g. /var/mail/%u) isn’t enough. You’ll also need to tell Dovecot where the other mailboxes are kept. This is called the root mail directory, and it must be the first path given in the ‘mail-location’ setting.
There are a few special variables you can use, e.g.:
- ‘%u’
username
- ‘%n’
user part in user@domain, same as %u if there’s no domain
- ‘%d’
domain part in user@domain, empty if there’s no domain
- ‘%h’
home director
See doc/wiki/Variables.txt for full list. Some examples:
- ‘maildir:~/Maildir’
- ‘mbox:~/mail:INBOX=/var/mail/%u’
- ‘mbox:/var/mail/%d/%1n/%n:INDEX=/var/indexes/%d/%1n/%’
Defaults to ‘""’.
dovecot-configurationparameter: string mail-uid ¶System user and group used to access mails. If you use multiple, userdb can override these by returning uid or gid fields. You can use either numbers or names. <doc/wiki/UserIds.txt>. Defaults to ‘""’.
dovecot-configurationparameter: string mail-gid ¶-
Defaults to ‘""’.
dovecot-configurationparameter: string mail-privileged-group ¶Group to enable temporarily for privileged operations. Currently this is used only with INBOX when either its initial creation or dotlocking fails. Typically this is set to ‘"mail"’ to give access to /var/mail. Defaults to ‘""’.
dovecot-configurationparameter: string mail-access-groups ¶Grant access to these supplementary groups for mail processes. Typically these are used to set up access to shared mailboxes. Note that it may be dangerous to set these if users can create symlinks (e.g. if ‘mail’ group is set here,
ln -s /var/mail ~/mail/varcould allow a user to delete others’ mailboxes, orln -s /secret/shared/box ~/mail/myboxwould allow reading it). Defaults to ‘""’.
dovecot-configurationparameter: string mail-attribute-dict ¶The location of a dictionary used to store
IMAP METADATAas defined by RFC 5464.The IMAP METADATA commands are available only if the “imap” protocol configuration’s
imap-metadata?field is ‘#t’.Defaults to ‘""’.
dovecot-configurationparameter: boolean mail-full-filesystem-access? ¶Allow full file system access to clients. There’s no access checks other than what the operating system does for the active UID/GID. It works with both maildir and mboxes, allowing you to prefix mailboxes names with e.g. /path/ or ~user/. Defaults to ‘#f’.
dovecot-configurationparameter: boolean mmap-disable? ¶Don’t use
mmap()at all. This is required if you store indexes to shared file systems (NFS or clustered file system). Defaults to ‘#f’.
dovecot-configurationparameter: boolean dotlock-use-excl? ¶Rely on ‘O_EXCL’ to work when creating dotlock files. NFS supports ‘O_EXCL’ since version 3, so this should be safe to use nowadays by default. Defaults to ‘#t’.
dovecot-configurationparameter: string mail-fsync ¶When to use fsync() or fdatasync() calls:
optimizedWhenever necessary to avoid losing important data
alwaysUseful with e.g. NFS when
write()s are delayedneverNever use it (best performance, but crashes can lose data).
Defaults to ‘"optimized"’.
dovecot-configurationparameter: boolean mail-nfs-storage? ¶Mail storage exists in NFS. Set this to yes to make Dovecot flush NFS caches whenever needed. If you’re using only a single mail server this isn’t needed. Defaults to ‘#f’.
dovecot-configurationparameter: boolean mail-nfs-index? ¶Mail index files also exist in NFS. Setting this to yes requires ‘mmap-disable? #t’ and ‘fsync-disable? #f’. Defaults to ‘#f’.
dovecot-configurationparameter: string lock-method ¶Locking method for index files. Alternatives are fcntl, flock and dotlock. Dotlocking uses some tricks which may create more disk I/O than other locking methods. NFS users: flock doesn’t work, remember to change ‘mmap-disable’. Defaults to ‘"fcntl"’.
dovecot-configurationparameter: file-name mail-temp-dir ¶Directory in which LDA/LMTP temporarily stores incoming mails >128 kB. Defaults to ‘"/tmp"’.
dovecot-configurationparameter: non-negative-integer first-valid-uid ¶Valid UID range for users. This is mostly to make sure that users can’t log in as daemons or other system users. Note that denying root logins is hardcoded to dovecot binary and can’t be done even if ‘first-valid-uid’ is set to 0. Defaults to ‘500’.
dovecot-configurationparameter: non-negative-integer last-valid-uid ¶-
Defaults to ‘0’.
dovecot-configurationparameter: non-negative-integer first-valid-gid ¶Valid GID range for users. Users having non-valid GID as primary group ID aren’t allowed to log in. If user belongs to supplementary groups with non-valid GIDs, those groups are not set. Defaults to ‘1’.
dovecot-configurationparameter: non-negative-integer last-valid-gid ¶-
Defaults to ‘0’.
dovecot-configurationparameter: non-negative-integer mail-max-keyword-length ¶Maximum allowed length for mail keyword name. It’s only forced when trying to create new keywords. Defaults to ‘50’.
dovecot-configurationparameter: colon-separated-file-name-list valid-chroot-dirs ¶List of directories under which chrooting is allowed for mail processes (i.e. /var/mail will allow chrooting to /var/mail/foo/bar too). This setting doesn’t affect ‘login-chroot’ ‘mail-chroot’ or auth chroot settings. If this setting is empty, ‘/./’ in home dirs are ignored. WARNING: Never add directories here which local users can modify, that may lead to root exploit. Usually this should be done only if you don’t allow shell access for users. <doc/wiki/Chrooting.txt>. Defaults to ‘()’.
dovecot-configurationparameter: string mail-chroot ¶Default chroot directory for mail processes. This can be overridden for specific users in user database by giving ‘/./’ in user’s home directory (e.g. ‘/home/./user’ chroots into /home). Note that usually there is no real need to do chrooting, Dovecot doesn’t allow users to access files outside their mail directory anyway. If your home directories are prefixed with the chroot directory, append ‘/.’ to ‘mail-chroot’. <doc/wiki/Chrooting.txt>. Defaults to ‘""’.
dovecot-configurationparameter: file-name auth-socket-path ¶UNIX socket path to master authentication server to find users. This is used by imap (for shared users) and lda. Defaults to ‘"/var/run/dovecot/auth-userdb"’.
dovecot-configurationparameter: file-name mail-plugin-dir ¶Directory where to look up mail plugins. Defaults to ‘"/usr/lib/dovecot"’.
dovecot-configurationparameter: space-separated-string-list mail-plugins ¶List of plugins to load for all services. Plugins specific to IMAP, LDA, etc. are added to this list in their own .conf files. Defaults to ‘()’.
dovecot-configurationparameter: non-negative-integer mail-cache-min-mail-count ¶The minimum number of mails in a mailbox before updates are done to cache file. This allows optimizing Dovecot’s behavior to do less disk writes at the cost of more disk reads. Defaults to ‘0’.
dovecot-configurationparameter: string mailbox-idle-check-interval ¶When IDLE command is running, mailbox is checked once in a while to see if there are any new mails or other changes. This setting defines the minimum time to wait between those checks. Dovecot can also use dnotify, inotify and kqueue to find out immediately when changes occur. Defaults to ‘"30 secs"’.
dovecot-configurationparameter: boolean mail-save-crlf? ¶Save mails with CR+LF instead of plain LF. This makes sending those mails take less CPU, especially with sendfile() syscall with Linux and FreeBSD. But it also creates a bit more disk I/O which may just make it slower. Also note that if other software reads the mboxes/maildirs, they may handle the extra CRs wrong and cause problems. Defaults to ‘#f’.
dovecot-configurationparameter: boolean maildir-stat-dirs? ¶By default LIST command returns all entries in maildir beginning with a dot. Enabling this option makes Dovecot return only entries which are directories. This is done by stat()ing each entry, so it causes more disk I/O. (For systems setting struct ‘dirent->d_type’ this check is free and it’s done always regardless of this setting). Defaults to ‘#f’.
dovecot-configurationparameter: boolean maildir-copy-with-hardlinks? ¶When copying a message, do it with hard links whenever possible. This makes the performance much better, and it’s unlikely to have any side effects. Defaults to ‘#t’.
dovecot-configurationparameter: boolean maildir-very-dirty-syncs? ¶Assume Dovecot is the only MUA accessing Maildir: Scan cur/ directory only when its mtime changes unexpectedly or when we can’t find the mail otherwise. Defaults to ‘#f’.
dovecot-configurationparameter: space-separated-string-list mbox-read-locks ¶Which locking methods to use for locking mbox. There are four available:
dotlockCreate <mailbox>.lock file. This is the oldest and most NFS-safe solution. If you want to use /var/mail/ like directory, the users will need write access to that directory.
dotlock-trySame as dotlock, but if it fails because of permissions or because there isn’t enough disk space, just skip it.
fcntlUse this if possible. Works with NFS too if lockd is used.
flockMay not exist in all systems. Doesn’t work with NFS.
lockfMay not exist in all systems. Doesn’t work with NFS.
You can use multiple locking methods; if you do the order they’re declared in is important to avoid deadlocks if other MTAs/MUAs are using multiple locking methods as well. Some operating systems don’t allow using some of them simultaneously.
dovecot-configurationparameter: space-separated-string-list mbox-write-locks 
dovecot-configurationparameter: string mbox-lock-timeout ¶Maximum time to wait for lock (all of them) before aborting. Defaults to ‘"5 mins"’.
dovecot-configurationparameter: string mbox-dotlock-change-timeout ¶If dotlock exists but the mailbox isn’t modified in any way, override the lock file after this much time. Defaults to ‘"2 mins"’.
dovecot-configurationparameter: boolean mbox-dirty-syncs? ¶When mbox changes unexpectedly we have to fully read it to find out what changed. If the mbox is large this can take a long time. Since the change is usually just a newly appended mail, it’d be faster to simply read the new mails. If this setting is enabled, Dovecot does this but still safely fallbacks to re-reading the whole mbox file whenever something in mbox isn’t how it’s expected to be. The only real downside to this setting is that if some other MUA changes message flags, Dovecot doesn’t notice it immediately. Note that a full sync is done with SELECT, EXAMINE, EXPUNGE and CHECK commands. Defaults to ‘#t’.
dovecot-configurationparameter: boolean mbox-very-dirty-syncs? ¶Like ‘mbox-dirty-syncs’, but don’t do full syncs even with SELECT, EXAMINE, EXPUNGE or CHECK commands. If this is set, ‘mbox-dirty-syncs’ is ignored. Defaults to ‘#f’.
dovecot-configurationparameter: boolean mbox-lazy-writes? ¶Delay writing mbox headers until doing a full write sync (EXPUNGE and CHECK commands and when closing the mailbox). This is especially useful for POP3 where clients often delete all mails. The downside is that our changes aren’t immediately visible to other MUAs. Defaults to ‘#t’.
dovecot-configurationparameter: non-negative-integer mbox-min-index-size ¶If mbox size is smaller than this (e.g. 100k), don’t write index files. If an index file already exists it’s still read, just not updated. Defaults to ‘0’.
dovecot-configurationparameter: non-negative-integer mdbox-rotate-size ¶Maximum dbox file size until it’s rotated. Defaults to ‘10000000’.
dovecot-configurationparameter: string mdbox-rotate-interval ¶Maximum dbox file age until it’s rotated. Typically in days. Day begins from midnight, so 1d = today, 2d = yesterday, etc. 0 = check disabled. Defaults to ‘"1d"’.
dovecot-configurationparameter: boolean mdbox-preallocate-space? ¶When creating new mdbox files, immediately preallocate their size to ‘mdbox-rotate-size’. This setting currently works only in Linux with some file systems (ext4, xfs). Defaults to ‘#f’.
dovecot-configurationparameter: string mail-attachment-dir ¶sdbox and mdbox support saving mail attachments to external files, which also allows single instance storage for them. Other backends don’t support this for now.
WARNING: This feature hasn’t been tested much yet. Use at your own risk.
Directory root where to store mail attachments. Disabled, if empty. Defaults to ‘""’.
dovecot-configurationparameter: non-negative-integer mail-attachment-min-size ¶Attachments smaller than this aren’t saved externally. It’s also possible to write a plugin to disable saving specific attachments externally. Defaults to ‘128000’.
dovecot-configurationparameter: string mail-attachment-fs ¶File system backend to use for saving attachments:
posixNo SiS done by Dovecot (but this might help FS’s own deduplication)
sis posixSiS with immediate byte-by-byte comparison during saving
sis-queue posixSiS with delayed comparison and deduplication.
Defaults to ‘"sis posix"’.
dovecot-configurationparameter: string mail-attachment-hash ¶Hash format to use in attachment filenames. You can add any text and variables:
%{md4},%{md5},%{sha1},%{sha256},%{sha512},%{size}. Variables can be truncated, e.g.%{sha256:80}returns only first 80 bits. Defaults to ‘"%{sha1}"’.
dovecot-configurationparameter: non-negative-integer default-process-limit ¶-
Defaults to ‘100’.
dovecot-configurationparameter: non-negative-integer default-client-limit ¶-
Defaults to ‘1000’.
dovecot-configurationparameter: non-negative-integer default-vsz-limit ¶Default VSZ (virtual memory size) limit for service processes. This is mainly intended to catch and kill processes that leak memory before they eat up everything. Defaults to ‘256000000’.
dovecot-configurationparameter: string default-login-user ¶Login user is internally used by login processes. This is the most untrusted user in Dovecot system. It shouldn’t have access to anything at all. Defaults to ‘"dovenull"’.
dovecot-configurationparameter: string default-internal-user ¶Internal user is used by unprivileged processes. It should be separate from login user, so that login processes can’t disturb other processes. Defaults to ‘"dovecot"’.
dovecot-configurationparameter: string ssl? ¶SSL/TLS support: yes, no, required. <doc/wiki/SSL.txt>. Defaults to ‘"required"’.
dovecot-configurationparameter: string ssl-cert ¶PEM encoded X.509 SSL/TLS certificate (public key). Defaults to ‘"</etc/dovecot/default.pem"’.
dovecot-configurationparameter: string ssl-key ¶PEM encoded SSL/TLS private key. The key is opened before dropping root privileges, so keep the key file unreadable by anyone but root. Defaults to ‘"</etc/dovecot/private/default.pem"’.
dovecot-configurationparameter: string ssl-key-password ¶If key file is password protected, give the password here. Alternatively give it when starting dovecot with -p parameter. Since this file is often world-readable, you may want to place this setting instead to a different. Defaults to ‘""’.
dovecot-configurationparameter: string ssl-ca ¶PEM encoded trusted certificate authority. Set this only if you intend to use ‘ssl-verify-client-cert? #t’. The file should contain the CA certificate(s) followed by the matching CRL(s). (e.g. ‘ssl-ca </etc/ssl/certs/ca.pem’). Defaults to ‘""’.
dovecot-configurationparameter: boolean ssl-require-crl? ¶Require that CRL check succeeds for client certificates. Defaults to ‘#t’.
dovecot-configurationparameter: boolean ssl-verify-client-cert? ¶Request client to send a certificate. If you also want to require it, set ‘auth-ssl-require-client-cert? #t’ in auth section. Defaults to ‘#f’.
dovecot-configurationparameter: string ssl-cert-username-field ¶Which field from certificate to use for username. commonName and x500UniqueIdentifier are the usual choices. You’ll also need to set ‘auth-ssl-username-from-cert? #t’. Defaults to ‘"commonName"’.
dovecot-configurationparameter: string ssl-min-protocol ¶Minimum SSL protocol version to accept. Defaults to ‘"TLSv1"’.
dovecot-configurationparameter: string ssl-cipher-list ¶SSL ciphers to use. Defaults to ‘"ALL:!kRSA:!SRP:!kDHd:!DSS:!aNULL:!eNULL:!EXPORT:!DES:!3DES:!MD5:!PSK:!RC4:!ADH:!LOW@STRENGTH"’.
dovecot-configurationparameter: string ssl-crypto-device ¶SSL crypto device to use, for valid values run "openssl engine". Defaults to ‘""’.
dovecot-configurationparameter: string postmaster-address ¶Address to use when sending rejection mails. %d expands to recipient domain. Defaults to ‘"postmaster@%d"’.
dovecot-configurationparameter: string hostname ¶Hostname to use in various parts of sent mails (e.g. in Message-Id) and in LMTP replies. Default is the system’s real hostname@domain. Defaults to ‘""’.
dovecot-configurationparameter: boolean quota-full-tempfail? ¶If user is over quota, return with temporary failure instead of bouncing the mail. Defaults to ‘#f’.
dovecot-configurationparameter: file-name sendmail-path ¶Binary to use for sending mails. Defaults to ‘"/usr/sbin/sendmail"’.
dovecot-configurationparameter: string submission-host ¶If non-empty, send mails via this SMTP host[:port] instead of sendmail. Defaults to ‘""’.
dovecot-configurationparameter: string rejection-subject ¶Subject: header to use for rejection mails. You can use the same variables as for ‘rejection-reason’ below. Defaults to ‘"Rejected: %s"’.
dovecot-configurationparameter: string rejection-reason ¶Human readable error message for rejection mails. You can use variables:
%nCRLF
%rreason
%soriginal subject
%trecipient
Defaults to ‘"Your message to <%t> was automatically rejected:%n%r"’.
dovecot-configurationparameter: string recipient-delimiter ¶Delimiter character between local-part and detail in email address. Defaults to ‘"+"’.
dovecot-configurationparameter: string lda-original-recipient-header ¶Header where the original recipient address (SMTP’s RCPT TO: address) is taken from if not available elsewhere. With dovecot-lda -a parameter overrides this. A commonly used header for this is X-Original-To. Defaults to ‘""’.
dovecot-configurationparameter: boolean lda-mailbox-autocreate? ¶Should saving a mail to a nonexistent mailbox automatically create it?. Defaults to ‘#f’.
dovecot-configurationparameter: boolean lda-mailbox-autosubscribe? ¶Should automatically created mailboxes be also automatically subscribed?. Defaults to ‘#f’.
dovecot-configurationparameter: non-negative-integer imap-max-line-length ¶Maximum IMAP command line length. Some clients generate very long command lines with huge mailboxes, so you may need to raise this if you get "Too long argument" or "IMAP command line too large" errors often. Defaults to ‘64000’.
dovecot-configurationparameter: string imap-logout-format ¶IMAP logout format string:
%itotal number of bytes read from client
%ototal number of bytes sent to client.
See doc/wiki/Variables.txt for a list of all the variables you can use. Defaults to ‘"in=%i out=%o deleted=%{deleted} expunged=%{expunged} trashed=%{trashed} hdr_count=%{fetch_hdr_count} hdr_bytes=%{fetch_hdr_bytes} body_count=%{fetch_body_count} body_bytes=%{fetch_body_bytes}"’.
dovecot-configurationparameter: string imap-capability ¶Override the IMAP CAPABILITY response. If the value begins with ’+’, add the given capabilities on top of the defaults (e.g. +XFOO XBAR). Defaults to ‘""’.
dovecot-configurationparameter: string imap-idle-notify-interval ¶How long to wait between "OK Still here" notifications when client is IDLEing. Defaults to ‘"2 mins"’.
dovecot-configurationparameter: string imap-id-send ¶ID field names and values to send to clients. Using * as the value makes Dovecot use the default value. The following fields have default values currently: name, version, os, os-version, support-url, support-email. Defaults to ‘""’.
dovecot-configurationparameter: string imap-id-log ¶ID fields sent by client to log. * means everything. Defaults to ‘""’.
dovecot-configurationparameter: space-separated-string-list imap-client-workarounds ¶Workarounds for various client bugs:
delay-newmailSend EXISTS/RECENT new mail notifications only when replying to NOOP and CHECK commands. Some clients ignore them otherwise, for example OSX Mail (<v2.1). Outlook Express breaks more badly though, without this it may show user "Message no longer in server" errors. Note that OE6 still breaks even with this workaround if synchronization is set to "Headers Only".
tb-extra-mailbox-sepThunderbird gets somehow confused with LAYOUT=fs (mbox and dbox) and adds extra ‘/’ suffixes to mailbox names. This option causes Dovecot to ignore the extra ‘/’ instead of treating it as invalid mailbox name.
tb-lsub-flagsShow \Noselect flags for LSUB replies with LAYOUT=fs (e.g. mbox). This makes Thunderbird realize they aren’t selectable and show them greyed out, instead of only later giving "not selectable" popup error.
Defaults to ‘()’.
dovecot-configurationparameter: string imap-urlauth-host ¶Host allowed in URLAUTH URLs sent by client. "*" allows all. Defaults to ‘""’.
Whew! Lots of configuration options. The nice thing about it though is that Guix has a complete interface to Dovecot’s configuration language. This allows not only a nice way to declare configurations, but also offers reflective capabilities as well: users can write code to inspect and transform configurations from within Scheme.
However, it could be that you just want to get a dovecot.conf up and
running. In that case, you can pass an opaque-dovecot-configuration
as the #:config parameter to dovecot-service. As its name
indicates, an opaque configuration does not have easy reflective
capabilities.
Available opaque-dovecot-configuration fields are:
opaque-dovecot-configurationparameter: package dovecot ¶The dovecot package.
opaque-dovecot-configurationparameter: string string ¶The contents of the
dovecot.conf, as a string.
For example, if your dovecot.conf is just the empty string, you could
instantiate a dovecot service like this:
(dovecot-service #:config
(opaque-dovecot-configuration
(string "")))
OpenSMTPD Service
- Scheme Variable: opensmtpd-service-type
This is the type of the OpenSMTPD service, whose value should be an
opensmtpd-configurationobject as in this example:(service opensmtpd-service-type (opensmtpd-configuration (config-file (local-file "./my-smtpd.conf"))))
- Data Type: opensmtpd-configuration
Data type representing the configuration of opensmtpd.
package(default: opensmtpd)Package object of the OpenSMTPD SMTP server.
config-file(default:%default-opensmtpd-config-file)File-like object of the OpenSMTPD configuration file to use. By default it listens on the loopback network interface, and allows for mail from users and daemons on the local machine, as well as permitting email to remote servers. Run
man smtpd.conffor more information.setgid-commands?(default:#t)Make the following commands setgid to
smtpqso they can be executed:smtpctl,sendmail,send-mail,makemap,mailq, andnewaliases. See setuid程序, for more information on setgid programs.
Exim Service
- Scheme Variable: exim-service-type
This is the type of the Exim mail transfer agent (MTA), whose value should be an
exim-configurationobject as in this example:(service exim-service-type (exim-configuration (config-file (local-file "./my-exim.conf"))))
In order to use an exim-service-type service you must also have a
mail-aliases-service-type service present in your
operating-system (even if it has no aliases).
- Data Type: exim-configuration
Data type representing the configuration of exim.
package(default: exim)Package object of the Exim server.
config-file(default:#f)File-like object of the Exim configuration file to use. If its value is
#fthen use the default configuration file from the package provided inpackage. The resulting configuration file is loaded after setting theexim_userandexim_groupconfiguration variables.
Getmail service
- Scheme Variable: getmail-service-type
This is the type of the Getmail mail retriever, whose value should be an
getmail-configuration.
Available getmail-configuration fields are:
getmail-configurationparameter: symbol name ¶A symbol to identify the getmail service.
Defaults to ‘"unset"’.
getmail-configurationparameter: package package ¶The getmail package to use.
getmail-configurationparameter: string user ¶The user to run getmail as.
Defaults to ‘"getmail"’.
getmail-configurationparameter: string group ¶The group to run getmail as.
Defaults to ‘"getmail"’.
getmail-configurationparameter: string directory ¶The getmail directory to use.
Defaults to ‘"/var/lib/getmail/default"’.
getmail-configurationparameter: getmail-configuration-file rcfile ¶The getmail configuration file to use.
Available
getmail-configuration-filefields are:getmail-configuration-fileparameter: getmail-retriever-configuration retriever ¶What mail account to retrieve mail from, and how to access that account.
Available
getmail-retriever-configurationfields are:getmail-retriever-configurationparameter: string type ¶The type of mail retriever to use. Valid values include ‘passwd’ and ‘static’.
Defaults to ‘"SimpleIMAPSSLRetriever"’.
getmail-retriever-configurationparameter: string server ¶Username to login to the mail server with.
Defaults to ‘unset’.
getmail-retriever-configurationparameter: string username ¶Username to login to the mail server with.
Defaults to ‘unset’.
getmail-retriever-configurationparameter: non-negative-integer port ¶Port number to connect to.
Defaults to ‘#f’.
getmail-retriever-configurationparameter: string password ¶Override fields from passwd.
Defaults to ‘""’.
getmail-retriever-configurationparameter: list password-command ¶Override fields from passwd.
Defaults to ‘()’.
getmail-retriever-configurationparameter: string keyfile ¶PEM-formatted key file to use for the TLS negotiation.
Defaults to ‘""’.
getmail-retriever-configurationparameter: string certfile ¶PEM-formatted certificate file to use for the TLS negotiation.
Defaults to ‘""’.
getmail-retriever-configurationparameter: string ca-certs ¶CA certificates to use.
Defaults to ‘""’.
getmail-retriever-configurationparameter: parameter-alist extra-parameters ¶Extra retriever parameters.
Defaults to ‘()’.
getmail-configuration-fileparameter: getmail-destination-configuration destination ¶What to do with retrieved messages.
Available
getmail-destination-configurationfields are:getmail-destination-configurationparameter: string type ¶The type of mail destination. Valid values include ‘Maildir’, ‘Mboxrd’ and ‘MDA_external’.
Defaults to ‘unset’.
getmail-destination-configurationparameter: string-or-filelike path ¶The path option for the mail destination. The behaviour depends on the chosen type.
Defaults to ‘""’.
getmail-destination-configurationparameter: parameter-alist extra-parameters ¶Extra destination parameters
Defaults to ‘()’.
getmail-configuration-fileparameter: getmail-options-configuration options ¶Configure getmail.
Available
getmail-options-configurationfields are:getmail-options-configurationparameter: non-negative-integer verbose ¶If set to ‘0’, getmail will only print warnings and errors. A value of ‘1’ means that messages will be printed about retrieving and deleting messages. If set to ‘2’, getmail will print messages about each of its actions.
Defaults to ‘1’.
getmail-options-configurationparameter: boolean read-all ¶If true, getmail will retrieve all available messages. Otherwise it will only retrieve messages it hasn’t seen previously.
Defaults to ‘#t’.
getmail-options-configurationparameter: boolean delete ¶If set to true, messages will be deleted from the server after retrieving and successfully delivering them. Otherwise, messages will be left on the server.
Defaults to ‘#f’.
getmail-options-configurationparameter: non-negative-integer delete-after ¶Getmail will delete messages this number of days after seeing them, if they have been delivered. This means messages will be left on the server this number of days after delivering them. A value of ‘0’ disabled this feature.
Defaults to ‘0’.
getmail-options-configurationparameter: non-negative-integer delete-bigger-than ¶Delete messages larger than this of bytes after retrieving them, even if the delete and delete-after options are disabled. A value of ‘0’ disables this feature.
Defaults to ‘0’.
getmail-options-configurationparameter: non-negative-integer max-bytes-per-session ¶Retrieve messages totalling up to this number of bytes before closing the session with the server. A value of ‘0’ disables this feature.
Defaults to ‘0’.
getmail-options-configurationparameter: non-negative-integer max-message-size ¶Don’t retrieve messages larger than this number of bytes. A value of ‘0’ disables this feature.
Defaults to ‘0’.
getmail-options-configurationparameter: boolean delivered-to ¶If true, getmail will add a Delivered-To header to messages.
Defaults to ‘#t’.
getmail-options-configurationparameter: boolean received ¶If set, getmail adds a Received header to the messages.
Defaults to ‘#t’.
getmail-options-configurationparameter: string message-log ¶Getmail will record a log of its actions to the named file. A value of ‘""’ disables this feature.
Defaults to ‘""’.
getmail-options-configurationparameter: boolean message-log-syslog ¶If true, getmail will record a log of its actions using the system logger.
Defaults to ‘#f’.
getmail-options-configurationparameter: boolean message-log-verbose ¶If true, getmail will log information about messages not retrieved and the reason for not retrieving them, as well as starting and ending information lines.
Defaults to ‘#f’.
getmail-options-configurationparameter: parameter-alist extra-parameters ¶Extra options to include.
Defaults to ‘()’.
getmail-configurationparameter: list idle ¶A list of mailboxes that getmail should wait on the server for new mail notifications. This depends on the server supporting the IDLE extension.
Defaults to ‘()’.
getmail-configurationparameter: list environment-variables ¶Environment variables to set for getmail.
Defaults to ‘()’.
Mail Aliases Service
- Scheme Variable: mail-aliases-service-type
This is the type of the service which provides
/etc/aliases, specifying how to deliver mail to users on this system.(service mail-aliases-service-type '(("postmaster" "bob") ("bob" "bob@example.com" "bob@example2.com")))
The configuration for a mail-aliases-service-type service is an
association list denoting how to deliver mail that comes to this system.
Each entry is of the form (alias addresses ...), with alias
specifying the local alias and addresses specifying where to deliver
this user’s mail.
The aliases aren’t required to exist as users on the local system. In the
above example, there doesn’t need to be a postmaster entry in the
operating-system’s user-accounts in order to deliver the
postmaster mail to bob (which subsequently would deliver mail
to bob@example.com and bob@example2.com).
GNU Mailutils IMAP4 Daemon
- Scheme Variable: imap4d-service-type
This is the type of the GNU Mailutils IMAP4 Daemon (see imap4d in GNU Mailutils Manual), whose value should be an
imap4d-configurationobject as in this example:(service imap4d-service-type (imap4d-configuration (config-file (local-file "imap4d.conf"))))
- Data Type: imap4d-configuration
Data type representing the configuration of
imap4d.package(default:mailutils)The package that provides
imap4d.config-file(default:%default-imap4d-config-file)File-like object of the configuration file to use, by default it will listen on TCP port 143 of
localhost. See Conf-imap4d in GNU Mailutils Manual, for details.
Radicale Service
- Scheme Variable: radicale-service-type
This is the type of the Radicale CalDAV/CardDAV server whose value should be a
radicale-configuration.
- Data Type: radicale-configuration
Data type representing the configuration of
radicale.package(default:radicale)The package that provides
radicale.config-file(default:%default-radicale-config-file)File-like object of the configuration file to use, by default it will listen on TCP port 5232 of
localhostand use thehtpasswdfile at /var/lib/radicale/users with no (plain) encryption.
12.9.13 消息服务
The (gnu services messaging) module provides Guix service definitions
for messaging services. Currently it provides the following services:
Prosody Service
- Scheme Variable: prosody-service-type
This is the type for the Prosody XMPP communication server. Its value must be a
prosody-configurationrecord as in this example:(service prosody-service-type (prosody-configuration (modules-enabled (cons* "groups" "mam" %default-modules-enabled)) (int-components (list (int-component-configuration (hostname "conference.example.net") (plugin "muc") (mod-muc (mod-muc-configuration))))) (virtualhosts (list (virtualhost-configuration (domain "example.net"))))))See below for details about
prosody-configuration.
By default, Prosody does not need much configuration. Only one
virtualhosts field is needed: it specifies the domain you wish
Prosody to serve.
You can perform various sanity checks on the generated configuration with
the prosodyctl check command.
Prosodyctl will also help you to import certificates from the
letsencrypt directory so that the prosody user can access
them. See https://prosody.im/doc/letsencrypt.
prosodyctl --root cert import /etc/letsencrypt/live
The available configuration parameters follow. Each parameter definition is
preceded by its type; for example, ‘string-list foo’ indicates that the
foo parameter should be specified as a list of strings. Types
starting with maybe- denote parameters that won’t show up in
prosody.cfg.lua when their value is left unspecified.
There is also a way to specify the configuration as a string, if you have an
old prosody.cfg.lua file that you want to port over from some other
system; see the end for more details.
The file-object type designates either a file-like object
(see file-like objects) or a file name.
Available prosody-configuration fields are:
prosody-configurationparameter: package prosody ¶The Prosody package.
prosody-configurationparameter: file-name data-path ¶Location of the Prosody data storage directory. See https://prosody.im/doc/configure. Defaults to ‘"/var/lib/prosody"’.
prosody-configurationparameter: file-object-list plugin-paths ¶Additional plugin directories. They are searched in all the specified paths in order. See https://prosody.im/doc/plugins_directory. Defaults to ‘()’.
prosody-configurationparameter: file-name certificates ¶Every virtual host and component needs a certificate so that clients and servers can securely verify its identity. Prosody will automatically load certificates/keys from the directory specified here. Defaults to ‘"/etc/prosody/certs"’.
prosody-configurationparameter: string-list admins ¶This is a list of accounts that are admins for the server. Note that you must create the accounts separately. See https://prosody.im/doc/admins and https://prosody.im/doc/creating_accounts. Example:
(admins '("user1@example.com" "user2@example.net"))Defaults to ‘()’.
prosody-configurationparameter: boolean use-libevent? ¶Enable use of libevent for better performance under high load. See https://prosody.im/doc/libevent. Defaults to ‘#f’.
prosody-configurationparameter: module-list modules-enabled ¶This is the list of modules Prosody will load on startup. It looks for
mod_modulename.luain the plugins folder, so make sure that exists too. Documentation on modules can be found at: https://prosody.im/doc/modules. Defaults to ‘("roster" "saslauth" "tls" "dialback" "disco" "carbons" "private" "blocklist" "vcard" "version" "uptime" "time" "ping" "pep" "register" "admin_adhoc")’.
prosody-configurationparameter: string-list modules-disabled ¶‘"offline"’, ‘"c2s"’ and ‘"s2s"’ are auto-loaded, but should you want to disable them then add them to this list. Defaults to ‘()’.
prosody-configurationparameter: file-object groups-file ¶Path to a text file where the shared groups are defined. If this path is empty then ‘mod_groups’ does nothing. See https://prosody.im/doc/modules/mod_groups. Defaults to ‘"/var/lib/prosody/sharedgroups.txt"’.
prosody-configurationparameter: boolean allow-registration? ¶Disable account creation by default, for security. See https://prosody.im/doc/creating_accounts. Defaults to ‘#f’.
prosody-configurationparameter: maybe-ssl-configuration ssl ¶These are the SSL/TLS-related settings. Most of them are disabled so to use Prosody’s defaults. If you do not completely understand these options, do not add them to your config, it is easy to lower the security of your server using them. See https://prosody.im/doc/advanced_ssl_config.
Available
ssl-configurationfields are:ssl-configurationparameter: maybe-string protocol ¶This determines what handshake to use.
ssl-configurationparameter: maybe-file-name key ¶Path to your private key file.
ssl-configurationparameter: maybe-file-name certificate ¶Path to your certificate file.
ssl-configurationparameter: file-object capath ¶Path to directory containing root certificates that you wish Prosody to trust when verifying the certificates of remote servers. Defaults to ‘"/etc/ssl/certs"’.
ssl-configurationparameter: maybe-file-object cafile ¶Path to a file containing root certificates that you wish Prosody to trust. Similar to
capathbut with all certificates concatenated together.
ssl-configurationparameter: maybe-string-list verify ¶A list of verification options (these mostly map to OpenSSL’s
set_verify()flags).
ssl-configurationparameter: maybe-string-list options ¶A list of general options relating to SSL/TLS. These map to OpenSSL’s
set_options(). For a full list of options available in LuaSec, see the LuaSec source.
ssl-configurationparameter: maybe-non-negative-integer depth ¶How long a chain of certificate authorities to check when looking for a trusted root certificate.
ssl-configurationparameter: maybe-string ciphers ¶An OpenSSL cipher string. This selects what ciphers Prosody will offer to clients, and in what order.
ssl-configurationparameter: maybe-file-name dhparam ¶A path to a file containing parameters for Diffie-Hellman key exchange. You can create such a file with:
openssl dhparam -out /etc/prosody/certs/dh-2048.pem 2048
ssl-configurationparameter: maybe-string curve ¶Curve for Elliptic curve Diffie-Hellman. Prosody’s default is ‘"secp384r1"’.
ssl-configurationparameter: maybe-string-list verifyext ¶A list of “extra” verification options.
ssl-configurationparameter: maybe-string password ¶Password for encrypted private keys.
prosody-configurationparameter: boolean c2s-require-encryption? ¶Whether to force all client-to-server connections to be encrypted or not. See https://prosody.im/doc/modules/mod_tls. Defaults to ‘#f’.
prosody-configurationparameter: string-list disable-sasl-mechanisms ¶Set of mechanisms that will never be offered. See https://prosody.im/doc/modules/mod_saslauth. Defaults to ‘("DIGEST-MD5")’.
prosody-configurationparameter: boolean s2s-require-encryption? ¶Whether to force all server-to-server connections to be encrypted or not. See https://prosody.im/doc/modules/mod_tls. Defaults to ‘#f’.
prosody-configurationparameter: boolean s2s-secure-auth? ¶Whether to require encryption and certificate authentication. This provides ideal security, but requires servers you communicate with to support encryption AND present valid, trusted certificates. See https://prosody.im/doc/s2s#security. Defaults to ‘#f’.
prosody-configurationparameter: string-list s2s-insecure-domains ¶Many servers don’t support encryption or have invalid or self-signed certificates. You can list domains here that will not be required to authenticate using certificates. They will be authenticated using DNS. See https://prosody.im/doc/s2s#security. Defaults to ‘()’.
prosody-configurationparameter: string-list s2s-secure-domains ¶Even if you leave
s2s-secure-auth?disabled, you can still require valid certificates for some domains by specifying a list here. See https://prosody.im/doc/s2s#security. Defaults to ‘()’.
prosody-configurationparameter: string authentication ¶Select the authentication backend to use. The default provider stores passwords in plaintext and uses Prosody’s configured data storage to store the authentication data. If you do not trust your server please see https://prosody.im/doc/modules/mod_auth_internal_hashed for information about using the hashed backend. See also https://prosody.im/doc/authentication Defaults to ‘"internal_plain"’.
prosody-configurationparameter: maybe-string log ¶Set logging options. Advanced logging configuration is not yet supported by the Prosody service. See https://prosody.im/doc/logging. Defaults to ‘"*syslog"’.
prosody-configurationparameter: file-name pidfile ¶File to write pid in. See https://prosody.im/doc/modules/mod_posix. Defaults to ‘"/var/run/prosody/prosody.pid"’.
prosody-configurationparameter: maybe-non-negative-integer http-max-content-size ¶Maximum allowed size of the HTTP body (in bytes).
prosody-configurationparameter: maybe-string http-external-url ¶Some modules expose their own URL in various ways. This URL is built from the protocol, host and port used. If Prosody sits behind a proxy, the public URL will be
http-external-urlinstead. See https://prosody.im/doc/http#external_url.
prosody-configurationparameter: virtualhost-configuration-list virtualhosts ¶A host in Prosody is a domain on which user accounts can be created. For example if you want your users to have addresses like ‘"john.smith@example.com"’ then you need to add a host ‘"example.com"’. All options in this list will apply only to this host.
注: The name virtual host is used in configuration to avoid confusion with the actual physical host that Prosody is installed on. A single Prosody instance can serve many domains, each one defined as a VirtualHost entry in Prosody’s configuration. Conversely a server that hosts a single domain would have just one VirtualHost entry.
Available
virtualhost-configurationfields are:all these
prosody-configurationfields:admins,use-libevent?,modules-enabled,modules-disabled,groups-file,allow-registration?,ssl,c2s-require-encryption?,disable-sasl-mechanisms,s2s-require-encryption?,s2s-secure-auth?,s2s-insecure-domains,s2s-secure-domains,authentication,log,http-max-content-size,http-external-url,raw-content, plus:virtualhost-configurationparameter: string domain ¶Domain you wish Prosody to serve.
prosody-configurationparameter: int-component-configuration-list int-components ¶Components are extra services on a server which are available to clients, usually on a subdomain of the main server (such as ‘"mycomponent.example.com"’). Example components might be chatroom servers, user directories, or gateways to other protocols.
Internal components are implemented with Prosody-specific plugins. To add an internal component, you simply fill the hostname field, and the plugin you wish to use for the component.
See https://prosody.im/doc/components. Defaults to ‘()’.
Available
int-component-configurationfields are:all these
prosody-configurationfields:admins,use-libevent?,modules-enabled,modules-disabled,groups-file,allow-registration?,ssl,c2s-require-encryption?,disable-sasl-mechanisms,s2s-require-encryption?,s2s-secure-auth?,s2s-insecure-domains,s2s-secure-domains,authentication,log,http-max-content-size,http-external-url,raw-content, plus:int-component-configurationparameter: string hostname ¶Hostname of the component.
int-component-configurationparameter: string plugin ¶Plugin you wish to use for the component.
int-component-configurationparameter: maybe-mod-muc-configuration mod-muc ¶Multi-user chat (MUC) is Prosody’s module for allowing you to create hosted chatrooms/conferences for XMPP users.
General information on setting up and using multi-user chatrooms can be found in the “Chatrooms” documentation (https://prosody.im/doc/chatrooms), which you should read if you are new to XMPP chatrooms.
See also https://prosody.im/doc/modules/mod_muc.
Available
mod-muc-configurationfields are:mod-muc-configurationparameter: string name ¶The name to return in service discovery responses. Defaults to ‘"Prosody Chatrooms"’.
mod-muc-configurationparameter: string-or-boolean restrict-room-creation ¶If ‘#t’, this will only allow admins to create new chatrooms. Otherwise anyone can create a room. The value ‘"local"’ restricts room creation to users on the service’s parent domain. E.g. ‘user@example.com’ can create rooms on ‘rooms.example.com’. The value ‘"admin"’ restricts to service administrators only. Defaults to ‘#f’.
mod-muc-configurationparameter: non-negative-integer max-history-messages ¶Maximum number of history messages that will be sent to the member that has just joined the room. Defaults to ‘20’.
prosody-configurationparameter: ext-component-configuration-list ext-components ¶External components use XEP-0114, which most standalone components support. To add an external component, you simply fill the hostname field. See https://prosody.im/doc/components. Defaults to ‘()’.
Available
ext-component-configurationfields are:all these
prosody-configurationfields:admins,use-libevent?,modules-enabled,modules-disabled,groups-file,allow-registration?,ssl,c2s-require-encryption?,disable-sasl-mechanisms,s2s-require-encryption?,s2s-secure-auth?,s2s-insecure-domains,s2s-secure-domains,authentication,log,http-max-content-size,http-external-url,raw-content, plus:ext-component-configurationparameter: string component-secret ¶Password which the component will use to log in.
ext-component-configurationparameter: string hostname ¶Hostname of the component.
prosody-configurationparameter: non-negative-integer-list component-ports ¶Port(s) Prosody listens on for component connections. Defaults to ‘(5347)’.
prosody-configurationparameter: string component-interface ¶Interface Prosody listens on for component connections. Defaults to ‘"127.0.0.1"’.
prosody-configurationparameter: maybe-raw-content raw-content ¶Raw content that will be added to the configuration file.
It could be that you just want to get a prosody.cfg.lua up and
running. In that case, you can pass an opaque-prosody-configuration
record as the value of prosody-service-type. As its name indicates,
an opaque configuration does not have easy reflective capabilities.
Available opaque-prosody-configuration fields are:
opaque-prosody-configurationparameter: package prosody ¶The prosody package.
opaque-prosody-configurationparameter: string prosody.cfg.lua ¶The contents of the
prosody.cfg.luato use.
For example, if your prosody.cfg.lua is just the empty string, you
could instantiate a prosody service like this:
(service prosody-service-type
(opaque-prosody-configuration
(prosody.cfg.lua "")))
BitlBee Service
BitlBee is a gateway that provides an IRC interface to a variety of messaging protocols such as XMPP.
- Scheme Variable: bitlbee-service-type
This is the service type for the BitlBee IRC gateway daemon. Its value is a
bitlbee-configuration(see below).To have BitlBee listen on port 6667 on localhost, add this line to your services:
(service bitlbee-service-type)
- Data Type: bitlbee-configuration
This is the configuration for BitlBee, with the following fields:
interface(default:"127.0.0.1")port(default:6667)Listen on the network interface corresponding to the IP address specified in interface, on port.
When interface is
127.0.0.1, only local clients can connect; when it is0.0.0.0, connections can come from any networking interface.bitlbee(default:bitlbee)The BitlBee package to use.
plugins(default:'())List of plugin packages to use—e.g.,
bitlbee-discord.extra-settings(default:"")Configuration snippet added as-is to the BitlBee configuration file.
Quassel Service
Quassel is a distributed IRC client, meaning that one or more clients can attach to and detach from the central core.
- Scheme Variable: quassel-service-type
This is the service type for the Quassel IRC backend daemon. Its value is a
quassel-configuration(see below).
- Data Type: quassel-configuration
This is the configuration for Quassel, with the following fields:
quassel(default:quassel)The Quassel package to use.
interface(default:"::,0.0.0.0")port(default:4242)Listen on the network interface(s) corresponding to the IPv4 or IPv6 interfaces specified in the comma delimited interface, on port.
loglevel(default:"Info")The level of logging desired. Accepted values are Debug, Info, Warning and Error.
Next: File-Sharing Services, Previous: 消息服务, Up: 服务 [Contents][Index]
12.9.14 电话服务
The (gnu services telephony) module contains Guix service definitions
for telephony services. Currently it provides the following services:
Jami
This section describes how to configure a Jami server that can be used to host video (or audio) conferences, among other uses. The following example demonstrates how to specify Jami account archives (backups) to be provisioned automatically:
(service jami-service-type
(jami-configuration
(accounts
(list (jami-account
(archive "/etc/jami/unencrypted-account-1.gz"))
(jami-account
(archive "/etc/jami/unencrypted-account-2.gz"))))))
When the accounts field is specified, the Jami account files of the service found under /var/lib/jami are recreated every time the service starts.
Jami accounts and their corresponding backup archives can be generated using
the jami or jami-gnome Jami clients. The accounts should not
be password-protected, but it is wise to ensure their files are only
readable by ‘root’.
The next example shows how to declare that only some contacts should be allowed to communicate with a given account:
(service jami-service-type
(jami-configuration
(accounts
(list (jami-account
(archive "/etc/jami/unencrypted-account-1.gz")
(peer-discovery? #t)
(rendezvous-point? #t)
(allowed-contacts
'("1dbcb0f5f37324228235564b79f2b9737e9a008f"
"2dbcb0f5f37324228235564b79f2b9737e9a008f")))))))
In this mode, only the declared allowed-contacts can initiate
communication with the Jami account. This can be used, for example, with
rendezvous point accounts to create a private video conferencing space.
To put the system administrator in full control of the conferences hosted on their system, the Jami service supports the following actions:
# herd doc jami list-actions (list-accounts list-account-details list-banned-contacts list-contacts list-moderators add-moderator ban-contact enable-account disable-account)
The above actions aim to provide the most valuable actions for moderation
purposes, not to cover the whole Jami API. Users wanting to interact with
the Jami daemon from Guile may be interested in experimenting with the
(gnu build jami-service) module, which powers the above Shepherd
actions.
The add-moderator and ban-contact actions accept a contact
fingerprint (40 characters long hash) as first argument and an
account fingerprint or username as second argument:
# herd add-moderator jami 1dbcb0f5f37324228235564b79f2b9737e9a008f \ f3345f2775ddfe07a4b0d95daea111d15fbc1199 # herd list-moderators jami Moderators for account f3345f2775ddfe07a4b0d95daea111d15fbc1199: - 1dbcb0f5f37324228235564b79f2b9737e9a008f
In the case of ban-contact, the second username argument is optional;
when omitted, the account is banned from all Jami accounts:
# herd ban-contact jami 1dbcb0f5f37324228235564b79f2b9737e9a008f # herd list-banned-contacts jami Banned contacts for account f3345f2775ddfe07a4b0d95daea111d15fbc1199: - 1dbcb0f5f37324228235564b79f2b9737e9a008f
Banned contacts are also stripped from their moderation privileges.
The disable-account action allows to completely disconnect an account
from the network, making it unreachable, while enable-account does
the inverse. They accept a single account username or fingerprint as first
argument:
# herd disable-account jami f3345f2775ddfe07a4b0d95daea111d15fbc1199 # herd list-accounts jami The following Jami accounts are available: - f3345f2775ddfe07a4b0d95daea111d15fbc1199 (dummy) [disabled]
The list-account-details action prints the detailed parameters of
each accounts in the Recutils format, which means the recsel
command can be used to select accounts of interest (see Selection
Expressions in GNU recutils manual). Note that period characters
(‘.’) found in the account parameter keys are mapped to underscores
(‘_’) in the output, to meet the requirements of the Recutils format.
The following example shows how to print the account fingerprints for all
accounts operating in the rendezvous point mode:
# herd list-account-details jami | \ recsel -p Account.username -e 'Account.rendezVous ~ "true"' Account_username: f3345f2775ddfe07a4b0d95daea111d15fbc1199
The remaining actions should be self-explanatory.
The complete set of available configuration options is detailed below.
- Data Type: jami-configuration
Available
jami-configurationfields are:libjami(default:libjami) (type: package)The Jami daemon package to use.
dbus(default:dbus-for-jami) (type: package)The D-Bus package to use to start the required D-Bus session.
nss-certs(default:nss-certs) (type: package)The nss-certs package to use to provide TLS certificates.
enable-logging?(default:#t) (type: boolean)Whether to enable logging to syslog.
debug?(default:#f) (type: boolean)Whether to enable debug level messages.
auto-answer?(default:#f) (type: boolean)Whether to force automatic answer to incoming calls.
accounts(type: maybe-jami-account-list)A list of Jami accounts to be (re-)provisioned every time the Jami daemon service starts. When providing this field, the account directories under /var/lib/jami/ are recreated every time the service starts, ensuring a consistent state.
- Data Type: jami-account
Available
jami-accountfields are:archive(type: string-or-computed-file)The account archive (backup) file name of the account. This is used to provision the account when the service starts. The account archive should not be encrypted. It is highly recommended to make it readable only to the ‘root’ user (i.e., not in the store), to guard against leaking the secret key material of the Jami account it contains.
allowed-contacts(type: maybe-account-fingerprint-list)The list of allowed contacts for the account, entered as their 40 characters long fingerprint. Messages or calls from accounts not in that list will be rejected. When left specified, the configuration of the account archive is used as-is with respect to contacts and public inbound calls/messaging allowance, which typically defaults to allow any contact to communicate with the account.
moderators(type: maybe-account-fingerprint-list)The list of contacts that should have moderation privileges (to ban, mute, etc. other users) in rendezvous conferences, entered as their 40 characters long fingerprint. When left unspecified, the configuration of the account archive is used as-is with respect to moderation, which typically defaults to allow anyone to moderate.
rendezvous-point?(type: maybe-boolean)Whether the account should operate in the rendezvous mode. In this mode, all the incoming audio/video calls are mixed into a conference. When left unspecified, the value from the account archive prevails.
peer-discovery?(type: maybe-boolean)Whether peer discovery should be enabled. Peer discovery is used to discover other OpenDHT nodes on the local network, which can be useful to maintain communication between devices on such network even when the connection to the Internet has been lost. When left unspecified, the value from the account archive prevails.
bootstrap-hostnames(type: maybe-string-list)A list of hostnames or IPs pointing to OpenDHT nodes, that should be used to initially join the OpenDHT network. When left unspecified, the value from the account archive prevails.
name-server-uri(type: maybe-string)The URI of the name server to use, that can be used to retrieve the account fingerprint for a registered username.
Mumble server
This section describes how to set up and run a Mumble server (formerly known as Murmur).
- Data Type: mumble-server-configuration
The service type for the Mumble server. An example configuration can look like this:
(service mumble-server-service-type (mumble-server-configuration (welcome-text "Welcome to this Mumble server running on Guix!") (cert-required? #t) ;disallow text password logins (ssl-cert "/etc/letsencrypt/live/mumble.example.com/fullchain.pem") (ssl-key "/etc/letsencrypt/live/mumble.example.com/privkey.pem")))After reconfiguring your system, you can manually set the mumble-server
SuperUserpassword with the command that is printed during the activation phase.It is recommended to register a normal Mumble user account and grant it admin or moderator rights. You can use the
mumbleclient to login as new normal user, register yourself, and log out. For the next step login with the nameSuperUseruse theSuperUserpassword that you set previously, and grant your newly registered mumble user administrator or moderator rights and create some channels.Available
mumble-server-configurationfields are:package(default:mumble)Package that contains
bin/mumble-server.user(default:"mumble-server")User who will run the Mumble-Server server.
group(default:"mumble-server")Group of the user who will run the mumble-server server.
port(default:64738)Port on which the server will listen.
welcome-text(default:"")Welcome text sent to clients when they connect.
server-password(default:"")Password the clients have to enter in order to connect.
max-users(default:100)Maximum of users that can be connected to the server at once.
max-user-bandwidth(default:#f)Maximum voice traffic a user can send per second.
database-file(default:"/var/lib/mumble-server/db.sqlite")File name of the sqlite database. The service’s user will become the owner of the directory.
log-file(default:"/var/log/mumble-server/mumble-server.log")File name of the log file. The service’s user will become the owner of the directory.
autoban-attempts(default:10)Maximum number of logins a user can make in
autoban-timeframewithout getting auto banned forautoban-time.autoban-timeframe(default:120)Timeframe for autoban in seconds.
autoban-time(default:300)Amount of time in seconds for which a client gets banned when violating the autoban limits.
opus-threshold(default:100)Percentage of clients that need to support opus before switching over to opus audio codec.
channel-nesting-limit(default:10)How deep channels can be nested at maximum.
channelname-regex(default:#f)A string in form of a Qt regular expression that channel names must conform to.
username-regex(default:#f)A string in form of a Qt regular expression that user names must conform to.
text-message-length(default:5000)Maximum size in bytes that a user can send in one text chat message.
image-message-length(default:(* 128 1024))Maximum size in bytes that a user can send in one image message.
cert-required?(default:#f)If it is set to
#tclients that use weak password authentication will not be accepted. Users must have completed the certificate wizard to join.remember-channel?(default:#f)Should mumble-server remember the last channel each user was in when they disconnected and put them into the remembered channel when they rejoin.
allow-html?(default:#f)Should html be allowed in text messages, user comments, and channel descriptions.
allow-ping?(default:#f)Setting to true exposes the current user count, the maximum user count, and the server’s maximum bandwidth per client to unauthenticated users. In the Mumble client, this information is shown in the Connect dialog.
Disabling this setting will prevent public listing of the server.
bonjour?(default:#f)Should the server advertise itself in the local network through the bonjour protocol.
send-version?(default:#f)Should the mumble-server server version be exposed in ping requests.
log-days(default:31)Mumble also stores logs in the database, which are accessible via RPC. The default is 31 days of months, but you can set this setting to 0 to keep logs forever, or -1 to disable logging to the database.
obfuscate-ips?(default:#t)Should logged ips be obfuscated to protect the privacy of users.
ssl-cert(default:#f)File name of the SSL/TLS certificate used for encrypted connections.
(ssl-cert "/etc/letsencrypt/live/example.com/fullchain.pem")ssl-key(default:#f)Filepath to the ssl private key used for encrypted connections.
(ssl-key "/etc/letsencrypt/live/example.com/privkey.pem")ssl-dh-params(default:#f)File name of a PEM-encoded file with Diffie-Hellman parameters for the SSL/TLS encryption. Alternatively you set it to
"@ffdhe2048","@ffdhe3072","@ffdhe4096","@ffdhe6144"or"@ffdhe8192"to use bundled parameters from RFC 7919.ssl-ciphers(default:#f)The
ssl-ciphersoption chooses the cipher suites to make available for use in SSL/TLS.This option is specified using OpenSSL cipher list notation.
It is recommended that you try your cipher string using ’openssl ciphers <string>’ before setting it here, to get a feel for which cipher suites you will get. After setting this option, it is recommend that you inspect your Mumble server log to ensure that Mumble is using the cipher suites that you expected it to.
注: Changing this option may impact the backwards compatibility of your Mumble-Server server, and can remove the ability for older Mumble clients to be able to connect to it.
public-registration(default:#f)Must be a
<mumble-server-public-registration-configuration>record or#f.You can optionally register your server in the public server list that the
mumbleclient shows on startup. You cannot register your server if you have set aserver-password, or setallow-pingto#f.It might take a few hours until it shows up in the public list.
file(default:#f)Optional alternative override for this configuration.
- Data Type: mumble-server-public-registration-configuration
Configuration for public registration of a mumble-server service.
名字This is a display name for your server. Not to be confused with the hostname.
passwordA password to identify your registration. Subsequent updates will need the same password. Don’t lose your password.
urlThis should be a
http://orhttps://link to your web site.hostname(default:#f)By default your server will be listed by its IP address. If it is set your server will be linked by this host name instead.
Deprecation notice: Due to historical reasons, all of the above
mumble-server-procedures are also exported with themurmur-prefix. It is recommended that you switch to usingmumble-server-going forward.
12.9.15 File-Sharing Services
The (gnu services file-sharing) module provides services that assist
with transferring files over peer-to-peer file-sharing networks.
Transmission Daemon Service
Transmission is a flexible BitTorrent
client that offers a variety of graphical and command-line interfaces. A
transmission-daemon-service-type service provides Transmission’s
headless variant, transmission-daemon, as a system service,
allowing users to share files via BitTorrent even when they are not logged
in.
- Scheme Variable: transmission-daemon-service-type
The service type for the Transmission Daemon BitTorrent client. Its value must be a
transmission-daemon-configurationobject as in this example:(service transmission-daemon-service-type (transmission-daemon-configuration ;; Restrict access to the RPC ("control") interface (rpc-authentication-required? #t) (rpc-username "transmission") (rpc-password (transmission-password-hash "transmission" ; desired password "uKd1uMs9")) ; arbitrary salt value ;; Accept requests from this and other hosts on the ;; local network (rpc-whitelist-enabled? #t) (rpc-whitelist '("::1" "127.0.0.1" "192.168.0.*")) ;; Limit bandwidth use during work hours (alt-speed-down (* 1024 2)) ; 2 MB/s (alt-speed-up 512) ; 512 kB/s (alt-speed-time-enabled? #t) (alt-speed-time-day 'weekdays) (alt-speed-time-begin (+ (* 60 8) 30)) ; 8:30 am (alt-speed-time-end (+ (* 60 (+ 12 5)) 30)))) ; 5:30 pm
Once the service is started, users can interact with the daemon through its
Web interface (at http://localhost:9091/) or by using the
transmission-remote command-line tool, available in the
transmission package. (Emacs users may want to also consider the
emacs-transmission package.) Both communicate with the daemon
through its remote procedure call (RPC) interface, which by default is
available to all users on the system; you may wish to change this by
assigning values to the rpc-authentication-required?,
rpc-username and rpc-password settings, as shown in the
example above and documented further below.
The value for rpc-password must be a password hash of the type
generated and used by Transmission clients. This can be copied verbatim
from an existing settings.json file, if another Transmission client
is already being used. Otherwise, the transmission-password-hash and
transmission-random-salt procedures provided by this module can be
used to obtain a suitable hash value.
- Scheme Procedure: transmission-password-hash password salt
Returns a string containing the result of hashing password together with salt, in the format recognized by Transmission clients for their
rpc-passwordconfiguration setting.salt must be an eight-character string. The
transmission-random-saltprocedure can be used to generate a suitable salt value at random.
- Scheme Procedure: transmission-random-salt
Returns a string containing a random, eight-character salt value of the type generated and used by Transmission clients, suitable for passing to the
transmission-password-hashprocedure.
These procedures are accessible from within a Guile REPL started with the
guix repl command (see Invoking guix repl). This is useful
for obtaining a random salt value to provide as the second parameter to
‘transmission-password-hash‘, as in this example session:
$ guix repl scheme@(guix-user)> ,use (gnu services file-sharing) scheme@(guix-user)> (transmission-random-salt) $1 = "uKd1uMs9"
Alternatively, a complete password hash can generated in a single step:
scheme@(guix-user)> (transmission-password-hash "transmission"
(transmission-random-salt))
$2 = "{c8bbc6d1740cd8dc819a6e25563b67812c1c19c9VtFPfdsX"
The resulting string can be used as-is for the value of rpc-password,
allowing the password to be kept hidden even in the operating-system
configuration.
Torrent files downloaded by the daemon are directly accessible only to users
in the “transmission” user group, who receive read-only access to the
directory specified by the download-dir configuration setting (and
also the directory specified by incomplete-dir, if
incomplete-dir-enabled? is #t). Downloaded files can be moved
to another directory or deleted altogether using
transmission-remote with its --move and
--remove-and-delete options.
If the watch-dir-enabled? setting is set to #t, users in the
“transmission” group are able also to place .torrent files in the
directory specified by watch-dir to have the corresponding torrents
added by the daemon. (The trash-original-torrent-files? setting
controls whether the daemon deletes these files after processing them.)
Some of the daemon’s configuration settings can be changed temporarily by
transmission-remote and similar tools. To undo these changes, use
the service’s reload action to have the daemon reload its settings
from disk:
# herd reload transmission-daemon
The full set of available configuration settings is defined by the
transmission-daemon-configuration data type.
- Data Type: transmission-daemon-configuration
The data type representing configuration settings for Transmission Daemon. These correspond directly to the settings recognized by Transmission clients in their settings.json file.
Available transmission-daemon-configuration fields are:
transmission-daemon-configurationparameter: package transmission ¶The Transmission package to use.
transmission-daemon-configurationparameter: non-negative-integer stop-wait-period ¶The period, in seconds, to wait when stopping the service for
transmission-daemonto exit before killing its process. This allows the daemon time to complete its housekeeping and send a final update to trackers as it shuts down. On slow hosts, or hosts with a slow network connection, this value may need to be increased.Defaults to ‘10’.
transmission-daemon-configurationparameter: string download-dir ¶The directory to which torrent files are downloaded.
Defaults to ‘"/var/lib/transmission-daemon/downloads"’.
transmission-daemon-configurationparameter: boolean incomplete-dir-enabled? ¶If
#t, files will be held inincomplete-dirwhile their torrent is being downloaded, then moved todownload-dironce the torrent is complete. Otherwise, files for all torrents (including those still being downloaded) will be placed indownload-dir.Defaults to ‘#f’.
transmission-daemon-configurationparameter: maybe-string incomplete-dir ¶The directory in which files from incompletely downloaded torrents will be held when
incomplete-dir-enabled?is#t.Defaults to ‘disabled’.
transmission-daemon-configurationparameter: umask umask ¶The file mode creation mask used for downloaded files. (See the
umaskman page for more information.)Defaults to ‘18’.
transmission-daemon-configurationparameter: boolean rename-partial-files? ¶When
#t, “.part” is appended to the name of partially downloaded files.Defaults to ‘#t’.
transmission-daemon-configurationparameter: preallocation-mode preallocation ¶The mode by which space should be preallocated for downloaded files, one of
none,fast(orsparse) andfull. Specifyingfullwill minimize disk fragmentation at a cost to file-creation speed.Defaults to ‘fast’.
transmission-daemon-configurationparameter: boolean watch-dir-enabled? ¶If
#t, the directory specified bywatch-dirwill be watched for new .torrent files and the torrents they describe added automatically (and the original files removed, iftrash-original-torrent-files?is#t).Defaults to ‘#f’.
transmission-daemon-configurationparameter: maybe-string watch-dir ¶The directory to be watched for .torrent files indicating new torrents to be added, when
watch-dir-enabledis#t.Defaults to ‘disabled’.
transmission-daemon-configurationparameter: boolean trash-original-torrent-files? ¶When
#t, .torrent files will be deleted from the watch directory once their torrent has been added (seewatch-directory-enabled?).Defaults to ‘#f’.
transmission-daemon-configurationparameter: boolean speed-limit-down-enabled? ¶When
#t, the daemon’s download speed will be limited to the rate specified byspeed-limit-down.Defaults to ‘#f’.
transmission-daemon-configurationparameter: non-negative-integer speed-limit-down ¶The default global-maximum download speed, in kilobytes per second.
Defaults to ‘100’.
transmission-daemon-configurationparameter: boolean speed-limit-up-enabled? ¶When
#t, the daemon’s upload speed will be limited to the rate specified byspeed-limit-up.Defaults to ‘#f’.
transmission-daemon-configurationparameter: non-negative-integer speed-limit-up ¶The default global-maximum upload speed, in kilobytes per second.
Defaults to ‘100’.
transmission-daemon-configurationparameter: boolean alt-speed-enabled? ¶When
#t, the alternate speed limitsalt-speed-downandalt-speed-upare used (in place ofspeed-limit-downandspeed-limit-up, if they are enabled) to constrain the daemon’s bandwidth usage. This can be scheduled to occur automatically at certain times during the week; seealt-speed-time-enabled?.Defaults to ‘#f’.
transmission-daemon-configurationparameter: non-negative-integer alt-speed-down ¶The alternate global-maximum download speed, in kilobytes per second.
Defaults to ‘50’.
transmission-daemon-configurationparameter: non-negative-integer alt-speed-up ¶The alternate global-maximum upload speed, in kilobytes per second.
Defaults to ‘50’.
transmission-daemon-configurationparameter: boolean alt-speed-time-enabled? ¶When
#t, the alternate speed limitsalt-speed-downandalt-speed-upwill be enabled automatically during the periods specified byalt-speed-time-day,alt-speed-time-beginandalt-time-speed-end.Defaults to ‘#f’.
transmission-daemon-configurationparameter: day-list alt-speed-time-day ¶The days of the week on which the alternate-speed schedule should be used, specified either as a list of days (
sunday,monday, and so on) or using one of the symbolsweekdays,weekendsorall.Defaults to ‘all’.
transmission-daemon-configurationparameter: non-negative-integer alt-speed-time-begin ¶The time of day at which to enable the alternate speed limits, expressed as a number of minutes since midnight.
Defaults to ‘540’.
transmission-daemon-configurationparameter: non-negative-integer alt-speed-time-end ¶The time of day at which to disable the alternate speed limits, expressed as a number of minutes since midnight.
Defaults to ‘1020’.
transmission-daemon-configurationparameter: string bind-address-ipv4 ¶The IP address at which to listen for peer connections, or “0.0.0.0” to listen at all available IP addresses.
Defaults to ‘"0.0.0.0"’.
transmission-daemon-configurationparameter: string bind-address-ipv6 ¶The IPv6 address at which to listen for peer connections, or “::” to listen at all available IPv6 addresses.
Defaults to ‘"::"’.
transmission-daemon-configurationparameter: boolean peer-port-random-on-start? ¶If
#t, when the daemon starts it will select a port at random on which to listen for peer connections, from the range specified (inclusively) bypeer-port-random-lowandpeer-port-random-high. Otherwise, it listens on the port specified bypeer-port.Defaults to ‘#f’.
transmission-daemon-configurationparameter: port-number peer-port-random-low ¶The lowest selectable port number when
peer-port-random-on-start?is#t.Defaults to ‘49152’.
transmission-daemon-configurationparameter: port-number peer-port-random-high ¶The highest selectable port number when
peer-port-random-on-startis#t.Defaults to ‘65535’.
transmission-daemon-configurationparameter: port-number peer-port ¶The port on which to listen for peer connections when
peer-port-random-on-start?is#f.Defaults to ‘51413’.
transmission-daemon-configurationparameter: boolean port-forwarding-enabled? ¶If
#t, the daemon will attempt to configure port-forwarding on an upstream gateway automatically using UPnP and NAT-PMP.Defaults to ‘#t’.
transmission-daemon-configurationparameter: encryption-mode encryption ¶The encryption preference for peer connections, one of
prefer-unencrypted-connections,prefer-encrypted-connectionsorrequire-encrypted-connections.Defaults to ‘prefer-encrypted-connections’.
transmission-daemon-configurationparameter: maybe-string peer-congestion-algorithm ¶The TCP congestion-control algorithm to use for peer connections, specified using a string recognized by the operating system in calls to
setsockopt. When left unspecified, the operating-system default is used.Note that on GNU/Linux systems, the kernel must be configured to allow processes to use a congestion-control algorithm not in the default set; otherwise, it will deny these requests with “Operation not permitted”. To see which algorithms are available on your system and which are currently permitted for use, look at the contents of the files tcp_available_congestion_control and tcp_allowed_congestion_control in the /proc/sys/net/ipv4 directory.
As an example, to have Transmission Daemon use the TCP Low Priority congestion-control algorithm, you’ll need to modify your kernel configuration to build in support for the algorithm, then update your operating-system configuration to allow its use by adding a
sysctl-service-typeservice (or updating the existing one’s configuration) with lines like the following:(service sysctl-service-type (sysctl-configuration (settings ("net.ipv4.tcp_allowed_congestion_control" . "reno cubic lp"))))The Transmission Daemon configuration can then be updated with
(peer-congestion-algorithm "lp")and the system reconfigured to have the changes take effect.
Defaults to ‘disabled’.
transmission-daemon-configurationparameter: tcp-type-of-service peer-socket-tos ¶The type of service to request in outgoing TCP packets, one of
default,low-cost,throughput,low-delayandreliability.Defaults to ‘default’.
transmission-daemon-configurationparameter: non-negative-integer peer-limit-global ¶The global limit on the number of connected peers.
Defaults to ‘200’.
transmission-daemon-configurationparameter: non-negative-integer peer-limit-per-torrent ¶The per-torrent limit on the number of connected peers.
Defaults to ‘50’.
transmission-daemon-configurationparameter: non-negative-integer upload-slots-per-torrent ¶The maximum number of peers to which the daemon will upload data simultaneously for each torrent.
Defaults to ‘14’.
transmission-daemon-configurationparameter: non-negative-integer peer-id-ttl-hours ¶The maximum lifespan, in hours, of the peer ID associated with each public torrent before it is regenerated.
Defaults to ‘6’.
transmission-daemon-configurationparameter: boolean blocklist-enabled? ¶When
#t, the daemon will ignore peers mentioned in the blocklist it has most recently downloaded fromblocklist-url.Defaults to ‘#f’.
transmission-daemon-configurationparameter: maybe-string blocklist-url ¶The URL of a peer blocklist (in P2P-plaintext or eMule .dat format) to be periodically downloaded and applied when
blocklist-enabled?is#t.Defaults to ‘disabled’.
transmission-daemon-configurationparameter: boolean download-queue-enabled? ¶If
#t, the daemon will be limited to downloading at mostdownload-queue-sizenon-stalled torrents simultaneously.Defaults to ‘#t’.
transmission-daemon-configurationparameter: non-negative-integer download-queue-size ¶The size of the daemon’s download queue, which limits the number of non-stalled torrents it will download at any one time when
download-queue-enabled?is#t.Defaults to ‘5’.
transmission-daemon-configurationparameter: boolean seed-queue-enabled? ¶If
#t, the daemon will be limited to seeding at mostseed-queue-sizenon-stalled torrents simultaneously.Defaults to ‘#f’.
transmission-daemon-configurationparameter: non-negative-integer seed-queue-size ¶The size of the daemon’s seed queue, which limits the number of non-stalled torrents it will seed at any one time when
seed-queue-enabled?is#t.Defaults to ‘10’.
transmission-daemon-configurationparameter: boolean queue-stalled-enabled? ¶When
#t, the daemon will consider torrents for which it has not shared data in the pastqueue-stalled-minutesminutes to be stalled and not count them against itsdownload-queue-sizeandseed-queue-sizelimits.Defaults to ‘#t’.
transmission-daemon-configurationparameter: non-negative-integer queue-stalled-minutes ¶The maximum period, in minutes, a torrent may be idle before it is considered to be stalled, when
queue-stalled-enabled?is#t.Defaults to ‘30’.
transmission-daemon-configurationparameter: boolean ratio-limit-enabled? ¶When
#t, a torrent being seeded will automatically be paused once it reaches the ratio specified byratio-limit.Defaults to ‘#f’.
transmission-daemon-configurationparameter: non-negative-rational ratio-limit ¶The ratio at which a torrent being seeded will be paused, when
ratio-limit-enabled?is#t.Defaults to ‘2.0’.
transmission-daemon-configurationparameter: boolean idle-seeding-limit-enabled? ¶When
#t, a torrent being seeded will automatically be paused once it has been idle foridle-seeding-limitminutes.Defaults to ‘#f’.
transmission-daemon-configurationparameter: non-negative-integer idle-seeding-limit ¶The maximum period, in minutes, a torrent being seeded may be idle before it is paused, when
idle-seeding-limit-enabled?is#t.Defaults to ‘30’.
transmission-daemon-configurationparameter: boolean dht-enabled? ¶Enable the distributed hash table (DHT) protocol, which supports the use of trackerless torrents.
Defaults to ‘#t’.
transmission-daemon-configurationparameter: boolean lpd-enabled? ¶Enable local peer discovery (LPD), which allows the discovery of peers on the local network and may reduce the amount of data sent over the public Internet.
Defaults to ‘#f’.
transmission-daemon-configurationparameter: boolean pex-enabled? ¶Enable peer exchange (PEX), which reduces the daemon’s reliance on external trackers and may improve its performance.
Defaults to ‘#t’.
transmission-daemon-configurationparameter: boolean utp-enabled? ¶Enable the micro transport protocol (uTP), which aims to reduce the impact of BitTorrent traffic on other users of the local network while maintaining full utilization of the available bandwidth.
Defaults to ‘#t’.
transmission-daemon-configurationparameter: boolean rpc-enabled? ¶If
#t, enable the remote procedure call (RPC) interface, which allows remote control of the daemon via its Web interface, thetransmission-remotecommand-line client, and similar tools.Defaults to ‘#t’.
transmission-daemon-configurationparameter: string rpc-bind-address ¶The IP address at which to listen for RPC connections, or “0.0.0.0” to listen at all available IP addresses.
Defaults to ‘"0.0.0.0"’.
transmission-daemon-configurationparameter: port-number rpc-port ¶The port on which to listen for RPC connections.
Defaults to ‘9091’.
transmission-daemon-configurationparameter: string rpc-url ¶The path prefix to use in the RPC-endpoint URL.
Defaults to ‘"/transmission/"’.
transmission-daemon-configurationparameter: boolean rpc-authentication-required? ¶When
#t, clients must authenticate (seerpc-usernameandrpc-password) when using the RPC interface. Note this has the side effect of disabling host-name whitelisting (seerpc-host-whitelist-enabled?.Defaults to ‘#f’.
transmission-daemon-configurationparameter: maybe-string rpc-username ¶The username required by clients to access the RPC interface when
rpc-authentication-required?is#t.Defaults to ‘disabled’.
transmission-daemon-configurationparameter: maybe-transmission-password-hash rpc-password ¶The password required by clients to access the RPC interface when
rpc-authentication-required?is#t. This must be specified using a password hash in the format recognized by Transmission clients, either copied from an existing settings.json file or generated using thetransmission-password-hashprocedure.Defaults to ‘disabled’.
transmission-daemon-configurationparameter: boolean rpc-whitelist-enabled? ¶When
#t, RPC requests will be accepted only when they originate from an address specified inrpc-whitelist.Defaults to ‘#t’.
transmission-daemon-configurationparameter: string-list rpc-whitelist ¶The list of IP and IPv6 addresses from which RPC requests will be accepted when
rpc-whitelist-enabled?is#t. Wildcards may be specified using ‘*’.Defaults to ‘("127.0.0.1" "::1")’.
transmission-daemon-configurationparameter: boolean rpc-host-whitelist-enabled? ¶When
#t, RPC requests will be accepted only when they are addressed to a host named inrpc-host-whitelist. Note that requests to “localhost” or “localhost.”, or to a numeric address, are always accepted regardless of these settings.Note also this functionality is disabled when
rpc-authentication-required?is#t.Defaults to ‘#t’.
transmission-daemon-configurationparameter: string-list rpc-host-whitelist ¶The list of host names recognized by the RPC server when
rpc-host-whitelist-enabled?is#t.Defaults to ‘()’.
transmission-daemon-configurationparameter: message-level message-level ¶The minimum severity level of messages to be logged (to /var/log/transmission.log) by the daemon, one of
none(no logging),error,infoanddebug.Defaults to ‘info’.
transmission-daemon-configurationparameter: boolean start-added-torrents? ¶When
#t, torrents are started as soon as they are added; otherwise, they are added in “paused” state.Defaults to ‘#t’.
transmission-daemon-configurationparameter: boolean script-torrent-done-enabled? ¶When
#t, the script specified byscript-torrent-done-filenamewill be invoked each time a torrent completes.Defaults to ‘#f’.
transmission-daemon-configurationparameter: maybe-file-object script-torrent-done-filename ¶A file name or file-like object specifying a script to run each time a torrent completes, when
script-torrent-done-enabled?is#t.Defaults to ‘disabled’.
transmission-daemon-configurationparameter: boolean scrape-paused-torrents-enabled? ¶When
#t, the daemon will scrape trackers for a torrent even when the torrent is paused.Defaults to ‘#t’.
transmission-daemon-configurationparameter: non-negative-integer cache-size-mb ¶The amount of memory, in megabytes, to allocate for the daemon’s in-memory cache. A larger value may increase performance by reducing the frequency of disk I/O.
Defaults to ‘4’.
transmission-daemon-configurationparameter: boolean prefetch-enabled? ¶When
#t, the daemon will try to improve I/O performance by hinting to the operating system which data is likely to be read next from disk to satisfy requests from peers.Defaults to ‘#t’.
Next: Kerberos服务, Previous: File-Sharing Services, Up: 服务 [Contents][Index]
12.9.16 监控服务
Tailon Service
Tailon is a web application for viewing and searching log files.
The following example will configure the service with default values. By
default, Tailon can be accessed on port 8080 (http://localhost:8080).
(service tailon-service-type)
The following example customises more of the Tailon configuration, adding
sed to the list of allowed commands.
(service tailon-service-type
(tailon-configuration
(config-file
(tailon-configuration-file
(allowed-commands '("tail" "grep" "awk" "sed"))))))
- Data Type: tailon-configuration
Data type representing the configuration of Tailon. This type has the following parameters:
config-file(default:(tailon-configuration-file))The configuration file to use for Tailon. This can be set to a tailon-configuration-file record value, or any gexp (see G-表达式).
For example, to instead use a local file, the
local-filefunction can be used:(service tailon-service-type (tailon-configuration (config-file (local-file "./my-tailon.conf"))))package(default:tailon)The tailon package to use.
- Data Type: tailon-configuration-file
Data type representing the configuration options for Tailon. This type has the following parameters:
files(default:(list "/var/log"))List of files to display. The list can include strings for a single file or directory, or a list, where the first item is the name of a subsection, and the remaining items are the files or directories in that subsection.
bind(default:"localhost:8080")Address and port to which Tailon should bind on.
relative-root(default:#f)URL path to use for Tailon, set to
#fto not use a path.allow-transfers?(default:#t)Allow downloading the log files in the web interface.
follow-names?(default:#t)Allow tailing of not-yet existent files.
tail-lines(default:200)Number of lines to read initially from each file.
allowed-commands(default:(list "tail" "grep" "awk"))Commands to allow running. By default,
sedis disabled.debug?(default:#f)Set
debug?to#tto show debug messages.wrap-lines(default:#t)Initial line wrapping state in the web interface. Set to
#tto initially wrap lines (the default), or to#fto initially not wrap lines.http-auth(default:#f)HTTP authentication type to use. Set to
#fto disable authentication (the default). Supported values are"digest"or"basic".users(default:#f)If HTTP authentication is enabled (see
http-auth), access will be restricted to the credentials provided here. To configure users, use a list of pairs, where the first element of the pair is the username, and the 2nd element of the pair is the password.(tailon-configuration-file (http-auth "basic") (users '(("user1" . "password1") ("user2" . "password2"))))
Darkstat Service
Darkstat is a packet sniffer that captures network traffic, calculates statistics about usage, and serves reports over HTTP.
- Variable: Scheme Variable darkstat-service-type
This is the service type for the darkstat service, its value must be a
darkstat-configurationrecord as in this example:(service darkstat-service-type (darkstat-configuration (interface "eno1")))
- Data Type: darkstat-configuration
Data type representing the configuration of
darkstat.package(default:darkstat)The darkstat package to use.
interfaceCapture traffic on the specified network interface.
port(default:"667")Bind the web interface to the specified port.
bind-address(default:"127.0.0.1")Bind the web interface to the specified address.
base(default:"/")Specify the path of the base URL. This can be useful if
darkstatis accessed via a reverse proxy.
Prometheus Node Exporter Service
The Prometheus “node exporter” makes hardware and operating system statistics provided by the Linux kernel available for the Prometheus monitoring system. This service should be deployed on all physical nodes and virtual machines, where monitoring these statistics is desirable.
- Variable: Scheme variable prometheus-node-exporter-service-type
This is the service type for the prometheus-node-exporter service, its value must be a
prometheus-node-exporter-configuration.(service prometheus-node-exporter-service-type)
- Data Type: prometheus-node-exporter-configuration
Data type representing the configuration of
node_exporter.package(default:go-github-com-prometheus-node-exporter)The prometheus-node-exporter package to use.
web-listen-address(default:":9100")Bind the web interface to the specified address.
textfile-directory(default:"/var/lib/prometheus/node-exporter")This directory can be used to export metrics specific to this machine. Files containing metrics in the text format, with the filename ending in
.promshould be placed in this directory.extra-options(default:'())Extra options to pass to the Prometheus node exporter.
Zabbix server
Zabbix is a high performance monitoring system that can collect data from a variety of sources and provide the results in a web-based interface. Alerting and reporting is built-in, as well as templates for common operating system metrics such as network utilization, CPU load, and disk space consumption.
This service provides the central Zabbix monitoring service; you also need
zabbix-front-end-service-type to configure
Zabbix and display results, and optionally zabbix-agent-service-type on machines that should be monitored
(other data sources are supported, such as Prometheus Node Exporter).
- Variable: Scheme variable zabbix-server-service-type
This is the service type for the Zabbix server service. Its value must be a
zabbix-server-configurationrecord, shown below.
- Data Type: zabbix-server-configuration
Available
zabbix-server-configurationfields are:zabbix-server(default:zabbix-server) (type: file-like)The zabbix-server package.
user(default:"zabbix") (type: string)User who will run the Zabbix server.
group(default:"zabbix") (type: group)Group who will run the Zabbix server.
db-host(default:"127.0.0.1") (type: string)Database host name.
db-name(default:"zabbix") (type: string)Database name.
db-user(default:"zabbix") (type: string)Database user.
db-password(default:"") (type: string)Database password. Please, use
include-fileswithDBPassword=SECRETinside a specified file instead.db-port(default:5432) (type: number)Database port.
log-type(default:"") (type: string)Specifies where log messages are written to:
-
system- syslog. -
file- file specified withlog-fileparameter. -
console- standard output.
-
log-file(default:"/var/log/zabbix/server.log") (type: string)Log file name for
log-typefileparameter.pid-file(default:"/var/run/zabbix/zabbix_server.pid") (type: string)Name of PID file.
ssl-ca-location(default:"/etc/ssl/certs/ca-certificates.crt") (type: string)The location of certificate authority (CA) files for SSL server certificate verification.
ssl-cert-location(default:"/etc/ssl/certs") (type: string)Location of SSL client certificates.
extra-options(default:"") (type: extra-options)Extra options will be appended to Zabbix server configuration file.
include-files(default:()) (type: include-files)You may include individual files or all files in a directory in the configuration file.
Zabbix agent
The Zabbix agent gathers information about the running system for the Zabbix monitoring server. It has a variety of built-in checks, and can be extended with custom user parameters.
- Variable: Scheme variable zabbix-agent-service-type
This is the service type for the Zabbix agent service. Its value must be a
zabbix-agent-configurationrecord, shown below.
- Data Type: zabbix-agent-configuration
Available
zabbix-agent-configurationfields are:zabbix-agent(default:zabbix-agentd) (type: file-like)The zabbix-agent package.
user(default:"zabbix") (type: string)User who will run the Zabbix agent.
group(default:"zabbix") (type: group)Group who will run the Zabbix agent.
hostname(default:"") (type: string)Unique, case sensitive hostname which is required for active checks and must match hostname as configured on the server.
log-type(default:"") (type: string)Specifies where log messages are written to:
-
system- syslog. -
file- file specified withlog-fileparameter. -
console- standard output.
-
log-file(default:"/var/log/zabbix/agent.log") (type: string)Log file name for
log-typefileparameter.pid-file(default:"/var/run/zabbix/zabbix_agent.pid") (type: string)Name of PID file.
server(default:("127.0.0.1")) (type: list)List of IP addresses, optionally in CIDR notation, or hostnames of Zabbix servers and Zabbix proxies. Incoming connections will be accepted only from the hosts listed here.
server-active(default:("127.0.0.1")) (type: list)List of IP:port (or hostname:port) pairs of Zabbix servers and Zabbix proxies for active checks. If port is not specified, default port is used. If this parameter is not specified, active checks are disabled.
extra-options(default:"") (type: extra-options)Extra options will be appended to Zabbix server configuration file.
include-files(default:()) (type: include-files)You may include individual files or all files in a directory in the configuration file.
Zabbix front-end
The Zabbix front-end provides a web interface to Zabbix. It does not need to run on the same machine as the Zabbix server. This service works by extending the PHP-FPM and NGINX services with the configuration necessary for loading the Zabbix user interface.
- Variable: Scheme variable zabbix-front-end-service-type
This is the service type for the Zabbix web frontend. Its value must be a
zabbix-front-end-configurationrecord, shown below.
- Data Type: zabbix-front-end-configuration
Available
zabbix-front-end-configurationfields are:zabbix-server(default:zabbix-server) (type: file-like)The Zabbix server package to use.
nginx(default:()) (type: list)List of
nginx-server-configurationblocks for the Zabbix front-end. When empty, a default that listens on port 80 is used.db-host(default:"localhost") (type: string)Database host name.
db-port(default:5432) (type: number)Database port.
db-name(default:"zabbix") (type: string)Database name.
db-user(default:"zabbix") (type: string)Database user.
db-password(default:"") (type: string)Database password. Please, use
db-secret-fileinstead.db-secret-file(default:"") (type: string)Secret file which will be appended to zabbix.conf.php file. This file contains credentials for use by Zabbix front-end. You are expected to create it manually.
zabbix-host(default:"localhost") (type: string)Zabbix server hostname.
zabbix-port(default:10051) (type: number)Zabbix server port.
Next: LDAP Services, Previous: 监控服务, Up: 服务 [Contents][Index]
12.9.17 Kerberos服务
The (gnu services kerberos) module provides services relating to the
authentication protocol Kerberos.
Krb5 Service
Programs using a Kerberos client library normally expect a configuration file in /etc/krb5.conf. This service generates such a file from a definition provided in the operating system declaration. It does not cause any daemon to be started.
No “keytab” files are provided by this service—you must explicitly
create them. This service is known to work with the MIT client library,
mit-krb5. Other implementations have not been tested.
- Scheme Variable: krb5-service-type
A service type for Kerberos 5 clients.
Here is an example of its use:
(service krb5-service-type
(krb5-configuration
(default-realm "EXAMPLE.COM")
(allow-weak-crypto? #t)
(realms (list
(krb5-realm
(name "EXAMPLE.COM")
(admin-server "groucho.example.com")
(kdc "karl.example.com"))
(krb5-realm
(name "ARGRX.EDU")
(admin-server "kerb-admin.argrx.edu")
(kdc "keys.argrx.edu"))))))
This example provides a Kerberos 5 client configuration which:
- Recognizes two realms, viz: “EXAMPLE.COM” and “ARGRX.EDU”, both of which have distinct administration servers and key distribution centers;
- Will default to the realm “EXAMPLE.COM” if the realm is not explicitly specified by clients;
- Accepts services which only support encryption types known to be weak.
The krb5-realm and krb5-configuration types have many fields.
Only the most commonly used ones are described here. For a full list, and
more detailed explanation of each, see the MIT
krb5.conf
documentation.
- Data Type: krb5-realm
-
名字This field is a string identifying the name of the realm. A common convention is to use the fully qualified DNS name of your organization, converted to upper case.
admin-serverThis field is a string identifying the host where the administration server is running.
kdcThis field is a string identifying the key distribution center for the realm.
- Data Type: krb5-configuration
-
allow-weak-crypto?(default:#f)If this flag is
#tthen services which only offer encryption algorithms known to be weak will be accepted.default-realm(default:#f)This field should be a string identifying the default Kerberos realm for the client. You should set this field to the name of your Kerberos realm. If this value is
#fthen a realm must be specified with every Kerberos principal when invoking programs such askinit.realmsThis should be a non-empty list of
krb5-realmobjects, which clients may access. Normally, one of them will have anamefield matching thedefault-realmfield.
PAM krb5 Service
The pam-krb5 service allows for login authentication and password
management via Kerberos. You will need this service if you want PAM enabled
applications to authenticate users using Kerberos.
- Scheme Variable: pam-krb5-service-type
A service type for the Kerberos 5 PAM module.
- Data Type: pam-krb5-configuration
Data type representing the configuration of the Kerberos 5 PAM module. This type has the following parameters:
pam-krb5(default:pam-krb5)The pam-krb5 package to use.
minimum-uid(default:1000)The smallest user ID for which Kerberos authentications should be attempted. Local accounts with lower values will silently fail to authenticate.
Next: Web服务, Previous: Kerberos服务, Up: 服务 [Contents][Index]
12.9.18 LDAP Services
The (gnu services authentication) module provides the
nslcd-service-type, which can be used to authenticate against an LDAP
server. In addition to configuring the service itself, you may want to add
ldap as a name service to the Name Service Switch. See Name Service Switch for detailed information.
Here is a simple operating system declaration with a default configuration
of the nslcd-service-type and a Name Service Switch configuration
that consults the ldap name service last:
(use-service-modules authentication) (use-modules (gnu system nss)) ... (operating-system ... (services (cons* (service nslcd-service-type) (service dhcp-client-service-type) %base-services)) (name-service-switch (let ((services (list (name-service (name "db")) (name-service (name "files")) (name-service (name "ldap"))))) (name-service-switch (inherit %mdns-host-lookup-nss) (password services) (shadow services) (group services) (netgroup services) (gshadow services)))))
Available nslcd-configuration fields are:
nslcd-configurationparameter: package nss-pam-ldapd ¶The
nss-pam-ldapdpackage to use.
nslcd-configurationparameter: maybe-number threads ¶The number of threads to start that can handle requests and perform LDAP queries. Each thread opens a separate connection to the LDAP server. The default is to start 5 threads.
Defaults to ‘disabled’.
nslcd-configurationparameter: string uid ¶This specifies the user id with which the daemon should be run.
Defaults to ‘"nslcd"’.
nslcd-configurationparameter: string gid ¶This specifies the group id with which the daemon should be run.
Defaults to ‘"nslcd"’.
nslcd-configurationparameter: log-option log ¶This option controls the way logging is done via a list containing SCHEME and LEVEL. The SCHEME argument may either be the symbols ‘none’ or ‘syslog’, or an absolute file name. The LEVEL argument is optional and specifies the log level. The log level may be one of the following symbols: ‘crit’, ‘error’, ‘warning’, ‘notice’, ‘info’ or ‘debug’. All messages with the specified log level or higher are logged.
Defaults to ‘("/var/log/nslcd" info)’.
nslcd-configurationparameter: list uri ¶The list of LDAP server URIs. Normally, only the first server will be used with the following servers as fall-back.
Defaults to ‘("ldap://localhost:389/")’.
nslcd-configurationparameter: maybe-string ldap-version ¶The version of the LDAP protocol to use. The default is to use the maximum version supported by the LDAP library.
Defaults to ‘disabled’.
nslcd-configurationparameter: maybe-string binddn ¶Specifies the distinguished name with which to bind to the directory server for lookups. The default is to bind anonymously.
Defaults to ‘disabled’.
nslcd-configurationparameter: maybe-string bindpw ¶Specifies the credentials with which to bind. This option is only applicable when used with binddn.
Defaults to ‘disabled’.
nslcd-configurationparameter: maybe-string rootpwmoddn ¶Specifies the distinguished name to use when the root user tries to modify a user’s password using the PAM module.
Defaults to ‘disabled’.
nslcd-configurationparameter: maybe-string rootpwmodpw ¶Specifies the credentials with which to bind if the root user tries to change a user’s password. This option is only applicable when used with rootpwmoddn
Defaults to ‘disabled’.
nslcd-configurationparameter: maybe-string sasl-mech ¶Specifies the SASL mechanism to be used when performing SASL authentication.
Defaults to ‘disabled’.
nslcd-configurationparameter: maybe-string sasl-realm ¶Specifies the SASL realm to be used when performing SASL authentication.
Defaults to ‘disabled’.
nslcd-configurationparameter: maybe-string sasl-authcid ¶Specifies the authentication identity to be used when performing SASL authentication.
Defaults to ‘disabled’.
nslcd-configurationparameter: maybe-string sasl-authzid ¶Specifies the authorization identity to be used when performing SASL authentication.
Defaults to ‘disabled’.
nslcd-configurationparameter: maybe-boolean sasl-canonicalize? ¶Determines whether the LDAP server host name should be canonicalised. If this is enabled the LDAP library will do a reverse host name lookup. By default, it is left up to the LDAP library whether this check is performed or not.
Defaults to ‘disabled’.
nslcd-configurationparameter: maybe-string krb5-ccname ¶Set the name for the GSS-API Kerberos credentials cache.
Defaults to ‘disabled’.
nslcd-configurationparameter: string base ¶The directory search base.
Defaults to ‘"dc=example,dc=com"’.
nslcd-configurationparameter: scope-option scope ¶Specifies the search scope (subtree, onelevel, base or children). The default scope is subtree; base scope is almost never useful for name service lookups; children scope is not supported on all servers.
Defaults to ‘(subtree)’.
nslcd-configurationparameter: maybe-deref-option deref ¶Specifies the policy for dereferencing aliases. The default policy is to never dereference aliases.
Defaults to ‘disabled’.
nslcd-configurationparameter: maybe-boolean referrals ¶Specifies whether automatic referral chasing should be enabled. The default behaviour is to chase referrals.
Defaults to ‘disabled’.
nslcd-configurationparameter: list-of-map-entries maps ¶This option allows for custom attributes to be looked up instead of the default RFC 2307 attributes. It is a list of maps, each consisting of the name of a map, the RFC 2307 attribute to match and the query expression for the attribute as it is available in the directory.
Defaults to ‘()’.
nslcd-configurationparameter: list-of-filter-entries filters ¶A list of filters consisting of the name of a map to which the filter applies and an LDAP search filter expression.
Defaults to ‘()’.
nslcd-configurationparameter: maybe-number bind-timelimit ¶Specifies the time limit in seconds to use when connecting to the directory server. The default value is 10 seconds.
Defaults to ‘disabled’.
nslcd-configurationparameter: maybe-number timelimit ¶Specifies the time limit (in seconds) to wait for a response from the LDAP server. A value of zero, which is the default, is to wait indefinitely for searches to be completed.
Defaults to ‘disabled’.
nslcd-configurationparameter: maybe-number idle-timelimit ¶Specifies the period if inactivity (in seconds) after which the con‐ nection to the LDAP server will be closed. The default is not to time out connections.
Defaults to ‘disabled’.
nslcd-configurationparameter: maybe-number reconnect-sleeptime ¶Specifies the number of seconds to sleep when connecting to all LDAP servers fails. By default one second is waited between the first failure and the first retry.
Defaults to ‘disabled’.
nslcd-configurationparameter: maybe-number reconnect-retrytime ¶Specifies the time after which the LDAP server is considered to be permanently unavailable. Once this time is reached retries will be done only once per this time period. The default value is 10 seconds.
Defaults to ‘disabled’.
nslcd-configurationparameter: maybe-ssl-option ssl ¶Specifies whether to use SSL/TLS or not (the default is not to). If ’start-tls is specified then StartTLS is used rather than raw LDAP over SSL.
Defaults to ‘disabled’.
nslcd-configurationparameter: maybe-tls-reqcert-option tls-reqcert ¶Specifies what checks to perform on a server-supplied certificate. The meaning of the values is described in the ldap.conf(5) manual page.
Defaults to ‘disabled’.
nslcd-configurationparameter: maybe-string tls-cacertdir ¶Specifies the directory containing X.509 certificates for peer authen‐ tication. This parameter is ignored when using GnuTLS.
Defaults to ‘disabled’.
nslcd-configurationparameter: maybe-string tls-cacertfile ¶Specifies the path to the X.509 certificate for peer authentication.
Defaults to ‘disabled’.
nslcd-configurationparameter: maybe-string tls-randfile ¶Specifies the path to an entropy source. This parameter is ignored when using GnuTLS.
Defaults to ‘disabled’.
nslcd-configurationparameter: maybe-string tls-ciphers ¶Specifies the ciphers to use for TLS as a string.
Defaults to ‘disabled’.
nslcd-configurationparameter: maybe-string tls-cert ¶Specifies the path to the file containing the local certificate for client TLS authentication.
Defaults to ‘disabled’.
nslcd-configurationparameter: maybe-string tls-key ¶Specifies the path to the file containing the private key for client TLS authentication.
Defaults to ‘disabled’.
nslcd-configurationparameter: maybe-number pagesize ¶Set this to a number greater than 0 to request paged results from the LDAP server in accordance with RFC2696. The default (0) is to not request paged results.
Defaults to ‘disabled’.
nslcd-configurationparameter: maybe-ignore-users-option nss-initgroups-ignoreusers ¶This option prevents group membership lookups through LDAP for the specified users. Alternatively, the value ’all-local may be used. With that value nslcd builds a full list of non-LDAP users on startup.
Defaults to ‘disabled’.
nslcd-configurationparameter: maybe-number nss-min-uid ¶This option ensures that LDAP users with a numeric user id lower than the specified value are ignored.
Defaults to ‘disabled’.
nslcd-configurationparameter: maybe-number nss-uid-offset ¶This option specifies an offset that is added to all LDAP numeric user ids. This can be used to avoid user id collisions with local users.
Defaults to ‘disabled’.
nslcd-configurationparameter: maybe-number nss-gid-offset ¶This option specifies an offset that is added to all LDAP numeric group ids. This can be used to avoid user id collisions with local groups.
Defaults to ‘disabled’.
nslcd-configurationparameter: maybe-boolean nss-nested-groups ¶If this option is set, the member attribute of a group may point to another group. Members of nested groups are also returned in the higher level group and parent groups are returned when finding groups for a specific user. The default is not to perform extra searches for nested groups.
Defaults to ‘disabled’.
nslcd-configurationparameter: maybe-boolean nss-getgrent-skipmembers ¶If this option is set, the group member list is not retrieved when looking up groups. Lookups for finding which groups a user belongs to will remain functional so the user will likely still get the correct groups assigned on login.
Defaults to ‘disabled’.
nslcd-configurationparameter: maybe-boolean nss-disable-enumeration ¶If this option is set, functions which cause all user/group entries to be loaded from the directory will not succeed in doing so. This can dramatically reduce LDAP server load in situations where there are a great number of users and/or groups. This option is not recommended for most configurations.
Defaults to ‘disabled’.
nslcd-configurationparameter: maybe-string validnames ¶This option can be used to specify how user and group names are verified within the system. This pattern is used to check all user and group names that are requested and returned from LDAP.
Defaults to ‘disabled’.
nslcd-configurationparameter: maybe-boolean ignorecase ¶This specifies whether or not to perform searches using case-insensitive matching. Enabling this could open up the system to authorization bypass vulnerabilities and introduce nscd cache poisoning vulnerabilities which allow denial of service.
Defaults to ‘disabled’.
nslcd-configurationparameter: maybe-boolean pam-authc-ppolicy ¶This option specifies whether password policy controls are requested and handled from the LDAP server when performing user authentication.
Defaults to ‘disabled’.
nslcd-configurationparameter: maybe-string pam-authc-search ¶By default nslcd performs an LDAP search with the user’s credentials after BIND (authentication) to ensure that the BIND operation was successful. The default search is a simple check to see if the user’s DN exists. A search filter can be specified that will be used instead. It should return at least one entry.
Defaults to ‘disabled’.
nslcd-configurationparameter: maybe-string pam-authz-search ¶This option allows flexible fine tuning of the authorisation check that should be performed. The search filter specified is executed and if any entries match, access is granted, otherwise access is denied.
Defaults to ‘disabled’.
nslcd-configurationparameter: maybe-string pam-password-prohibit-message ¶If this option is set password modification using pam_ldap will be denied and the specified message will be presented to the user instead. The message can be used to direct the user to an alternative means of changing their password.
Defaults to ‘disabled’.
nslcd-configurationparameter: list pam-services ¶List of pam service names for which LDAP authentication should suffice.
Defaults to ‘()’.
Next: 证书服务, Previous: LDAP Services, Up: 服务 [Contents][Index]
12.9.19 Web服务
The (gnu services web) module provides the Apache HTTP Server, the
nginx web server, and also a fastcgi wrapper daemon.
Apache HTTP Server
- Scheme Variable: httpd-service-type
Service type for the Apache HTTP server (httpd). The value for this service type is a
httpd-configurationrecord.A simple example configuration is given below.
(service httpd-service-type (httpd-configuration (config (httpd-config-file (server-name "www.example.com") (document-root "/srv/http/www.example.com")))))Other services can also extend the
httpd-service-typeto add to the configuration.(simple-service 'www.example.com-server httpd-service-type (list (httpd-virtualhost "*:80" (list (string-join '("ServerName www.example.com" "DocumentRoot /srv/http/www.example.com") "\n")))))
The details for the httpd-configuration, httpd-module,
httpd-config-file and httpd-virtualhost record types are given
below.
- Data Type: httpd-configuration
This data type represents the configuration for the httpd service.
package(default:httpd)The httpd package to use.
pid-file(default:"/var/run/httpd")The pid file used by the shepherd-service.
config(default:(httpd-config-file))The configuration file to use with the httpd service. The default value is a
httpd-config-filerecord, but this can also be a different G-expression that generates a file, for example aplain-file. A file outside of the store can also be specified through a string.
- Data Type: httpd-module
This data type represents a module for the httpd service.
名字The name of the module.
fileThe file for the module. This can be relative to the httpd package being used, the absolute location of a file, or a G-expression for a file within the store, for example
(file-append mod-wsgi "/modules/mod_wsgi.so").
- Scheme Variable: %default-httpd-modules
A default list of
httpd-moduleobjects.
- Data Type: httpd-config-file
This data type represents a configuration file for the httpd service.
modules(default:%default-httpd-modules)The modules to load. Additional modules can be added here, or loaded by additional configuration.
For example, in order to handle requests for PHP files, you can use Apache’s
mod_proxy_fcgimodule along withphp-fpm-service-type:(service httpd-service-type (httpd-configuration (config (httpd-config-file (modules (cons* (httpd-module (name "proxy_module") (file "modules/mod_proxy.so")) (httpd-module (name "proxy_fcgi_module") (file "modules/mod_proxy_fcgi.so")) %default-httpd-modules)) (extra-config (list "\ <FilesMatch \\.php$> SetHandler \"proxy:unix:/var/run/php-fpm.sock|fcgi://localhost/\" </FilesMatch>")))))) (service php-fpm-service-type (php-fpm-configuration (socket "/var/run/php-fpm.sock") (socket-group "httpd")))
server-root(default:httpd)The
ServerRootin the configuration file, defaults to the httpd package. Directives includingIncludeandLoadModuleare taken as relative to the server root.server-name(default:#f)The
ServerNamein the configuration file, used to specify the request scheme, hostname and port that the server uses to identify itself.This doesn’t need to be set in the server config, and can be specified in virtual hosts. The default is
#fto not specify aServerName.document-root(default:"/srv/http")The
DocumentRootfrom which files will be served.listen(default:'("80"))The list of values for the
Listendirectives in the config file. The value should be a list of strings, when each string can specify the port number to listen on, and optionally the IP address and protocol to use.pid-file(default:"/var/run/httpd")The
PidFileto use. This should match thepid-fileset in thehttpd-configurationso that the Shepherd service is configured correctly.error-log(default:"/var/log/httpd/error_log")The
ErrorLogto which the server will log errors.user(default:"httpd")The
Userwhich the server will answer requests as.group(default:"httpd")The
Groupwhich the server will answer requests as.extra-config(default:(list "TypesConfig etc/httpd/mime.types"))A flat list of strings and G-expressions which will be added to the end of the configuration file.
Any values which the service is extended with will be appended to this list.
- Data Type: httpd-virtualhost
This data type represents a virtualhost configuration block for the httpd service.
These should be added to the extra-config for the httpd-service.
(simple-service 'www.example.com-server httpd-service-type (list (httpd-virtualhost "*:80" (list (string-join '("ServerName www.example.com" "DocumentRoot /srv/http/www.example.com") "\n")))))addresses-and-portsThe addresses and ports for the
VirtualHostdirective.contentsThe contents of the
VirtualHostdirective, this should be a list of strings and G-expressions.
NGINX
- Scheme Variable: nginx-service-type
Service type for the NGinx web server. The value for this service type is a
<nginx-configuration>record.A simple example configuration is given below.
(service nginx-service-type (nginx-configuration (server-blocks (list (nginx-server-configuration (server-name '("www.example.com")) (root "/srv/http/www.example.com"))))))In addition to adding server blocks to the service configuration directly, this service can be extended by other services to add server blocks, as in this example:
(simple-service 'my-extra-server nginx-service-type (list (nginx-server-configuration (root "/srv/http/extra-website") (try-files (list "$uri" "$uri/index.html")))))
At startup, nginx has not yet read its configuration file, so it
uses a default file to log error messages. If it fails to load its
configuration file, that is where error messages are logged. After the
configuration file is loaded, the default error log file changes as per
configuration. In our case, startup error messages can be found in
/var/run/nginx/logs/error.log, and after configuration in
/var/log/nginx/error.log. The second location can be changed with
the log-directory configuration option.
- Data Type: nginx-configuration
This data type represents the configuration for NGinx. Some configuration can be done through this and the other provided record types, or alternatively, a config file can be provided.
nginx(default:nginx)The nginx package to use.
shepherd-requirement(default:'())This is a list of symbols naming Shepherd services the nginx service will depend on.
This is useful if you would like
nginxto be started after a back-end web server or a logging service such as Anonip has been started.log-directory(default:"/var/log/nginx")The directory to which NGinx will write log files.
run-directory(default:"/var/run/nginx")The directory in which NGinx will create a pid file, and write temporary files.
server-blocks(default:'())A list of server blocks to create in the generated configuration file, the elements should be of type
<nginx-server-configuration>.The following example would setup NGinx to serve
www.example.comfrom the/srv/http/www.example.comdirectory, without using HTTPS.(service nginx-service-type (nginx-configuration (server-blocks (list (nginx-server-configuration (server-name '("www.example.com")) (root "/srv/http/www.example.com"))))))upstream-blocks(default:'())A list of upstream blocks to create in the generated configuration file, the elements should be of type
<nginx-upstream-configuration>.Configuring upstreams through the
upstream-blockscan be useful when combined withlocationsin the<nginx-server-configuration>records. The following example creates a server configuration with one location configuration, that will proxy requests to a upstream configuration, which will handle requests with two servers.(service nginx-service-type (nginx-configuration (server-blocks (list (nginx-server-configuration (server-name '("www.example.com")) (root "/srv/http/www.example.com") (locations (list (nginx-location-configuration (uri "/path1") (body '("proxy_pass http://server-proxy;")))))))) (upstream-blocks (list (nginx-upstream-configuration (name "server-proxy") (servers (list "server1.example.com" "server2.example.com")))))))file(default:#f)If a configuration file is provided, this will be used, rather than generating a configuration file from the provided
log-directory,run-directory,server-blocksandupstream-blocks. For proper operation, these arguments should match what is in file to ensure that the directories are created when the service is activated.This can be useful if you have an existing configuration file, or it’s not possible to do what is required through the other parts of the nginx-configuration record.
server-names-hash-bucket-size(default:#f)Bucket size for the server names hash tables, defaults to
#fto use the size of the processors cache line.server-names-hash-bucket-max-size(default:#f)Maximum bucket size for the server names hash tables.
modules(default:'())List of nginx dynamic modules to load. This should be a list of file names of loadable modules, as in this example:
(modules (list (file-append nginx-accept-language-module "\ /etc/nginx/modules/ngx_http_accept_language_module.so") (file-append nginx-lua-module "\ /etc/nginx/modules/ngx_http_lua_module.so")))lua-package-path(default:'())List of nginx lua packages to load. This should be a list of package names of loadable lua modules, as in this example:
(lua-package-path (list lua-resty-core lua-resty-lrucache lua-resty-signal lua-tablepool lua-resty-shell))lua-package-cpath(default:'())List of nginx lua C packages to load. This should be a list of package names of loadable lua C modules, as in this example:
(lua-package-cpath (list lua-resty-signal))global-directives(default:'((events . ())))Association list of global directives for the top level of the nginx configuration. Values may themselves be association lists.
(global-directives `((worker_processes . 16) (pcre_jit . on) (events . ((worker_connections . 1024)))))extra-content(default:"")Extra content for the
httpblock. Should be string or a string valued G-expression.
- Data Type: nginx-server-configuration
Data type representing the configuration of an nginx server block. This type has the following parameters:
listen(default:'("80" "443 ssl"))Each
listendirective sets the address and port for IP, or the path for a UNIX-domain socket on which the server will accept requests. Both address and port, or only address or only port can be specified. An address may also be a hostname, for example:'("127.0.0.1:8000" "127.0.0.1" "8000" "*:8000" "localhost:8000")
server-name(default:(list 'default))A list of server names this server represents.
'defaultrepresents the default server for connections matching no other server.root(default:"/srv/http")Root of the website nginx will serve.
locations(default:'())A list of nginx-location-configuration or nginx-named-location-configuration records to use within this server block.
index(default:(list "index.html"))Index files to look for when clients ask for a directory. If it cannot be found, Nginx will send the list of files in the directory.
try-files(default:'())A list of files whose existence is checked in the specified order.
nginxwill use the first file it finds to process the request.ssl-certificate(default:#f)Where to find the certificate for secure connections. Set it to
#fif you don’t have a certificate or you don’t want to use HTTPS.ssl-certificate-key(default:#f)Where to find the private key for secure connections. Set it to
#fif you don’t have a key or you don’t want to use HTTPS.server-tokens?(default:#f)Whether the server should add its configuration to response.
raw-content(default:'())A list of raw lines added to the server block.
- Data Type: nginx-upstream-configuration
Data type representing the configuration of an nginx
upstreamblock. This type has the following parameters:名字Name for this group of servers.
serversSpecify the addresses of the servers in the group. The address can be specified as a IP address (e.g. ‘127.0.0.1’), domain name (e.g. ‘backend1.example.com’) or a path to a UNIX socket using the prefix ‘unix:’. For addresses using an IP address or domain name, the default port is 80, and a different port can be specified explicitly.
extra-contentA string or list of strings to add to the upstream block.
- Data Type: nginx-location-configuration
Data type representing the configuration of an nginx
locationblock. This type has the following parameters:uriURI which this location block matches.
bodyBody of the location block, specified as a list of strings. This can contain many configuration directives. For example, to pass requests to a upstream server group defined using an
nginx-upstream-configurationblock, the following directive would be specified in the body ‘(list "proxy_pass http://upstream-name;")’.
- Data Type: nginx-named-location-configuration
Data type representing the configuration of an nginx named location block. Named location blocks are used for request redirection, and not used for regular request processing. This type has the following parameters:
名字Name to identify this location block.
bodySee nginx-location-configuration body, as the body for named location blocks can be used in a similar way to the
nginx-location-configuration body. One restriction is that the body of a named location block cannot contain location blocks.
Varnish Cache
Varnish is a fast cache server that sits in between web applications and end users. It proxies requests from clients and caches the accessed URLs such that multiple requests for the same resource only creates one request to the back-end.
- Scheme Variable: varnish-service-type
Service type for the Varnish daemon.
- Data Type: varnish-configuration
Data type representing the
varnishservice configuration. This type has the following parameters:package(default:varnish)The Varnish package to use.
name(default:"default")A name for this Varnish instance. Varnish will create a directory in /var/varnish/ with this name and keep temporary files there. If the name starts with a forward slash, it is interpreted as an absolute directory name.
Pass the
-nargument to other Varnish programs to connect to the named instance, e.g.varnishncsa -n default.backend(default:"localhost:8080")The backend to use. This option has no effect if
vclis set.vcl(default: #f)The VCL (Varnish Configuration Language) program to run. If this is
#f, Varnish will proxybackendusing the default configuration. Otherwise this must be a file-like object with valid VCL syntax.For example, to mirror www.gnu.org with VCL you can do something along these lines:
(define %gnu-mirror (plain-file "gnu.vcl" "vcl 4.1; backend gnu { .host = \"www.gnu.org\"; }")) (operating-system ;; … (services (cons (service varnish-service-type (varnish-configuration (listen '(":80")) (vcl %gnu-mirror))) %base-services)))
The configuration of an already running Varnish instance can be inspected and changed using the
varnishadmprogram.Consult the Varnish User Guide and Varnish Book for comprehensive documentation on Varnish and its configuration language.
listen(default:'("localhost:80"))List of addresses Varnish will listen on.
storage(default:'("malloc,128m"))List of storage backends that will be available in VCL.
parameters(default:'())List of run-time parameters in the form
'(("parameter" . "value")).extra-options(default:'())Additional arguments to pass to the
varnishdprocess.
Patchwork
Patchwork is a patch tracking system. It can collect patches sent to a mailing list, and display them in a web interface.
- Scheme Variable: patchwork-service-type
Service type for Patchwork.
The following example is an example of a minimal service for Patchwork, for
the patchwork.example.com domain.
(service patchwork-service-type
(patchwork-configuration
(domain "patchwork.example.com")
(settings-module
(patchwork-settings-module
(allowed-hosts (list domain))
(default-from-email "patchwork@patchwork.example.com")))
(getmail-retriever-config
(getmail-retriever-configuration
(type "SimpleIMAPSSLRetriever")
(server "imap.example.com")
(port 993)
(username "patchwork")
(password-command
(list (file-append coreutils "/bin/cat")
"/etc/getmail-patchwork-imap-password"))
(extra-parameters
'((mailboxes . ("Patches"))))))))
There are three records for configuring the Patchwork service. The
<patchwork-configuration> relates to the configuration for Patchwork
within the HTTPD service.
The settings-module field within the <patchwork-configuration>
record can be populated with the <patchwork-settings-module> record,
which describes a settings module that is generated within the Guix store.
For the database-configuration field within the
<patchwork-settings-module>, the
<patchwork-database-configuration> must be used.
- Data Type: patchwork-configuration
Data type representing the Patchwork service configuration. This type has the following parameters:
patchwork(default:patchwork)The Patchwork package to use.
domainThe domain to use for Patchwork, this is used in the HTTPD service virtual host.
settings-moduleThe settings module to use for Patchwork. As a Django application, Patchwork is configured with a Python module containing the settings. This can either be an instance of the
<patchwork-settings-module>record, any other record that represents the settings in the store, or a directory outside of the store.static-path(default:"/static/")The path under which the HTTPD service should serve the static files.
getmail-retriever-configThe getmail-retriever-configuration record value to use with Patchwork. Getmail will be configured with this value, the messages will be delivered to Patchwork.
- Data Type: patchwork-settings-module
Data type representing a settings module for Patchwork. Some of these settings relate directly to Patchwork, but others relate to Django, the web framework used by Patchwork, or the Django Rest Framework library. This type has the following parameters:
database-configuration(default:(patchwork-database-configuration))The database connection settings used for Patchwork. See the
<patchwork-database-configuration>record type for more information.secret-key-file(default:"/etc/patchwork/django-secret-key")Patchwork, as a Django web application uses a secret key for cryptographically signing values. This file should contain a unique unpredictable value.
If this file does not exist, it will be created and populated with a random value by the patchwork-setup shepherd service.
This setting relates to Django.
allowed-hostsA list of valid hosts for this Patchwork service. This should at least include the domain specified in the
<patchwork-configuration>record.This is a Django setting.
default-from-emailThe email address from which Patchwork should send email by default.
This is a Patchwork setting.
static-url(default:#f)The URL to use when serving static assets. It can be part of a URL, or a full URL, but must end in a
/.If the default value is used, the
static-pathvalue from the<patchwork-configuration>record will be used.This is a Django setting.
admins(default:'())Email addresses to send the details of errors that occur. Each value should be a list containing two elements, the name and then the email address.
This is a Django setting.
debug?(default:#f)Whether to run Patchwork in debug mode. If set to
#t, detailed error messages will be shown.This is a Django setting.
enable-rest-api?(default:#t)Whether to enable the Patchwork REST API.
This is a Patchwork setting.
enable-xmlrpc?(default:#t)Whether to enable the XML RPC API.
This is a Patchwork setting.
force-https-links?(default:#t)Whether to use HTTPS links on Patchwork pages.
This is a Patchwork setting.
extra-settings(default:"")Extra code to place at the end of the Patchwork settings module.
- Data Type: patchwork-database-configuration
Data type representing the database configuration for Patchwork.
engine(default:"django.db.backends.postgresql_psycopg2")The database engine to use.
name(default:"patchwork")The name of the database to use.
user(default:"httpd")The user to connect to the database as.
password(default:"")The password to use when connecting to the database.
host(default:"")The host to make the database connection to.
port(default:"")The port on which to connect to the database.
Mumi
Mumi is a Web interface to the Debbugs bug tracker, by default for the GNU instance. Mumi is a Web server, but it also fetches and indexes mail retrieved from Debbugs.
- Scheme Variable: mumi-service-type
This is the service type for Mumi.
- Data Type: mumi-configuration
Data type representing the Mumi service configuration. This type has the following fields:
mumi(default:mumi)The Mumi package to use.
mailer?(default:#true)Whether to enable or disable the mailer component.
mumi-configuration-senderThe email address used as the sender for comments.
mumi-configuration-smtpA URI to configure the SMTP settings for Mailutils. This could be something like
sendmail:///path/to/bin/msmtpor any other URI supported by Mailutils. See SMTP Mailboxes in GNU Mailutils.
FastCGI
FastCGI is an interface between the front-end and the back-end of a web service. It is a somewhat legacy facility; new web services should generally just talk HTTP between the front-end and the back-end. However there are a number of back-end services such as PHP or the optimized HTTP Git repository access that use FastCGI, so we have support for it in Guix.
To use FastCGI, you configure the front-end web server (e.g., nginx) to
dispatch some subset of its requests to the fastcgi backend, which listens
on a local TCP or UNIX socket. There is an intermediary fcgiwrap
program that sits between the actual backend process and the web server.
The front-end indicates which backend program to run, passing that
information to the fcgiwrap process.
- Scheme Variable: fcgiwrap-service-type
A service type for the
fcgiwrapFastCGI proxy.
- Data Type: fcgiwrap-configuration
Data type representing the configuration of the
fcgiwrapservice. This type has the following parameters:package(default:fcgiwrap)The fcgiwrap package to use.
socket(default:tcp:127.0.0.1:9000)The socket on which the
fcgiwrapprocess should listen, as a string. Valid socket values includeunix:/path/to/unix/socket,tcp:dot.ted.qu.ad:portandtcp6:[ipv6_addr]:port.user(default:fcgiwrap)group(default:fcgiwrap)The user and group names, as strings, under which to run the
fcgiwrapprocess. Thefastcgiservice will ensure that if the user asks for the specific user or group namesfcgiwrapthat the corresponding user and/or group is present on the system.It is possible to configure a FastCGI-backed web service to pass HTTP authentication information from the front-end to the back-end, and to allow
fcgiwrapto run the back-end process as a corresponding local user. To enable this capability on the back-end, runfcgiwrapas therootuser and group. Note that this capability also has to be configured on the front-end as well.
PHP-FPM
PHP-FPM (FastCGI Process Manager) is an alternative PHP FastCGI implementation with some additional features useful for sites of any size.
These features include:
- Adaptive process spawning
- Basic statistics (similar to Apache’s mod_status)
- Advanced process management with graceful stop/start
- Ability to start workers with different uid/gid/chroot/environment and different php.ini (replaces safe_mode)
- Stdout & stderr logging
- Emergency restart in case of accidental opcode cache destruction
- Accelerated upload support
- Support for a "slowlog"
- Enhancements to FastCGI, such as fastcgi_finish_request() - a special function to finish request & flush all data while continuing to do something time-consuming (video converting, stats processing, etc.)
... and much more.
- Scheme Variable: php-fpm-service-type
A Service type for
php-fpm.
- Data Type: php-fpm-configuration
Data Type for php-fpm service configuration.
php(default:php)The php package to use.
socket(default:(string-append "/var/run/php" (version-major (package-version php)) "-fpm.sock"))The address on which to accept FastCGI requests. Valid syntaxes are:
"ip.add.re.ss:port"Listen on a TCP socket to a specific address on a specific port.
"port"Listen on a TCP socket to all addresses on a specific port.
"/path/to/unix/socket"Listen on a unix socket.
user(default:php-fpm)User who will own the php worker processes.
group(default:php-fpm)Group of the worker processes.
socket-user(default:php-fpm)User who can speak to the php-fpm socket.
socket-group(default:nginx)Group that can speak to the php-fpm socket.
pid-file(default:(string-append "/var/run/php" (version-major (package-version php)) "-fpm.pid"))The process id of the php-fpm process is written to this file once the service has started.
log-file(default:(string-append "/var/log/php" (version-major (package-version php)) "-fpm.log"))Log for the php-fpm master process.
process-manager(default:(php-fpm-dynamic-process-manager-configuration))Detailed settings for the php-fpm process manager. Must be one of:
<php-fpm-dynamic-process-manager-configuration><php-fpm-static-process-manager-configuration><php-fpm-on-demand-process-manager-configuration>
display-errors(default#f)Determines whether php errors and warning should be sent to clients and displayed in their browsers. This is useful for local php development, but a security risk for public sites, as error messages can reveal passwords and personal data.
timezone(default#f)Specifies
php_admin_value[date.timezone]parameter.workers-logfile(default(string-append "/var/log/php" (version-major (package-version php)) "-fpm.www.log"))This file will log the
stderroutputs of php worker processes. Can be set to#fto disable logging.file(default#f)An optional override of the whole configuration. You can use the
mixed-text-filefunction or an absolute filepath for it.php-ini-file(default#f)An optional override of the default php settings. It may be any “file-like” object (see file-like objects). You can use the
mixed-text-filefunction or an absolute filepath for it.For local development it is useful to set a higher timeout and memory limit for spawned php processes. This be accomplished with the following operating system configuration snippet:
(define %local-php-ini (plain-file "php.ini" "memory_limit = 2G max_execution_time = 1800")) (operating-system ;; … (services (cons (service php-fpm-service-type (php-fpm-configuration (php-ini-file %local-php-ini))) %base-services)))
Consult the core php.ini directives for comprehensive documentation on the acceptable php.ini directives.
- Data type: php-fpm-dynamic-process-manager-configuration
Data Type for the
dynamicphp-fpm process manager. With thedynamicprocess manager, spare worker processes are kept around based on its configured limits.max-children(default:5)Maximum of worker processes.
start-servers(default:2)How many worker processes should be started on start-up.
min-spare-servers(default:1)How many spare worker processes should be kept around at minimum.
max-spare-servers(default:3)How many spare worker processes should be kept around at maximum.
- Data type: php-fpm-static-process-manager-configuration
Data Type for the
staticphp-fpm process manager. With thestaticprocess manager, an unchanging number of worker processes are created.max-children(default:5)Maximum of worker processes.
- Data type: php-fpm-on-demand-process-manager-configuration
Data Type for the
on-demandphp-fpm process manager. With theon-demandprocess manager, worker processes are only created as requests arrive.max-children(default:5)Maximum of worker processes.
process-idle-timeout(default:10)The time in seconds after which a process with no requests is killed.
- Scheme Procedure: nginx-php-location [#:nginx-package nginx] [socket (string-append "/var/run/php" (version-major (package-version php)) "-fpm.sock")] A helper function to
quickly add php to an
nginx-server-configuration.
A simple services setup for nginx with php can look like this:
(services (cons* (service dhcp-client-service-type)
(service php-fpm-service-type)
(service nginx-service-type
(nginx-server-configuration
(server-name '("example.com"))
(root "/srv/http/")
(locations
(list (nginx-php-location)))
(listen '("80"))
(ssl-certificate #f)
(ssl-certificate-key #f)))
%base-services))
The cat avatar generator is a simple service to demonstrate the use of
php-fpm in Nginx. It is used to generate cat avatar from a seed, for
instance the hash of a user’s email address.
- Scheme Procedure: cat-avatar-generator-service [#:cache-dir "/var/cache/cat-avatar-generator"] [#:package
cat-avatar-generator] [#:configuration (nginx-server-configuration)] Returns an nginx-server-configuration that inherits
configuration. It extends the nginx configuration to add a server block that servespackage, a version of cat-avatar-generator. During execution, cat-avatar-generator will be able to usecache-diras its cache directory.
A simple setup for cat-avatar-generator can look like this:
(services (cons* (cat-avatar-generator-service
#:configuration
(nginx-server-configuration
(server-name '("example.com"))))
...
%base-services))
Hpcguix-web
The hpcguix-web program is a customizable web interface to browse Guix packages, initially designed for users of high-performance computing (HPC) clusters.
- Scheme Variable: hpcguix-web-service-type
The service type for
hpcguix-web.
- Data Type: hpcguix-web-configuration
Data type for the hpcguix-web service configuration.
specsA gexp (see G-表达式) specifying the hpcguix-web service configuration. The main items available in this spec are:
title-prefix(default:"hpcguix | ")The page title prefix.
guix-command(default:"guix")The
guixcommand.package-filter-proc(default:(const #t))A procedure specifying how to filter packages that are displayed.
package-page-extension-proc(default:(const '()))Extension package for
hpcguix-web.menu(default:'())Additional entry in page
menu.channels(default:%default-channels)List of channels from which the package list is built (see 通道).
package-list-expiration(default:(* 12 3600))The expiration time, in seconds, after which the package list is rebuilt from the latest instances of the given channels.
See the hpcguix-web repository for a complete example.
package(default:hpcguix-web)The hpcguix-web package to use.
address(default:"127.0.0.1")The IP address to listen to.
port(default:5000)The port number to listen to.
A typical hpcguix-web service declaration looks like this:
(service hpcguix-web-service-type
(hpcguix-web-configuration
(specs
#~(define site-config
(hpcweb-configuration
(title-prefix "Guix-HPC - ")
(menu '(("/about" "ABOUT"))))))))
注: The hpcguix-web service periodically updates the package list it publishes by pulling channels from Git. To that end, it needs to access X.509 certificates so that it can authenticate Git servers when communicating over HTTPS, and it assumes that /etc/ssl/certs contains those certificates.
Thus, make sure to add
nss-certsor another certificate package to thepackagesfield of your configuration. X.509证书, for more information on X.509 certificates.
gmnisrv
The gmnisrv program is a simple Gemini protocol server.
- Scheme Variable: gmnisrv-service-type
This is the type of the gmnisrv service, whose value should be a
gmnisrv-configurationobject, as in this example:(service gmnisrv-service-type (gmnisrv-configuration (config-file (local-file "./my-gmnisrv.ini"))))
- Data Type: gmnisrv-configuration
Data type representing the configuration of gmnisrv.
package(default: gmnisrv)Package object of the gmnisrv server.
config-file(default:%default-gmnisrv-config-file)File-like object of the gmnisrv configuration file to use. The default configuration listens on port 1965 and serves files from /srv/gemini. Certificates are stored in /var/lib/gemini/certs. For more information, run
man gmnisrvandman gmnisrv.ini.
Agate
The Agate (GitHub page over HTTPS) program is a simple Gemini protocol server written in Rust.
- Scheme Variable: agate-service-type
This is the type of the agate service, whose value should be an
agate-service-typeobject, as in this example:(service agate-service-type (agate-configuration (content "/srv/gemini") (cert "/srv/cert.pem") (key "/srv/key.rsa")))The example above represents the minimal tweaking necessary to get Agate up and running. Specifying the path to the certificate and key is always necessary, as the Gemini protocol requires TLS by default.
To obtain a certificate and a key, you could, for example, use OpenSSL, running a command similar to the following example:
openssl req -x509 -newkey rsa:4096 -keyout key.rsa -out cert.pem \ -days 3650 -nodes -subj "/CN=example.com"Of course, you’ll have to replace example.com with your own domain name, and then point the Agate configuration towards the path of the generated key and certificate.
- Data Type: agate-configuration
Data type representing the configuration of Agate.
package(default:agate)The package object of the Agate server.
content(default: "/srv/gemini")The directory from which Agate will serve files.
cert(default:#f)The path to the TLS certificate PEM file to be used for encrypted connections. Must be filled in with a value from the user.
key(default:#f)The path to the PKCS8 private key file to be used for encrypted connections. Must be filled in with a value from the user.
addr(default:'("0.0.0.0:1965" "[::]:1965"))A list of the addresses to listen on.
hostname(default:#f)The domain name of this Gemini server. Optional.
lang(default:#f)RFC 4646 language code(s) for text/gemini documents. Optional.
silent?(default:#f)Set to
#tto disable logging output.serve-secret?(default:#f)Set to
#tto serve secret files (files/directories starting with a dot).log-ip?(default:#t)Whether or not to output IP addresses when logging.
user(default:"agate")Owner of the
agateprocess.group(default:"agate")Owner’s group of the
agateprocess.log-file(default: "/var/log/agate.log")The file which should store the logging output of Agate.
12.9.20 证书服务
The (gnu services certbot) module provides a service to automatically
obtain a valid TLS certificate from the Let’s Encrypt certificate
authority. These certificates can then be used to serve content securely
over HTTPS or other TLS-based protocols, with the knowledge that the client
will be able to verify the server’s authenticity.
Let’s Encrypt provides the certbot
tool to automate the certification process. This tool first securely
generates a key on the server. It then makes a request to the Let’s Encrypt
certificate authority (CA) to sign the key. The CA checks that the request
originates from the host in question by using a challenge-response protocol,
requiring the server to provide its response over HTTP. If that protocol
completes successfully, the CA signs the key, resulting in a certificate.
That certificate is valid for a limited period of time, and therefore to
continue to provide TLS services, the server needs to periodically ask the
CA to renew its signature.
The certbot service automates this process: the initial key generation, the initial certification request to the Let’s Encrypt service, the web server challenge/response integration, writing the certificate to disk, the automated periodic renewals, and the deployment tasks associated with the renewal (e.g. reloading services, copying keys with different permissions).
Certbot is run twice a day, at a random minute within the hour. It won’t do anything until your certificates are due for renewal or revoked, but running it regularly would give your service a chance of staying online in case a Let’s Encrypt-initiated revocation happened for some reason.
By using this service, you agree to the ACME Subscriber Agreement, which can be found there: https://acme-v01.api.letsencrypt.org/directory.
- Scheme Variable: certbot-service-type
A service type for the
certbotLet’s Encrypt client. Its value must be acertbot-configurationrecord as in this example:(define %nginx-deploy-hook (program-file "nginx-deploy-hook" #~(let ((pid (call-with-input-file "/var/run/nginx/pid" read))) (kill pid SIGHUP)))) (service certbot-service-type (certbot-configuration (email "foo@example.net") (certificates (list (certificate-configuration (domains '("example.net" "www.example.net")) (deploy-hook %nginx-deploy-hook)) (certificate-configuration (domains '("bar.example.net")))))))
See below for details about
certbot-configuration.
- Data Type: certbot-configuration
Data type representing the configuration of the
certbotservice. This type has the following parameters:package(default:certbot)The certbot package to use.
webroot(default:/var/www)The directory from which to serve the Let’s Encrypt challenge/response files.
certificates(default:())A list of
certificates-configurations for which to generate certificates and request signatures. Each certificate has anameand severaldomains.email(default:#f)Optional email address used for registration and recovery contact. Setting this is encouraged as it allows you to receive important notifications about the account and issued certificates.
server(default:#f)Optional URL of ACME server. Setting this overrides certbot’s default, which is the Let’s Encrypt server.
rsa-key-size(default:2048)Size of the RSA key.
default-location(default: see below)The default
nginx-location-configuration. Becausecertbotneeds to be able to serve challenges and responses, it needs to be able to run a web server. It does so by extending thenginxweb service with annginx-server-configurationlistening on the domains on port 80, and which has anginx-location-configurationfor the/.well-known/URI path subspace used by Let’s Encrypt. See Web服务, for more on these nginx configuration data types.Requests to other URL paths will be matched by the
default-location, which if present is added to allnginx-server-configurations.By default, the
default-locationwill issue a redirect fromhttp://domain/...tohttps://domain/..., leaving you to define what to serve on your site viahttps.Pass
#fto not issue a default location.
- Data Type: certificate-configuration
Data type representing the configuration of a certificate. This type has the following parameters:
name(default: see below)This name is used by Certbot for housekeeping and in file paths; it doesn’t affect the content of the certificate itself. To see certificate names, run
certbot certificates.Its default is the first provided domain.
domains(default:())The first domain provided will be the subject CN of the certificate, and all domains will be Subject Alternative Names on the certificate.
challenge(默认值:#f)The challenge type that has to be run by certbot. If
#fis specified, default to the HTTP challenge. If a value is specified, defaults to the manual plugin (seeauthentication-hook,cleanup-hookand the documentation at https://certbot.eff.org/docs/using.html#hooks), and gives Let’s Encrypt permission to log the public IP address of the requesting machine.csr(default:#f)File name of Certificate Signing Request (CSR) in DER or PEM format. If
#fis specified, this argument will not be passed to certbot. If a value is specified, certbot will use it to obtain a certificate, instead of using a self-generated CSR. The domain-name(s) mentioned indomains, must be consistent with the domain-name(s) mentioned in CSR file.authentication-hook(默认值:#f)Command to be run in a shell once for each certificate challenge to be answered. For this command, the shell variable
$CERTBOT_DOMAINwill contain the domain being authenticated,$CERTBOT_VALIDATIONcontains the validation string and$CERTBOT_TOKENcontains the file name of the resource requested when performing an HTTP-01 challenge.cleanup-hook(默认值:#f)Command to be run in a shell once for each certificate challenge that have been answered by the
auth-hook. For this command, the shell variables available in theauth-hookscript are still available, and additionally$CERTBOT_AUTH_OUTPUTwill contain the standard output of theauth-hookscript.deploy-hook(default:#f)Command to be run in a shell once for each successfully issued certificate. For this command, the shell variable
$RENEWED_LINEAGEwill point to the config live subdirectory (for example, ‘"/etc/letsencrypt/live/example.com"’) containing the new certificates and keys; the shell variable$RENEWED_DOMAINSwill contain a space-delimited list of renewed certificate domains (for example, ‘"example.com www.example.com"’.
For each certificate-configuration, the certificate is saved to
/etc/letsencrypt/live/name/fullchain.pem and the key is saved
to /etc/letsencrypt/live/name/privkey.pem.
Next: VNC Services, Previous: 证书服务, Up: 服务 [Contents][Index]
12.9.21 DNS服务
The (gnu services dns) module provides services related to the
domain name system (DNS). It provides a server service for hosting an
authoritative DNS server for multiple zones, slave or master. This
service uses Knot DNS. And also a caching
and forwarding DNS server for the LAN, which uses
dnsmasq.
Knot Service
An example configuration of an authoritative server for two zones, one master and one slave, is:
(define-zone-entries example.org.zone ;; Name TTL Class Type Data ("@" "" "IN" "A" "127.0.0.1") ("@" "" "IN" "NS" "ns") ("ns" "" "IN" "A" "127.0.0.1")) (define master-zone (knot-zone-configuration (domain "example.org") (zone (zone-file (origin "example.org") (entries example.org.zone))))) (define slave-zone (knot-zone-configuration (domain "plop.org") (dnssec-policy "default") (master (list "plop-master")))) (define plop-master (knot-remote-configuration (id "plop-master") (address (list "208.76.58.171")))) (operating-system ;; ... (services (cons* (service knot-service-type (knot-configuration (remotes (list plop-master)) (zones (list master-zone slave-zone)))) ;; ... %base-services)))
- Scheme Variable: knot-service-type
This is the type for the Knot DNS server.
Knot DNS is an authoritative DNS server, meaning that it can serve multiple zones, that is to say domain names you would buy from a registrar. This server is not a resolver, meaning that it can only resolve names for which it is authoritative. This server can be configured to serve zones as a master server or a slave server as a per-zone basis. Slave zones will get their data from masters, and will serve it as an authoritative server. From the point of view of a resolver, there is no difference between master and slave.
The following data types are used to configure the Knot DNS server:
- Data Type: knot-key-configuration
Data type representing a key. This type has the following parameters:
id(default:"")An identifier for other configuration fields to refer to this key. IDs must be unique and must not be empty.
algorithm(default:#f)The algorithm to use. Choose between
#f,'hmac-md5,'hmac-sha1,'hmac-sha224,'hmac-sha256,'hmac-sha384and'hmac-sha512.secret(default:"")The secret key itself.
- Data Type: knot-acl-configuration
Data type representing an Access Control List (ACL) configuration. This type has the following parameters:
id(default:"")An identifier for other configuration fields to refer to this key. IDs must be unique and must not be empty.
address(default:'())An ordered list of IP addresses, network subnets, or network ranges represented with strings. The query must match one of them. Empty value means that address match is not required.
key(default:'())An ordered list of references to keys represented with strings. The string must match a key ID defined in a
knot-key-configuration. No key means that a key is not require to match that ACL.action(default:'())An ordered list of actions that are permitted or forbidden by this ACL. Possible values are lists of zero or more elements from
'transfer,'notifyand'update.deny?(default:#f)When true, the ACL defines restrictions. Listed actions are forbidden. When false, listed actions are allowed.
- Data Type: zone-entry
Data type representing a record entry in a zone file. This type has the following parameters:
name(default:"@")The name of the record.
"@"refers to the origin of the zone. Names are relative to the origin of the zone. For example, in theexample.orgzone,"ns.example.org"actually refers tons.example.org.example.org. Names ending with a dot are absolute, which means that"ns.example.org."refers tons.example.org.ttl(default:"")The Time-To-Live (TTL) of this record. If not set, the default TTL is used.
class(default:"IN")The class of the record. Knot currently supports only
"IN"and partially"CH".type(default:"A")The type of the record. Common types include A (IPv4 address), AAAA (IPv6 address), NS (Name Server) and MX (Mail eXchange). Many other types are defined.
data(default:"")The data contained in the record. For instance an IP address associated with an A record, or a domain name associated with an NS record. Remember that domain names are relative to the origin unless they end with a dot.
- Data Type: zone-file
Data type representing the content of a zone file. This type has the following parameters:
entries(default:'())The list of entries. The SOA record is taken care of, so you don’t need to put it in the list of entries. This list should probably contain an entry for your primary authoritative DNS server. Other than using a list of entries directly, you can use
define-zone-entriesto define a object containing the list of entries more easily, that you can later pass to theentriesfield of thezone-file.origin(default:"")The name of your zone. This parameter cannot be empty.
ns(default:"ns")The domain of your primary authoritative DNS server. The name is relative to the origin, unless it ends with a dot. It is mandatory that this primary DNS server corresponds to an NS record in the zone and that it is associated to an IP address in the list of entries.
mail(default:"hostmaster")An email address people can contact you at, as the owner of the zone. This is translated as
<mail>@<origin>.serial(default:1)The serial number of the zone. As this is used to keep track of changes by both slaves and resolvers, it is mandatory that it never decreases. Always increment it when you make a change in your zone.
refresh(default:(* 2 24 3600))The frequency at which slaves will do a zone transfer. This value is a number of seconds. It can be computed by multiplications or with
(string->duration).retry(default:(* 15 60))The period after which a slave will retry to contact its master when it fails to do so a first time.
expiry(default:(* 14 24 3600))Default TTL of records. Existing records are considered correct for at most this amount of time. After this period, resolvers will invalidate their cache and check again that it still exists.
nx(default:3600)Default TTL of inexistent records. This delay is usually short because you want your new domains to reach everyone quickly.
- Data Type: knot-remote-configuration
Data type representing a remote configuration. This type has the following parameters:
id(default:"")An identifier for other configuration fields to refer to this remote. IDs must be unique and must not be empty.
address(default:'())An ordered list of destination IP addresses. Addresses are tried in sequence. An optional port can be given with the @ separator. For instance:
(list "1.2.3.4" "2.3.4.5@53"). Default port is 53.via(default:'())An ordered list of source IP addresses. An empty list will have Knot choose an appropriate source IP. An optional port can be given with the @ separator. The default is to choose at random.
key(default:#f)A reference to a key, that is a string containing the identifier of a key defined in a
knot-key-configurationfield.
- Data Type: knot-keystore-configuration
Data type representing a keystore to hold dnssec keys. This type has the following parameters:
id(default:"")The id of the keystore. It must not be empty.
backend(default:'pem)The backend to store the keys in. Can be
'pemor'pkcs11.config(default:"/var/lib/knot/keys/keys")The configuration string of the backend. An example for the PKCS#11 is:
"pkcs11:token=knot;pin-value=1234 /gnu/store/.../lib/pkcs11/libsofthsm2.so". For the pem backend, the string represents a path in the file system.
- Data Type: knot-policy-configuration
Data type representing a dnssec policy. Knot DNS is able to automatically sign your zones. It can either generate and manage your keys automatically or use keys that you generate.
Dnssec is usually implemented using two keys: a Key Signing Key (KSK) that is used to sign the second, and a Zone Signing Key (ZSK) that is used to sign the zone. In order to be trusted, the KSK needs to be present in the parent zone (usually a top-level domain). If your registrar supports dnssec, you will have to send them your KSK’s hash so they can add a DS record in their zone. This is not automated and need to be done each time you change your KSK.
The policy also defines the lifetime of keys. Usually, ZSK can be changed easily and use weaker cryptographic functions (they use lower parameters) in order to sign records quickly, so they are changed often. The KSK however requires manual interaction with the registrar, so they are changed less often and use stronger parameters because they sign only one record.
This type has the following parameters:
id(default:"")The id of the policy. It must not be empty.
keystore(default:"default")A reference to a keystore, that is a string containing the identifier of a keystore defined in a
knot-keystore-configurationfield. The"default"identifier means the default keystore (a kasp database that was setup by this service).manual?(default:#f)Whether the key management is manual or automatic.
single-type-signing?(default:#f)When
#t, use the Single-Type Signing Scheme.algorithm(default:"ecdsap256sha256")An algorithm of signing keys and issued signatures.
ksk-size(default:256)The length of the KSK. Note that this value is correct for the default algorithm, but would be unsecure for other algorithms.
zsk-size(default:256)The length of the ZSK. Note that this value is correct for the default algorithm, but would be unsecure for other algorithms.
dnskey-ttl(default:'default)The TTL value for DNSKEY records added into zone apex. The special
'defaultvalue means same as the zone SOA TTL.zsk-lifetime(default:(* 30 24 3600))The period between ZSK publication and the next rollover initiation.
propagation-delay(default:(* 24 3600))An extra delay added for each key rollover step. This value should be high enough to cover propagation of data from the master server to all slaves.
rrsig-lifetime(default:(* 14 24 3600))A validity period of newly issued signatures.
rrsig-refresh(default:(* 7 24 3600))A period how long before a signature expiration the signature will be refreshed.
nsec3?(default:#f)When
#t, NSEC3 will be used instead of NSEC.nsec3-iterations(default:5)The number of additional times the hashing is performed.
nsec3-salt-length(default:8)The length of a salt field in octets, which is appended to the original owner name before hashing.
nsec3-salt-lifetime(default:(* 30 24 3600))The validity period of newly issued salt field.
- Data Type: knot-zone-configuration
Data type representing a zone served by Knot. This type has the following parameters:
domain(default:"")The domain served by this configuration. It must not be empty.
file(default:"")The file where this zone is saved. This parameter is ignored by master zones. Empty means default location that depends on the domain name.
zone(default:(zone-file))The content of the zone file. This parameter is ignored by slave zones. It must contain a zone-file record.
master(default:'())A list of master remotes. When empty, this zone is a master. When set, this zone is a slave. This is a list of remotes identifiers.
ddns-master(default:#f)The main master. When empty, it defaults to the first master in the list of masters.
notify(default:'())A list of slave remote identifiers.
acl(default:'())A list of acl identifiers.
semantic-checks?(default:#f)When set, this adds more semantic checks to the zone.
zonefile-sync(default:0)The delay between a modification in memory and on disk. 0 means immediate synchronization.
zonefile-load(默认值:#f)The way the zone file contents are applied during zone load. Possible values are:
-
#ffor using the default value from Knot, -
'nonefor not using the zone file at all, -
'differencefor computing the difference between already available contents and zone contents and applying it to the current zone contents, -
'difference-no-serialfor the same as'difference, but ignoring the SOA serial in the zone file, while the server takes care of it automatically. -
'wholefor loading zone contents from the zone file.
-
journal-content(默认值:#f)The way the journal is used to store zone and its changes. Possible values are
'noneto not use it at all,'changesto store changes and'allto store contents.#fdoes not set this option, so the default value from Knot is used.max-journal-usage(默认值:#f)The maximum size for the journal on disk.
#fdoes not set this option, so the default value from Knot is used.max-journal-depth(默认值:#f)The maximum size of the history.
#fdoes not set this option, so the default value from Knot is used.max-zone-size(默认值:#f)The maximum size of the zone file. This limit is enforced for incoming transfer and updates.
#fdoes not set this option, so the default value from Knot is used.dnssec-policy(默认值:#f)A reference to a
knot-policy-configurationrecord, or the special name"default". If the value is#f, there is no dnssec signing on this zone.serial-policy(default:'increment)A policy between
'incrementand'unixtime.
- Data Type: knot-configuration
Data type representing the Knot configuration. This type has the following parameters:
knot(default:knot)The Knot package.
run-directory(default:"/var/run/knot")The run directory. This directory will be used for pid file and sockets.
includes(默认值:'())A list of strings or file-like objects denoting other files that must be included at the top of the configuration file.
This can be used to manage secrets out-of-band. For example, secret keys may be stored in an out-of-band file not managed by Guix, and thus not visible in /gnu/store—e.g., you could store secret key configuration in /etc/knot/secrets.conf and add this file to the
includeslist.One can generate a secret tsig key (for nsupdate and zone transfers with the keymgr command from the knot package. Note that the package is not automatically installed by the service. The following example shows how to generate a new tsig key:
keymgr -t mysecret > /etc/knot/secrets.conf chmod 600 /etc/knot/secrets.conf
Also note that the generated key will be named mysecret, so it is the name that needs to be used in the key field of the
knot-acl-configurationrecord and in other places that need to refer to that key.It can also be used to add configuration not supported by this interface.
listen-v4(default:"0.0.0.0")An ip address on which to listen.
listen-v6(default:"::")An ip address on which to listen.
listen-port(default:53)A port on which to listen.
keys(default:'())The list of knot-key-configuration used by this configuration.
acls(default:'())The list of knot-acl-configuration used by this configuration.
remotes(default:'())The list of knot-remote-configuration used by this configuration.
zones(default:'())The list of knot-zone-configuration used by this configuration.
Knot Resolver Service
- Scheme Variable: knot-resolver-service-type
This is the type of the knot resolver service, whose value should be an
knot-resolver-configurationobject as in this example:(service knot-resolver-service-type (knot-resolver-configuration (kresd-config-file (plain-file "kresd.conf" " net.listen('192.168.0.1', 5353) user('knot-resolver', 'knot-resolver') modules = { 'hints > iterate', 'stats', 'predict' } cache.size = 100 * MB "))))For more information, refer its manual.
- Data Type: knot-resolver-configuration
Data type representing the configuration of knot-resolver.
package(default: knot-resolver)Package object of the knot DNS resolver.
kresd-config-file(default: %kresd.conf)File-like object of the kresd configuration file to use, by default it will listen on
127.0.0.1and::1.garbage-collection-interval(default: 1000)Number of milliseconds for
kres-cache-gcto periodically trim the cache.
Dnsmasq Service
- Scheme Variable: dnsmasq-service-type
This is the type of the dnsmasq service, whose value should be an
dnsmasq-configurationobject as in this example:(service dnsmasq-service-type (dnsmasq-configuration (no-resolv? #t) (servers '("192.168.1.1"))))
- Data Type: dnsmasq-configuration
Data type representing the configuration of dnsmasq.
package(default: dnsmasq)Package object of the dnsmasq server.
no-hosts?(default:#f)When true, don’t read the hostnames in /etc/hosts.
port(default:53)The port to listen on. Setting this to zero completely disables DNS responses, leaving only DHCP and/or TFTP functions.
local-service?(default:#t)Accept DNS queries only from hosts whose address is on a local subnet, ie a subnet for which an interface exists on the server.
listen-addresses(default:'())Listen on the given IP addresses.
resolv-file(default:"/etc/resolv.conf")The file to read the IP address of the upstream nameservers from.
no-resolv?(default:#f)When true, don’t read resolv-file.
forward-private-reverse-lookup?(default:#t)When false, all reverse lookups for private IP ranges are answered with "no such domain" rather than being forwarded upstream.
query-servers-in-order?(default:#f)When true, dnsmasq queries the servers in the same order as they appear in servers.
servers(default:'())Specify IP address of upstream servers directly.
addresses(default:'())For each entry, specify an IP address to return for any host in the given domains. Queries in the domains are never forwarded and always replied to with the specified IP address.
This is useful for redirecting hosts locally, for example:
(service dnsmasq-service-type (dnsmasq-configuration (addresses '(; Redirect to a local web-server. "/example.org/127.0.0.1" ; Redirect subdomain to a specific IP. "/subdomain.example.org/192.168.1.42"))))Note that rules in /etc/hosts take precedence over this.
cache-size(default:150)Set the size of dnsmasq’s cache. Setting the cache size to zero disables caching.
negative-cache?(default:#t)When false, disable negative caching.
cpe-id(default:#f)If set, add a CPE (Customer-Premises Equipment) identifier to DNS queries which are forwarded upstream.
tftp-enable?(default:#f)Whether to enable the built-in TFTP server.
tftp-no-fail?(default:#f)If true, does not fail dnsmasq if the TFTP server could not start up.
tftp-single-port?(default:#f)Whether to use only one single port for TFTP.
tftp-secure?(default:#f)If true, only files owned by the user running the dnsmasq process are accessible.
If dnsmasq is being run as root, different rules apply:
tftp-secure?has no effect, but only files which have the world-readable bit set are accessible.tftp-max(default:#f)If set, sets the maximal number of concurrent connections allowed.
tftp-mtu(default:#f)If set, sets the MTU for TFTP packets to that value.
tftp-no-blocksize?(default:#f)If true, stops the TFTP server from negotiating the blocksize with a client.
tftp-lowercase?(default:#f)Whether to convert all filenames in TFTP requests to lowercase.
tftp-port-range(default:#f)If set, fixes the dynamical ports (one per client) to the given range (
"<start>,<end>").tftp-root(default:/var/empty,lo)Look for files to transfer using TFTP relative to the given directory. When this is set, TFTP paths which include ‘..’ are rejected, to stop clients getting outside the specified root. Absolute paths (starting with ‘/’) are allowed, but they must be within the TFTP-root. If the optional interface argument is given, the directory is only used for TFTP requests via that interface.
tftp-unique-root(default:#f)If set, add the IP or hardware address of the TFTP client as a path component on the end of the TFTP-root. Only valid if a TFTP root is set and the directory exists. Defaults to adding IP address (in standard dotted-quad format).
For instance, if --tftp-root is ‘/tftp’ and client ‘1.2.3.4’ requests file myfile then the effective path will be /tftp/1.2.3.4/myfile if /tftp/1.2.3.4 exists or /tftp/myfile otherwise. When ‘=mac’ is specified it will append the MAC address instead, using lowercase zero padded digits separated by dashes, e.g.: ‘01-02-03-04-aa-bb’. Note that resolving MAC addresses is only possible if the client is in the local network or obtained a DHCP lease from dnsmasq.
ddclient Service
The ddclient service described below runs the ddclient daemon, which takes care of automatically updating DNS entries for service providers such as Dyn.
The following example show instantiates the service with its default configuration:
(service ddclient-service-type)
Note that ddclient needs to access credentials that are stored in a
secret file, by default /etc/ddclient/secrets (see
secret-file below). You are expected to create this file manually,
in an “out-of-band” fashion (you could make this file part of the
service configuration, for instance by using plain-file, but it will
be world-readable via /gnu/store). See the examples in the
share/ddclient directory of the ddclient package.
Available ddclient-configuration fields are:
ddclient-configurationparameter: package ddclient ¶The ddclient package.
ddclient-configurationparameter: integer daemon ¶The period after which ddclient will retry to check IP and domain name.
Defaults to ‘300’.
ddclient-configurationparameter: boolean syslog ¶Use syslog for the output.
Defaults to ‘#t’.
ddclient-configurationparameter: string mail ¶Mail to user.
Defaults to ‘"root"’.
ddclient-configurationparameter: string mail-failure ¶Mail failed update to user.
Defaults to ‘"root"’.
ddclient-configurationparameter: string pid ¶The ddclient PID file.
Defaults to ‘"/var/run/ddclient/ddclient.pid"’.
ddclient-configurationparameter: boolean ssl ¶Enable SSL support.
Defaults to ‘#t’.
ddclient-configurationparameter: string user ¶Specifies the user name or ID that is used when running ddclient program.
Defaults to ‘"ddclient"’.
ddclient-configurationparameter: string group ¶Group of the user who will run the ddclient program.
Defaults to ‘"ddclient"’.
ddclient-configurationparameter: string secret-file ¶Secret file which will be appended to ddclient.conf file. This file contains credentials for use by ddclient. You are expected to create it manually.
Defaults to ‘"/etc/ddclient/secrets.conf"’.
ddclient-configurationparameter: list extra-options ¶Extra options will be appended to ddclient.conf file.
Defaults to ‘()’.
12.9.22 VNC Services
The (gnu services vnc) module provides services related to
Virtual Network Computing (VNC), which makes it possible to locally
use graphical Xorg applications running on a remote machine. Combined with
a graphical manager that supports the X Display Manager Control
Protocol, such as GDM (see gdm) or LightDM (see lightdm), it is
possible to remote an entire desktop for a multi-user environment.
Xvnc
Xvnc is a VNC server that spawns its own X window server; which means it can
run on headless servers. The Xvnc implementations provided by the
tigervnc-server and turbovnc aim to be fast and efficient.
- Variable: Scheme Variable xvnc-service-type
-
The
xvnc-server-typeservice can be configured via thexvnc-configurationrecord, documented below. A second virtual display could be made available on a remote machine via the following configuration:
(service xvnc-service-type
(xvnc-configuration (display-number 10)))
As a demonstration, the xclock command could then be started on
the remote machine on display number 10, and it could be displayed locally
via the vncviewer command:
# Start xclock on the remote machine. ssh -L5910:localhost:5910 -- guix shell xclock -- env DISPLAY=:10 xclock # Access it via VNC. guix shell tigervnc-client -- vncviewer localhost:5910
The following configuration combines XDMCP and Inetd to allow multiple users to concurrently use the remote system, login in graphically via the GDM display manager:
(operating-system
[...]
(services (cons*
[...]
(service xvnc-service-type (xvnc-configuration
(display-number 5)
(localhost? #f)
(xdmcp? #t)
(inetd? #t)))
(modify-services %desktop-services
(gdm-service-type config => (gdm-configuration
(inherit config)
(auto-suspend? #f)
(xdmcp? #t)))))))
A remote user could then connect to it by using the vncviewer
command or a compatible VNC client and start a desktop session of their
choosing:
vncviewer remote-host:5905
Warning: Unless your machine is in a controlled environment, for security reasons, the
localhost?configuration of thexvnc-configurationrecord should be left to its default#tvalue and exposed via a secure means such as an SSH port forward. The XDMCP port, UDP 177 should also be blocked from the outside by a firewall, as it is not a secure protocol and can expose login credentials in clear.
- Data Type: xvnc-configuration
Available
xvnc-configurationfields are:xvnc(default:tigervnc-server) (type: file-like)The package that provides the Xvnc binary.
display-number(default:0) (type: number)The display number used by Xvnc. You should set this to a number not already used a Xorg server.
geometry(default:"1024x768") (type: string)The size of the desktop to be created.
depth(default:24) (type: color-depth)The pixel depth in bits of the desktop to be created. Accepted values are 16, 24 or 32.
port(type: maybe-port)The port on which to listen for connections from viewers. When left unspecified, it defaults to 5900 plus the display number.
ipv4?(default:#t) (type: boolean)Use IPv4 for incoming and outgoing connections.
ipv6?(default:#t) (type: boolean)Use IPv6 for incoming and outgoing connections.
password-file(type: maybe-string)The password file to use, if any. Refer to vncpasswd(1) to learn how to generate such a file.
xdmcp?(default:#f) (type: boolean)Query the XDMCP server for a session. This enables users to log in a desktop session from the login manager screen. For a multiple users scenario, you’ll want to enable the
inetd?option as well, so that each connection to the VNC server is handled separately rather than shared.inetd?(default:#f) (type: boolean)Use an Inetd-style service, which runs the Xvnc server on demand.
frame-rate(default:60) (type: number)The maximum number of updates per second sent to each client.
security-types(default:("None")) (type: security-types)The allowed security schemes to use for incoming connections. The default is "None", which is safe given that Xvnc is configured to authenticate the user via the display manager, and only for local connections. Accepted values are any of the following: ("None" "VncAuth" "Plain" "TLSNone" "TLSVnc" "TLSPlain" "X509None" "X509Vnc")
localhost?(default:#t) (type: boolean)Only allow connections from the same machine. It is set to #true by default for security, which means SSH or another secure means should be used to expose the remote port.
log-level(default:30) (type: log-level)The log level, a number between 0 and 100, 100 meaning most verbose output. The log messages are output to syslog.
extra-options(default:()) (type: strings)This can be used to provide extra Xvnc options not exposed via this <xvnc-configuration> record.
Next: 网络文件系统, Previous: VNC Services, Up: 服务 [Contents][Index]
12.9.23 VPN服务
The (gnu services vpn) module provides services related to
virtual private networks (VPNs).
Bitmask
- Scheme Variable: bitmask-service-type
A service type for the Bitmask VPN client. It makes the client available in the system and loads its polkit policy. Please note that the client expects an active polkit-agent, which is either run by your desktop-environment or should be run manually.
OpenVPN
It provides a client service for your machine to connect to a VPN, and a server service for your machine to host a VPN.
- Scheme Procedure: openvpn-client-service [#:config (openvpn-client-configuration)]
-
Return a service that runs
openvpn, a VPN daemon, as a client.
- Scheme Procedure: openvpn-server-service [#:config (openvpn-server-configuration)]
-
Return a service that runs
openvpn, a VPN daemon, as a server.Both can be run simultaneously.
- Data Type: openvpn-client-configuration
Available
openvpn-client-configurationfields are:openvpn(default:openvpn) (type: file-like)The OpenVPN package.
pid-file(default:"/var/run/openvpn/openvpn.pid") (type: string)The OpenVPN pid file.
proto(default:udp) (type: proto)The protocol (UDP or TCP) used to open a channel between clients and servers.
dev(default:tun) (type: dev)The device type used to represent the VPN connection.
ca(default:"/etc/openvpn/ca.crt") (type: maybe-string)The certificate authority to check connections against.
cert(default:"/etc/openvpn/client.crt") (type: maybe-string)The certificate of the machine the daemon is running on. It should be signed by the authority given in
ca.key(default:"/etc/openvpn/client.key") (type: maybe-string)The key of the machine the daemon is running on. It must be the key whose certificate is
cert.comp-lzo?(default:#t) (type: boolean)Whether to use the lzo compression algorithm.
persist-key?(default:#t) (type: boolean)Don’t re-read key files across SIGUSR1 or –ping-restart.
persist-tun?(default:#t) (type: boolean)Don’t close and reopen TUN/TAP device or run up/down scripts across SIGUSR1 or –ping-restart restarts.
fast-io?(default:#f) (type: boolean)(Experimental) Optimize TUN/TAP/UDP I/O writes by avoiding a call to poll/epoll/select prior to the write operation.
verbosity(default:3) (type: number)Verbosity level.
tls-auth(default:#f) (type: tls-auth-client)Add an additional layer of HMAC authentication on top of the TLS control channel to protect against DoS attacks.
auth-user-pass(type: maybe-string)Authenticate with server using username/password. The option is a file containing username/password on 2 lines. Do not use a file-like object as it would be added to the store and readable by any user.
verify-key-usage?(default:#t) (type: key-usage)Whether to check the server certificate has server usage extension.
bind?(default:#f) (type: bind)Bind to a specific local port number.
resolv-retry?(default:#t) (type: resolv-retry)Retry resolving server address.
remote(default:()) (type: openvpn-remote-list)A list of remote servers to connect to.
- Data Type: openvpn-remote-configuration
Available
openvpn-remote-configurationfields are:name(default:"my-server") (type: string)Server name.
port(default:1194) (type: number)Port number the server listens to.
- Data Type: openvpn-server-configuration
Available
openvpn-server-configurationfields are:openvpn(default:openvpn) (type: file-like)The OpenVPN package.
pid-file(default:"/var/run/openvpn/openvpn.pid") (type: string)The OpenVPN pid file.
proto(default:udp) (type: proto)The protocol (UDP or TCP) used to open a channel between clients and servers.
dev(default:tun) (type: dev)The device type used to represent the VPN connection.
ca(default:"/etc/openvpn/ca.crt") (type: maybe-string)The certificate authority to check connections against.
cert(default:"/etc/openvpn/client.crt") (type: maybe-string)The certificate of the machine the daemon is running on. It should be signed by the authority given in
ca.key(default:"/etc/openvpn/client.key") (type: maybe-string)The key of the machine the daemon is running on. It must be the key whose certificate is
cert.comp-lzo?(default:#t) (type: boolean)Whether to use the lzo compression algorithm.
persist-key?(default:#t) (type: boolean)Don’t re-read key files across SIGUSR1 or –ping-restart.
persist-tun?(default:#t) (type: boolean)Don’t close and reopen TUN/TAP device or run up/down scripts across SIGUSR1 or –ping-restart restarts.
fast-io?(default:#f) (type: boolean)(Experimental) Optimize TUN/TAP/UDP I/O writes by avoiding a call to poll/epoll/select prior to the write operation.
verbosity(default:3) (type: number)Verbosity level.
tls-auth(default:#f) (type: tls-auth-server)Add an additional layer of HMAC authentication on top of the TLS control channel to protect against DoS attacks.
port(default:1194) (type: number)Specifies the port number on which the server listens.
server(default:"10.8.0.0 255.255.255.0") (type: ip-mask)An ip and mask specifying the subnet inside the virtual network.
server-ipv6(default:#f) (type: cidr6)A CIDR notation specifying the IPv6 subnet inside the virtual network.
dh(default:"/etc/openvpn/dh2048.pem") (type: string)The Diffie-Hellman parameters file.
ifconfig-pool-persist(default:"/etc/openvpn/ipp.txt") (type: string)The file that records client IPs.
redirect-gateway?(default:#f) (type: gateway)When true, the server will act as a gateway for its clients.
client-to-client?(default:#f) (type: boolean)When true, clients are allowed to talk to each other inside the VPN.
keepalive(default:(10 120)) (type: keepalive)Causes ping-like messages to be sent back and forth over the link so that each side knows when the other side has gone down.
keepaliverequires a pair. The first element is the period of the ping sending, and the second element is the timeout before considering the other side down.max-clients(default:100) (type: number)The maximum number of clients.
status(default:"/var/run/openvpn/status") (type: string)The status file. This file shows a small report on current connection. It is truncated and rewritten every minute.
client-config-dir(default:()) (type: openvpn-ccd-list)The list of configuration for some clients.
strongSwan
Currently, the strongSwan service only provides legacy-style configuration with ipsec.conf and ipsec.secrets files.
- Scheme Variable: strongswan-service-type
A service type for configuring strongSwan for IPsec VPN (Virtual Private Networking). Its value must be a
strongswan-configurationrecord as in this example:(service strongswan-service-type (strongswan-configuration (ipsec-conf "/etc/ipsec.conf") (ipsec-secrets "/etc/ipsec.secrets")))
- Data Type: strongswan-configuration
Data type representing the configuration of the StrongSwan service.
strongswanThe strongSwan package to use for this service.
ipsec-conf(default:#f)The file name of your ipsec.conf. If not
#f, then this andipsec-secretsmust both be strings.ipsec-secrets(default#f)The file name of your ipsec.secrets. If not
#f, then this andipsec-confmust both be strings.
Wireguard
- Scheme Variable: wireguard-service-type
A service type for a Wireguard tunnel interface. Its value must be a
wireguard-configurationrecord as in this example:(service wireguard-service-type (wireguard-configuration (peers (list (wireguard-peer (name "my-peer") (endpoint "my.wireguard.com:51820") (public-key "hzpKg9X1yqu1axN6iJp0mWf6BZGo8m1wteKwtTmDGF4=") (allowed-ips '("10.0.0.2/32")))))))
- Data Type: wireguard-configuration
Data type representing the configuration of the Wireguard service.
wireguardThe wireguard package to use for this service.
interface(default:"wg0")The interface name for the VPN.
addresses(default:'("10.0.0.1/32"))The IP addresses to be assigned to the above interface.
port(default:51820)The port on which to listen for incoming connections.
dns(default:#f)The DNS server(s) to announce to VPN clients via DHCP.
private-key(default:"/etc/wireguard/private.key")The private key file for the interface. It is automatically generated if the file does not exist.
peers(default:'())The authorized peers on this interface. This is a list of wireguard-peer records.
pre-up(default:'())The script commands to be run before setting up the interface.
post-up(default:'())The script commands to be run after setting up the interface.
pre-down(default:'())The script commands to be run before tearing down the interface.
post-down(default:'())The script commands to be run after tearing down the interface.
table(default:"auto")The routing table to which routes are added, as a string. There are two special values:
"off"that disables the creation of routes altogether, and"auto"(the default) that adds routes to the default table and enables special handling of default routes.
- Data Type: wireguard-peer
Data type representing a Wireguard peer attached to a given interface.
名字The peer name.
endpoint(default:#f)The optional endpoint for the peer, such as
"demo.wireguard.com:51820".public-keyThe peer public-key represented as a base64 string.
allowed-ipsA list of IP addresses from which incoming traffic for this peer is allowed and to which incoming traffic for this peer is directed.
keep-alive(default:#f)An optional time interval in seconds. A packet will be sent to the server endpoint once per time interval. This helps receiving incoming connections from this peer when you are behind a NAT or a firewall.
Next: Samba Services, Previous: VPN服务, Up: 服务 [Contents][Index]
12.9.24 网络文件系统
The (gnu services nfs) module provides the following services, which
are most commonly used in relation to mounting or exporting directory trees
as network file systems (NFS).
While it is possible to use the individual components that together make up
a Network File System service, we recommended to configure an NFS server
with the nfs-service-type.
NFS Service
The NFS service takes care of setting up all NFS component services, kernel configuration file systems, and installs configuration files in the locations that NFS expects.
- Scheme Variable: nfs-service-type
A service type for a complete NFS server.
- Data Type: nfs-configuration
This data type represents the configuration of the NFS service and all of its subsystems.
It has the following parameters:
nfs-utils(default:nfs-utils)The nfs-utils package to use.
nfs-versions(default:'("4.2" "4.1" "4.0"))If a list of string values is provided, the
rpc.nfsddaemon will be limited to supporting the given versions of the NFS protocol.exports(default:'())This is a list of directories the NFS server should export. Each entry is a list consisting of two elements: a directory name and a string containing all options. This is an example in which the directory /export is served to all NFS clients as a read-only share:
(nfs-configuration (exports '(("/export" "*(ro,insecure,no_subtree_check,crossmnt,fsid=0)"))))rpcmountd-port(default:#f)The network port that the
rpc.mountddaemon should use.rpcstatd-port(default:#f)The network port that the
rpc.statddaemon should use.rpcbind(default:rpcbind)The rpcbind package to use.
idmap-domain(default:"localdomain")The local NFSv4 domain name.
nfsd-port(default:2049)The network port that the
nfsddaemon should use.nfsd-threads(default:8)The number of threads used by the
nfsddaemon.nfsd-tcp?(default:#t)Whether the
nfsddaemon should listen on a TCP socket.nfsd-udp?(default:#f)Whether the
nfsddaemon should listen on a UDP socket.pipefs-directory(default:"/var/lib/nfs/rpc_pipefs")The directory where the pipefs file system is mounted.
debug(default:'()")A list of subsystems for which debugging output should be enabled. This is a list of symbols. Any of these symbols are valid:
nfsd,nfs,rpc,idmap,statd, ormountd.
If you don’t need a complete NFS service or prefer to build it yourself you can use the individual component services that are documented below.
RPC Bind Service
The RPC Bind service provides a facility to map program numbers into universal addresses. Many NFS related services use this facility. Hence it is automatically started when a dependent service starts.
- Scheme Variable: rpcbind-service-type
A service type for the RPC portmapper daemon.
- Data Type: rpcbind-configuration
Data type representing the configuration of the RPC Bind Service. This type has the following parameters:
rpcbind(default:rpcbind)The rpcbind package to use.
warm-start?(default:#t)If this parameter is
#t, then the daemon will read a state file on startup thus reloading state information saved by a previous instance.
Pipefs Pseudo File System
The pipefs file system is used to transfer NFS related data between the kernel and user space programs.
- Scheme Variable: pipefs-service-type
A service type for the pipefs pseudo file system.
- Data Type: pipefs-configuration
Data type representing the configuration of the pipefs pseudo file system service. This type has the following parameters:
mount-point(default:"/var/lib/nfs/rpc_pipefs")The directory to which the file system is to be attached.
GSS Daemon Service
The global security system (GSS) daemon provides strong security for
RPC based protocols. Before exchanging RPC requests an RPC client must
establish a security context. Typically this is done using the Kerberos
command kinit or automatically at login time using PAM services
(see Kerberos服务).
- Scheme Variable: gss-service-type
A service type for the Global Security System (GSS) daemon.
- Data Type: gss-configuration
Data type representing the configuration of the GSS daemon service. This type has the following parameters:
nfs-utils(default:nfs-utils)The package in which the
rpc.gssdcommand is to be found.pipefs-directory(default:"/var/lib/nfs/rpc_pipefs")The directory where the pipefs file system is mounted.
IDMAP Daemon Service
The idmap daemon service provides mapping between user IDs and user names. Typically it is required in order to access file systems mounted via NFSv4.
- Scheme Variable: idmap-service-type
A service type for the Identity Mapper (IDMAP) daemon.
- Data Type: idmap-configuration
Data type representing the configuration of the IDMAP daemon service. This type has the following parameters:
nfs-utils(default:nfs-utils)The package in which the
rpc.idmapdcommand is to be found.pipefs-directory(default:"/var/lib/nfs/rpc_pipefs")The directory where the pipefs file system is mounted.
domain(default:#f)The local NFSv4 domain name. This must be a string or
#f. If it is#fthen the daemon will use the host’s fully qualified domain name.verbosity(default:0)The verbosity level of the daemon.
12.9.25 Samba Services
The (gnu services samba) module provides service definitions for
Samba as well as additional helper services. Currently it provides the
following services.
Samba
Samba provides network shares for folders and printers using the SMB/CIFS protocol commonly used on Windows. It can also act as an Active Directory Domain Controller (AD DC) for other hosts in an heterougenious network with different types of Computer systems.
- Variable: Scheme variable samba-service-type
-
The service type to enable the samba services
samba,nmbd,smbdandwinbindd. By default this service type does not run any of the Samba daemons; they must be enabled individually.Below is a basic example that configures a simple, anonymous (unauthenticated) Samba file share exposing the /public directory.
Tip: The /public directory and its contents must be world readable/writable, so you’ll want to run ‘chmod -R 777 /public’ on it.
Caution: Such a Samba configuration should only be used in controlled environments, and you should not share any private files using it, as anyone connecting to your network would be able to access them.
(service samba-service-type (samba-configuration (enable-smbd? #t) (config-file (plain-file "smb.conf" "\ [global] map to guest = Bad User logging = syslog@1 [public] browsable = yes path = /public read only = no guest ok = yes guest only = yes\n"))))
- Data Type: samba-service-configuration Configuration record for the
Samba suite.
package(default:samba)The samba package to use.
config-file(default:#f)The config file to use. To learn about its syntax, run ‘man smb.conf’.
enable-samba?(default:#f)Enable the
sambadaemon.enable-smbd?(default:#f)Enable the
smbddaemon.enable-nmbd?(default:#f)Enable the
nmbddaemon.enable-winbindd?(default:#f)Enable the
winbindddaemon.
Web Service Discovery Daemon
The WSDD (Web Service Discovery daemon) implements the Web Services Dynamic Discovery protocol that enables host discovery over Multicast DNS, similar to what Avahi does. It is a drop-in replacement for SMB hosts that have had SMBv1 disabled for security reasons.
- Scheme Variable: wsdd-service-type
Service type for the WSD host daemon. The value for this service type is a
wsdd-configurationrecord. The details for thewsdd-configurationrecord type are given below.
- Data Type: wsdd-configuration
This data type represents the configuration for the wsdd service.
package(default:wsdd)The wsdd package to use.
ipv4only?(default:#f)Only listen to IPv4 addresses.
ipv6only(default:#f)Only listen to IPv6 addresses. Please note: Activating both options is not possible, since there would be no IP versions to listen to.
chroot(default:#f)Chroot into a separate directory to prevent access to other directories. This is to increase security in case there is a vulnerability in
wsdd.hop-limit(default:1)Limit to the level of hops for multicast packets. The default is 1 which should prevent packets from leaving the local network.
interface(default:'())Limit to the given list of interfaces to listen to. By default wsdd will listen to all interfaces. Except the loopback interface is never used.
uuid-device(default:#f)The WSD protocol requires a device to have a UUID. Set this to manually assign the service a UUID.
domain(default:#f)Notify this host is a member of an Active Directory.
host-name(default:#f)Manually set the hostname rather than letting
wsddinherit this host’s hostname. Only the host name part of a possible FQDN will be used in the default case.preserve-case?(default:#f)By default
wsddwill convert the hostname in workgroup to all uppercase. The opposite is true for hostnames in domains. Setting this parameter will preserve case.workgroup(default: "WORKGROUP")Change the name of the workgroup. By default
wsddreports this host being member of a workgroup.
Next: 电源管理服务, Previous: Samba Services, Up: 服务 [Contents][Index]
12.9.26 持续集成
Cuirass is a continuous integration tool for Guix. It can be used both for development and for providing substitutes to others (see substitutes).
The (gnu services cuirass) module provides the following service.
- Scheme Procedure: cuirass-service-type
The type of the Cuirass service. Its value must be a
cuirass-configurationobject, as described below.
To add build jobs, you have to set the specifications field of the
configuration. For instance, the following example will build all the
packages provided by the my-channel channel.
(define %cuirass-specs #~(list (specification (name "my-channel") (build '(channels my-channel)) (channels (cons (channel (name 'my-channel) (url "https://my-channel.git")) %default-channels))))) (service cuirass-service-type (cuirass-configuration (specifications %cuirass-specs)))
To build the linux-libre package defined by the default Guix channel,
one can use the following configuration.
(define %cuirass-specs #~(list (specification (name "my-linux") (build '(packages "linux-libre"))))) (service cuirass-service-type (cuirass-configuration (specifications %cuirass-specs)))
The other configuration possibilities, as well as the specification record itself are described in the Cuirass manual (see Specifications in Cuirass).
While information related to build jobs is located directly in the
specifications, global settings for the cuirass process are
accessible in other cuirass-configuration fields.
- Data Type: cuirass-configuration
Data type representing the configuration of Cuirass.
cuirass(default:cuirass)The Cuirass package to use.
log-file(default:"/var/log/cuirass.log")Location of the log file.
web-log-file(default:"/var/log/cuirass-web.log")Location of the log file used by the web interface.
cache-directory(default:"/var/cache/cuirass")Location of the repository cache.
user(default:"cuirass")Owner of the
cuirassprocess.group(default:"cuirass")Owner’s group of the
cuirassprocess.interval(default:60)Number of seconds between the poll of the repositories followed by the Cuirass jobs.
parameters(default:#f)Read parameters from the given parameters file. The supported parameters are described here (see Parameters in Cuirass).
remote-server(default:#f)A
cuirass-remote-server-configurationrecord to use the build remote mechanism or#fto use the default build mechanism.database(default:"dbname=cuirass host=/var/run/postgresql")Use database as the database containing the jobs and the past build results. Since Cuirass uses PostgreSQL as a database engine, database must be a string such as
"dbname=cuirass host=localhost".port(default:8081)Port number used by the HTTP server.
host(default:"localhost")Listen on the network interface for host. The default is to accept connections from localhost.
specifications(default:#~'())A gexp (see G-表达式) that evaluates to a list of specifications records. The specification record is described in the Cuirass manual (see Specifications in Cuirass).
use-substitutes?(default:#f)This allows using substitutes to avoid building every dependencies of a job from source.
one-shot?(default:#f)Only evaluate specifications and build derivations once.
fallback?(default:#f)When substituting a pre-built binary fails, fall back to building packages locally.
extra-options(default:'())Extra options to pass when running the Cuirass processes.
Cuirass remote building
Cuirass supports two mechanisms to build derivations.
- Using the local Guix daemon. This is the default build mechanism. Once the build jobs are evaluated, they are sent to the local Guix daemon. Cuirass then listens to the Guix daemon output to detect the various build events.
- Using the remote build mechanism. The build jobs are not submitted to the local Guix daemon. Instead, a remote server dispatches build requests to the connect remote workers, according to the build priorities.
To enable this build mode a cuirass-remote-server-configuration
record must be passed as remote-server argument of the
cuirass-configuration record. The
cuirass-remote-server-configuration record is described below.
This build mode scales way better than the default build mode. This is the build mode that is used on the GNU Guix build farm at https://ci.guix.gnu.org. It should be preferred when using Cuirass to build large amount of packages.
- Data Type: cuirass-remote-server-configuration
Data type representing the configuration of the Cuirass remote-server.
backend-port(default:5555)The TCP port for communicating with
remote-workerprocesses using ZMQ. It defaults to5555.log-port(default:5556)The TCP port of the log server. It defaults to
5556.publish-port(default:5557)The TCP port of the publish server. It defaults to
5557.log-file(default:"/var/log/cuirass-remote-server.log")Location of the log file.
cache(default:"/var/cache/cuirass/remote")Use cache directory to cache build log files.
trigger-url(default:#f)Once a substitute is successfully fetched, trigger substitute baking at trigger-url.
publish?(default:#t)If set to false, do not start a publish server and ignore the
publish-portargument. This can be useful if there is already a standalone publish server standing next to the remote server.public-keyprivate-keyUse the specific files as the public/private key pair used to sign the store items being published.
At least one remote worker must also be started on any machine of the local network to actually perform the builds and report their status.
- Data Type: cuirass-remote-worker-configuration
Data type representing the configuration of the Cuirass remote-worker.
cuirass(default:cuirass)The Cuirass package to use.
workers(default:1)Start workers parallel workers.
server(default:#f)Do not use Avahi discovery and connect to the given
serverIP address instead.systems(default:(list (%current-system)))Only request builds for the given systems.
log-file(default:"/var/log/cuirass-remote-worker.log")Location of the log file.
publish-port(default:5558)The TCP port of the publish server. It defaults to
5558.substitute-urls(default:%default-substitute-urls)The list of URLs where to look for substitutes by default.
public-keyprivate-keyUse the specific files as the public/private key pair used to sign the store items being published.
Laminar
Laminar is a lightweight and modular Continuous Integration service. It doesn’t have a configuration web UI instead uses version-controllable configuration files and scripts.
Laminar encourages the use of existing tools such as bash and cron instead of reinventing them.
- Scheme Procedure: laminar-service-type
The type of the Laminar service. Its value must be a
laminar-configurationobject, as described below.All configuration values have defaults, a minimal configuration to get Laminar running is shown below. By default, the web interface is available on port 8080.
(service laminar-service-type)
- Data Type: laminar-configuration
Data type representing the configuration of Laminar.
laminar(default:laminar)The Laminar package to use.
home-directory(default:"/var/lib/laminar")The directory for job configurations and run directories.
bind-http(default:"*:8080")The interface/port or unix socket on which laminard should listen for incoming connections to the web frontend.
bind-rpc(default:"unix-abstract:laminar")The interface/port or unix socket on which laminard should listen for incoming commands such as build triggers.
title(default:"Laminar")The page title to show in the web frontend.
keep-rundirs(default:0)Set to an integer defining how many rundirs to keep per job. The lowest-numbered ones will be deleted. The default is 0, meaning all run dirs will be immediately deleted.
archive-url(default:#f)The web frontend served by laminard will use this URL to form links to artefacts archived jobs.
base-url(default:#f)Base URL to use for links to laminar itself.
12.9.27 电源管理服务
TLP daemon
The (gnu services pm) module provides a Guix service definition for
the Linux power management tool TLP.
TLP enables various powersaving modes in userspace and kernel. Contrary to
upower-service, it is not a passive, monitoring tool, as it will
apply custom settings each time a new power source is detected. More
information can be found at TLP
home page.
- Scheme Variable: tlp-service-type
The service type for the TLP tool. The default settings are optimised for battery life on most systems, but you can tweak them to your heart’s content by adding a valid
tlp-configuration:(service tlp-service-type (tlp-configuration (cpu-scaling-governor-on-ac (list "performance")) (sched-powersave-on-bat? #t)))
Each parameter definition is preceded by its type; for example,
‘boolean foo’ indicates that the foo parameter should be
specified as a boolean. Types starting with maybe- denote parameters
that won’t show up in TLP config file when their value is left unset, or is
explicitly set to the %unset-value value.
Available tlp-configuration fields are:
tlp-configurationparameter: package tlp ¶The TLP package.
tlp-configurationparameter: boolean tlp-enable? ¶Set to true if you wish to enable TLP.
Defaults to ‘#t’.
tlp-configurationparameter: string tlp-default-mode ¶Default mode when no power supply can be detected. Alternatives are AC and BAT.
Defaults to ‘"AC"’.
tlp-configurationparameter: non-negative-integer disk-idle-secs-on-ac ¶Number of seconds Linux kernel has to wait after the disk goes idle, before syncing on AC.
Defaults to ‘0’.
tlp-configurationparameter: non-negative-integer disk-idle-secs-on-bat ¶Same as
disk-idle-acbut on BAT mode.Defaults to ‘2’.
tlp-configurationparameter: non-negative-integer max-lost-work-secs-on-ac ¶Dirty pages flushing periodicity, expressed in seconds.
Defaults to ‘15’.
tlp-configurationparameter: non-negative-integer max-lost-work-secs-on-bat ¶Same as
max-lost-work-secs-on-acbut on BAT mode.Defaults to ‘60’.
tlp-configurationparameter: maybe-space-separated-string-list cpu-scaling-governor-on-ac ¶CPU frequency scaling governor on AC mode. With intel_pstate driver, alternatives are powersave and performance. With acpi-cpufreq driver, alternatives are ondemand, powersave, performance and conservative.
Defaults to ‘disabled’.
tlp-configurationparameter: maybe-space-separated-string-list cpu-scaling-governor-on-bat ¶Same as
cpu-scaling-governor-on-acbut on BAT mode.Defaults to ‘disabled’.
tlp-configurationparameter: maybe-non-negative-integer cpu-scaling-min-freq-on-ac ¶Set the min available frequency for the scaling governor on AC.
Defaults to ‘disabled’.
tlp-configurationparameter: maybe-non-negative-integer cpu-scaling-max-freq-on-ac ¶Set the max available frequency for the scaling governor on AC.
Defaults to ‘disabled’.
tlp-configurationparameter: maybe-non-negative-integer cpu-scaling-min-freq-on-bat ¶Set the min available frequency for the scaling governor on BAT.
Defaults to ‘disabled’.
tlp-configurationparameter: maybe-non-negative-integer cpu-scaling-max-freq-on-bat ¶Set the max available frequency for the scaling governor on BAT.
Defaults to ‘disabled’.
tlp-configurationparameter: maybe-non-negative-integer cpu-min-perf-on-ac ¶Limit the min P-state to control the power dissipation of the CPU, in AC mode. Values are stated as a percentage of the available performance.
Defaults to ‘disabled’.
tlp-configurationparameter: maybe-non-negative-integer cpu-max-perf-on-ac ¶Limit the max P-state to control the power dissipation of the CPU, in AC mode. Values are stated as a percentage of the available performance.
Defaults to ‘disabled’.
tlp-configurationparameter: maybe-non-negative-integer cpu-min-perf-on-bat ¶Same as
cpu-min-perf-on-acon BAT mode.Defaults to ‘disabled’.
tlp-configurationparameter: maybe-non-negative-integer cpu-max-perf-on-bat ¶Same as
cpu-max-perf-on-acon BAT mode.Defaults to ‘disabled’.
tlp-configurationparameter: maybe-boolean cpu-boost-on-ac? ¶Enable CPU turbo boost feature on AC mode.
Defaults to ‘disabled’.
tlp-configurationparameter: maybe-boolean cpu-boost-on-bat? ¶Same as
cpu-boost-on-ac?on BAT mode.Defaults to ‘disabled’.
tlp-configurationparameter: boolean sched-powersave-on-ac? ¶Allow Linux kernel to minimize the number of CPU cores/hyper-threads used under light load conditions.
Defaults to ‘#f’.
tlp-configurationparameter: boolean sched-powersave-on-bat? ¶Same as
sched-powersave-on-ac?but on BAT mode.Defaults to ‘#t’.
tlp-configurationparameter: boolean nmi-watchdog? ¶Enable Linux kernel NMI watchdog.
Defaults to ‘#f’.
tlp-configurationparameter: maybe-string phc-controls ¶For Linux kernels with PHC patch applied, change CPU voltages. An example value would be ‘"F:V F:V F:V F:V"’.
Defaults to ‘disabled’.
tlp-configurationparameter: string energy-perf-policy-on-ac ¶Set CPU performance versus energy saving policy on AC. Alternatives are performance, normal, powersave.
Defaults to ‘"performance"’.
tlp-configurationparameter: string energy-perf-policy-on-bat ¶Same as
energy-perf-policy-acbut on BAT mode.Defaults to ‘"powersave"’.
tlp-configurationparameter: space-separated-string-list disks-devices ¶Hard disk devices.
tlp-configurationparameter: space-separated-string-list disk-apm-level-on-ac ¶Hard disk advanced power management level.
tlp-configurationparameter: space-separated-string-list disk-apm-level-on-bat ¶Same as
disk-apm-batbut on BAT mode.
tlp-configurationparameter: maybe-space-separated-string-list disk-spindown-timeout-on-ac ¶Hard disk spin down timeout. One value has to be specified for each declared hard disk.
Defaults to ‘disabled’.
tlp-configurationparameter: maybe-space-separated-string-list disk-spindown-timeout-on-bat ¶Same as
disk-spindown-timeout-on-acbut on BAT mode.Defaults to ‘disabled’.
tlp-configurationparameter: maybe-space-separated-string-list disk-iosched ¶Select IO scheduler for disk devices. One value has to be specified for each declared hard disk. Example alternatives are cfq, deadline and noop.
Defaults to ‘disabled’.
tlp-configurationparameter: string sata-linkpwr-on-ac ¶SATA aggressive link power management (ALPM) level. Alternatives are min_power, medium_power, max_performance.
Defaults to ‘"max_performance"’.
tlp-configurationparameter: string sata-linkpwr-on-bat ¶Same as
sata-linkpwr-acbut on BAT mode.Defaults to ‘"min_power"’.
tlp-configurationparameter: maybe-string sata-linkpwr-blacklist ¶Exclude specified SATA host devices for link power management.
Defaults to ‘disabled’.
tlp-configurationparameter: maybe-on-off-boolean ahci-runtime-pm-on-ac? ¶Enable Runtime Power Management for AHCI controller and disks on AC mode.
Defaults to ‘disabled’.
tlp-configurationparameter: maybe-on-off-boolean ahci-runtime-pm-on-bat? ¶Same as
ahci-runtime-pm-on-acon BAT mode.Defaults to ‘disabled’.
tlp-configurationparameter: non-negative-integer ahci-runtime-pm-timeout ¶Seconds of inactivity before disk is suspended.
Defaults to ‘15’.
tlp-configurationparameter: string pcie-aspm-on-ac ¶PCI Express Active State Power Management level. Alternatives are default, performance, powersave.
Defaults to ‘"performance"’.
tlp-configurationparameter: string pcie-aspm-on-bat ¶Same as
pcie-aspm-acbut on BAT mode.Defaults to ‘"powersave"’.
tlp-configurationparameter: maybe-non-negative-integer start-charge-thresh-bat0 ¶Percentage when battery 0 should begin charging. Only supported on some laptops.
Defaults to ‘disabled’.
tlp-configurationparameter: maybe-non-negative-integer stop-charge-thresh-bat0 ¶Percentage when battery 0 should stop charging. Only supported on some laptops.
Defaults to ‘disabled’.
tlp-configurationparameter: maybe-non-negative-integer start-charge-thresh-bat1 ¶Percentage when battery 1 should begin charging. Only supported on some laptops.
Defaults to ‘disabled’.
tlp-configurationparameter: maybe-non-negative-integer stop-charge-thresh-bat1 ¶Percentage when battery 1 should stop charging. Only supported on some laptops.
Defaults to ‘disabled’.
tlp-configurationparameter: string radeon-power-profile-on-ac ¶Radeon graphics clock speed level. Alternatives are low, mid, high, auto, default.
Defaults to ‘"high"’.
tlp-configurationparameter: string radeon-power-profile-on-bat ¶Same as
radeon-power-acbut on BAT mode.Defaults to ‘"low"’.
tlp-configurationparameter: string radeon-dpm-state-on-ac ¶Radeon dynamic power management method (DPM). Alternatives are battery, performance.
Defaults to ‘"performance"’.
tlp-configurationparameter: string radeon-dpm-state-on-bat ¶Same as
radeon-dpm-state-acbut on BAT mode.Defaults to ‘"battery"’.
tlp-configurationparameter: string radeon-dpm-perf-level-on-ac ¶Radeon DPM performance level. Alternatives are auto, low, high.
Defaults to ‘"auto"’.
tlp-configurationparameter: string radeon-dpm-perf-level-on-bat ¶Same as
radeon-dpm-perf-acbut on BAT mode.Defaults to ‘"auto"’.
tlp-configurationparameter: on-off-boolean wifi-pwr-on-ac? ¶Wifi power saving mode.
Defaults to ‘#f’.
tlp-configurationparameter: on-off-boolean wifi-pwr-on-bat? ¶Same as
wifi-power-ac?but on BAT mode.Defaults to ‘#t’.
tlp-configurationparameter: y-n-boolean wol-disable? ¶Disable wake on LAN.
Defaults to ‘#t’.
tlp-configurationparameter: non-negative-integer sound-power-save-on-ac ¶Timeout duration in seconds before activating audio power saving on Intel HDA and AC97 devices. A value of 0 disables power saving.
Defaults to ‘0’.
tlp-configurationparameter: non-negative-integer sound-power-save-on-bat ¶Same as
sound-powersave-acbut on BAT mode.Defaults to ‘1’.
tlp-configurationparameter: y-n-boolean sound-power-save-controller? ¶Disable controller in powersaving mode on Intel HDA devices.
Defaults to ‘#t’.
tlp-configurationparameter: boolean bay-poweroff-on-bat? ¶Enable optical drive in UltraBay/MediaBay on BAT mode. Drive can be powered on again by releasing (and reinserting) the eject lever or by pressing the disc eject button on newer models.
Defaults to ‘#f’.
tlp-configurationparameter: string bay-device ¶Name of the optical drive device to power off.
Defaults to ‘"sr0"’.
tlp-configurationparameter: string runtime-pm-on-ac ¶Runtime Power Management for PCI(e) bus devices. Alternatives are on and auto.
Defaults to ‘"on"’.
tlp-configurationparameter: string runtime-pm-on-bat ¶Same as
runtime-pm-acbut on BAT mode.Defaults to ‘"auto"’.
tlp-configurationparameter: boolean runtime-pm-all? ¶Runtime Power Management for all PCI(e) bus devices, except blacklisted ones.
Defaults to ‘#t’.
tlp-configurationparameter: maybe-space-separated-string-list runtime-pm-blacklist ¶Exclude specified PCI(e) device addresses from Runtime Power Management.
Defaults to ‘disabled’.
tlp-configurationparameter: space-separated-string-list runtime-pm-driver-blacklist ¶Exclude PCI(e) devices assigned to the specified drivers from Runtime Power Management.
tlp-configurationparameter: boolean usb-autosuspend? ¶Enable USB autosuspend feature.
Defaults to ‘#t’.
tlp-configurationparameter: maybe-string usb-blacklist ¶Exclude specified devices from USB autosuspend.
Defaults to ‘disabled’.
tlp-configurationparameter: boolean usb-blacklist-wwan? ¶Exclude WWAN devices from USB autosuspend.
Defaults to ‘#t’.
tlp-configurationparameter: maybe-string usb-whitelist ¶Include specified devices into USB autosuspend, even if they are already excluded by the driver or via
usb-blacklist-wwan?.Defaults to ‘disabled’.
tlp-configurationparameter: maybe-boolean usb-autosuspend-disable-on-shutdown? ¶Enable USB autosuspend before shutdown.
Defaults to ‘disabled’.
tlp-configurationparameter: boolean restore-device-state-on-startup? ¶Restore radio device state (bluetooth, wifi, wwan) from previous shutdown on system startup.
Defaults to ‘#f’.
Thermald daemon
The (gnu services pm) module provides an interface to thermald, a CPU
frequency scaling service which helps prevent overheating.
- Scheme Variable: thermald-service-type
This is the service type for thermald, the Linux Thermal Daemon, which is responsible for controlling the thermal state of processors and preventing overheating.
- Data Type: thermald-configuration
Data type representing the configuration of
thermald-service-type.adaptive?(default:#f)Use DPTF (Dynamic Power and Thermal Framework) adaptive tables when present.
ignore-cpuid-check?(default:#f)Ignore cpuid check for supported CPU models.
thermald(default: thermald)Package object of thermald.
12.9.28 音频服务
The (gnu services audio) module provides a service to start MPD (the
Music Player Daemon).
Music Player Daemon
The Music Player Daemon (MPD) is a service that can play music while being controlled from the local machine or over the network by a variety of clients.
The following example shows how one might run mpd as user
"bob" on port 6666. It uses pulseaudio for output.
(service mpd-service-type
(mpd-configuration
(user "bob")
(port "6666")))
- Scheme Variable: mpd-service-type
The service type for
mpd
- Data Type: mpd-configuration
Data type representing the configuration of
mpd.user(default:"mpd")The user to run mpd as.
music-dir(default:"~/Music")The directory to scan for music files.
playlist-dir(default:"~/.mpd/playlists")The directory to store playlists.
db-file(default:"~/.mpd/tag_cache")The location of the music database.
state-file(default:"~/.mpd/state")The location of the file that stores current MPD’s state.
sticker-file(default:"~/.mpd/sticker.sql")The location of the sticker database.
port(default:"6600")The port to run mpd on.
address(default:"any")The address that mpd will bind to. To use a Unix domain socket, an absolute path can be specified here.
outputs(default:"(list (mpd-output))")The audio outputs that MPD can use. By default this is a single output using pulseaudio.
- Data Type: mpd-output
Data type representing an
mpdaudio output.name(default:"MPD")The name of the audio output.
type(default:"pulse")The type of audio output.
enabled?(default:#t)Specifies whether this audio output is enabled when MPD is started. By default, all audio outputs are enabled. This is just the default setting when there is no state file; with a state file, the previous state is restored.
tags?(default:#t)If set to
#f, then MPD will not send tags to this output. This is only useful for output plugins that can receive tags, for example thehttpdoutput plugin.always-on?(default:#f)If set to
#t, then MPD attempts to keep this audio output always open. This may be useful for streaming servers, when you don’t want to disconnect all listeners even when playback is accidentally stopped.mixer-typeThis field accepts a symbol that specifies which mixer should be used for this audio output: the
hardwaremixer, thesoftwaremixer, thenullmixer (allows setting the volume, but with no effect; this can be used as a trick to implement an external mixer External Mixer) or no mixer (none).extra-options(default:'())An association list of option symbols to string values to be appended to the audio output configuration.
The following example shows a configuration of mpd that provides an
HTTP audio streaming output.
(service mpd-service-type
(mpd-configuration
(outputs
(list (mpd-output
(name "streaming")
(type "httpd")
(mixer-type 'null)
(extra-options
`((encoder . "vorbis")
(port . "8080"))))))))
12.9.29 虚拟化服务
The (gnu services virtualization) module provides services for the
libvirt and virtlog daemons, as well as other virtualization-related
services.
Libvirt daemon
libvirtd is the server side daemon component of the libvirt
virtualization management system. This daemon runs on host servers and
performs required management tasks for virtualized guests.
- Scheme Variable: libvirt-service-type
This is the type of the libvirt daemon. Its value must be a
libvirt-configuration.(service libvirt-service-type (libvirt-configuration (unix-sock-group "libvirt") (tls-port "16555")))
Available libvirt-configuration fields are:
libvirt-configurationparameter: package libvirt ¶Libvirt package.
libvirt-configurationparameter: boolean listen-tls? ¶Flag listening for secure TLS connections on the public TCP/IP port. You must set
listenfor this to have any effect.It is necessary to setup a CA and issue server certificates before using this capability.
Defaults to ‘#t’.
libvirt-configurationparameter: boolean listen-tcp? ¶Listen for unencrypted TCP connections on the public TCP/IP port. You must set
listenfor this to have any effect.Using the TCP socket requires SASL authentication by default. Only SASL mechanisms which support data encryption are allowed. This is DIGEST_MD5 and GSSAPI (Kerberos5).
Defaults to ‘#f’.
libvirt-configurationparameter: string tls-port ¶Port for accepting secure TLS connections. This can be a port number, or service name.
Defaults to ‘"16514"’.
libvirt-configurationparameter: string tcp-port ¶Port for accepting insecure TCP connections. This can be a port number, or service name.
Defaults to ‘"16509"’.
libvirt-configurationparameter: string listen-addr ¶IP address or hostname used for client connections.
Defaults to ‘"0.0.0.0"’.
libvirt-configurationparameter: boolean mdns-adv? ¶Flag toggling mDNS advertisement of the libvirt service.
Alternatively can disable for all services on a host by stopping the Avahi daemon.
Defaults to ‘#f’.
libvirt-configurationparameter: string mdns-name ¶Default mDNS advertisement name. This must be unique on the immediate broadcast network.
Defaults to ‘"Virtualization Host <hostname>"’.
libvirt-configurationparameter: string unix-sock-group ¶UNIX domain socket group ownership. This can be used to allow a ’trusted’ set of users access to management capabilities without becoming root.
Defaults to ‘"root"’.
libvirt-configurationparameter: string unix-sock-ro-perms ¶UNIX socket permissions for the R/O socket. This is used for monitoring VM status only.
Defaults to ‘"0777"’.
libvirt-configurationparameter: string unix-sock-rw-perms ¶UNIX socket permissions for the R/W socket. Default allows only root. If PolicyKit is enabled on the socket, the default will change to allow everyone (eg, 0777)
Defaults to ‘"0770"’.
libvirt-configurationparameter: string unix-sock-admin-perms ¶UNIX socket permissions for the admin socket. Default allows only owner (root), do not change it unless you are sure to whom you are exposing the access to.
Defaults to ‘"0777"’.
libvirt-configurationparameter: string unix-sock-dir ¶The directory in which sockets will be found/created.
Defaults to ‘"/var/run/libvirt"’.
libvirt-configurationparameter: string auth-unix-ro ¶Authentication scheme for UNIX read-only sockets. By default socket permissions allow anyone to connect
Defaults to ‘"polkit"’.
libvirt-configurationparameter: string auth-unix-rw ¶Authentication scheme for UNIX read-write sockets. By default socket permissions only allow root. If PolicyKit support was compiled into libvirt, the default will be to use ’polkit’ auth.
Defaults to ‘"polkit"’.
libvirt-configurationparameter: string auth-tcp ¶Authentication scheme for TCP sockets. If you don’t enable SASL, then all TCP traffic is cleartext. Don’t do this outside of a dev/test scenario.
Defaults to ‘"sasl"’.
libvirt-configurationparameter: string auth-tls ¶Authentication scheme for TLS sockets. TLS sockets already have encryption provided by the TLS layer, and limited authentication is done by certificates.
It is possible to make use of any SASL authentication mechanism as well, by using ’sasl’ for this option
Defaults to ‘"none"’.
libvirt-configurationparameter: optional-list access-drivers ¶API access control scheme.
By default an authenticated user is allowed access to all APIs. Access drivers can place restrictions on this.
Defaults to ‘()’.
libvirt-configurationparameter: string key-file ¶Server key file path. If set to an empty string, then no private key is loaded.
Defaults to ‘""’.
libvirt-configurationparameter: string cert-file ¶Server key file path. If set to an empty string, then no certificate is loaded.
Defaults to ‘""’.
libvirt-configurationparameter: string ca-file ¶Server key file path. If set to an empty string, then no CA certificate is loaded.
Defaults to ‘""’.
libvirt-configurationparameter: string crl-file ¶Certificate revocation list path. If set to an empty string, then no CRL is loaded.
Defaults to ‘""’.
libvirt-configurationparameter: boolean tls-no-sanity-cert ¶Disable verification of our own server certificates.
When libvirtd starts it performs some sanity checks against its own certificates.
Defaults to ‘#f’.
libvirt-configurationparameter: boolean tls-no-verify-cert ¶Disable verification of client certificates.
Client certificate verification is the primary authentication mechanism. Any client which does not present a certificate signed by the CA will be rejected.
Defaults to ‘#f’.
libvirt-configurationparameter: optional-list tls-allowed-dn-list ¶Whitelist of allowed x509 Distinguished Name.
Defaults to ‘()’.
libvirt-configurationparameter: optional-list sasl-allowed-usernames ¶Whitelist of allowed SASL usernames. The format for username depends on the SASL authentication mechanism.
Defaults to ‘()’.
libvirt-configurationparameter: string tls-priority ¶Override the compile time default TLS priority string. The default is usually ‘"NORMAL"’ unless overridden at build time. Only set this is it is desired for libvirt to deviate from the global default settings.
Defaults to ‘"NORMAL"’.
libvirt-configurationparameter: integer max-clients ¶Maximum number of concurrent client connections to allow over all sockets combined.
Defaults to ‘5000’.
libvirt-configurationparameter: integer max-queued-clients ¶Maximum length of queue of connections waiting to be accepted by the daemon. Note, that some protocols supporting retransmission may obey this so that a later reattempt at connection succeeds.
Defaults to ‘1000’.
libvirt-configurationparameter: integer max-anonymous-clients ¶Maximum length of queue of accepted but not yet authenticated clients. Set this to zero to turn this feature off
Defaults to ‘20’.
libvirt-configurationparameter: integer min-workers ¶Number of workers to start up initially.
Defaults to ‘5’.
libvirt-configurationparameter: integer max-workers ¶Maximum number of worker threads.
If the number of active clients exceeds
min-workers, then more threads are spawned, up to max_workers limit. Typically you’d want max_workers to equal maximum number of clients allowed.Defaults to ‘20’.
libvirt-configurationparameter: integer prio-workers ¶Number of priority workers. If all workers from above pool are stuck, some calls marked as high priority (notably domainDestroy) can be executed in this pool.
Defaults to ‘5’.
libvirt-configurationparameter: integer max-requests ¶Total global limit on concurrent RPC calls.
Defaults to ‘20’.
libvirt-configurationparameter: integer max-client-requests ¶Limit on concurrent requests from a single client connection. To avoid one client monopolizing the server this should be a small fraction of the global max_requests and max_workers parameter.
Defaults to ‘5’.
libvirt-configurationparameter: integer admin-min-workers ¶Same as
min-workersbut for the admin interface.Defaults to ‘1’.
libvirt-configurationparameter: integer admin-max-workers ¶Same as
max-workersbut for the admin interface.Defaults to ‘5’.
libvirt-configurationparameter: integer admin-max-clients ¶Same as
max-clientsbut for the admin interface.Defaults to ‘5’.
libvirt-configurationparameter: integer admin-max-queued-clients ¶Same as
max-queued-clientsbut for the admin interface.Defaults to ‘5’.
libvirt-configurationparameter: integer admin-max-client-requests ¶Same as
max-client-requestsbut for the admin interface.Defaults to ‘5’.
libvirt-configurationparameter: integer log-level ¶Logging level. 4 errors, 3 warnings, 2 information, 1 debug.
Defaults to ‘3’.
libvirt-configurationparameter: string log-filters ¶Logging filters.
A filter allows to select a different logging level for a given category of logs. The format for a filter is one of:
- x:name
- x:+name
where
nameis a string which is matched against the category given in theVIR_LOG_INIT()at the top of each libvirt source file, e.g., ‘"remote"’, ‘"qemu"’, or ‘"util.json"’ (the name in the filter can be a substring of the full category name, in order to match multiple similar categories), the optional ‘"+"’ prefix tells libvirt to log stack trace for each message matching name, andxis the minimal level where matching messages should be logged:- 1: DEBUG
- 2: INFO
- 3: WARNING
- 4: ERROR
Multiple filters can be defined in a single filters statement, they just need to be separated by spaces.
Defaults to ‘"3:remote 4:event"’.
libvirt-configurationparameter: string log-outputs ¶Logging outputs.
An output is one of the places to save logging information. The format for an output can be:
x:stderroutput goes to stderr
x:syslog:nameuse syslog for the output and use the given name as the ident
x:file:file_pathoutput to a file, with the given filepath
x:journaldoutput to journald logging system
In all case the x prefix is the minimal level, acting as a filter
- 1: DEBUG
- 2: INFO
- 3: WARNING
- 4: ERROR
Multiple outputs can be defined, they just need to be separated by spaces.
Defaults to ‘"3:stderr"’.
libvirt-configurationparameter: integer audit-level ¶Allows usage of the auditing subsystem to be altered
- 0: disable all auditing
- 1: enable auditing, only if enabled on host
- 2: enable auditing, and exit if disabled on host.
Defaults to ‘1’.
libvirt-configurationparameter: boolean audit-logging ¶Send audit messages via libvirt logging infrastructure.
Defaults to ‘#f’.
libvirt-configurationparameter: optional-string host-uuid ¶Host UUID. UUID must not have all digits be the same.
Defaults to ‘""’.
libvirt-configurationparameter: string host-uuid-source ¶Source to read host UUID.
-
smbios: fetch the UUID fromdmidecode -s system-uuid -
machine-id: fetch the UUID from/etc/machine-id
If
dmidecodedoes not provide a valid UUID a temporary UUID will be generated.Defaults to ‘"smbios"’.
-
libvirt-configurationparameter: integer keepalive-interval ¶A keepalive message is sent to a client after
keepalive_intervalseconds of inactivity to check if the client is still responding. If set to -1, libvirtd will never send keepalive requests; however clients can still send them and the daemon will send responses.Defaults to ‘5’.
libvirt-configurationparameter: integer keepalive-count ¶Maximum number of keepalive messages that are allowed to be sent to the client without getting any response before the connection is considered broken.
In other words, the connection is automatically closed approximately after
keepalive_interval * (keepalive_count + 1)seconds since the last message received from the client. Whenkeepalive-countis set to 0, connections will be automatically closed afterkeepalive-intervalseconds of inactivity without sending any keepalive messages.Defaults to ‘5’.
libvirt-configurationparameter: integer admin-keepalive-interval ¶Same as above but for admin interface.
Defaults to ‘5’.
libvirt-configurationparameter: integer admin-keepalive-count ¶Same as above but for admin interface.
Defaults to ‘5’.
libvirt-configurationparameter: integer ovs-timeout ¶Timeout for Open vSwitch calls.
The
ovs-vsctlutility is used for the configuration and its timeout option is set by default to 5 seconds to avoid potential infinite waits blocking libvirt.Defaults to ‘5’.
Virtlog daemon
The virtlogd service is a server side daemon component of libvirt that is used to manage logs from virtual machine consoles.
This daemon is not used directly by libvirt client applications, rather it
is called on their behalf by libvirtd. By maintaining the logs in a
standalone daemon, the main libvirtd daemon can be restarted without
risk of losing logs. The virtlogd daemon has the ability to
re-exec() itself upon receiving SIGUSR1, to allow live upgrades
without downtime.
- Scheme Variable: virtlog-service-type
This is the type of the virtlog daemon. Its value must be a
virtlog-configuration.(service virtlog-service-type (virtlog-configuration (max-clients 1000)))
- Variable:
libvirtparameter package libvirt ¶ Libvirt package.
virtlog-configurationparameter: integer log-level ¶Logging level. 4 errors, 3 warnings, 2 information, 1 debug.
Defaults to ‘3’.
virtlog-configurationparameter: string log-filters ¶Logging filters.
A filter allows to select a different logging level for a given category of logs The format for a filter is one of:
- x:name
- x:+name
where
nameis a string which is matched against the category given in theVIR_LOG_INIT()at the top of each libvirt source file, e.g., "remote", "qemu", or "util.json" (the name in the filter can be a substring of the full category name, in order to match multiple similar categories), the optional "+" prefix tells libvirt to log stack trace for each message matching name, andxis the minimal level where matching messages should be logged:- 1: DEBUG
- 2: INFO
- 3: WARNING
- 4: ERROR
Multiple filters can be defined in a single filters statement, they just need to be separated by spaces.
Defaults to ‘"3:remote 4:event"’.
virtlog-configurationparameter: string log-outputs ¶Logging outputs.
An output is one of the places to save logging information The format for an output can be:
x:stderroutput goes to stderr
x:syslog:nameuse syslog for the output and use the given name as the ident
x:file:file_pathoutput to a file, with the given filepath
x:journaldoutput to journald logging system
In all case the x prefix is the minimal level, acting as a filter
- 1: DEBUG
- 2: INFO
- 3: WARNING
- 4: ERROR
Multiple outputs can be defined, they just need to be separated by spaces.
Defaults to ‘"3:stderr"’.
virtlog-configurationparameter: integer max-clients ¶Maximum number of concurrent client connections to allow over all sockets combined.
Defaults to ‘1024’.
virtlog-configurationparameter: integer max-size ¶Maximum file size before rolling over.
Defaults to ‘2MB’
virtlog-configurationparameter: integer max-backups ¶Maximum number of backup files to keep.
Defaults to ‘3’
Transparent Emulation with QEMU
qemu-binfmt-service-type provides support for transparent emulation
of program binaries built for different architectures—e.g., it allows you
to transparently execute an ARMv7 program on an x86_64 machine. It achieves
this by combining the QEMU emulator and the
binfmt_misc feature of the kernel Linux. This feature only allows
you to emulate GNU/Linux on a different architecture, but see below for
GNU/Hurd support.
- Scheme Variable: qemu-binfmt-service-type
This is the type of the QEMU/binfmt service for transparent emulation. Its value must be a
qemu-binfmt-configurationobject, which specifies the QEMU package to use as well as the architecture we want to emulated:(service qemu-binfmt-service-type (qemu-binfmt-configuration (platforms (lookup-qemu-platforms "arm" "aarch64"))))In this example, we enable transparent emulation for the ARM and aarch64 platforms. Running
herd stop qemu-binfmtturns it off, and runningherd start qemu-binfmtturns it back on (see theherdcommand in The GNU Shepherd Manual).
- Data Type: qemu-binfmt-configuration
This is the configuration for the
qemu-binfmtservice.platforms(default:'())The list of emulated QEMU platforms. Each item must be a platform object as returned by
lookup-qemu-platforms(see below).For example, let’s suppose you’re on an x86_64 machine and you have this service:
(service qemu-binfmt-service-type (qemu-binfmt-configuration (platforms (lookup-qemu-platforms "arm"))))You can run:
guix build -s armhf-linux inkscape
and it will build Inkscape for ARMv7 as if it were a native build, transparently using QEMU to emulate the ARMv7 CPU. Pretty handy if you’d like to test a package build for an architecture you don’t have access to!
qemu(default:qemu)The QEMU package to use.
- Scheme Procedure: lookup-qemu-platforms platforms…
Return the list of QEMU platform objects corresponding to platforms…. platforms must be a list of strings corresponding to platform names, such as
"arm","sparc","mips64el", and so on.
- Scheme Procedure: qemu-platform? obj
Return true if obj is a platform object.
- Scheme Procedure: qemu-platform-name platform
Return the name of platform—a string such as
"arm".
QEMU Guest Agent
The QEMU guest agent provides control over the emulated system to the host.
The qemu-guest-agent service runs the agent on Guix guests. To
control the agent from the host, open a socket by invoking QEMU with the
following arguments:
qemu-system-x86_64 \ -chardev socket,path=/tmp/qga.sock,server=on,wait=off,id=qga0 \ -device virtio-serial \ -device virtserialport,chardev=qga0,name=org.qemu.guest_agent.0 \ ...
This creates a socket at /tmp/qga.sock on the host. Once the guest
agent is running, you can issue commands with socat:
$ guix shell socat -- socat unix-connect:/tmp/qga.sock stdio
{"execute": "guest-get-host-name"}
{"return": {"host-name": "guix"}}
See QEMU guest agent documentation for more options and commands.
- Scheme Variable: qemu-guest-agent-service-type
Service type for the QEMU guest agent service.
- Data Type: qemu-guest-agent-configuration
Configuration for the
qemu-guest-agentservice.qemu(default:qemu-minimal)The QEMU package to use.
device(default:"")File name of the device or socket the agent uses to communicate with the host. If empty, QEMU uses a default file name.
The Hurd in a Virtual Machine
Service hurd-vm provides support for running GNU/Hurd in a virtual
machine (VM), a so-called childhurd. This service is meant to be used
on GNU/Linux and the given GNU/Hurd operating system configuration is
cross-compiled. The virtual machine is a Shepherd service that can be
referred to by the names hurd-vm and childhurd and be
controlled with commands such as:
herd start hurd-vm herd stop childhurd
When the service is running, you can view its console by connecting to it with a VNC client, for example with:
guix shell tigervnc-client -- vncviewer localhost:5900
The default configuration (see hurd-vm-configuration below) spawns a
secure shell (SSH) server in your GNU/Hurd system, which QEMU (the virtual
machine emulator) redirects to port 10222 on the host. Thus, you can
connect over SSH to the childhurd with:
ssh root@localhost -p 10022
The childhurd is volatile and stateless: it starts with a fresh root file
system every time you restart it. By default though, all the files under
/etc/childhurd on the host are copied as is to the root file system
of the childhurd when it boots. This allows you to initialize “secrets”
inside the VM: SSH host keys, authorized substitute keys, and so on—see
the explanation of secret-root below.
- Scheme Variable: hurd-vm-service-type
This is the type of the Hurd in a Virtual Machine service. Its value must be a
hurd-vm-configurationobject, which specifies the operating system (seeoperating-systemReference) and the disk size for the Hurd Virtual Machine, the QEMU package to use as well as the options for running it.For example:
(service hurd-vm-service-type (hurd-vm-configuration (disk-size (* 5000 (expt 2 20))) ;5G (memory-size 1024))) ;1024MiB
would create a disk image big enough to build GNU Hello, with some extra memory.
- Data Type: hurd-vm-configuration
The data type representing the configuration for
hurd-vm-service-type.os(default: %hurd-vm-operating-system)The operating system to instantiate. This default is bare-bones with a permissive OpenSSH secure shell daemon listening on port 2222 (see
openssh-service-type).qemu(default:qemu-minimal)The QEMU package to use.
image(default: hurd-vm-disk-image)The procedure used to build the disk-image built from this configuration.
disk-size(default:'guess)The size of the disk image.
memory-size(default:512)The memory size of the Virtual Machine in mebibytes.
options(default:'("--snapshot"))The extra options for running QEMU.
id(default:#f)If set, a non-zero positive integer used to parameterize Childhurd instances. It is appended to the service’s name, e.g.
childhurd1.net-options(default: hurd-vm-net-options)The procedure used to produce the list of QEMU networking options.
By default, it produces
'("--device" "rtl8139,netdev=net0" "--netdev" (string-append "user,id=net0," "hostfwd=tcp:127.0.0.1:secrets-port-:1004," "hostfwd=tcp:127.0.0.1:ssh-port-:2222," "hostfwd=tcp:127.0.0.1:vnc-port-:5900"))
with forwarded ports:
secrets-port:
(+ 11004 (* 1000 ID))ssh-port:(+ 10022 (* 1000 ID))vnc-port:(+ 15900 (* 1000 ID))secret-root(default: /etc/childhurd)The root directory with out-of-band secrets to be installed into the childhurd once it runs. Childhurds are volatile which means that on every startup, secrets such as the SSH host keys and Guix signing key are recreated.
If the /etc/childhurd directory does not exist, the
secret-servicerunning in the Childhurd will be sent an empty list of secrets.By default, the service automatically populates /etc/childhurd with the following non-volatile secrets, unless they already exist:
/etc/childhurd/etc/guix/acl /etc/childhurd/etc/guix/signing-key.pub /etc/childhurd/etc/guix/signing-key.sec /etc/childhurd/etc/ssh/ssh_host_ed25519_key /etc/childhurd/etc/ssh/ssh_host_ecdsa_key /etc/childhurd/etc/ssh/ssh_host_ed25519_key.pub /etc/childhurd/etc/ssh/ssh_host_ecdsa_key.pub
These files are automatically sent to the guest Hurd VM when it boots, including permissions.
Having these files in place means that only a couple of things are missing to allow the host to offload
i586-gnubuilds to the childhurd:- Authorizing the childhurd’s key on the host so that the host accepts build
results coming from the childhurd, which can be done like so:
guix archive --authorize < \ /etc/childhurd/etc/guix/signing-key.pub
- Adding the childhurd to /etc/guix/machines.scm (see 使用任务下发设施).
We’re working towards making that happen automatically—get in touch with us at guix-devel@gnu.org to discuss it!
- Authorizing the childhurd’s key on the host so that the host accepts build
results coming from the childhurd, which can be done like so:
Note that by default the VM image is volatile, i.e., once stopped the
contents are lost. If you want a stateful image instead, override the
configuration’s image and options without the
--snapshot flag using something along these lines:
(service hurd-vm-service-type
(hurd-vm-configuration
(image (const "/out/of/store/writable/hurd.img"))
(options '())))
Ganeti
注: This service is considered experimental. Configuration options may be changed in a backwards-incompatible manner, and not all features have been thorougly tested. Users of this service are encouraged to share their experience at guix-devel@gnu.org.
Ganeti is a virtual machine management system. It is designed to keep
virtual machines running on a cluster of servers even in the event of
hardware failures, and to make maintenance and recovery tasks easy. It
consists of multiple services which are described later in this section. In
addition to the Ganeti service, you will need the OpenSSH service
(see openssh-service-type), and update the
/etc/hosts file (see hosts-file) with the cluster name and address (or use a DNS server).
All nodes participating in a Ganeti cluster should have the same Ganeti and
/etc/hosts configuration. Here is an example configuration for a
Ganeti cluster node that supports multiple storage backends, and installs
the debootstrap and guix OS providers:
(use-package-modules virtualization) (use-service-modules base ganeti networking ssh) (operating-system ;; … (host-name "node1") (hosts-file (plain-file "hosts" (format #f " 127.0.0.1 localhost ::1 localhost 192.168.1.200 ganeti.example.com 192.168.1.201 node1.example.com node1 192.168.1.202 node2.example.com node2 "))) ;; Install QEMU so we can use KVM-based instances, and LVM, DRBD and Ceph ;; in order to use the "plain", "drbd" and "rbd" storage backends. (packages (append (map specification->package '("qemu" "lvm2" "drbd-utils" "ceph" ;; Add the debootstrap and guix OS providers. "ganeti-instance-guix" "ganeti-instance-debootstrap")) %base-packages)) (services (append (list (service static-networking-service-type (list (static-networking (addresses (list (network-address (device "eth0") (value "192.168.1.201/24")))) (routes (list (network-route (destination "default") (gateway "192.168.1.254")))) (name-servers '("192.168.1.252" "192.168.1.253"))))) ;; Ganeti uses SSH to communicate between nodes. (service openssh-service-type (openssh-configuration (permit-root-login 'prohibit-password))) (service ganeti-service-type (ganeti-configuration ;; This list specifies allowed file system paths ;; for storing virtual machine images. (file-storage-paths '("/srv/ganeti/file-storage")) ;; This variable configures a single "variant" for ;; both Debootstrap and Guix that works with KVM. (os %default-ganeti-os)))) %base-services)))
Users are advised to read the Ganeti administrators guide to learn about the various cluster options and day-to-day operations. There is also a blog post describing how to configure and initialize a small cluster.
- Scheme Variable: ganeti-service-type
This is a service type that includes all the various services that Ganeti nodes should run.
Its value is a
ganeti-configurationobject that defines the package to use for CLI operations, as well as configuration for the various daemons. Allowed file storage paths and available guest operating systems are also configured through this data type.
- Data Type: ganeti-configuration
The
ganetiservice takes the following configuration options:ganeti(default:ganeti)The
ganetipackage to use. It will be installed to the system profile and makegnt-cluster,gnt-instance, etc available. Note that the value specified here does not affect the other services as each refer to a specificganetipackage (see below).noded-configuration(default:(ganeti-noded-configuration))confd-configuration(default:(ganeti-confd-configuration))wconfd-configuration(default:(ganeti-wconfd-configuration))luxid-configuration(default:(ganeti-luxid-configuration))rapi-configuration(default:(ganeti-rapi-configuration))kvmd-configuration(default:(ganeti-kvmd-configuration))mond-configuration(default:(ganeti-mond-configuration))metad-configuration(default:(ganeti-metad-configuration))watcher-configuration(default:(ganeti-watcher-configuration))cleaner-configuration(default:(ganeti-cleaner-configuration))-
These options control the various daemons and cron jobs that are distributed with Ganeti. The possible values for these are described in detail below. To override a setting, you must use the configuration type for that service:
(service ganeti-service-type (ganeti-configuration (rapi-configuration (ganeti-rapi-configuration (interface "eth1")))) (watcher-configuration (ganeti-watcher-configuration (rapi-ip "10.0.0.1")))) file-storage-paths(default:'())List of allowed directories for file storage backend.
os(default:%default-ganeti-os)List of
<ganeti-os>records.
In essence
ganeti-service-typeis shorthand for declaring each service individually:(service ganeti-noded-service-type) (service ganeti-confd-service-type) (service ganeti-wconfd-service-type) (service ganeti-luxid-service-type) (service ganeti-kvmd-service-type) (service ganeti-mond-service-type) (service ganeti-metad-service-type) (service ganeti-watcher-service-type) (service ganeti-cleaner-service-type)
Plus a service extension for
etc-service-typethat configures the file storage backend and OS variants.
- Data Type: ganeti-os
This data type is suitable for passing to the
osparameter ofganeti-configuration. It takes the following parameters:名字The name for this OS provider. It is only used to specify where the configuration ends up. Setting it to “debootstrap” will create /etc/ganeti/instance-debootstrap.
extension(default:#f)The file extension for variants of this OS type. For example .conf or .scm. It will be appended to the variant file name if set.
variants(default:'())This must be either a list of
ganeti-os-variantobjects for this OS, or a “file-like” object (see file-like objects) representing the variants directory.To use the Guix OS provider with variant definitions residing in a local directory instead of declaring individual variants (see guix-variants below), you can do:
(ganeti-os (name "guix") (variants (local-file "ganeti-guix-variants" #:recursive? #true)))Note that you will need to maintain the variants.list file (see
ganeti-os-interface(7)) manually in this case.
- Data Type: ganeti-os-variant
This is the data type for a Ganeti OS variant. It takes the following parameters:
名字The name of this variant.
configurationA configuration file for this variant.
- Scheme Variable: %default-debootstrap-hooks
This variable contains hooks to configure networking and the GRUB bootloader.
- Scheme Variable: %default-debootstrap-extra-pkgs
This variable contains a list of packages suitable for a fully-virtualized guest.
- Data Type: debootstrap-configuration
-
This data type creates configuration files suitable for the debootstrap OS provider.
hooks(default:%default-debootstrap-hooks)When not
#f, this must be a G-expression that specifies a directory with scripts that will run when the OS is installed. It can also be a list of(name . file-like)pairs. For example:`((99-hello-world . ,(plain-file "#!/bin/sh\necho Hello, World")))
That will create a directory with one executable named
99-hello-worldand run it every time this variant is installed. If set to#f, hooks in /etc/ganeti/instance-debootstrap/hooks will be used, if any.proxy(default:#f)Optional HTTP proxy to use.
mirror(default:#f)The Debian mirror. Typically something like
http://ftp.no.debian.org/debian. The default varies depending on the distribution.arch(default:#f)The dpkg architecture. Set to
armhfto debootstrap an ARMv7 instance on an AArch64 host. Default is to use the current system architecture.suite(default:"stable")When set, this must be a Debian distribution “suite” such as
busterorfocal. If set to#f, the default for the OS provider is used.extra-pkgs(default:%default-debootstrap-extra-pkgs)List of extra packages that will get installed by dpkg in addition to the minimal system.
components(default:#f)When set, must be a list of Debian repository “components”. For example
'("main" "contrib").generate-cache?(default:#t)Whether to automatically cache the generated debootstrap archive.
clean-cache(default:14)Discard the cache after this amount of days. Use
#fto never clear the cache.partition-style(default:'msdos)The type of partition to create. When set, it must be one of
'msdos,'noneor a string.partition-alignment(default:2048)Alignment of the partition in sectors.
- Scheme Procedure: debootstrap-variant name configuration
This is a helper procedure that creates a
ganeti-os-variantrecord. It takes two parameters: a name and adebootstrap-configurationobject.
- Scheme Procedure: debootstrap-os variants…
This is a helper procedure that creates a
ganeti-osrecord. It takes a list of variants created withdebootstrap-variant.
- Scheme Procedure: guix-variant name configuration
This is a helper procedure that creates a
ganeti-os-variantrecord for use with the Guix OS provider. It takes a name and a G-expression that returns a “file-like” (see file-like objects) object containing a Guix System configuration.
- Scheme Procedure: guix-os variants…
This is a helper procedure that creates a
ganeti-osrecord. It takes a list of variants produced byguix-variant.
- Scheme Variable: %default-debootstrap-variants
This is a convenience variable to make the debootstrap provider work “out of the box” without users having to declare variants manually. It contains a single debootstrap variant with the default configuration:
(list (debootstrap-variant "default" (debootstrap-configuration)))
- Scheme Variable: %default-guix-variants
This is a convenience variable to make the Guix OS provider work without additional configuration. It creates a virtual machine that has an SSH server, a serial console, and authorizes the Ganeti hosts SSH keys.
(list (guix-variant "default" (file-append ganeti-instance-guix "/share/doc/ganeti-instance-guix/examples/dynamic.scm")))
Users can implement support for OS providers unbeknownst to Guix by
extending the ganeti-os and ganeti-os-variant records
appropriately. For example:
(ganeti-os
(name "custom")
(extension ".conf")
(variants
(list (ganeti-os-variant
(name "foo")
(configuration (plain-file "bar" "this is fine"))))))
That creates /etc/ganeti/instance-custom/variants/foo.conf which
points to a file in the store with contents this is fine. It also
creates /etc/ganeti/instance-custom/variants/variants.list with
contents foo.
Obviously this may not work for all OS providers out there. If you find the interface limiting, please reach out to guix-devel@gnu.org.
The rest of this section documents the various services that are included by
ganeti-service-type.
- Scheme Variable: ganeti-noded-service-type
ganeti-nodedis the daemon responsible for node-specific functions within the Ganeti system. The value of this service must be aganeti-noded-configurationobject.
- Data Type: ganeti-noded-configuration
This is the configuration for the
ganeti-nodedservice.ganeti(default:ganeti)The
ganetipackage to use for this service.port(default:1811)The TCP port on which the node daemon listens for network requests.
address(default:"0.0.0.0")The network address that the daemon will bind to. The default address means bind to all available addresses.
interface(default:#f)When this is set, it must be a specific network interface (e.g.
eth0) that the daemon will bind to.max-clients(default:20)This sets a limit on the maximum number of simultaneous client connections that the daemon will handle. Connections above this count are accepted, but no responses will be sent until enough connections have closed.
ssl?(default:#t)Whether to use SSL/TLS to encrypt network communications. The certificate is automatically provisioned by the cluster and can be rotated with
gnt-cluster renew-crypto.ssl-key(default: "/var/lib/ganeti/server.pem")This can be used to provide a specific encryption key for TLS communications.
ssl-cert(default: "/var/lib/ganeti/server.pem")This can be used to provide a specific certificate for TLS communications.
debug?(default:#f)When true, the daemon performs additional logging for debugging purposes. Note that this will leak encryption details to the log files, use with caution.
- Scheme Variable: ganeti-confd-service-type
ganeti-confdanswers queries related to the configuration of a Ganeti cluster. The purpose of this daemon is to have a highly available and fast way to query cluster configuration values. It is automatically active on all master candidates. The value of this service must be aganeti-confd-configurationobject.
- Data Type: ganeti-confd-configuration
This is the configuration for the
ganeti-confdservice.ganeti(default:ganeti)The
ganetipackage to use for this service.port(default:1814)The UDP port on which to listen for network requests.
address(default:"0.0.0.0")Network address that the daemon will bind to.
debug?(default:#f)When true, the daemon performs additional logging for debugging purposes.
- Scheme Variable: ganeti-wconfd-service-type
ganeti-wconfdis the daemon that has authoritative knowledge about the cluster configuration and is the only entity that can accept changes to it. All jobs that need to modify the configuration will do so by sending appropriate requests to this daemon. It only runs on the master node and will automatically disable itself on other nodes.The value of this service must be a
ganeti-wconfd-configurationobject.
- Data Type: ganeti-wconfd-configuration
This is the configuration for the
ganeti-wconfdservice.ganeti(default:ganeti)The
ganetipackage to use for this service.no-voting?(default:#f)The daemon will refuse to start if the majority of cluster nodes does not agree that it is running on the master node. Set to
#tto start even if a quorum can not be reached (dangerous, use with caution).debug?(default:#f)When true, the daemon performs additional logging for debugging purposes.
- Scheme Variable: ganeti-luxid-service-type
ganeti-luxidis a daemon used to answer queries related to the configuration and the current live state of a Ganeti cluster. Additionally, it is the authoritative daemon for the Ganeti job queue. Jobs can be submitted via this daemon and it schedules and starts them.It takes a
ganeti-luxid-configurationobject.
- Data Type: ganeti-luxid-configuration
This is the configuration for the
ganeti-luxidservice.ganeti(default:ganeti)The
ganetipackage to use for this service.no-voting?(default:#f)The daemon will refuse to start if it cannot verify that the majority of cluster nodes believes that it is running on the master node. Set to
#tto ignore such checks and start anyway (this can be dangerous).debug?(default:#f)When true, the daemon performs additional logging for debugging purposes.
- Scheme Variable: ganeti-rapi-service-type
ganeti-rapiprovides a remote API for Ganeti clusters. It runs on the master node and can be used to perform cluster actions programmatically via a JSON-based RPC protocol.Most query operations are allowed without authentication (unless require-authentication? is set), whereas write operations require explicit authorization via the /var/lib/ganeti/rapi/users file. See the Ganeti Remote API documentation for more information.
The value of this service must be a
ganeti-rapi-configurationobject.
- Data Type: ganeti-rapi-configuration
This is the configuration for the
ganeti-rapiservice.ganeti(default:ganeti)The
ganetipackage to use for this service.require-authentication?(default:#f)Whether to require authentication even for read-only operations.
port(default:5080)The TCP port on which to listen to API requests.
address(default:"0.0.0.0")The network address that the service will bind to. By default it listens on all configured addresses.
interface(default:#f)When set, it must specify a specific network interface such as
eth0that the daemon will bind to.max-clients(default:20)The maximum number of simultaneous client requests to handle. Further connections are allowed, but no responses are sent until enough connections have closed.
ssl?(default:#t)Whether to use SSL/TLS encryption on the RAPI port.
ssl-key(default: "/var/lib/ganeti/server.pem")This can be used to provide a specific encryption key for TLS communications.
ssl-cert(default: "/var/lib/ganeti/server.pem")This can be used to provide a specific certificate for TLS communications.
debug?(default:#f)When true, the daemon performs additional logging for debugging purposes. Note that this will leak encryption details to the log files, use with caution.
- Scheme Variable: ganeti-kvmd-service-type
ganeti-kvmdis responsible for determining whether a given KVM instance was shut down by an administrator or a user. Normally Ganeti will restart an instance that was not stopped through Ganeti itself. If the cluster optionuser_shutdownis true, this daemon monitors theQMPsocket provided by QEMU and listens for shutdown events, and marks the instance as USER_down instead of ERROR_down when it shuts down gracefully by itself.It takes a
ganeti-kvmd-configurationobject.
- Data Type: ganeti-kvmd-configuration
-
ganeti(default:ganeti)The
ganetipackage to use for this service.debug?(default:#f)When true, the daemon performs additional logging for debugging purposes.
- Scheme Variable: ganeti-mond-service-type
ganeti-mondis an optional daemon that provides Ganeti monitoring functionality. It is responsible for running data collectors and publish the collected information through a HTTP interface.It takes a
ganeti-mond-configurationobject.
- Data Type: ganeti-mond-configuration
-
ganeti(default:ganeti)The
ganetipackage to use for this service.port(default:1815)The port on which the daemon will listen.
address(default:"0.0.0.0")The network address that the daemon will bind to. By default it binds to all available interfaces.
debug?(default:#f)When true, the daemon performs additional logging for debugging purposes.
- Scheme Variable: ganeti-metad-service-type
ganeti-metadis an optional daemon that can be used to provide information about the cluster to instances or OS install scripts.It takes a
ganeti-metad-configurationobject.
- Data Type: ganeti-metad-configuration
-
ganeti(default:ganeti)The
ganetipackage to use for this service.port(default:80)The port on which the daemon will listen.
address(default:#f)If set, the daemon will bind to this address only. If left unset, the behavior depends on the cluster configuration.
debug?(default:#f)When true, the daemon performs additional logging for debugging purposes.
- Scheme Variable: ganeti-watcher-service-type
ganeti-watcheris a script designed to run periodically and ensure the health of a cluster. It will automatically restart instances that have stopped without Ganeti’s consent, and repairs DRBD links in case a node has rebooted. It also archives old cluster jobs and restarts Ganeti daemons that are not running. If the cluster parameterensure_node_healthis set, the watcher will also shutdown instances and DRBD devices if the node it is running on is declared offline by known master candidates.It can be paused on all nodes with
gnt-cluster watcher pause.The service takes a
ganeti-watcher-configurationobject.
- Data Type: ganeti-watcher-configuration
-
ganeti(default:ganeti)The
ganetipackage to use for this service.schedule(default:'(next-second-from (next-minute (range 0 60 5))))How often to run the script. The default is every five minutes.
rapi-ip(default:#f)This option needs to be specified only if the RAPI daemon is configured to use a particular interface or address. By default the cluster address is used.
job-age(default:(* 6 3600))Archive cluster jobs older than this age, specified in seconds. The default is 6 hours. This keeps
gnt-job listmanageable.verify-disks?(default:#t)If this is
#f, the watcher will not try to repair broken DRBD links automatically. Administrators will need to usegnt-cluster verify-disksmanually instead.debug?(default:#f)When
#t, the script performs additional logging for debugging purposes.
- Scheme Variable: ganeti-cleaner-service-type
ganeti-cleaneris a script designed to run periodically and remove old files from the cluster. This service type controls two cron jobs: one intended for the master node that permanently purges old cluster jobs, and one intended for every node that removes expired X509 certificates, keys, and outdatedganeti-watcherinformation. Like all Ganeti services, it is safe to include even on non-master nodes as it will disable itself as necessary.It takes a
ganeti-cleaner-configurationobject.
- Data Type: ganeti-cleaner-configuration
-
ganeti(default:ganeti)The
ganetipackage to use for thegnt-cleanercommand.master-schedule(default:"45 1 * * *")How often to run the master cleaning job. The default is once per day, at 01:45:00.
node-schedule(default:"45 2 * * *")How often to run the node cleaning job. The default is once per day, at 02:45:00.
12.9.30 版本控制服务
The (gnu services version-control) module provides a service to allow
remote access to local Git repositories. There are three options: the
git-daemon-service, which provides access to repositories via the
git:// unsecured TCP-based protocol, extending the nginx web
server to proxy some requests to git-http-backend, or providing a web
interface with cgit-service-type.
- Scheme Procedure: git-daemon-service [#:config (git-daemon-configuration)]
-
Return a service that runs
git daemon, a simple TCP server to expose repositories over the Git protocol for anonymous access.The optional config argument should be a
<git-daemon-configuration>object, by default it allows read-only access to exported32 repositories under /srv/git.
- Data Type: git-daemon-configuration
Data type representing the configuration for
git-daemon-service.package(default:git)Package object of the Git distributed version control system.
export-all?(default:#f)Whether to allow access for all Git repositories, even if they do not have the git-daemon-export-ok file.
base-path(default: /srv/git)Whether to remap all the path requests as relative to the given path. If you run
git daemonwith(base-path "/srv/git")on ‘example.com’, then if you later try to pull ‘git://example.com/hello.git’, git daemon will interpret the path as /srv/git/hello.git.user-path(default:#f)Whether to allow
~usernotation to be used in requests. When specified with empty string, requests to ‘git://host/~alice/foo’ is taken as a request to accessfoorepository in the home directory of useralice. If(user-path "path")is specified, the same request is taken as a request to access path/foo repository in the home directory of useralice.listen(default:'())Whether to listen on specific IP addresses or hostnames, defaults to all.
port(default:#f)Whether to listen on an alternative port, which defaults to 9418.
whitelist(default:'())If not empty, only allow access to this list of directories.
extra-options(default:'())Extra options will be passed to
git daemon, please runman git-daemonfor more information.
The git:// protocol lacks authentication. When you pull from a
repository fetched via git://, you don’t know whether the data you
receive was modified or is even coming from the specified host, and your
connection is subject to eavesdropping. It’s better to use an authenticated
and encrypted transport, such as https. Although Git allows you to
serve repositories using unsophisticated file-based web servers, there is a
faster protocol implemented by the git-http-backend program. This
program is the back-end of a proper Git web service. It is designed to sit
behind a FastCGI proxy. See Web服务, for more on running the
necessary fcgiwrap daemon.
Guix has a separate configuration data type for serving Git repositories over HTTP.
- Data Type: git-http-configuration
Data type representing the configuration for a future
git-http-service-type; can currently be used to configure Nginx throughgit-http-nginx-location-configuration.package(default: git)Package object of the Git distributed version control system.
git-root(default: /srv/git)Directory containing the Git repositories to expose to the world.
export-all?(default:#f)Whether to expose access for all Git repositories in git-root, even if they do not have the git-daemon-export-ok file.
uri-path(default: ‘/git/’)Path prefix for Git access. With the default ‘/git/’ prefix, this will map ‘
http://server/git/repo.git’ to /srv/git/repo.git. Requests whose URI paths do not begin with this prefix are not passed on to this Git instance.fcgiwrap-socket(default:127.0.0.1:9000)The socket on which the
fcgiwrapdaemon is listening. See Web服务.
There is no git-http-service-type, currently; instead you can create
an nginx-location-configuration from a git-http-configuration
and then add that location to a web server.
- Scheme Procedure: git-http-nginx-location-configuration [config=(git-http-configuration)] Compute an
nginx-location-configurationthat corresponds to the given Git http configuration. An example nginx service definition to serve the default /srv/git over HTTPS might be:(service nginx-service-type (nginx-configuration (server-blocks (list (nginx-server-configuration (listen '("443 ssl")) (server-name "git.my-host.org") (ssl-certificate "/etc/letsencrypt/live/git.my-host.org/fullchain.pem") (ssl-certificate-key "/etc/letsencrypt/live/git.my-host.org/privkey.pem") (locations (list (git-http-nginx-location-configuration (git-http-configuration (uri-path "/"))))))))))This example assumes that you are using Let’s Encrypt to get your TLS certificate. See 证书服务. The default
certbotservice will redirect all HTTP traffic ongit.my-host.orgto HTTPS. You will also need to add anfcgiwrapproxy to your system services. See Web服务.
Cgit Service
Cgit is a web frontend for Git repositories written in C.
The following example will configure the service with default values. By
default, Cgit can be accessed on port 80 (http://localhost:80).
(service cgit-service-type)
The file-object type designates either a file-like object
(see file-like objects) or a string.
Available cgit-configuration fields are:
cgit-configurationparameter: package package ¶The CGIT package.
cgit-configurationparameter: nginx-server-configuration-list nginx ¶NGINX configuration.
cgit-configurationparameter: file-object about-filter ¶Specifies a command which will be invoked to format the content of about pages (both top-level and for each repository).
Defaults to ‘""’.
cgit-configurationparameter: string agefile ¶Specifies a path, relative to each repository path, which can be used to specify the date and time of the youngest commit in the repository.
Defaults to ‘""’.
cgit-configurationparameter: file-object auth-filter ¶Specifies a command that will be invoked for authenticating repository access.
Defaults to ‘""’.
cgit-configurationparameter: string branch-sort ¶Flag which, when set to ‘age’, enables date ordering in the branch ref list, and when set ‘name’ enables ordering by branch name.
Defaults to ‘"name"’.
cgit-configurationparameter: string cache-root ¶Path used to store the cgit cache entries.
Defaults to ‘"/var/cache/cgit"’.
cgit-configurationparameter: integer cache-static-ttl ¶Number which specifies the time-to-live, in minutes, for the cached version of repository pages accessed with a fixed SHA1.
Defaults to ‘-1’.
cgit-configurationparameter: integer cache-dynamic-ttl ¶Number which specifies the time-to-live, in minutes, for the cached version of repository pages accessed without a fixed SHA1.
Defaults to ‘5’.
cgit-configurationparameter: integer cache-repo-ttl ¶Number which specifies the time-to-live, in minutes, for the cached version of the repository summary page.
Defaults to ‘5’.
cgit-configurationparameter: integer cache-root-ttl ¶Number which specifies the time-to-live, in minutes, for the cached version of the repository index page.
Defaults to ‘5’.
cgit-configurationparameter: integer cache-scanrc-ttl ¶Number which specifies the time-to-live, in minutes, for the result of scanning a path for Git repositories.
Defaults to ‘15’.
cgit-configurationparameter: integer cache-about-ttl ¶Number which specifies the time-to-live, in minutes, for the cached version of the repository about page.
Defaults to ‘15’.
cgit-configurationparameter: integer cache-snapshot-ttl ¶Number which specifies the time-to-live, in minutes, for the cached version of snapshots.
Defaults to ‘5’.
cgit-configurationparameter: integer cache-size ¶The maximum number of entries in the cgit cache. When set to ‘0’, caching is disabled.
Defaults to ‘0’.
cgit-configurationparameter: boolean case-sensitive-sort? ¶Sort items in the repo list case sensitively.
Defaults to ‘#t’.
cgit-configurationparameter: list clone-prefix ¶List of common prefixes which, when combined with a repository URL, generates valid clone URLs for the repository.
Defaults to ‘()’.
cgit-configurationparameter: list clone-url ¶List of
clone-urltemplates.Defaults to ‘()’.
cgit-configurationparameter: file-object commit-filter ¶Command which will be invoked to format commit messages.
Defaults to ‘""’.
cgit-configurationparameter: string commit-sort ¶Flag which, when set to ‘date’, enables strict date ordering in the commit log, and when set to ‘topo’ enables strict topological ordering.
Defaults to ‘"git log"’.
cgit-configurationparameter: file-object css ¶URL which specifies the css document to include in all cgit pages.
Defaults to ‘"/share/cgit/cgit.css"’.
cgit-configurationparameter: file-object email-filter ¶Specifies a command which will be invoked to format names and email address of committers, authors, and taggers, as represented in various places throughout the cgit interface.
Defaults to ‘""’.
cgit-configurationparameter: boolean embedded? ¶Flag which, when set to ‘#t’, will make cgit generate a HTML fragment suitable for embedding in other HTML pages.
Defaults to ‘#f’.
cgit-configurationparameter: boolean enable-commit-graph? ¶Flag which, when set to ‘#t’, will make cgit print an ASCII-art commit history graph to the left of the commit messages in the repository log page.
Defaults to ‘#f’.
cgit-configurationparameter: boolean enable-filter-overrides? ¶Flag which, when set to ‘#t’, allows all filter settings to be overridden in repository-specific cgitrc files.
Defaults to ‘#f’.
cgit-configurationparameter: boolean enable-follow-links? ¶Flag which, when set to ‘#t’, allows users to follow a file in the log view.
Defaults to ‘#f’.
cgit-configurationparameter: boolean enable-http-clone? ¶If set to ‘#t’, cgit will act as an dumb HTTP endpoint for Git clones.
Defaults to ‘#t’.
cgit-configurationparameter: boolean enable-index-links? ¶Flag which, when set to ‘#t’, will make cgit generate extra links "summary", "commit", "tree" for each repo in the repository index.
Defaults to ‘#f’.
cgit-configurationparameter: boolean enable-index-owner? ¶Flag which, when set to ‘#t’, will make cgit display the owner of each repo in the repository index.
Defaults to ‘#t’.
cgit-configurationparameter: boolean enable-log-filecount? ¶Flag which, when set to ‘#t’, will make cgit print the number of modified files for each commit on the repository log page.
Defaults to ‘#f’.
cgit-configurationparameter: boolean enable-log-linecount? ¶Flag which, when set to ‘#t’, will make cgit print the number of added and removed lines for each commit on the repository log page.
Defaults to ‘#f’.
cgit-configurationparameter: boolean enable-remote-branches? ¶Flag which, when set to
#t, will make cgit display remote branches in the summary and refs views.Defaults to ‘#f’.
cgit-configurationparameter: boolean enable-subject-links? ¶Flag which, when set to
1, will make cgit use the subject of the parent commit as link text when generating links to parent commits in commit view.Defaults to ‘#f’.
cgit-configurationparameter: boolean enable-html-serving? ¶Flag which, when set to ‘#t’, will make cgit use the subject of the parent commit as link text when generating links to parent commits in commit view.
Defaults to ‘#f’.
cgit-configurationparameter: boolean enable-tree-linenumbers? ¶Flag which, when set to ‘#t’, will make cgit generate linenumber links for plaintext blobs printed in the tree view.
Defaults to ‘#t’.
cgit-configurationparameter: boolean enable-git-config? ¶Flag which, when set to ‘#f’, will allow cgit to use Git config to set any repo specific settings.
Defaults to ‘#f’.
cgit-configurationparameter: file-object favicon ¶URL used as link to a shortcut icon for cgit.
Defaults to ‘"/favicon.ico"’.
The content of the file specified with this option will be included verbatim at the bottom of all pages (i.e. it replaces the standard "generated by..." message).
Defaults to ‘""’.
cgit-configurationparameter: string head-include ¶The content of the file specified with this option will be included verbatim in the HTML HEAD section on all pages.
Defaults to ‘""’.
cgit-configurationparameter: string header ¶The content of the file specified with this option will be included verbatim at the top of all pages.
Defaults to ‘""’.
cgit-configurationparameter: file-object include ¶Name of a configfile to include before the rest of the current config- file is parsed.
Defaults to ‘""’.
cgit-configurationparameter: string index-header ¶The content of the file specified with this option will be included verbatim above the repository index.
Defaults to ‘""’.
cgit-configurationparameter: string index-info ¶The content of the file specified with this option will be included verbatim below the heading on the repository index page.
Defaults to ‘""’.
cgit-configurationparameter: boolean local-time? ¶Flag which, if set to ‘#t’, makes cgit print commit and tag times in the servers timezone.
Defaults to ‘#f’.
cgit-configurationparameter: file-object logo ¶URL which specifies the source of an image which will be used as a logo on all cgit pages.
Defaults to ‘"/share/cgit/cgit.png"’.
cgit-configurationparameter: string logo-link ¶URL loaded when clicking on the cgit logo image.
Defaults to ‘""’.
cgit-configurationparameter: file-object owner-filter ¶Command which will be invoked to format the Owner column of the main page.
Defaults to ‘""’.
cgit-configurationparameter: integer max-atom-items ¶Number of items to display in atom feeds view.
Defaults to ‘10’.
cgit-configurationparameter: integer max-commit-count ¶Number of entries to list per page in "log" view.
Defaults to ‘50’.
cgit-configurationparameter: integer max-message-length ¶Number of commit message characters to display in "log" view.
Defaults to ‘80’.
cgit-configurationparameter: integer max-repo-count ¶Specifies the number of entries to list per page on the repository index page.
Defaults to ‘50’.
cgit-configurationparameter: integer max-repodesc-length ¶Specifies the maximum number of repo description characters to display on the repository index page.
Defaults to ‘80’.
cgit-configurationparameter: integer max-blob-size ¶Specifies the maximum size of a blob to display HTML for in KBytes.
Defaults to ‘0’.
cgit-configurationparameter: string max-stats ¶Maximum statistics period. Valid values are ‘week’,‘month’, ‘quarter’ and ‘year’.
Defaults to ‘""’.
cgit-configurationparameter: mimetype-alist mimetype ¶Mimetype for the specified filename extension.
Defaults to ‘((gif "image/gif") (html "text/html") (jpg "image/jpeg") (jpeg "image/jpeg") (pdf "application/pdf") (png "image/png") (svg "image/svg+xml"))’.
cgit-configurationparameter: file-object mimetype-file ¶Specifies the file to use for automatic mimetype lookup.
Defaults to ‘""’.
cgit-configurationparameter: string module-link ¶Text which will be used as the formatstring for a hyperlink when a submodule is printed in a directory listing.
Defaults to ‘""’.
cgit-configurationparameter: boolean nocache? ¶If set to the value ‘#t’ caching will be disabled.
Defaults to ‘#f’.
cgit-configurationparameter: boolean noplainemail? ¶If set to ‘#t’ showing full author email addresses will be disabled.
Defaults to ‘#f’.
cgit-configurationparameter: boolean noheader? ¶Flag which, when set to ‘#t’, will make cgit omit the standard header on all pages.
Defaults to ‘#f’.
cgit-configurationparameter: project-list project-list ¶A list of subdirectories inside of
repository-directory, relative to it, that should loaded as Git repositories. An empty list means that all subdirectories will be loaded.Defaults to ‘()’.
cgit-configurationparameter: file-object readme ¶Text which will be used as default value for
cgit-repo-readme.Defaults to ‘""’.
cgit-configurationparameter: boolean remove-suffix? ¶If set to
#tandrepository-directoryis enabled, if any repositories are found with a suffix of.git, this suffix will be removed for the URL and name.Defaults to ‘#f’.
cgit-configurationparameter: integer renamelimit ¶Maximum number of files to consider when detecting renames.
Defaults to ‘-1’.
cgit-configurationparameter: string repository-sort ¶The way in which repositories in each section are sorted.
Defaults to ‘""’.
cgit-configurationparameter: robots-list robots ¶Text used as content for the
robotsmeta-tag.Defaults to ‘("noindex" "nofollow")’.
cgit-configurationparameter: string root-desc ¶Text printed below the heading on the repository index page.
Defaults to ‘"a fast webinterface for the git dscm"’.
cgit-configurationparameter: string root-readme ¶The content of the file specified with this option will be included verbatim below the “about” link on the repository index page.
Defaults to ‘""’.
cgit-configurationparameter: string root-title ¶Text printed as heading on the repository index page.
Defaults to ‘""’.
If set to ‘#t’ and repository-directory is enabled, repository-directory will recurse into directories whose name starts with a period. Otherwise, repository-directory will stay away from such directories, considered as “hidden”. Note that this does not apply to the .git directory in non-bare repos.
Defaults to ‘#f’.
cgit-configurationparameter: list snapshots ¶Text which specifies the default set of snapshot formats that cgit generates links for.
Defaults to ‘()’.
cgit-configurationparameter: repository-directory repository-directory ¶Name of the directory to scan for repositories (represents
scan-path).Defaults to ‘"/srv/git"’.
cgit-configurationparameter: string section ¶The name of the current repository section - all repositories defined after this option will inherit the current section name.
Defaults to ‘""’.
cgit-configurationparameter: string section-sort ¶Flag which, when set to ‘1’, will sort the sections on the repository listing by name.
Defaults to ‘""’.
cgit-configurationparameter: integer section-from-path ¶A number which, if defined prior to repository-directory, specifies how many path elements from each repo path to use as a default section name.
Defaults to ‘0’.
cgit-configurationparameter: boolean side-by-side-diffs? ¶If set to ‘#t’ shows side-by-side diffs instead of unidiffs per default.
Defaults to ‘#f’.
cgit-configurationparameter: file-object source-filter ¶Specifies a command which will be invoked to format plaintext blobs in the tree view.
Defaults to ‘""’.
cgit-configurationparameter: integer summary-branches ¶Specifies the number of branches to display in the repository “summary” view.
Defaults to ‘10’.
cgit-configurationparameter: integer summary-log ¶Specifies the number of log entries to display in the repository “summary” view.
Defaults to ‘10’.
Specifies the number of tags to display in the repository “summary” view.
Defaults to ‘10’.
cgit-configurationparameter: string strict-export ¶Filename which, if specified, needs to be present within the repository for cgit to allow access to that repository.
Defaults to ‘""’.
cgit-configurationparameter: string virtual-root ¶URL which, if specified, will be used as root for all cgit links.
Defaults to ‘"/"’.
cgit-configurationparameter: repository-cgit-configuration-list repositories ¶A list of cgit-repo records to use with config.
Defaults to ‘()’.
Available
repository-cgit-configurationfields are:repository-cgit-configurationparameter: repo-list snapshots ¶A mask of snapshot formats for this repo that cgit generates links for, restricted by the global
snapshotssetting.Defaults to ‘()’.
repository-cgit-configurationparameter: repo-file-object source-filter ¶Override the default
source-filter.Defaults to ‘""’.
repository-cgit-configurationparameter: repo-string url ¶The relative URL used to access the repository.
Defaults to ‘""’.
repository-cgit-configurationparameter: repo-file-object about-filter ¶Override the default
about-filter.Defaults to ‘""’.
repository-cgit-configurationparameter: repo-string branch-sort ¶Flag which, when set to ‘age’, enables date ordering in the branch ref list, and when set to ‘name’ enables ordering by branch name.
Defaults to ‘""’.
repository-cgit-configurationparameter: repo-list clone-url ¶A list of URLs which can be used to clone repo.
Defaults to ‘()’.
repository-cgit-configurationparameter: repo-file-object commit-filter ¶Override the default
commit-filter.Defaults to ‘""’.
repository-cgit-configurationparameter: repo-string commit-sort ¶Flag which, when set to ‘date’, enables strict date ordering in the commit log, and when set to ‘topo’ enables strict topological ordering.
Defaults to ‘""’.
repository-cgit-configurationparameter: repo-string defbranch ¶The name of the default branch for this repository. If no such branch exists in the repository, the first branch name (when sorted) is used as default instead. By default branch pointed to by HEAD, or “master” if there is no suitable HEAD.
Defaults to ‘""’.
repository-cgit-configurationparameter: repo-string desc ¶The value to show as repository description.
Defaults to ‘""’.
repository-cgit-configurationparameter: repo-string homepage ¶The value to show as repository homepage.
Defaults to ‘""’.
repository-cgit-configurationparameter: repo-file-object email-filter ¶Override the default
email-filter.Defaults to ‘""’.
repository-cgit-configurationparameter: maybe-repo-boolean enable-commit-graph? ¶A flag which can be used to disable the global setting
enable-commit-graph?.Defaults to ‘disabled’.
repository-cgit-configurationparameter: maybe-repo-boolean enable-log-filecount? ¶A flag which can be used to disable the global setting
enable-log-filecount?.Defaults to ‘disabled’.
repository-cgit-configurationparameter: maybe-repo-boolean enable-log-linecount? ¶A flag which can be used to disable the global setting
enable-log-linecount?.Defaults to ‘disabled’.
repository-cgit-configurationparameter: maybe-repo-boolean enable-remote-branches? ¶Flag which, when set to
#t, will make cgit display remote branches in the summary and refs views.Defaults to ‘disabled’.
repository-cgit-configurationparameter: maybe-repo-boolean enable-subject-links? ¶A flag which can be used to override the global setting
enable-subject-links?.Defaults to ‘disabled’.
repository-cgit-configurationparameter: maybe-repo-boolean enable-html-serving? ¶A flag which can be used to override the global setting
enable-html-serving?.Defaults to ‘disabled’.
repository-cgit-configurationparameter: repo-boolean hide? ¶Flag which, when set to
#t, hides the repository from the repository index.Defaults to ‘#f’.
repository-cgit-configurationparameter: repo-boolean ignore? ¶Flag which, when set to ‘#t’, ignores the repository.
Defaults to ‘#f’.
repository-cgit-configurationparameter: repo-file-object logo ¶URL which specifies the source of an image which will be used as a logo on this repo’s pages.
Defaults to ‘""’.
repository-cgit-configurationparameter: repo-string logo-link ¶URL loaded when clicking on the cgit logo image.
Defaults to ‘""’.
repository-cgit-configurationparameter: repo-file-object owner-filter ¶Override the default
owner-filter.Defaults to ‘""’.
repository-cgit-configurationparameter: repo-string module-link ¶Text which will be used as the formatstring for a hyperlink when a submodule is printed in a directory listing. The arguments for the formatstring are the path and SHA1 of the submodule commit.
Defaults to ‘""’.
repository-cgit-configurationparameter: module-link-path module-link-path ¶Text which will be used as the formatstring for a hyperlink when a submodule with the specified subdirectory path is printed in a directory listing.
Defaults to ‘()’.
repository-cgit-configurationparameter: repo-string max-stats ¶Override the default maximum statistics period.
Defaults to ‘""’.
repository-cgit-configurationparameter: repo-string name ¶The value to show as repository name.
Defaults to ‘""’.
repository-cgit-configurationparameter: repo-string owner ¶A value used to identify the owner of the repository.
Defaults to ‘""’.
repository-cgit-configurationparameter: repo-string path ¶An absolute path to the repository directory.
Defaults to ‘""’.
repository-cgit-configurationparameter: repo-string readme ¶A path (relative to repo) which specifies a file to include verbatim as the “About” page for this repo.
Defaults to ‘""’.
repository-cgit-configurationparameter: repo-string section ¶The name of the current repository section - all repositories defined after this option will inherit the current section name.
Defaults to ‘""’.
repository-cgit-configurationparameter: repo-list extra-options ¶Extra options will be appended to cgitrc file.
Defaults to ‘()’.
cgit-configurationparameter: list extra-options ¶Extra options will be appended to cgitrc file.
Defaults to ‘()’.
However, it could be that you just want to get a cgitrc up and
running. In that case, you can pass an opaque-cgit-configuration as
a record to cgit-service-type. As its name indicates, an opaque
configuration does not have easy reflective capabilities.
Available opaque-cgit-configuration fields are:
opaque-cgit-configurationparameter: package cgit ¶The cgit package.
opaque-cgit-configurationparameter: string string ¶The contents of the
cgitrc, as a string.
For example, if your cgitrc is just the empty string, you could
instantiate a cgit service like this:
(service cgit-service-type
(opaque-cgit-configuration
(cgitrc "")))
Gitolite Service
Gitolite is a tool for hosting Git repositories on a central server.
Gitolite can handle multiple repositories and users, and supports flexible configuration of the permissions for the users on the repositories.
The following example will configure Gitolite using the default git
user, and the provided SSH public key.
(service gitolite-service-type
(gitolite-configuration
(admin-pubkey (plain-file
"yourname.pub"
"ssh-rsa AAAA... guix@example.com"))))
Gitolite is configured through a special admin repository which you can
clone, for example, if you setup Gitolite on example.com, you would
run the following command to clone the admin repository.
git clone git@example.com:gitolite-admin
When the Gitolite service is activated, the provided admin-pubkey
will be inserted in to the keydir directory in the gitolite-admin
repository. If this results in a change in the repository, it will be
committed using the message “gitolite setup by GNU Guix”.
- Data Type: gitolite-configuration
Data type representing the configuration for
gitolite-service-type.package(default: gitolite)Gitolite package to use. There are optional Gitolite dependencies that are not included in the default package, such as Redis and git-annex. These features can be made available by using the
make-gitoliteprocedure in the(gnu packages version-control) module to produce a variant of Gitolite with the desired additional dependencies.The following code returns a package in which the Redis and git-annex programs can be invoked by Gitolite’s scripts:
(use-modules (gnu packages databases) (gnu packages haskell-apps) (gnu packages version-control)) (make-gitolite (list redis git-annex))user(default: git)User to use for Gitolite. This will be user that you use when accessing Gitolite over SSH.
group(default: git)Group to use for Gitolite.
home-directory(default: "/var/lib/gitolite")Directory in which to store the Gitolite configuration and repositories.
rc-file(default: (gitolite-rc-file))A “file-like” object (see file-like objects), representing the configuration for Gitolite.
admin-pubkey(default: #f)A “file-like” object (see file-like objects) used to setup Gitolite. This will be inserted in to the keydir directory within the gitolite-admin repository.
To specify the SSH key as a string, use the
plain-filefunction.(plain-file "yourname.pub" "ssh-rsa AAAA... guix@example.com")
- Data Type: gitolite-rc-file
Data type representing the Gitolite RC file.
umask(default:#o0077)This controls the permissions Gitolite sets on the repositories and their contents.
A value like
#o0027will give read access to the group used by Gitolite (by default:git). This is necessary when using Gitolite with software like cgit or gitweb.local-code(default:"$rc{GL_ADMIN_BASE}/local")Allows you to add your own non-core programs, or even override the shipped ones with your own.
Please supply the FULL path to this variable. By default, directory called "local" in your gitolite clone is used, providing the benefits of versioning them as well as making changes to them without having to log on to the server.
unsafe-pattern(default:#f)An optional Perl regular expression for catching unsafe configurations in the configuration file. See Gitolite’s documentation for more information.
When the value is not
#f, it should be a string containing a Perl regular expression, such as ‘"[`~#\$\&()|;<>]"’, which is the default value used by gitolite. It rejects any special character in configuration that might be interpreted by a shell, which is useful when sharing the administration burden with other people that do not otherwise have shell access on the server.git-config-keys(default:"")Gitolite allows you to set git config values using the ‘config’ keyword. This setting allows control over the config keys to accept.
roles(default:'(("READERS" . 1) ("WRITERS" . )))Set the role names allowed to be used by users running the perms command.
enable(default:'("help" "desc" "info" "perms" "writable" "ssh-authkeys" "git-config" "daemon" "gitweb"))This setting controls the commands and features to enable within Gitolite.
Gitile Service
Gitile is a Git forge for viewing public git repository contents from a web browser.
Gitile works best in collaboration with Gitolite, and will serve the public repositories from Gitolite by default. The service should listen only on a local port, and a webserver should be configured to serve static resources. The gitile service provides an easy way to extend the Nginx service for that purpose (see NGINX).
The following example will configure Gitile to serve repositories from a custom location, with some default messages for the home page and the footers.
(service gitile-service-type
(gitile-configuration
(repositories "/srv/git")
(base-git-url "https://myweb.site/git")
(index-title "My git repositories")
(intro '((p "This is all my public work!")))
(footer '((p "This is the end")))
(nginx-server-block
(nginx-server-configuration
(ssl-certificate
"/etc/letsencrypt/live/myweb.site/fullchain.pem")
(ssl-certificate-key
"/etc/letsencrypt/live/myweb.site/privkey.pem")
(listen '("443 ssl http2" "[::]:443 ssl http2"))
(locations
(list
;; Allow for https anonymous fetch on /git/ urls.
(git-http-nginx-location-configuration
(git-http-configuration
(uri-path "/git/")
(git-root "/var/lib/gitolite/repositories")))))))))
In addition to the configuration record, you should configure your git repositories to contain some optional information. First, your public repositories need to contain the git-daemon-export-ok magic file that allows Git to export the repository. Gitile uses the presence of this file to detect public repositories it should make accessible. To do so with Gitolite for instance, modify your conf/gitolite.conf to include this in the repositories you want to make public:
repo foo
R = daemon
In addition, Gitile can read the repository configuration to display more information on the repository. Gitile uses the gitweb namespace for its configuration. As an example, you can use the following in your conf/gitolite.conf:
repo foo
R = daemon
desc = A long description, optionally with <i>HTML</i>, shown on the index page
config gitweb.name = The Foo Project
config gitweb.synopsis = A short description, shown on the main page of the project
Do not forget to commit and push these changes once you are satisfied. You may need to change your gitolite configuration to allow the previous configuration options to be set. One way to do that is to add the following service definition:
(service gitolite-service-type
(gitolite-configuration
(admin-pubkey (local-file "key.pub"))
(rc-file
(gitolite-rc-file
(umask #o0027)
;; Allow to set any configuration key
(git-config-keys ".*")
;; Allow any text as a valid configuration value
(unsafe-patt "^$")))))
- Data Type: gitile-configuration
Data type representing the configuration for
gitile-service-type.package(default: gitile)Gitile package to use.
host(default:"localhost")The host on which gitile is listening.
port(default:8080)The port on which gitile is listening.
database(default:"/var/lib/gitile/gitile-db.sql")The location of the database.
repositories(default:"/var/lib/gitolite/repositories")The location of the repositories. Note that only public repositories will be shown by Gitile. To make a repository public, add an empty git-daemon-export-ok file at the root of that repository.
base-git-urlThe base git url that will be used to show clone commands.
index-title(default:"Index")The page title for the index page that lists all the available repositories.
intro(default:'())The intro content, as a list of sxml expressions. This is shown above the list of repositories, on the index page.
footer(default:'())The footer content, as a list of sxml expressions. This is shown on every page served by Gitile.
nginx-server-blockAn nginx server block that will be extended and used as a reverse proxy by Gitile to serve its pages, and as a normal web server to serve its assets.
You can use this block to add more custom URLs to your domain, such as a
/git/URL for anonymous clones, or serving any other files you would like to serve.
Next: PAM Mount Service, Previous: 版本控制服务, Up: 服务 [Contents][Index]
12.9.31 游戏服务
The Battle for Wesnoth Service
The Battle for Wesnoth is a fantasy, turn based tactical strategy game, with several single player campaigns, and multiplayer games (both networked and local).
- Variable: Scheme Variable wesnothd-service-type
Service type for the wesnothd service. Its value must be a
wesnothd-configurationobject. To run wesnothd in the default configuration, instantiate it as:(service wesnothd-service-type)
- Data Type: wesnothd-configuration
Data type representing the configuration of
wesnothd.package(default:wesnoth-server)The wesnoth server package to use.
port(default:15000)The port to bind the server to.
Next: Guix Services, Previous: 游戏服务, Up: 服务 [Contents][Index]
12.9.32 PAM Mount Service
The (gnu services pam-mount) module provides a service allowing users
to mount volumes when they log in. It should be able to mount any volume
format supported by the system.
- Variable: Scheme Variable pam-mount-service-type
Service type for PAM Mount support.
- Data Type: pam-mount-configuration
Data type representing the configuration of PAM Mount.
It takes the following parameters:
rulesThe configuration rules that will be used to generate /etc/security/pam_mount.conf.xml.
The configuration rules are SXML elements (see SXML in GNU Guile Reference Manual), and the default ones don’t mount anything for anyone at login:
`((debug (@ (enable "0"))) (mntoptions (@ (allow ,(string-join '("nosuid" "nodev" "loop" "encryption" "fsck" "nonempty" "allow_root" "allow_other") ",")))) (mntoptions (@ (require "nosuid,nodev"))) (logout (@ (wait "0") (hup "0") (term "no") (kill "no"))) (mkmountpoint (@ (enable "1") (remove "true"))))
Some
volumeelements must be added to automatically mount volumes at login. Here’s an example allowing the useraliceto mount her encryptedHOMEdirectory and allowing the userbobto mount the partition where he stores his data:(define pam-mount-rules `((debug (@ (enable "0"))) (volume (@ (user "alice") (fstype "crypt") (path "/dev/sda2") (mountpoint "/home/alice"))) (volume (@ (user "bob") (fstype "auto") (path "/dev/sdb3") (mountpoint "/home/bob/data") (options "defaults,autodefrag,compress"))) (mntoptions (@ (allow ,(string-join '("nosuid" "nodev" "loop" "encryption" "fsck" "nonempty" "allow_root" "allow_other") ",")))) (mntoptions (@ (require "nosuid,nodev"))) (logout (@ (wait "0") (hup "0") (term "no") (kill "no"))) (mkmountpoint (@ (enable "1") (remove "true"))))) (service pam-mount-service-type (pam-mount-configuration (rules pam-mount-rules)))
The complete list of possible options can be found in the man page for pam_mount.conf.
Next: Linux Services, Previous: PAM Mount Service, Up: 服务 [Contents][Index]
12.9.33 Guix Services
Guix Build Coordinator
The Guix Build Coordinator aids in distributing derivation builds among machines running an agent. The build daemon is still used to build the derivations, but the Guix Build Coordinator manages allocating builds and working with the results.
The Guix Build Coordinator consists of one coordinator, and one or more connected agent processes. The coordinator process handles clients submitting builds, and allocating builds to agents. The agent processes talk to a build daemon to actually perform the builds, then send the results back to the coordinator.
There is a script to run the coordinator component of the Guix Build Coordinator, but the Guix service uses a custom Guile script instead, to provide better integration with G-expressions used in the configuration.
- Variable: Scheme Variable guix-build-coordinator-service-type
Service type for the Guix Build Coordinator. Its value must be a
guix-build-coordinator-configurationobject.
- Data Type: guix-build-coordinator-configuration
Data type representing the configuration of the Guix Build Coordinator.
package(default:guix-build-coordinator)The Guix Build Coordinator package to use.
user(default:"guix-build-coordinator")The system user to run the service as.
group(default:"guix-build-coordinator")The system group to run the service as.
database-uri-string(default:"sqlite:///var/lib/guix-build-coordinator/guix_build_coordinator.db")The URI to use for the database.
agent-communication-uri(default:"http://0.0.0.0:8745")The URI describing how to listen to requests from agent processes.
client-communication-uri(default:"http://127.0.0.1:8746")The URI describing how to listen to requests from clients. The client API allows submitting builds and currently isn’t authenticated, so take care when configuring this value.
allocation-strategy(default:#~basic-build-allocation-strategy)A G-expression for the allocation strategy to be used. This is a procedure that takes the datastore as an argument and populates the allocation plan in the database.
hooks(default: ’())An association list of hooks. These provide a way to execute arbitrary code upon certain events, like a build result being processed.
parallel-hooks(default: ’())Hooks can be configured to run in parallel. This parameter is an association list of hooks to do in parallel, where the key is the symbol for the hook and the value is the number of threads to run.
guile(default:guile-3.0-latest)The Guile package with which to run the Guix Build Coordinator.
- Variable: Scheme Variable guix-build-coordinator-agent-service-type
Service type for a Guix Build Coordinator agent. Its value must be a
guix-build-coordinator-agent-configurationobject.
- Data Type: guix-build-coordinator-agent-configuration
Data type representing the configuration a Guix Build Coordinator agent.
package(default:guix-build-coordinator/agent-only)The Guix Build Coordinator package to use.
user(default:"guix-build-coordinator-agent")The system user to run the service as.
coordinator(default:"http://localhost:8745")The URI to use when connecting to the coordinator.
authenticationRecord describing how this agent should authenticate with the coordinator. Possible record types are described below.
systems(default:#f)The systems for which this agent should fetch builds. The agent process will use the current system it’s running on as the default.
max-parallel-builds(default:1)The number of builds to perform in parallel.
max-allocated-builds(default:#f)The maximum number of builds this agent can be allocated.
max-1min-load-average(default:#f)Load average value to look at when considering starting new builds, if the 1 minute load average exceeds this value, the agent will wait before starting new builds.
This will be unspecified if the value is
#f, and the agent will use the number of cores reported by the system as the max 1 minute load average.derivation-substitute-urls(default:#f)URLs from which to attempt to fetch substitutes for derivations, if the derivations aren’t already available.
non-derivation-substitute-urls(default:#f)URLs from which to attempt to fetch substitutes for build inputs, if the input store items aren’t already available.
- Data Type: guix-build-coordinator-agent-password-auth
Data type representing an agent authenticating with a coordinator via a UUID and password.
uuidThe UUID of the agent. This should be generated by the coordinator process, stored in the coordinator database, and used by the intended agent.
passwordThe password to use when connecting to the coordinator.
- Data Type: guix-build-coordinator-agent-password-file-auth
Data type representing an agent authenticating with a coordinator via a UUID and password read from a file.
uuidThe UUID of the agent. This should be generated by the coordinator process, stored in the coordinator database, and used by the intended agent.
password-fileA file containing the password to use when connecting to the coordinator.
- Data Type: guix-build-coordinator-agent-dynamic-auth
Data type representing an agent authenticating with a coordinator via a dynamic auth token and agent name.
agent-nameName of an agent, this is used to match up to an existing entry in the database if there is one. When no existing entry is found, a new entry is automatically added.
tokenDynamic auth token, this is created and stored in the coordinator database, and is used by the agent to authenticate.
- Data Type: guix-build-coordinator-agent-dynamic-auth-with-file
Data type representing an agent authenticating with a coordinator via a dynamic auth token read from a file and agent name.
agent-nameName of an agent, this is used to match up to an existing entry in the database if there is one. When no existing entry is found, a new entry is automatically added.
token-fileFile containing the dynamic auth token, this is created and stored in the coordinator database, and is used by the agent to authenticate.
The Guix Build Coordinator package contains a script to query an instance of the Guix Data Service for derivations to build, and then submit builds for those derivations to the coordinator. The service type below assists in running this script. This is an additional tool that may be useful when building derivations contained within an instance of the Guix Data Service.
- Variable: Scheme Variable guix-build-coordinator-queue-builds-service-type
Service type for the guix-build-coordinator-queue-builds-from-guix-data-service script. Its value must be a
guix-build-coordinator-queue-builds-configurationobject.
- Data Type: guix-build-coordinator-queue-builds-configuration
Data type representing the options to the queue builds from guix data service script.
package(default:guix-build-coordinator)The Guix Build Coordinator package to use.
user(default:"guix-build-coordinator-queue-builds")The system user to run the service as.
coordinator(default:"http://localhost:8746")The URI to use when connecting to the coordinator.
systems(default:#f)The systems for which to fetch derivations to build.
systems-and-targets(default:#f)An association list of system and target pairs for which to fetch derivations to build.
guix-data-service(default:"https://data.guix.gnu.org")The Guix Data Service instance from which to query to find out about derivations to build.
guix-data-service-build-server-id(default:#f)The Guix Data Service build server ID corresponding to the builds being submitted. Providing this speeds up the submitting of builds as derivations that have already been submitted can be skipped before asking the coordinator to build them.
processed-commits-file(default:"/var/cache/guix-build-coordinator-queue-builds/processed-commits")A file to record which commits have been processed, to avoid needlessly processing them again if the service is restarted.
Guix Data Service
The Guix Data Service processes, stores and provides data about GNU Guix. This includes information about packages, derivations and lint warnings.
The data is stored in a PostgreSQL database, and available through a web interface.
- Variable: Scheme Variable guix-data-service-type
Service type for the Guix Data Service. Its value must be a
guix-data-service-configurationobject. The service optionally extends the getmail service, as the guix-commits mailing list is used to find out about changes in the Guix git repository.
- Data Type: guix-data-service-configuration
Data type representing the configuration of the Guix Data Service.
package(default:guix-data-service)The Guix Data Service package to use.
user(default:"guix-data-service")The system user to run the service as.
group(default:"guix-data-service")The system group to run the service as.
port(default:8765)The port to bind the web service to.
host(default:"127.0.0.1")The host to bind the web service to.
getmail-idle-mailboxes(default:#f)If set, this is the list of mailboxes that the getmail service will be configured to listen to.
commits-getmail-retriever-configuration(default:#f)If set, this is the
getmail-retriever-configurationobject with which to configure getmail to fetch mail from the guix-commits mailing list.extra-options(default: ’())Extra command line options for
guix-data-service.extra-process-jobs-options(default: ’())Extra command line options for
guix-data-service-process-jobs.
Nar Herder
The Nar Herder is a utility for managing a collection of nars.
- Variable: Scheme Variable nar-herder-type
Service type for the Guix Data Service. Its value must be a
nar-herder-configurationobject. The service optionally extends the getmail service, as the guix-commits mailing list is used to find out about changes in the Guix git repository.
- Data Type: nar-herder-configuration
Data type representing the configuration of the Guix Data Service.
package(default:nar-herder)The Nar Herder package to use.
user(default:"nar-herder")The system user to run the service as.
group(default:"nar-herder")The system group to run the service as.
port(default:8734)The port to bind the server to.
host(default:"127.0.0.1")The host to bind the server to.
mirror(default:#f)Optional URL of the other Nar Herder instance which should be mirrored. This means that this Nar Herder instance will download it’s database, and keep it up to date.
database(default:"/var/lib/nar-herder/nar_herder.db")Location for the database. If this Nar Herder instance is mirroring another, the database will be downloaded if it doesn’t exist. If this Nar Herder instance isn’t mirroring another, an empty database will be created.
database-dump(default:"/var/lib/nar-herder/nar_herder_dump.db")Location of the database dump. This is created and regularly updated by taking a copy of the database. This is the version of the database that is available to download.
storage(default:#f)Optional location in which to store nars.
storage-limit(default:"none")Limit in bytes for the nars stored in the storage location. This can also be set to “none” so that there is no limit.
When the storage location exceeds this size, nars are removed according to the nar removal criteria.
storage-nar-removal-criteria(default:'())Criteria used to remove nars from the storage location. These are used in conjunction with the storage limit.
When the storage location exceeds the storage limit size, nars will be checked against the nar removal criteria and if any of the criteria match, they will be removed. This will continue until the storage location is below the storage limit size.
Each criteria is specified by a string, then an equals sign, then another string. Currently, only one criteria is supported, checking if a nar is stored on another Nar Herder instance.
ttl(default:#f)Produce
Cache-ControlHTTP headers that advertise a time-to-live (TTL) of ttl. ttl must denote a duration:5dmeans 5 days,1mmeans 1 month, and so on.This allows the user’s Guix to keep substitute information in cache for ttl.
negative-ttl(default:#f)Similarly produce
Cache-ControlHTTP headers to advertise the time-to-live (TTL) of negative lookups—missing store items, for which the HTTP 404 code is returned. By default, no negative TTL is advertised.log-level(default:'DEBUG)Log level to use, specify a log level like
'INFOto stop logging individual requests.
Next: Hurd Services, Previous: Guix Services, Up: 服务 [Contents][Index]
12.9.34 Linux Services
Early OOM Service
Early OOM, also known as Earlyoom, is a minimalist out of memory (OOM) daemon that runs in user space and provides a more responsive and configurable alternative to the in-kernel OOM killer. It is useful to prevent the system from becoming unresponsive when it runs out of memory.
- Scheme Variable: earlyoom-service-type
The service type for running
earlyoom, the Early OOM daemon. Its value must be aearlyoom-configurationobject, described below. The service can be instantiated in its default configuration with:(service earlyoom-service-type)
- Data Type: earlyoom-configuration
This is the configuration record for the
earlyoom-service-type.earlyoom(default: earlyoom)The Earlyoom package to use.
minimum-available-memory(default:10)The threshold for the minimum available memory, in percentages.
minimum-free-swap(default:10)The threshold for the minimum free swap memory, in percentages.
prefer-regexp(default:#f)A regular expression (as a string) to match the names of the processes that should be preferably killed.
avoid-regexp(default:#f)A regular expression (as a string) to match the names of the processes that should not be killed.
memory-report-interval(default:0)The interval in seconds at which a memory report is printed. It is disabled by default.
ignore-positive-oom-score-adj?(default:#f)A boolean indicating whether the positive adjustments set in /proc/*/oom_score_adj should be ignored.
show-debug-messages?(default:#f)A boolean indicating whether debug messages should be printed. The logs are saved at /var/log/earlyoom.log.
send-notification-command(default:#f)This can be used to provide a custom command used for sending notifications.
Kernel Module Loader Service
The kernel module loader service allows one to load loadable kernel modules
at boot. This is especially useful for modules that don’t autoload and need
to be manually loaded, as is the case with ddcci.
- Scheme Variable: kernel-module-loader-service-type
The service type for loading loadable kernel modules at boot with
modprobe. Its value must be a list of strings representing module names. For example loading the drivers provided byddcci-driver-linux, in debugging mode by passing some module parameters, can be done as follow:(use-modules (gnu) (gnu services)) (use-package-modules linux) (use-service-modules linux) (define ddcci-config (plain-file "ddcci.conf" "options ddcci dyndbg delay=120")) (operating-system ... (services (cons* (service kernel-module-loader-service-type '("ddcci" "ddcci_backlight")) (simple-service 'ddcci-config etc-service-type (list `("modprobe.d/ddcci.conf" ,ddcci-config))) %base-services)) (kernel-loadable-modules (list ddcci-driver-linux)))
Rasdaemon Service
The Rasdaemon service provides a daemon which monitors platform RAS (Reliability, Availability, and Serviceability) reports from Linux kernel trace events, logging them to syslogd.
Reliability, Availability and Serviceability is a concept used on servers meant to measure their robustness.
Relability is the probability that a system will produce correct outputs:
- Generally measured as Mean Time Between Failures (MTBF), and
- Enhanced by features that help to avoid, detect and repair hardware faults
Availability is the probability that a system is operational at a given time:
- Generally measured as a percentage of downtime per a period of time, and
- Often uses mechanisms to detect and correct hardware faults in runtime.
Serviceability is the simplicity and speed with which a system can be repaired or maintained:
- Generally measured on Mean Time Between Repair (MTBR).
Among the monitoring measures, the most usual ones include:
- CPU – detect errors at instruction execution and at L1/L2/L3 caches;
- Memory – add error correction logic (ECC) to detect and correct errors;
- I/O – add CRC checksums for transferred data;
- Storage – RAID, journal file systems, checksums, Self-Monitoring, Analysis and Reporting Technology (SMART).
By monitoring the number of occurrences of error detections, it is possible to identify if the probability of hardware errors is increasing, and, on such case, do a preventive maintenance to replace a degraded component while those errors are correctable.
For detailed information about the types of error events gathered and how to make sense of them, see the kernel administrator’s guide at https://www.kernel.org/doc/html/latest/admin-guide/ras.html.
- Scheme Variable: rasdaemon-service-type
Service type for the
rasdaemonservice. It accepts arasdaemon-configurationobject. Instantiating like(service rasdaemon-service-type)will load with a default configuration, which monitors all events and logs to syslogd.
- Data Type: rasdaemon-configuration
The data type representing the configuration of
rasdaemon.record?(default:#f)-
A boolean indicating whether to record the events in an SQLite database. This provides a more structured access to the information contained in the log file. The database location is hard-coded to /var/lib/rasdaemon/ras-mc_event.db.
Zram Device Service
The Zram device service provides a compressed swap device in system memory. The Linux Kernel documentation has more information about zram devices.
- Scheme Variable: zram-device-service-type
This service creates the zram block device, formats it as swap and enables it as a swap device. The service’s value is a
zram-device-configurationrecord.- Data Type: zram-device-configuration
This is the data type representing the configuration for the zram-device service.
size(default"1G")This is the amount of space you wish to provide for the zram device. It accepts a string and can be a number of bytes or use a suffix, eg.:
"512M"or1024000.compression-algorithm(default'lzo)This is the compression algorithm you wish to use. It is difficult to list all the possible compression options, but common ones supported by Guix’s Linux Libre Kernel include
'lzo,'lz4and'zstd.memory-limit(default0)This is the maximum amount of memory which the zram device can use. Setting it to ’0’ disables the limit. While it is generally expected that compression will be 2:1, it is possible that uncompressable data can be written to swap and this is a method to limit how much memory can be used. It accepts a string and can be a number of bytes or use a suffix, eg.:
"2G".priority(default#f)This is the priority of the swap device created from the zram device. See Swap Space for a description of swap priorities. You might want to set a specific priority for the zram device, otherwise it could end up not being used much for the reasons described there.
Next: 其它各种服务, Previous: Linux Services, Up: 服务 [Contents][Index]
12.9.35 Hurd Services
- Scheme Variable: hurd-console-service-type
This service starts the fancy
VGAconsole client on the Hurd.The service’s value is a
hurd-console-configurationrecord.
- Data Type: hurd-console-configuration
This is the data type representing the configuration for the hurd-console-service.
hurd(default: hurd)The Hurd package to use.
- Scheme Variable: hurd-getty-service-type
This service starts a tty using the Hurd
gettyprogram.The service’s value is a
hurd-getty-configurationrecord.
- Data Type: hurd-getty-configuration
This is the data type representing the configuration for the hurd-getty-service.
hurd(default: hurd)The Hurd package to use.
ttyThe name of the console this Getty runs on—e.g.,
"tty1".baud-rate(default:38400)An integer specifying the baud rate of the tty.
Previous: Hurd Services, Up: 服务 [Contents][Index]
12.9.36 其它各种服务
Fingerprint Service
The (gnu services authentication) module provides a DBus service to
read and identify fingerprints via a fingerprint sensor.
- Scheme Variable: fprintd-service-type
The service type for
fprintd, which provides the fingerprint reading capability.(service fprintd-service-type)
System Control Service
The (gnu services sysctl) provides a service to configure kernel
parameters at boot.
- Scheme Variable: sysctl-service-type
The service type for
sysctl, which modifies kernel parameters under /proc/sys/. To enable IPv4 forwarding, it can be instantiated as:(service sysctl-service-type (sysctl-configuration (settings '(("net.ipv4.ip_forward" . "1")))))Since
sysctl-service-typeis used in the default lists of services,%base-servicesand%desktop-services, you can usemodify-servicesto change its configuration and add the kernel parameters that you want (seemodify-services).(modify-services %base-services (sysctl-service-type config => (sysctl-configuration (settings (append '(("net.ipv4.ip_forward" . "1")) %default-sysctl-settings)))))
- Data Type: sysctl-configuration
The data type representing the configuration of
sysctl.sysctl(default:(file-append procps "/sbin/sysctl")The
sysctlexecutable to use.settings(default:%default-sysctl-settings)An association list specifies kernel parameters and their values.
- Scheme Variable: %default-sysctl-settings
An association list specifying the default
sysctlparameters on Guix System.
PC/SC Smart Card Daemon Service
The (gnu services security-token) module provides the following
service to run pcscd, the PC/SC Smart Card Daemon.
pcscd is the daemon program for pcsc-lite and the MuscleCard
framework. It is a resource manager that coordinates communications with
smart card readers, smart cards and cryptographic tokens that are connected
to the system.
- Scheme Variable: pcscd-service-type
Service type for the
pcscdservice. Its value must be apcscd-configurationobject. To run pcscd in the default configuration, instantiate it as:(service pcscd-service-type)
- Data Type: pcscd-configuration
The data type representing the configuration of
pcscd.pcsc-lite(default:pcsc-lite)The pcsc-lite package that provides pcscd.
usb-drivers(default:(list ccid))List of packages that provide USB drivers to pcscd. Drivers are expected to be under pcsc/drivers in the store directory of the package.
Lirc Service
The (gnu services lirc) module provides the following service.
- Scheme Procedure: lirc-service [#:lirc lirc] [#:device #f] [#:driver #f] [#:config-file #f] [#:extra-options '()]
Return a service that runs LIRC, a daemon that decodes infrared signals from remote controls.
Optionally, device, driver and config-file (configuration file name) may be specified. See
lircdmanual for details.Finally, extra-options is a list of additional command-line options passed to
lircd.
Spice Service
The (gnu services spice) module provides the following service.
- Scheme Procedure: spice-vdagent-service [#:spice-vdagent]
Returns a service that runs VDAGENT, a daemon that enables sharing the clipboard with a vm and setting the guest display resolution when the graphical console window resizes.
inputattach Service
The inputattach service allows you to use input devices such as Wacom tablets, touchscreens, or joysticks with the Xorg display server.
- Scheme Variable: inputattach-service-type
Type of a service that runs
inputattachon a device and dispatches events from it.
- Data Type: inputattach-configuration
device-type(default:"wacom")The type of device to connect to. Run
inputattach --help, from theinputattachpackage, to see the list of supported device types.device(default:"/dev/ttyS0")The device file to connect to the device.
baud-rate(default:#f)Baud rate to use for the serial connection. Should be a number or
#f.log-file(default:#f)If true, this must be the name of a file to log messages to.
Dictionary Service
The (gnu services dict) module provides the following service:
- Scheme Variable: dicod-service-type
This is the type of the service that runs the
dicoddaemon, an implementation of DICT server (see Dicod in GNU Dico Manual).
- Scheme Procedure: dicod-service [#:config (dicod-configuration)]
Return a service that runs the
dicoddaemon, an implementation of DICT server (see Dicod in GNU Dico Manual).The optional config argument specifies the configuration for
dicod, which should be a<dicod-configuration>object, by default it serves the GNU Collaborative International Dictionary of English.You can add
open localhostto your ~/.dico file to makelocalhostthe default server fordicoclient (see Initialization File in GNU Dico Manual).
- Data Type: dicod-configuration
Data type representing the configuration of dicod.
dico(default: dico)Package object of the GNU Dico dictionary server.
interfaces(default: ’("localhost"))This is the list of IP addresses and ports and possibly socket file names to listen to (see
listendirective in GNU Dico Manual).handlers(default: ’())List of
<dicod-handler>objects denoting handlers (module instances).databases(default: (list %dicod-database:gcide))List of
<dicod-database>objects denoting dictionaries to be served.
- Data Type: dicod-handler
Data type representing a dictionary handler (module instance).
名字Name of the handler (module instance).
module(default: #f)Name of the dicod module of the handler (instance). If it is
#f, the module has the same name as the handler. (see Modules in GNU Dico Manual).optionsList of strings or gexps representing the arguments for the module handler
- Data Type: dicod-database
Data type representing a dictionary database.
名字Name of the database, will be used in DICT commands.
handlerName of the dicod handler (module instance) used by this database (see Handlers in GNU Dico Manual).
complex?(default: #f)Whether the database configuration complex. The complex configuration will need a corresponding
<dicod-handler>object, otherwise not.optionsList of strings or gexps representing the arguments for the database (see Databases in GNU Dico Manual).
- Scheme Variable: %dicod-database:gcide
A
<dicod-database>object serving the GNU Collaborative International Dictionary of English using thegcidepackage.
The following is an example dicod-service configuration.
(dicod-service #:config
(dicod-configuration
(handlers (list (dicod-handler
(name "wordnet")
(module "dictorg")
(options
(list #~(string-append "dbdir=" #$wordnet))))))
(databases (list (dicod-database
(name "wordnet")
(complex? #t)
(handler "wordnet")
(options '("database=wn")))
%dicod-database:gcide))))
Docker Service
The (gnu services docker) module provides the following services.
- Scheme Variable: docker-service-type
-
This is the type of the service that runs Docker, a daemon that can execute application bundles (sometimes referred to as “containers”) in isolated environments.
- Data Type: docker-configuration
This is the data type representing the configuration of Docker and Containerd.
docker(default:docker)The Docker daemon package to use.
docker-cli(default:docker-cli)The Docker client package to use.
containerd(default: containerd)The Containerd package to use.
proxy(default docker-libnetwork-cmd-proxy)The Docker user-land networking proxy package to use.
enable-proxy?(default#t)Enable or disable the use of the Docker user-land networking proxy.
debug?(default#f)Enable or disable debug output.
enable-iptables?(default#t)Enable or disable the addition of iptables rules.
environment-variables(default:())List of environment variables to set for
dockerd.This must be a list of strings where each string has the form ‘key=value’ as in this example:
(list "LANGUAGE=eo:ca:eu" "TMPDIR=/tmp/dockerd")
- Scheme Variable: singularity-service-type
This is the type of the service that allows you to run Singularity, a Docker-style tool to create and run application bundles (aka. “containers”). The value for this service is the Singularity package to use.
The service does not install a daemon; instead, it installs helper programs as setuid-root (see setuid程序) such that unprivileged users can invoke
singularity runand similar commands.
Auditd Service
The (gnu services auditd) module provides the following service.
- Scheme Variable: auditd-service-type
-
This is the type of the service that runs auditd, a daemon that tracks security-relevant information on your system.
Examples of things that can be tracked:
- File accesses
- System calls
- Invoked commands
- Failed login attempts
- Firewall filtering
- Network access
auditctlfrom theauditpackage can be used in order to add or remove events to be tracked (until the next reboot). In order to permanently track events, put the command line arguments of auditctl into a file calledaudit.rulesin the configuration directory (see below).aureportfrom theauditpackage can be used in order to view a report of all recorded events. The audit daemon by default logs into the file /var/log/audit.log.
- Data Type: auditd-configuration
This is the data type representing the configuration of auditd.
audit(default:audit)The audit package to use.
configuration-directory(default:%default-auditd-configuration-directory)The directory containing the configuration file for the audit package, which must be named
auditd.conf, and optionally some audit rules to instantiate on startup.
R-Shiny service
The (gnu services science) module provides the following service.
- Scheme Variable: rshiny-service-type
-
This is a type of service which is used to run a webapp created with
r-shiny. This service sets theR_LIBS_USERenvironment variable and runs the provided script to callrunApp.- Data Type: rshiny-configuration
This is the data type representing the configuration of rshiny.
package(default:r-shiny)The package to use.
binary(default"rshiny")The name of the binary or shell script located at
package/bin/to run when the service is run.The common way to create this file is as follows:
… (let* ((out (assoc-ref %outputs "out")) (targetdir (string-append out "/share/" ,name)) (app (string-append out "/bin/" ,name)) (Rbin (search-input-file %build-inputs "/bin/Rscript"))) ;; … (mkdir-p (string-append out "/bin")) (call-with-output-file app (lambda (port) (format port "#!~a library(shiny) setwd(\"~a\") runApp(launch.browser=0, port=4202)~%\n" Rbin targetdir))))
Nix service
The (gnu services nix) module provides the following service.
- Scheme Variable: nix-service-type
-
This is the type of the service that runs build daemon of the Nix package manager. Here is an example showing how to use it:
(use-modules (gnu)) (use-service-modules nix) (use-package-modules package-management) (operating-system ;; … (packages (append (list nix) %base-packages)) (services (append (list (service nix-service-type)) %base-services)))
After
guix system reconfigureconfigure Nix for your user:- Add a Nix channel and update it. See Nix Package Manager Guide.
- Create a symlink to your profile and activate Nix profile:
$ ln -s "/nix/var/nix/profiles/per-user/$USER/profile" ~/.nix-profile $ source /run/current-system/profile/etc/profile.d/nix.sh
- Data Type: nix-configuration
This data type represents the configuration of the Nix daemon.
nix(default:nix)The Nix package to use.
sandbox(default:#t)Specifies whether builds are sandboxed by default.
build-sandbox-items(default:'())This is a list of strings or objects appended to the
build-sandbox-itemsfield of the configuration file.extra-config(default:'())This is a list of strings or objects appended to the configuration file. It is used to pass extra text to be added verbatim to the configuration file.
extra-options(default:'())Extra command line options for
nix-service-type.
Fail2Ban service
fail2ban scans log files
(e.g. /var/log/apache/error_log) and bans IP addresses that show
malicious signs – repeated password failures, attempts to make use of
exploits, etc.
fail2ban-service-type service type is provided by the (gnu
services security) module.
This service type runs the fail2ban daemon. It can be configured in
various ways, which are:
- Basic configuration
The basic parameters of the Fail2Ban service can be configured via its
fail2banconfiguration, which is documented below.- User-specified jail extensions
The
fail2ban-jail-servicefunction can be used to add new Fail2Ban jails.- Shepherd extension mechanism
Service developers can extend the
fail2ban-service-typeservice type itself via the usual service extension mechanism.
- Scheme Variable: fail2ban-service-type
-
This is the type of the service that runs
fail2bandaemon. Below is an example of a basic, explicit configuration:(append (list (service fail2ban-service-type (fail2ban-configuration (extra-jails (list (fail2ban-jail-configuration (name "sshd") (enabled? #t)))))) ;; There is no implicit dependency on an actual SSH ;; service, so you need to provide one. (service openssh-service-type)) %base-services)
- Scheme Procedure: fail2ban-jail-service svc-type jail
Extend svc-type, a
<service-type>object with jail, afail2ban-jail-configurationobject.For example:
(append (list (service ;; The 'fail2ban-jail-service' procedure can extend any service type ;; with a fail2ban jail. This removes the requirement to explicitly ;; extend services with fail2ban-service-type. (fail2ban-jail-service openssh-service-type (fail2ban-jail-configuration (name "sshd") (enabled? #t))) (openssh-configuration ...))))
Below is the reference for the different jail-service-type
configuration records.
- Data Type: fail2ban-configuration
Available
fail2ban-configurationfields are:fail2ban(default:fail2ban) (type: package)The
fail2banpackage to use. It is used for both binaries and as base default configuration that is to be extended with<fail2ban-jail-configuration>objects.run-directory(default:"/var/run/fail2ban") (type: string)The state directory for the
fail2bandaemon.jails(default:()) (type: list-of-fail2ban-jail-configurations)Instances of
<fail2ban-jail-configuration>collected from extensions.extra-jails(default:()) (type: list-of-fail2ban-jail-configurations)Instances of
<fail2ban-jail-configuration>explicitly provided.extra-content(default:()) (type: text-config)Extra raw content to add to the end of the jail.local file, provided as a list of file-like objects.
- Data Type: fail2ban-ignore-cache-configuration
Available
fail2ban-ignore-cache-configurationfields are:key(type: string)Cache key.
max-count(type: integer)Cache size.
max-time(type: integer)Cache time.
- Data Type: fail2ban-jail-action-configuration
Available
fail2ban-jail-action-configurationfields are:name(type: string)Action name.
arguments(default:()) (type: list-of-arguments)Action arguments.
- Data Type: fail2ban-jail-configuration
Available
fail2ban-jail-configurationfields are:name(type: string)Required name of this jail configuration.
enabled?(default:#t) (type: boolean)Whether this jail is enabled.
backend(type: maybe-symbol)Backend to use to detect changes in the
log-path. The default is ’auto. To consult the defaults of the jail configuration, refer to the /etc/fail2ban/jail.conf file of thefail2banpackage.max-retry(type: maybe-integer)The number of failures before a host get banned (e.g.
(max-retry 5)).max-matches(type: maybe-integer)The number of matches stored in ticket (resolvable via tag
<matches>) in action.find-time(type: maybe-string)The time window during which the maximum retry count must be reached for an IP address to be banned. A host is banned if it has generated
max-retryduring the lastfind-timeseconds (e.g.(find-time "10m")). It can be provided in seconds or using Fail2Ban’s "time abbreviation format", as described inman 5 jail.conf.ban-time(type: maybe-string)The duration, in seconds or time abbreviated format, that a ban should last. (e.g.
(ban-time "10m")).ban-time-increment?(type: maybe-boolean)Whether to consider past bans to compute increases to the default ban time of a specific IP address.
ban-time-factor(type: maybe-string)The coefficient to use to compute an exponentially growing ban time.
ban-time-formula(type: maybe-string)This is the formula used to calculate the next value of a ban time.
ban-time-multipliers(type: maybe-string)Used to calculate next value of ban time instead of formula.
ban-time-max-time(type: maybe-string)The maximum number of seconds a ban should last.
ban-time-rnd-time(type: maybe-string)The maximum number of seconds a randomized ban time should last. This can be useful to stop “clever” botnets calculating the exact time an IP address can be unbanned again.
ban-time-overall-jails?(type: maybe-boolean)When true, it specifies the search of an IP address in the database should be made across all jails. Otherwise, only the current jail of the ban IP address is considered.
ignore-self?(type: maybe-boolean)Never ban the local machine’s own IP address.
ignore-ip(default:()) (type: list-of-strings)A list of IP addresses, CIDR masks or DNS hosts to ignore.
fail2banwill not ban a host which matches an address in this list.ignore-cache(type: maybe-fail2ban-ignore-cache-configuration)Provide cache parameters for the ignore failure check.
filter(type: maybe-fail2ban-jail-filter-configuration)The filter to use by the jail, specified via a
<fail2ban-jail-filter-configuration>object. By default, jails have names matching their filter name.log-time-zone(type: maybe-string)The default time zone for log lines that do not have one.
log-encoding(type: maybe-symbol)The encoding of the log files handled by the jail. Possible values are:
'ascii,'utf-8and'auto.log-path(default:()) (type: list-of-strings)The file names of the log files to be monitored.
action(default:()) (type: list-of-fail2ban-jail-actions)A list of
<fail2ban-jail-action-configuration>.extra-content(default:()) (type: text-config)Extra content for the jail configuration, provided as a list of file-like objects.
- Data Type: fail2ban-jail-filter-configuration
Available
fail2ban-jail-filter-configurationfields are:name(type: string)Filter to use.
mode(type: maybe-string)Mode for filter.
12.10 setuid程序
Some programs need to run with elevated privileges, even when they are
launched by unprivileged users. A notorious example is the passwd
program, which users can run to change their password, and which needs to
access the /etc/passwd and /etc/shadow files—something
normally restricted to root, for obvious security reasons. To address that,
passwd should be setuid-root, meaning that it always runs
with root privileges (see How Change Persona in The GNU C Library
Reference Manual, for more info about the setuid mechanism).
The store itself cannot contain setuid programs: that would be a security issue since any user on the system can write derivations that populate the store (see 仓库). Thus, a different mechanism is used: instead of changing the setuid or setgid bits directly on files that are in the store, we let the system administrator declare which programs should be entrusted with these additional privileges.
The setuid-programs field of an operating-system declaration
contains a list of <setuid-program> denoting the names of programs to
have a setuid or setgid bit set (see 使用配置系统).
For instance, the mount.nfs program, which is part of the
nfs-utils package, with a setuid root can be designated like this:
(setuid-program
(program (file-append nfs-utils "/sbin/mount.nfs")))
And then, to make mount.nfs setuid on your system, add the
previous example to your operating system declaration by appending it to
%setuid-programs like this:
(operating-system
;; Some fields omitted...
(setuid-programs
(append (list (setuid-program
(program (file-append nfs-utils "/sbin/mount.nfs"))))
%setuid-programs)))
- Data Type: setuid-program
This data type represents a program with a setuid or setgid bit set.
programA file-like object having its setuid and/or setgid bit set.
setuid?(default:#t)Whether to set user setuid bit.
setgid?(default:#f)Whether to set group setgid bit.
user(default:0)UID (integer) or user name (string) for the user owner of the program, defaults to root.
group(default:0)GID (integer) goup name (string) for the group owner of the program, defaults to root.
A default set of setuid programs is defined by the %setuid-programs
variable of the (gnu system) module.
- Scheme Variable: %setuid-programs
A list of
<setuid-program>denoting common programs that are setuid-root.The list includes commands such as
passwd,ping,su, andsudo.
Under the hood, the actual setuid programs are created in the /run/setuid-programs directory at system activation time. The files in this directory refer to the “real” binaries, which are in the store.
Next: Name Service Switch, Previous: setuid程序, Up: 系统配置 [Contents][Index]
12.11 X.509证书
Web servers available over HTTPS (that is, HTTP over the transport-layer security mechanism, TLS) send client programs an X.509 certificate that the client can then use to authenticate the server. To do that, clients verify that the server’s certificate is signed by a so-called certificate authority (CA). But to verify the CA’s signature, clients must have first acquired the CA’s certificate.
Web browsers such as GNU IceCat include their own set of CA certificates, such that they are able to verify CA signatures out-of-the-box.
However, most other programs that can talk HTTPS—wget,
git, w3m, etc.—need to be told where CA certificates
can be found.
In Guix, this is done by adding a package that provides certificates to the
packages field of the operating-system declaration
(see operating-system Reference). Guix includes one such package,
nss-certs, which is a set of CA certificates provided as part of
Mozilla’s Network Security Services.
Note that it is not part of %base-packages, so you need to
explicitly add it. The /etc/ssl/certs directory, which is where most
applications and libraries look for certificates by default, points to the
certificates installed globally.
Unprivileged users, including users of Guix on a foreign distro, can also
install their own certificate package in their profile. A number of
environment variables need to be defined so that applications and libraries
know where to find them. Namely, the OpenSSL library honors the
SSL_CERT_DIR and SSL_CERT_FILE variables. Some applications add
their own environment variables; for instance, the Git version control
system honors the certificate bundle pointed to by the GIT_SSL_CAINFO
environment variable. Thus, you would typically run something like:
guix install nss-certs export SSL_CERT_DIR="$HOME/.guix-profile/etc/ssl/certs" export SSL_CERT_FILE="$HOME/.guix-profile/etc/ssl/certs/ca-certificates.crt" export GIT_SSL_CAINFO="$SSL_CERT_FILE"
As another example, R requires the CURL_CA_BUNDLE environment variable
to point to a certificate bundle, so you would have to run something like
this:
guix install nss-certs export CURL_CA_BUNDLE="$HOME/.guix-profile/etc/ssl/certs/ca-certificates.crt"
For other applications you may want to look up the required environment variable in the relevant documentation.
12.12 Name Service Switch
The (gnu system nss) module provides bindings to the configuration
file of the libc name service switch or NSS (see NSS
Configuration File in The GNU C Library Reference Manual). In a
nutshell, the NSS is a mechanism that allows libc to be extended with new
“name” lookup methods for system databases, which includes host names,
service names, user accounts, and more (see System
Databases and Name Service Switch in The GNU C Library Reference
Manual).
The NSS configuration specifies, for each system database, which lookup
method is to be used, and how the various methods are chained together—for
instance, under which circumstances NSS should try the next method in the
list. The NSS configuration is given in the name-service-switch
field of operating-system declarations (see name-service-switch).
As an example, the declaration below configures the NSS to use the
nss-mdns
back-end, which supports host name lookups over multicast DNS (mDNS) for
host names ending in .local:
(name-service-switch
(hosts (list %files ;first, check /etc/hosts
;; If the above did not succeed, try
;; with 'mdns_minimal'.
(name-service
(name "mdns_minimal")
;; 'mdns_minimal' is authoritative for
;; '.local'. When it returns "not found",
;; no need to try the next methods.
(reaction (lookup-specification
(not-found => return))))
;; Then fall back to DNS.
(name-service
(name "dns"))
;; Finally, try with the "full" 'mdns'.
(name-service
(name "mdns")))))
Do not worry: the %mdns-host-lookup-nss variable (see below)
contains this configuration, so you will not have to type it if all you want
is to have .local host lookup working.
Note that, in this case, in addition to setting the
name-service-switch of the operating-system declaration, you
also need to use avahi-service-type (see avahi-service-type), or %desktop-services, which includes it
(see 桌面服务). Doing this makes nss-mdns accessible to
the name service cache daemon (see nscd-service).
For convenience, the following variables provide typical NSS configurations.
- Scheme Variable: %default-nss
This is the default name service switch configuration, a
name-service-switchobject.
- Scheme Variable: %mdns-host-lookup-nss
This is the name service switch configuration with support for host name lookup over multicast DNS (mDNS) for host names ending in
.local.
The reference for name service switch configuration is given below. It is a
direct mapping of the configuration file format of the C library , so please
refer to the C library manual for more information (see NSS Configuration
File in The GNU C Library Reference Manual). Compared to the
configuration file format of libc NSS, it has the advantage not only of
adding this warm parenthetic feel that we like, but also static checks: you
will know about syntax errors and typos as soon as you run guix
system.
- Data Type: name-service-switch
-
This is the data type representation the configuration of libc’s name service switch (NSS). Each field below represents one of the supported system databases.
aliasesethersgroupgshadowhostsinitgroupsnetgroupnetworkspasswordpublic-keyrpcservicesshadowThe system databases handled by the NSS. Each of these fields must be a list of
<name-service>objects (see below).
- Data Type: name-service
-
This is the data type representing an actual name service and the associated lookup action.
名字A string denoting the name service (see Services in the NSS configuration in The GNU C Library Reference Manual).
Note that name services listed here must be visible to nscd. This is achieved by passing the
#:name-servicesargument tonscd-servicethe list of packages providing the needed name services (seenscd-service).reactionAn action specified using the
lookup-specificationmacro (see Actions in the NSS configuration in The GNU C Library Reference Manual). For example:(lookup-specification (unavailable => continue) (success => return))
Next: 引导设置, Previous: Name Service Switch, Up: 系统配置 [Contents][Index]
12.13 初始的内存虚拟硬盘
For bootstrapping purposes, the Linux-Libre kernel is passed an initial RAM disk, or initrd. An initrd contains a temporary root file system as well as an initialization script. The latter is responsible for mounting the real root file system, and for loading any kernel modules that may be needed to achieve that.
The initrd-modules field of an operating-system declaration
allows you to specify Linux-libre kernel modules that must be available in
the initrd. In particular, this is where you would list modules needed to
actually drive the hard disk where your root partition is—although the
default value of initrd-modules should cover most use cases. For
example, assuming you need the megaraid_sas module in addition to the
default modules to be able to access your root file system, you would write:
(operating-system
;; …
(initrd-modules (cons "megaraid_sas" %base-initrd-modules)))
- Scheme Variable: %base-initrd-modules
This is the list of kernel modules included in the initrd by default.
Furthermore, if you need lower-level customization, the initrd field
of an operating-system declaration allows you to specify which initrd
you would like to use. The (gnu system linux-initrd) module provides
three ways to build an initrd: the high-level base-initrd procedure
and the low-level raw-initrd and expression->initrd
procedures.
The base-initrd procedure is intended to cover most common uses. For
example, if you want to add a bunch of kernel modules to be loaded at boot
time, you can define the initrd field of the operating system
declaration like this:
(initrd (lambda (file-systems . rest)
;; Create a standard initrd but set up networking
;; with the parameters QEMU expects by default.
(apply base-initrd file-systems
#:qemu-networking? #t
rest)))
The base-initrd procedure also handles common use cases that involves
using the system as a QEMU guest, or as a “live” system with volatile root
file system.
The base-initrd procedure is built from raw-initrd procedure.
Unlike base-initrd, raw-initrd doesn’t do anything high-level,
such as trying to guess which kernel modules and packages should be included
to the initrd. An example use of raw-initrd is when a user has a
custom Linux kernel configuration and default kernel modules included by
base-initrd are not available.
The initial RAM disk produced by base-initrd or raw-initrd
honors several options passed on the Linux kernel command line (that is,
arguments passed via the linux command of GRUB, or the
-append option of QEMU), notably:
gnu.load=bootTell the initial RAM disk to load boot, a file containing a Scheme program, once it has mounted the root file system.
Guix uses this option to yield control to a boot program that runs the service activation programs and then spawns the GNU Shepherd, the initialization system.
root=rootMount root as the root file system. root can be a device name like
/dev/sda1, a file system label, or a file system UUID. When unspecified, the device name from the root file system of the operating system declaration is used.rootfstype=typeSet the type of the root file system. It overrides the
typefield of the root file system specified via theoperating-systemdeclaration, if any.rootflags=optionsSet the mount options of the root file system. It overrides the
optionsfield of the root file system specified via theoperating-systemdeclaration, if any.fsck.mode=modeWhether to check the root file system for errors before mounting it. mode is one of
skip(never check),force(always check), orautoto respect the root<file-system>object’scheck?setting (see 文件系统) and run a full scan only if the file system was not cleanly shut down.autois the default if this option is not present or if mode is not one of the above.fsck.repair=levelThe level of repairs to perform automatically if errors are found in the root file system. level is one of
no(do not write to root at all if possible),yes(repair as much as possible), orpreento repair problems considered safe to repair automatically.preenis the default if this option is not present or if level is not one of the above.gnu.system=systemHave /run/booted-system and /run/current-system point to system.
modprobe.blacklist=modules…¶-
Instruct the initial RAM disk as well as the
modprobecommand (from the kmod package) to refuse to load modules. modules must be a comma-separated list of module names—e.g.,usbkbd,9pnet. gnu.replStart a read-eval-print loop (REPL) from the initial RAM disk before it tries to load kernel modules and to mount the root file system. Our marketing team calls it boot-to-Guile. The Schemer in you will love it. See Using Guile Interactively in GNU Guile Reference Manual, for more information on Guile’s REPL.
Now that you know all the features that initial RAM disks produced by
base-initrd and raw-initrd provide, here is how to use it and
customize it further.
- Scheme Procedure: raw-initrd file-systems [#:linux-modules '()] [#:pre-mount #t] [#:mapped-devices '()] [#:keyboard-layout #f] [#:helper-packages '()] [#:qemu-networking? #f]
[#:volatile-root? #f] Return a derivation that builds a raw initrd. file-systems is a list of file systems to be mounted by the initrd, possibly in addition to the root file system specified on the kernel command line via root. linux-modules is a list of kernel modules to be loaded at boot time. mapped-devices is a list of device mappings to realize before file-systems are mounted (see 映射的设备). pre-mount is a G-expression to evaluate before realizing mapped-devices. helper-packages is a list of packages to be copied in the initrd. It may include
e2fsck/staticor other packages needed by the initrd to check the root file system.When true, keyboard-layout is a
<keyboard-layout>record denoting the desired console keyboard layout. This is done before mapped-devices are set up and before file-systems are mounted such that, should the user need to enter a passphrase or use the REPL, this happens using the intended keyboard layout.When qemu-networking? is true, set up networking with the standard QEMU parameters. When virtio? is true, load additional modules so that the initrd can be used as a QEMU guest with para-virtualized I/O drivers.
When volatile-root? is true, the root file system is writable but any changes to it are lost.
- Scheme Procedure: base-initrd file-systems [#:mapped-devices '()] [#:keyboard-layout #f] [#:qemu-networking? #f]
[#:volatile-root? #f] [#:linux-modules ’()] Return as a file-like object a generic initrd, with kernel modules taken from linux. file-systems is a list of file-systems to be mounted by the initrd, possibly in addition to the root file system specified on the kernel command line via root. mapped-devices is a list of device mappings to realize before file-systems are mounted.
When true, keyboard-layout is a
<keyboard-layout>record denoting the desired console keyboard layout. This is done before mapped-devices are set up and before file-systems are mounted such that, should the user need to enter a passphrase or use the REPL, this happens using the intended keyboard layout.qemu-networking? and volatile-root? behaves as in
raw-initrd.The initrd is automatically populated with all the kernel modules necessary for file-systems and for the given options. Additional kernel modules can be listed in linux-modules. They will be added to the initrd, and loaded at boot time in the order in which they appear.
Needless to say, the initrds we produce and use embed a statically-linked
Guile, and the initialization program is a Guile program. That gives a lot
of flexibility. The expression->initrd procedure builds such an
initrd, given the program to run in that initrd.
- Scheme Procedure: expression->initrd exp [#:guile %guile-static-stripped] [#:name "guile-initrd"] Return as a
file-like object a Linux initrd (a gzipped cpio archive) containing guile and that evaluates exp, a G-expression, upon booting. All the derivations referenced by exp are automatically copied to the initrd.
Next: Invoking guix system, Previous: 初始的内存虚拟硬盘, Up: 系统配置 [Contents][Index]
12.14 引导设置
The operating system supports multiple bootloaders. The bootloader is
configured using bootloader-configuration declaration. All the
fields of this structure are bootloader agnostic except for one field,
bootloader that indicates the bootloader to be configured and
installed.
Some of the bootloaders do not honor every field of
bootloader-configuration. For instance, the extlinux bootloader does
not support themes and thus ignores the theme field.
- Data Type: bootloader-configuration
The type of a bootloader configuration declaration.
bootloader¶-
The bootloader to use, as a
bootloaderobject. For nowgrub-bootloader,grub-efi-bootloader,grub-efi-netboot-bootloader,grub-efi-removable-bootloader,extlinux-bootloaderandu-boot-bootloaderare supported.Available bootloaders are described in
(gnu bootloader …)modules. In particular,(gnu bootloader u-boot)contains definitions of bootloaders for a wide range of ARM and AArch64 systems, using the U-Boot bootloader.grub-efi-bootloaderallows to boot on modern systems using the Unified Extensible Firmware Interface (UEFI). This is what you should use if the installation image contains a /sys/firmware/efi directory when you boot it on your system.grub-bootloaderallows you to boot in particular Intel-based machines in “legacy” BIOS mode.grub-efi-netboot-bootloaderallows you to boot your system over network through TFTP. In combination with an NFS root file system this allows you to build a diskless Guix system.The installation of the
grub-efi-netboot-bootloadergenerates the content of the TFTP root directory attargets(seetargets), to be served by a TFTP server. You may want to mount your TFTP server directories onto thetargetsto move the required files to the TFTP server automatically.If you plan to use an NFS root file system as well (actually if you mount the store from an NFS share), then the TFTP server needs to serve the file /boot/grub/grub.cfg and other files from the store (like GRUBs background image, the kernel (see
kernel) and the initrd (seeinitrd)), too. All these files from the store will be accessed by GRUB through TFTP with their normal store path, for example as tftp://tftp-server/gnu/store/…-initrd/initrd.cpio.gz.Two symlinks are created to make this possible. For each target in the
targetsfield, the first symlink is ‘target’/efi/Guix/boot/grub/grub.cfg pointing to ../../../boot/grub/grub.cfg, where ‘target’ may be /boot. In this case the link is not leaving the served TFTP root directory, but otherwise it does. The second link is ‘target’/gnu/store and points to ../gnu/store. This link is leaving the served TFTP root directory.The assumption behind all this is that you have an NFS server exporting the root file system for your Guix system, and additionally a TFTP server exporting your
targetsdirectories—usually a single /boot—from that same root file system for your Guix system. In this constellation the symlinks will work.For other constellations you will have to program your own bootloader installer, which then takes care to make necessary files from the store accessible through TFTP, for example by copying them into the TFTP root directory to your
targets.It is important to note that symlinks pointing outside the TFTP root directory may need to be allowed in the configuration of your TFTP server. Further the store link exposes the whole store through TFTP. Both points need to be considered carefully for security aspects.
Beside the
grub-efi-netboot-bootloader, the already mentioned TFTP and NFS servers, you also need a properly configured DHCP server to make the booting over netboot possible. For all this we can currently only recommend you to look for instructions about PXE (Preboot eXecution Environment).grub-efi-removable-bootloaderallows you to boot your system from removable media by writing the GRUB file to the UEFI-specification location of /EFI/BOOT/BOOTX64.efi of the boot directory, usually /boot/efi. This is also useful for some UEFI firmwares that “forget” their configuration from their non-volatile storage. Likegrub-efi-bootloader, this can only be used if the /sys/firmware/efi directory is available.注: This will overwrite the GRUB file from any other operating systems that also place their GRUB file in the UEFI-specification location; making them unbootable.
targetsThis is a list of strings denoting the targets onto which to install the bootloader.
The interpretation of targets depends on the bootloader in question. For
grub-bootloader, for example, they should be device names understood by the bootloaderinstallercommand, such as/dev/sdaor(hd0)(see Invoking grub-install in GNU GRUB Manual). Forgrub-efi-bootloaderandgrub-efi-removable-bootloaderthey should be mount points of the EFI file system, usually /boot/efi. Forgrub-efi-netboot-bootloader,targetsshould be the mount points corresponding to TFTP root directories served by your TFTP server.menu-entries(default:())A possibly empty list of
menu-entryobjects (see below), denoting entries to appear in the bootloader menu, in addition to the current system entry and the entry pointing to previous system generations.default-entry(default:0)The index of the default boot menu entry. Index 0 is for the entry of the current system.
timeout(default:5)The number of seconds to wait for keyboard input before booting. Set to 0 to boot immediately, and to -1 to wait indefinitely.
keyboard-layout(default:#f)If this is
#f, the bootloader’s menu (if any) uses the default keyboard layout, usually US English (“qwerty”).Otherwise, this must be a
keyboard-layoutobject (see 键盘布局).注: This option is currently ignored by bootloaders other than
grubandgrub-efi.theme(default: #f)The bootloader theme object describing the theme to use. If no theme is provided, some bootloaders might use a default theme, that’s true for GRUB.
terminal-outputs(default:'(gfxterm))The output terminals used for the bootloader boot menu, as a list of symbols. GRUB accepts the values:
console,serial,serial_{0-3},gfxterm,vga_text,mda_text,morse, andpkmodem. This field corresponds to the GRUB variableGRUB_TERMINAL_OUTPUT(see Simple configuration in GNU GRUB manual).terminal-inputs(default:'())The input terminals used for the bootloader boot menu, as a list of symbols. For GRUB, the default is the native platform terminal as determined at run-time. GRUB accepts the values:
console,serial,serial_{0-3},at_keyboard, andusb_keyboard. This field corresponds to the GRUB variableGRUB_TERMINAL_INPUT(see Simple configuration in GNU GRUB manual).serial-unit(default:#f)The serial unit used by the bootloader, as an integer from 0 to 3. For GRUB, it is chosen at run-time; currently GRUB chooses 0, which corresponds to COM1 (see Serial terminal in GNU GRUB manual).
serial-speed(default:#f)The speed of the serial interface, as an integer. For GRUB, the default value is chosen at run-time; currently GRUB chooses 9600 bps (see Serial terminal in GNU GRUB manual).
device-tree-support?(default:#t)Whether to support Linux device tree files loading.
This option in enabled by default. In some cases involving the
u-bootbootloader, where the device tree has already been loaded in RAM, it can be handy to disable the option by setting it to#f.
Should you want to list additional boot menu entries via the
menu-entries field above, you will need to create them with the
menu-entry form. For example, imagine you want to be able to boot
another distro (hard to imagine!), you can define a menu entry along these
lines:
(menu-entry
(label "The Other Distro")
(linux "/boot/old/vmlinux-2.6.32")
(linux-arguments '("root=/dev/sda2"))
(initrd "/boot/old/initrd"))
Details below.
The type of an entry in the bootloader menu.
labelThe label to show in the menu—e.g.,
"GNU".linux(default:#f)The Linux kernel image to boot, for example:
(file-append linux-libre "/bzImage")For GRUB, it is also possible to specify a device explicitly in the file path using GRUB’s device naming convention (see Naming convention in GNU GRUB manual), for example:
"(hd0,msdos1)/boot/vmlinuz"
If the device is specified explicitly as above, then the
devicefield is ignored entirely.linux-arguments(default:())The list of extra Linux kernel command-line arguments—e.g.,
("console=ttyS0").initrd(default:#f)A G-Expression or string denoting the file name of the initial RAM disk to use (see G-表达式).
device(default:#f)The device where the kernel and initrd are to be found—i.e., for GRUB, root for this menu entry (see root in GNU GRUB manual).
This may be a file system label (a string), a file system UUID (a bytevector, see 文件系统), or
#f, in which case the bootloader will search the device containing the file specified by thelinuxfield (see search in GNU GRUB manual). It must not be an OS device name such as /dev/sda1.multiboot-kernel(default:#f)The kernel to boot in Multiboot-mode (see multiboot in GNU GRUB manual). When this field is set, a Multiboot menu-entry is generated. For example:
(file-append mach "/boot/gnumach")multiboot-arguments(default:())The list of extra command-line arguments for the multiboot-kernel.
multiboot-modules(default:())The list of commands for loading Multiboot modules. For example:
(list (list (file-append hurd "/hurd/ext2fs.static") "ext2fs" …) (list (file-append libc "/lib/ld.so.1") "exec" …))chain-loader(default:#f)A string that can be accepted by
grub’schainloaderdirective. This has no effect if eitherlinuxormultiboot-kernelfields are specified. The following is an example of chainloading a different GNU/Linux system.(bootloader (bootloader-configuration ;; … (menu-entries (list (menu-entry (label "GNU/Linux") (device (uuid "1C31-A17C" 'fat)) (chain-loader "/EFI/GNULinux/grubx64.efi"))))))
For now only GRUB has theme support. GRUB themes are created using the
grub-theme form, which is not fully documented yet.
- Data Type: grub-theme
Data type representing the configuration of the GRUB theme.
gfxmode(default:'("auto"))The GRUB
gfxmodeto set (a list of screen resolution strings, see gfxmode in GNU GRUB manual).
- Scheme Procedure: grub-theme
Return the default GRUB theme used by the operating system if no
themefield is specified inbootloader-configurationrecord.It comes with a fancy background image displaying the GNU and Guix logos.
For example, to override the default resolution, you may use something like
(bootloader
(bootloader-configuration
;; …
(theme (grub-theme
(inherit (grub-theme))
(gfxmode '("1024x786x32" "auto"))))))
Next: Invoking guix deploy, Previous: 引导设置, Up: 系统配置 [Contents][Index]
12.15 Invoking guix system
Once you have written an operating system declaration as seen in the
previous section, it can be instantiated using the guix
system command. The synopsis is:
guix system options… action file
file must be the name of a file containing an operating-system
declaration. action specifies how the operating system is
instantiated. Currently the following values are supported:
searchDisplay available service type definitions that match the given regular expressions, sorted by relevance:
$ guix system search console name: console-fonts location: gnu/services/base.scm:806:2 extends: shepherd-root description: Install the given fonts on the specified ttys (fonts are per + virtual console on GNU/Linux). The value of this service is a list of + tty/font pairs. The font can be the name of a font provided by the `kbd' + package or any valid argument to `setfont', as in this example: + + '(("tty1" . "LatGrkCyr-8x16") + ("tty2" . (file-append + font-tamzen + "/share/kbd/consolefonts/TamzenForPowerline10x20.psf")) + ("tty3" . (file-append + font-terminus + "/share/consolefonts/ter-132n"))) ; for HDPI relevance: 9 name: mingetty location: gnu/services/base.scm:1190:2 extends: shepherd-root description: Provide console login using the `mingetty' program. relevance: 2 name: login location: gnu/services/base.scm:860:2 extends: pam description: Provide a console log-in service as specified by its + configuration value, a `login-configuration' object. relevance: 2 …As for
guix package --search, the result is written inrecutilsformat, which makes it easy to filter the output (see GNU recutils databases in GNU recutils manual).editEdit or view the definition of the given service types.
For example, the command below opens your editor, as specified by the
EDITORenvironment variable, on the definition of theopensshservice type:guix system edit openssh
reconfigureBuild the operating system described in file, activate it, and switch to it33.
注: It is highly recommended to run
guix pullonce before you runguix system reconfigurefor the first time (see Invokingguix pull). Failing to do that you would see an older version of Guix oncereconfigurehas completed.This effects all the configuration specified in file: user accounts, system services, global package list, setuid programs, etc. The command starts system services specified in file that are not currently running; if a service is currently running this command will arrange for it to be upgraded the next time it is stopped (e.g. by
herd stop Xorherd restart X).This command creates a new generation whose number is one greater than the current generation (as reported by
guix system list-generations). If that generation already exists, it will be overwritten. This behavior mirrors that ofguix package(see Invokingguix package).It also adds a bootloader menu entry for the new OS configuration, —unless --no-bootloader is passed. For GRUB, it moves entries for older configurations to a submenu, allowing you to choose an older system generation at boot time should you need it.
Upon completion, the new system is deployed under /run/current-system. This directory contains provenance meta-data: the list of channels in use (see 通道) and file itself, when available. You can view it by running:
guix system describe
This information is useful should you later want to inspect how this particular generation was built. In fact, assuming file is self-contained, you can later rebuild generation n of your operating system with:
guix time-machine \ -C /var/guix/profiles/system-n-link/channels.scm -- \ system reconfigure \ /var/guix/profiles/system-n-link/configuration.scm
You can think of it as some sort of built-in version control! Your system is not just a binary artifact: it carries its own source. See
provenance-service-type, for more information on provenance tracking.By default,
reconfigureprevents you from downgrading your system, which could (re)introduce security vulnerabilities and also cause problems with “stateful” services such as database management systems. You can override that behavior by passing --allow-downgrades.switch-generation¶Switch to an existing system generation. This action atomically switches the system profile to the specified system generation. It also rearranges the system’s existing bootloader menu entries. It makes the menu entry for the specified system generation the default, and it moves the entries for the other generations to a submenu, if supported by the bootloader being used. The next time the system boots, it will use the specified system generation.
The bootloader itself is not being reinstalled when using this command. Thus, the installed bootloader is used with an updated configuration file.
The target generation can be specified explicitly by its generation number. For example, the following invocation would switch to system generation 7:
guix system switch-generation 7
The target generation can also be specified relative to the current generation with the form
+Nor-N, where+3means “3 generations ahead of the current generation,” and-1means “1 generation prior to the current generation.” When specifying a negative value such as-1, you must precede it with--to prevent it from being parsed as an option. For example:guix system switch-generation -- -1
Currently, the effect of invoking this action is only to switch the system profile to an existing generation and rearrange the bootloader menu entries. To actually start using the target system generation, you must reboot after running this action. In the future, it will be updated to do the same things as
reconfigure, like activating and deactivating services.This action will fail if the specified generation does not exist.
roll-back¶Switch to the preceding system generation. The next time the system boots, it will use the preceding system generation. This is the inverse of
reconfigure, and it is exactly the same as invokingswitch-generationwith an argument of-1.Currently, as with
switch-generation, you must reboot after running this action to actually start using the preceding system generation.delete-generations¶-
Delete system generations, making them candidates for garbage collection (see Invoking
guix gc, for information on how to run the “garbage collector”).This works in the same way as ‘guix package --delete-generations’ (see --delete-generations). With no arguments, all system generations but the current one are deleted:
guix system delete-generations
You can also select the generations you want to delete. The example below deletes all the system generations that are more than two months old:
guix system delete-generations 2m
Running this command automatically reinstalls the bootloader with an updated list of menu entries—e.g., the “old generations” sub-menu in GRUB no longer lists the generations that have been deleted.
buildBuild the derivation of the operating system, which includes all the configuration files and programs needed to boot and run the system. This action does not actually install anything.
initPopulate the given directory with all the files necessary to run the operating system specified in file. This is useful for first-time installations of Guix System. For instance:
guix system init my-os-config.scm /mnt
copies to /mnt all the store items required by the configuration specified in my-os-config.scm. This includes configuration files, packages, and so on. It also creates other essential files needed for the system to operate correctly—e.g., the /etc, /var, and /run directories, and the /bin/sh file.
This command also installs bootloader on the targets specified in my-os-config, unless the --no-bootloader option was passed.
vm¶-
Build a virtual machine (VM) that contains the operating system declared in file, and return a script to run that VM.
注: The
vmaction and others below can use KVM support in the Linux-libre kernel. Specifically, if the machine has hardware virtualization support, the corresponding KVM kernel module should be loaded, and the /dev/kvm device node must exist and be readable and writable by the user and by the build users of the daemon (see 设置构建环境).Arguments given to the script are passed to QEMU as in the example below, which enables networking and requests 1 GiB of RAM for the emulated machine:
$ /gnu/store/…-run-vm.sh -m 1024 -smp 2 -nic user,model=virtio-net-pci
It’s possible to combine the two steps into one:
$ $(guix system vm my-config.scm) -m 1024 -smp 2 -nic user,model=virtio-net-pci
The VM shares its store with the host system.
By default, the root file system of the VM is mounted volatile; the --persistent option can be provided to make it persistent instead. In that case, the VM disk-image file will be copied from the store to the
TMPDIRdirectory to make it writable.Additional file systems can be shared between the host and the VM using the --share and --expose command-line options: the former specifies a directory to be shared with write access, while the latter provides read-only access to the shared directory.
The example below creates a VM in which the user’s home directory is accessible read-only, and where the /exchange directory is a read-write mapping of $HOME/tmp on the host:
guix system vm my-config.scm \ --expose=$HOME --share=$HOME/tmp=/exchange
On GNU/Linux, the default is to boot directly to the kernel; this has the advantage of requiring only a very tiny root disk image since the store of the host can then be mounted.
The --full-boot option forces a complete boot sequence, starting with the bootloader. This requires more disk space since a root image containing at least the kernel, initrd, and bootloader data files must be created.
The --image-size option can be used to specify the size of the image.
The --no-graphic option will instruct
guix systemto spawn a headless VM that will use the invoking tty for IO. Among other things, this enables copy-pasting, and scrollback. Use the ctrl-a prefix to issue QEMU commands; e.g. ctrl-a h prints a help, ctrl-a x quits the VM, and ctrl-a c switches between the QEMU monitor and the VM. image¶The
imagecommand can produce various image types. The image type can be selected using the --image-type option. It defaults toefi-raw. When its value isiso9660, the --label option can be used to specify a volume ID withimage. By default, the root file system of a disk image is mounted non-volatile; the --volatile option can be provided to make it volatile instead. When usingimage, the bootloader installed on the generated image is taken from the providedoperating-systemdefinition. The following example demonstrates how to generate an image that uses thegrub-efi-bootloaderbootloader and boot it with QEMU:image=$(guix system image --image-type=qcow2 \ gnu/system/examples/lightweight-desktop.tmpl) cp $image /tmp/my-image.qcow2 chmod +w /tmp/my-image.qcow2 qemu-system-x86_64 -enable-kvm -hda /tmp/my-image.qcow2 -m 1000 \ -bios $(guix build ovmf)/share/firmware/ovmf_x64.binWhen using the
efi-rawimage type, a raw disk image is produced; it can be copied as is to a USB stick, for instance. Assuming/dev/sdcis the device corresponding to a USB stick, one can copy the image to it using the following command:# dd if=$(guix system image my-os.scm) of=/dev/sdc status=progress
The
--list-image-typescommand lists all the available image types.When using the
qcow2image type, the returned image is in qcow2 format, which the QEMU emulator can efficiently use. See Running Guix in a Virtual Machine, for more information on how to run the image in a virtual machine. Thegrub-bootloaderbootloader is always used independently of what is declared in theoperating-systemfile passed as argument. This is to make it easier to work with QEMU, which uses the SeaBIOS BIOS by default, expecting a bootloader to be installed in the Master Boot Record (MBR).When using the
dockerimage type, a Docker image is produced. Guix builds the image from scratch, not from a pre-existing Docker base image. As a result, it contains exactly what you define in the operating system configuration file. You can then load the image and launch a Docker container using commands like the following:image_id="$(docker load < guix-system-docker-image.tar.gz)" container_id="$(docker create $image_id)" docker start $container_id
This command starts a new Docker container from the specified image. It will boot the Guix system in the usual manner, which means it will start any services you have defined in the operating system configuration. You can get an interactive shell running in the container using
docker exec:docker exec -ti $container_id /run/current-system/profile/bin/bash --login
Depending on what you run in the Docker container, it may be necessary to give the container additional permissions. For example, if you intend to build software using Guix inside of the Docker container, you may need to pass the --privileged option to
docker create.Last, the --network option applies to
guix system docker-image: it produces an image where network is supposedly shared with the host, and thus without services like nscd or NetworkManager.容器Return a script to run the operating system declared in file within a container. Containers are a set of lightweight isolation mechanisms provided by the kernel Linux-libre. Containers are substantially less resource-demanding than full virtual machines since the kernel, shared objects, and other resources can be shared with the host system; this also means they provide thinner isolation.
Currently, the script must be run as root in order to support more than a single user and group. The container shares its store with the host system.
As with the
vmaction (see guix system vm), additional file systems to be shared between the host and container can be specified using the --share and --expose options:guix system container my-config.scm \ --expose=$HOME --share=$HOME/tmp=/exchange
The --share and --expose options can also be passed to the generated script to bind-mount additional directories into the container.
注: This option requires Linux-libre 3.19 or newer.
options can contain any of the common build options (see 普通的构建选项). In addition, options can contain one of the following:
- --expression=expr
- -e expr
Consider the operating-system expr evaluates to. This is an alternative to specifying a file which evaluates to an operating system. This is used to generate the Guix system installer see 构建安装镜像).
- --system=system
- -s system
Attempt to build for system instead of the host system type. This works as per
guix build(see 调用guix build).- --target=triplet
Cross-build for triplet, which must be a valid GNU triplet, such as
"aarch64-linux-gnu"(see GNU configuration triplets in Autoconf).- --derivation
- -d
Return the derivation file name of the given operating system without building anything.
- --save-provenance
As discussed above,
guix system initandguix system reconfigurealways save provenance information via a dedicated service (seeprovenance-service-type). However, other commands don’t do that by default. If you wish to, say, create a virtual machine image that contains provenance information, you can run:guix system image -t qcow2 --save-provenance config.scm
That way, the resulting image will effectively “embed its own source” in the form of meta-data in /run/current-system. With that information, one can rebuild the image to make sure it really contains what it pretends to contain; or they could use that to derive a variant of the image.
- --image-type=type
- -t type
For the
imageaction, create an image with given type.When this option is omitted,
guix systemuses theefi-rawimage type.--image-type=iso9660 produces an ISO-9660 image, suitable for burning on CDs and DVDs.
- --image-size=size
For the
imageaction, create an image of the given size. size may be a number of bytes, or it may include a unit as a suffix (see size specifications in GNU Coreutils).When this option is omitted,
guix systemcomputes an estimate of the image size as a function of the size of the system declared in file.- --network
- -N
For the
containeraction, allow containers to access the host network, that is, do not create a network namespace.- --root=file
- -r file
Make file a symlink to the result, and register it as a garbage collector root.
- --skip-checks
Skip pre-installation safety checks.
By default,
guix system initandguix system reconfigureperform safety checks: they make sure the file systems that appear in theoperating-systemdeclaration actually exist (see 文件系统), and that any Linux kernel modules that may be needed at boot time are listed ininitrd-modules(see 初始的内存虚拟硬盘). Passing this option skips these tests altogether.- --allow-downgrades
Instruct
guix system reconfigureto allow system downgrades.By default,
reconfigureprevents you from downgrading your system. It achieves that by comparing the provenance info of your system (shown byguix system describe) with that of yourguixcommand (shown byguix describe). If the commits forguixare not descendants of those used for your system,guix system reconfigureerrors out. Passing --allow-downgrades allows you to bypass these checks.注: Make sure you understand its security implications before using --allow-downgrades.
- --on-error=strategy
Apply strategy when an error occurs when reading file. strategy may be one of the following:
nothing-specialReport the error concisely and exit. This is the default strategy.
backtraceLikewise, but also display a backtrace.
debugReport the error and enter Guile’s debugger. From there, you can run commands such as
,btto get a backtrace,,localsto display local variable values, and more generally inspect the state of the program. See Debug Commands in GNU Guile Reference Manual, for a list of available debugging commands.
Once you have built, configured, re-configured, and re-re-configured your Guix installation, you may find it useful to list the operating system generations available on disk—and that you can choose from the bootloader boot menu:
describeDescribe the running system generation: its file name, the kernel and bootloader used, etc., as well as provenance information when available.
The
--list-installedflag is available, with the same syntax that is used inguix package --list-installed(see Invokingguix package). When the flag is used, the description will include a list of packages that are currently installed in the system profile, with optional filtering based on a regular expression.注: The running system generation—referred to by /run/current-system—is not necessarily the current system generation—referred to by /var/guix/profiles/system: it differs when, for instance, you chose from the bootloader menu to boot an older generation.
It can also differ from the booted system generation—referred to by /run/booted-system—for instance because you reconfigured the system in the meantime.
list-generationsList a summary of each generation of the operating system available on disk, in a human-readable way. This is similar to the --list-generations option of
guix package(see Invokingguix package).Optionally, one can specify a pattern, with the same syntax that is used in
guix package --list-generations, to restrict the list of generations displayed. For instance, the following command displays generations that are up to 10 days old:$ guix system list-generations 10d
The
--list-installedflag may also be specified, with the same syntax that is used inguix package --list-installed. This may be helpful if trying to determine when a package was added to the system.
The guix system command has even more to offer! The following
sub-commands allow you to visualize how your system services relate to each
other:
extension-graphEmit to standard output the service extension graph of the operating system defined in file (see 合成服务, for more information on service extensions). By default the output is in Dot/Graphviz format, but you can choose a different format with --graph-backend, as with
guix graph(see --backend):The command:
$ guix system extension-graph file | xdot -
shows the extension relations among services.
注: The
dotprogram is provided by thegraphvizpackage.shepherd-graphEmit to standard output the dependency graph of shepherd services of the operating system defined in file. See Shepherd服务, for more information and for an example graph.
Again, the default output format is Dot/Graphviz, but you can pass --graph-backend to select a different one.
Next: Running Guix in a Virtual Machine, Previous: Invoking guix system, Up: 系统配置 [Contents][Index]
12.16 Invoking guix deploy
We’ve already seen operating-system declarations used to manage a
machine’s configuration locally. Suppose you need to configure multiple
machines, though—perhaps you’re managing a service on the web that’s
comprised of several servers. guix deploy enables you to use
those same operating-system declarations to manage multiple remote
hosts at once as a logical “deployment”.
注: The functionality described in this section is still under development and is subject to change. Get in touch with us on guix-devel@gnu.org!
guix deploy file
Such an invocation will deploy the machines that the code within file evaluates to. As an example, file might contain a definition like this:
;; This is a Guix deployment of a "bare bones" setup, with ;; no X11 display server, to a machine with an SSH daemon ;; listening on localhost:2222. A configuration such as this ;; may be appropriate for virtual machine with ports ;; forwarded to the host's loopback interface. (use-service-modules networking ssh) (use-package-modules bootloaders) (define %system (operating-system (host-name "gnu-deployed") (timezone "Etc/UTC") (bootloader (bootloader-configuration (bootloader grub-bootloader) (targets '("/dev/vda")) (terminal-outputs '(console)))) (file-systems (cons (file-system (mount-point "/") (device "/dev/vda1") (type "ext4")) %base-file-systems)) (services (append (list (service dhcp-client-service-type) (service openssh-service-type (openssh-configuration (permit-root-login #t) (allow-empty-passwords? #t)))) %base-services)))) (list (machine (operating-system %system) (environment managed-host-environment-type) (configuration (machine-ssh-configuration (host-name "localhost") (system "x86_64-linux") (user "alice") (identity "./id_rsa") (port 2222)))))
The file should evaluate to a list of machine objects. This example,
upon being deployed, will create a new generation on the remote system
realizing the operating-system declaration %system.
environment and configuration specify how the machine should
be provisioned—that is, how the computing resources should be created and
managed. The above example does not create any resources, as a
'managed-host is a machine that is already running the Guix system
and available over the network. This is a particularly simple case; a more
complex deployment may involve, for example, starting virtual machines
through a Virtual Private Server (VPS) provider. In such a case, a
different environment type would be used.
Do note that you first need to generate a key pair on the coordinator
machine to allow the daemon to export signed archives of files from the
store (see Invoking guix archive), though this step is automatic on Guix
System:
# guix archive --generate-key
Each target machine must authorize the key of the master machine so that it accepts store items it receives from the coordinator:
# guix archive --authorize < coordinator-public-key.txt
user, in this example, specifies the name of the user account to log
in as to perform the deployment. Its default value is root, but root
login over SSH may be forbidden in some cases. To work around this,
guix deploy can log in as an unprivileged user and employ
sudo to escalate privileges. This will only work if sudo is
currently installed on the remote and can be invoked non-interactively as
user. That is, the line in sudoers granting user the
ability to use sudo must contain the NOPASSWD tag. This can
be accomplished with the following operating system configuration snippet:
(use-modules ... (gnu system)) ;for %sudoers-specification (define %user "username") (operating-system ... (sudoers-file (plain-file "sudoers" (string-append (plain-file-content %sudoers-specification) (format #f "~a ALL = NOPASSWD: ALL~%" %user)))))
For more information regarding the format of the sudoers file,
consult man sudoers.
Once you’ve deployed a system on a set of machines, you may find it useful
to run a command on all of them. The --execute or -x
option lets you do that; the example below runs uname -a on all
the machines listed in the deployment file:
guix deploy file -x -- uname -a
One thing you may often need to do after deployment is restart specific services on all the machines, which you can do like so:
guix deploy file -x -- herd restart service
The guix deploy -x command returns zero if and only if the command
succeeded on all the machines.
Below are the data types you need to know about when writing a deployment file.
- Data Type: machine
This is the data type representing a single machine in a heterogeneous Guix deployment.
operating-systemThe object of the operating system configuration to deploy.
environmentAn
environment-typedescribing how the machine should be provisioned.configuration(default:#f)An object describing the configuration for the machine’s
environment. If theenvironmenthas a default configuration,#fmay be used. If#fis used for an environment with no default configuration, however, an error will be thrown.
- Data Type: machine-ssh-configuration
This is the data type representing the SSH client parameters for a machine with an
environmentofmanaged-host-environment-type.host-namebuild-locally?(default:#t)If false, system derivations will be built on the machine being deployed to.
系统The system type describing the architecture of the machine being deployed to—e.g.,
"x86_64-linux".authorize?(default:#t)If true, the coordinator’s signing key will be added to the remote’s ACL keyring.
port(默认值:22)user(default:"root")identity(default:#f)If specified, the path to the SSH private key to use to authenticate with the remote host.
host-key(default:#f)This should be the SSH host key of the machine, which looks like this:
ssh-ed25519 AAAAC3Nz… root@example.org
When
host-keyis#f, the server is authenticated against the ~/.ssh/known_hosts file, just like the OpenSSHsshclient does.allow-downgrades?(default:#f)Whether to allow potential downgrades.
Like
guix system reconfigure,guix deploycompares the channel commits currently deployed on the remote host (as returned byguix system describe) to those currently in use (as returned byguix describe) to determine whether commits currently in use are descendants of those deployed. When this is not the case andallow-downgrades?is false, it raises an error. This ensures you do not accidentally downgrade remote machines.safety-checks?(default:#t)Whether to perform “safety checks” before deployment. This includes verifying that devices and file systems referred to in the operating system configuration actually exist on the target machine, and making sure that Linux modules required to access storage devices at boot time are listed in the
initrd-modulesfield of the operating system.These safety checks ensure that you do not inadvertently deploy a system that would fail to boot. Be careful before turning them off!
- Data Type: digital-ocean-configuration
This is the data type describing the Droplet that should be created for a machine with an
environmentofdigital-ocean-environment-type.ssh-keyThe path to the SSH private key to use to authenticate with the remote host. In the future, this field may not exist.
tagsA list of string “tags” that uniquely identify the machine. Must be given such that no two machines in the deployment have the same set of tags.
regionA Digital Ocean region slug, such as
"nyc3".sizeA Digital Ocean size slug, such as
"s-1vcpu-1gb"enable-ipv6?Whether or not the droplet should be created with IPv6 networking.
Next: 定义服务, Previous: Invoking guix deploy, Up: 系统配置 [Contents][Index]
12.17 Running Guix in a Virtual Machine
To run Guix in a virtual machine (VM), one can use the pre-built Guix VM image distributed at https://ftp.gnu.org/gnu/guix/guix-system-vm-image-1.4.0.x86_64-linux.qcow2. This image is a compressed image in QCOW format. You can pass it to an emulator such as QEMU (see below for details).
This image boots the Xfce graphical environment and it contains some
commonly used tools. You can install more software in the image by running
guix package in a terminal (see Invoking guix package). You
can also reconfigure the system based on its initial configuration file
available as /run/current-system/configuration.scm (see 使用配置系统).
Instead of using this pre-built image, one can also build their own image
using guix system image (see Invoking guix system).
If you built your own image, you must copy it out of the store (see 仓库) and give yourself permission to write to the copy before you can use
it. When invoking QEMU, you must choose a system emulator that is suitable
for your hardware platform. Here is a minimal QEMU invocation that will
boot the result of guix system image -t qcow2 on x86_64 hardware:
$ qemu-system-x86_64 \ -nic user,model=virtio-net-pci \ -enable-kvm -m 2048 \ -device virtio-blk,drive=myhd \ -drive if=none,file=guix-system-vm-image-1.4.0.x86_64-linux.qcow2,id=myhd
Here is what each of these options means:
qemu-system-x86_64This specifies the hardware platform to emulate. This should match the host.
-nic user,model=virtio-net-pciEnable the unprivileged user-mode network stack. The guest OS can access the host but not vice versa. This is the simplest way to get the guest OS online.
modelspecifies which network device to emulate:virtio-net-pciis a special device made for virtualized operating systems and recommended for most uses. Assuming your hardware platform is x86_64, you can get a list of available NIC models by runningqemu-system-x86_64 -nic model=help.-enable-kvmIf your system has hardware virtualization extensions, enabling the virtual machine support (KVM) of the Linux kernel will make things run faster.
-m 2048RAM available to the guest OS, in mebibytes. Defaults to 128 MiB, which may be insufficient for some operations.
-device virtio-blk,drive=myhdCreate a
virtio-blkdrive called “myhd”.virtio-blkis a “paravirtualization” mechanism for block devices that allows QEMU to achieve better performance than if it were emulating a complete disk drive. See the QEMU and KVM documentation for more info.-drive if=none,file=/tmp/qemu-image,id=myhdUse our QCOW image, the guix-system-vm-image-1.4.0.x86_64-linux.qcow2 file, as the backing store of the “myhd” drive.
The default run-vm.sh script that is returned by an invocation of
guix system vm does not add a -nic user flag by
default. To get network access from within the vm add the
(dhcp-client-service) to your system definition and start the VM
using $(guix system vm config.scm) -nic user. An important caveat
of using -nic user for networking is that ping will not
work, because it uses the ICMP protocol. You’ll have to use a different
command to check for network connectivity, for example guix
download.
12.17.1 Connecting Through SSH
To enable SSH inside a VM you need to add an SSH server like
openssh-service-type to your VM (see openssh-service-type). In addition you need to forward the SSH
port, 22 by default, to the host. You can do this with
$(guix system vm config.scm) -nic user,model=virtio-net-pci,hostfwd=tcp::10022-:22
To connect to the VM you can run
ssh -o UserKnownHostsFile=/dev/null -o StrictHostKeyChecking=no -p 10022 localhost
The -p tells ssh the port you want to connect to.
-o UserKnownHostsFile=/dev/null prevents ssh from
complaining every time you modify your config.scm file and the
-o StrictHostKeyChecking=no prevents you from having to allow a
connection to an unknown host every time you connect.
注: If you find the above ‘hostfwd’ example not to be working (e.g., your SSH client hangs attempting to connect to the mapped port of your VM), make sure that your Guix System VM has networking support, such as by using the
dhcp-client-service-typeservice type.
12.17.2 Using virt-viewer with Spice
As an alternative to the default qemu graphical client you can use
the remote-viewer from the virt-viewer package. To
connect pass the -spice port=5930,disable-ticketing flag to
qemu. See previous section for further information on how to do
this.
Spice also allows you to do some nice stuff like share your clipboard with
your VM. To enable that you’ll also have to pass the following flags to
qemu:
-device virtio-serial-pci,id=virtio-serial0,max_ports=16,bus=pci.0,addr=0x5 -chardev spicevmc,name=vdagent,id=vdagent -device virtserialport,nr=1,bus=virtio-serial0.0,chardev=vdagent,\ name=com.redhat.spice.0
You’ll also need to add the (spice-vdagent-service) to your system
definition (see Spice service).
Previous: Running Guix in a Virtual Machine, Up: 系统配置 [Contents][Index]
12.18 定义服务
The previous sections show the available services and how one can combine
them in an operating-system declaration. But how do we define them
in the first place? And what is a service anyway?
12.18.1 合成服务
Here we define a service as, broadly, something that extends the
functionality of the operating system. Often a service is a process—a
daemon—started when the system boots: a secure shell server, a Web
server, the Guix build daemon, etc. Sometimes a service is a daemon whose
execution can be triggered by another daemon—e.g., an FTP server started
by inetd or a D-Bus service activated by dbus-daemon.
Occasionally, a service does not map to a daemon. For instance, the
“account” service collects user accounts and makes sure they exist when
the system runs; the “udev” service collects device management rules and
makes them available to the eudev daemon; the /etc service populates
the /etc directory of the system.
Guix system services are connected by extensions. For instance, the
secure shell service extends the Shepherd—the initialization
system, running as PID 1—by giving it the command lines to start and
stop the secure shell daemon (see openssh-service-type); the UPower service extends the D-Bus service
by passing it its .service specification, and extends the udev
service by passing it device management rules (see upower-service); the Guix daemon service extends the Shepherd by
passing it the command lines to start and stop the daemon, and extends the
account service by passing it a list of required build user accounts
(see 基础服务).
All in all, services and their “extends” relations form a directed acyclic graph (DAG). If we represent services as boxes and extensions as arrows, a typical system might provide something like this:
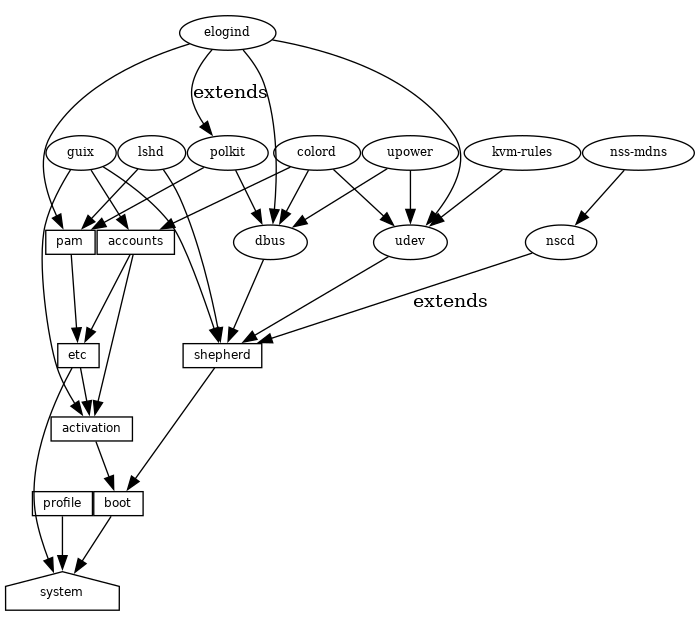
At the bottom, we see the system service, which produces the directory
containing everything to run and boot the system, as returned by the
guix system build command. See 服务参考, to learn
about the other service types shown here. See the
guix system extension-graph command, for information on how to
generate this representation for a particular operating system definition.
Technically, developers can define service types to express these
relations. There can be any number of services of a given type on the
system—for instance, a system running two instances of the GNU secure
shell server (lsh) has two instances of lsh-service-type, with
different parameters.
The following section describes the programming interface for service types and services.
12.18.2 服务类型和服务
A service type is a node in the DAG described above. Let us start
with a simple example, the service type for the Guix build daemon
(see 调用guix-daemon):
(define guix-service-type
(service-type
(name 'guix)
(extensions
(list (service-extension shepherd-root-service-type guix-shepherd-service)
(service-extension account-service-type guix-accounts)
(service-extension activation-service-type guix-activation)))
(default-value (guix-configuration))))
It defines three things:
- A name, whose sole purpose is to make inspection and debugging easier.
- A list of service extensions, where each extension designates the
target service type and a procedure that, given the parameters of the
service, returns a list of objects to extend the service of that type.
Every service type has at least one service extension. The only exception is the boot service type, which is the ultimate service.
- Optionally, a default value for instances of this type.
In this example, guix-service-type extends three services:
shepherd-root-service-typeThe
guix-shepherd-serviceprocedure defines how the Shepherd service is extended. Namely, it returns a<shepherd-service>object that defines howguix-daemonis started and stopped (see Shepherd服务).account-service-typeThis extension for this service is computed by
guix-accounts, which returns a list ofuser-groupanduser-accountobjects representing the build user accounts (see 调用guix-daemon).activation-service-typeHere
guix-activationis a procedure that returns a gexp, which is a code snippet to run at “activation time”—e.g., when the service is booted.
A service of this type is instantiated like this:
(service guix-service-type
(guix-configuration
(build-accounts 5)
(extra-options '("--gc-keep-derivations"))))
The second argument to the service form is a value representing the
parameters of this specific service instance.
See guix-configuration, for information
about the guix-configuration data type. When the value is omitted,
the default value specified by guix-service-type is used:
(service guix-service-type)
guix-service-type is quite simple because it extends other services
but is not extensible itself.
The service type for an extensible service looks like this:
(define udev-service-type
(service-type (name 'udev)
(extensions
(list (service-extension shepherd-root-service-type
udev-shepherd-service)))
(compose concatenate) ;concatenate the list of rules
(extend (lambda (config rules)
(match config
(($ <udev-configuration> udev initial-rules)
(udev-configuration
(udev udev) ;the udev package to use
(rules (append initial-rules rules)))))))))
This is the service type for the
eudev device management
daemon. Compared to the previous example, in addition to an extension of
shepherd-root-service-type, we see two new fields:
composeThis is the procedure to compose the list of extensions to services of this type.
Services can extend the udev service by passing it lists of rules; we compose those extensions simply by concatenating them.
extendThis procedure defines how the value of the service is extended with the composition of the extensions.
Udev extensions are composed into a list of rules, but the udev service value is itself a
<udev-configuration>record. So here, we extend that record by appending the list of rules it contains to the list of contributed rules.descriptionThis is a string giving an overview of the service type. The string can contain Texinfo markup (see Overview in GNU Texinfo). The
guix system searchcommand searches these strings and displays them (see Invokingguix system).
There can be only one instance of an extensible service type such as
udev-service-type. If there were more, the service-extension
specifications would be ambiguous.
Still here? The next section provides a reference of the programming interface for services.
Next: Shepherd服务, Previous: 服务类型和服务, Up: 定义服务 [Contents][Index]
12.18.3 服务参考
We have seen an overview of service types (see 服务类型和服务). This section provides a reference on how to manipulate services
and service types. This interface is provided by the (gnu services)
module.
- Scheme Procedure: service type [value]
Return a new service of type, a
<service-type>object (see below). value can be any object; it represents the parameters of this particular service instance.When value is omitted, the default value specified by type is used; if type does not specify a default value, an error is raised.
For instance, this:
(service openssh-service-type)is equivalent to this:
(service openssh-service-type (openssh-configuration))In both cases the result is an instance of
openssh-service-typewith the default configuration.
- Scheme Procedure: service? obj
Return true if obj is a service.
- Scheme Procedure: service-kind service
Return the type of service—i.e., a
<service-type>object.
- Scheme Procedure: service-value service
Return the value associated with service. It represents its parameters.
Here is an example of how a service is created and manipulated:
(define s (service nginx-service-type (nginx-configuration (nginx nginx) (log-directory log-directory) (run-directory run-directory) (file config-file)))) (service? s) ⇒ #t (eq? (service-kind s) nginx-service-type) ⇒ #t
The modify-services form provides a handy way to change the
parameters of some of the services of a list such as %base-services
(see %base-services). It evaluates to a list of
services. Of course, you could always use standard list combinators such as
map and fold to do that (see List Library in GNU Guile Reference Manual); modify-services simply provides a more
concise form for this common pattern.
- Scheme Syntax: modify-services services (type variable => body) …
-
Modify the services listed in services according to the given clauses. Each clause has the form:
(type variable => body)
where type is a service type—e.g.,
guix-service-type—and variable is an identifier that is bound within the body to the service parameters—e.g., aguix-configurationinstance—of the original service of that type.The body should evaluate to the new service parameters, which will be used to configure the new service. This new service will replace the original in the resulting list. Because a service’s service parameters are created using
define-record-type*, you can write a succinct body that evaluates to the new service parameters by using theinheritfeature thatdefine-record-type*provides.Clauses can also have the following form:
(delete type)Such a clause removes all services of the given type from services.
See 使用配置系统, for example usage.
Next comes the programming interface for service types. This is something
you want to know when writing new service definitions, but not necessarily
when simply looking for ways to customize your operating-system
declaration.
- Data Type: service-type
-
This is the representation of a service type (see 服务类型和服务).
名字This is a symbol, used only to simplify inspection and debugging.
extensionsA non-empty list of
<service-extension>objects (see below).compose(default:#f)If this is
#f, then the service type denotes services that cannot be extended—i.e., services that do not receive “values” from other services.Otherwise, it must be a one-argument procedure. The procedure is called by
fold-servicesand is passed a list of values collected from extensions. It may return any single value.extend(default:#f)If this is
#f, services of this type cannot be extended.Otherwise, it must be a two-argument procedure:
fold-servicescalls it, passing it the initial value of the service as the first argument and the result of applyingcomposeto the extension values as the second argument. It must return a value that is a valid parameter value for the service instance.descriptionThis is a string, possibly using Texinfo markup, describing in a couple of sentences what the service is about. This string allows users to find about the service through
guix system search(see Invokingguix system).default-value(default:&no-default-value)The default value associated for instances of this service type. This allows users to use the
serviceform without its second argument:(service type)The returned service in this case has the default value specified by type.
See 服务类型和服务, for examples.
- Scheme Procedure: service-extension target-type compute Return a new extension for services of type
target-type. compute must be a one-argument procedure:
fold-servicescalls it, passing it the value associated with the service that provides the extension; it must return a valid value for the target service.
- Scheme Procedure: service-extension? obj
Return true if obj is a service extension.
Occasionally, you might want to simply extend an existing service. This
involves creating a new service type and specifying the extension of
interest, which can be verbose; the simple-service procedure provides
a shorthand for this.
- Scheme Procedure: simple-service name target value
Return a service that extends target with value. This works by creating a singleton service type name, of which the returned service is an instance.
For example, this extends mcron (see 执行计划任务) with an additional job:
(simple-service 'my-mcron-job mcron-service-type #~(job '(next-hour (3)) "guix gc -F 2G"))
At the core of the service abstraction lies the fold-services
procedure, which is responsible for “compiling” a list of services down to
a single directory that contains everything needed to boot and run the
system—the directory shown by the guix system build command
(see Invoking guix system). In essence, it propagates service
extensions down the service graph, updating each node parameters on the way,
until it reaches the root node.
- Scheme Procedure: fold-services services [#:target-type system-service-type] Fold services by propagating
their extensions down to the root of type target-type; return the root service adjusted accordingly.
Lastly, the (gnu services) module also defines several essential
service types, some of which are listed below.
- Scheme Variable: system-service-type
This is the root of the service graph. It produces the system directory as returned by the
guix system buildcommand.
- Scheme Variable: boot-service-type
The type of the “boot service”, which produces the boot script. The boot script is what the initial RAM disk runs when booting.
- Scheme Variable: etc-service-type
The type of the /etc service. This service is used to create files under /etc and can be extended by passing it name/file tuples such as:
(list `("issue" ,(plain-file "issue" "Welcome!\n")))In this example, the effect would be to add an /etc/issue file pointing to the given file.
- Scheme Variable: setuid-program-service-type
Type for the “setuid-program service”. This service collects lists of executable file names, passed as gexps, and adds them to the set of setuid and setgid programs on the system (see setuid程序).
- Scheme Variable: profile-service-type
Type of the service that populates the system profile—i.e., the programs under /run/current-system/profile. Other services can extend it by passing it lists of packages to add to the system profile.
- Scheme Variable: provenance-service-type
This is the type of the service that records provenance meta-data in the system itself. It creates several files under /run/current-system:
- channels.scm
This is a “channel file” that can be passed to
guix pull -Corguix time-machine -C, and which describes the channels used to build the system, if that information was available (see 通道).- configuration.scm
This is the file that was passed as the value for this
provenance-service-typeservice. By default,guix system reconfigureautomatically passes the OS configuration file it received on the command line.- provenance
This contains the same information as the two other files but in a format that is more readily processable.
In general, these two pieces of information (channels and configuration file) are enough to reproduce the operating system “from source”.
Caveats: This information is necessary to rebuild your operating system, but it is not always sufficient. In particular, configuration.scm itself is insufficient if it is not self-contained—if it refers to external Guile modules or to extra files. If you want configuration.scm to be self-contained, we recommend that modules or files it refers to be part of a channel.
Besides, provenance meta-data is “silent” in the sense that it does not change the bits contained in your system, except for the meta-data bits themselves. Two different OS configurations or sets of channels can lead to the same system, bit-for-bit; when
provenance-service-typeis used, these two systems will have different meta-data and thus different store file names, which makes comparison less trivial.This service is automatically added to your operating system configuration when you use
guix system reconfigure,guix system init, orguix deploy.
- Scheme Variable: linux-loadable-module-service-type
Type of the service that collects lists of packages containing kernel-loadable modules, and adds them to the set of kernel-loadable modules.
This service type is intended to be extended by other service types, such as below:
(simple-service 'installing-module linux-loadable-module-service-type (list module-to-install-1 module-to-install-2))This does not actually load modules at bootup, only adds it to the kernel profile so that it can be loaded by other means.
Next: Complex Configurations, Previous: 服务参考, Up: 定义服务 [Contents][Index]
12.18.4 Shepherd服务
The (gnu services shepherd) module provides a way to define services
managed by the GNU Shepherd, which is the initialization system—the
first process that is started when the system boots, also known as
PID 1 (see Introduction in The GNU Shepherd Manual).
Services in the Shepherd can depend on each other. For instance, the SSH daemon may need to be started after the syslog daemon has been started, which in turn can only happen once all the file systems have been mounted. The simple operating system defined earlier (see 使用配置系统) results in a service graph like this:
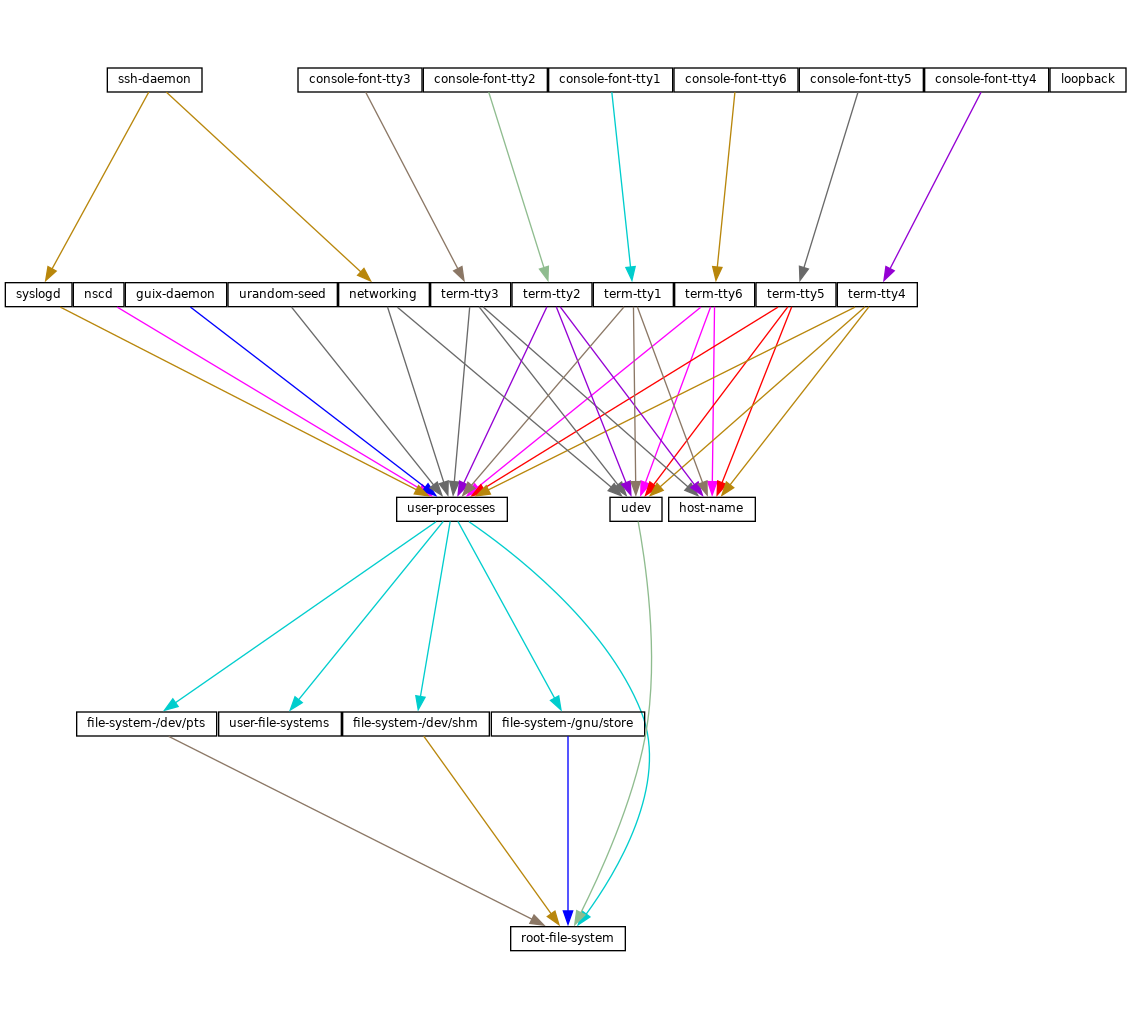
You can actually generate such a graph for any operating system definition
using the guix system shepherd-graph command
(see guix system shepherd-graph).
The %shepherd-root-service is a service object representing
PID 1, of type shepherd-root-service-type; it can be extended by
passing it lists of <shepherd-service> objects.
- Data Type: shepherd-service
The data type representing a service managed by the Shepherd.
provisionThis is a list of symbols denoting what the service provides.
These are the names that may be passed to
herd start,herd status, and similar commands (see Invoking herd in The GNU Shepherd Manual). See theprovidesslot in The GNU Shepherd Manual, for details.requirement(default:'())List of symbols denoting the Shepherd services this one depends on.
one-shot?(default:#f)Whether this service is one-shot. One-shot services stop immediately after their
startaction has completed. See Slots of services in The GNU Shepherd Manual, for more info.respawn?(default:#t)Whether to restart the service when it stops, for instance when the underlying process dies.
startstop(default:#~(const #f))The
startandstopfields refer to the Shepherd’s facilities to start and stop processes (see Service De- and Constructors in The GNU Shepherd Manual). They are given as G-expressions that get expanded in the Shepherd configuration file (see G-表达式).actions(default:'()) ¶This is a list of
shepherd-actionobjects (see below) defining actions supported by the service, in addition to the standardstartandstopactions. Actions listed here become available asherdsub-commands:herd action service [arguments…]
auto-start?(default:#t)Whether this service should be started automatically by the Shepherd. If it is
#fthe service has to be started manually withherd start.documentationA documentation string, as shown when running:
herd doc service-name
where service-name is one of the symbols in
provision(see Invoking herd in The GNU Shepherd Manual).modules(default:%default-modules)This is the list of modules that must be in scope when
startandstopare evaluated.
The example below defines a Shepherd service that spawns syslogd,
the system logger from the GNU Networking Utilities (see syslogd in GNU Inetutils):
(let ((config (plain-file "syslogd.conf" "…")))
(shepherd-service
(documentation "Run the syslog daemon (syslogd).")
(provision '(syslogd))
(requirement '(user-processes))
(start #~(make-forkexec-constructor
(list #$(file-append inetutils "/libexec/syslogd")
"--rcfile" #$config)
#:pid-file "/var/run/syslog.pid"))
(stop #~(make-kill-destructor))))
Key elements in this example are the start and stop fields:
they are staged code snippets that use the
make-forkexec-constructor procedure provided by the Shepherd and its
dual, make-kill-destructor (see Service De- and Constructors in The GNU Shepherd Manual). The start field will have
shepherd spawn syslogd with the given option; note that
we pass config after --rcfile, which is a configuration file
declared above (contents of this file are omitted). Likewise, the
stop field tells how this service is to be stopped; in this case, it
is stopped by making the kill system call on its PID. Code staging
is achieved using G-expressions: #~ stages code, while #$
“escapes” back to host code (see G-表达式).
- Data Type: shepherd-action
This is the data type that defines additional actions implemented by a Shepherd service (see above).
名字Symbol naming the action.
documentationThis is a documentation string for the action. It can be viewed by running:
herd doc service action action
procedureThis should be a gexp that evaluates to a procedure of at least one argument, which is the “running value” of the service (see Slots of services in The GNU Shepherd Manual).
The following example defines an action called
say-hellothat kindly greets the user:(shepherd-action (name 'say-hello) (documentation "Say hi!") (procedure #~(lambda (running . args) (format #t "Hello, friend! arguments: ~s\n" args) #t)))Assuming this action is added to the
exampleservice, then you can do:# herd say-hello example Hello, friend! arguments: () # herd say-hello example a b c Hello, friend! arguments: ("a" "b" "c")This, as you can see, is a fairly sophisticated way to say hello. See Service Convenience in The GNU Shepherd Manual, for more info on actions.
- Scheme Procedure: shepherd-configuration-action
Return a
configurationaction to display file, which should be the name of the service’s configuration file.It can be useful to equip services with that action. For example, the service for the Tor anonymous router (see
tor-service-type) is defined roughly like this:(let ((torrc (plain-file "torrc" …))) (shepherd-service (provision '(tor)) (requirement '(user-processes loopback syslogd)) (start #~(make-forkexec-constructor (list #$(file-append tor "/bin/tor") "-f" #$torrc) #:user "tor" #:group "tor")) (stop #~(make-kill-destructor)) (actions (list (shepherd-configuration-action torrc))) (documentation "Run the Tor anonymous network overlay.")))Thanks to this action, administrators can inspect the configuration file passed to
torwith this shell command:cat $(herd configuration tor)
This can come in as a handy debugging tool!
- Scheme Variable: shepherd-root-service-type
The service type for the Shepherd “root service”—i.e., PID 1.
This is the service type that extensions target when they want to create shepherd services (see 服务类型和服务, for an example). Each extension must pass a list of
<shepherd-service>. Its value must be ashepherd-configuration, as described below.
- Data Type: shepherd-configuration
This data type represents the Shepherd’s configuration.
shepherd (default:shepherd)The Shepherd package to use.
services (default:'())A list of
<shepherd-service>to start. You should probably use the service extension mechanism instead (see Shepherd服务).
The following example specifies the Shepherd package for the operating system:
(operating-system
;; ...
(services (append (list openssh-service-type))
;; ...
%desktop-services)
;; ...
;; Use own Shepherd package.
(essential-services
(modify-services (operating-system-default-essential-services
this-operating-system)
(shepherd-root-service-type config => (shepherd-configuration
(inherit config)
(shepherd my-shepherd))))))
- Scheme Variable: %shepherd-root-service
This service represents PID 1.
Previous: Shepherd服务, Up: 定义服务 [Contents][Index]
12.18.5 Complex Configurations
Some programs might have rather complex configuration files or formats, and
to make it easier to create Scheme bindings for these configuration files,
you can use the utilities defined in the (gnu services configuration)
module.
The main utility is the define-configuration macro, which you will
use to define a Scheme record type (see Record Overview in GNU
Guile Reference Manual). The Scheme record will be serialized to a
configuration file by using serializers, which are procedures that
take some kind of Scheme value and returns a G-expression
(see G-表达式), which should, once serialized to the disk, return a
string. More details are listed below.
- Scheme Syntax: define-configuration name clause1 clause2 ... Create a record type named
namethat contains the fields found in the clauses.
A clause can have one of the following forms:
(field-name (type default-value) documentation) (field-name (type default-value) documentation serializer) (field-name (type) documentation) (field-name (type) documentation serializer)
field-name is an identifier that denotes the name of the field in the generated record.
type is the type of the value corresponding to field-name; since Guile is untyped, a predicate procedure—
type?—will be called on the value corresponding to the field to ensure that the value is of the correct type. This means that if say, type ispackage, then a procedure namedpackage?will be applied on the value to make sure that it is indeed a<package>object.default-value is the default value corresponding to the field; if none is specified, the user is forced to provide a value when creating an object of the record type.
documentation is a string formatted with Texinfo syntax which should provide a description of what setting this field does.
serializer is the name of a procedure which takes two arguments, the first is the name of the field, and the second is the value corresponding to the field. The procedure should return a string or G-expression (see G-表达式) that represents the content that will be serialized to the configuration file. If none is specified, a procedure of the name
serialize-typewill be used.A simple serializer procedure could look like this:
(define (serialize-boolean field-name value) (let ((value (if value "true" "false"))) #~(string-append #$field-name #$value)))In some cases multiple different configuration records might be defined in the same file, but their serializers for the same type might have to be different, because they have different configuration formats. For example, the
serialize-booleanprocedure for the Getmail service would have to be different from the one for the Transmission service. To make it easier to deal with this situation, one can specify a serializer prefix by using theprefixliteral in thedefine-configurationform. This means that one doesn’t have to manually specify a custom serializer for every field.(define (foo-serialize-string field-name value) …) (define (bar-serialize-string field-name value) …) (define-configuration foo-configuration (label (string) "The name of label.") (prefix foo-)) (define-configuration bar-configuration (ip-address (string) "The IPv4 address for this device.") (prefix bar-))
However, in some cases you might not want to serialize any of the values of the record, to do this, you can use the
no-serializationliteral. There is also thedefine-configuration/no-serializationmacro which is a shorthand of this.;; Nothing will be serialized to disk. (define-configuration foo-configuration (field (string "test") "Some documentation.") (no-serialization)) ;; The same thing as above. (define-configuration/no-serialization bar-configuration (field (string "test") "Some documentation."))
- Scheme Syntax: define-maybe type
Sometimes a field should not be serialized if the user doesn’t specify a value. To achieve this, you can use the
define-maybemacro to define a “maybe type”; if the value of a maybe type is left unset, or is set to the%unset-valuevalue, then it will not be serialized.When defining a “maybe type”, the corresponding serializer for the regular type will be used by default. For example, a field of type
maybe-stringwill be serialized using theserialize-stringprocedure by default, you can of course change this by specifying a custom serializer procedure. Likewise, the type of the value would have to be a string, or left unspecified.(define-maybe string) (define (serialize-string field-name value) …) (define-configuration baz-configuration (name ;; If set to a string, the `serialize-string' procedure will be used ;; to serialize the string. Otherwise this field is not serialized. maybe-string "The name of this module."))
Like with
define-configuration, one can set a prefix for the serializer name by using theprefixliteral.(define-maybe integer (prefix baz-)) (define (baz-serialize-integer field-name value) …)
There is also the
no-serializationliteral, which when set means that no serializer will be defined for the “maybe type”, regardless of whether its value is set or not.define-maybe/no-serializationis a shorthand for specifying theno-serializationliteral.(define-maybe/no-serialization symbol) (define-configuration/no-serialization test-configuration (mode maybe-symbol "Docstring."))
- (Scheme: Procedure) maybe-value-set? value
Predicate to check whether a user explicitly specified the value of a maybe field.
- Scheme Procedure: serialize-configuration configuration fields Return a G-expression that contains the values corresponding to
the fields of configuration, a record that has been generated by
define-configuration. The G-expression can then be serialized to disk by using something likemixed-text-file.
- Scheme Procedure: empty-serializer field-name value
A serializer that just returns an empty string. The
serialize-packageprocedure is an alias for this.
Once you have defined a configuration record, you will most likely also want to document it so that other people know to use it. To help with that, there are two procedures, both of which are documented below.
- Scheme Procedure: generate-documentation documentation documentation-name Generate a Texinfo fragment from the docstrings in
documentation, a list of
(label fields sub-documentation ...). label should be a symbol and should be the name of the configuration record. fields should be a list of all the fields available for the configuration record.sub-documentation is a
(field-name configuration-name)tuple. field-name is the name of the field which takes another configuration record as its value, and configuration-name is the name of that configuration record.sub-documentation is only needed if there are nested configuration records. For example, the
getmail-configurationrecord (see 邮件服务) accepts agetmail-configuration-filerecord in one of itsrcfilefield, therefore documentation forgetmail-configuration-fileis nested ingetmail-configuration.(generate-documentation `((getmail-configuration ,getmail-configuration-fields (rcfile getmail-configuration-file)) …) 'getmail-configuration)documentation-name should be a symbol and should be the name of the configuration record.
- Scheme Procedure: configuration->documentation
configuration-symbol Take configuration-symbol, the symbol corresponding to the name used when defining a configuration record with
define-configuration, and print the Texinfo documentation of its fields. This is useful if there aren’t any nested configuration records since it only prints the documentation for the top-level fields.
As of right now, there is no automated way to generate documentation for
configuration records and put them in the manual. Instead, every time you
make a change to the docstrings of a configuration record, you have to
manually call generate-documentation or
configuration->documentation, and paste the output into the
doc/guix.texi file.
Below is an example of a record type created using
define-configuration and friends.
(use-modules (gnu services) (guix gexp) (gnu services configuration) (srfi srfi-26) (srfi srfi-1)) ;; Turn field names, which are Scheme symbols into strings (define (uglify-field-name field-name) (let ((str (symbol->string field-name))) ;; field? -> is-field (if (string-suffix? "?" str) (string-append "is-" (string-drop-right str 1)) str))) (define (serialize-string field-name value) #~(string-append #$(uglify-field-name field-name) " = " #$value "\n")) (define (serialize-integer field-name value) (serialize-string field-name (number->string value))) (define (serialize-boolean field-name value) (serialize-string field-name (if value "true" "false"))) (define (serialize-contact-name field-name value) #~(string-append "\n[" #$value "]\n")) (define (list-of-contact-configurations? lst) (every contact-configuration? lst)) (define (serialize-list-of-contact-configurations field-name value) #~(string-append #$@(map (cut serialize-configuration <> contact-configuration-fields) value))) (define (serialize-contacts-list-configuration configuration) (mixed-text-file "contactrc" #~(string-append "[Owner]\n" #$(serialize-configuration configuration contacts-list-configuration-fields)))) (define-maybe integer) (define-maybe string) (define-configuration contact-configuration (name (string) "The name of the contact." serialize-contact-name) (phone-number maybe-integer "The person's phone number.") (email maybe-string "The person's email address.") (married? (boolean) "Whether the person is married.")) (define-configuration contacts-list-configuration (name (string) "The name of the owner of this contact list.") (email (string) "The owner's email address.") (contacts (list-of-contact-configurations '()) "A list of @code{contact-configuation} records which contain information about all your contacts."))
A contacts list configuration could then be created like this:
(define my-contacts
(contacts-list-configuration
(name "Alice")
(email "alice@example.org")
(contacts
(list (contact-configuration
(name "Bob")
(phone-number 1234)
(email "bob@gnu.org")
(married? #f))
(contact-configuration
(name "Charlie")
(phone-number 0000)
(married? #t))))))
After serializing the configuration to disk, the resulting file would look like this:
[owner] name = Alice email = alice@example.org [Bob] phone-number = 1234 email = bob@gnu.org is-married = false [Charlie] phone-number = 0 is-married = true
13 Home Configuration
Guix supports declarative configuration of home environments by
utilizing the configuration mechanism described in the previous chapter
(see 定义服务), but for user’s dotfiles and packages. It works
both on Guix System and foreign distros and allows users to declare all the
packages and services that should be installed and configured for the user.
Once a user has written a file containing home-environment record,
such a configuration can be instantiated by an unprivileged user with
the guix home command (see Invoking guix home).
注: The functionality described in this section is still under development and is subject to change. Get in touch with us on guix-devel@gnu.org!
The user’s home environment usually consists of three basic parts: software,
configuration, and state. Software in mainstream distros are usually
installed system-wide, but with GNU Guix most software packages can be
installed on a per-user basis without needing root privileges, and are thus
considered part of the user’s home environment. Packages on their own
are not very useful in many cases, because often they require some
additional configuration, usually config files that reside in
XDG_CONFIG_HOME (~/.config by default) or other directories.
Everything else can be considered state, like media files, application
databases, and logs.
Using Guix for managing home environments provides a number of advantages:
- All software can be configured in one language (Guile Scheme), this gives users the ability to share values between configurations of different programs.
- A well-defined home environment is self-contained and can be created in a declarative and reproducible way—there is no need to grab external binaries or manually edit some configuration file.
- After every
guix home reconfigureinvocation, a new home environment generation will be created. This means that users can rollback to a previous home environment generation so they don’t have to worry about breaking their configuration. - It is possible to manage stateful data with Guix Home, this
includes the ability to automatically clone Git repositories on the initial
setup of the machine, and periodically running commands like
rsyncto sync data with another host. This functionality is still in an experimental stage, though.
Next: Configuring the Shell, Up: Home Configuration [Contents][Index]
13.1 Declaring the Home Environment
The home environment is configured by providing a home-environment
declaration in a file that can be passed to the guix home command
(see Invoking guix home). The easiest way to get started is by
generating an initial configuration with guix home import:
guix home import ~/src/guix-config
The guix home import command reads some of the “dot files” such
as ~/.bashrc found in your home directory and copies them to the
given directory, ~/src/guix-config in this case; it also reads the
contents of your profile, ~/.guix-profile, and, based on that, it
populates ~/src/guix-config/home-configuration.scm with a Home
configuration that resembles your current configuration.
A simple setup can include Bash and a custom text configuration, like in the example below. Don’t be afraid to declare home environment parts, which overlaps with your current dot files: before installing any configuration files, Guix Home will back up existing config files to a separate place in the home directory.
注: It is highly recommended that you manage your shell or shells with Guix Home, because it will make sure that all the necessary scripts are sourced by the shell configuration file. Otherwise you will need to do it manually. (see Configuring the Shell).
(use-modules (gnu home) (gnu home services) (gnu home services shells) (gnu services) (gnu packages admin) (guix gexp)) (home-environment (packages (list htop)) (services (list (service home-bash-service-type (home-bash-configuration (guix-defaults? #t) (bash-profile (list (plain-file "bash-profile" "\ export HISTFILE=$XDG_CACHE_HOME/.bash_history"))))) (simple-service 'test-config home-xdg-configuration-files-service-type (list `("test.conf" ,(plain-file "tmp-file.txt" "the content of ~/.config/test.conf")))))))
The packages field should be self-explanatory, it will install the
list of packages into the user’s profile. The most important field is
services, it contains a list of home services, which are the
basic building blocks of a home environment.
There is no daemon (at least not necessarily) related to a home service, a home service is just an element that is used to declare part of home environment and extend other parts of it. The extension mechanism discussed in the previous chapter (see 定义服务) should not be confused with Shepherd services (see Shepherd服务). Using this extension mechanism and some Scheme code that glues things together gives the user the freedom to declare their own, very custom, home environments.
Once the configuration looks good, you can first test it in a throw-away “container”:
guix home container config.scm
The command above spawns a shell where your home environment is running. The shell runs in a container, meaning it’s isolated from the rest of the system, so it’s a good way to try out your configuration—you can see if configuration bits are missing or misbehaving, if daemons get started, and so on. Once you exit that shell, you’re back to the prompt of your original shell “in the real world”.
Once you have a configuration file that suits your needs, you can reconfigure your home by running:
guix home reconfigure config.scm
This “builds” your home environment and creates ~/.guix-home pointing to it. Voilà!
注: Make sure the operating system has elogind, systemd, or a similar mechanism to create the XDG run-time directory and has the
XDG_RUNTIME_DIRvariable set. Failing that, the on-first-login script will not execute anything, and processes like user Shepherd and its descendants will not start.
Next: Home Services, Previous: Declaring the Home Environment, Up: Home Configuration [Contents][Index]
13.2 Configuring the Shell
This section is safe to skip if your shell or shells are managed by Guix Home. Otherwise, read it carefully.
There are a few scripts that must be evaluated by a login shell to activate
the home environment. The shell startup files only read by login shells
often have profile suffix. For more information about login shells
see Invoking Bash in The GNU Bash Reference Manual and see
Bash Startup Files in The GNU Bash Reference Manual.
The first script that needs to be sourced is setup-environment, which
sets all the necessary environment variables (including variables declared
by the user) and the second one is on-first-login, which starts
Shepherd for the current user and performs actions declared by other home
services that extends home-run-on-first-login-service-type.
Guix Home will always create ~/.profile, which contains the following lines:
HOME_ENVIRONMENT=$HOME/.guix-home . $HOME_ENVIRONMENT/setup-environment $HOME_ENVIRONMENT/on-first-login
This makes POSIX compliant login shells activate the home environment. However, in most cases this file won’t be read by most modern shells, because they are run in non POSIX mode by default and have their own *profile startup files. For example Bash will prefer ~/.bash_profile in case it exists and only if it doesn’t will it fallback to ~/.profile. Zsh (if no additional options are specified) will ignore ~/.profile, even if ~/.zprofile doesn’t exist.
To make your shell respect ~/.profile, add . ~/.profile or
source ~/.profile to the startup file for the login shell. In case
of Bash, it is ~/.bash_profile, and in case of Zsh, it is
~/.zprofile.
注: This step is only required if your shell is not managed by Guix Home. Otherwise, everything will be done automatically.
Next: Invoking guix home, Previous: Configuring the Shell, Up: Home Configuration [Contents][Index]
13.3 Home Services
A home service is not necessarily something that has a daemon and is
managed by Shepherd (see Jump Start in The GNU Shepherd
Manual), in most cases it doesn’t. It’s a simple building block of the
home environment, often declaring a set of packages to be installed in the
home environment profile, a set of config files to be symlinked into
XDG_CONFIG_HOME (~/.config by default), and environment
variables to be set by a login shell.
There is a service extension mechanism (see 合成服务) which
allows home services to extend other home services and utilize capabilities
they provide; for example: declare mcron jobs (see GNU Mcron) by extending Scheduled User’s Job Execution; declare daemons by
extending Managing User Daemons; add commands, which will be invoked
on by the Bash by extending home-bash-service-type.
A good way to discover available home services is using the guix
home search command (see Invoking guix home). After the required home
services are found, include its module with the use-modules form
(see Using Guile Modules in The GNU Guile Reference
Manual), or the #:use-modules directive (see Creating Guile Modules in The GNU Guile Reference Manual) and declare
a home service using the service function, or extend a service type
by declaring a new service with the simple-service procedure from
(gnu services).
- Essential Home Services
- Shells
- Scheduled User’s Job Execution
- Power Management Home Services
- Managing User Daemons
- Secure Shell
- Desktop Home Services
- Guix Home Services
Next: Shells, Up: Home Services [Contents][Index]
13.3.1 Essential Home Services
There are a few essential home services defined in (gnu services),
they are mostly for internal use and are required to build a home
environment, but some of them will be useful for the end user.
- Scheme Variable: home-environment-variables-service-type
The service of this type will be instantiated by every home environment automatically by default, there is no need to define it, but someone may want to extend it with a list of pairs to set some environment variables.
(list ("ENV_VAR1" . "value1") ("ENV_VAR2" . "value2"))The easiest way to extend a service type, without defining a new service type is to use the
simple-servicehelper from(gnu services).(simple-service 'some-useful-env-vars-service home-environment-variables-service-type `(("LESSHISTFILE" . "$XDG_CACHE_HOME/.lesshst") ("SHELL" . ,(file-append zsh "/bin/zsh")) ("USELESS_VAR" . #f) ("_JAVA_AWT_WM_NONREPARENTING" . #t)))If you include such a service in you home environment definition, it will add the following content to the setup-environment script (which is expected to be sourced by the login shell):
export LESSHISTFILE=$XDG_CACHE_HOME/.lesshst export SHELL=/gnu/store/2hsg15n644f0glrcbkb1kqknmmqdar03-zsh-5.8/bin/zsh export _JAVA_AWT_WM_NONREPARENTING
注: Make sure that module
(gnu packages shells)is imported withuse-modulesor any other way, this namespace contains the definition of thezshpackage, which is used in the example above.The association list (see Association Lists in The GNU Guile Reference manual) is a data structure containing key-value pairs, for
home-environment-variables-service-typethe key is always a string, the value can be a string, string-valued gexp (see G-表达式), file-like object (see file-like object) or boolean. For gexps, the variable will be set to the value of the gexp; for file-like objects, it will be set to the path of the file in the store (see 仓库); for#t, it will export the variable without any value; and for#f, it will omit variable.
- Scheme Variable: home-profile-service-type
The service of this type will be instantiated by every home environment automatically, there is no need to define it, but you may want to extend it with a list of packages if you want to install additional packages into your profile. Other services, which need to make some programs available to the user will also extend this service type.
The extension value is just a list of packages:
(list htop vim emacs)The same approach as
simple-service(see simple-service) forhome-environment-variables-service-typecan be used here, too. Make sure that modules containing the specified packages are imported withuse-modules. To find a package or information about its module useguix search(see Invokingguix package). Alternatively,specification->packagecan be used to get the package record from string without importing related module.
There are few more essential services, but users are not expected to extend them.
- Scheme Variable: home-service-type
The root of home services DAG, it generates a folder, which later will be symlinked to ~/.guix-home, it contains configurations, profile with binaries and libraries, and some necessary scripts to glue things together.
- Scheme Variable: home-run-on-first-login-service-type
The service of this type generates a Guile script, which is expected to be executed by the login shell. It is only executed if the special flag file inside
XDG_RUNTIME_DIRhasn’t been created, this prevents redundant executions of the script if multiple login shells are spawned.It can be extended with a gexp. However, to autostart an application, users should not use this service, in most cases it’s better to extend
home-shepherd-service-typewith a Shepherd service (see Shepherd服务), or extend the shell’s startup file with the required command using the appropriate service type.
- Scheme Variable: home-files-service-type
The service of this type allows to specify a list of files, which will go to ~/.guix-home/files, usually this directory contains configuration files (to be more precise it contains symlinks to files in /gnu/store), which should be placed in $XDG_CONFIG_DIR or in rare cases in $HOME. It accepts extension values in the following format:
`((".sway/config" ,sway-file-like-object) (".tmux.conf" ,(local-file "./tmux.conf")))
Each nested list contains two values: a subdirectory and file-like object. After building a home environment ~/.guix-home/files will be populated with apropiate content and all nested directories will be created accordingly, however, those files won’t go any further until some other service will do it. By default a
home-symlink-manager-service-type, which creates necessary symlinks in home folder to files from ~/.guix-home/files and backs up already existing, but clashing configs and other things, is a part of essential home services (enabled by default), but it’s possible to use alternative services to implement more advanced use cases like read-only home. Feel free to experiment and share your results.
- Scheme Variable: home-xdg-configuration-files-service-type
The service is very similiar to
home-files-service-type(and actually extends it), but used for defining files, which will go to ~/.guix-home/files/.config, which will be symlinked to $XDG_CONFIG_DIR byhome-symlink-manager-service-type(for example) during activation. It accepts extension values in the following format:`(("sway/config" ,sway-file-like-object) ;; -> ~/.guix-home/files/.config/sway/config ;; -> $XDG_CONFIG_DIR/sway/config (by symlink-manager) ("tmux/tmux.conf" ,(local-file "./tmux.conf")))
- Scheme Variable: home-activation-service-type
The service of this type generates a guile script, which runs on every
guix home reconfigureinvocation or any other action, which leads to the activation of the home environment.
- Scheme Variable: home-symlink-manager-service-type
The service of this type generates a guile script, which will be executed during activation of home environment, and do a few following steps:
- Reads the content of files/ directory of current and pending home environments.
- Cleans up all symlinks created by symlink-manager on previous activation. Also, sub-directories, which become empty also will be cleaned up.
- Creates new symlinks the following way: It looks files/ directory
(usually defined with
home-files-service-type,home-xdg-configuration-files-service-typeand maybe some others), takes the files from files/.config/ subdirectory and put respective links inXDG_CONFIG_DIR. For example symlink for files/.config/sway/config will end up in $XDG_CONFIG_DIR/sway/config. The rest files in files/ outside of files/.config/ subdirectory will be treated slightly different: symlink will just go to $HOME. files/.some-program/config will end up in $HOME/.some-program/config. - If some sub-directories are missing, they will be created.
- If there is a clashing files on the way, they will be backed up.
symlink-manager is a part of essential home services and is enabled and used by default.
Next: Scheduled User’s Job Execution, Previous: Essential Home Services, Up: Home Services [Contents][Index]
13.3.2 Shells
Shells play a quite important role in the environment initialization process, you can configure them manually as described in section Configuring the Shell, but the recommended way is to use home services listed below. It’s both easier and more reliable.
Each home environment instantiates home-shell-profile-service-type,
which creates a ~/.profile startup file for all POSIX-compatible
shells. This file contains all the necessary steps to properly initialize
the environment, but many modern shells like Bash or Zsh prefer their own
startup files, that’s why the respective home services
(home-bash-service-type and home-zsh-service-type) ensure that
~/.profile is sourced by ~/.bash_profile and
~/.zprofile, respectively.
Shell Profile Service
- Data Type: home-shell-profile-configuration
Available
home-shell-profile-configurationfields are:profile(default:()) (type: text-config)home-shell-profileis instantiated automatically byhome-environment, DO NOT create this service manually, it can only be extended.profileis a list of file-like objects, which will go to ~/.profile. By default ~/.profile contains the initialization code which must be evaluated by the login shell to make home-environment’s profile available to the user, but other commands can be added to the file if it is really necessary. In most cases shell’s configuration files are preferred places for user’s customizations. Extend home-shell-profile service only if you really know what you do.
Bash Home Service
- Data Type: home-bash-configuration
Available
home-bash-configurationfields are:package(default:bash) (type: package)The Bash package to use.
guix-defaults?(default:#t) (type: boolean)Add sane defaults like reading /etc/bashrc and coloring the output of
lsto the top of the .bashrc file.environment-variables(default:()) (type: alist)Association list of environment variables to set for the Bash session. The rules for the
home-environment-variables-service-typeapply here (see Essential Home Services). The contents of this field will be added after the contents of thebash-profilefield.aliases(default:()) (type: alist)Association list of aliases to set for the Bash session. The aliases will be defined after the contents of the
bashrcfield has been put in the .bashrc file. The alias will automatically be quoted, so something like this:'(("ls" . "ls -alF"))
turns into
alias ls="ls -alF"
bash-profile(default:()) (type: text-config)List of file-like objects, which will be added to .bash_profile. Used for executing user’s commands at start of login shell (In most cases the shell started on tty just after login). .bash_login won’t be ever read, because .bash_profile always present.
bashrc(default:()) (type: text-config)List of file-like objects, which will be added to .bashrc. Used for executing user’s commands at start of interactive shell (The shell for interactive usage started by typing
bashor by terminal app or any other program).bash-logout(default:()) (type: text-config)List of file-like objects, which will be added to .bash_logout. Used for executing user’s commands at the exit of login shell. It won’t be read in some cases (if the shell terminates by exec’ing another process for example).
You can extend the Bash service by using the home-bash-extension
configuration record, whose fields must mirror that of
home-bash-configuration (see home-bash-configuration). The
contents of the extensions will be added to the end of the corresponding
Bash configuration files (see Bash Startup Files in The GNU Bash
Reference Manual.
For example, here is how you would define a service that extends the Bash
service such that ~/.bash_profile defines an additional environment
variable, PS1:
(define bash-fancy-prompt-service
(simple-service 'bash-fancy-prompt
home-bash-service-type
(home-bash-extension
(environment-variables
'(("PS1" . "\\u \\wλ "))))))
You would then add bash-fancy-prompt-service to the list in the
services field of your home-environment. The reference of
home-bash-extension follows.
- Data Type: home-bash-extension
Available
home-bash-extensionfields are:environment-variables(default:()) (type: alist)Additional environment variables to set. These will be combined with the environment variables from other extensions and the base service to form one coherent block of environment variables.
aliases(default:()) (type: alist)Additional aliases to set. These will be combined with the aliases from other extensions and the base service.
bash-profile(default:()) (type: text-config)Additional text blocks to add to .bash_profile, which will be combined with text blocks from other extensions and the base service.
bashrc(default:()) (type: text-config)Additional text blocks to add to .bashrc, which will be combined with text blocks from other extensions and the base service.
bash-logout(default:()) (type: text-config)Additional text blocks to add to .bash_logout, which will be combined with text blocks from other extensions and the base service.
Zsh Home Service
- Data Type: home-zsh-configuration
Available
home-zsh-configurationfields are:package(default:zsh) (type: package)The Zsh package to use.
xdg-flavor?(default:#t) (type: boolean)Place all the configs to $XDG_CONFIG_HOME/zsh. Makes ~/.zshenv to set
ZDOTDIRto $XDG_CONFIG_HOME/zsh. Shell startup process will continue with $XDG_CONFIG_HOME/zsh/.zshenv.environment-variables(default:()) (type: alist)Association list of environment variables to set for the Zsh session.
zshenv(default:()) (type: text-config)List of file-like objects, which will be added to .zshenv. Used for setting user’s shell environment variables. Must not contain commands assuming the presence of tty or producing output. Will be read always. Will be read before any other file in
ZDOTDIR.zprofile(default:()) (type: text-config)List of file-like objects, which will be added to .zprofile. Used for executing user’s commands at start of login shell (In most cases the shell started on tty just after login). Will be read before .zlogin.
zshrc(default:()) (type: text-config)List of file-like objects, which will be added to .zshrc. Used for executing user’s commands at start of interactive shell (The shell for interactive usage started by typing
zshor by terminal app or any other program).zlogin(default:()) (type: text-config)List of file-like objects, which will be added to .zlogin. Used for executing user’s commands at the end of starting process of login shell.
zlogout(default:()) (type: text-config)List of file-like objects, which will be added to .zlogout. Used for executing user’s commands at the exit of login shell. It won’t be read in some cases (if the shell terminates by exec’ing another process for example).
Next: Power Management Home Services, Previous: Shells, Up: Home Services [Contents][Index]
13.3.3 Scheduled User’s Job Execution
The (gnu home services mcron) module provides an interface to
GNU mcron, a daemon to run jobs at scheduled times (see GNU mcron). The information about system’s mcron is applicable
here (see 执行计划任务), the only difference for home
services is that they have to be declared in a home-environment
record instead of an operating-system record.
- Scheme Variable: home-mcron-service-type
This is the type of the
mcronhome service, whose value is anhome-mcron-configurationobject. It allows to manage scheduled tasks.This service type can be the target of a service extension that provides additional job specifications (see 合成服务). In other words, it is possible to define services that provide additional mcron jobs to run.
- Data Type: home-mcron-configuration
Available
home-mcron-configurationfields are:mcron(default:mcron) (type: file-like)The mcron package to use.
jobs(default:()) (type: list-of-gexps)This is a list of gexps (see G-表达式), where each gexp corresponds to an mcron job specification (see mcron job specifications in GNU mcron).
log?(default:#t) (type: boolean)Log messages to standard output.
log-format(default:"~1@*~a ~a: ~a~%") (type: string)(ice-9 format)format string for log messages. The default value produces messages like "‘pid name: message"’ (see Invoking in GNU mcron). Each message is also prefixed by a timestamp by GNU Shepherd.
Next: Managing User Daemons, Previous: Scheduled User’s Job Execution, Up: Home Services [Contents][Index]
13.3.4 Power Management Home Services
The (gnu home services pm) module provides home services pertaining
to battery power.
- Scheme Variable: home-batsignal-service-type
Service for
batsignal, a program that monitors battery levels and warns the user through desktop notifications when their battery is getting low. You can also configure a command to be run when the battery level passes a point deemed “dangerous”. This service is configured with thehome-batsignal-configurationrecord.
- Data Type: home-batsignal-configuration
Data type representing the configuration for batsignal.
warning-level(default:15)The battery level to send a warning message at.
warning-message(default:#f)The message to send as a notification when the battery level reaches the
warning-level. Setting to#fuses the default message.critical-level(default:5)The battery level to send a critical message at.
critical-message(default:#f)The message to send as a notification when the battery level reaches the
critical-level. Setting to#fuses the default message.danger-level(default:2)The battery level to run the
danger-commandat.danger-command(default:#f)The command to run when the battery level reaches the
danger-level. Setting to#fdisables running the command entirely.full-level(default:#f)The battery level to send a full message at. Setting to
#fdisables sending the full message entirely.full-message(default:#f)The message to send as a notification when the battery level reaches the
full-level. Setting to#fuses the default message.batteries(default:'())The batteries to monitor. Setting to
'()tries to find batteries automatically.poll-delay(default:60)The time in seconds to wait before checking the batteries again.
icon(default:#f)A file-like object to use as the icon for battery notifications. Setting to
#fdisables notification icons entirely.notifications?(default:#t)Whether to send any notifications.
notifications-expire?(default:#f)Whether notifications sent expire after a time.
notification-command(default:#f)Command to use to send messages. Setting to
#fsends a notification throughlibnotify.ignore-missing?(default:#f)Whether to ignore missing battery errors.
Next: Secure Shell, Previous: Power Management Home Services, Up: Home Services [Contents][Index]
13.3.5 Managing User Daemons
The (gnu home services shepherd) module supports the definitions of
per-user Shepherd services (see Introduction in The GNU
Shepherd Manual). You extend home-shepherd-service-type with new
services; Guix Home then takes care of starting the shepherd daemon
for you when you log in, which in turns starts the services you asked for.
- Scheme Variable: home-shepherd-service-type
The service type for the userland Shepherd, which allows one to manage long-running processes or one-shot tasks. User’s Shepherd is not an init process (PID 1), but almost all other information described in (see Shepherd服务) is applicable here too.
This is the service type that extensions target when they want to create shepherd services (see 服务类型和服务, for an example). Each extension must pass a list of
<shepherd-service>. Its value must be ahome-shepherd-configuration, as described below.
- Data Type: home-shepherd-configuration
This data type represents the Shepherd’s configuration.
shepherd (default:shepherd)The Shepherd package to use.
auto-start? (default:#t)Whether or not to start Shepherd on first login.
services (default:'())A list of
<shepherd-service>to start. You should probably use the service extension mechanism instead (see Shepherd服务).
Next: Desktop Home Services, Previous: Managing User Daemons, Up: Home Services [Contents][Index]
13.3.6 Secure Shell
The OpenSSH package includes a client, the
ssh command, that allows you to connect to remote machines using
the SSH (secure shell) protocol. With the (gnu home services
ssh) module, you can set up OpenSSH so that it works in a predictable
fashion, almost independently of state on the local machine. To do that,
you instantiate home-openssh-service-type in your Home configuration,
as explained below.
- Scheme Variable: home-openssh-service-type
This is the type of the service to set up the OpenSSH client. It takes care of several things:
- providing a ~/.ssh/config file based on your configuration so that
sshknows about hosts you regularly connect to and their associated parameters; - providing a ~/.ssh/authorized_keys, which lists public keys that the
local SSH server,
sshd, may accept to connect to this user account; - optionally providing a ~/.ssh/known_hosts file so that ssh can authenticate hosts you connect to.
Here is an example of a service and its configuration that you could add to the
servicesfield of yourhome-environment:(service home-openssh-service-type (home-openssh-configuration (hosts (list (openssh-host (name "ci.guix.gnu.org") (user "charlie")) (openssh-host (name "chbouib") (host-name "chbouib.example.org") (user "supercharlie") (port 10022)))) (authorized-keys (list (local-file "alice.pub")))))The example above lists two hosts and their parameters. For instance, running
ssh chbouibwill automatically connect tochbouib.example.orgon port 10022, logging in as user ‘supercharlie’. Further, it marks the public key in alice.pub as authorized for incoming connections.The value associated with a
home-openssh-service-typeinstance must be ahome-openssh-configurationrecord, as describe below.- providing a ~/.ssh/config file based on your configuration so that
- Data Type: home-openssh-configuration
This is the datatype representing the OpenSSH client and server configuration in one’s home environment. It contains the following fields:
hosts(default:'())A list of
openssh-hostrecords specifying host names and associated connection parameters (see below). This host list goes into ~/.ssh/config, whichsshreads at startup.known-hosts(default:*unspecified*)This must be either:
-
*unspecified*, in which casehome-openssh-service-typeleaves it up tosshand to the user to maintain the list of known hosts at ~/.ssh/known_hosts, or - a list of file-like objects, in which case those are concatenated and emitted as ~/.ssh/known_hosts.
The ~/.ssh/known_hosts contains a list of host name/host key pairs that allow
sshto authenticate hosts you connect to and to detect possible impersonation attacks. By default,sshupdates it in a TOFU, trust-on-first-use fashion, meaning that it records the host’s key in that file the first time you connect to it. This behavior is preserved whenknown-hostsis set to*unspecified*.If you instead provide a list of host keys upfront in the
known-hostsfield, your configuration becomes self-contained and stateless: it can be replicated elsewhere or at another point in time. Preparing this list can be relatively tedious though, which is why*unspecified*is kept as a default.-
authorized-keys(default:'())This must be a list of file-like objects, each of which containing an SSH public key that should be authorized to connect to this machine.
Concretely, these files are concatenated and made available as ~/.ssh/authorized_keys. If an OpenSSH server,
sshd, is running on this machine, then it may take this file into account: this is whatsshddoes by default, but be aware that it can also be configured to ignore it.
- Data Type: openssh-host
Available
openssh-hostfields are:name(type: string)Name of this host declaration.
host-name(type: maybe-string)Host name—e.g.,
"foo.example.org"or"192.168.1.2".address-family(type: address-family)Address family to use when connecting to this host: one of
AF_INET(for IPv4 only),AF_INET6(for IPv6 only), or*unspecified*(allowing any address family).identity-file(type: maybe-string)The identity file to use—e.g.,
"/home/charlie/.ssh/id_ed25519".port(type: maybe-natural-number)TCP port number to connect to.
user(type: maybe-string)User name on the remote host.
forward-x11?(default:#f) (type: boolean)Whether to forward remote client connections to the local X11 graphical display.
forward-x11-trusted?(default:#f) (type: boolean)Whether remote X11 clients have full access to the original X11 graphical display.
forward-agent?(default:#f) (type: boolean)Whether the authentication agent (if any) is forwarded to the remote machine.
compression?(default:#f) (type: boolean)Whether to compress data in transit.
proxy-command(type: maybe-string)The command to use to connect to the server. As an example, a command to connect via an HTTP proxy at 192.0.2.0 would be:
"nc -X connect -x 192.0.2.0:8080 %h %p".host-key-algorithms(type: maybe-string-list)The list of accepted host key algorithms—e.g.,
'("ssh-ed25519").accepted-key-types(type: maybe-string-list)The list of accepted user public key types.
extra-content(default:"") (type: raw-configuration-string)Extra content appended as-is to this
Hostblock in ~/.ssh/config.
Next: Guix Home Services, Previous: Secure Shell, Up: Home Services [Contents][Index]
13.3.7 Desktop Home Services
The (gnu home services desktop) module provides services that you may
find useful on “desktop” systems running a graphical user environment such
as Xorg.
- Scheme Variable: home-redshift-service-type
This is the service type for Redshift, a program that adjusts the display color temperature according to the time of day. Its associated value must be a
home-redshift-configurationrecord, as shown below.A typical configuration, where we manually specify the latitude and longitude, might look like this:
(service home-redshift-service-type (home-redshift-configuration (location-provider 'manual) (latitude 35.81) ;northern hemisphere (longitude -0.80))) ;west of Greenwich
- Data Type: home-redshift-configuration
Available
home-redshift-configurationfields are:redshift(default:redshift) (type: file-like)Redshift package to use.
location-provider(default:geoclue2) (type: symbol)Geolocation provider—
'manualor'geoclue2. In the former case, you must also specify thelatitudeandlongitudefields so Redshift can determine daytime at your place. In the latter case, the Geoclue system service must be running; it will be queried for location information.adjustment-method(default:randr) (type: symbol)Color adjustment method.
daytime-temperature(default:6500) (type: integer)Daytime color temperature (kelvins).
nighttime-temperature(default:4500) (type: integer)Nighttime color temperature (kelvins).
daytime-brightness(type: maybe-inexact-number)Daytime screen brightness, between 0.1 and 1.0, or left unspecified.
nighttime-brightness(type: maybe-inexact-number)Nighttime screen brightness, between 0.1 and 1.0, or left unspecified.
latitude(type: maybe-inexact-number)Latitude, when
location-provideris'manual.longitude(type: maybe-inexact-number)Longitude, when
location-provideris'manual.dawn-time(type: maybe-string)Custom time for the transition from night to day in the morning—
"HH:MM"format. When specified, solar elevation is not used to determine the daytime/nighttime period.dusk-time(type: maybe-string)Likewise, custom time for the transition from day to night in the evening.
extra-content(default:"") (type: raw-configuration-string)Extra content appended as-is to the Redshift configuration file. Run
man redshiftfor more information about the configuration file format.
- Scheme Variable: home-dbus-service-type
This is the service type for running a session-specific D-Bus, for unprivileged applications that require D-Bus to be running.
- Data Type: home-dbus-configuration
The configuration record for
home-dbus-service-type.dbus(default:dbus)The package providing the
/bin/dbus-daemoncommand.
Previous: Desktop Home Services, Up: Home Services [Contents][Index]
13.3.8 Guix Home Services
The (gnu home services guix) module provides services for
user-specific Guix configuration.
- Scheme Variable: home-channels-service-type
This is the service type for managing $XDG_CONFIG_HOME/guix/channels.scm, the file that controls the channels received on
guix pull(see 通道). Its associated value is a list ofchannelrecords, defined in the(guix channels)module.Generally, it is better to extend this service than to directly configure it, as its default value is the default guix channel(s) defined by
%default-channels. If you configure this service directly, be sure to include a guix channel. See Specifying Additional Channels and Using a Custom Guix Channel for more details.A typical extension for adding a channel might look like this:
(simple-service 'variant-packages-service home-channels-service-type (list (channel (name 'variant-packages) (url "https://example.org/variant-packages.git"))))
Previous: Home Services, Up: Home Configuration [Contents][Index]
13.4 Invoking guix home
Once you have written a home environment declaration (see Declaring the Home Environment, it can be instantiated using the guix
home command. The synopsis is:
guix home options… action file
file must be the name of a file containing a home-environment
declaration. action specifies how the home environment is
instantiated, but there are few auxiliary actions which don’t instantiate
it. Currently the following values are supported:
searchDisplay available home service type definitions that match the given regular expressions, sorted by relevance:
$ guix home search shell name: home-shell-profile location: gnu/home/services/shells.scm:100:2 extends: home-files description: Create `~/.profile', which is used for environment initialization of POSIX compliant login shells. + This service type can be extended with a list of file-like objects. relevance: 6 name: home-fish location: gnu/home/services/shells.scm:640:2 extends: home-files home-profile description: Install and configure Fish, the friendly interactive shell. relevance: 3 name: home-zsh location: gnu/home/services/shells.scm:290:2 extends: home-files home-profile description: Install and configure Zsh. relevance: 1 name: home-bash location: gnu/home/services/shells.scm:508:2 extends: home-files home-profile description: Install and configure GNU Bash. relevance: 1 …
As for
guix search, the result is written inrecutilsformat, which makes it easy to filter the output (see GNU recutils databases in GNU recutils manual).容器Spawn a shell in an isolated environment—a container—containing your home as specified by file.
For example, this is how you would start an interactive shell in a container with your home:
guix home container config.scm
This is a throw-away container where you can lightheartedly fiddle with files; any changes made within the container, any process started—all this disappears as soon as you exit that shell.
As with
guix shell, several options control that container:- --network
- -N
Enable networking within the container (it is disabled by default).
- --expose=source[=target]
- --share=source[=target]
As with
guix shell, make directory source of the host system available as target inside the container—read-only if you pass --expose, and writable if you pass --share (see --expose and --share).
Additionally, you can run a command in that container, instead of spawning an interactive shell. For instance, here is how you would check which Shepherd services are started in a throw-away home container:
guix home container config.scm -- herd status
The command to run in the container must come after
--(double hyphen).editEdit or view the definition of the given Home service types.
For example, the command below opens your editor, as specified by the
EDITORenvironment variable, on the definition of thehome-mcronservice type:guix home edit home-mcron
reconfigureBuild the home environment described in file, and switch to it. Switching means that the activation script will be evaluated and (in basic scenario) symlinks to configuration files generated from
home-environmentdeclaration will be created in ~. If the file with the same path already exists in home folder it will be moved to ~/timestamp-guix-home-legacy-configs-backup, where timestamp is a current UNIX epoch time.注: It is highly recommended to run
guix pullonce before you runguix home reconfigurefor the first time (see Invokingguix pull).This effects all the configuration specified in file. The command starts Shepherd services specified in file that are not currently running; if a service is currently running, this command will arrange for it to be upgraded the next time it is stopped (e.g. by
herd stop serviceorherd restart service).This command creates a new generation whose number is one greater than the current generation (as reported by
guix home list-generations). If that generation already exists, it will be overwritten. This behavior mirrors that ofguix package(see Invokingguix package).Upon completion, the new home is deployed under ~/.guix-home. This directory contains provenance meta-data: the list of channels in use (see 通道) and file itself, when available. You can view the provenance information by running:
guix home describe
This information is useful should you later want to inspect how this particular generation was built. In fact, assuming file is self-contained, you can later rebuild generation n of your home environment with:
guix time-machine \ -C /var/guix/profiles/per-user/USER/guix-home-n-link/channels.scm -- \ home reconfigure \ /var/guix/profiles/per-user/USER/guix-home-n-link/configuration.scm
You can think of it as some sort of built-in version control! Your home is not just a binary artifact: it carries its own source.
switch-generation¶Switch to an existing home generation. This action atomically switches the home profile to the specified home generation.
The target generation can be specified explicitly by its generation number. For example, the following invocation would switch to home generation 7:
guix home switch-generation 7
The target generation can also be specified relative to the current generation with the form
+Nor-N, where+3means “3 generations ahead of the current generation,” and-1means “1 generation prior to the current generation.” When specifying a negative value such as-1, you must precede it with--to prevent it from being parsed as an option. For example:guix home switch-generation -- -1
This action will fail if the specified generation does not exist.
roll-back¶Switch to the preceding home generation. This is the inverse of
reconfigure, and it is exactly the same as invokingswitch-generationwith an argument of-1.delete-generations¶-
Delete home generations, making them candidates for garbage collection (see Invoking
guix gc, for information on how to run the “garbage collector”).This works in the same way as ‘guix package --delete-generations’ (see --delete-generations). With no arguments, all home generations but the current one are deleted:
guix home delete-generations
You can also select the generations you want to delete. The example below deletes all the home generations that are more than two months old:
guix home delete-generations 2m
buildBuild the derivation of the home environment, which includes all the configuration files and programs needed. This action does not actually install anything.
describeDescribe the current home generation: its file name, as well as provenance information when available.
To show installed packages in the current home generation’s profile, the
--list-installedflag is provided, with the same syntax that is used inguix package --list-installed(see Invokingguix package). For instance, the following command shows a table of all the packages with “emacs” in their name that are installed in the current home generation’s profile:guix home describe --list-installed=emacs
list-generationsList a summary of each generation of the home environment available on disk, in a human-readable way. This is similar to the --list-generations option of
guix package(see Invokingguix package).Optionally, one can specify a pattern, with the same syntax that is used in
guix package --list-generations, to restrict the list of generations displayed. For instance, the following command displays generations that are up to 10 days old:guix home list-generations 10d
The
--list-installedflag may also be specified, with the same syntax that is used inguix home describe. This may be helpful if trying to determine when a package was added to the home profile.importGenerate a home environment from the packages in the default profile and configuration files found in the user’s home directory. The configuration files will be copied to the specified directory, and a home-configuration.scm will be populated with the home environment. Note that not every home service that exists is supported (see Home Services).
$ guix home import ~/guix-config guix home: '/home/alice/guix-config' populated with all the Home configuration files
And there’s more! guix home also provides the following
sub-commands to visualize how the services of your home environment relate
to one another:
extension-graphEmit to standard output the service extension graph of the home environment defined in file (see 合成服务, for more information on service extensions). By default the output is in Dot/Graphviz format, but you can choose a different format with --graph-backend, as with
guix graph(see --backend):The command:
guix home extension-graph file | xdot -
shows the extension relations among services.
shepherd-graphEmit to standard output the dependency graph of shepherd services of the home environment defined in file. See Shepherd服务, for more information and for an example graph.
Again, the default output format is Dot/Graphviz, but you can pass --graph-backend to select a different one.
options can contain any of the common build options (see 普通的构建选项). In addition, options can contain one of the following:
- --expression=expr
- -e expr
Consider the home-environment expr evaluates to. This is an alternative to specifying a file which evaluates to a home environment.
- --allow-downgrades
Instruct
guix home reconfigureto allow system downgrades.Just like
guix system,guix home reconfigure, by default, prevents you from downgrading your home to older or unrelated revisions compared to the channel revisions that were used to deploy it—those shown byguix home describe. Using --allow-downgrades allows you to bypass that check, at the risk of downgrading your home—be careful!
Next: Platforms, Previous: Home Configuration, Up: GNU Guix [Contents][Index]
14 文档
In most cases packages installed with Guix come with documentation. There
are two main documentation formats: “Info”, a browsable hypertext format
used for GNU software, and “manual pages” (or “man pages”), the linear
documentation format traditionally found on Unix. Info manuals are accessed
with the info command or with Emacs, and man pages are accessed
using man.
You can look for documentation of software installed on your system by keyword. For example, the following command searches for information about “TLS” in Info manuals:
$ info -k TLS "(emacs)Network Security" -- STARTTLS "(emacs)Network Security" -- TLS "(gnutls)Core TLS API" -- gnutls_certificate_set_verify_flags "(gnutls)Core TLS API" -- gnutls_certificate_set_verify_function …
The command below searches for the same keyword in man pages34:
$ man -k TLS SSL (7) - OpenSSL SSL/TLS library certtool (1) - GnuTLS certificate tool …
These searches are purely local to your computer so you have the guarantee that documentation you find corresponds to what you have actually installed, you can access it off-line, and your privacy is respected.
Once you have these results, you can view the relevant documentation by running, say:
$ info "(gnutls)Core TLS API"
or:
$ man certtool
Info manuals contain sections and indices as well as hyperlinks like those
found in Web pages. The info reader (see Info reader in Stand-alone GNU Info) and its Emacs counterpart (see Misc
Help in The GNU Emacs Manual) provide intuitive key bindings to
navigate manuals. See Getting Started in Info: An Introduction,
for an introduction to Info navigation.
Next: Creating System Images, Previous: 文档, Up: GNU Guix [Contents][Index]
15 Platforms
The packages and systems built by Guix are intended, like most computer
programs, to run on a CPU with a specific instruction set, and under a
specific operating system. Those programs are often also targeting a
specific kernel and system library. Those constraints are captured by Guix
in platform records.
Next: Supported Platforms, Up: Platforms [Contents][Index]
15.1 platform Reference
The platform data type describes a platform: an ISA (instruction set architecture), combined with an operating system and
possibly additional system-wide settings such as the ABI (application binary interface).
- Data Type: platform
This is the data type representing a platform.
targetThis field specifies the platform’s GNU triplet as a string (see GNU configuration triplets in Autoconf).
系统This string is the system type as it is known to Guix and passed, for instance, to the --system option of most commands.
It usually has the form
"cpu-kernel", where cpu is the target CPU and kernel the target operating system kernel.It can be for instance
"aarch64-linux"or"armhf-linux". You will encounter system types when you perform native builds (see Native Builds).linux-architecture(default:#false)This optional string field is only relevant if the kernel is Linux. In that case, it corresponds to the ARCH variable used when building Linux,
"mips"for instance.glibc-dynamic-linkerThis field is the name of the GNU C Library dynamic linker for the corresponding system, as a string. It can be
"/lib/ld-linux-armhf.so.3".
Previous: platform Reference, Up: Platforms [Contents][Index]
15.2 Supported Platforms
The (guix platforms …) modules export the following variables,
each of which is bound to a platform record.
- Scheme Variable: armv7-linux
Platform targeting ARM v7 CPU running GNU/Linux.
- Scheme Variable: aarch64-linux
Platform targeting ARM v8 CPU running GNU/Linux.
- Scheme Variable: mips64-linux
Platform targeting MIPS little-endian 64-bit CPU running GNU/Linux.
- Scheme Variable: powerpc-linux
Platform targeting PowerPC big-endian 32-bit CPU running GNU/Linux.
- Scheme Variable: powerpc64le-linux
Platform targeting PowerPC little-endian 64-bit CPU running GNU/Linux.
- Scheme Variable: riscv64-linux
Platform targeting RISC-V 64-bit CPU running GNU/Linux.
- Scheme Variable: i686-linux
Platform targeting x86 CPU running GNU/Linux.
- Scheme Variable: x86_64-linux
Platform targeting x86 64-bit CPU running GNU/Linux.
- Scheme Variable: i686-mingw
Platform targeting x86 CPU running Windows, with run-time support from MinGW.
- Scheme Variable: x86_64-mingw
Platform targeting x86 64-bit CPU running Windows, with run-time support from MinGW.
- Scheme Variable: i586-gnu
Platform targeting x86 CPU running GNU/Hurd (also referred to as “GNU”).
16 Creating System Images
When it comes to installing Guix System for the first time on a new machine,
you can basically proceed in three different ways. The first one is to use
an existing operating system on the machine to run the guix system
init command (see Invoking guix system). The second one, is to produce
an installation image (see 构建安装镜像). This is a
bootable system which role is to eventually run guix system init.
Finally, the third option would be to produce an image that is a direct
instantiation of the system you wish to run. That image can then be copied
on a bootable device such as an USB drive or a memory card. The target
machine would then directly boot from it, without any kind of installation
procedure.
The guix system image command is able to turn an operating system
definition into a bootable image. This command supports different image
types, such as efi-raw, iso9660 and docker. Any modern
x86_64 machine will probably be able to boot from an iso9660
image. However, there are a few machines out there that require specific
image types. Those machines, in general using ARM processors, may
expect specific partitions at specific offsets.
This chapter explains how to define customized system images and how to turn them into actual bootable images.
Next: Instantiate an Image, Up: Creating System Images [Contents][Index]
16.1 image Reference
The image record, described right after, allows you to define a
customized bootable system image.
- Data Type: image
This is the data type representing a system image.
name(default:#false)The image name as a symbol,
'my-iso9660for instance. The name is optional and it defaults to#false.formatThe image format as a symbol. The following formats are supported:
-
disk-image, a raw disk image composed of one or multiple partitions. -
compressed-qcow2, a compressed qcow2 image composed of one or multiple partitions. -
docker, a Docker image. -
iso9660, an ISO-9660 image. -
tarball, a tar.gz image archive. -
wsl2, a WSL2 image.
-
platform(default:#false)The
platformrecord the image is targeting (see Platforms),aarch64-linuxfor instance. By default, this field is set to#falseand the image will target the host platform.size(default:'guess)The image size in bytes or
'guess. The'guesssymbol, which is the default, means that the image size will be inferred based on the image content.operating-systemThe image’s
operating-systemrecord that is instanciated.partition-table-type(default:'mbr)The image partition table type as a symbol. Possible values are
'mbrand'gpt. It default to'mbr.partitions(default:'())The image partitions as a list of
partitionrecords (seepartitionReference).compression?(default:#true)Whether the image content should be compressed, as a boolean. It defaults to
#trueand only applies to'iso9660image formats.volatile-root?(default:#true)Whether the image root partition should be made volatile, as a boolean.
This is achieved by using a RAM backed file system (overlayfs) that is mounted on top of the root partition by the initrd. It defaults to
#true. When set to#false, the image root partition is mounted as read-write partition by the initrd.shared-store?(default:#false)Whether the image’s store should be shared with the host system, as a boolean. This can be useful when creating images dedicated to virtual machines. When set to
#false, which is the default, the image’soperating-systemclosure is copied to the image. Otherwise, when set to#true, it is assumed that the host store will be made available at boot, using a9pmount for instance.shared-network?(default:#false)Whether to use the host network interfaces within the image, as a boolean. This is only used for the
'dockerimage format. It defaults to#false.substitutable?(default:#true)Whether the image derivation should be substitutable, as a boolean. It defaults to
true.
Up: image Reference [Contents][Index]
16.1.1 partition Reference
In image record may contain some partitions.
- Data Type: partition
This is the data type representing an image partition.
size(default:'guess)The partition size in bytes or
'guess. The'guesssymbol, which is the default, means that the partition size will be inferred based on the partition content.offset(default:0)The partition’s start offset in bytes, relative to the image start or the previous partition end. It defaults to
0which means that there is no offset applied.file-system(default:"ext4")The partition file system as a string, defaulting to
"ext4". The supported values are"vfat","fat16","fat32"and"ext4".file-system-options(default:'())The partition file system creation options that should be passed to the partition creation tool, as a list of strings. This is only supported when creating
"ext4"partitions.See the
"extended-options"man page section of the"mke2fs"tool for a more complete reference.labelThe partition label as a mandatory string,
"my-root"for instance.uuid(default:#false)The partition UUID as an
uuidrecord (see 文件系统). By default it is#false, which means that the partition creation tool will attribute a random UUID to the partition.flags(default:'())The partition flags as a list of symbols. Possible values are
'bootand'esp. The'bootflags should be set if you want to boot from this partition. Exactly one partition should have this flag set, usually the root one. The'espflag identifies a UEFI System Partition.initializer(default:#false)The partition initializer procedure as a gexp. This procedure is called to populate a partition. If no initializer is passed, the
initialize-root-partitionprocedure from the(gnu build image)module is used.
Next: image-type Reference, Previous: image Reference, Up: Creating System Images [Contents][Index]
16.2 Instantiate an Image
Let’s say you would like to create an MBR image with three distinct partitions:
- The ESP (EFI System Partition), a partition of 40 MiB at offset 1024 KiB with a vfat file system.
- an ext4 partition of 50 MiB data file, and labeled “data”.
- an ext4 bootable partition containing the
%simple-osoperating-system.
You would then write the following image definition in a my-image.scm
file for instance.
(use-modules (gnu) (gnu image) (gnu tests) (gnu system image) (guix gexp)) (define MiB (expt 2 20)) (image (format 'disk-image) (operating-system %simple-os) (partitions (list (partition (size (* 40 MiB)) (offset (* 1024 1024)) (label "GNU-ESP") (file-system "vfat") (flags '(esp)) (initializer (gexp initialize-efi-partition))) (partition (size (* 50 MiB)) (label "DATA") (file-system "ext4") (initializer #~(lambda* (root . rest) (mkdir root) (call-with-output-file (string-append root "/data") (lambda (port) (format port "my-data")))))) (partition (size 'guess) (label root-label) (file-system "ext4") (flags '(boot)) (initializer (gexp initialize-root-partition))))))
Note that the first and third partitions use generic initializers
procedures, initialize-efi-partition and initialize-root-partition
respectively. The initialize-efi-partition installs a GRUB EFI loader that
is loading the GRUB bootloader located in the root partition. The
initialize-root-partition instantiates a complete system as defined by the
%simple-os operating-system.
You can now run:
guix system image my-image.scm
to instantiate the image definition. That produces a disk image
which has the expected structure:
$ parted $(guix system image my-image.scm) print … Model: (file) Disk /gnu/store/yhylv1bp5b2ypb97pd3bbhz6jk5nbhxw-disk-image: 1714MB Sector size (logical/physical): 512B/512B Partition Table: msdos Disk Flags: Number Start End Size Type File system Flags 1 1049kB 43.0MB 41.9MB primary fat16 esp 2 43.0MB 95.4MB 52.4MB primary ext4 3 95.4MB 1714MB 1619MB primary ext4 boot
The size of the boot partition has been inferred to 1619MB so
that it is large enough to host the %simple-os operating-system.
You can also use existing image record definitions and inherit from
them to simplify the image definition. The (gnu system image)
module provides the following image definition variables.
- Scheme Variable: efi-disk-image
A MBR disk-image composed of two partitions: a 64 bits ESP partition and a ROOT boot partition. This image can be used on most
x86_64andi686machines, supporting BIOS or UEFI booting.
- Scheme Variable: efi32-disk-image
Same as
efi-disk-imagebut with a 32 bits EFI partition.
- Scheme Variable: iso9660-image
An ISO-9660 image composed of a single bootable partition. This image can also be used on most
x86_64andi686machines.
- Scheme Variable: docker-image
A Docker image that can be used to spawn a Docker container.
Using the efi-disk-image we can simplify our previous image
declaration this way:
(use-modules (gnu) (gnu image) (gnu tests) (gnu system image) (guix gexp) (ice-9 match)) (define MiB (expt 2 20)) (define data (partition (size (* 50 MiB)) (label "DATA") (file-system "ext4") (initializer #~(lambda* (root . rest) (mkdir root) (call-with-output-file (string-append root "/data") (lambda (port) (format port "my-data"))))))) (image (inherit efi-disk-image) (operating-system %simple-os) (partitions (match (image-partitions efi-disk-image) ((esp root) (list esp data root)))))
This will give the exact same image instantiation but the
image declaration is simpler.
Next: Image Modules, Previous: Instantiate an Image, Up: Creating System Images [Contents][Index]
16.3 image-type Reference
The guix system image command can, as we saw above, take a file
containing an image declaration as argument and produce an actual
disk image from it. The same command can also handle a file containing an
operating-system declaration as argument. In that case, how is the
operating-system turned into an image?
That’s where the image-type record intervenes. This record defines
how to transform an operating-system record into an image
record.
- Data Type: image-type
This is the data type representing an image-type.
名字The image-type name as a mandatory symbol,
'efi32-rawfor instance.constructorThe image-type constructor, as a mandatory procedure that takes an
operating-systemrecord as argument and returns animagerecord.
There are several image-type records provided by the (gnu
system image) and the (gnu system images …) modules.
- Scheme Variable: efi-raw-image-type
Build an image based on the
efi-disk-imageimage.
- Scheme Variable: efi32-raw-image-type
Build an image based on the
efi32-disk-imageimage.
- Scheme Variable: qcow2-image-type
Build an image based on the
efi-disk-imageimage but with thecompressed-qcow2image format.
- Scheme Variable: iso-image-type
Build a compressed image based on the
iso9660-imageimage.
- Scheme Variable: uncompressed-iso-image-type
Build an image based on the
iso9660-imageimage but with thecompression?field set to#false.
- Scheme Variable: docker-image-type
Build an image based on the
docker-imageimage.
- Scheme Variable: raw-with-offset-image-type
Build an MBR image with a single partition starting at a
1024KiBoffset. This is useful to leave some room to install a bootloader in the post-MBR gap.
- Scheme Variable: pinebook-pro-image-type
Build an image that is targeting the Pinebook Pro machine. The MBR image contains a single partition starting at a
9MiBoffset. Theu-boot-pinebook-pro-rk3399-bootloaderbootloader will be installed in this gap.
- Scheme Variable: rock64-image-type
Build an image that is targeting the Rock64 machine. The MBR image contains a single partition starting at a
16MiBoffset. Theu-boot-rock64-rk3328-bootloaderbootloader will be installed in this gap.
- Scheme Variable: novena-image-type
Build an image that is targeting the Novena machine. It has the same characteristics as
raw-with-offset-image-type.
- Scheme Variable: pine64-image-type
Build an image that is targeting the Pine64 machine. It has the same characteristics as
raw-with-offset-image-type.
- Scheme Variable: hurd-image-type
Build an image that is targeting a
i386machine running the Hurd kernel. The MBR image contains a single ext2 partitions with specificfile-system-optionsflags.
- Scheme Variable: hurd-qcow2-image-type
Build an image similar to the one built by the
hurd-image-typebut with theformatset to'compressed-qcow2.
- Scheme Variable: wsl2-image-type
Build an image for the WSL2 (Windows Subsystem for Linux 2). It can be imported by running:
wsl --import Guix ./guix ./wsl2-image.tar.gz wsl -d Guix
So, if we get back to the guix system image command taking an
operating-system declaration as argument. By default, the
efi-raw-image-type is used to turn the provided
operating-system into an actual bootable image.
To use a different image-type, the --image-type option can be
used. The --list-image-types option will list all the supported
image types. It turns out to be a textual listing of all the
image-types variables described just above (see Invoking guix system).
Previous: image-type Reference, Up: Creating System Images [Contents][Index]
16.4 Image Modules
Let’s take the example of the Pine64, an ARM based machine. To be able to produce an image targeting this board, we need the following elements:
- An
operating-systemrecord containing at least an appropriate kernel (linux-libre-arm64-generic) and bootloaderu-boot-pine64-lts-bootloader) for the Pine64. - Possibly, an
image-typerecord providing a way to turn anoperating-systemrecord to animagerecord suitable for the Pine64. - An actual
imagethat can be instantiated with theguix system imagecommand.
The (gnu system images pine64) module provides all those elements:
pine64-barebones-os, pine64-image-type and
pine64-barebones-raw-image respectively.
The module returns the pine64-barebones-raw-image in order for users
to be able to run:
guix system image gnu/system/images/pine64.scm
Now, thanks to the pine64-image-type record declaring the
'pine64-raw image-type, one could also prepare a
my-pine.scm file with the following content:
(use-modules (gnu system images pine64)) (operating-system (inherit pine64-barebones-os) (timezone "Europe/Athens"))
to customize the pine64-barebones-os, and run:
$ guix system image --image-type=pine64-raw my-pine.scm
Note that there are other modules in the gnu/system/images directory
targeting Novena, Pine64, PinebookPro and Rock64
machines.
Next: Using TeX and LaTeX, Previous: Creating System Images, Up: GNU Guix [Contents][Index]
17 安装调试文件
Program binaries, as produced by the GCC compilers for instance, are typically written in the ELF format, with a section containing debugging information. Debugging information is what allows the debugger, GDB, to map binary code to source code; it is required to debug a compiled program in good conditions.
This chapter explains how to use separate debug info when packages provide it, and how to rebuild packages with debug info when it’s missing.
Next: Rebuilding Debug Info, Up: 安装调试文件 [Contents][Index]
17.1 Separate Debug Info
The problem with debugging information is that is takes up a fair amount of disk space. For example, debugging information for the GNU C Library weighs in at more than 60 MiB. Thus, as a user, keeping all the debugging info of all the installed programs is usually not an option. Yet, space savings should not come at the cost of an impediment to debugging—especially in the GNU system, which should make it easier for users to exert their computing freedom (see GNU发行版).
Thankfully, the GNU Binary Utilities (Binutils) and GDB provide a mechanism that allows users to get the best of both worlds: debugging information can be stripped from the binaries and stored in separate files. GDB is then able to load debugging information from those files, when they are available (see Separate Debug Files in Debugging with GDB).
The GNU distribution takes advantage of this by storing debugging
information in the lib/debug sub-directory of a separate package
output unimaginatively called debug (see 有多个输出的软件包). Users can choose to install the debug output of a package
when they need it. For instance, the following command installs the
debugging information for the GNU C Library and for GNU Guile:
guix install glibc:debug guile:debug
GDB must then be told to look for debug files in the user’s profile, by
setting the debug-file-directory variable (consider setting it from
the ~/.gdbinit file, see Startup in Debugging with GDB):
(gdb) set debug-file-directory ~/.guix-profile/lib/debug
From there on, GDB will pick up debugging information from the .debug files under ~/.guix-profile/lib/debug.
Below is an alternative GDB script which is useful when working with other profiles. It takes advantage of the optional Guile integration in GDB. This snippet is included by default on Guix System in the ~/.gdbinit file.
guile
(use-modules (gdb))
(execute (string-append "set debug-file-directory "
(or (getenv "GDB_DEBUG_FILE_DIRECTORY")
"~/.guix-profile/lib/debug")))
end
In addition, you will most likely want GDB to be able to show the source
code being debugged. To do that, you will have to unpack the source code of
the package of interest (obtained with guix build --source,
see 调用guix build), and to point GDB to that source directory
using the directory command (see directory in Debugging with GDB).
The debug output mechanism in Guix is implemented by the
gnu-build-system (see 构建系统). Currently, it is
opt-in—debugging information is available only for the packages with
definitions explicitly declaring a debug output. To check whether a
package has a debug output, use guix package
--list-available (see Invoking guix package).
Read on for how to deal with packages lacking a debug output.
Previous: Separate Debug Info, Up: 安装调试文件 [Contents][Index]
17.2 Rebuilding Debug Info
As we saw above, some packages, but not all, provide debugging info in a
debug output. What can you do when debugging info is missing? The
--with-debug-info option provides a solution to that: it allows you
to rebuild the package(s) for which debugging info is missing—and only
those—and to graft those onto the application you’re debugging. Thus,
while it’s not as fast as installing a debug output, it is relatively
inexpensive.
Let’s illustrate that. Suppose you’re experiencing a bug in Inkscape and
would like to see what’s going on in GLib, a library that’s deep down in its
dependency graph. As it turns out, GLib does not have a debug output
and the backtrace GDB shows is all sadness:
(gdb) bt
#0 0x00007ffff5f92190 in g_getenv ()
from /gnu/store/…-glib-2.62.6/lib/libglib-2.0.so.0
#1 0x00007ffff608a7d6 in gobject_init_ctor ()
from /gnu/store/…-glib-2.62.6/lib/libgobject-2.0.so.0
#2 0x00007ffff7fe275a in call_init (l=<optimized out>, argc=argc@entry=1, argv=argv@entry=0x7fffffffcfd8,
env=env@entry=0x7fffffffcfe8) at dl-init.c:72
#3 0x00007ffff7fe2866 in call_init (env=0x7fffffffcfe8, argv=0x7fffffffcfd8, argc=1, l=<optimized out>)
at dl-init.c:118
To address that, you install Inkscape linked against a variant GLib that contains debug info:
guix install inkscape --with-debug-info=glib
This time, debugging will be a whole lot nicer:
$ gdb --args sh -c 'exec inkscape'
…
(gdb) b g_getenv
Function "g_getenv" not defined.
Make breakpoint pending on future shared library load? (y or [n]) y
Breakpoint 1 (g_getenv) pending.
(gdb) r
Starting program: /gnu/store/…-profile/bin/sh -c exec\ inkscape
…
(gdb) bt
#0 g_getenv (variable=variable@entry=0x7ffff60c7a2e "GOBJECT_DEBUG") at ../glib-2.62.6/glib/genviron.c:252
#1 0x00007ffff608a7d6 in gobject_init () at ../glib-2.62.6/gobject/gtype.c:4380
#2 gobject_init_ctor () at ../glib-2.62.6/gobject/gtype.c:4493
#3 0x00007ffff7fe275a in call_init (l=<optimized out>, argc=argc@entry=3, argv=argv@entry=0x7fffffffd088,
env=env@entry=0x7fffffffd0a8) at dl-init.c:72
…
Much better!
Note that there can be packages for which --with-debug-info will not have the desired effect. See --with-debug-info, for more information.
18 Using TeX and LaTeX
Guix provides packages for the TeX, LaTeX, ConTeXt, LuaTeX, and related typesetting systems, taken from the TeX Live distribution. However, because TeX Live is so huge and because finding your way in this maze is tricky, we thought that you, dear user, would welcome guidance on how to deploy the relevant packages so you can compile your TeX and LaTeX documents.
TeX Live currently comes in two flavors in Guix:
- The “monolithic”
texlivepackage: it comes with every single TeX Live package (more than 7,000 of them), but it is huge (more than 4 GiB for a single package!). - The “modular”
texlive-packages: you installtexlive-base, which provides core functionality and the main commands—pdflatex,dvips,luatex,mf, etc.—together with individual packages that provide just the features you need—texlive-listingsfor thelistingspackage,texlive-hyperrefforhyperref,texlive-beamerfor Beamer,texlive-pgffor PGF/TikZ, and so on.
We recommend using the modular package set because it is much less resource-hungry. To build your documents, you would use commands such as:
guix shell texlive-base texlive-wrapfig \ texlive-hyperref texlive-cm-super -- pdflatex doc.tex
You can quickly end up with unreasonably long command lines though. The solution is to instead write a manifest, for example like this one:
(specifications->manifest
'("rubber"
"texlive-base"
"texlive-wrapfig"
"texlive-microtype"
"texlive-listings" "texlive-hyperref"
;; PGF/TikZ
"texlive-pgf"
;; Additional fonts.
"texlive-cm-super" "texlive-amsfonts"
"texlive-times" "texlive-helvetic" "texlive-courier"))
You can then pass it to any command with the -m option:
guix shell -m manifest.scm -- pdflatex doc.tex
See 书写清单, for more on manifests. In the future, we plan to
provide packages for TeX Live collections—“meta-packages” such
as fontsrecommended, humanities, or langarabic that
provide the set of packages needed in this particular domain. That will
allow you to list fewer packages.
The main difficulty here is that using the modular package set forces you to
select precisely the packages that you need. You can use guix
search, but finding the right package can prove to be tedious. When a
package is missing, pdflatex and similar commands fail with an
obscure message along the lines of:
doc.tex: File `tikz.sty' not found. doc.tex:7: Emergency stop.
or, for a missing font:
kpathsea: Running mktexmf phvr7t ! I can't find file `phvr7t'.
How do you determine what the missing package is? In the first case, you’ll find the answer by running:
$ guix search texlive tikz name: texlive-pgf version: 59745 …
In the second case, guix search turns up nothing. Instead, you
can search the TeX Live package database using the tlmgr
command:
$ guix shell texlive-base -- tlmgr info phvr7t
tlmgr: cannot find package phvr7t, searching for other matches:
Packages containing `phvr7t' in their title/description:
Packages containing files matching `phvr7t':
helvetic:
texmf-dist/fonts/tfm/adobe/helvetic/phvr7t.tfm
texmf-dist/fonts/tfm/adobe/helvetic/phvr7tn.tfm
texmf-dist/fonts/vf/adobe/helvetic/phvr7t.vf
texmf-dist/fonts/vf/adobe/helvetic/phvr7tn.vf
tex4ht:
texmf-dist/tex4ht/ht-fonts/alias/adobe/helvetic/phvr7t.htf
The file is available in the TeX Live helvetic package, which is
known in Guix as texlive-helvetic. Quite a ride, but we found it!
There is one important limitation though: Guix currently provides a subset
of the TeX Live packages. If you stumble upon a missing package, you can
try and import it (see Invoking guix import):
guix import texlive package
Additional options include:
--recursive-rTraverse the dependency graph of the given upstream package recursively and generate package expressions for all those packages that are not yet in Guix.
注: TeX Live packaging is still very much work in progress, but you can help! See 贡献, for more information.
Next: 引导, Previous: Using TeX and LaTeX, Up: GNU Guix [Contents][Index]
19 安全更新
Occasionally, important security vulnerabilities are discovered in software
packages and must be patched. Guix developers try hard to keep track of
known vulnerabilities and to apply fixes as soon as possible in the
master branch of Guix (we do not yet provide a “stable” branch
containing only security updates). The guix lint tool helps
developers find out about vulnerable versions of software packages in the
distribution:
$ guix lint -c cve gnu/packages/base.scm:652:2: glibc@2.21: probably vulnerable to CVE-2015-1781, CVE-2015-7547 gnu/packages/gcc.scm:334:2: gcc@4.9.3: probably vulnerable to CVE-2015-5276 gnu/packages/image.scm:312:2: openjpeg@2.1.0: probably vulnerable to CVE-2016-1923, CVE-2016-1924 …
See Invoking guix lint, for more information.
Guix follows a functional package management discipline (see 介绍), which implies that, when a package is changed, every package that depends on it must be rebuilt. This can significantly slow down the deployment of fixes in core packages such as libc or Bash, since basically the whole distribution would need to be rebuilt. Using pre-built binaries helps (see substitutes), but deployment may still take more time than desired.
To address this, Guix implements grafts, a mechanism that allows for fast deployment of critical updates without the costs associated with a whole-distribution rebuild. The idea is to rebuild only the package that needs to be patched, and then to “graft” it onto packages explicitly installed by the user and that were previously referring to the original package. The cost of grafting is typically very low, and order of magnitudes lower than a full rebuild of the dependency chain.
For instance, suppose a security update needs to be applied to Bash. Guix
developers will provide a package definition for the “fixed” Bash, say
bash-fixed, in the usual way (see 定义软件包). Then, the
original package definition is augmented with a replacement field
pointing to the package containing the bug fix:
(define bash
(package
(name "bash")
;; …
(replacement bash-fixed)))
From there on, any package depending directly or indirectly on Bash—as
reported by guix gc --requisites (see Invoking guix gc)—that
is installed is automatically “rewritten” to refer to bash-fixed
instead of bash. This grafting process takes time proportional to
the size of the package, usually less than a minute for an “average”
package on a recent machine. Grafting is recursive: when an indirect
dependency requires grafting, then grafting “propagates” up to the package
that the user is installing.
Currently, the length of the name and version of the graft and that of the
package it replaces (bash-fixed and bash in the example above)
must be equal. This restriction mostly comes from the fact that grafting
works by patching files, including binary files, directly. Other
restrictions may apply: for instance, when adding a graft to a package
providing a shared library, the original shared library and its replacement
must have the same SONAME and be binary-compatible.
The --no-grafts command-line option allows you to forcefully avoid grafting (see --no-grafts). Thus, the command:
guix build bash --no-grafts
returns the store file name of the original Bash, whereas:
guix build bash
returns the store file name of the “fixed”, replacement Bash. This allows you to distinguish between the two variants of Bash.
To verify which Bash your whole profile refers to, you can run
(see Invoking guix gc):
guix gc -R $(readlink -f ~/.guix-profile) | grep bash
… and compare the store file names that you get with those above. Likewise for a complete Guix system generation:
guix gc -R $(guix system build my-config.scm) | grep bash
Lastly, to check which Bash running processes are using, you can use the
lsof command:
lsof | grep /gnu/store/.*bash
Next: Porting to a New Platform, Previous: 安全更新, Up: GNU Guix [Contents][Index]
20 引导
Bootstrapping in our context refers to how the distribution gets built “from nothing”. Remember that the build environment of a derivation contains nothing but its declared inputs (see 介绍). So there’s an obvious chicken-and-egg problem: how does the first package get built? How does the first compiler get compiled?
It is tempting to think of this question as one that only die-hard hackers may care about. However, while the answer to that question is technical in nature, its implications are wide-ranging. How the distribution is bootstrapped defines the extent to which we, as individuals and as a collective of users and hackers, can trust the software we run. It is a central concern from the standpoint of security and from a user freedom viewpoint.
The GNU system is primarily made of C code, with libc at its core. The GNU
build system itself assumes the availability of a Bourne shell and
command-line tools provided by GNU Coreutils, Awk, Findutils, ‘sed’, and
‘grep’. Furthermore, build programs—programs that run ./configure,
make, etc.—are written in Guile Scheme (see Derivations).
Consequently, to be able to build anything at all, from scratch, Guix relies
on pre-built binaries of Guile, GCC, Binutils, libc, and the other packages
mentioned above—the bootstrap binaries.
These bootstrap binaries are “taken for granted”, though we can also re-create them if needed (see Preparing to Use the Bootstrap Binaries).
- The Reduced Binary Seed Bootstrap
- Preparing to Use the Bootstrap Binaries
- Building the Build Tools
- Building the Bootstrap Binaries
- Reducing the Set of Bootstrap Binaries
Next: Preparing to Use the Bootstrap Binaries, Up: 引导 [Contents][Index]
20.1 The Reduced Binary Seed Bootstrap
Guix—like other GNU/Linux distributions—is traditionally bootstrapped from a set of bootstrap binaries: Bourne shell, command-line tools provided by GNU Coreutils, Awk, Findutils, ‘sed’, and ‘grep’ and Guile, GCC, Binutils, and the GNU C Library (see 引导). Usually, these bootstrap binaries are “taken for granted.”
Taking the bootstrap binaries for granted means that we consider them to be a correct and trustworthy “seed” for building the complete system. Therein lies a problem: the combined size of these bootstrap binaries is about 250MB (see Bootstrappable Builds in GNU Mes). Auditing or even inspecting these is next to impossible.
For i686-linux and x86_64-linux, Guix now features a “Reduced
Binary Seed” bootstrap 35.
The Reduced Binary Seed bootstrap removes the most critical tools—from a
trust perspective—from the bootstrap binaries: GCC, Binutils and the GNU C
Library are replaced by: bootstrap-mescc-tools (a tiny assembler and
linker) and bootstrap-mes (a small Scheme Interpreter and a C
compiler written in Scheme and the Mes C Library, built for TinyCC and for
GCC).
Using these new binary seeds the “missing” Binutils, GCC, and the GNU C Library are built from source. From here on the more traditional bootstrap process resumes. This approach has reduced the bootstrap binaries in size to about 145MB in Guix v1.1.
The next step that Guix has taken is to replace the shell and all its utilities with implementations in Guile Scheme, the Scheme-only bootstrap. Gash (see Gash in The Gash manual) is a POSIX-compatible shell that replaces Bash, and it comes with Gash Utils which has minimalist replacements for Awk, the GNU Core Utilities, Grep, Gzip, Sed, and Tar. The rest of the bootstrap binary seeds that were removed are now built from source.
Building the GNU System from source is currently only possible by adding
some historical GNU packages as intermediate steps36. As Gash and Gash Utils mature, and
GNU packages become more bootstrappable again (e.g., new releases of GNU Sed
will also ship as gzipped tarballs again, as alternative to the hard to
bootstrap xz-compression), this set of added packages can hopefully
be reduced again.
The graph below shows the resulting dependency graph for
gcc-core-mesboot0, the bootstrap compiler used for the traditional
bootstrap of the rest of the Guix System.
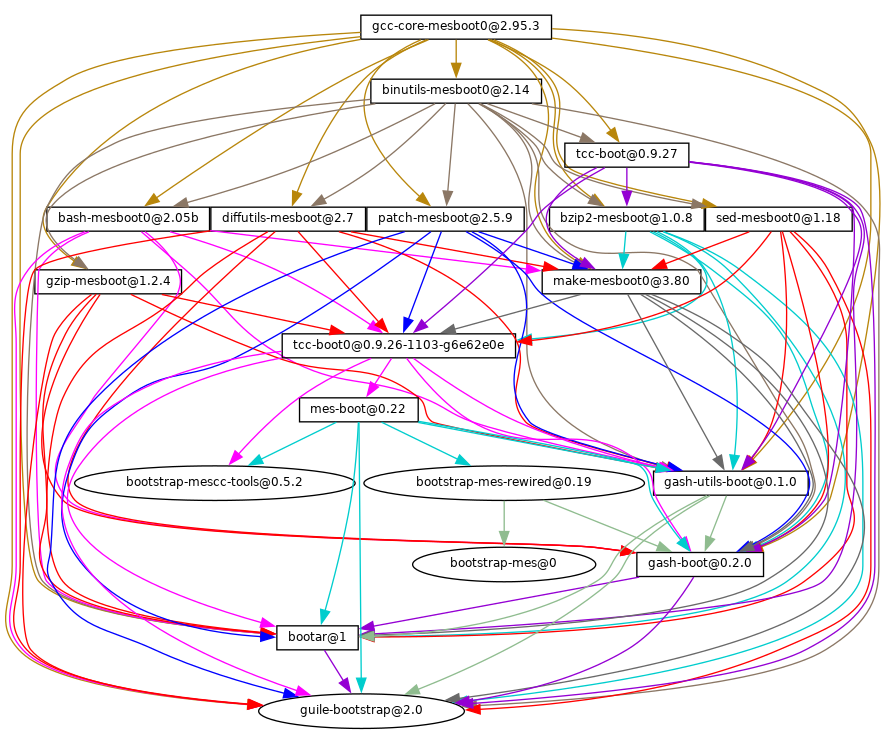
The only significant binary bootstrap seeds that remain37 are a Scheme interpreter and a Scheme compiler: GNU Mes and GNU Guile38.
This further reduction has brought down the size of the binary seed to about
60MB for i686-linux and x86_64-linux.
Work is ongoing to remove all binary blobs from our free software bootstrap
stack, working towards a Full Source Bootstrap. Also ongoing is work to
bring these bootstraps to the arm-linux and aarch64-linux
architectures and to the Hurd.
If you are interested, join us on ‘#bootstrappable’ on the Freenode IRC network or discuss on bug-mes@gnu.org or gash-devel@nongnu.org.
Previous: The Reduced Binary Seed Bootstrap, Up: 引导 [Contents][Index]
20.2 Preparing to Use the Bootstrap Binaries
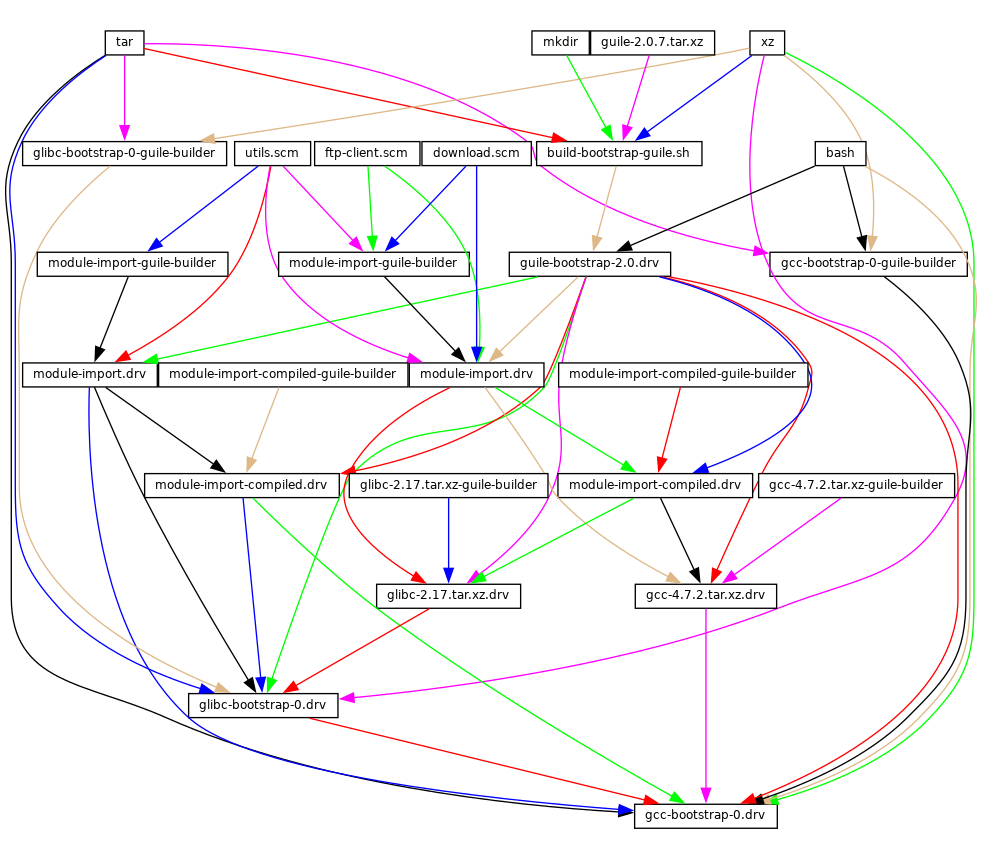
The figure above shows the very beginning of the dependency graph of the
distribution, corresponding to the package definitions of the (gnu
packages bootstrap) module. A similar figure can be generated with
guix graph (see Invoking guix graph), along the lines of:
guix graph -t derivation \ -e '(@@ (gnu packages bootstrap) %bootstrap-gcc)' \ | dot -Tps > gcc.ps
or, for the further Reduced Binary Seed bootstrap
guix graph -t derivation \ -e '(@@ (gnu packages bootstrap) %bootstrap-mes)' \ | dot -Tps > mes.ps
At this level of detail, things are slightly complex. First, Guile itself
consists of an ELF executable, along with many source and compiled Scheme
files that are dynamically loaded when it runs. This gets stored in the
guile-2.0.7.tar.xz tarball shown in this graph. This tarball is part
of Guix’s “source” distribution, and gets inserted into the store with
add-to-store (see 仓库).
But how do we write a derivation that unpacks this tarball and adds it to
the store? To solve this problem, the guile-bootstrap-2.0.drv
derivation—the first one that gets built—uses bash as its
builder, which runs build-bootstrap-guile.sh, which in turn calls
tar to unpack the tarball. Thus, bash, tar, xz,
and mkdir are statically-linked binaries, also part of the Guix
source distribution, whose sole purpose is to allow the Guile tarball to be
unpacked.
Once guile-bootstrap-2.0.drv is built, we have a functioning Guile
that can be used to run subsequent build programs. Its first task is to
download tarballs containing the other pre-built binaries—this is what the
.tar.xz.drv derivations do. Guix modules such as
ftp-client.scm are used for this purpose. The
module-import.drv derivations import those modules in a directory in
the store, using the original layout. The module-import-compiled.drv
derivations compile those modules, and write them in an output directory
with the right layout. This corresponds to the #:modules argument of
build-expression->derivation (see Derivations).
Finally, the various tarballs are unpacked by the derivations
gcc-bootstrap-0.drv, glibc-bootstrap-0.drv, or
bootstrap-mes-0.drv and bootstrap-mescc-tools-0.drv, at which
point we have a working C tool chain.
Building the Build Tools
Bootstrapping is complete when we have a full tool chain that does not
depend on the pre-built bootstrap tools discussed above. This no-dependency
requirement is verified by checking whether the files of the final tool
chain contain references to the /gnu/store directories of the
bootstrap inputs. The process that leads to this “final” tool chain is
described by the package definitions found in the (gnu packages
commencement) module.
The guix graph command allows us to “zoom out” compared to the
graph above, by looking at the level of package objects instead of
individual derivations—remember that a package may translate to several
derivations, typically one derivation to download its source, one to build
the Guile modules it needs, and one to actually build the package from
source. The command:
guix graph -t bag \
-e '(@@ (gnu packages commencement)
glibc-final-with-bootstrap-bash)' | xdot -
displays the dependency graph leading to the “final” C library39, depicted below.
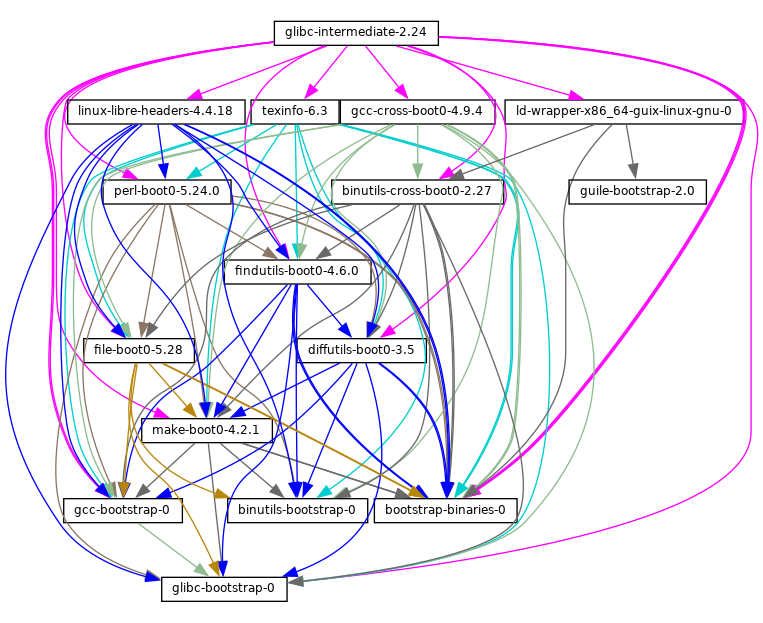
The first tool that gets built with the bootstrap binaries is
GNU Make—noted make-boot0 above—which is a prerequisite for
all the following packages. From there Findutils and Diffutils get built.
Then come the first-stage Binutils and GCC, built as pseudo cross tools—i.e., with --target equal to --host. They are used to build libc. Thanks to this cross-build trick, this libc is guaranteed not to hold any reference to the initial tool chain.
From there the final Binutils and GCC (not shown above) are built. GCC uses
ld from the final Binutils, and links programs against the
just-built libc. This tool chain is used to build the other packages used
by Guix and by the GNU Build System: Guile, Bash, Coreutils, etc.
And voilà! At this point we have the complete set of build tools that the
GNU Build System expects. These are in the %final-inputs variable of
the (gnu packages commencement) module, and are implicitly used by
any package that uses gnu-build-system (see gnu-build-system).
Building the Bootstrap Binaries
Because the final tool chain does not depend on the bootstrap binaries,
those rarely need to be updated. Nevertheless, it is useful to have an
automated way to produce them, should an update occur, and this is what the
(gnu packages make-bootstrap) module provides.
The following command builds the tarballs containing the bootstrap binaries (Binutils, GCC, glibc, for the traditional bootstrap and linux-libre-headers, bootstrap-mescc-tools, bootstrap-mes for the Reduced Binary Seed bootstrap, and Guile, and a tarball containing a mixture of Coreutils and other basic command-line tools):
guix build bootstrap-tarballs
The generated tarballs are those that should be referred to in the
(gnu packages bootstrap) module mentioned at the beginning of this
section.
Still here? Then perhaps by now you’ve started to wonder: when do we reach a fixed point? That is an interesting question! The answer is unknown, but if you would like to investigate further (and have significant computational and storage resources to do so), then let us know.
Reducing the Set of Bootstrap Binaries
Our traditional bootstrap includes GCC, GNU Libc, Guile, etc. That’s a lot of binary code! Why is that a problem? It’s a problem because these big chunks of binary code are practically non-auditable, which makes it hard to establish what source code produced them. Every unauditable binary also leaves us vulnerable to compiler backdoors as described by Ken Thompson in the 1984 paper Reflections on Trusting Trust.
This is mitigated by the fact that our bootstrap binaries were generated from an earlier Guix revision. Nevertheless it lacks the level of transparency that we get in the rest of the package dependency graph, where Guix always gives us a source-to-binary mapping. Thus, our goal is to reduce the set of bootstrap binaries to the bare minimum.
The Bootstrappable.org web site lists on-going projects to do that. One of these is about replacing the bootstrap GCC with a sequence of assemblers, interpreters, and compilers of increasing complexity, which could be built from source starting from a simple and auditable assembler.
Our first major achievement is the replacement of of GCC, the GNU C Library and Binutils by MesCC-Tools (a simple hex linker and macro assembler) and Mes (see GNU Mes Reference Manual in GNU Mes, a Scheme interpreter and C compiler in Scheme). Neither MesCC-Tools nor Mes can be fully bootstrapped yet and thus we inject them as binary seeds. We call this the Reduced Binary Seed bootstrap, as it has halved the size of our bootstrap binaries! Also, it has eliminated the C compiler binary; i686-linux and x86_64-linux Guix packages are now bootstrapped without any binary C compiler.
Work is ongoing to make MesCC-Tools and Mes fully bootstrappable and we are also looking at any other bootstrap binaries. Your help is welcome!
21 Porting to a New Platform
As discussed above, the GNU distribution is self-contained, and
self-containment is achieved by relying on pre-built “bootstrap binaries”
(see 引导). These binaries are specific to an operating system
kernel, CPU architecture, and application binary interface (ABI). Thus, to
port the distribution to a platform that is not yet supported, one must
build those bootstrap binaries, and update the (gnu packages
bootstrap) module to use them on that platform.
Fortunately, Guix can cross compile those bootstrap binaries. When everything goes well, and assuming the GNU tool chain supports the target platform, this can be as simple as running a command like this one:
guix build --target=armv5tel-linux-gnueabi bootstrap-tarballs
For this to work, it is first required to register a new platform as defined
in the (guix platform) module. A platform is making the connection
between a GNU triplet (see GNU configuration
triplets in Autoconf), the equivalent system in Nix
notation, the name of the glibc-dynamic-linker, and the corresponding
Linux architecture name if applicable (see Platforms).
Once the bootstrap tarball are built, the (gnu packages bootstrap)
module needs to be updated to refer to these binaries on the target
platform. That is, the hashes and URLs of the bootstrap tarballs for the
new platform must be added alongside those of the currently supported
platforms. The bootstrap Guile tarball is treated specially: it is expected
to be available locally, and gnu/local.mk has rules to download it
for the supported architectures; a rule for the new platform must be added
as well.
In practice, there may be some complications. First, it may be that the
extended GNU triplet that specifies an ABI (like the eabi suffix
above) is not recognized by all the GNU tools. Typically, glibc recognizes
some of these, whereas GCC uses an extra --with-abi configure flag
(see gcc.scm for examples of how to handle this). Second, some of
the required packages could fail to build for that platform. Lastly, the
generated binaries could be broken for some reason.
Next: 致谢, Previous: Porting to a New Platform, Up: GNU Guix [Contents][Index]
22 贡献
本项目是团体合作成果,我们需要您的帮助以更好地发展。请通过 guix-devel@gnu.org 邮箱和 Libera Chat
IRC 网络上的 #guix 频道联系我们。我们欢迎您的想法、Bug
反馈、补丁和任何可能对项目有帮助的贡献。我们特别欢迎帮助我们打包(see 打包指导)。
我们希望提供一个温暖、友好,并且没有骚扰的的环境,这样每个人都能尽最大努力贡献。为了这个目的,我们的项目遵循“贡献者契约”,这个契约是根据 https://contributor-covenant.org/ 制定的。你可以在源代码目录里的 CODE-OF-CONDUCT 文件里找到一份本地版。
贡献者在提交补丁和网上交流时不需要使用法律认可的名字。他们可以使用任何名字或者假名。
Next: 在安装之前运行Guix, Up: 贡献 [Contents][Index]
22.1 从Git构建
如果你想折腾Guix本身,建议使用Git仓库里最新的版本:
git clone https://git.savannah.gnu.org/git/guix.git
如何确保您获得了存储库的真实副本?为此,运行guix git authenticate,将channel
introduction(see Invoking guix git authenticate)的提交和OpenPGP指纹传递给它:
git fetch origin keyring:keyring guix git authenticate 9edb3f66fd807b096b48283debdcddccfea34bad \ "BBB0 2DDF 2CEA F6A8 0D1D E643 A2A0 6DF2 A33A 54FA"
此命令完成,若成功退出代码为零;否则打印一条错误消息,以非零代码退出。
如你所见,存在一个先有鸡还是蛋的问题:首先你需要安装Guix。更多情况,您将在另一个发行版(see 系统安装)上安装Guix系统(see 二进制文件安装)或Guix;但无论如何,您都需要在安装介质上验证OpenPGP签名。这“保证”了信任链。
设置Guix开发环境的最简单的方式当然是使用Guix!下面这些命令启动一个shell,所有的依赖和环境变量都为折腾Guix设置好了:
guix shell -D guix --pure
See Invoking guix shell, for more information on that command.
当从Git检出构建Guix时无法使用Guix,除安装指导(see 需求)里提及的软件包之外还需要这些包。
On Guix, extra dependencies can be added by instead running guix
shell:
guix shell -D guix help2man git strace --pure
From there you can generate the build system infrastructure using Autoconf and Automake:
引导
If you get an error like this one:
configure.ac:46: error: possibly undefined macro: PKG_CHECK_MODULES
它可能意味着Autoconf无法找到由pkg-config提供的pkg.m4。请确保pkg.m4可用。由Guile提供的guile.m4宏也类似。假如你的Automake安装在/usr/local,那么它不会从/usr/share里寻找.m4文件。这种情况下,你必须执行下面这个命令:
export ACLOCAL_PATH=/usr/share/aclocal
参考See Macro Search Path in The GNU Automake Manual.
Then, run:
./configure --localstatedir=/var
... where /var is the normal localstatedir value (see 仓库, for information about this). Note that you will probably not run
make install at the end (you don’t have to) but it’s still
important to pass the right localstatedir.
Finally, you can build Guix and, if you feel so inclined, run the tests (see 运行测试套件):
make make check
If anything fails, take a look at installation instructions (see 安装) or send a message to the mailing list.
From there on, you can authenticate all the commits included in your checkout by running:
make authenticate
The first run takes a couple of minutes, but subsequent runs are faster.
Or, when your configuration for your local Git repository doesn’t match the
default one, you can provide the reference for the keyring branch
through the variable GUIX_GIT_KEYRING. The following example assumes
that you have a Git remote called ‘myremote’ pointing to the official
repository:
make authenticate GUIX_GIT_KEYRING=myremote/keyring
注: You are advised to run
make authenticateafter everygit pullinvocation. This ensures you keep receiving valid changes to the repository.
After updating the repository, make might fail with an error
similar to the following example:
error: failed to load 'gnu/packages/dunst.scm': ice-9/eval.scm:293:34: In procedure abi-check: #<record-type <origin>>: record ABI mismatch; recompilation needed
This means that one of the record types that Guix defines (in this example,
the origin record) has changed, and all of guix needs to be
recompiled to take that change into account. To do so, run make
clean-go followed by make.
22.2 在安装之前运行Guix
为了保持一个合适的工作环境,你会发现在你的本地代码树里测试修改而不用安装它们会很有用。TODO: So that you can distinguish between your “end-user” hat and your “motley” costume.
To that end, all the command-line tools can be used even if you have not run
make install. To do that, you first need to have an environment with
all the dependencies available (see 从Git构建), and then simply
prefix each command with ./pre-inst-env (the pre-inst-env
script lives in the top build tree of Guix; it is generated by running
./bootstrap followed by ./configure). As an example,
here is how you would build the hello package as defined in your
working tree (this assumes guix-daemon is already running on your
system; it’s OK if it’s a different version):
$ ./pre-inst-env guix build hello
同样,一个使用 Guix 模块的 Guile 会话的例子:
$ ./pre-inst-env guile -c '(use-modules (guix utils)) (pk (%current-system))'
;;; ("x86_64-linux")
… and for a REPL (see Using Guix Interactively):
$ ./pre-inst-env guile
scheme@(guile-user)> ,use(guix)
scheme@(guile-user)> ,use(gnu)
scheme@(guile-user)> (define snakes
(fold-packages
(lambda (package lst)
(if (string-prefix? "python"
(package-name package))
(cons package lst)
lst))
'()))
scheme@(guile-user)> (length snakes)
$1 = 361
If you are hacking on the daemon and its supporting code or if
guix-daemon is not already running on your system, you can launch
it straight from the build tree40:
$ sudo -E ./pre-inst-env guix-daemon --build-users-group=guixbuild
pre-inst-env脚本设置为此好了所有必要的的环境变量,包括PATH和GUILE_LOAD_PATH。
./pre-inst-env guix pull 不
会更新本地源代码树,它只更新符号链接~/.config/guix/current (see Invoking guix pull)。如果你想更新本地源代码树,请运行git pull。
Sometimes, especially if you have recently updated your repository, running
./pre-inst-env will print a message similar to the following
example:
;;; note: source file /home/user/projects/guix/guix/progress.scm ;;; newer than compiled /home/user/projects/guix/guix/progress.go
This is only a note and you can safely ignore it. You can get rid of the
message by running make -j4. Until you do, Guile will run
slightly slower because it will interpret the code instead of using prepared
Guile object (.go) files.
You can run make automatically as you work using
watchexec from the watchexec package. For example, to
build again each time you update a package file, run ‘watchexec -w
gnu/packages -- make -j4’.
Next: 打包指导, Previous: 在安装之前运行Guix, Up: 贡献 [Contents][Index]
22.3 完美的配置
折腾 Guix 的完美配置也是折腾 Guile 的完美配置 see Using Guile in Emacs in Guile Reference Manual)。首先,你需要的不仅是一个编辑器,你需要 Emacs,以及美妙的 Geiser。为此,运行:
guix install emacs guile emacs-geiser emacs-geiser-guile
Geiser 允许在 Emacs 里进行交互式的、增长式的开发:buffer 里的代码补全和执行,获取一行的文档 (docstrings),上下文敏感的补全,M-. 跳转到对象定义,测试代码的 REPL,及更多(see Introduction in Geiser User Manual)。为了方便的 Guix 开发,请确保修改 Guile 的加载路径 (load path) 以使其能从你的项目里找到源代码文件:
;; 假设Guix项目在 ~/src/guix. (with-eval-after-load 'geiser-guile (add-to-list 'geiser-guile-load-path "~/src/guix"))
真正编辑代码时别忘了 Emacs 自带了方便的 Scheme 模式。而且,一定不要错过 Paredit。它提供了直接操作语法树的的功能,例如,用 S- 表达式替换父节点,为 S- 表达式添加、删除前后的括号,删除后面的 S- 表达式,等等。
We also provide templates for common git commit messages and package definitions in the etc/snippets directory. These templates can be used to expand short trigger strings to interactive text snippets. If you use YASnippet, you may want to add the etc/snippets/yas snippets directory to the yas-snippet-dirs variable. If you use Tempel, you may want to add the etc/snippets/tempel/* path to the tempel-path variable in Emacs.
;; Assuming the Guix checkout is in ~/src/guix. ;; Yasnippet configuration (with-eval-after-load 'yasnippet (add-to-list 'yas-snippet-dirs "~/src/guix/etc/snippets/yas")) ;; Tempel configuration (with-eval-after-load 'tempel ;; Ensure tempel-path is a list -- it may also be a string. (unless (listp 'tempel-path) (setq tempel-path (list tempel-path))) (add-to-list 'tempel-path "~/src/guix/etc/snippets/tempel/*"))
commit信息片段显示staged文件需要依赖Magit。编辑commit信息时,输入add,然后按TAB就可以插入一段用于新增软件包的模板;输入update,然后按TAB可以插入一段更新软件包的模板;输入https然后按TAB可以插入一段修改主页URI为HTTPS的模板。
scheme-mode最重要的模板可以通过输入package...,然后按TAB触发。这个片段还插入了触发字符串origin...,以进一步展开。origin片段更进一步的可能插入其它以...结尾的触发字符串,它们可以被继续展开。
We additionally provide insertion and automatic update of a copyright in etc/copyright.el. You may want to set your full name, mail, and load a file.
(setq user-full-name "Alice Doe") (setq user-mail-address "alice@mail.org") ;; Assuming the Guix checkout is in ~/src/guix. (load-file "~/src/guix/etc/copyright.el")
To insert a copyright at the current line invoke M-x guix-copyright.
To update a copyright you need to specify a copyright-names-regexp.
(setq copyright-names-regexp
(format "%s <%s>" user-full-name user-mail-address))
You can check if your copyright is up to date by evaluating M-x
copyright-update. If you want to do it automatically after each buffer
save then add (add-hook 'after-save-hook 'copyright-update) in Emacs.
22.4 打包指导
这个GNU发行版正在开发的早期阶段,可能缺少一些你喜欢的软件。这个章节介绍你可以怎样帮助这个发行版成长。
自由软件通常以源代码包的形式分发,通常是包含完整代码的tar.gz包。添加软件包到这个发行版意味着两件事:添加描述如何构建包的配方和一系列依赖软件,以及添加配方之外的软件包元数据,如一段文字描述和证书信息。
在Guix里所有这些信息都包含在软件包定义里。软件包定义提供了软件包的高层视角。它们使用Scheme编程语言编写,事实上,对每个软件包我们都定义一个绑定到软件包定义的的变量,并且从模块(see 软件包模块)中导出那个变量。然而,深入的Scheme知识不是创建软件包的前提条件。若要了解软件包的更多信息,see 定义软件包。
一旦软件包定义准备好了,并且包存在Guix代码树的一个文件里,你可以用guix build (see 调用guix build)命令测试它。假设这个新软件包的名字叫做gnew,你可以在Guix构建树里运行这个命令(see 在安装之前运行Guix):
./pre-inst-env guix build gnew --keep-failed
使用--keep-failed参数会保留失败的构建树,这可以使调试构建错误更容易。--log-file也是一个调试时很有用的参数,它可以用来访问构建日志。
如果guix命令找不到这个软件包,那可能是因为源文件包含语法错误,或者缺少导出软件包的define-public语句。为了查找错误,你可以用Guile导入这个模块以了解这个错误的详情:
./pre-inst-env guile -c '(use-modules (gnu packages gnew))'
Once your package builds correctly, please send us a patch (see 提交补丁). Well, if you need help, we will be happy to help you too. Once the patch is committed in the Guix repository, the new package automatically gets built on the supported platforms by our continuous integration system.
Users can obtain the new package definition simply by running guix
pull (see Invoking guix pull). When ci.guix.gnu.org
is done building the package, installing the package automatically downloads
binaries from there (see substitutes). The only place where human
intervention is needed is to review and apply the patch.
- 软件自由
- 软件包命名
- 版本号
- 简介和描述
- Snippets versus Phases
- Emacs Packages
- Python模块
- Perl模块
- Java包
- Rust Crates
- Elm Packages
- 字体
22.4.1 软件自由
开发 GNU 操作系统是为了用户拥有计算的自由。GNU是自由软件,这意味着它有四项重要的自由:运行程序的自由,以源代码形式学习和修改程序的自由,原样重新分发副本的自由,和分发修改后的版本的自由。GNU 发行版里包含的软件包只提供遵守这四项自由的软件。
此外,GNU 发行版遵循自由软件发行版准则。这些准则拒绝非自由的固件和对非自由软件的推荐,并讨论解决商标和专利的方法。
某些上游的软件包源代码包含一小部分违反上述准则的可选的子集,比如这个子集本身就是非自由代码。这时,这些讨厌的代码需要用合适的补丁或者软件包定义(see 定义软件包)里的origin里的代码片段移除。这样,guix build
--source就可以返回自由的源代码而不是未经修改的上游源代码。
22.4.2 软件包命名
一个软件包事实上有两个名字:第一个是Scheme变量的名字,即用define-public定义的名字。通过这个名字,软件包可以被Scheme代码找到,如用作其它软件包的输入。第二个名字是软件包定义里的name属性的字符串值。这个名字用于软件包管理命令,如:guix
package,guix build。
两个名字通常是相同的,常是上游项目名字转成小写字母并把下划线替换成连字符的结果。比如,GNUnet转成gnunet,SDL_net转成sdl-net。
A noteworthy exception to this rule is when the project name is only a
single character, or if an older maintained project with the same name
already exists—regardless of whether it has already been packaged for
Guix. Use common sense to make such names unambiguous and meaningful. For
example, Guix’s package for the shell called “s” upstream is
s-shell and not s. Feel free to ask your fellow
hackers for inspiration.
我们不给库软件包添加lib前缀,除非它是项目官方名字的一部分。但是see Python模块和Perl模块有关于Python和Perl语言的特殊规则。
字体软件包的名字处理起来不同,see 字体.
22.4.3 版本号
我们通常只为每个自由软件的最新版本打包。但是有时候,比如对于版本不兼容的库,需要有同一个软件包的两个或更多版本。它们需要使用不同的Scheme变量名。我们为最新的版本使用软件包命名里规定的名字,旧的版本使用加上后缀的名字,后缀是-和可以区分开版本号的版本号的最小前缀。
软件包定义里的名字对于同一个软件包的所有版本都是相同的,并且不含有版本号。
例如,GTK+的2.24.20和3.9.12两个版本可以这样打包:
(define-public gtk+ (package (name "gtk+") (version "3.9.12") ...)) (define-public gtk+-2 (package (name "gtk+") (version "2.24.20") ...))
如果我们还需要GTK+ 3.8.2,就这样打包
(define-public gtk+-3.8
(package
(name "gtk+")
(version "3.8.2")
...))
有时候,我们为软件包上游的版本控制系统(VCS)的快照而不是正式发布版打包。这是特殊情况,因为决定哪个是稳定版的权力应该属于上游开发者。然而,有时候这是必须的。那么,我们该如何决定写在version里的版本号呢?
显然,我们需要让VCS快照的commit ID在版本号中体现出来,但是我们也需要确保版本号单调递增,以便guix package
--upgrade决定哪个版本号更新。由于commit ID,尤其是Git的commit
ID,不是单调递增的,我们添加一个每次升级快照时都手动增长的revision数字。最后的版本号字符串看起来是这样:
2.0.11-3.cabba9e ^ ^ ^ | | `-- 上游的commit ID | | | `--- Guix软件包的revision | 最新的上游版本号
把版本号里的commit
ID截短,比如只取7个数字,是一个好主意。它避免了美学上的烦恼(假设美学在这里很重要),以及操作系统限制引起的问题(比如Linux内核的127字节)。尽管如此,在origin里最好使用完整的commit
ID,以避免混淆。通常一个软件包应该看起来是下面这样:
(define my-package
(let ((commit "c3f29bc928d5900971f65965feaae59e1272a3f7")
(revision "1")) ;Guix软件包的revision
(package
(version (git-version "0.9" revision commit))
(source (origin
(method git-fetch)
(uri (git-reference
(url "git://example.org/my-package.git")
(commit commit)))
(sha256 (base32 "1mbikn…"))
(file-name (git-file-name name version))))
;; …
)))
- Scheme Procedure: git-version VERSION REVISION COMMIT
Return the version string for packages using
git-fetch.(git-version "0.2.3" "0" "93818c936ee7e2f1ba1b315578bde363a7d43d05") ⇒ "0.2.3-0.93818c9"
- Scheme Procedure: hg-version VERSION REVISION CHANGESET
Return the version string for packages using
hg-fetch. It works in the same way asgit-version.
Next: Snippets versus Phases, Previous: 版本号, Up: 打包指导 [Contents][Index]
22.4.4 简介和描述
我们已经看到,GNU Guix里的每个软件包都包含一个简介(synopsis)和一个描述(description)(see 定义软件包)。简介和描述很重要:它们是guix package
--search搜索的信息,并且是帮助用户决定一个软件包是否符合自己需求的重要信息。因此,打包的人应该关注怎样写它们的内容。
简介必须以大写字母开头,并且不能以句号结尾。它们不能以 “a” 或者 “the” 等没有意义的词开头。例如 “File-frobbing tool” 要比 “A tool that frobs files” 更好。简介需要说明软件包是什么--如 “Core GNU utilities (file, text, shell)”,或者它的用途--如 GNU grep 的简介是 “Print lines matching a pattern”。
记住,简介必须能被广大的听众理解。例如,“以SAM格式修改对齐”可能对经验丰富的生物信息科研工作者来说能理解,但是对普通对听众则是无用的甚至是令人误解的。简介最好说明软件包应用的领域。在这个例子中,应该这样描述“修改核苷酸序列的对齐格式”,这会让用户更容易判断这是不是他们想要的。
描述应该在5至10句话之间。使用完整的句子,并且避免在未介绍的情况下使用缩写。请避免推广营销性对词汇,如“世界领先”,“行业最强”,“下一代”,并且避免高级的形容词,如“最先进的”–他们对用户寻找软件包是无用的,甚至是可疑的。相反的,尽量务实,提及用例和功能。
Descriptions can include Texinfo markup, which is useful to introduce
ornaments such as @code or @dfn, bullet lists, or hyperlinks
(see Overview in GNU Texinfo). However you should be careful
when using some characters for example ‘@’ and curly braces which are
the basic special characters in Texinfo (see Special Characters in GNU Texinfo). User interfaces such as guix show take
care of rendering it appropriately.
Synopses and descriptions are translated by volunteers at Weblate so that as many users as possible can read them in their native language. User interfaces search them and display them in the language specified by the current locale.
为了让xgettext可以把它们提取成待翻译的字符串,简介和描述必须是文字字符串。这意味着你不能使用string-append或format来合成字符串:
(package
;; …
(synopsis "这是可以翻译的")
(description (string-append "这是" "*不可以*" "翻译的")))
翻译是很繁重的工作,所以,作为打包者请更加注意你的简介和介绍,每一个改动都会增加翻译的工作量。为了帮助他们,你可以插入这类可以被他们看到的建议和指示(see xgettext Invocation in GNU Gettext):
;; TRANSLATORS: "X11 resize-and-rotate"不需要翻译。 (description "ARandR为X11 resize-and-rotate (RandR)扩展提供简单的图形界面。…")
Next: Emacs Packages, Previous: 简介和描述, Up: 打包指导 [Contents][Index]
22.4.5 Snippets versus Phases
The boundary between using an origin snippet versus a build phase to modify
the sources of a package can be elusive. Origin snippets are typically used
to remove unwanted files such as bundled libraries, nonfree sources, or to
apply simple substitutions. The source derived from an origin should
produce a source that can be used to build the package on any system that
the upstream package supports (i.e., act as the corresponding source). In
particular, origin snippets must not embed store items in the sources; such
patching should rather be done using build phases. Refer to the
origin record documentation for more information (see origin Reference).
Next: Python模块, Previous: Snippets versus Phases, Up: 打包指导 [Contents][Index]
22.4.6 Emacs Packages
Emacs packages should preferably use the Emacs build system
(see emacs-build-system), for uniformity and the benefits provided by
its build phases, such as the auto-generation of the autoloads file and the
byte compilation of the sources. Because there is no standardized way to
run a test suite for Emacs packages, tests are disabled by default. When a
test suite is available, it should be enabled by setting the #:tests?
argument to #true. By default, the command to run the test is
make check, but any command can be specified via the
#:test-command argument. The #:test-command argument expects
a list containing a command and its arguments, to be invoked during the
check phase.
The Elisp dependencies of Emacs packages are typically provided as
propagated-inputs when required at run time. As for other packages,
build or test dependencies should be specified as native-inputs.
Emacs packages sometimes depend on resources directories that should be
installed along the Elisp files. The #:include argument can be used
for that purpose, by specifying a list of regexps to match. The best
practice when using the #:include argument is to extend rather than
override its default value (accessible via the %default-include
variable). As an example, a yasnippet extension package typically include a
snippets directory, which could be copied to the installation
directory using:
#:include (cons "^snippets/" %default-include)
When encountering problems, it is wise to check for the presence of the
Package-Requires extension header in the package main source file,
and whether any dependencies and their versions listed therein are
satisfied.
Next: Perl模块, Previous: Emacs Packages, Up: 打包指导 [Contents][Index]
22.4.7 Python模块
我们目前为Python 2和Python 3打包,如版本号的规则所述,它们的Scheme变量名分别是python-2和python。为了避免和其他编程语言的冲突,Python模块的软件包名字最好含有python。
Some modules are compatible with only one version of Python, others with
both. If the package Foo is compiled with Python 3, we name it
python-foo. If it is compiled with Python 2, we name it
python2-foo. Packages should be added when they are necessary; we
don’t add Python 2 variants of the package unless we are going to use them.
如果一个项目的名字已经含有python这个单词,我们把它丢掉;例如,python-dateutil模块打包后的名字是python-dateutil和python2-dateutil。如果项目的名字以py开头(如
pytz),我们把它保留,并且添加上面所述的前缀。
注: Currently there are two different build systems for Python packages in Guix: python-build-system and pyproject-build-system. For the longest time, Python packages were built from an informally specified setup.py file. That worked amazingly well, considering Python’s success, but was difficult to build tooling around. As a result, a host of alternative build systems emerged and the community eventually settled on a formal standard for specifying build requirements. pyproject-build-system is Guix’s implementation of this standard. It is considered “experimental” in that it does not yet support all the various PEP-517 build backends, but you are encouraged to try it for new Python packages and report any problems. It will eventually be deprecated and merged into python-build-system.
22.4.7.1 指定依赖
Dependency information for Python packages is usually available in the package source tree, with varying degrees of accuracy: in the pyproject.toml file, the setup.py file, in requirements.txt, or in tox.ini (the latter mostly for test dependencies).
你在写软件包配方时的任务是把这些依赖转换成相应的“输入”(see inputs)。尽管pypi导入工具通常可以做得很好(see Invoking guix import),你可能想检查下面这个清单,以决定每个依赖放在哪儿。
- We currently package Python with
setuptoolsandpipinstalled per default. This is about to change, and users are encouraged to usepython-toolchainif they want a build environment for Python.guix lintwill warn ifsetuptoolsorpipare added as native-inputs because they are generally not necessary. - 运行时需要的Python依赖要放进
propagated-inputs。它们通常由setup.py文件里的install_requires关键字或requirements.txt文件定义。 - Python packages required only at build time—e.g., those listed under
build-system.requiresin pyproject.toml or with thesetup_requireskeyword in setup.py—or dependencies only for testing—e.g., those intests_requireor tox.ini—go intonative-inputs. The rationale is that (1) they do not need to be propagated because they are not needed at run time, and (2) in a cross-compilation context, it’s the “native” input that we’d want.例如
pytest,mock,nose测试框架。当然,如果在运行时需要这里的任何一个包,它需要被加进propagated-inputs。 - 任何不属于上述类别的包都要被加进
inputs,如,构建含有C语言扩展的Python包所需的程序和C语言库。 - 如果一个Python软件包由可选的依赖(
extras_require),由你根据它们的性价比(用处/负担)决定是否添加它们(seeguix size)。
22.4.8 Perl模块
Perl程序和其它软件包的命名规则类似,用小写的上游名字命名。对于仅包含一个类的Perl包,我们使用小写的类名,把所有的::替换成破折号,并且添加perl-前缀。所以类XML::Parser变成perl-xml-parser。包含多个类的模块保留它们上游的名字,并且添加perl-前缀。这类模块的名字通常含有perl,这个单词需要被删掉。例如,libwww-perl变成perl-libwww。
Next: Rust Crates, Previous: Perl模块, Up: 打包指导 [Contents][Index]
22.4.9 Java包
Java程序和其它软件包的命名规则类似,用小写的上游名字命名。
为了避免和其它编程语言混淆和命名冲突,Java软件包的名字最好有java-前缀。如果一个项目的名字已经含有java,我们把它删掉;例如,ngsjava打包后的名字是java-ngs。
对于仅包含一个或很少几个类的Java软件包,我们使用小写的类名,把所有的.替换成破折号,并且添加java-前缀。因此,类apache.commons.cli打包后的名字是java-apache-commons-cli。
Next: Elm Packages, Previous: Java包, Up: 打包指导 [Contents][Index]
22.4.10 Rust Crates
Rust 程序和其它软件包的命名规则类似,用小写的上游名字命名。
To prevent namespace collisions we prefix all other Rust packages with the
rust- prefix. The name should be changed to lowercase as appropriate
and dashes should remain in place.
In the rust ecosystem it is common for multiple incompatible versions of a
package to be used at any given time, so all package definitions should have
a versioned suffix. The versioned suffix is the left-most non-zero digit
(and any leading zeros, of course). This follows the “caret” version
scheme intended by Cargo. Examples rust-clap-2,
rust-rand-0.6.
Because of the difficulty in reusing rust packages as pre-compiled inputs
for other packages the Cargo build system (see cargo-build-system) presents the #:cargo-inputs and
cargo-development-inputs keywords as build system arguments. It
would be helpful to think of these as similar to propagated-inputs
and native-inputs. Rust dependencies and
build-dependencies should go in #:cargo-inputs, and
dev-dependencies should go in #:cargo-development-inputs. If
a Rust package links to other libraries then the standard placement in
inputs and the like should be used.
Care should be taken to ensure the correct version of dependencies are used;
to this end we try to refrain from skipping the tests or using
#:skip-build? when possible. Of course this is not always possible,
as the package may be developed for a different Operating System, depend on
features from the Nightly Rust compiler, or the test suite may have
atrophied since it was released.
Next: 字体, Previous: Rust Crates, Up: 打包指导 [Contents][Index]
22.4.11 Elm Packages
Elm applications can be named like other software: their names need not mention Elm.
Packages in the Elm sense (see elm-build-system under 构建系统) are required use names of the format
author/project, where both the author and the
project may contain hyphens internally, and the author sometimes
contains uppercase letters.
To form the Guix package name from the upstream name, we follow a convention
similar to Python packages (see Python模块), adding an elm-
prefix unless the name would already begin with elm-.
In many cases we can reconstruct an Elm package’s upstream name
heuristically, but, since conversion to a Guix-style name involves a loss of
information, this is not always possible. Care should be taken to add the
'upstream-name property when necessary so that ‘guix import elm’
will work correctly (see Invoking guix import). The most notable
scenarios when explicitly specifying the upstream name is necessary are:
- When the author is
elmand the project contains one or more hyphens, as withelm/virtual-dom; and - When the author contains hyphens or uppercase letters, as with
Elm-Canvas/raster-shapes—unless the author iselm-explorations, which is handled as a special case, so packages likeelm-explorations/markdowndo not need to use the'upstream-nameproperty.
The module (guix build-system elm) provides the following utilities
for working with names and related conventions:
- Scheme procedure: elm-package-origin elm-name version hash Returns a Git origin using the repository naming and tagging
regime required for a published Elm package with the upstream name elm-name at version version with sha256 checksum hash.
For example:
(package (name "elm-html") (version "1.0.0") (source (elm-package-origin "elm/html" version (base32 "15k1679ja57vvlpinpv06znmrxy09lbhzfkzdc89i01qa8c4gb4a"))) ...)
- Scheme procedure: elm->package-name elm-name
Returns the Guix-style package name for an Elm package with upstream name elm-name.
Note that there is more than one possible elm-name for which
elm->package-namewill produce a given result.
- Scheme procedure: guix-package->elm-name package
Given an Elm package, returns the possibly-inferred upstream name, or
#fthe upstream name is not specified via the'upstream-nameproperty and can not be inferred byinfer-elm-package-name.
- Scheme procedure: infer-elm-package-name guix-name
Given the guix-name of an Elm package, returns the inferred upstream name, or
#fif the upstream name can’t be inferred. If the result is not#f, supplying it toelm->package-namewould produce guix-name.
Previous: Elm Packages, Up: 打包指导 [Contents][Index]
22.4.12 字体
对于通常不会被用户安装用于排版的字体,或者随更大的软件包分发的字体,我们使用通常的命名规则。例如,这适用于X.Org系统附带的字体或TeX Live附带的字体。
为了让用户更容易搜索字体,其它仅含有字体的软件包按以下规则命名,不管上游的包名是什么。
仅含有一个字体家族的软件包需要以font-开头;如果作者名字已知,则添加作者名字和-,接着是字体家族名字(把空格替换成破折号),(和通常一样,把所有的大写字母转换成小写字母)。例如,由SIL设计的Gentium字体家族打包后的名字是font-sil-gentium。
对于一个含有多个字体家族的软件包,用集合的名字替换字体家族的名字。例如,Liberation字体含有三个家族,Liberation
Sans、Liberation Serif和Liberation
Mono。它们可以用font-liberation-sans等名字分开打包;但是由于它们以一个共同的名字分发,我们倾向于以font-liberation名字统一打包。
当同一个字体家族或字体集合的不同格式分开打包时,把破折号和格式(缩写)添加在软件包名字后面。我们用-ttf代表TrueType字体,-otf代表OpenType字体,-type1代表PostScript
Type 1字体。
22.5 代码风格
总的来说,我们的代码遵循GNU代码规范(see GNU代码规范)。但是,这个规范对Scheme的介绍不多,所以这儿提供一些额外的规则。
22.5.1 编程范例
Guix里的Scheme代码是以纯函数的风格写的。一个例外是有关输入/输出的代码,和实现底层概念的过程,如memoize过程。
22.5.2 模块
用于构建的Guile模块必须放在(guix build
…)命名空间里。它们不允许引用其它Guix或GNU模块。但是,主机端(host-side)模块可以使用构建端(build-side)模块。
关于更广的GNU系统的模块应该在(gnu …)命名空间里而不是(guix …)。
22.5.3 数据类型和模式匹配
经典的Lisp倾向于用列表表示所有的东西,然后用car,cdr,cadr等手动浏览它们。这种风格有几个问题,特别是难以阅读,易出错,并且妨碍生成合适的类型错误报告。
Guix code should define appropriate data types (for instance, using
define-record-type*) rather than abuse lists. In addition, it should
use pattern matching, via Guile’s (ice-9 match) module, especially
when matching lists (see Pattern Matching in GNU Guile Reference
Manual); pattern matching for records is better done using
match-record from (guix records), which, unlike match,
verifies field names at macro-expansion time.
22.5.4 格式化代码
When writing Scheme code, we follow common wisdom among Scheme programmers. In general, we follow the Riastradh’s Lisp Style Rules. This document happens to describe the conventions mostly used in Guile’s code too. It is very thoughtful and well written, so please do read it.
一些Guix添加的special
form,如substitute*宏,有特殊的缩进规则。它们的规则在.dir-locals.el文件里定义,Emacs会自动使用。另外,Emacs-Guix提供的guix-devel-mode模式可以正确地缩进和高亮Guix代码(see Development in Emacs-Guix参考手册)。
如果你不使用Emacs,请确保让你的编辑器知道这些规则。为了自动地缩进软件包定义,你也可以运行:
./pre-inst-env guix style package
See Invoking guix style, for more information.
如果你用Vim编辑代码,我们推荐你运行:set
autoindent,以使你在输入时自动缩进代码。另外,paredit.vim可以帮你处理括号。
我们要求所有的顶级过程附带一个docstring。这个要求对(guix build …)命名空间里的简单的私有过程可以放宽。
过程不应该有多于四个定位参数。对于接收多于四个定位参数的过程应使用关键字参数。
22.6 提交补丁
Development is done using the Git distributed version control system. Thus,
access to the repository is not strictly necessary. We welcome
contributions in the form of patches as produced by git format-patch
sent to the guix-patches@gnu.org mailing list (see Submitting
patches to a project in Git User Manual). Contributors are encouraged
to take a moment to set some Git repository options (see 配置Git) first, which can improve the readability of patches. Seasoned Guix
developers may also want to look at the section on commit access
(see 提交权利).
This mailing list is backed by a Debbugs instance, which allows us to keep
track of submissions (see 跟踪程序漏洞和补丁). Each message sent
to that mailing list gets a new tracking number assigned; people can then
follow up on the submission by sending email to
ISSUE_NUMBER@debbugs.gnu.org, where ISSUE_NUMBER is the
tracking number (see 发送补丁系列).
请以ChangeLog格式(see Change Logs in GNU代码规范)写commit日志;你可以浏览commit历史里的例子。
提交添加或者修改软件包定义的补丁之前,请过一遍这个检查列表:
- 如果软件包的作者为发布的文件包提供了密码学签名,请验证文件的真实性。对于独立的 GPG 签名文件,这可以通过
gpg --verify命令完成。 - 花些时间为软件包提供一个合适的简介和描述。更多指导,See 简介和描述。
- 运行
guix lint 软件包,软件包是新添加的或修改过的软件包的名字,修复它报告的错误(see Invokingguix lint)。 - Run
guix style packageto format the new package definition according to the project’s conventions (see Invokingguix style). - 用
guix build 软件包命令确保这个软件包可以在你的平台上构建。 - We recommend you also try building the package on other supported
platforms. As you may not have access to actual hardware platforms, we
recommend using the
qemu-binfmt-service-typeto emulate them. In order to enable it, add thevirtualizationservice module and the following service to the list of services in youroperating-systemconfiguration:(service qemu-binfmt-service-type (qemu-binfmt-configuration (platforms (lookup-qemu-platforms "arm" "aarch64"))))然后重新配置你的系统。
You can then build packages for different platforms by specifying the
--systemoption. For example, to build the "hello" package for the armhf or aarch64 architectures, you would run the following commands, respectively:guix build --system=armhf-linux --rounds=2 hello guix build --system=aarch64-linux --rounds=2 hello
-
请确保软件包里不捆绑出现已经被打过包的软件的副本。
有时,软件包为了方便用户,捆绑了依赖库的源代码。然而,当依赖库在发行版里已经存在时,做为一个发行版,我们希望确保这些软件包使用发行版里已有的副本。这提高资源使用率(依赖库只构建一次,存储一份),并且使发行版更容易管理,如仅在一个地方对某个软件包进行安全更新就可以影响整个系统--捆绑软件会妨碍这么做。
- Take a look at the profile reported by
guix size(see Invokingguix size). This will allow you to notice references to other packages unwillingly retained. It may also help determine whether to split the package (see 有多个输出的软件包), and which optional dependencies should be used. In particular, avoid addingtexliveas a dependency: because of its extreme size, use thetexlive-tinypackage ortexlive-unionprocedure instead. - For important changes, check that dependent packages (if applicable) are not
affected by the change;
guix refresh --list-dependent packagewill help you do that (see Invokingguix refresh).取决于受影响的软件包的数量,即需要重新构建的数量,commit需要被提交到不同的分支,具体如下:
- 300个或更少的受影响的软件包
master分支(非破坏性的更改)。- 300 至 1800 个受影响的软件包
stagingbranch (non-disruptive changes). This branch is intended to be merged inmasterevery 6 weeks or so. Topical changes (e.g., an update of the GNOME stack) can instead go to a specific branch (say,gnome-updates). This branch is not expected to be buildable or usable until late in its development process.- 超过 1800 个受影响的软件包
core-updatesbranch (may include major and potentially disruptive changes). This branch is intended to be merged inmasterevery 6 months or so. This branch is not expected to be buildable or usable until late in its development process.
All these branches are tracked by our build farm and merged into
masteronce everything has been successfully built. This allows us to fix issues before they hit users, and to reduce the window during which pre-built binaries are not available.When we decide to start building the
stagingorcore-updatesbranches, they will be forked and renamed with the suffix-frozen, at which time only bug fixes may be pushed to the frozen branches. Thecore-updatesandstagingbranches will remain open to accept patches for the next cycle. Please ask on the mailing list or IRC if unsure where to place a patch. -
检查软件包的构建过程是不是确定性的。这通常意味着检查对软件包的独立构建是否能得到每一个比特都完全相同的结果。
为此,一个简单的做法是在你的机器上多次构建同一个软件包(see 调用
guix build):guix build --rounds=2 <我的软件包>
这足以查出一批普通的不确定性问题,如构建结果里存在时间戳或随机生成的输出。
Another option is to use
guix challenge(see Invokingguix challenge). You may run it once the package has been committed and built byci.guix.gnu.orgto check whether it obtains the same result as you did. Better yet: Find another machine that can build it and runguix publish. Since the remote build machine is likely different from yours, this can catch non-determinism issues related to the hardware—e.g., use of different instruction set extensions—or to the operating system kernel—e.g., reliance onunameor /proc files. - 在编写文档时,请用性别中立的词语指代人,如“他”, “他的”,等。
- 检查你的补丁只包含一些相关的更改。把不相关的更改捆绑在一起会让评审更困难和更慢。
不相关的更改的例子有:同时新增多个软件包,或更新软件包同时修补这个软件包。
- Please follow our code formatting rules, possibly running
guix stylescript to do that automatically for you (see 格式化代码). - 当可能时,请在源URL里使用镜像see Invoking
guix download。使用可靠的而不是生成的URL。例如,GitHub的下载文件每次生成时不一定是相同的,所以这时最好克隆仓库。不要在URL里使用name变量:这没有什么用,而且如果名字变了,URL很可能就错了。 - Check if Guix builds (see 从Git构建) and address the warnings, especially those about use of undefined symbols.
- Make sure your changes do not break Guix and simulate a
guix pullwith:guix pull --url=/path/to/your/checkout --profile=/tmp/guix.master
When posting a patch to the mailing list, use ‘[PATCH] …’ as a
subject, if your patch is to be applied on a branch other than
master, say core-updates, specify it in the subject like
‘[PATCH core-updates] …’.
You may use your email client or the git send-email command
(see 发送补丁系列). We prefer to get patches in plain text
messages, either inline or as MIME attachments. You are advised to pay
attention if your email client changes anything like line breaks or
indentation which could potentially break the patches.
Expect some delay when you submit your very first patch to guix-patches@gnu.org. You have to wait until you get an acknowledgement with the assigned tracking number. Future acknowledgements should not be delayed.
When a bug is resolved, please close the thread by sending an email to ISSUE_NUMBER-done@debbugs.gnu.org.
22.6.1 配置Git
If you have not done so already, you may wish to set a name and email that
will be associated with your commits (see Telling Git your name in Git User Manual). If you wish to use a
different name or email just for commits in this repository, you can use
git config --local, or edit .git/config in the repository
instead of ~/.gitconfig.
We provide some default settings in etc/git/gitconfig which modify how patches are generated, making them easier to read and apply. These settings can be applied by manually copying them to .git/config in your checkout, or by telling Git to include the whole file:
git config --local include.path ../etc/git/gitconfig
From then on, any changes to etc/git/gitconfig would automatically take effect.
Since the first patch in a series must be sent separately (see 发送补丁系列), it can also be helpful to tell git format-patch to
handle the e-mail threading instead of git send-email:
git config --local format.thread shallow git config --local sendemail.thread no
22.6.2 发送补丁系列
Single Patches
The git send-email command is the best way to send both single
patches and patch series (see Multiple Patches) to the Guix mailing
list. Sending patches as email attachments may make them difficult to
review in some mail clients, and git diff does not store commit
metadata.
注: The
git send-emailcommand is provided by thesend-emailoutput of thegitpackage, i.e.git:send-email.
The following command will create a patch email from the latest commit, open it in your EDITOR or VISUAL for editing, and send it to the Guix mailing list to be reviewed and merged:
$ git send-email -1 -a --base=auto --to=guix-patches@gnu.org
Tip: To add a prefix to the subject of your patch, you may use the --subject-prefix option. The Guix project uses this to specify that the patch is intended for a branch or repository other than the
masterbranch of https://git.savannah.gnu.org/cgit/guix.git.git send-email -1 -a --base=auto \ --subject-prefix='PATCH core-updates' \ --to=guix-patches@gnu.org
The patch email contains a three-dash separator line after the commit message. You may “annotate” the patch with explanatory text by adding it under this line. If you do not wish to annotate the email, you may drop the -a flag (which is short for --annotate).
The --base=auto flag automatically adds a note at the bottom of the patch of the commit it was based on, making it easier for maintainers to rebase and merge your patch.
If you need to send a revised patch, don’t resend it like this or send a
“fix” patch to be applied on top of the last one; instead, use
git commit -a or git rebase
to modify the commit, and use the
ISSUE_NUMBER@debbugs.gnu.org address and the -v flag
with git send-email.
$ git commit -a
$ git send-email -1 -a --base=auto -v REVISION \
--to=ISSUE_NUMBER@debbugs.gnu.org
You can find out ISSUE_NUMBER either by searching on the mumi interface at issues.guix.gnu.org for the name of your patch or reading the acknowledgement email sent automatically by Debbugs in reply to incoming bugs and patches, which contains the bug number.
Notifying Teams
The etc/teams.scm script may be used to notify all those who may be
interested in your patch of its existence (see Teams). Use
etc/teams.scm list-teams to display all the teams, decide which
team(s) your patch relates to, and use etc/teams.scm cc to output
various git send-email flags which will notify the appropriate
team members, or use etc/teams.scm cc-members to detect the
appropriate teams automatically.
Multiple Patches
While git send-email alone will suffice for a single patch, an
unfortunate flaw in Debbugs means you need to be more careful when sending
multiple patches: if you send them all to the guix-patches@gnu.org
address, a new issue will be created for each patch!
When sending a series of patches, it’s best to send a Git “cover letter”
first, to give reviewers an overview of the patch series. We can create a
directory called outgoing containing both our patch series and a
cover letter called 0000-cover-letter.patch with git
format-patch.
$ git format-patch -NUMBER_COMMITS -o outgoing \
--cover-letter --base=auto
We can now send just the cover letter to the guix-patches@gnu.org address, which will create an issue that we can send the rest of the patches to.
$ git send-email outgoing/0000-cover-letter.patch -a \
--to=guix-patches@debbugs.gnu.org \
$(etc/teams.scm cc-members ...)
$ rm outgoing/0000-cover-letter.patch # we don't want to resend it!
Ensure you edit the email to add an appropriate subject line and blurb before sending it. Note the automatically generated shortlog and diffstat below the blurb.
Once the Debbugs mailer has replied to your cover letter email, you can send the actual patches to the newly-created issue address.
$ git send-email outgoing/*.patch \
--to=ISSUE_NUMBER@debbugs.gnu.org \
$(etc/teams.scm cc-members ...)
$ rm -rf outgoing # we don't need these anymore
Thankfully, this git format-patch dance is not necessary to send
an amended patch series, since an issue already exists for the patchset.
$ git send-email -NUMBER_COMMITS \
-vREVISION --base=auto \
--to ISSUE_NUMBER@debbugs.gnu.org
If need be, you may use --cover-letter -a to send another cover letter, e.g. for explaining what’s changed since the last revision, and these changes are necessary.
22.6.3 Teams
There are several teams mentoring different parts of the Guix source code. To list all those teams, you can run from a Guix checkout:
$ ./etc/teams.scm list-teams id: mentors name: Mentors description: A group of mentors who chaperone contributions by newcomers. members: + Christopher Baines <mail@cbaines.net> + Ricardo Wurmus <rekado@elephly.net> + Mathieu Othacehe <othacehe@gnu.org> + jgart <jgart@dismail.de> + Ludovic Courtès <ludo@gnu.org> …
You can run the following command to have the Mentors team put in CC
of a patch series:
$ git send-email --to ISSUE_NUMBER@debbugs.gnu.org $(./etc/teams.scm cc mentors) *.patch
The appropriate team or teams can also be inferred from the modified files. For instance, if you want to send the two latest commits of the current Git repository to review, you can run:
$ guix shell -D guix [env]$ git send-email --to ISSUE_NUMBER@debbugs.gnu.org $(./etc/teams.scm cc-members HEAD~2 HEAD) *.patch
22.7 跟踪程序漏洞和补丁
This section describes how the Guix project tracks its bug reports and patch submissions.
Next: Debbugs User Interfaces, Up: 跟踪程序漏洞和补丁 [Contents][Index]
22.7.1 The Issue Tracker
Bug reports and patch submissions are currently tracked using the Debbugs
instance at https://bugs.gnu.org. Bug reports are filed against the
guix “package” (in Debbugs parlance), by sending email to
bug-guix@gnu.org, while patch submissions are filed against the
guix-patches package by sending email to
guix-patches@gnu.org (see 提交补丁).
Next: Debbugs Usertags, Previous: The Issue Tracker, Up: 跟踪程序漏洞和补丁 [Contents][Index]
22.7.2 Debbugs User Interfaces
A web interface (actually two web interfaces!) are available to browse issues:
- https://issues.guix.gnu.org provides a pleasant interface41 to browse bug reports and patches, and to participate in discussions;
- https://bugs.gnu.org/guix lists bug reports;
- https://bugs.gnu.org/guix-patches lists patch submissions.
To view discussions related to issue number n, go to
‘https://issues.guix.gnu.org/n’ or
‘https://bugs.gnu.org/n’.
If you use Emacs, you may find it more convenient to interact with issues using debbugs.el, which you can install with:
guix install emacs-debbugs
For example, to list all open issues on guix-patches, hit:
C-u M-x debbugs-gnu RET RET guix-patches RET n y
See Debbugs User Guide,了解更多有关此实用工具的信息!
Previous: Debbugs User Interfaces, Up: 跟踪程序漏洞和补丁 [Contents][Index]
22.7.3 Debbugs Usertags
Debbugs provides a feature called usertags that allows any user to tag any bug with an arbitrary label. Bugs can be searched by usertag, so this is a handy way to organize bugs42.
For example, to view all the bug reports (or patches, in the case of
guix-patches) tagged with the usertag powerpc64le-linux for
the user guix, open a URL like the following in a web browser:
https://debbugs.gnu.org/cgi-bin/pkgreport.cgi?tag=powerpc64le-linux;users=guix.
For more information on how to use usertags, please refer to the documentation for Debbugs or the documentation for whatever tool you use to interact with Debbugs.
In Guix, we are experimenting with usertags to keep track of
architecture-specific issues. To facilitate collaboration, all our usertags
are associated with the single user guix. The following usertags
currently exist for that user:
powerpc64le-linuxThe purpose of this usertag is to make it easy to find the issues that matter most for the
powerpc64le-linuxsystem type. Please assign this usertag to bugs or patches that affectpowerpc64le-linuxbut not other system types. In addition, you may use it to identify issues that for some reason are particularly important for thepowerpc64le-linuxsystem type, even if the issue affects other system types, too.reproducibilityFor issues related to reproducibility. For example, it would be appropriate to assign this usertag to a bug report for a package that fails to build reproducibly.
If you’re a committer and you want to add a usertag, just start using it
with the guix user. If the usertag proves useful to you, consider
updating this section of the manual so that others will know what your
usertag means.
22.8 提交权利
Everyone can contribute to Guix without having commit access (see 提交补丁). However, for frequent contributors, having write access to the repository can be convenient. As a rule of thumb, a contributor should have accumulated fifty (50) reviewed commits to be considered as a committer and have sustained their activity in the project for at least 6 months. This ensures enough interactions with the contributor, which is essential for mentoring and assessing whether they are ready to become a committer. Commit access should not be thought of as a “badge of honor” but rather as a responsibility a contributor is willing to take to help the project.
The following sections explain how to get commit access, how to be ready to push commits, and the policies and community expectations for commits pushed upstream.
22.8.1 Applying for Commit Access
When you deem it necessary, consider applying for commit access by following these steps:
- Find three committers who would vouch for you. You can view the list of
committers at
https://savannah.gnu.org/project/memberlist.php?group=guix. Each of
them should email a statement to guix-maintainers@gnu.org (a
private alias for the collective of maintainers), signed with their OpenPGP
key.
Committers are expected to have had some interactions with you as a contributor and to be able to judge whether you are sufficiently familiar with the project’s practices. It is not a judgment on the value of your work, so a refusal should rather be interpreted as “let’s try again later”.
- Send guix-maintainers@gnu.org a message stating your intent,
listing the three committers who support your application, signed with the
OpenPGP key you will use to sign commits, and giving its fingerprint (see
below). See https://emailselfdefense.fsf.org/en/, for an
introduction to public-key cryptography with GnuPG.
Set up GnuPG such that it never uses the SHA1 hash algorithm for digital signatures, which is known to be unsafe since 2019, for instance by adding the following line to ~/.gnupg/gpg.conf (see GPG Esoteric Options in The GNU Privacy Guard Manual):
digest-algo sha512
- Maintainers ultimately decide whether to grant you commit access, usually following your referrals’ recommendation.
-
If and once you’ve been given access, please send a message to
guix-devel@gnu.org to say so, again signed with the OpenPGP key you
will use to sign commits (do that before pushing your first commit). That
way, everyone can notice and ensure you control that OpenPGP key.
Important: Before you can push for the first time, maintainers must:
- add your OpenPGP key to the
keyringbranch; - add your OpenPGP fingerprint to the .guix-authorizations file of the branch(es) you will commit to.
- add your OpenPGP key to the
- Make sure to read the rest of this section and... profit!
注: Maintainers are happy to give commit access to people who have been contributing for some time and have a track record—don’t be shy and don’t underestimate your work!
However, note that the project is working towards a more automated patch review and merging system, which, as a consequence, may lead us to have fewer people with commit access to the main repository. Stay tuned!
All commits that are pushed to the central repository on Savannah must be
signed with an OpenPGP key, and the public key should be uploaded to your
user account on Savannah and to public key servers, such as
keys.openpgp.org. To configure Git to automatically sign commits,
run:
git config commit.gpgsign true # Substitute the fingerprint of your public PGP key. git config user.signingkey CABBA6EA1DC0FF33
To check that commits are signed with correct key, use:
make authenticate
You can prevent yourself from accidentally pushing unsigned or signed with the wrong key commits to Savannah by using the pre-push Git hook located at etc/git/pre-push:
cp etc/git/pre-push .git/hooks/pre-push
It additionally calls make check-channel-news to be sure
news.scm file is correct.
22.8.2 Commit Policy
If you get commit access, please make sure to follow the policy below (discussions of the policy can take place on guix-devel@gnu.org).
Non-trivial patches should always be posted to guix-patches@gnu.org (trivial patches include fixing typos, etc.). This mailing list fills the patch-tracking database (see 跟踪程序漏洞和补丁).
For patches that just add a new package, and a simple one, it’s OK to
commit, if you’re confident (which means you successfully built it in a
chroot setup, and have done a reasonable copyright and license auditing).
Likewise for package upgrades, except upgrades that trigger a lot of
rebuilds (for example, upgrading GnuTLS or GLib). We have a mailing list
for commit notifications (guix-commits@gnu.org), so people can
notice. Before pushing your changes, make sure to run git pull
--rebase.
When pushing a commit on behalf of somebody else, please add a
Signed-off-by line at the end of the commit log message—e.g., with
git am --signoff. This improves tracking of who did what.
When adding channel news entries (see Writing Channel News), make sure they are well-formed by running the following command right before pushing:
make check-channel-news
For anything else, please post to guix-patches@gnu.org and leave time for a review, without committing anything (see 提交补丁). If you didn’t receive any reply after two weeks, and if you’re confident, it’s OK to commit.
That last part is subject to being adjusted, allowing individuals to commit directly on non-controversial changes on parts they’re familiar with.
22.8.3 Addressing Issues
Peer review (see 提交补丁) and tools such as guix
lint (see Invoking guix lint) and the test suite (see 运行测试套件) should catch issues before they are pushed. Yet, commits that
“break” functionality might occasionally go through. When that happens,
there are two priorities: mitigating the impact, and understanding what
happened to reduce the chance of similar incidents in the future. The
responsibility for both these things primarily lies with those involved, but
like everything this is a group effort.
Some issues can directly affect all users—for instance because they make
guix pull fail or break core functionality, because they break
major packages (at build time or run time), or because they introduce known
security vulnerabilities.
The people involved in authoring, reviewing, and pushing such commit(s) should be at the forefront to mitigate their impact in a timely fashion: by pushing a followup commit to fix it (if possible), or by reverting it to leave time to come up with a proper fix, and by communicating with other developers about the problem.
If these persons are unavailable to address the issue in time, other committers are entitled to revert the commit(s), explaining in the commit log and on the mailing list what the problem was, with the goal of leaving time to the original committer, reviewer(s), and author(s) to propose a way forward.
Once the problem has been dealt with, it is the responsibility of those involved to make sure the situation is understood. If you are working to understand what happened, focus on gathering information and avoid assigning any blame. Do ask those involved to describe what happened, do not ask them to explain the situation—this would implicitly blame them, which is unhelpful. Accountability comes from a consensus about the problem, learning from it and improving processes so that it’s less likely to reoccur.
22.8.4 Commit Revocation
In order to reduce the possibility of mistakes, committers will have their Savannah account removed from the Guix Savannah project and their key removed from .guix-authorizations after 12 months of inactivity; they can ask to regain commit access by emailing the maintainers, without going through the vouching process.
Maintainers43 may also revoke an individual’s commit rights, as a last resort, if cooperation with the rest of the community has caused too much friction—even within the bounds of the project’s code of conduct (see 贡献). They would only do so after public or private discussion with the individual and a clear notice. Examples of behavior that hinders cooperation and could lead to such a decision include:
- repeated violation of the commit policy stated above;
- repeated failure to take peer criticism into account;
- breaching trust through a series of grave incidents.
When maintainers resort to such a decision, they notify developers on guix-devel@gnu.org; inquiries may be sent to guix-maintainers@gnu.org. Depending on the situation, the individual may still be welcome to contribute.
22.8.5 Helping Out
One last thing: the project keeps moving forward because committers not only push their own awesome changes, but also offer some of their time reviewing and pushing other people’s changes. As a committer, you’re welcome to use your expertise and commit rights to help other contributors, too!
22.9 更新Guix软件包
It is sometimes desirable to update the guix package itself (the
package defined in (gnu packages package-management)), for example to
make new daemon features available for use by the guix-service-type
service type. In order to simplify this task, the following command can be
used:
make update-guix-package
The update-guix-package make target will use the last known
commit corresponding to HEAD in your Guix checkout, compute
the hash of the Guix sources corresponding to that commit and update the
commit, revision and hash of the guix package
definition.
To validate that the updated guix package hashes are correct and that
it can be built successfully, the following command can be run from the
directory of your Guix checkout:
./pre-inst-env guix build guix
To guard against accidentally updating the guix package to a commit
that others can’t refer to, a check is made that the commit used has already
been pushed to the Savannah-hosted Guix git repository.
This check can be disabled, at your own peril, by setting the
GUIX_ALLOW_ME_TO_USE_PRIVATE_COMMIT environment variable. When this
variable is set, the updated package source is also added to the store.
This is used as part of the release process of Guix.
22.10 撰写文档
Guix is documented using the Texinfo system. If you are not yet familiar with it, we accept contributions for documentation in most formats. That includes plain text, Markdown, Org, etc.
Documentation contributions can be sent to guix-patches@gnu.org. Prepend ‘[DOCUMENTATION]’ to the subject.
When you need to make more than a simple addition to the documentation, we prefer that you send a proper patch as opposed to sending an email as described above. See 提交补丁 for more information on how to send your patches.
To modify the documentation, you need to edit doc/guix.texi and doc/contributing.texi (which contains this documentation section), or doc/guix-cookbook.texi for the cookbook. If you compiled the Guix repository before, you will have many more .texi files that are translations of these documents. Do not modify them, the translation is managed through Weblate. See 翻译 Guix for more information.
To render documentation, you must first make sure that you ran
./configure in your source tree (see 在安装之前运行Guix). After that you can run one of the following commands:
- ‘make doc/guix.info’ to compile the Info manual.
You can check it with
info doc/guix.info. - ‘make doc/guix.html’ to compile the HTML version. You can point your browser to the relevant file in the doc/guix.html directory.
- ‘make doc/guix-cookbook.info’ for the cookbook Info manual.
- ‘make doc/guix-cookbook.html’ for the cookbook HTML version.
22.11 翻译 Guix
Writing code and packages is not the only way to provide a meaningful contribution to Guix. Translating to a language you speak is another example of a valuable contribution you can make. This section is designed to describe the translation process. It gives you advice on how you can get involved, what can be translated, what mistakes you should avoid and what we can do to help you!
Guix is a big project that has multiple components that can be translated. We coordinate the translation effort on a Weblate instance hosted by our friends at Fedora. You will need an account to submit translations.
Some of the software packaged in Guix also contain translations. We do not
host a translation platform for them. If you want to translate a package
provided by Guix, you should contact their developers or find the
information on their website. As an example, you can find the homepage of
the hello package by typing guix show hello. On the
“homepage” line, you will see https://www.gnu.org/software/hello/ as
the homepage.
Many GNU and non-GNU packages can be translated on the Translation Project. Some projects with multiple components have their own platform. For instance, GNOME has its own platform, Damned Lies.
Guix has five components hosted on Weblate.
-
guixcontains all the strings from the Guix software (the guided system installer, the package manager, etc), excluding packages. -
packagescontains the synopsis (single-sentence description of a package) and description (longer description) of packages in Guix. -
websitecontains the official Guix website, except for blog posts and multimedia content. -
documentation-manualcorresponds to this manual. -
documentation-cookbookis the component for the cookbook.
General Directions
Once you get an account, you should be able to select a component from the guix project, and select a language. If your language does not appear in the list, go to the bottom and click on the “Start new translation” button. Select the language you want to translate to from the list, to start your new translation.
Like lots of other free software packages, Guix uses GNU Gettext for its translations, with which translatable strings are extracted from the source code to so-called PO files.
Even though PO files are text files, changes should not be made with a text editor but with PO editing software. Weblate integrates PO editing functionality. Alternatively, translators can use any of various free-software tools for filling in translations, of which Poedit is one example, and (after logging in) upload the changed file. There is also a special PO editing mode for users of GNU Emacs. Over time translators find out what software they are happy with and what features they need.
On Weblate, you will find various links to the editor, that will show various subsets (or all) of the strings. Have a look around and at the documentation to familiarize yourself with the platform.
Translation Components
In this section, we provide more detailed guidance on the translation process, as well as details on what you should or should not do. When in doubt, please contact us, we will be happy to help!
- guix
Guix is written in the Guile programming language, and some strings contain special formatting that is interpreted by Guile. These special formatting should be highlighted by Weblate. They start with
~followed by one or more characters.When printing the string, Guile replaces the special formatting symbols with actual values. For instance, the string ‘ambiguous package specification `~a'’ would be substituted to contain said package specification instead of
~a. To properly translate this string, you must keep the formatting code in your translation, although you can place it where it makes sense in your language. For instance, the French translation says ‘spécification du paquet « ~a » ambiguë’ because the adjective needs to be placed in the end of the sentence.If there are multiple formatting symbols, make sure to respect the order. Guile does not know in which order you intended the string to be read, so it will substitute the symbols in the same order as the English sentence.
As an example, you cannot translate ‘package '~a' has been superseded by '~a'’ by ‘'~a' superseeds package '~a'’, because the meaning would be reversed. If foo is superseded by bar, the translation would read ‘'foo' superseeds package 'bar'’. To work around this problem, it is possible to use more advanced formatting to select a given piece of data, instead of following the default English order. See Formatted Output in GNU Guile Reference Manual, for more information on formatting in Guile.
- packages
-
Package descriptions occasionally contain Texinfo markup (see 简介和描述). Texinfo markup looks like ‘@code{rm -rf}’, ‘@emph{important}’, etc. When translating, please leave markup as is.
The characters after “@” form the name of the markup, and the text between “{” and “}” is its content. In general, you should not translate the content of markup like
@code, as it contains literal code that do not change with language. You can translate the content of formatting markup such as@emph,@i,@itemize,@item. However, do not translate the name of the markup, or it will not be recognized. Do not translate the word after@end, it is the name of the markup that is closed at this position (e.g.@itemize ... @end itemize). - documentation-manual and documentation-cookbook
-
The first step to ensure a successful translation of the manual is to find and translate the following strings first:
-
version.texi: Translate this string asversion-xx.texi, wherexxis your language code (the one shown in the URL on weblate). -
contributing.texi: Translate this string ascontributing.xx.texi, wherexxis the same language code. -
Top: Do not translate this string, it is important for Texinfo. If you translate it, the document will be empty (missing a Top node). Please look for it, and registerTopas its translation.
Translating these strings first ensure we can include your translation in the guix repository without breaking the make process or the
guix pullmachinery.The manual and the cookbook both use Texinfo. As for
packages, please keep Texinfo markup as is. There are more possible markup types in the manual than in the package descriptions. In general, do not translate the content of@code,@file,@var,@value, etc. You should translate the content of formatting markup such as@emph,@i, etc.The manual contains sections that can be referred to by name by
@ref,@xrefand@pxref. We have a mechanism in place so you do not have to translate their content. If you keep the English title, we will automatically replace it with your translation of that title. This ensures that Texinfo will always be able to find the node. If you decide to change the translation of the title, the references will automatically be updated and you will not have to update them all yourself.When translating references from the cookbook to the manual, you need to replace the name of the manual and the name of the section. For instance, to translate
@pxref{Defining Packages,,, guix, GNU Guix Reference Manual}, you would replaceDefining Packageswith the title of that section in the translated manual only if that title is translated. If the title is not translated in your language yet, do not translate it here, or the link will be broken. Replaceguixwithguix.xxwherexxis your language code.GNU Guix Reference Manualis the text of the link. You can translate it however you wish. -
- website
-
The website pages are written using SXML, an s-expression version of HTML, the basic language of the web. We have a process to extract translatable strings from the source, and replace complex s-expressions with a more familiar XML markup, where each markup is numbered. Translators can arbitrarily change the ordering, as in the following example.
#. TRANSLATORS: Defining Packages is a section name #. in the English (en) manual. #: apps/base/templates/about.scm:64 msgid "Packages are <1>defined<1.1>en</1.1><1.2>Defining-Packages.html</1.2></1> as native <2>Guile</2> modules." msgstr "Pakete werden als reine <2>Guile</2>-Module <1>definiert<1.1>de</1.1><1.2>Pakete-definieren.html</1.2></1>."
Note that you need to include the same markups. You cannot skip any.
In case you make a mistake, the component might fail to build properly with your language, or even make guix pull fail. To prevent that, we have a process in place to check the content of the files before pushing to our repository. We will not be able to update the translation for your language in Guix, so we will notify you (through weblate and/or by email) so you get a chance to fix the issue.
Outside of Weblate
Currently, some parts of Guix cannot be translated on Weblate, help wanted!
-
guix pullnews can be translated in news.scm, but is not available from Weblate. If you want to provide a translation, you can prepare a patch as described above, or simply send us your translation with the name of the news entry you translated and your language. See Writing Channel News, for more information about channel news. - Guix blog posts cannot currently be translated.
- The installer script (for foreign distributions) is entirely in English.
- Some of the libraries Guix uses cannot be translated or are translated outside of the Guix project. Guile itself is not internationalized.
- Other manuals linked from this manual or the cookbook might not be translated.
Conditions for Inclusion
There are no conditions for adding new translations of the guix and
guix-packages components, other than they need at least one
translated string. New languages will be added to Guix as soon as
possible. The files may be removed if they fall out of sync and have no
more translated strings.
Given that the web site is dedicated to new users, we want its translation to be as complete as possible before we include it in the language menu. For a new language to be included, it needs to reach at least 80% completion. When a language is included, it may be removed in the future if it stays out of sync and falls below 60% completion.
The manual and cookbook are automatically added in the default compilation target. Every time we synchronize translations, developers need to recompile all the translated manuals and cookbooks. This is useless for what is essentially the English manual or cookbook. Therefore, we will only include a new language when it reaches 10% completion in the component. When a language is included, it may be removed in the future if it stays out of sync and falls below 5% completion.
Translation Infrastructure
Weblate is backed by a git repository from which it discovers new strings to translate and pushes new and updated translations. Normally, it would be enough to give it commit access to our repositories. However, we decided to use a separate repository for two reasons. First, we would have to give Weblate commit access and authorize its signing key, but we do not trust it in the same way we trust guix developers, especially since we do not manage the instance ourselves. Second, if translators mess something up, it can break the generation of the website and/or guix pull for all our users, independently of their language.
For these reasons, we use a dedicated repository to host translations, and we synchronize it with our guix and artworks repositories after checking no issue was introduced in the translation.
Developers can download the latest PO files from weblate in the Guix
repository by running the make download-po command. It will
automatically download the latest files from weblate, reformat them to a
canonical form, and check they do not contain issues. The manual needs to
be built again to check for additional issues that might crash Texinfo.
Before pushing new translation files, developers should add them to the make machinery so the translations are actually available. The process differs for the various components.
- New po files for the
guixandpackagescomponents must be registered by adding the new language to po/guix/LINGUAS or po/packages/LINGUAS. - New po files for the
documentation-manualcomponent must be registered by adding the file name toDOC_PO_FILESin po/doc/local.mk, the generated %D%/guix.xx.texi manual toinfo_TEXINFOSin doc/local.mk and the generated %D%/guix.xx.texi and %D%/contributing.xx.texi toTRANSLATED_INFOalso in doc/local.mk. - New po files for the
documentation-cookbookcomponent must be registered by adding the file name toDOC_COOKBOOK_PO_FILESin po/doc/local.mk, the generated %D%/guix-cookbook.xx.texi manual toinfo_TEXINFOSin doc/local.mk and the generated %D%/guix-cookbook.xx.texi toTRANSLATED_INFOalso in doc/local.mk. - New po files for the
websitecomponent must be added to theguix-artworkrepository, in website/po/. website/po/LINGUAS and website/po/ietf-tags.scm must be updated accordingly (see website/i18n-howto.txt for more information on the process).
Next: GNU自由文档许可证, Previous: 贡献, Up: GNU Guix [Contents][Index]
23 致谢
Guix is based on the Nix package manager, which was designed and implemented by Eelco Dolstra, with contributions from other people (see the nix/AUTHORS file in Guix). Nix pioneered functional package management, and promoted unprecedented features, such as transactional package upgrades and rollbacks, per-user profiles, and referentially transparent build processes. Without this work, Guix would not exist.
基于 Nix 的软件发行版 Nixpkgs 和 NixOS 也给 Guix 带来了灵感。
GNU Guix itself is a collective work with contributions from a number of people. See the AUTHORS file in Guix for more information on these fine people. The THANKS file lists people who have helped by reporting bugs, taking care of the infrastructure, providing artwork and themes, making suggestions, and more—thank you!
Appendix A GNU自由文档许可证
Copyright © 2000, 2001, 2002, 2007, 2008 Free Software Foundation, Inc. https://fsf.org/ Everyone is permitted to copy and distribute verbatim copies of this license document, but changing it is not allowed.
- PREAMBLE
The purpose of this License is to make a manual, textbook, or other functional and useful document free in the sense of freedom: to assure everyone the effective freedom to copy and redistribute it, with or without modifying it, either commercially or noncommercially. Secondarily, this License preserves for the author and publisher a way to get credit for their work, while not being considered responsible for modifications made by others.
This License is a kind of “copyleft”, which means that derivative works of the document must themselves be free in the same sense. It complements the GNU General Public License, which is a copyleft license designed for free software.
We have designed this License in order to use it for manuals for free software, because free software needs free documentation: a free program should come with manuals providing the same freedoms that the software does. But this License is not limited to software manuals; it can be used for any textual work, regardless of subject matter or whether it is published as a printed book. We recommend this License principally for works whose purpose is instruction or reference.
- APPLICABILITY AND DEFINITIONS
This License applies to any manual or other work, in any medium, that contains a notice placed by the copyright holder saying it can be distributed under the terms of this License. Such a notice grants a world-wide, royalty-free license, unlimited in duration, to use that work under the conditions stated herein. The “Document”, below, refers to any such manual or work. Any member of the public is a licensee, and is addressed as “you”. You accept the license if you copy, modify or distribute the work in a way requiring permission under copyright law.
A “Modified Version” of the Document means any work containing the Document or a portion of it, either copied verbatim, or with modifications and/or translated into another language.
A “Secondary Section” is a named appendix or a front-matter section of the Document that deals exclusively with the relationship of the publishers or authors of the Document to the Document’s overall subject (or to related matters) and contains nothing that could fall directly within that overall subject. (Thus, if the Document is in part a textbook of mathematics, a Secondary Section may not explain any mathematics.) The relationship could be a matter of historical connection with the subject or with related matters, or of legal, commercial, philosophical, ethical or political position regarding them.
The “Invariant Sections” are certain Secondary Sections whose titles are designated, as being those of Invariant Sections, in the notice that says that the Document is released under this License. If a section does not fit the above definition of Secondary then it is not allowed to be designated as Invariant. The Document may contain zero Invariant Sections. If the Document does not identify any Invariant Sections then there are none.
The “Cover Texts” are certain short passages of text that are listed, as Front-Cover Texts or Back-Cover Texts, in the notice that says that the Document is released under this License. A Front-Cover Text may be at most 5 words, and a Back-Cover Text may be at most 25 words.
A “Transparent” copy of the Document means a machine-readable copy, represented in a format whose specification is available to the general public, that is suitable for revising the document straightforwardly with generic text editors or (for images composed of pixels) generic paint programs or (for drawings) some widely available drawing editor, and that is suitable for input to text formatters or for automatic translation to a variety of formats suitable for input to text formatters. A copy made in an otherwise Transparent file format whose markup, or absence of markup, has been arranged to thwart or discourage subsequent modification by readers is not Transparent. An image format is not Transparent if used for any substantial amount of text. A copy that is not “Transparent” is called “Opaque”.
Examples of suitable formats for Transparent copies include plain ASCII without markup, Texinfo input format, LaTeX input format, SGML or XML using a publicly available DTD, and standard-conforming simple HTML, PostScript or PDF designed for human modification. Examples of transparent image formats include PNG, XCF and JPG. Opaque formats include proprietary formats that can be read and edited only by proprietary word processors, SGML or XML for which the DTD and/or processing tools are not generally available, and the machine-generated HTML, PostScript or PDF produced by some word processors for output purposes only.
The “Title Page” means, for a printed book, the title page itself, plus such following pages as are needed to hold, legibly, the material this License requires to appear in the title page. For works in formats which do not have any title page as such, “Title Page” means the text near the most prominent appearance of the work’s title, preceding the beginning of the body of the text.
The “publisher” means any person or entity that distributes copies of the Document to the public.
A section “Entitled XYZ” means a named subunit of the Document whose title either is precisely XYZ or contains XYZ in parentheses following text that translates XYZ in another language. (Here XYZ stands for a specific section name mentioned below, such as “Acknowledgements”, “Dedications”, “Endorsements”, or “History”.) To “Preserve the Title” of such a section when you modify the Document means that it remains a section “Entitled XYZ” according to this definition.
The Document may include Warranty Disclaimers next to the notice which states that this License applies to the Document. These Warranty Disclaimers are considered to be included by reference in this License, but only as regards disclaiming warranties: any other implication that these Warranty Disclaimers may have is void and has no effect on the meaning of this License.
- VERBATIM COPYING
You may copy and distribute the Document in any medium, either commercially or noncommercially, provided that this License, the copyright notices, and the license notice saying this License applies to the Document are reproduced in all copies, and that you add no other conditions whatsoever to those of this License. You may not use technical measures to obstruct or control the reading or further copying of the copies you make or distribute. However, you may accept compensation in exchange for copies. If you distribute a large enough number of copies you must also follow the conditions in section 3.
You may also lend copies, under the same conditions stated above, and you may publicly display copies.
- COPYING IN QUANTITY
If you publish printed copies (or copies in media that commonly have printed covers) of the Document, numbering more than 100, and the Document’s license notice requires Cover Texts, you must enclose the copies in covers that carry, clearly and legibly, all these Cover Texts: Front-Cover Texts on the front cover, and Back-Cover Texts on the back cover. Both covers must also clearly and legibly identify you as the publisher of these copies. The front cover must present the full title with all words of the title equally prominent and visible. You may add other material on the covers in addition. Copying with changes limited to the covers, as long as they preserve the title of the Document and satisfy these conditions, can be treated as verbatim copying in other respects.
If the required texts for either cover are too voluminous to fit legibly, you should put the first ones listed (as many as fit reasonably) on the actual cover, and continue the rest onto adjacent pages.
If you publish or distribute Opaque copies of the Document numbering more than 100, you must either include a machine-readable Transparent copy along with each Opaque copy, or state in or with each Opaque copy a computer-network location from which the general network-using public has access to download using public-standard network protocols a complete Transparent copy of the Document, free of added material. If you use the latter option, you must take reasonably prudent steps, when you begin distribution of Opaque copies in quantity, to ensure that this Transparent copy will remain thus accessible at the stated location until at least one year after the last time you distribute an Opaque copy (directly or through your agents or retailers) of that edition to the public.
It is requested, but not required, that you contact the authors of the Document well before redistributing any large number of copies, to give them a chance to provide you with an updated version of the Document.
- MODIFICATIONS
You may copy and distribute a Modified Version of the Document under the conditions of sections 2 and 3 above, provided that you release the Modified Version under precisely this License, with the Modified Version filling the role of the Document, thus licensing distribution and modification of the Modified Version to whoever possesses a copy of it. In addition, you must do these things in the Modified Version:
- Use in the Title Page (and on the covers, if any) a title distinct from that of the Document, and from those of previous versions (which should, if there were any, be listed in the History section of the Document). You may use the same title as a previous version if the original publisher of that version gives permission.
- List on the Title Page, as authors, one or more persons or entities responsible for authorship of the modifications in the Modified Version, together with at least five of the principal authors of the Document (all of its principal authors, if it has fewer than five), unless they release you from this requirement.
- State on the Title page the name of the publisher of the Modified Version, as the publisher.
- Preserve all the copyright notices of the Document.
- Add an appropriate copyright notice for your modifications adjacent to the other copyright notices.
- Include, immediately after the copyright notices, a license notice giving the public permission to use the Modified Version under the terms of this License, in the form shown in the Addendum below.
- Preserve in that license notice the full lists of Invariant Sections and required Cover Texts given in the Document’s license notice.
- Include an unaltered copy of this License.
- Preserve the section Entitled “History”, Preserve its Title, and add to it an item stating at least the title, year, new authors, and publisher of the Modified Version as given on the Title Page. If there is no section Entitled “History” in the Document, create one stating the title, year, authors, and publisher of the Document as given on its Title Page, then add an item describing the Modified Version as stated in the previous sentence.
- Preserve the network location, if any, given in the Document for public access to a Transparent copy of the Document, and likewise the network locations given in the Document for previous versions it was based on. These may be placed in the “History” section. You may omit a network location for a work that was published at least four years before the Document itself, or if the original publisher of the version it refers to gives permission.
- For any section Entitled “Acknowledgements” or “Dedications”, Preserve the Title of the section, and preserve in the section all the substance and tone of each of the contributor acknowledgements and/or dedications given therein.
- Preserve all the Invariant Sections of the Document, unaltered in their text and in their titles. Section numbers or the equivalent are not considered part of the section titles.
- Delete any section Entitled “Endorsements”. Such a section may not be included in the Modified Version.
- Do not retitle any existing section to be Entitled “Endorsements” or to conflict in title with any Invariant Section.
- Preserve any Warranty Disclaimers.
If the Modified Version includes new front-matter sections or appendices that qualify as Secondary Sections and contain no material copied from the Document, you may at your option designate some or all of these sections as invariant. To do this, add their titles to the list of Invariant Sections in the Modified Version’s license notice. These titles must be distinct from any other section titles.
You may add a section Entitled “Endorsements”, provided it contains nothing but endorsements of your Modified Version by various parties—for example, statements of peer review or that the text has been approved by an organization as the authoritative definition of a standard.
You may add a passage of up to five words as a Front-Cover Text, and a passage of up to 25 words as a Back-Cover Text, to the end of the list of Cover Texts in the Modified Version. Only one passage of Front-Cover Text and one of Back-Cover Text may be added by (or through arrangements made by) any one entity. If the Document already includes a cover text for the same cover, previously added by you or by arrangement made by the same entity you are acting on behalf of, you may not add another; but you may replace the old one, on explicit permission from the previous publisher that added the old one.
The author(s) and publisher(s) of the Document do not by this License give permission to use their names for publicity for or to assert or imply endorsement of any Modified Version.
- COMBINING DOCUMENTS
You may combine the Document with other documents released under this License, under the terms defined in section 4 above for modified versions, provided that you include in the combination all of the Invariant Sections of all of the original documents, unmodified, and list them all as Invariant Sections of your combined work in its license notice, and that you preserve all their Warranty Disclaimers.
The combined work need only contain one copy of this License, and multiple identical Invariant Sections may be replaced with a single copy. If there are multiple Invariant Sections with the same name but different contents, make the title of each such section unique by adding at the end of it, in parentheses, the name of the original author or publisher of that section if known, or else a unique number. Make the same adjustment to the section titles in the list of Invariant Sections in the license notice of the combined work.
In the combination, you must combine any sections Entitled “History” in the various original documents, forming one section Entitled “History”; likewise combine any sections Entitled “Acknowledgements”, and any sections Entitled “Dedications”. You must delete all sections Entitled “Endorsements.”
- COLLECTIONS OF DOCUMENTS
You may make a collection consisting of the Document and other documents released under this License, and replace the individual copies of this License in the various documents with a single copy that is included in the collection, provided that you follow the rules of this License for verbatim copying of each of the documents in all other respects.
You may extract a single document from such a collection, and distribute it individually under this License, provided you insert a copy of this License into the extracted document, and follow this License in all other respects regarding verbatim copying of that document.
- AGGREGATION WITH INDEPENDENT WORKS
A compilation of the Document or its derivatives with other separate and independent documents or works, in or on a volume of a storage or distribution medium, is called an “aggregate” if the copyright resulting from the compilation is not used to limit the legal rights of the compilation’s users beyond what the individual works permit. When the Document is included in an aggregate, this License does not apply to the other works in the aggregate which are not themselves derivative works of the Document.
If the Cover Text requirement of section 3 is applicable to these copies of the Document, then if the Document is less than one half of the entire aggregate, the Document’s Cover Texts may be placed on covers that bracket the Document within the aggregate, or the electronic equivalent of covers if the Document is in electronic form. Otherwise they must appear on printed covers that bracket the whole aggregate.
- TRANSLATION
Translation is considered a kind of modification, so you may distribute translations of the Document under the terms of section 4. Replacing Invariant Sections with translations requires special permission from their copyright holders, but you may include translations of some or all Invariant Sections in addition to the original versions of these Invariant Sections. You may include a translation of this License, and all the license notices in the Document, and any Warranty Disclaimers, provided that you also include the original English version of this License and the original versions of those notices and disclaimers. In case of a disagreement between the translation and the original version of this License or a notice or disclaimer, the original version will prevail.
If a section in the Document is Entitled “Acknowledgements”, “Dedications”, or “History”, the requirement (section 4) to Preserve its Title (section 1) will typically require changing the actual title.
- TERMINATION
You may not copy, modify, sublicense, or distribute the Document except as expressly provided under this License. Any attempt otherwise to copy, modify, sublicense, or distribute it is void, and will automatically terminate your rights under this License.
However, if you cease all violation of this License, then your license from a particular copyright holder is reinstated (a) provisionally, unless and until the copyright holder explicitly and finally terminates your license, and (b) permanently, if the copyright holder fails to notify you of the violation by some reasonable means prior to 60 days after the cessation.
Moreover, your license from a particular copyright holder is reinstated permanently if the copyright holder notifies you of the violation by some reasonable means, this is the first time you have received notice of violation of this License (for any work) from that copyright holder, and you cure the violation prior to 30 days after your receipt of the notice.
Termination of your rights under this section does not terminate the licenses of parties who have received copies or rights from you under this License. If your rights have been terminated and not permanently reinstated, receipt of a copy of some or all of the same material does not give you any rights to use it.
- FUTURE REVISIONS OF THIS LICENSE
The Free Software Foundation may publish new, revised versions of the GNU Free Documentation License from time to time. Such new versions will be similar in spirit to the present version, but may differ in detail to address new problems or concerns. See https://www.gnu.org/copyleft/.
Each version of the License is given a distinguishing version number. If the Document specifies that a particular numbered version of this License “or any later version” applies to it, you have the option of following the terms and conditions either of that specified version or of any later version that has been published (not as a draft) by the Free Software Foundation. If the Document does not specify a version number of this License, you may choose any version ever published (not as a draft) by the Free Software Foundation. If the Document specifies that a proxy can decide which future versions of this License can be used, that proxy’s public statement of acceptance of a version permanently authorizes you to choose that version for the Document.
- RELICENSING
“Massive Multiauthor Collaboration Site” (or “MMC Site”) means any World Wide Web server that publishes copyrightable works and also provides prominent facilities for anybody to edit those works. A public wiki that anybody can edit is an example of such a server. A “Massive Multiauthor Collaboration” (or “MMC”) contained in the site means any set of copyrightable works thus published on the MMC site.
“CC-BY-SA” means the Creative Commons Attribution-Share Alike 3.0 license published by Creative Commons Corporation, a not-for-profit corporation with a principal place of business in San Francisco, California, as well as future copyleft versions of that license published by that same organization.
“Incorporate” means to publish or republish a Document, in whole or in part, as part of another Document.
An MMC is “eligible for relicensing” if it is licensed under this License, and if all works that were first published under this License somewhere other than this MMC, and subsequently incorporated in whole or in part into the MMC, (1) had no cover texts or invariant sections, and (2) were thus incorporated prior to November 1, 2008.
The operator of an MMC Site may republish an MMC contained in the site under CC-BY-SA on the same site at any time before August 1, 2009, provided the MMC is eligible for relicensing.
ADDENDUM: How to use this License for your documents
To use this License in a document you have written, include a copy of the License in the document and put the following copyright and license notices just after the title page:
Copyright (C) year your name. Permission is granted to copy, distribute and/or modify this document under the terms of the GNU Free Documentation License, Version 1.3 or any later version published by the Free Software Foundation; with no Invariant Sections, no Front-Cover Texts, and no Back-Cover Texts. A copy of the license is included in the section entitled ``GNU Free Documentation License''.
If you have Invariant Sections, Front-Cover Texts and Back-Cover Texts, replace the “with…Texts.” line with this:
with the Invariant Sections being list their titles, with
the Front-Cover Texts being list, and with the Back-Cover Texts
being list.
If you have Invariant Sections without Cover Texts, or some other combination of the three, merge those two alternatives to suit the situation.
If your document contains nontrivial examples of program code, we recommend releasing these examples in parallel under your choice of free software license, such as the GNU General Public License, to permit their use in free software.
Next: 编程索引, Previous: GNU自由文档许可证, Up: GNU Guix [Contents][Index]
概念索引
| Jump to: | .
/
A B C D E F G H I J K L M N O P Q R S T U V W X Z 下 仓 代 减 函 分 别 去 发 可 后 和 垃 字 安 官 定 容 强 归 构 格 检 模 测 状 用 目 秘 自 行 补 贡 软 重 隔 |
|---|
| Jump to: | .
/
A B C D E F G H I J K L M N O P Q R S T U V W X Z 下 仓 代 减 函 分 别 去 发 可 后 和 垃 字 安 官 定 容 强 归 构 格 检 模 测 状 用 目 秘 自 行 补 贡 软 重 隔 |
|---|
编程索引
| Jump to: | #
$
%
'
(
,
>
`
A B C D E F G H I J K L M N O P Q R S T U V W X Y Z |
|---|
| Jump to: | #
$
%
'
(
,
>
`
A B C D E F G H I J K L M N O P Q R S T U V W X Y Z |
|---|